1. Командная строка Windows
1. Командная строка Windows
В данном разделе мы познакомимся с возможностями командной строки операционной системы Microsoft Windows на примере часто используемых команд.
Студентам предстоит освоить следующие навыки:
работа с файловой системой в командной строке;
создание архивных и пакетных файлов;
настройка переменных среды окружения.
На защите лабораторной работы студент должен уметь выполнять любое задание и объяснять смысл выполненной команды.
Основные понятия
Интерфейс операционной системы (ОС) — это средство общения пользователя с ОС. С помощью интерфейса пользователь обращается к различным функциям ОС, таким как запуск программ или копирование файлов, и получает сообщения ОС.
Командная строка — это интерфейс ОС, работающий в текстовом режиме следующим образом:
— ОС выводит на экран приглашение;
— пользователь вводит команду и нажимает [Enter];
— ОС выводит результаты на экран.
Приглашение к вводу команд содержит имя диска и текущий каталог, например:
C:\User\Valentin>
Пользователь вводит с клавиатуры команду и ее параметры, разделенные пробелами, например:
dir /b *.txt
Параметры (аргументы) командной строки — это части строки, разделенные пробелами. Их нумеруют, начиная с нуля. Нулевой параметр — это имя команды или исполняемого файла. Следующие за ним параметры указывают режим выполнения команды и сообщают имя объекта, с которым будет выполняться операция.
Команды ОС, например dir, выполняет сама ОС, поэтому на диске нет отдельных файлов для каждой команды, например dir. exe. К исполняемым файлам относятся прикладные программы (приложения) *.com и *.exe, а также пакетные файлы *.bat и *.cmd. Пакетные файлы — это текстовые файлы, содержащие последовательность команд ОС.
Регистр букв. Команды можно вводить и заглавными (большими) и строчными (маленькими) буквами — командной строке Windows это будет понятно: CD, cd, Cd, cD, см. рис.

Рис. Одна команда в разном регистре
Некоторые ОС могут различать большие и маленькие буквы в названиях команд, файлов и каталогов. Это касается и разных языков программирования.
В квадратных скобках в описании команд указывают необязательные параметры. При вводе команды сами квадратные скобки писать не нужно, см. рис.

Рис. Квадратные скобки не используем!
Квадратные скобки — это первая проверка внимательности и понимания. Если студент читает справку по команде и потом вводит квадратные скобки, значит он ничего не понял. И таких студентов с каждым годом встречается всё больше.
На самом деле в процессе обучения в вузе мы тренируем студентов читать и понимать прочитанное. В школе от учеников требуется только скорость чтения и ответов. А здесь мы требуем понимание. Придётся использовать голову не только для еды, но и для обучения.
Задание
Найдите в Википедии сведения про регистр букв и чувствительность к регистру символов.
Запуск командной строки
Командную строку можно запустить разными способами:
1) через главное меню Пуск:
Start — Windows System — Command Prompt
2) через поле поиска:
Type here to search — cmd — Command Prompt
4) с помощью «горячих клавиш»:
нажмите комбинацию клавиш [Win + R] — Run — cmd — [OK] или [Enter], см. рис.

Рис. Запуск командной строки
Окно командной строки содержит приглашение, содержащее полный путь к текущему каталогу. Мигающий курсор указывает место для ввода следующей команды, см. рис. Чтобы просмотреть предысторию, можно использовать полосу прокрутки.
Нажав кнопку в левом верхнем углу окна, можно изменять настройки шрифта, а также копировать и вставлять текст через буфер обмена.
Чтобы закрыть командное окно, нажмите кнопку [x] в правом верхнем углу окна либо введите на клавиатуре команду exit — «выйти». В переводе эта команда могла бы звучать так: «Закройте это окно!»

Рис. Окно командной строки
Задание
— Запустите командную строку описанными способами.
— Настройте размер шрифта и цвет текста и фона.
— Введите команду ver и нажмите [Enter].
— Запишите версию ОС.
— Найдите в командном окне все элементы интерфейса:
— — Приглашение
— — Мигающий курсор
— — Команду
— — Ответ ОС
— — Полосу прокрутки
— Закройте командное окно.
Справочная система
Команда help выводит на экран описание указанной команды. Например, чтобы изучить команду dir, нужно ввести команду:
help dir
Длинный текст справки выводится на экран постранично.
Некоторые команды и программы сами могут выводить справку при указании вопросительного знака в качестве параметра:
dir /?
Квадратные скобки в тексте справки отмечают необязательные аргументы. Например, выражение
dir [диск: ]
означает, что допускаются следующие варианты использования команды dir:
dir
dir c:
dir d:
Задание
Вызовите справку для команды dir описанными выше способами.
История ввода команд
Все команды, введенные течение текущего сеанса работы командного окна, сохраняются в памяти. Их можно вернуть стрелками [Вниз] и [Вверх] и снова выполнить.
Содержимое командной строки можно редактировать клавишами [Влево], [Вправо], [Home], [End], [Del], [BackSpace].
Клавиша [Backspace] находится на клавиатуре над клавишей [Enter]. Эта клавиша удаляет символ слева от курсора.
Английское слово backspace означает «вернуться на одну позицию назад». Эта клавиша была ещё на печатных машинках, см. рис. Тогда она просто передвигала печатающую головку на один символ влево. Русское название — «Забой». Можно было вернуться и напечатать другую букву поверх первой — если надо было исправить ошибку — то есть «забить» одну букву другой, перепечатать символ. А теперь на компьютере это ещё и стирание символа слева от курсора — с той же целью — исправить опечатку.
Обратите внимание на расположение букв на клавишах печатной машинки и на компьютерной клавиатуре. И для этого есть причина. В центре расположены буквы, которые встречаются чаще всего — чтобы не приходилось далеко передвигать пальцы при печати. Ближе к краям находятся более редкие буквы.
Клавиша «Забой» тоже осталась на своём привычном месте.

Рис. Клавиша «Забой» на печатающей машинке
Клавиша [Del] удаляет символ справа от курсора.
Для полного удаления текущей команды нажмите [Esc].
Задание
— Используя клавиши [Up] и [Down], просмотрите историю ввода.
— Верните команду help dir
— Отредактируйте команду, чтобы получить help help
— Нажмите [Enter]
— Верните предыдущую команду
— Нажмите [Esc]
— Прочитайте описание [Backspace] на Википедии
Команда DIR
Для просмотра содержимого каталога используется команда dir. Английское слово directory переводится как «каталог, папка, директория».
На экран выводится список всех каталогов и файлов, находящихся в текущем каталоге диска с указанием их расширения и размеров, даты и времени создания, см. рис.
Каталоги помечаются символами <DIR>.
Примеры использования команды:
dir /b — вывод только названий файлов
dir /d — вывод списка в несколько колонок
dir /oe-s — отсортированный по расширениям список имен каталогов и файлов, а среди них — сортировка от больших файлов к меньшим.

Рис. Содержимое каталога
Задание
— Введите следующие команды:
dir
dir c:\
dir /b c:\
— Обратите внимание на результаты выполнения команд
— Вызовите справку для команды dir
— Выведите на экран список файлов и каталогов диска D:, отсортированных по расширению в обратном алфавитном порядке;
— Выведите на экран список файлов и каталогов диска D:, отсортированных по дате — от ранних к поздним
— Выведите на экран список файлов и каталогов диска D:, сгруппировав каталоги после файлов
— Выведите на экран в алфавитном порядке имена скрытых файлов
— Выведите на экран в алфавитном порядке имена системных файлов
Команда CD
Для перехода из каталога в каталог используют команду cd. Это сокращение от английских слов Change Directory — «смените каталог».
Как и многие другие команды ОС, это выражение действительно звучит как команда в армии: «Рядовой Петров, смените каталог!»
Команда cd без параметров выводит имена текущего диска и папки.
Примеры использования команды:
cd c:\tmp — переход в каталог c:\tmp из любого каталога диска c:
cd /d c:\tmp — переход в каталог c:\tmp из любого каталога любого диска
cd tmp — переход в подкаталог tmp, расположенный в текущем каталоге
cd.. — переход на один уровень выше по дереву файлов
cd \ — переход в корневой каталог текущего диска
d: — переход на диск D:
Обратите внимание, что в последнем примере мы не пишем команду, а вводим только имя диска и двоеточие.
В приглашении ОС каждый раз после выполнения любой команды выводится имя текущего диска и каталога — если не изменить настройки командной строки.
Задание
— Вызовите справку для команды cd
— Обратите внимание на использование кавычек в команде cd
— Используя команды cd и dir, переходите вверх и вниз по файловому дереву диска с:
— Сделайте зарисовку фрагмента файлового дерева
— Установите текущий диск d:
— Переходите вверх и вниз по файловому дереву диска d:
— Перейдите в каталог C:\Program Files с одновременной сменой диска и каталога
— Перейдите в корневой каталог
Команда TREE
Команда tree выводит на экран схематичное изображение дерева каталогов. Английское слово Tree означает «дерево», а также «забраться на дерево». В нашем случае это слово означает «вывести на экран схему дерева файловой системы».
Если не указаны диск или путь, на экран выводится часть дерева, начиная с текущего каталога.
Чтобы прервать вывод на экран, нажмите сочетание клавиш [Ctrl + C].
Примеры:
tree \ — вывод дерева каталогов всего диска C:
tree c:\ /f more — постраничный вывод дерева диска C:
Задание
— Вызовите справку для команды tree
— Введите команду tree
— Введите команду tree и нажмите [Ctrl + C]
— Введите команду tree с постраничным выводом
— Сделайте зарисовку части дерева диска C:, начиная с корневого каталога
Команда SET
Команда set (англ. Set — «установите значение, задайте состояние, настройте») позволяет просматривать и изменять переменные (параметры) среды окружения (англ. Environment variables — «переменные окружения»). Имеется в виду среда выполнения программ.
Переменные окружения — это настройки ОС, доступные для прикладных программ в виде текстовых строк в оперативной памяти. Их также называют так: set-параметры.
К переменным окружения обращаются по имени.
Команда set без параметров выводит текущие значения переменных среды окружения, см. рис.
Вот некоторые примеры переменных окружения:
HOMEDRIVE — диск, на котором находится домашний каталог
HOMEPATH — путь к домашнему каталогу
NUMBER_OF_PROCESSORS — число логических процессоров, то есть процессоров, ядер и т. п.
OS — операционная система или семейство ОС
PATH — путь поиска исполняемых файлов
PROMPT — формат приглашения командной строки
USERNAME — имя пользователя

Рис. Параметры окружения
Для обращения к значению переменной окружения используют символ процента. Например, %os% — значение переменной os.
Примеры:
set path=C:\Temp;%path% — добавление каталога C:\Temp в путь поиска
echo %os% — вывод на экран значения переменной OS
Задание
— Выведите полный список переменных окружения
— Определите число «процессоров»
— Определите тип операционной системы
— Выясните в Википедии, что такое Windows NT
— Определите имя пользователя
— Выведите путь для поиска
— Добавьте каталог d:\ в путь для поиска
— Выведите путь для поиска
— Выведите полный список переменных окружения
— Убедитесь, что значение переменной path изменилось
Команда PATH
Команда path (англ. Path — «путь») устанавливает путь для поиска исполняемых файлов. Если при запуске приложения полный путь к файлу не указан, ОС пытается найти исполняемый файл в текущем каталоге, а затем просматривает пути к каталогам из заранее заданного списка path.
Список путей для поиска хранится в переменной среды окружения PATH. Для просмотра списка путей используется команда path без параметров.
Примеры:
path — выводит список путей
path c:\usr; d:\bin — задание двух путей для поиска
path %path%; d:\s — добавляет каталог d:\s к пути поиска
Изменение set-параметров из командной строки действует только для текущего командного окна. После изменения путей для поиска ОС не сможет выполнять некоторые команды. Для восстановления работоспособности закройте текущее командное окно и откройте новое.
Задание
— Выведите список путей поиска
— Добавьте каталог c:\1 в список путей
— Выведите список путей поиска
— Убедитесь, что каталог добавлен в список
Создание файлов
Обычно системный администратор ограничивает права рядового пользователя — чтобы тот не испортил работающую систему.
Например, пользователю могут запретить создание файлов в корневом каталоге диска c:\. Рекомендуется проводить опыты с файлами на другом диске в своём каталоге, например d:\sidorov.
Для создания текстовых файлов в командной строке можно использовать два способа.
Способ 1. Копирование ввода с клавиатуры в файл:
copy con file. txt
При выполнении этой команды данные с клавиатуры записываются в указанный файл. Для завершения ввода текста нажмите комбинацию [Ctrl + Z], а затем [Enter].
con (англ. Console — «Консоль») — устройство стандартного ввода-вывода информации. «Стандартный ввод» выполняется с клавиатуры, а «стандартный вывод» — на экран.
Способ 2. Перенаправление стандартного вывода:
echo текст> file. txt
Команда echo (англ. Echo — «эхо») выводит текст, напечатанный после команды, на экран.
Символ «больше» направляет вывод вместо экрана в файл. В результате, при выполнении этой команды будет создан файл file. txt, который будет содержать в себе текст, напечатанный после команды echo.
Задание
— Просмотрите в Википедии статью Консоль, которая относится к компьютерам
— Создайте на рабочем диске свой рабочий каталог и назовите его своей фамилией
— Перейдите в свой рабочий каталог
— Создайте текстовый файл a. txt с помощью копирования с консоли в файл.
— Создайте текстовый файл b. txt с помощью перенаправления стандартного вывода.
Вывод на экран
Команда type выводит на экран содержимое текстового файла (например, *.txt или *.bat), например:
type f. txt
Можно также выполнить копирование файла на экран (устройство стандартного вывода, консоль), например
copy f. txt con
Задание
— Выведите на экран файл a. txt командой type
— Выведите на экран файл b. txt командой copy
Команда COPY
Команда copy (англ. copy — «скопируйте, создайте копию») используется, чтобы скопировать один или несколько файлов. Первый параметр команды — исходный файл (источник). Второй параметр — результат копирования (каталог или новый файл). Например, команда copy f1.txt d:\t копирует файл f1.txt в каталог d:\t.
Для объединения нескольких файлов в один файл между именами файлов ставится знак +. Например команда
copy f1+f2+f3 f4
объединяет файлы f1, f2 и f3 в файл f4
Второй параметр команды может содержать имя файла или путь к файлу.
Примеры:
copy 1.txt 2.txt — копирование файла 1.txt в файл 2.txt в текущем каталоге. Если файл с именем 2.txt уже существует в этом каталоге, то его содержимое заменяется содержимым файла 1.txt. Перед копированием ОС запрашивает согласие пользователя на замену существующего файла.
copy 1.txt d:\t\2.txt — копирование файла 1.txt в файл 2.txt в каталоге d:\t
Звездочка * заменяет любой символ или несколько символов в названии файла. Например, команда copy *.txt d:\ копирует все файлы с расширением txt в каталог d:\.
Задания
— Скопируйте файл a. txt в каталог d:\
— Выведите на экран файл d:\a. txt
— Скопируйте файл a. txt в d:\z. txt
— Выведите на экран файл d:\z. txt
— Скопируйте файл b. txt в файл c. txt
— Выведите на экран файл c. txt
— Скопируйте файл a. txt в файл c. txt
— Выведите на экран файл c. txt
— Скопируйте файлы a. txt и b. txt в файл c. txt
— Выведите на экран файл c. txt
— Скопируйте все файлы типа txt в файл d. txt
— Выведите на экран файл d. txt
Работа с архивами
Архив — это файл, внутри которого упакованы каталоги и файлы. Архиватор — это программа, которая выполняет упаковку и распаковку архивов. Многотомный архив — это большой архив, разбитый на несколько частей. Такие архивы можно записать на несколько дисков или отправить частями по сети.
Самораспаковывающийся архив SFX (SelF-eXtracting archive) — это исполняемый файл *.exe, содержащий архив и программу распаковки. При запуске такого файла производится распаковка архива без использования дополнительной программы-архиватора.
В лабораторной работе используется программа 7-zip — свободно распространяемый архиватор.
Сайт программы:
https://www.7-zip.org/
Чтобы запускать архиватор из командной строки, необходимо добавить в путь поиска каталог C:\Program Files\7-Zip
При вызове архиватора ему передают команду — первую букву английского слова, например
add
list
extract
Примеры использования архиватора:
7z a x1 b. txt — упаковка файла b. txt в архив x1.7z
7z l 1.7z — вывод списка файлов из архива 1.7z
7z e 1.7z — извлечение файлов из архива 1.7z
7z e 1.7z — od:\ — извлечение файлов в каталог d:\
7z a — sfx rr *.txt — сжатие всех текстовых файлов в самораспаковывающйся архив rr. exe
В описании архиватора используются следующие обозначения. В квадратных скобках даются необязательные параметры. Угловые скобки служат для обозначения параметров. При вводе команды квадратные и угловые скобки не используют. Например, следующее описание
7z <command> [<switches>…] <archive_name> [<file_names>…]
означает, что пользователь может вводить такие команды:
7z a ghjk
7z l ghjk
7z a ghjk a. txt
7z a — sfx ghjk b.doc b. txt
Задания
— Выясните, в каком каталоге находится архиватор 7-zip
— Выведите на экран путь поиска
— Добавьте путь для поиска архиватора
set path=%path%;C:\Program Files\7-Zip
— Выведите на экран путь поиска
— Убедитесь, что путь добавлен
— Введите команду 7z и прочитайте справку по использованию архиватора
— Выясните назначение и перевод команд a, e, l
— Упакуйте файл с. txt в архив сс.7z
— Сравните размеры исходного и сжатого файлов
— Создайте текстовый файл tt.docx в редакторе MS Word
— Упакуйте файл tt.docx в архив t1.7z
— Сравните размеры исходного и сжатого файлов
— Упакуйте все файлы с расширением *.txt в архив ttt.7z
— Выведите список файлов из архива ttt.7z
— Распакуйте архив ttt.7z в каталог d:\
— Убедитесь, что операция выполнена успешно
— Упакуйте файл tt.doc в саморапаковывающийся архив в каталоге d:\
— Сравните размеры исходного и сжатого файлов
— Перейдите в каталог d:\
— Запустите созданный архивный файл на выполнение
— Убедитесь, что операция выполнена успешно
Перенаправление ввода-вывода
При выполнении программ в командной строке используется так называемый стандартный ввод-вывод. Это стандартные встроенные функции ОС для ввода текста с клавиатуры и вывода текста на экран. Такие действия выполняются, например, при использовании команд printf и scanf в программе на языке C.
Для перенаправления стандартного ввода-вывода используют следующие символы:
> — записать в файл (вместо вывода на экран);
>> — добавить к файлу (вместо вывода на экран);
< — прочитать из файла (вместо ввода с клавиатуры);
— объединить две команды в конвейер (вместо вывода на экран и ввода с клавиатуры).
Стандартный ввод
Если в параметрах командной строки не указано имя файла, то команда принимает данные с клавиатуры. Например, команда sort сортирует текстовые строки по алфавиту. Команда sort без параметров сортирует текст, вводимый с клавиатуры до нажатия [Ctrl+Z] и [Enter]. Команда sort f. txt сортирует текст из файла f. txt. Команда dir> f. txt отправляет список файлов в файл f. txt вместо вывода на экран. Команда dir>> f. txt дописывает список файлов в конец файла f. txt, если этот файл уже существует.
Конвейер
При организации конвейера стандартный вывод первой команды (вместо вывода на экран) направляется на стандартный ввод второй команды (вместо чтения с клавиатуры). Например, конвейер dir sort создает список файлов, сортирует его и выводит на экран.
Команда more организует постраничный вывод на экран. При организации конвейера в виде tree more, команда more перехватывает вывод на экран результатов работы команды tree и выводит длинный текст по страницам. При работе с командой more для вывода на экран следующей строки нажимают [Enter], для вывода следующей страницы — пробел [Space], для выхода из страничного просмотра — клавишу [Q] (англ. Quit — «выйти»).
Задания
— Вызовите команду dir и запишите результаты в файл d4.txt
— Выведите файл d4.txt на экран
— Вызовите команду ver и добавьте результаты к файлу d4.txt
— Выведите файл d4.txt на экран
— Выведите файловое дерево в постраничном режиме
Пакетные файлы
Пакетный файл — это текстовый файл с расширением *.bat (англ. Batch — «пакет»). В пакетном файле записывают последовательность команд ОС. Имеется также возможность составления несложных программ.
Хотя пакетный файл содержит текст, он является исполняемым файлом. Чтобы запустить пакетный файл из командной строки, нужно ввести его имя и нажать [Enter]. При этом расширение указывать не обязательно.
Для запуска файла или команды в отдельном окне используется команда start, например:
start dir
Задание
— Выведите справку по команде date
— Командой echo создайте пакетный файл da.bat, в котором содержится команда вывода на экран текущей даты
— Запустите файл da.bat на выполнение, указав расширение
— Запустите файл da.bat на выполнение, не указав расширение
— Запустите файл da.bat на выполнение в отдельном окне
— Перейдите в корневой каталог диска D:
— Запустите на исполнение файл da.bat без указания пути
— Ознакомьтесь с сообщением ОС
— Добавьте к пути поиска полный путь к каталогу, где находится файл da.bat
— Убедитесь, что путь поиска изменен
— Запустите на исполнение файл da.bat без указания пути
— Убедитесь, что файл успешно запущен
Работа с файлами и каталогами
Для создания каталогов используется команда mkdir (англ. Make Directory — «Создайте каталог»).
Для удаления каталогов используется команда rmdir (англ. Remove Directory — «Удалите каталог»).
Для удаления фалов используется команда del (англ. Delete — «Удалите»).
Задания
— Вызовите справку по mkdir
— Создайте каталог (в названии используйте номер группы)
— Перейдите в новый каталог
— Создайте каталог (в названии используйте фамилию)
— Перейдите в новый каталог
— Создайте текстовый файл
— Вызовите справку по del
— Удалите текстовый файл
— Поднимитесь на один уровень вверх по файловому дереву
— Вызовите справку по rmdir
— Удалите каталог
— Создайте каталог
— Поднимитесь на один уровень вверх по файловому дереву
— Удалите каталог
Управление процессами
Процесс — это программа, которая выполняется на компьютере. Пока программа хранится на диске, это файл. Когда она запущена на выполнение, это процесс. Процессы находятся в оперативной памяти, а не на диске.
Для вывода списка процессов используется команда tasklist (англ. Task List — «Составьте список задач (процессов)»).
Для остановки выполнения процесса используется команда taskkill (англ. Task Kill — «Убейте задачу, остановите выполнение указанного процесса»).
Для остановки процесса требуется указать идентификатор процесса PID (англ. Process Identifier — «Идентификатор процесса»). PID — это «уникальное» целое число, назначенное каждому процессу. У всех процессов эти номера разные.
Задание
— Выведите на экран список процессов
— Определите, какой процесс занимает больше всего памяти
— Определите номер процесса cmd. exe
— Запустите второе командное окно
— Выведите список процессов
— Определите номер второго процесса cmd. exe
— Определите, сколько памяти занимает каждый процесс cmd. exe
Конец ознакомительного фрагмента.
- SS64
- CMD
- How-to
Change the appearance of the cmd.exe command prompt.
Syntax
      PROMPT [text]

Key
   text : a text string.
The prompt text can be made up of normal characters and the following
special codes:
   $A  &           (Ampersand)
   $B  |           (pipe)
   $C  (           (Opening parenthesis)
   $D Current date
   $E Escape code  (ASCII code 27)
   $F  )           (Closing parenthesis)
   $G  >           (greater-than sign)
   $H  Backspace   (erases previous character)
   $L  <           (less-than sign)
   $M  Display the remote name for Network drives
   $N  Current drive
   $P  Current drive and path
   $Q  =           (equal sign)
   $S              (space)
   $T  Current time
   $V  Windows version number
   $_  Carriage return and linefeed
   $$  $           (dollar sign)
   $+  Will display plus signs (+) one for each level of the PUSHD directory stack
The default prompt is $P$G (drive/path followed by > )
The PROMPT command is tied to the %PROMPT% environment variable, editing the variable will lead to the same result as using the PROMPT command (e.g. PROMPT $P$G is the same as SET PROMPT=$P$G)
If the %PROMPT% variable is deleted, the prompt will automatically revert to the default.
To set the CMD prompt for all sessions, set a permanent environment variable (SETX) with the appropriate prompt text. e.g.
SETX PROMPT $M$_$P$G
The prompt variable only holds the prompt definition, the final prompt characters are calculated by the CMD console.
The maximum length of a prompt string is 511 characters. If a longer prompt is set it will be silently truncated to the first 511 symbols.
The dollar codes each count as 1 character.
Errorlevels
When CMD Command Extensions are enabled (the default)
If the prompt was successfully changed %ERRORLEVEL% = unchanged, typically this will be 0 but if a previous command set an errorlevel, that will be preserved (this is a bug).
If prompt could not be changed %ERRORLEVEL% = 1
If an attempt is made to set a prompt using a dollar sign followed by any character not in the list of codes above, then everything after that dollar sign will be ignored.
PROMPT does not error if passed invalid switches PROMPT /Z /invalid — it will just set them as part of the prompt.
Examples
Display the UNC path whenever you are using a network drive (mapped with NET USE)
PROMPT $M$_$P$G
Simulate an HP-UX style prompt with the computername and the current folder on separate lines:
PROMPT=$p$_%username%@%computername%:.
Display the time, backspacing to hide the milliseconds:
PROMPT=$T$H$H$H$G$S
Restore the default prompt:
PROMPT $P$G
Save a backspace character (obtained via the $H option) into the variable %BS%. (source)
For /F %%A in (‘Echo PROMPT $H ^| cmd’) do Set «BS=%%A»
PROMPT is an internal command. If Command Extensions are disabled the commands $M and $+ are not supported.
“All actions are judged by the motive prompting them” ~ Muhammad
Related commands
SETX — Set an environment variable permanently.
Equivalent PowerShell: Create a function called Prompt (save in Profile.ps1 to make permanent).
Equivalent bash command (Linux): variable $PROMPT_COMMAND
Copyright © 1999-2023 SS64.com
Some rights reserved
![]()
Загрузить PDF
![]()
Загрузить PDF
Команда строка Windows (command.exe) является полезным инструментом для выполнения различных административных задач. Приглашение командной строки – это короткая фраза или символ, отображаемый на экране, чтобы информировать пользователя о готовности программы принять команду. Эта статья расскажет вам, как изменить приглашение командной строки однократно и на постоянной основе.
-

1
Нажмите Windows + R.
-
2
Введите CMD и нажмите Enter.
-
3
Введите prompt и новый символ/фразу приглашения.
-
4
Новое приглашение отобразится на следующей строке. Обратите внимание, что новое приглашение будет сброшено при закрытии окна командной строки.
Реклама


-
1
Щелкните правой кнопкой мыши по «Компьютер» и в меню выберите «Свойства».
-
2
Нажмите «Дополнительные параметры системы».
-
3
Нажмите «Переменные среды».
-
4
Нажмите «Создать» (в разделе «Пользовательские переменные»).
-
5
В строке «Имя» введите prompt.
-
6
В строке «Значение» введите новый символ/фразу приглашения.
-
7
Нажмите ОК.
Реклама


Советы
Существуют специальные последовательности символов, которые можно использовать для отображения различных переменных. Команда prompt /? выводит список этих специальных символов. Переменные среды также могут использоваться в строке приглашения, используя стандартный формат %variablename%.
По умолчанию приглашением является «$P$G», что означает «Показывать букву диска и путь ($P), за которым следует «>»($ G)», например, C:\Windows>. Ниже приводится список специальных символов.
$A & (Амперсанд)
$B | (вертикальная черта)
$C ( (левая скобка)
$D Текущая дата
$E Код выхода (ASCII код 27)
$F ) (правая скобка)
$G > (знак «больше»)
$H Backspace (стирает предыдущий символ)
$L < (знак «меньше»)
$N Текущий диск
$P Текущий диск и путь
$Q = (знак «равно»)
$S (пробел)
$T Текущее время
$V Номер версии Windows
$_ Возврат каретки
$$ $ (Знак доллара)
Если включены командные расширения, командная строка поддерживает следующие дополнительные символы форматирования:
$+ Нуль или дополнительные знаки «плюс» (+) в зависимости от размера стека PUSHD (один символ для каждого уровня).
$M Отображение удаленного имени, связанного с буквой текущего диска или пустой строкой (если текущий диск не является сетевым).
Реклама
Предупреждения
- Не вводите набор случайных символов в командной строке. Командная строка является мощным инструментом, который может внести необратимые изменения в систему или даже удалить все данные на вашем компьютере!
Реклама
Об этой статье
Эту страницу просматривали 13 425 раз.
Была ли эта статья полезной?
Everyone who uses Windows on a daily basis has definitely bumped into the command prompt every once in a while. It’s one of those things that you know exists, but most likely have no idea how to use or what it’s for. Most advanced users know a few basic commands, but very few know how to fully take advantage of the Windows Command Prompt.
That’s why it’s a damn good thing you are here. You are about to learn everything there is to know about the Command Prompt, also known as cmd or console. We will start off with the basics, like different ways to open it, as well as basic navigation and file modification. After that, we will move on to more complex commands and features.
No matter if you’ve never touched the command prompt before or you are an expert at it, you will definitely find tons of useful information in this guide.
If a video format is more your style, you can check out this guide on our YouTube channel. It won’t be as in-depth, but contains all the main commands and features you need to learn.
What is the Command Prompt?
Command Prompt or CMD is a command line interpreter, in which the user interacts with the the command prompt through its command-line interface. It can be used to interact with the Windows operating system through various built-in commands. It is not a cross-platform application, as it is native to Windows, unlike it’s big brother, PowerShell which works on many other operating systems.
The command prompt was most popular in its early days, as the user interfaces were a lot more limited back then. Navigating through the files on a computer was simple when using only the keyboard. Nowadays most people don’t know how to use cmd because there is often no real need for it.
Many of the basic functions in command prompt can be done easily with basic mouse operations and menus, so most end-users will never need to use CMD. However, even in the age of mouse dominated PC operations, there are tons of useful things you can only accomplish through the command prompt on Windows and that’s what we’re here to find out.
Let’s start off with the basics first, then move on to some more complicated examples and commands.
Quick Ways to Launch Command Prompt
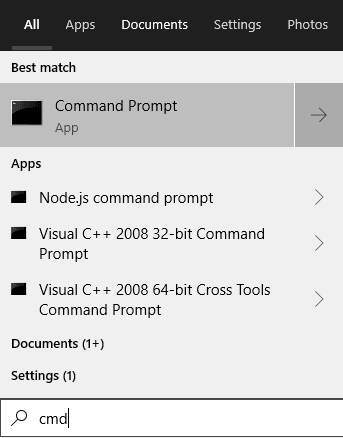
The best thing about command prompt on windows besides its many uses; is how fast you can get it going. The easiest way to open it up is to just open up your start menu and look for the Command Prompt within it, but there are a few faster alternatives.
The easiest and probably fastest way to launch CMD on Windows operating systems is by pressing the Windows Key and typing in ‘cmd‘. You should then see the command prompt icon appear and then you can open it up by clicking on it. This is the way I tend to open it up, as I don’t use the command prompt more than a few times a week.
If you find yourself using the command prompt on a daily basis, it might be a better idea to pin the command prompt to your taskbar. This way it’s just one click away at all times.
In order to pin command prompt to your taskbar, first you need to find it in the start menu with the method showcased above. Then all you need to do is right-click on the app icon and select the ‘Pin to taskbar‘ option. Now you should see the CMD icon on your Windows taskbar at all times.
Run Command Prompt as Administrator
Sometimes you need to let Windows know that you have enough permissions to access certain directories and files. This includes other users folders and sensitive files within folders like System32, which might cause issues when tampered with. Also if you are going to be running batch scripts or using advanced commands, you need elevated permissions.
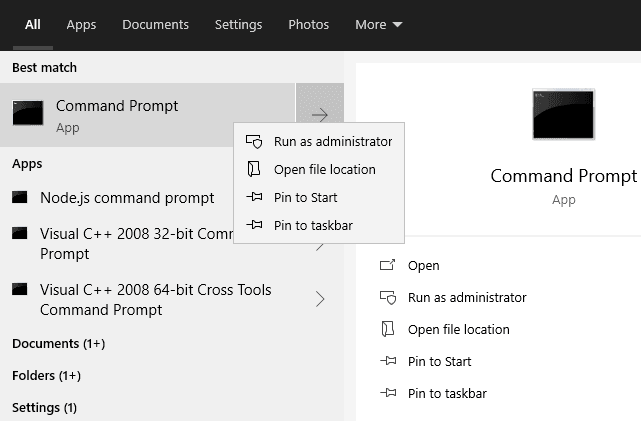
The easiest way to run command prompt as administrator is by finding it in the start menu as shown above, then right-clicking it and selecting the ‘Run as administrator‘ option from the drop-down menu. However, there is an even easier way to accomplish this if you pinned the app to your taskbar.
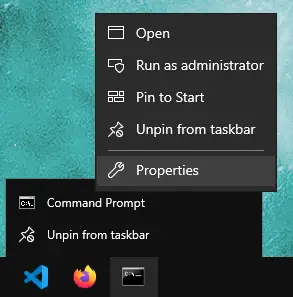
If you wish to automatically run cmd as admin every time you open it, just follow these simple steps. First, right-click the icon in your taskbar and then right-click the ‘Command Prompt’ selection from that pop-up menu as well. Once you see the menu, you could just run it as administrator from there, but select the ‘Properties‘ tab instead.
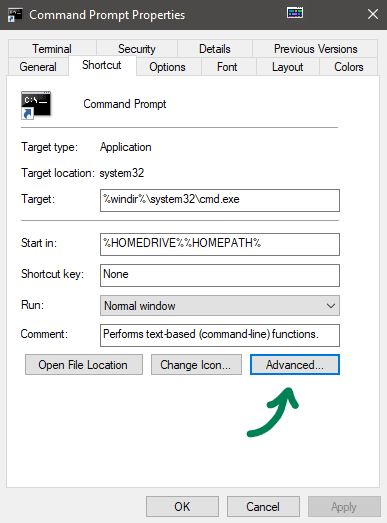
When you have opened up the ‘Properties‘ window, look for the tab labelled ‘Shortcut‘ and select it. Once you’re there, click on the ‘Advanced…‘ button to open up the advanced properties of the CMD shortcut. Finally, the last thing you need to do is tick the ‘Run as administrator’ checkbox. Now just click OK on both menus and you’re done.
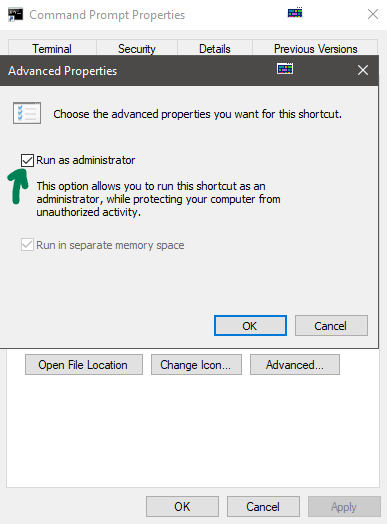
After this step is done, every time you click on the command prompt icon in your taskbar, it will launch as admin automatically. This will save you a few clicks and you don’t ever have to remember to do it again. In order to make sure that you are running the cmd as an admin, you should see the text ‘Administrator: Command Prompt‘ at the top toolbar of the window.
![]()
Command Prompt vs Windows PowerShell
You might have already heard about PowerShell, but might not know what it is or how it differs from the normal command prompt. In a nutshell, PowerShell is a more complex and powerful alternative to cmd, a Command Prompt on steroids. You can do everything with PowerShell that you can do with cmd and much more.
The reason why most people have never used PowerShell, is because it hasn’t been integrated with Windows operating systems until Windows 7. Ever since then, it comes pre-installed and you can find it in the same manner as the cmd through your start menu. You can also pin it to the taskbar and run as admin the same way.
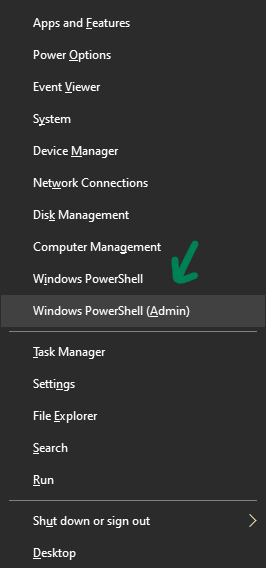
You can launch PowerShell just as you would CMD, but there is also a new quick method to do this in Windows 10. The best way to quickly open PowerShell on Windows by pressing the Windows key + X to open up a hidden menu. From that menu you can find ‘Windows PowerShell (Admin)‘ from which you can instantly open PowerShell as an administrator.
In the end it’s completely up to you if you wish to use the default Command Prompt or PowerShell, but here are some benefits of using PowerShell:
- PowerShell uses the .NET framework allowing users to use actual programming libraries and allowing for the creation of custom commands.
- It’s cross platform so you can use your newly learned skills on Windows, Linux and MacOS while the normal Command Prompt is only usable on Windows.
- PowerShell uses a lot of easier-to-understand commands and tons of documentation about all commands through the
Get-Helpcommand. - It has a higher learning curve as there’s a lot more things to learn about, almost like learning a new language. This means there’s more potential as well.
- Most end users will only ever need the CMD, which is why we will stick to it in this guide, but if you’re feeling up for it, we recommend you start with PowerShell as it will be more beneficial for you in the long run.
If you would like a guide similar to this one about Windows PowerShell, let us know in the YouTube video comments or through our About Us page.
You can find more information and documentation about the app on the official PowerShell Microsoft Documentation page.
Few Important Base Commands to Learn in CMD
To start your CMD journey, there are a few basic commands that are going to help you on your way.
As with all new software and applications, it’s great to have instructions or a user manual. Although this guide should have you covered, it’s nice to know how to find help within command prompt itself.
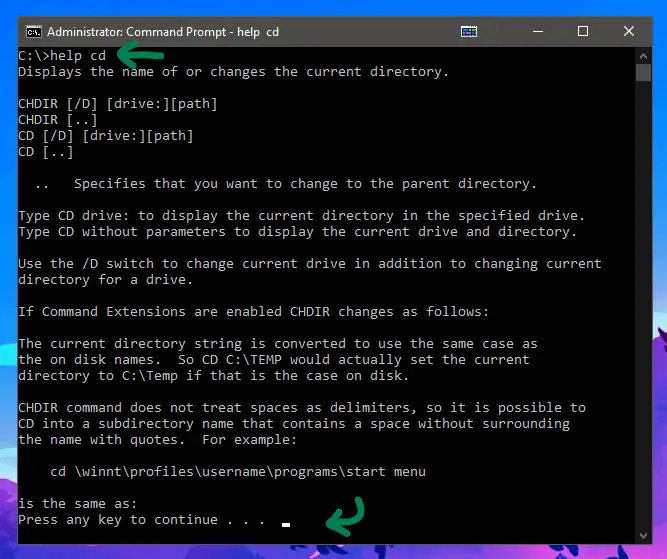
In order to find a neat list of all the basic commands within CMD, all you need to do is type in help and press enter.
The list above is a great refresher on the available commands, but they don’t explain much usage wise. That’s why there is a different documentation command which provides more in-depth information for each command.
In order to see the guide for a specific command, you can type help COMMAND or COMMAND /? both of which will show the same information.
Now that you have a huge wall of text in your command prompt, you might be wondering how to get rid of it. Thankfully there’s a command for that instead of just scrolling down constantly.
In order to empty out the cmd of all text, you need to type in cls which stands for Clear Screen. It’s extremely useful once your prompt starts to get cluttered.
Another quick useful tip is that you can paste whatever text is on your clipboard by simply right-clicking anywhere on the command prompt window.
In order to copy whatever your command outputs, you can simply add | copy after the command. This will copy any results onto your clipboard.
It is good to note that all commands within the cmd are NOT case sensitive, so you can write in upper- or lower-case letters as you please. For example, help and HELP are the same command and work just fine. I prefer writing everything in lower case, as it seems faster.
Finally, if you don’t like to move your mouse to exit the command prompt, you can simply type exit in order to close down the cmd instantly.
System & Folder Navigation
Now we’re ready to get into the thick of things. These commands are the first thing you need to learn in order to navigate through your system within command prompt. They consist of changing folders and directories as well as switching between drives.
Change Directory (cd)
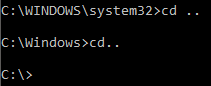
This is usually the first command you learn when starting out with cmd. When starting up the command prompt as administrator, you start out in the C:\WINDOWS\system32 folder.
In order to move up one level in the folder hierarchy, you need to type cd .. so if you execute this command twice, you will be in the root of your C:\ drive. In addition, to go directly to the root level, in this case the C drive base, you can simply type cd / with or without the white-space.
cd is not necessary for the command to work.
If you want to change the drive you are working in, all you need to do is type in the drive letter followed by a colon. For example, if you would like to change from C:\WINDOWDS\system32 to X:\ just type in X: and you’re done.
If you want to move to a specific folder within the current directory you can type in cd DIRECTORYNAME which is one of the most used commands. You can also press TAB while writing the folder name to auto-fill it. It will speed up your process and navigation a lot.
In order to move to specific path on the current drive, you can type the entire path after cd to jump there. For example if you’re located in C:\, you can type cd Windows/System32 to move up directly to the System32 folder.
If you want to jump to a different hierarchy on the same drive you need to start off with the drive letter. For example you can type in cd C:/Users/TechTipVault to move directly to that folder, no matter where you are currently.
Similarly if you want to jump to a path on a different drive, you need to add in cd /d and then the full path. For example if you want to move from C:/Users to X:/Users, you need to type in cd /d X:/Users and voilà.
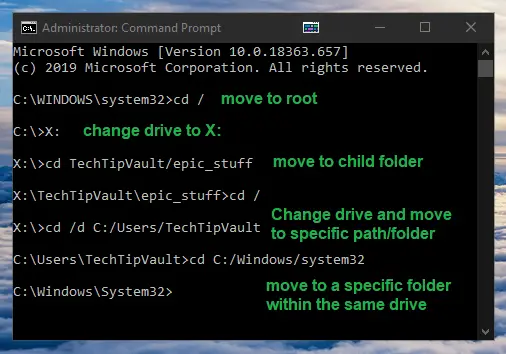
Finally, it’s good to note that it is good practice to surround any folder names with quotes if they contain white-space. It is not required in all cases, but it is good to get used to. For example, you should type a path like this: cd C:/"Program Files (x86)"/"Tech Tip Vault"/dot_com
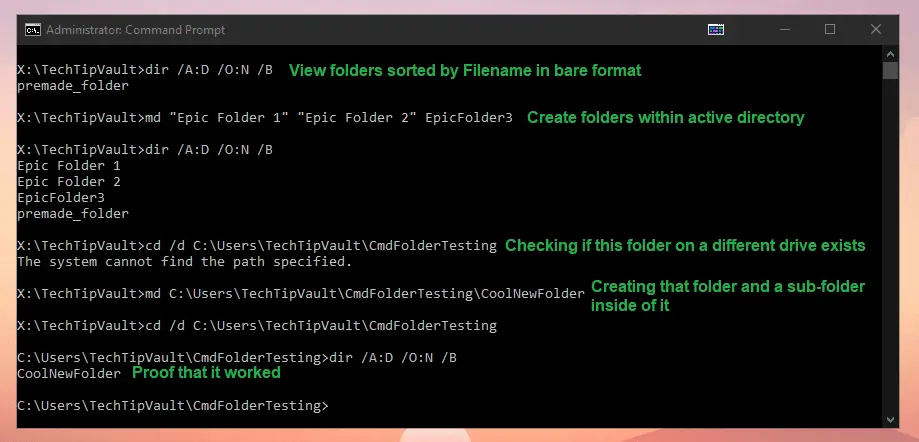
List Files and Directories (dir)
When you’re navigating through your system with cmd, you often want to know what your options are in the active directory. Thankfully there is a very versatile command that allows you to see all the files, directories and sub-directories in the current folder.
In order to see basic information about every file and folder in the current directory, type dir in the command prompt.
If you want to view the contents of a folder you’re not currently in, you can also use dir for that. The catch is, you need to use back-slashes or quotes for the file-path as otherwise the path won’t be recognized. This is due to the additional parameters that can be used. For example, if you want to see the contents of the Users folder, you can either type dir C:\Users or dir "C:/Users" as both options work the same. It just really depends on if you hate typing back-slashes as much as I do.
This command has tons of optional parameters that decide the amount of details and items to show. You can view all of them using the help command by typing dir /? but we will explain some of them here for clarity.
| Parameter | Example | Explanation |
/A:ATTRIBUTE or /A:-ATRRIBUTE |
dir /A:Ddir /A:Rdir /A:Hdir /A:-Ddir /A:-D-H |
Show all folders Show Read-Only files Show Hidden files Do NOT show folders Do NOT show folders or Hidden Files |
/O:SORTINGORDER or /O:-SORTINGORDER |
dir /O:Ndir /O:Sdir /O:Ddir /O:Edir /O:D-N |
Sort by filename Sort by file size Sort by Date & Time Sort by File Extension Sort by Date & Descending Filename |
/T:TIMEMODE |
dir /T:Cdir /T:Adir /T:W |
Sort or view by Creation time Sort or view by Last Access time Sort or view by Last Written time |
/S |
dir /S |
Include all sub-folders |
/B |
dir /B |
Bare format (no header, size, or summary) |
/L |
dir /L |
Use lowercase letters |
/Q |
dir /Q |
Show the owner of the file |
/N |
dir /N |
Long format with filenames on the right |
/X |
dir /X |
Long format with short filenames |
/C or /-C |
dir /C |
Include/Hide thousand separator in file size |
Launch and Application or Program
The last thing that you should know when navigation through your system in command prompt is how to start an app through it. Thankfully it’s as simple as navigating to the correct folder and typing the name of the executable.
For example, if for whatever twisted reason you wanted to start up another command prompt instance from within the command prompt, you can do that. First you need to navigate to System 32 folder with cd /d C:/Windows/System32 and then type in start cmd to launch a new instance of cmd.
You can also start an app simply through the full file-path. For example, to launch MS Paint you can type in C:/Windows/System32/mspaint.exe and the software will start up instantly.
File & Folder Editing
File and folder editing is the bread and butter of the command prompt. These are the main commands you will be taking advantage of when using cmd. Once you get the hang of the navigation first, you will be ready to get going with the editing itself.
Make Directory (md)
The first command will let you create a new folder or directory. The md command is an alias for the longer version mkdir which both do the same thing. As long as you remember one of them, you’re good to go.
In order to create a new folder in the current working directory, type md FOLDERNAME. You can also create multiple nested folders by just adding them in with slashes. For example, if you want to create folders and sub-folders at once, type in md TechTipVault/SubFolderName/EvenDeeperFolder and now you have a triple layered folder hierarchy.
If you want to create multiple folders within the same directory, you need to separate the folder names with white-space. For example, in order to create 3 folders within the active directory, type up md Folder1 Folder2 Folder3 and now you have three new folders to work with.
It is good to note that white-space or special characters like commas, equals or semicolons will separate multiple folders. This means if you want to add special characters or spaces within the folder names, you need to add the folder name between quotation marks. For example, to create two folders with spaces in the names, you can type md "Folder 1" "Folder 2 = Folder 2". Now you will have 2 new folders, one called Folder 1 and the other one called Folder 2 = Folder 2.
Finally, you can create a folder with the above commands directly into any location by writing the entire path after the command. For example, if you are currently in C:/Users folder, you can type md X:\TechTipVault\EpicFolder to create a new folder on a different drive. Make sure to use back-slashes for the path or it won’t work.
Rename Files & Folders (ren)
The rename command is one of the most useful commands cmd has to offer. It allows you to rename any files and even change their extensions, transforming the file into a different type.
Simply renaming a file can be done by typing ren tipvaulttech.txt TechTipVault.txt in order to name the file into the latter format. You can also use this same syntax to rename a folder.
As you might expect, you can use the same logic to change the extension of a file. By typing ren TechTipVault.txt TechTipVault.html you will change your text file into an html file.
The best part about the renaming syntax in the command prompt is the ability to use wildcards. You can use * and ? characters to make complicated naming scenarios very easily.
Below is an interesting example utilizing the forward slash, which is not really documented anywhere, but a fun use-case can be seen utilized to remove parts of the filename.
 |
ren "Artist - " "/////////.*"(Add same amount of slashes as characters found on the left side) |
 |
The * symbol basically means every character before the character that follows it. For example, if you wanted to transform every text file in a folder into log files, you could accomplish this by typing ren *.txt *.log noting the space(s) in between. The first “*” takes the original name and the second “*” replaces any character after (and including) the dot with .log.
The ? symbol finds the next character after it and appends it to the target name (as long as the next character is not a .). If the next character is a . then no character will be added in to the result.
For example, if you add 5 question-marks, it will replace 5 (or less) characters before a dot. See the examples in the table below.
If both are combined *?, they will append all remaining text from the source name to the target name and vice versa.
| Initial Files | Command | Final Files |
| ttv.txt TechTipVault.html file1.xyz.log |
1. ren *.* *.2. ren * *_NEW.log |
ttv_NEW.log TechTipVault_NEW.log file1.xyz_NEW.log |
| abc.abc 12345.12345 ABC123.docx TechTipVault.Backup.log |
ren * ????.???? (4 times ? on each side) |
abc.abc 1234.1234 ABC1.docx Tech.Back |
| ttv.txt TechTipVault.xxx.dat a.b.c_d |
ren * *?.bak |
ttv.txt.bak TechTipVault.xxx.dat.bak a.b.c_d.bak |
Copy Files & Folders (copy |xcopy)
When looking to copy things, it’s good to note that there are two separate commands you need to use. You have to use the copy command in order to copy files and the xcopy command to copy folders and their contents. Both of these commands also have their own parameters and options to give you more options.
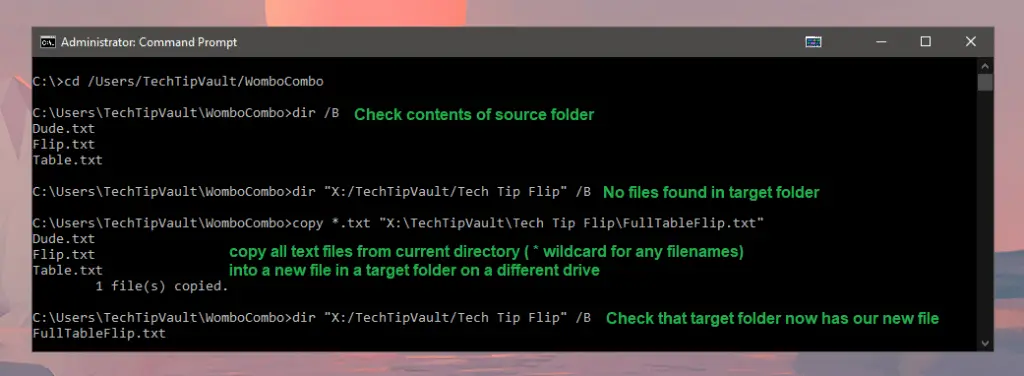
Copy Files (copy)
Let’s first go in-depth with copying files using command prompt. The simple and easy basic functionality of this command is copy filename.ext newfilename.ext which will copy the file with a new name in the active directory.
Similar to most of the other commands, you can copy files from the active directory to a different folder or drive by adding their separate paths. For example, copy "C:/Users/TechTipVault/Epic Text File.txt" "X:/TechTipVault/CopiedVersion.txt" will copy a file (even with white-space in the name) from the C-drive to the X-drive.
A unique feature with this command is the possibility to merge text files into a single new text file. For example, if you want to merge every text file in a folder into a single one, you can use copy *.txt "\TargetDirectory\CombinedFileName.txt" and you now have a nice wombo-combo. Check the example below.

Copy Files and Folders (xcopy)
Now let’s dive into the xcopy command. It is very similar to the normal copy command but provides more parameters and switches to take advantage of.
The basic syntax for copying files with xcopy is the same as with the normal copy command, which is why you should use that one instead. The main reason for this is because when using xcopy, you can’t tell if the target should be a file or a folder. If you do this, you will be prompted to enter either ‘F’ for file or ‘D’ for directory into the command prompt. In order to ignore this prompt and default as a file, you can add a wildcard (*) to the end of the target as such xcopy source.txt target.txt*
Finally, there are a few parameters you should be aware of with xcopy, although most of them are not very useful. You can type xcopy C:\Users\TechTipVault\FolderWithStuff X:\TechTipVault /S /I in order to copy every file, subfolder and files in the subfolders to the target folder. Here you can see the most important parameters that can be combined with the xcopy command.
| Parameter (Usage: xcopy source target parameter) |
Explanation |
/S |
Copy folders and sub-folders (including files within them) (excluding empty folders) |
/E |
Copy folders and sub-folders (including files within them) (including empty folders) |
/I |
Assume the target is a Folder (type) |
/Y |
Suppress the prompt for overwriting files. (Overwrites duplicates without warnings) |
/T |
Copy entire folder structure, but ignore any files. (/T /E combo will also include empty folders and subfolders) |
/K |
Copy attributes (otherwise things like read-only attributes will be reset) |
Modify File Attributes (attrib)
The attribute command is quite a simple but useful affair. It allows you to display a files attributes or change them to your liking. Attributes mean features like being Read-only or hidden files.
With this command you can add an attribute with a + symbol and disable an attribute with the - symbol. The two basic attributes you will be using are R for Read-only and H for Hidden. The Hidden parameter also works for folders, but the Read-only attribute can only be applied to files. There are also A for Archive and S for System attributes, but they are rarely used.
You can also use the /S modifier to apply the attributes to all files within sub-folders as well and /D to apply the changes to selected folders too. As with most file editing commands, you can also use wildcards with the attrib command to easily modify a group of files instead of just one.
The basic syntax to make a file hidden and remove its read-only property can be done as follows: attrib +h -r SuperSecretPasswords.txt
Delete Files (del)
The delete command is unsurprisingly quite self-explanatory. It can be used to delete files. However, it is not possible to remove folders with it, as that’s what the remove directory command is for, discussed below.
Thankfully, to make the del command a little more useful, it includes plenty of parameters for more specific deletions alongside the ability to use wildcards for filenames. As for basic usability, you can type one or multiple filenames after the command as such: del file1.docx "Tech Tip File.log" "X:\TechTipVault\File.txt"
A cool feature of the del command is if you use it on a folder, all the files within the folder will be deleted but the folder itself will remain intact.
Now let’s get to the parameters you can use alongside the delete command. Here’s a quick list of the useful ones:
| Parameter (Usage: del parameters /A:attributes filesToDelete) |
Explanation |
/F |
Ignore read-only settings and force-delete the file |
/Q |
Don’t show Yes/No prompt when deleting file |
/A |
Use this before adding file attributes (/A:format) |
/A:R or /A:-R |
Delete files that are Read-only or not Read-only |
/A:H or /A:-H |
Delete files that are Hidden or not Hidden |
You can combine multiple attributes by adding multiple of the parameters after the /A: syntax. There are a few more attributes, but rarely used in default cases. If you would like to learn more about them, check the documentation for the command with del /? syntax.
Remove Directory (rd)
The remove directory command is a very simple alternative to the delete command, but it allows the deletion of folders. The rd command doesn’t allow for the use of wildcards and only has 2 parameters, which makes it a lot easier to remember.
The usage of this command is simple, you can delete any amount of folders and their contents by simply typing rd FolderPath but without parameters, it will only delete an empty folder.
The parameters include: /S which deletes all files and sub-folders alongside the folder itself and /Q which will remove the Yes/No prompt on deletion. For example, rd /S /Q "X:\TechTipVault\GarbageFolder\" will delete the whole GarbageFolder and all of its contents without asking for confirmation for the deletion.
Advanced Command Prompt Commands
This is going to be the most exciting section of the entire command prompt ultimate guide. We will feature all the awesome commands you can use to find tons of useful information about your system and do things like repair corrupt files. These are the commands you will find yourself using over and over again and will want to tell your friends about.
Check All File Associations (assoc)
This command allows you to view or change what a file extension stands for. The basic usage is as simple as assoc .txt to find out what program the .txt extension is associated with.
If you want to add or change an association to a file extension, you can use similar syntax as to what you receive as a result from the base command. For example, if you want to associate the .log extension as a text file, you can type assoc .log=txtfile.
Similarly, if you would like to remove a file association, you can just type assoc .log= and execute the command.
File Comparison (fc)
The file comparison is another interesting command. You can use it to find differences in files using binary or ASCII format. If you want to compare files with an ASCII format comparison, you need to add /a after the command and in case of binary comparison, add /b after the command. Then just enter the filenames or paths to compare.
You can also add /number like /1 which is the number of lines that need to match for the file to be considered synchronized. It is quite difficult to explain clearly, which is why I highly recommend you do some testing on your own to really notice how the differences are laid out (we also added some pictures below to explain this further). Another very useful parameter is /n which will show the line numbers next to the text lines within the command prompt.
The basic formatting of the differences in the command prompt results are as follows:
- Name of the first file
- First row that matches
- Differences
- Second row that matches after the differences
- Name of the second file
- Same as steps 2-4 but for the second file
- Rinse and repeat
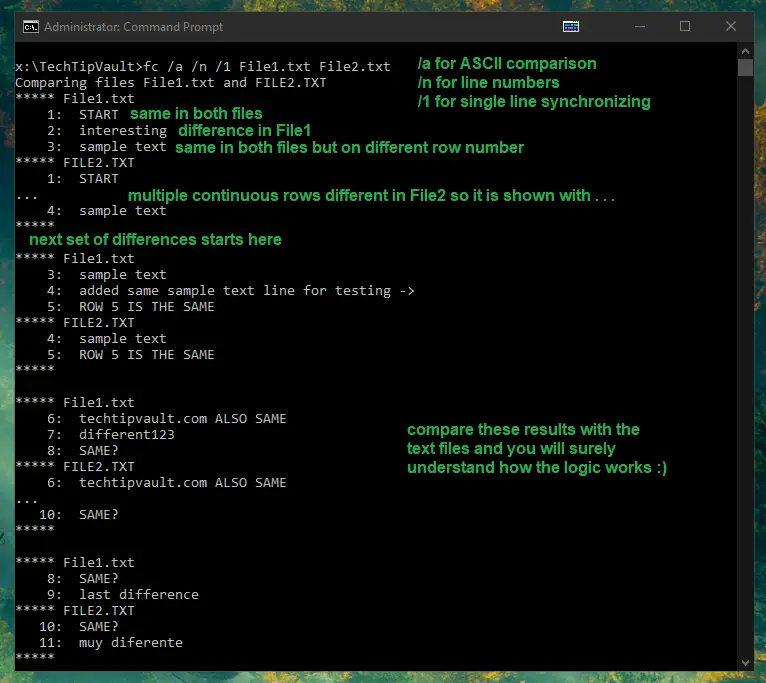
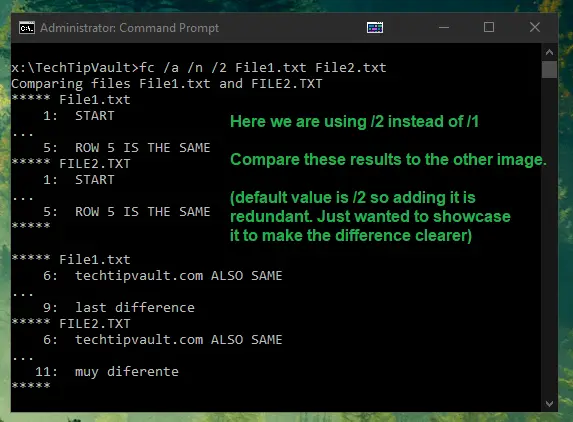
The use-cases for binary comparison (/b) are a lot more limited, as most end-users won’t have need for it. It’s best used when trying to find out if two non-text files are duplicates. This can be useful when looking for duplicate images with different names, for example, as the binary differences will show up.
Check IP-Address & Network Information (ipconfig)
This is without a doubt the most well-known command out of anything we list here. Everyone who has done any gaming or connection related things, has probably used ipconfig to find out their IP-address.
There’s not much to explain about ipconfig as what you see is what you get with the results. However, the command has a few cool parameters you can take advantage of to see more information and perform a few unique functions as well.
Probably the most useful parameter for this command is the /all command which shows the full TCP/IP configuration for all your network adapters. This way you will see all the information you need and there’s really no reason not run the command with this parameter every time.
Another very useful option to use with ipconfig is the /flushdns parameter. You can use it to clear your DNS cache. On the same note, you can also view your DNS cache with /displaydns to see if you should be clearing it up with the previous parameter.
For clarification, a DNS or a domain name server basically converts a domain name or URL (for example techtipvault.com) into an IP-address that the computer can understand and connect to. You system hold a record of these conversions to speed up repeated requests to same addresses and that record is called the DNS cache.
The reason why you might want to flush your DNS cache is because sometimes there’s out-dated conversions if a website has moved to a different server for example. You can flush your DNS cache to update those records on the next connection attempt.
See All Your Active Connections (netstat)
You can use the Network Status or netstat command to view all the connections going out and coming in to your machine. This command is mostly popular among Indian tech support scammers as they attempt to convince their victims there are hackers connected to the PC by typing in this command.
This command also a has a few parameters to increase its functionality. For example, you can use -a to display all connections and listening ports. You can also check out your Routing table by adding in the -r parameter.
Probably the most useful parameter that can be used with netstat is -b which will display the executable names with which each connection is associated with. This means you can easily see which connections are attached to your web browser or any other process.
Finally, you can add a number to the end of the command after all the parameters to indicate how fast you would like to automatically repeat the command (in seconds). If you don’t add a number, the command will only execute once. Typing netstat -b 10 would show the executable above each connection and command would repeat once every 10 seconds. In order to stop the repetition, you need to press Ctrl + C.
Show Optimal Route to Target Address (tracert)
The Trace Route or tracert command will tell you the optimal route from your system to the target IP-address or URL. It will also show that exact route step-by-step and tell you how long it took between each step or hop. It is fantastic for troubleshooting issues within large networks as many different paths can be acquired to arrive to a target machine.
The command has a default limit of 30 hops which means it will attempt to find the fastest route within 30 jumps from one router to the next. You can use the -h parameter to change the max hops, so tracert -h 10 techtipvault.com would use a maximum of 10 hops to reach the target.
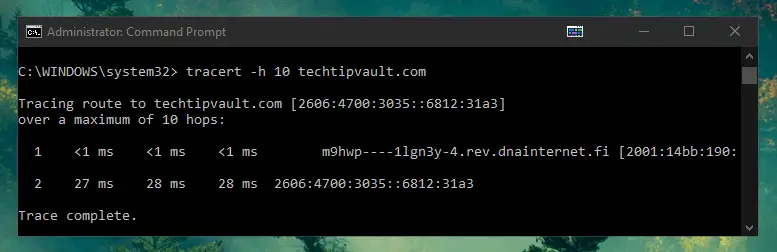
Conveniently, you can also see the IP address if you type in a URL. This can also be accomplished without the hops using the ping command, explained below.
It is also good to note that trace route shows the most optimal route, not always the ACTUAL route it takes.
Send Test Packet & Check Connection to Target Address (ping)
The ping command is used to test or ping the target IP-address to see if there’s any issues in the connectivity. It is very similar to the tracert command, but pinging is quicker as it just tells you if a specified target can be reached and how long it takes to send and receive packets to that target server.
It is as quick and simple to use as typing ping techtipvault.com to see the target IP-address as well as response times.
The ping command has a lot of optional parameters to use, but most of them are not useful for most users so if you’re interested, you should check out the information page by typing ping /? into the command prompt. The most useful one is probably -n number to specific the amount of ping attempts and -w number to specify how long to wait for each reply from the server in milliseconds.
Lookup the IP-Addresses on a Nameserver (nslookup)
The name-server lookup command in its simplest form is a way to find what IP addresses belong to a target address. This can be done simply by typing nslookup techtipvault.com to find the connection details.
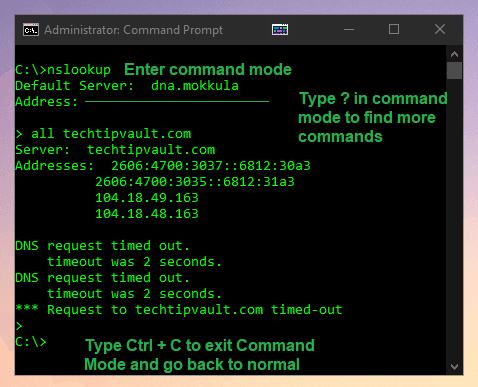
This command has a special Command Mode which can be accessed by typing the command without any parameters. Doing this will activate a mode where you can execute a bunch of unique commands to do name-server testing. You should check the command prompt info page (nslookup /?) for the special commands, as there are too many of them to explain here.
If you wish to exit the Command Mode, you can simply use the Ctrl + C keyboard shortcut.
Check Your System Specifications & Drivers (systeminfo | driverquery)
The System Info command is a great tool to quickly check your operating system information and other info like how much RAM you have installed. It is organized in a neat list so it’s easy to read and even copy if needed.
You can also see your network card information as well as Hyper-V requirements which are needed by some monitors and features like Miracast. It is possible to check remote system info as well by typing systeminfo /S targetSystem /U username /P password, noting you don’t need to use the username and password parameters if nothing is set-up for them.
To see a comprehensive list of all the drivers operating on your system, you can use the driverquery command. It uses the same syntax for remote connecting username and password wise as seen above.
Get a Power Efficiency Report of Your System (powercfg)
This is an interesting utility which allows you to see all kinds of information about your power usage. There are tons of parameters to take advantage of to view and modify your power schemes among other things.
The most useful one is powercfg /energy which will run a 60 second test of your computers power efficiency. The command will save a full report as an html file in your active directory so you can see any potential issues in full detail.
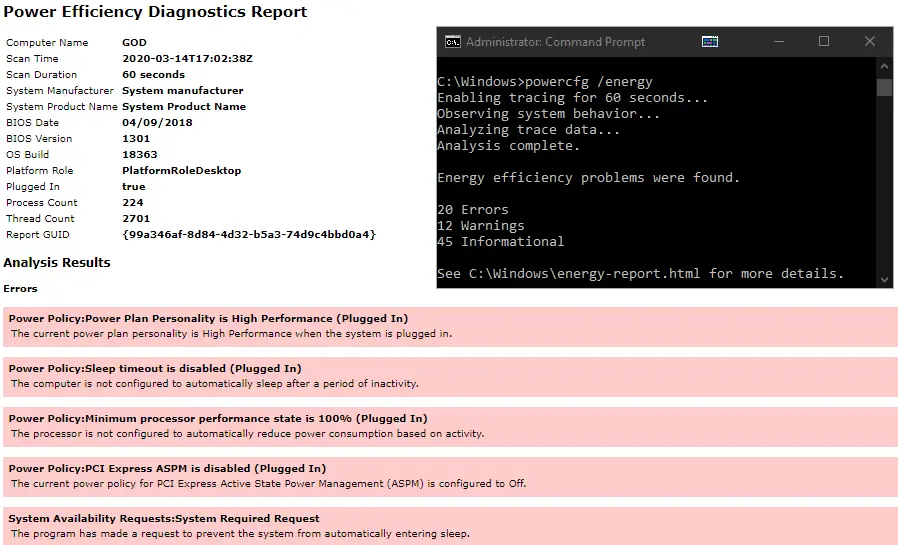
To check the other commands, again, type in powercfg /? to see what parameters are available for use.
Note that you need to run the command prompt as administrator to use this command.
Check the Integrity of Your Files and Fix Them (sfc)
The System File Scan is a great utility to make sure you don’t have any corrupted system files on your machine. The command will basically scan all of your protected system files and check their integrity.
The most useful and popular command is the /scannow parameter, which scans all the files and replaces any faulty ones with the official Microsoft files. Sometimes it might require the official installer files to replace them, so you need to follow any instructions given if this is the case.
The simpler version of this parameter is /verifyonly which does the same scan telling you of any problems, but it won’t do any repairs unlike the prior command.
Similarly, you can use /scanfile to check and repair a specific file or /verifyfile to check the integrity of a file, but no automatic repairs are done. With these parameters, you need to add the full path to the target file after an equals sign like so: sfc /scanfile=C:\Windows\System32\kernel32.dll
Scan Entire Drive or Disk for Issues (chkdsk)
The Check Disk command is a more impressive version of the Scan Disk command. With this command you can scan an entire disk for issues and repair them automatically.
The base use of the Check Disk command is chkdsk C: /F which stands for fix any corrupted files. It is important to note that when you run this scan, it will count any currently opened files as errors as well. This means it’s best to check the disk when booting up the PC with nothing open yet.
You should be aware that checking the disk can last a very long time depending on the number of files and your processing power. It’s also good to note that you can’t do anything or modify files on the disk being scanned, so it’s best to let then scan run and not touch the system while it’s running.
Here are some of the more useful parameters that can be used with the chkdsk command:
| Parameter (Usage: chkdsk /parameter) |
Explanation |
/F |
Fix any errors on the disk |
/R |
Recover any bad sectors and recover readable information |
/X |
Makes the specified disk dismount first, closing all open files and processes running from it |
/C |
Skip checking for corrupt folders, only check files |
/scan |
Run a scan online, checking for fixes on issues from the internet |
/scan /perf |
The perf parameter can only be used alongside scan to perform the scan a lot faster.This can slow down all other processes on the system during the scan. |
/sdcleanup |
Cleans up unnecessary security descriptor data from storage |
Find and Kill Any Running Task (tasklist | taskkill)
You can use the tasklist command to see all currently running tasks on your system, similar to the Task Manager. It might be somewhat redundant due to the simplicity of the Task Manager, but it can show some tasks that are not otherwise visible as well as the memory usage in a cleaner format, within command prompt.
If you wish to force-close a process, you should first take note of the name or process ID (PID) from the task list. Once you have decided on one, you can type either taskkill /im AppName to close an application by name or by typing taskkill /pid processID to kill it by its ID.
In some cases, this can be useful, for example if you want to make a batch script to close certain processes automatically when you start playing a game or boot up your machine. There are also plenty of additional parameters to be used with tasklist to sort it in a fashion you prefer.
Command Prompt Shortcut Keys
Here are the best and most useful keyboard shortcuts for command prompt. These will definitely speed up your performance with the command prompt and you can always return to this table for a quick refresher.
| Shortcut | Explanation |
Up/Down arrow key |
Select the previous/next commands you’ve previously executed. |
Right arrow key |
Repeat the previous command you’ve executed one character at a time. |
Ctrl + Right/Left arrow key |
Move the marker before the first character of the next or previous word. |
Ctrl + Up/Down arrow key |
Scroll up or down on the command prompt without moving the marker. |
Ctrl + A |
Select all written text on the current row and press the combination again to select everything within the cmd. |
Shift + Right/Left/Up/Down arrow key |
Increase the amount of text currently selected by one character left/right, or a full row up/down. |
Ctrl + C / Ctrl + V |
Copy / Paste text to and from the command prompt. Copying requires text to be selected first. |
Ctrl + Backspace |
Delete the word left of the marker. |
Escape (Esc) |
Delete the entire row of text. |
F1 |
Repeat the previous command you’ve executed one character at a time. |
F2 |
Repeat a portion of the previous command up to a specified number (or all of it). |
F3 |
Repeats the entire previous command. |
F4 |
Deletes a command up to a specified number (or all of it). |
F5 |
Repeats the last command without cycling more previous commands. |
F6 |
Pastes “^Z” to the current row. |
F7 |
Gives you a list of previously executed commands. |
F8 |
Repeats previously executed commands in a cycle (keep pressing for more). |
F9 |
Allows you to paste a previously executed command from the list (list obtained from F7). |
Edit the Look & Colors of Command Prompt
Now that you know all the good stuff there is to know about the Windows cmd, it’s time to customize it a little bit. There are a few commands available for customization. You can do things like change the font or background colors, title of the command prompt window and change the font itself.
Changing the title of the command prompt is quite a useless command unless you are creating scripts and want to showcase your name or company in it. The command doesn’t save the title after the prompt is closed. However, you can change it to whatever you want by simply typing title TechTipVault.com Command Prompt or whatever name you wish.
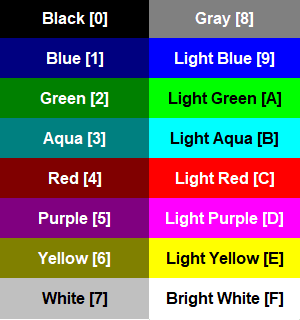
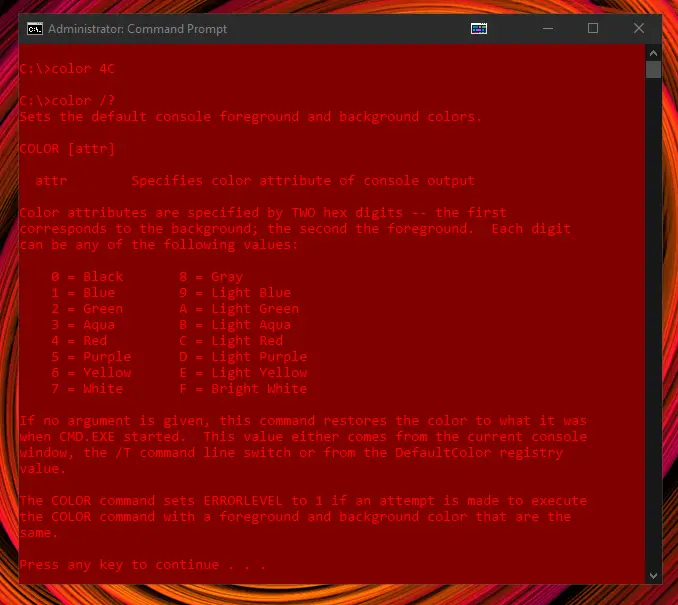
Change Background & Font Color
First and foremost, let’s figure out how to change the font and background colors. Thankfully it’s extremely simple as all you need to do is type color and 1 or 2 color codes.
The first character in the parameter is the background color and the second character is the font color. If you only enter one character, it will change the font color and the background will default to black.
So, if you wanted a red font and a bright white background, you could type color F4. To change the color scheme back to the default options, type in color without any parameters.
 |
 |
Change the Font Style
In order to change the font used in cmd, you need to first access the properties of the window. You can do this by right-clicking on the title bar of the command prompt and selecting Properties.
Once opened, you might notice you can also change the above colors there as well, but the most useful tab is the Font tab. The options there are very self-explanatory. At the top you can choose your font-size and below it you can pick a font family of your choosing.
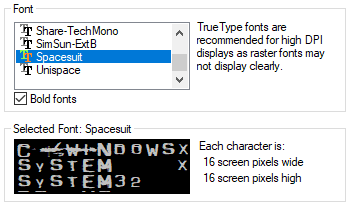
You can also tick the Bold fonts checkbox to bold all fonts and you can see the preview of what your selection will look like at the bottom.
Now that you’ve read through the entire guide, you should have a firm grasp on the functionality of the Command Prompt. There’s tons of parameters and commands not covered in this guide, as it would become way too cluttered and hard to read. We highly recommend you go through all the command manuals within cmd and try as many of them out yourself to understand how they work in-depth.
If you noticed any issues with the contents or think we should add some clarifications, don’t hesitate to contact us. You can find our contact details on our About Us page.
- Описание команды prompt
- Формат командной строки prompt
- Параметры командной строки prompt
- Примеры использования prompt
Описание команды prompt
Команда prompt изменяет командную строку Cmd.exe, включая отображение любого текста, который вы хотите, например, имя текущего каталога, время и дату или номер версии Microsoft Windows. Если эта команда используется без параметров, эта команда сбрасывает командную строку до значения по умолчанию ($P$G), которое представляет собой текущую букву диска и каталог, за которыми следует символ «больше» (>).
Формат командной строки prompt
PROMPT [text]Параметры командной строки prompt
| text | Задает текст и сведения, которые необходимо включить в командную строку. В тексте можно использовать значение переменных окружения. Командная строка может включать обычные символы и следующие специальные коды:
Когда расширенная обработка команд включена, команда PROMPT поддерживает следующие дополнительные символы форматирования:
Если включить $p символ в текстовый параметр, диск считывается после ввода каждой команды (для определения текущего диска и пути). Это может занять некоторое время, особенно для дисководов гибких дисков. |
| /? | Отображение справки в командной строке. |
Примеры использования prompt
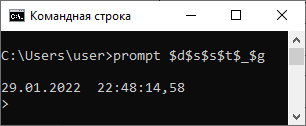
| prompt $d$s$s$t$_$g | Установит двухстрочную командную строку с текущим временем и датой в первой строке и знаком «больше» в следующей строке. |
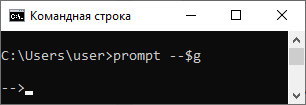
| prompt —$g | Настроит командную строку для вывода в виде стрелки (—>). |
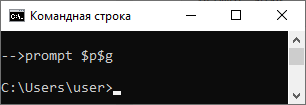
| prompt $p$g | Вручную изменит командную строку на значение по умолчанию (текущий диск и путь, за которым следует знак «больше»), аналогично использованию команды prompt без параметров. |
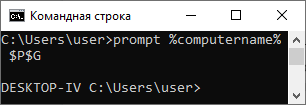
| prompt %computername% $P$G | Перед стандартным приглашением будет отображаться имя компьютера. |
| prompt $V$S$C%computername%$F $P$G | Отображение номера версии Windows с выводом имени компьютера заключено в скобки. |
