После перезагрузки Windows застряла на Подождите… Или Пожалуйста, подождите…
Если вы запустив в очередной раз Windows 10 вдруг обнаруживаете, что система далее окна с просьбой Пожалуйста, подождите… загружаться не собирается, предлагаю такой вариант решения. Личный опыт мне подсказывает, что чаще всего тому виной некоторые из многочисленных сервисов, запускающиеся задолго до появления Рабочего стола. Мы сможем добраться до них только после принудительной перезагрузки: никакие более инструменты нам сейчас недоступны. Впрочем, однажды причиной зависания на экране приветствия стал устаревший аудио драйвер, когда я попытался перейти с Windows 7 на Windows 10 на одном из ноутбуков от HP. И в идеале конечным итогом ваших действий был бы запуск Восстановления системы и откат к работоспособному образу Windows. В общем, я позволил себе составить небольшую по этому поводу инструкцию. Некоторым она покажется неполной, но читайте до конца и поймёте почему.
Причины того, почему Windows застряла на Подождите…
Если в общих чертах, система пытается «что-то на что-то» подменить. Извините за, мягко говоря, расплывчатую формулировку, но детали причины будут доступны только вам. Этим «чем-то» может быть что угодно. 99,99% вероятности ошибки в том, что система ждёт установки полученных обновлений, но прописать их не может. И ничего лучшего, чем заставлять нас смотреть на Пожалуйста, подождите… , разрабы не придумали. Так что принцип избавления от ошибки зиждется именно на факте неудачной попытки обновиться. ИМХО. Во-вторых: системе РЕАЛЬНО нужно время. Машинка не новая? Давно не обновлялись? Понаставили программ? Ну, а что вы хотели… Сидим и ждём.
Как исправить, или что будем делать ниже.
Я для себя выработал небольшой «ход конём», который меня часто выручал. По крайней мере, виновника после этого я всегда видел в лицо. И порядок действий по выявлению причины я предлагаю такой:
- ЖДИТЕ. Выберите время посвободнее, наберитесь терпения и оставьте на минут от 10-ти. «Ошибка» сама пропадёт. Процесс применения обновлений сложен, и система предпочитает это нам не показывать, скрывая происходящее за синим экраном с расплывчатым сообщением. Как бы ни глупо это звучало, но «погоди ещё чуть-чуть» прокатывает очень нередко. Если нет, то…
- Отключаем наиболее вероятные проблемные службы, вызывающие «вечное» окно и/или пробуем откатить незавершённые обновления.
- Заставляем Windows выводить детальную информацию об ошибке.
- Активируем поочерёдно службы обратно, чтобы остаться с ошибкой тет-а-тет (редактором групповой политики или через реестр).
- Ну… далее действуем по усмотрению.
Входим в Безопасный режим с поддержкой командной строки
- Отключаем все внешние носители из USB портов и карты: флешки, внешние диски, модемы и т.п., пробуя загрузиться в Безопасный режим.
- Перезагружаем или выключаем компьютер с кнопки, удерживая её по полного прекращения подачи питания в момент появления значка Windows.

перезагружайте компьютер именно сейчас
- Так повторяем не менее ДВУХ-ТРЁХ раз, пока не появится консоль восстановления Windows с Дополнительными параметрами восстановления:

- Оттуда выходим на особые варианты загрузки Windows в окно Параметры загрузки, выбирая внизу Перезагрузить:

- После этого появится возможность загрузиться в Windows в Безопасном режиме с поддержкой командной строки (F6):

- Загрузившись в Безопасный режим учётной записи, в автоматически открывшемся окне cmd просим Windows УДАЛИТЬ все НЕЗАВЕРШЁННЫЕ обновления:
dism /online /cleanup-image /revertpendingactions

- Консоль закрываем. Переходим в консоль Служб быстрой командой из строки поиска WIN + R. Запускаем её от имени администратора и вводим:
services.msc
ВНИМАНИЕ. Здесь я сделаю небольшое отступление. Виновником могут оказаться службы:
- системные
- сторонние (со стороны позже установленных программ).
Отсюда и подход к их отключению может быть разным. Безопасный режим выключит большинство служб без разбора, так что в БР мы будем ограничены в своих возможностях. Однако именно сам факт возможности попасть в Windows (хотя бы и через БР) говорит о том, что мы движемся в верном направлении. Но я начну именно с системных и, по опыту, наиболее вероятных виновников.
Ищем следующие службы:
- … списка сетей
- … регистрации ошибок Windows
- … сведений о подключённых сетях. Все указанные службы в их свойствах выводим в положение Тип запуска — Отключена.

После того, как вы запретили автозапуск всех трёх служб, перезагружайте компьютер в нормальном режиме. Проверьте: теперь окно Пожалуйста подождите… не должно задержать вас надолго. Если ошибка продолжает удерживать на экране приветствия, повторите процедуру с выходом в Безопасный режим, однако на этот раз отключите службы со стороны с помощью msconfig, отметив чек-бокс у пункта Не отображать службы Microsoft и кнопкой Отключить всё:

Попасть в Безопасный режим не удалось…
Здесь вам придётся воспользоваться флешкой с аналогичным вашей версии образом Windows 10. Учитывая факт, что здесь перечень реально действующих способов ограничен, нам придётся довольствоваться единственной и знакомой вам уже командой DISM на удаление обновлений. Зайдите в консоль восстановления Дополнительных параметрах, загрузившись с флешки и выбрав командную консоль:

и введём ту же команду, но уже на такой манер:
dism /image:X:\ /cleanup-image /revertpendingactions
где Х — буква системного тома. Будьте внимательны: том с незагружаемой Windows может быть уже не диском С. Из-под консоли восстановления буква может быть другой. Убедиться в правильности букв поможет утилита Diskpart. С ремонтной/загрузочной флешки ваши тома и разделы автоматически сдвигаются буквами на порядок ниже. Так, флешка сама получает литеру С, диск с вашей Windows — D и т.д.
Подробные сообщения о состоянии Windows на экране
Помните, что предложенные варианты — всего лишь временное решение с целью вывести Windows в более-менее рабочее состояние. Откуда вам будут уже доступны другие, более мощные или радикальные средства восстановления. Это связано с тем, что помимо указанных служб встанут и зависимые от них. Вероятно, что вам будет отказано в выходе в интернет. Но ИТОГОМ всех этих манипуляций лично для меня является по сути вот эта настройка в редакторе групповой политики gpedit.msc:

Выводить очень подробные сообщения о состоянии системы лежит в
Конфигурации компьютера — Административные шаблоны — Система.
В Безопасном режиме я вывожу настройку в положение Включена …

Групповая политика не работает вообще или частично…
Если вы обладатель Домашней версии, у вас редактора ГП нет. Как нет и времени на установку редактора в эту версию. Так что вам придётся сделать то же самое, но через редактор реестра:
HKEY_LOCAL_MACHINE\SOFTWARE\Microsoft\Windows\CurrentVersion\Policies\System
создайте 32-х битный DWORD параметр, который нужно назвать VerboseStatus и вывести в положение 1. Теперь вернувшись в редактор групповой политики, возвращаем службы из предыдущего абзаца в положения:

А если вы запрещали запуск сторонних служб, вернитесь в msconfig и снимите галку с чек-бокса служб Microsoft, вернув службы к запуску. После перезагрузки система будет отчитываться за каждый шаг, но не задерживаясь на успешно пройденных:


Однако у любого, даже вкрутую «прошаренного» пользователя зачастую в итоге вариантов останется немного. К сожалению. Перед тем, как вы конкретно определите причину ошибки, лучше сразу подготовиться к:
- восстановлению системы (из ранее сохранённого образа или через точку восстановления, если в нормальный режим всё-таки удалось попасть).
- переустановке с сохранением личных файлов средствами Windows 10 (без диска или образа) с помощью штатной функции из той же Windows RE.
Успехов.
Lots of users receive the “Windows stuck on please wait” error when booting their PC. If you are also trying to fix the error, this post from MiniTool Partition Wizard is what you need.
When booting your Windows 10/11 PC, you may find your machine gets stuck on the please wait screen for several minutes. Sometimes you will get an error message asking you to restart. After restarting, the computer was stuck on the same screen again.

This is not normal and indicates a problem. It may be caused by an unsuccessful update, hardware failure, corrupt hard drive, malware infection, etc.
So, how to solve this problem? Here are some troubleshooting tips worth trying.
Other similar situations where Windows might get stuck include:
- Windows 10 stuck on Just A Moment
- Getting Windows ready stuck
- Windows stuck on the welcome screen
- Windows stuck on preparing to configure
Before You Do
# 1. Remove Peripheral Devices
Your PC may get Windows 10 stuck on please wait due to a peripheral device. Trying to remove them might be a good solution. Just remove any external devices other than the mouse or keyboard. Then, restart your computer and check to see if you’re still stuck on please wait Windows 10 screen. If yes, proceed to the solutions below.
# 2. Boot into Safe Mode
Because the computer cannot boot successfully, in this case, you should boot the computer into Safe Mode and then perform these actions. For how to start a PC with a blue screen in Safe Mode, the steps are:
- Press Win + X and then click Shut down or sign out. Then press Shift and click Restart to enter Windows Recovery Environment (WinRE).
- When you are in WinRE, navigate to Troubleshoot > Advanced options > Startup Settings > Restart.
- After the computer restarts, there is a list of options. Press the F5 key to choose the Enable Safe Mode with Networking option.
If you can’t get into Safe Mode, you can prepare an ISO of Windows 11/10, burn it to a USB flash drive, change the boot order, and start your PC from the drive. Then, click Repair your computer to enter WinRE, and enter Safe Mode.
How to Fix Windows Stuck on Please Wait
Now, try the following solutions one by one to get rid of the “Windows 10 stuck on please wait” issue.
Way 1. Run Windows Update Troubleshooter
If you meet the “Windows update stuck on please wait” problem, you can try to run Windows Update troubleshooter. The steps are as follows:
Step 1: Press the Win + I key to open the Settings app. Then click on Update & Security.
Step 2: Under the Troubleshoot tab, locate Windows Update and click on the Run the troubleshooter button.
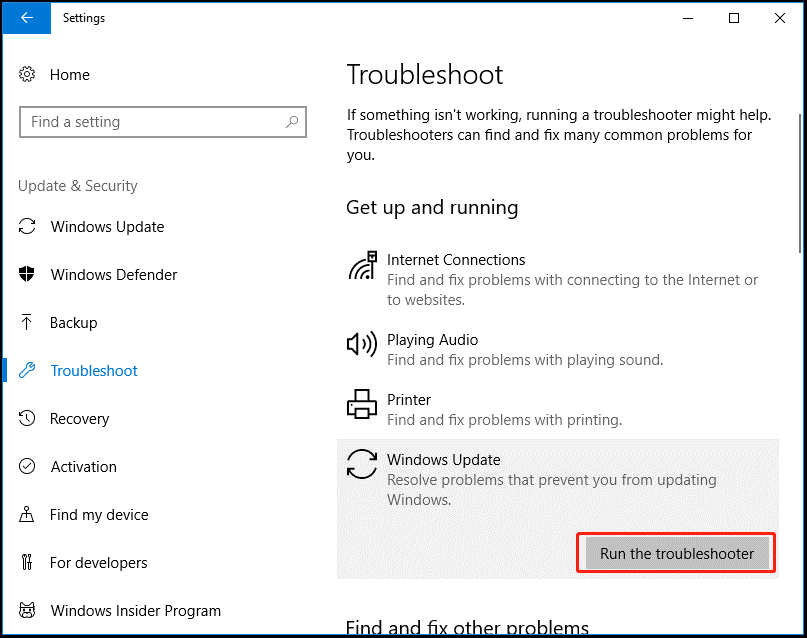
Step 3: Then this troubleshooter will start detecting problems and if some are found, follow the on-screen instructions to fix them.
Way 2. Install Windows Updates
If Windows updates are not completed normally, the “Windows stuck on please wait after update” issue may occur. To resolve this issue, you should finish installing the update. In Safe Mode, go to Settings > Update & Security, and check for updates under the Windows Update section. Once you find some available updates, download and install them.
Way 3. Disable Windows Services
The third way to fix the “Windows 10 upgrade stuck on please wait” error is to turn off some Windows services like Windows Error Reporting service, Network List Service, and Network Location Awareness. Here’s how to do that.
Step 1: Press the Win + R key to open the Run dialog box. Then type services.msc into the box and press Enter.
Step 2: In the Services window, locate the services mentioned above one by one and double-click on one to open the Properties window. If the service is running, stop it and then change Startup type to Disabled.
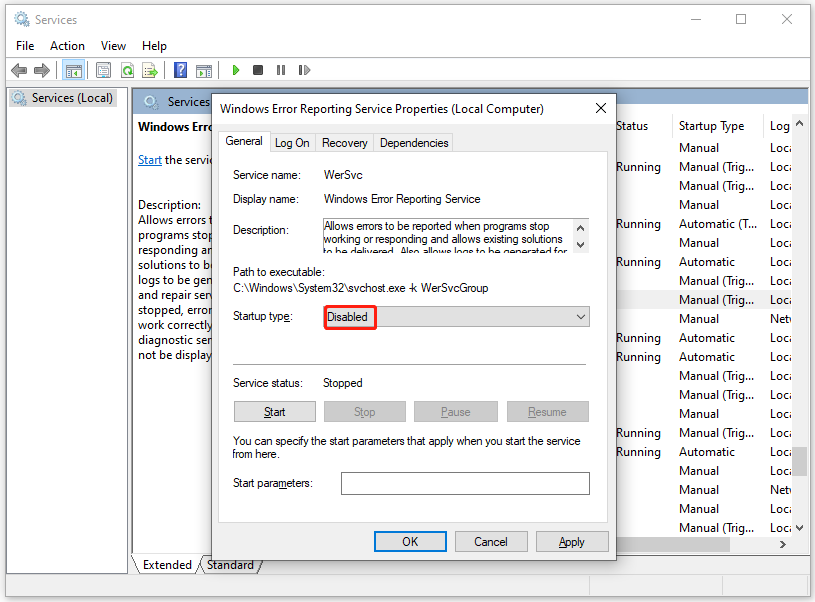
Step 3: Click on Apply > OK to save the changes.
After that, you should restart your PC to see if the issue of “stuck on please wait Windows 10” is resolved. If not, go on to the next solution.
Way 4. Run DISM and SFC Tools
Corrupted or damaged Windows system files could get Windows 10 stuck on please wait. To get rid of this error, you can perform some scans by running DISM and SFC tools. The two tools should be used in Command Prompt. Here shows how to use DISM and SFC in Command Prompt.
Step 1: Type cmd in the Windows search bar. Then right-click on Command Prompt and select Run as administrator.
Step 2: In the Command Prompt window, type sfc /scannow and press Enter.
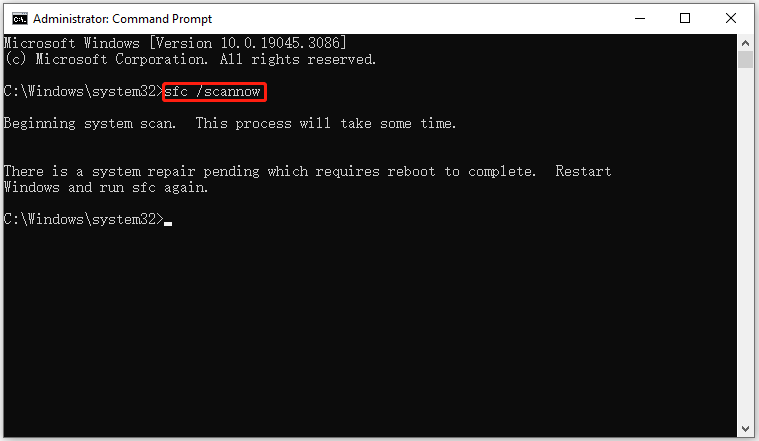
Step 3: When the SFC tool completes its task, type DISM.exe /Online /Cleanup-image /Restorehealth and press Enter.
Step 4: Wait patiently until the process is 100% complete.
Tips:
If you encounter the SFC not working issue, you can refer to this post: Quick Fix: SFC Scannow Not Working in Windows 10
Way 5: Check the Hard Drive for Issues
As mentioned above, the main reason for the “Windows 10 stuck on please wait” issue is that the hard drive has gotten corrupted or broken. So, it’s necessary to check if the hard drive gets faulty. There are 2 methods to check the hard disk for issues. For that:
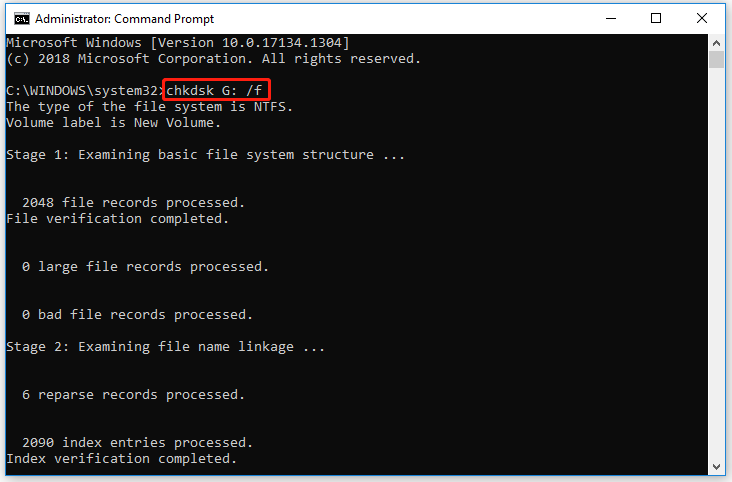
Method 1: Use CHKDSK
CHKDSK is a disk error checking and repair utility built into Windows. It scans hard drive partitions for internal errors and repairs them at the same time. To use CHKDSK to repair a corrupted hard drive partition, follow these steps:
Step 1: Open Command Prompt as administrator again.
Step 2: In the Command Prompt window, type the chkdsk G: /f command and press Enter. “G” represents the hard drive partition letter.
Method 2: Use MiniTool Partition Wizard
Although CHKDSK can be used to check the hard drive for errors, this tool often runs into various issues like CHKDSK being write-protected, CHKDSK getting stuck, etc. So, it’s highly recommended you use a powerful disk manager – MiniTool Partition Wizard. It can help you check bad sectors but also repair file system errors easily and quickly.
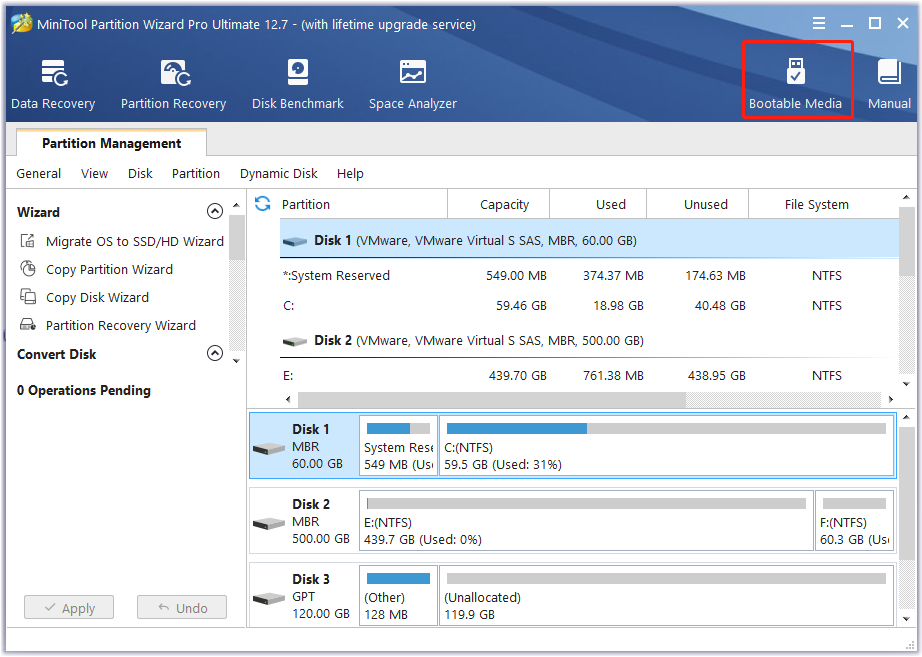
Facing the situation that Windows cannot boot normally, you should take advantage of the third-party software called MiniTool Partition Wizard. Since Windows cannot boot normally, you should create a bootable media in advance, and then check hard drive for errors.
MiniTool Partition Wizard DemoClick to Download100%Clean & Safe
Step 1: Plug the prepared USB into the working computer or insert the prepared CD/DVD into its CD/DVD burner.
Step 2: Download the software and then launch it to access its main interface. Click Bootable Media in the upper right corner and follow the on-screen instructions to create a bootable USB, CD, or DVD.
Step 3: Plug the bootable USB into the original computer which the operating system cannot boot or put the bootable CD or DVD into it.
Step 4: Restart the computer and press F2 or another key to enter BIOS menu. Change boot order to make your computer boot from the USB or CD/DVD flash drive.
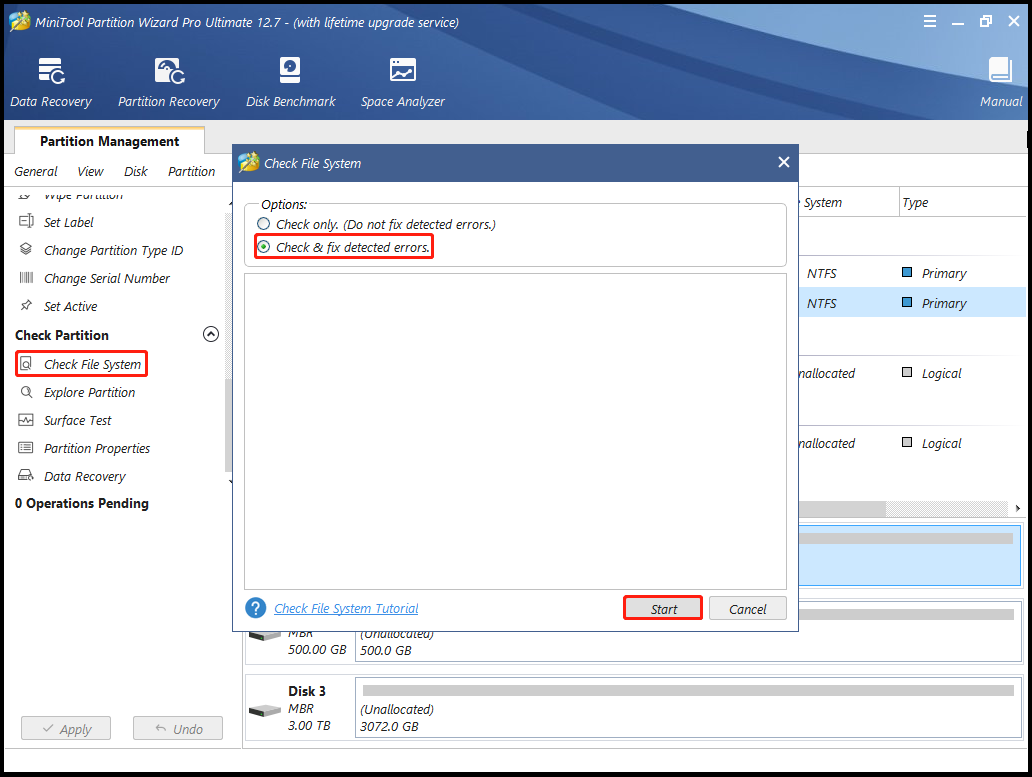
Step 5: In the main interface of MiniTool Partition Wizard, click on Check File System from the left action panel.
Step 6: Select Check & fix detected errors and click on the Start button. This tool will check and repair file system errors immediately.
Step 7:In the main interface, select the drive again and click on Surface Test from the left pane.
Step 8:Click on the Start Now button in the pop-up window. After that, this tool will scan the whole drive immediately and show you the test result.
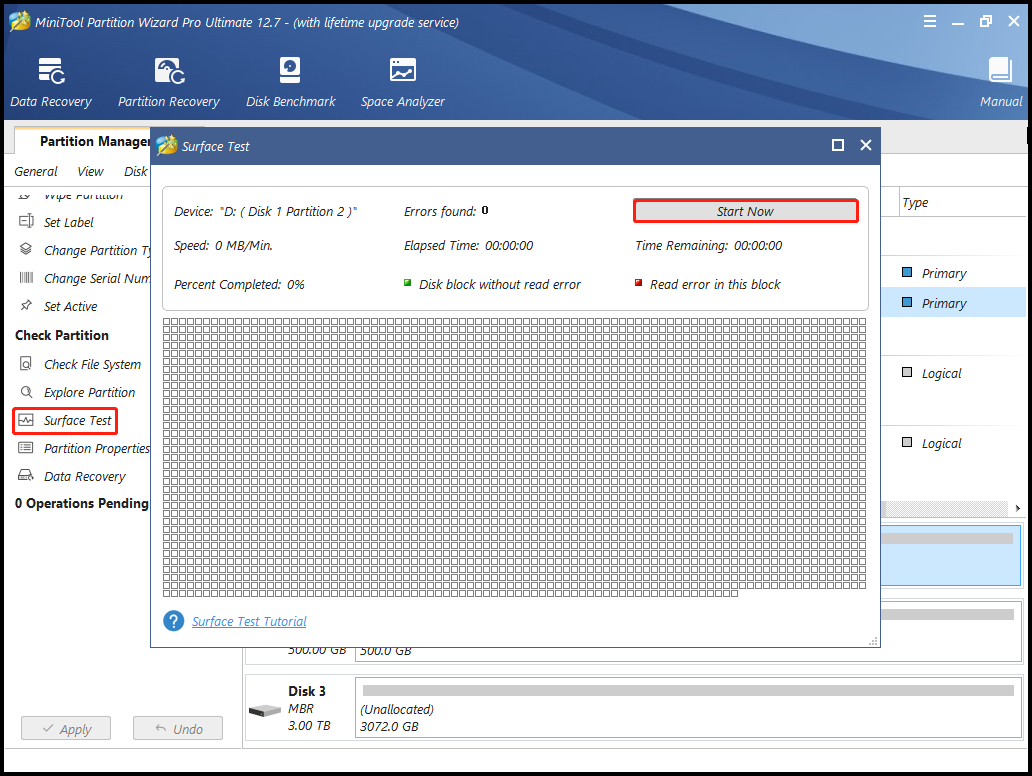
Step 9: When the hard drive error test process is completed, the bad sectors on the hard drive will be marked with red color. In this case, you can either use this bad sector repair guide or consider replacing it with a new one.
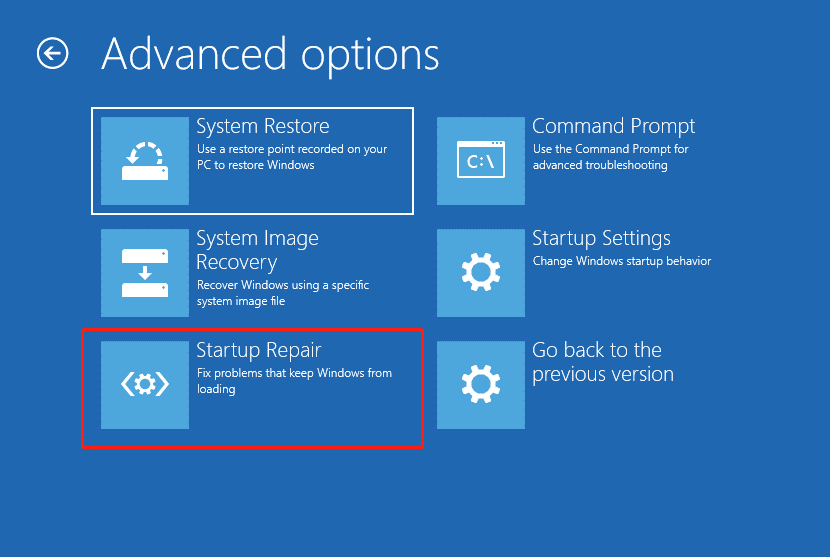
Way 6: Run Startup Repair
You can also try to run Start Repair to fix the “Windows update stuck on please wait” error and see if that works for you. Just run your PC to WinRE to the Advanced options page and select Startup Repair. Then follow the on-screen instructions to complete the repair.
Way 7: Run System Restore
If you created a Windows restore point before the “Windows stuck on please wait” error occurred, you can perform a system restore to take care of the issue.
Step 1: Boot your PC to WinRE. Then go to Troubleshoot > Advanced Options > System Restore.
Step 2: Select your user account and enter a password.
Step 3: Select the system restore point created earlier, then follow the prompts and wait for the process to complete.
Way 8: Reset Your PC
If the above methods can’t solve the “Windows stuck on please wait” error, you can try to reset your PC to solve it. Some users report that they have solved this error through this method. But pay attention that you need to recover the lost data or back up them before you do.
Facing the situation that Windows cannot boot normally, you should take advantage of the third-party software called MiniTool Partition Wizard, which can help you back up data before resetting Windows.
MiniTool Partition Wizard DemoClick to Download100%Clean & Safe
Here is a tutorial on how to back up data with the help of MiniTool Partition Wizard.
Step 1: Boot PC from created bootable CD/DVD disc or USB flash drive as the steps mentioned above.
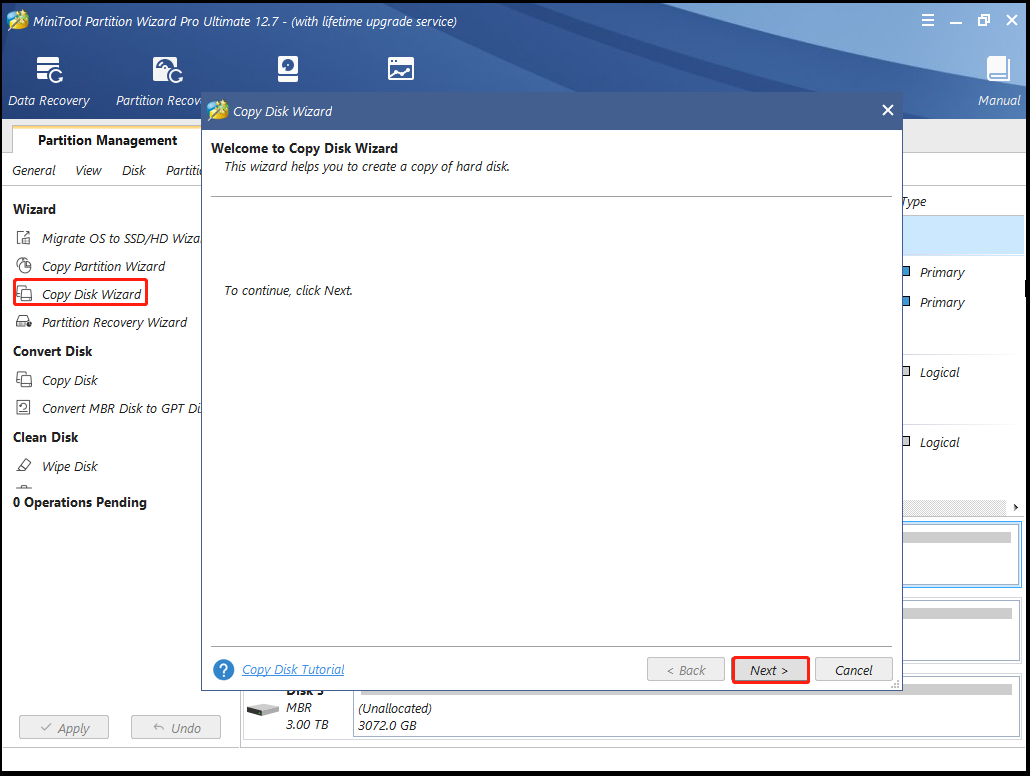
Step 2: In the main interface of MiniTool Partition Wizard, click on Copy Disk Wizard in the action panel. Then click on Next.
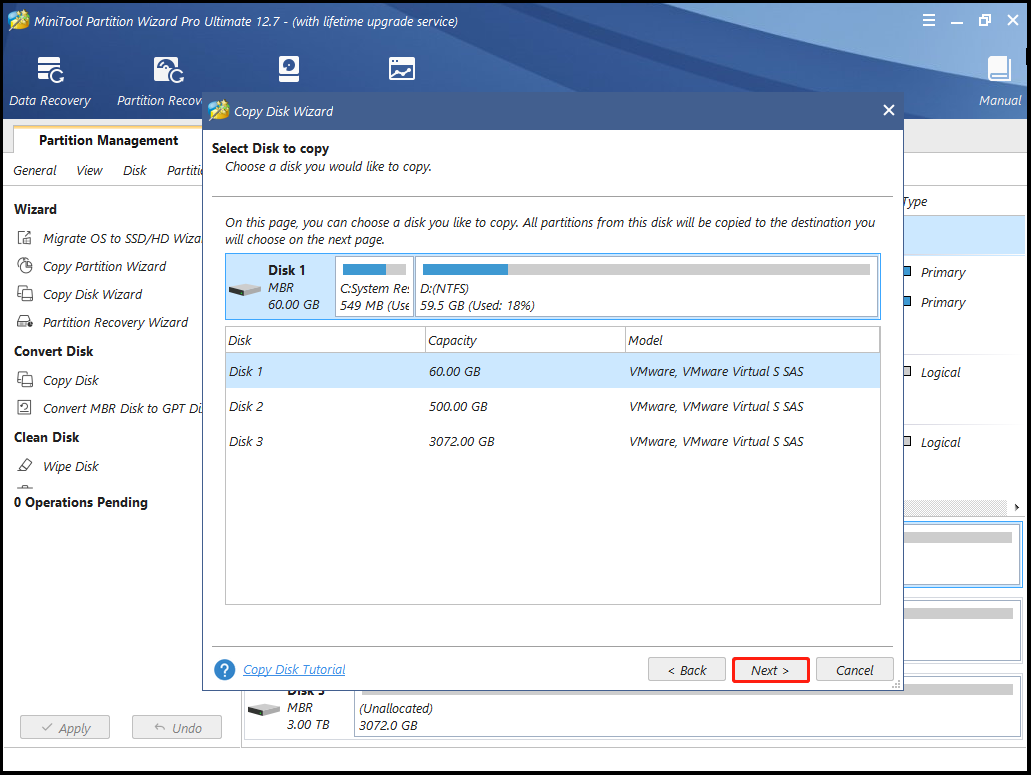
Step 3: In the pop-up window, select the disk to copy and click on Next. Here, we choose Disk 1.
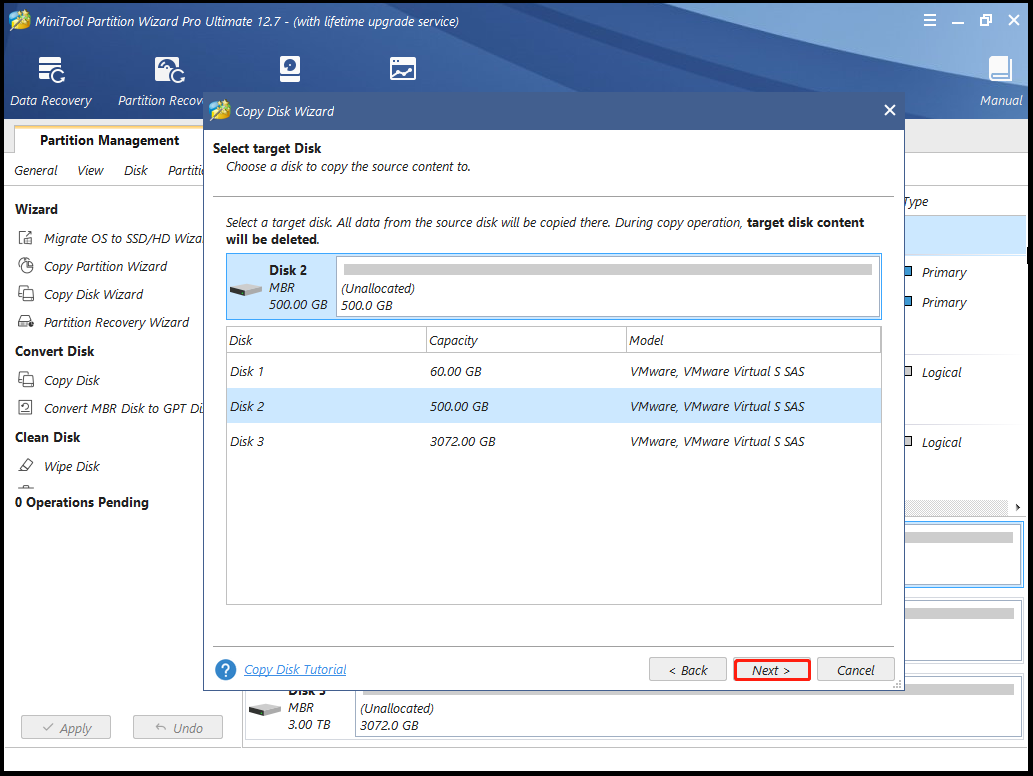
Step 4: Select the destination disk in the next window and click on the Next button.
Tips:
You will be warned that the data on the destination disk would be destroyed during the copy process. If there’s no important data on it, click Yes to confirm the operation. On the contrary, back up the data and then continue the process.
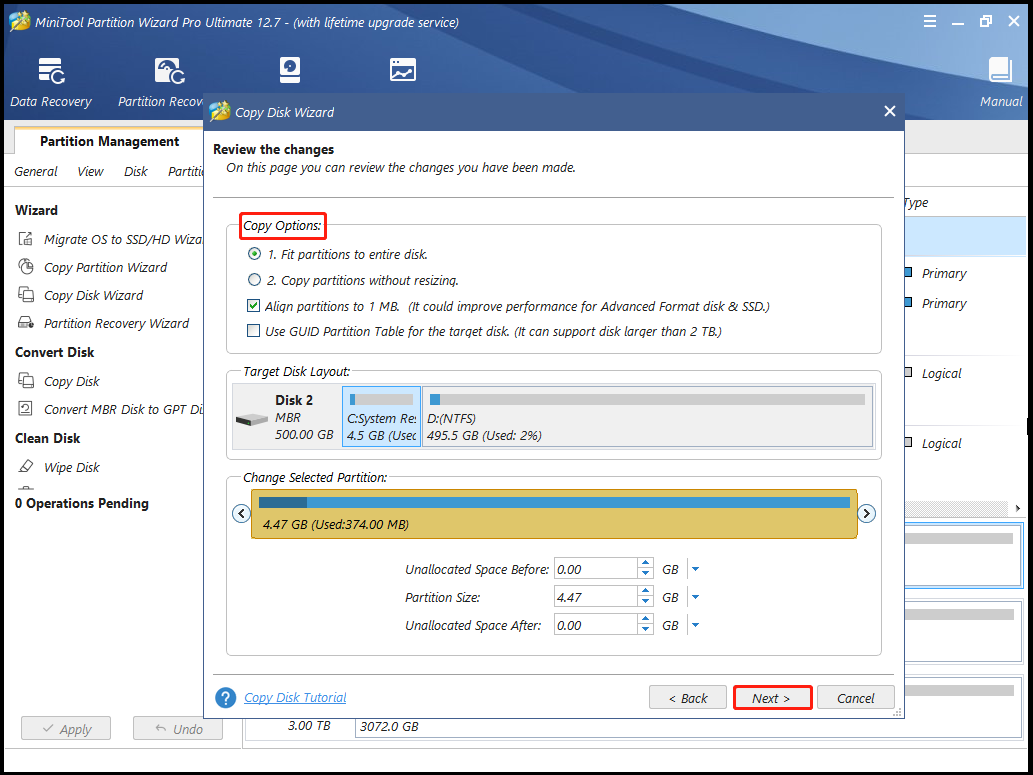
Step 5: Pick Copy Options based on your needs or situation. For instance, you can either choose fit partitions to the entire disk or copy partitions without resizing freely. It is recommended to select align partitions to 1MB if the destination disk is an MBR one. After configuring the settings, click Next to move on.
Step 6: Click Finish > Apply > Yes to carry out the pending operation.
After backing up data, you can reset your PC. Just boot your PC to WinRE to Troubleshoot > Reset this PC > choose Keep my files or Remove everything. Finally, click on Cloud download or Local reinstall. Then follow the on-screen instructions to finish the resetting operation.
Cloud Download vs Local Reinstall: Differences on Win 10/11 Reset
Are you bothered by the “Windows stuck on please wait” error when booting your PC? This post provides several feasible solutions to this issue. Just have a try!Click to Tweet
Bottom Line
All 8 solutions to Windows stuck on please wait have been displayed in the above content. Hope this article can help you solve the “Windows 10 upgrade stuck on please wait” error. If you run into some problems during the fixing process, you can leave them in the following comment zone.
Certainly, if you have any questions about or suggestions for MiniTool Partition Wizard, please do not hesitate to contact us via [email protected].
Symptoms
You try to start a computer that is running Windows 7 or Windows Server 2008 R2. However, the operating system stops responding at the «Please wait» screen that appears before you are requested to press Ctrl+ALT+DEL. Therefore, you cannot log on to the computer.
Cause
This issue occurs because an auto-start service remains in the pending mode for too long and cannot start during the Windows startup process. This is caused by a deadlock that occurs because of an interaction between Windows Error Reporting (WER) and AppLocker.
Resolution
Hotfix information
A supported hotfix is available from Microsoft. However, this hotfix is intended to correct only the problem that is described in this article. Apply this hotfix only to systems that are experiencing the problem described in this article. This hotfix might receive additional testing. Therefore, if you are not severely affected by this problem, we recommend that you wait for the next software update that contains this hotfix.
If the hotfix is available for download, there is a «Hotfix download available» section at the top of this Knowledge Base article. If this section does not appear, contact Microsoft Customer Service and Support to obtain the hotfix.
Note If additional issues occur or if any troubleshooting is required, you might have to create a separate service request. The usual support costs will apply to additional support questions and issues that do not qualify for this specific hotfix. For a complete list of Microsoft Customer Service and Support telephone numbers or to create a separate service request, visit the following Microsoft Web site:
http://support.microsoft.com/contactus/?ws=supportNote The «Hotfix download available» form displays the languages for which the hotfix is available. If you do not see your language, it is because a hotfix is not available for that language.
Prerequisites
To apply this hotfix, your computer must be running Windows 7 or Windows Server 2008 R2.
Registry information
To use the hotfix in this package, you do not have to make any changes to the registry.
Restart requirement
You must restart the computer after you apply this hotfix.
Hotfix replacement information
This hotfix does not replace a previously released hotfix.
File information
The English (United States) version of this hotfix installs files that have the attributes that are listed in the following tables. The dates and the times for these files are listed in Coordinated Universal Time (UTC). The dates and the times for these files on your local computer are displayed in your local time together with your current daylight saving time (DST) bias. Additionally, the dates and the times may change when you perform certain operations on the files.
Windows 7 and Windows Server 2008 R2 file information notes
Important Windows 7 hotfixes and Windows Server 2008 R2 hotfixes are included in the same packages. However, hotfixes on the Hotfix Request page are listed under both operating systems. To request the hotfix package that applies to one or both operating systems, select the hotfix that is listed under «Windows 7/Windows Server 2008 R2» on the page. Always refer to the «Applies To» section in articles to determine the actual operating system that each hotfix applies to.
-
The MANIFEST files (.manifest) and the MUM files (.mum) that are installed for each environment are listed separately in the «Additional file information for Windows Server 2008 R2 and for Windows 7» section. MUM and MANIFEST files, and the associated security catalog (.cat) files, are extremely important to maintaining the state of the updated component. The security catalog files, for which the attributes are not listed, are signed with a Microsoft digital signature.
For all supported x86-based versions of Windows 7
|
File name |
File version |
File size |
Date |
Time |
Platform |
|---|---|---|---|---|---|
|
Appid-ppdlic.xrm-ms |
3,013 |
09-May-2010 |
09:39 |
Not Applicable |
|
|
Appid.sys |
6.1.7600.20710 |
50,176 |
08-May-2010 |
22:07 |
x86 |
|
Appidapi.dll |
6.1.7600.16385 |
50,688 |
14-Jul-2009 |
01:14 |
x86 |
|
Appidcertstorecheck.exe |
6.1.7600.16385 |
16,896 |
14-Jul-2009 |
01:14 |
x86 |
|
Appidpolicyconverter.exe |
6.1.7600.20710 |
96,768 |
09-May-2010 |
09:17 |
x86 |
|
Appidsvc.dll |
6.1.7600.16385 |
27,648 |
14-Jul-2009 |
01:14 |
x86 |
For all supported x64-based versions of Windows 7 and of Windows Server 2008 R2
|
File name |
File version |
File size |
Date |
Time |
Platform |
|---|---|---|---|---|---|
|
Appid-ppdlic.xrm-ms |
3,013 |
09-May-2010 |
09:17 |
Not Applicable |
|
|
Appid.sys |
6.1.7600.20710 |
61,440 |
08-May-2010 |
22:25 |
x64 |
|
Appidapi.dll |
6.1.7600.16385 |
58,368 |
14-Jul-2009 |
01:40 |
x64 |
|
Appidcertstorecheck.exe |
6.1.7600.16385 |
17,920 |
14-Jul-2009 |
01:38 |
x64 |
|
Appidpolicyconverter.exe |
6.1.7600.16385 |
146,944 |
14-Jul-2009 |
01:38 |
x64 |
|
Appidsvc.dll |
6.1.7600.16385 |
32,256 |
14-Jul-2009 |
01:40 |
x64 |
|
Appidapi.dll |
6.1.7600.20710 |
50,688 |
09-May-2010 |
09:18 |
x86 |
For all supported IA-64-based versions of Windows Server 2008 R2
|
File name |
File version |
File size |
Date |
Time |
Platform |
|---|---|---|---|---|---|
|
Appid-ppdlic.xrm-ms |
3,013 |
09-May-2010 |
02:00 |
Not Applicable |
|
|
Appid.sys |
6.1.7600.20710 |
130,560 |
08-May-2010 |
03:14 |
IA-64 |
|
Appidapi.dll |
6.1.7600.16385 |
116,736 |
14-Jul-2009 |
01:45 |
IA-64 |
|
Appidcertstorecheck.exe |
6.1.7600.20710 |
39,424 |
08-May-2010 |
06:22 |
IA-64 |
|
Appidpolicyconverter.exe |
6.1.7600.16385 |
280,064 |
14-Jul-2009 |
01:44 |
IA-64 |
|
Appidsvc.dll |
6.1.7600.20710 |
69,120 |
08-May-2010 |
06:23 |
IA-64 |
|
Appidapi.dll |
6.1.7600.20710 |
50,688 |
09-May-2010 |
09:18 |
x86 |
Status
Microsoft has confirmed that this is a problem in the Microsoft products that are listed in the «Applies to» section.
More Information
For more information about software update terminology, click the following article number to view the article in the Microsoft Knowledge Base:
824684 Description of the standard terminology that is used to describe Microsoft software updates
Additional file information
Additional file information for Windows 7 and for Windows Server 2008 R2
Additional files for all supported x86-based versions of Windows 7
|
File name |
X86_ce47b595e7186c76742f11820a5191d4_31bf3856ad364e35_6.1.7600.20710_none_b789a0cab039820a.manifest |
|
File version |
|
|
File size |
693 |
|
Date (UTC) |
09-May-2010 |
|
Time (UTC) |
15:49 |
|
Platform |
Not Applicable |
|
File name |
X86_microsoft-windows-appid_31bf3856ad364e35_6.1.7600.20710_none_57f2b6ee2c64366c.manifest |
|
File version |
|
|
File size |
15,227 |
|
Date (UTC) |
09-May-2010 |
|
Time (UTC) |
16:56 |
|
Platform |
Not Applicable |
Additional files for all supported x64-based versions of Windows 7 and of Windows Server 2008 R2
|
File name |
Amd64_bce66ed917b45b3fe53f843291b6b9e5_31bf3856ad364e35_6.1.7600.20710_none_c416fd738dccc88c.manifest |
|
File version |
|
|
File size |
1,036 |
|
Date (UTC) |
09-May-2010 |
|
Time (UTC) |
15:49 |
|
Platform |
Not Applicable |
|
File name |
Amd64_microsoft-windows-appid_31bf3856ad364e35_6.1.7600.20710_none_b4115271e4c1a7a2.manifest |
|
File version |
|
|
File size |
15,231 |
|
Date (UTC) |
09-May-2010 |
|
Time (UTC) |
19:05 |
|
Platform |
Not Applicable |
|
File name |
Wow64_microsoft-windows-appid_31bf3856ad364e35_6.1.7600.20710_none_be65fcc41922699d.manifest |
|
File version |
|
|
File size |
3,356 |
|
Date (UTC) |
09-May-2010 |
|
Time (UTC) |
09:57 |
|
Platform |
Not Applicable |
Additional files for all supported IA-64-based versions of Windows Server 2008 R2
|
File name |
Ia64_9e4707644343cb7878e446c8c60dd531_31bf3856ad364e35_6.1.7600.20710_none_f6ca3db0e0e205f4.manifest |
|
File version |
|
|
File size |
1,034 |
|
Date (UTC) |
09-May-2010 |
|
Time (UTC) |
15:49 |
|
Platform |
Not Applicable |
|
File name |
Ia64_microsoft-windows-appid_31bf3856ad364e35_6.1.7600.20710_none_57f45ae42c623f68.manifest |
|
File version |
|
|
File size |
15,229 |
|
Date (UTC) |
09-May-2010 |
|
Time (UTC) |
15:50 |
|
Platform |
Not Applicable |
|
File name |
Wow64_microsoft-windows-appid_31bf3856ad364e35_6.1.7600.20710_none_be65fcc41922699d.manifest |
|
File version |
|
|
File size |
3,356 |
|
Date (UTC) |
09-May-2010 |
|
Time (UTC) |
09:57 |
|
Platform |
Not Applicable |
Нужна дополнительная помощь?
Нужны дополнительные параметры?
Explore subscription benefits, browse training courses, learn how to secure your device, and more.
Communities help you ask and answer questions, give feedback, and hear from experts with rich knowledge.
Если вы запускаете компьютер с Windows, и он зависает на «пожалуйста, подождите», то вот как вы можете решить эту проблему. После запуска компьютера многие системные службы запускаются еще до входа в систему. Службы, связанные с сетью, пользовательским интерфейсом и т. д., должны быть готовы к тому моменту, когда вы доберетесь до рабочего стола.
Если вы обнаружите, что экран вашего компьютера завис на экране «Подождите», вот несколько шагов, которые вам помогут. На этом экране вы не сможете использовать ALT+CTRL+DEL, поэтому единственный вариант — удалить периферийные устройства, перезагрузить компьютер и следовать этим рекомендациям.
- Принудительное автоматическое восстановление при запуске
- Отключите некоторые службы Windows
- Откатить изменения или выполнить восстановление системы.
1] Принудительное автоматическое восстановление при запуске
Было бы разумно использовать загрузочный USB-накопитель Windows для загрузки в безопасном режиме, но, если у вас нет доступа к другому компьютеру, давайте сделаем это принудительно.
Сначала отключите внешние накопители, периферийные устройства и т. д., подождите минуту и включите систему.
Теперь принудительно выключите, а затем включите ваш компьютер.в три разаs подряд. Вы можете сделать это, сначала включив компьютер, а затем сразу же снова нажав кнопку питания, но на этот раз удерживая ее нажатой. Компьютер выключится. Если вы используете настольный компьютер, вы также можете отключить его от источника питания. Повторите это три раза.
При следующем запуске компьютера начнется процесс автоматического восстановления при загрузке, который в конечном итоге запустит режим расширенного восстановления.
Перейдите в раздел «Устранение неполадок» и выберите «Безопасный режим».
2] Отключить службы
Как только компьютер загрузится в безопасном режиме, вам необходимо отключить три службы:
- Служба отчетов об ошибках Windows,
- Служба списка сетей
- Осведомленность о сетевом местоположении.
Для этого откройте окно «Выполнить» и введите Services.msc, а затем нажмите клавишу Enter.
Откроется диспетчер служб Windows.
Найдите упомянутые нами службы и выполните действия для каждой из них.
Дважды щелкните, чтобы открыть свойства службы.
Остановите его, если служба запущена
Измените тип запуска на «Отключено».
Нажмите Применить.
Перезагрузите компьютер.
3] Откатить изменения или выполнить восстановление системы.
Когда вы вернетесь к обычному режиму загрузки, экран «Подождите» не должен удерживаться долго, и вы должны увидеть экран входа в систему или рабочий стол, если пароль не установлен.
Хотя я хотел предложить это раньше, теперь, когда вы здесь, вам нужно найти причину. Если до возникновения проблемы вы внесли в компьютер изменения, возможно, вам придется отменить их. Если разобраться, то устранить причину будет легко. Если нет, лучший вариант — восстановить предыдущее рабочее состояние вашего компьютера.
КОНЧИК: Здесь есть еще несколько советов, которые помогут вам, если ваша Windows зависает при загрузке какого-либо экрана.
Почему мой ноутбук продолжает говорить: «Пожалуйста, подождите»?
Если ваш ноутбук продолжает говорить «Пожалуйста, подождите», то зависание экрана может произойти из-за повреждения файлов Windows. Файлы Windows могут быть повреждены вирусами или нежелательными программами.
Я надеюсь, что этот пост был простым для понимания и вы смогли пройти мимо того, что Windows 11/10 застряла на экране «Подождите».
- Remove From My Forums

Подождите, пожалуйста…
-
Вопрос
-
Есть домен 2008. В нём живёт с сотню всяких Windows: 2000, XP, Win7. Недавно с некоторыми Windows 7 ( версия Professional, OEM, RUS) начались проблемы: приходит утром пользователь, включает машину. Начинает грузиться ОС, доходит до голубого фона с надписью
«Подождите, пожалуйста…» и на этом всё. Приглашение нажать три кнопки не появляется, винт переодически подёргивается, клавиатура на кнопки CAPS LOCL/NUM LOCK реагирует (лампочки зажигает), значит, система не висит. Но больше с ней сделать ничего нельзя —
ни залогиниться, ни перезагрузить. Только выключить питание можно. После выключения питания ОС загружается нормально: после непродолжительного «Подождите, пожалуйста…» выпадает приглашение нажать Ctrl+Alt+Del ну и далее всё хорошо.В чём может быть причина? В логах всё чисто, ошибок не вижу…
PS. Через GPO на машинах устанавливается мысль «дожидаться появления сети перед логином», но с сетью всё хорошо: проблемные машины IP-адрес получают в то время, когда на экране висит «Подождите, пожалуйста…».
PPS: Вот, ещё нашёл в журнале приложений проблемной машины вот такую мысль:
Код события 6005: Подписчик уведомлений winlogon <GPClient> тратит слишком много времени на обработку события уведомления (CreateSession). Может тут проблема?
Сергей Панченко
-
Изменено
22 августа 2012 г. 5:59
-
Изменено
Ответы
-
Предлагаю вам
еще раз на пару тестовых утр )) не переопределять параметр ждать сеть ( Вы для чего его определили, поделитесь? Чтобы все круто было?)Лог обработки и применения а также много всего можно поглядеть в Журналы приложений и служб—>Microsoft—>Windows—>Group Ploicy—>Operational
Отфильтруйте коды событий- информации вагон получите.
Что касается ХП машин, по умолчанию, Windows XP не ждет полного завершения инициализации сети при загрузке и входе в систему — т.н. фоновое применение результатов обработки ГП.
А проблема внезапно нарисовалась, на ровном месте? Я к тому, может, обновление поставили на драйверы карточек какое модное, нет? Поройтесь в памяти)
-
Помечено в качестве ответа
Rotar Maksim
5 октября 2012 г. 4:36
-
Помечено в качестве ответа
-
Что касается ХП машин, по умолчанию, Windows XP не ждет полного завершения инициализации сети при загрузке и входе в систему — т.н. фоновое применение результатов обработки ГП.
Оставьте дефолтное значение политики. Все политики безопасности и др. настройки все равно обработаются -«не применятся» в этот момент только «тяжелые» параметры политик ( установка софта и пр.)
В общем, всё разрешилось изменением порядка (приоритета) политик.
Сергей Панченко
-
Помечено в качестве ответа
Rotar Maksim
5 октября 2012 г. 4:36
-
Помечено в качестве ответа