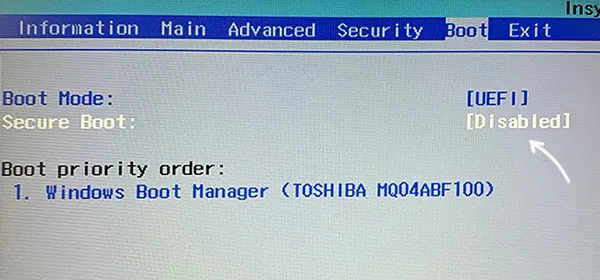
Microsoft has made Windows 11 available for all users. Windows 10 users can upgrade their computers to Windows 11 for free, provided their computers meet the hardware requirements. One of these hardware requirements is that your system’s firmware should be capable of Secure Boot. Therefore, if you are going to upgrade your Windows 10 operating system to Windows 11, you should enable Secure Boot. Some users are complaining that their computer does not boot after enabling the Secure Boot. In this article, we will provide some solutions that may help you fix this problem.

Secure Boot is a feature of UEFI (Unified Extensible Firmware Interface) that ensures that a device uses the startup software developed only by OEM (Original Equipment Manufacturer). By doing so, Secure Boot protects the device from being taken control of by malware or other unauthorized software during the boot process. When we start our computer, the firmware validates the signature of the boot software. If the signatures are found valid or legit, the firmware gives control to the OS.
If we compare UEFI with the Legacy BIOS, the Secure Boot feature is not available in the latter one. Another factor on which the Secure Boot depends is the drive partition type. Some of you may probably know that there are two types of formats used to define drive partitions, namely, MBR and GPT. Both MBR and GPT contain information about the beginning and the end of the partitions on a physical disk. This information lets the operating system know which partition on a hard disk is bootable.
If we compare MBR with GPT, the former one has some limitations, like:
- MBR works with disks of size up to 2 TB.
- MBR supports only a maximum of four primary partitions.
Is your Windows computer not booting after enabling Secure Boot? If yes, the following solutions may help you fix it:
- Check the file format used to define your drive partition
- Disconnect external hard disks and other storage devices
- Try to boot your computer from bootx64.efi file or bootia32.efi file manually
Now since you cannot boot Windows normally to the desktop, you may have to try and boot in Safe Mode or into the Advanced Startup options screen to be able to carry out the fixes. You will need to make use of the Command Prompt. For some strange reason if you can boot in Safe Mode but cannot access the Advanced Startup Options screen, when in Safe Mode, you may use the Command Prompt to boot Windows directly to the Advanced Startup Settings screen.
1] Check the file format used to define your drive partition
If your computer does not boot after enabling Secure Boot mode, the first thing that you should do is check your drive is partitioned by using which format, GPT or MBR. You can check this in the Disk Management app. The following steps will help you with that:

- Right-click on the Start Menu and select Disk Management.
- Now, right-click on your hard disk and select Properties. Remember, you have to open the properties of your hard disk and not of the disk partitions.
- In the Properties window, click on the Volumes tab. There, you will see the partition style of your hard disk.
If the partition style of your hard disk is MBR, you should convert it into GPT. After converting MBR into GPT, boot your PC with Secure Boot enabled. It should work.
2] Disconnect external hard disks and other storage devices
If you have connected external hard disks or any other storage devices to your computer, disconnect them and then boot your PC. See if it helps.
3] Try to boot your computer from bootx64.efi file or bootia32.efi file manually
Some users have reported that the issue was fixed after manually booting their computer from bootx64.efi file. The files with the EFI extension are the boot loaders. In most cases, these files are located on a specific system partition. This system partition does not have any drive letter and is usually hidden. If you have a UEFI based system, you may find the EFI file located at the following location under the Windows Boot Manager:
\EFI\boot\bootx64.efi
\EFI\boot\bootia32.efi
If you have a 64-bit version of Windows OS, you will see the bootx64.efi file on your firmware. On the other hand, 32-bit Windows OS users will find bootia32.efi file on their firmware.
Try to boot your computer manually from bootx64.efi file or bootia32.efi file and see if it works. To boot your computer manually from EFI files, you have to enter into the boot options in BIOS. There, you will find all the boot options available on your computer. The key to enter into the boot options menu is different for different computer brands. Therefore, you have to refer to your user manual. See whether bootx64.efi or bootia32.efi file is available there. If yes, boot your computer from that file.
Related read: Windows PC will not boot up or start.
What happens if I turn on Secure Boot?
Secure Boot is a security standard that makes sure your computer uses only the software from the OEM (Original Equipment Manufacturers) by validating the digital signatures at the time of startup. This avoids the risk of being hijacked by malware or other unauthorized software at the time of startup. Hence, by turning on the Secure Boot, you will increase your device security.
How do I know if my Secure Boot is disabled?

The following instructions will help you know if Secure Boot is disabled on your system:
- Click on the Windows 11/10 Search and type System Information.
- Select the System Information tool from the search results.
- Select the System Summary from the left side.
- Take your cursor on the right pane and scroll down to find Secure Boot State. If its Value is off, Secure Boot is disabled and vice-versa.
Why won’t my PC boot after enabling Secure Boot?
There are numerous things involved in this error. For example, if the file format used to define your drive partition doesn’t match, you can encounter this problem. For your information, this is the most common reason since people often get conflicts between GPT and MBR. On the other hand, you can get the same issue when an external hard drive is connected to your PC as well.
Hope this helps.
Read next: The value is protected by Secure Boot policy and cannot be modified or deleted.
 Если установщик Windows 11, а возможно и какая-то программа или игра (такое тоже возможно) сообщает о том, что его не устраивает состояние безопасной загрузки и её необходимо включить — сделать это сравнительно легко, но возможны нюансы.
В этой инструкции подробно о способах включить безопасную загрузку на вашем компьютере или ноутбуке, при условии, что это возможно. Обратите внимание, если задача — установка Windows 11, существуют возможности запуска установки и без включенной безопасной загрузки (Secure Boot), например — создание загрузочной флешки в Rufus с отключением проверки совместимости при чистой установке, или обновление с обходом требований для установки.
Проверка состояния безопасной загрузки, особенности работы после включения
Прежде чем начать, о том, где вы можете проверить текущее состояние безопасной загрузки в Windows 11 или Windows 10:
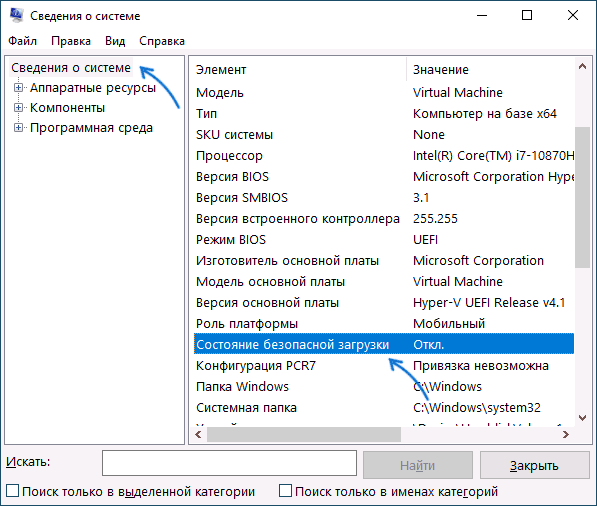
- Нажмите правой кнопкой мыши по кнопке «Пуск», выберите пункт «Выполнить», введите msinfo32 и нажмите Enter. В разделе «Сведения о системе» вы увидите пункт «Состояние безопасной загрузки» с её текущим статусом.

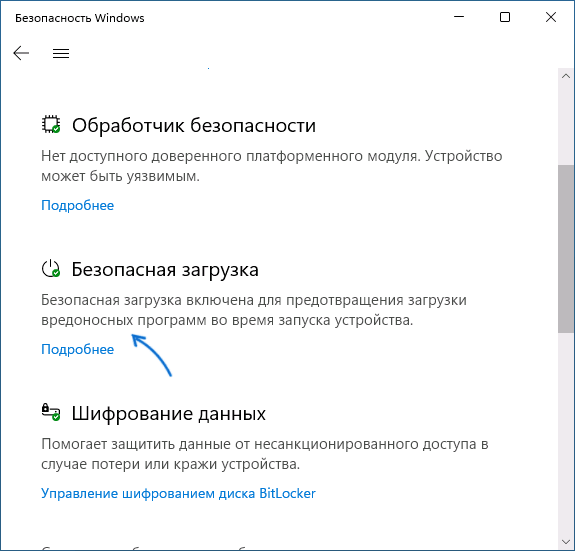
- Можно зайти в окно «Безопасность Windows», например, с помощью значка в области уведомлений и открыть раздел «Безопасность устройства». Если вы наблюдаете там пункт «Безопасная загрузка» с зеленой отметкой, она включена. Иначе — нет.

Ещё один важный момент: загрузка с включенной безопасной загрузкой возможна только для систем, установленных в UEFI-режиме на GPT диск.
Если, к примеру, у вас Windows 10 и установлена в Legacy-режиме на диск MBR, после включения Secure Boot она перестанет загружаться. Возможные варианты действий: конвертировать диск в GPT с помощью mbr2gpt.exe и включить UEFI-загрузку, либо использовать вариант с чистой установкой с флешки и обходом требований Windows 11, как было указано в начале статьи.
Включение безопасной загрузки Secure Boot в БИОС/UEFI
Само включение безопасной загрузки или Secure Boot выполняется не в Windows 11/10, а в БИОС/UEFI вашего компьютера или ноутбука. Для того, чтобы включить её, необходимо:
- Зайти в БИОС при включении/перезагрузке устройства. На ноутбуках для этого обычно используется клавиша F2 (или сочетание Fn+F2), которую необходимо ритмично нажимать сразу после появления заставки производителя (но бывают и другие варианты клавиши), на ПК как правило используется клавиша Delete. Более подробно: Как зайти в БИОС/UEFI на компьютере или ноутбуке.
- Найти раздел БИОС, на котором доступна опция включения (установка в Enabled) функции Secure Boot. Учитывайте, что на очень старых компьютерах такой настройки может и не быть. Как правило, она располагается где-то в разделе Security, Boot, System Configuration, иногда — Advanced Settings. Несколько примеров расположения будут приведены далее.
- Сменить состояние Secure Boot на Enabled (если ранее выполнялась очистка ключей Secure Boot, восстановить их), сохранить настройки БИОС/UEFI (обычно выполняется клавишей F10 или на вкладке Exit) и перезагрузиться обратно в систему.
Примеры расположения опции для включения безопасной загрузки (Secure Boot)
Ниже — несколько примеров, где можно найти опцию включения безопасной загрузки на разных материнских платах и ноутбуках. У вас может отличаться, но логика везде одна и та же.
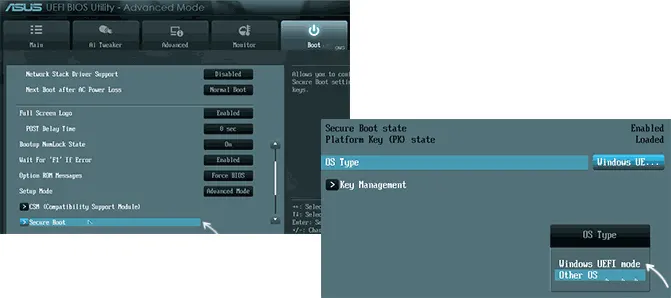
Ещё раз отмечу: включить безопасную загрузку можно только в случае, если у вас включен режим загрузки UEFI, а режим Legacy/CSM отключен, иначе опция будет недоступна. В некоторых вариантах БИОС переключение в режим загрузки UEFI выполняется путем выбора типа операционной системы (OS Type) между Windows 11/10/8 и «Other OS» (нужно выбрать Windows).
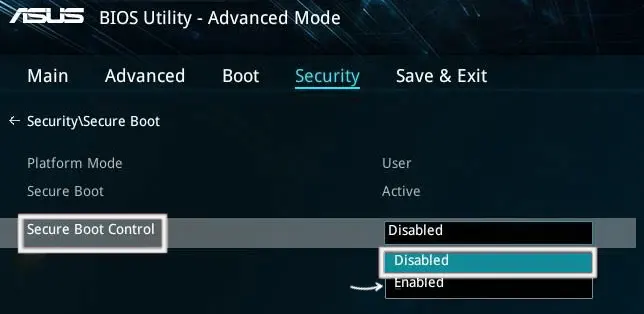
ASUS
На разных версиях материнских плат и ноутбуков включение Secure Boot реализовано слегка по-разному. Обычно пункт «Secure Boot» можно найти на вкладке «Boot» или «Security». При этом для OS Type может потребоваться выставить Windows UEFI Mode (параметр может и отсутствовать).
Также, для доступности пункта настройки безопасной загрузки в БИОС может потребоваться перейти в Advanced Mode, обычно — по клавише F7.
В некоторых случаях может потребоваться восстановление ключей безопасной загрузки, обычно выполняется следующим образом: в Advanced Mode в BIOS на вкладке Boot или в Secure Boot — Key Management выбираем Load Default PK и подтверждаем загрузку ключей по умолчанию.
AsRock
Настройка для включения безопасной загрузки на материнских платах AsRock обычно находится в разделе «Security».

Зайдя в раздел необходимо будет установить значение Secure Boot в Enabled, а если выбор недоступен, включить стандартный Secure Boot Mode и установить ключи по умолчанию (Install default Secure Boot keys).

Acer
Как правило, опция включения Secure Boot на ноутбуках Acer находится либо в разделе Advanced — System Configuration, либо в Boot или Authentication.
Также помните, о том, что должен быть включен режим загрузки UEFI, а не Legacy/CSM для возможности изменения состояния безопасной загрузки на Enabled.
Lenovo
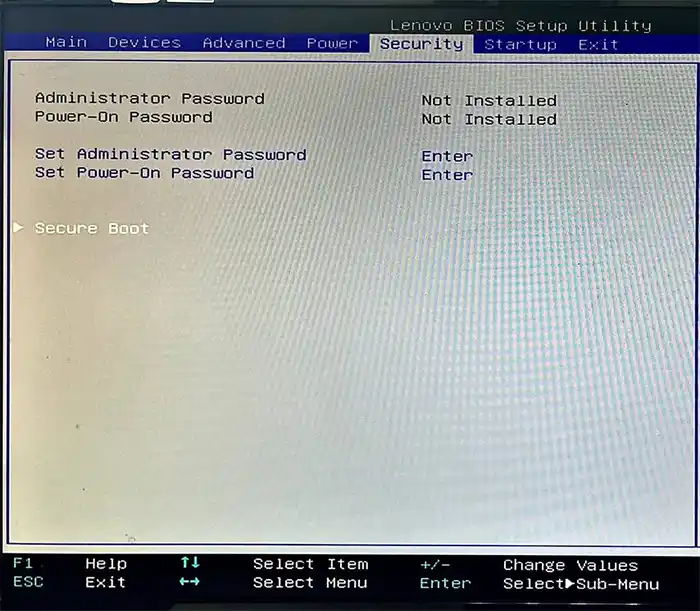
ПК и ноутбуки Lenovo имеют разные варианты интерфейса БИОС, но обычно нужная опция находится на вкладке Security, как на фото ниже:

Ещё один пример с ноутбука Lenovo:
Gigabyte
Варианты отключения Secure Boot на материнских платах и ноутбуках Gigabyte могут отличаться, обычно порядок действий следующий:
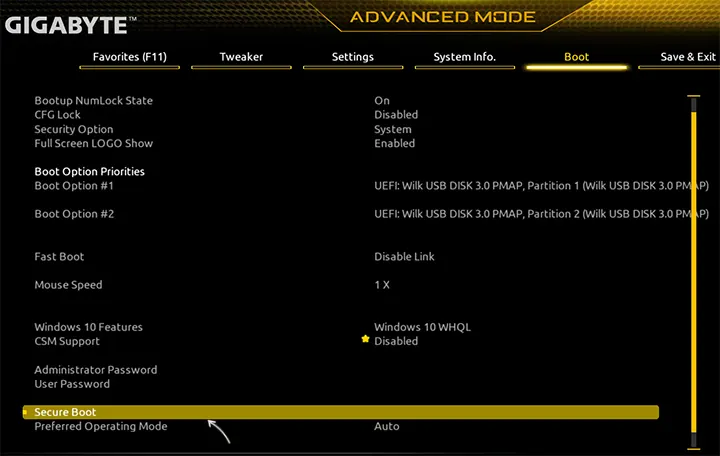
- На вкладке Boot или BIOS отключить CSM Support, и выбрать тип операционной системы или установить пункт Windows 8/10 Features в, соответственно, Windows 8/10, а не Other OS.
- После этого должен появиться пункт Secure Boot, в который необходимо зайти, чтобы включить безопасную загрузку.
Несколько дополнительных мест расположения опции включения Secure Boot (устанавливаем в Enabled) на старых Dell, Gigabyte, HP:

Также, если в вашем интерфейсе БИОС предусмотрен поиск, можно использовать его:

В случае, если вы не нашли способа включить безопасную загрузку на вашей материнской плате, либо её не удается перевести в Enabled, укажите её марку и модель в комментариях, я постараюсь подсказать, где именно требуется включать этот параметр. Кстати, часто достаточно просто сбросить настройки БИОС (Load Defaults на вкладке Exit), чтобы включить безопасную загрузку, так как на большинстве современных материнских плат она по умолчанию включена.
Аккаунт удален
Комментарий недоступен
Ответить
Развернуть ветку
Fashmiw
Автор
Всегда был uefi
Самое странное, что я сейчас даже в биос зайти не могу
Ответить
Развернуть ветку
Karl666Smith
кстати что за хрень с uefi? Если переключаю, то только выниманием видяхи, заменой её на древность, т.к. нет встройки, и обратно, картинка появляется.
Ответить
Развернуть ветку
Аккаунт удален
Комментарий недоступен
Ответить
Развернуть ветку
Ivan Beany
Не, несколько секунд не всегда достаточно. Часто в обвязке чипа есть конденсаторы, которые могут продолжительное время отдавать заряд для питания чипа, а биосу много не надо. Скорее автору нужно было еще и ресетнуть биос замыканием контактов для сброса, если они есть
Ответить
Развернуть ветку
Антон Карпенко
Недавно тоже включил его и перестал реагировать комп на что либо после включения, скидывал Биос через джампер на материнке, только это помогло. Если есть флешка и кнопка для перепрошивка Биоса, то можно скачать ласт версию Биоса и этот вариант попробовать. А какой то момент думал, что все, ггвп
Ответить
Развернуть ветку
TVEYE
Вчера на b450 aorus pro включал secure boot. Тоже как-то странно заводилась. Темный экран был, помогло отключение питания рубильником на бп. Потом все же завелась.
Ответить
Развернуть ветку
Another Satta
Аорус Элит, это вообще не материнка, а цирк фриков злоебучий, сам ею владею, и первый месяц дался не сладко.
Ответить
Развернуть ветку
TVEYE
Я сначала элитку брал, но ее сдать пришлось, у меня на ней система не заводилась. Взял взамен про-версию. Пока работает. Но вот был странный затык на включении secure boot.
Я даже не знаю. Либо ГБ ссучились так, либо для нормальной работы надо покупать материнку от 20к.
Ответить
Развернуть ветку
GRADUS
на матери есть Q-Flash — смотри ролик:
Ответить
Развернуть ветку
Gradient.Kid
Когда включаешь комп, спустя секунд 5, при нажатии на caps lock он загорается?
Ответить
Развернуть ветку
igrok
Такое может быть если видеокарта не поддерживает gop uefi или поддерживает но биос очень старый, на первых платах с gop uefi они были глючные. Нужно сбросить биос через clear cmos на мп (предварительно выключить пк из розетки, можно сетевой фильтр выключить), и после этого secure boot не включать, достаточно отключить csm чтобы w11 сообщила о совместимости, майкрософт всех запутали за зря.
Ответить
Развернуть ветку
Мало Табака
Такую же хрень учудили, но ресет биуса через батарейку все таки помог
Ответить
Развернуть ветку
Антон Калугин
После включения secure boot, перестал работать пк, сменил матернскую плату, также не работает, помогите пожалуйста
Ответить
Развернуть ветку
Lunchpyne
У тебя материнка сдохла. Я сам был в такой ситуацией, думал пи3д@ моей видюхе но оказалась что материнка сдохла. Купил новую, такую же на чипсете X570 но от компании Aorus. Честно говоря второй раз страшно это включать.
Ответить
Развернуть ветку
Lilith
Понимаю, времени много прошло. Но мне все же интересно как автор решил эту проблему. У меня только что такая же ситуация. Не знаю даже что делать
Ответить
Развернуть ветку
17 комментариев
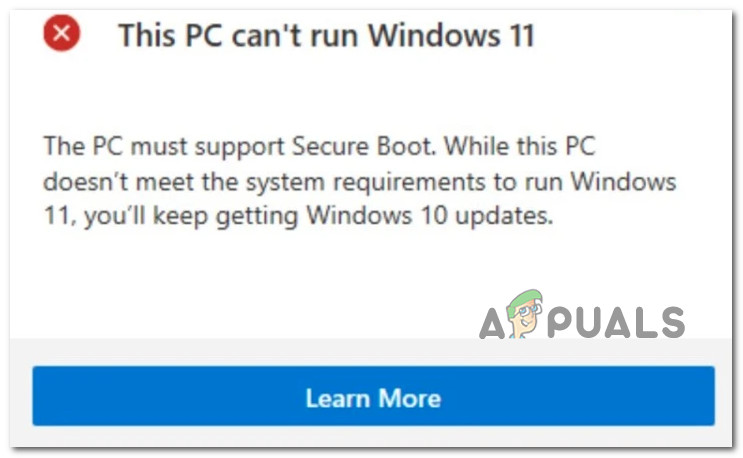
Раскрывать всегда
As it turns out, there’s an entire category of Windows 11 that are finding their PC unable to boot after they enabled secure boot. Most users are reporting that whenever they face this problem, they see their computer going back to the UEFI or BIOS screen with no error messages or logs. On the other hand, if Secure Boot is kept disabled, they get an error message saying that ‘This PC can’t run Windows 11‘.
After investigating this particular issue, it turns out that there are several different underlying causes why you might expect to deal with this issue on Windows 11. Here’s a shortlist of potential culprits that you should be aware of:
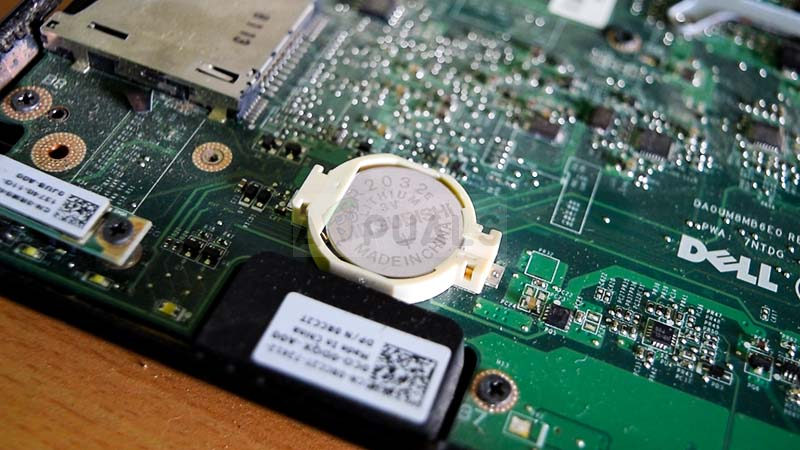
- Remnant boot data is perpetuated by motherboard battery – As it turns out, one of the most common causes that will prevent your PC from booting Windows 11 even after enabling Secure Boot is a scenario in which your motherboard battery (CMOS) is actually perpetuating a state in which your computer thinks that secure boot is not enabled (despite being enabled). In this case, you can fix the issue by taking out the motherboard battery and leaving it out for 10 minutes or so in order to clear the power capacitors. Some motherboards might have a dedicated switch to do this.
- Outdated BIOS version – There are documented scenarios where the main reason that was causing this type of issue was an outdated BIOS version that was not fully compatible with the new security protocols on Windows 11. To ensure that this is not the cause of the issue, you should be able to fix the problem by flashing your BIOS with the latest version available.
- Failing GPU – According to several affected users, this type of behavior can also be indicative of a dedicated GPU that is beginning to fail. In order to eliminate this scenario of your culprit’s list, simply disconnect your dedicated GPU and see if your PC boots successfully from the integrated GPU alternative.
- Outdated SSD drivers – If you’re experiencing this issue only when secure boot is enabled but you can boot normally when it’s not, one potential culprit is your SSD drivers fleet. In order to fix it, simply boot your computer and update your SSD driver fleet to the latest.
- Hotfix for boot glitch is not installed – Microsoft recently patched a booting defect caused by a bad Windows update that ended up corrupting the BMR data on certain computers running Windows 11. In order to fix this issue, you’ll need to install every pending Windows Update in order to apply the hotfix that resolves this issue.
- The partition style is incompatible – Windows can use the GUID Partition Table (GPT) partition style with Secure Boot. The drive is still in an unbootable MBR partition table when Secure Boot is enabled. The system boots up without any issues if Secure Boot is disabled. You must change your data or disks from MBR to GPT in order to support Secure Boot and make your computer bootable with that feature activated.
- Boot data inconsistency – Some claim that the issue was fixed by manually booting their computer from the bootx64.efi file. The files with the EFI extension are boot loaders. This system partition is typically hidden and lacks a drive letter. However, by following a set of instructions, you can usually boot from it.
- MBR data is mismanaged due to an external drive – As it turns out, you might experience this type of behavior if you have an external HDD (slave) connected to your Windows 11 PC via a USB port. In this case, you can get the issue resolved by temporarily disconnecting it (until after the booting procedure is complete).
- System file corruption – According to some affected users, this problem can also be caused by some kind of inconsistency produced by some type of system file corruption. In order to rectify this problem, you should consider performing SFC and DISM scans, and even going for a repair install or a clean install procedure if the issue persists.
1. Reset BIOS by removing the CMOS Battery
It turns out that one of the most frequent reasons why Windows 11 won’t start on your PC even after Secure Boot is enabled is a situation where your motherboard battery (CMOS) is actually maintaining a condition in which your computer believes that secure boot isn’t enabled (despite being enabled).
In this situation, you can resolve the problem by removing the motherboard battery and letting it sit outside for around 10 minutes to clean the power capacitors. There may be a switch specifically for this purpose on some motherboards.
Note: The CMOS (Complementary Metal Oxide Semiconductor) battery, also referred to as the RTC or the NVRAM, is in charge of storing data ranging from the time and date to the hardware configurations of the system. The computer’s inability to maintain the date and time between startup typically indicates an issue with this component.
If you are dealing with a replaceable CMOS battery, you should be able to resolve the problem by clearing the CMOS battery or replacing it entirely in case the problem reappears if this scenario applies to your current situation and you suspect that you’re dealing with a malfunctioning CMOS battery.
Here is a little guide on how to accomplish it:
Important: No matter what version of Windows you are using or how your computer is set up, the procedures below should work.
- Make sure your PC is totally unplugged from any power sources and turned off.
- Next, take off the side cover and put a static wristband on your dominant hand (if you have one).
Note: This grounds you to the computer’s frame and balances the electrical energy, ensuring that you don’t cause any harm to the PC’s internal parts. - Locate the CMOS battery on your motherboard by taking a look at it. It shouldn’t be challenging to find. Once you spot it, pry it out of the slot with your fingernail or a non-conductive screwdriver.

Removing the CMOS Battery Note: To be sure you’re not working with a bad battery, replace the present one with a spare CMOS battery if you have one available. If you don’t, make sure to properly clean it to make sure no debris is preventing connectivity with the motherboard.
- Before putting everything back together and turning on your computer again, wait a few minutes to give the power capacitors enough time to clear themselves.
- Boot your PC up once again and see if the issue is now fixed.
If the same kind of issue is still occurring, move down to the next potential fix below.
2. Disconnect external hard disks
It turns out that if you have an external HDD (slave) linked to your Windows 11 PC through a USB port, you might encounter this kind of behavior. In this situation, momentarily disconnecting it will solve the problem (until after the booting procedure is complete).
As strange as it may sound, this kind of error might be caused by an external hard disk.
Although we are unable to provide you with a comprehensive list of circumstances in which this issue can arise, you can try disconnecting all auxiliary devices in order to isolate the issue’s root cause. It turns out that a power draw issue can also cause this specific problem.
You may encounter this secure boot-related inconsistency if your power supply unit (PSU) is insufficient to support all of your USB-connected devices because your system is unable to supply the necessary power.
Specific configurations with external hard drives connected through USB have been observed to experience this.
If this scenario describes your current circumstance, try taking off the external hard drive (if necessary), and observe if you still get erratic disconnections.
You have two options moving forward if the error stops happening after you disconnect external devices and you want to solve it without sacrificing any functionality at all:
- Purchase a higher PSU that can supply your USB-connected devices with additional power. Naturally, desktop arrangements are the only ones where this is applicable.
- Purchase a USB hub that has an external power source. If you’re having trouble with a laptop or ultrabook, this should be the solution. The demand on your PSU will be reduced by USB hubs with built-in power adapters.
If the investigations you’ve just performed aren’t pointing towards a PSU-related issue, continue to the next way below if this one isn’t appropriate for your situation or didn’t change anything.
3. Update your BIOS version
There are cases when this type of problem was primarily brought on by an out-of-date BIOS version that was insufficiently compliant with Windows 11’s new security procedures. You should be able to resolve the issue by flashing your BIOS with the most recent version available to be sure that this isn’t the root of the problem.
You should also investigate your BIOS as another potential offender. Several affected customers claim that after updating their BIOS firmware to the most recent version, the issue was completely fixed. This method has largely been shown to work well with ASUS PCs.
Particularly on older motherboards, it’s uncommon for an outdated BIOS version to result in system instability.
Remember that updating your motherboard’s BIOS isn’t as challenging as it once was because all of the main motherboard manufacturers now offer flashing software that enables you to do so without needing to be particularly tech-savvy.
The best course of action is to visit the website of the company that makes your motherboard and browses the Drivers Download section for a BIOS upgrading program. ASUS has E-Z Flash, MSI has MFlash, Gigabyte has @BIOS Live Update, and so on.
Note: Regardless of the manufacturer of your BIOS, read the official documentation in its entirety before starting the update process. If you carry out this process incorrectly, you run the risk of bricking the hardware, which calls for the help of a trained professional.
Upgrade your BIOS to the most recent version by following the on-screen instructions, and then restart your machine to see if you are able to boot while the secure boot feature is enabled.
Try the next technique below if you don’t already have the most recent BIOS for your motherboard or if the previous one didn’t work for you.
4. Booting with the integrated GPU
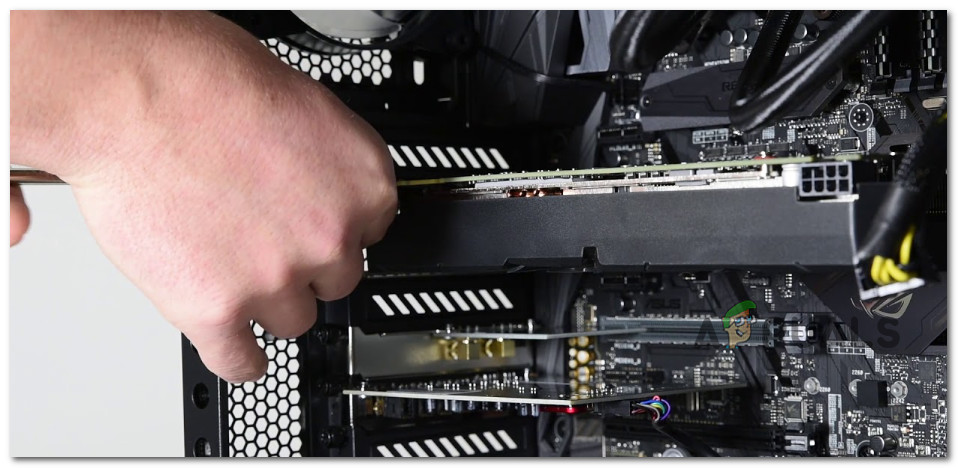
This kind of behavior, according to multiple impacted customers, may also be a sign that a dedicated GPU is starting to malfunction. Simply unplug your dedicated GPU and check to see whether your computer boots correctly using the integrated GPU alternative to exclude this possibility from your list of possible culprits.
There is no universal way of forcing your PC to boot directly from the integrated component, but you can do this easily by physically taking out your dedicated GPU and booting without it.
Although replacing a GPU is a straightforward process, it is crucial to use caution before handling your computer to prevent any harm.
IMPORTANT: When using a computer, it is advised to wear an anti-static band around your wrist or ankle. Usually, an alligator clip is on the other end of the anti-static band. Make sure the alligator clip is attached to something, perhaps an unpainted area of your computer case. Using one of these bands is an easy method to assure that you won’t damage anything while working on your PC because static electricity can harm or even destroy computer components.
To force your computer to boot using the integrated GPU component, follow these steps to remove your dedicated GPU:
- Ensure that your computer is completely off and disconnected.
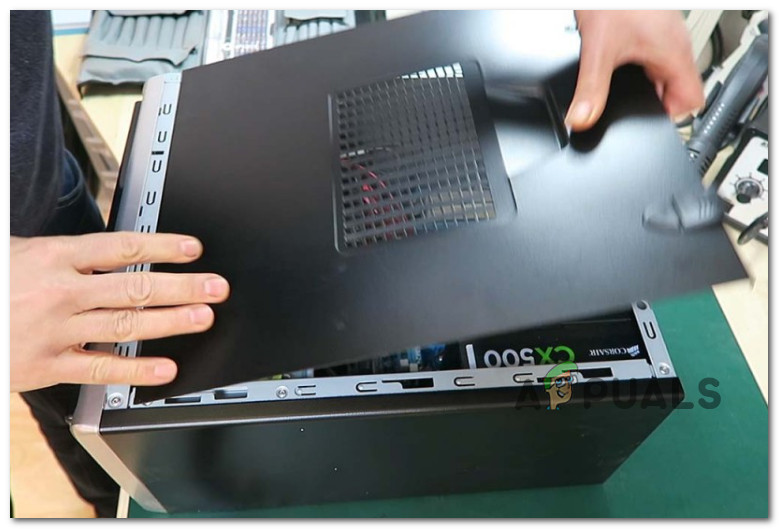
- To access the internal components of your desktop, remove the side panel.

Remove the side panel Note: Typically, you may do this by using a screwdriver or your hands to loosen the screws holding the side panel in place.
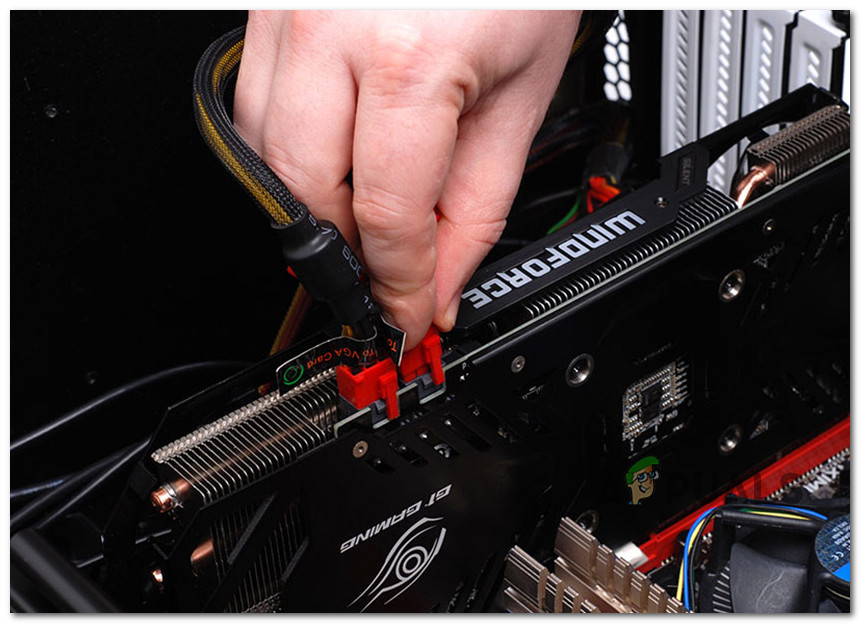
- A six- or eight-pin PCIe cable is generally used to connect graphics cards to power supplies, providing the necessary electricity for the graphics card to function.
- To disconnect the PCIe cable from the graphics card, push the cable’s clip down and carefully pull the cable away.

Disconnect the power cable - In addition to being held in place by the motherboard, the graphics card will also be kept firmly in place in the computer since it will be bolted into the case’s rear.
- Remove the screws holding the GPU to the case’s back.
- The graphics card will still be inserted into a PCIe slot after being unplugged from the enclosure. You can see a tiny clip holding the card to the motherboard if you look down at the area where the card is inserted into the motherboard.
- To release the card, depress the clip.

Remove the GPU - Gently remove the graphics card from the slot after depressing the clip.
- Put your PC case back on and boot it normally. At this point, your PC will be forced to boot from the integrated GPU component.
If this method was not applicable or you’re looking for a different fix, move down to the next method below.
5. Update SSD Drivers
Your SSD driver’s fleet may be the root of the problem if you only encounter it when secure boot is enabled but can boot normally otherwise. Simply reboot your computer to fix it, then install the most recent SSD drivers.
Check to see if there is an updated driver available if you are using a more recent SSD model. Go to Device Manager and take note of the SSD model number. As soon as you have that, check the internet to see if there is a new firmware update that you can install.
Important: Be cautious to back up your data before updating the firmware on your SSD. All data on your disk will be deleted if the firmware is updated.
Many users reporting this kind of error have confirmed that after following the methods below to determine their SSD model number and using it to find a newer driver version, they were eventually able to boot with secure boot enabled.
Note: You can also try updating the SSD firmware through Device Manager, but don’t get your hopes up as there is very little chance you’ll discover a newer version.
To update the SSD firmware to the most recent version, follow these steps:
- To bring up the Run dialog box, press the Windows key + R. Then, to launch Device Manager, type “devmgmt.msc” into the text box and click Ctrl + Shift + Enter.

Accessing Device Manager - Select Yes to give admin access at the User Account Control.
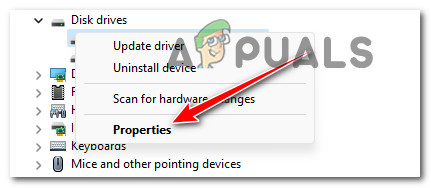
- After entering Device Manager, expand the Disk Drives drop-down box.
- After that, from the context menu, right-click the SSD disk in the Disk Drives section and select Properties.

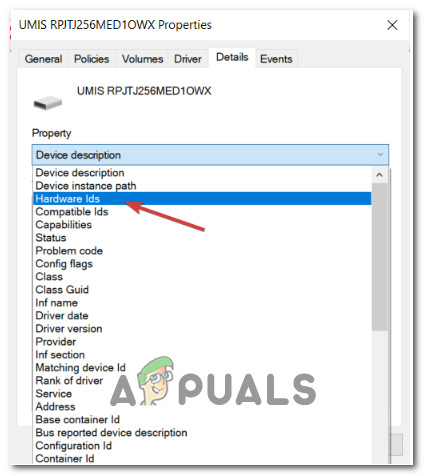
Accessing the Properties screen of your SSD entry - Click on the Details tab at the top of the Properties screen after you’ve arrived there.
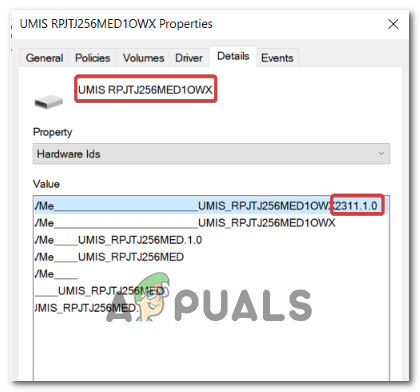
- Select Hardware IDs from the Property menu on the Details tab.

Accessing the Hardware ID property - The model number of the drive you’re now using and the firmware version displayed beneath its name can both be found in the upper part of the drive.

Take note of the model and firmware model - Check to see if there is a new firmware version available for your SSD by searching online (or on the SSD manufacturer’s or PC manufacturer’s website).
- Download the new version if it’s available, then install it by following the on-screen directions.
- Restart your computer after installing the latest SSD firmware to determine if the problem has been resolved.
- Make sure that Secure Boot is turned on, then boot your PC once again and see if the procedure completes successfully.

If the same kind of issue is still occurring, move down to the next method below.
6. Install Pending Windows Updates
Microsoft recently fixed a booting issue brought on by a problematic Windows update that resulted in the BMR data being corrupted on some Windows 11-powered devices. You’ll need to install every pending Windows Update before you can apply the patch that fixes this problem.
If you own a high-end PC, you should ensure that you have the most recent Windows infrastructure updates installed. If you frequently see this problem when using your PC for resource-intensive tasks, you should take this action.
Bringing Windows 11 up to date may allow you to finally boot in secure mode if your Windows installation is missing any crucial infrastructure updates.
Read on for detailed instructions on how to accomplish this on Windows 10 or Windows 11:
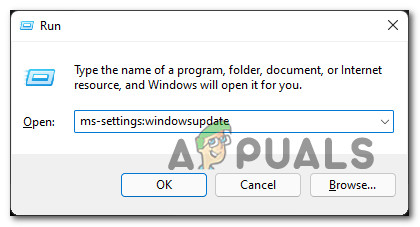
- Using the Run dialog box is one approach to launching Windows Update. To do this, press the Windows key + R on your keyboard. The Run dialog box will appear as a result.
- Next, type “ms-settings:windowsupdate” in the text field and hit Enter. This will direct you to the Settings app’s Windows Update tab.

Accessing the Windows Update screen Note: You could see a prompt requesting your consent to proceed if you haven’t adjusted the UAC settings. To give your consent in this instance, click Yes.
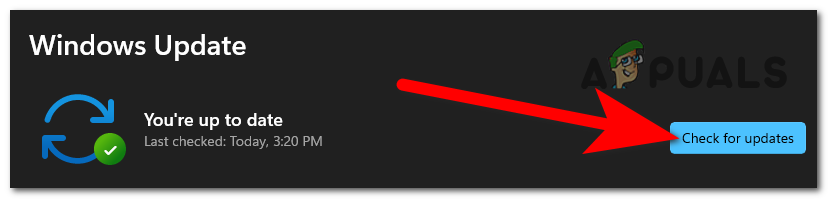
- After opening the Windows Update tab, select Check for Updates from the menu on the right.

Check for Updates - After the update has finished downloading, select Install Now to begin a local installation.
- Restart your computer to see if the issue has been resolved.
If Secure Boot is still preventing you from starting your computer, continue to the method after that.
7. Convert Disk from MBR to GPT
It turns out that if you have an external HDD (slave) linked to your Windows 11 PC through a USB port, you might encounter this kind of behavior. In this situation, momentarily disconnecting it will solve the problem (until after the booting procedure is complete).
You are prepared to change your drive to the new GPT format if you have already determined that your current partition is an MBR type and your system can boot from UEFI.
But bear in mind that there is no turning back once you’ve taken this action. Without losing any of your data, you cannot convert a GPT format back to MBR.
Important: The drive has occasionally sustained damage during the conversion procedure. Even though there is a very small risk that this will happen, if you have any important files that you are concerned about losing, we encourage you to make a comprehensive system backup.
If you want to go for this conversion in order to resolve the secure boot issue, follow this article here to do it without any data loss.
If you want to go for a different approach or this method was not applicable, follow the remaining instructions below.
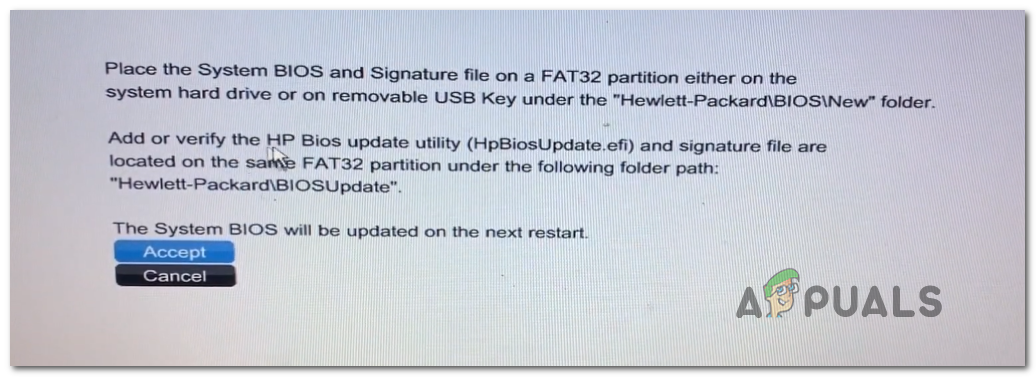
8. Boot from bootx64.efi file or bootia32.efi
Some claim that manually starting their PC from the bootx64.efi file resolved the problem. Boot loaders are the files having the EFI extension. Usually hidden and without a drive letter, this system partition. You can typically boot from it, though, by according to a set of instructions.
The EFI file may be found in the following place under the Windows Boot Manager if your computer is UEFI-based:
\EFI\boot\bootx64.efi \EFI\boot\bootia32.efi
Note: The bootx64.efi file is present on your firmware if your operating system is a 64-bit version of Windows. Users of the 32-bit Windows OS, on the other hand, will discover the bootia32.efi file on their firmware.
See whether your computer will start up manually using the bootx64.efi or bootia32.efi files. You must access the BIOS boot settings in order to manually boot your machine from EFI files.
All of your computer’s boot choices are available there. For each type of computer, a distinct key is required to access the boot options menu. As a result, you must consult your user manual. Check to see if the bootx64.efi or bootia32.efi file is present. If so, use that file to start your machine.
If this method was not helpful in your particular case and you’re still unable to boot while the secure boot feature is enabled, try the next method below.
9. Deploy SFC and DISM Scans
According to some users, this issue can happen as a result of system file corruption, which is a high resource-consuming feature of Windows.
You can resolve this problem by utilizing SFC (System File Checker) and DISM (Deployment Image Servicing and Management) to identify the damaged files that are the root of the problem and swap them out with working copies.
Even while these two utilities have many things in common, they approach removing corruption in distinct ways. SFC downloads clean files using a locally stored archive, whereas DISM uses a Windows Update add-on
Start by initiating an SFC scan if you want to try this approach.
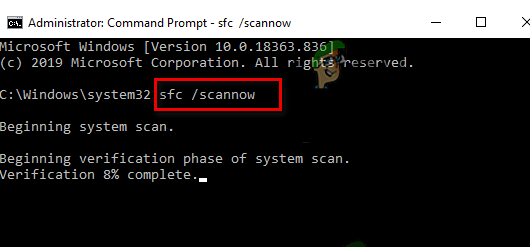
Run a DISM scan after restarting your computer when the first SFC scan is finished.
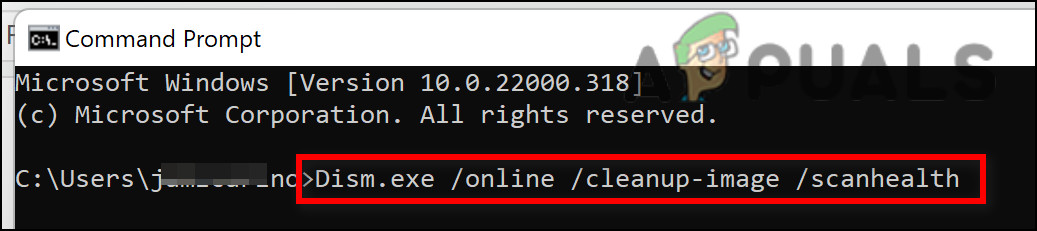
Note: Make sure your Internet connection is steady before starting the DISM operation.
If any of these tools end up identifying and resolving an underlying corrupt issue, replace corrupted files by following the on-screen instructions.
Restart your computer when the DISM scan has successfully finished checking if the issue has been resolved.
10. Clean install or repair install
If you’ve attempted every possible workaround and your computer still won’t boot up with Secure Boot enabled, there’s a good possibility that a system file dependency utilized by the backup sequence has been damaged.
The following step would be to perform a clean install or repair install in order to reset every Windows component (in-place repair).
Although a clean install is a simple option, you should be aware that it will erase all personal data from your OS drive. For this procedure, you won’t require suitable installation media.
Repair install (also known as “in-place repair”) is more time-consuming but has the advantage of updating every component that can be corrupted without wiping away the data from any apps, games, documents, or private media that are saved on your OS disk. You will require appropriate installation discs for this procedure.
|
0 / 0 / 0 Регистрация: 26.01.2022 Сообщений: 10 |
|
|
1 |
|
|
26.01.2022, 21:49. Показов 9398. Ответов 25
Мои догадки что это произошло из-за включения Secure Boot или отключения CSM, а именно я залез в Platform Key и что-то там наклацал. Сброс биоса не помогает. После сброса биоса он запускается с обычным сигналов спикера, но изображения нет, через пару секунд он перезагружается и выдает обычные сигналы спикера + 5 длинных Кто знает, помогите пожалуйста, буду безумно благодарен. Мат. Плата Atermiter X79G v1.3
0 |

|
Programming Эксперт 94731 / 64177 / 26122 Регистрация: 12.04.2006 Сообщений: 116,782 |
26.01.2022, 21:49 |
|
Ответы с готовыми решениями: Что такое boot manager, и почему после выключения secure boot в uefi bios не грузится винда? Ищу материалы по принципу работы UEFI, EFI, CSM, Secure boot Здравствуйте! Я ищу обширную статью… go to advanced boot csm parameters and adjust the csm settings to enable the boot device Не запускается BIOS после включения, запускается после 4-5 минут работы системника 25 |
|
Дно пробито 4625 / 2802 / 379 Регистрация: 07.10.2020 Сообщений: 19,380 |
|
|
26.01.2022, 21:53 |
2 |
|
settwor достань батарейку и сделай клеар-кмос .
Atermiter X79G v1.3 зачем вы трогали ненужные настройки в этом говне не понятно — с ним один принцип только подходит — работает : не трогай
С железом все хорошо, так как спикер пищит как обычно, когда все исправно а ПОСТ карта что вам показывает
1 |

|
Модератор
23561 / 13210 / 2305 Регистрация: 23.11.2016 Сообщений: 66,353 Записей в блоге: 31 |
|
|
27.01.2022, 10:42 |
4 |
|
settwor, предлагаю вам поискать возможность перешить биос
0 |
|
1668 / 967 / 99 Регистрация: 27.02.2021 Сообщений: 4,824 |
|
|
27.01.2022, 11:24 |
5 |
|
настройки в этом говне / один принцип только подходит — работает : не трогай По части ключей и брэнды взбрыкнут, если туда не знаючи, со скуки полезть. Я тоже там побывал естественно, но обошлось без
0 |
|
0 / 0 / 0 Регистрация: 26.01.2022 Сообщений: 10 |
|
|
27.01.2022, 20:42 [ТС] |
6 |
|
Биос сбрасывается 100%, я и батарейку доставал и замыкал контакты батарейки (на мп нет клеар кмос). Я знаю что я виноват, но уже что я сделаю. Пост карты нет
0 |
|
Дно пробито 4625 / 2802 / 379 Регистрация: 07.10.2020 Сообщений: 19,380 |
|
|
27.01.2022, 20:53 |
7 |
|
Биос сбрасывается 100%, я и батарейку доставал и замыкал контакты батарейки мда ну тогда только шить и если не поможет смотреть что ПОСТ карта выдаёт — купил дешевле : теперь раскошеливайся на инструменты
0 |

|
0 / 0 / 0 Регистрация: 26.01.2022 Сообщений: 10 |
|
|
27.01.2022, 21:02 [ТС] |
8 |
|
пробуйте это когда не знал в чем проблема, пробовал. НО понял уже что проблема с биосом
Как восстановить secure boot_ — Сообщество Microsoft_compressed.pdf Изображения нет вообще Добавлено через 1 минуту
ну тогда только шить ну это понятно, а есть еще способы какие-то? может проблема не в биосе
купил дешевле : теперь раскошеливайся на инструменты ну это да…
0 |
|
Дно пробито 4625 / 2802 / 379 Регистрация: 07.10.2020 Сообщений: 19,380 |
|
|
27.01.2022, 21:06 |
9 |
|
а есть еще способы какие-то? знал бы подсказал — разве что видюху протестить на другом ПК и БП замерить на холостом ходу хотя бы на всякий случай .
1 |
|
0 / 0 / 0 Регистрация: 26.01.2022 Сообщений: 10 |
|
|
27.01.2022, 21:11 [ТС] |
10 |
|
Пробовал я и две видеокарты, и два БП. Все равно то самое
0 |
|
Дно пробито 4625 / 2802 / 379 Регистрация: 07.10.2020 Сообщений: 19,380 |
|
|
27.01.2022, 21:13 |
11 |
|
Без ПОСТ карты это гадание — что у китайцев эти сигналы означают ни знает никто — была бы брендовая : там ФАК есть хотя бы от производителя .
1 |
|
0 / 0 / 0 Регистрация: 26.01.2022 Сообщений: 10 |
|
|
27.01.2022, 21:17 [ТС] |
12 |
|
И что мне делать? Что бы вы сделали на моем месте?
0 |
|
Дно пробито 4625 / 2802 / 379 Регистрация: 07.10.2020 Сообщений: 19,380 |
|
|
27.01.2022, 21:19 |
13 |
|
Не покупал ноунейм желез без гарантии . А так шить БИОС и потом смотреть что будет .
1 |
|
0 / 0 / 0 Регистрация: 26.01.2022 Сообщений: 10 |
|
|
27.01.2022, 21:21 [ТС] |
14 |
|
Только через программатор? То есть в сервисный центр? (У меня нет программатора)
0 |
|
Дно пробито 4625 / 2802 / 379 Регистрация: 07.10.2020 Сообщений: 19,380 |
|
|
27.01.2022, 21:23 |
15 |
|
(У меня нет программатора) цена вопроса недорого — гайдов дофига
1 |
|
0 / 0 / 0 Регистрация: 26.01.2022 Сообщений: 10 |
|
|
27.01.2022, 22:03 [ТС] |
16 |
|
А сколько это будет стоить в сервисном центре?
0 |
|
1668 / 967 / 99 Регистрация: 27.02.2021 Сообщений: 4,824 |
|
|
28.01.2022, 10:46 |
17 |
|
Надеюсь при всех телодвижениях в поиске трабла ни один из дисков не был подключен ? Первейшая задача не систему загрузить, а войти в настройки Биос-а и подключенные харды, флешки для этого не нужны.
(У меня нет программатора) Наличие программатора не панацея, он дешёвый, а вот паяльная станция что-бы чип выпаять (если он не в кроватке) и умение ей пользоватся нужны. В сервисе аппетиты разные, зависит от того, сколько их в городе, насколько сервисники наглые. Думаю не ошибусь в том, что цена будет в пределах 500-1000 р.
2 |
|
0 / 0 / 0 Регистрация: 26.01.2022 Сообщений: 10 |
|
|
28.01.2022, 17:37 [ТС] |
18 |
|
в поиске трабла ни один из дисков не был подключен да, все отключил, оставил самое важное(то что для запуска нужно)
Наличие программатора не панацея, он дешёвый, а вот паяльная станция что-бы чип выпаять (если он не в кроватке) и умение ей пользоватся нужны. В сервисе аппетиты разные, зависит от того, сколько их в городе, насколько сервисники наглые. Думаю не ошибусь в том, что цена будет в пределах 500-1000 р. спасибо, буду знать
0 |
|
0 / 0 / 0 Регистрация: 26.01.2022 Сообщений: 10 |
|
|
29.01.2022, 08:53 [ТС] |
19 |
|
Я посмотрел пост карты, но пост карты на разъем pci-e не нашел, на моей мп есть только pci-e. Что делать? Программатор я куплю
0 |
|
1737 / 169 / 31 Регистрация: 16.12.2017 Сообщений: 846 |
|
|
29.01.2022, 12:00 |
20 |
|
Надеюсь при всех телодвижениях в поиске трабла ни один из дисков не был подключен ? Первейшая задача не систему загрузить, а войти в настройки Биос-а и подключенные харды, флешки для этого не нужны. Думаю не ошибусь в том, что цена будет в пределах 500-1000 р. Ошибаетесь наглости не предела 1000 руб. только чтоб взглянут
0 |