It’s lightweight, open source software, and free for anyone to use. And it just works.
How it works
Basically you install a tiny agent in your PC or phone, which silently waits for a remote signal to wake up and work its magic.
This signal is sent either from the Internet or through an SMS message, and allows you to gather information regarding the device’s location, hardware and network status, and optionally trigger specific actions on it.
100% geolocation aware
Prey uses either the device’s GPS or the nearest WiFi hotspots to triangulate and grab a fix on its location. It’s shockingly accurate.
Know your enemy
Take a picture of the thief with your laptop’s webcam so you know what he looks like and where he’s hiding. Powerful evidence.
No unauthorized access
Fully lock down your PC, making it unusable unless a specific password is entered. The guy won’t be able to do a thing!
Wifi autoconnect
If enabled, Prey will attempt to hook onto to the nearest open WiFi hotspot when no Internet connection is found.
Watch their movements
Grab a screenshot of the active session * if you’re lucky you may catch the guy logged into his email or Facebook account!
Scan your hardware
Get a complete list of your PC’s CPU, motherboard, RAM, and BIOS information. Works great when used with Active Mode.
Light as a feather
Prey has very few dependencies and doesn’t even leave a memory footprint until activated. We care as much as you do.
Keep your data safe
Hide your Outlook or Thunderbird data and optionally remove your stored passwords, so no one will be able to look into your stuff.
Full auto updater
Prey can check its current version and automagically fetch and update itself, so you don’t need to manually reinstall each time.
What’s New
- Android version updated to 2.4.9
Bitlocker Disk Encryption
Use our new Disk Encryption tool to easily encrypt data on compatible Windows devices remotely using Windows’ native BitLocker tool.
Enterprises with fleets using Windows as an operating system can now take advantage of Microsoft’s native BitLocker disk encryption tool using Prey! Let us introduce you to our new Disk Encryption action. This tool allows you to easily activate BitLocker’s disk encryption remotely on compatible devices (Windows 10 Pro, Enterprise, or Education) and protect the data on their hard drives!
BitLocker is a native encryption tool that comes with Windows 10 Pro, Enterprise, or Education and doesn’t need to be installed or bought separately.
This new tool has been added to our Enterprise plan, and it is the next step into better helping organizations secure their data. Encryption is a key risk mitigator! Data theft, data breaches, or device loss won’t result in compromised data if said information is encrypted.
How to use the Disk Encryption Tool
This action will be available on any Windows 10 device using a Windows Pro, Enterprise, or Education version and with hardware that possesses the TPM (Trusted Platform Module). To turn on BitLocker:
1) Find a compatible Windows device on your Prey control panel, and access its individual view by clicking it on the device list. Once there, you can find the Disk Encryption action on the right-hand action bar.
2) Click on the action’s button to begin the process. You will need to select the drives on the computer that you want to encrypt with BitLocker.
3) Select the encryption method you want to apply. Selecting ‘Full Disk’ takes longer, but protects the complete disk (unused, and used). This is ideal for computers that are in active use; on the other hand, selecting the ‘Used Space Only’ will be faster, but doesn’t protect unused space. This is ideal for brand new computers that haven’t had data stored yet.
4) Finally, select the encryption standard. AES_128 is ideal for fixed internal drives, and XTS_AES128 is ideal for removable drives like a flash drive. This option represents the type of encryption applied.
5) Click Start Encryption to apply!
What will happen next?
Prey will reach out to the device and, once connected, will request BitLocker to begin the encryption process. You can click the action to see a progress bar and follow the encryption process as it protects the selected drive.
Note that the encryption process is not instant, as Windows will need to encrypt all available data as a whole. The completion time will vary according to the computer’s specifications and the disk’s data size.
The encryption process is ongoing and the device can be used continuously even when encrypting, and when completed all newly generated data will be encrypted by default. This, however, does mean that the computer’s performance will be slightly modified as a minor part of processing power will run this continuous encryption process. The recovery key (or encryption key) and disk password will be available on the devices’ hardware details in your account.
How to Decrypt a Disk Encrypted With Prey
- The decryption process is fairly straightforward. You can find the Decrypt option in the same action as before, Disk Encryption.
- Find a Windows device on your Prey account that had been previously encrypted using the same platform, and click on it to access its individual view.
- Open the Disk Encryption tool, and select the target disks to be decrypted.
- Click decrypt and Prey will initiate the process.
What will happen next?
Prey will connect to the Windows device and disable BitLocker, commencing the decryption of the selected disks. This process takes anywhere from 20 minutes to a couple of hours depending on the disk’s size, and the computer’s characteristics. If the device is turned off, it will be interrupted and resumed when turned back on.
Время на прочтение
7 мин
Количество просмотров 57K

Доброго времени суток читатель.
В последнее время участились на хабре сообщения о том, как люди находят свой украденный компьютер с помощью неких волшебных сервисов, преподносящих всю информацию о злоумышленнике на блюдечке с золотой каемочкой.
Речь идет в первую очередь о событиях описанных здесь и здесь, но для любителей все делать своими руками
(гентушников?)
есть еще информация здесь.
Мне почему-то казалось, что есть здесь обзоры таких программ, но поиск ничего не выдал, и я решил поведать общественности о замечательном сервисе Prey. Для тех кто о нем знает, пользуется им, либо каким-то другим предлагаю прочитать заключение статьи. Там есть несколько информации про верблюдов для всех пользователей подобных продуктов.
Для тех кому интересны подробности — прошу под кат.
Коротко и четко о сервисе говорится на их сайте:
Prey позволяет Вам следить за своим телефоном или ноутбуком все время и поможет найти, если они пропадут или их украдут. Это легкая open source разработка, кроме того абсолютно бесплатная. Она просто работает.
Что это такое
Prey — это программа, которая будучи запущенная на компьютере/телефоне сидит тихо и помалкивает, а в случае пропажи — по сигналу хозяина начинает втихую следить за действиями текущего пользователя (не будет уподобляться некоторым личностям и говорить «вор» — возможно это будет человек, который ищет как с вам связаться). Но обо всем по-порядку.
Немного общих слов:
- Prey — open source проект, расположенный на Github
- Написано все в основном на Bash. Присутствуют Perl и Python
- Проекту 2.5 года (первый коммит состоялся 18 февраля 2009)
- Клиент кросплатформенный. На официальном сайте доступны для скачивания версии для Windows, Linux (отдельно пакет для Ubuntu), Mac OS, ссылка на Android Market
- Текущая версия 0.5.3
Далее, я буду делать обзор на основе версии для Mac, однако, для Windows и Linux все отличается только на уровне внешнего вида установщика.
Установка
При запуске установки будет предложено выбрать два варианта настройки — для работы через личный кабинет, либо слать отчеты напрямую в почту.
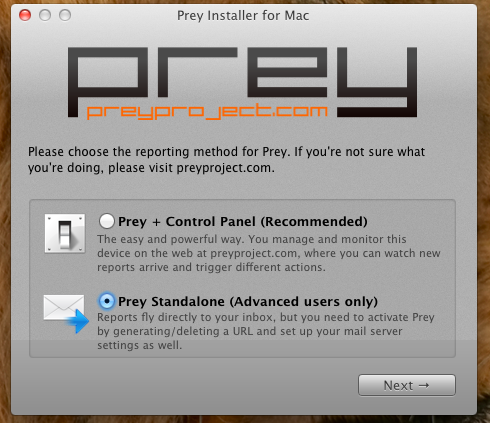
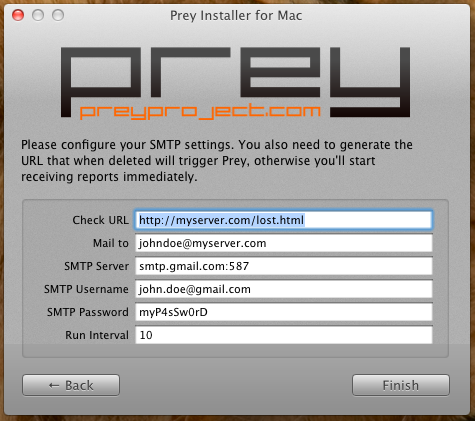
Про второй вариант стоит рассказать подробнее. Здесь необходимо указать URL который программа будет проверять на наличие с указанным интервалом, как только страницы не стало — запускает мониторинг. Ну и естественно указать реквизиты SMTP для отправки почты.
После выбора типа установки, ввода данных аккаунта или регистрации на preyproject.org (в версии Prey + Control Panel) и пароля администратора (для возможности запуска от root) происходит установка. Далее в Mac OS (и Linux наверняка) он поселяется в cron:
*/20 * * * * /usr/share/prey/prey.sh > /var/log/prey.log
На этом установка завершена. У Prey есть одно маленькое побочное явление, вызванное поселением в cron — его нет в списке установленных программ, но это скорее плюс. Удаление происходит не через корзину, а с помощью идущего в комплекте с установщиком деинсталлятора.
Панель управления
Я не использовал Standalone режим, поэтому тех кто с ним работает, пожалуйста, отпишитесь в комментариях как там все происходит.
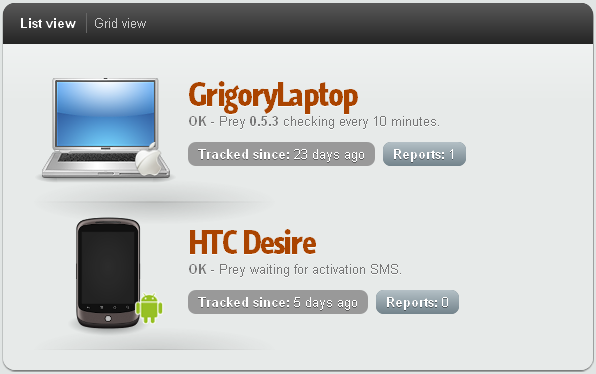
Итак, войдя в панель управления, нам показывают общую информацию о привязанных девайсах, кнопку добавления нового (хотя при переходе по ней предлагают подключать устройство при установке) и ненавязчивая реклама pro-аккаунта. В общем ничего лишнего — все в меру, интуитивно понятно, а главное — только главное.
Далее при клике на имя открывается панель управления копией Prey на данном устройстве. Тут четыре вкладки, за которыми скрываются настройки и информация об устройстве. Слева тихо висит немного общей информациио, список отчетов и кнопка отвязки устройства.
К сожалению, у меня нет pro-аккаунта, и поэтому некоторые функции мне недоступны, но почитать о них можно. В конце статьи я дам краткий список того, что можно делать, если заплатить денюшку. Функции доступные в платной подписке я буду отмечать звездочкой.
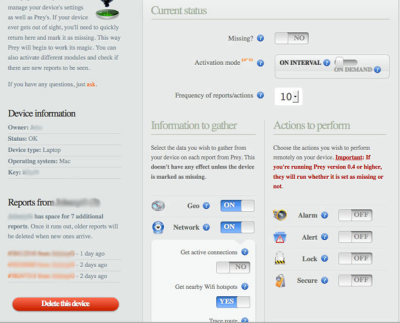
Основные настройки
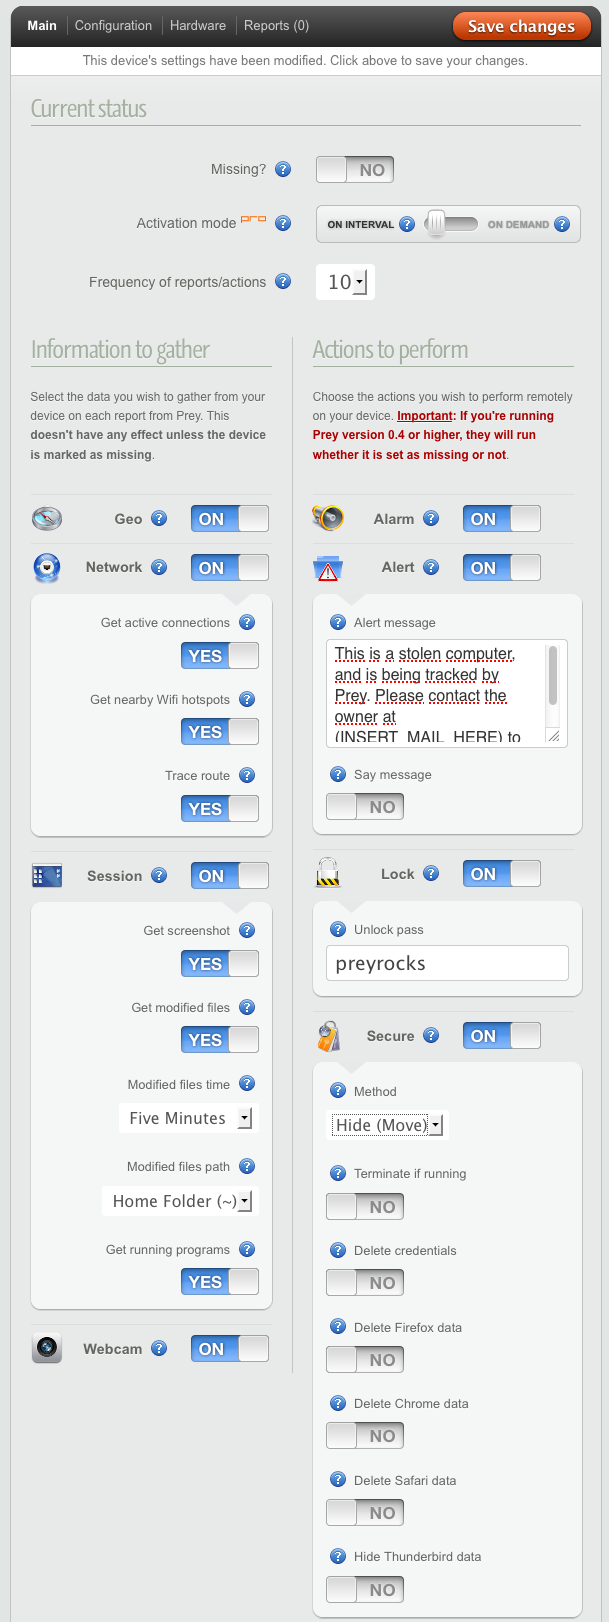
Основных настроек довольно немного, все скомпоновано по группам.
В самом верху расположены настройки текущего статуса, где можно «заявить» о пропаже, изменить интервал обновления, запросить отчет немедленно (*).
Далее настройки делятся на две колонки: информация для сбора, и действия для выполнения.
Информация для сбора:
- Информацию о текущем местоположении. GeoIP или встроенный GPS
- Информация о сети: активные соединения, информация о Wi-Fi точке, трассировка
- Информация о текущей сессии: скриншот, запущенные процессы, информация о модифицированных файлах: период, папка для мониторинга
- Сномок с камеры
Действия для выполнения:
- Издавать звуки каждые 30 секунд
- Вывести текстовое сообщение (в котором можно указать координаты или ультиматум), проговорить это сообщение
- Заблокировать устройство до ввода указанного пароля
- Можно удалить или переместить (опционально) пароли, куки, профили Firefox, Safari, Chrome, Thunderbird
Конфигурация
Здесь располагается конфигурация для контрольной панели и самого скрипта.
Кроме того присутствуют настройки самого скрипта:
- * Отчеты передаются по SSL
- * Шифровать инструкции. Видимо для защиты при передаче от сервера
- * Периодически сканировать железо компьютера.
- * Автоматическое обновление
- Возможность работать по последней полученной конфигурации в автономном режиме
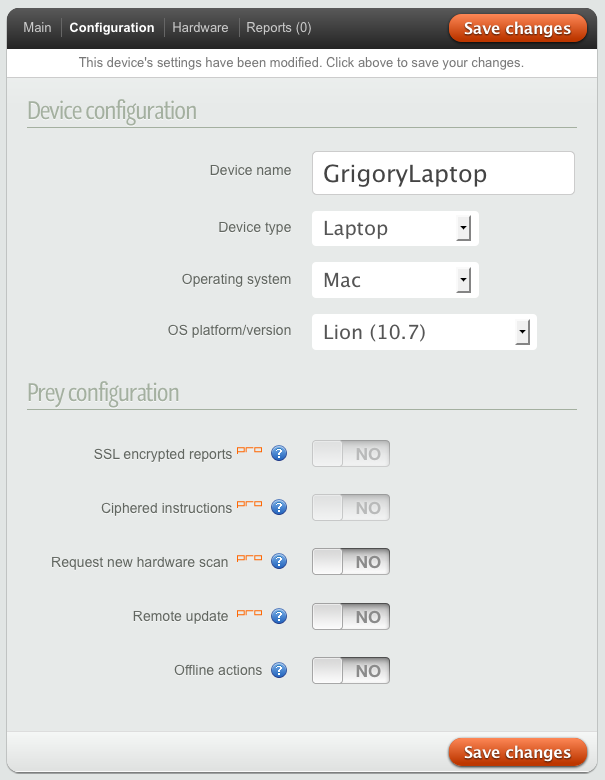
Отмечу, что Prey не заметил обновления до OS X Lion — пришлось ручками менять.
Железо
Тут не о чем много говорить, все предельно просто и понятно.

Вот мы и добрались до самого интересного места, ради которого все и затевалось!
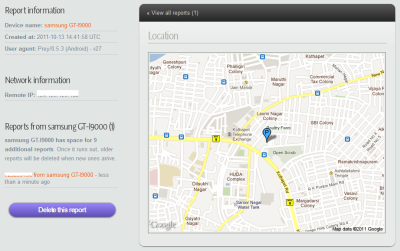
Отчет
В отчете есть много разнообразной информации (хотя все зависит от того, что было выбрано в настройках), поэтому и разберем по частям все, что я получил.
При просмотре отчета информация слева заменяется информацией об IP (private, public, gateway) и MAC адресах.
В самом начале отчета, в части гордо именуемой Location, есть карта с нанесенным предполагаемым местонахождением устройства. Предполагаемым потому, что в данном случае он промахнулся на полкилометра.

Ниже приводятся в Picture и Screenshot фотография со встреной камеры (если таковая имеется) и скриншот. Не покажу здесь по двум причинам — я не получился на фото, а на экране личная информация.
Далее идут блоки информации уже для тех кто более-менее понимает что в них написано. По ним пробегусь быстро и приведу куски информации, потому как большинству хабражителей и так ясно, как оно выглядит.
Под заголовком Uptime ожидаемо находится данные об аптайме системы:
11:20 up 4 days, 11:52, 2 users, load averages: 0.21 0.42 0.39
Под заголовком Running Programs находится список всех запущенных программ:
USER PID %CPU %MEM VSZ RSS TT STAT STARTED TIME COMMAND

...

grigory 1212 0.0 0.9 2520340 19316 ?? S Sun02PM 0:04.65 .../MacOS/Terminal -psn_0_491640

...
В части Logged User содержится список всех залогиненых пользователей:
grigory
Далее в Logged User содержится вывод комманды netstat:
Active Internet connections (including servers)

Proto Recv-Q Send-Q Local Address Foreign Address (state)

...

tcp4 0 0 grigorylaptop.im.56649 checkip-pao.dynd.http LAST_ACK

tcp4 0 0 grigorylaptop.im.56392 186-011.skype.qu.34051 ESTABLISHED

...
Также присутствует информация о сети Wi-Fi (если к ней подключен, конечно):
agrCtlRSSI: -57

agrExtRSSI: 0

agrCtlNoise: -91

agrExtNoise: 0

state: running

op mode: station

lastTxRate: 18

maxRate: 54

lastAssocStatus: 0

802.11 auth: open

link auth: wpa2-psk

BSSID: 00:**:**:**:**:**

SSID: ******

MCS: -1

channel: 11
Блок Complete Trace содержит трассировку до google.com:
traceroute: Warning: www.google.com has multiple addresses; using 74.125.232.18

traceroute to www.l.google.com (74.125.232.18), 64 hops max, 52 byte packets

 1 .....

 .....

 6 *

 7 msk-ix-gw1.google.com (193.232.244.232) 36.192 ms

 8 *

 9 74.125.232.18 (74.125.232.18) 33.950 ms
На этом отчет заканчивается, хотя мне кажется, что этой информации тоже достаточно.
Плюсы
Относительно плюсов я думаю все понятно из вышесказанного, однако здесь есть один момент, который хотелось бы рассмотреть отдельно.
В обсуждениях новости об эксперте по сетевой безопасности высказывалось, что когда-нибудь создатели Prey начнут следить за самим пользователем без его ведома. На мой взгляд при открытых исходных кодах в купе со Standalone режимом такая ситуация становится маловероятной, но если уж паранойя совсем подступила — поправь исходники, убрав оттуда код общения с их сервером и будет счастье.
Минусы
Плюсы использования Prey описаны, а вот минусов кстати нет, то есть они конечно имеются, но мной были незамечены. Присутствуют один неприятный момент в бесплатной версии: Control Panel работатет по HTTP, но скорее всего я их со своим вниманием просто проглядел.
Pro-аккаунт
При наличии платной подписки становятся доступны все нижеперечисленные возможности:
- Отчет по запросу
- Отчеты передаются по SSL (на сайте написано «Full SSL encryption», видимо и Control Panel будет через HTTPS)
- Шифровать инструкции. Видимо для защиты при передаче от сервера
- Периодически сканировать железо компьютера.
- Автоматическое обновление
- Монитор активности устройства
- Интервал сбора отчетов можно уменьшить до двух минут
- Автоматическая установка на несколько устройств
А ты верблюд?
Какой верблюд? — спросите вы. Следить за своим компьютером это конечно хорошо, придти с заявлением на грабителя и парой-тройкой отчетов, конечно можно. Но все это там, за рубежем, а на нашей любимой Родине все могут понять с точностью до наоборот. Поэтому я предложил glazkova обрисовать картину суровой действительности, рассмотренной через призму российского законодательства. На момент написания Мария сказала, что статья находится в работе. Так что спокойно ждем и НЕ ХОЛИВАРИМ по этому поводу.
О себе вместо заключения
Использовать данный сервис я начал около двух месяцев назад — установил сразу после покупки ноутбука, заодно закинул на HTC Desire. Сразу скажу, что вспомнил я про них когда читал о том лондонском специалисте. Про компьютеры все понятно — там он сидит в cron и спокойно делает свою работу, а вот про Android я не знаю как все устроено (нет времени ковырять исходники), но могу сказать главное — проблем с батареей и производительностью он не создает.
Из-за специфики работы сервиса трудно что-то говорить о комфорте использования. На мой непрофессиональный взгляд, работа сервиса не вызывает никаких нареканий кроме одного: панель управления иногда притормаживает — видимо пользователей у них уже достаточно много, и сервера начинают не справляться с нагрузкой. В остальном все замечательно.
UPD 1. Т.к. проскакивают комментарии в стиле «Дак они же отфарматируют диск и все.», «Пароль рута получается в три клика», я хочу сказать, что в начале поста неслучайно приведены ссылки на статьи из которых понятно, что такие люди были, есть, и, самое главное, будут. Поэтому смысл иметь такую программу в своем арсенале стоит.
UPD 2. Готова статья glazkova о правовых аспектах действий хозяев ноутбуков в случае их кражи.

How many times have you brought your laptop out in public? Unless you’re willing to splurge on a low-jack anti-theft device a software solution is your best bet. This one is free.
Do you take your laptop out in public? Maybe to a coffee shop, in your car, and do you think there is any risk in it being stolen? If you’d like a basic level of protection against theft, a software solution can provide that. Today we’ll look at Prey, an open-source application that allows you more peace of mind regarding your devices. It helps you quickly locate your laptop (and other devices) if you lose it or if it is stolen. Follow along as we do a brief overview of how it works.
Apart from the Windows version, there are also iOS, Ubuntu, Linux, Mac OS, and Android versions (Android has a built-in solution called Device Manager).
Download links:
- Windows
- iOS
- Android
- Ubuntu (Linux)
- Mac
In this overview, we’ll be using the Windows version. Installation is just a few clicks of the Next buttons, but don’t forget to have Configure Prey Settings ticked before hitting Finish.

Your antivirus may ask you whether you trust the file before proceeding, but you can go ahead and run it (the project’s FAQ does mention false positives as a not-so-uncommon occurrence). First, you’ll create a user account, provided you don’t have one already.

Not much data is required to do so, apart from an email address, your name, and a password. You’ll also need to give your device a name and select the type of device it belongs to. A desktop can also be added (because one can get stolen, too, can’t it?).

That’s about it for the configurator. You’ll get a confirmation message and an email that tells you things are in working order. Also in the email is this link, which will lead you to your Control panel. Once you’re logged in with your email address and password, you’ll notice that your device is already tracked and showing up.

Now, if you click its name, you’ll see a whole lot of options that you can use after you have reported the device as missing. The moment you have, you’ll see “Tracked, waiting for the report” next to its name, with the report taking more than 10 minutes to show up, depending on the amount of information you requested.
All that’s required is for the laptop to be connected to the internet.

Each one of the categories has lots of options you can enable and use. First of all, the Geo area will allow you to locate the device based on the device’s GPS or nearest Wi-Fi network. In contrast, the Network option will provide you with details such as active connections and nearby Wi-Fi hotspots to make it easier to locate.

It is also possible to take a screenshot and even attempt to take a picture of the thief using the webcam and find out details such as running programs and modified files. If it’s a laptop containing sensitive information, this could be very useful.

A second panel is the action one, where you can do things on your missing device. You can sound an alarm or send a message to it, which will appear on its screen – for example, a phone number and a reward in case of its return. Actions will work whether the laptop is missing or not, as seen below.

You can also take more drastic measures, like adding a password or deleting various information, like browser data or data from your email client. A good thing is that data can be hidden instead of being permanently deleted, so you can recover it if you recover the device.

Once a report is available, you will get a notification in your Prey account. The report will include all the information you requested and, most importantly, you will be able to see your device on Google Maps and the thief’s picture, too. In my case, as you can see, the thief was a total rockstar babe clever one.

Starting from that information, you can go about recovering your device.
More Details
Another thing you should know is that the free account only allows you to store 10 reports in your account for up to three devices. Should you need more, several pro account options are available, ranging from $5 to $399 per month, with an increasing number of devices protected.
Pro accounts include additional features such as monitoring devices even when they aren’t reported as missing, a more significant number of reports stored, smaller intervals between said reports, SSL security, and a few other things.
All in all, a pretty functional solution, which could prove priceless should your laptop get stolen.
![]()
Download Windows Speedup Tool to fix errors and make PC run faster
Your laptop generally has a lot of important and sensitive data which comprises both your personal and business information. This is the main reason that you need to make sure that your data is not misused in case of theft. Also, you might want to make it possible to retrieve your laptop after it is stolen.
Although there are a few paid premium services to help you protect and track your stolen laptop there is an equally effective free alternative service available. Prey is a cross-platform, free open-source anti-theft laptop recovery software that can potentially help you secure your data and track your laptop.

The first thing which needs to be done is installing prey on your laptop. Installing prey is a fairly simple process that is consistent with installing other applications on your computer. After it is installed it leaves practically no trace on your computer and sits quietly in the background and cannot be detected in the activity manager.
Once prey is installed on your computer it is paired to an online account which can be accessed through a regular browser. You can use this account to configure and monitor the various alert and security settings as per your requirements.
How To Recover Stolen Laptop/Phone
As soon as your laptop goes missing you need to alert Prey using your online account. It can subsequently monitor and track your laptop through this account. As soon as a missing laptop is reported, prey’s service jumps into action. The next time your stolen laptop connects to the internet, it sends back valuable information from the laptop.
This information includes a list of running applications, detailed Wi-Fi and network information, a screenshot of the desktop and if your laptop has an integrated webcam – then a picture of the person using the computer. You will receive regular email notifications as long as the laptop is connected to the internet. Prey provides additional security features which can help you erase sensitive data, lock down your computer and also send a message to the person using the laptop.
Prey also provides a premium paid option which provides you access to more detailed and real-time reports and other add-on benefits. One of the major shortcomings of Prey is that it can be uninstalled by a tech-savvy thief in the same way a regular application is uninstalled. Also since it is not embedded in the BIOS, like some of its paid counterparts, therefore it can be rendered useless in case the hard disk is formatted.
VERDICT
Prey is a good application to have on your mobile computers and phones. It enhances your chances of protecting your data and retrieving back your stolen laptop/phones. Most importantly, it is free and open source. You can download and read about Prey Free on its official page here.
Arun Kumar has been a Microsoft MVP (2010-12). He is obsessed with technology, especially the Internet. He deals with the multimedia content needs of training and corporate houses.

Looking for a way to Download Prey Anti Theft: Find My Phone & Mobile Security for Windows 10/8/7 PC? You are in the correct place then. Keep reading this article to get to know how you can Download and Install one of the best Tools app Prey Anti Theft for PC.
Most of the apps available on Google play store or iOS Appstore are made exclusively for mobile platforms. But do you know you can still use any of your favorite Android or iOS apps on your laptop even if the official version for PC platform not available? Yes, they do exits a few simple tricks you can use to install Android apps on Windows machine and use them as you use on Android smartphones.
Here in this article, we will list down different ways to Download Prey Anti Theft: Find My Phone & Mobile Security on PC in a step by step guide. So before jumping into it, let’s see the technical specifications of Prey Anti Theft: Find My Phone & Mobile Security.
Prey Anti Theft: Find My Phone & Mobile Security for PC – Technical Specifications
| Name | Prey Anti Theft: Find My Phone & Mobile Security |
| Category | Tools |
| File size | 7.1M |
| Installations | 1,000,000+ |
| Developed By | Prey, Inc. |
Prey Anti Theft: Find My Phone & Mobile Security is on the top of the list of Tools category apps on Google Playstore. It has got really good rating points and reviews. Currently, Prey Anti Theft: Find My Phone & Mobile Security for Windows has got over 1,000,000+ app installations and 3.6 star average user aggregate rating points.
If you haven’t installed Prey Anti Theft: Find My Phone & Mobile Security on your Android smartphone, here is the Google playstore link. It’s worth installing on your smartphone –
[appbox googleplay com.prey]
Prey Anti Theft Download for PC Windows 10/8/7 Laptop:
Most of the apps these days are developed only for the mobile platform. Games and apps like PUBG, Subway surfers, Snapseed, Beauty Plus, etc. are available for Android and iOS platforms only. But Android emulators allow us to use all these apps on PC as well.
So even if the official version of Prey Anti Theft: Find My Phone & Mobile Security for PC not available, you can still use it with the help of Emulators. Here in this article, we are gonna present to you two of the popular Android emulators to use Prey Anti Theft on PC.
Prey Anti Theft Download for PC Windows 10/8/7 – Method 1:
Bluestacks is one of the coolest and widely used Emulator to run Android applications on your Windows PC. Bluestacks software is even available for Mac OS as well. We are going to use Bluestacks in this method to Download and Install Prey Anti Theft: Find My Phone & Mobile Security for PC Windows 10/8/7 Laptop. Let’s start our step by step installation guide.
- Step 1: Download the Bluestacks software from the below link, if you haven’t installed it earlier – Download Bluestacks for PC
- Step 2: Installation procedure is quite simple and straight-forward. After successful installation, open Bluestacks emulator.
- Step 3: It may take some time to load the Bluestacks app initially. Once it is opened, you should be able to see the Home screen of Bluestacks.
- Step 4: Google play store comes pre-installed in Bluestacks. On the home screen, find Playstore and double click on the icon to open it.
- Step 5: Now search for the app you want to install on your PC. In our case search for Prey Anti Theft: Find My Phone & Mobile Security to install on PC.
- Step 6: Once you click on the Install button, Prey Anti Theft: Find My Phone & Mobile Security will be installed automatically on Bluestacks. You can find the app under list of installed apps in Bluestacks.
Now you can just double click on the app icon in bluestacks and start using Prey Anti Theft: Find My Phone & Mobile Security app on your laptop. You can use the app the same way you use it on your Android or iOS smartphones.
If you have an APK file, then there is an option in Bluestacks to Import APK file. You don’t need to go to Google Playstore and install the game. However, using the standard method to Install any android applications is recommended.
The latest version of Bluestacks comes with a lot of stunning features. Bluestacks4 is literally 6X faster than the Samsung Galaxy J7 smartphone. So using Bluestacks is the recommended way to install Prey Anti Theft: Find My Phone & Mobile Security on PC. You need to have a minimum configuration PC to use Bluestacks. Otherwise, you may face loading issues while playing high-end games like PUBG
Prey Anti Theft Download for PC Windows 10/8/7 – Method 2:
Yet another popular Android emulator which is gaining a lot of attention in recent times is MEmu play. It is super flexible, fast and exclusively designed for gaming purposes. Now we will see how to Download Prey Anti Theft: Find My Phone & Mobile Security for PC Windows 10 or 8 or 7 laptop using MemuPlay.
- Step 1: Download and Install MemuPlay on your PC. Here is the Download link for you – Memu Play Website. Open the official website and download the software.
- Step 2: Once the emulator is installed, just open it and find Google Playstore app icon on the home screen of Memuplay. Just double tap on that to open.
- Step 3: Now search for Prey Anti Theft: Find My Phone & Mobile Security app on Google playstore. Find the official app from Prey, Inc. developer and click on the Install button.
- Step 4: Upon successful installation, you can find Prey Anti Theft: Find My Phone & Mobile Security on the home screen of MEmu Play.
MemuPlay is simple and easy to use application. It is very lightweight compared to Bluestacks. As it is designed for Gaming purposes, you can play high-end games like PUBG, Mini Militia, Temple Run, etc.
Prey Anti Theft for PC – Conclusion:
Prey Anti Theft: Find My Phone & Mobile Security has got enormous popularity with it’s simple yet effective interface. We have listed down two of the best methods to Install Prey Anti Theft: Find My Phone & Mobile Security on PC Windows laptop. Both the mentioned emulators are popular to use Apps on PC. You can follow any of these methods to get Prey Anti Theft for Windows 10 PC.
We are concluding this article on Prey Anti Theft Download for PC with this. If you have any queries or facing any issues while installing Emulators or Prey Anti Theft: Find My Phone & Mobile Security for Windows, do let us know through comments. We will be glad to help you out!