Вы можете использовать PowerShell модуль PSWindowsUpdate для управления обновлениями Windows из командной строки. Модуль PSWindowsUpdate не встроен в Windows и доступен для установки из репозитория PowerShell Gallery. PSWindowsUpdate позволяет администраторам удаленно проверять, устанавливать, удалять и скрывать обновления на рабочих станциях и серверах Windows. Модуль PSWindowsUpdate особо ценен при использовании для управления обновлениями в Core редакциях Windows Server (в которых отсутствуют графический интерфейс), а также при настройке образа Windows в режиме аудита.
Содержание:
- Установка модуля управления обновлениями PSWindowsUpdate
- Обзор команд модуля PSWindowsUpdate
- Управление обновлениями Windows на удаленных компьютерах через PowerShell
- Получить список доступных обновлений Windows из PowerShell
- Установка обновлений Windows с помощью Install-WindowsUpdate
- Просмотр истории установленных обновлений Windows (Get-WUHistory)
- Удаление обновлений в Windows с помощью Remove-WindowsUpdate
- Как скрыть ненужные обновления Windows с помощью PowerShell (Hide-WindowsUpdate)?
Установка модуля управления обновлениями PSWindowsUpdate
Если вы используете Windows 10/11 или Windows Server 2022/2019/2016, вы можете установить (обновить) модуль PSWindowsUpdate из онлайн репозитория через менеджер пакетов PackageManagement всего одной командой:
Install-Module -Name PSWindowsUpdate
После окончания установки нужно проверить наличие пакета:
Get-Package -Name PSWindowsUpdate
В старых версиях Windows 2012R2/Windows 8.1 и ниже при установке PowerShell модуля может появится ошибка:
Install-Module: Unable to download from URI.Unable to download the list of available providers. Check your internet connection.
Для установки модуля нужно использовать для подключения протокол TLS 1.2. Включите его:
[Net.ServicePointManager]::SecurityProtocol = [Net.SecurityProtocolType]::Tls12
Если у вас установлена более старая версия Windows (Windows 7/8.1/ Windows Server 2008 R2/ 2012 R2) или отсутствует прямой доступ в Интернет, вы можете установить модуль PSWindowsUpdate вручную (см. полную инструкцию по офлайн установке модулей PowerShell).
- Скачайте модуль PSWindowsUpdate на любой онлайн компьютер:
Save-Module –Name PSWindowsUpdate –Path C:\ps\
; - Скопируйте модуль на целевой компьютер, и поместите его в каталог
%WINDIR%\System32\WindowsPowerShell\v1.0\Modules
(при постоянном использовании модуля это лучший вариант); - Разрешите выполнение PowerShell скриптов:
Set-ExecutionPolicy –ExecutionPolicy RemoteSigned -force - Теперь вы можете импортировать модуль в свою сессию PowerShell:
Import-Module PSWindowsUpdate
Примечание. В Windows 7 / Server 2008 R2 при импорте модуля PSWindowsUpdate вы можете столкнутся с ошибкой вида:
Имя "Unblock-File" не распознано как имя командлета
. Дело в том, что в модуле используются некоторые функции, которые появились только в PowerShell 3.0. Для использования этих функций вам придется обновить PowerShell, либо вручную удалить строку | Unblock-File из файла PSWindowsUpdate.psm1.
После установки модуля PSWindowsUpdate на своем компьютере вы можете удаленно установить его на другие компьютеры или сервера с помощью командлета Update-WUModule. Например, чтобы скопировать PSWindowsUpdate модуль с вашего компьютера на два удаленных сервера, выполните команды (нужен доступ к удаленным серверам по протоколу WinRM):
$Targets = "Server1", "Server2"
Update-WUModule -ComputerName $Targets -local
Чтобы сохранить модуль в сетевой каталог для дальнейшего импорта модуля на других компьютерах, выполните:
Save-Module -Name PSWindowsUpdate –Path \\fs01\ps\
Обзор команд модуля PSWindowsUpdate
Список доступных командлетов модуля можно вывести так:
get-command -module PSWindowsUpdate
Вкратце опишем назначение команд модуля:
- Clear-WUJob – использовать Get-WUJob для вызова задания WUJob в планировщике;
- Download-WindowsUpdate (алиас для Get-WindowsUpdate –Download) — получить список обновлений и скачать их;
- Get-WUInstall, Install-WindowsUpdate (алиас для Get-WindowsUpdate –Install) – установить обвновления;
- Hide-WindowsUpdate (алиас для Get-WindowsUpdate -Hide:$false) – скрыть обновление;
- Uninstall-WindowsUpdate -удалить обновление с помощью Remove-WindowsUpdate;
- Add-WUServiceManager – регистрация сервера обновления (Windows Update Service Manager) на компьютере;
- Enable-WURemoting — включить правила Windows Defender файервола, разрешающие удаленное использование командлета PSWindowsUpdate;
- Get-WindowsUpdate (Get-WUList) — выводит список обновлений, соответствующим указанным критериям, позволяет найти и установить нужное обновление. Это основной командлет модуля PSWindowsUpdate. Позволяет скачать и установить обновления с сервера WSUS или Microsoft Update. Позволяет выбрать категории обновлений, конкретные обновления и указать правила перезагрузки компьютера при установке обновлений;
- Get-WUApiVersion – получить версию агента Windows Update Agent на компьютере;
- Get-WUHistory – вывести список установленных обновлений (история обновлений);
- Get-WUInstallerStatus — проверка состояния службы Windows Installer;
- Get-WUJob – запуска заданий обновления WUJob в Task Scheduler;
- Get-WULastResults — даты последнего поиска и установки обновлений (LastSearchSuccessDate и LastInstallationSuccessDate);
- Get-WURebootStatus — позволяет проверить, нужна ли перезагрузка для применения конкретного обновления;
- Get-WUServiceManager – вывод источников обновлений;
- Get-WUSettings – получить настройки клиента Windows Update;
- Invoke-WUJob – удаленное вызов заданий WUJobs в Task Schduler для немедленного выполнения заданий PSWindowsUpdate.
- Remove-WindowsUpdate – удалить обновление;
- Remove-WUServiceManager – отключить Windows Update Service Manager;
- Set-PSWUSettings – сохранить настройки модуля PSWindowsUpdate в XML файл;
- Set-WUSettings – настройка параметров клиента Windows Update;
- Update-WUModule – обновить модуль PSWindowsUpdate (можно обновить модуль на удаленном компьютере, скопировав его с текущего, или обновить из PSGallery);
- Reset-WUComponents – позволяет сбросить настройка агента Windows Update на компьютере к настройкам по-умолчанию.
Чтобы проверить текущие настройки клиента Windows Update, выполните команду:
Get-WUSettings
ComputerName                                 : WKS22122
WUServer                                     : http://MS-WSUS:8530
WUStatusServer                               : http://MS-WSUS:8530
AcceptTrustedPublisherCerts                  : 1
ElevateNonAdmins                             : 1
DoNotConnectToWindowsUpdateInternetLocations : 1
TargetGroupEnabled                           : 1
TargetGroup                                  : WorkstationsProd
NoAutoUpdate                                 : 0
AUOptions                                    : 3 - Notify before installation
ScheduledInstallDay                          : 0 - Every Day
ScheduledInstallTime                         : 3
UseWUServer                                  : 1
AutoInstallMinorUpdates                      : 0
AlwaysAutoRebootAtScheduledTime              : 0
DetectionFrequencyEnabled                    : 1
DetectionFrequency                           : 4
В данном примере клиент Windows Update на компьютере настроен с помощью GPO на получение обновлений с локального сервера WSUS.
Команда
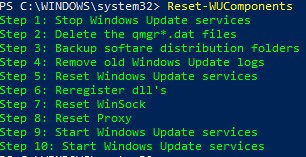
Reset-WUComponents –Verbose
позволяет сбросить все настройки агента Windows Update, перерегистрировать библиотеки и восстановить исходное состояние службы wususerv.
Управление обновлениями Windows на удаленных компьютерах через PowerShell
Практически все командлеты модуля PSWindowsUpdate позволяют управлять установкой обновлений на удаленных компьютерах. Для этого используется атрибут
-Computername Host1, Host2, Host3
. На удаленных компьютерах должен быть включен и настроен WinRM (вручную или через GPO).
Установите модуль PSWindowsUpdate на удаленных компьютерах и разрешите в файерволе доступ по динамическим RPC портам к процессу dllhost.exe. Можно использовать Invoke-Command для настройки модуля PSWindowsUpdate на удаленных компьютерах:
Invoke-Command -ComputerName $computer -ScriptBlock {Set-ExecutionPolicy RemoteSigned -force }
Invoke-Command -ComputerName $computer -ScriptBlock {Import-Module PSWindowsUpdate; Enable-WURemoting}
Модуль PSWindowsUpdate можно использовать для удаленного управлений обновлениями Windows как на компьютерах в домене AD, так и в рабочей группе (потребует определенной настройки PowerShell Remoting)
Для удаленного управления обновлениями компьютерах, нужно добавить имена компьютеров доверенных хостов winrm, или настроить удаленное управление PSRemoting через WinRM HTTPS:
winrm set winrm/config/client ‘@{TrustedHosts="HOST1,HOST2,…"}’
Или с помощью PowerShell:
Set-Item wsman:\localhost\client\TrustedHosts -Value wsk-w10BO1 -Force
Получить список доступных обновлений Windows из PowerShell
Вывести список обновлений, доступных для данного компьютера на сервере обновлений можно с помощью команд Get-WindowsUpdate или Get-WUList.
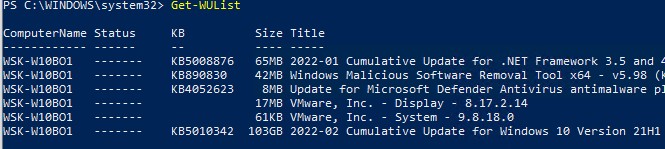
Чтобы проверить список доступных обновлений на удаленном компьютере, выполните:
Get-WUList –ComputerName server2
Вы можете проверить, откуда должна получать обновления ваша ОС Windows. Выполните команду:
Get-WUServiceManager
ServiceID IsManaged IsDefault Name
--------- --------- --------- ----
8b24b027-1dee-babb-9a95-3517dfb9c552 False False DCat Flighting Prod
855e8a7c-ecb4-4ca3-b045-1dfa50104289 False False Windows Store (DCat Prod)
3da21691-e39d-4da6-8a4b-b43877bcb1b7 True True Windows Server Update Service
9482f4b4-e343-43b6-b170-9a65bc822c77 False False Windows Update

Как вы видите, компьютер настроен на получение обновлений с локального сервера WSUS (Windows Server Update Service = True). В этом случае вы должны увидеть список обновлений, одобренных для вашего компьютера на WSUS.
Если вы хотите просканировать ваш компьютер на серверах Microsoft Update (кроме обновлений Windows на этих серверах содержатся обновления Office и других продуктов) в Интернете, выполните команду:
Get-WUlist -MicrosoftUpdate
Вы получаете предупреждение:
Get-WUlist : Service Windows Update was not found on computer
Чтобы разрешить сканирование на Microsoft Update, выполните команду:
Add-WUServiceManager -ServiceID "7971f918-a847-4430-9279-4a52d1efe18d" -AddServiceFlag 7
Теперь можете выполнить сканирование на Microsoft Update. Как вы видите, в данном случае были найдены дополнительные обновления для Microsoft Visual C++ 2008 и Microsoft Silverlight.

Чтобы проверить версию агента Windows Update на компьютере, выполните команду:
Get-WUApiVersion
ComputerName PSWindowsUpdate PSWUModuleDll ApiVersion WuapiDllVersion
------------ --------------- ------------- ---------- ---------------
FS01 2.2.0.2 2.2.0.2 8.0 10.0.19041.1320

Чтобы убрать определенные продукты или конкретные KB из списка обновлений, которые получает ваш компьютер, вы их можете исключить по:
- Категории (-NotCategory);
- Названию (-NotTitle);
- Номеру обновления (-NotKBArticleID).
Например, исключим из списка обновления драйверов, OneDrive и одну конкретную KB:
Get-WUlist -NotCategory "Drivers" -NotTitle OneDrive -NotKBArticleID KB4533002
Установка обновлений Windows с помощью Install-WindowsUpdate
Чтобы автоматически загрузить и установить все доступные обновления для вашей версии Windows с серверов Windows Update (вместо локального WSUS), выполните:
Install-WindowsUpdate -MicrosoftUpdate -AcceptAll -AutoReboot
Ключ AcceptAll включает одобрение установки для всех пакетов, а AutoReboot разрешает автоматическую перезагрузку Windows после установки обновлений.
Также можно использовать следующе параметры:
- IgnoreReboot – запретить автоматическую перезагрузку;
- ScheduleReboot – задать точное время перезагрузки компьютера.
Можете сохранить историю установки обновлений в лог файл (можно использовать вместо WindowsUpdate.log).
Install-WindowsUpdate -AcceptAll -Install -AutoReboot | Out-File "c:\$(get-date -f yyyy-MM-dd)-WindowsUpdate.log" -force
Можно установить только конкретные обновления по номерам KB:
Get-WindowsUpdate -KBArticleID KB2267602, KB4533002 -Install

В данном случае нужно подтверждать установку каждого обновления вручную.
Если вы хотите исключить некоторые обновления из списка на установку, выполните:
Install-WindowsUpdate -NotCategory "Drivers" -NotTitle OneDrive -NotKBArticleID KB4011670 -AcceptAll -IgnoreReboot
Модуль позволяет удаленно запустить установку обновлений сразу на нескольких компьютерах или серверах (на компьютерах должен присутствовать модуль PSWindowsUpdate). Это особенно удобно, так как позволяет администратору не заходить вручную на все сервера во время плановой установки обновлений. Следующая команда установит все доступные обновление на трех удаленных серверах:
ServerNames = “server1, server2, server3”
Invoke-WUJob -ComputerName $ServerNames -Script {ipmo PSWindowsUpdate; Install-WindowsUpdate -AcceptAll | Out-File C:\Windows\PSWindowsUpdate.log } -RunNow -Confirm:$false -Verbose -ErrorAction Ignore
Командлет Invoke-WUJob (ранее командлет назывался Invoke-WUInstall) создаст на удаленном компьютере задание планировщика, запускаемое от SYSTEM. Можно указать точное время для установки обновлений Windows:
Invoke-WUJob -ComputerName $ServerNames -Script {ipmo PSWindowsUpdate; Install-WindowsUpdate –AcceptAll -AutoReboot | Out-File C:\Windows\PSWindowsUpdate.log } -Confirm:$false -TriggerDate (Get-Date -Hour 20 -Minute 0 -Second 0)
Можно установить обновления на удаленном компьютере и отправить email отчет администратору:
Install-WindowsUpdate -ComputerName server1 -MicrosoftUpdate -AcceptAll - IgnoreReboot -SendReport –PSWUSettings @{SmtpServer="smtp.winitpro.ru";From="[email protected]";To="[email protected]";Port=25} -Verbose
Проверить статус задания установки обновления можно с помощью Get-WUJob:
Get-WUJob -ComputerName $ServerNames
Если команда вернет пустой список, значит задача установки на всех компьютерах выполнена.
Просмотр истории установленных обновлений Windows (Get-WUHistory)
С помощью команды Get-WUHistory вы можете получить список обновлений, установленных на компьютере ранее автоматически или вручную.

Можно получить информацию о дате установки конкретного обновления:
Get-WUHistory| Where-Object {$_.Title -match "KB4517389"} | Select-Object *|ft

Чтобы получить информацию об наличии установленного обновления на нескольких удаленных компьютерах, можно воспользоваться таким кодом:
"server1","server2" | Get-WUHistory| Where-Object {$_.Title -match "KB4011634"} | Select-Object *|ft
Проверить, нужна ли перезагрузка компьютеру после установки обновления:
Get-WURebootStatus –ComputerName WKS80JT
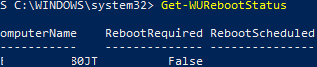
Проверьте значение атрибутов
RebootRequired
и
RebootScheduled
.
Получить дату последней установки обновлений на всех компьютерах в домене можно с помощью командлета Get-ADComputer из модуля AD PowerShell:
$Computers=Get-ADComputer -Filter {enabled -eq "true" -and OperatingSystem -Like '*Windows*' }
Foreach ($Computer in $Computers)
{
Get-WULastResults -ComputerName $Computer.Name|select ComputerName, LastSearchSuccessDate, LastInstallationSuccessDate
}
По аналогии можно найти компьютеры, которые не устаналивали обновления более 40 дней и вывести результат в графическую таблицу Out-GridView:
$result=@()
Foreach ($Computer in $Computers) {
$result+= Get-WULastResults -ComputerName $Computer.Name
}
$result| Where-Object { $_.LastInstallationSuccessDate -lt ((Get-Date).AddDays(-30)) }| Out-GridView
Удаление обновлений в Windows с помощью Remove-WindowsUpdate
Для корректного удаления обновлений используется командлет Remove-WindowsUpdate. Вам достаточно указать номер KB в качестве аргумента параметра KBArticleID. Чтобы отложить автоматическую перезагрузку компьютера можно добавить ключ
–NoRestart
:
Remove-WindowsUpdate -KBArticleID KB4011634 -NoRestart
Как скрыть ненужные обновления Windows с помощью PowerShell (Hide-WindowsUpdate)?
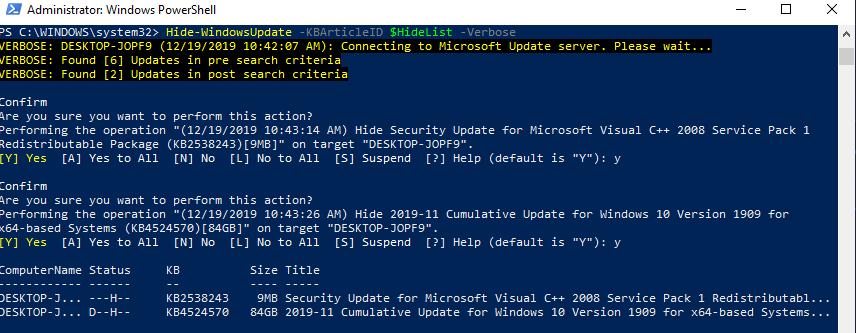
Вы можете скрыть определенные обновления, чтобы они никогда не устанавливались службой обновлений Windows Update на вашем компьютер (чаще всего скрывают обновления драйверов). Например, чтобы скрыть обновления KB2538243 и KB4524570, выполните такие команды:
$HideList = "KB2538243", "KB4524570"
Get-WindowsUpdate -KBArticleID $HideList -Hide
или используйте alias:
Hide-WindowsUpdate -KBArticleID $HideList -Verbose
Теперь при следующем сканировании обновлений с помощью команды
Get-WUlist
скрытые обновления не будут отображаться в списке доступных для установки патчей.
Вывести список обновлений, которые скрыты на данном компьютере можно так:
Get-WindowsUpdate –IsHidden
Обратите внимание, что в колонке Status у скрытых обновлений появился атрибут H (Hidden).

Отменить скрытие некоторых обновлений можно так:
Get-WindowsUpdate -KBArticleID $HideList -WithHidden -Hide:$false
или так:
Show-WindowsUpdate -KBArticleID $HideList
Для тех, кто себя некомфортно чувствует в консоли PowerShell, для управления обновлениями Windows 10 могу порекомендовать графическую утилиту Windows Update MiniTool.
Patch Management in our days is one of the most important tasks for the IT for small ,medium or large organizations.
Unfortunately to be honest it’s very time consuming and sometimes very complex task.
For these reasons lot of IT don’t give the attention that must be has the Patch Management. This is what hackers take advantage to exploit the systems most of the times.
I wrote articles in the past related with WSUS that can read if not.
How to install & configure WSUS in Windows Server 2016
WSUS Best Practices on Windows Server 2016
I understand that some of you maybe don’t have the time , budget or for any other reason to install and manage WSUS.
So today i will explain how can Manage Windows Updates in the Workstations or Servers with Powershell
I am sure that some of you have here for the module PSWindowsUpdate created by Michal Gajda.
Before start You can find the module in PowershellGallery.
The only prerequisites is to have Windows OS from Windows 7 or Windows Server 2012 or later and Powershell v.2.0 and later.
So Let’s start
How to install the PsWindowsUpdate module
The installation of the PsWIndowsUpdate module it’s simple but the steps are different when you have Windows Server 2016/Windows 10 and later or Windows Server 2012R2/Windows 8.1and prior.
I created different sections base on the Windows OS to describe exactly the steps that you should follow.
Local Installation In Windows Server 2016/Windows 10 and later
The installation of the PsWIndowsUpdate module in a local Server/Workstation it’s not require any advance knowledge when you have Windows Server 2016/Windows 10 and later.
-
Decide which Server/Workstation you want to install and use the PSWindowsUpdate module.
-
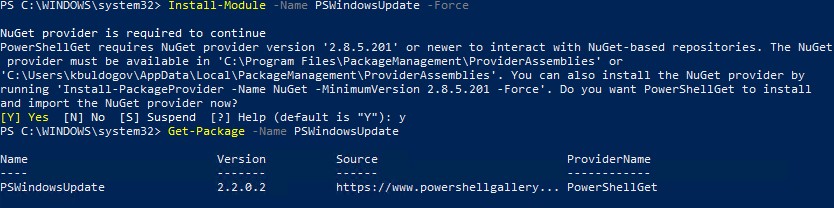
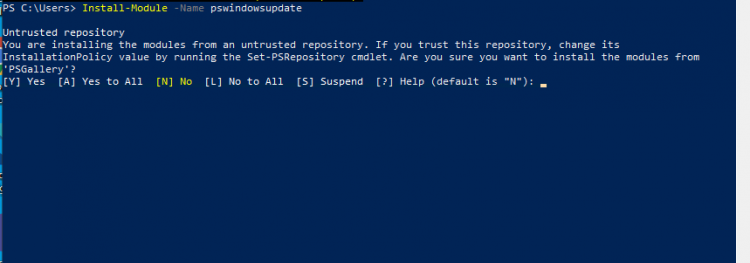
Open a Powershell As administrator and run the following command to install the module.
-
Type Y in the question regarding the Untrusted respository
Install-Module -Name PSWindowsUpdate
- After finish the installation don’t wait to see any info.
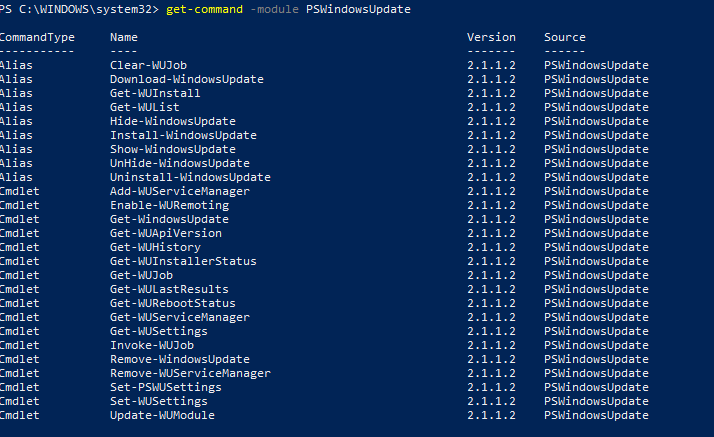
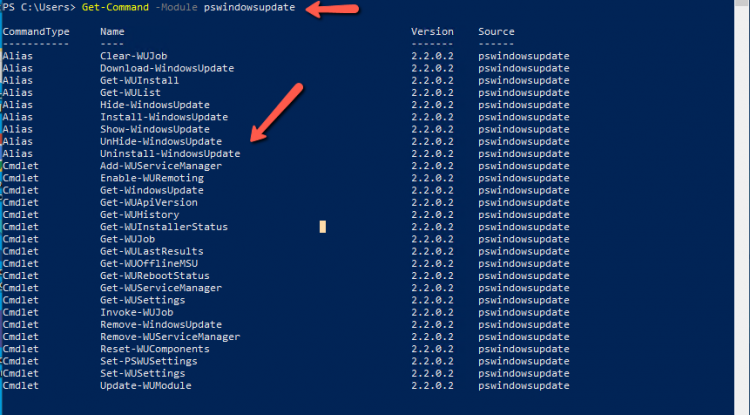
- To verify that the module installed type the following command to see all the available commands of the module.
Get-Command -Module PSWindowsUpdate
Remotely installation In Windows Server 2016/Windows 10 and later
With the PsWindowsUpdate module you can install Windows Update remotely in Servers/Workstations in order to centralize the deployment of the Windows Updates when you don’t have the WSUS.
The only prerequisite is to enable the TLS1.2 security protocol in powershell to be able download and install the Nuget Package Provider that requested before install the Pswindowsupdate module.
By default Powershell use the Ssl3 and Tls as Security Protocols.
Nuget.org has remove the security protocols Tls1.0 and Tls1.2 from 2020 as you can read in Deprecating TLS 1.0 and 1.1 on NuGet.org
So as I love the automation I have create a simple script that do the followings in order to install the module in the Remote Servers/Workstations.
- Create a new PSsession
- Enable the TLS12 Protocol
- Install the PsWindowsupdate module
- Get the Windows Updates that must be install
- Close the PSSession
——————————————————————————————————————
$session=New-PSSession -ComputerName <yourcomputername> -Credential «credential of admin account»
Invoke-Command -Session $session -ScriptBlock {
[Net.servicepointmanager]::SecurityProtocol=[Net.SecurityProtocolType]::Tls12
Install-module pswindowsupdate -force -AllowClobber
Get-WindowsUpdate | Format-Table
}
Get-PSSession | Remove-PSSession
————————————————————————————————————————————————————————-
Local installation prior to Windows Server 2016/Windows 10
Windows OS prior to Windows Server 2016 or Windows 10 it’s not include the Install-module command in Powershell.
So if you have Windows Server 2012/Windows 8.1 it needs more steps to install the PSWindowsUpdate module
- First of all you must download the module manual from the PowershellGallery .
- Save it in a folder to use it later.
- Unzip the file pswindowsupdate.2.2.0.2.nupkg (version depends when you will download).
- Now you can see a folder with a name pswindowsupdate.2.2.0.2.
- Open a Powershell As administrator.
- Change the path in the folder that you have save and extracted the module
- Run the following command
Import-Module PSWindowsUpdate.psd1 - Now run the Get-Command -Module PSWindowsUpdate to identify that you have import the module and have the available commands.
Remotely installation prior to Windows Server 2016/Windows 10
The installation of the module in Windows Server 2012/Windows 8.1 and prior remotely require more steps included some challenges that must be resolve.
Following the steps you can proceed to resolve any challenge and install the module.
- First of all you must save the folder pswindowsupdate.2.2.0.2 that you have extracted in a share location that can has access from the Servers/workstations that you want to install the module.
- Because the module will be located in a share location if you try to run an Import-module in Invoke-command in the remote servers/workstation you will get an Access denied error. The reason is that with the Invoke-command it’s a second hop and the remote computer can’t delegate the credentials from your computer to get access in the UNC path.

- To be able to resolve this challenge must enable the WSMAN CredSSP to transfer the credentials over the network and allow us in remote server/workstation to get access in the remote location that the module was saved. This is security issue but with the following script will be enable the WSMAN CredSSP only the time that needs to Import the module and after that will be disable it again.
- The steps are lot so I create a script that can do it for you and stay safe as describe above the WSMAN CredSSP will be enable only for the time that needs to import the module
- The following script is an example only for 2 Servers and do the following
- Enable WSMAN CredSSP in Client Role in the Server/Workstation that you will use it to install remotely the module in other devices
- Create a new PSSessionfor every Server/Workstation
- Enable WSMAN CredSSP as Server Role to accept the credentials in remote Servers/Workstations
- Remove the PSSession
- Create a new PSSessionwith Authentication method CredSSP in every remote Servers/Workstation in the list
- Import the PSWindowsUpdate module from the share location
- Get the Windows Updates that must be install
- Disable the WSMAN CredSSP in every remote device
- Disable the WSMAN CredSSP in the Server/Workstation that run the Powershell
- Close the PSSession
———————————————————————————————————————————————————————————————————-
Enable-WSManCredSSP -Role Client -DelegateComputer computernames -Force
$session1,$session2=New-PSSession -ComputerName computernames
Invoke-Command -Session $session1,$session2 -ScriptBlock {
Enable-WSManCredSSP -Role Server -Force
}
Get-PSSession | Remove-PSSession
$session=New-PSSession -ComputerName computernames -Authentication Credssp -Credential «credential of admin account»
Invoke-Command -Session $session -ScriptBlock {
Import-Module «share path of the PSWindowsUpdate.psd1»
Get-WindowsUpdate | Format-Table
Disable-WSManCredSSP -Role Server
}
Disable-WSManCredSSP -Role Client
Get-PSSession | Remove-PSSession
————————————————————————————————————————————————————————————————————————
How to install Windows Updates with PSWindowsUpdate module
The installation in a local Server/Workstation of the Windows Updates with the PSWindowsUpdate module it’s the same for every Windows OS.
- You can write down the following command to get all the available powershell commands that you can use in the module
Get-Command -Module PSWindowsUpdate - I will not explain all the commands in this article but only that we need to use.
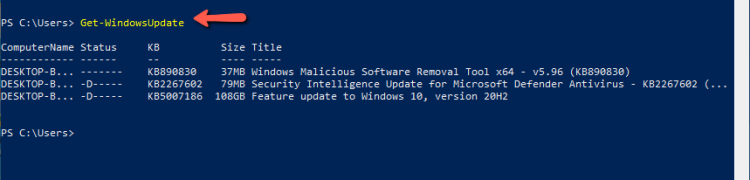
- So in order to get the available Windows Updates of the Server/Workstation you can run the following command
Get-WindowsUpdates - After some time you can see the list of the available Windows Updates.
- You have the option to install all the Available Windows updates with the following command
Get-WUInstall -AcceptAll -AutoReboot or Get-WUInstall -AcceptAll -IgnoreReboot - Or if you want to install only specific Windows Updates you can run the following command.
- Let’s install only the Windows Malicious Software Removal tool x64 update in my PC
Get-WUInstall -KBArticleID KB890830 -AcceptAll

- These are some of the most common commands that will be use in this module.
Install Windows Updates Remotely in Windows Server 2016/Windows 10 and later
As we have already create the script to install the PSWindowsUpdate module the only thing that must change is the line
Get-WindowsUpdates with the Get-WUInstall.
How to use the Get-WUInstall depends from you.
- if we want to install all the Updates or not.
- If you want to restart the Server/Workstation or not
——————————————————————————————————————
$session=New-PSSession -ComputerName <yourcomputername> -Credential «credential of admin account»
Invoke-Command -Session $session -ScriptBlock {
[net.servicepointmanager]::SecurityProtocol=[Net.SecurityProtocolType]::Tls12
Install-module pswindowsupdate -force -AllowClobber
Get-WUInstall -AcceptAll
}
Get-PSSession | Remove-PSSession
————————————————————————————————————————————————————————-
Install Windows Updates Remotely prior to Windows Server 2016/Windows 10
As we have already create the script to install the PSWindowsUpdate module the only thing that must change is the line
Get-WindowsUpdates with the Get-WUInstall.
How to use the Get-WUInstall depends from you.
- if we want to install all the Updates or not.
- If you want to restart the Server/Workstation or not
———————————————————————————————————————————————————————————————————-
Enable-WSManCredSSP -Role Client -DelegateComputer computernames -Force
$session1,$session2=New-PSSession -ComputerName computernames
Invoke-Command -Session $session1,$session2 -ScriptBlock {
Enable-WSManCredSSP -Role Server -Force
}
Get-PSSession | Remove-PSSession
$session=New-PSSession -ComputerName computernames -Authentication Credssp -Credential «credential of admin account»
Invoke-Command -Session $session -ScriptBlock {
Import-Module «share path of the PSWindowsUpdate.psd1»
Get-WUInstall -AcceptAll
Disable-WSManCredSSP -Role Server
}
Disable-WSManCredSSP -Role Client
Get-PSSession | Remove-PSSession
————————————————————————————————————————————————————————————————————————
Flexible and quick solution for those that need to Centralize Windows Updates without the WSUS.
To be honest the installation prior to Windows Server 2016/Windows 10 it’s not so easy but you will spend time only once until customize your script. After that you can use it as a schedule Task.
Imagine how much time you can save.
You will not have the options and possibilities that give you the WSUS but it’s a simple way to keep all the Windows PC and Servers up to date without need to spend lot of time.
The most time that you will spend will be the first time until manage all the Servers and Workstations to install the available Windows Updates.

A while ago, I had written a blog post about installing Windows Updates during an unattended install of Windows Server 2019. Let’s take a look at how to work with Windows Update in Windows Server 2019 including, logs, installing updates, and using PowerShell to automatically install Windows updates in Windows Server 2019. By controlling Windows Updates with PowerShell, you open a lot of doors to being able to implement effective configuration management and automated desired state with your infrastructure. Let’s look at Windows Server 2019 Automating Windows Update with PowerShell and Logs to see how this can be done.
Microsoft has departed from using the traditional windowsupdate.log file starting with Windows 10 and recent Windows Server versions starting with Windows Server 2016. Windows Server 2019 has followed suit with using PowerShell as the method to aggregate your log files. In case you are not familiar with this change in Windows Update logging, let’s step through that process and see how you can effectively gain access to your Windows Update logs in a readable format that is easily viewable.
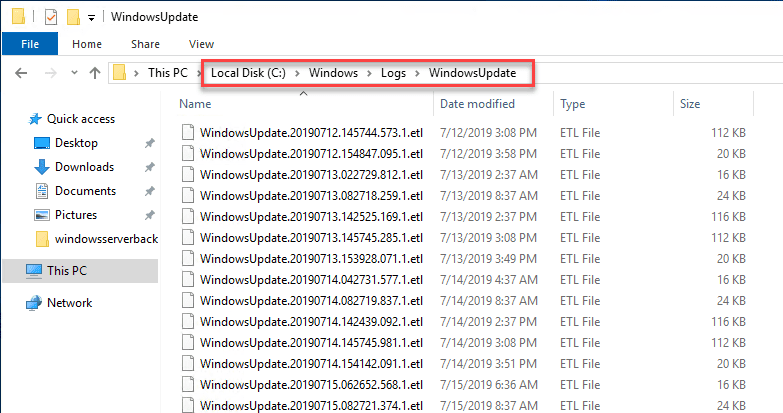
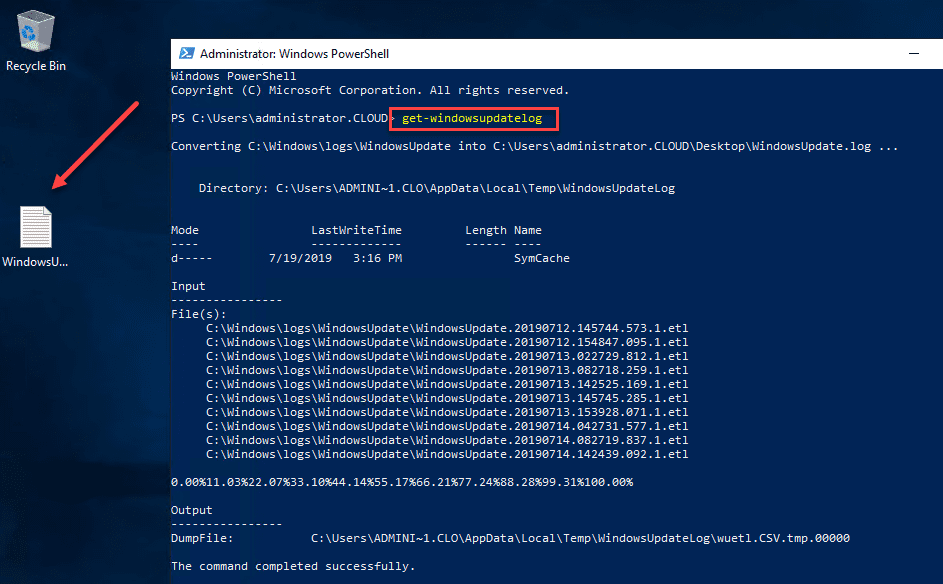
On a Windows Server 2016 and higher server, if you look in the location c:WindowsLogsWindowsUpdate you will see various log files that are in the format of .etl files. These are not easily readable if you are to simply try to open them up to edit and view their contents. However, there is a PowerShell command that Microsoft has provided that essentially creates a WindowsUpdate.log file similar to the legacy file that we have been used to viewing and troubleshooting with.
Below is a look at the c:windowslogswindowsupdate directory.
The command to aggregate your ETL log files into an easily readable format is the cmdlet:
Get-WindowsUpdateLog
As you can see below, you will see the message converting c:windowslogswindowsupdate into c:users<your username>Desktopwindowsupdate.log. As you can see with the arrow, the traditional WindowsUpdate.log file gets created as a result of the cmdlet.
The WindowsUpdate.log file that is created has the usual log information. Below is a snippet from the one generated in the screenshot above from a Windows Server 2019 VM.
2019/07/19 14:58:27.5442492 4328  6336  Agent           LogHistory called. idUpdate={BF584F11-3B97-415D-B596-E2BFB6BC4E7A}.200, resultMapped=0, resultUnMapped=0
2019/07/19 14:58:27.5477844 4328  6336  Agent           Install updates CallerId = Windows Defender Antivirus (77BDAF73-B396-481F-9042-AD358843EC24)
2019/07/19 14:58:27.5480030 4328  6336  IdleTimer       WU operation (CInstallCall::Init ID 5, operation # 30) stopped; does not use network; is not at background priority
2019/07/19 14:58:27.5503666 8880  7240  ComApi           Install ClientId = Windows Defender Antivirus (77BDAF73-B396-481F-9042-AD358843EC24)
2019/07/19 14:58:27.5503778 8880  7240  ComApi          Install call complete (succeeded = 1, succeeded with errors = 0, failed = 0, cancelled = 0, unaccounted = 0
2019/07/19 14:58:27.5503836 8880  7240  ComApi          Reboot required = False
2019/07/19 14:58:27.5503855 8880  7240  ComApi          * END *   Install ClientId = Windows Defender Antivirus (77BDAF73-B396-481F-9042-AD358843EC24)
2019/07/19 14:58:27.5504177 4328  7276  Agent           WU client calls back to install call {565D23B1-7445-4604-8120-B11E6B73C271} with code Call complete and error 0
2019/07/19 14:58:27.5551328 8880  8556  ComApi          Install call complete (succeeded = 1, succeeded with errors = 0, failed = 0, cancelled = 0, unaccounted = 0
2019/07/19 14:58:27.5551402 8880  8556  ComApi          * END *   All federated installs have completed. ClientId = Windows Defender Antivirus (77BDAF73-B396-481F-9042-AD358843EC24) (cV = Fl5ilwUoSEqn9HfP.3.1)
2019/07/19 15:08:27.5752052 4328  8400  Agent           Earliest future timer found:
2019/07/19 15:08:27.5752233 4328  8400  Agent               Timer: 29A863E7-8609-4D1E-B7CD-5668F857F1DB, Expires 2019-07-20 19:26:35, not idle-only, not network-only
2019/07/19 15:08:28.5871440 4328  96    Shared          UninitializeSUS
2019/07/19 15:08:28.5871472 4328  96    Misc            CSusClientGlobal::DoServicePreShutdown
2019/07/19 15:08:28.5873373 4328  96    IdleTimer       Idle timer disabled in preparation for service shutdown
2019/07/19 15:08:28.5873574 4328  96    Misc            WUTaskManager uninit
2019/07/19 15:08:28.5873602 4328  96    Agent           Earliest future timer found:
2019/07/19 15:08:28.5873691 4328  96    Agent               Timer: 7971F918-A847-4430-9279-4A52D1EFE18D, Expires 2019-07-19 20:51:09, not idle-only, network-only
2019/07/19 15:08:28.5916952 4328  96    Misc            CreateSessionStateChangeTrigger, TYPE:2, Enable:No
2019/07/19 15:08:28.5917026 4328  96    Misc            CreateSessionStateChangeTrigger, TYPE:4, Enable:No
2019/07/19 15:08:28.6273705 4328  96    Misc            Agent uninit
2019/07/19 15:08:28.6289738 4328  96    Misc            Reporter uninit
2019/07/19 15:08:28.6297334 4328  96    Misc            network cost manager uninit
2019/07/19 15:08:28.6297439 4328  96    Misc            Eventer uninit
2019/07/19 15:08:29.6336957 4328  96    Misc            ServiceManager uninit
2019/07/19 15:08:29.6337784 4328  96    Misc            PersistentTimeoutScheduler uninit
2019/07/19 15:08:29.6337806 4328  96    Misc            datastore uninit
2019/07/19 15:08:29.6883274 4328  96    Misc            setting cache uninit
2019/07/19 15:08:29.6883300 4328  96    Misc            security checker uninit
2019/07/19 15:08:29.6883341 4328  96    Misc            Test Hook uninit
2019/07/19 15:08:29.6883414 4328  96    Misc            IdleTimer uninit
2019/07/19 15:08:29.6887794 4328  96    Shared          * END * Service exit Exit code = 0x240001
One thing to note about the WindowsUpdate.log file that is created with the PowerShell cmdlet is that it is static. It doesn’t autoupdate like the traditional WindowsUpdate.log file did. You can just rerun the PowerShell cmdlet to regenerate the WindowsUpdate.log file to review the latest logs generated.
Automating Windows Updates in Windows Server 2019
I have covered this utility before, however, there is a great module available for installation – the GetWindowsUpdate cmdlet found in the PSWindowsUpdate. It is installed using the following PowerShell commands and requirements:
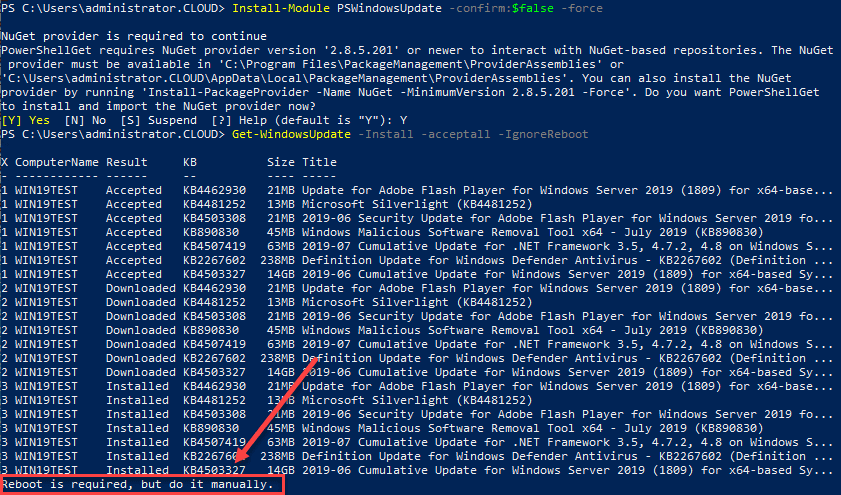
#Install PS Windows Update Module

Get-PackageProvider -name nuget -force
Install-Module PSWindowsUpdate -confirm:$false -force
Get-WindowsUpdate -Install -acceptall -IgnoreReboot
Below, is a look at installing the PSWindowsUpdate Module for installing Windows Updates in Windows Server 2019 using PowerShell.
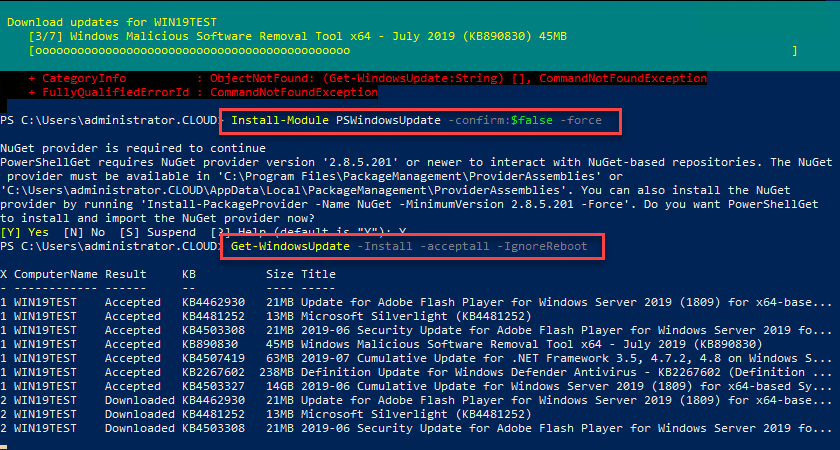
After running the Get-WindowsUpdate command on a Windows Server 2019 server with the installation of available updates. Note the Reboot is required, but do it manually at the end. This can be controlled with the -IgnoreReboot switch.

Wrapping Up Windows Server 2019 Automating Windows Update with PowerShell and Logs
With Windows Server 2019 automating Windows Update with PowerShell is a great way to control Windows updates with Windows Server 2019. Also, Windows Server 2019 Windows Update logs are easily obtained with PowerShell as well by running a PowerShell cmdlet to aggregate the various ETL files that are created by Windows Server 2019. The great thing about PowerShell is that Microsoft has fully embraced it in all aspects of both client and server operating systems. Having PowerShell performing the heavy lifting with Windows Updates is a great way to control and automate the process.
Windows Updates play a great role in security. We always recommend installing updates that are marked as Important. If you are having automatic update installation setting enabled then; you do not need to worry about anything, as Windows install all the updates from the background. For some reason, if your server does not have automatic update installation enabled, you must install all the important updates manually, or set it to automatic according to your preference.
Method 1 – Using Windows Updater
Windows Server 2016 & 2019
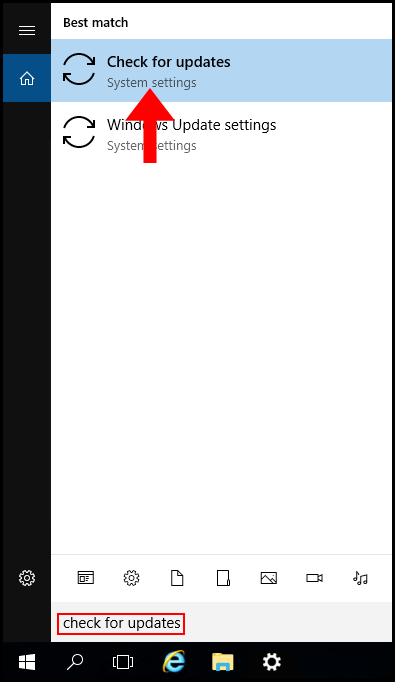
1. First, log in to your Windows Server then search, and open Check for updates.
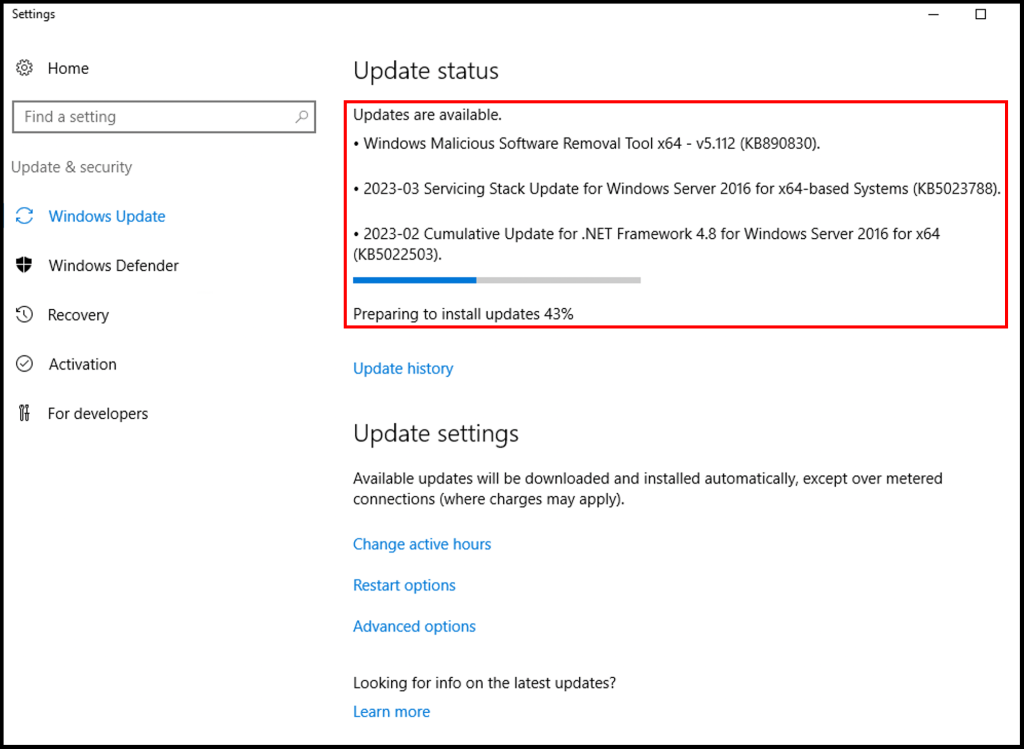
2. Now click Check for updates and Windows will begin to check for updates. Then it will start to download them.
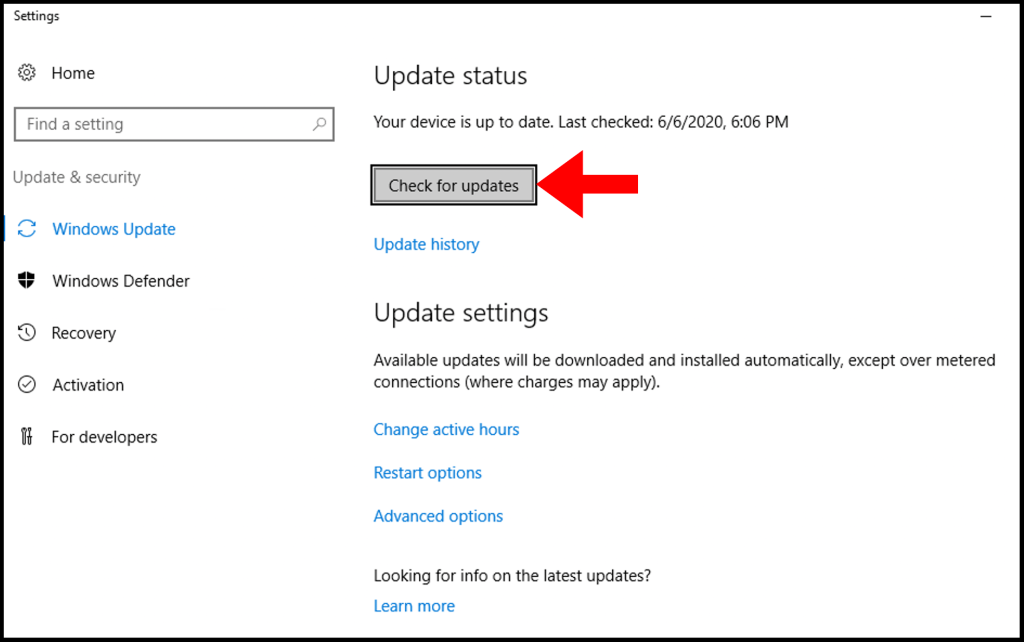
3. After finishing the download, Windows will begin to prepare the update for installation.
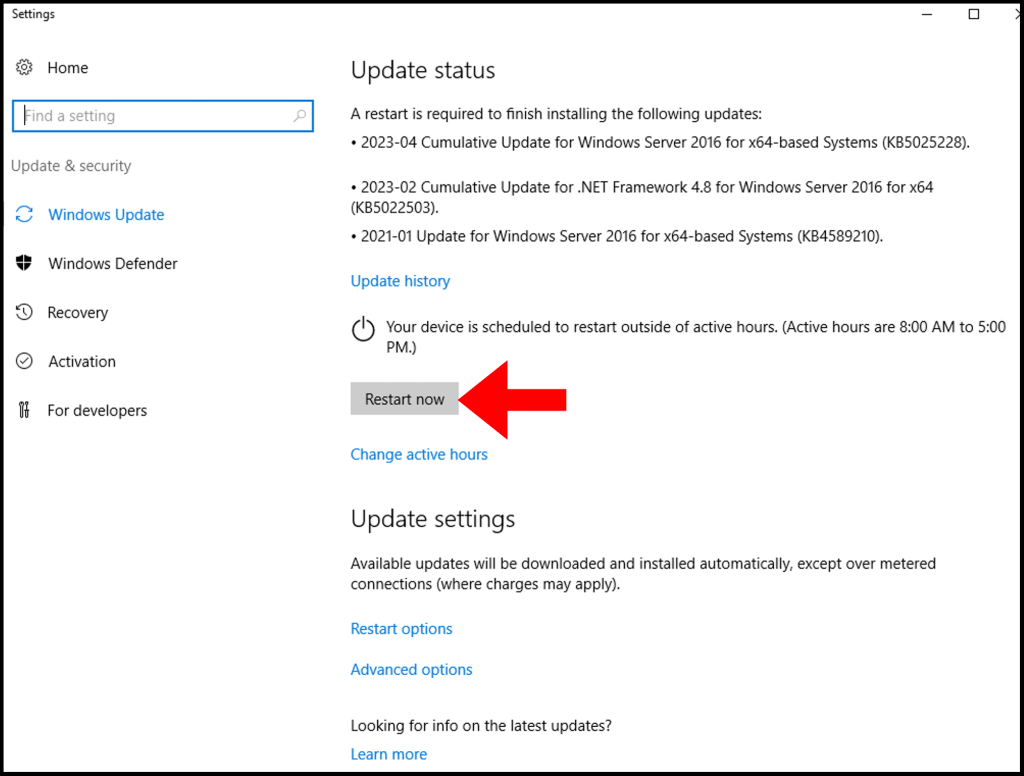
4. Once the installation is done, you will be prompted to restart the server. Click Restart now to complete the update.
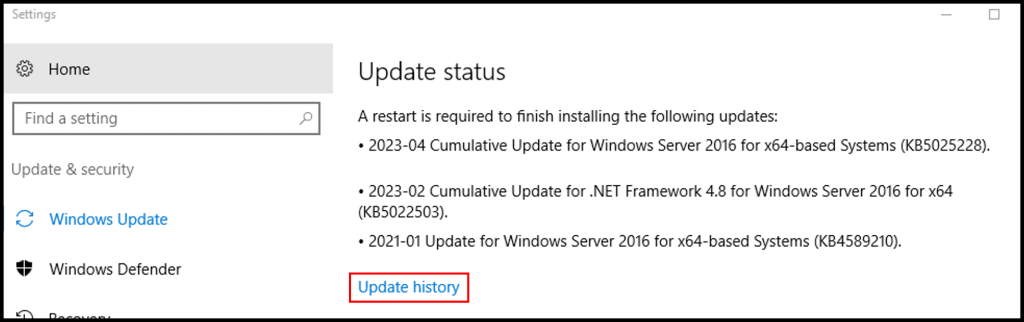
5. (Optional) You can check the recent installed Updates from “Update History“.
Windows Server 2012 R2
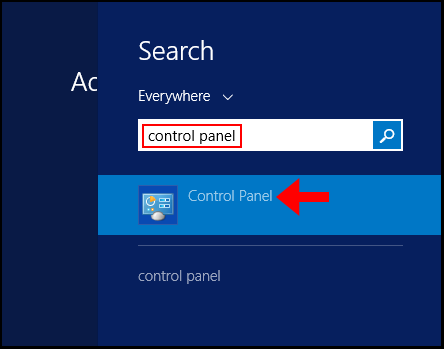
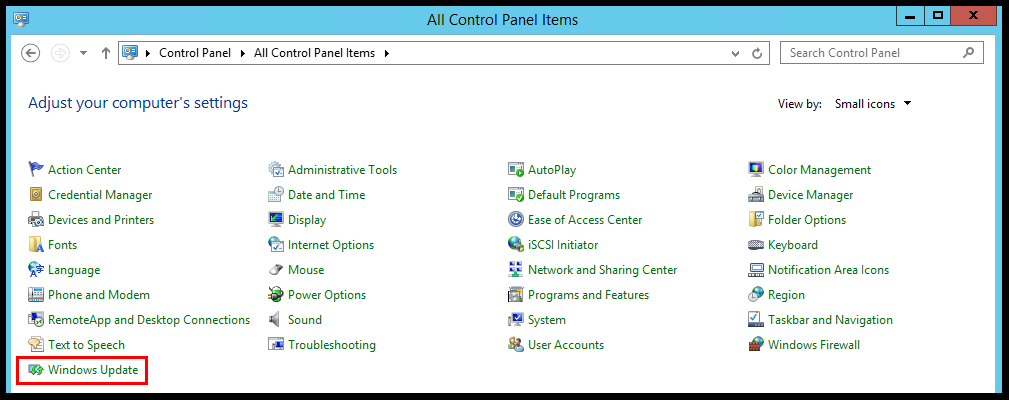
1. First, log in to your Windows Server then search and open Control Panel.
2. Expand the View by dropdown and select Small Icons to enable the view of all the options.
3. Then, click on Windows Update.
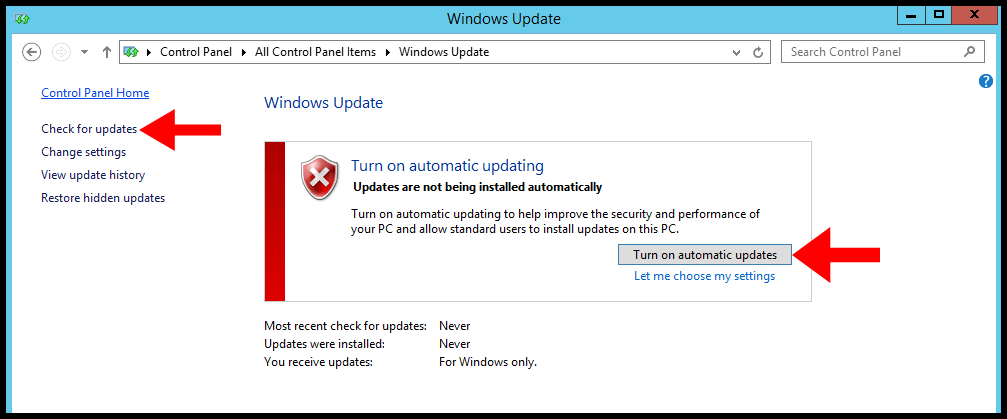
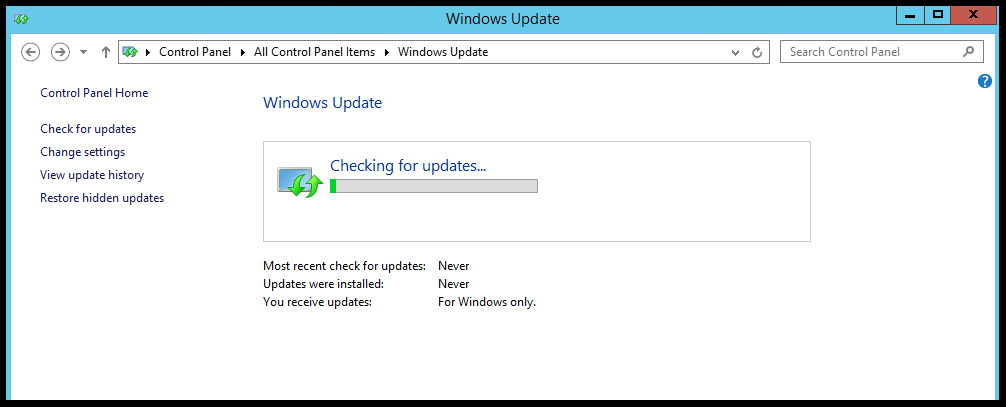
4. In Windows Server 2012 R2, automatic updates are disabled, for that, you need to Turn on automatic updates or click on Check for the updates. Once, you do that, Windows will begin looking for available updates.
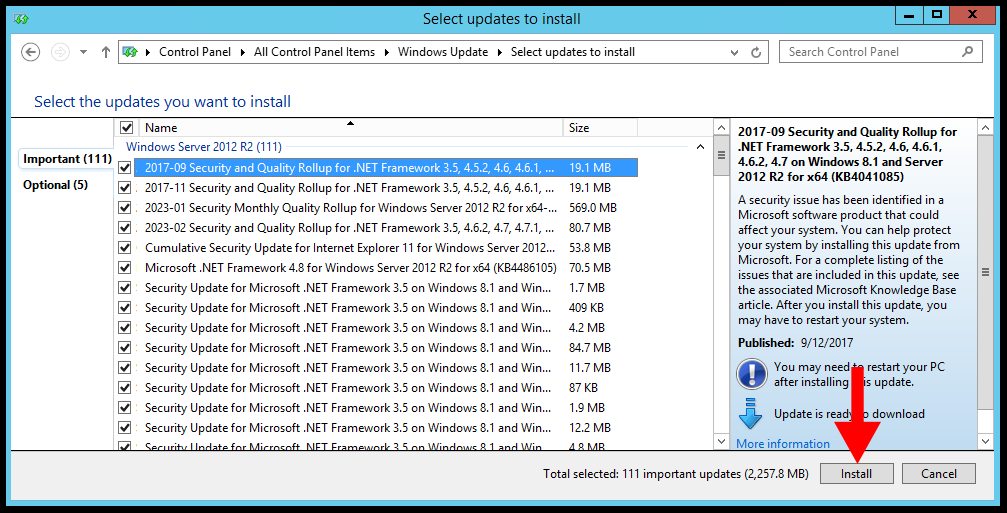
5. Next, Windows will display all the available updates and click important updates are available.
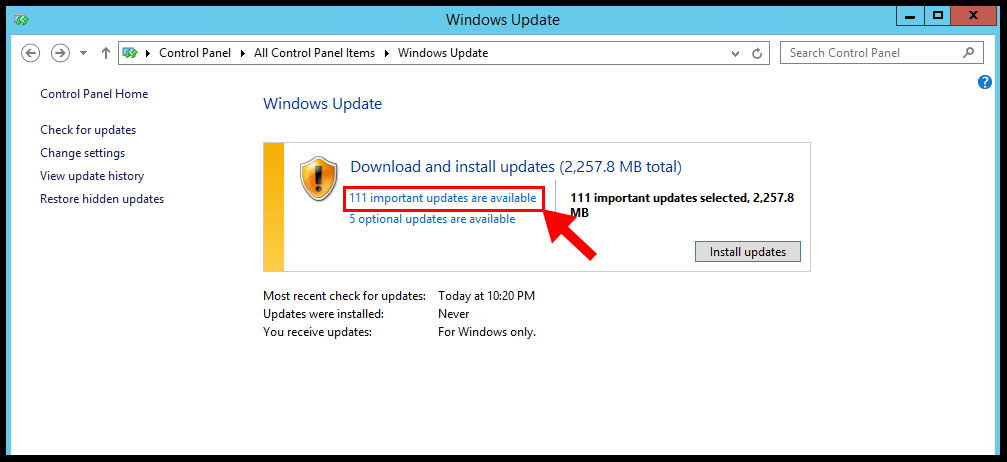
6. Select, all the important updates from the list and click on Install.
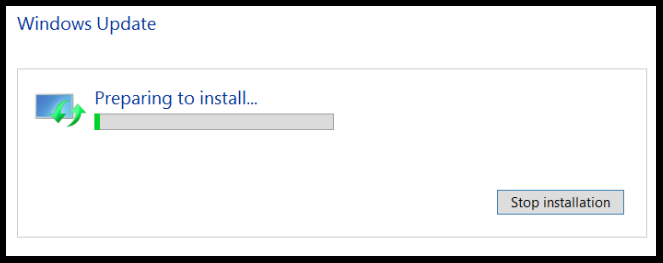
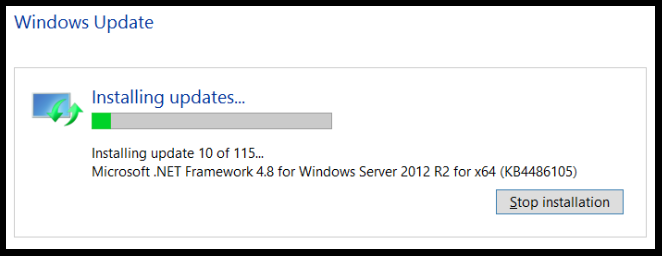
7. Windows will prepare for the installation and instantly starts the installation of selected updates after download,
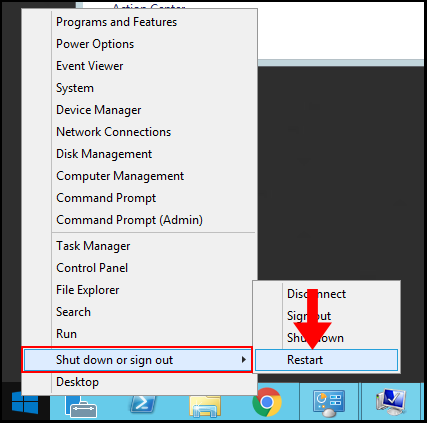
8. Finally, once the installation is done you must reboot the server.
Method 2 – Using Windows Powershell
1. Log in to Windows Server then search and open Windows Powershell.
2. First, we need to check the available updates, for that windows, PowerShell has a separate module, first install the update module using the following command,
Install-Module PSWindowsUpdate3. Once update module installation is done, check the available update using the following command,
Get-WindowsUpdate4. Now, run the following command to install the updates,
Install-WindowsUpdateConclusion
In the article, we went through how to apply windows updates for servers 2012 R2 and 2016. We always recommend updating the windows servers with the latest security patches.
Hyonix was founded in early 2018, as we believed the current pricing of Windows VPS was far too overpriced for most consumers. This makes it nonuser and budget-friendly for many people around the world. Our main goal is to change that – providing powerful licensed Windows VPS at a reasonable price so that everyone can grab one without thinking twice about the performance/price that you will get. Get yourself fully optimized Windows VPS starting @ $6.5/mo from Hyonix.com.
If you want to run Windows Update from Command Prompt or PowerShell in Windows 10/11, continue reading below.
Microsoft releases updates regularly to enhance security, fix bugs, and introduce new features that improve the functionality of Windows devices.
Windows updates are divided into 2 categories: Quality updates, which are constantly released for security reasons and to fix glitches, and Feature updates, which offer improved versions and additional features.
The usual way to update Windows 10/11 is by going to Settings > Update & Security and to check and install updates, but in some cases may needed to install updates from the command line or PowerShell if the usual way doesn’t work.

This tutorial contains instructions on how run Windows Update and install or uninstall Updates with commands in Command Prompt & PowerShell.
How to Check and Install Updates from PowerShell or Command Prompt in Windows 10/11 & Server 2016/2019.
- Part 1. Install Updates from Command Line.
- Part 2. Install Updates from PowerShell.
- Part 3. Uninstall Updates from PowerShell.
Part 1. How to Run Windows Update from Command Prompt.
In previous versions of Windows you could update Windows using the command «wuauclt /detectnow /updatenow».
In latest Windows 10 versions the command ‘WUAUCLT.EXE’ does not work anymore and has been replaced by the command ‘USOCLIENT.EXE’.
Info: The ‘USOCLIENT.EXE’ is the Update Session Orchestrator client that used to download and install Windows Updates. *
* Notes:
1. According to reports, not all Windows 10 and 11 versions support the USOCLIENT. If the same is true for your device, update your system using the PowerShell method.
2. Since USOCLIENT commands do not display anything on the screen at the time they are executed, the only way to determine if the command is working is to look at the events in the following destinations.
- C:\Windows\SoftwareDistribution\ReportingEvents.log
- Task Scheduler -> Microsoft -> Windows -> Update Orchestrator
To install updates with ‘USOCLIENT.EXE’, follow these steps:
1. Launch Command Prompt or PowerShell as an Administrator and ask Yes at the UAC prompt.
2. Force Windows to Check for Updates with one of the following commands: *
-
- UsoClient StartScan
- USOClient.exe StartInteractiveScan
* Note: Some users reported that in their case one command worked and not the other. To see which of the 2 commands works in your case open Windows Update at the same time as running the command to make sure that Windows is checking for updates.

3. After finding Updates, download them with one of the following commands:
-
- UsoClient StartDownload
- ScanInstallWait
4. Proceed to install downloaded updates with this command:
- UsoClient StartInstall
5. When the updates installed, reboot your pc with this command: *
- UsoClient RestartDevice
* Note: I suggest to wait at least 30 minutes before restarting your PC.

Part 2. How to Run Windows Update from PowerShell in Windows 10/11.
If you want to download and install Windows or Drivers updates using PowerShell commands, use the instructions below.
To Install Windows Updates from PowerShell:
1. Open PowerShell as Administrator.
2. Proceed and install the ‘PowerShell Windows Update module’ with this command and ask Yes (press ‘y’), when prompted to install any other provider needed: *
- Install-Module PSWindowsUpdate
* Notes:
1. The ‘PSWindowsUpdate’ is a necessary module to install updates from PowerShell. To see all the commands available in the module, give this command:
- Get-Command -module PSWindowsUpdate
2. By default the module only look for Windows and driver updates. If you have other Microsoft Products installed (e.g. Office), and you want to get updates for them too, give also this command:
- Add-WUServiceManager -MicrosoftUpdate

3. Then give the following command to allow the execution of scripts on your machine and ask Yes at the warning when prompted.
- Set-ExecutionPolicy -ExecutionPolicy RemoteSigned

4. Now force Windows to download and list all available updates in PowerShell. *
- Get-WindowsUpdate
5. Now proceed according to what you want:
A. To install all available Windows Updates from PowerShell give this command:
- Install-WindowsUpdate

B. To install all available Windows Updates and the updates for all other Microsoft Products, give this command:
- Install-WindowsUpdate -MicrosoftUpdate
C. To install a specific Windows Update from PowerShell, give this command and ask Yes (y) when prompted: *
- Get-WindowsUpdate -KBArticleID «KB-Number” -Install
e.g. to install the KB5005463 in this example:
- Get-WindowsUpdate -KBArticleID «KB5005463» -Install

D. To prevent a Windows Update from being installed, give this command in PowerShell:
- Get-WindowsUpdate -NotKBArticle “KB-Number” -AcceptAll
e.g. to prevent the installation of the KB5005463 in this example:
- Get-WindowsUpdate -NotKBArticle “KB5005463” -AcceptAll

E. To exclude specific categories from updating, (e.g. the «Driver updates or the Feature updates, give this command:
- Install-WindowsUpdate -NotCategory «Drivers»,»FeaturePacks» -AcceptAll
Part 3. How to Uninstall Windows Updates from PowerShell.
To remove Updates using PowerShell:
1. Open PowerShell as Administrator.
2. In the PowerShell window, give the following command to get a list of all installed updates.
- wmic qfe list brief /format:table

2. Take note of the KB number associated with the Windows Update you wish to remove.

3. Now execute the following command to remove the desired update in PowerShell:
- wusa /uninstall /kb:Number
Note: Replace ‘Number’ with the KB number of the update you want to remove. For example: to remove the KB5005635 give this command:
- wusa /uninstall /kb:5005635

That’s it! Which method worked for you?
Let me know if this guide has helped you by leaving your comment about your experience. Please like and share this guide to help others.