Из любого скрипта PowerShell можно сделать службу Windows, которая работает в фоновом режиме и запускается автоматически при загрузке сервера. Вы можете создать службу Windows с помощью утилит srvany.exe и instsrv.exe (из состава Windows Server Resource 2003 Kit), позволяющих запустить процесс powershell.exe с параметром в виде пути к ps1 файлу скрипта. Основной недостаток такого способа создания службы — srvany.exe не контролирует выполнение приложения (скрипта PowerShell в нашем случае) и, если приложение падает (зависает), то служба это не видит и продолжает работать. В этой статье для создания службы Windows из файла со скриптом PowerShell мы будем использовать утилиту NSSM (Non-Sucking Service Manager – оставим без перевода…:)), которая лишена этих недостатков.
Вы можете скачать и установить NSSM вручную или через Chocolately. Сначала нужно разрешить запуск PS1 скриптов в сесиии и установить сам Choco:
Set-ExecutionPolicy Bypass -Scope Process -Force; `
iex ((New-Object System.Net.WebClient).DownloadString('https://chocolatey.org/install.ps1'))
Затем установим пакет NSSM:
choco install nssm
В этом примере мы будем в реальном времени отслеживать изменения определенной группы AD (скрипт из этой статьи) и при изменении оповещать администратора безопасности всплывающим уведомлением и письмом.
Итак, у нас имеется код, который нужно сохранить в PS1 файл. Добавим бесконечный цикл, который раз в минуту выполняет проверку:
while($true) {
#Ваш PS код
Start-Sleep –Seconds 60
}
Конечно, для реализации подобного сценария можно создать и задание в планировщике (Task Scheduler), но если вам нужно реагировать на любые изменения в реальном времени, метод с отдельной службой гораздо правильнее.
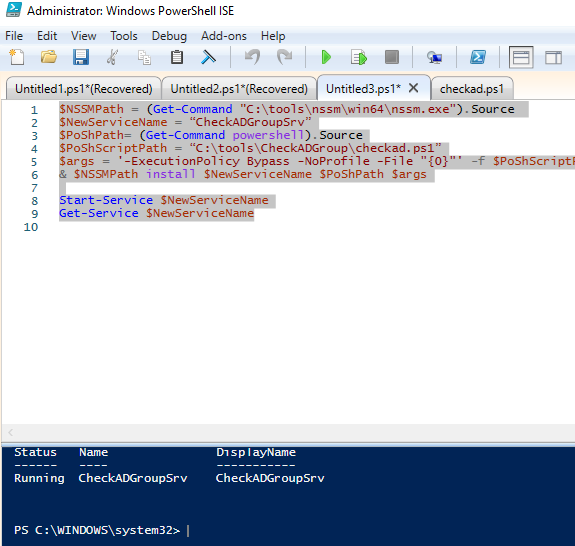
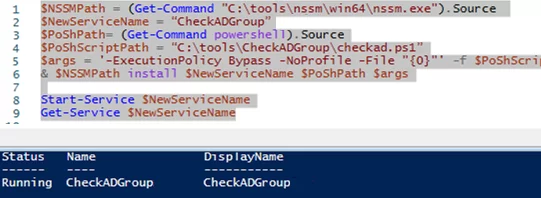
Создать службу из скрипта PowerShell при помощи NSSM можно прямо из PowerShell :):
$NSSMPath = (Get-Command "C:\tools\nssm\win64\nssm.exe").Source
$NewServiceName = “CheckADGroupSrv”
$PoShPath= (Get-Command powershell).Source
$PoShScriptPath = “C:\tools\CheckADGroup\checkad.ps1”
$args = '-ExecutionPolicy Bypass -NoProfile -File "{0}"' -f $PoShScriptPath
& $NSSMPath install $NewServiceName $PoShPath $args
& $NSSMPath status $NewServiceName
Запустим новую службу:
Start-Service $NewServiceName
Проверим статус службы с помощью PowerShell:
Get-Service $NewServiceName
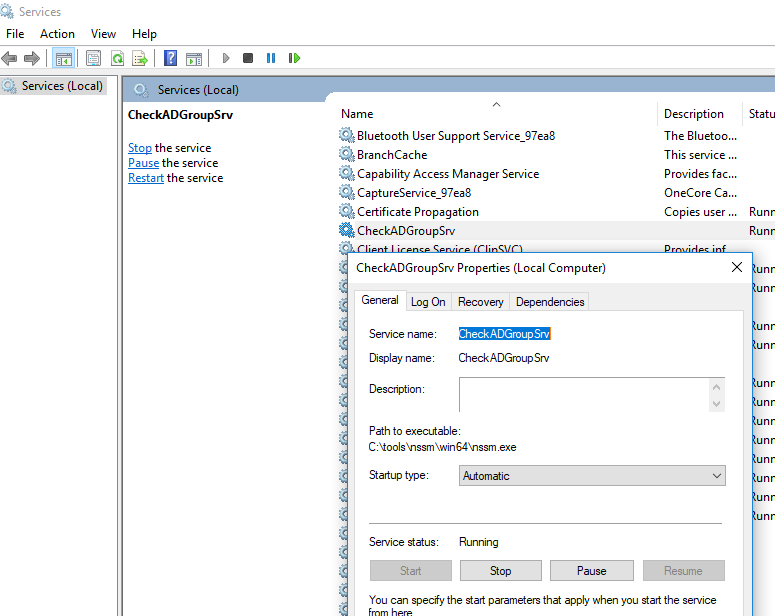
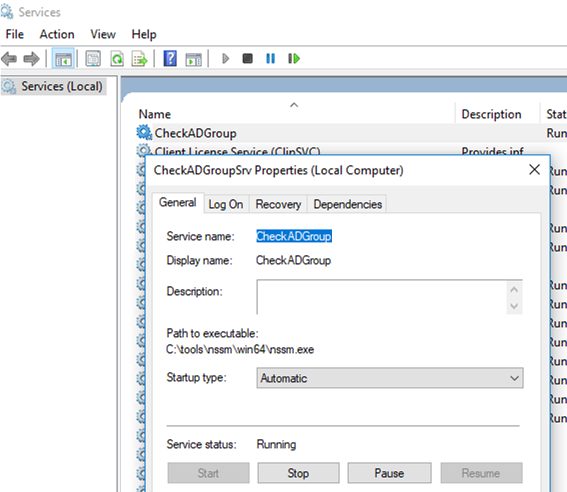
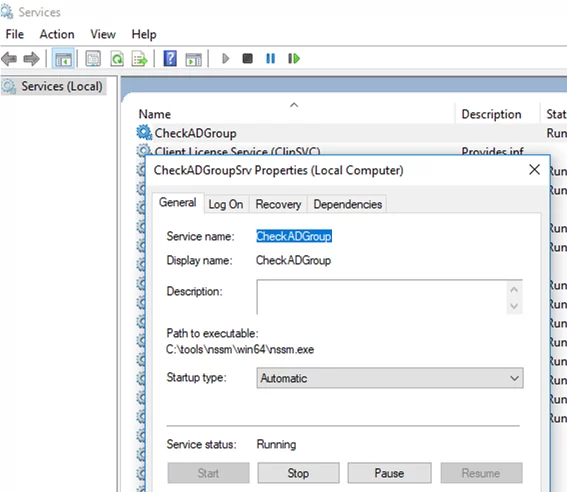
Итак, вы создали и запустили новую службу Windows. Проверим, что она появилась в консоли управления службами services.msc
Служба CheckADGroupSrv действительно появилась, она настроена на автоматический запус и в данный момент запущена (Running). Как вы видите, ваш PowerShell скрипт запущен внутри процесса nssm.exe.
Обратите внимание, что служба запущена из-под учетной записи System. Если вы используете в своих PS скриптах другие модули (в моем случае для получения состава доменной группы безопасности используется командлет Get-ADGroupMember из модуля Active Directory для Windows PowerShell), этот аккаунт должен иметь доступ к файлам модуля и права на подключение к AD (в моем случае). Вы так же можете запустить эту службы под другой учётной записью (или аккаунтом gMSA) и предоставить пользователям права на остановку/перезапуск службы, если у них нет прав локального администратора.
Чтобы служба могла отображать уведомления в сеанс пользователя (взаимодействовать с рабочим столом) нужно на вкладке “Вход в систему” (Log on) включить опцию “Разрешить взаимодействие с рабочим столом” (Allow service to interact with desktop).
Чтобы это работало в Windows 10 / Windows Server 2012 R2/ 2016 нужно изменить значение DWORD параметра реестра NoInteractiveServices в ветке HKLM\System\CurrentControlSet\Control\Windows на 0 и включить службу обозревателя интерактивных служб (Interactive Services Detection Service):
Start-Service -Name ui0detect
Однако в Windows 10 1803 службу Interactive Services Detection Service полностью убрали из системы, и вы более не можете переключиться в нулевую сессию (Session 0), так что вы просто не увидите окна, которые выводятся из-под аккаунта System.
Вы можете изменить описание службы командой:
& $NSSMPath set $NewServiceName description “Мониторинг изменений группы AD”
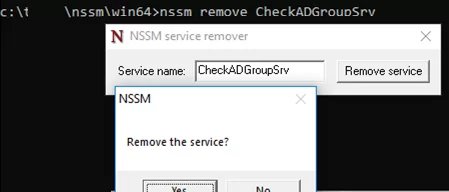
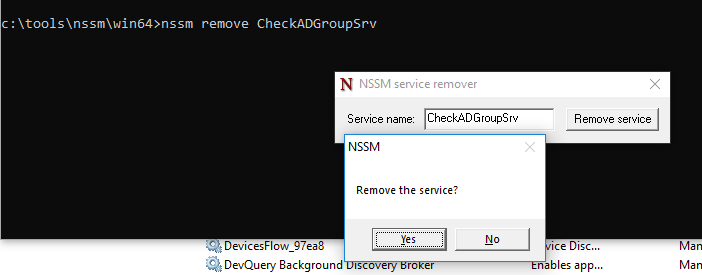
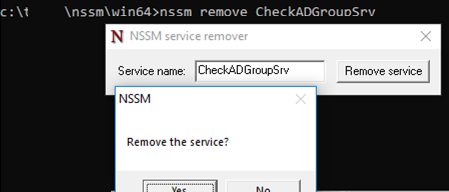
Чтобы удалить созданную службу можете воспользоваться командой sc delete или
nssm remove CheckADGroupSrv
My original answer failed to take into account that you still need to implement the service control interfaces, which powershell.exe does not implement. I did look into some other methods of running a PowerShell script as a service, however.
One of the easier tools I came across that does this for you is nssm You can use nssm (Non-Sucking Service Manager) to register a new service and have it run your PowerShell script. You’ll need to make sure your script’s main logic runs within an infinite loop (as most long running programs or services do), and then you can use nssm to register a new service that will run your PowerShell script. Below is an example of putting your code into a main loop that doesn’t terminate:
while( $true ) {
  $startTime =  (Get-Date).ToString("dd_MM_yyyy")
  $LogDate = ((get-date).ToLocalTime()).ToString("yyyy-MM-ddTHH:mm:ss.fff")
  $hostname = hostname

  $portTServer = 8000
  $FileTserver = netstat -ano | findstr "8000"

  $LogTserver = $LogDate + " - Quantidade de Conexoes na porta " + $portTServer + ": " + $FileTserver.count + " - Servidor: " + $hostname
  $LogTserver | Out-File -Append D:\SCTT521CTO\netstat_$startTime.log

  $limit = (Get-Date).AddDays(-5)
  $path = "D:\SCTT521CTO\*"
  Get-ChildItem -Path $path -Recurse -Force | Where-Object { !$_.PSIsContainer -and $_.CreationTime -lt $limit } | Remove-Item -Force

  # Add a sleep at the end of the loop to prevent the script from eating
  # too much CPU time
  Start-Sleep -Seconds 60
}
To register your script as a PowerShell service, you can use the following PowerShell code (note that if you install with Chocolatey, nssm will already be on the PATH, not sure if it is when you manually install):
# Desired name of the service
$serviceName = 'netstat_2025'

# Get the full path to powershell.exe
$powershellPath = ( Get-Command powershell ).Source

# The path to the script you want to run as a service
$serviceScriptPath = C:\path\to\service\script.ps1

# The arguments to pass to the powershell executable each time the service starts
$args = '-ExecutionPolicy Bypass -NoProfile -File "{0}"' -f $serviceScriptPath

# Install the service using nssm
nssm install $serviceName $powershellPath $args

# See that the service is registered and check its status
Get-Service $serviceName
Your service should now be installed and able to be controlled like any other Windows service. The way this works is instead of registering powershell.exe as a service directly, it registers nssm.exe as the service executable instead, which does implement the correct service control handlers, and then runs whatever program you configured it to for this service (in this case, calling your script with powershell.exe).
If you have a PowerShell script you’d like to run constantly in the background and start up automatically after a reboot, the best option is to run it as a Windows service. I’ll show you how to set this up using NSSM, the Non-Sucking Service Manager.
Contents
- The scenario
- About NSSM
- Example script
- Installing Polaris
- Install NSSM
- Install the Windows service
- Validating the script
- Conclusion
- Author
- Recent Posts

Brandon is a Cloud Architect and veteran Systems Engineer with a penchant for PowerShell, DevOps processes, and open-source software. You can reach Brandon at devblackops.io or on Twitter @devblackops.
The scenario
Most PowerShell scripts aim to run a task and then exit. You’ll usually execute a script from the PowerShell console or perhaps trigger it periodically via the Windows Task Scheduler. However, you may want to run a script 24/7 and ensure it starts up again after a reboot or crash. To do this, the easiest option is to use NSSM.
About NSSM
If you’ve not heard about NSSM before, it’s a small service helper similar to the built-in program srvany. NSSM aims to make it extremely simple to configure any binary to run as a service and ensure it stays running. You can take a look at the NSSM website for more information about common use cases.
Example script
Take this example script below. This script runs a small web server using the Polaris framework. Polaris is a cross-platform, minimalist web framework written in PowerShell. Currently, this is not a Microsoft-supported module, but I encourage you to look at it if you are interested in experimenting with web servers and PowerShell commands. Like a normal web server, ours should run all the time, and we will use a Windows service to achieve this.
[cmdletbinding()]
param()

Import-Module -Name Polaris

New-PolarisGetRoute -Path '/helloworld' -Scriptblock {
    $Response.Send('Hello World!')
}

Start-Polaris -Port 8080

while($true) {
    Start-Sleep -Milliseconds 10
}
Installing Polaris
Currently, Polaris is not available in the PowerShell Gallery, so we’ll need to install it manually. Download the zip archive from the git repository, and extract the contents to C:\Program Files\WindowsPowerShell\Modules\Polaris.

Download the Polaris zip file
Your modules directory should look like this:

Polaris extracted to the modules folder
If we run this script manually, we can verify Polaris is running and serving requests at http://localhost:8080/helloworld. It will keep running until you press Ctrl+C.
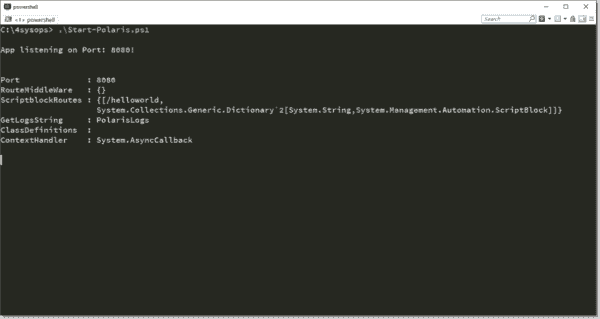
Starting Polaris
Testing Polaris in the browser
Install NSSM
Now on to installing NSSM so we can configure our Windows service. If you are already using Chocolatey, you can install NSSM with the following:

Installing NSSM with Chocolatey
If you don’t have Chocolatey installed, you can download NSSM here.
Install the Windows service
After installing NSSM, we’ll need to run a few commands to install our web server script as a Windows service. You’ll need to run these next commands as an administrator.
We have to define a few variables. We’ll need the path to NSSM itself, the name of the service we want to create, the path to PowerShell, the path to our Polaris script, and the argument string we’ll pass to PowerShell.
$nssm = (Get-Command nssm).Source
$serviceName = 'Polaris'
$powershell = (Get-Command powershell).Source
$scriptPath = 'C:/4sysops/Start-Polaris.ps1'
$arguments = '-ExecutionPolicy Bypass -NoProfile -File "{0}"' -f $scriptPath
& $nssm install $serviceName $powershell $arguments
& $nssm status $serviceName
Start-Service $serviceName
Get-Service $serviceName

Install a script as a service
Validating the script
Now that we’ve installed our new service, we can test everything is working with Invoke-RestMethod.

Testing the web server with Invoke RestMethod
As with any Windows service, we can also set this to start automatically on boot or restart if it unexpectedly terminates.
Subscribe to 4sysops newsletter!
Conclusion
You might find running a PowerShell script as a service handy in many use cases. Hopefully I’ve just whetted your appetite on what you can do with services, NSSM, and PowerShell.
Any PowerShell script can be transformed to a real Windows service that runs in the background and starts automatically during your server boot.
You can create a Windows service using srvany.exe or instsrv.exe tools (from Windows Server Resource 2003 Kit) which allow you to run the powershell.exe process with a parameter that contains the path to your PS1 script file.
The main disadvantage of creating a service using this method is that srvany.exe does not control a PowerShell script execution state, and if the app crashes (hangs up), the service does not see it and goes on working. To create a Windows service from a file that contains a PowerShell script, in this article we will use the NSSM (Non-Sucking Service Manager) toolkit, which does not demonstrate the above mentioned disadvantages.
You can download and install NSSM manually or using Chocolatey. Firstly, install Choco itself:
Set-ExecutionPolicy Bypass -Scope Process -Force; `
iex ((New-Object System.Net.WebClient).DownloadString('https://chocolatey.org/install.ps1'))
Then install the NSSM package:
choco install nssm
In this example, we will track the changes in a specific Active Directory group in real time and inform a security administrator using a pop-up notification and e-mail.
So, we have a PowerShell code that needs to be saved as a PS1 file. Let’s add an infinite loop that performs a check every minute:
while($true) {Of course, to implement such a scenario you can create a separate task in the Task Scheduler. But if you have to respond to changes in real time, the separate service method is better.
#Your PS code
Start-Sleep –Seconds 60
}
You can create a service from a PowerShell script using NSSM directly from PowerShell:
$NSSMPath = (Get-Command "C:\ps\nssm\win64\nssm.exe").Source
$NewServiceName = “CheckADGroup”
$PoShPath= (Get-Command powershell).Source
$PoShScriptPath = “C:\ps\CheckADGroup\checkad.ps1”
$args = '-ExecutionPolicy Bypass -NoProfile -File "{0}"' -f $PoShScriptPath
& $NSSMPath install $NewServiceName $PoShPath $args
& $NSSMPath status $NewServiceName
Start your new service:
Start-Service $NewServiceName
Check the service status in PowerShell:
Get-Service $NewServiceName

So you have created and started your new Windows service. Make sure that it has appeared in the services management console (services.msc).
CheckADGroup has appeared, it is configured to start automatically and is currently running. As you can see, your PowerShell script is running inside the nssm.exe process.
Please note that the service is running under the System account. If you use other modules in your PowerShell scripts (in my case, Get-ADGroupMember from Active Directory for Windows PowerShell is used to get the list of members in the domain security group), this account must have access to the PS module files and AD connection permissions (in my case). You can also start this service under another domain account (or a gMSA account) and allow users to stop/restart the service if they do not have local admin rights.
In order the service can show notifications in a user session enable the Allow service to interact with desktop option on the Log on tab. To make it work in Windows 10 and Windows Server 2012 R2/2016, change the DWORD NoInteractiveServices parameter value in the registry key HKEY_LOCAL_MACHINE\System\CurrentControlSet\Control\Windows to 0 and run the Interactive Services Detection Service:
Start-Service -Name ui0detect
However, Interactive Services Detection Service has been completely removed from Windows 10 build 1803, and you won’t be able to switch to Session 0. So you won’t see the notification windows displayed under System account.
You can change the service description using this command:
& $NSSMPath set $NewServiceName description “Monitoring of AD group changes”
To remove the service you have created, use the sc delete command or:
nssm remove CheckADGroup
Any PowerShell script can be transformed to a real Windows service that runs in the background and starts automatically during your server boot. You can create a Windows service using srvany.exe or instsrv.exe tools (from Windows Server Resource 2003 Kit) which allow you to run the powershell.exe process with a parameter that contains the path to your PS1 script file.
The main disadvantage of creating a service using this method is that srvany.exe does not control a PowerShell script execution state, and if the app crashes (hangs up), the service does not see it and goes on working. To create a Windows service from a file that contains a PowerShell script, in this article we will use the NSSM (Non-Sucking Service Manager) toolkit, which does not demonstrate the above mentioned disadvantages.
You can download and install NSSM manually or using Chocolatey. Firstly, install Choco itself:
Set-ExecutionPolicy Bypass -Scope Process -Force; `
iex ((New-Object System.Net.WebClient).DownloadString('https://chocolatey.org/install.ps1'))
Then install the NSSM package:
choco install nssm
In this example, we will track the changes in a specific Active Directory group in real time and inform a security administrator using a pop-up notification and e-mail (the script is given in this article) .
So, we have a PowerShell code that needs to be saved as a PS1 file. Let’s add an infinite loop that performs a check every minute:
while($true) {
#Your PS code
Start-Sleep –Seconds 60
}
Of course, to implement such a scenario you can create a separate task in the Task Scheduler. But if you have to respond to changes in real time, the separate service method is better.
You can create a service from a PowerShell script using NSSM directly from PowerShell:
$NSSMPath = (Get-Command "C:\ps\nssm\win64\nssm.exe").Source
$NewServiceName = “CheckADGroup”
$PoShPath= (Get-Command powershell).Source
$PoShScriptPath = “C:\ps\CheckADGroup\checkad.ps1”
$args = '-ExecutionPolicy Bypass -NoProfile -File "{0}"' -f $PoShScriptPath
& $NSSMPath install $NewServiceName $PoShPath $args
& $NSSMPath status $NewServiceName
Start your new service:
Start-Service $NewServiceName
Check the service status in PowerShell:
Get-Service $NewServiceName
So you have created and started your new Windows service. Make sure that it has appeared in the services management console (services.msc).
CheckADGroup has appeared, it is configured to start automatically and is currently running. As you can see, your PowerShell script is running inside the nssm.exe process.
Please note that the service is running under the System account. If you use other modules in your PowerShell scripts (in my case, Get-ADGroupMember from Active Directory for Windows PowerShell is used to get the list of members in the domain security group), this account must have access to the PS module files and AD connection permissions (in my case). You can also start this service under another domain account (or a gMSA account) and allow users to stop/restart the service if they do not have local admin rights.
In order the service can show notifications in a user session enable the Allow service to interact with desktop option on the Log on tab.
To make it work in Windows 10 and Windows Server 2012 R2/2016, change the DWORD NoInteractiveServices parameter value in the registry key HKEY_LOCAL_MACHINE\System\CurrentControlSet\Control\Windows to 0 and run the Interactive Services Detection Service:
Start-Service -Name ui0detect
However, Interactive Services Detection Service has been completely removed from Windows 10 build 1803, and you won’t be able to switch to Session 0. So you won’t see the notification windows displayed under System account.
You can change the service description using this command:
& $NSSMPath set $NewServiceName description “Monitoring of AD group changes”
To remove the service you have created, use the sc delete command or:
nssm remove CheckADGroup