Время на прочтение
7 мин
Количество просмотров 68K
Некоторое время назад в компании была развернута терминальная ферма.
Первым делом в неё были выселены пользователи некой желтой программы.
После чего отдел поддержки желтой программы спросил меня, можно ли отсылать сообщения пользователям фермы всем сразу. XaocCPS посоветовал мне играться в сторону WPF. Нужный скрипт был написан, но его работой я неудовлетворился:
1. Надо ставить внешний компонент PowerShellPack.
2. Компонент ставиться на сервера фермы (х64) отказался.
3. Распространять такое решение из за пункта 1 всем желающим не очень удобно.
Xaegr подсказал что я могу избавиться от прослойки WPF.
Писать можно, можно даже писать красиво. Скрипт выполняется везде где есть .Net Framework — XP, Win7 и скорее всего пойдет даже на х64 серверах фермы.
Как писать — под катом.
UPD по просьбам скрипт выложен на SkyDrive, ссылка в конце
И так — ТЗ, полученное от отдела поддержки было «отправка сообщений всем пользователям терминальной фермы».
Мною ТЗ было расширено:
1. Выбор серверов.
2. Выбор пользователей.
3. Ввод текста сообщения.
4. Вставка подписи — идентификатор отправившего сообщения пользователя — виден в заголовке окна, но на него внимание обращают мало, выбрал вариант из нескольких предустановленных вариантов.
5. Защита от нечаянной отправки.
Предварительно было найдено, что в Win7 и 2008* есть команда msg, с помощью которой данные сообщения и будут отправляться, но прием сообщений надо разрешить, что и сделал простеньким regedit файлом:
Windows Registry Editor Version 5.00

[HKEY_LOCAL_MACHINE\SYSTEM\CurrentControlSet\Control\Terminal Server]

"AllowRemoteRPC"=dword:00000001
К сожалению, если пользователь из списка не подключен к серверу — скрипт много и сильно ругается. Я пока не придумал как получить вывод msg, и его обрабатывать.
Скрипт по максимуму комментирован.
~15kb
# Подключаем то, с помощью чего будем рисовать нашу форму
Add-Type -assembly System.Windows.Forms

	# Все просто, массивы из списка серверов, списка пользоватей, и варианты подписи - чтобы использовать могла не только поддержка.
	$Server        = @("rdp1-1, rdp1-2, rdp1-3, rdp1-4", "rdp2-1, rdp2-2, rdp2-3, rdp2-4")
	$User          = @("*", "1c-admin1, 1c-admin2")
	$Message       = "Умолчательное сообщение"
	# По хорошему, надо бы сделать так, чтобы если умолчательное сообщение не менялось и шло нажатие на кнопку отправить, то выводилось бы предупреждение.
	# Так же по аналогии с тем что есть, тут тоже можно повесить список со стандартными сообщениями

	# Подписываемся
	$Sign          = @("С уважением, администраторы 1С", "С уважением, системные администраторы")

	# Повелось, что все функции описываются до их использования.
	# Функция отправки сообщения. Принимаем параметры, проверяем, если чекбокс включен (а он включен по умолчанию), устанавливаем параметры отправки только на консоль локалхоста, иначе проходим по списку серверов, внутри каждого сервера инициируем цикл по списку пользователей с предварительно отрезанными пробелами до и после текста(помните формат: "сервер1, сервер2, сервер3" для красивой читаемости текста), вызываем сам msg для отправки сообщения и после чего вызываем диалогов окно с подтверждением отправки и закрытием программы.
Function SendMessage {
        param ($Server, $User, $Message, $Sign)
       # Write-Host $Server, $User, $Message, $Sign
        If ($TestRunCheckBox.Checked -eq 1 ) { Write-Host $TestRunCheckBox.Checked; $Server="localhost"; $User = "Console" }
        ForEach ($Item in $Server) {
            ForEach ($UserX in $User) {
                    $UserTrim = $UserX.Trim()
                    $ServerTrim = $Item.Trim()
                    $MsgTrim = $Message.Trim()
                    $SignTrim = $SignX.Trim()
                    # Отладочный вывод, оставлен на всякий случай.
                    # Write-Host "User: $UserTrim; Server: $ServerTrim; Message: $MsgTrim; Signature: $SignTrim"
                    c:\windows\system32\msg.exe $UserTrim /Server:$ServerTrim $MsgTrim $SignTrim
                }
        }
     Confirm
    }

# Вывод окна с подтверждением
Function Confirm {
        $ConfirmWin = New-Object System.Windows.Forms.Form
        $ConfirmWin.StartPosition  = "CenterScreen"
        $ConfirmWin.Text = "Подтверждение отправки"
        $ConfirmWin.Width = 200
        $ConfirmWin.Height = 120
        $ConfirmWin.ControlBox = 0

        $ConfirmWinOKButton = New-Object System.Windows.Forms.Button
        $ConfirmWinOKButton.add_click({ $MainSendWindow.Close(); $ConfirmWin.Close() })
        $ConfirmWinOKButton.Text = "Закрыть"
        $ConfirmWinOKButton.AutoSize = 1
        $ConfirmWinOKButton.Location        = New-Object System.Drawing.Point(50,50)

        $ConfirmLabel = New-Object System.Windows.Forms.Label
        $ConfirmLabel.Text = "Сообщение было отправлено"
        $ConfirmLabel.AutoSize = 1
        $ConfirmLabel.Location  = New-Object System.Drawing.Point(10,10)

        $ConfirmWin.Controls.Add($ConfirmLabel)
        $ConfirmWin.Controls.Add($ConfirmWinOKButton)
        $ConfirmWin.ShowDialog() | Out-Null
    }

# Главное окно, по хорошему тоже стоило бы оформить в виде функции
     $MainSendWindow                = New-Object System.Windows.Forms.Form
     $ToolTip = New-Object System.Windows.Forms.ToolTip

     $ToolTip.BackColor = [System.Drawing.Color]::LightGoldenrodYellow
     $ToolTip.IsBalloon = $true
     # $ToolTip.InitialDelay = 500
     # $ToolTip.ReshowDelay = 500

     # Инициализация контролов формы
     # Кнопки и чекбокс
     $SendButton                   = New-Object System.Windows.Forms.Button
     $CloseButton                   = New-Object System.Windows.Forms.Button
     $TestRunCheckBox           = New-Object System.Windows.Forms.CheckBox

     # Текстовые поля и списки
     $ServerTextBox                = New-Object System.Windows.Forms.ComboBox
     $UserTextBox                   = New-Object System.Windows.Forms.ComboBox
     $MessageTextBox             = New-Object System.Windows.Forms.TextBox
     $SignTextBox                   = New-Object System.Windows.Forms.ComboBox

     # Подписи
     $ServerTextBoxLabel           = New-Object System.Windows.Forms.Label
     $UserTextBoxLabel              = New-Object System.Windows.Forms.Label
     $MessageTextBoxLabel        = New-Object System.Windows.Forms.Label
     $SignTextBoxLabel              = New-Object System.Windows.Forms.Label

# Описываем свойства (комментариями я еще добавлю несколько нагугленных
# интересных свойств для общего развития и чтобы далеко не бегать ;))

# Главная форма
$MainSendWindow.StartPosition  = "CenterScreen"
$MainSendWindow.Text           = "Отправка сообщения пользователям"
$MainSendWindow.Width          = 470
$MainSendWindow.Height         = 220
# несколько плюшек и обещанных красивостей
#$Win.ControlBox           = 0 # отключить кнопки свернуть, минимизацию и закрытие.
# $Win.ShowIcon             = 0
# $Win.ShowInTaskbar        = 0
# $Win.HelpButton           = 1
# авторазмер может отрабатывать если вся форма - к примеру одна кнопка "Сделать хорошо"
# $Win.Autosize             = 1
# $Win.AutoSizeMode         = "GrowAndShrink"
# стиль обрамления и шрифт.
# $Win.FormBorderStyle      = [System.Windows.Forms.FormBorderStyle]::Fixed3D
# $Win.Font                 = New-Object System.Drawing.Font("Verdana",32)

# Подписи к текстовым полям
$ServerTextBoxLabel.Location   = New-Object System.Drawing.Point(10,12)
$ServerTextBoxLabel.Text       = "Список серверов"
$ServerTextBoxLabel.Autosize     = 1

$UserTextBoxLabel.Location     = New-Object System.Drawing.Point(10,42)
$UserTextBoxLabel.Text         = "Список пользователей"
$UserTextBoxLabel.Autosize     = 1

$MessageTextBoxLabel.Location  = New-Object System.Drawing.Point(10,73)
$MessageTextBoxLabel.Text      = "Сообщение"
$MessageTextBoxLabel.Autosize  = 1
# Плюшка в виде красивой подсказки, делается другим методом вызова, поэтому идет к каждому обьекту в блоке, чтобы не теряться.
$ToolTip.SetToolTip($MessageTextBoxLabel, "Надо подписаться, а то в заголовке окна с сообщениями не видно")

$SignTextBoxLabel.Location     = New-Object System.Drawing.Point(10,103)
$SignTextBoxLabel.Text         = "Подпись"
$SignTextBoxLabel.Autosize     = 1
$ToolTip.SetToolTip($SignTextBoxLabel, "Надо подписаться, а то в заголовке окна с сообщениями не видно")

# Описание текстбокса
# Позиция
$ServerTextBox.Location        = New-Object System.Drawing.Point(140,10)
# Источник данных
$ServerTextBox.DataSource      = $Server
# Размер
$ServerTextBox.Width           = 300
# Обработка события - при смене текста в поле, присваиваем переменной новое полученное значение.
$ServerTextBox.add_TextChanged({ $Server = $ServerTextBox.Text })
# индекс порядка перехода по Tab
$ServerTextBox.TabIndex        = 1
$ToolTip.SetToolTip($ServerTextBox, "Укажите список серверов")

$UserTextBox.Location          = New-Object System.Drawing.Point(140,40)
$UserTextBox.DataSource        = $User
# Не забываем про массив
$UserTextBox.Text              = $User[1]
$UserTextBox.add_TextChanged({ $User = $UserTextBox.Text })
$UserTextBox.Width             = 300
$UserTextBox.TabIndex          = 2
$ToolTip.SetToolTip($UserTextBox, "Кому отправлять будем? (* для *всех* пользователей, по умолчанию)")

# Поле сообщения
$MessageTextBox.Location       = New-Object System.Drawing.Point(140,70)
$MessageTextBox.Text           = $Message
# По клику в поле ввода - автоматически выделяем весь текст, чтобы не надо было
# нажимать удаление
$MessageTextBox.add_click({ $MessageTextBox.SelectAll() })
$MessageTextBox.add_TextChanged( { $Message = $MessageTextBox.Text })
$MessageTextBox.Width          = 300
$MessageTextBox.TabIndex       = 3
$ToolTip.SetToolTip($MessageTextBox, "И шо мы таки хотим сказать?")

# Поле подписи - отправляемая переменная уже другая
$SignTextBox.Location          = New-Object System.Drawing.Point(140,103)
# Источник текста для подписи
$SignTextBox.DataSource        = $Sign
# А мы помним, что там массив?:)
$SignTextBox.Text              = $Sign[1]
$SignTextBox.add_TextChanged({ $SignX = $SignTextBox.Text })
$SignTextBox.Width             = 300
$SignTextBox.TabIndex          = 4
$ToolTip.SetToolTip($SignTextBox, "Страна должна знать своих героев")

# Нопка отправки.
$SendButton.Location           = New-Object System.Drawing.Point(10,150)
$SendButton.Text               = "Отправить сообщение"
# Выполняем разделения строк на массивы с разделителем запятая, вызываем функцию отправки сообщения
$SendButton.add_click({ $User  = $UserTextBox.Text.Split(","); $Server = $ServerTextBox.Text.Split(","); $SignX = $SignTextBox.Text; SendMessage $Server $User $Message $SignX} )
$SendButton.Autosize           = 1
$SendButton.TabIndex           = 5
$ToolTip.SetToolTip($SendButton, "Тыцни пимпочку")

# Прописываем блокировочный чекбокс
$TestRunCheckBox.Location      = New-Object System.Drawing.Point(200,150)
$TestRunCheckBox.Text          = "Тест"
$TestRunCheckBox.Checked       = 1
$TestRunCheckBox.AutoSize      = 1
$TestRunCheckBox.TabIndex      = 6
$ToolTip.SetToolTip($TestRunCheckBox, "Сними меня, а то работать не будет")

# Кнопочка выхода, по событию вызывает метод закрытия
$CloseButton.Location          = New-Object System.Drawing.Point(315,150)
$CloseButton.Text              = "Выйти из программы"
$CloseButton.add_click({ $MainSendWindow.Close() })
$CloseButton.Autosize          = 1
$CloseButton.TabIndex          = 7
$ToolTip.SetToolTip($CloseButton, "Пойдем ка отсюда")


# Добавляем контролы в форму и вызываем её запуск
$MainSendWindow.Controls.Add($SendButton)
$MainSendWindow.Controls.Add($TestRunCheckBox)
$MainSendWindow.Controls.Add($CloseButton)

$MainSendWindow.Controls.Add($ServerTextBox)
$MainSendWindow.Controls.Add($UserTextBox)
$MainSendWindow.Controls.Add($MessageTextBox)
$MainSendWindow.Controls.Add($SignTextBox)

$MainSendWindow.Controls.Add($ServerTextBoxLabel)
$MainSendWindow.Controls.Add($UserTextBoxLabel)
$MainSendWindow.Controls.Add($MessageTextBoxLabel)
$MainSendWindow.Controls.Add($SignTextBoxLabel)

$MainSendWindow.ShowDialog() | Out-Null
В результате получилась вот такая вот красивость

Скрипт могу выложить, при желании читателей, куда-то.
Не уверен, что хватит кармы публировать в профильный, поэтому выложил сюда
Исходник скрипта на GitHub’е
Одним из существенных недостатков скриптов PowerShell при использовании их простыми пользователями (не сисадминами или программистами) — его консольный интерфейс. Результат выполнения скрипта PoSh отображается также в командной строке и не всегда удобен для восприятия конечного пользователя. Однако Powershell это мощное и современное средство автоматизации для Windows, которое позволяет прозрачно использовать разнообразные объекты .NET Framework. К примеру, с помощью API. NET вы сможете легко создать простой графический интерфейс для ваших PowerShell скриптов.
В этом примере вы покажем, как с помощью PowerShell создать простую Windows форму и расположить на ней различные стандартные диалоговые элементы (кнопки, поля для ввода, текстовые элементы, выпадающие списки). К примеру наша задача – написание простого GUI для определения времени последней смены пароля пользователя в Active Directory. Логика скрипта следующая — из AD в выпадающий список загружается список всех учетных записей в домене. Пользователь выбирает учетную запись, нажимает кнопку и в текстовом поле отображается данные о последнем времени смены пароля пользователя.
В данном примере мы используем PowerShell 3.0+ (я буду писать скрипт в PowerShell ISE в Windows 10).
Для использования функционала .NET по созданию форм мы воспользуемся классом System.Windows.Forms. Загрузить данный класс в сессию PowerShell можно так:
Add-Type -assembly System.Windows.Forms
Теперь создадим графическую форму (окно):
$window_form = New-Object System.Windows.Forms.Form
Установим заголовок и размеры окна формы (в пикселях):
$window_form.Text ='Пример графического интерфейса для скрипта PowerShell'
$window_form.Width = 500
$window_form.Height = 200
Чтобы форма автоматически растягивалась, если элементы расположенные на форме выйдут за границы, нужно включить атрибут AutoSize:
$window_form.AutoSize = $true
Теперь можно отобразить форму на экране.
$window_form.ShowDialog()
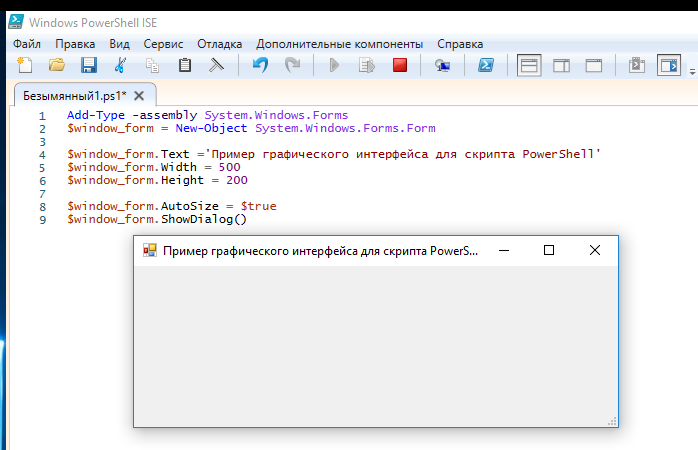
Как вы видите, на экране появилась пустая форма указанных размеров. Чтобы добавить не нее различные графические диалоговые элементы, перед строкой $window_form.ShowDialog() добавим следующие строки.
Создадим на форме надпись:
$FormLabel1 = New-Object System.Windows.Forms.Label
$FormLabel1.Text = "Выберите пользователя домена AD"
$FormLabel1.Location = New-Object System.Drawing.Point(0,10)
$FormLabel1.AutoSize = $true
$window_form.Controls.Add($FormLabel1)
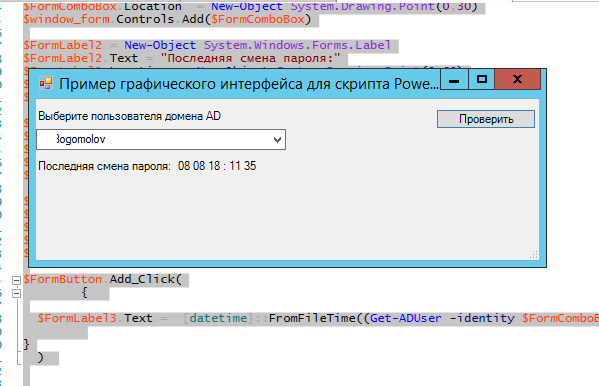
Создадим выпадающий список и заполним его списком учетных записей из домена, полученных с помощью командлета Get-ADuser (входит в модуль ActiveDirectory для PowerShell).
$FormComboBox = New-Object System.Windows.Forms.ComboBox
$FormComboBox.Width = 250
$Users = get-aduser -filter * -Properties SamAccountName
Foreach ($User in $Users)
{
$FormComboBox.Items.Add($User.SamAccountName);
}
$FormComboBox.Location = New-Object System.Drawing.Point(60,10)
$window_form.Controls.Add($FormComboBox)
Отобразим еще две надписи. Во второй будет отображаться время последней смены пароля выбранного пользователя.
$FormLabel2 = New-Object System.Windows.Forms.Label
$FormLabel2.Text = "Последняя смена пароля:"
$FormLabel2.Location = New-Object System.Drawing.Point(0,40)
$FormLabel2.AutoSize = $true
$window_form.Controls.Add($FormLabel2)
$FormLabel3 = New-Object System.Windows.Forms.Label
$FormLabel3.Text = ""
$FormLabel3.Location = New-Object System.Drawing.Point(140,60)
$FormLabel3.AutoSize = $true
$window_form.Controls.Add($FormLabel3)
Теперь поместим на форму кнопку действия с надписью «Проверить»:
$FormButton = New-Object System.Windows.Forms.Button
$FormButton.Location = New-Object System.Drawing.Size(400,10)
$FormButton.Size = New-Object System.Drawing.Size(100,20)
$FormButton.Text = "Проверить"
$window_form.Controls.Add($FormButton)
Теперь к созданной кнопке привяжем скрипт проверки, которые должен вызываться при щелчке на кнопке (событие Add_Click). Для преобразования даты из формата TimeStamp в нормальный вид воспользуемся функцией [datetime]::FromFileTime.
$FormButton.Add_Click(
{
$FormLabel3.Text = [datetime]::FromFileTime((Get-ADUser -identity $FormComboBox.selectedItem -Properties pwdLastSet).pwdLastSet).ToString('dd mm yy : hh ss')
}
)
Запустите PowerShell скрипт. Как вы видите, он заполняет выпадающий список именами учётных записей из AD. Если вы выберите нужную учетную запись пользователя и нажмите на кнопку, в поле отобразится время последней смены пароля данного пользователя в Active Directory.
Аналогичным образом вы можете создать следующие графические элементы на форме:
- CheckBox
- RadioButton
- TextBox
- ChekedListBox
- GroupBox
- ListBox
- TabControl
- ListView
- TreeView
- DateTimePicker
- TrackBar
- PictureBox
- ProgressBar
- HScrollBar
- VScrollBar
- ContextMenu
- Menu
Для вывода диалогового окна с уведомлением пользователю можно испоьзоват следующий код:
[System.Windows.Forms.MessageBox]::Show("Запущен процесс расчета","Предупреждение",0)
Для более удобного и быстрого создания графических элементов для PowerShell форм вы можете воспользоваться онлайн редактор для создания GUI формы для Powershell : https://poshgui.com/Editor.
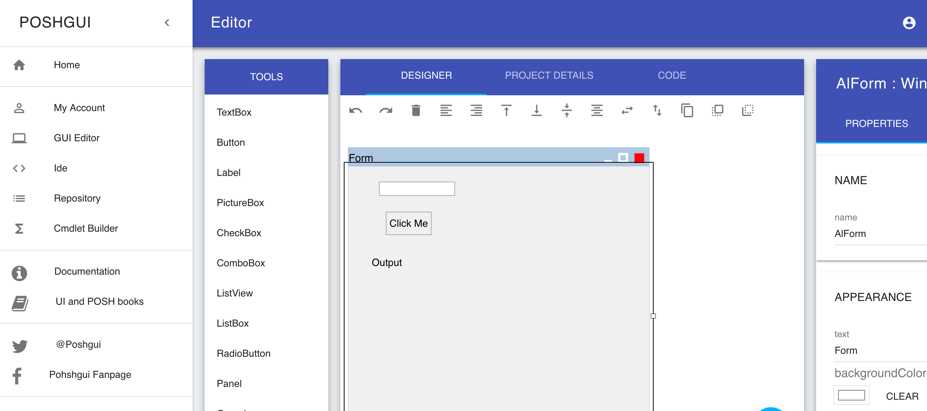
С помощью него вы сможете создать красивую форму с необходимыми диалоговыми элементами. И получить готовый код графической формы с разными элементами и кнопками для ваших PowerShell скриптов.
PowerShell is an advanced shell with integration of .NET objects. It’s more than just a replacement for the older cmd.exe. It can work with .NET assemblies, process large datasets and even interact with web services.
Because of the .NET assemblies support, it can work with WinForms (or even WPF), making it possible to create scripts with GUIs.
Requirements
This has been tested to work with Windows PowerShell verion 5.1. It’s likely going to work with older versions as well, but it’s not going to work with the new cross-platform PowerShell (there are no WinForms on Linux/macOS). You can check the version with
Get-Host | Select-Object version
Enter fullscreen mode
Exit fullscreen mode
Setting up the environment
Before we can start, let’s check a few things.
The first one is the script execution policy. It controls which scripts can be run. By default, Windows blocks execution of all scripts (more on that here). We have to allow it to run local scripts that are not digitally signed. It’s possible to do this this either by going through Windows Settings > Updates & Security > For developers, checking the Change execution policy… checkbox and clicking Apply, or just executing
Set-ExecutionPolicy RemoteSigned
Enter fullscreen mode
Exit fullscreen mode
from administrator PowerShell.
Another (less important) thing is the code editor. Even though we could just write the entire script directly in PowerShell, it’s easier to use a full-featured editor with error checking and syntax highlighting. Windows already comes with PowerShell ISE (Integrated Scripting Environment), but you can use Visual Studio Code with the PowerShell extension.
Writing our script
Let’s start!
Importing the assemblies
We have to import both System.Windows.Forms and System.Drawing assemblies. It’s possible to only include the first one but we also need the 2nd to specify control sizes.
Add-Type -AssemblyName System.Windows.Forms
Add-Type -AssemblyName System.Drawing
Enter fullscreen mode
Exit fullscreen mode
You can test it by creating a blank form:
$form = New-Object System.Windows.Forms.Form
$form.ShowDialog()
Enter fullscreen mode
Exit fullscreen mode

Adding controls
Let’s make a «Hello World» form. First, we create a top-level Form object:
$form = New-Object System.Windows.Forms.Form
$form.Text = "Some form"
$form.Size = New-Object System.Drawing.Size(150, 145)
$form.AutoSize = $true
Enter fullscreen mode
Exit fullscreen mode
In PowerShell, objects are created using New-Object. You can also pass parameters to constructors, similar to the new keyword in C#. Values are assigned to properties directly. Another difference is using $true instead of just true.
Let’s add a label and a button:
$lbl1 = New-Object System.Windows.Forms.Label
$lbl1.Text = "Hello World!"
$lbl1.Location = New-Object System.Drawing.Point(30, 20);

$btn = New-Object System.Windows.Forms.Button
$btn.Text = "Close"
$btn.location = New-Object System.Drawing.Point(30, 60);
$btn.DialogResult = [System.Windows.Forms.DialogResult]::OK
Enter fullscreen mode
Exit fullscreen mode
The $btn.DialogResult line tells the form what to return when the button is clicked. You can use this to figure out whether the user clicked OK or Cancel. We also make $btn the default button and lay controls onto the form:
$form.AcceptButton = $btn
$form.controls.Add($lbl1)
$form.controls.Add($btn)
Enter fullscreen mode
Exit fullscreen mode
All that’s left is showing the form itself:
$form.ShowDialog()
Enter fullscreen mode
Exit fullscreen mode
Event handlers
In our form, $btn is the default OK button which just terminates the form. But we can use non-terminating event handlers as well. For example, let’s make it possible to click on the label:
$lbl1.Add_Click({
    [System.Windows.Forms.MessageBox]::Show("Hey!")
})
Enter fullscreen mode
Exit fullscreen mode
You can call functions from event handlers as you normally would.
Visual Styles
Something I’ve noticed with these GUI scripts is that different control styles are used when the script is run from the PowerShell console instead of VSCode. The console uses legacy rendering which falls back to using Windows 95-style controls. We need to enable Visual Styles to fix that:
[System.Windows.Forms.Application]::EnableVisualStyles()
Enter fullscreen mode
Exit fullscreen mode
From here on, you can add more controls and event handlers. If you’ve used C#/VB.NET before you can reuse large parts of that knowledge to create nicer and more powerful scripts.
That’s it for now 😉
The full script:
Add-Type -AssemblyName System.Windows.Forms
Add-Type -AssemblyName System.Drawing

[System.Windows.Forms.Application]::EnableVisualStyles()

$form = New-Object System.Windows.Forms.Form
$form.Text = "Some form"
$form.Size = New-Object System.Drawing.Size(150, 145)
$form.AutoSize = $true

$lbl1 = New-Object System.Windows.Forms.Label
$lbl1.Text = "Hello World!"
$lbl1.Location = New-Object System.Drawing.Point(30, 20);

$lbl1.Add_Click({
    [System.Windows.Forms.MessageBox]::Show("Hey!")
})

$btn = New-Object System.Windows.Forms.Button
$btn.Text = "Close"
$btn.location = New-Object System.Drawing.Point(30, 60);
$btn.DialogResult = [System.Windows.Forms.DialogResult]::OK

$form.AcceptButton = $btn
$form.controls.Add($lbl1)
$form.controls.Add($btn)

$Null = $form.ShowDialog()
Enter fullscreen mode
Exit fullscreen mode
I have created many PowerShell scripts for the last couple of years. All with a single purpose to automate my IT work as much as possible. But this week I needed to create a script that could be run by the users themselves. And users and command line isn’t the best combination, so let’s take a look at using the PowerShell GUI.
We all love PowerShell for the simplicity and efficientness when it comes to scripting, but for normal users working with a CLI isn’t something they are used to. In this article, I will explain how you can create a simple GUI for your script and help you through the basic obstacles.
The example project
In this article I will use one of my own projects as an example, so let me first tell a bit about the problem I needed to solve.
I work for a construction company and our construction sites are connected over a 4G IPVPN network with the datacenter. Because of double natting, we can’t deploy printers with a print server.
Our users can install a printer themselves, but because they are not listed on the print server they can easily search for the printer. They will need to create a TCP/IP port, find the IP Address of the printer, select the driver and give a printer name.
I created a PowerShell script that I could run remotely to do this in the background, but that would require them to call me, so I could run the script in the background. Now I could just install all the printers, but that would only be confusing and resulting in a long list of printers.
So I figured, the PowerShell script only needs the printer model, Ip Address and a name. We can look up the Ip Address so if the user can select a model and fill in a name we are done. Saving me 2 calls a week.
The basics of the PowerShell GUI
Before we start creating a form is it important to know that the PowerShell script is run sequentially. So you define your form and show it. But any code after you displayed the form won’t be executed until you close the form.
This is something that took me 30 minutes to figure out… I simply thought I could show the form and handle the input below it in PowerShell.
Creating the form
We start with a blank form. First, we add the .Net Windows. Forms. Also, we need to define a size for the form (width, height), title and background color. Just copy-paste the code below in the PowerShell ISE and click on run
# Init PowerShell Gui
Add-Type -AssemblyName System.Windows.Forms

# Create a new form
$LocalPrinterForm                    = New-Object system.Windows.Forms.Form

# Define the size, title and background color
$LocalPrinterForm.ClientSize         = '500,300'
$LocalPrinterForm.text               = "LazyAdmin - PowerShell GUI Example"
$LocalPrinterForm.BackColor          = "#ffffff"

# Display the form
[void]$LocalPrinterForm.ShowDialog()
You will see a simple form just like this one below:
Adding elements to your form
On our form, we can add elements. These can be used to display information and gather user input. The place of the input is based on points/pixels from the left side and the top side. So the location 20,50 is 20 pixels from the left side and 50 points from the top side.
We have the following elements that we can use on our forms:
- TextBox (to get user input)
- Label
- Button
- PictureBox
- CheckBox
- ComboBox (Dropdown list)
- ListView
- ListBox
- RadioButton
- Panel
- Groupbox (To group elements together)
- ProgressBar
- DataGridView
So let’s create some elements on our form. Add the code below to your script. Make sure that ShowDialog is at the end of your script.
# Create a Title for our form. We will use a label for it.
$Titel                           = New-Object system.Windows.Forms.Label

# The content of the label
$Titel.text                      = "Adding new printer"

# Make sure the label is sized the height and length of the content
$Titel.AutoSize                  = $true

# Define the minial width and height (not nessary with autosize true)
$Titel.width                     = 25
$Titel.height                    = 10

# Position the element
$Titel.location                  = New-Object System.Drawing.Point(20,20)

# Define the font type and size
$Titel.Font                      = 'Microsoft Sans Serif,13'

# Other elemtents
$Description                     = New-Object system.Windows.Forms.Label
$Description.text                = "Add a new construction site printer to your computer. Make sure you are connected to the network of the construction site."
$Description.AutoSize            = $false
$Description.width               = 450
$Description.height              = 50
$Description.location            = New-Object System.Drawing.Point(20,50)
$Description.Font                = 'Microsoft Sans Serif,10'

$PrinterStatus                   = New-Object system.Windows.Forms.Label
$PrinterStatus.text              = "Status:"
$PrinterStatus.AutoSize          = $true
$PrinterStatus.location          = New-Object System.Drawing.Point(20,115)
$PrinterStatus.Font              = 'Microsoft Sans Serif,10,style=Bold'

$PrinterFound                    = New-Object system.Windows.Forms.Label
$PrinterFound.text               = "Searching for printer..."
$PrinterFound.AutoSize           = $true
$PrinterFound.location           = New-Object System.Drawing.Point(75,115)
$PrinterFound.Font               = 'Microsoft Sans Serif,10'

# ADD OTHER ELEMENTS ABOVE THIS LINE

# Add the elements to the form
$LocalPrinterForm.controls.AddRange(@($Titel,$Description,$PrinterStatus,$PrinterFound))

# THIS SHOULD BE AT THE END OF YOUR SCRIPT FOR NOW
# Display the form
[void]$LocalPrinterForm.ShowDialog()
What you see here is that every element is created. These are all simple text or labels elements. You can define the width and height of each element, but if your content is longer then the element it will only be partially displayed. So by setting the Autosize to true, you are assured that the user can read the whole label.
Every element is given a location, the first digit is the number of pixels from the left side, the second the number of pixels from the top.
The result will look like this:
Using a dropdown list
Our user needs to select the printer manufacturer, we only use two brands, so I radio button could work too. We use generic print drivers so I don’t need to know the specific model of the printer.
$PrinterType                     = New-Object system.Windows.Forms.ComboBox
$PrinterType.text                = ""
$PrinterType.width               = 170
$printerType.autosize            = $true

# Add the items in the dropdown list
@('Canon','Hp') | ForEach-Object {[void] $PrinterType.Items.Add($_)}

# Select the default value
$PrinterType.SelectedIndex       = 0
$PrinterType.location            = New-Object System.Drawing.Point(20,210)
$PrinterType.Font                = 'Microsoft Sans Serif,10'
The code above is pretty clear I think, we create the combo box and add the items with a single line foreach loop to the list. Again we also define the position and I have set a minimum width for the element.
You can set a default value for your dropdown list by selecting the index. Make sure you add the variable of the element to the $LocalPrinterForm.controls.AddRange, otherwise it won’t be displayed.
Adding buttons
We are also going to add some buttons to our form. A button can have a standard action, like (
OK, Cancel, Abort, Retry, Ignore, Yes, or No) or you can assign a custom function to it.
The buttons we are going to add are Cancel and Add Printer. Cancel will just close the form and does nothing else, while AddPrinter will run our logic to add the printer. Add the buttons with the code below, again make sure you add the variables of the buttons to the $LocalPrinterForm.controls.AddRange
$AddPrinterBtn                   = New-Object system.Windows.Forms.Button
$AddPrinterBtn.BackColor         = "#a4ba67"
$AddPrinterBtn.text              = "Add Printer"
$AddPrinterBtn.width             = 90
$AddPrinterBtn.height            = 30
$AddPrinterBtn.location          = New-Object System.Drawing.Point(370,250)
$AddPrinterBtn.Font              = 'Microsoft Sans Serif,10'
$AddPrinterBtn.ForeColor         = "#ffffff"

$cancelBtn                       = New-Object system.Windows.Forms.Button
$cancelBtn.BackColor             = "#ffffff"
$cancelBtn.text                  = "Cancel"
$cancelBtn.width                 = 90
$cancelBtn.height                = 30
$cancelBtn.location              = New-Object System.Drawing.Point(260,250)
$cancelBtn.Font                  = 'Microsoft Sans Serif,10'
$cancelBtn.ForeColor             = "#000"
$cancelBtn.DialogResult          = [System.Windows.Forms.DialogResult]::Cancel
$LocalPrinterForm.CancelButton   = $cancelBtn
$LocalPrinterForm.Controls.Add($cancelBtn)
Now a lot of examples on other websites discard the results of the dialog by using [void]$form.ShowDialog(). But the return value of the dialog should be used to tell how the user has closed the form.
So we are going to modify the ShowDialog cmd.
$result = $LocalPrinterForm.ShowDialog()
This way we can check if the user has pressed Cancel or any other default button in the form
if ($result –eq [System.Windows.Forms.DialogResult]::Cancel)
{
    write-output 'User pressed cancel'
}
Adding a custom function to a button
When the user clicks Add Printer a custom script should be executed. We can create a function with our logic and assign the function to the button with the following cmd
$AddPrinterBtn.Add_Click({ AddPrinter })
And our function
function AddPrinter {
	# ADDING PRINTER LOGIC GOES HERE
}
Result
So after we added all elements, and I added some extra-label, our final PowerShell GUI form looks like this:
Now we only have to finish our script so a printer is added.
Adding the logic
So with our form in place, we can start by adding the logic. During the execution of your script, you might want to change text, show or remove fields or perform a specific action. Lets first start with outlining our PowerShell script.
#------------[Initialisations]------------

# Init PowerShell Gui
Add-Type -AssemblyName System.Windows.Forms
Add-Type -AssemblyName System.Drawing


#---------------[Form]-------------------

# Our form goes here

[System.Windows.Forms.Application]::EnableVisualStyles()

$LocalPrinterForm                    = New-Object system.Windows.Forms.Form
$LocalPrinterForm.ClientSize         = '480,300'
$LocalPrinterForm.text               = "LazyAdmin - PowerShell GUI Example"
$LocalPrinterForm.BackColor          = "#ffffff"
$LocalPrinterForm.TopMost            = $false
$Icon                                = New-Object system.drawing.icon ("./form.ico")
$LocalPrinterForm.Icon               = $Icon

# THE REST OF THE FORM

$LocalPrinterForm.controls.AddRange(@( "<ALL FORM ELEMENTS>" ))

#------------[Functions]------------

function AddPrinter {
    # Function that is triggered with the add printer button
}

#------------[Script]------------

$AddPrinterBtn.Add_Click({ AddPrinter })

# REST OF YOUR SCRIPT


#------------[Show form]------------

# Show the form
$result = $LocalPrinterForm.ShowDialog()

# Catch any output of the form
if ($result –eq [System.Windows.Forms.DialogResult]::Cancel)
{
    write-output 'User pressed cancel'
}
In your functions or script section, you might want to give some feedback to the user or use the data from the input fields.
Reading and changing PowerShell GUI Elements
Reading data from the textbox is pretty straight forward. In our example, we want to use the name the users have entered and check if the printer name already exists. If the name exists we want to show an error.
if (Get-Printer -Name $printerName.text) {
	$PrinterStatus.ForeColor = "#D0021B"
	$PrinterStatus.Text = 'Printer name already exists.'
}
In the example above we check the given printer name, if it exists we change the font color of the label “PrinterStatus” to read and change the text of the label to show a message to the users.
There is no need to refresh the form or input, you can just change the text as you go.
Showing and hiding fields
Before the form is loaded I check if there is a printer available on the expected network address. If not then there is no need for the user to continue. So when I initialize the form elements I have hidden some elements.
If we have a connection, then I show the elements or change the label of the buttons for example. Hiding and show elements in PowerShell GUI can be done with the following code:
$PrinterNameLabel.Visible = $false # or $true of course 😉
Online PowerShell GUI Editor PoshGUI
Creating a bigger or complex form from the command line only can be a bit challenging. You will have to position all the elements in the correct place, create all the necessary code. Luckily there is an online PowerShell GUI editor PoshGUI.
This is a great tool to create your initial form layout. You can download the PS1 file and continue working on your form in your favorite editor.
Conclusion
So I hope this article helpt you to get started creating your first PowerShell form. While PowerShell isn’t really meant for creating forms, it can be a great way to make a script more usable to your user or colleagues.
Subscribe to the newsletter to receive the latest article about PowerShell or Office 365 in your mailbox.
The complete code looks as follows:
#---------------------------------------------------------[Initialisations]--------------------------------------------------------
# Init PowerShell Gui
Add-Type -AssemblyName System.Windows.Forms
Add-Type -AssemblyName System.Drawing


#---------------------------------------------------------[Form]--------------------------------------------------------

[System.Windows.Forms.Application]::EnableVisualStyles()

$LocalPrinterForm                    = New-Object system.Windows.Forms.Form
$LocalPrinterForm.ClientSize         = '480,300'
$LocalPrinterForm.text               = "Printers"
$LocalPrinterForm.BackColor          = "#ffffff"
$LocalPrinterForm.TopMost            = $false
$Icon                                = New-Object system.drawing.icon ("//thunnissen.local/netlogon/printer.ico")
$LocalPrinterForm.Icon               = $Icon

$Titel                           = New-Object system.Windows.Forms.Label
$Titel.text                      = "Add new printer"
$Titel.AutoSize                  = $true
$Titel.width                     = 25
$Titel.height                    = 10
$Titel.location                  = New-Object System.Drawing.Point(20,20)
$Titel.Font                      = 'Microsoft Sans Serif,13'

$Description                     = New-Object system.Windows.Forms.Label
$Description.text                = "To add a printer, make sure you are connected to the same network as the printer.."
$Description.AutoSize            = $false
$Description.width               = 450
$Description.height              = 50
$Description.location            = New-Object System.Drawing.Point(20,50)
$Description.Font                = 'Microsoft Sans Serif,10'

$PrinterStatus                   = New-Object system.Windows.Forms.Label
$PrinterStatus.text              = "Status:"
$PrinterStatus.AutoSize          = $true
$PrinterStatus.width             = 25
$PrinterStatus.height            = 10
$PrinterStatus.location          = New-Object System.Drawing.Point(20,115)
$PrinterStatus.Font              = 'Microsoft Sans Serif,10,style=Bold'

$PrinterFound                    = New-Object system.Windows.Forms.Label
$PrinterFound.text               = "Searching for printer..."
$PrinterFound.AutoSize           = $true
$PrinterFound.width              = 25
$PrinterFound.height             = 10
$PrinterFound.location           = New-Object System.Drawing.Point(100,115)
$PrinterFound.Font               = 'Microsoft Sans Serif,10'

$PrinterDetails                  = New-Object system.Windows.Forms.Label
$PrinterDetails.text             = "Printer details"
$PrinterDetails.AutoSize         = $true
$PrinterDetails.width            = 25
$PrinterDetails.height           = 10
$PrinterDetails.location         = New-Object System.Drawing.Point(20,150)
$PrinterDetails.Font             = 'Microsoft Sans Serif,12'
$PrinterDetails.Visible          = $false

$PrinterNameLabel                = New-Object system.Windows.Forms.Label
$PrinterNameLabel.text           = "Name:"
$PrinterNameLabel.AutoSize       = $true
$PrinterNameLabel.width          = 25
$PrinterNameLabel.height         = 20
$PrinterNameLabel.location       = New-Object System.Drawing.Point(20,180)
$PrinterNameLabel.Font           = 'Microsoft Sans Serif,10,style=Bold'
$PrinterNameLabel.Visible        = $false

$PrinterName                     = New-Object system.Windows.Forms.TextBox
$PrinterName.multiline           = $false
$PrinterName.width               = 314
$PrinterName.height              = 20
$PrinterName.location            = New-Object System.Drawing.Point(100,180)
$PrinterName.Font                = 'Microsoft Sans Serif,10'
$PrinterName.Visible             = $false

$PrinterTypeLabel                = New-Object system.Windows.Forms.Label
$PrinterTypeLabel.text           = "Brand:"
$PrinterTypeLabel.AutoSize       = $true
$PrinterTypeLabel.width          = 25
$PrinterTypeLabel.height         = 20
$PrinterTypeLabel.location       = New-Object System.Drawing.Point(20,210)
$PrinterTypeLabel.Font           = 'Microsoft Sans Serif,10,style=Bold'
$PrinterTypeLabel.Visible        = $false

$PrinterType                     = New-Object system.Windows.Forms.ComboBox
$PrinterType.text                = ""
$PrinterType.width               = 170
$PrinterType.height              = 20
@('Canon','Hp') | ForEach-Object {[void] $PrinterType.Items.Add($_)}
$PrinterType.SelectedIndex       = 0
$PrinterType.location            = New-Object System.Drawing.Point(100,210)
$PrinterType.Font                = 'Microsoft Sans Serif,10'
$PrinterType.Visible             = $false

$AddPrinterBtn                   = New-Object system.Windows.Forms.Button
$AddPrinterBtn.BackColor         = "#ff7b00"
$AddPrinterBtn.text              = "Add"
$AddPrinterBtn.width             = 90
$AddPrinterBtn.height            = 30
$AddPrinterBtn.location          = New-Object System.Drawing.Point(370,250)
$AddPrinterBtn.Font              = 'Microsoft Sans Serif,10'
$AddPrinterBtn.ForeColor         = "#ffffff"
$AddPrinterBtn.Visible           = $false

$cancelBtn                       = New-Object system.Windows.Forms.Button
$cancelBtn.BackColor             = "#ffffff"
$cancelBtn.text                  = "Cancel"
$cancelBtn.width                 = 90
$cancelBtn.height                = 30
$cancelBtn.location              = New-Object System.Drawing.Point(260,250)
$cancelBtn.Font                  = 'Microsoft Sans Serif,10'
$cancelBtn.ForeColor             = "#000"
$cancelBtn.DialogResult          = [System.Windows.Forms.DialogResult]::Cancel
$LocalPrinterForm.CancelButton   = $cancelBtn
$LocalPrinterForm.Controls.Add($cancelBtn)

$LocalPrinterForm.controls.AddRange(@($Titel,$Description,$PrinterStatus,$PrinterFound,$PrinterName,$PrinterNameLabel,$PrinterType,$AddPrinterBtn,$cancelBtn,$PrinterTypeLabel,$PrinterDetails))

#-----------------------------------------------------------[Functions]------------------------------------------------------------

function AddPrinter {
	$PrinterFound.ForeColor = "#000000"
	$PrinterFound.Text = 'Adding printer...'
	# Check printer port
	$portName = "TCPPort:"+$printerIp
	$portExists = Get-Printerport -Name $portname -ErrorAction SilentlyContinue

	# Create port if it not exists
	if (-not $portExists) {
		$PrinterFound.Text = 'Creating printer port...'
		Add-PrinterPort -name $portName -PrinterHostAddress $printerIp
	}

	# Select the correct driver
	if ($PrinterType.SelectedItem -eq 'Canon') {
		$printerDriverName = "Canon Generic Plus PCL6"
	}else{
		$printerDriverName = "HP LaserJet M227-M231 PCL-6"
	}

	# Check if printer driver exists
	$printDriverExists = Get-PrinterDriver -name $printerDriverName -ErrorAction SilentlyContinue

	# Install printer or printer driver and printer
	if ($printDriverExists) {
		$PrinterFound.Text = 'Installing printer...'
		Add-Printer -Name $printerName.text -PortName $portName -DriverName $printerDriverName
	}else{
		$PrinterFound.Text = 'Installing printer driver...'
		Add-PrinterDriver -name $printerDriverName

		$PrinterFound.Text = 'Installing printer...'
		Add-Printer -Name $printerName.text -PortName $portName -DriverName $printerDriverName
	}

	if (Get-Printer -Name $printerName.text) {
		$PrinterFound.ForeColor = "#7ed321"
		$PrinterFound.Text = 'The printer is installed'
	}
	else {
		$PrinterFound.ForeColor = "#D0021B"
		$PrinterFound.Text = 'Installation failed'
	}
	$PrinterNameLabel.Visible = $false
	$PrinterName.Visible = $false
	$PrinterType.Visible = $false
	$AddPrinterBtn.Visible = $false
	$PrinterDetails.Visible = $false
	$PrinterTypeLabel.Visible = $false
	$cancelBtn.text = "Close"
}

#---------------------------------------------------------[Script]--------------------------------------------------------
# Get printers IP Address
$clientIP = (
    Get-NetIPConfiguration |
    Where-Object {
        $_.IPv4DefaultGateway -ne $null -and
        $_.NetAdapter.Status -ne "Disconnected"
    }
).IPv4Address.IPAddress

$networkAddress = $clientIP.Split('.')
$networkAddress = $networkAddress[0]+"."+$networkAddress[1]+"."+$networkAddress[2]

# Check if printer is online
$printerIp =  $networkAddress + ".31"
$testConnection = Test-Connection $printerIp -count 1 -Quiet

If ($testConnection) {
	$PrinterFound.text = "Printer found"
	$PrinterFound.ForeColor = "#7ed321"
	$PrinterNameLabel.Visible = $true
	$PrinterName.Visible = $true
	$PrinterType.Visible = $true
	$AddPrinterBtn.Visible = $true
	$PrinterDetails.Visible = $true
	$PrinterTypeLabel.Visible = $true
}else{
	$PrinterFound.text = "No printers found"
	$PrinterFound.ForeColor = "#D0021B"
	$cancelBtn.text = "Sluiten"
}

$AddPrinterBtn.Add_Click({ AddPrinter })

[void]$LocalPrinterForm.ShowDialog()
You can also check the following articles:
- Adding printers and printer ports with PowerShell
- Migrating home folders to OneDrive with PowerShell
- Getting started with Microsoft Flow
Powershell is a powerful scripting language that can automate many tasks and perform complex operations. But sometimes, you may want to make your scripts more user-friendly and interactive by adding a graphical user interface (GUI). A GUI can make your scripts easier to use, more appealing, and more versatile. However, creating a GUI for your Powershell scripts can be challenging and time-consuming, especially if you use external tools that may not work well with your scripts or preferences. In this post, I will show you how to create a stunning GUI for your Powershell scripts in minutes, using nothing but Powershell and WinForms. WinForms are a set of classes in the .NET Framework that allow you to create graphical windows and controls for your applications. They are compatible with Powershell and offer a lot of flexibility and functionality for creating GUIs. You will learn how to design a GUI that is easy to maintain, consistent, and reusable for any script you want.
Table of Contents
- Table of Contents
- Prerequisites
- Objective
- Steps
- Clear all existing variables
- Import Windows Forms Classes and Methods
- Create Structure
- Define Functions
- Display Window
- Define Functions Part 2
- Adding Objects To the Form
- Wrapping the Functions in an External Module
- Conclusion
Prerequisites
- Windows 10 or Above
- Basic programming knowledge
Objective
Let’s have some fun as we go through each step and command that we are creating. I will try to make everything clear and interesting for you. Don’t worry if you feel confused, just follow me until the end. By the time you finish reading this, you should have a better idea on how to use WinForms in Powershell, organize your script and how to write re-usable functions.
Steps
Clear all existing variables
First, make sure you have the Powershell ISE window open (Click Start > Search for “Powershell ISE” in the Searchbar) if you haven’t already. The next thing we are going to do is to write this line of code to delete all the variables from the session. This may not seem like a big deal initially, but this is crucial when we create forms and add objects, we want to avoid any conflicts.
#Clear all variables
Remove-Variable * -ErrorAction SilentlyContinue
Import Windows Forms Classes and Methods
Next, we have to first set up the Form classes and methods to actually create the GUI. Add this code to the next line…
#Initialize Form
Add-Type -AssemblyName System.Windows.Forms
Create Structure
I prefer to structure my scripts in a way that makes them easy to read and maintain. I use functions and comments to divide the script into different sections. Let’s see how the script looks like with this approach.
#Clear all variables
Remove-Variable * -ErrorAction SilentlyContinue

#Initialize Form
Add-Type -AssemblyName System.Windows.Forms

#---FUNCTIONS---#
function Form{
    param(
    )
}

function Label{
    param(
    )
}

function TextBox{
    param(
    )
}

function Button{
    param(
    )
}

#---MAIN---#


#---BUTTONS ACTION---#


#--BOTTOM OF SCRIPT---#
I hope you’re still with me. Copy and paste this into your ISE session if you need to. We’re going to move on to defining the functions.
Define Functions
We’re going to start by creating the Form object. This will be the main window that we will use to display a window. right now, it looks like this….
function Form{
    param(

    )

}
Let’s set some parameters for the title and the size (width, height) of the form. We can also use default values if we don’t provide anything when calling, which is what we will do for the width and height.
#Functions
function Form{
    param(
        $title,
        $width=10,
        $height=10
    )
}
The function will make the Form object, use the parameters we just set and return it. We can also change the window color, font, font-size and other properties, but for now, we’re only concerned about the title and size of the window. Add the following to your script…
function Form{
    param(
        $title,
        $width=10,
        $height=10
    )
    $Form = New-Object system.Windows.Forms.Form
    $Form.text = $title
    $Form.ClientSize = "$width,$height"
    return $Form
}
Well done! We just created the Form function that will let us display the window. Look at the function again, it should be clear to you, all we did was create a WindowsForm variable and apply our title, width, height parameters to it. Creating a function like this will allow us to re-use it much easier.
Display Window
Now lets create our first window!
under the Main section, we’re going to make a variable to invoke the Form function, we’ll assign it a name and specify a width and height for it.
#---MAIN---#
$window = Form -title "First WinForm" -width 500 -height 500
and add the following to the end of your script, we will need this to make the window, we just created, show up.
#--BOTTOM OF SCRIPT---#
$window.ShowDialog()
Now.. run the script! if you followed everything, you should see a window appear.

Define Functions Part 2
We are almost done with the hard part. We used the Form function to create the window, and now we need to create three more functions for the Labels, Textboxes and Buttons. The code for these functions is similar to the Form function, except that we added an X and Y parameter to position the objects on the window. You can see the code for these functions below.
function Label{
    param(
        $text,
        $X,
        $Y
    )
    $Label = New-Object system.Windows.Forms.Label
    $Label.Location  = New-Object System.Drawing.Point($X, $Y)
    $Label.text = $text
    return $Label
}

function TextBox{
    param(
        $X,
        $Y,
        $width=100

    )
    $TextBox = New-Object system.Windows.Forms.TextBox
    $TextBox.Location  = New-Object System.Drawing.Point($X, $Y)
    $TextBox.text = $text
    return $TextBox
}

function Button{
    param(
        $text,
        $X,
        $Y,
        $width,
        $height
    )
    $Button = New-Object system.Windows.Forms.Button
    $Button.Location  = New-Object System.Drawing.Point($X, $Y)
    $Button.Width = $width
    $Button.Height = $height
    $Button.text = $text
    return $Button
}
Adding Objects To the Form
To show our new objects on screen, we need one more essential thing at the end of our script. We will make a for loop that goes through all the System.Window.Form variables we created and adds them to our Window form.
#--BOTTOM OF SCRIPT---#

#For loop to add every form object (label, textboxes, buttons, etc. into the window)
foreach ($var in (Get-Variable | where {$_.Value -like "System.Windows.Forms.*" }  | where {$_.Value -notlike "System.Windows.Forms.Form*" }).value){
    $window.Controls.Add($var)
}
We have simplified the process of adding our objects to the form by doing the hard work beforehand. Now we can create some labels in the main section with less hassle. Just like we accessed our Form, we can also access our labels, text boxes, and buttons more easily.
Lets create a few labels, textboxes and a button
#---MAIN---#
$window = Form -title "First WinForm" -width 500 -height 500

$firstNameLabel = Label -text "Firstname" -X 100 -Y 80
$LastNameLabel = Label -text "Lastname" -X 100 -Y 180

$firstNameTextBox = TextBox -X 100 -Y 120
$lastNameTextbox = TextBox -X 100 -Y 220

$ClickMeButton = Button -text "Click Me!" -X 100 -Y 280 -width 100 -height 80
Now lets run the script and if you followed everything, you should see the following.

Looks great!!
Lets complete the project by making the “Click Me!” button do something..
Add an action button to the button.
$ClickMeButton = Button -text "Click Me!" -X 100 -Y 280 -width 100 -height 80

$ClickMeButton.add_click({

})
and lets add a command that outputs in a dialog box, from what we typed into the text boxes.
$ClickMeButton.add_click({
    [System.Windows.Forms.MessageBox]::Show("Hello World. " + ($firstNameTextBox.Text) + " " + ($lastNameTextbox.Text) , "My Dialog Box")
})
Lets run it again and see what happens. And if you did everything correctly, this is what you should be seeing.

Wrapping the Functions in an External Module
This is an optional step for us to shorten the code and make our script look less cluttered but we can start moving all our functions into an external module.
Create a new Powershell file called WinFormsModule.ps1 within the same directory and import it with the following code the top of your script
Import-Module -Name ".\WinFormsModule.ps1"
Lets take all of our functions, initializers and copy it into the new module we just created. We’ll also move a few commands. This is what it should look like.
Remove-Variable * -ErrorAction SilentlyContinue
Add-Type -AssemblyName System.Windows.Forms

#Functions
function Form{
    #Parameters
    param(
    $title="Title",
    $width=10,
    $height=10
    )
    # Initialize Object
    $Form = New-Object system.Windows.Forms.Form
    $Form.ClientSize = "$width,$height"
    $Form.text = $title

    return $Form
}


function Label{
    param(
        $text,
        $X,
        $Y
    )
    $Label = New-Object system.Windows.Forms.Label
    $Label.Location  = New-Object System.Drawing.Point($X, $Y)
    $Label.text = $text
    return $Label
}

function TextBox{
    param(
        $X,
        $Y,
        $width=100

    )
    $TextBox = New-Object system.Windows.Forms.TextBox
    $TextBox.Location  = New-Object System.Drawing.Point($X, $Y)
    $TextBox.text = $text
    return $TextBox
}

function Button{
    param(
        $text,
        $X,
        $Y,
        $width,
        $height
    )
    $Button = New-Object system.Windows.Forms.Button
    $Button.Location  = New-Object System.Drawing.Point($X, $Y)
    $Button.Width = $width
    $Button.Height = $height
    $Button.text = $text
    return $Button
}

function DisplayForm($window){
    #For loop to add every form object (label, textboxes, buttons, etc. into the window)
    foreach ($var in (Get-Variable | where {$_.Value -like "System.Windows.Forms.*" }  | where {$_.Value -notlike "System.Windows.Forms.Form*" }).value){
        $window.Controls.Add($var)
    }
    #Keep this at the bottom of your script
    $window.ShowDialog()
}
and your main script should look a lot cleaner like this.
Import-Module -Name ".\WinFormsModule.ps1"

#Main
$window1 = Form -title "First WinForm" -width 500 -height 500

$firstNameLabel = Label -text "Firstname" -X 100 -Y 80
$LastNameLabel = Label -text "Lastname" -X 100 -Y 180

$firstNameTextBox = TextBox -X 100 -Y 120
$lastNameTextbox = TextBox -X 100 -Y 220

$ClickMeButton = Button -text "Click Me!" -X 100 -Y 280 -width 100 -height 80

$ClickMeButton.add_click({
    [System.Windows.Forms.MessageBox]::Show("Hello World. " + ($firstNameTextBox.Text) + " " + ($lastNameTextbox.Text) , "My Dialog Box")
})

DisplayForm($window1)
Conclusion
Using PowerShell alone, you have created a simple and easy-to-use PowerShell GUI script. Although it may be basic, it can serve as a foundation for more complex scripts by providing a starting point and skeleton framework. The .NET WinForm framework is a useful resource that allows us to create visual interfaces for our scripts with ease. Armed with this knowledge, you can develop powerful and user-friendly scripts and applications. I hope you found this guide helpful and informative. Please share your thoughts in the comments below.
Full Code
https://github.com/fabiod89/WinFormGuiModule