 Если для какой-то программы или игры требуется подключение через определенный порт, может оказаться что по умолчанию в системе этот порт закрыт и соединение не выполняется. При необходимости порты в Windows 11, Windows 10 и предыдущих версиях системы сравнительно легко открыть.
В этой инструкции подробно о том, как открыть порты в Windows 11 или Windows 10, посмотреть список открытых портов и дополнительная информация, которая может пригодиться, если при подключении всё равно возникают проблемы.
Открытие портов в брандмауэре Windows
Основной способ открытия портов в Windows 11 и 10 — настройка соответствующих правил в брандмауэре.
Прежде всего, откройте настройки Windows в режиме повышенной безопасности. Для этого можно использовать следующие способы:
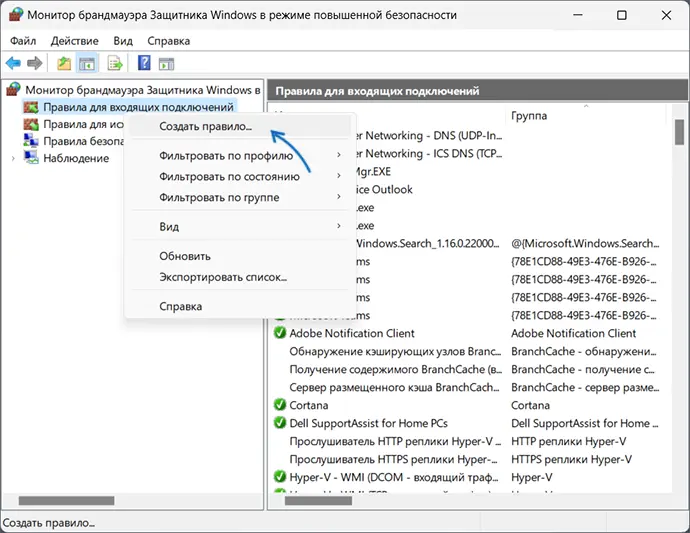
Следующий шаг — настроить правила для нужных портов:
- Нажмите правой кнопкой мыши по «Правила для входящих подключений» и выберите пункт «Создать правило» в контекстном меню.

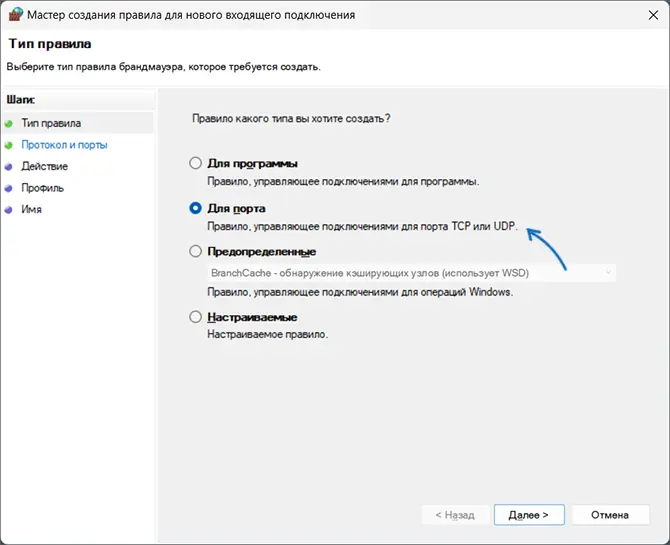
- В мастере создания правил выберите пункт «Для порта» и нажмите «Далее».

- Выберите тип протокола — TCP или UDP (если вам не известен нужный тип, уточните в справке по конкретной программе).
- Укажите порты: конкретный порт или их диапазон, можно использовать запятые для перечисления нескольких портов, или знак дефиса для указания их диапазона. Нажмите «Далее».
- Выберите пункт «Разрешить подключение».
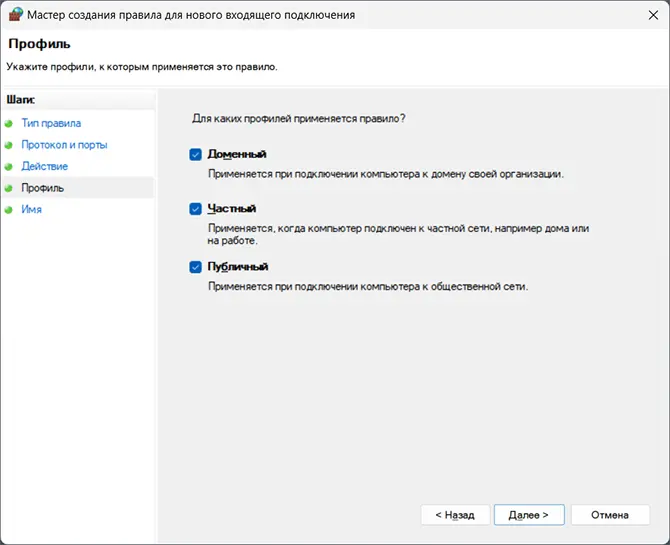
- Укажите, для каких типов сетей (сетевых профилей) следует открыть порты.
- Укажите имя правила и, при желании, его описание. Затем нажмите кнопку «Готово».
- Выполните действия 1-7, но уже для исходящего подключения.


Готово, порт открыт и, если что-то ещё не мешает его работе, соединения должны будут устанавливаться.
Возможные проблемы и дополнительные необходимые действия
Если вы открыли требуемые порты в Windows, но несмотря на это соединение не устанавливается, следует учитывать, проверить или выполнить следующие действия:
- VPN может влиять не возможность обмена данными по определенным портам. Решение: отключить VPN, либо посмотреть, есть ли возможность открыть порты в ПО для VPN.
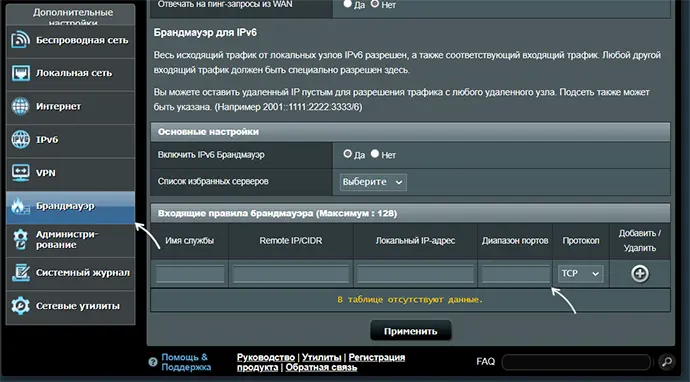
- Роутеры имеют собственные функции файрволла/брандмауэра и порты может потребоваться открыть (пробросить) и в настройках роутера. В зависимости от марки и модели Wi-Fi роутера, это выполняется в разных разделах: перенаправление портов (port forwarding), брандмауэр (firewall), межсетевой экран, виртуальные серверы. Логика настройки везде одна и та же: добавляются обычно совпадающие внешний порт и внутренний порт (нужный вам порт), указывается внутренний IP (локальный IP компьютера, к которому нужно пробросить порт), тип протокола — TCP или UDP, иногда требуется указать интерфейс, для соединений из «внешней сети» — WAN.

- Если само приложение заблокировано в брандмауэре, оно не сможет устанавливать соединения: можно добавить правила, разрешающие подключения для программы тем же способом, которым это выполнялось выше для портов.
- Наличие сторонних файрволлов и антивирусов с функциями защиты сети также может влиять на возможность установки соединений по определенным портам: следует проверить их настройки, при наличии такого ПО, чтобы открыть соответствующие порты или отключить защиту для них.
Как посмотреть открытые порты в Windows и какие программы их используют
В Windows постоянно открыты многие порты, требующиеся как для работы системных служб, программ (в том числе сторонних), браузеров. Вы можете посмотреть список открытых портов одним из следующих способов:
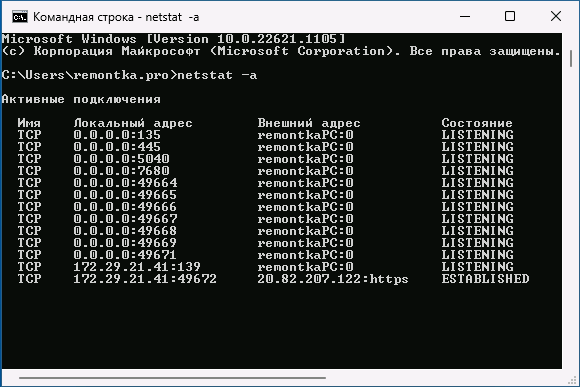
- Запустить командную строку и ввести команду (порты указаны после двоеточия в IP-адресе)
netstat -a

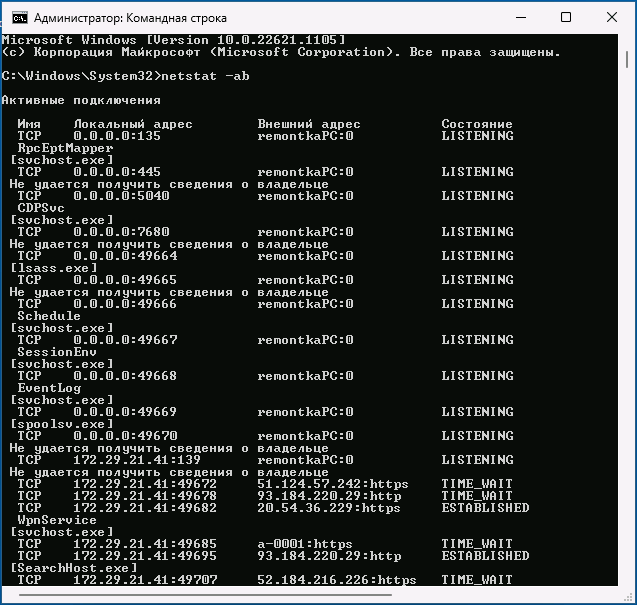
- Если требуется посмотреть, какие процессы используют определенные порты, используйте команду (требует запуска от имени администратора)
netstat -ab

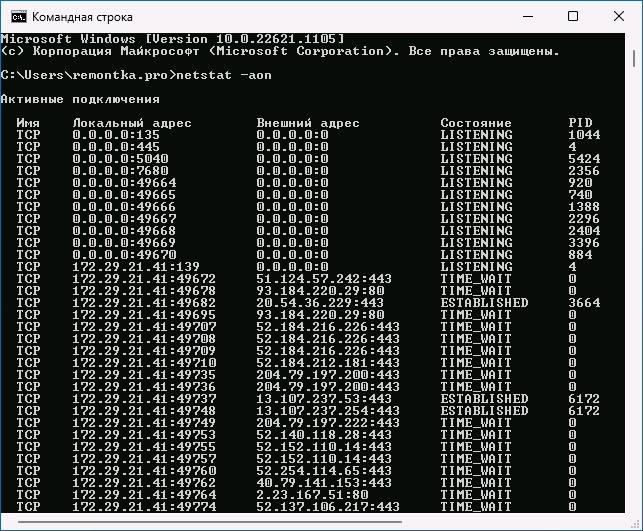
- Для просмотра открытых портов с ИД (PID) процесса (по которому в диспетчере задач можно увидеть конкретный процесс):
netstat -aon

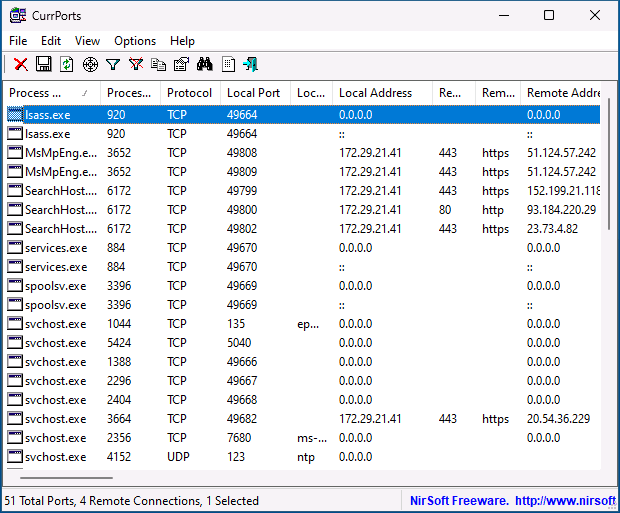
- Есть сторонние программы, позволяющие получить сведения об открытых портах и использующих их процессах, например, бесплатная NirSoft CurrPorts.

Список «стандартных» и наиболее часто используемых портов доступен в Википедии, но многие игры и программы могут использовать свои собственные, не указанные в списке порты для работы.
In this tutorial, we will learn how to run the netstat command to check open ports in Windows Operating System. We will also look at command options and how to use the findstr command (similar to grep) to filter the netstat output.
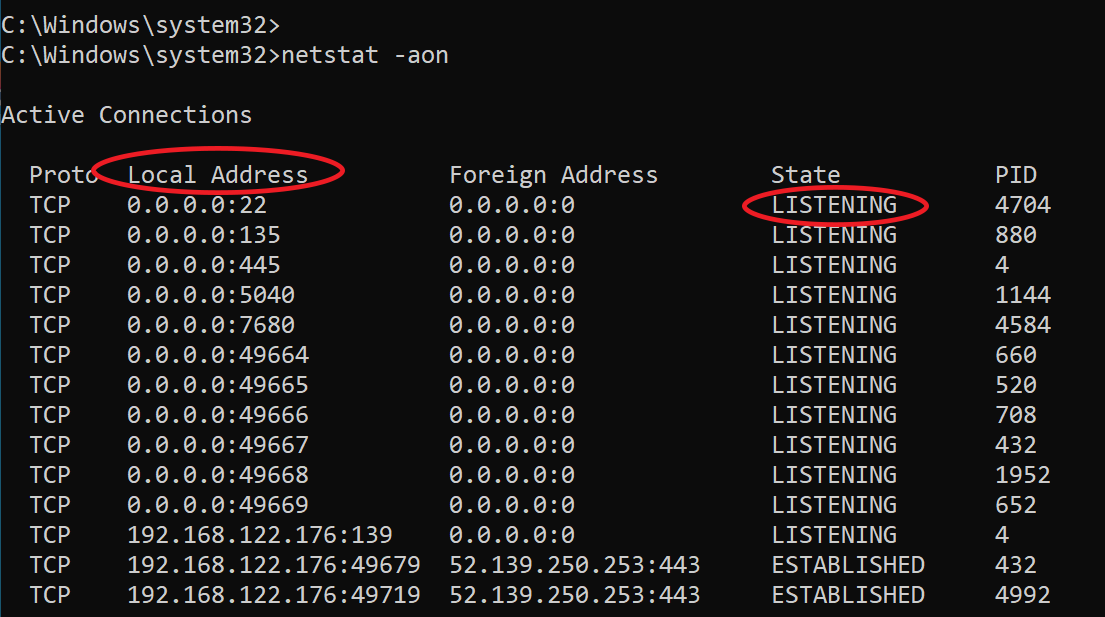
To check open ports, open a command prompt (or PowerShell) as administrator and run the netstat command as follows:
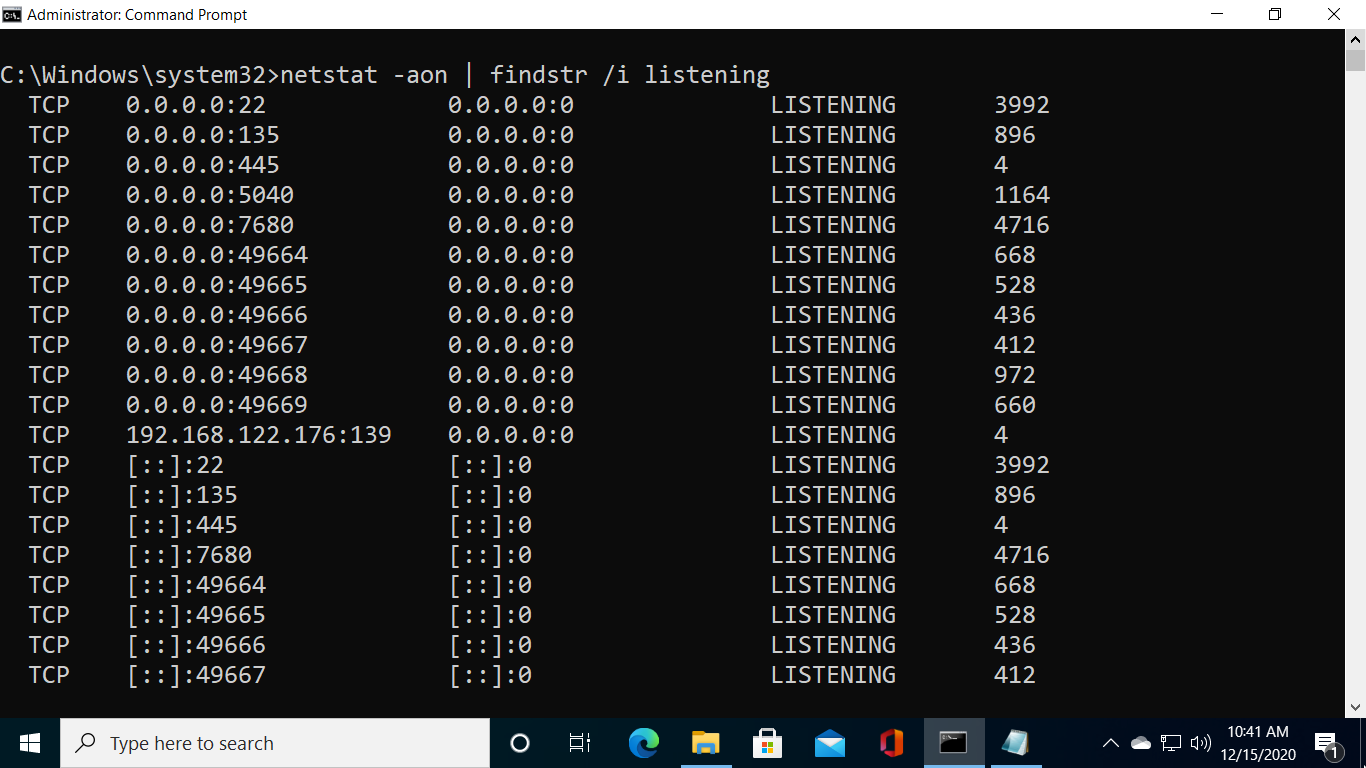
netstat -aonThe command displays lots of information. What you should pay attention to are Local Addresses that are in the LISTENING state.
As you can see in the previous screenshot, In my Windows 10 computer, port 22 (SSH) is open.
Administrators can run the following command to show opened ports only without all other details:
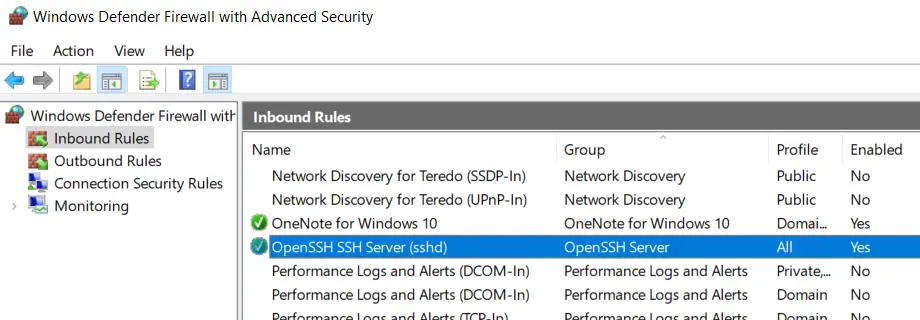
netstat -aon | findstr /i listeningOne important point is that the Windows Firewall may block a port even if it is in the listening state. In the Windows Defender Firewall with Advanced Security, there has to be a corresponding inbound firewall rule to match the listening port (Anything with a green checkmark is an open rule).
The Foreign Address column of the output shows the IP address and port of the computer/server at the remote end of the connection.
To check that the port is open from a remote computer, an administrator can run the telnet command from a remote computer against the IP address of the Windows computer.
For example, to check if port 22 is open, I will run the telnet command from a remote computer as follows:
telnet IP_ADDRESS 22Replace IP_ADDRESS with the actual IP Address of the Windows computer.

Filtering netstat using findstr
Administrators can use the findstr CMD command (which is similar to grep) to filter netstat command data based on string patterns.
For example, run the following command to check TCP connections in TIME_WAIT State.
netstat -a | findstr /i TIME_WAITThe /I option is for the case insensitive matching.

Command Options
Windows netstat command, without any command-line arguments, displays active TCP connections.
It also includes some useful command options to show network connections and ports in various forms, such as show connections and opened ports based on the protocol, find the process id of a connection/port, view network statics, and find the application that utilizes connections and ports.
| -a | displays all network connections and ports on which Windows is listening (include both IPv4 or IPv6 addresses). |
| -b | The output shows you which applications are using each active connection and ports (need administrative privileges). |
| -e | Displays network statistics, such as the Errors, the number of bytes, and packets sent and received. |
| -n | Displays addresses and ports in numerical format. |
| -f | When used, the output will contain Fully Qualified Domain Names (FQDNs) of IP addresses, if available. |
| -o | Displays an additional column that contains the Process ID (PID). |
| -p | Display data for a specific protocol (e.g., -p TCP). The Protocol can be one of the following: TCP, UDP, TCPv6, or UDPv6. If combined with the -s option, Protocol can be TCP, UDP, ICMP, IP, TCPv6, UDPv6, ICMPv6, or IPv6. |
| -r | Check Windows routing table. |
| -s | Displays detailed network statistics for each protocol (IPv4, IPv6, ICMPv4, ICMPv6, TCP, and UDP). |
| interval | Sets Time interval (in seconds) to automatically update the output. See examples to learn more. |
Examples: Using the netstat command
List all Active TCP connections:
netstatCheck open ports:
netstat -aon | findstr /i listeningOnly want to see information about TCP protocol:
netstat -a -p tcpShow network statistics:
netstat -sReal-time network monitoring — In the following example, we set a 5 second time interval to check active network connections in real-time. The number 5 causes the command to repeat every five seconds (Press CTRL+C to quit).
netstat -n 5If you need more information about the Windows netstat command, type netstat \? in the command prompt.
Certain apps and processes in Windows 10 can cause problems if you’re not properly connected to the internet. Firewalls can cause these connection issues when they cannot determine whether incoming and outgoing connections pose a threat. Work around this issue and open ports for incoming and outgoing connections. We will know to check whether a TCP port is open or closed on the Windows operating system.
Basically, many times we need to check the port status when any of the below issues results in closing the port.
- They may not be properly working.
- External IP addresses that are in use may be set to private IPs.
- Firewall rules may block the network.
There are several ways to check open TCP/IP ports in Windows. Here are a few options:
Using Telnet Client:
Step 1: Check whether the telnet client feature is ON or not. In order to check, open the Turn Windows feature on or off settings from the search bar. OR press the ‘window’ key and type ‘windows’ features. Then press on “Turn Windows features on or off”.
-660.png)
Windows Features Option
A new prompt will be opened. Search for “Telnet Client” and check the box in front of ‘telnet Client’.

Windows Features
Step 2: Open the command prompt. Press the ‘windows’ key and type ‘cmd’. Press “Command Prompt”.
-660.png)
Command Prompt Option
Step 3: On the command prompt, type the command “telnet + IP address or hostname + port number” and check the status of the provided TCP port.
-660.png)
Telnet Command
Step 4: If only the blinking cursor is visible, then the port is open.
-660.png)
Port is Open
Step 5: If you get the message “connection failed” then the port is closed.
-660.png)
Port is close
Using built-in netstat command-line utility:
Step 1: Open the command prompt.
Step 2: Run the following command:
netstat -an

Using TcpView
Another option is to use the TcpView utility from Microsoft’s Sysinternals suite of tools. This utility provides a more user-friendly interface for viewing active TCP/IP connections, along with additional information such as the process ID and process name for each connection. Steps to be followed:
Step 1: Download the TcpView utility from the Microsoft Sysinternals website. You can find the download link on the TcpView page of the Sysinternals website.
-660.png)
Download Page
Step 2: Extract the downloaded file and run the TcpView.exe file to launch the TcpView utility. This will open the TcpView window, which shows a list of all active TCP/IP connections on your machine.

Extracted FIles
Step 3: Open the tcpview.exe (application).
By default, TcpView will display the following columns in the list of connections:
Protocol: Shows the protocol being used for the connection (TCP or UDP)
Local Address: Shows the local address and port being used for the connection
Remote Address: Shows the remote address and port being connected to
State: Shows the current state of the connection (e.g. Established, Listen, etc.)
You can use the “Local Address” and “Remote Address” columns to see which ports are being used by which applications. For example, if you see a connection with a local address of “127.0.0.1:80”, this means that the local application is using port 80 for outgoing connections.
Windows PowerShell
You can also use Windows PowerShell to check open TCP/IP ports. To do this, use the Get-NetTCPConnection cmdlet, which allows you to view a list of active TCP/IP connections and the local and remote addresses and ports being used. For example, you can run the following command to view a list of all active TCP/IP connections:
Get-NetTCPConnection |
Select-Object LocalAddress,
LocalPort, RemoteAddress, RemotePort

Get-NetTCPConnection cmdlet
Nmap
To install Nmap in the Windows command line, follow these steps:
Step 1: Download the latest version of Nmap from the Nmap website. You can find the download link on the Nmap download page:
https://nmap.org/download.html
Step 2: Extract the downloaded file to a location on your computer. This will create a new folder containing the Nmap files.
Step 3: Open a command prompt and navigate to the directory where you extracted the Nmap files. For example, if you extracted the files to the C:\nmap directory, you would run the following command:
cd C:\nmap
Step 4: Once you are in the Nmap directory, you can install Nmap by running the nmap.exe file. To do this, run the following command:
nmap.exe -V
This will display the version number of Nmap, indicating that it has been installed successfully.
Step 5: To use nmap to scan for open TCP/IP ports, run the “nmap -sT” command, followed by the IP address or hostname of the machine you want to scan.
nmap -sT localhost

This will scan the specified host or IP address and display the results. You can also use the -h option to view a list of available options and arguments for the nmap command. Overall, installing Nmap in the Windows command line is a straightforward process. You can download the latest version of Nmap from the Nmap website, extract the files, and then run the nmap.exe file to install it. Once it is installed, you can use the nmap command to scan hosts and IP addresses and view the results.
Last Updated :
01 Jan, 2023
Like Article
Save Article
Статья обновлена: 10 сентября 2021
ID: 101
Чтобы посмотреть список открытых портов:
- Откройте командную строку. Инструкция в статье.
- Выполните команду:
netstat -a
- Нажмите Enter на клавиатуре.

Вы получите список открытых портов в Windows.
Спасибо за ваш отзыв, вы помогаете нам становиться лучше!
Спасибо за ваш отзыв, вы помогаете нам становиться лучше!
Introduction
Like Linux, Windows does have a netstat command and it can come handy when you are in need of network-related monitoring and troubleshooting.
Consider you have any of the following requirement
- How to find who or which process owns the port in Windows Server
- To see how many HTTP/DB connections opened by IIS/Any other App server runs on windows.
- To make sure the port is open and listening for incoming calls in Windows Server
- How many connections are open from IIS to Database in WIndows server
- How many Connections are open from Application Server like Tomcat running on Windows Server
- Connection leaks to the database from windows server etc
Netstat command windows have the following syntax and options support.

using this various options given in the preceding picture you can derive many useful commands to help you in your endeavour
- Find all the ESTABLISHED and WAITING TCP connections
- Get Detailed info of TCP and UDP connections
- List of Connections and Ports open with Process information – Find Who Owns the port
- Find Who owns the port with Process ID and Process Name
- Get Fully Qualified remote address on the open connections
- How to Grep for a Specific port with windows netstat command
- Execute Windows Netstat commands in interval
Here we have given some of the most used and quick netstat command snippets. You can choose one or you can frame one using the options shown in the preceding picture
To find all the Established and Waiting for TCP connections.
This is a Simple Netstat command it would result the simple list of TCP connections Established on the server
netstat

To get Detailed info on Ports Open, Ports Listening, Connections Established for TCP/UDP connections
netstat -a command would give the extended result of ports opened on the server and established connections and their current state for both TCP and UDP connections.
this command can be used to check if your application server (Tomcat,Weblogic,IIS) or any process running on the windows server has opened and listening on a certain port.
netstat -a

You can also use the netstat -an command to get faster results as netstat -a would take longer time in the name resolution of the remote foreign address
netstat -an

So, What is the Difference between netstat -a and netstat -an why the latter one is faster
Simply put,
netstat -ancommand would only show the remote server IP addresses wherenetstat -awould try to resolve the name for that IP address. Thusnetstat -anwould be faster than thenetstat -a
How to get the Process name [service name] along with connections – Who owns the port
Consider that you have any of the tomcat ,weblogic, websphere, Apache HTTPD, IIS, MSSQL server, Oracle DB product running on the windows server
During issues, It might be necessary for you to validate which process owns which port. or would have wanted to know how many connections are currently open or established.
In Such cases, you can use the following command which would result in the great detailed info along with the process name (or) the binary name which opened the port or the connection.
You have to run the command prompt as Administrator [ Run as Administrator ] before running this command
netstat -ab
If you do not want the the Domain Name be displayed in the Foreign Address and OK with the numeric IP information. You can use netstat -anb as said earlier, adding an -n option makes the command faster

Get the Process ID and Process Name of the Ports and Connections Open
In the previous example, with netstat -ab we were only getting the Process name who owns the port. not the Process ID.
Getting a Process ID of the process who owns the port would also be helpful in most of the cases.
To get the PID information you need to use -o option along with -ab
netstat -abo

Using -f option to get Fully Qualified Domain Names (FQDN) or Remote Address
With any preceding command, you can use the -f option to get the Fully Qualified Domain Names (FQDN) of the remote address
netstat -afb
You cannot use -n with -f is for FQDN where -n is for only numeric.

Look for a Specific Port or Process ID using FINDSTR [ equivalent to grep ]
How to make sure a Specific port is listening in windows
The windows netstat command output is so large and if you are looking for a precise port or process or PID. you can use findstr , a windows equivalent for Linux grep command
netstat -afb |findstr 8080

in the preceding snapshot you can see that findstr was used to check if port 8080 is open and tomcat is listening
Using Netstat in Script with Sleep interval. Monitor a Port status with Netstat
Let’s suppose you want to monitor if a port is listening at a constant interval. Windows netstat command can accept sleep interval.
You can use any netstat command with a specific interval. The command will run in a loop with a Specified interval and it can be stopped with CTRL+C
netstat -abo 5|findstr 8080
here the interval is 5 seconds,
The netstat -abo command would run every 5 seconds until interrupted or stopped with CTRL+C

Various other Windows Netstat commands and their usage
netstat has more to offer and here I have listed some of the command snippets and their usage as quick gist.
Display Routing table
netstat -r
Display only UDP connections
netstat -abp udp -ab
Display only TCP connections
netstat -abp tcp -ab
Display Detailed Ethernet and Connection Usage Statistics
netstat -es
Hope it helps
Thanks
Rumen Lishkov
![]()
Follow us onFacebook orTwitter
For more practical videos and tutorials. Subscribe to our channel
Find me on Linkedin My Profile
For any Consultation or to hire us [email protected]
If you like this article. Show your Support! Buy me a Coffee.
Signup for Exclusive «Subscriber-only» Content