По умолчанию во всех операционных системах Windows для подключения по протоколу RDP (Remote Desktop Protocol / Удаленный рабочий стол) использует порт TCP 3389. После того, как вы включили RDP доступ в Windows, служба TermService (Remote Desktop Services) начинает слушать на порту 3389. В этой статье мы покажем, как изменить стандартный номер RDP порта в дестопных редакциях Windows (7/8/10/11) и Windows Server.
Обратите внимание, что в современных версиях Windows для удаленного рабочего стола используется также протокол UDP с тем же номером порта 3389. 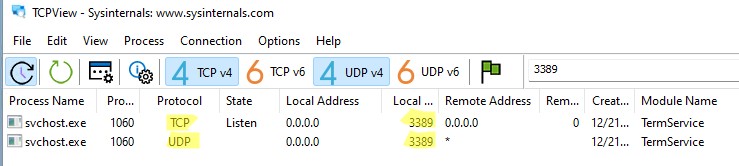
Вы можете изменить номер стандартного порта RDP в Windows с 3389 на любой другой. Чаще всего это используется, когда нужно спрятать ваш RDP/RDS хост от автоматических сканеров портов, которые ищут в сети хосты Windows с открытым стандартным RDP портом 3389. Смена RDP порта позволит уменьшить вероятность эксплуатации RDP уязвимостей (последняя критическая уязвимость в RDP BlueKeep описана в CVE-2019-0708), уменьшить количество попыток удалённого подбора паролей по RDP (не забывает периодически анализировать логи RDP подключений), SYN и других типов атак (особенно при отключенном NLA). Чаще всего RDP порт меняют на компьютерах с прямым подключением к интернету (VPS/VDS), или в сетях, где пограничный маршрутизатор перенаправляет порт 3389/RDP в локальную сеть на компьютер/сервер с Windows.
Несмотря на смену порта, нежелательно выставлять открытый RDP порт в интернет. Сканеры портов позволяют по сигнатуре понять, что на новом порту находится RDP Listener. Если вы хотите открыть RDP доступ к компьютеру в своей сети, лучше использовать такие технологии подключения, как VPN, RD Web Access, RD Gateway и другие
Если вы решили использовать нестандартный номер порта для RDP, обратите внимание, что нежелательно использовать номера портов в диапазоне от 1 до 1023 (известные порты). Используйте динамический порт из RPC диапазона (от 49152 до 65535), или любой портов в диапазоне от 1024 до 49151, который не используется другим сервисом или приложением.
Изменить номер RDP порта по-умолчанию в Windows
В нашем примере мы изменим номер порта, на котором ожидает подключения служба Remote Desktop на 1350. Для этого:
- Откройте редактор реестра (regedit.exe) и перейдите в ветку HKEY_LOCAL_MACHINE\System\CurrentControlSet\Control\Terminal Server\WinStations\RDP-Tcp;
- Найдите DWORD параметр реестра с именем PortNumber.. В этом параметре указан порт, на котором ожидает подключения служба Remote Desktop. Значение по умолчанию – 3389 (decimal);
- Измените значение этого порта. Я изменил RDP порт на 1350 в десятичном значении (Deciamal);

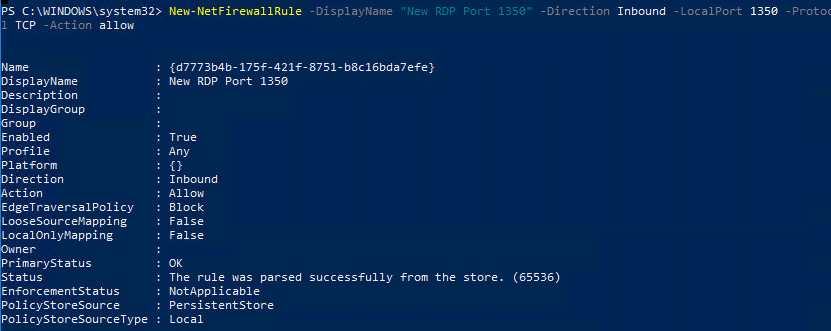
- Если на вашем компьютере включен Windows Firewall, вы должны создать новое правило, разрешающее входящие подключения на новый RDP порт (если вы перенастраиваете удаленный сервер через RDP, создайте разрешающее правило в файерволе до перезапуска службы TermService, иначе вы потеряете доступ к серверу). Вы можете создать разрешающее входящее правило для нового TCP/UDP порта RDP вручную из консоли ‘Брандмауэр Защитника Windows’ (firewall.cpl) или с помощью PowerShell команд:
New-NetFirewallRule -DisplayName "NewRDPPort-TCP-In" -Direction Inbound -LocalPort 1350 -Protocol TCP -Action allow
И:
New-NetFirewallRule -DisplayName "NewRDPPort-UDP-In" -Direction Inbound -LocalPort 1350 -Protocol UDP -Action allow
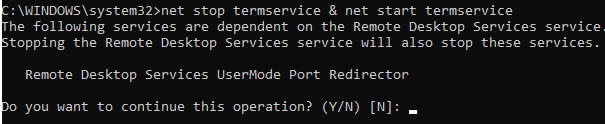
- Перезагрузите компьютер или перезапустите службу удаленных рабочих столов командой:
net stop termservice & net start termservice
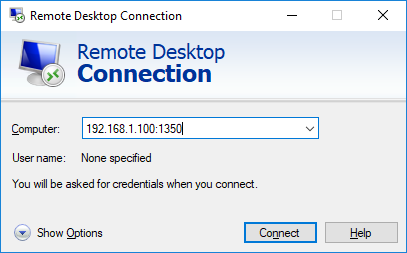
- Теперь для подключения к данному Windows компьютеру по RDP, в клиенте mstsc.exe нужно указывать порт RDP подключения через двоеточие следующим образом:
Your_Computer_Name:1350
или по IP адресу
192.168.1.100:1350
или из командной строки:
mstsc.exe /v 192.168.1.100:1350
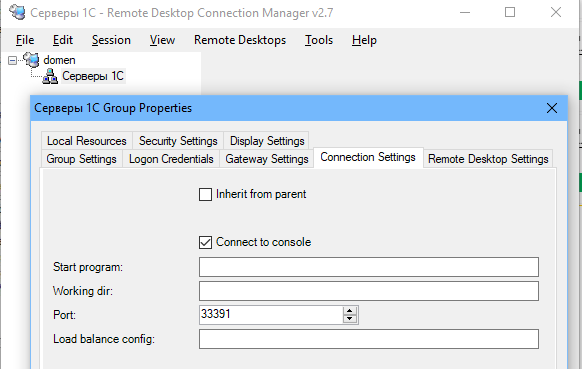
Если для управления множеством RDP подключений вы используете менеджер RDP подключений RDCMan, новый номер RDP порта подключения можно указать на вкладке “Connection Settings”.
- В результате вы успешно подключитесь к рабочему столу удаленного компьютера через новый номер RDP порта (с помощью команды
nenstat –na | Find “LIST”
убедитесь, что служба RDP теперь слушает на другом порту).


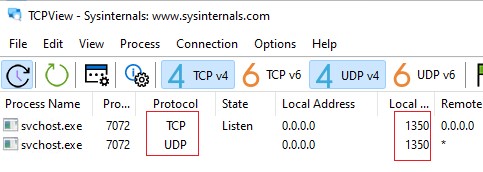
Обратите внимание, что номер UDP порта RDP также изменился на 1350 (проще всего проверить это с помощью утилиты TCPView).
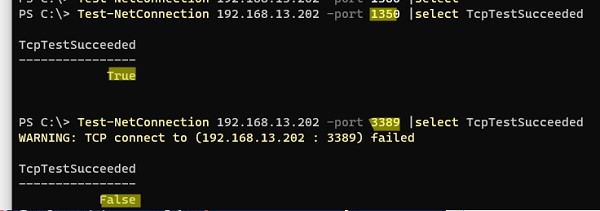
С помощью команды Test-NetConnection, проверьте что старый RDP порт теперь закрыт (
TcpTestSucceeded : False
):
Test-NetConnection 192.168.13.202 -port 3389 |select TcpTestSucceeded
И для RDP подключения теперь нужно использовать новый порт 1350.
Если вы хотите изменить номер RDP порта на компьютерах в домене, можно воспользоваться групповыми политиками. Создайте новую GPO, которая распространит параметр реестра PortNumber с новым значением RDP порта на компьютеры домена.
PowerShell скрипт для смены номера RDP порта в Windows
Полный код PowerShell скрипт для смены номера RDP порта, создания правила в брандмауэре и перезапуска службы RDP может выглядеть так:
Write-host "Укажите номер нового RDP порта: " -ForegroundColor Yellow -NoNewline;$RDPPort = Read-Host
Set-ItemProperty -Path "HKLM:\SYSTEM\CurrentControlSet\Control\Terminal Server\WinStations\RDP-TCP\" -Name PortNumber -Value $RDPPort
New-NetFirewallRule -DisplayName "NewRDPPort-TCP-In-$RDPPort" -Direction Inbound –LocalPort $RDPPort -Protocol TCP -Action Allow
New-NetFirewallRule -DisplayName "NewRDPPort-UDP-In-$RDPPort" -Direction Inbound –LocalPort $RDPPort -Protocol UDP -Action Allow
Restart-Service termservice -force
Write-host "Номер RDP порта изменен на $RDPPort " -ForegroundColor Magenta
Вы можете удаленно изменить номер порта на компьютере. Для этого на удаленном компьютере должен быть настроен WinRM, тогда для подключения к компьютеру можно использовать командлет Invoke-Command:
Invoke-Command -ComputerName PC1name -ScriptBlock {Set-ItemProperty -Path "HKLM:\SYSTEM\CurrentControlSet\Control\Terminal Server\WinStations\RDP-TCP\" -Name PortNumber -Value 1350}
Если нужно изменить номер RDP на нескольких компьютерах в домене AD (определенной OU), используйте такой скрипт (список компьютеров в OU можно получить с помощью Get-ADComputer):
Write-host "Укажите номер нового RDP порта: " -ForegroundColor Yellow -NoNewline;$RDPPort = Read-Host
$PCs = Get-ADComputer -Filter * -SearchBase "CN=DMZ,CN=Computers,DC=winitpro,DC=ru"
Foreach ($PC in $PCs) {
Invoke-Command -ComputerName $PC.Name -ScriptBlock {
param ($RDPPort)
Set-ItemProperty -Path "HKLM:\SYSTEM\CurrentControlSet\Control\Terminal Server\WinStations\RDP-TCP\" -Name PortNumber -Value $RDPPort
New-NetFirewallRule -DisplayName "New RDP Port $RDPPort" -Direction Inbound –LocalPort $RDPPort -Protocol TCP -Action Allow
New-NetFirewallRule -DisplayName "New RDP Port $RDPPort" -Direction Inbound –LocalPort $RDPPort -Protocol TCP -Action Allow
Restart-Service termservice -force
}
Это инструкция по смене стандартного RDP порта подойдёт для любой версии Windows, начиная с Windows XP (Windows Server 2003) и заканчивая Windows 11 (Windows Server 2022).
Why is it recommended to change the port in Windows Server
It often happens that hackers scan ports and guess passwords to access your server. By default, RDP uses port 3389. If you set a very simple password, an hacker will gain access to your server and use it for their own purposes, or encrypt all data and ask you for money. The problem due to port scanning can also be that due to many bots attempts, you will not be able to enter the server. This can overload the resources of the server. If you have such a suspicion, it is strongly recommended to protect the RDP port from bots by changing it to any port to the range from 1000 to 65535.
How to change RDP port in Windows Server?
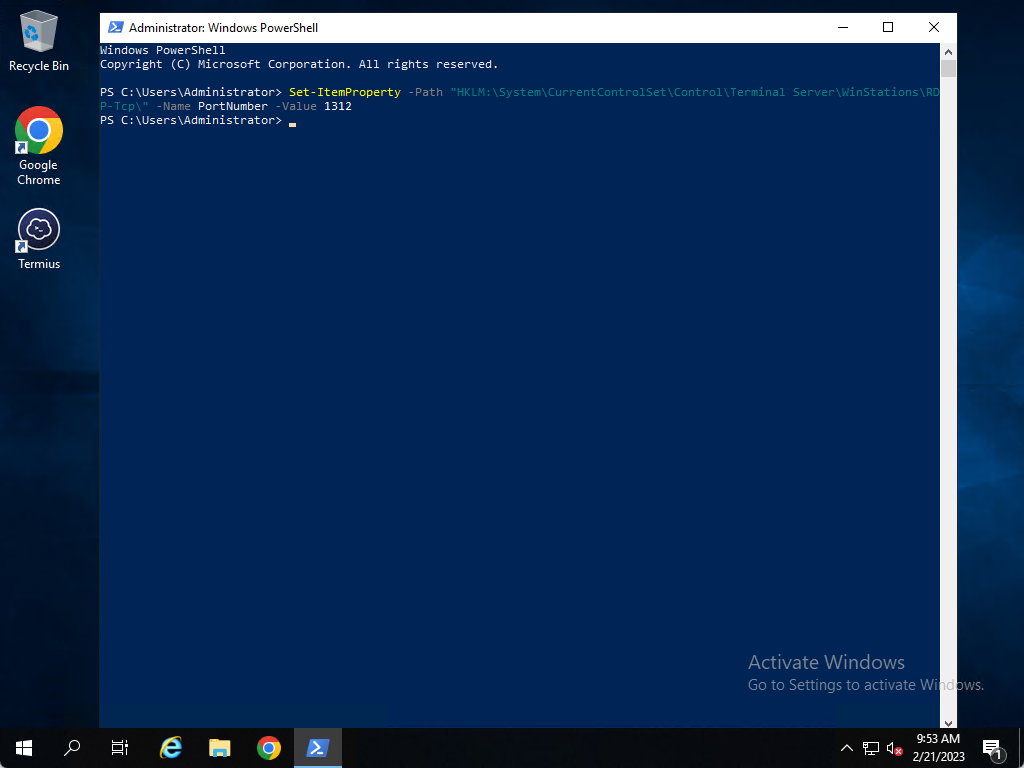
To begin with the process, we must connect to our server and open “PowerShell”.
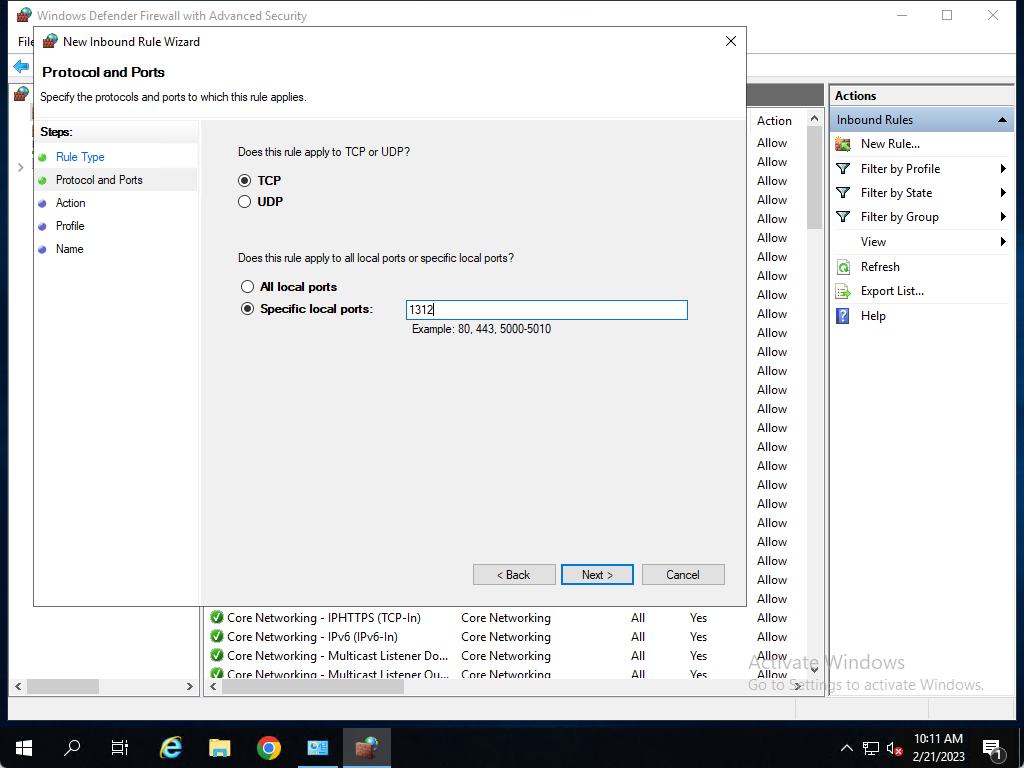
Click on “Start”, then on “PowerShell”. You must select the option to run “As Administrator”. Suppose we want to change the port to 1312. After PowerShell has opened, we execute this command.
You can specify any other port you want, such as 7777, 8888, 20000, etc.
After the PowerShell is opened, paste this command and hit the Enter to execute it.
Set-ItemProperty -Path "HKLM:\System\CurrentControlSet\Control\Terminal Server\WinStations\RDP-Tcp\" -Name PortNumber -Value 1312
After executing the command, we see that there is no answer from the server, which means that we made the changes correctly.
How to open RDP port
Now we can’t just connect to our server, because we have “Firewall turned on” and the port does not work immediately after changing to another one.
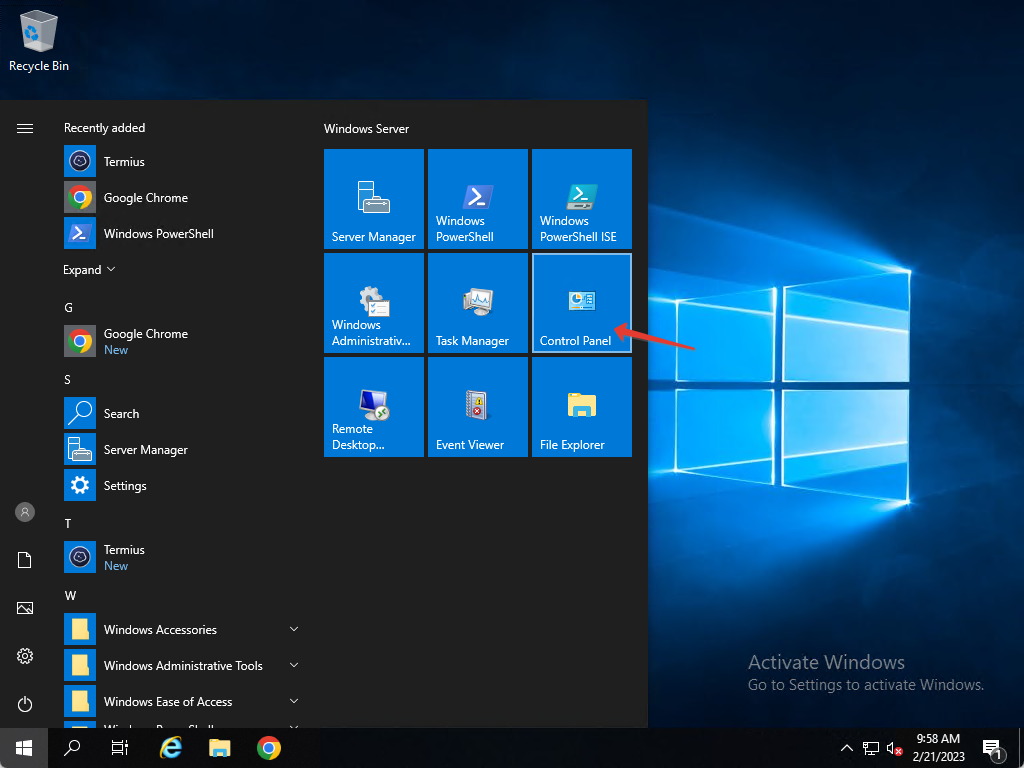
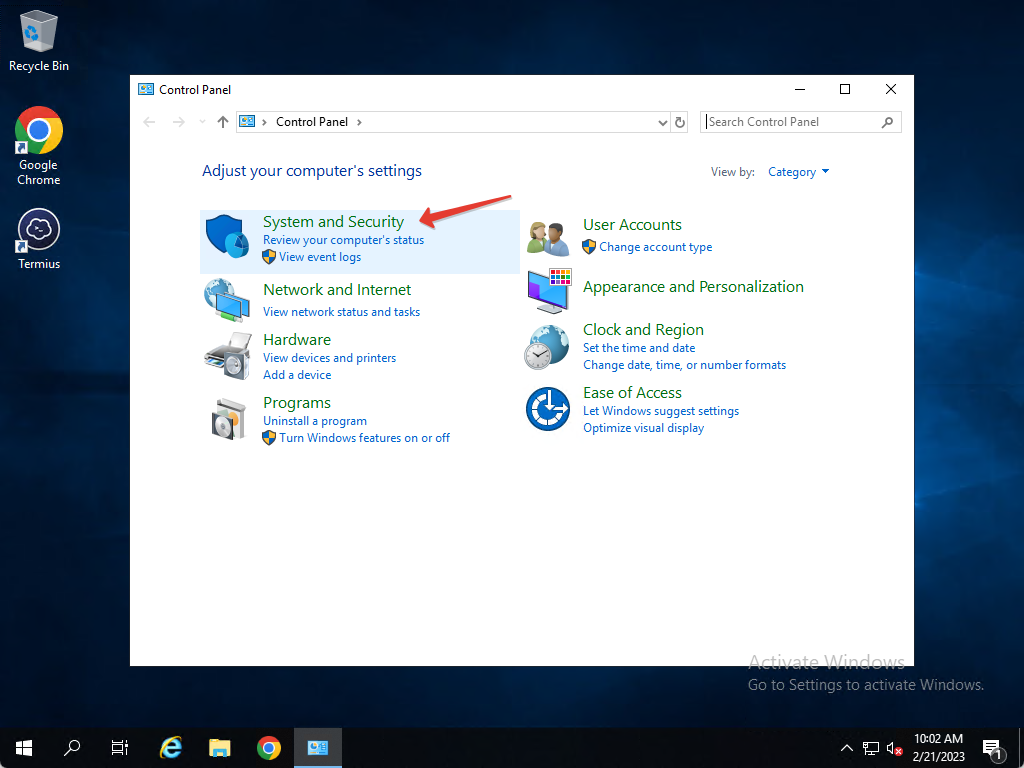
We have to open a new port. Click on “Start” again, then on “Control Panel”.
When the Control Panel has opened, we click on “System and Security”
Then click on “Windows Defender Firewall” and after that on “Advanced Settings”

Here we have to open the port. Click on “Inbound Rules”, then on “New Rule…”.
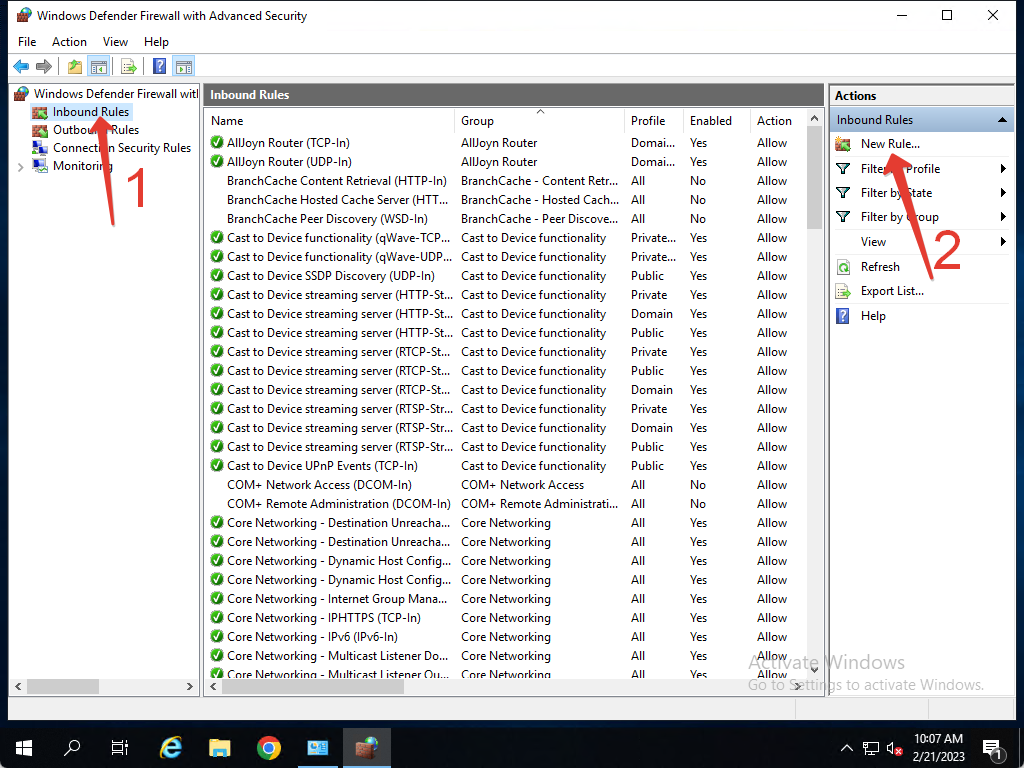
Select “Port”, then click “Next”.
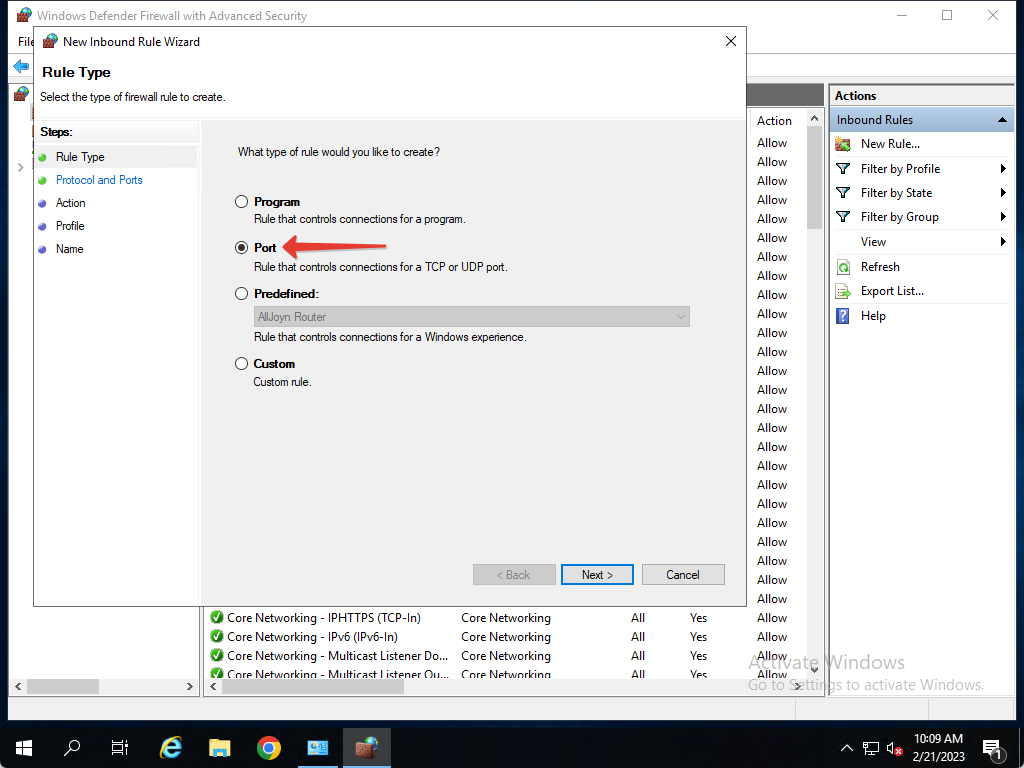
We write down our port, which we specified in the command in “PowerShell” and click on “Next”
Leave everything as it is in the “Action” and “Profile” sections and click “Next”.
In the “Name” we indicate the name of the port on which we will open, and click on “Finish”.
How to restart the RDP service
We haven’t finished yet. In order server to work on the new port, we must restart the remote access service. Of course, we can also restart the server, but there is an option to restart this service, so all our software continues to work, without downtime.
Click on “Start” and look for “Services”. Click and open.
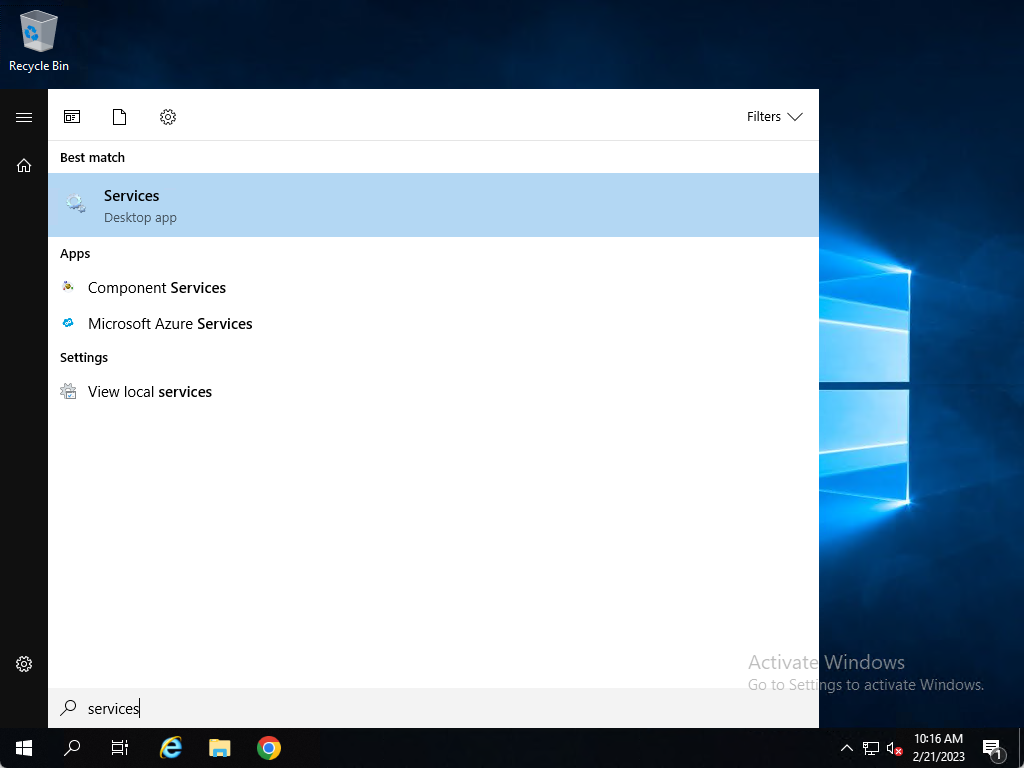
We are looking for “Remote Desktop Services” and we will restart it.
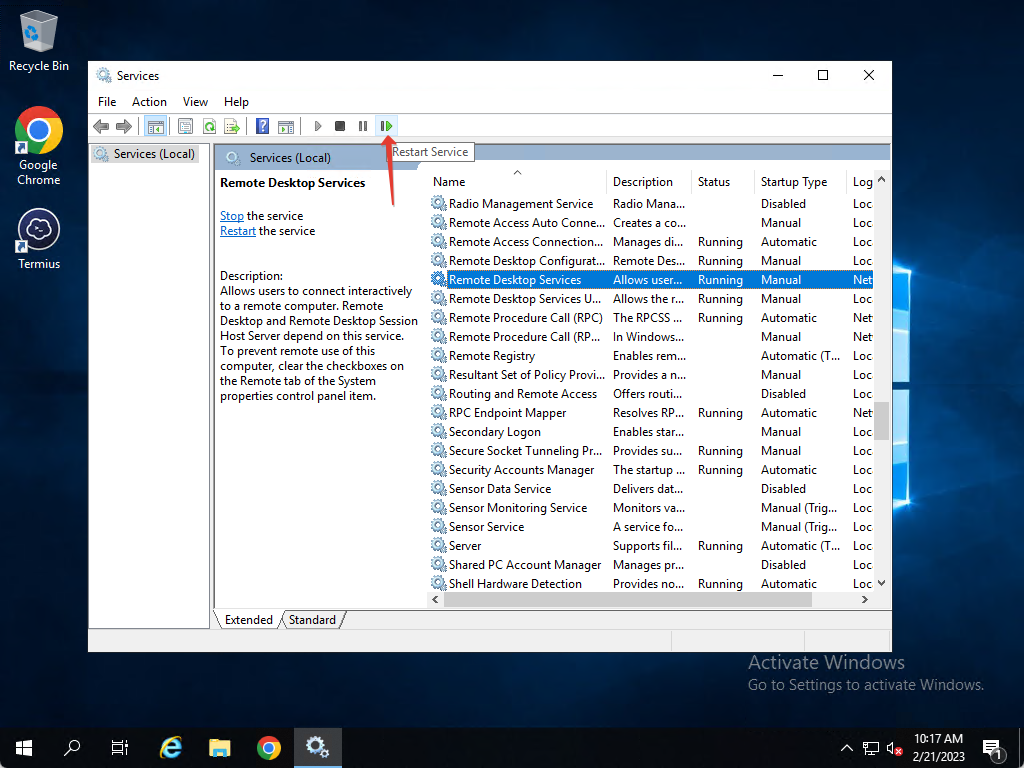
The service will see the new port and it will immediately close the connection to the old port for us.
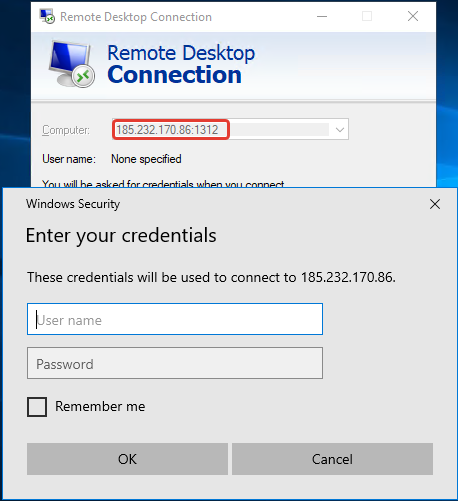
We reopen “Remote Desktop Connection” on our PC or other device and enter the IP and port that we opened and enter password for the Administrator user.
Now the server can be used without the fear that hacker will guess the passwords of users on your server, since they usually scan the standard port, and you changed it.
Changing the RDP (Remote Desktop Protocol) port on a Windows Server 2019 can be helpful in enhancing the security of the server. You can accomplish this task using a few simple steps.
Firstly, you need to open the Windows Firewall with Advanced Security and create a new inbound rule for the new port you want to use for RDP. Make sure to enable the rule by ticking the box.
Next, you need to open the Registry Editor and navigate to the following path: HKEY_LOCAL_MACHINE\System\CurrentControlSet\Control\Terminal Server\WinStations\RDP-Tcp. Here, you can find a PortNumber value. Double-click on the value, select Decimal, and then enter the new port number you want to use for RDP.
Once you have made the necessary changes, save the Registry Editor and restart the server. You should now be able to connect to the server using the new RDP port.
However, it is important to note that changing the RDP port alone may not provide complete protection against cyber threats. Additional measures such as strong passwords, two-factor authentication, and restricting access based on IP addresses should also be considered for better security.
Video Tutorial:How do I change my RDP port 3389 in Server 2019?
Changing the RDP port on a Windows server involves modifying the Windows Registry. To do this, you’ll need to access the Registry Editor by pressing the Windows key + R and then typing «regedit.» From there, navigate to «HKEY_LOCAL_MACHINE\SYSTEM\CurrentControlSet\Control\Terminal Server\WinStations\RDP-Tcp.» Look for the «PortNumber» key and modify its value to the desired port number. After making the change, you’ll need to restart the Remote Desktop Service for the changes to take effect. It’s important to note that changing the default RDP port can improve security, but it can also cause compatibility issues with certain applications that rely on the default port. Therefore, it’s important to thoroughly test any changes before implementing them on a production server.
How do I change my RDP port 3389?
If you want to change the default Remote Desktop Protocol (RDP) port 3389 on your Windows device, you can do so by modifying the registry. Here are the steps:
1. Press the Windows key + R to open the Run dialog box.
2. Type «regedit» and press Enter to open the Registry Editor.
3. Navigate to the following key: HKEY_LOCAL_MACHINE\System\CurrentControlSet\Control\Terminal Server\WinStations\RDP-Tcp
4. Look for the «PortNumber» entry on the right-hand side and double-click on it.
5. Select the «Decimal» option and enter the new port number you want to use (e.g., 3390).
6. Click OK and close the Registry Editor.
7. Restart your computer to apply the changes.
After performing these steps, you should be able to connect to your Windows device using the new RDP port number. Please note that you may need to modify your firewall or router settings to allow incoming connections on the new port.
What ports does Server 2019 use for RDP?
Server 2019 uses TCP port 3389 by default for Remote Desktop Protocol (RDP) connections. However, it is recommended to configure the remote desktop to use a non-default port for security purposes. It is also important to implement additional security measures such as strong passwords, two-factor authentication, and network-level authentication to prevent unauthorized access to the server.
How to configure RDP on Windows Server 2019?
Configuring Remote Desktop Protocol (RDP) on Windows Server 2019 involves a few simple steps:
1. First, you’ll need to enable Remote Desktop on your server. To do this, navigate to the System properties, click on the «Remote Desktop» option, and select «Allow remote connections to this computer.«
2. Next, configure your firewall settings to allow inbound traffic for RDP. You can do this using the «Windows Defender Firewall with Advanced Security» tool.
3. You’ll also need to ensure that the user accounts you want to grant remote access to are members of the Remote Desktop Users group on the server.
4. Finally, you can connect to the server with Remote Desktop Client software using the server’s IP address or hostname.
It’s important to ensure that your RDP connections are secure by using strong passwords and implementing additional security measures like two-factor authentication and network level authentication (NLA). Regularly updating your server with the latest security patches is also critical to keeping it secure.
How do I open port 3389 on Windows Server 2019?
To open port 3389 on Windows Server 2019, you can follow these steps:
1. Log in to the server with administrator privileges.
2. Open the Windows Firewall with Advanced Security control panel.
3. Click on Inbound Rules in the left-hand pane.
4. Click on New Rule in the right-hand pane.
5. In the New Inbound Rule Wizard, select the Port option.
6. Click Next, and select TCP as the protocol and enter 3389 as the port number.
7. Click Next, and select Allow the connection.
8. Click Next, and select the profiles for which you want to allow the connection.
9. Give the rule a name and click Finish.
Once you have completed these steps, port 3389 should be open on your Windows Server 2019 machine, allowing remote desktop connections. It is important to note that opening ports on your system can be a security risk, so be sure to only open the ports that are necessary and that you have proper security measures in place.
How do I specify a port in Remote Desktop?
To specify a port in Remote Desktop, you need to add a colon followed by the port number at the end of the computer name or IP address in the Remote Desktop Connection dialog box. For example, if the computer you want to connect to has an IP address of 192.168.1.100 and the port number you want to use is 3389, you would enter «192.168.1.100:3389» in the computer field of the Remote Desktop Connection dialog box. If the port number is not included, Remote Desktop will use the default port of 3389. It’s important to ensure that the port you’re using is open and properly configured on the remote computer and any firewalls or routers in between.
— Advertisement —
Hello! One of the many tasks that system administrators have is to manage computers remotely. This way they can solve users’ problems. They can also update computers or resolve concerns about the use of computers. Although there are third-party applications, Windows Server has its own remote connection manager. Indeed, Remote Desktop allows you to connect to Windows Server with any device with a Remote Desktop client. However, this technology uses the Remote Desktop Protocol (RDP). Which is connected through port 3389. Additionally, today we will see how to change the remote desktop port in Windows Server 2019, 2016.
How to modify the port for the remote desktop connection in Windows Server
The main reason to modify this port is very simple. Because security is a crucial element in any server. Indeed, hackers know that port 3389 is the one used for remote connection. They can then try to access the computer to steal information or make unauthorized changes. Consequently, it is highly recommended to change this port. To do this we will modify the Windows Server Registry. With this intention, press the Win+R combination and execute the following command:
regedit

Now please follow the next path:
HKEY_LOCAL_MACHINE / SYSTEM / CurrentControlSet / Control / Terminal Server / WinStations / RDP-Tcp
Then select the value corresponding to PortNumber

Then double-click on the value. Immediately the values are displayed. Also, you can see that the value is displayed as d3d. This is because it is in a hexadecimal format. When you pass it to a decimal value, it is displayed as 3389.

Well, please edit it and add the value 6000. This will set this port. Finally, it is necessary to check a couple of steps. First, please check that the port is not blocked by the Windows Firewall. Finally, restart the server to set the changes.

Check access to the remote desktop.
Once the port is modified, it is time to check if the access to the remote desktop is correct. With this intention, please open the Remote Desktop client and enter the server name or IP address.

However, the connection will not be successful and you will see the following error message.

To access correctly, it is necessary to add the port number at the end of the IP address. For example:
192.168.30.128:6000

In this way, you will be asked for credentials to connect:

Lately, we have seen How to change the remote desktop port in Windows Server 2019, 2016. This way you can increase the security of the server. We hope that you like this. If so, please share on your social networks and don’t miss our post about How to use Active Directory Administrative Center in Windows Server 2019/2016.
Windows Server 2019 предлагает удобный способ изменить порт RDP, что позволяет улучшить безопасность вашего сервера. По умолчанию RDP работает на стандартном порту 3389, который может быть подвержен внешним атакам. В этой статье мы рассмотрим пошаговую инструкцию о том, как изменить порт RDP на Windows Server 2019 и обеспечить дополнительный уровень защиты.
Первым шагом является открытие редактора реестра Windows. Для этого нажмите комбинацию клавиш Win + R, введите «regedit» и нажмите Enter. Появится окно редактора реестра, где вам нужно будет выполнить несколько действий для изменения порта RDP.
Далее вам необходимо найти следующий путь в редакторе реестра: «HKEY_LOCAL_MACHINE\SYSTEM\CurrentControlSet\Control\Terminal Server\WinStations\RDP-Tcp». Здесь вы найдете параметр «PortNumber», который и отвечает за порт RDP.
Чтобы изменить порт RDP, щелкните правой кнопкой мыши на «PortNumber» и выберите «Изменить». В открывшемся окне введите новый порт RDP и нажмите «ОК». После внесения изменений в реестр, вам необходимо выполнить перезагрузку сервера, чтобы изменения вступили в силу.
Теперь вы знаете, как сменить порт RDP на Windows Server 2019. Помните, что использование нестандартного порта может улучшить безопасность вашего сервера и защитить его от внешних угроз. Применяйте данную инструкцию с осторожностью и помните о необходимости правильной настройки брандмауэра и других систем безопасности для обеспечения максимальной защиты вашего сервера.
Содержание
- Как изменить порт RDP на Windows Server 2019
- Шаг 1: Открыть Панель управления
- Шаг 2: Найти и выбрать «Система»
- Шаг 3: Выбрать «Удалённый доступ к компьютеру»
- Шаг 4: Нажать на «Параметры»
- Шаг 5: Найти «Порт»
Как изменить порт RDP на Windows Server 2019
Для обеспечения безопасности и защиты от несанкционированного доступа, рекомендуется изменить порт удаленного рабочего стола (RDP) на Windows Server 2019. Установка нестандартного порта поможет снизить риск атаки на сервер и улучшить безопасность вашей системы.
Вот пошаговая инструкция о том, как изменить порт RDP на Windows Server 2019:
- Войдите в систему под учетной записью администратора.
- Откройте меню «Пуск» и введите «Панель управления».
- Выберите «Панель управления» из результатов поиска.
- В панели управления выберите «Система и безопасность».
- Выберите «Система».
- В левой части окна выберите «Удаленный доступ к компьютеру».
- В разделе «Удаленный доступ» нажмите на кнопку «Изменить», расположенную рядом с «Входящие подключения к этому компьютеру».
- Убедитесь, что поле «Премежуточный» выбрано.
- Нажмите кнопку «Добавить» в разделе «Услуги автоматического удаленного подключения».
- Введите нестандартный порт RDP в поле «Сведения о службе», например, «5000».
- Нажмите «Ok», чтобы сохранить изменения.
- Убедитесь, что поменялась отображаемая информация о порте в разделе «Порт».
- Нажмите «Применить», а затем «Ok», чтобы закрыть окно «Свойства соединения с удаленным рабочим столом».
- Перезапустите компьютер для применения настроек.
После перезапуска сервер будет слушать новый порт RDP. Теперь вы сможете подключаться к серверу, указывая нестандартный порт в клиентском приложении для удаленного рабочего стола.
Примечание: Помните, что после изменения порта RDP вам необходимо убедиться, что ваш сервер защищен правильными брандмауэрными настройками и другими мерами безопасности, чтобы предотвратить потенциальные атаки и взломы.
Шаг 1: Открыть Панель управления
1. На рабочем столе или в меню «Пуск» найдите и откройте «Панель управления».
2. Если вы используете меню «Пуск», нажмите на иконку «Пуск» в левом нижнем углу экрана, затем найдите пункт «Панель управления» в списке программ, ищите в разделе «Система и безопасность».
3. Если на рабочем столе есть ярлык «Панель управления», просто дважды щелкните на нем, чтобы открыть.
4. После открытия «Панели управления» вы увидите множество иконок, представляющих различные категории настроек. Вам понадобится найти иконку «Сеть и Интернет» или «Сеть и общий доступ».
5. Щелкните на найденной иконке «Сеть и Интернет» или «Сеть и общий доступ».
6. После этого, в «Панели управления» отобразится список доступных настроек. Вам нужно найти иконку «Центр управления сетями и общим доступом» или «Настройка соединения с Интернетом».
7. Щелкните на найденной иконке «Центр управления сетями и общим доступом» или «Настройка соединения с Интернетом».
8. После открытия «Центра управления сетями и общим доступом» вы увидите различные вкладки и опции. Вам нужно найти иконку «Изменение параметров сети».
9. Щелкните на найденной иконке «Изменение параметров сети».
10. После открытия «Изменения параметров сети» вам нужно найти сетевое подключение, которое связано с вашей сетевой картой или адаптером.
11. Щелкните правой кнопкой мыши на выбранном сетевом подключении и выберите «Свойства».
12. После открытия «Свойств» сетевого подключения, выберите вкладку «Сетевые протоколы (TCP/IP)» и нажмите на кнопку «Свойства».
13. В открывшемся окне «Свойства протокола TCP/IP» выберите вкладку «Дополнительно».
14. Внизу окна вы увидите список различных протоколов. Найдите и выберите «TCP/IP версии 4 (TCP/IPv4)».
15. Нажмите на кнопку «Свойства».
Шаг 2: Найти и выбрать «Система»
После успешной авторизации на сервере Windows Server 2019 откройте меню «Пуск», используя кнопку «Пуск» в левом нижнем углу экрана или клавишу с логотипом Windows на клавиатуре. Введите «Система» в строке поиска и выберите раздел «Система» из результатов поиска.
В открывшемся окне «Система» вы увидите информацию о компьютере, такую как наименование компьютера, рабочая группа, тип и процессор. Отлично, мы уже близки к цели!
Шаг 3: Выбрать «Удалённый доступ к компьютеру»
Чтобы изменить порт RDP на Windows Server 2019, необходимо выбрать «Удалённый доступ к компьютеру». Этот шаг позволит вам настроить параметры удалённого доступа к серверу.
Для того чтобы перейти к настройкам удалённого доступа, выполните следующие действия:
- Откройте меню «Пуск» и нажмите правой кнопкой мыши на «Компьютер».
- В контекстном меню выберите «Свойства».
- На открывшейся странице нажмите на ссылку «Удалённые настройки системы» в левой части окна.
Теперь у вас открылись настройки удалённого доступа к компьютеру. Можно переходить к следующему шагу и изменить порт RDP на Windows Server 2019.
Шаг 4: Нажать на «Параметры»
После успешного входа в систему Windows Server 2019 перейдите к рабочему столу. Вы увидите значок «Пуск» в левом нижнем углу экрана. Щелкните по нему правой кнопкой мыши.
Появится контекстное меню. В нем выберите опцию «Параметры». Нажмите на нее левой кнопкой мыши.
После этого откроется окно «Параметры». Здесь вы найдете различные вкладки и опции для настройки вашего сервера.
Шаг 5: Найти «Порт»
Чтобы изменить порт RDP на Windows Server 2019, вам необходимо найти соответствующую настройку в системе. Для этого выполните следующие действия:
- Зайдите в панель администрирования сервера.
- Откройте меню «Инструменты» и выберите «Служба удаленных рабочих столов».
- В открывшемся окне найдите вкладку «Сетевой уровень аутентификации» и выберите ее.
- Далее, в этой вкладке найдите раздел «TCP-порт» или «Порт RDP».
- Обратите внимание на значение, указанное в поле «Порт».
По умолчанию, RDP использует порт 3389. Если вы хотите изменить порт, запишите новое значение порта и перейдите к следующему шагу.