This error usually signals an account corruption
by Taiba Hasan
A postgraduate in Computer Applications, she is an avid technical writer who loves to craft content revolving around Windows, Android, and emerging technologies like SaaS. With How-To and… read more
Updated on
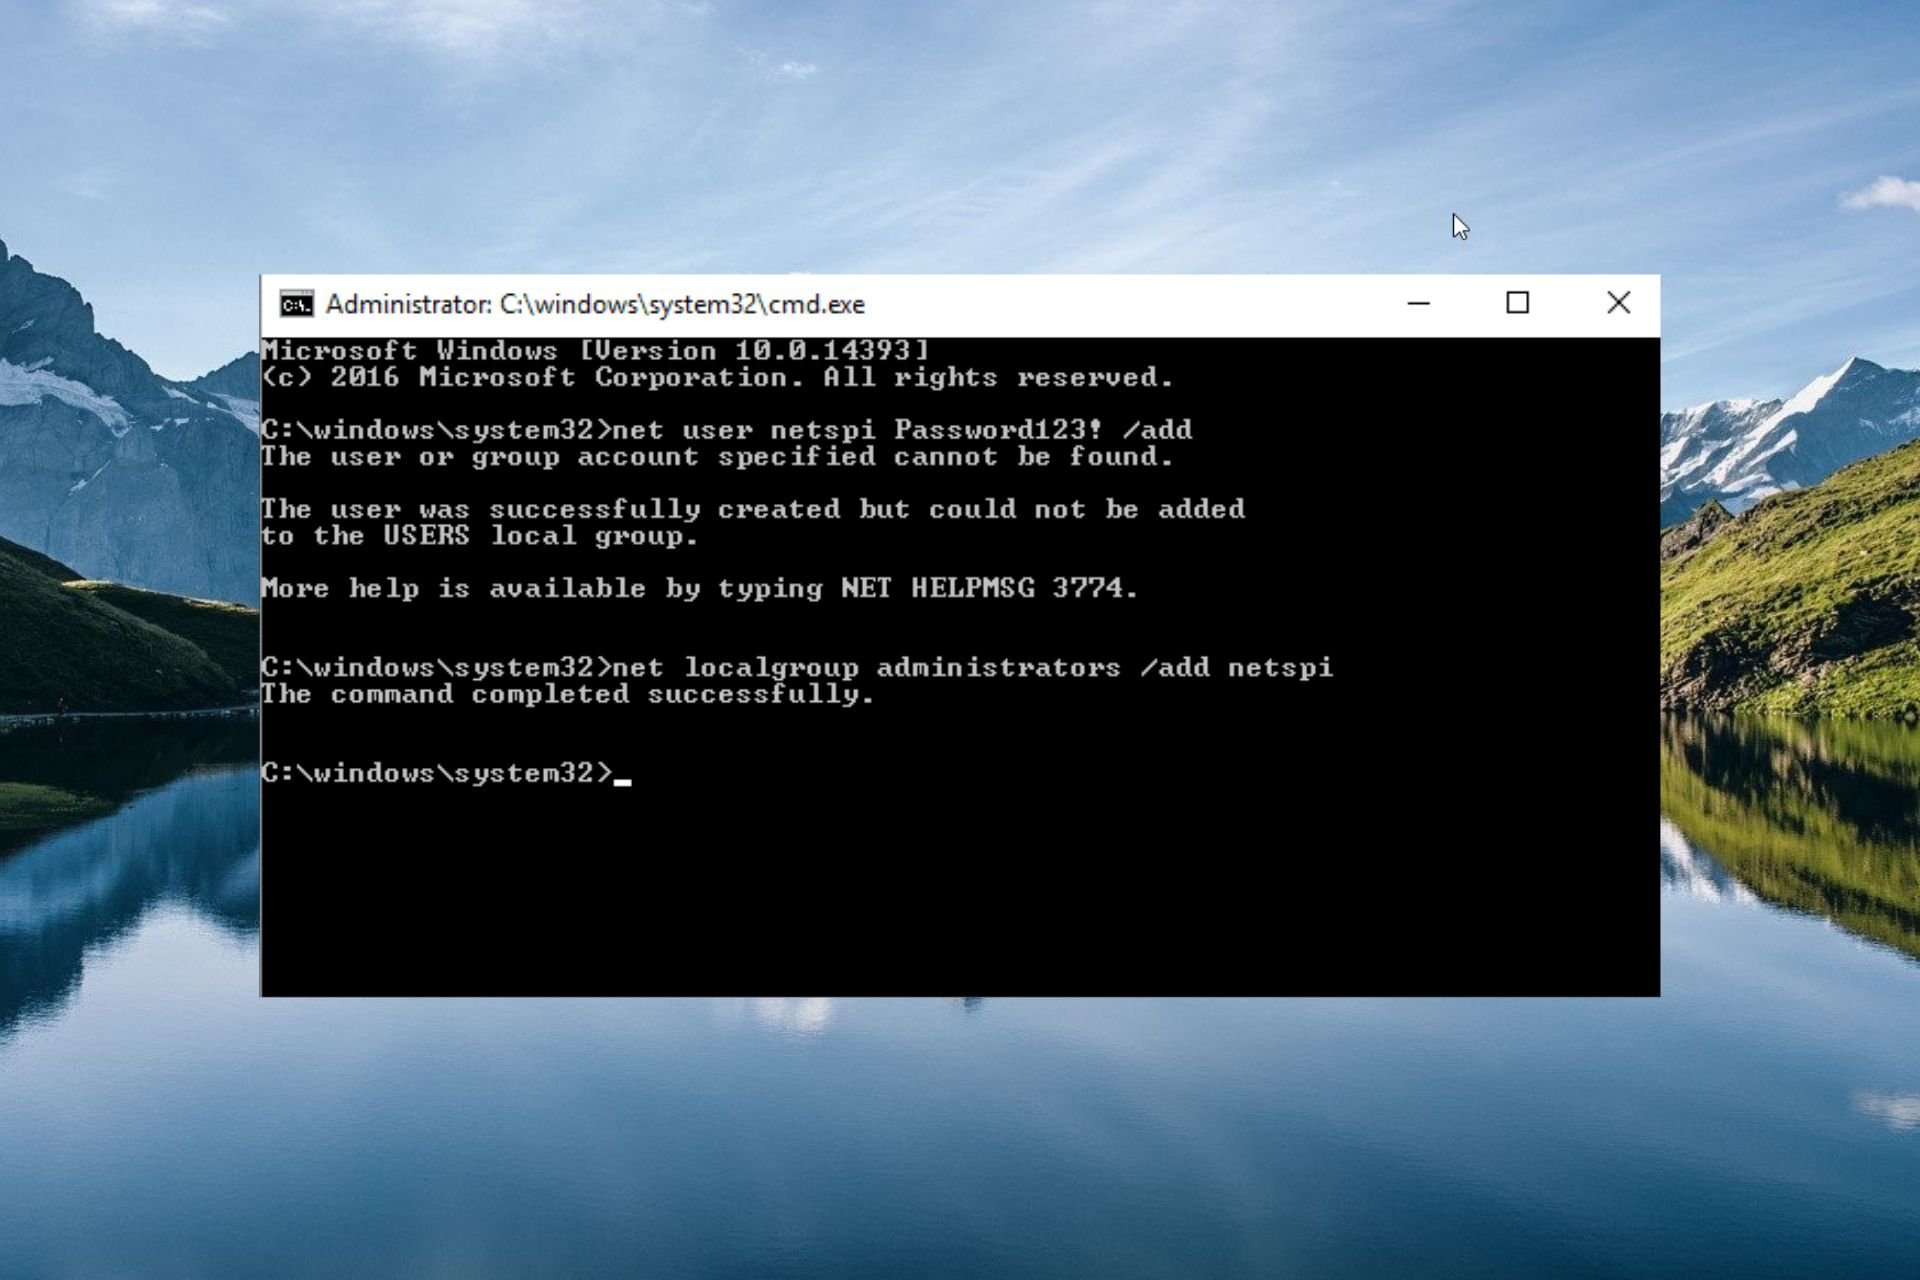
- Error code NET HELPMSG 3774 indicates that the user account is successfully created but could not be added to the local group.
- Incomplete Windows installation and corrupt system files often create issues during user account creation on Windows.
- You can fix the broken system files or try alternative methods to create a user account and get rid of the NET HELPMSG 3774 error.
Many of our readers have encountered an error code NET HELPMSG 3774 when trying to create a new user account via Command Prompt. The error states that The user was successfully created but could not be added to the USERS local group.
Why do I get the NET HELPMSG 3774 error code?
If you receive the error code NET HELPMSG 3774 when trying to create a user account on your Windows PC, one or more of the following may be the reason for it.
- Incomplete Windows installation – If Windows has not been installed correctly, or the installation process was interrupted, a NET HELPMSG 3774 error can occur during the user account creation.
- Corrupt user profile – If the current user account becomes corrupt, you will run into NET HELPMSG 3774 error when creating a new user account.
- Corrupt or missing system files – Missing or corrupt component store files and system images also prevent you from creating a new user.
- Buggy Windows update – A bug in the current Windows version may create various issues on your Windows PC, including errors during user account creation.
- Virus or malware attack – A malware infection can cause your system to malfunction when you attempt to create a new user account using the net user command.
Now that you are aware of what causes the NET HELPMSG 3774 error, let’s proceed to check out the potential solutions to resolve the error.
How do I fix the error NET HELPMSG 3774 in Windows?
1. Run SFC and DISM scans
- Click the Windows icon on the taskbar, type cmd in the search bar, and select Run as Administrator from the right section.
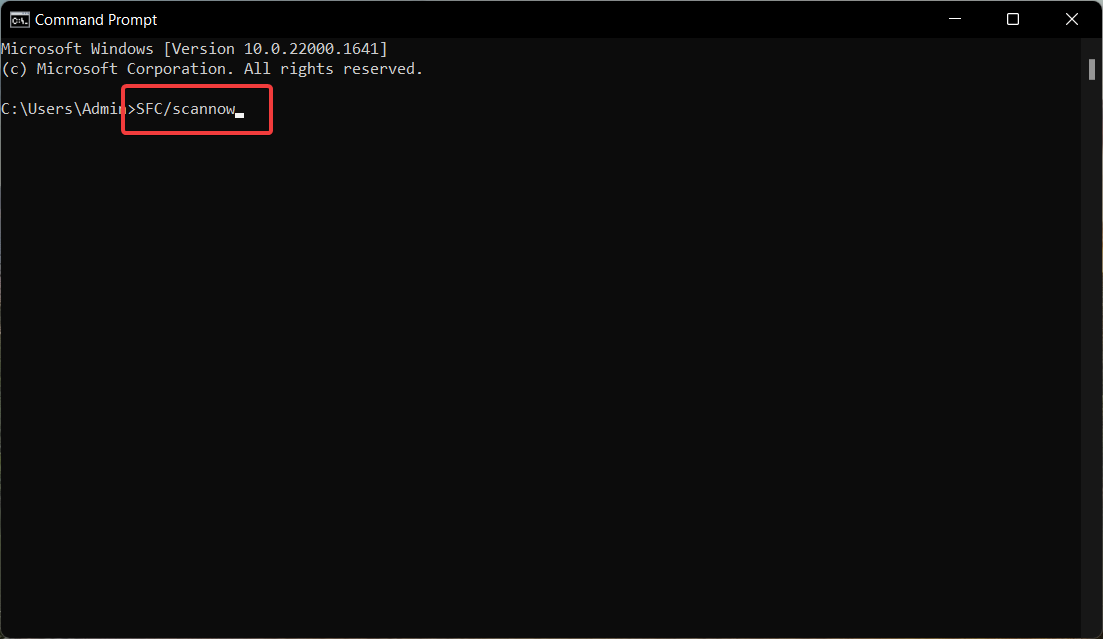
- Execute the following command by pressing the Enter key to run the System File Checker scan.
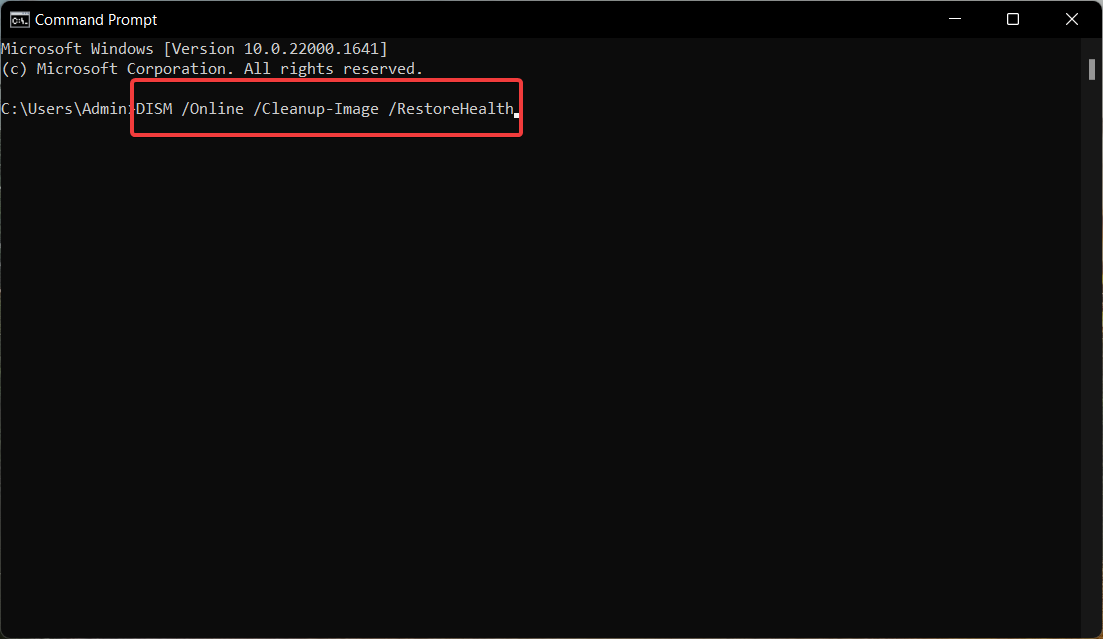
sfc /scannow - After the SFC scan is completed, type or copy-paste the following command and press Enter.
DISM /Online /Cleanup-Image /RestoreHealth
The SFC and DISM (Deployment Image Servicing and Management) will scan all the protected files and system images and replace them with the cached copy stored in the compressed folder.
How we test, review and rate?
We have worked for the past 6 months on building a new review system on how we produce content. Using it, we have subsequently redone most of our articles to provide actual hands-on expertise on the guides we made.
For more details you can read how we test, review, and rate at WindowsReport.
Once the scan is complete, you can create the new user account without encountering the NET HELPMSG 3774 error.
Regardless, you have a better alternative to scan your PC and repair broken system files automatically. Plus, you don’t need any technical tasks as required in the next solution, the clean boot of your PC.
2. Clean Boot your Windows PC
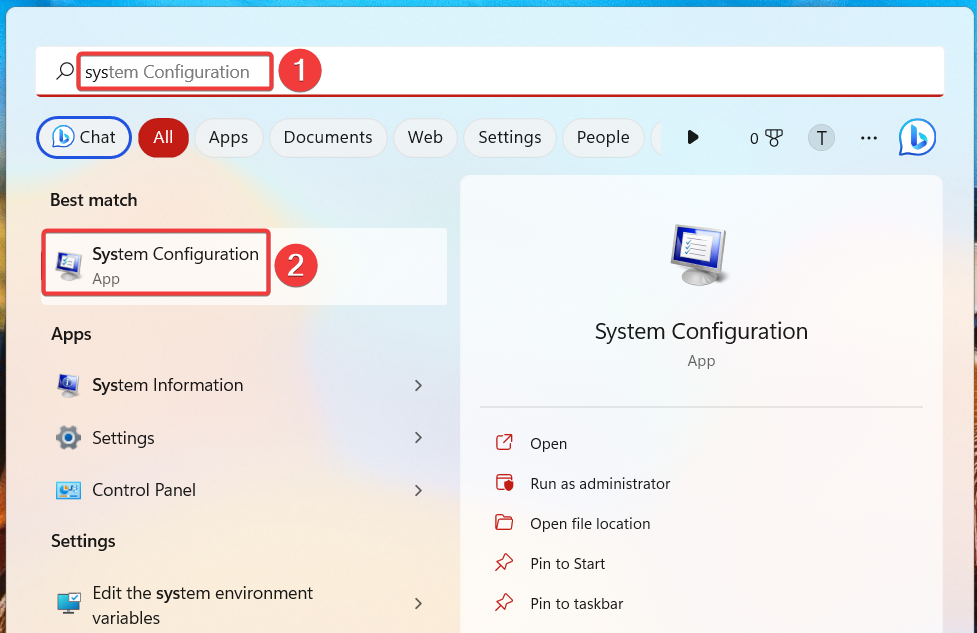
- Bring up the Start menu by pressing the Windows key, type system configuration in the search bar, and choose the relevant search result.
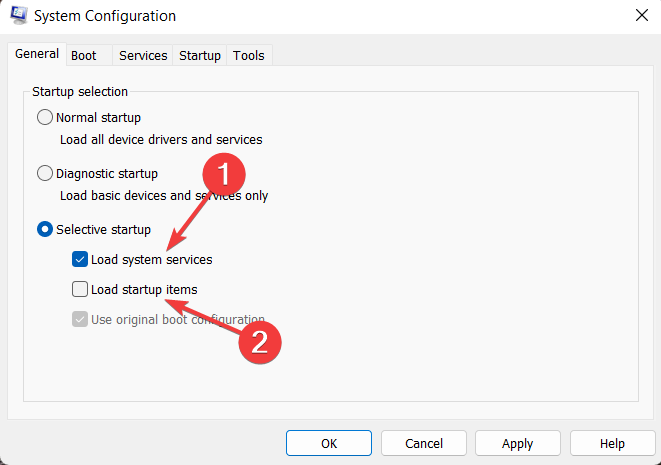
- Ensure Selective Startup is enabled in the System Configuration property window. Now uncheck the checkbox for Load startup items but keep the box for the Load system services option enabled.
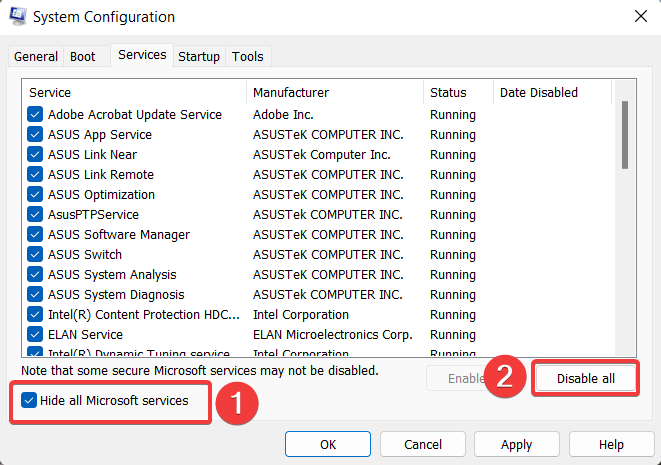
- Switch to the Services tab, enable the checkbox for the Hide all Microsoft services, and click the Disable all button.
- After making the changes, press the Apply button followed by OK to exit the System Configuration window. After this, reboot your PC like you normally do to enter the clean boot mode.
In the clean boot state, the startup services and startup items will be disabled. Try creating the user account via the command prompt once again.
If you no longer get the NET HELPMSG 3774 message, the third-party apps were preventing the new user account creation. If these apps create further problems on your system, you can uninstall these apps for good.
- Fix: Stuck at CHKDSK is Verifying USN Journal
- Fix: Set Time Zone Automatically Defaults to Wrong Time Zone
3. Try alternative methods to create a user account
3.1 Via the Settings app
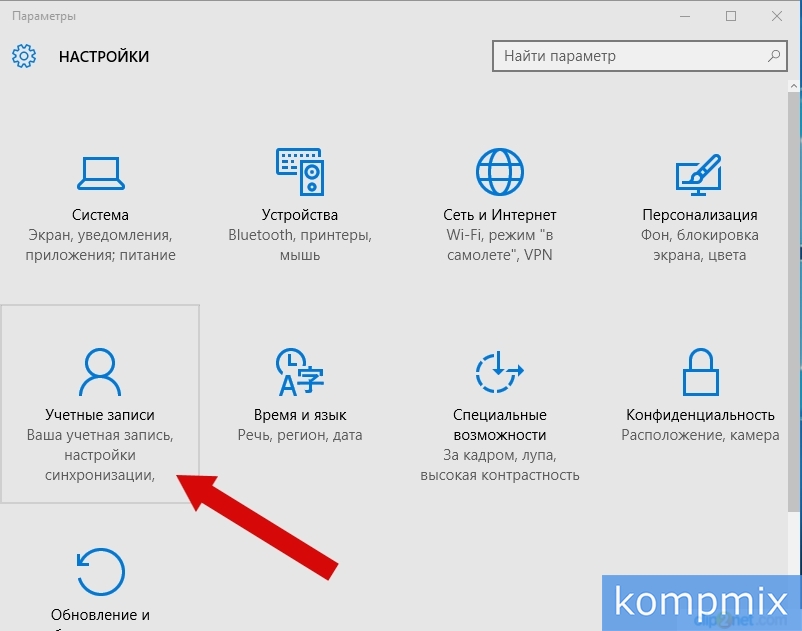
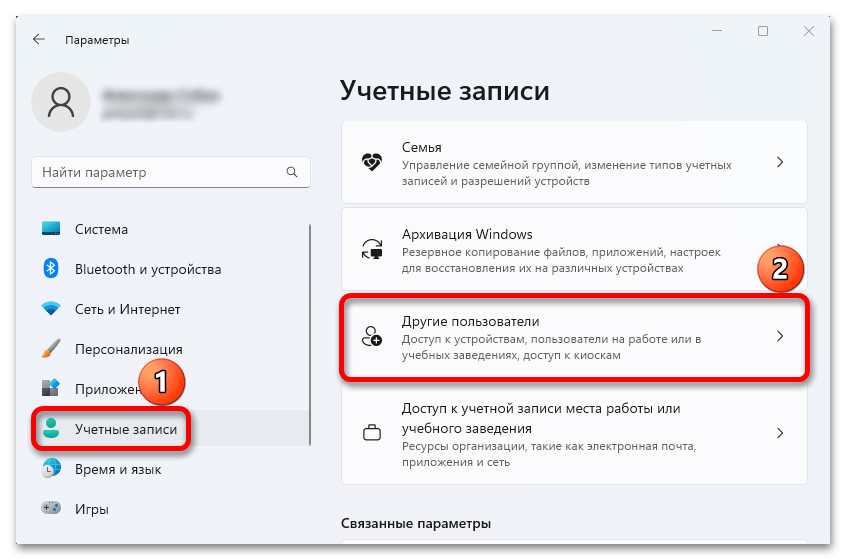
- Use the Windows + I shortcut to launch the Settings app.
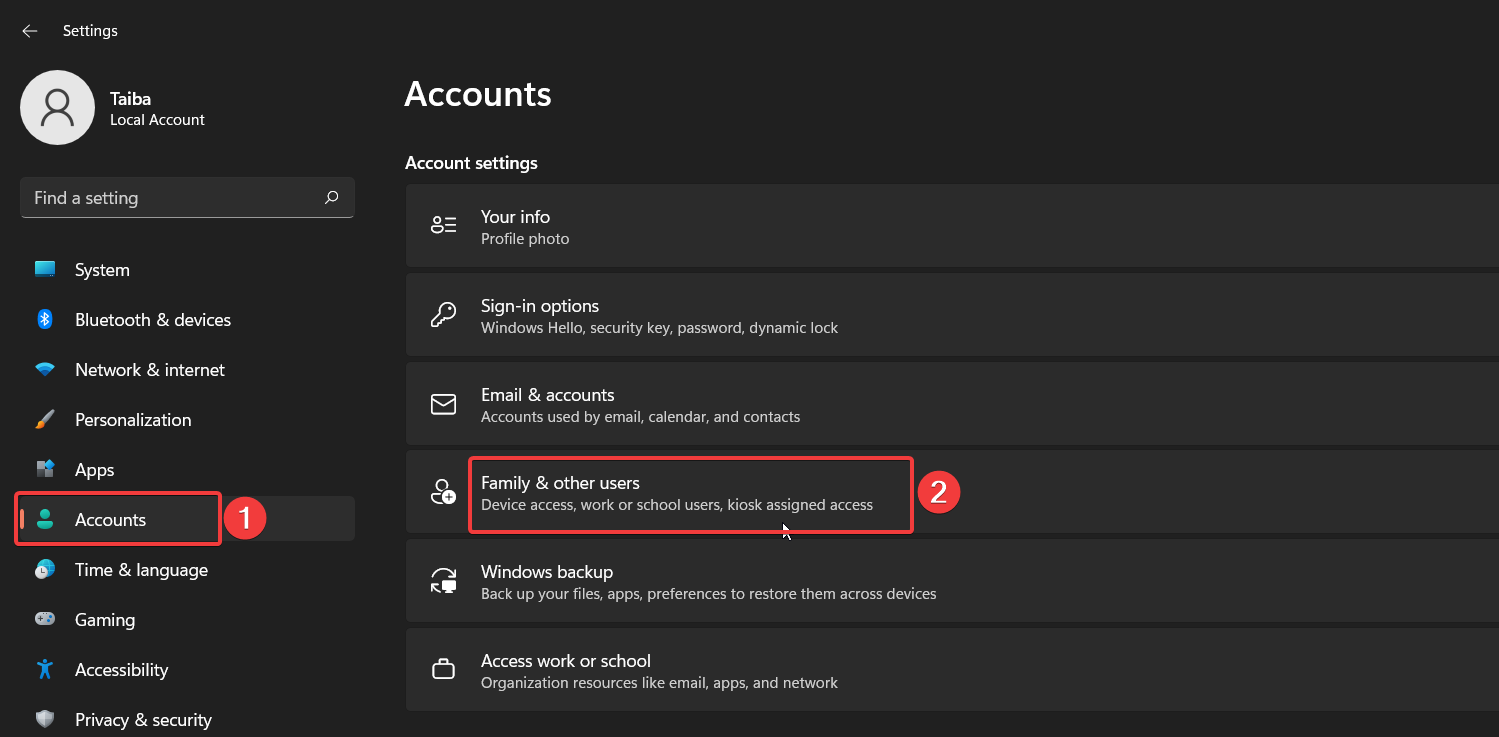
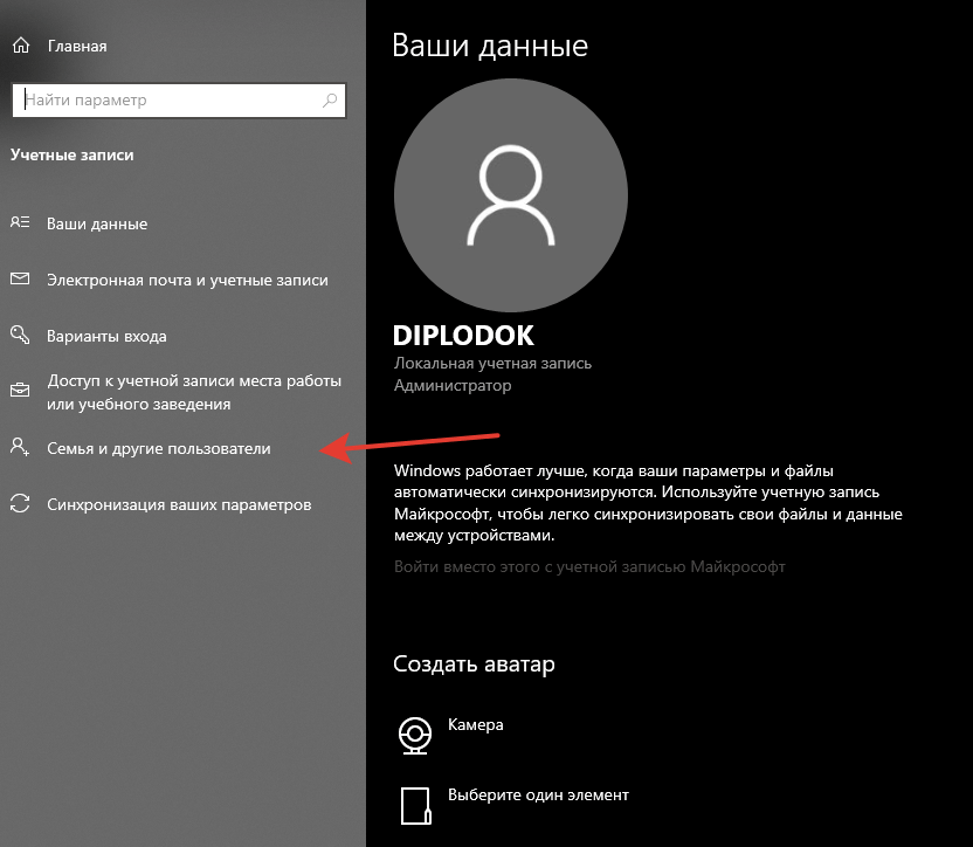
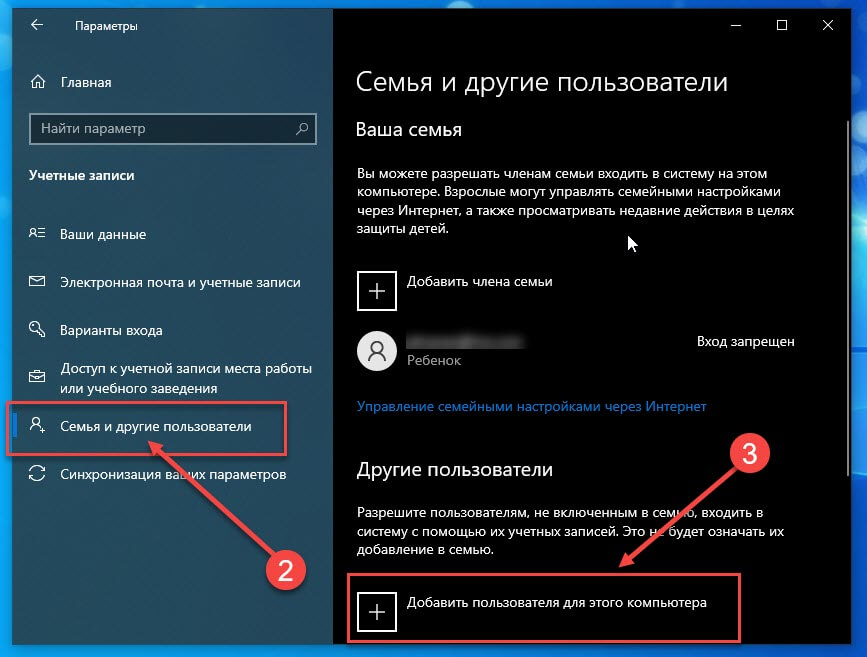
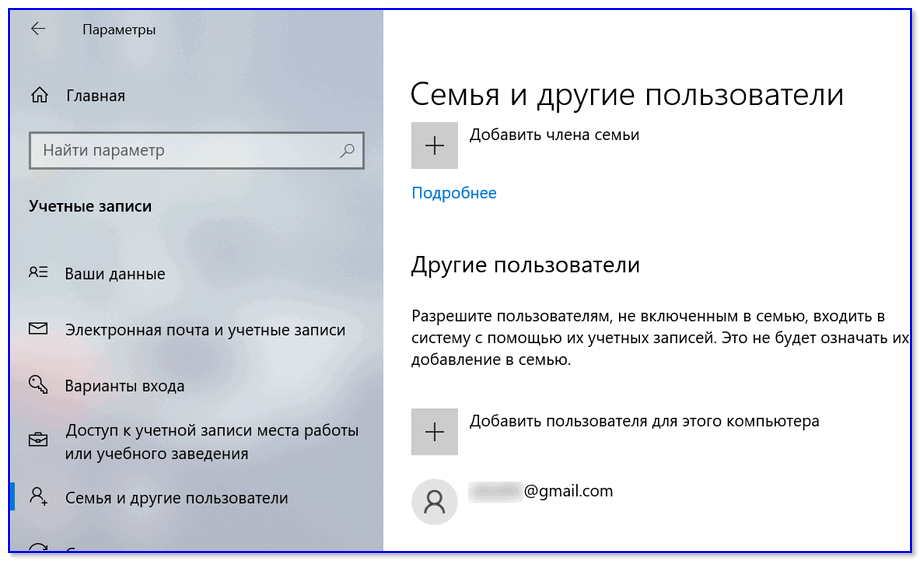
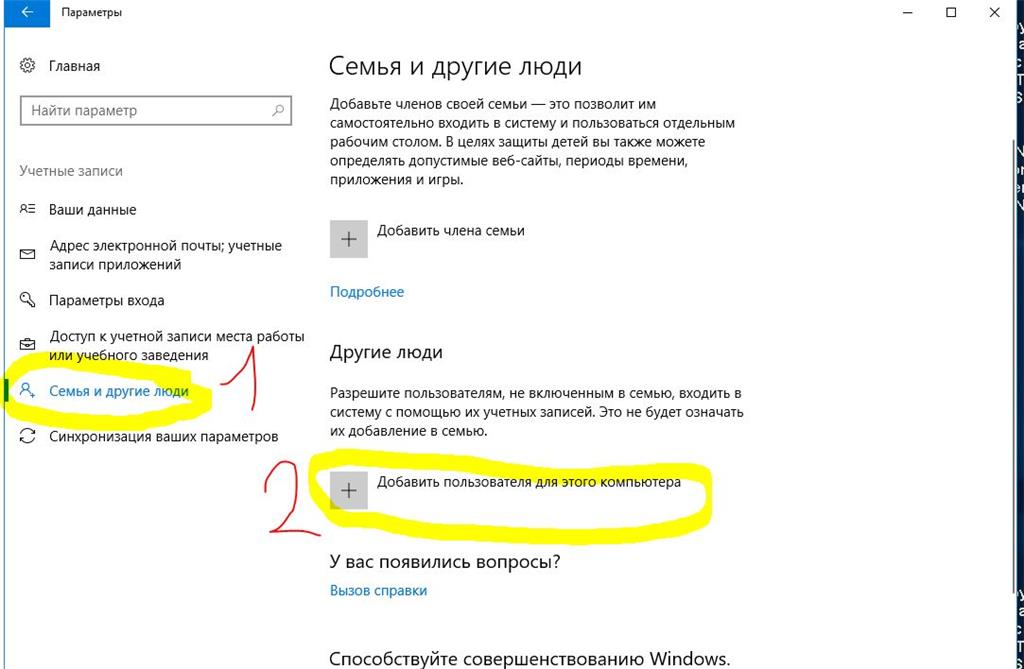
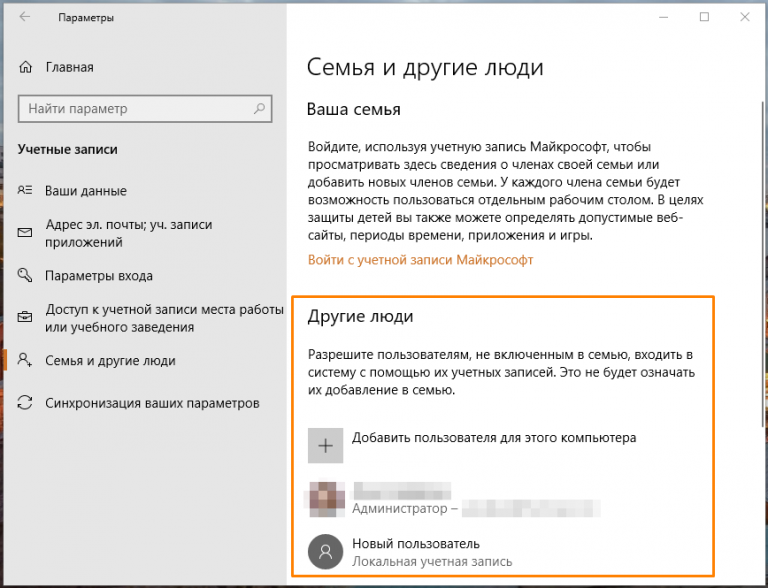
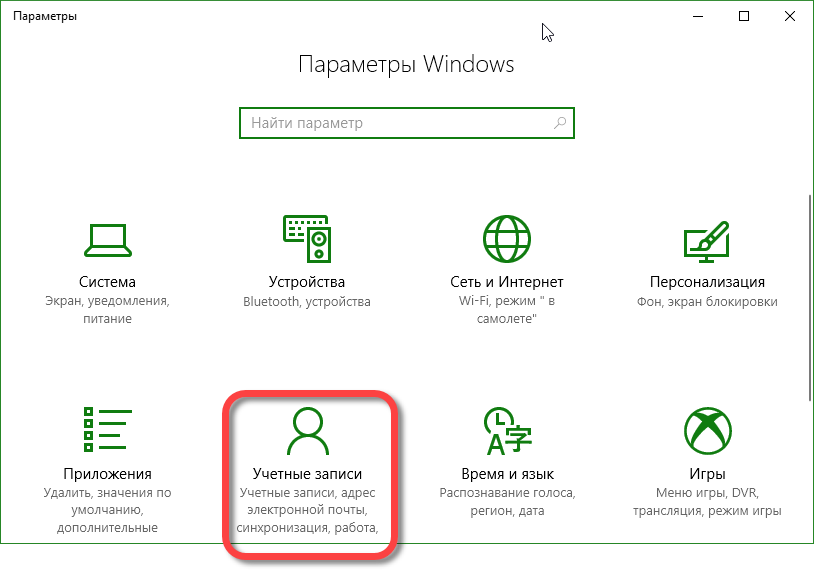
- Choose Accounts from the left sidebar and then Family & other users.
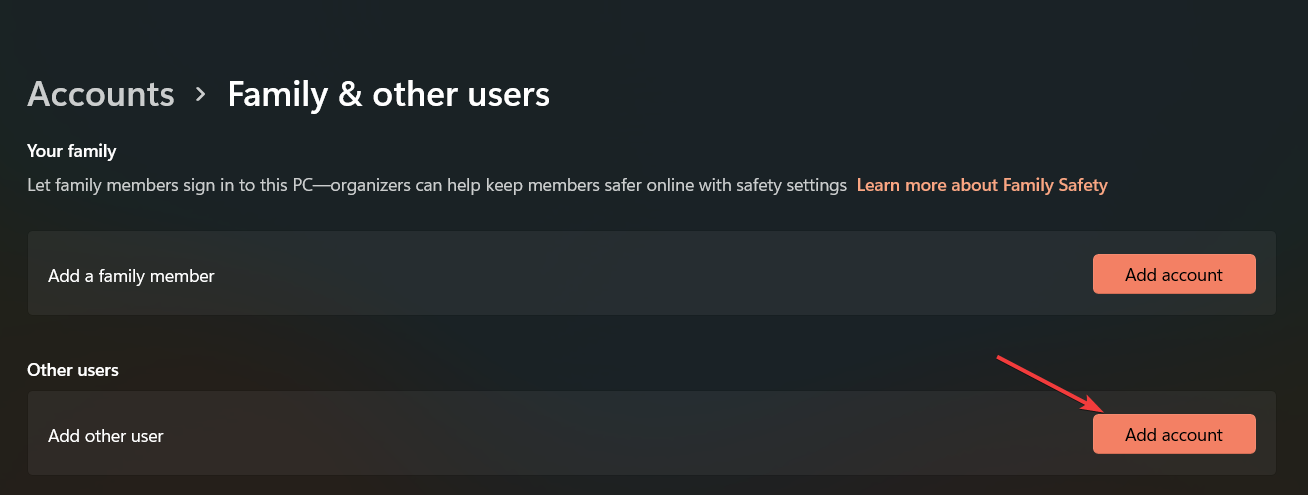
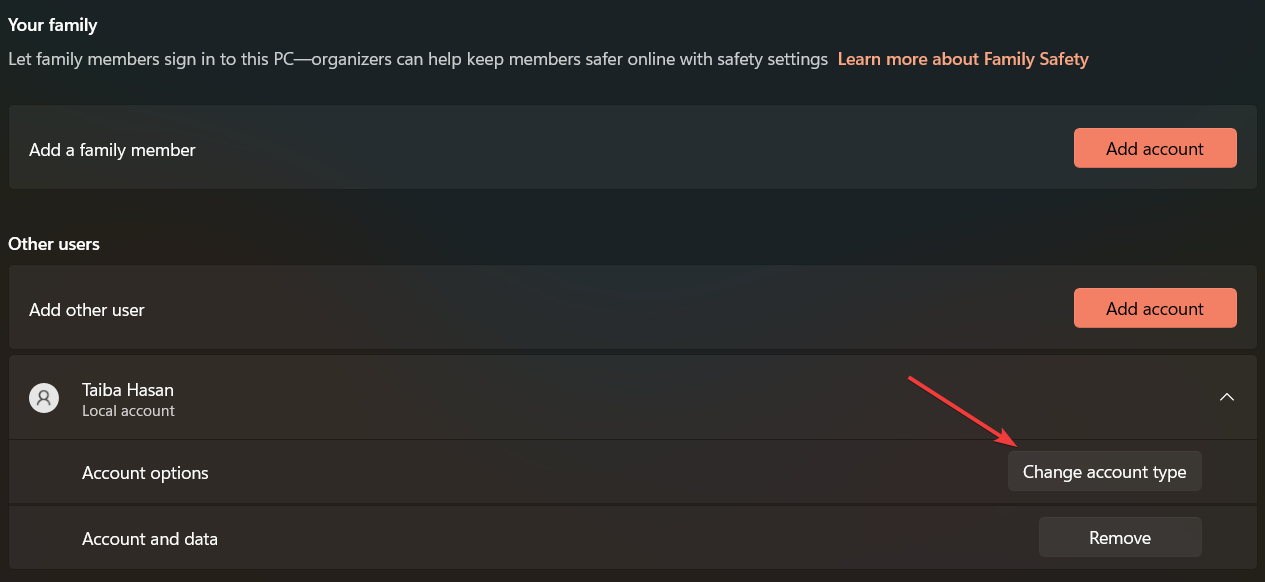
- Next, press the Add account button under the Other users section.
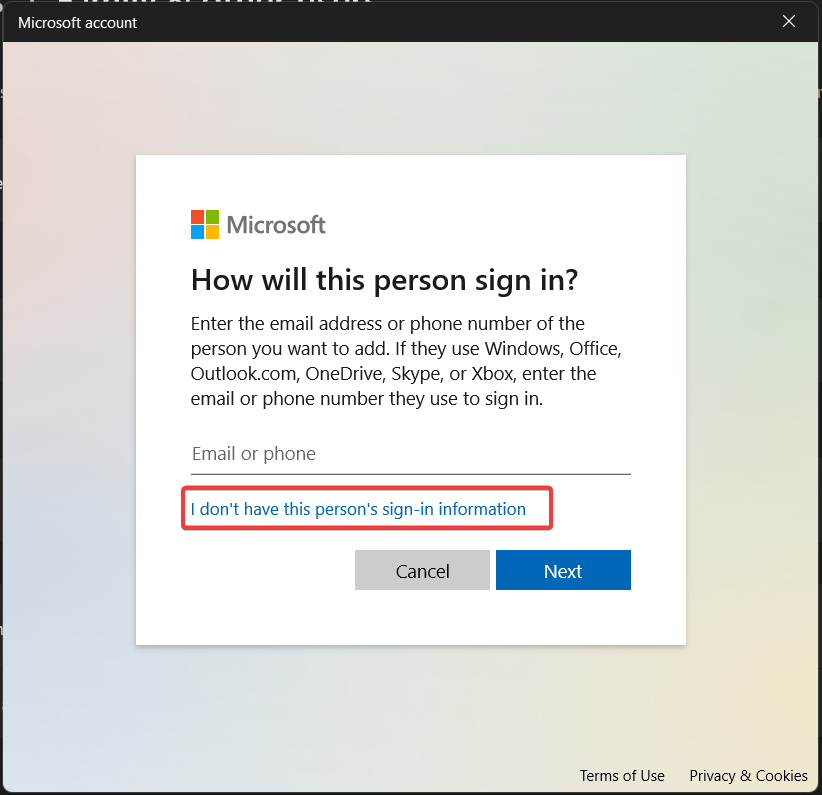
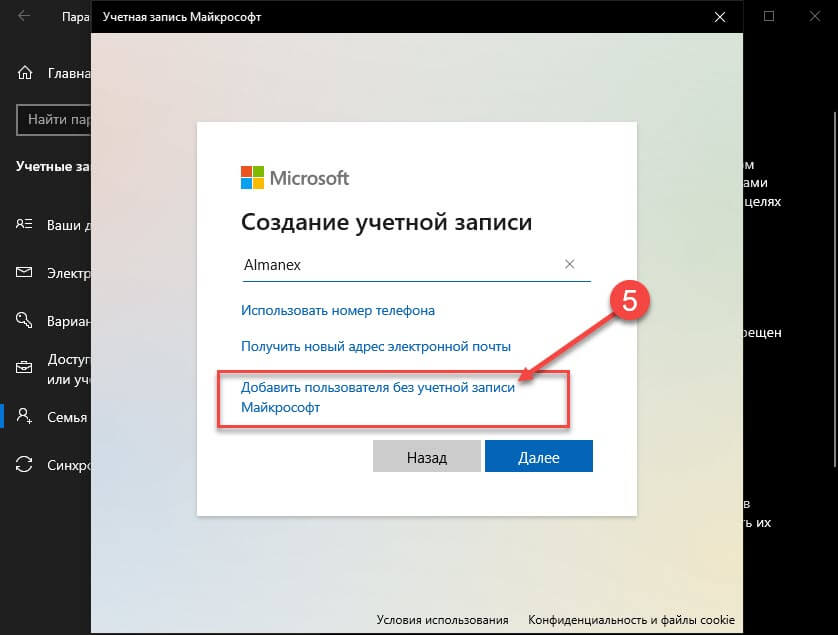
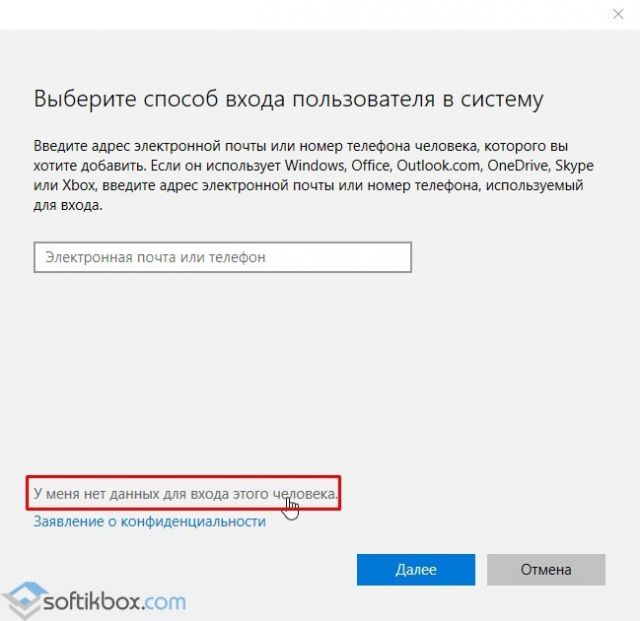
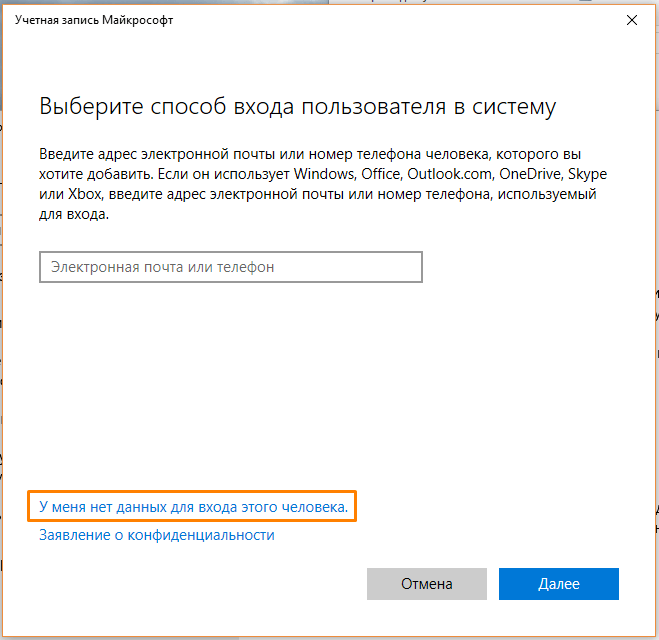
- Select I don’t have this person’s sign-in information on the sign-in window.
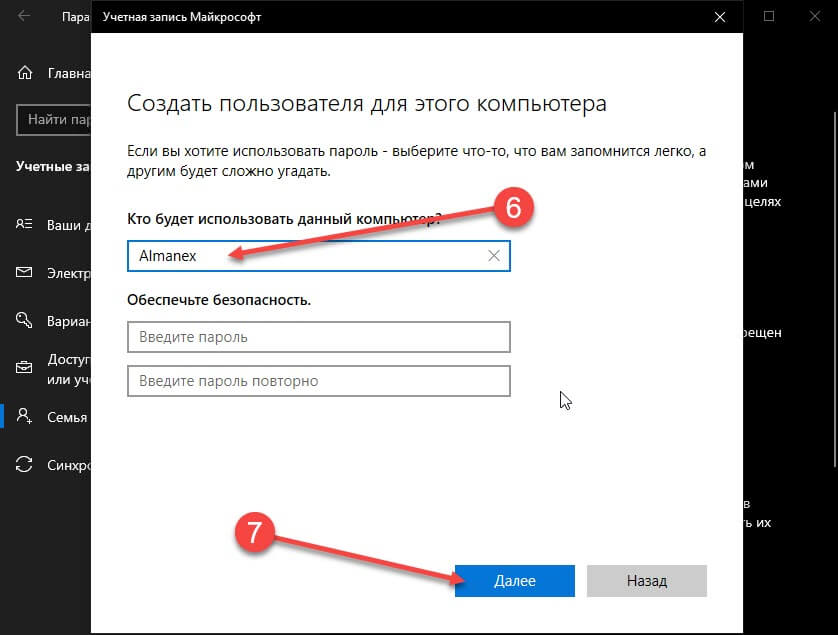
- Next, choose the Add a user without a Microsoft account option and provide the necessary details to create a new user account.
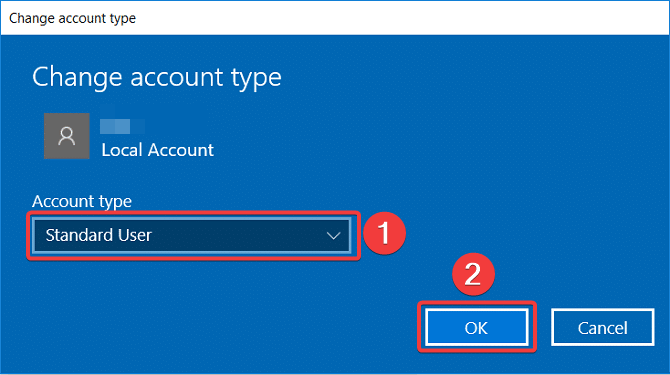
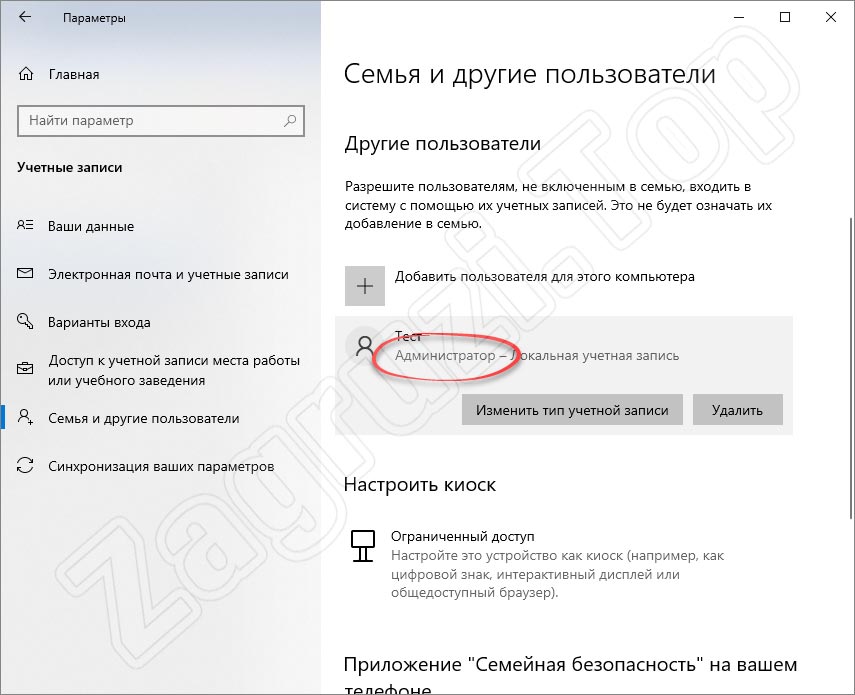
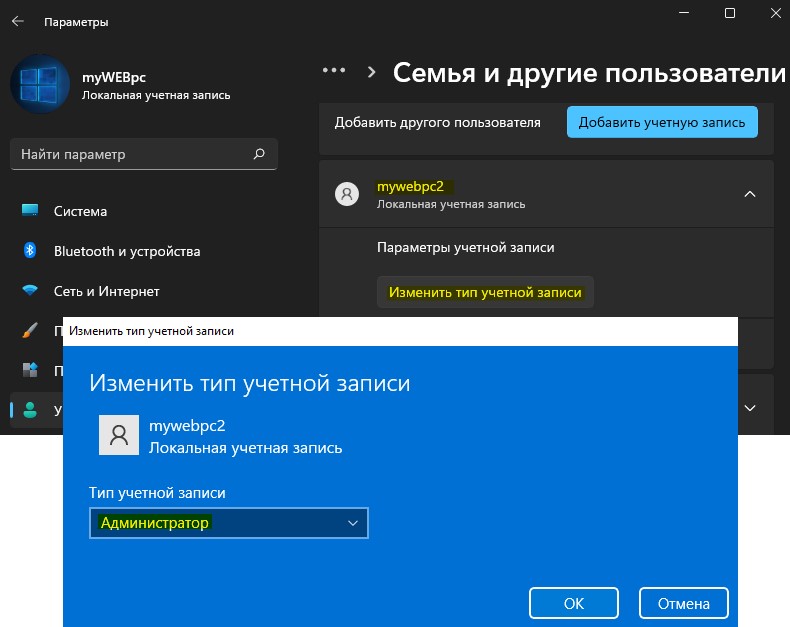
- After the user account is successfully created, click it to reveal the related settings and press the Change account type button.
- Select the Account type from the drop-down and press the OK button to save the changes.
3.2 Use the Netplwiz command
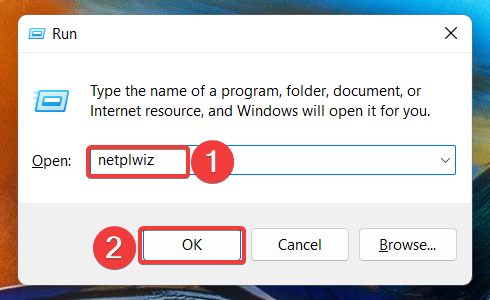
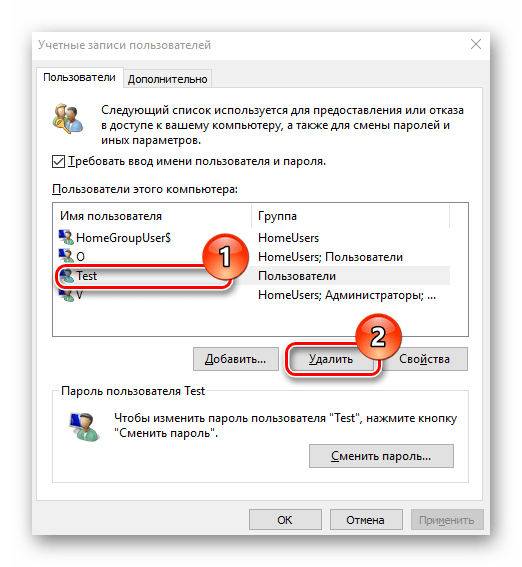
- Use the Windows + R shortcut to launch the Run dialog box, type the following command in the text box and press the OK button.
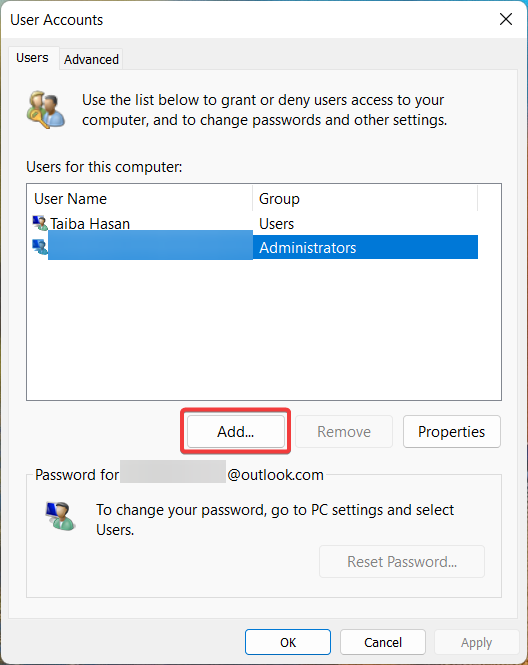
netplwiz - Press the Add button on the User Accounts window to create a new user account on your computer.
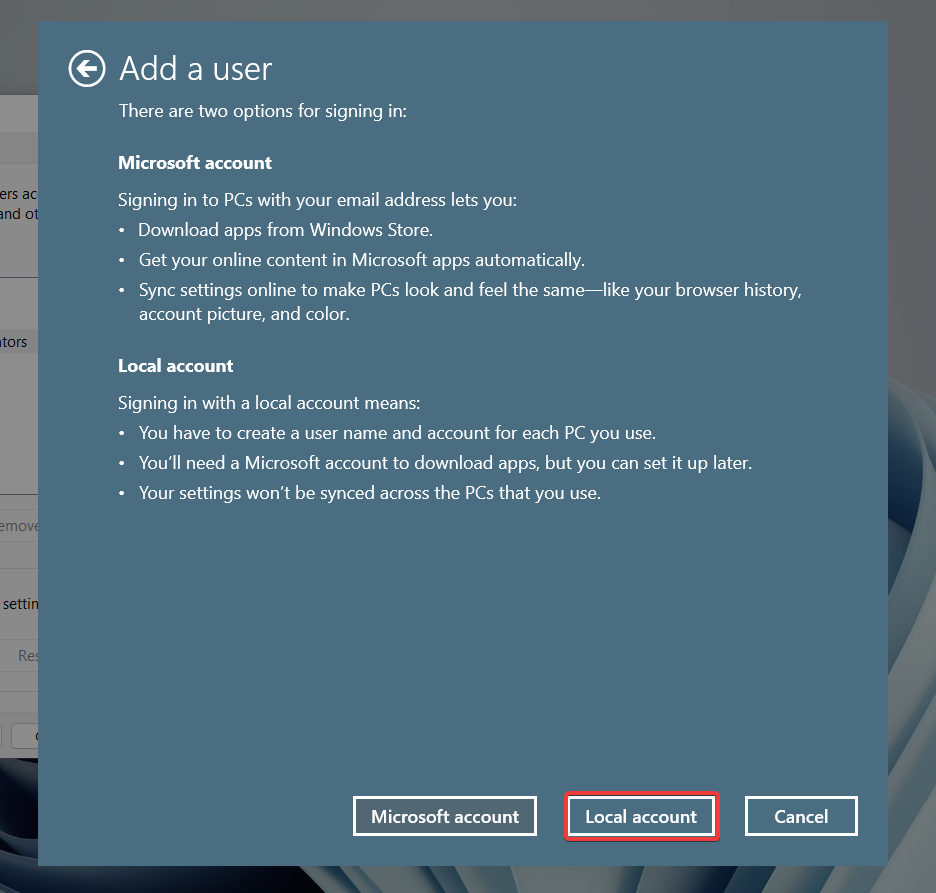
- Choose Sign in without a Microsoft Account option on the signup window.
- Press the Local account button and provide the required details in the next window.
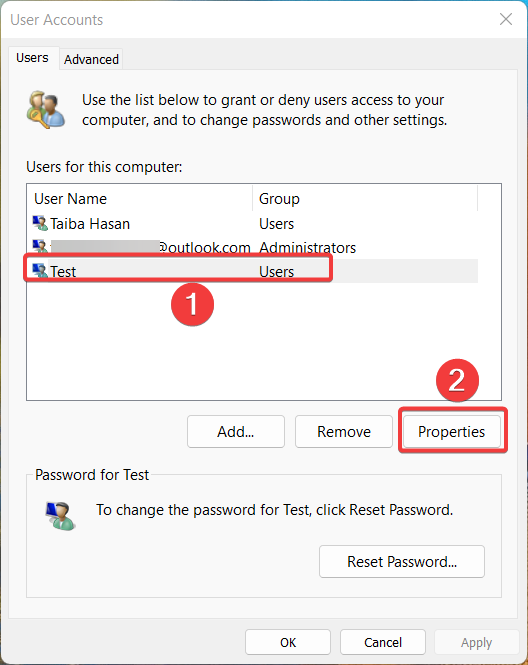
- After the local account is created, select the username and press the Properties button.
- Switch to the Group Membership tab and select the level of access you want to provide to the user account.
4. Perform System Restore
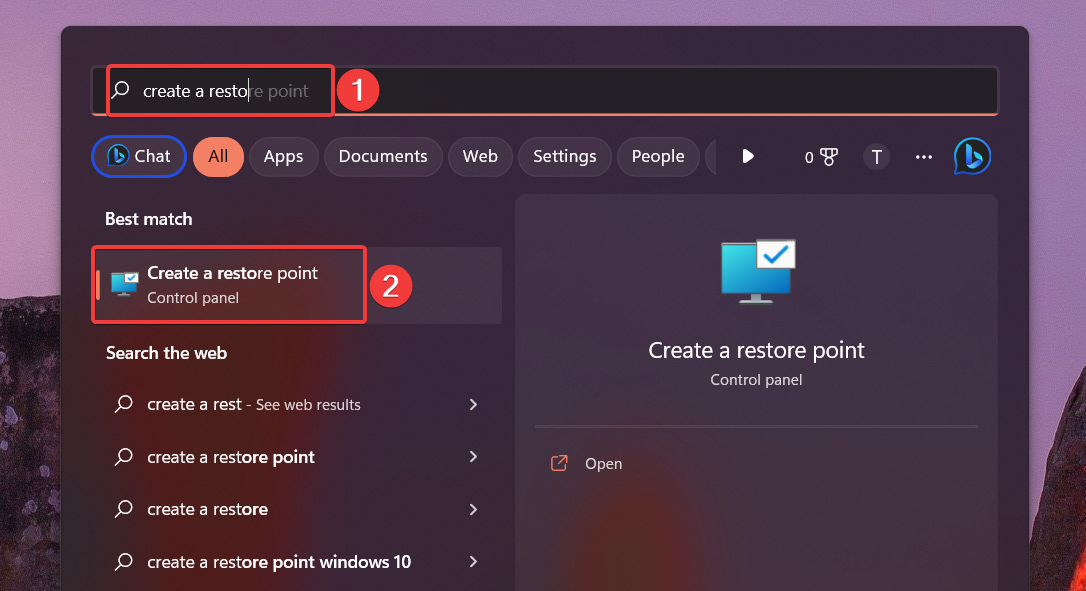
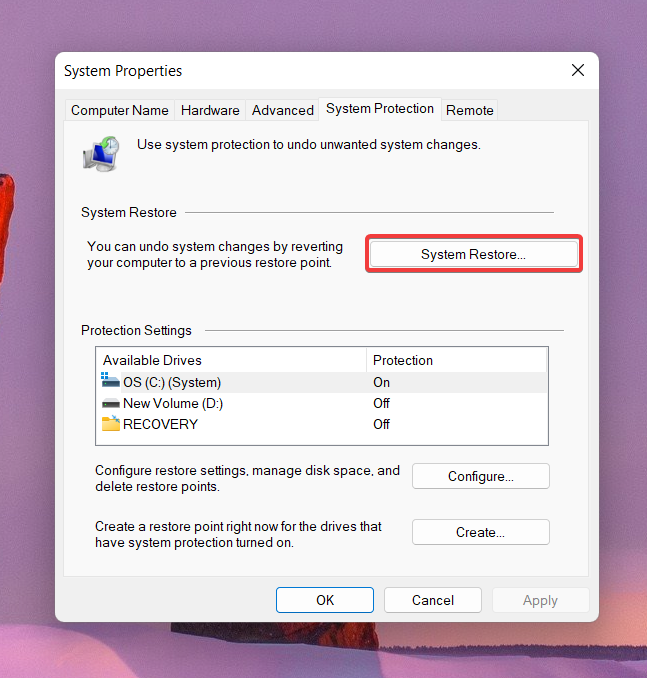
- Use the Windows key to launch the Start menu, type create a restore point in the search bar on top, and select the relevant search result to access the System Properties window.
- Click the System Restore button under the System Protection tab.
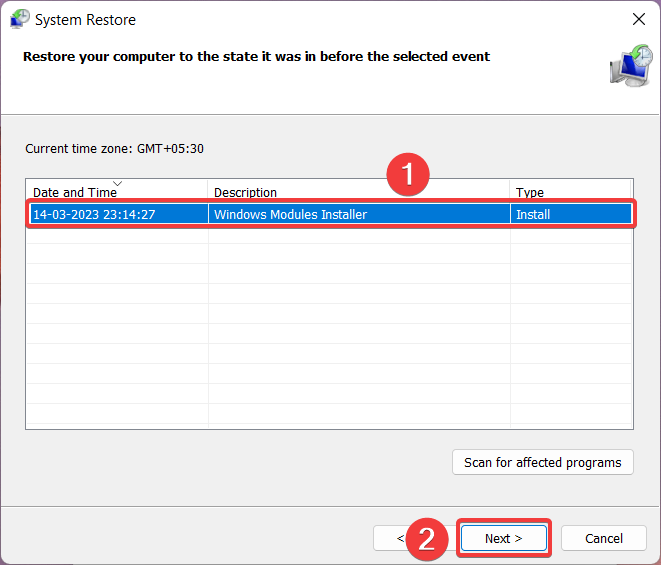
- Press the Next button on the System Restore wizard.
- Select the restore point from the list and click the Next button.
- Finally, press the Finish button to begin the system restoration process.
Performing a system restore will revert all the changes in your PC that are causing the error code NET HELPMSG 3774 error when creating a new user account on your computer.
5. Reset Windows
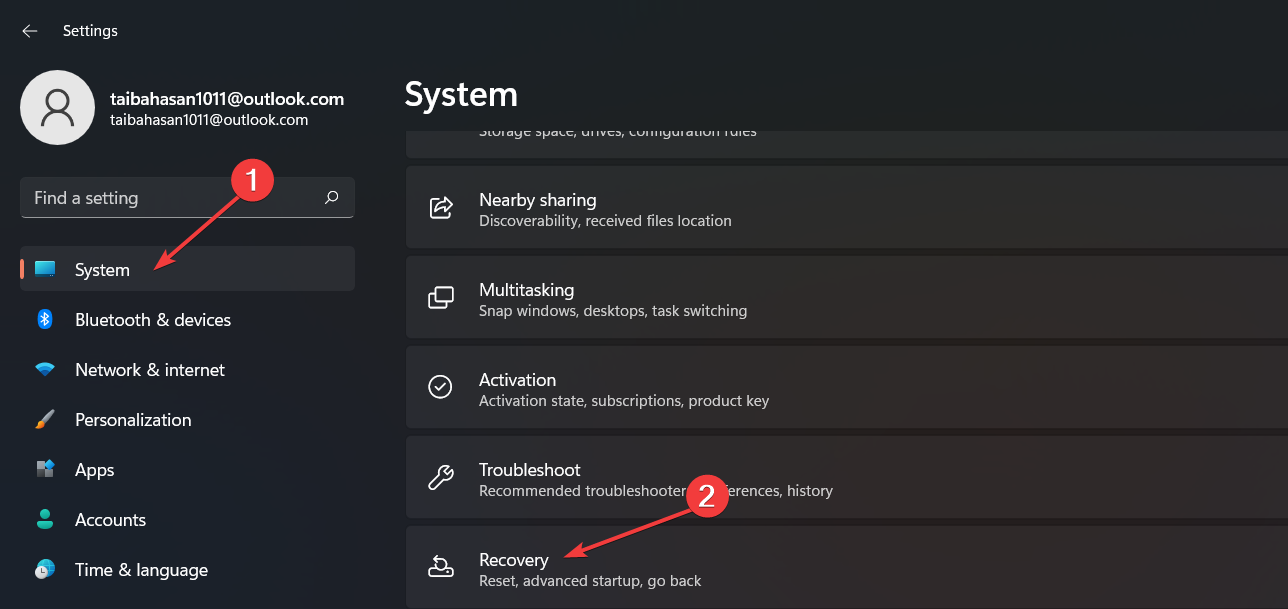
- Use the Windows + I shortcut to launch the Settings app.
- Scroll down the System settings and choose Recovery from the right section of the Settings app.
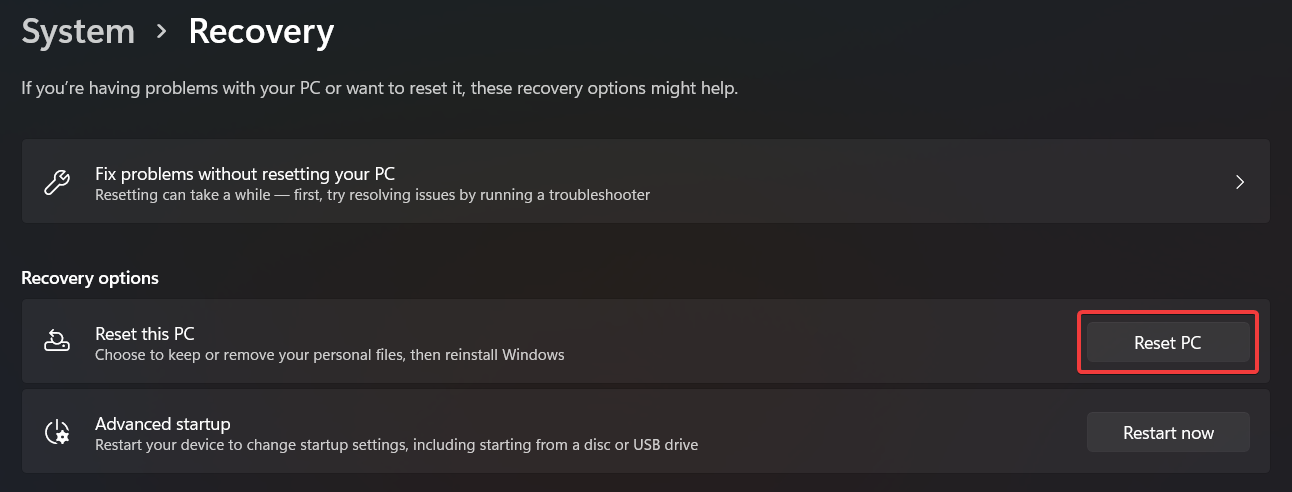
- Press the Reset PC button, located in the Recovery options section to reinstall Windows.
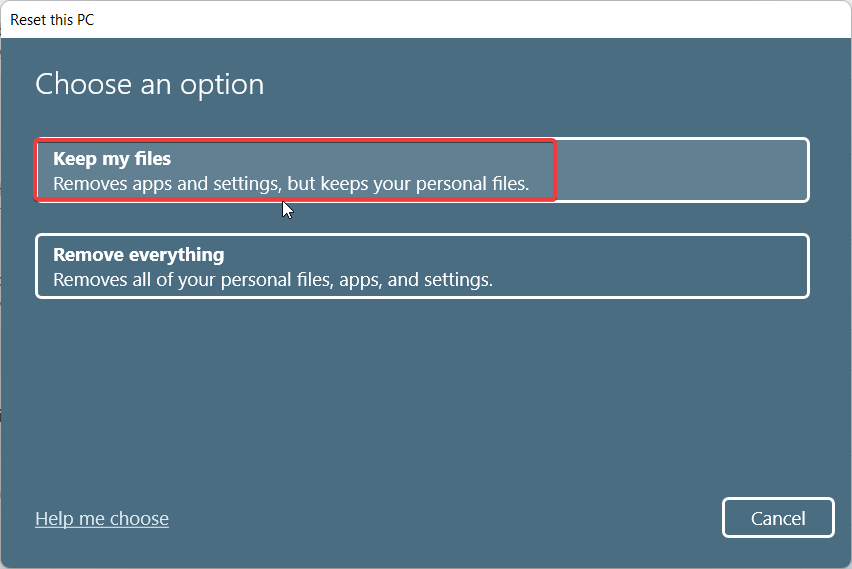
- A Reset this PC window will appear on the screen with two options- Keep my files and Remove everything. Choose the first option to reset the Windows settings while keeping your data intact.
- On the next window, specify the method you would like to opt for reinstalling Windows. We recommend you choose the Local reinstall option to quickly re-install Windows from your device.
Now follow the step-by-step process to complete the Windows setup process. Performing the Windows reset removes the misconfigured settings and restores their default values. You can then start afresh to create a new user account using Command Prompt, and you will no longer get the NET HELPMSG 3774 error.
That’s it! These are the workarounds you can implement to fix the NET HELPMSG 3774 error when creating a user account on your PC.
While you are here, you might be interested to know how to fix temporary profile errors in Windows.
Which of the methods mentioned in this guide fixed the NET HELPMSG 3774 error code? Let us know in the comments section below.
Рассмотрим два простых способа предоставления учетной записи прав локального администратора.
После того, как вы создали учетную запись на сервере Windows Server, часто возникает вопрос, как добавить пользователя в группу локальных администраторов?
В этом статье мы покажем, как добавить пользователя в локальные админы на примере операционной системы Windows Server 2012 R2. Вся информация применима к любым другим поддерживаемым операционным системам Windows. Естественно, для выполнения этих операций учетная запись, выполняющая данные изменения должна обладать административными полномочиями.
- Добавление в группу администраторов при помощи консоли Сomputer Management
- Добавление пользователя в администраторы с помощью команды net user
Содержание:
Добавление в группу администраторов при помощи консоли Сomputer Management
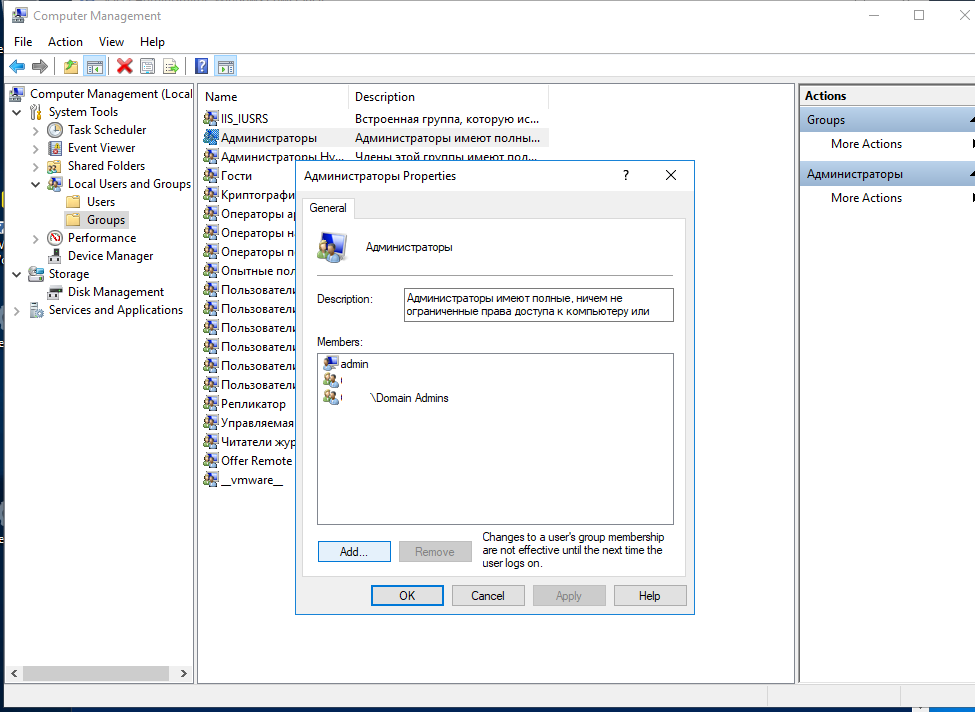
- Нажмите кнопки Win + X, чтобы открыть консоль управления компьютером — «Сomputer Management»
- В списке с левой стороны разверните секцию Computer Management -> System Tools -> Local Users and Groups и выберите пункт Groups.
- Щелкните правой кнопкой мыши по группе Administrators , выберите пункт Add to Group , а затем нажмите кнопку Add.
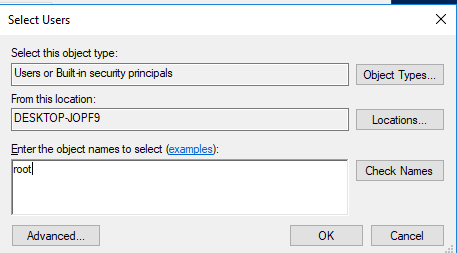
- В диалоговом окне «Select Users» в поле «Enter the object names to select» введите имя учетной записи пользователя или группы, которую вы хотите добавить в группу Administrators и нажмите OK.
- Если в группу локальных администраторов нужно добавить учетную запись другого компьютера, выберите «Object Types», установите флажок «Computers» и нажмите «ОК». В поле «Enter the object names to select» и укажите имя компьютера.
Добавление пользователя в администраторы с помощью команды net user
Войдите в операционную систему Windows под учетной записью, обладающей правами администратора и запустите командную строку с повышенными привилегиями.
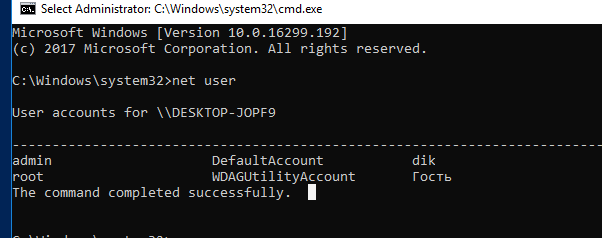
Для того, чтобы вывести список всех локальных учетных записей пользователей в системе введите команду
net user
Как вы видите, в системе имеется 6 учетных записей.
Чтобы добавить учетную запись пользователя root в группу локальных администраторов, выполните следующую команду и нажмите Enter:
net localgroup administrators root /add
В русской версии Windows локальная группа администраторов называется по-другому, поэтому если предыдущая команда вернула ошибку «Указанная локальная группа не существует», воспользуйтесь другой командной:
net localgroup "Администраторы" root /add
Если нужно добавить в администраторы системы учетную запись пользователя домена Active Directory, формат команды будет такой:
net localgroup administrators yourdomain\root /add
Проверить состав группы локальных администраторов можно с помощью команды:
Net localgroup administrators
Как вы видите, учетная запись пользователя root теперь является администратором сервера.
Harry Johnston
You can’t use command-line tools in the recovery environment to manipulate the accounts on the HDD installation of Windows. All you’re doing is messing with the recovery environment’s own accounts, which only exist on the RAM disk, so any changes disappear the moment you reboot.
Since the recovery environment’s account database only requires minimal functionality (there’s no need to create new accounts) it isn’t surprising that you get an odd error message. (I see the same message, by the way, it doesn’t reflect anything wrong with the particular computer you’re working on.)
Password change ISOs work differently, by manipulating the registry files on the target HDD directly; they know the format of the registry files and the way in which account information is stored in them.

PC-PORTAL
МЕНЮ
Обновлено: 09.10.2023
Читайте также:
- Что делать если айфон был стерт или потерян и просят apple id
- Почему onedrive занимает место на диске с
- Укажите порядок действий для удаления строки из таблицы в текстовом процессоре microsoft word
Вопрос:
Я работаю над Windows 10 Assigned Access for Desktop для версии 1607.
Миссия: мне нужно получить Assigned Access для работы с Powershell.
Сделанные шаги: я создаю новую учетную запись LocalUser с New-LocalUser, и я включаю учетную запись с Enable-LocalUser. Чтобы проверить, добавлена ли учетная запись, я запускаю Get-LocalUser и вижу, что учетная запись создана (см. Вложение).
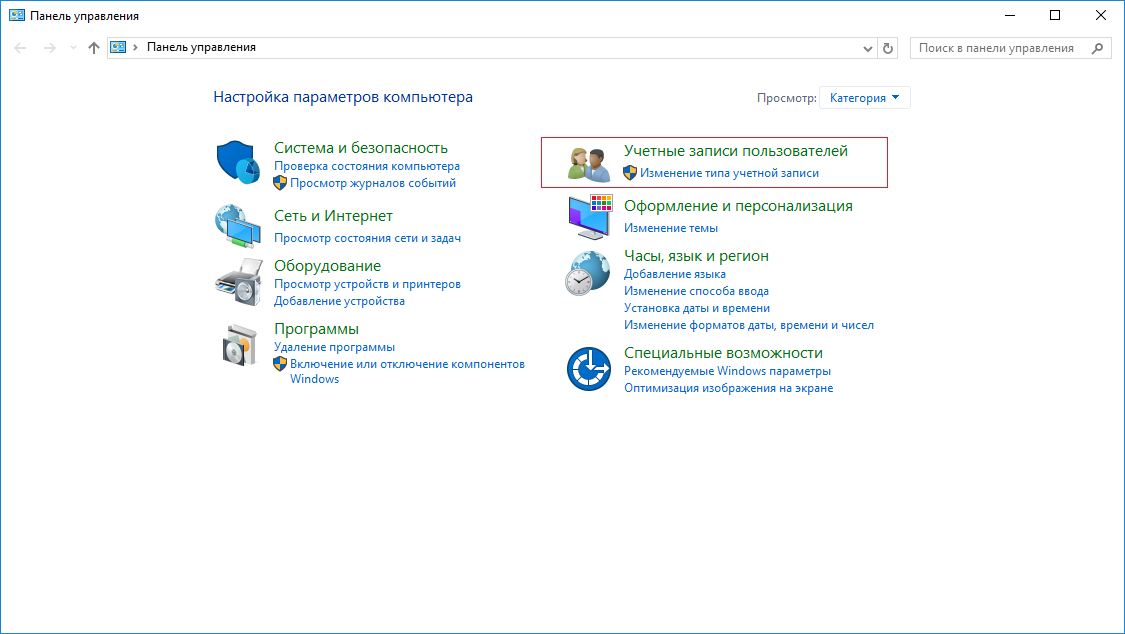
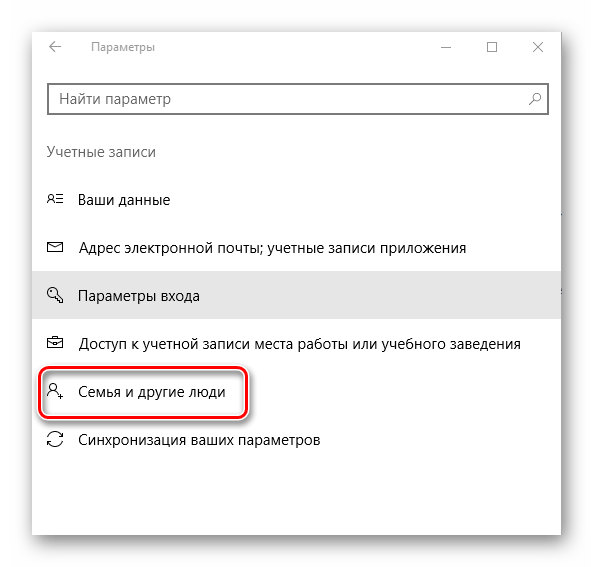
Проблема. Чтобы дважды проверить, я перехожу к настройкам ПК для Accounts-Family и других людей, но я не вижу новую локальную учетную запись пользователя “KioskTest”.
Я перезапустил компьютер, но учетная запись не добавлена в раздел “Семья и другие люди”.
Я потратил некоторое время на это, и я был бы очень признателен за вашу помощь. Как я могу убедиться, что добавленный локальный пользователь “KioskTest” отображается в настройках учетных записей ПК – “Семья и другие люди” при использовании Powershell?
Я могу Set-AssignedAccess, когда я делаю Get-AssignedAccess, я вижу, что он есть. Проблема в том, что я не могу войти в учетную запись локального пользователя, потому что я не могу найти учетную запись в настройках для ПК.
Он вроде powershell “скрыл” локальную учетную запись пользователя с моего клиентского компьютера !!!
ДОБАВЛЕННАЯ информация + обновленные изображения: после некоторых проб и ошибок я узнал следующее:
- Использование имени пользователя NET USER/ADD –works отлично! Я могу найти учетную запись пользователя и войти в систему как клиент. Учетная запись является частью LocalGroupMember
- Локальная учетная запись пользователя, созданная с помощью New-LocalUser с Powershell, НЕ отображается в настройках учетной записи ПК, но если вы нажмете на установленный назначенный доступ в Family & other people, система найдет локальную учетную запись пользователя (см. Вложение). Однако вы не можете войти в учетную запись, поскольку она, похоже, не имеет членства в группе! Не отлично для тестирования 🙁
Спасибо, что нашли время, Карина
См. Вложение: Powershell Get-AssignedAccess Настройки учетной записи ПК Семья и другие люди
Лучший ответ:
Это не проблема PowerShell и может быть лучше подходит для SuperUser. Но я бы предположил, что это проблема с членством в группе. К сожалению, get-localuser не дает членства. Итак, что-то вроде этого будет способом PowerShell, чтобы проверить, какие объекты пользователя принадлежат к локальным группам.
Get-Localgroup | % { "'n$($_.name)'n"; get-localgroupmember $_}
Затем проверьте, через какие группы входят другие пользовательские объекты, и добавьте в эту группу учетную запись KioskTest, используя следующую команду:
Add-LocalGroupMember -Group "ExampleGroup" -Member "KioskTest"
Ответ №1
Чтобы проверить, создан пользователь или нет, помогает следующая простая команда. Вы можете попробовать это.
-
В случае, если пользователь создан, вы получите ниже вывод Command- net user TestUser2 Output- Имя пользователя TestUser2
-
Когда пользователя нет Command- net user TestUser Output- Имя пользователя не найдено.
Ответ №2
В моем случае это была проблема членства в группе. Я создал некоторых пользователей с powershell new-localuser, но они не отображаются ни в одном графическом интерфейсе, и я не смог войти в систему. Пользователи были видны только в powershell с get-localuser и lusmgr. В настройках панели управления “учетные записи пользователей” и экрана входа они не отображаются.
Мне просто нужно было добавить новых пользователей в локальную группу пользователей. Как только это было сделано, новые пользователи были видны во всех настройках и доступны для входа в систему. Я не знал об этой локальной политике безопасности (локальная политика/назначение прав пользователя/локальный вход в систему), ограничивающей вход в систему “Гость, администраторы, пользователи, операторы резервного копирования”. Либо добавьте пользователей в одну из этих групп, либо добавьте их в локальную политику безопасности.
