 Обновлено:
Опубликовано:
Из соображений безопасности и удобства, по умолчанию, после установки Windows система скрывает некоторые объекты — системные и критически важные файлы и папки, а также данные, используемые редко. При необходимости получить доступ к данным объектам, можно настроить показ скрытых файлов и папок. Для этого существуют различные способы.
Графический интерфейс
Реестр Windows
Командная строка
Файловые менеджеры
Способ 1. Графический интерфейс
Шаг 1. Открыть параметры папок.
В Windows 7 и младше открываем проводник и нажимаем клавишу Alt. Появится верхнее меню — переходим в разделы Сервис — Свойства папки.
В Windows 8 и 10 открываем проводник и разворачиваем ленту настроек

Теперь переходим в раздел Вид и нажимаем по Параметры.

Шаг 2. Настроить отображение скрытых файлов и папок.
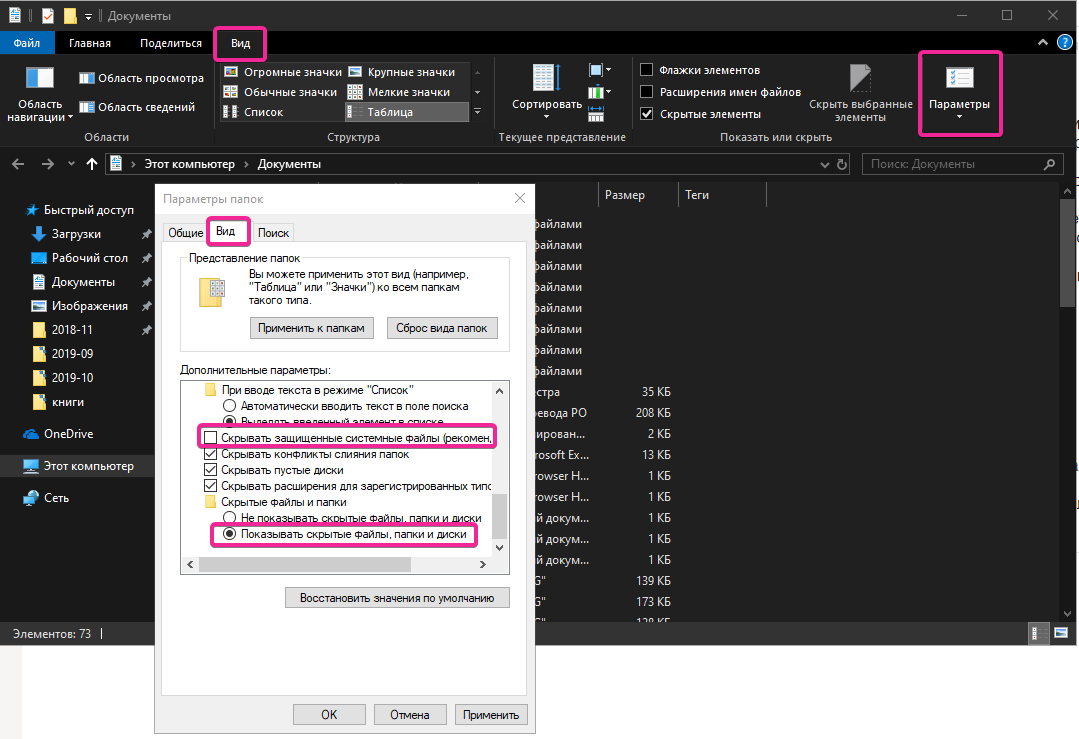
В открывшемся окне переходим на вкладку Вид, затем снимаем галочку Скрывать защищенные системные файлы и переключаем на Показывать скрытые файлы, папки и диски.

Нажимаем OK.
Способ 2. Реестр Windows
Настройка выполняется в ветке HKCU\Software\Microsoft\Windows\CurrentVersion\Explorer\Advanced. Необходимо создать или отредактировать ключ Hidden (тип REG_DWORD): значение 1 — показать скрытые файлы, 2 — скрыть.
В командной строке можно выполнить следующее.
Отобразить скрытые элементы:
reg add «HKCU\Software\Microsoft\Windows\CurrentVersion\Explorer\Advanced» /v Hidden /t REG_DWORD /d 1 /f
Скрыть:
reg add «HKCU\Software\Microsoft\Windows\CurrentVersion\Explorer\Advanced» /v Hidden /t REG_DWORD /d 2 /f
Способ 3. Командная строка
cmd
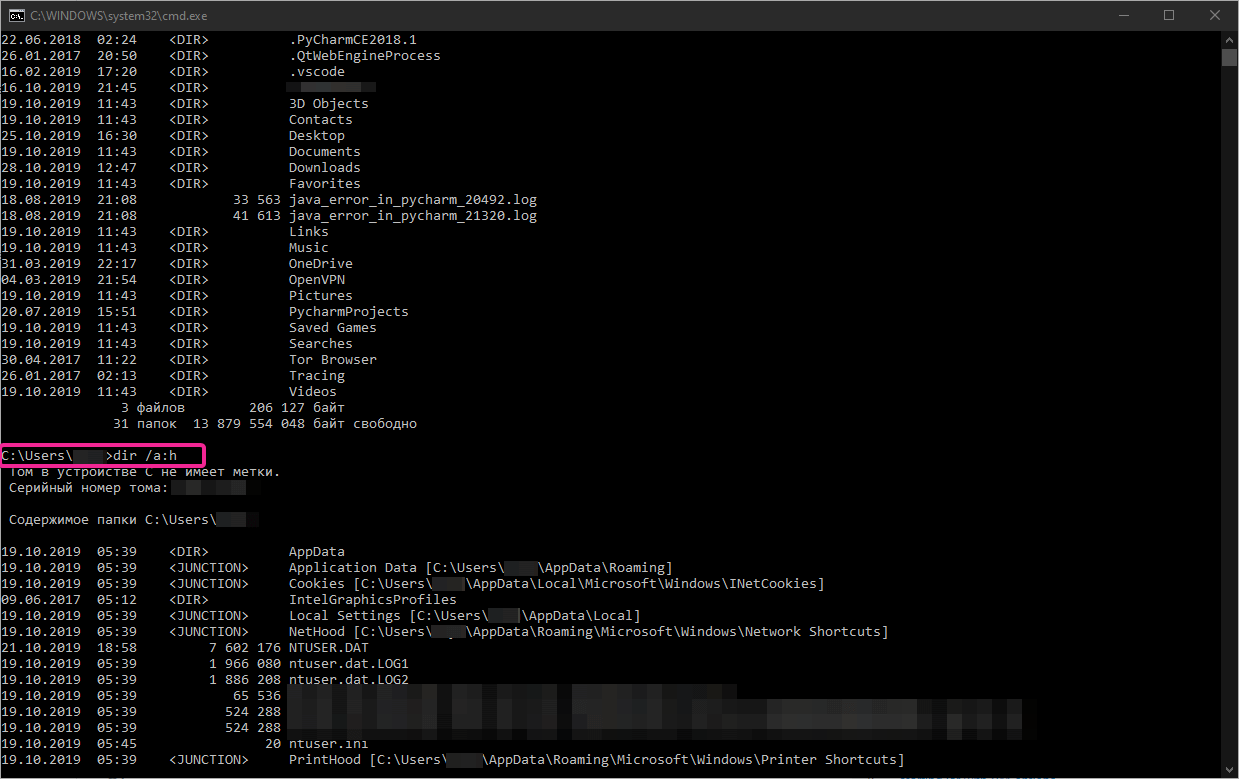
Команда dir показывает только не скрытые папки и файлы. Для отображения всех элементов вводим команду с ключом ah, например:
dir /ah c:\
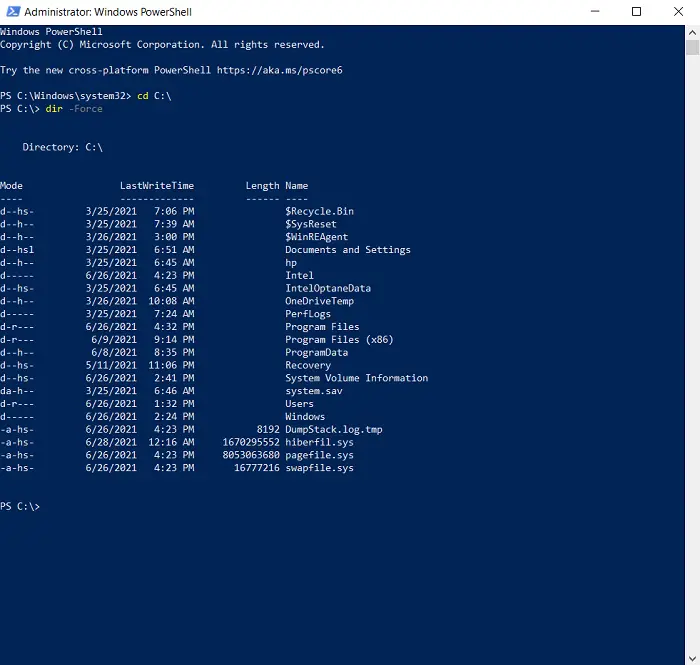
Powershell
Get-ChildItem -Force c:\
Способ 4. Файловые менеджеры
Также для просмотра скрытого содержимого можно использовать файловые менеджеры. Например, в Far Manager они отображаются по умолчанию, а в Total Commander необходимо зайти в Конфигурация — Настройка и убедиться, что стоит галочка в пункте Показать скрытые/системные файлы:

![]()
Была ли полезна вам эта инструкция?
Да Нет
In this tutorial, you can learn how to show hidden files and folders in Windows 10 with CMD and other 4 ways. Also check how to show hidden files in Windows 10 with File Explorer, Control Panel, Registry or Folder Options. MiniTool software also offers a top data recovery program to help you recover any deleted/lost file in Windows 10.
Windows hide some files and folders related to the OS by default, to avoid accidental deletion or altering from users which may cause the malfunction of system. However, if you are a tech fanatic, and want to make the hidden files visible, you can try the solutions below to show hidden files Windows 10.
You can open Command Prompt in Windows 10 to show hidden files with attrib command. Detailed steps are as follows.
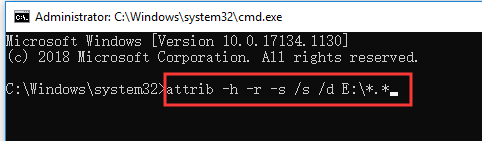
Step 1. Press Windows + R, type cmd, and press Ctrl + Shift + Enter to open elevated Command Prompt in your Windows 10 computer.
Step 2. Then you can type this command line: attrib -h -r -s /s /d E:\*.*, and hit Enter to unhide the files and folders in drive E. You should replace the drive letter with the exact drive letter of your computer. You can open This PC to check the drive letters of your computer hard drive partitions.
To help you better understand this attrib command, below is the explanation of each part of the command line.
- –h: It clears the Hidden file attribute to show hidden files.
- –r: It clears the Read-only file attribute to allow you modify the file after it shows.
- –s: It clears the System file attribute.
- /s: It applies attrib and any command-line options to matching files in the current directory and all of its subdirectories.
- /d: It applies attrib and any command-line options to directories.
You can also show hidden files in Windows 10 with File Explorer. Check how to do it.
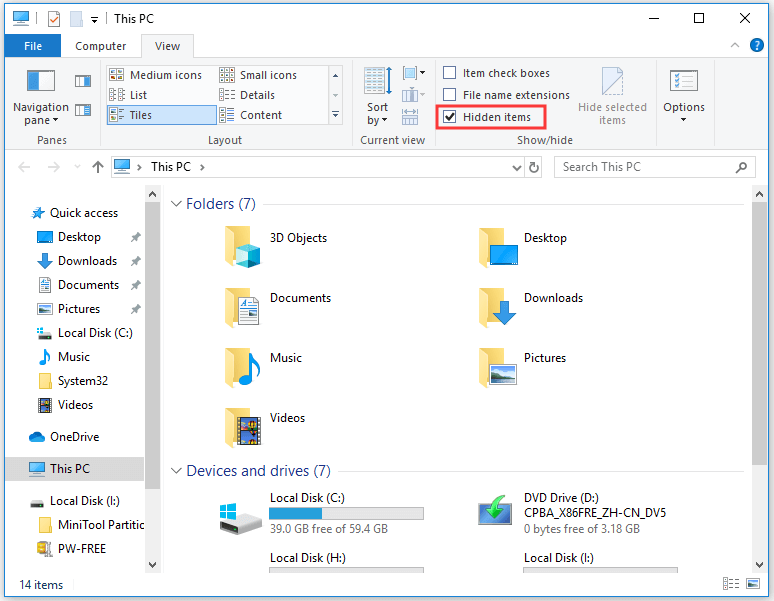
Step 1. You can click This PC to open File Explorer on Windows 10. You should expand the menu bar in File Explorer. If you don’t see the menu bar, you can click the ^ icon at the upper-right corner of File Explorer window.
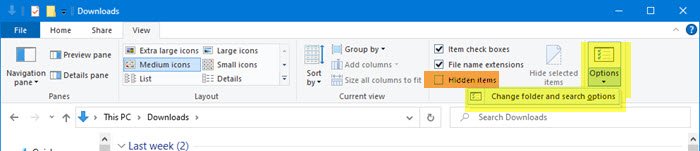
Step 2. Next you can click View tab, and tick Hidden items box in Show/Hide section. This will let you view the hidden files and folders in Windows 10.
If you need to modify more file viewing options, you can click Options.
Another way to show hidden files in Windows 10 is through Control Panel.
Step 1. To open Control Panel Windows 10, you can click the Control Panel desktop shortcut icon, or click Start, type control panel, and select Control Panel to open it.
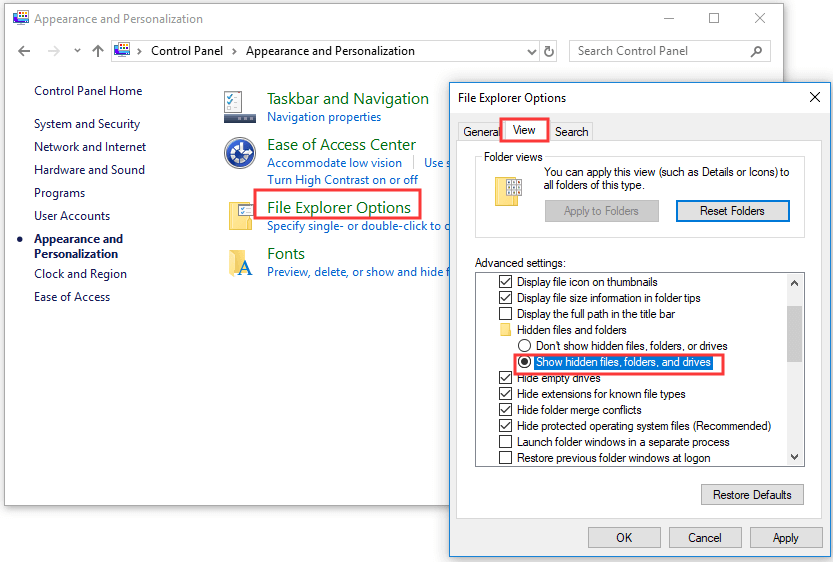
Step 2. Next you can click Appearance and Personalization, and click File Explorer Options.
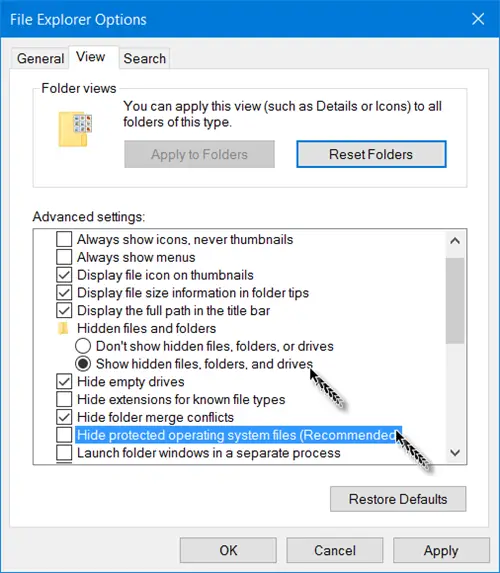
Step 3. Then you can click View tab in File Explorer Options window. Find Show hidden files, folders, and drives option under Advanced settings, tick this option and click Apply and OK to reveal hidden files and folders.
If you also want to see the hidden operating system files, you can uncheck the Hide protected operating system files (Recommended) option.
Another way to view the hidden files in Windows 10 is to use Windows Registry Editor.
Step 1. You can press Windows + R, type regedit, and hit Enter to open Registry Editor in Windows 10.
Step 2. Next click as follows to find the target registry key: HKEY_CURRENT_USER\Software\Microsoft\Windows\CurrentVersion\Explorer\Advanced, and click Advanced key.
Step 3. Then you can find the Hidden REG_DWORD in the right window, double-click it, and set its data value as 1 to show hidden files, folders, and drives in Windows 10. If you don’t want to show hidden files, folders, and drives in future, you can follow the same operation to change its data value to the default 2.
You can also find the ShowSuperHidden REG_DWORD, double click it and change its data value to 1 to show protected operating system files in Windows 10. The default data value is 2 which will not show protected OS files.

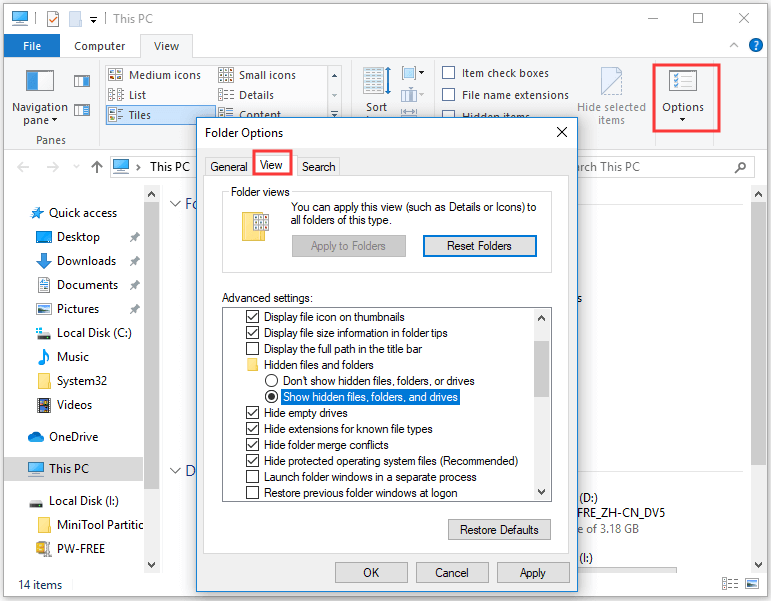
You can also follow the same instruction in Way 1 to open File Explorer and expand its menu bar, and click View -> Options.
Then you can click View tab in Folder Options window, and navigate Show hidden files, folders, and drives option under Advanced settings. Tick this option and click Apply and OK to show hidden files and folders in your Windows 10 computer.
>> Quick Video Guide:
Bottom Line
This post introduces 5 ways to provide a full Windows 10 show hidden files guide to you. You can try any of them to show hidden files and folders in Windows 10.
As for recovering deleted/lost files and data from your Windows 10 computer and other storage devices, you can try MiniTool Power Data Recovery, a 100% clean and free data recovery program.
MiniTool Power Data Recovery FreeClick to Download100%Clean & Safe
In this post, we will see how to show Hidden Files, Folders & Drives along with Protected operating system files in Windows 11/10/8/7, via File Explorer Options in the Control Panel or by using the Command Prompt and PowerShell.
On most days, you would not want to be bothered by the hidden Windows files on your computer. After all, the last thing that an average Windows user needs is some more data to deal with. On some rare instances though, or if you know what you’re getting yourself into, you may need access to these hidden files to make changes to Windows apps or system settings. These hidden files aren’t readily viewable when you open their parent folder(s) in the File Explorer. Ee will walk you through the steps needed to be taken to show hidden files and folders using the Explorer Options, Windows Command Prompt and the PowerShell, two of the strongest methods for the purpose.
Show Hidden Files & Folders in Windows 11/10 via Explorer Options
You will have to open the Control Panel and then select the File Explorer Options in Windows 11/10. File Explorer Options is referred to as Folder Options in Windows 8.1/7.
To show Hidden Files, Folders & Drives on your Windows 11/10 computer:
- Open File Explorer Options
- Click on the View tab
- Locate Hidden Files & Folders
- Select the Show Hidden Files, Folders and Drives option
- Click on Apply and Exit.
You can also open File Explorer Options in Windows 11 as follows:
1] Launch File Explorer on Windows 11.
2] Click on the three horizontal dots and select Option. This will open the Folder Options window.

3] In the Folder Options window, click on the View tab and select the radio button that says Show hidden files, folders, and drives.

4] Click Apply and then OK.
Alternative method via Explorer Menu bar
In Windows 11, you can open Explorer > View > Show > Select Hidden items.
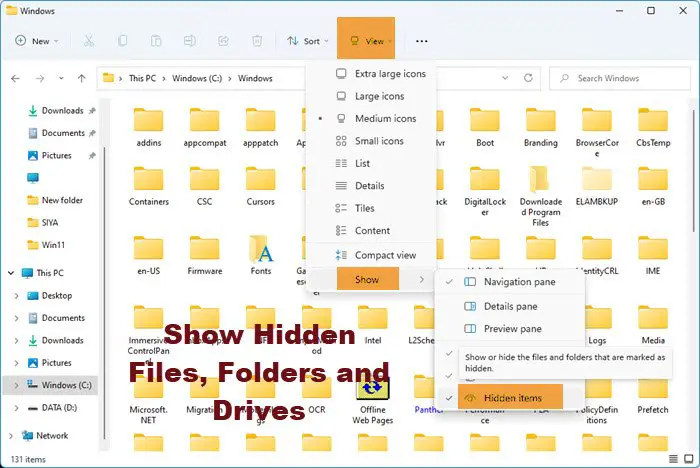
In Windows 10, open Explorer, select the View tab and toggle the Hidden items checkbox to short or hide files and folders.
For your information, you can also access the Change folder and search options box from here.
Unhide Protected operating system files
If you wish to unhide and show the Protected operating system files, you need to also uncheck the Hide protected operating system files (Recommended) setting in File Explorer Options, and click Apply.
Show hidden files using Command prompt
The process here is pretty simple. Here are the steps you have to follow:
Open the start command and search for Command Prompt. Select to run it as administrator.
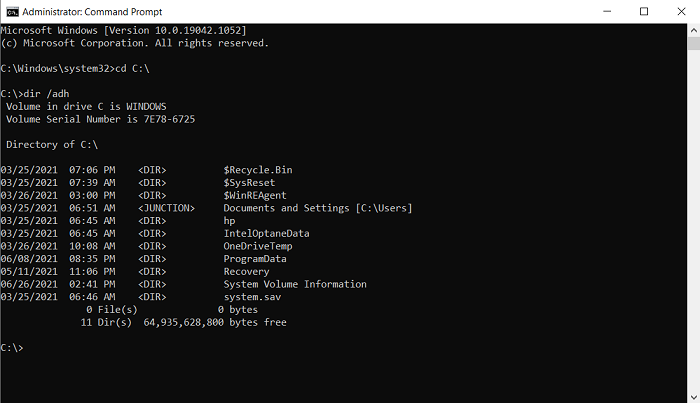
Make a note of the folder in which you want to look for hidden files. For the purposes of this article, we will be using the C:/ drive. Access your drive by using the change directory command cd. Our first command line will look something like
cd C:\
Now, type out the following command line which will show you all the hidden files in the location that you’ve chose
dir /adh
This will show to you all the hidden files, in this case, in the C:/ drive. There are some other keywords that you can use with the dir command if there is some specific information you are looking for. They’re all to be used in a similar manner:
- /a – this will show you only the hidden folders.
- /a:d – this will show you all the directories.
- /a:h – this will show only the hidden files.
- /adh – (The one we’ve used) Gives you all the above information combined.
Let’s now talk about PowerShell and how this process can be replicated there.
Show hidden files using PowerShell
- Open the Start Menu and search for PowerShell, run it as administrator. (You can do the same via the Power User Menu too.)
- The process here is quite similar. Access the location of your choice with the change directory keyword cd. It is used the same way as it was in the Command Prompt.
- Once you’re into the location, type the following command line which will display to you all the hidden files inside it.
dir -Force
- You can browse through the hidden files in a folder inside the drive’s root folder by adding that folder’s name to the cd command. Eg., cd C:\Program Files.
- Once you’re inside this particular folder, type/copy the following command and press enter:
Get-ChildItem -Filter *.* -Recurse -Force -ErrorAction SilentlyContinue | where { $_.Attributes -match “Hidden”}
There is a strong chance that the above command line may return a very high number of hidden files and folders, making it impossible for you to actually read through them.
In that case, you can copy the resultant output and have it saved in a text document by modifying the command line. Simply add a >log.txt to the end of the above Get-ChildItem command and all the data will be saved to a text file named log.txt.
TIP: There is another way! You can use attrib.exe to change File Attributes, and/or show the hidden files.
This post will show you how to make a File or Folder Hidden or Read Only.
If you wish to, you can also list all the hidden files & folders on your Windows computer.
BONUS TIP:
- If you find that the Show Hidden Files, Folders and Drives option is missing, then this registry tweak is sure to help you.
- Alternatively, you could use our freeware FixWin to fix this problem. You will find the fix under its Explorer section.
Перейти к содержанию
На чтение 3 мин Просмотров 457 Опубликовано
2 простых способа увидеть скрытые документы, фото и системные файлы в Виндоус 10.
Скрытыми могут быть не только чьи-то личные фото и видео, размещенные на общем компьютере.
Многие служебные папки и файлы в Windows 10 по умолчанию также скрыты от пользователей.
Это сделано для безопасности пользователя, так как удаление многих системных файлов может привести к фатальным ошибкам в работе операционной системы.
Мы рассмотрим 2 способа увидеть спрятанные файлы.
Отображение скрытых файлов и папок с помощью Проводника
Это наиболее простой способ найти скрытые файлы на Windows 10.
- Зайдите в систему от имени Администратора.
- Откройте Проводник (или зайдите в любую папку на компьютере).
- Перейдите на вкладку Вид в верхней панели.
- Выберите последний пункт Параметры – Изменение параметров папок и поиска.
- Перейдите во вкладку Вид в всплывшем окне.
- Прокрутите строки вниз до категории Скрытые папки и файлы.
- Поставьте галочку рядом с пунктом Показывать скрытые папки, файлы и диски.
- Поднявшись чуть выше уберите галочку с пункта Скрывать защищенные системные файлы (рекомендуется).
- Нажмите Применить.
Скрытые файлы и папки также можно увидеть в командной строке, выполнив следующие действия.
Отображение скрытых файлов и папок с помощью командной строки
Если по каким-либо причинам вам не удалось воспользоваться первым способом, попросим показать скрытые папки Панель администратора.
- Для этого нажмите сочетание клавиш Win+R в любой раскладке.
- В появившемся окне напишите cmd и нажмите Ok.
- Перед вами появится консоль Windows 10. Чтобы увидеть файлы в указанной в последней строке папке, наберите символы dir /a:h
- Если вы хотите увидеть скрытое содержимое другой папки, напишите cd и добавьте путь к папке. Например, cd Users\admin.
- Если вам нужен показ скрытых файлов и папок, напишите просто dir /a
После того, как вы найдете интересующий файл, скопируйте путь к нему, и вставьте адрес в строку поиска.
Так вы сможете войти в скрытую папку, не меняя параметров для всей системы.
Если вы так и не поняли, как показать скрытые файлы на Windows 10, пишите в нашу группу Телеграм.
Читайте далее: Как сменить пароль в Windows 10: инструкция.
Информация обновлена: 28 октября 2019 г.