Environment
C:\Users\Liu.D.H>ver

Microsoft Windows [Version 10.0.19041.264]

C:\Users\Liu.D.H>bcdedit

Windows Boot Manager
--------------------
identifier              {bootmgr}
device                  partition=\Device\HarddiskVolume1
description             Windows Boot Manager
locale                  en-US
inherit                 {globalsettings}
default                 {current}
resumeobject            {8c132511-806f-11e9-8860-f798d1b7a8f1}
displayorder            {current}
                        {89f269f4-cc9f-11e6-8727-64006a16df31}
                        {8c132516-806f-11e9-8860-f798d1b7a8f1}
toolsdisplayorder       {memdiag}
timeout                 5

Windows Boot Loader
-------------------
identifier              {current}
device                  partition=C:
path                    \WINDOWS\system32\winload.exe
description             Windows 10
locale                  en-US
inherit                 {bootloadersettings}
recoverysequence        {8c132514-806f-11e9-8860-f798d1b7a8f1}
displaymessageoverride  Recovery
recoveryenabled         Yes
allowedinmemorysettings 0x15000075
osdevice                partition=C:
systemroot              \WINDOWS
resumeobject            {8c132511-806f-11e9-8860-f798d1b7a8f1}
nx                      OptIn
bootmenupolicy          Legacy
hypervisorlaunchtype    Off

Windows Boot Loader
-------------------
identifier              {89f269f4-cc9f-11e6-8727-64006a16df31}
device                  partition=\Device\HarddiskVolume1
path                    \Windows\system32\winload.exe
description             Windows 7
locale                  zh-CN
inherit                 {bootloadersettings}
osdevice                partition=\Device\HarddiskVolume1
systemroot              \Windows
resumeobject            {89f269f3-cc9f-11e6-8727-64006a16df31}
nx                      OptIn
detecthal               Yes

Windows Boot Loader
-------------------
identifier              {8c132516-806f-11e9-8860-f798d1b7a8f1}
device                  partition=C:
path                    \WINDOWS\system32\winload.exe
description             Windows10 with Hyper-V
locale                  en-US
inherit                 {bootloadersettings}
recoverysequence        {8c132514-806f-11e9-8860-f798d1b7a8f1}
displaymessageoverride  Recovery
recoveryenabled         Yes
allowedinmemorysettings 0x15000075
osdevice                partition=C:
systemroot              \WINDOWS
resumeobject            {8c132511-806f-11e9-8860-f798d1b7a8f1}
nx                      OptIn
bootmenupolicy          Legacy
hypervisorlaunchtype    Auto

C:\Users\Liu.D.H>systeminfo

Host Name:                 DESKTOP-LDH
OS Name:                   Microsoft Windows 10 Education
OS Version:                10.0.19041 N/A Build 19041
OS Manufacturer:           Microsoft Corporation
OS Configuration:          Standalone Workstation
OS Build Type:             Multiprocessor Free
Registered Owner:          Windows User
Registered Organization:
Product ID:                00328-10000-00001-AA635
Original Install Date:     2020-05-11, 22:13:14
System Boot Time:          2020-06-08, 10:12:11
System Manufacturer:       Dell Inc.
System Model:              Vostro 3900
System Type:               x64-based PC
Processor(s):              1 Processor(s) Installed.
                           [01]: Intel64 Family 6 Model 60 Stepping 3 GenuineIntel ~3601 Mhz
BIOS Version:              Dell Inc. A10, 2015-07-30
Windows Directory:         C:\WINDOWS
System Directory:          C:\WINDOWS\system32
Boot Device:               \Device\HarddiskVolume1
System Locale:             zh-cn;Chinese (China)
Input Locale:              zh-cn;Chinese (China)
Time Zone:                 (UTC+08:00) Beijing, Chongqing, Hong Kong, Urumqi
Total Physical Memory:     16,301 MB
Available Physical Memory: 9,703 MB
Virtual Memory: Max Size:  33,709 MB
Virtual Memory: Available: 26,300 MB
Virtual Memory: In Use:    7,409 MB
Page File Location(s):     C:\pagefile.sys
Domain:                    WORKGROUP
Logon Server:              \\DESKTOP-LDH
Hotfix(s):                 6 Hotfix(s) Installed.
                           [01]: KB4552925
                           [02]: KB4534170
                           [03]: KB4537759
                           [04]: KB4545706
                           [05]: KB4557968
                           [06]: KB4556803
Network Card(s):           4 NIC(s) Installed.
                           [01]: TAP-Windows Adapter V9
                                 Connection Name: 以太网
                                 Status:          Media disconnected
                           [02]: Realtek PCIe GBE Family Controller
                                 Connection Name: Ethernet_Realtek
                                 DHCP Enabled:    Yes
                                 DHCP Server:     113.55.112.1
                                 IP address(es)
                                 [01]: 113.55.127.140
                                 [02]: fe80::3d0a:ecde:2178:d77c
                                 [03]: 2001:250:2800:cc09:6600:6aff:fe16:df31
                           [03]: Realtek RTL8188CU Wireless LAN 802.11n USB 2.0 Network Adapter
                                 Connection Name: Wi-Fi 2
                                 Status:          Media disconnected
                           [04]: Microsoft KM-TEST Loopback Adapter
                                 Connection Name: Npcap Loopback Adapter
                                 DHCP Enabled:    Yes
                                 DHCP Server:     255.255.255.255
                                 IP address(es)
                                 [01]: 169.254.104.11
                                 [02]: fe80::d8bf:11ab:7b05:680b
Hyper-V Requirements:      VM Monitor Mode Extensions: Yes
                           Virtualization Enabled In Firmware: Yes
                           Second Level Address Translation: Yes
                           Data Execution Prevention Available: Yes

C:\Users\Liu.D.H>
Steps to reproduce
Open Ubuntu 18.04 or 20.04.
Expected behavior
Works as expected.
Actual behavior
I can confirm that I have enabled
Virtual Machine PlatformandVT-x. But the errors when I started Ubuntu is confused. And for some reasons I do not want to enable Hyper-V features. From the doc (https://docs.microsoft.com/en-us/windows/wsl/), it is not a requirement for WSL2.
How did you get all the environment info of your machine?
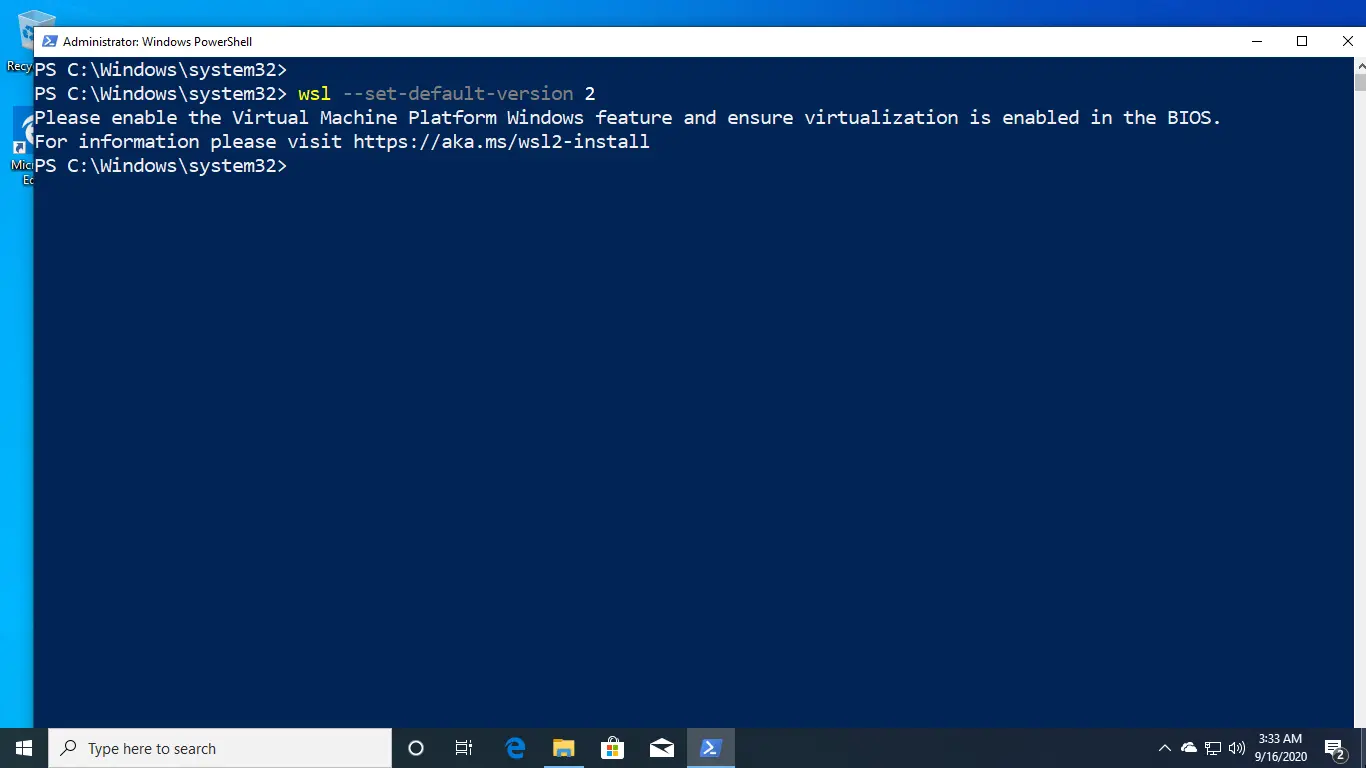
You need to enable the Virtual Machine Platform Windows feature to use WSL 2. If this is not done, then you will get the following error:
wsl --set-version kali-linux 2
Conversion in progress, this may take a few minutes...
For information on key differences with WSL 2 please visit https://aka.ms/wsl2
Please enable the Virtual Machine Platform Windows feature and ensure virtualization is enabled in the BIOS.
To enable WSL 2, Open the Windows Features window by navigating to Control Panel | Programs | Turn Windows feature on or off.

Ensure that the Virtual Machine Platform and Windows Subsystem for Linux features are selected.
After clicking on the OK button, Windows will enable WSL 2.
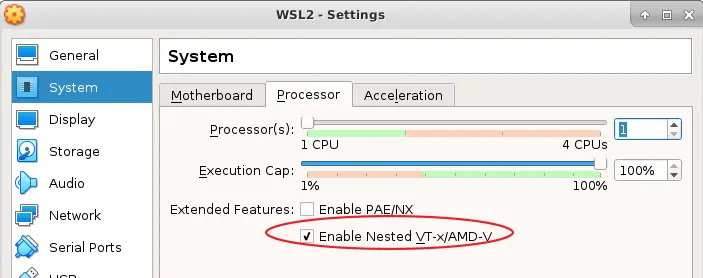
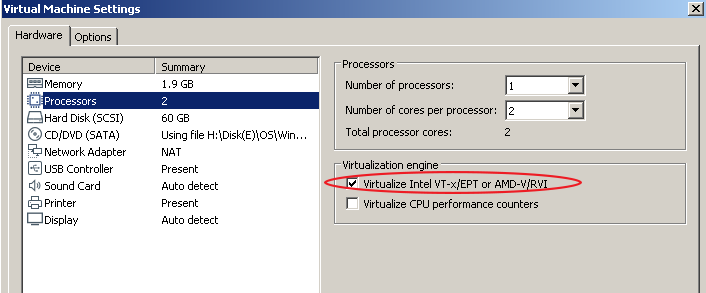
If you want to install WSL 2 on a Windows 10 virtual machine, the virtual machine should support nested virtualization.
With VirtualBox, right-click the VM and choose Settings. In the System section, under the Processor tab, check the box: Enable Nested VT-x/AMD-V.
On VMware Workstation, right-click the VM and choose Settings. In the Hardware section, under the Processor, make sure the Virtualize Intel VT-x/EPT or AMD-V/RVI checkbox is enabled.
You also have to make sure virtualization is enabled in the BIOS (Intel Virtualization Technology or SVM Mode in AMD).
Once upon a time i installed WSL 2 on Windows 10 correctly, run it and also worked with it. However, i was messing around with BlueStack, an android emulator which uses hyper-V. After configuring all the gears to make it run i discovered, that my WSL 2 didn’t work anymore. When starting it would prompt:
Please enable the Virtual Machine Platform Windows feature and ensure virtualization is enabled in the BIOS There are 2 generally known fixes and one additional fix which in the end worked for me:
1. Activate VM-Plattform
As the error message suggest you need to activate the VM-Plattform feature. To do so:
- Under Windows > search for Windows-Features
- Activate VM-Plattform and Windows-Subsystem for Linux
- Remember to restart your computer

2. Enable Virtualization in your BIOS setting
As the error message suggest, activate the appropriate settings in your BIOS. The setting to be made is different from mainboard to mainboard and can be read in various other articles, e.g. at simplilearn.com. I will skip a detailed explanation here, as there are plenty other posts describing this configuration.
3. Configure hypervisorlaunchtype
What eventually did the trick was the following line, executed on the windows shell (and should be done as a last resort). Remember to restart your computer afterwards. Admittingly i don’t fully understand, how the following configuration works, but hey it worked for me! (source)
bcdedit /set hypervisorlaunchtype auto
If this post helped you, or if you found another fix, I would be happy about a comment 🙂
One of the crucial features in modern computers is virtualization, which enables multiple operating systems to run on a single physical machine. This feature is useful for running applications that don’t work on a particular version of an operating system, or for testing different operating systems without buying multiple machines. However, to enable this feature on Windows, you need to activate the virtual machine platform Windows feature and ensure that virtualization is enabled in the BIOS. In this article, we will explain what virtualization is and why it’s important, how to enable the virtual machine platform windows feature, and how to enable virtualization in the BIOS.
What is Virtualization?
Virtualization is the technology that enables multiple operating systems, or virtual machines, to run on a single physical machine. Each virtual machine runs as if it were a separate computer, with its own virtual hardware, operating system, and applications. The virtualization software provides an abstraction layer between the virtual machine and the physical hardware, allowing multiple virtual machines to run simultaneously on the same physical machine without interfering with each other.
Why is Virtualization Important?
Virtualization has many benefits, including:
• Consolidation: Virtualization enables multiple virtual machines to run on a single physical machine, reducing the need for multiple physical machines.
• Flexibility: Virtual machines are portable and can be moved between physical machines, enabling rapid provisioning of new virtual machines or relocation of existing ones.
• Isolation: Each virtual machine is isolated from other virtual machines and from the host operating system, providing strong security and stability.
• Testing: Virtualization enables the creation of virtual test environments to test new operating systems, applications, or configurations without impacting the production environment.
How to Enable the Virtual Machine Platform Windows Feature
To enable the virtual machine platform Windows feature, follow these steps:
- Open the Control Panel.
- Click on Programs.
- Click on Turn Windows features on or off.
- In the Features window, scroll down and locate the Virtual Machine Platform feature.
- Check the box next to the Virtual Machine Platform feature.
- Click OK to save the changes.
- Restart your computer.
Example Code:
Alternatively, you can use PowerShell to enable the Virtual Machine Platform Windows feature. Here’s the code to enable it:
- Open PowerShell as an administrator.
- Type the following command:
Enable-WindowsOptionalFeature -Online -FeatureName Microsoft-Hyper-V-All
- Press Enter to run the command.
- Wait for the command to complete.
- Restart your computer.
How to Ensure Virtualization is Enabled in the BIOS
To enable virtualization in the BIOS, follow these steps:
- Reboot your computer.
- During startup, press the key to enter the BIOS settings.
- Look for the virtualization setting in the BIOS menu. The location of the settings varies depending on the manufacturer of the motherboard.
- Enable virtualization by selecting the option and pressing Enter to change the value.
- Save and exit the BIOS settings.
Example Code:
Here’s an example of activating virtualization in the BIOS.
- Restart your computer and press the key to enter the BIOS settings.
- Look for the virtualization settings in the BIOS menu.
- Enable virtualization by selecting the option and pressing Enter to change the value.
- Save and exit the BIOS settings.
Conclusion
Virtualization is an essential technology that enables multiple virtual machines to run on a single physical machine, providing many benefits such as consolidation, flexibility, isolation, and testing. To enable virtualization on Windows, you need to activate the virtual machine platform Windows feature and ensure that virtualization is enabled in the BIOS. By following the steps in this article and using the example code provided, you can quickly enable virtualization on your Windows computer and start running multiple virtual machines.
I’d be happy to provide additional information on the previous topics.
Let’s start with virtualization. In addition to the benefits already mentioned, virtualization also enables better resource utilization of the underlying hardware, as multiple virtual machines can efficiently share the same physical resources, such as CPU, memory, and storage. It also allows for easy backup, restoration, and migration of virtual machines, as they can be saved as a file and moved to a different physical machine or backed up to a cloud-based storage service.
Virtualization is commonly used in enterprise environments, including data centers and cloud computing, where it forms the basis of Infrastructure as a Service (IaaS) and Platform as a Service (PaaS) offerings. It’s also widely used in testing and development environments, as virtual machines can quickly be created, configured, and destroyed, saving time and resources.
Moving on to the process of enabling the virtual machine platform Windows feature and ensuring virtualization is enabled in the BIOS, it’s important to note that not all computers support virtualization. Therefore, you should check if your computer’s CPU provides support for virtualization before proceeding with these steps.
To check for CPU virtualization support, you can use a tool such as CPU-Z or Speccy, which will provide detailed information about your computer’s hardware. Most modern CPUs, such as Intel Core i5 and i7, and AMD Ryzen, support virtualization technology, but older CPUs or lower-end models may not. In the event that your CPU does not support virtualization, you will not be able to enable the virtual machine platform Windows feature or run virtual machines.
If your CPU does support virtualization, you should have no problem following the steps outlined in the previous section to enable the virtual machine platform Windows feature and ensure virtualization is enabled in the BIOS. However, it’s important to be careful when making changes to the BIOS settings, as incorrect configurations can cause problems or even damage to your computer. Always proceed with caution, consult the user manual or online documentation, and make a backup of important data before making changes.
In summary, virtualization is a powerful technology that enables multiple virtual machines to run on a single physical machine, providing numerous benefits in terms of resource utilization, flexibility, isolation, and testing. To take advantage of virtualization on Windows, you need to enable the virtual machine platform Windows feature and ensure virtualization is enabled in the BIOS, provided your computer’s CPU supports it. Remember to exercise caution when making changes to the BIOS settings and always consult documentation or seek professional help when in doubt.
Popular questions
-
What is virtualization, and how does it work?
A. Virtualization is a method of running multiple operating systems on a single physical machine. It works by creating virtual machines that run independently of the host operating system, with each virtual machine having its own virtual hardware, operating system, and applications. -
Why is virtualization important?
A. Virtualization has many benefits, including reducing the need for multiple physical machines, enabling flexibility and portability of virtual machines, providing strong security and isolation, and enabling testing of new operating systems or configurations. -
Can all computers support virtualization?
A. No, not all computers support virtualization. You should check if your computer’s CPU provides support for virtualization before proceeding with enabling the virtual machine platform Windows feature and ensuring virtualization is enabled in the BIOS. -
What are the steps to enable the virtual machine platform Windows feature?
A. The steps are: Open the Control Panel, click on Programs, click on Turn Windows features on or off, locate the Virtual Machine Platform feature, check the box next to the feature, click OK to save the changes, and restart your computer. -
Is there an alternative way to enable the Virtual Machine Platform Windows feature?
A. Yes, there is an alternative way to enable the Virtual Machine Platform Windows feature using PowerShell. The code to enable it is «Enable-WindowsOptionalFeature -Online -FeatureName Microsoft-Hyper-V-All».
Tag
Virtualization
«Please enable the Virtual Machine Platform Windows feature and ensure virtualization is enabled in the BIOS.»
WSL2
Hi,
I’m trying to install WSL 2 (in order to be able to use docker). I think I have followed all the steps described here but it’s not working. When I run
wsl --set-version Ubuntu 2
or
wsl --set-default-version 2
I get this message:
Please enable the Virtual Machine Platform Windows feature and ensure virtualization is enabled in the BIOS.
I’ve done the previous steps, including running these commands in an elevated Powershell:
dism.exe /online /enable-feature /featurename:Microsoft-Windows-Subsystem-Linux /all /norestart
dism.exe /online /enable-feature /featurename:VirtualMachinePlatform /all /norestart
Edit: After running these commands my computer refused to boot. Startup repair fixed it but I believe it in doing so it has rolled back the effects of these commands.
I have confirmed I have virtualisation enabled (I checked the performance tab of the task manager and it says Virtualization: Enabled)
I am running Microsoft Windows [Version 10.0.19536.1000].
Googling the problem, it turns out someone has posted on github with a seemingly identical issue. Unfortunately, he last posted 16 days ago that he did all the troubleshooting steps without success and no one has replied anything since.
Any help or advice would be greatly appreciated. I’m particularly interested in your opinion on whether i should persist in fixing this issue or attempt to run docker with WSL 1.
EDIT: Seems to be working now after I updated to the just-released Windows build 19551. I converted from WSL1 to WSL2 with no issues using the normal procedure.
Archived post. New comments cannot be posted and votes cannot be cast.