В этой статье я расскажу о том, что такое планировщик заданий в Windows 10 и как с ним работать.
Планировщик заданий — это оснастка MMC, позволяющая назначать автоматически выполняемые задания, запуск которых производится в определенное время или при возникновении определенных событий.
Планировщик заданий содержит библиотеку всех назначенных заданий, обеспечивая возможность быстрого просмотра и удобного управления заданиями. Из библиотеки можно запустить, отключить, изменить и удалить задание.
Для запуска планировщика заданий нужно проверить, включена ли соответствующая служба. В поисковой сроке Windows 10 наберите слово «Службы».
Если служба остановлена, запустите ее (щелчок правой кнопкой мыши -> запустить).
Для автоматического запуска службы нужно вызвать контекстное меню, кликнув правой кнопкой мыши на данную службу и выбрать Свойства и выбрать тип запуска – Автоматически. После этого служба планировщика будет запускаться при загрузке системы, и все задания будут выполняться по расписанию.
Самый простой способ открыть планировщик заданий
Для того, что бы открыть сам планировщик заданий, нужно щелкнуть правой кнопкой мыши по ярлыку «Этот компьютер», выбрать пункт «Управление».
В меню справа будет планировщик заданий.
Открыть планировщик с помощью поиска
Так же можно начать вводить фразу «Планировщик заданий» в поисковую строку, после чего выбрать планировщик.
Запуск с помощью панели управления
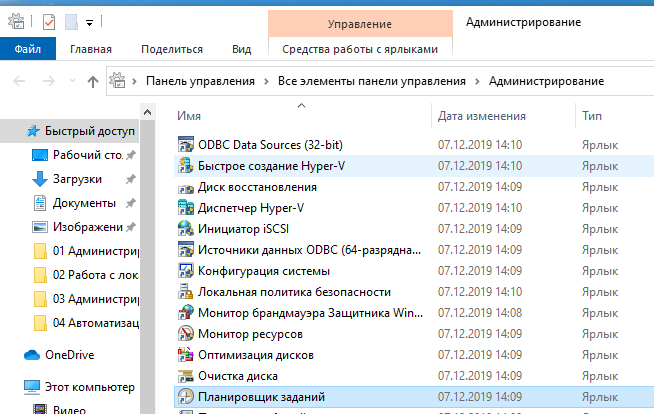
Зайдите в Панель управления -> Администрирование -> Планировщик заданий.
Как создать задачу?
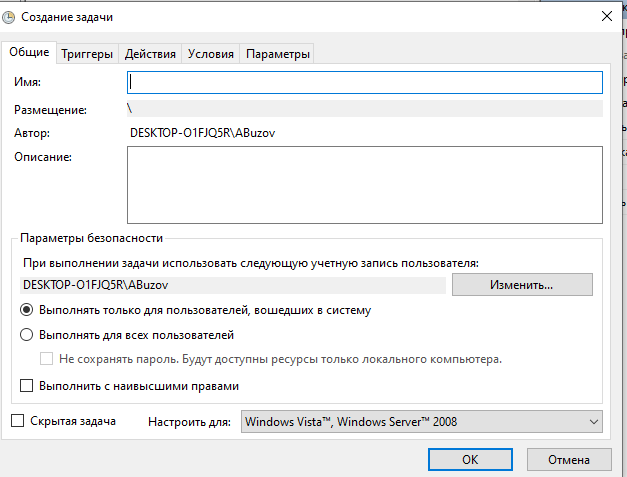
Для того, что бы создать новое задание нужно выбрать пункт «Создать задачу…» в правом окне, запуститься мастер задач.
Введите имя и описание задачи на вкладке «Общие».
На вкладке «Действие» нажмите кнопку «Создать».
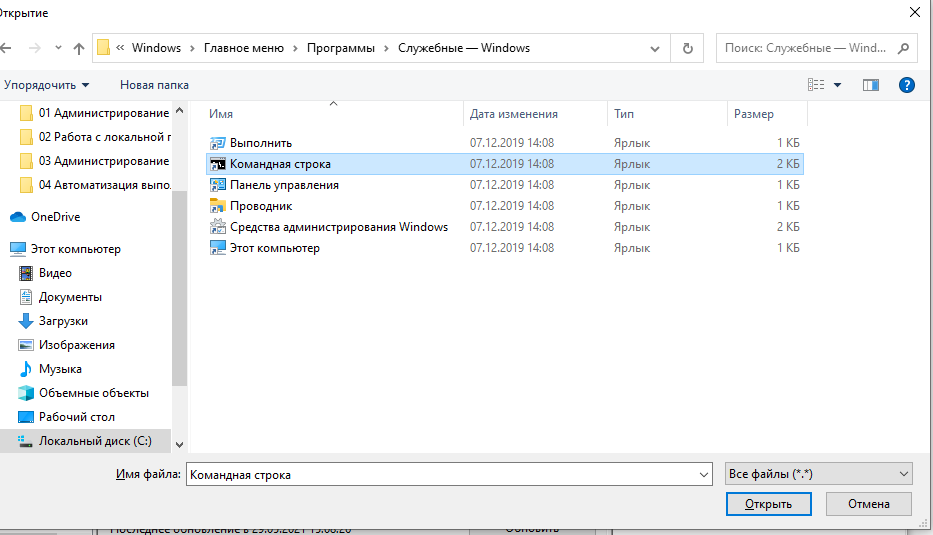
Выберите командную строку.
C:\Windows\system32\cmd.exe
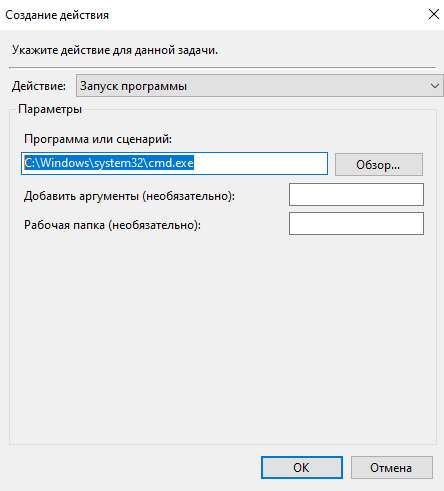
Нажмите кнопку «ОК».
После выбора программы настройте расписание на вкладке «Триггеры», с помощью кнопки «Создать».
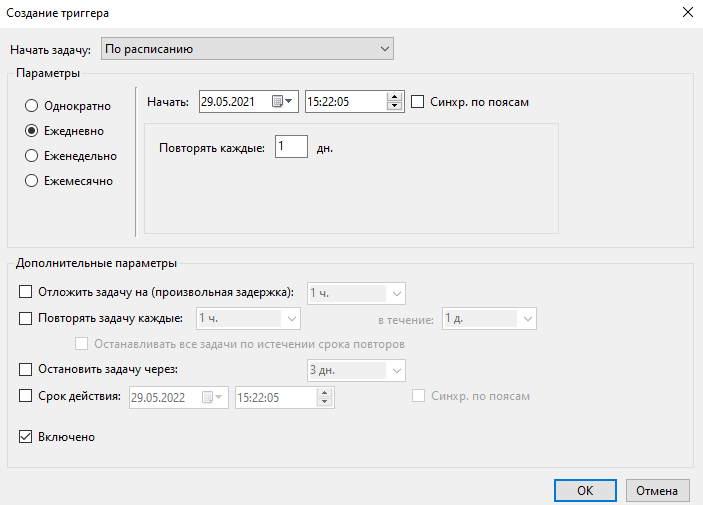
В Триггерах можно задать такие параметры расписания как:
- Промежуток времени.
- Периодичность:
- Ежедневно. Задание будет запускаться ежедневно, либо только по рабочим дням или через несколько дней в указанное время.
- Еженедельно. Указывается, каждую ли неделю нужно запускать задание и выбирать дни недели, по которым задание будет запущено в определенное время.
- Ежемесячно. В какие месяцы года надо запускать задание и выбирать по каким числам месяца, либо по каким дням месяца в определенное время будет запущено задание.
- Однократно. Можно выбрать дату и время запуска задания. Больше это задание выполняться не будет.
- Дополнительные параметры (параметры задержки и остановки задачи).
Помимо этого запуск задач возможен:
- При входе в систему.
- При запуске компьютера.
- При простое компьютера.
- При событии (простом или настраиваемом).
- При создании или изменении задачи.
- При подключении к пользовательскому сеансу.
- При отключении от пользовательского сеанса.
- При блокировании рабочей станции.
- При разблокировании рабочей станции.
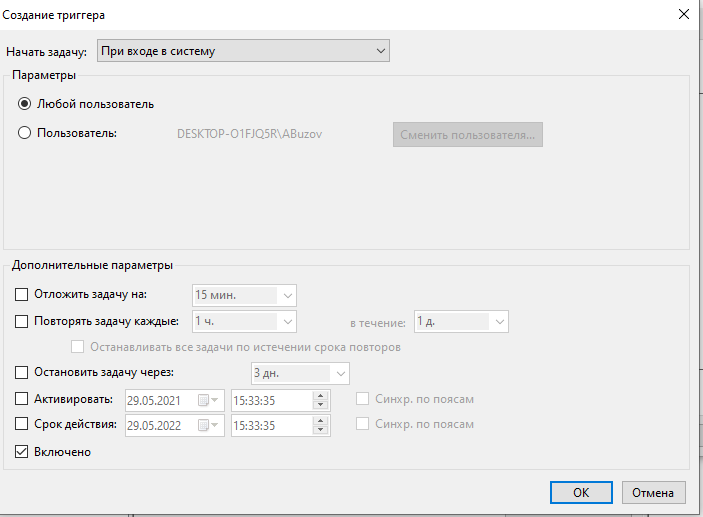
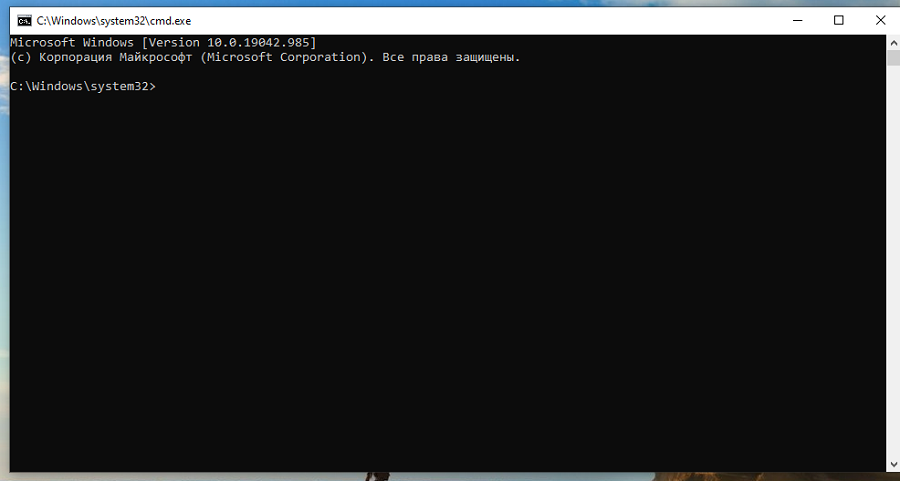
Выберем «При входе в систему» что бы командная строка запускалась при входе в Windows.
Нажмите «ОК» и «Применить» для сохранения задачи. Перезагрузите компьютер для того, что бы проверить работоспособность задачи.
Тренировка: добавляем в планировщик дефрагментацию диска
Для добавления в планировщик заданий дефрагментации диска необходимо:
- Открыть планировщик задач.
- Создать задачу.
- Ввести название и описание.
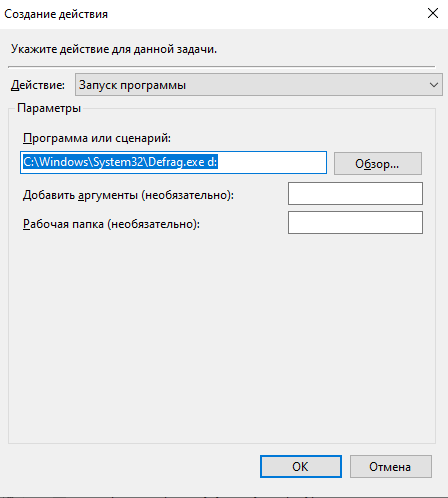
- На вкладке «Действия» -> «Создать» -> «Обзор» ->
C:\Windows\System32\Defrag.exe d:-> «ОК». Примечание: d: — буква диска который нужно дефрагментировать. - Создать расписание запуска на вкладке «Триггеры».
- Нажать «ОК» два раза.
Планировщик заданий в Windows 10 в целом изучен. Если у вас появились вопросы, задавайте их в комментариях.

Анатолий Бузов / об авторе
Обучаю HTML, CSS, PHP. Создаю и продвигаю сайты, скрипты и программы. Занимаюсь информационной безопасностью. Рассмотрю различные виды сотрудничества.
- 23.08.2020
- 38 769
- 11
- 14
- 13
- 1
- Содержание статьи
- Введение
- Создание задачи
- Дополнительные настройки
- Примеры настройки Планировщика
- Ежедневный запуск задачи
- Запуск задачи через день
- Отложенный ежедневный запуск задачи
- Ежедневный запуск задачи до определенной даты с последующим удалением задачи из Планировщика
- Запуск задачи в разные дни недели в разное время
- Ежеминутный запуск задачи в рабочее время в рабочие дни
- Ежемесячный запуск задачи
- Тестовый запуск задачи
- Управление заданиями Планировщика задач по сети
- Комментарии к статье ( 11 шт )
- Добавить комментарий
Введение
Эта статья рассказывает о возможностях стандартного Планировщика Windows.
На примерах показано как запланировать запуск той или иной программы в определенное время. Рассказано о том, как правильно составить расписание запуска программы в определенные дни, в определенное время.
Планировщик будет незаменимым и удобным инструментом если необходимо запускать какие-то приложения, которые выполняют рутинные операции и не требуют присутствия пользователя. Это могут быть операции резервного копирования, обновления данных, дефрагментация и т.д.
На примере будет показано создание задания со сложным расписанием запуска. Статья содержит массу скриншотов с подробными описаниями.
Создание задачи
Первое, на что следует обратить внимание еще до создания задач — запущена ли служба «Планировщик заданий». Эта служба могла быть отключена при настройке системных служб для освобождения памяти в то время, когда использование Планировщика задач не было нужно. Теперь, если запланированные задания будут выполняться регулярно, то этот сервис надо переключить в автоматический режим запуска.
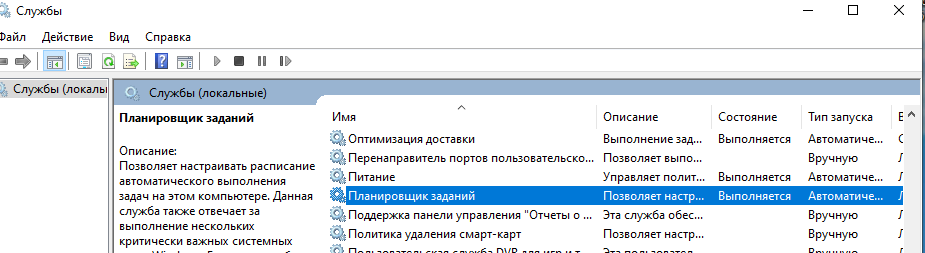
Чтобы убедиться, что сервис запущен, зажмите поочередно клавиши Win + R, и в открывшемся окошке «Выполнить», нужно набрать команду services.msc и нажать кнопку «ОК». Откроется окно, показанное на рисунке 1.
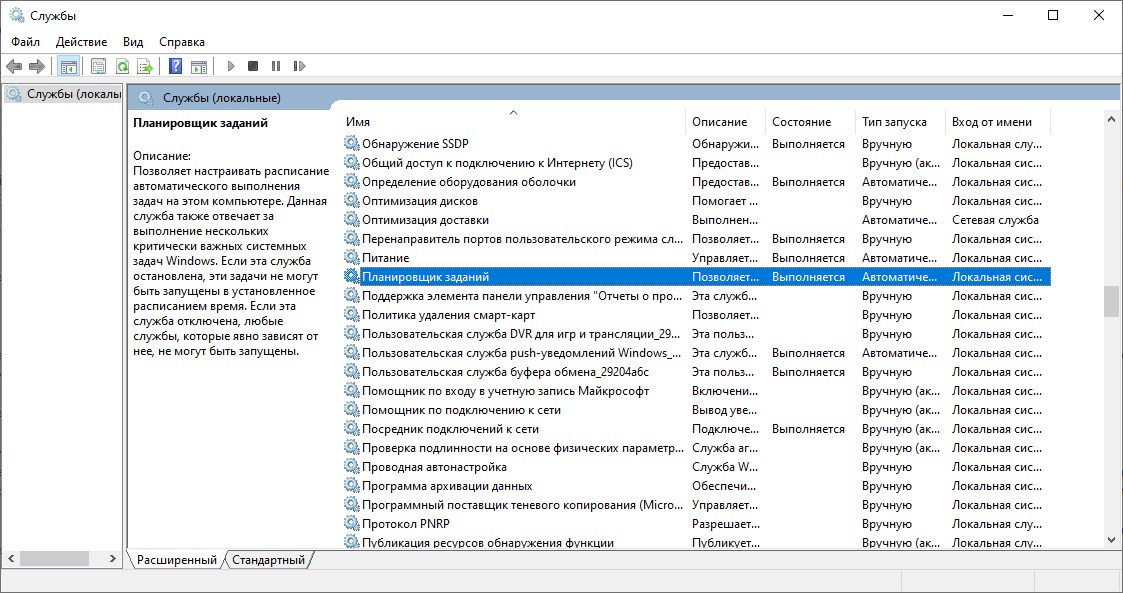
Рисунок 1.
Найдите службу «Планировщик заданий» и убедитесь, что в столбце «Состояние» у нее «Выполняется» («Работает» в старых версиях Windows), а в столбце «Тип запуска» — «Автоматически». Если это не так, то дважды щелкните по имени службы и в открывшемся окне скорректируйте значения на те, которые указаны выше (для этого нужно иметь привилегии администратора, т. е. Ваша учетная запись должна быть из группы Администраторы).
После того, как служба запущена и тип ее запуска скорректирован на автоматический, служба будет стартовать при загрузке системы и задания буду выполняться в соответствии с расписанием.
Теперь создадим задачу.
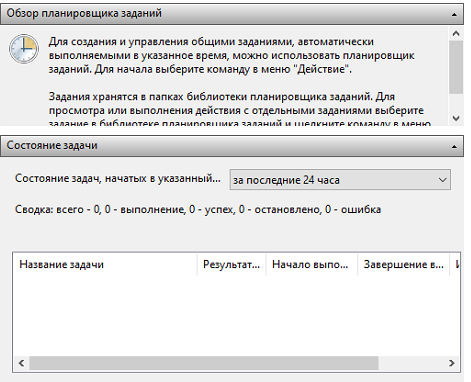
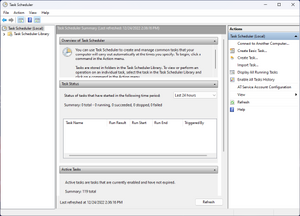
Для этого, опять поочередно зажмем клавиши Win + R, и введем команду taskschd.msc, после чего нажмем «ОК». Откроется окно, показанное на рисунке 2.
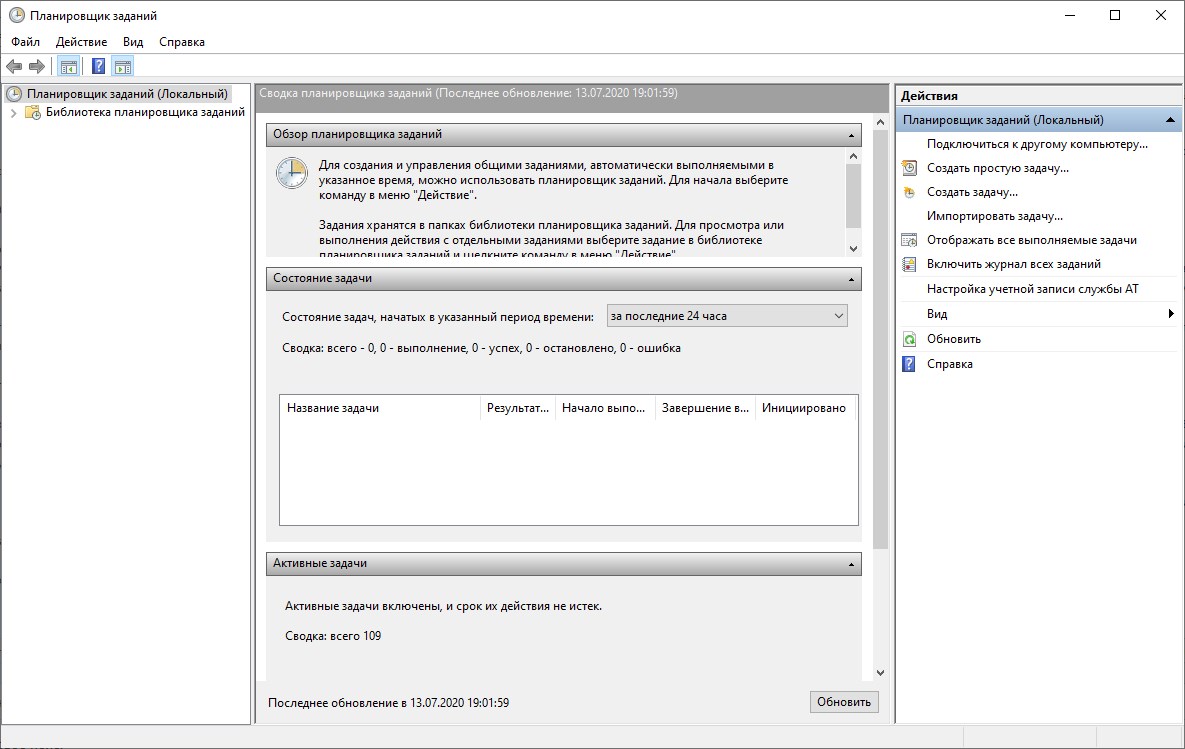
Рисунок 2.
В правой панели данного окна нажмем на «Создать задачу…». Откроется окно, показанное на рисунке 3.
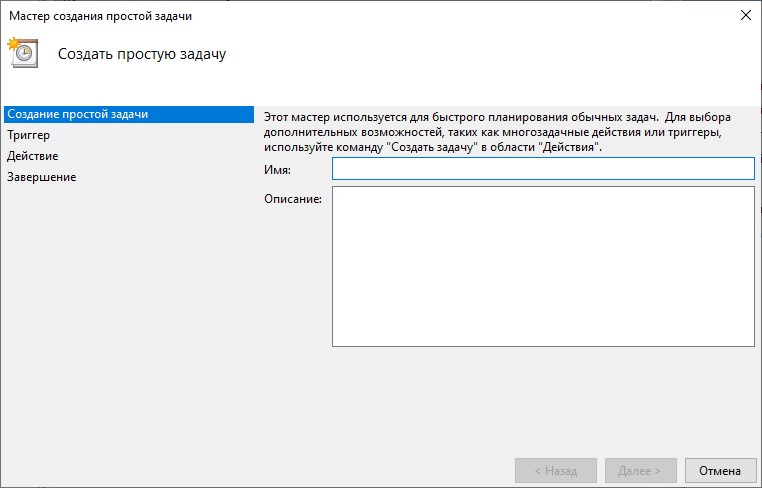
Рисунок 3.
В поле «Имя» нужно указать название этого задания, которое будет отображаться в окне Планировщика. Название может быть любым. Присвойте заданию такое имя, чтобы потом, при открытии Планировщика, можно было сразу вспомнить, что делает это задание. В данном примере я назвал задание «Тестирование Планировщика». После этого, нажимаем «Далее». Откроется окно, показанное на рисунке 4.
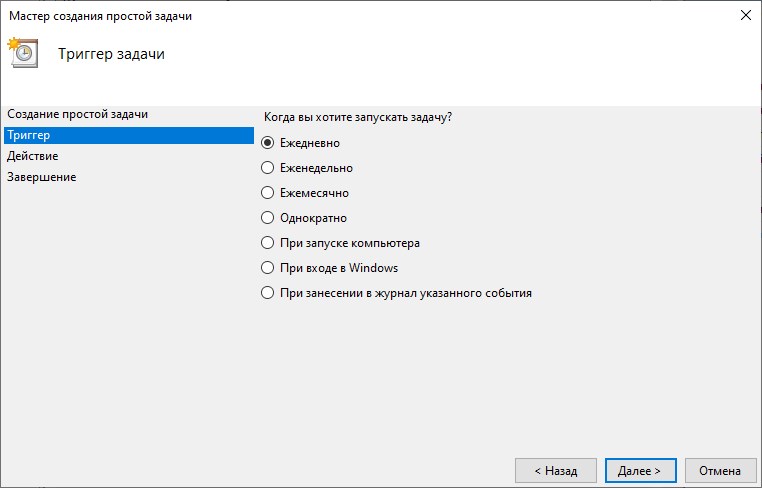
Рисунок 4.
Здесь нужно выбрать период запуска этого задания. Возможны следующие варианты:
- Ежедневно. Задание будет запускаться ежедневно, либо только по рабочим дням, либо через несколько дней в указанное время. Все эти параметры можно будет выбрать в следующем окне, о чем пойдет речь ниже.
- Еженедельно. В следующем окне можно будет указать каждую ли неделю нужно запускать задание и выбрать дни недели, по которым задание будет запущено в определенное время.
- Ежемесячно. Далее можно будет указать в какие месяцы года надо запускать задание и выбрать по каким числам месяца или по каким дням месяца в определенное время задание будет запущено.
- Однократно. В следующем окне мастера можно будет выбрать дату и время запуска задания. Больше это задание выполняться не будет.
- При загрузке компьютера. Следующего окна при выборе этого варианта нет, что логично, т.к. при таком типе запуска задание будет выполняться каждый раз при загрузке компьютера. Данный тип запуска не требует входа пользователя, задание будет запущено от имени того пользователя, которое будет нужно указать в следующем окне.
- При входе в Windows. Этот тип запуска похож на предыдущий с тем отличием, что задание будет выполнено только когда пользователь войдет в Windows, т.е. введет свои логин и пароль.
Теперь разберем эти типы запуска заданий более подробно. После нажатия кнопки «Далее» будет выведено окно, в котором нужно указать дополнительные параметры расписания для запуска задачи. Исключение — два последних типа запуска, когда задание исполняется при загрузке компьютера или при входе пользователя. Итак, введите название задачи и выберите один из типов запуска, затем нажмите кнопку Далее. В зависимости от того, какой тип запуска был выбран, будут предложены те или иные настройки расписания запуска задачи.
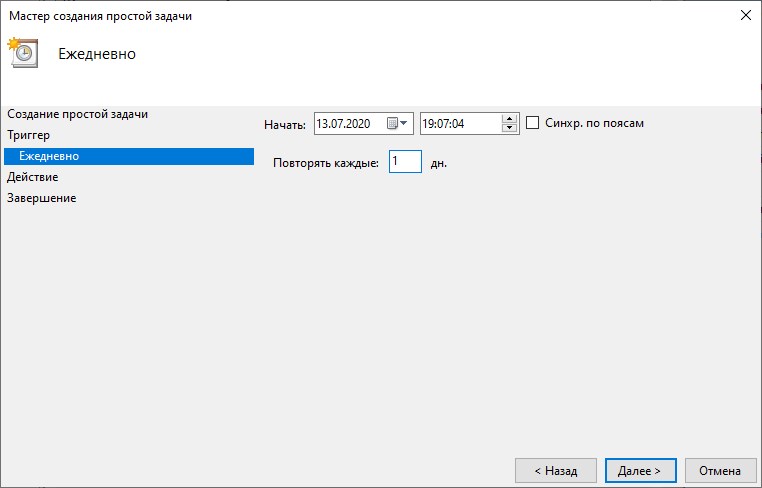
Рисунок 5.
Ежедневно
При ежедневном типе запуска есть возможность выбора запускать ли задание ежедневно, либо запускать задание с периодичностью, например, один раз в три дня. В этом же окне нужно выбрать время запуска задания. Поле «Начать» позволит отложить первый запуск задания до определенной даты, т.е. если сегодня первое число месяца, а «Начать» установлена на 10-е, то задача начнет выполняться с десятого числа, не смотря на то, что ее запуск запланирован как ежедневный.
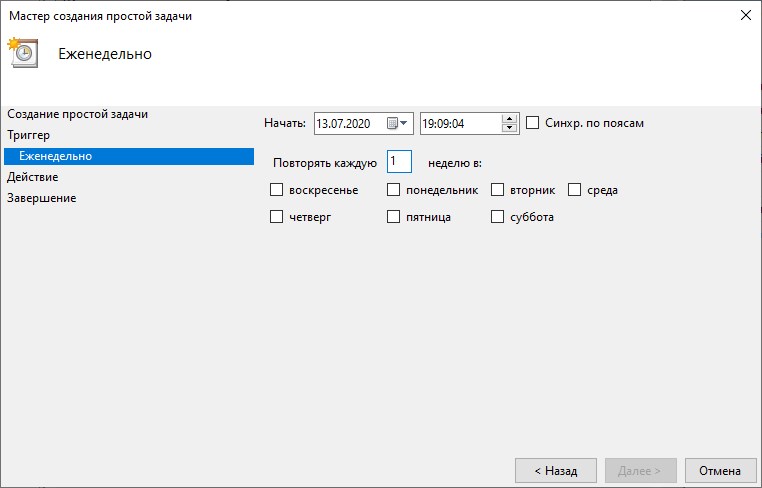
Рисунок 6.
Еженедельно
При еженедельном типе запуска есть возможность запускать задачу по определенным дням недели, отметив галками соответствующие дни недели в окне, показанном на рисунке 7. Можно указать, что задание должно выполняться через неделю, т.е., например, первую неделю в понедельник, среду и пятницу, вторую неделю задание не выполняется, в третью выполняется в понедельник, среду, пятницу, четвертую не выполняется и т.д. Также, нужно указать время, в которое задание будет выполняться в указанные дни недели.
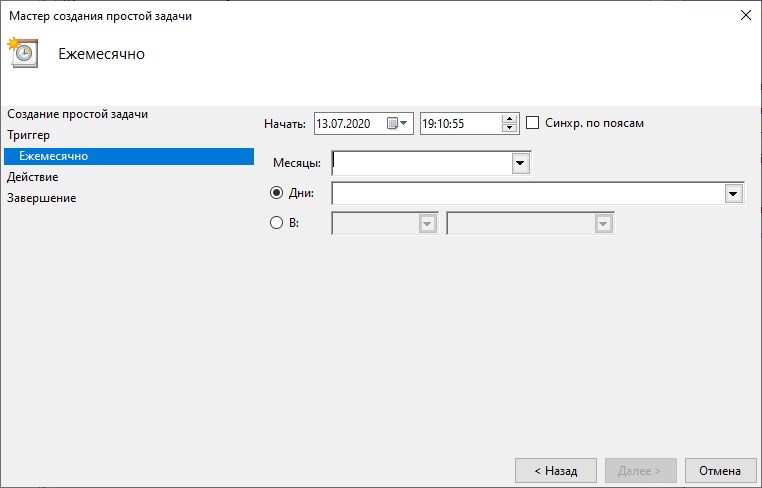
Рисунок 7.
Ежемесячно
При ежемесячном типе запуска задания необходимо отметить месяца, по которым будет запускаться задание и указать число, когда задание будет запущено. Обратите внимание на то, что последнее число месяца может быть 28-е, 29-е, 30-е или 31-е, поэтому, если задание необходимо выполнить в конце месяца, то его запуск лучше запланировать на первое число следующего месяца в 00:01. Если есть необходимость не указывать конкретное число для запуска задания, а запускать его только, например, по третьим пятницам указанных месяцев, то можно переключить соответствующий переключатель и выбрать из полей со списками требуемые значения.

Рисунок 8.
Однократно
При выборе однократного выполнения задания требуется указать только дату и время его запуска. Задание будет запущено в указанное время и после этого его запуск больше производится не будет. Задание из Планировщика не будет удалено, поэтому его можно будет использовать в дальнейшем, исправив дату и время запуска. Данный тип запуска задания хорошо подходит для непериодического выполнения заданий во время отсутствия пользователя за компьютером.
При загрузке компьютера
Как уже говорилось выше, при таком типе запуска задание будет выполняться при каждой загрузке компьютера, до логина пользователя.
При входе в Windows
Такое задание будет выполняться при логоне пользователя.
Выберите наиболее подходящее под требования к периодичности запуска расписание, даже если оно не полностью соответствует необходимому. Например, если задачу необходимо выполнять по рабочим дням в 21:00, а по выходным — в 19:00, то на этом этапе создания задачи следует выбрать еженедельный запуск задачи, а после ее создания скорректировать расписание нужным образом. Пример такой настройки показан на рисунке 10.
Выберите наиболее подходящее под требования к периодичности запуска расписание, даже если оно не полностью соответствует необходимому. Например, если задачу необходимо выполнять по рабочим дням в 21:00, а по выходным — в 19:00, то на этом этапе создания задачи следует выбрать еженедельный запуск задачи, а после ее создания скорректировать расписание нужным образом.
После того, как начальное расписание задано нажмите кнопку Далее. Пример открывшегося окна показан на рисунке 9.
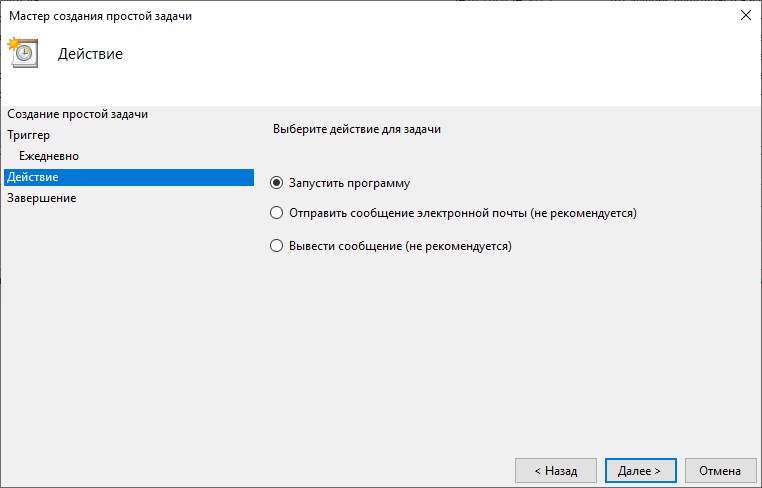
Рисунок 9.
В данном окне нужно выбрать действие, которое будет выполнятся данной задачей. На выбор доступно три пункта:
- Запустить программу — будет выполнен указанный файл. Ограничений на формат файла нет, это может быть как исполняемый файл, так и какой-нибудь пакетный (bat, cmd и т. д.), или вообще любой другой.
- Отправить сообщение электронной почты — в Windows 10 не получится создать задачу с таким действием.
- Вывести сообщение — в Windows 10 не получится создать задачу с таким действием.
Выбрав действие «Запустить программу», и нажав Далее, увидим показанное на рисунке 10 окно.
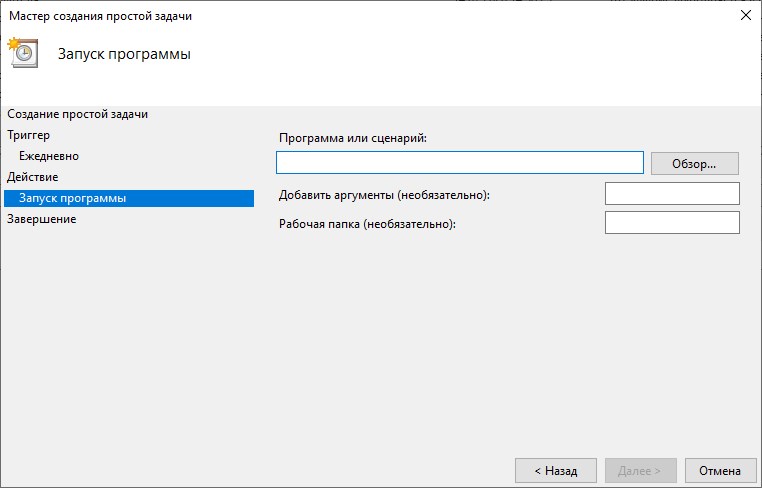
Рисунок 10.
В этом окне надо выбрать программу, которая будет запускаться Планировщиком, её надо найти при помощи кнопки Обзор. Для примера я создал на диске С папку Scheduler и поместил в нее пакетный файл test.bat, в котором находится последовательность команд, которые надо запускать в определенное время. Нажав кнопку Обзор найдите файл, который будет запускать Планировщик и нажмите Открыть. Если все сделано правильно, то мастер создания нового задания выведет следующее окно, показанное на рисунке 11.
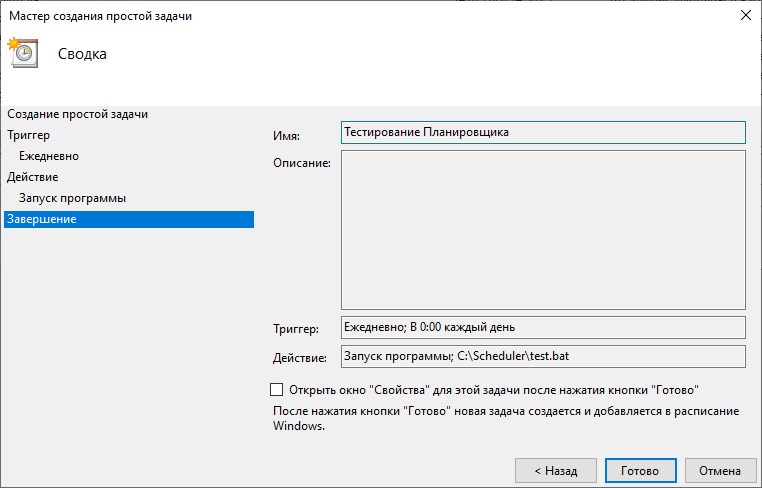
Рисунок 11.
Если проделанные ранее действия полностью удовлетворяют Вашим требованиям, то после нажатия кнопки Готово в окне, показанном на рисунке 13, создание будет завершено и в окне Планировщик заданий, в разделе «Библиотека планировщика заданий» появится вновь созданное задание. Если расписание запуска задачи требует дальнейшей, более тонкой донастройки, то отметьте пункт «Открыть окно Свойства для этой задачи после нажатия кнопки Готово» и нажмите кнопку Готово. В этом случае, будет открыто окно для настройки дополнительных возможностей расписания запуска задачи, которые подробно будут рассмотрены в следующей главе.
Дополнительные настройки
Если есть необходимость настроить дополнительные параметры запланированного задания, то щелкните правой кнопкой по созданному заданию в разделе «Библиотека планировщика заданий», находящейся в Планировщике заданий и выберите Свойства. Если дополнительные настройки будут меняться сразу после создания задания, то в последнем окне при создании задания (рисунок 11 в предыдущей главе) нужно поставить галочку у пункта «Открыть окно Свойства для этой задачи после нажатия кнопки Готово» и нажать Готово. Любая из этих последовательность действий приведет к тому, что откроется окно, пример которого показан на рисунке 12.
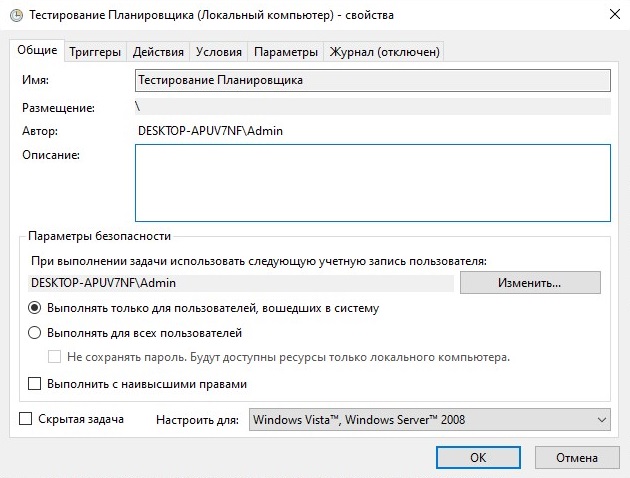
Рисунок 12.
Это окно содержит несколько вкладок с параметрами более тонкой настройки расписания запуска задачи. Все настройки, расположенные на них будут подробно рассмотрены ниже.
На первой вкладке Задание, внешний вид которой показан на рисунке 12, находятся основные сведения о запланированной задаче. Это:
- Имя — Имя задания, под которым оно отображается в Планировщике задач.
- Размещение — Расположение задачи в древовидной структуре планировщика задач. В данном случае «» обозначает, что задача расположена в корне древа.
- Автор — Имя пользователя, создавшего задачу.
- Описание — Текстовое описание задачи.
- При выполнении задачи использовать следующую учетную запись пользователя — Имя пользователя, под которым будет выполнятся задача.
- Выполнять только для пользователей, вошедших в систему — Если установить данный чекбокс, то данная задача будет выполнятся только при наличии залогиненного пользователя.
- Выполнять для всех пользователей — Данная задача будет выполнятся вне зависимости от наличия залогиненного пользователя.
- Выполнять с наивысшими правами — Для выполнения задачи будет предоставлены права администратора.
Внешний вид следующей вкладки «Триггеры» показан на рисунке 13.
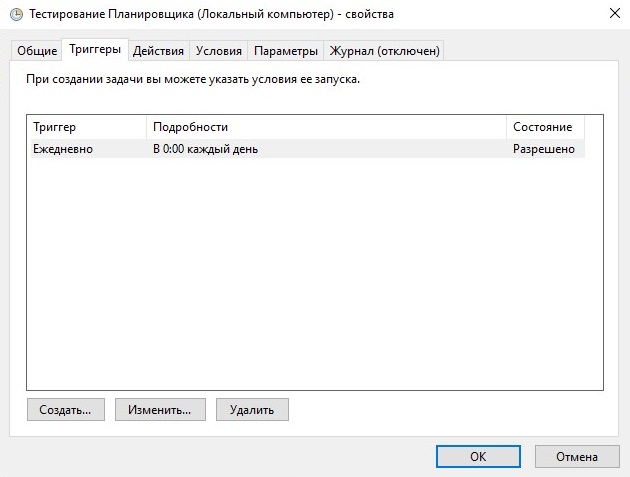
Рисунок 13.
Эта вкладка предоставляет все возможности по управлению расписанием запуска запланированной задачи, которые значительно шире, чем те, которые была возможность настроить в мастере создания задач и о которых шла речь в предыдущей главе. На ней есть возможность создать как новый триггер для запуска, так и отредактировать уже имеющейся старый. Выбрав уже существующий триггер, и нажав кнопку «Изменить», откроются расширенные настройки триггера, которые можно увидеть на рисунке 14.
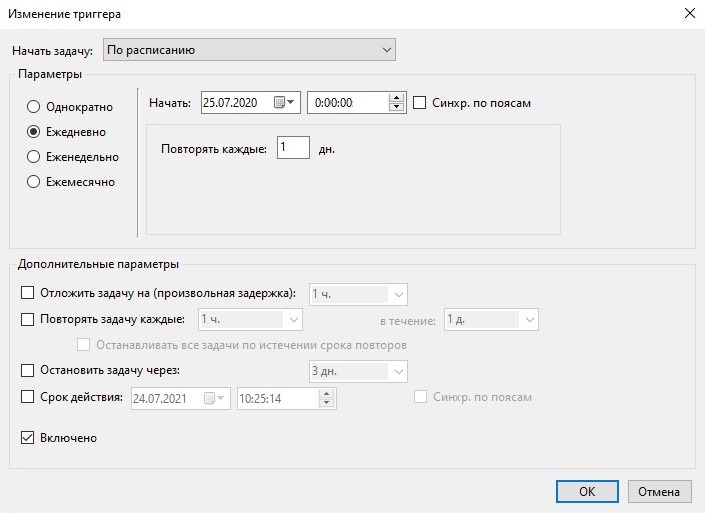
Рисунок 14.
Здесь можно наблюдать следующие пункты настроек:
- Начать задачу — Условие, при котором будет начинаться задача. Данная настройка уже рассматривалась в предыдущей главе.
- Параметры — Тип расписания запуска. Все типы были рассмотрены в предыдущей главе, поэтому останавливаться на них не будем.
- Отложить задачу на (произвольная задержка) — Позволяет включить задержку в выполнении задачи, без изменения её раписания запуска.
- Повторять задачу каждые … в течении … — С помощью данных настроек можно настроить повторение задачи в течении заданного интервала времени. Например, можно запускать задание каждые 30 минут в течение 8-ми часов или до определенного времени. Очень удобная возможность для решения определенных задач мониторинга событий. К примеру, иногда требуется проверять наличие в определенной папке файла с периодом в пять минут в течение рабочего дня и если он там появился, то запустить скрипт, который выполнит над файлом определенные действия.
- Остановить задачу через — Принудительно завершает запущенный Планировщиком задач процесс. Например, в поле Выполнять до указано время 18:00. Если задание очень большое и исполняется полчаса, то запуск его в 17:55 приведет к тому, что задание фактически будет работать до 18:25. Если такое положение дел нежелательно, то нужно поставить галку Остановить задание. В этом случае выполнение задания будет прекращено в 18:00 не смотря ни на что.
- Срок действия — Интервал дат, во время которого задача будет активна.
- Включено — Позволяет включить или выключить данный триггер.
Вкладка «Действия» показывает список задач, которые будут выполнятся при активации ранее расмотренных триггеров. Её внешний вид приведен на рисунке 15, расположенном ниже.
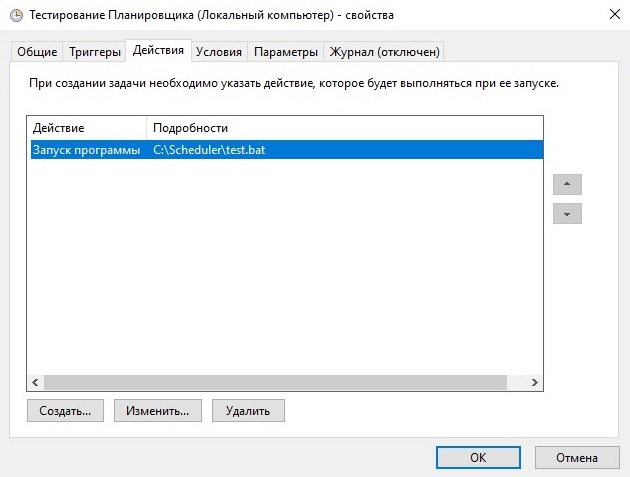
Рисунок 15.
На данной вкладке можно задать дополнительные действия, которые будут выполятся при активации задачи — в отличии от окна создания задачи, где можно было задать только одно единственное действие. При выборе создания или изменения действия появится уже окно с уже расмотренными ранее действиями по выборе запускаемой программы, по этому перейдем к следующей вкладке «Условия», которая показана на рисунке 16.
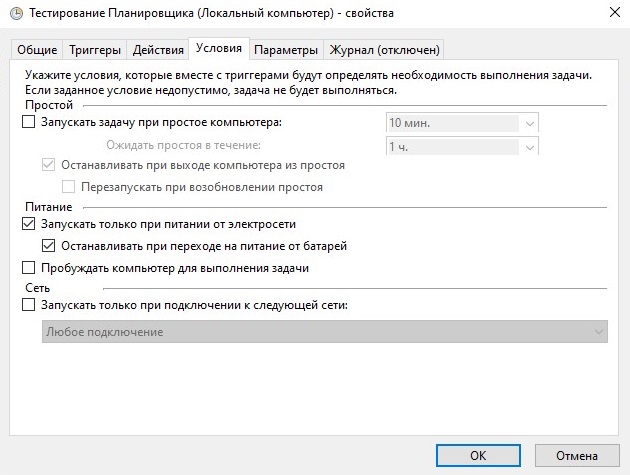
Рисунок 16.
Здесь содержатся дополнительные условия задачи, такие как:
- Запускать задачу при простое компьютера — Задача будет выполнятся только при «простое» компьютера, полезно для планирования запуска ресурсоемких задач, которые отнимают при своем выполнении все время процессора, загружая его на 100%.
- Запускать только при питании для электросети — Если устройство, на котором настроена эта задача, перейдет к питанию от аккамуляторов (например это ноутбук, или сервер с подключенным ИБП), то при этой включенной опции, задача не будет выполнятся.
- Пробуждать компьютер для выполнения задачи — При включении этой опции, Планировщик задач будет выводить компьютер из спящего режима для выполнения данной задачи.
- Запускать только при подключении к следующей сети — При активации этого параметра, и выборе нужного сетевого подключения, задача будет выполнятся только при условии, что это подключение активно.
Вкладка «Параметры» показана на рисунке 17.
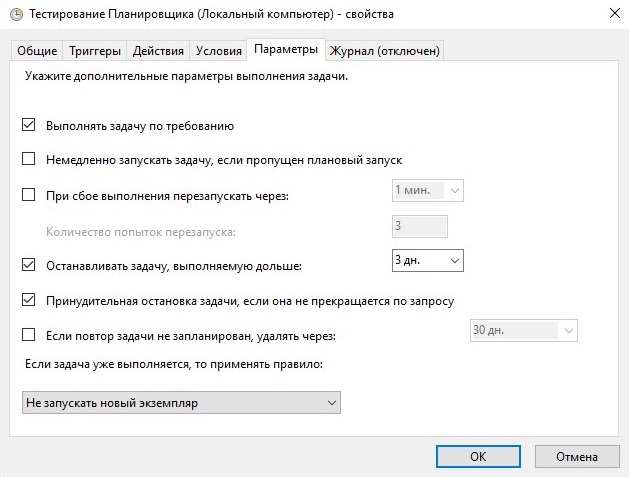
Рисунок 17.
- Немедлено запускать задачу, если пропущен плановый запуск — В случае, если задача не была выполнена вовремя, она будет выполнятся при первой же возможности (например, если в это время был выключен компьютер, то задача начнет выполнятся сразу при его включении).
- При сбое выполнения перезапускать через — Если задача завершается с ошибкой, то можно указать времянной интервал, через который она будет повторно запущена. Так же можно задать количество повторных попыток запуска задачи.
- Останавливать задачу, выполняемую дольше — Можно принудительно остановить выполнение задачи, если задание выполняется дольше указанного времени.
- Принудительная остановка задачи, если она не прекращается по запросу — Если задача не останавливается, то она будет завершена принудительно.
- Если повтор задачи не запланирован, удалять через — Позволяет настроить автоматическое удаление «одноразовой» задачи спустя какое-то время.
Примеры настройки Планировщика
В данной главе будет показано несколько вариантов расписаний настроенной задачи. Все расписания запускают файл test.bat из C:Scheduler. Задача была сперва создана при помощи мастера, а затем в окне Планировщика открыты её свойства.
Ежедневный запуск задачи
Первый пример настройки показывает как настроить задачу на ежедневный запуск в 21:00. Самый простой вариант расписания, которое создается мастером без последующей донастройки. Свойства триггера созданной задачи выглядит так, как показано на рисунке 18.
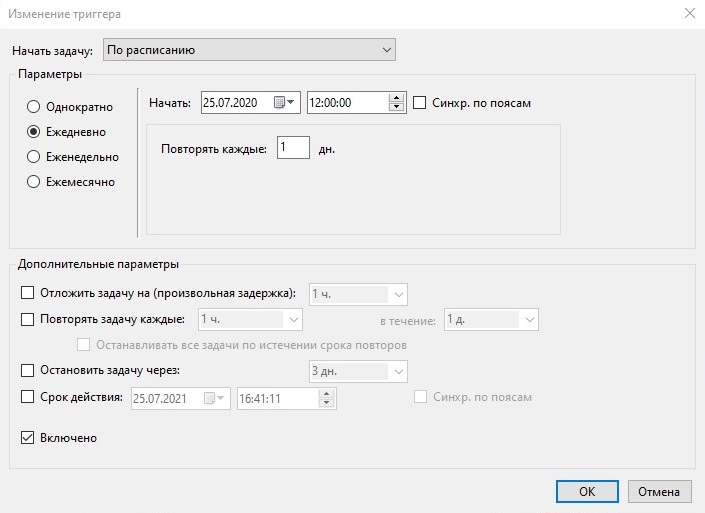
Рисунок 18.
Такое расписание не требует каких-то дополнительных комментариев. Задача запускается каждый день в 21:00.
Запуск задачи через день
Это расписание отличается от предыдущего лишь тем, что оно запускается раз в два дня.

Рисунок 19.
Как видно на рисунке 19, в поле «Повторять каждые» установлено значение 2 дня. Это приведет к тому, что задача будет запущена раз в два дня. В это поле можно ввести любое значение.
Отложенный ежедневный запуск задачи
В этом примере запланирован ежедневный запуск задачи, но первый ее запуск отложен на 5 дней.
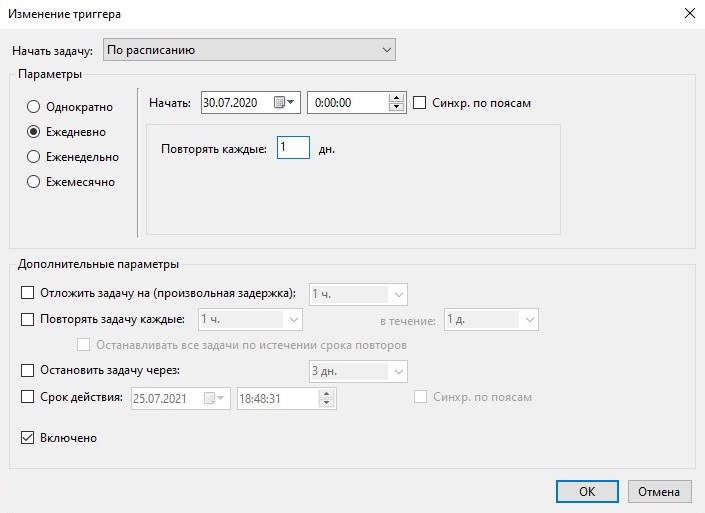
Рисунок 20.
Как видно, на рисунке 20 в Дополнительных настройках установлена дата начала работы задания на 30-е число, притом, что задание создано 25-го. Таким образом, мы создали задачу, но отложили начало ее ежедневного запуска на 10 дней.
Ежедневный запуск задачи до определенной даты с последующим удалением задачи из Планировщика
При таком расписании задача запускается ежедневно до определенной даты. Когда дата последнего запуска достигнута задача удаляется из Планировщика.
Такое расписание запускает задачу каждый день начиная с 25-го июля и заканчивая 25-м августом, о чем говорят Дополнительные параметры, показанные на рисунке 21.
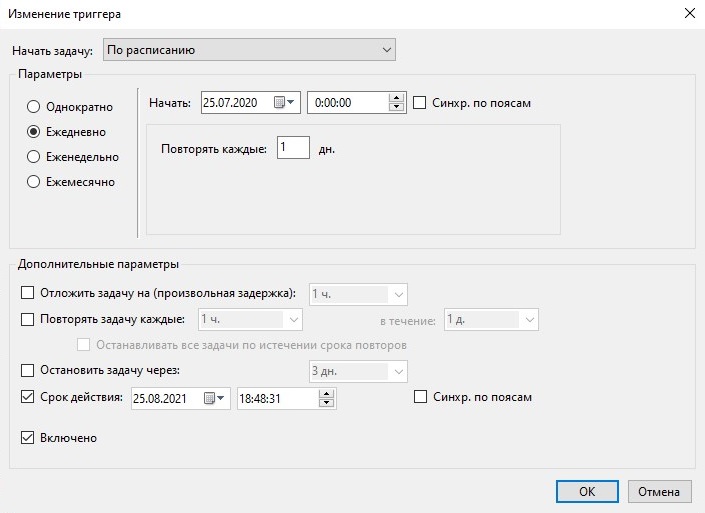
Рисунок 21.
На рисунке 22 показаны настройки на вкладке «Параметры», а именно то, что установлена галочка у пункта «Если повтор задачи не запланирован, удалять через» и выбрано значение «Немедлено». Установка этой галки в совокупности с данным параметром приведет к тому, что задание, после последнего запуска будет удалено из Планировщика.

Рисунок 22.
Запуск задачи в разные дни недели в разное время
Этот пример демонстрирует настройку расписания запуска задачи Планировщиком в разные дни недели в разное время. При помощи расписания, представленного на рисунках 23 и 24 реализована следующая задача. Задание запускается в рабочие дни в 20:00, а в выходные — в 10:00. В созданном при использовании мастера создания задачи, были выставленны следующие значения, для запуска задачи по будням:
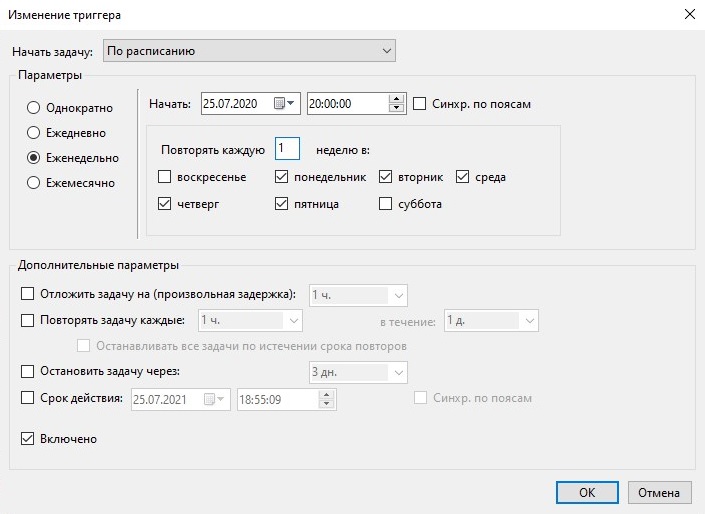
Рисунок 23.
После чего был создан второй триггер, и в нем выставлены уже настройки для запуска в выходные дни:
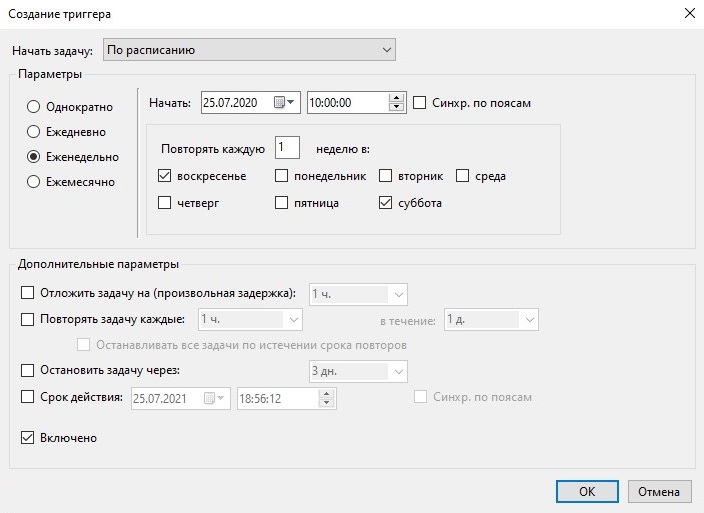
Рисунок 24.
Можно создать больше триггеров с расписаниями, чтобы более точно настроить время запуска задачи в разные дни, вплоть до создания семи триггеров для настройки расписания запуска задачи в разное время каждого дня недели.
Ежеминутный запуск задачи в рабочее время в рабочие дни
Такое расписание запускает задачу каждую минуту в течение рабочего дня и только в рабочие дни. Такое расписание будет полезно для проверки из скрипта наличия в определенной папке файла. Например, филиалы ежедневно в разное время заливают на ftp в центральном офисе отчеты о проделанной работе за предыдущий день, которые должны быть автоматически разархивированы и импортированы скриптом в корпоративную базу данных. Планировщик запускает скрипт, который проверяет, появился ли файл в указанной папке, если появился, то выполняет с ним необходимые действия, а если файла нет, то скрипт завершается.
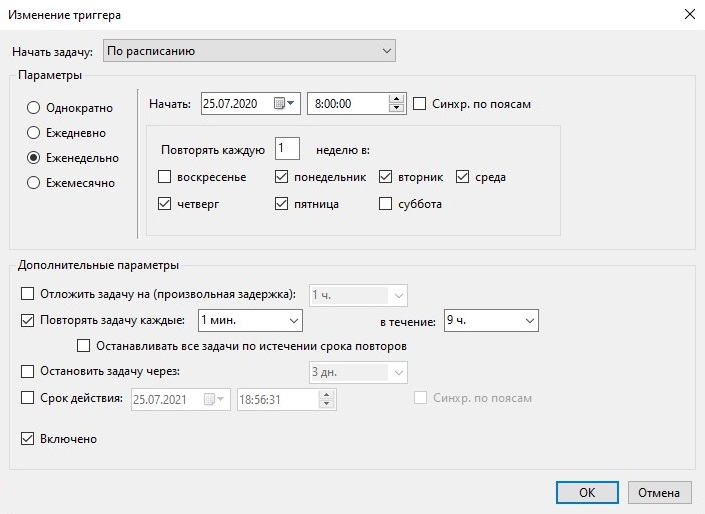
Рисунок 25.
Стоит отметить, что по умолчанию нужных вариантов для настройки повтора и завершения выполнения задачи нет, их нужно вписать вручную, отредактировав наиболее подходящий вариант, предлагаемый планировщиком задач.
Ежемесячный запуск задачи
Этот пример показывает как настроить запуск задачи один раз в месяц. Как правило, такая периодичность нужна для запуска скриптов, которые анализируют логи за прошедший месяц, создают статистику и помещают логи в архив.
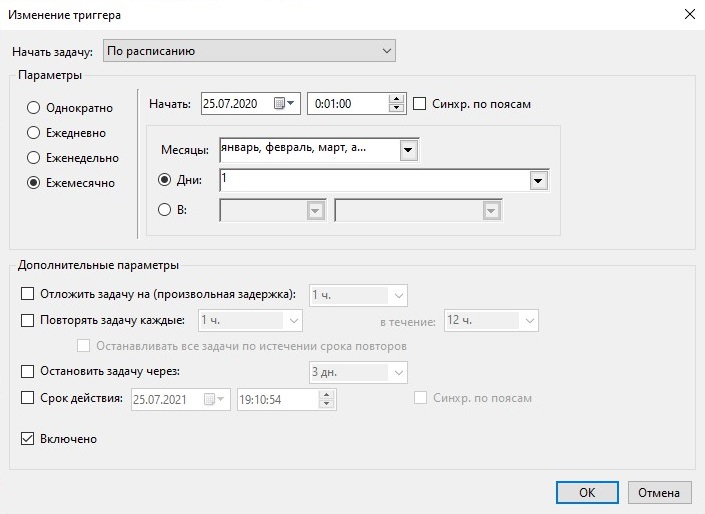
Рисунок 26.
Запуск задачи запланирован на первую минуту нового месяца. Это связано с тем, что в месяце может быть 28, 29, 30 или 31 день. Чтобы не создавать для каждого месяца свое расписание логичнее выполнять задачу первого числа каждого месяца.
Построенные на этих примерах расписания смогут запустить задачу именно в то время, так часто и по тем дням, когда это требуется для решения задачи. Настройки Планировщика настолько гибки, что можно создать сколь угодно сложное расписание. Использование Планировщика позволяет отказаться от использования утилит, которые могут работать нестабильно, будут занимать часть системных ресурсов, либо не будут обладать требуемой гибкостью настроек.
В следующей главе будет кратко рассказано о том, как протестировать созданное задание, чтобы убедиться в том, что первый его запуск пройдет без проблем.
Тестовый запуск задачи
Мало создать задание и написать программу или скрипт, которые будут запускаться Планировщиком. Нужно обязательно выполнить тестовый запуск задачи, чтобы убедиться, что задача работает именно так, как планировалось и при ее запуске не возникает проблем. Сделать это достаточно просто.
Щелкните правой кнопкой по созданной задаче в Планировщике и выберите пункт Выполнить. Задача будет немедленно запущена, не смотря на расписание.
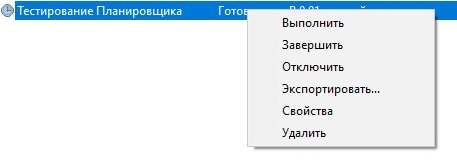
Рисунок 27.
При удачном прохождении тестового запуска задачи, в главном окне Планировщика, в столбце «Результат прошлого запуска» появится значение 0х0. Это говорит о том, что запуск задачи был успешным. Если запуск задачи по каким-то причинам не удался, то в столбце «Результат прошлого запуска» будет стоять другое значение — 0x1. Помочь узнать причину незапуска задачи может журнал задачи, но перед этим его нужно включить. Для этого, нужно в правой колонке окна Планировщика задач найти пункт «Включить журнал всех заданий».
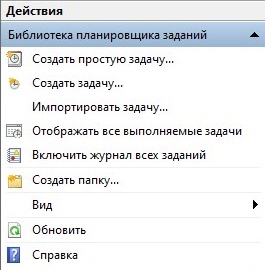
Рисунок 28.
После этого, можно повторно запустить задачу, и уже по журналу смотреть, в чем же произошло.
Успешные тестовые запуски задачи не отменяют необходимости постоянного контроля за выполнением задачи. Введя в «боевую» эксплуатацию задание не забывайте периодически просматривать журнал и Планировщик. Более разумное решение — создавать лог-файл работы самой задачи и по завершении ее работы открывать этот лог. К примеру, приходя утром на работу Вы будете видеть открытое окно редактора с лог-файлом. Это вынудит невольно просмотреть результат выполнения задачи, а отсутствие открытого окна будет означать проблемы, возникшие либо при запуске задачи, либо в ходе ее выполнения. Это позволит оперативно исправить проблему.
Управление заданиями Планировщика задач по сети
Нередко возникает необходимость выполнять автоматически те или иные действия на компьютерах пользователей в локальной сети. Администратор может управлять заданиями Планировщика на компьютерах пользователей удаленно, по сети. Учетная запись, из-под которой будет производится управление заданиями Планировщика должна обладать правами Администратора на компьютере пользователя.
Чтобы создать, изменить или удалить задание на компьютере пользователя по сети, откройте «Планировщик задач», и в левом столбце нажмите правой кнопкой мыши на «Планировщик заданий (Локальный компьютер)». В появившемся контекстном меню нужно выбрать пункт «Подключится к другому компьютеру…».
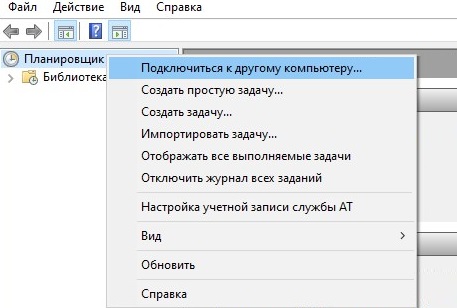
Рисунок 29.
После этого, следует ввести имя компьютера, к которому будет выполнятся подключение. Если для подключения к другому компьютеру нужно использовать данные пользователя, отличающиеся от локального, необходимо установить галочку на пункте «Подключиться как другой пользователь». По окончанию ввода всех данных нужно нажать на кнопку «ОК», и если все было сделано правильно — произойдет подключение к удаленному планировщику задач.
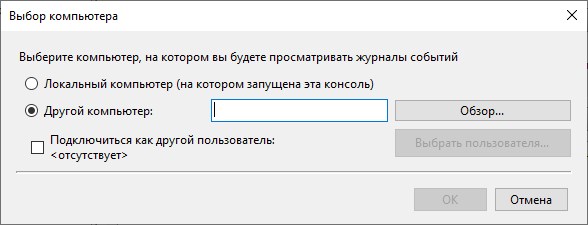
Рисунок 30.
После этого, можно начинать пользоваться удаленным планировщиком, будто это локальный.
From Wikipedia, the free encyclopedia
Windows Task Scheduler
Management console for Task Scheduler 3.0 in Windows 11 |
|
| Other names | taskschd.msc |
|---|---|
| Developer(s) | Microsoft |
| Initial release | 1995; 28 years ago |
| Written in | C++ |
| Included with |
|
| Predecessor | System Agent |
| Service name | Task Scheduler (Schedule) |
| Type | Windows service |
| Website | docs.microsoft.com/en-us/windows/win32/taskschd/task-scheduler-start-page |
Task Scheduler (formerly Scheduled Tasks)[1] is a job scheduler in Microsoft Windows that launches computer programs or scripts at pre-defined times or after specified time intervals.[2][3] Microsoft introduced this component in the Microsoft Plus! for Windows 95 as System Agent.[4] Its core component is an eponymous Windows service.[5] The Windows Task Scheduler infrastructure is the basis for the Windows PowerShell scheduled jobs feature introduced with PowerShell v3.[6]
Task Scheduler can be compared to cron or anacron on Unix-like operating systems. This service should not be confused with the scheduler, which is a core component of the OS kernel that allocates CPU resources to processes already running.
Versions[edit]
Task Scheduler 1.0[edit]
Task Scheduler 1.0 is included with Windows NT 4.0[7] (with Internet Explorer 4.0 or later), Windows 2000,[7] Windows XP[8] and Windows Server 2003.[9] It runs as a Windows Service, and the task definitions and schedules are stored in binary .job files. Tasks are manipulated directly by manipulating the .job files. Each task corresponds to single action. On Windows 95 (with Internet Explorer 4.0 or later), Windows 98 and Windows Me, the Task Scheduler runs as an ordinary program, mstask.exe. It also displays a status icon in the notification area on Windows 95 and Windows 98 and runs as a hidden service on Windows Me, but can be made to show a tray icon.[1] Computer programs and scripts can access the service through six COM interfaces.[10] Microsoft provides a scheduling agent DLL, a sample VBScript and a configuration file to automate Task Scheduler.[11]
In addition to the graphical user interface for Task Scheduler in Control Panel, Windows provides two command-line tools for managing scheduled task: at.exe (deprecated)[12] and schtasks.exe.[5][13][14] However, at.exe cannot access tasks created or modified by Control Panel or schtasks.exe.[15] Also, tasks created with at.exe are not interactive by default; interactivity needs to be explicitly requested. The binary «.job» files which the AT command produces are stored in the %WINDIR%Tasks directory.[16][17]
Task Scheduler 2.0[edit]
Task Scheduler 2.0 was introduced with Windows Vista[18] and included in Windows Server 2008 as well.[19][9] The redesigned Task Scheduler user interface is now based on Management Console. In addition to running tasks on scheduled times or specified intervals, Task Scheduler 2.0 also supports calendar and event-based triggers, such as starting a task when a particular event is logged to the event log, or when a combination of events has occurred. Also, several tasks that are triggered by the same event can be configured to run either simultaneously or in a pre-determined chained sequence of a series of actions, instead of having to create multiple scheduled tasks. Tasks can also be configured to run based on system status such as being idle for a pre-configured amount of time, on startup,[20] logoff, or only during or for a specified time. XPath expressions can be used to filter events from the Windows Event Log. Tasks can also be delayed for a specified time after the triggering event has occurred, or repeat until some other event occurs. Actions that need to be done if a task fails can also be configured. The actions that can be taken in response to triggers, both event-based as well as time-based, not only include launching applications but also take a number of custom actions. Task Scheduler includes a number of actions built-in, spanning a number of applications; including send an e-mail, show a message box, or fire a COM handler when it is triggered. Custom actions can also be specified using the Task Scheduler API. Task Scheduler keeps a history log of all execution details of all the tasks.[21] Windows Vista uses Task Scheduler 2.0 to run various system-level tasks;[22] consequently, the Task Scheduler service can no longer be disabled (except with a simple registry tweak).
Task Scheduler 2.0 exposes an API to allow computer programs and scripts create tasks.[19][23] It consists of 42 COM interfaces.[24] The Windows API does not, however, include a managed wrapper for Task Scheduler though an open source implementation exists.[25] The job files for Task Scheduler 2.0 are XML-based, and are human-readable, conforming to the Task Scheduler Schema.[19][23]
Other features[edit]
- New security features, including using Credential Manager to passwords for tasks on workgroup computers and using Active Directory for task credentials on domain-joined computers so that they cannot be retrieved easily. Also, scheduled tasks are executed in their own session, instead of the same session as system services or the current user.
- Ability to wake up a machine remotely or using BIOS timer from sleep or hibernation to execute a scheduled task or run a previously scheduled task after a machine gets turned on.
- Ability to attach tasks to events directly from the Event Viewer.
Tasks[edit]
The Task Scheduler service works by managing Tasks; Task refers to the action (or actions) taken in response to trigger(s). A task is defined by associating a set of actions, which can include launching an application or taking some custom-defined action, to a set of triggers, which can either be time-based or event-based. In addition, a task also can contain metadata that defines how the actions will be executed, such as the security context the task will run in. Tasks are serialized to .job files and are stored in the special folder titled Task Folder, organized in subdirectories. Programmatically, the task folder is accessed using the ITaskFolder interface or the TaskFolder scripting object and individual tasks using the IRegisteredTask interface or RegisteredTask object.[26]
Column ‘Last Result’[edit]
The Last Result column displays a completion code. The common codes for scheduled tasks are:[27][28]
- 0 or 0x0: The operation completed successfully.
- 1 or 0x1: Incorrect function called or unknown function called.
- 2 or 0x2: File not found.
- 10 or 0xa: The environment is incorrect.
- 0x00041300: Task is ready to run at its next scheduled time.
- 0x00041301: The task is currently running.
- 0x00041302: The task has been disabled.
- 0x00041303: The task has not yet run.
- 0x00041304: There are no more runs scheduled for this task.
- 0x00041305: One or more of the properties that are needed to run this task have not been set.
- 0x00041306: The last run of the task was terminated by the user.
- 0x00041307: Either the task has no triggers or the existing triggers are disabled or not set.
- 0x00041308: Event triggers do not have set run times.
- 0x80010002: Call was canceled by the message filter
- 0x80041309: A task’s trigger is not found.
- 0x8004130A: One or more of the properties required to run this task have not been set.
- 0x8004130B: There is no running instance of the task.
- 0x8004130C: The Task Scheduler service is not installed on this computer.
- 0x8004130D: The task object could not be opened.
- 0x8004130E: The object is either an invalid task object or is not a task object.
- 0x8004130F: No account information could be found in the Task Scheduler security database for the task indicated.
- 0x80041310: Unable to establish existence of the account specified.
- 0x80041311: Corruption was detected in the Task Scheduler security database
- 0x80041312: Task Scheduler security services are available only on Windows NT.
- 0x80041313: The task object version is either unsupported or invalid.
- 0x80041314: The task has been configured with an unsupported combination of account settings and run time options.
- 0x80041315: The Task Scheduler Service is not running.
- 0x80041316: The task XML contains an unexpected node.
- 0x80041317: The task XML contains an element or attribute from an unexpected namespace.
- 0x80041318: The task XML contains a value which is incorrectly formatted or out of range.
- 0x80041319: The task XML is missing a required element or attribute.
- 0x8004131A: The task XML is malformed.
- 0x0004131B: The task is registered, but not all specified triggers will start the task.
- 0x0004131C: The task is registered, but may fail to start. Batch logon privilege needs to be enabled for the task principal.
- 0x8004131D: The task XML contains too many nodes of the same type.
- 0x8004131E: The task cannot be started after the trigger end boundary.
- 0x8004131F: An instance of this task is already running.
- 0x80041320: The task will not run because the user is not logged on.
- 0x80041321: The task image is corrupt or has been tampered with.
- 0x80041322: The Task Scheduler service is not available.
- 0x80041323: The Task Scheduler service is too busy to handle your request. Please try again later.
- 0x80041324: The Task Scheduler service attempted to run the task, but the task did not run due to one of the constraints in the task definition.
- 0x00041325: The Task Scheduler service has asked the task to run.
- 0x80041326: The task is disabled.
- 0x80041327: The task has properties that are not compatible with earlier versions of Windows.
- 0x80041328: The task settings do not allow the task to start on demand.
- 0xC000013A: The application terminated as a result of a CTRL+C.
- 0xC0000142: The application failed to initialize properly.
Bugs[edit]
On Windows 2000 and Windows XP, when a computer is prepared for disk imaging with the sysprep utility, it cannot run tasks configured to run in the context of the SYSTEM account. Sysprep changes the security identifier (SID) to avoid duplication but does not update scheduled tasks to use the new SID. Consequently, the affected tasks fail to run. There is no solution for this problem but one may reschedule the affected tasks to work around the issue.[29]
On Windows Vista or Windows Server 2008, the next execution time displayed in Task Scheduler may be wrong. Microsoft issued a hotfix to remedy this issue.[30]
See also[edit]
- cron, job scheduler for Unix-like operating systems
References[edit]
- ^ a b «How to Enable the Scheduled Tasks Icon in Windows Me». Support. Microsoft. January 29, 2007. Archived from the original on January 30, 2008.
- ^ «Keep your Windows desktop in shape with Task Scheduler». TechRepublic. January 4, 2002.
- ^ «What is Task Scheduler?». Computer Hope. November 30, 2020.
- ^ Al Fasoltd (March 29, 1998). «Windows 98: Stable and fast, as well as ‘new and improved’«. The Syracuse Newspapers. Retrieved October 6, 2007.
- ^ a b Mueller, John Paul (2010). Windows Command Line Administration Instant Reference. John Wiley & Sons. ISBN 978-0470930908.
- ^ Warner, Timothy L. (2015). Sams Teach Yourself Windows PowerShell in 24 Hours. Sams Publishing. ISBN 978-0134049359.
- ^ a b Burnett, Mark; Amaris, Chris; Doyle, Chris; Locher, L. J.; Morimoto, Rand (2002). Maximum Windows 2000 Security. Sams Publishing. ISBN 978-0672319655.
- ^ Mueller, John Paul (2001). Sams Teach Yourself Microsoft Windows XP in 21 Days. Sams Publishing. ISBN 978-0132715539.
- ^ a b «About the Task Scheduler». MSDN. Microsoft. Retrieved October 6, 2007.
- ^ «Task Scheduler 1.0 Interfaces». MSDN. Microsoft. Retrieved May 30, 2014.
- ^ «Task Scheduler Using VBScript». Download Center. Microsoft. March 22, 2004. Archived from the original on May 4, 2006.
- ^ «MS-DOS and Windows command line at command». Computer Hope. Retrieved March 7, 2021.
- ^ «Schtasks». Microsoft TechNet. Microsoft. Retrieved May 18, 2014.
- ^ «At». Microsoft TechNet. Microsoft. Retrieved May 18, 2014.
- ^ «How To Use the AT Command to Schedule Tasks». Support. Microsoft. October 30, 2006.
- ^ Kleiman, Dave; Hunter, Laura E (2006). Winternals Defragmentation, Recovery, and Administration Field Guide. Elsevier. ISBN 978-0080489872.
- ^ «Applications Started with AT Are Not Interactive». Support. Microsoft. February 20, 2007. Archived from the original on October 29, 2004.
- ^ Cowart, Robert; Knittel, Brian (2008). Special Edition Using Microsoft Windows Vista. Que Publishing. ISBN 978-0789737816.
- ^ a b c Kingsley-Hughes, Adrian; Kingsley-Hughes, Kathie; Read, Daniel (2011). VBScript Programmer’s Reference. John Wiley & Sons. ISBN 978-1118058695.
- ^ Paul, Ian (September 5, 2014). «Automate your morning programs with Windows Task Scheduler». PCWorld. Retrieved March 15, 2021.
- ^ «Windows Vista Task Scheduler». Microsoft TechNet. Microsoft. March 3, 2006. Archived from the original on April 12, 2006. Retrieved April 24, 2006.
- ^ «Description of the scheduled tasks in Windows Vista». August 24, 2007. Archived from the original on October 22, 2007.
- ^ a b Kenny Kerr (October 2007). «Task Scheduler 2.0». MSDN. Microsoft. Archived from the original on December 26, 2007. Retrieved October 6, 2007.
- ^ «Task Scheduler 2.0 Interfaces». MSDN. Microsoft. Retrieved May 30, 2014.
- ^ «C# API for Task Scheduler 2.0». Stack Overflow. Retrieved July 24, 2019.
- ^ «Tasks (Windows)». MSDN. Microsoft. Retrieved October 6, 2007.
- ^ «How to troubleshoot scheduled tasks in Windows XP and in Windows Server 2003». Support. Microsoft. May 22, 2013. Retrieved September 3, 2013.
- ^ «Task Scheduler Error and Success Constants». MSDN. Microsoft.
- ^ «Scheduled tasks may not start if you used a System Preparation image to install Windows XP or Windows 2000». Support. Microsoft. July 1, 2004. Archived from the original on September 26, 2008. Retrieved May 19, 2012.
- ^ «The value in the Next Run Time field in Task Scheduler is incorrect in Windows Vista and in Windows Server 2008». Support. Microsoft. October 15, 2008. Archived from the original on December 11, 2008.
Further reading[edit]
- Leonhard, Woody; Rusen, Ciprian (2021). Windows 10 All-in-One For Dummies. John Wiley & Sons. ISBN 978-1119680574.
- Knittel, Brian; McFedries, Paul (2014). Windows 8.1 in Depth. Que Publishing. ISBN 978-0789752819.
- Bott, Ed; Siechert, Carl; Stinson, Craig (2009). Windows 7 Inside Out. Pearson Education. ISBN 978-0735636842.
- Ruest, Danielle; Ruest, Nelson (2008). Microsoft Windows Server 2008: The Complete Reference. McGraw-Hill Education. ISBN 978-0071596466.
- Cowart, Robert; Knittel, Brian (2008). Special Edition Using Microsoft Windows Vista. Que. ISBN 978-0789737816.
External links[edit]
- Task Scheduler on MSDN
- The Log File in the Task Scheduler May Be Incorrectly Formatted and Difficult to Read — Archived October 16, 2007, at the Wayback Machine
- Unable to Delete Text in the Task Scheduler Log File
- Task Scheduler Service Does Not Start
- Scheduled Program Does Not Start in Task Scheduler — Archived August 21, 2006, at the Wayback Machine
- Cannot Disable Task Scheduler
From Wikipedia, the free encyclopedia
Windows Task Scheduler
|
Management console for Task Scheduler 3.0 in Windows 11 |
|
| Other names | taskschd.msc |
|---|---|
| Developer(s) | Microsoft |
| Initial release | 1995; 28 years ago |
| Written in | C++ |
| Included with |
|
| Predecessor | System Agent |
| Service name | Task Scheduler (Schedule) |
| Type | Windows service |
| Website | docs.microsoft.com/en-us/windows/win32/taskschd/task-scheduler-start-page |
Task Scheduler (formerly Scheduled Tasks)[1] is a job scheduler in Microsoft Windows that launches computer programs or scripts at pre-defined times or after specified time intervals.[2][3] Microsoft introduced this component in the Microsoft Plus! for Windows 95 as System Agent.[4] Its core component is an eponymous Windows service.[5] The Windows Task Scheduler infrastructure is the basis for the Windows PowerShell scheduled jobs feature introduced with PowerShell v3.[6]
Task Scheduler can be compared to cron or anacron on Unix-like operating systems. This service should not be confused with the scheduler, which is a core component of the OS kernel that allocates CPU resources to processes already running.
Versions[edit]
Task Scheduler 1.0[edit]
Task Scheduler 1.0 is included with Windows NT 4.0[7] (with Internet Explorer 4.0 or later), Windows 2000,[7] Windows XP[8] and Windows Server 2003.[9] It runs as a Windows Service, and the task definitions and schedules are stored in binary .job files. Tasks are manipulated directly by manipulating the .job files. Each task corresponds to single action. On Windows 95 (with Internet Explorer 4.0 or later), Windows 98 and Windows Me, the Task Scheduler runs as an ordinary program, mstask.exe. It also displays a status icon in the notification area on Windows 95 and Windows 98 and runs as a hidden service on Windows Me, but can be made to show a tray icon.[1] Computer programs and scripts can access the service through six COM interfaces.[10] Microsoft provides a scheduling agent DLL, a sample VBScript and a configuration file to automate Task Scheduler.[11]
In addition to the graphical user interface for Task Scheduler in Control Panel, Windows provides two command-line tools for managing scheduled task: at.exe (deprecated)[12] and schtasks.exe.[5][13][14] However, at.exe cannot access tasks created or modified by Control Panel or schtasks.exe.[15] Also, tasks created with at.exe are not interactive by default; interactivity needs to be explicitly requested. The binary «.job» files which the AT command produces are stored in the %WINDIR%Tasks directory.[16][17]
Task Scheduler 2.0[edit]
Task Scheduler 2.0 was introduced with Windows Vista[18] and included in Windows Server 2008 as well.[19][9] The redesigned Task Scheduler user interface is now based on Management Console. In addition to running tasks on scheduled times or specified intervals, Task Scheduler 2.0 also supports calendar and event-based triggers, such as starting a task when a particular event is logged to the event log, or when a combination of events has occurred. Also, several tasks that are triggered by the same event can be configured to run either simultaneously or in a pre-determined chained sequence of a series of actions, instead of having to create multiple scheduled tasks. Tasks can also be configured to run based on system status such as being idle for a pre-configured amount of time, on startup,[20] logoff, or only during or for a specified time. XPath expressions can be used to filter events from the Windows Event Log. Tasks can also be delayed for a specified time after the triggering event has occurred, or repeat until some other event occurs. Actions that need to be done if a task fails can also be configured. The actions that can be taken in response to triggers, both event-based as well as time-based, not only include launching applications but also take a number of custom actions. Task Scheduler includes a number of actions built-in, spanning a number of applications; including send an e-mail, show a message box, or fire a COM handler when it is triggered. Custom actions can also be specified using the Task Scheduler API. Task Scheduler keeps a history log of all execution details of all the tasks.[21] Windows Vista uses Task Scheduler 2.0 to run various system-level tasks;[22] consequently, the Task Scheduler service can no longer be disabled (except with a simple registry tweak).
Task Scheduler 2.0 exposes an API to allow computer programs and scripts create tasks.[19][23] It consists of 42 COM interfaces.[24] The Windows API does not, however, include a managed wrapper for Task Scheduler though an open source implementation exists.[25] The job files for Task Scheduler 2.0 are XML-based, and are human-readable, conforming to the Task Scheduler Schema.[19][23]
Other features[edit]
- New security features, including using Credential Manager to passwords for tasks on workgroup computers and using Active Directory for task credentials on domain-joined computers so that they cannot be retrieved easily. Also, scheduled tasks are executed in their own session, instead of the same session as system services or the current user.
- Ability to wake up a machine remotely or using BIOS timer from sleep or hibernation to execute a scheduled task or run a previously scheduled task after a machine gets turned on.
- Ability to attach tasks to events directly from the Event Viewer.
Tasks[edit]
The Task Scheduler service works by managing Tasks; Task refers to the action (or actions) taken in response to trigger(s). A task is defined by associating a set of actions, which can include launching an application or taking some custom-defined action, to a set of triggers, which can either be time-based or event-based. In addition, a task also can contain metadata that defines how the actions will be executed, such as the security context the task will run in. Tasks are serialized to .job files and are stored in the special folder titled Task Folder, organized in subdirectories. Programmatically, the task folder is accessed using the ITaskFolder interface or the TaskFolder scripting object and individual tasks using the IRegisteredTask interface or RegisteredTask object.[26]
Column ‘Last Result’[edit]
The Last Result column displays a completion code. The common codes for scheduled tasks are:[27][28]
- 0 or 0x0: The operation completed successfully.
- 1 or 0x1: Incorrect function called or unknown function called.
- 2 or 0x2: File not found.
- 10 or 0xa: The environment is incorrect.
- 0x00041300: Task is ready to run at its next scheduled time.
- 0x00041301: The task is currently running.
- 0x00041302: The task has been disabled.
- 0x00041303: The task has not yet run.
- 0x00041304: There are no more runs scheduled for this task.
- 0x00041305: One or more of the properties that are needed to run this task have not been set.
- 0x00041306: The last run of the task was terminated by the user.
- 0x00041307: Either the task has no triggers or the existing triggers are disabled or not set.
- 0x00041308: Event triggers do not have set run times.
- 0x80010002: Call was canceled by the message filter
- 0x80041309: A task’s trigger is not found.
- 0x8004130A: One or more of the properties required to run this task have not been set.
- 0x8004130B: There is no running instance of the task.
- 0x8004130C: The Task Scheduler service is not installed on this computer.
- 0x8004130D: The task object could not be opened.
- 0x8004130E: The object is either an invalid task object or is not a task object.
- 0x8004130F: No account information could be found in the Task Scheduler security database for the task indicated.
- 0x80041310: Unable to establish existence of the account specified.
- 0x80041311: Corruption was detected in the Task Scheduler security database
- 0x80041312: Task Scheduler security services are available only on Windows NT.
- 0x80041313: The task object version is either unsupported or invalid.
- 0x80041314: The task has been configured with an unsupported combination of account settings and run time options.
- 0x80041315: The Task Scheduler Service is not running.
- 0x80041316: The task XML contains an unexpected node.
- 0x80041317: The task XML contains an element or attribute from an unexpected namespace.
- 0x80041318: The task XML contains a value which is incorrectly formatted or out of range.
- 0x80041319: The task XML is missing a required element or attribute.
- 0x8004131A: The task XML is malformed.
- 0x0004131B: The task is registered, but not all specified triggers will start the task.
- 0x0004131C: The task is registered, but may fail to start. Batch logon privilege needs to be enabled for the task principal.
- 0x8004131D: The task XML contains too many nodes of the same type.
- 0x8004131E: The task cannot be started after the trigger end boundary.
- 0x8004131F: An instance of this task is already running.
- 0x80041320: The task will not run because the user is not logged on.
- 0x80041321: The task image is corrupt or has been tampered with.
- 0x80041322: The Task Scheduler service is not available.
- 0x80041323: The Task Scheduler service is too busy to handle your request. Please try again later.
- 0x80041324: The Task Scheduler service attempted to run the task, but the task did not run due to one of the constraints in the task definition.
- 0x00041325: The Task Scheduler service has asked the task to run.
- 0x80041326: The task is disabled.
- 0x80041327: The task has properties that are not compatible with earlier versions of Windows.
- 0x80041328: The task settings do not allow the task to start on demand.
- 0xC000013A: The application terminated as a result of a CTRL+C.
- 0xC0000142: The application failed to initialize properly.
Bugs[edit]
On Windows 2000 and Windows XP, when a computer is prepared for disk imaging with the sysprep utility, it cannot run tasks configured to run in the context of the SYSTEM account. Sysprep changes the security identifier (SID) to avoid duplication but does not update scheduled tasks to use the new SID. Consequently, the affected tasks fail to run. There is no solution for this problem but one may reschedule the affected tasks to work around the issue.[29]
On Windows Vista or Windows Server 2008, the next execution time displayed in Task Scheduler may be wrong. Microsoft issued a hotfix to remedy this issue.[30]
See also[edit]
- cron, job scheduler for Unix-like operating systems
References[edit]
- ^ a b «How to Enable the Scheduled Tasks Icon in Windows Me». Support. Microsoft. January 29, 2007. Archived from the original on January 30, 2008.
- ^ «Keep your Windows desktop in shape with Task Scheduler». TechRepublic. January 4, 2002.
- ^ «What is Task Scheduler?». Computer Hope. November 30, 2020.
- ^ Al Fasoltd (March 29, 1998). «Windows 98: Stable and fast, as well as ‘new and improved’«. The Syracuse Newspapers. Retrieved October 6, 2007.
- ^ a b Mueller, John Paul (2010). Windows Command Line Administration Instant Reference. John Wiley & Sons. ISBN 978-0470930908.
- ^ Warner, Timothy L. (2015). Sams Teach Yourself Windows PowerShell in 24 Hours. Sams Publishing. ISBN 978-0134049359.
- ^ a b Burnett, Mark; Amaris, Chris; Doyle, Chris; Locher, L. J.; Morimoto, Rand (2002). Maximum Windows 2000 Security. Sams Publishing. ISBN 978-0672319655.
- ^ Mueller, John Paul (2001). Sams Teach Yourself Microsoft Windows XP in 21 Days. Sams Publishing. ISBN 978-0132715539.
- ^ a b «About the Task Scheduler». MSDN. Microsoft. Retrieved October 6, 2007.
- ^ «Task Scheduler 1.0 Interfaces». MSDN. Microsoft. Retrieved May 30, 2014.
- ^ «Task Scheduler Using VBScript». Download Center. Microsoft. March 22, 2004. Archived from the original on May 4, 2006.
- ^ «MS-DOS and Windows command line at command». Computer Hope. Retrieved March 7, 2021.
- ^ «Schtasks». Microsoft TechNet. Microsoft. Retrieved May 18, 2014.
- ^ «At». Microsoft TechNet. Microsoft. Retrieved May 18, 2014.
- ^ «How To Use the AT Command to Schedule Tasks». Support. Microsoft. October 30, 2006.
- ^ Kleiman, Dave; Hunter, Laura E (2006). Winternals Defragmentation, Recovery, and Administration Field Guide. Elsevier. ISBN 978-0080489872.
- ^ «Applications Started with AT Are Not Interactive». Support. Microsoft. February 20, 2007. Archived from the original on October 29, 2004.
- ^ Cowart, Robert; Knittel, Brian (2008). Special Edition Using Microsoft Windows Vista. Que Publishing. ISBN 978-0789737816.
- ^ a b c Kingsley-Hughes, Adrian; Kingsley-Hughes, Kathie; Read, Daniel (2011). VBScript Programmer’s Reference. John Wiley & Sons. ISBN 978-1118058695.
- ^ Paul, Ian (September 5, 2014). «Automate your morning programs with Windows Task Scheduler». PCWorld. Retrieved March 15, 2021.
- ^ «Windows Vista Task Scheduler». Microsoft TechNet. Microsoft. March 3, 2006. Archived from the original on April 12, 2006. Retrieved April 24, 2006.
- ^ «Description of the scheduled tasks in Windows Vista». August 24, 2007. Archived from the original on October 22, 2007.
- ^ a b Kenny Kerr (October 2007). «Task Scheduler 2.0». MSDN. Microsoft. Archived from the original on December 26, 2007. Retrieved October 6, 2007.
- ^ «Task Scheduler 2.0 Interfaces». MSDN. Microsoft. Retrieved May 30, 2014.
- ^ «C# API for Task Scheduler 2.0». Stack Overflow. Retrieved July 24, 2019.
- ^ «Tasks (Windows)». MSDN. Microsoft. Retrieved October 6, 2007.
- ^ «How to troubleshoot scheduled tasks in Windows XP and in Windows Server 2003». Support. Microsoft. May 22, 2013. Retrieved September 3, 2013.
- ^ «Task Scheduler Error and Success Constants». MSDN. Microsoft.
- ^ «Scheduled tasks may not start if you used a System Preparation image to install Windows XP or Windows 2000». Support. Microsoft. July 1, 2004. Archived from the original on September 26, 2008. Retrieved May 19, 2012.
- ^ «The value in the Next Run Time field in Task Scheduler is incorrect in Windows Vista and in Windows Server 2008». Support. Microsoft. October 15, 2008. Archived from the original on December 11, 2008.
Further reading[edit]
- Leonhard, Woody; Rusen, Ciprian (2021). Windows 10 All-in-One For Dummies. John Wiley & Sons. ISBN 978-1119680574.
- Knittel, Brian; McFedries, Paul (2014). Windows 8.1 in Depth. Que Publishing. ISBN 978-0789752819.
- Bott, Ed; Siechert, Carl; Stinson, Craig (2009). Windows 7 Inside Out. Pearson Education. ISBN 978-0735636842.
- Ruest, Danielle; Ruest, Nelson (2008). Microsoft Windows Server 2008: The Complete Reference. McGraw-Hill Education. ISBN 978-0071596466.
- Cowart, Robert; Knittel, Brian (2008). Special Edition Using Microsoft Windows Vista. Que. ISBN 978-0789737816.
External links[edit]
- Task Scheduler on MSDN
- The Log File in the Task Scheduler May Be Incorrectly Formatted and Difficult to Read — Archived October 16, 2007, at the Wayback Machine
- Unable to Delete Text in the Task Scheduler Log File
- Task Scheduler Service Does Not Start
- Scheduled Program Does Not Start in Task Scheduler — Archived August 21, 2006, at the Wayback Machine
- Cannot Disable Task Scheduler
Многих волновал вопрос, «как сделать свой компьютер более автоматизированным?». Настроить автовыключение и запуск определённых задач в конкретное время: отправить электронное письмо или создать какой-то макрос (автовыполнение действий клавиатуры или мыши). Оказывается, практически все это можно сделать стандартными средствами Windows, через «Планировщик заданий».
Что такое «Планировщик заданий» и для чего он нужен
«Планировщик заданий» — это сервис, который может помочь в автоматизировании работы операционной системы. Среда автоматизации может работать в обе стороны: можно задать параметр включения приложения в определённый момент, а можно наоборот, не давать приложению запускаться. К примеру со стартом ОС. Разница между «Планировщиком заданий» (ПЗ) и автозагрузкой в этом случае заключается в разных сферах деятельности Windows и больших правах для планировщика. Этим нередко пользуются авторы вредоносных кодов.
«Планировщик заданий» нужен для тонкой настройки операционной системы под график пользователя.
Как и любой другой сервис Windows, «Планировщик» можно открыть самыми разными способами, на любой вкус для каждого пользователя.
С помощью поиска Windows
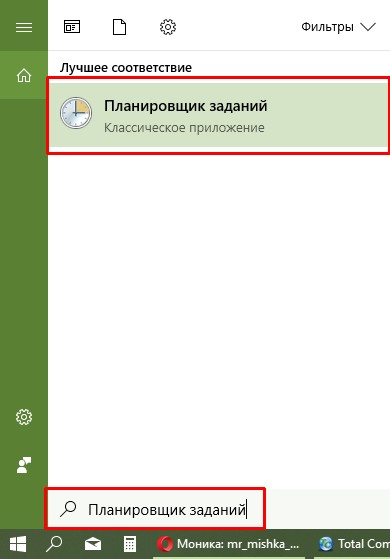
Один из самых простых способов открытия ПЗ — при помощи поиска.
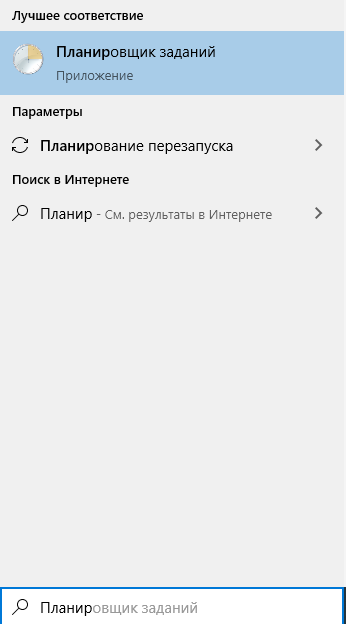
- Открываем поиск (значок лупы в левом нижнем углу) вводим «Планировщик заданий» и щёлкаем по лучшему соответствию.

В поиске вводим «Планировщик заданий» и щёлкаем по лучшему соответствию
Через меню «Пуск»
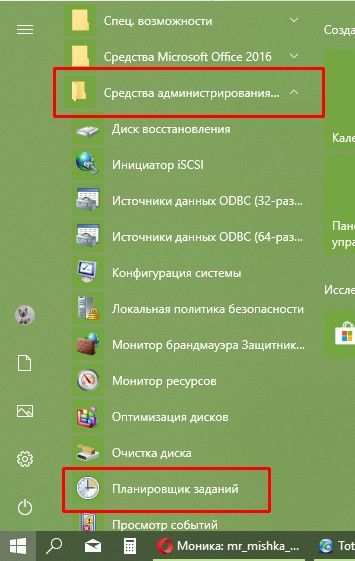
Как административный ресурс, «Планировщик» можно найти в стандартных программах меню «Пуск».
- Кликом мышки по значку Windows или нажатием кнопки Win открываем меню «Пуск».
- В списке программ открываем «Средства администрирования Windows» и щёлкаем на «Планировщик заданий».

В списке программ открываем «Средства администрирования Windows» и щёлкаем на «Планировщик заданий»
Через «Панель управления»
«Панель управления» представляет собой целую платформу для настройки компьютера. Все административные программы и утилиты собраны и разделены по категориям для большего удобства пользования.
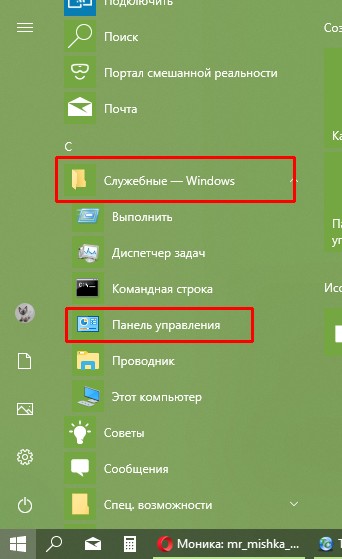
- Открываем меню «Пуск», в списке программ выбираем «Служебные» — «Панель управления».

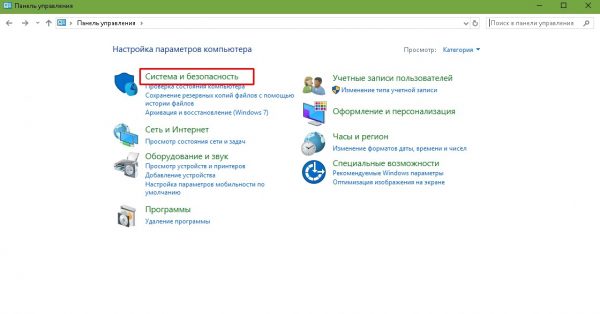
Открываем меню «Пуск», в списке программ выбираем «Служебные» — «Панель управления» - В открывшемся окне переходим в «Система и безопасность».

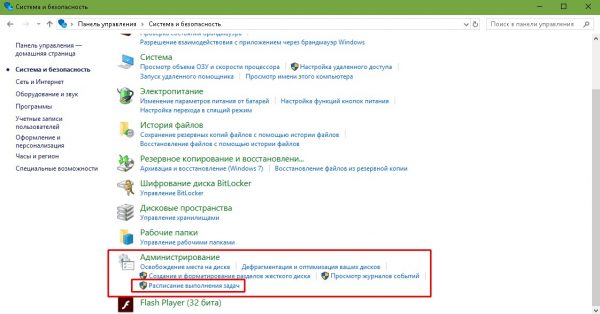
Среди категорий выбираем «Система и безопасность» - Далее в графе «Администрирование» пункт «Расписание выполнения задач».
В графе «Администрирование» открываем «Расписание выполнения задач»
С помощью команды «Выполнить»
Консоль «Выполнить» была внедрена ещё в Windows 95 и дожила до «Десятки» в неизменном виде. Основная задача утилиты — быстрый запуск системных программ, одной из которых является «Планировщик заданий».
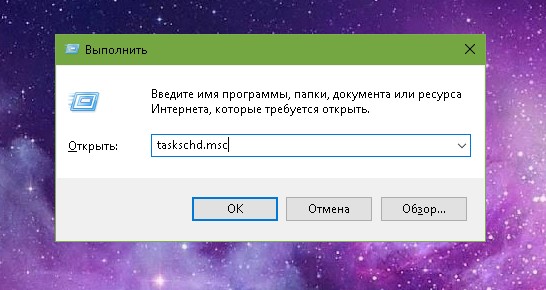
- Нажимаем комбинацию клавиш Win+R.
- Прописываем команду taskschd.msc.
- Запускаем её кнопкой OK.

Нажимаем комбинацию клавиш Win+R, прописываем команду taskschd.msc и запускаем её кнопкой OK
Через «Проводник»
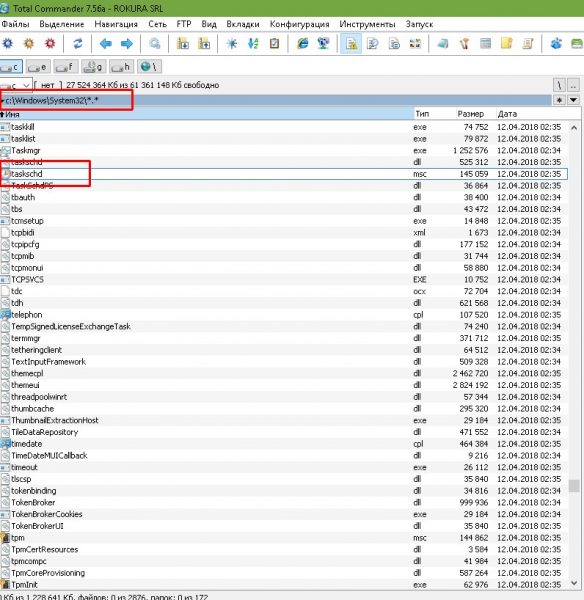
Так как «Планировщик заданий» является программой и имеет исполняющий файл, его можно открыть при помощи запуска специального файла через проводник.
- В любом файловом менеджере открываем папку C:Windowssystem32, находим файл taskschd.msc и запускаем его двойным щелчком.

Открываем папку C:Windowssystem32, находим файл taskschd.msc и запускаем его двойным щелчком
«Планировщик заданий» можно использовать самыми разными способами. Благодаря сервису можно настроить автозагрузку компьютера, автоматическое включение программ и процессов. В «Планировщике» можно создать собственную папку для хранения и быстрого доступа к личным настройкам. Пользовательские задачи делятся на простые и сложные. В простых практически все параметры заданы изначально, необходимо только выбрать, что задействовать. В сложной задаче придётся задавать все самостоятельно.
Просмотр запланированных задач
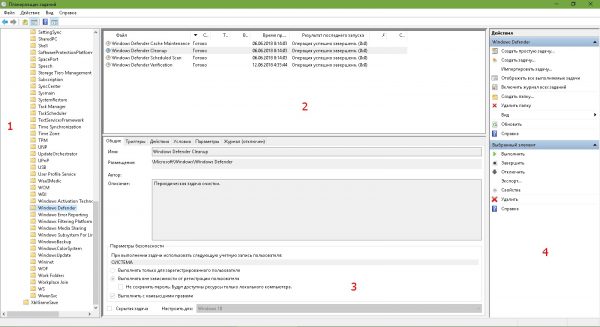
Интерфейс «Планировщика» делится на четыре основных диалоговых окна:
- первое — дерево папок, в которых структурированы задачи;
- второе — непосредственно сами задачи;
- третье — информация, которая выводится при выборе задачи из второго окна;
- четвёртое — панель действий, для управления задачами.
Просмотреть задачу довольно просто.
- Открываем «Планировщик заданий», выбираем любую папку и задание в ней.
- Знакомимся с информацией по вкладкам в третьем диалоговом окне:
- «Общие» — предоставляет информацию о задаче: название, описание и параметры безопасности;
- «Триггеры» — задаёт параметры запуска задания, периодичность, длительность и так далее;
- «Действия» — описывает процесс с атрибутами, который будет выполняться;
- «Условия» — дополнительные параметры запуска задачи. Если «Триггеры» задают время, то «Условия» могут добавить или ограничить параметры запуска процесса.
- «Параметры» — также добавляет условий выполнения или невыполнения задачи.
Создание задачи
Перед созданием задачи желательно сделать папку с личными настройками:
- В древе директорий выбираем папку Microsoft, затем в панели действий нажимаем «Создать папку».
- Прописываем название папки и нажимаем OK.

В панели действий нажимаем «Создать папку», задаем имя и нажимаем OK

Теперь можно приступать к созданию задачи, к примеру, включение музыкального проигрывателя:
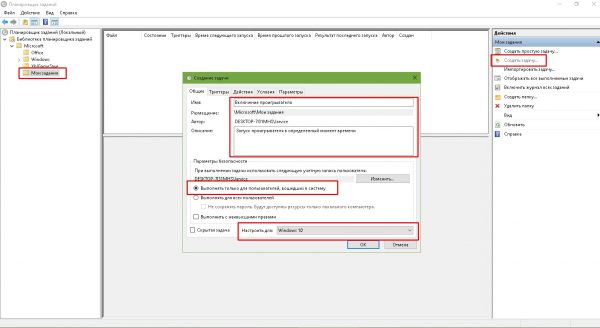
- Щёлкаем по созданной папке, затем в панели действий выбираем «Создать задачу».
- В открывшемся окне заполняем поля «Имя» обязательно и «Описание» — не обязательно. В параметрах безопасности оставляем тумблер у «Выполнять только для вошедших пользователей» и в фильтре «Настроить для:» выбираем Windows 10.
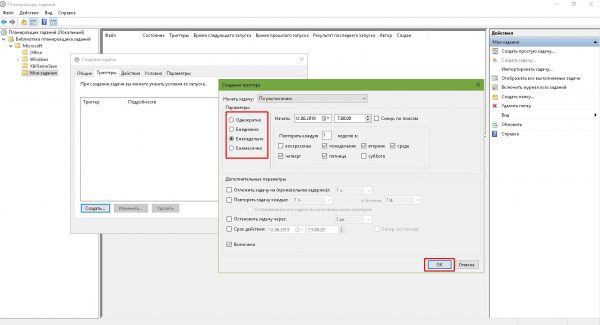
В панели действий нажимаем на «Создать задачу», прописываем имя и описание задания - Переходим во вкладку «Триггеры», нажимаем кнопку «Создать». Выбираем параметры времени, когда будет запускаться приложение. К примеру, задаём время на 7 утра, каждый будний день и нажимаем OK.

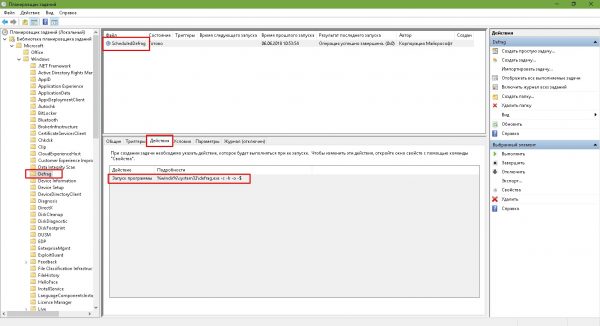
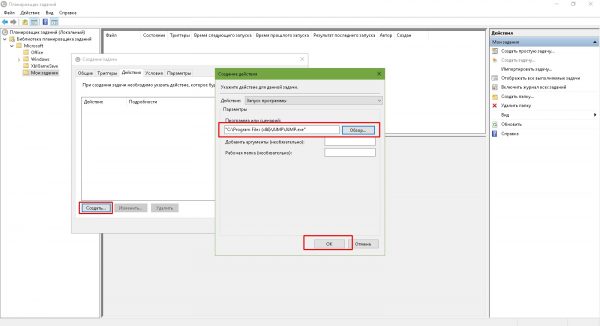
Во вкладке «Триггеры» щёлкаем «Создать» и задаем время срабатывания задачи - Переходим во вкладку «Действие», нажимаем «Создать». Прописываем или выбираем путь к файлу, который запускает проигрыватель и щёлкаем OK.

Прописываем путь к программе и нажимаем OK - Во вкладках «Условия» и «Параметры» можно ничего не менять, сохраняем задачу кнопкой OK.
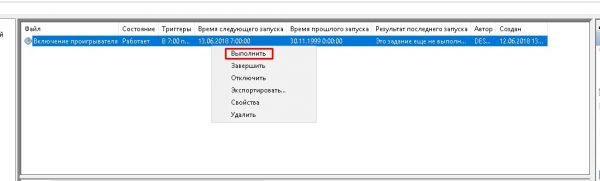
- Проверяем работоспособность задачи: щёлкаем правой кнопкой и выбираем «Выполнить». Если все сделано правильно, проигрыватель запустится.

Щелкаем правой кнопкой по задаче и выбираем «Выполнить»
Создание простой задачи
Простая задача отличается от обычной тем, что она проще. Пользователю нужно меньше вычитывать, какая настройка за что отвечает, интерфейс для создания куда понятней:
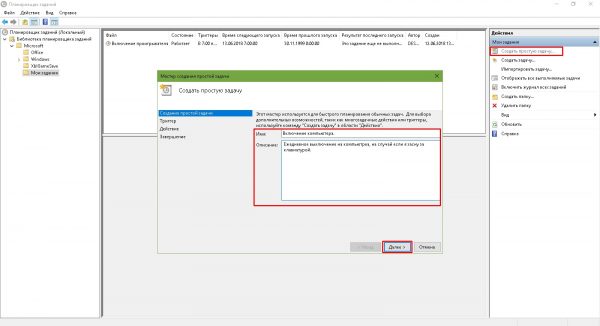
- В панели действия щёлкаем на «Создать простую задачу». Заполняем поля названия и описания, к примеру, задание на ежедневное выключение компьютера в определённый момент, затем нажимаем «Далее».
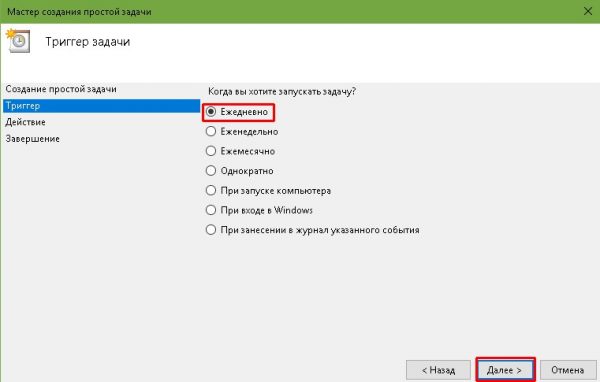
В панели действия выбираем «Создать простую задачу» и - Задаём «Триггер» на ежедневно и снова «Далее».

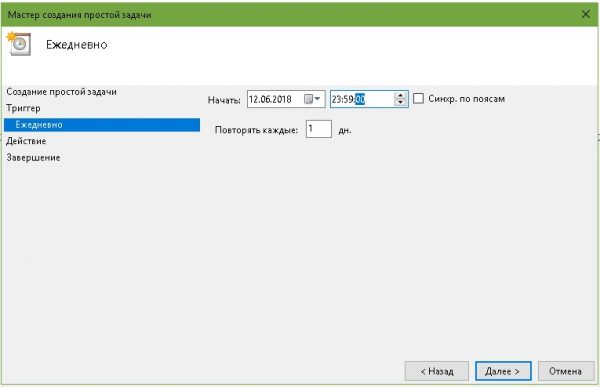
Выбираем пункт «Ежедневно» и нажимаем «Далее» - Выставляем время выключения, в поле «Повторять каждые» оставляем значение 1.

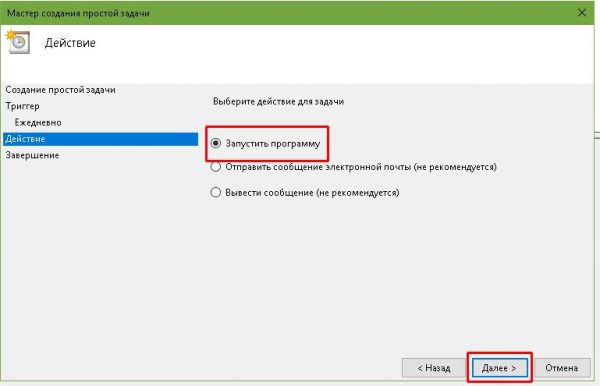
Выставляем дату и время первой задачи, задаем периодичность повторения в днях - В окне «Действие» оставляем тумблер на «Запустить программу», снова «Далее».

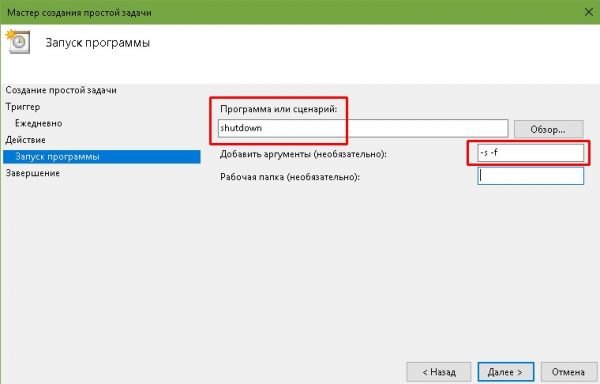
Ставим тумблер на «Запустить программу» и нажимаем «Далее» - Далее в поле «Программа или сценарий» записываем shutdown, а в «Добавить аргументы» -s -f, и жмём «Далее».

Прописываем в поле программы shutdown, а в атрибутах -s -f - В последнем экране мастера настройки задачи просто сверяем все установки и нажимаем «Готово».
Видео: как создать простую задачу в «Планировщике заданий»
Удаление задачи
Удалить задачу куда проще, чем её создать, буквально «ломать не строить»:
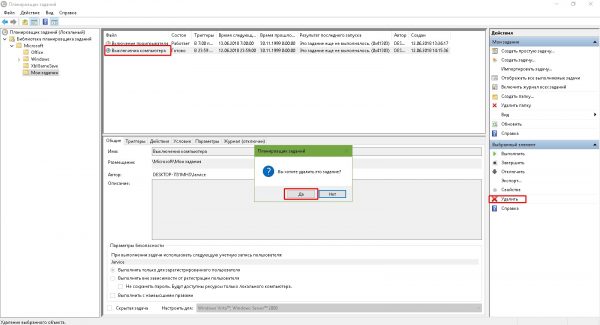
- Выбираем задачу в любой из папок, желательно, чтобы вы точно знали, что это за задача, иначе можно удалить проверку компьютера антивирусом, а это повлечет за собой печальные последствия.
- В панели действий, графе «Выбранный элемент» нажимаем «Удалить» и подтверждаем удаление.
Выбираем задачу, нажимаем «Удалить» в панели действий и подтверждаем команду
Настроить «Планировщик заданий» очень просто. Достаточно лишь единожды разобраться в настройках и понять его механизмы, чтобы затем постоянно пользоваться инструментами автоуправления компьютером.
- Распечатать

Здравствуйте! Меня зовут Алексей. Мне 27 лет. По образованию — менеджер и филолог.
Оцените статью:
- 5
- 4
- 3
- 2
- 1
(4 голоса, среднее: 4.5 из 5)
Поделитесь с друзьями!
С помощью Планировщика заданий в Windows 10 можно автоматизировать некоторые аспекты при работе с операционной системой. Например, произвести автоматический запуск такой-то программы при загрузке системы или при запуске какой-то другой программы. Рассмотрим, как пользоваться данной утилитой более подробно.

Содержание
- Как открыть Планировщик заданий в Windows 10
- Просмотр запланированных задач в Планировщике задач в Windows 10
- Первичная настройка Планировщика задач в Windows 10
- Создание задач в Планировщике задач в Windows 10
- Отключение Планировщика задач в Windows 10
- Что делать, если Планировщик не работает
У некоторых пользователей может возникнуть проблема с открытием Планировщика заданий в Windows 10. К счастью, разработчики предусмотрели множество способов, позволяющих выполнить запуск данной утилиты.
Самым простым из них является – запуск Планировщика через поисковую строку в «Панели задач». Чтобы открыть его таким способом, нажмите на иконку лупы на «Панели задач» и введите в строку наименование искомого объекта на русском языке. Кликните по подходящему результату или нажмите Enter.

Чуть сложнее обстоят дела, если вы намерены открыть Планировщик при помощи «Панели управления». Здесь нужно воспользоваться этой небольшой инструкцией:
- Для начала откройте саму «Панель управления».
- Напротив «Просмотр» установите вариант «Мелкие значки» или «Крупные значки».
- Теперь среди представленных элементов нужно выбрать вариант «Администрирование». Для удобства можно использовать поисковую строку по «Панели управления», что расположена в верхней правой части окна.
- Откроется окошко, где пользователь может видеть список утилит, относящихся к разделу «Администрирование». Здесь нужно выбрать программу «Планировщик задач».


Ещё есть способ открыть Планировщик при помощи утилиты «Управление компьютером». Рассмотрим его исполнение на примере пошаговой инструкции:
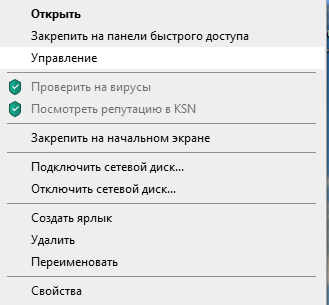
- Для начала нужно вызвать первую утилиту. Нажмите правой кнопкой мыши по иконке меню «Пуск» или используйте комбинацию клавиш Win+X.
- Из контекстного меню выберите вариант «Управление компьютером».
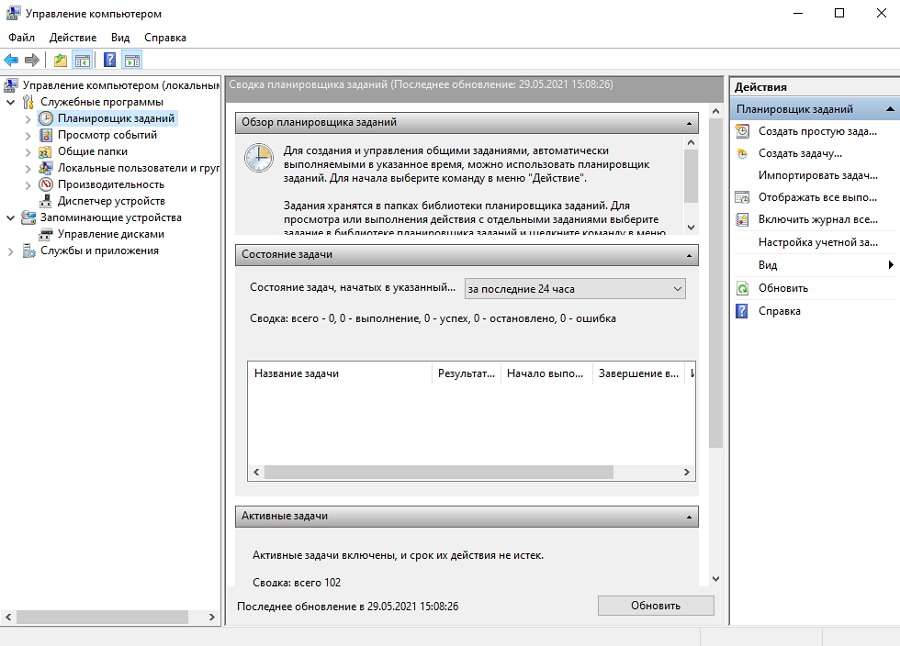
- В интерфейсе открывшегося окна раскройте ветку «Служебные программы». Она расположена в левой части окна.
- Теперь выберите вариант «Планировщик задач», который тоже расположен слева. Он запустится в интерфейсе утилиты «Управление компьютером».


Также вы можете использовать универсальный способ открытия каких-либо программ на компьютере при помощи строки «Выполнить»:
- Запустите её, воспользовавшись комбинацией Win+R.
- Введите в строку команду:
taskschd.mscИ нажмите на кнопку «Ок» или Enter на клавиатуре.

Дополнительно «Планировщик» можно найти в «Проводнике», введя этот адрес в поисковую строку: Windows/System32. Там нужно найти и запустить файл «taskschd».
Из всех представленных способов можно использовать любой удобный. Однако в некоторых ситуация применить один или несколько из них не представляется возможным, поэтому приходится пользоваться аналогами.
Просмотр запланированных задач в Планировщике задач в Windows 10
На самом деле просматривать активные задачи в Планировищке для Windows 10 очень просто. Для этого нужно просто обратить внимание на то, что написано под заголовком «Активные задачи». Все задачи представлены в виде таблицы, разделённую на следующие колонки:
- «Название задачи». В ней можно просмотреть наименование задач;
- «Время следующего запуска». Здесь указано время, когда эта задача запустится. В определённых случаях, например, если запуск задачи никак нельзя привязать к конкретному времени, колонка может быть пустой;
- «Триггеры». В этой колонке прописаны условия, при которых происходит запуск той или иной задачи. Для каждой задачи указан свой триггер;
- «Размещение». Опять же, у некоторых задач эта колонка может быть не заполнена. Как правило, в ней указывается адрес какого-либо файла, который запускается при выполнении задачи.

Обычно список задач обновляется в реальном времени, но иногда требуется непосредственное участие пользователя для его обновления. К счастью, в таких случаях достаточно просто нажать на кнопку «Обновить», что расположена ниже.
Первичная настройка Планировщика задач в Windows 10
Для начала рассмотрим сам интерфейс программы. Он условно разделён на несколько секций:
- Верхнее меню. Здесь всё стандартно, как и у большинства других программ в Windows. Находятся некоторые элементы управления, некоторые из которых также дублируются в основном интерфейсе;
- Левая колонка. Здесь представлено дерево с папками и файлами, которое очень похожее на аналогичное в редакторе реестра;
- Центральная колонка. Здесь пользователь может видеть основную информацию о задачах, добавленных в программу. Более подробно про неё было написано выше;
- Правая колонка. Тут расположены определённые элементы управления, отвечающие за действие пользователей в программе.

Читайте также:
Как запустить командную строку в Windows (Виндовс) 10
Почему на компьютере пропал значок звука и что делать
Classic Shell для Windows — где скачать, как настроить
Также рассмотрим действия, которые пользователь может совершать над задачами в Планировщике задач в Windows 10:
- Создание простых задач. В этом случае ОС самостоятельно проставляет большинство параметров у новой задачи. Вам нужно лишь настроить самые основные из них самостоятельно, например, время/условие запуска;
- Полноценное создание задач. Очень похоже на предыдущий вариант, но только почти все настройки вам придётся выставлять самостоятельно. Больше подойдёт для каких-либо специфических нужд, где требуется прописывание каких-то особых условий;
- Импортирование задач. Для этого вам потребуется выгрузить файл с ранее созданной задачей и попытаться открыть его при помощи Планировщика задач в Windows 10;
- Отображение задач. В этом случае в программе будут показаны все задачи, которые выполнены или будут выполнены в ближайшее время;
- Включение и отключение журнала со всеми записями. Показывает или наоборот скрывать историю действий пользователя в данной программе. С помощью «Журнала» можно вернуться к той или иной задаче;
- Создание и удаление папок, расположенных в левом дереве папок;
- Экспорт той или иной задачи. При использовании этой возможности программы, задача записывается в специальный файл, который можно запустить на стороннем компьютере.
Создание задач в Планировщике задач в Windows 10
В качестве примера будет создана задача, согласно которой Skype будет запускаться через 15 минут после запуска операционной системы:
- Перейдите к Планировщику задач. Все доступные способы, как это сделать были описаны выше.
- В правой части окна нажмите на кнопку «Создать задачу». Если её там нет и/или интерфейс программы в вашем случае немного отличается, то нажмите в верхнем меню на пункт «Действие», а там, из контекстного меню, выберите вариант «Создать задачу».
- Сразу же откроется окошко с настройкой основных параметров задачи. В ней откройте вкладку «Общее», если она не открылась по умолчанию.
- В поле «Имя» напишите, как будет называться созданная задача.
- В поле «Размещение» укажите место на диске, где расположена программа.
- Дополнительно к этой задачи можно добавить какое-либо описание, воспользовавшись специальным полем в нижней части окна.
- В блоке «Параметры безопасности» обратите внимание на пункт «При выполнении задач использовать следующую учётную запись». Здесь должна быть по умолчанию ваша учётная запись. Если там не выбрано ничего или выбрана не та запись, то нажмите на кнопку «Изменить» для внесения корректировок.
- Также в «Параметры безопасности» можно настроить что-либо дополнительно, если вам это нужно.
- Теперь перейдите в раздел «Триггеры».
- В рассматриваемом случае нужно поставить напротив пункта «Начать задачу» значение «При запуске».
- Так как нам требуется, чтобы Скайп запускался автоматически через 15 минут после входа в учётную запись, нужно поставить галочку напротив пункта «Отложить задачу на». В поле, которое находится напротив этого пункта, поставьте нужное время. В данном случае это 15 минут.
- Перейдите в раздел «Действие». Там нажмите на кнопку «Задать».
- Напротив параметра «Действие» раскройте выпадающий список и выберите, что требуется сделать. В данном случае нужно выбрать вариант «Запуск программы».
- Ниже, в поле «Программа или сценарий», укажите расположение программы на компьютере. Чтобы это сделать, нужно нажать на кнопку «Обзор».
- Дополнительно можно воспользоваться вкладками «Условия» и «Параметры». Однако использовать их в данном примере необязательно, поэтому они рассматриваться не будут.


Отключение Планировщика задач в Windows 10
Планировщик – это отдельная служба, которая потребляет ресурсы системы, но даже если он вам не нужен в данный момент, то отключать его не следует. Всё дело в том, что в него могут быть по умолчанию записаны некоторые задачи, необходимые для корректной работы операционной системы. Однако можно отключать или вовсе удалять те задачи, которые вы создали самостоятельно. Делается это по следующей инструкции:
- В интерфейсе Планировщика выберите ту задачу, которую хотели бы отключить. Её нужно выделить при помощи клика левой кнопкой мыши.
- Теперь в правой части окна обратите внимание на колонку «Действие». Там нужно выбрать вариант «Отключить» или «Удалить».
Что делать, если Планировщик не работает
Иногда бывает так, что пользователю либо вообще не удаётся запустить Планировщик (бывает крайне редко), либо Планировщик не запускается в автоматическом порядке вместе с операционной системой. Это чревато сбоями в работе операционной системы. Попробуйте исправить неполадки в запуске при помощи данной инструкции:
- Откройте строку «Выполнить», воспользовавшись комбинацией Win+R.
- Пропишите в ней команду:
services.mscДля применения нажмите Enter или «Ок».
- Откроется окно, где представлены все службы на компьютере. Здесь нужно найти службу «Планировщик задач». Кликните по ней правой кнопкой мыши, чтобы появилось контекстное меню. В нём выберите вариант «Свойства».
- Напротив поля «Тип запуска» установите значение «Автоматический».
- Нажмите на кнопку «Применить» и «Ок».
- Перезагрузите компьютер.


Если предложенная выше инструкция не сработала, то это значит, что нужно внести некоторые корректировки в реестр:
- Откройте редактор реестра. Это можно сделать через строку «Выполнить», которая вызывается сочетанием клавиш Win+R. В неё пропишите команду:
regeditи нажмите Enter или «Ок». - Воспользовавшись специальной строкой, расположенной в верхней части окна реестра, перейдите по этому адресу:
HKEY_LOCAL_MACHINESYSTEMCurrentControlSetServicesScheduleЕго просто нужно вставить в строку и нажать на Enter для перехода.
- Откроется нужная папка, где требуется найти и открыть при помощи двойного клика левой кнопкой мыши файл Start или Start DWORD.
- Появится окно с редактированием параметров файла. Здесь нужно вписать в строку «Значение» цифру 4.
- Затем нажмите на «Да» и закройте реестр.
- Перезагрузите компьютер, чтобы изменения вступили в силу.


Теперь вы знаете как взаимодействовать с Планировщиком задач в Windows 10. Данная программа необходима как для стабильной работы самой операционной системы, так и для упрощения взаимодействия пользователя с операционной системой.
 В рамках серии статей об инструментах администрирования Windows, которыми мало кто пользуется, но которые при этом могут быть очень полезными, сегодня расскажу об использовании планировщика заданий.
По идее, планировщик заданий Windows — это способ запустить какую-то программу или процесс при наступлении определенного времени или условий, однако его возможности этим не исчерпываются. Кстати, благодаря тому, что многие пользователи не знают об этом инструменте, удаление из автозагрузки вредоносных программ, которые умеют прописывать свой запуск в планировщике, оказывается более проблематичен, чем с теми, которые прописывают себя только в реестре.
Еще на тему администрирования Windows
- Администрирование Windows для начинающих
- Редактор реестра
- Редактор локальной групповой политики
- Работа со службами Windows
- Управление дисками
- Диспетчер задач
- Просмотр событий
- Планировщик заданий (эта статья)
- Монитор стабильности системы
- Системный монитор
- Монитор ресурсов
- Брандмауэр Windows в режиме повышенной безопасности
Запуск планировщика заданий

Как всегда, начну с того, как запустить планировщик заданий Windows из окна «Выполнить»:
- Нажмите клавиши Windows + R на клавиатуре
- В появившемся окне введите taskschd.msc
- Нажмите Ok или Enter (см. также: 5 способов открыть планировщик заданий в Windows 10, 8 и Windows 7).
Следующий способ, который будет работать в Windows 10, 8 и в Windows 7 — зайти в папку «Администрирование» панели управления и запустить планировщик заданий оттуда.
Использование планировщика заданий

Планировщик заданий имеет примерно тот же интерфейс, что и другие инструменты администрирования — в левой части древовидная структура папок, по центру — информация о выбранном элементе, справа — основные действия над задачами. Доступ к этим же действиям можно получить из соответствующего пункта главного меню (При выборе конкретной задачи или папки пункты меню меняются на относящиеся к выбранному элементу).
Основные действия в планировщике заданий
В данном инструменте вам доступны следующие действия над задачами:
- Создать простую задачу — создание задания с помощью встроенного мастера.
- Создать задачу — то же, что и в предыдущем пункте, но с ручной настройкой всех параметров.
- Импортировать задачу — импорт ранее созданной задачи, которую вы экспортировали. Может пригодиться, если вам нужно настроить выполнение определенного действия на нескольких компьютерах (например, запуск проверки антивирусом, блокировка сайтов и прочее).
- Отображать все выполняемые задачи — позволяет посмотреть список всех задач, которые запущены в настоящий момент времени.
- Включить журнал всех заданий — позволяет включить и отключить ведение журнала планировщика заданий (записывает все действия, запускаемые планировщиком).
- Создать папку — служит для создания собственных папок в левой панели. Можно использовать для собственного удобства, чтобы было понятно, что и где вы создали.
- Удалить папку — удаление папки, созданной в предыдущем пункте.
- Экспорт — позволяет экспортировать выбранную задачу для последующего использования на других компьютерах или на этом же, например, после переустановки ОС.
Кроме этого, вы можете вызвать список действий, кликнув правой кнопкой мыши по папке или задаче.
Кстати, если у вас есть подозрения на наличие вредоносного ПО, рекомендую заглянуть в список всех выполняемых задач, это может оказаться полезным. Также будет полезным включить журнал заданий (по умолчанию отключен), и заглянуть в него после пары перезагрузок, чтобы посмотреть, какие задания выполнялись (для просмотра журнала используйте вкладку «Журнал», выбрав папку «Библиотека планировщика заданий»).

В планировщике заданий уже присутствует большое количество задач, которые необходимы для работы самой Windows. Например, автоматическая очистка жесткого диска от временных файлов и дефрагментация диска, автоматическое обслуживание и проверка компьютера во время простоя и другие.
Создание простой задачи
Теперь давайте посмотрим, как создать простую задачу в планировщике заданий. Это самый легкий способ для начинающих пользователей, который не требует особенных навыков. Итак, выбираем пункт «Создать простую задачу».

На первом экране вам потребуется ввести имя задачи и, при желании, ее описание.

Следующий пункт — выбрать, когда будет выполняться задание: можно выполнять ее по времени, при входе в Windows или включении компьютера, или же по возникновению какого-либо события в системе. При выборе одного из пунктов, вам также предложат задать время выполнения и другие детали.

И последний этап, выбрать, какое именно действие будет выполняться — запуск программы (к ней можно добавить аргументы), вывод сообщения или отправка сообщения электронной почты.
Создание задачи без использования мастера
Если вам требуется более точная настройка задач в планировщике заданий Windows, нажмите «Создать задачу» и вас ждет множество параметров и опций.

Я не буду подробно описывать полный процесс создания задачи: в общем-то, в интерфейсе все достаточно ясно. Отмечу лишь существенные отличия по сравнению с простыми задачами:
- На вкладке «Триггеры» вы можете задать сразу несколько параметров для ее запуска — например, при простое и при блокировке компьютера. Также, при выборе пункта «По графику», вы можете настроить выполнение в определенные числа месяца или дни недели.

- На вкладке «Действие» вы можете определить запуск сразу нескольких программ или выполнения других действий на компьютере.

- Также вы можете настроить выполнение задачи при простое компьютера, только при питании от розетки и другие параметры.


Несмотря на то, что различных опций большое количество, думаю, в них не составит труда разобраться — все они называются достаточно ясно и означают именно то, о чем сообщают в названии.
Надеюсь, что кому-то изложенное сможет пригодиться.
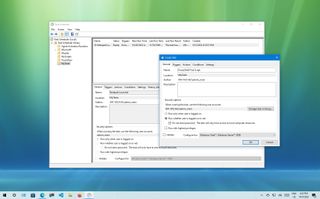
(Image credit: Future)
On Windows 10, Task Scheduler is a tool that allows you to create and run tasks automatically. Usually, the system and certain apps use the scheduler to automate maintenance tasks (such as disk defragmentation, disk cleanup, and updates), but anyone can use it. Using this feature, you can launch programs, run commands, and execute scripts on a particular day and time, or you can also trigger tasks when a specific event occurs.
Task Scheduler works by monitoring the system’s time and events to execute the task as soon as the condition is met.
When trying to use the scheduler app to run a task at a specific time or when an event occurs, you can create a task in at least two different ways using the basic and advanced settings.
This guide will walk you through the steps to get started with the Task Scheduler experience to automate tasks on your device.
How to create a basic task on Task Scheduler
To create a task using basic settings on Windows 10, use these steps:
- Open Start.
- Search for Task Scheduler, and click the top result to open the app.
- Right-click the «Task Scheduler Library» branch and select the New Folder option.
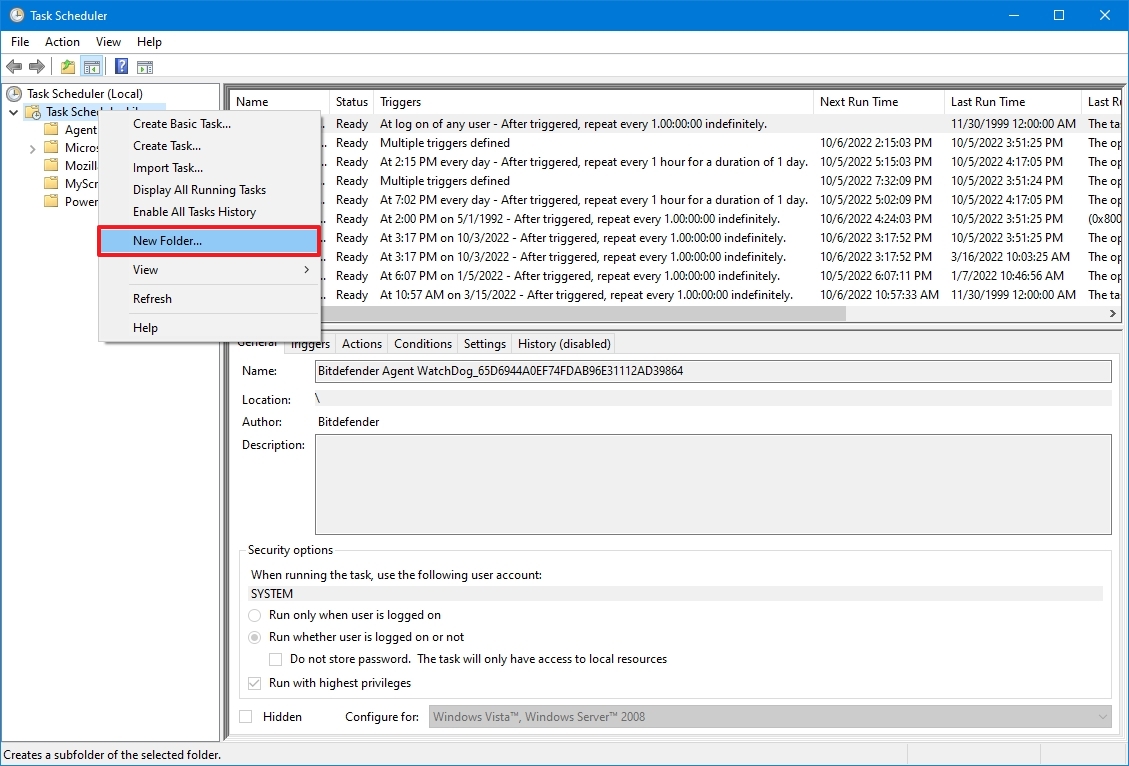
- Type a name for the folder – for example, MyTasks. (This step isn’t a requirement, but it’s a recommended step to keep your tasks separate from the system and apps tasks.)
- Click the OK button.
- Expand the «Task Scheduler Library» branch, and select the MyTasks folder.
- Click the Action menu.
- Select the «Create Basic Task» option.
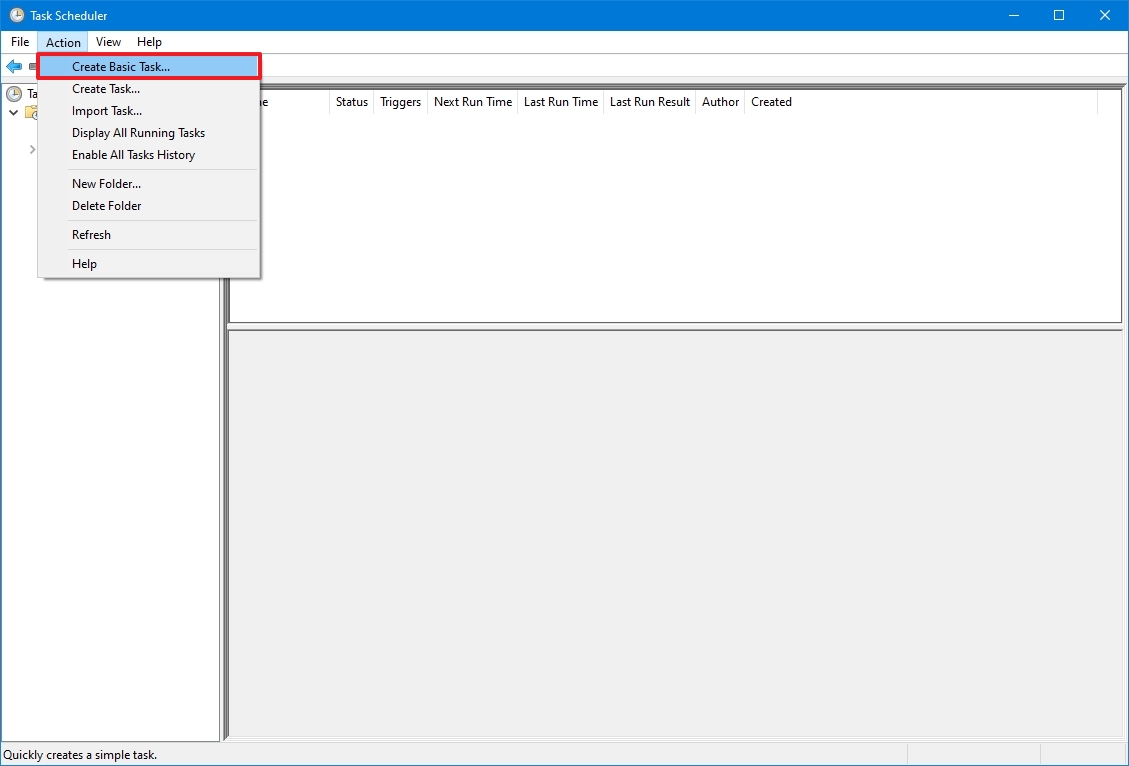
- In the «Name» field, type a short descriptive name for the task – for example, Notepad Launcher.
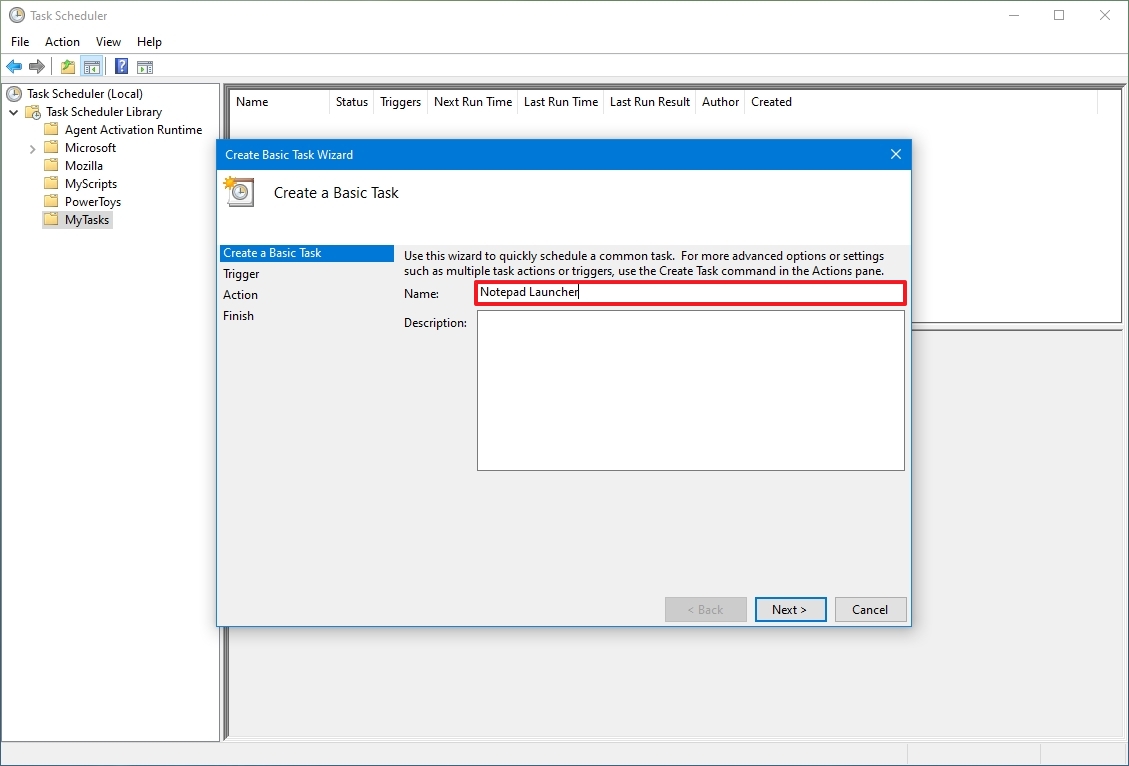
- (Optional) In the «Description» field, create a description for the task.
- Click the Next button.
- Select the Monthly option.
- Quick note: Task Scheduler allows you to select from a number of triggers, including on a specific date, during startup, or when you or a particular user signs in. Depending on your requirements, you’ll need to configure additional parameters. In this case, we’ll be selecting the option to run a task every month.
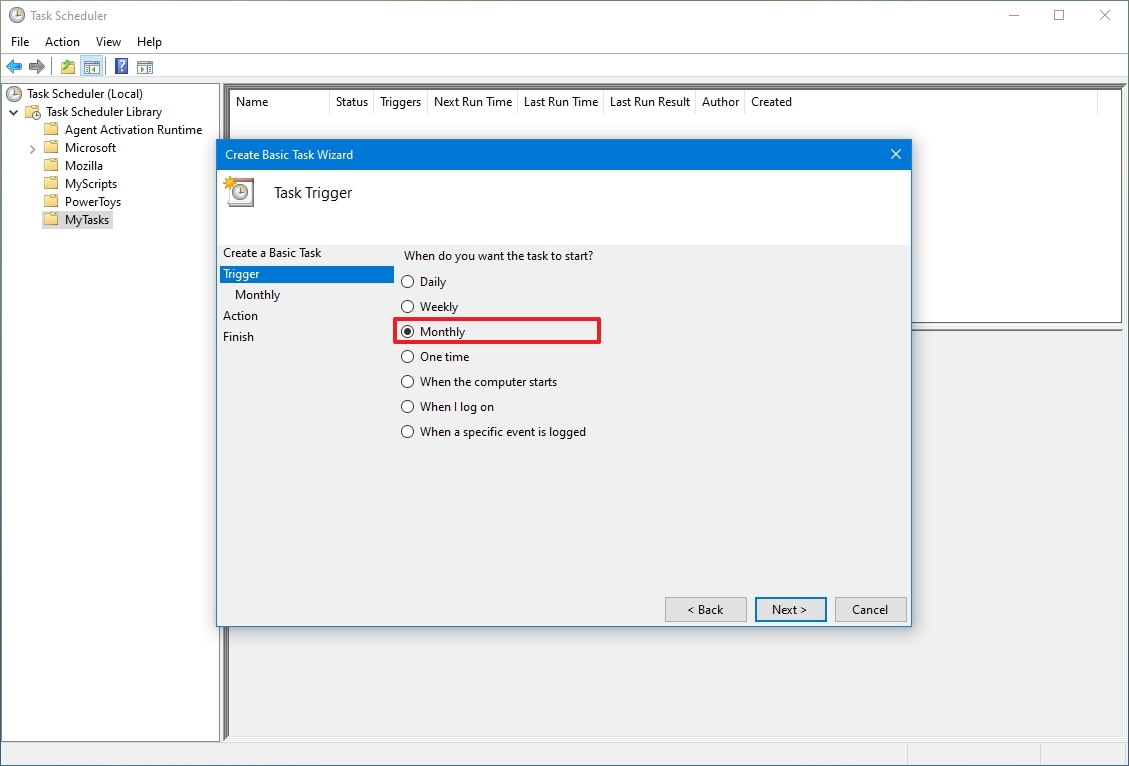
- Click the Next button.
- Using the «Start» settings, specify when the task should run and the time (very important).
- Use the «Monthly» drop-down menu for the months of the year you want to run the task.

- Use the «Days» or «On» drop-down menu to specify the days that the task will run.
- Quick tip: Using the «On» setting may be your best option if you’re planning to run a task during a specific day of the week.
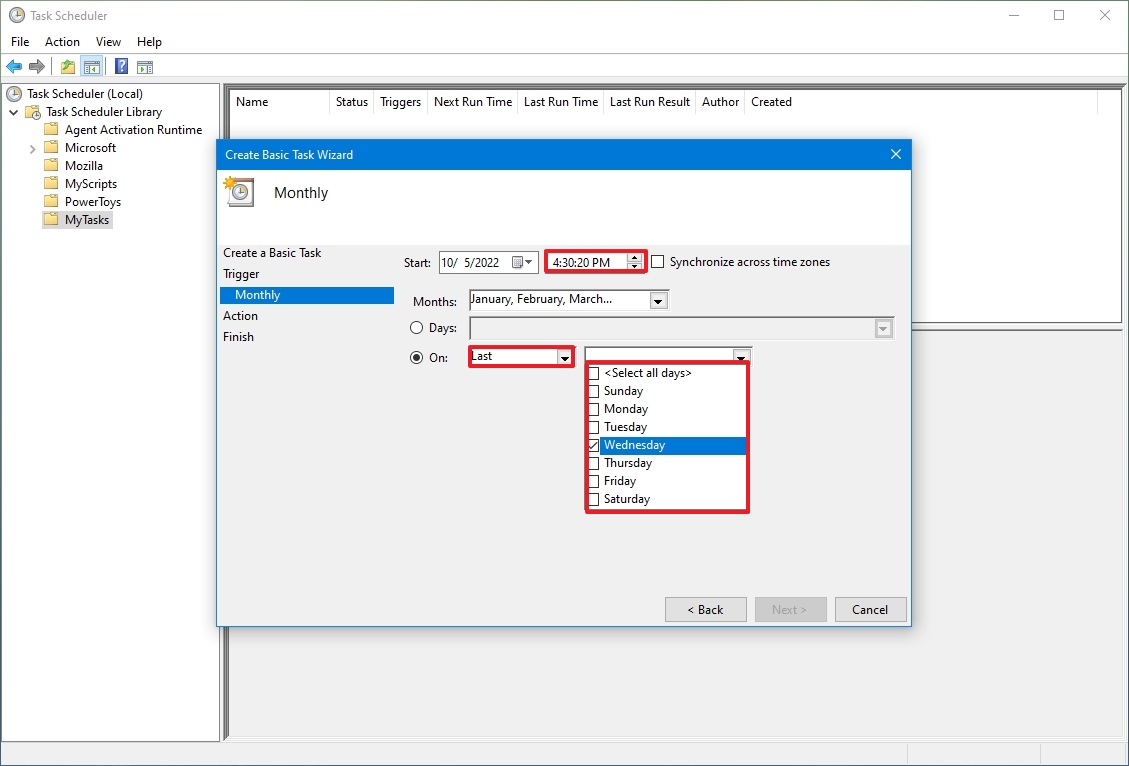
- Click the Next button.
- Select the Start a program option to launch an app, run a command, or execute a script file.
- Quick note: You can select the Send an e-mail or Display a message option, but these are deprecated features, which means that they may or may not work because Microsoft is no longer maintaining them.
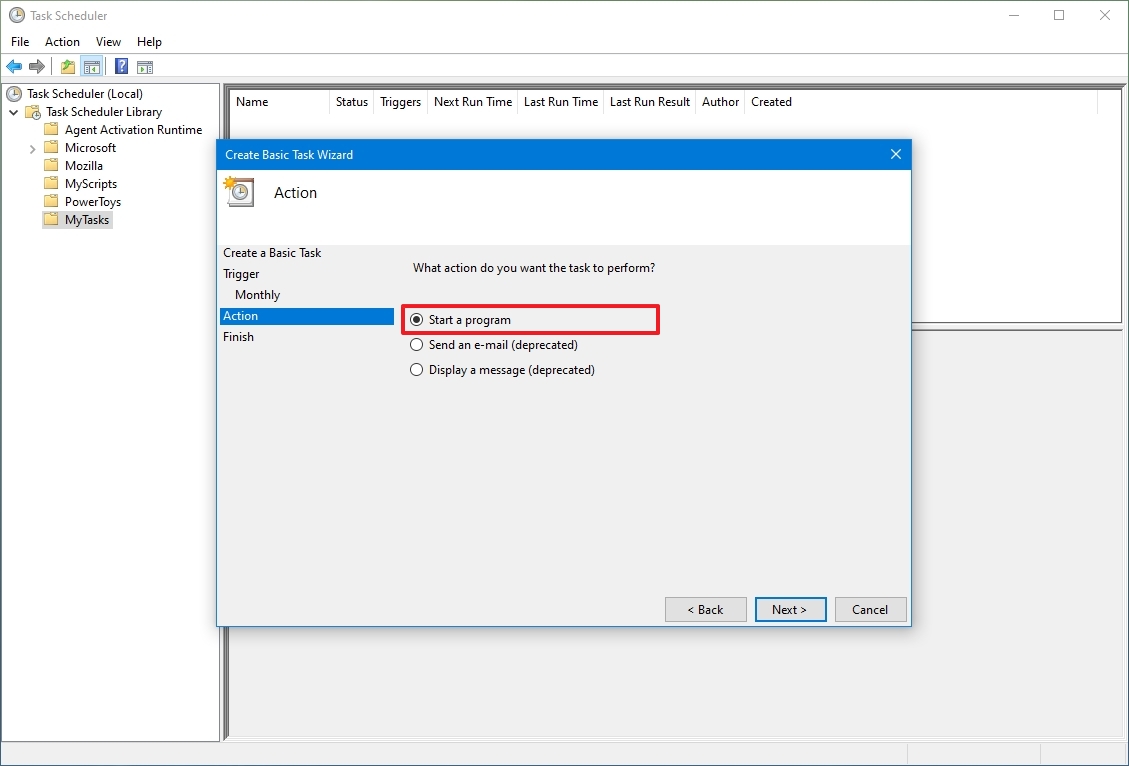
- In the «Program/script» field, specify the path for the application.
- Quick tip: If you don’t know the path of the app, click the Browse button to find it.
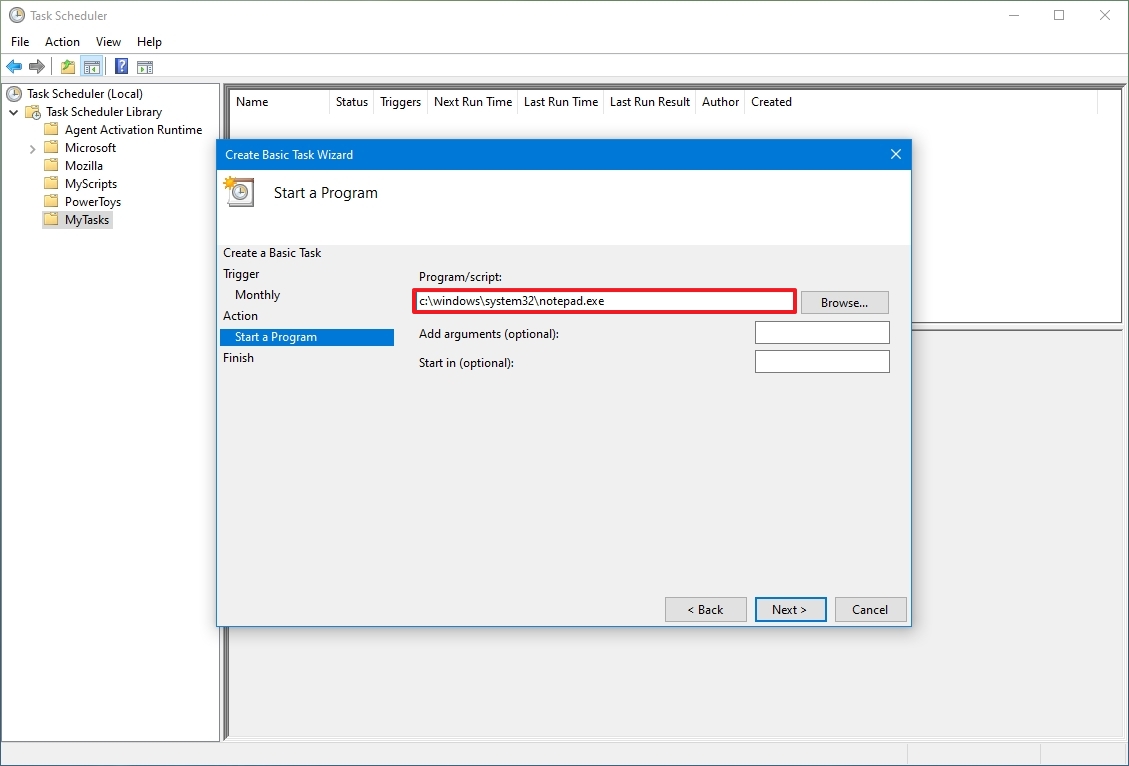
- (Optional) In the «Add arguments» field, you can specify arguments to run the task with special instructions.
- (Optional) In the «Start in» field, specify the folder in which the program will start. (Usually, you can leave this setting empty.)
- Click the Finish button.
Once you complete the steps, Task Scheduler will save the task and run automatically on your specified schedule.
How to create an advanced task on Task Scheduler
To create a task using advanced settings using the Task Scheduler, use these steps:
- Open Start.
- Search for Task Scheduler, and click the top result to open the app.
- Right-click the «Task Scheduler Library» branch and select the New Folder option.
- Type a name for the folder – for example, MyTasks.
- Click the OK button.
- Expand the «Task Scheduler Library» branch, and select the MyTasks folder.
- Click the Action menu.
- Select the Create Task option.
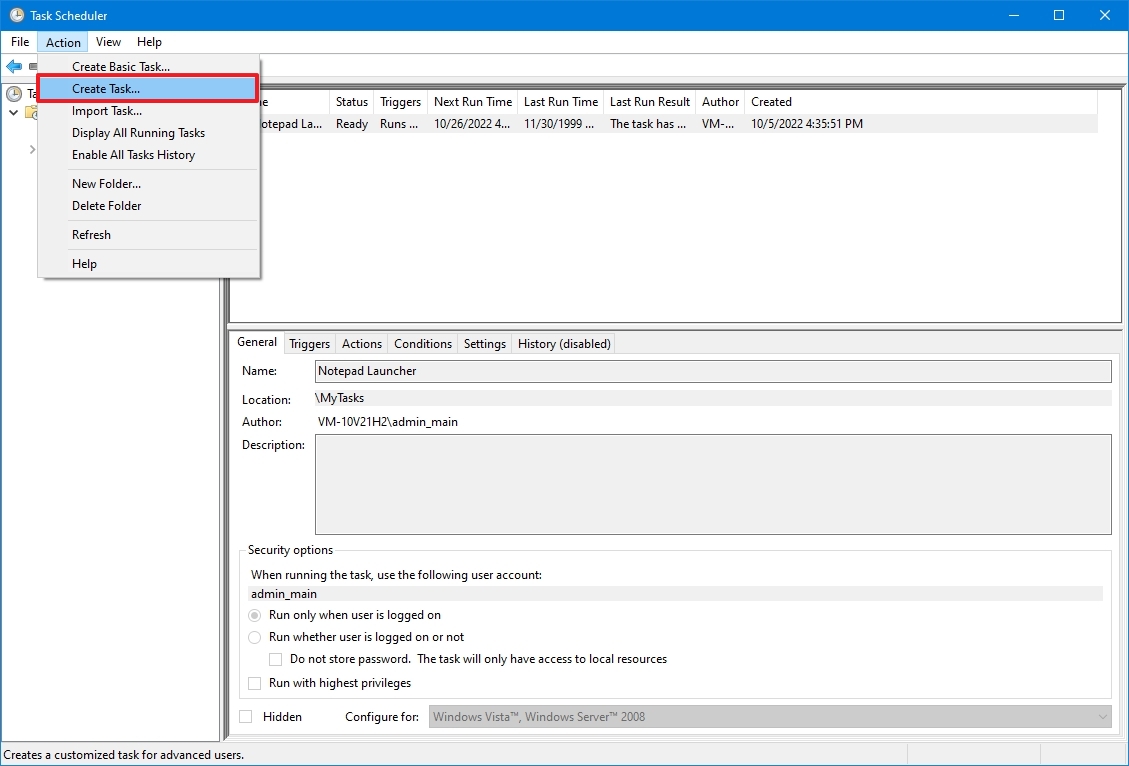
- In the «Name» field, type a short descriptive name for the task – for example, PowerShell First Script.
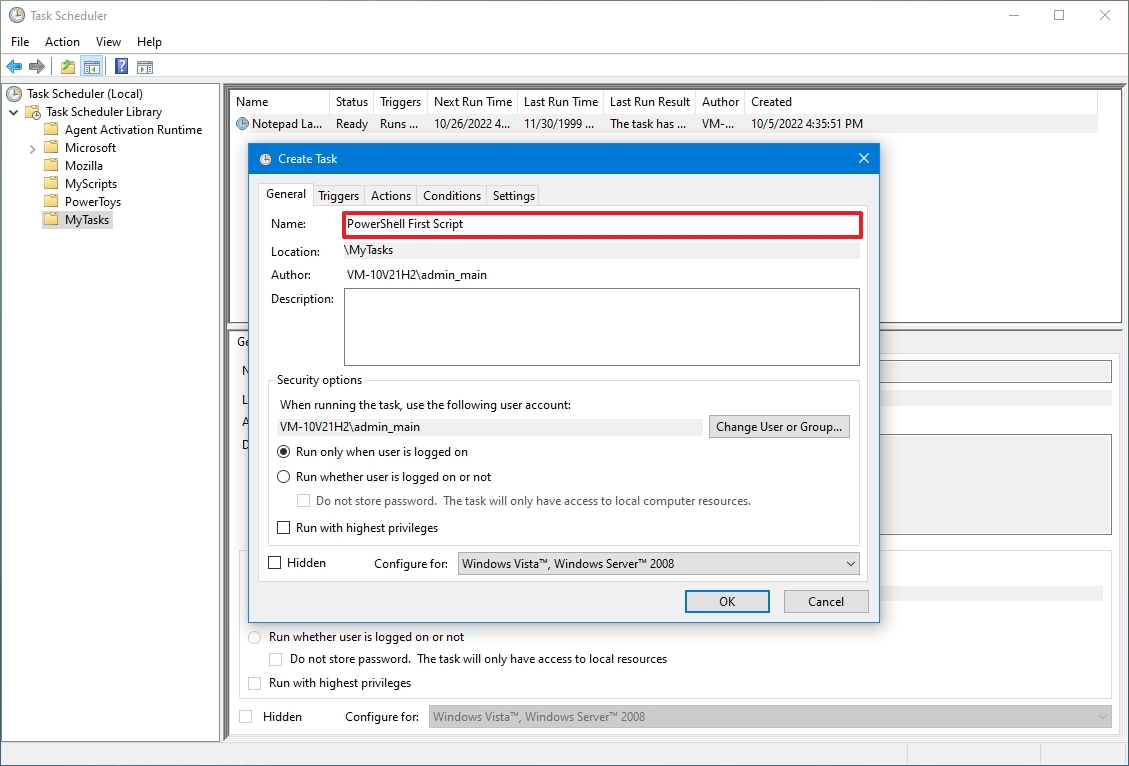
- (Optional) In the «Description» field, create a description for the task.
- In the «Security options» section, you can configure which administrator account can run the task.
- Quick tip: The default user should be fine if you use an account with administrative privileges. If you want to run a Command Prompt or PowerShell command, you can select the «Run whether user is logged on or not» option to prevent the command window from showing up when the task runs automatically, as it’s likely that using the Hidden option won’t work.
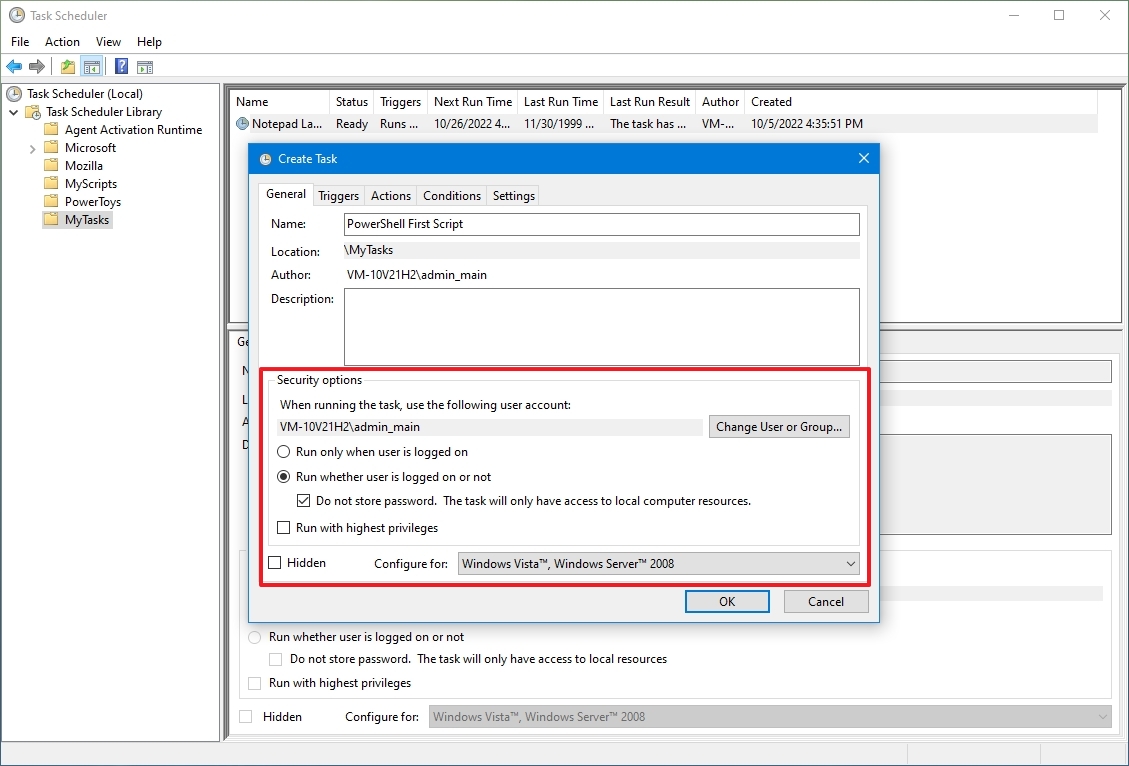
- (Optional) Check the «Run with highest privileges» option if the task requires elevated privileges.
- The «Configure for» settings should be left alone unless you’re required to use a different compatibility option.
- Click the Triggers tab.
- Click the New button.
- Use the «Begin the task» drop-down menu to select one of the many triggers, including «On a schedule,» «At startup,» «On workstation unlock,» and many others. (For this guide, select the On a schedule option.)
- Using the «Start» settings, specify when the task should start running and the time (very important).
- Select the Monthly option from the left side.
- Use the «Months» drop-down menu to select the months the task will run.
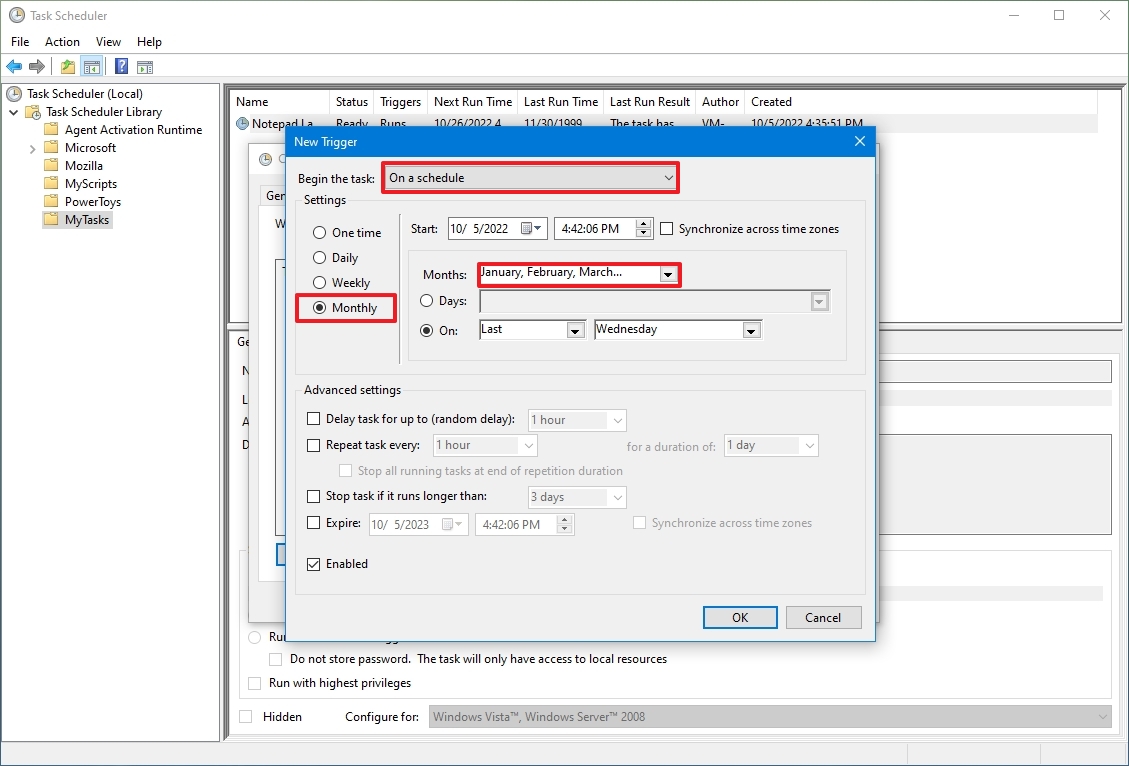
- Use the «Days» or «On» drop-down menu to specify the days that the task will run.
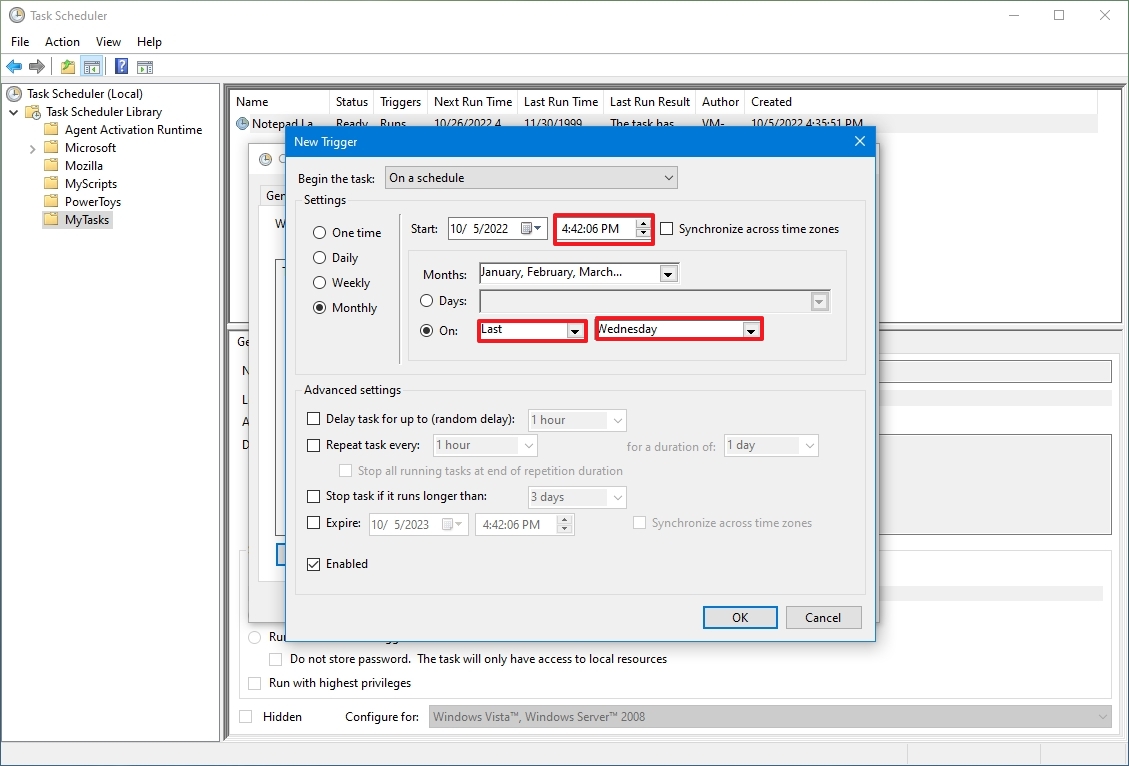
- (Optional) In the «Advanced settings» section, you can select options to delay, repeat, stop, and expire a task. The Enabled option is checked by default. (Usually, you don’t want to change these settings unless necessary.)
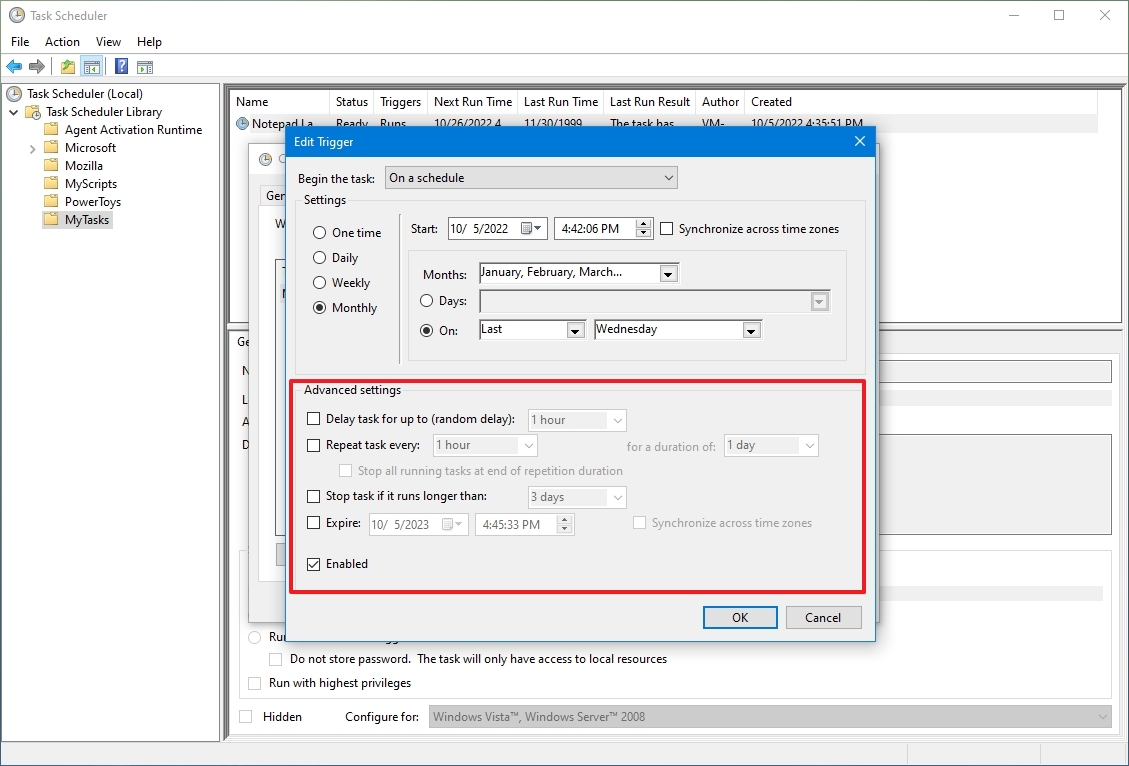
- Click the OK button.
- Click the Action tab.
- Click the New button.
- Use the «Action» drop-down menu and select the Start a program option.
- Under the «Settings» section, in the «Program/script» field, specify the path for the application – for example, powershell.exe.
- Quick tip: If you don’t know the path of the app, click the Browse button to find it. Also, if it’s a known application like PowerShell or Command Prompt, you only need to specify the file name.
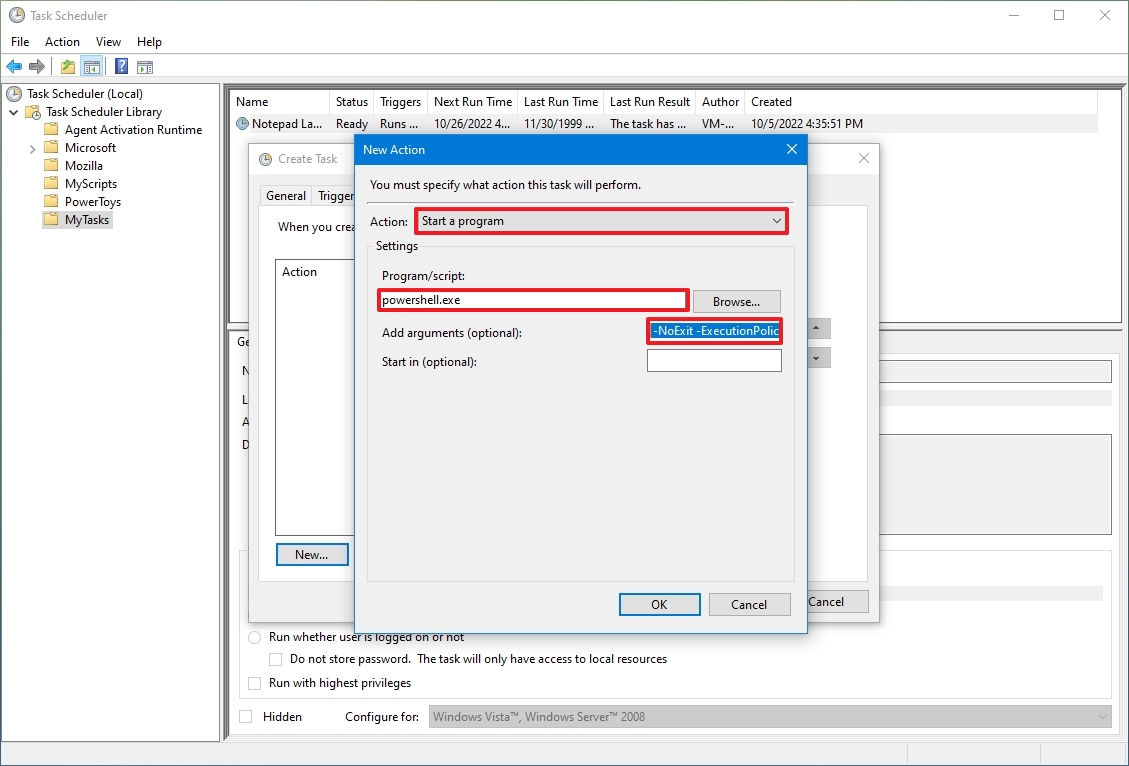
- (Optional) In the «Add arguments» field, you can specify arguments to run the task with special instructions – for example -NoExit -ExecutionPolicy Bypass C:\PATH\TO\SCRIPT\first_script.ps1.
The «powershell.exe» command and the above argument will run the script named «first_script.ps1.» The argument «-ExecutionPolicy Bypass» ensures that the script runs successfully, and the «-NoExit» argument will prevent the window from closing after running the script. You can learn more about creating a PowerShell script in this guide.
- (Optional) In the «Start in» field, specify the folder in which the program will start. (Usually, you can leave this setting empty.)
- Click the OK button.
- Click the Conditions tab.
- (Optional) The «Conditions» tab includes settings that, combined with the «Triggers» settings, will determine when the task should run. (If you’re creating a simple task, you don’t need to modify these settings. However, you want to make sure the Power settings are configured to your situation.)
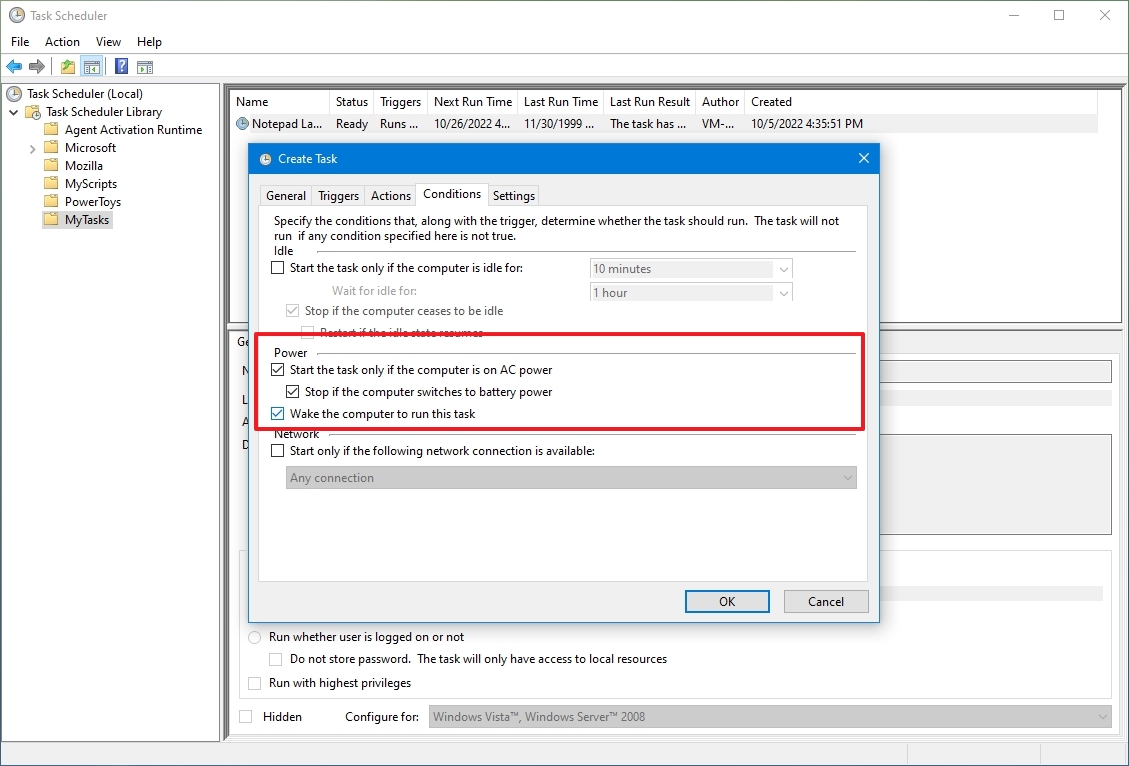
- Click the OK button.
- Click the Settings app.
- (Optional) The «Settings» app includes additional options that will directly affect the behavior of the task. It’s not a requirement to change these settings, but it’s a good idea to check the following options:
- Run the task as soon as possible after a scheduled start is missed.
- If the task fails, restart every. (Use this option with the default selections.)

- Click the OK button.
After you complete the steps, authenticate with your account credentials, and then the task will run automatically on schedule or event using the specified settings.
How to run, edit, and delete a task on Task Scheduler
Once you’ve created the task, you can use these steps to view, exit, or run it on demand:
- Open Start.
- Search for Task Scheduler, click the top result to open the experience.
- Expand the Task Scheduler Library branch.
- Select the folder with your tasks.
- To run a task on demand, right-click it and select the Run option.
- To edit a task, right-click it and select the Properties options.
- To delete a task, right-click it and select the Delete option.
On the page, you’ll also be able to see all your tasks with information, such as the triggers, when the task runs last, and when it’ll run the next time.
Alternatively, you can always select the task and use the Actions pane on the right to perform actions, such as run, end quickly, disable, and edit the job.
While we’re focusing this guide on Windows 10, Task Scheduler has been around for a long time so you can use the same instructions on Windows 8.1, Windows 7, and older versions.
More resources
For more helpful articles, coverage, and answers to common questions about Windows 10 and Windows 11, visit the following resources:
- Windows 11 on Windows Central — All you need to know
- Windows 10 on Windows Central — All you need to know
All the latest news, reviews, and guides for Windows and Xbox diehards.
Mauro Huculak is technical writer for WindowsCentral.com. His primary focus is to write comprehensive how-tos to help users get the most out of Windows 10 and its many related technologies. He has an IT background with professional certifications from Microsoft, Cisco, and CompTIA, and he’s a recognized member of the Microsoft MVP community.
Learn to automate your tasks with Task Scheduler
by Madalina Dinita
Madalina has been a Windows fan ever since she got her hands on her first Windows XP computer. She is interested in all things technology, especially emerging technologies… read more
Updated on
- If you want to streamline your work, Task Scheduler is the right app for your Windows 10 PC.
- The basic system of this program is composed of 2 elements: triggers and actions.
- This tool enables different scripts and schedules to run at a specific time or event, depending on your needs.
- All planned tasks are indexed in a library, which organizes them according to their priority.

Task Scheduler is one of the most practical preset Windows applications because it can streamline your work.
The main idea of this application is to trigger the running of different scripts and programs at a specific time or a certain event.
It has a library where all the tasks loaded are indexed, and it organizes them according to the time that must be done and their importance.
Let’s discover together in the lines below what Task Scheduler contains and how we can use this useful application.
How do I schedule tasks in Windows 10 using Task Scheduler?
- Types of triggers
- Types of actions
- Types of Task Conditions
- Task settings
- Task security context
- How to use the Task Scheduler
1. Types of triggers
The first step of creating a task is to determine what will cause it to run, so the trigger is a set of conditions that when fulfilled, starts the task.
The triggers can be found in the Trigger tab from the Task Properties and the Create Task menu. From the Create Task menu, you can create new triggers for your needs. 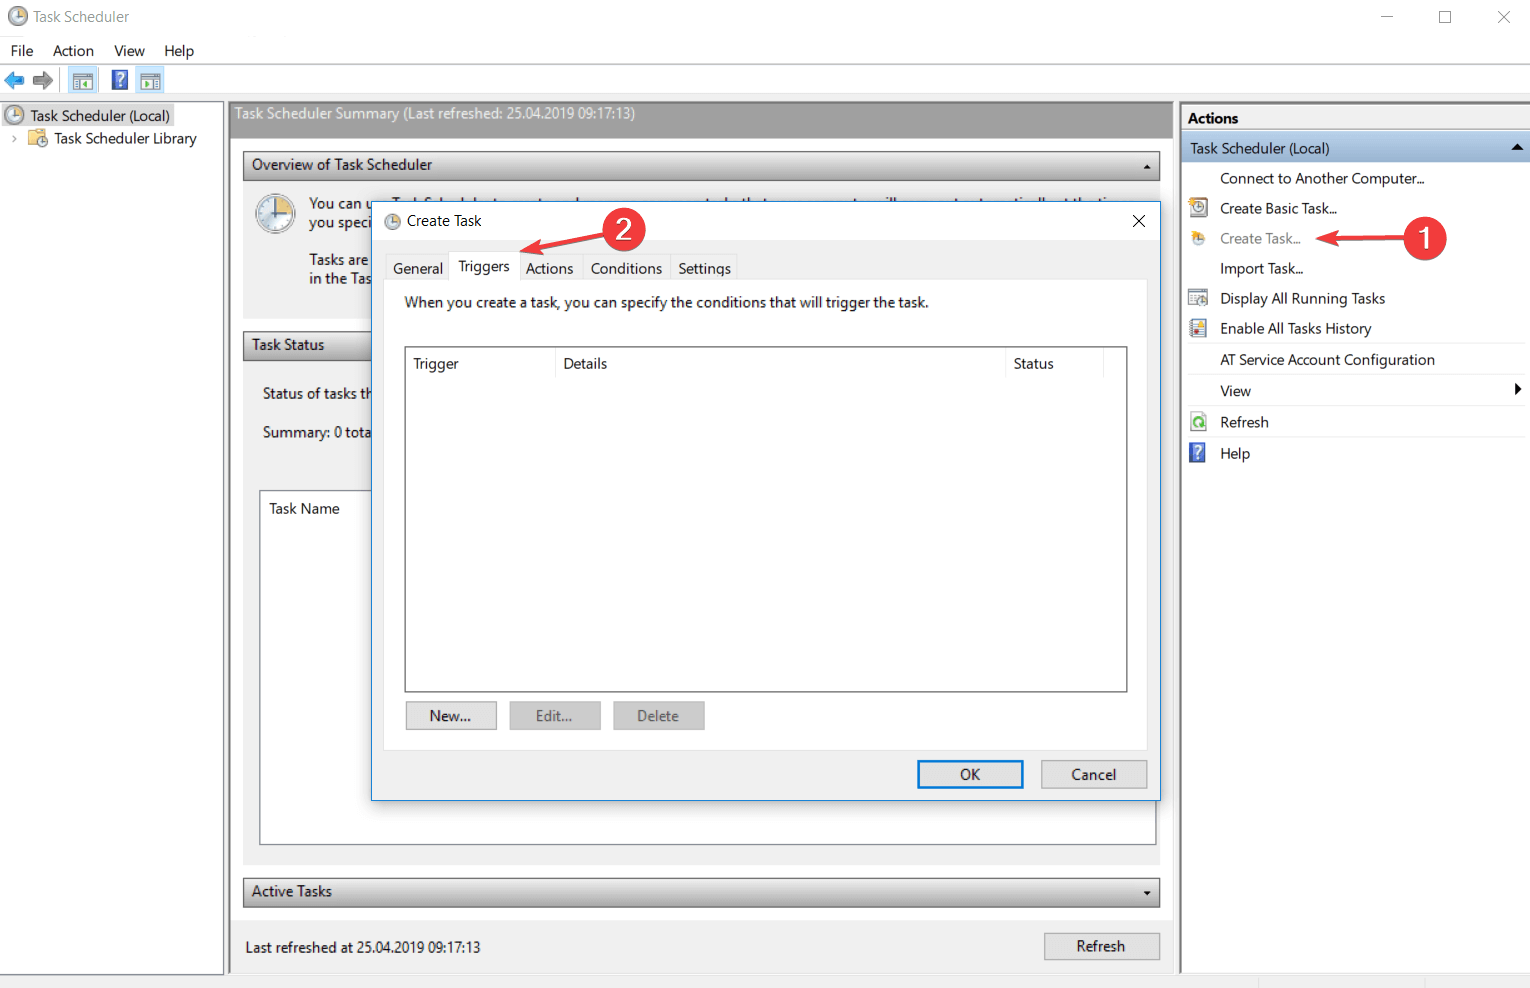
There are two types of triggers: the time-based trigger and the event-based trigger.
- The time-based trigger is used for tasks that start at a certain time or tasks that starts periodically, depending on your schedule.
- The event-based trigger is used for actions that start at a specific system event.
For example, let’s suppose that on this day you want to recover a few hours of work, and you want to have the same productivity, even though you know you will work more than usual.
You can set a task to be triggered every time your computer is entering an idle state.

NOTE
1.1. Triggers for a schedule
This kind of trigger causes the task to run after a well-determined schedule configured by you. From the trigger settings, you can choose if the task will be repeated once, daily, weekly, or monthly.
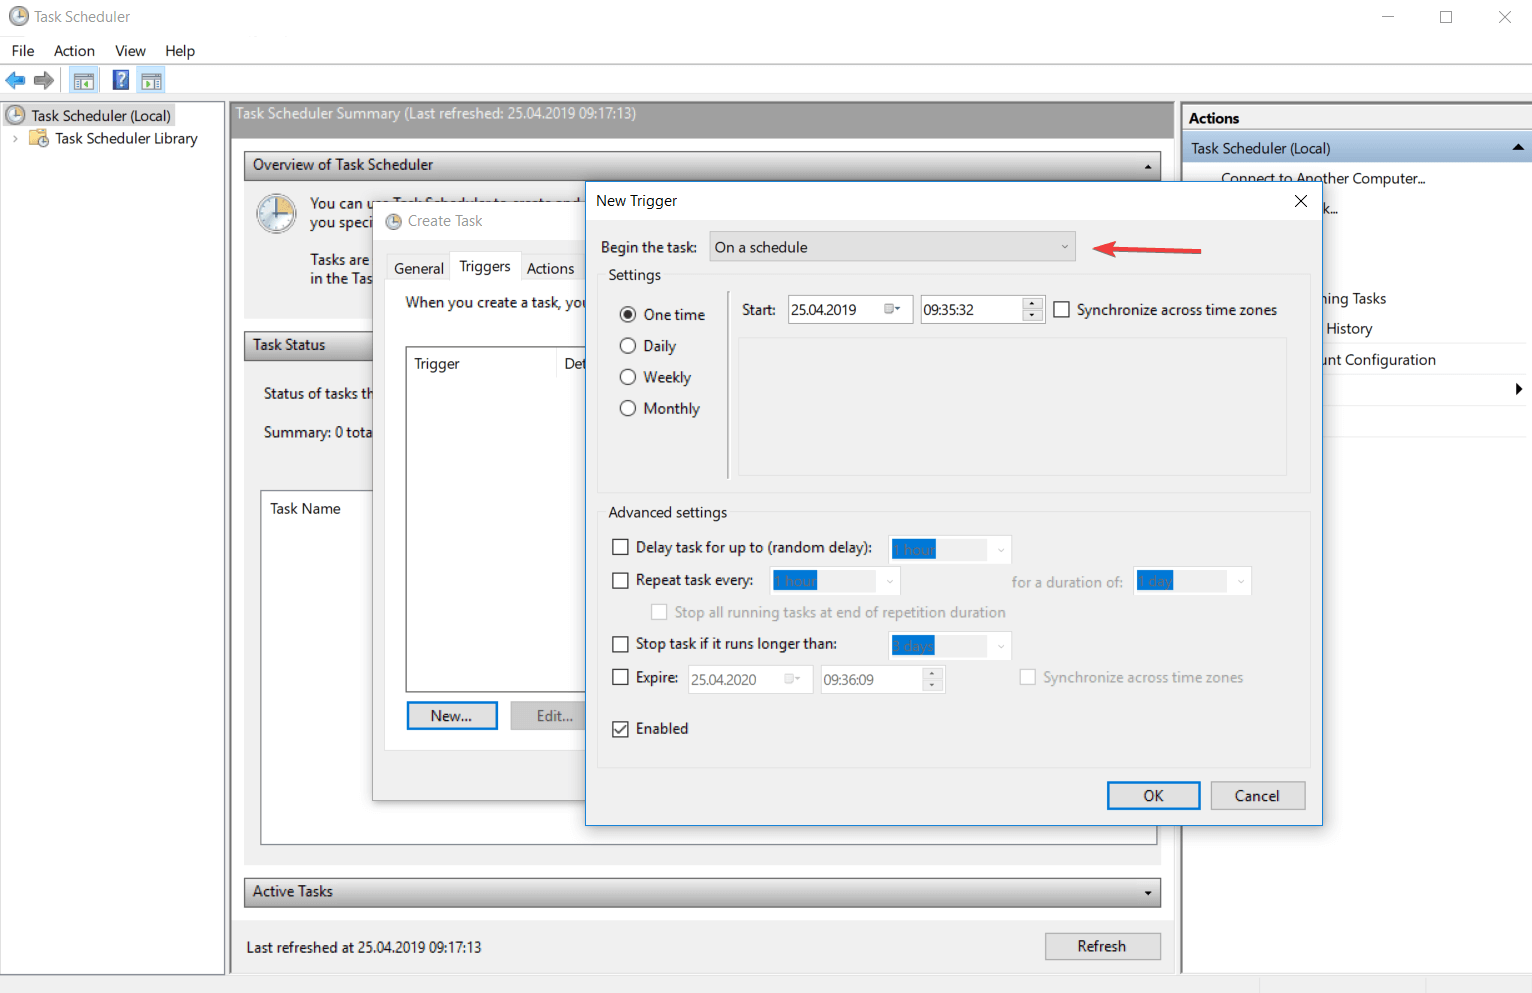
This time interval is guided by the computer’s date and time. You can check the Universal box for making the time interval relative and synchronize it with UTC (Coordinated Universal Time).
This feature allows you to coordinate multiple tasks to run independently in different time zones.
- The One time trigger is the easiest to set up. All you have to do is enter the day and time you want the action to take place.
- The Daily trigger is based on a recurrent system and the date and time you want to start using this kind of trigger.
The interval of 1 is producing a daily schedule, the interval of 2 is producing an every other day schedule, and so on.
- If you opt for a Weekly trigger you must enter the date and time you want to start this schedule, the days when you want to take place and how often to repeat. Recursion of this trigger is similar to the daily one.
For the interval of 1, the task will be repeated weekly, for the interval of 2, the task will be repeated every two weeks, and so on.
- The Monthly trigger does not have many differences from the others, you only need to select the week and the day that you want to activate your task.
The recursion system is the same, the only difference being that the minimum interval of repetition is one month.
1.2. Triggers for logging on
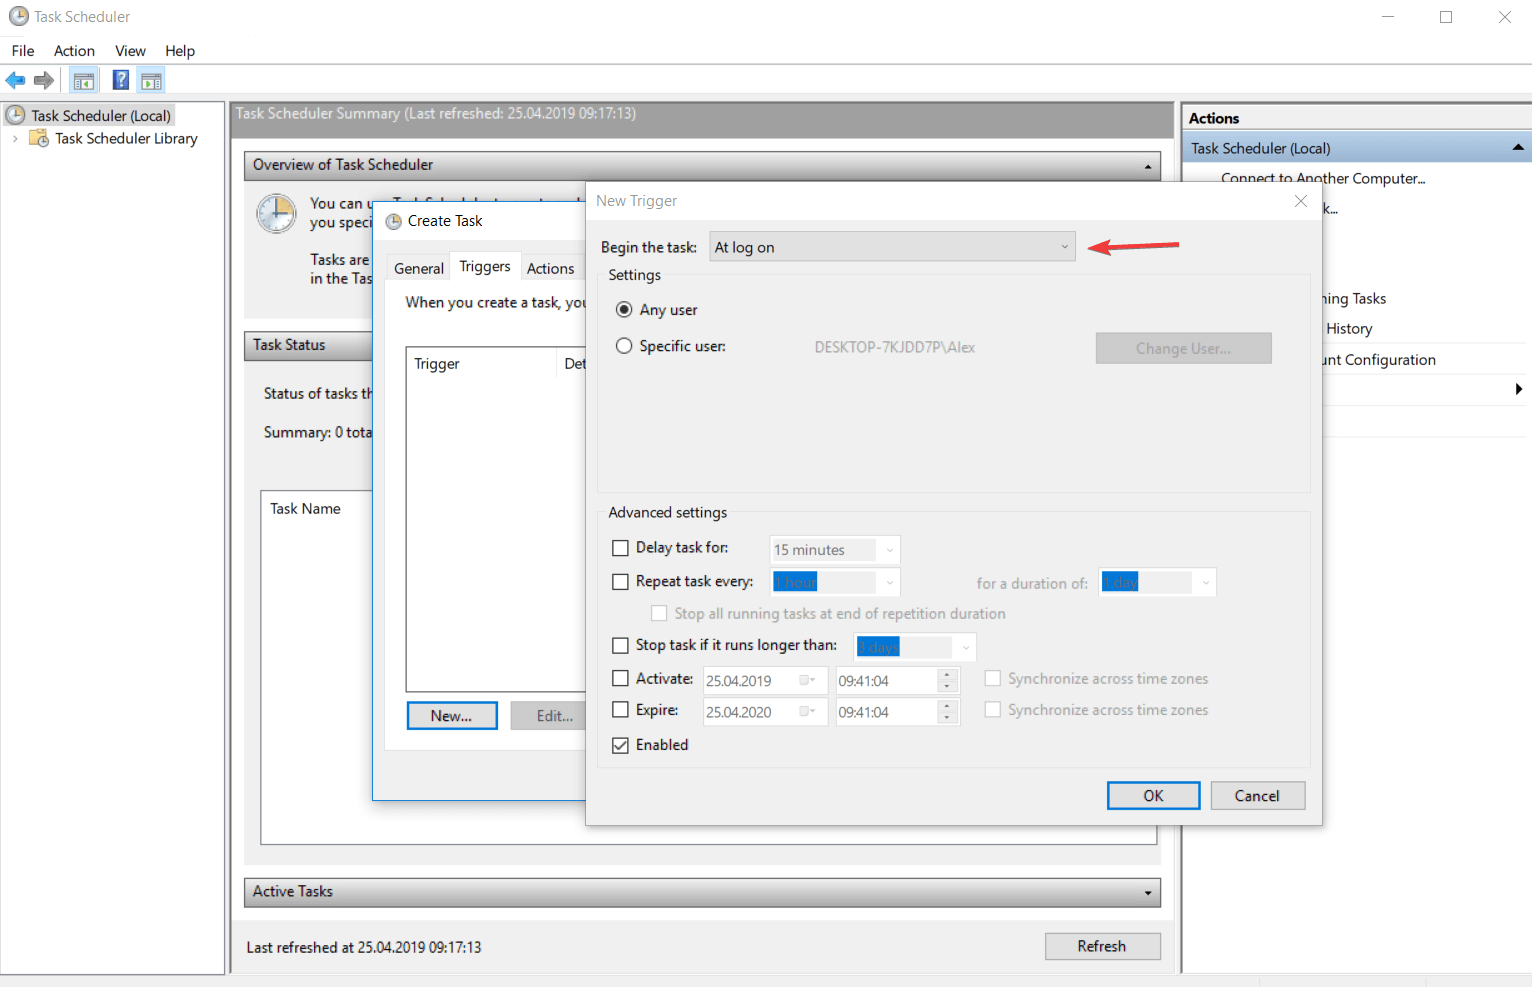
This type of trigger runs an action when a user logs onto the computer. It has a customization feature that allows you to set the action to occur for all users or only for certain users.
1.3. Triggers for idle state
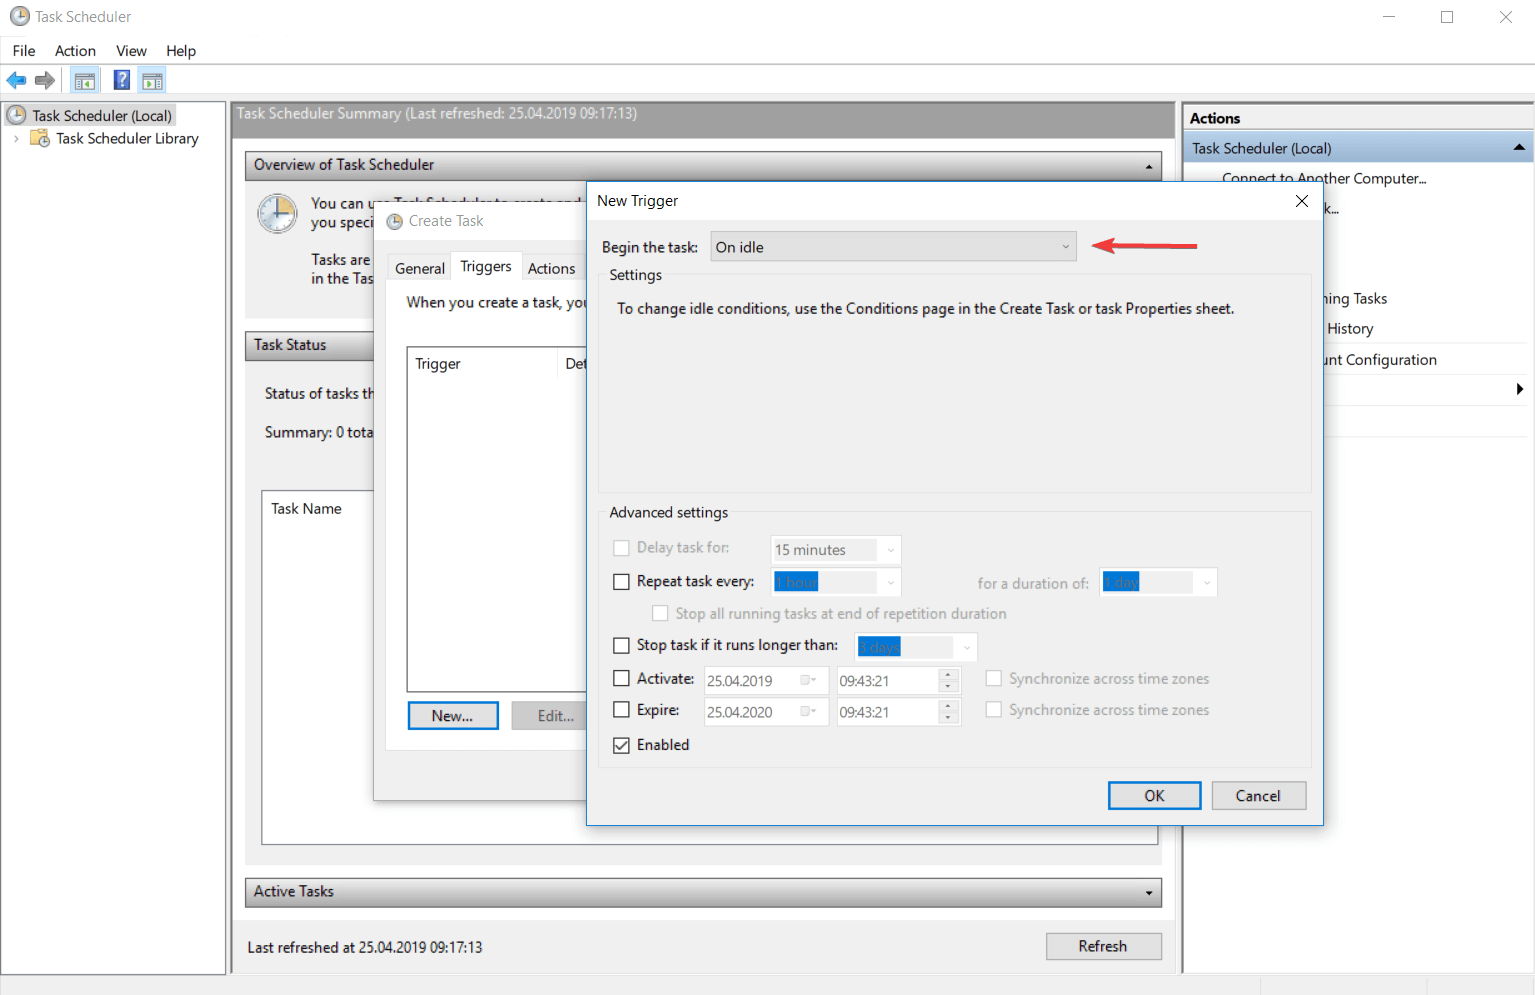
This trigger determines the action to run after entering the computer in the idle state. The trigger conditions can be configured from the Conditions tab of the Create Task menu or from the Task Properties window.
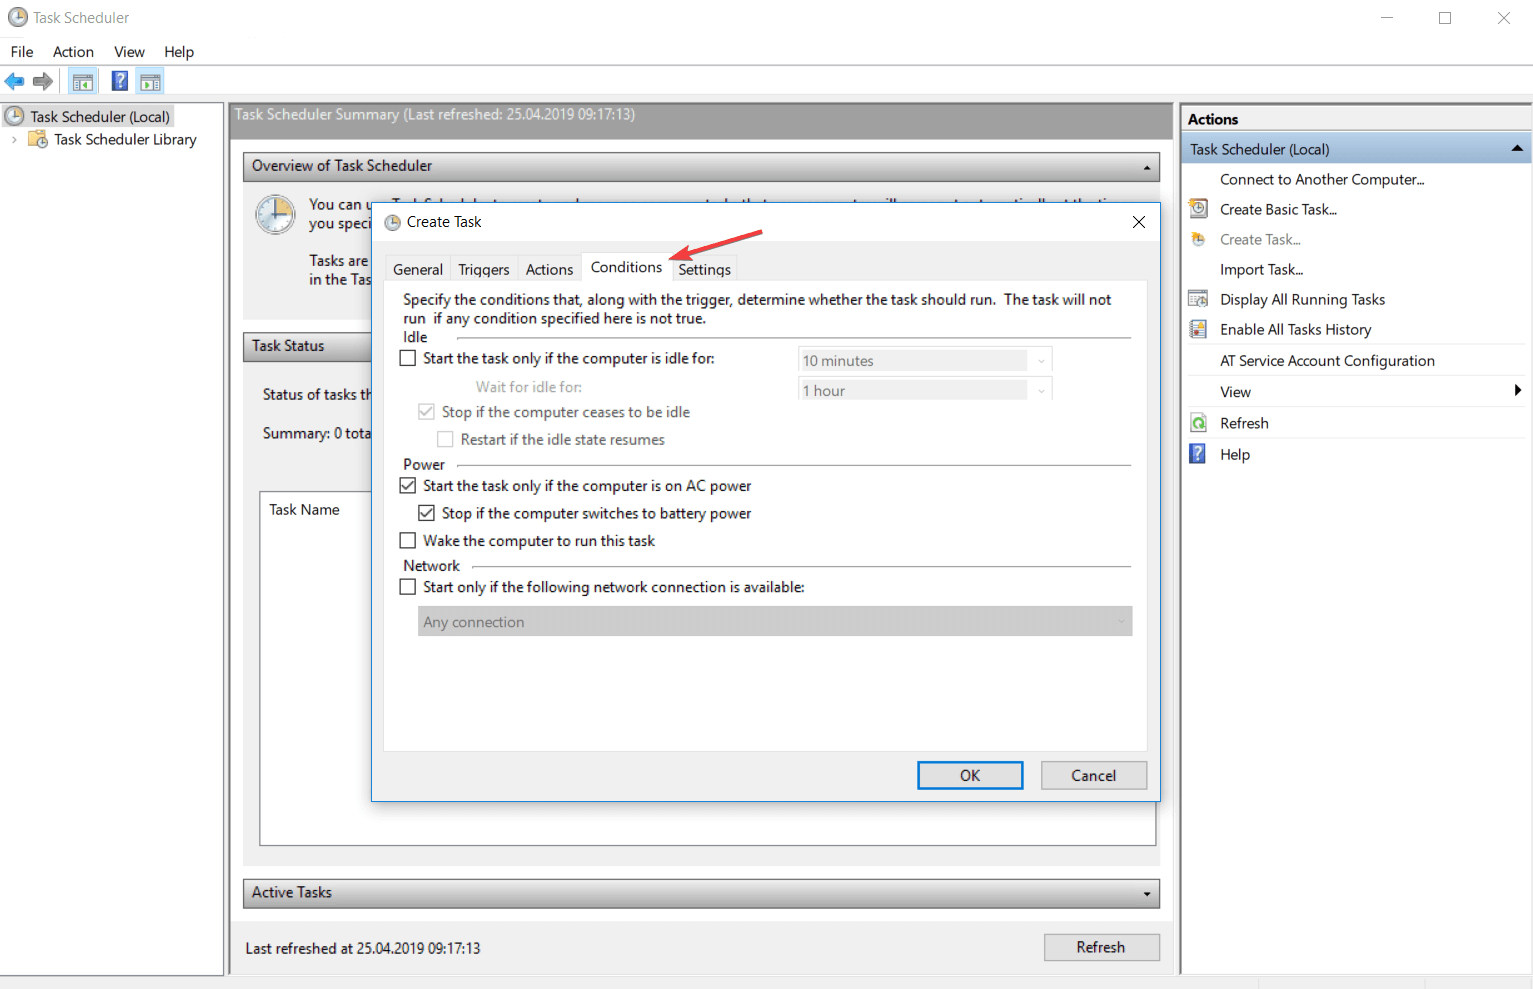
1.4. Triggers for an event
The event-based trigger determines the action to run after an event occurs. You can choose from a predefined list of events but you can also set a specific event.
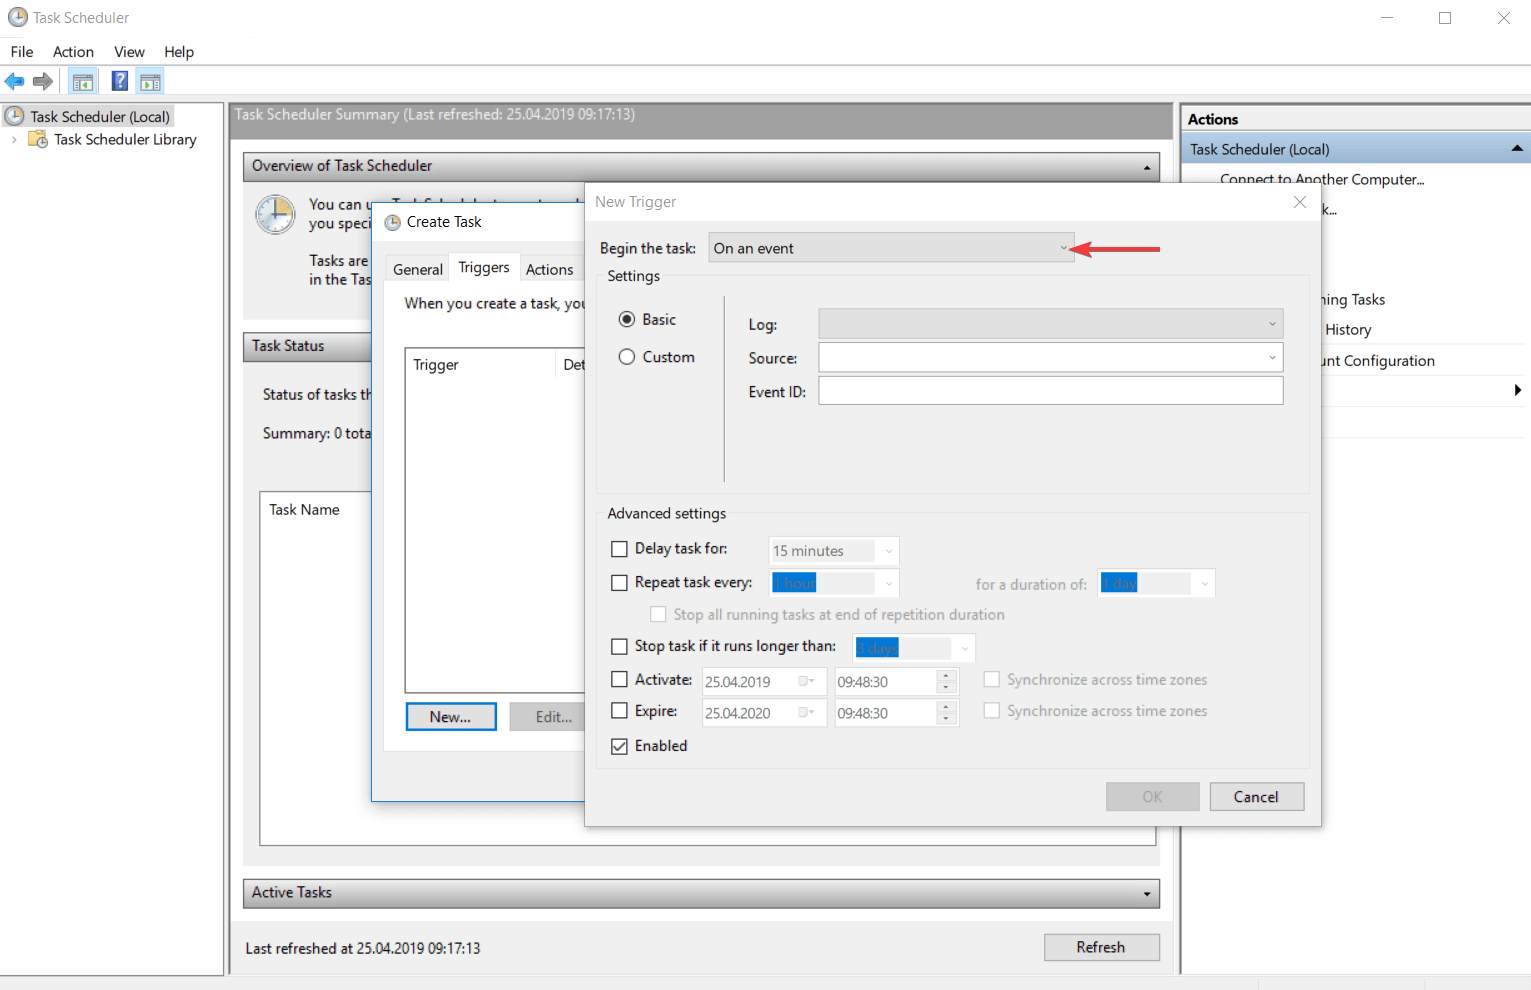
If you are choosing the Basic trigger settings, only one event from the specific event log will run the task.
If you choose the Custom trigger settings you can enter the XML event query or a custom filter for the events that can run the task.
1.5. Triggers on workstation lock
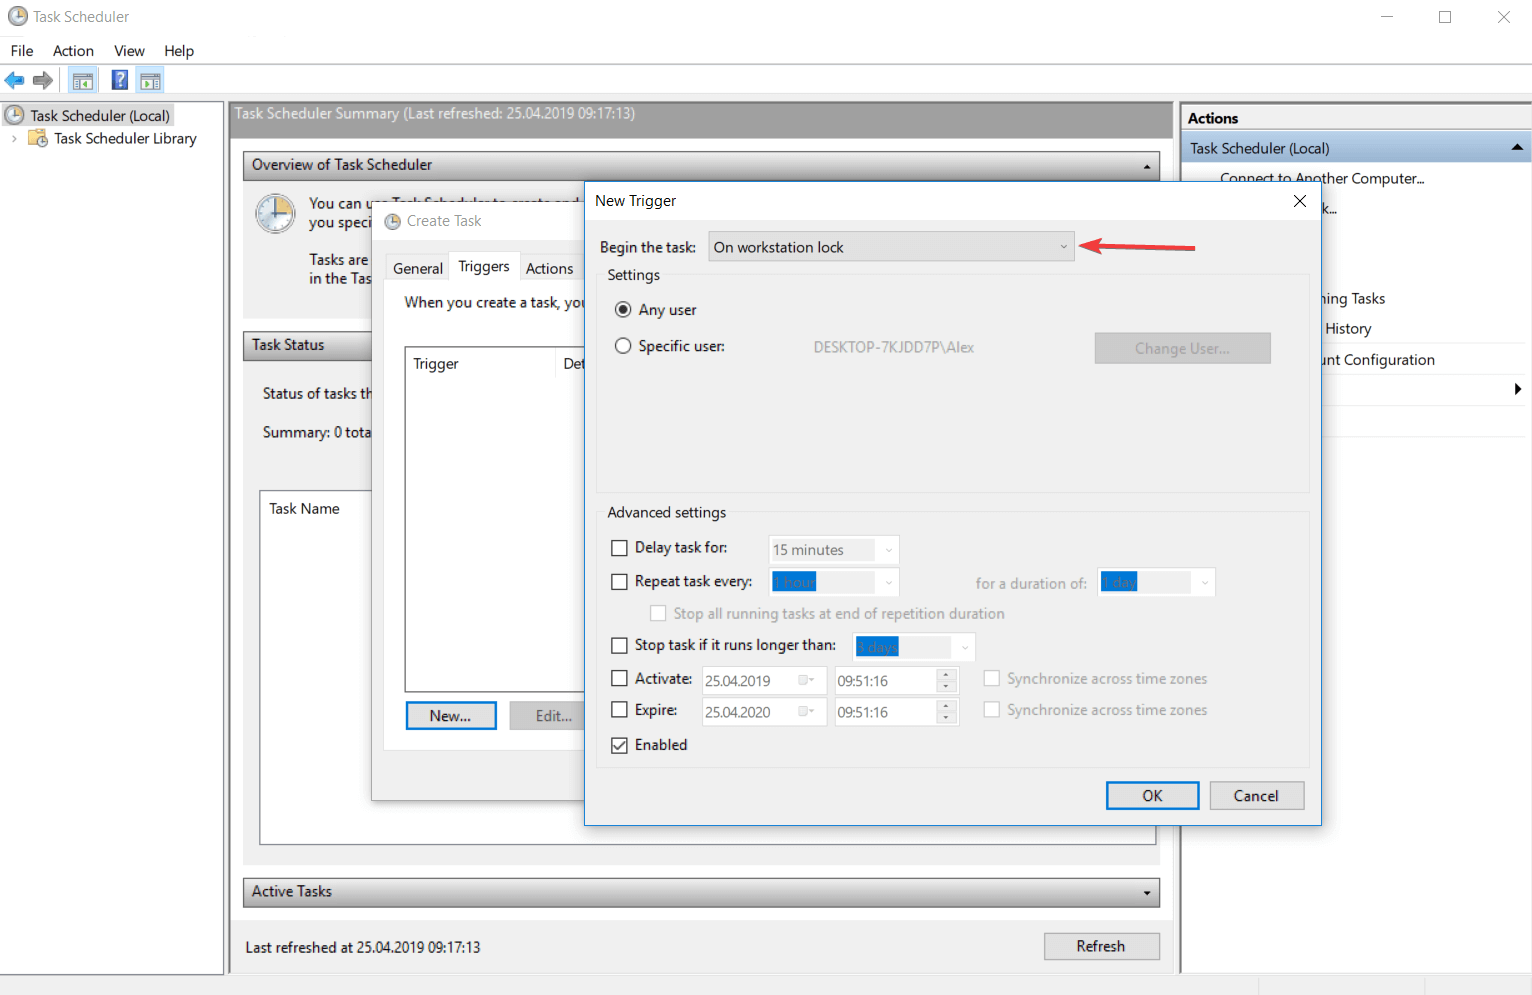
This type of trigger runs the task when the computer is locked. You can configure from the settings if this action will be available for any user or for a specific user. You can do the same thing for the unlocking station process.
1.6. Advanced settings of triggers
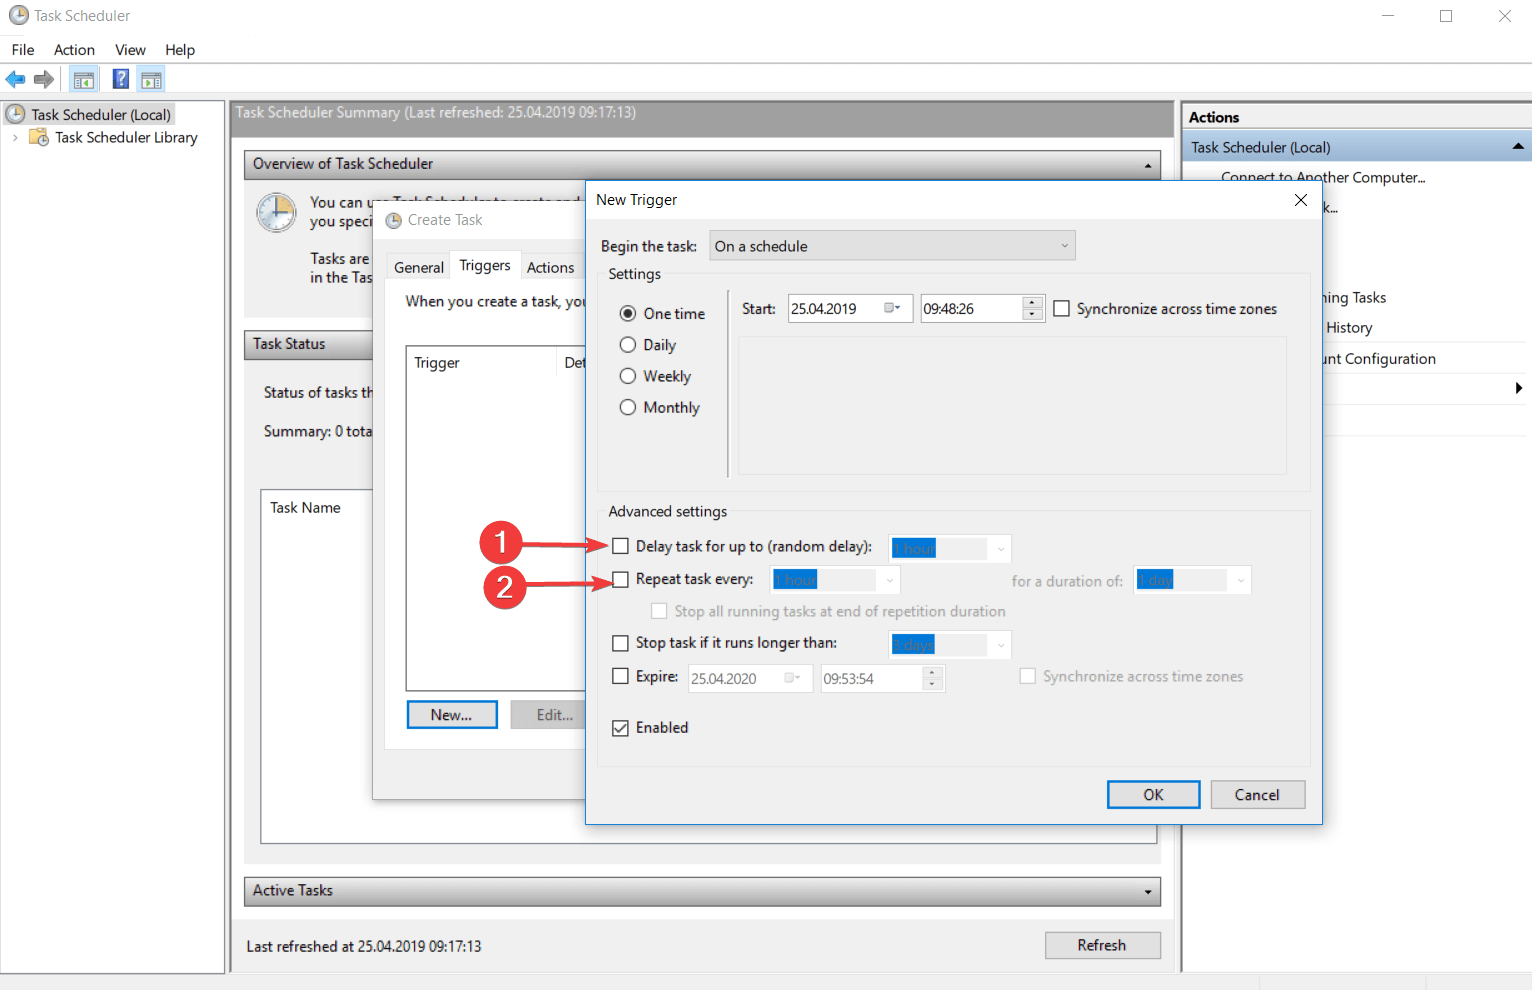
- Delay task for up to (random delay)
This feature allows you to insert a delay between the moment when the task was triggered and the moment when the task will take place.
For example, if you have a time based trigger, the task is scheduled to be triggered at 3:00 PM and you set the Delay task for up to (random delay) to 30 minutes, your task will be triggered in between 3:00 PM and 3:30 PM.
- Repeat task every:
Here you can set a repeating time for your task. So, after the task will be triggered, it will wait the amount of time specified and after that, it will be triggered again. This entire process will continue until the period allocated is done.
2. Types of actions
The action is the process or a part of the process that is performed when the task is running. A task can have up to 32 actions. Every action has some settings that determine how the task is performed.
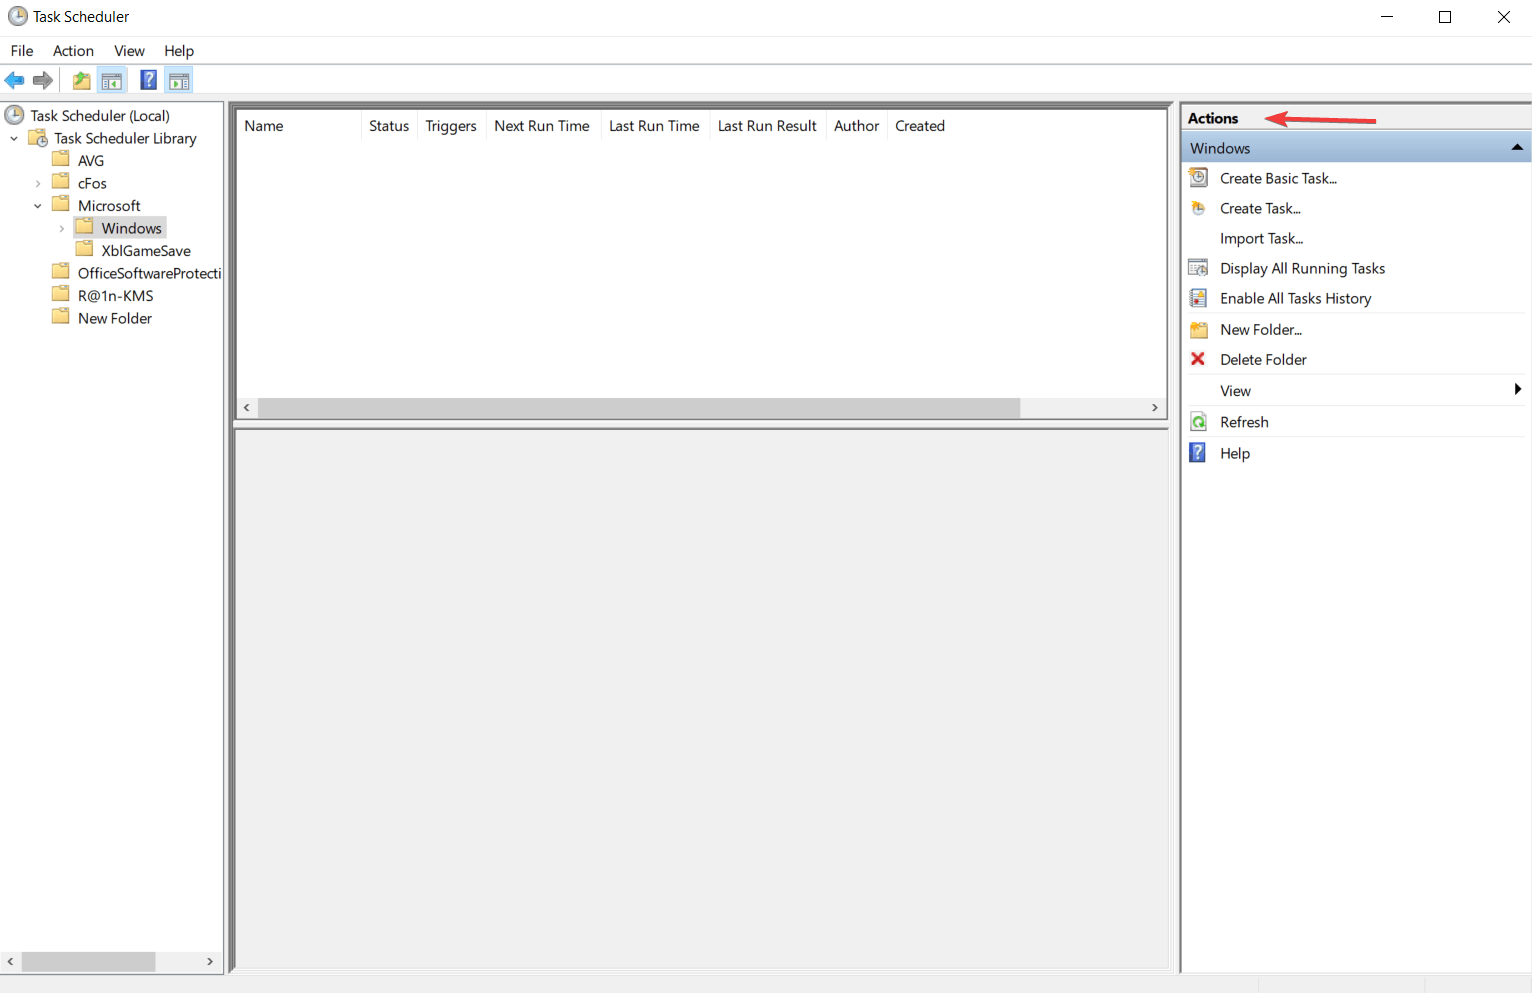
You can find and edit the task’s actions from the Actions tab of the Task Properties menu or from Create Task window.
When the list contains more than one action, they will be executed consecutively starting with the action from the top of the Actions tab and ending with the action from the bottom of the list.
If you want to change the actions order all you have to do is to click on the action that you want to move and then use the arrow keys to move it above or below.
2.1. Action that activates a program
This kind of action is used for starting a program or a script.
How we test, review and rate?
We have worked for the past 6 months on building a new review system on how we produce content. Using it, we have subsequently redone most of our articles to provide actual hands-on expertise on the guides we made.
For more details you can read how we test, review, and rate at WindowsReport.
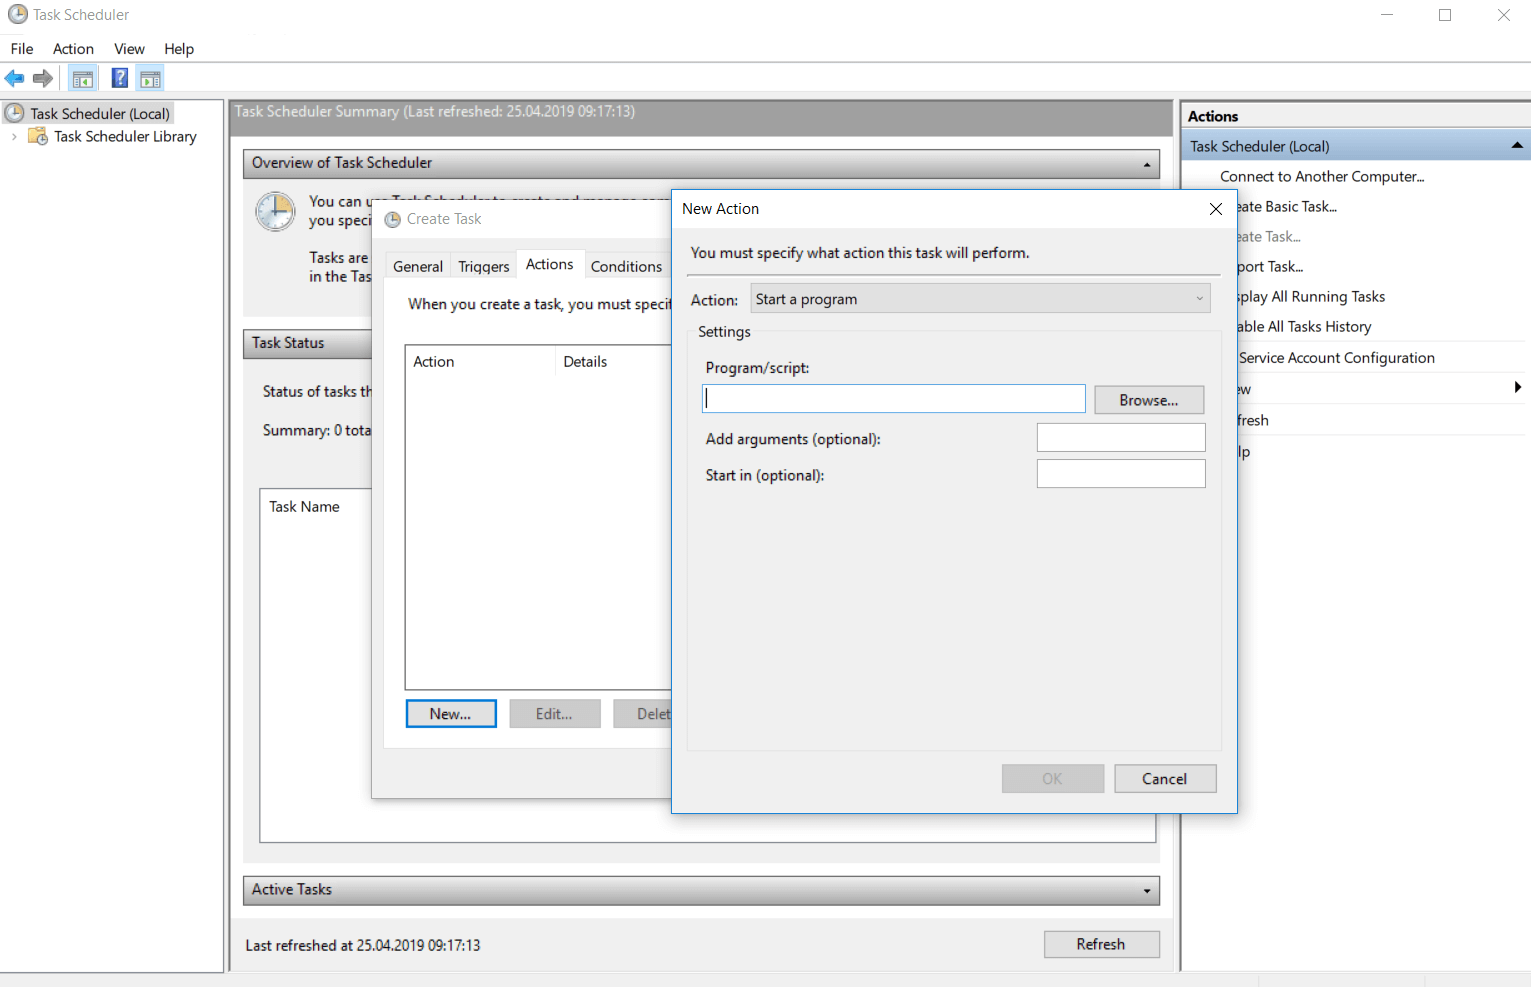
In the Settings menu of the Actions tab, you enter the name of the script or the program you want to start.
If one of those sequences takes command line arguments you can add, delete and edit them in the Add arguments (optional) text box.
The Start In (optional) is the place where you can specify the directory for the command line that will execute your script or your program.
This should be either the path to the program or the script file that leads to the files that are used by the executable file.
2.2. Action that sends an e-mail
This action is particularly useful for people who communicate a lot via email.
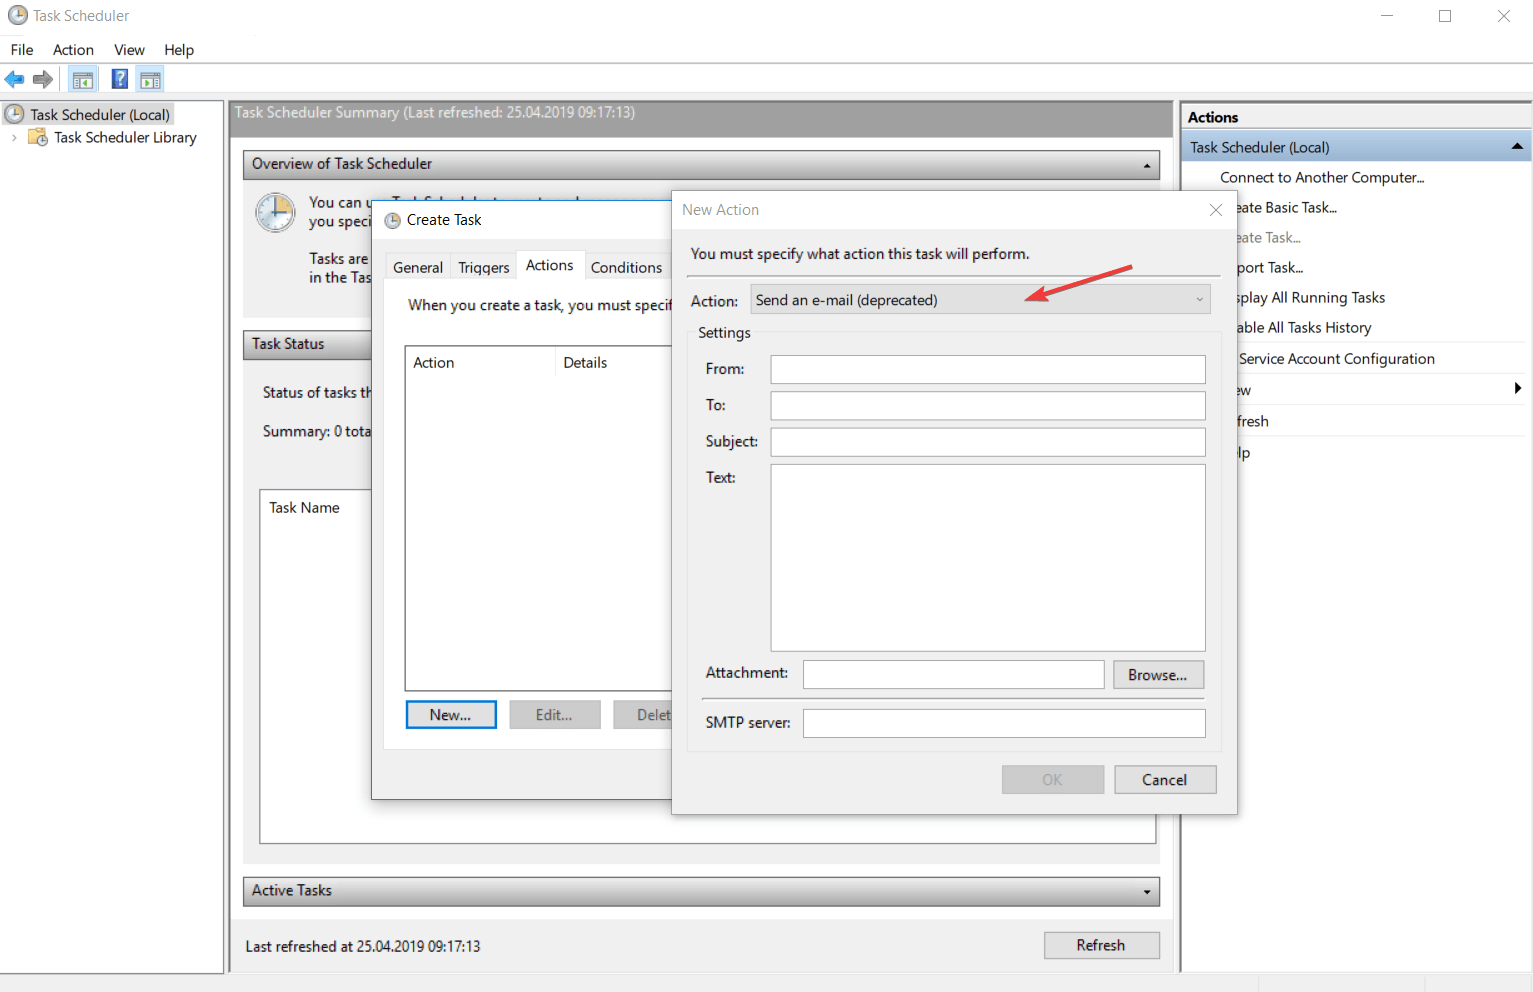
In the settings of this action, you have to enter your e-mail address, the e-mail address of the person who will receive the mail, the title of the e-mail, the message you want to be sent, and you have also an optional feature to attach different files to the mail.
You must also specify the SMTP server of your e-mail.
2.3. Action that displays a message
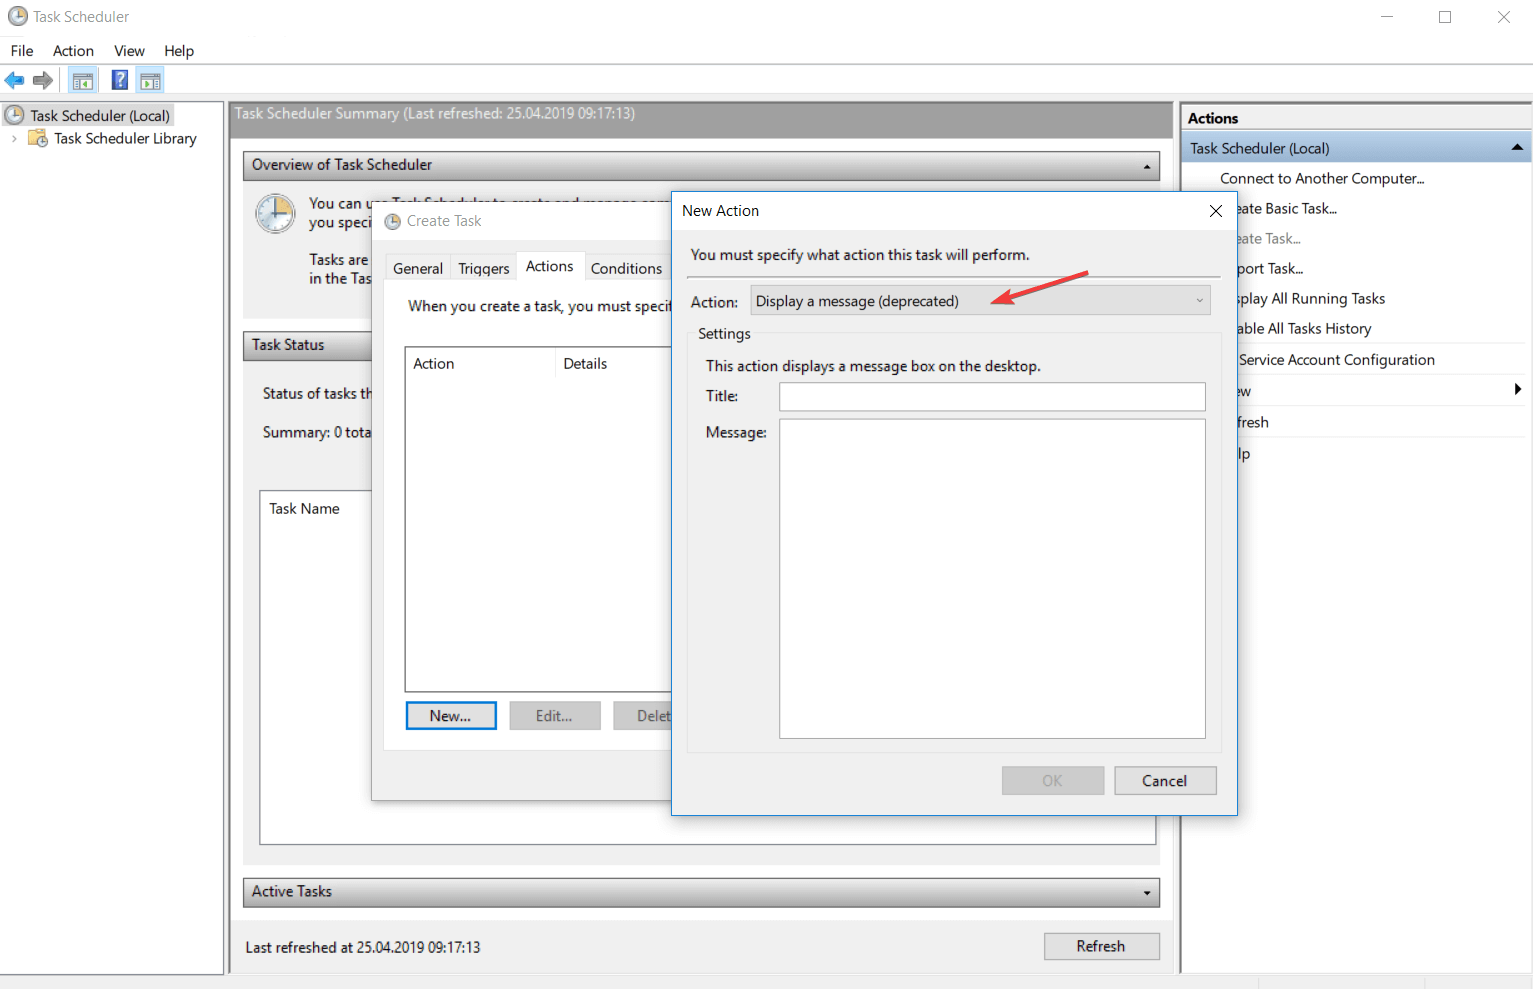
This action is used more like a reminder because it displays on your screen a text with a title. Select the Display a message category from the Actions menu and type the title and the message of the reminder.
If you are facing Task Scheduler failed to launch an action issue, we recommend you check out this detailed guide for solutions.
3. Types of Task Conditions
Task conditions decide if a task can run after it was triggered. Conditions are optional and their main role is to help you accomplish a more accurate task reported to the operating situation.
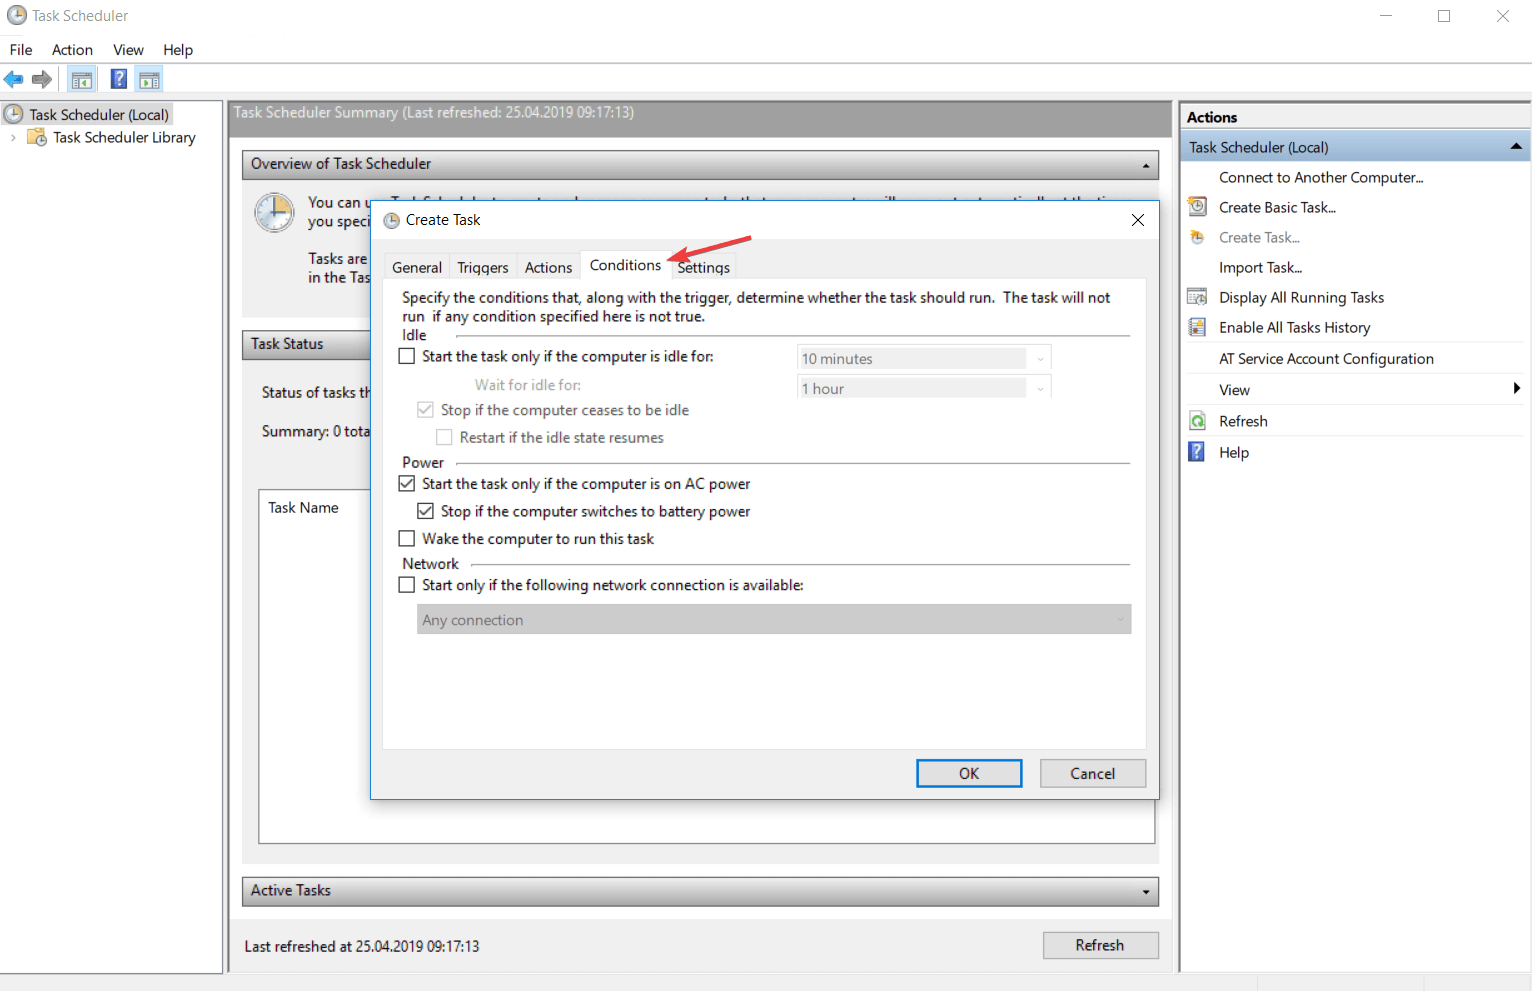
You can find them in the Conditions tab of the Task Properties or Create Task menu. Conditions are divided into 3 categories: idle conditions, network conditions, and network conditions.
3.1. Idle conditions
With this condition, you can tell the task to run only if your computer is an idle for a certain amount of time. Every 15 minutes, Task Scheduler is checking your activity to find out if your PC has entered into an idle state.
It is considered that your computer is in an idle state if the screensaver is on or if the percentage of CPU and memory operation is 0%.
As soon as the Task Scheduler has detected that your computer is in an idle state, it will begin the countdown of the length of time that has been set.
If you come back at this time and continue your work, the application will reset the task.
You can also set the time condition to 0 and in this case, the task will run when the application will detect that your computer has entered the idle state.
If the Stop if the computer ceases to be the idle condition is on, the task will stop running after the computer gets out from the idle state. Normally, this task will run just one time.
To run every time the computer remains inactive you have to check the Restart if the idle state resumes.
3.2. Power conditions
This condition is dedicated to laptop users because it follows the power method of the device.
While a computer receives a current flow of energy from a source, the laptop can run on a battery when you do not have a stable source of power.
With this condition, you can set a task to run when the computer is connected to a stable and continuous source of energy after the trigger was activated. You can also set a condition.
You can also configure the condition so as not to allow the task to run if the device goes on the battery power.
From these conditions, you can also create a task that will tell the computer to start from sleep mode and run the actions after it was triggered. Consider that this can happen during hours of rest and may create trouble.
To avoid this, make sure the device is at a distance where it cannot bother you or turn it off when you rest.
NOTE
3.3. Network conditions
With this condition, you can configure a task to run if a specific named network is available or if any connection is available when the task is triggered.
If you consider that your task will need network conditions to run, you can also set this in the conditions.
4. Task settings
Task settings are indicating how a task run, is deleted, or is stopped. You can find the panel with all the available settings in the Settings tab from the Task Properties or from the Create Task menu.
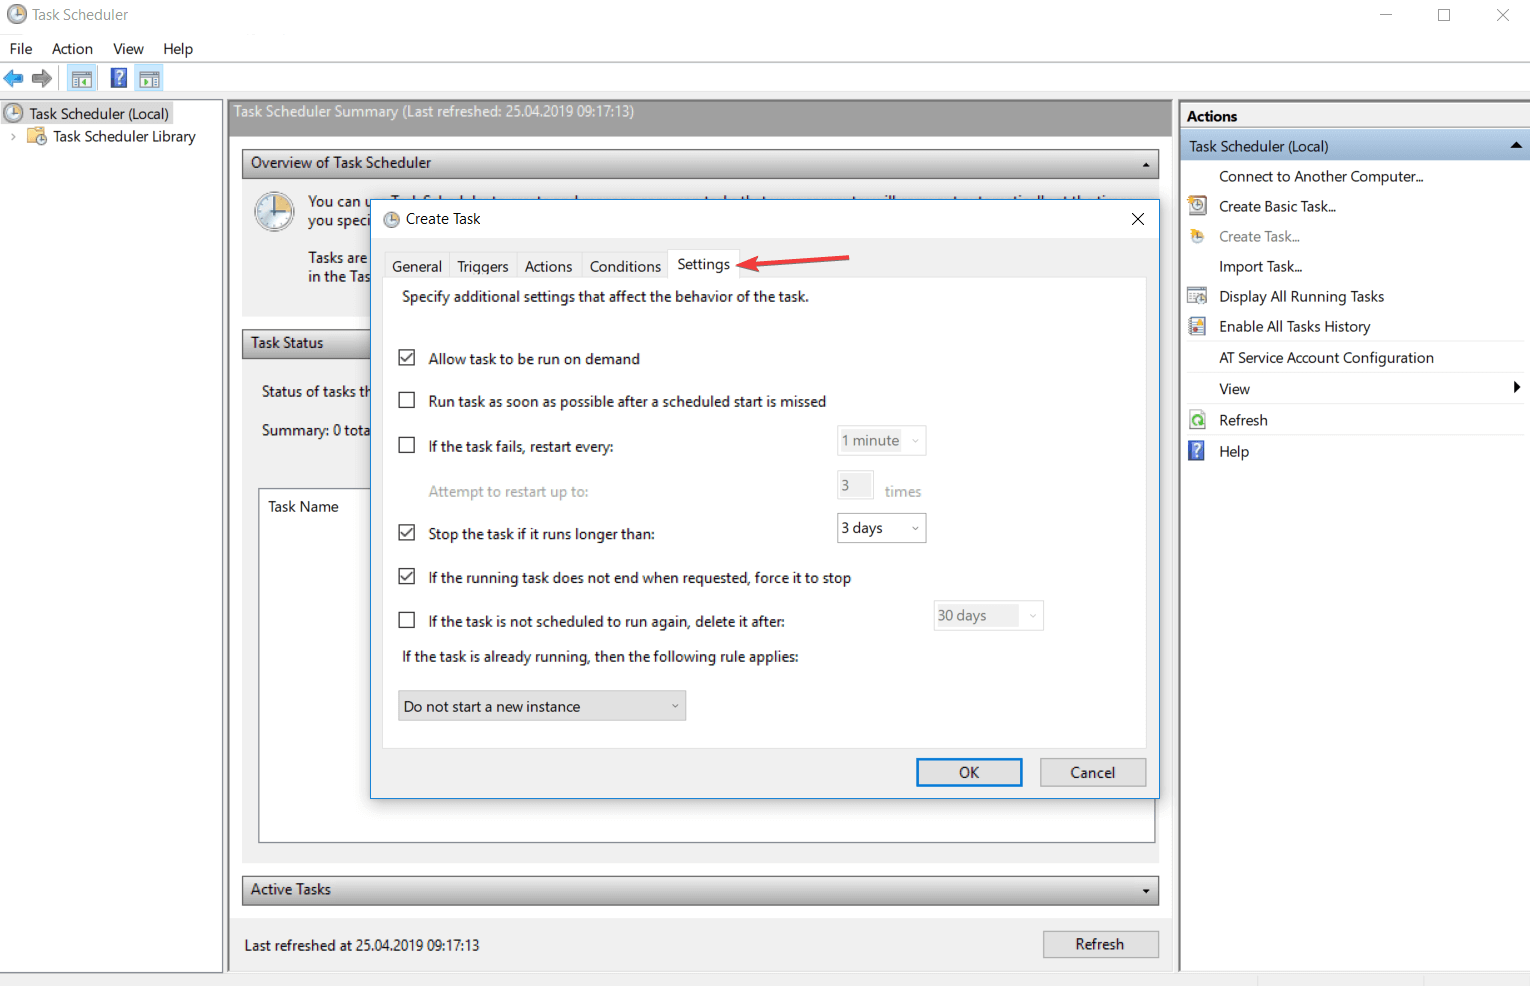
The following list contains a description of all the available settings.
4.1. Allow tasks to run on demand
Here you can specify if the task can be run manually before or after it is scheduled by allowing it to run on demand. You can set a task to run at any time on demand.
You find more information about the demand configuration in the How to run a task on demand topic of this article.
4.2. Run a task as soon as possible after a scheduled start is missed
This setting will assure you that a task will start running even if it could not run when it was scheduled from different reasons (the device was turned off, Task Scheduler was busy).
In the default settings, the Task Scheduler will not start the task immediately when the service is available. It will wait 10 minutes and then immediately start the process.
4.3. If the task fails, restart every time period
This setting will force the Task Scheduler to restart the task if the previous attempt was thwarted by an error.
You have to add the time interval between the running attempts and the number of attempts to achieve.
4.4. Stop a task if it runs longer than the time period
With this setting you can establish a time limit in which the task can run.
This setting is used for limiting the number of tasks that need a long period of time to execute and in this way you can save resources for your computer.
4.5. If the task is not scheduled to run again, delete if after a time period
This feature replaces an action that you should do it manually.
If you schedule a task to run only once means that you will not need it in the future and not unnecessarily load the list of tasks you should delete after you have used it.
This setting will delete automatically the task after a period of time set by the user after it was activated.
Remember, your task must include at least one trigger with an expiration date in order to select this setting.
4.6. If a task is already running you must know a few things
You must configure the Task Scheduler to know how to run the task in case another instance of the current task is already running.
- Do not try to start a new instance because the application will not run the new instance and either stop the current instance from running.
- You can run a new instance in parallel. Task Scheduler is able to run different instances in parallel, so if you want to run a new instance, it will run it at the same time as the instance that is already running.
- You can queue a new instance. You can set an instance to start as soon as the current task ends the activity. The Task Scheduler will add your add the new instance in a queue and the service will not stop the current task from running.
- Stop the current instance. After you stop the current instance, the service will try to run on the next one.
- You can run a new instance in parallel. Task Scheduler is able to run different instances in parallel, so if you want to run a new instance, it will run at the same time as the instance that is already running.

- You can queue a new instance. You can set an instance to start as soon as the current task ends the activity. The Task Scheduler will add your add the new instance in a queue and the service will not stop the current task from running.
- Stop the current instance. After you stop the current instance, the service will try to run on the next one.
- You can run a new instance in parallel. Task Scheduler is able to run different instances in parallel, so if you want to run a new instance, it will run it at the same time as the instance that is already running.
- You can queue a new instance. You can set an instance to start as soon as the current task ends the activity. The Task Scheduler will add your add the new instance in a queue and the service will not stop the current task from running.
- Stop the current instance. After you stop the current instance, the service will try to run on the next one.
If you are looking for ways to enable Task Scheduler History, check out this guide.
5. Task security context
By default, the Task Scheduler runs the tasks in order with the security context of every user logged on when the task is triggered.
You can modify these settings from the Security options sections of the General tab after you have selected the task that you want to modify.
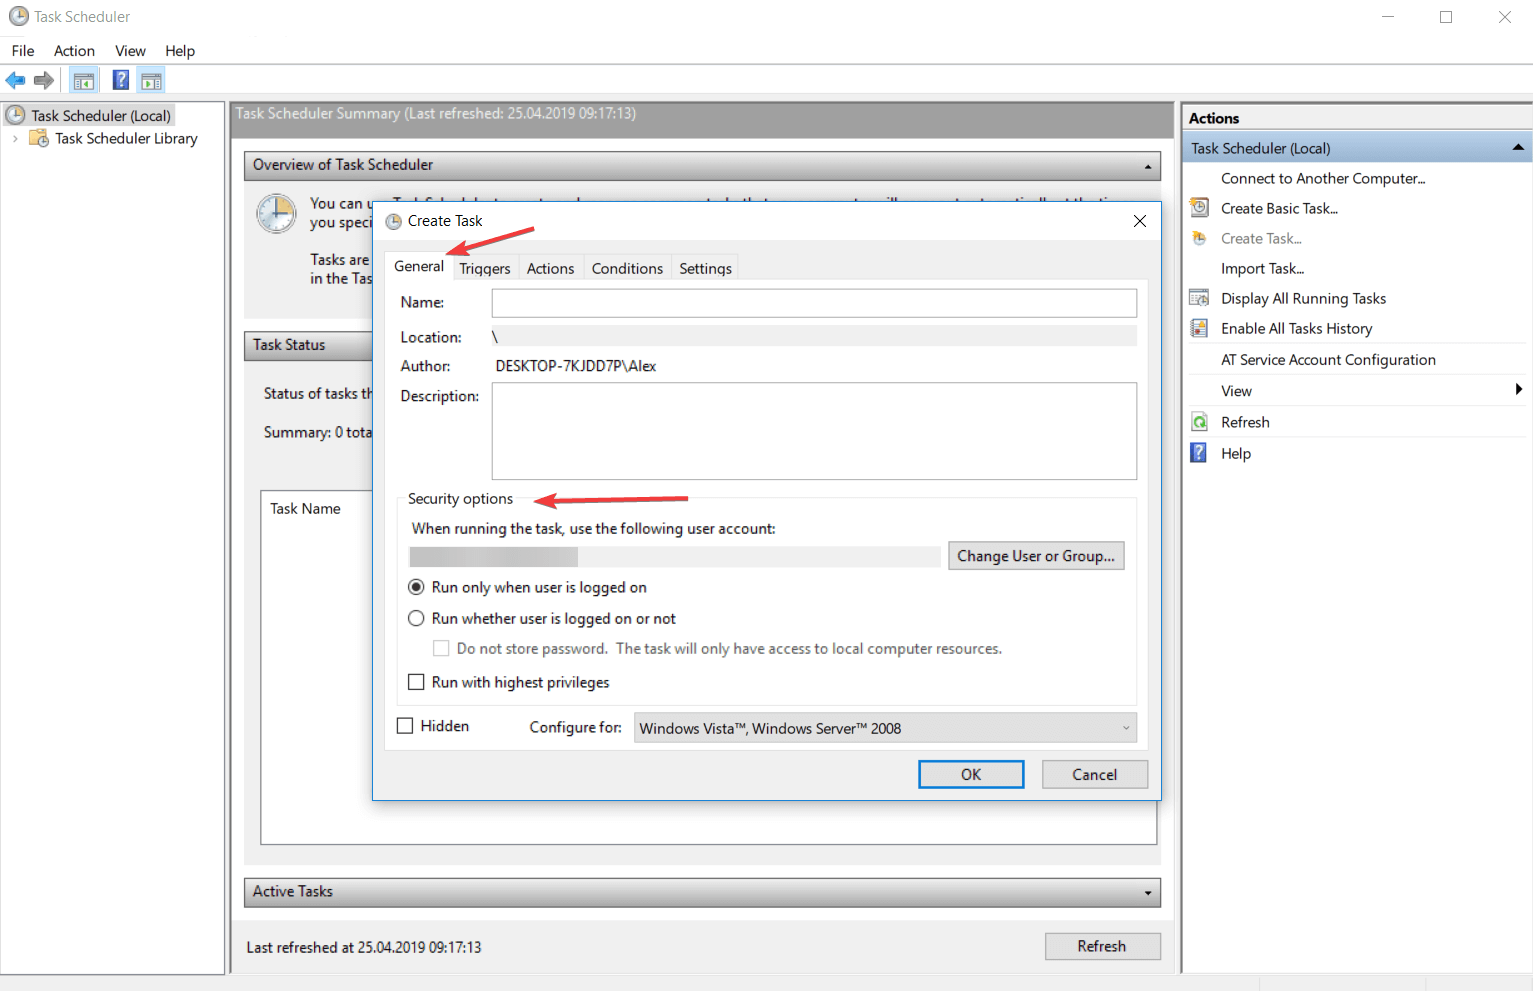
For a better organization of your tasks, you can group them on users or on groups of users by clicking on the Change User or Group category.
If your user does not have administrator rights the button will be called Change User and your account will not be able to enter the Administrators group.
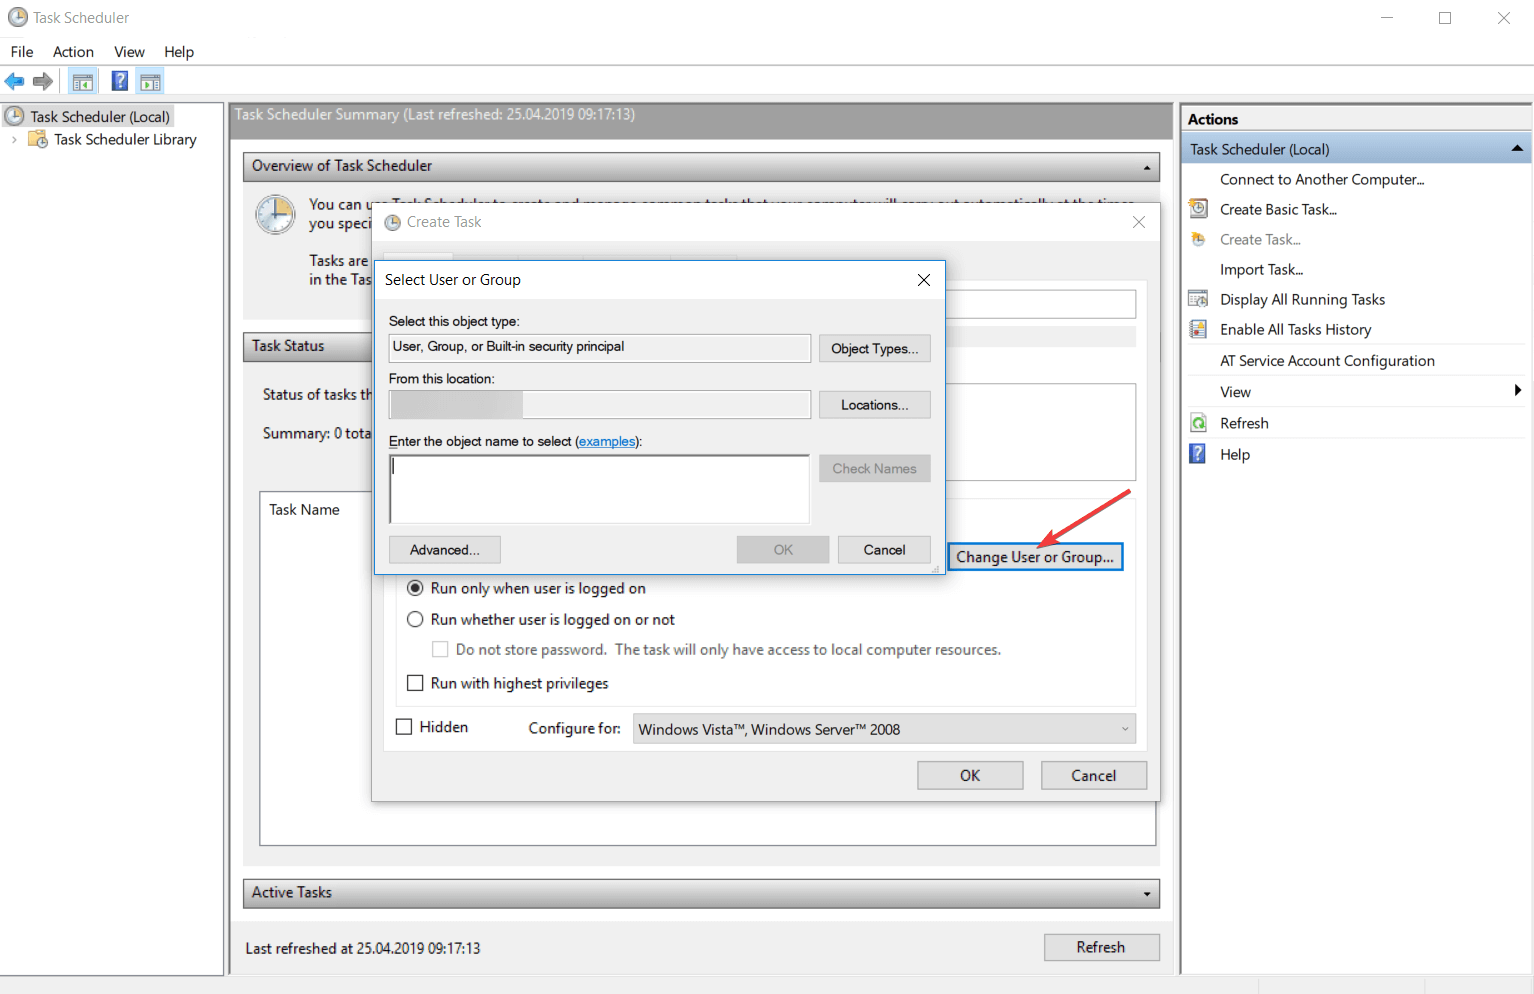
The Run whether the user is logged on or not feature allows you to run tasks even if the specific user is not logged on.
The feature is used for tasks that need to be run on any user of the system. If this setting is checked, the tasks will not run interactively.
To make a task run only when a user is logged on, select the Run only when the user is logged on radio button.
If the Run whether the user is logged on or not feature is used, you should supply the credentials of the account no matter if you check the Do not store password or not.
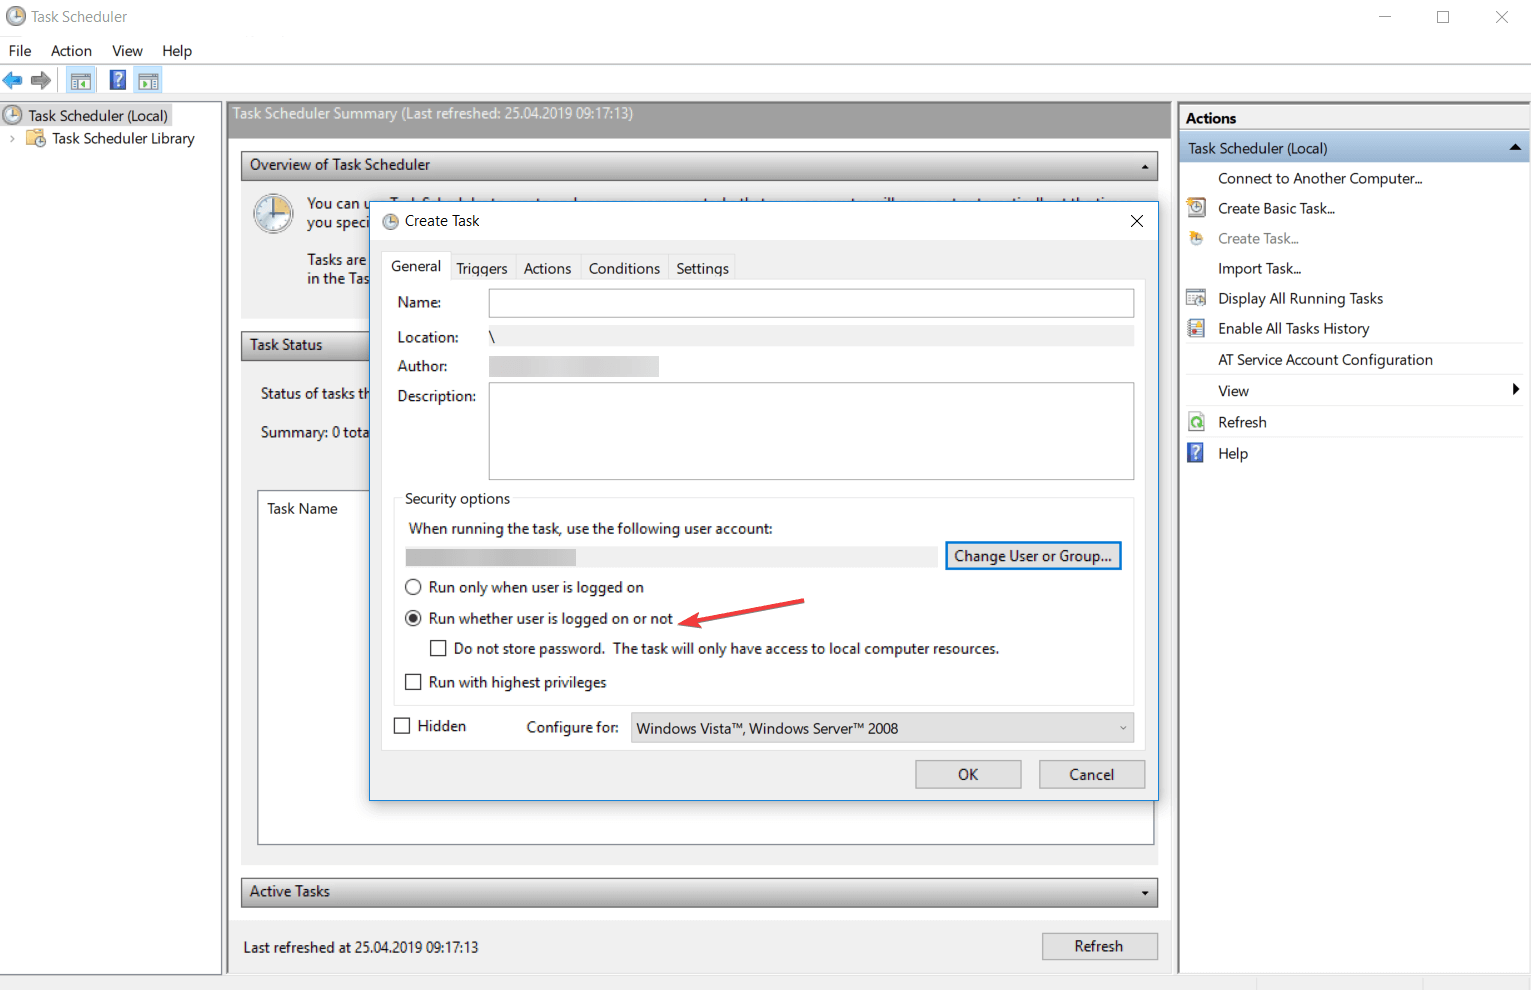
In the account is not logged on, the Task Scheduler will use the saved credentials in order to run the task.
When you select the Do not store password, the application will not save the credentials when you are creating a task but will discard them after the user properly authenticates.
When the service requires running a task, it will use the Service-for-user (S4U) extensions to the logging protocol to retrieve the user’s token.
In other words, the main purpose of the Service-for-user is to secure the context of the account.
- How to Delete Documents in Microsoft 365
- Microsoft Teams Halloween Backgrounds: 10 Best to Get
- Google Earth for Windows 10: How to Download & Install
- Protected: How to Download Video from Facebook on PC
- Microsoft Authenticator App: Download & Install
6. How to use the Task Scheduler
6.1. Start Task Scheduler
- Using Windows interface
- Type Control Panel in the search bar from the bottom left corner of your screen.
- Click on the System and Security, and select Administrative Tools.
- This will open you a list with different applications and in that list, you will find Task Scheduler.

- Double-click on it and the application will open.
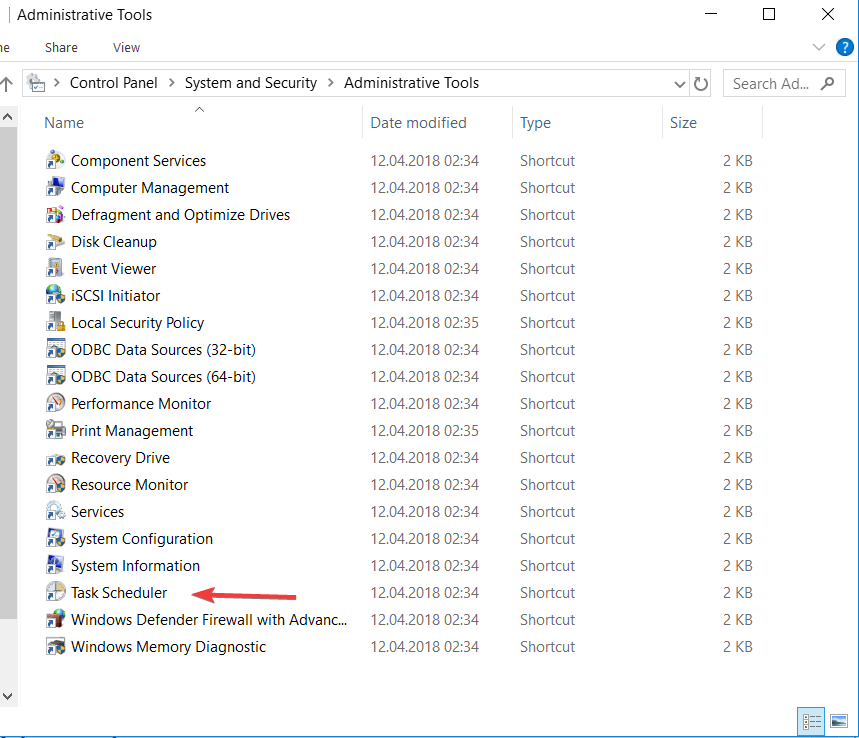
- Using Command Prompt
- Type cmd in the search bar from the bottom left corner of your screen, and select Command Prompt.
- Type msd command in the console, and you will open the application.
There are several ways you can get to access this application. You find above two of them that will work on any version of Windows that you have.
6.2. Create a task
1. Press the Start button on your taskbar.
2. Type task scheduler in the search box that opens and click on the first result.
3. When the Task Scheduler app opens, navigate to the Library section from the left pane.
4. Select the folder where you want to create a task. If you have not already a created folder, from the Actions tab, click on the New folder… button and name your new folder.
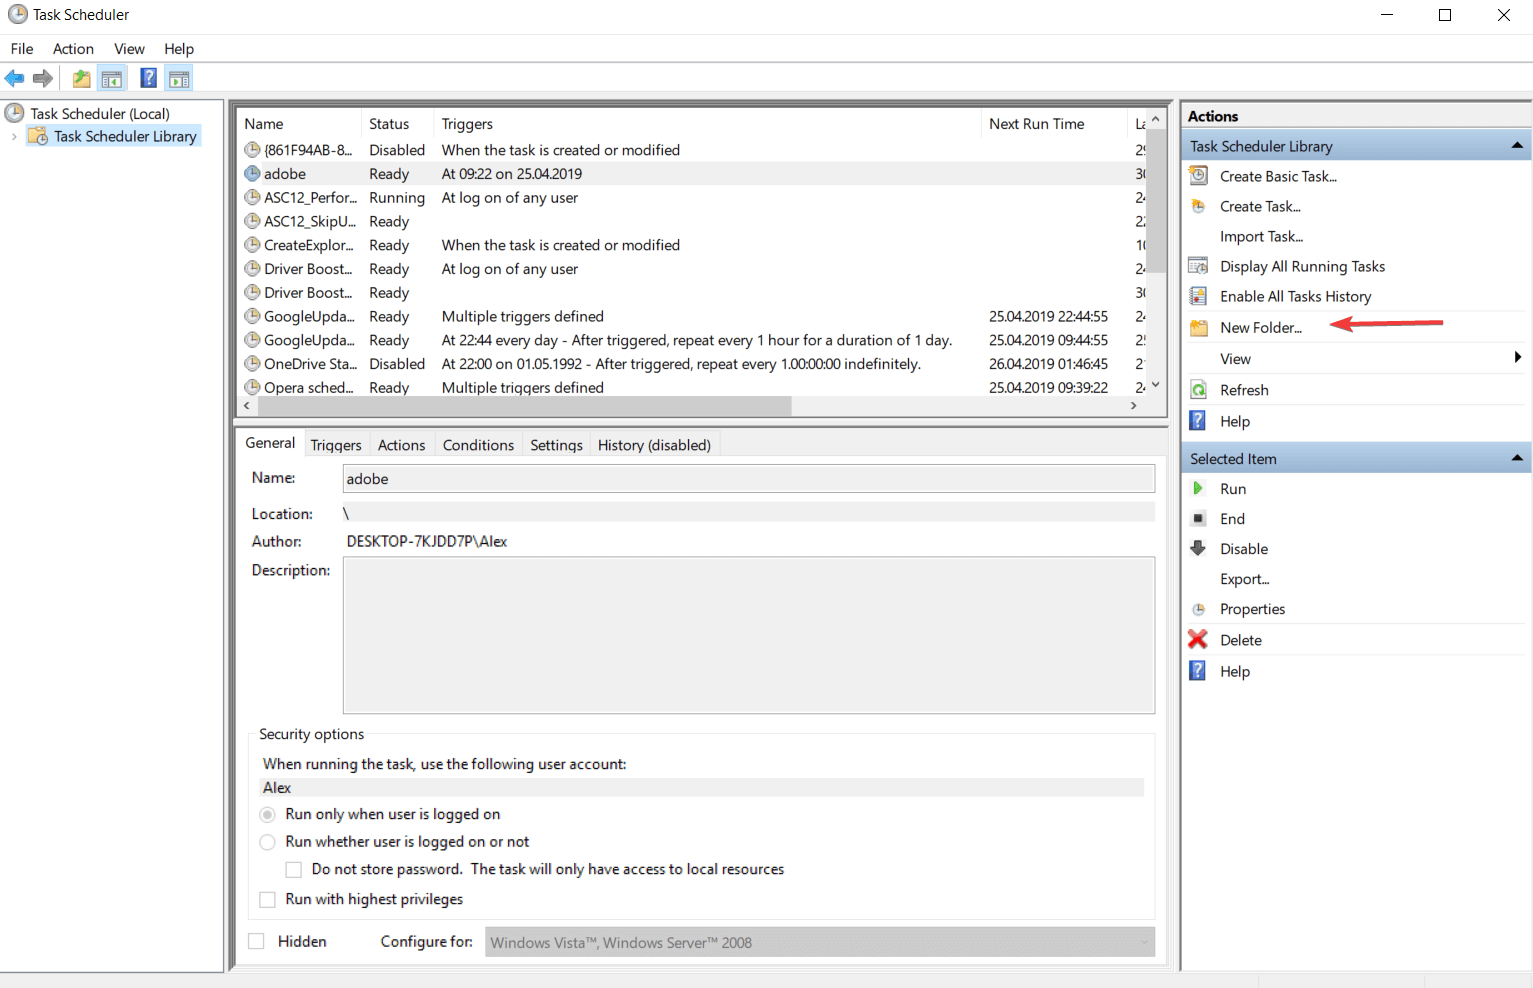
5. Click on the Create Task button from the Actions section.
6. You must enter a name for your task in the General tab of the Create Task dialog box.
7. Select what type of trigger you want to be attached to this action. To do this, open the Triggers tab, and click on the … button.
8. Choose the action or the set of actions which will be found in the task. Enter the Actions menu of the Create Task, and click on the .. button and configure your action settings.
9. Take a look at the Conditions and Settings tab to better customize the task for your needs.
10. Click on the OK button from the Create Task dialog box to finish the task creation process.
The process of creating an automated task via Task Scheduler in Windows 10 is simple and fast. The app allows you to configure every setting, such as the task’s name, its triggers and conditions.
6.3. How to change an already created task
- Open Task Scheduler, and select the task that you want to change.
- Click on the Properties tab from the Action menu to open the Task Properties dialog box.

- Click on the General tab to view the task’s general settings that you can modify.
- To finish the process click on the OK button of the Task Properties dialog box, and the new task will be registered.
- If you have already created a task that activates when you register another task, it will enable it.
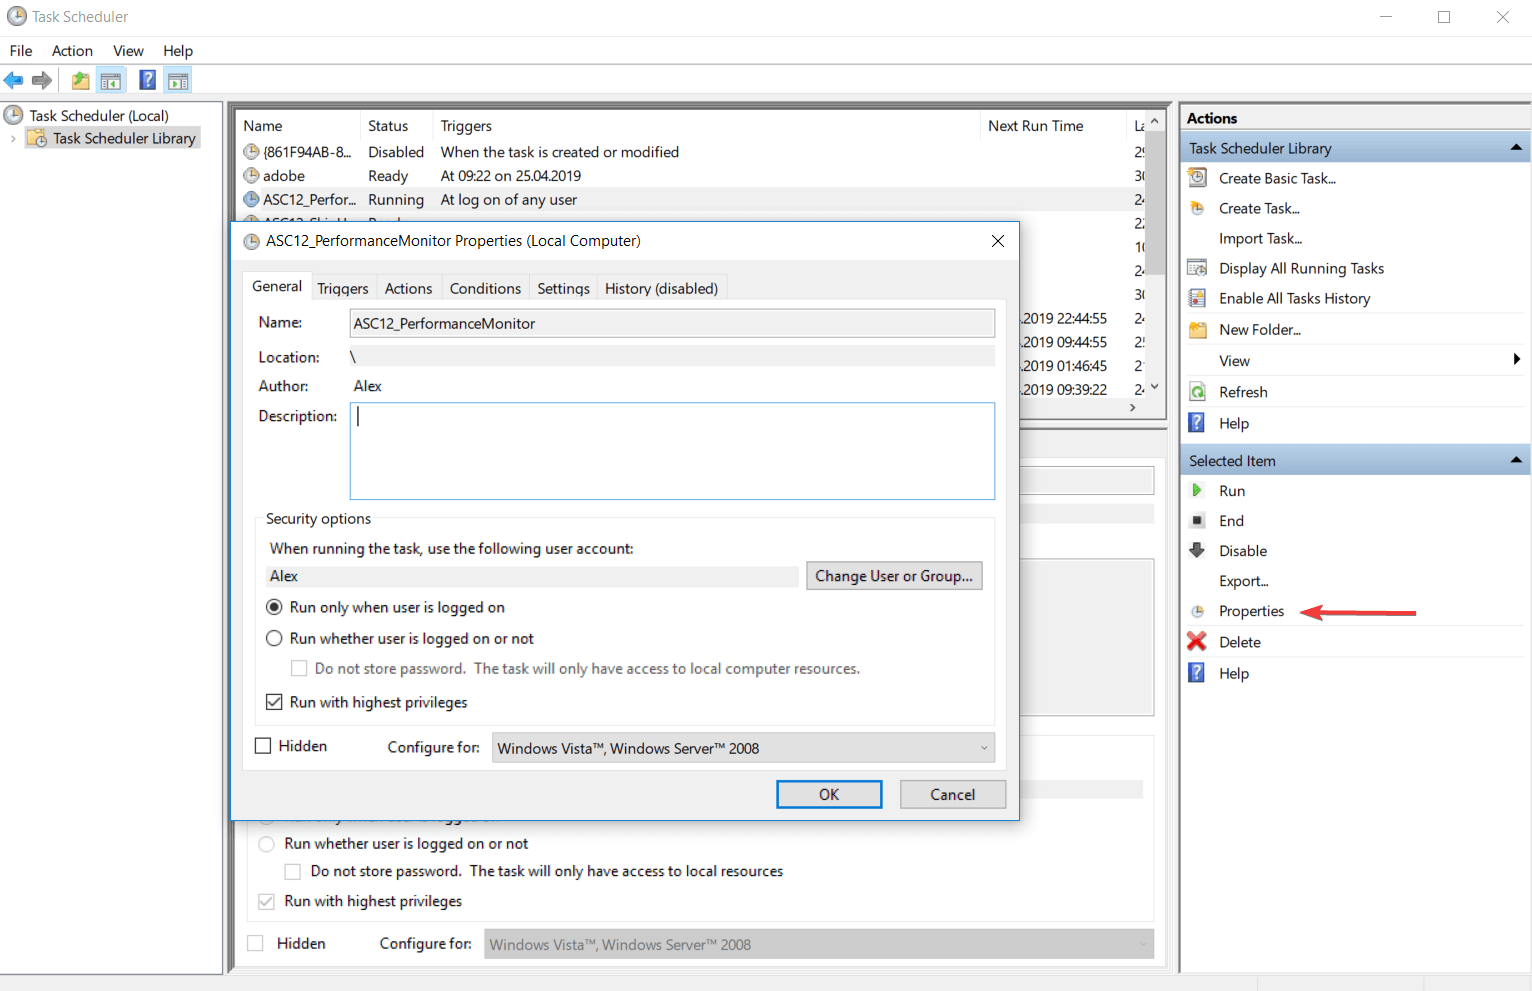
6.4. How to delete a task
- Using Windows interface
- Open Task Scheduler, and click on the Task Scheduler Library folder.
- Right-click on the task that you want to remove and select Delete Folder.

- Using Command Prompt
- Type Command Prompt in the search bar, and open it.
- Paste the following command:
schtasks /Delete [/S <system> [/U <username> [/P [<password>]]]] /TN <taskname> [/F] - To find more information about the command from above, type: schtasks /Delete /?
6.5. How to create a Task Folder
- Open Task Scheduler, and select the task folder under which you want to create a new task folder.
- Press on the New Folder button from the Actions, and enter the name of the new folder.
- Click on the OK button to finish the process.
To organize better the scheduled tasks we recommend you to share them in different folders depending on their role.
NOTE
6.6. How to delete a Task Folder
- Start Task Scheduler, and select the task folder from the left table of the application interface.
- You will notice that in the Action panel you have the Delete folder.

- Click on that option and choose the Yes option to complete the process.

If you want to delete a folder to better organize your tasks, you must ensure that it is empty, so be sure to delete all the tasks and the subfolder tasks before you delete the task folder.
NOTE
6.7. How to import a task
- Using Windows interface
- Open Task Scheduler, and select the folder where you want to import the new task.
- Click on the Import Task button from the Action, and select the path to the XML file of the task.
- After you entered the path to the task, the app will open the Create Task dialog box where you can find all the information about the imported task.
- Click on the OK button to finish the importing process.
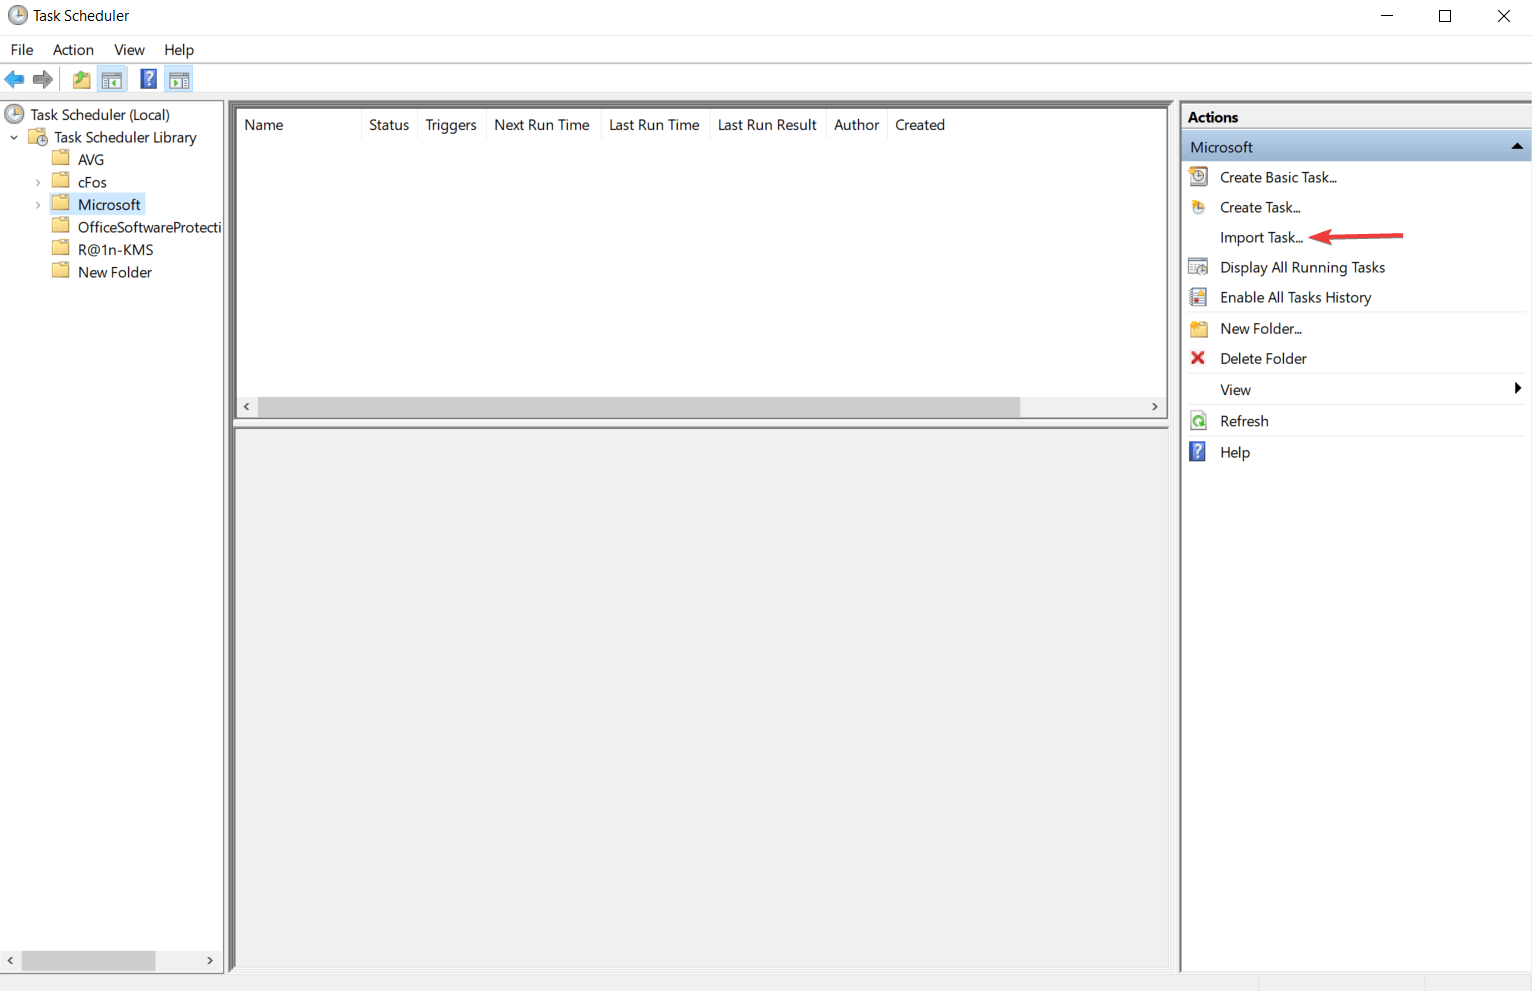
- Using Command Prompt
- Open Command Prompt. To do that, type cmd in the Windows search bar.
- Edit and paste the following command:
schtasks /Create [/S <system> [/U <username> [/P [<password>]]]] /XML <xmlfile> /TN <taskname> - For more information about the command from above, type the following command:
schtasks /Create /?
Task Scheduler has a feature that allows you to import tasks, which will be added to a folder chosen by you. All the task characteristics can be found in an XML file.
6.8. How to export a task
- Export a task using Windows interface
- Open Task Scheduler, and select the task folder which contains the task that you want to export.
- Right-click on the task that you want to export and select the Export option.

- If you select the task, you can find this option in the Action panel.
- This action will open a dialog box where you must browse the location where you want to save the task.
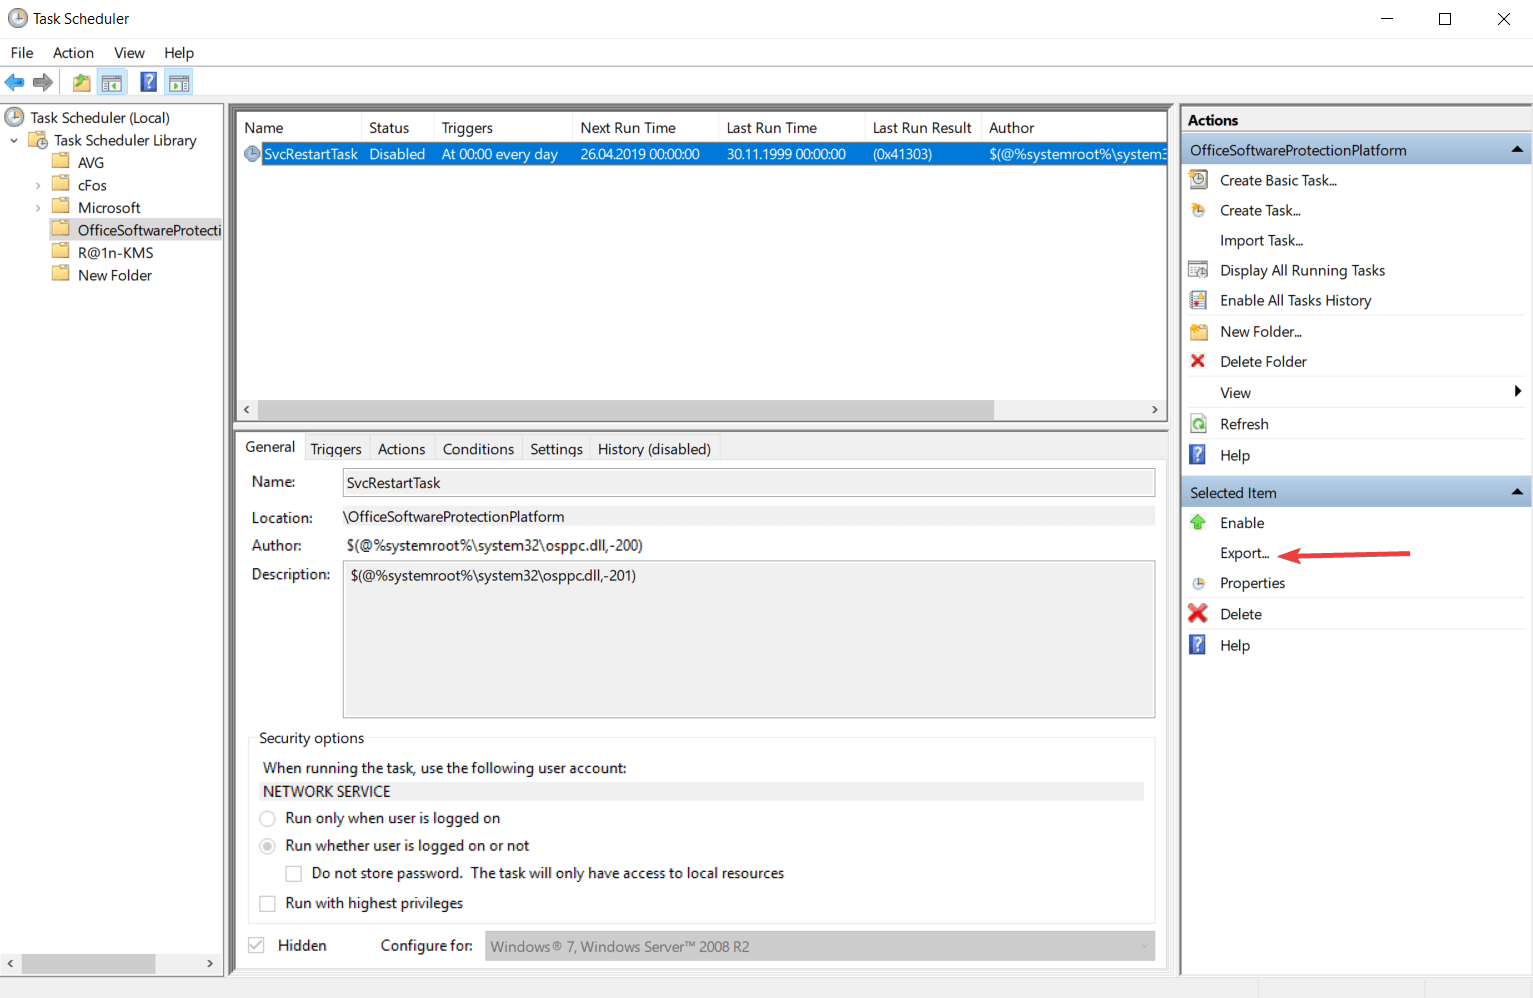
- Using Command Prompt
- Open Command Prompt by typing cmd in the Windows search bar.
- Edit and paste the following command: schtasks /Query [/S <system> [/P <password>]]]] /XML /TN <taskname>
- To find more information about the command tag, type the following command:
schtasks /Query /? - Your XML file is shown in the console. Copy the task XML and paste it into a blank XML file.
- After the XML file is saved, it will contain all the characteristics of your task.
Task Scheduler has also an integrated feature that allows you to export your task to different users. The task will be saved in an XML format that can be shared like a usual file.
6.9. How to run a task on demand
- Using Windows interface
- Open the Task Scheduler, and select the folder that contains the task you want to run.
- Right-click on your task and select Run.

- If you select the task you can find this option in the Action panel.
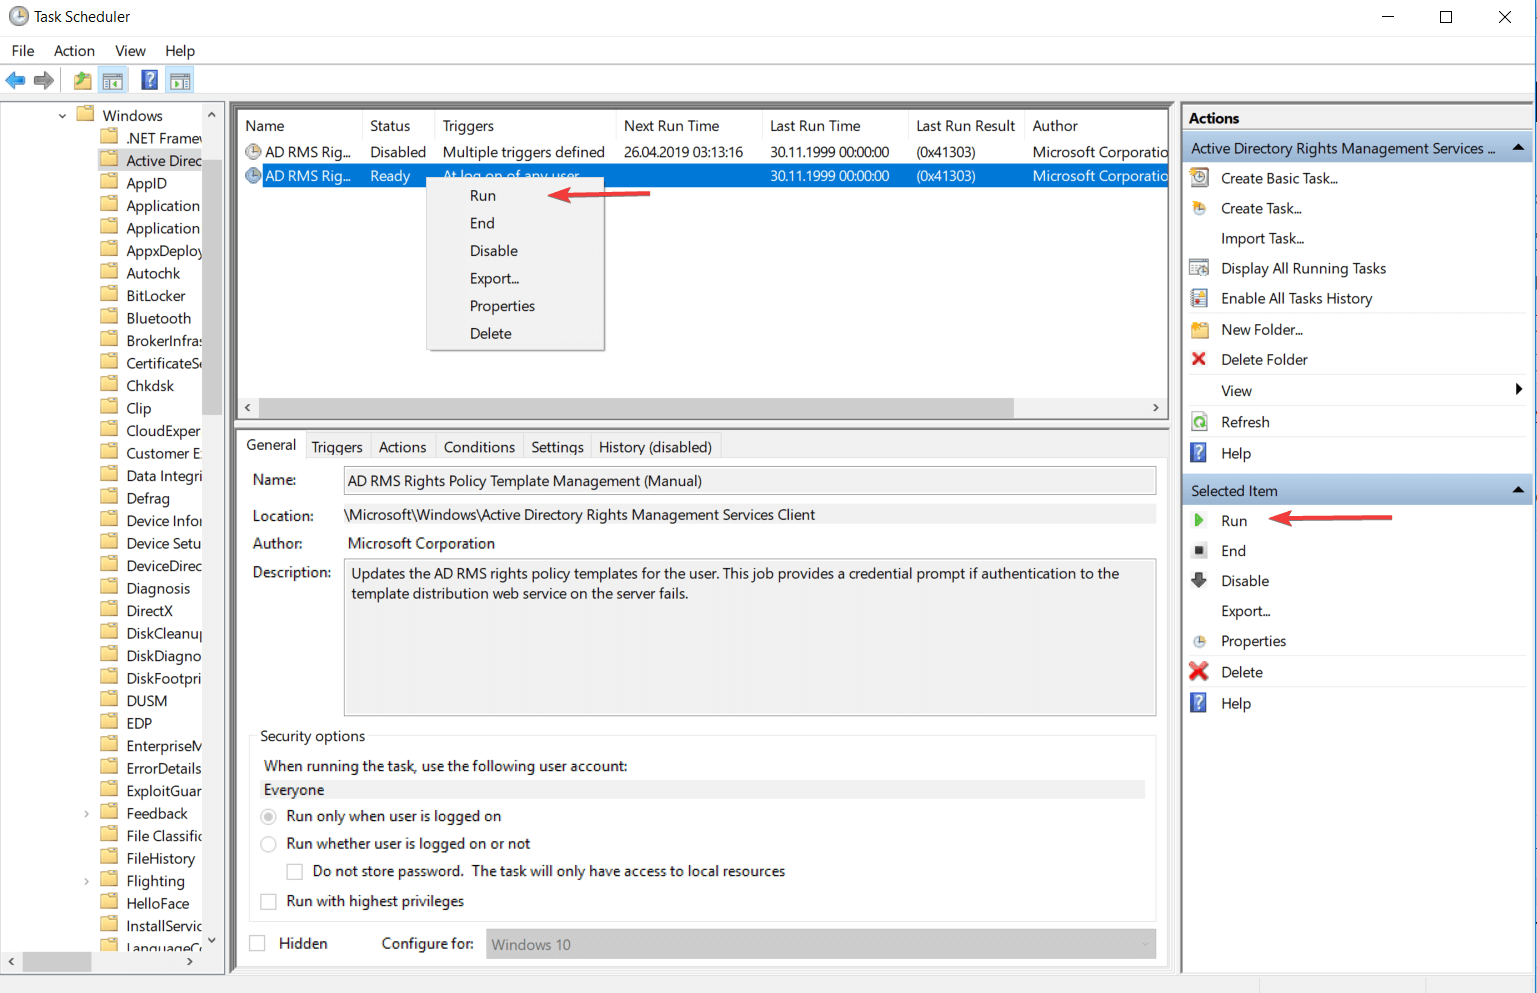
- Using Command Prompt
- Right-click on the Windows icon from the bottom left corner of your screen, and select the Command Prompt (Admin) section.
- Edit and type this command:
schtasks /Run [/S <system> [/U <username> [/P [<password>]]]] /TN <taskname> - For more information about the command lines from above, type in the console
schtasks /Run /?
This feature helps you to run a task after or before it was scheduled to run. This is possible only if the task is not disabled and the Allow task to be run on demand setting is selected for your task.
6.10. How to stop a running task
- Using Windows interface
- Open Task Scheduler, and select the folder which contains the task that you want to close.
- Right-click on your task, and select the End If you select the task.

- It will be displayed a dialog box where you will be asked if you want to end all instances of this task. Click on the Yes button to end stop the task.
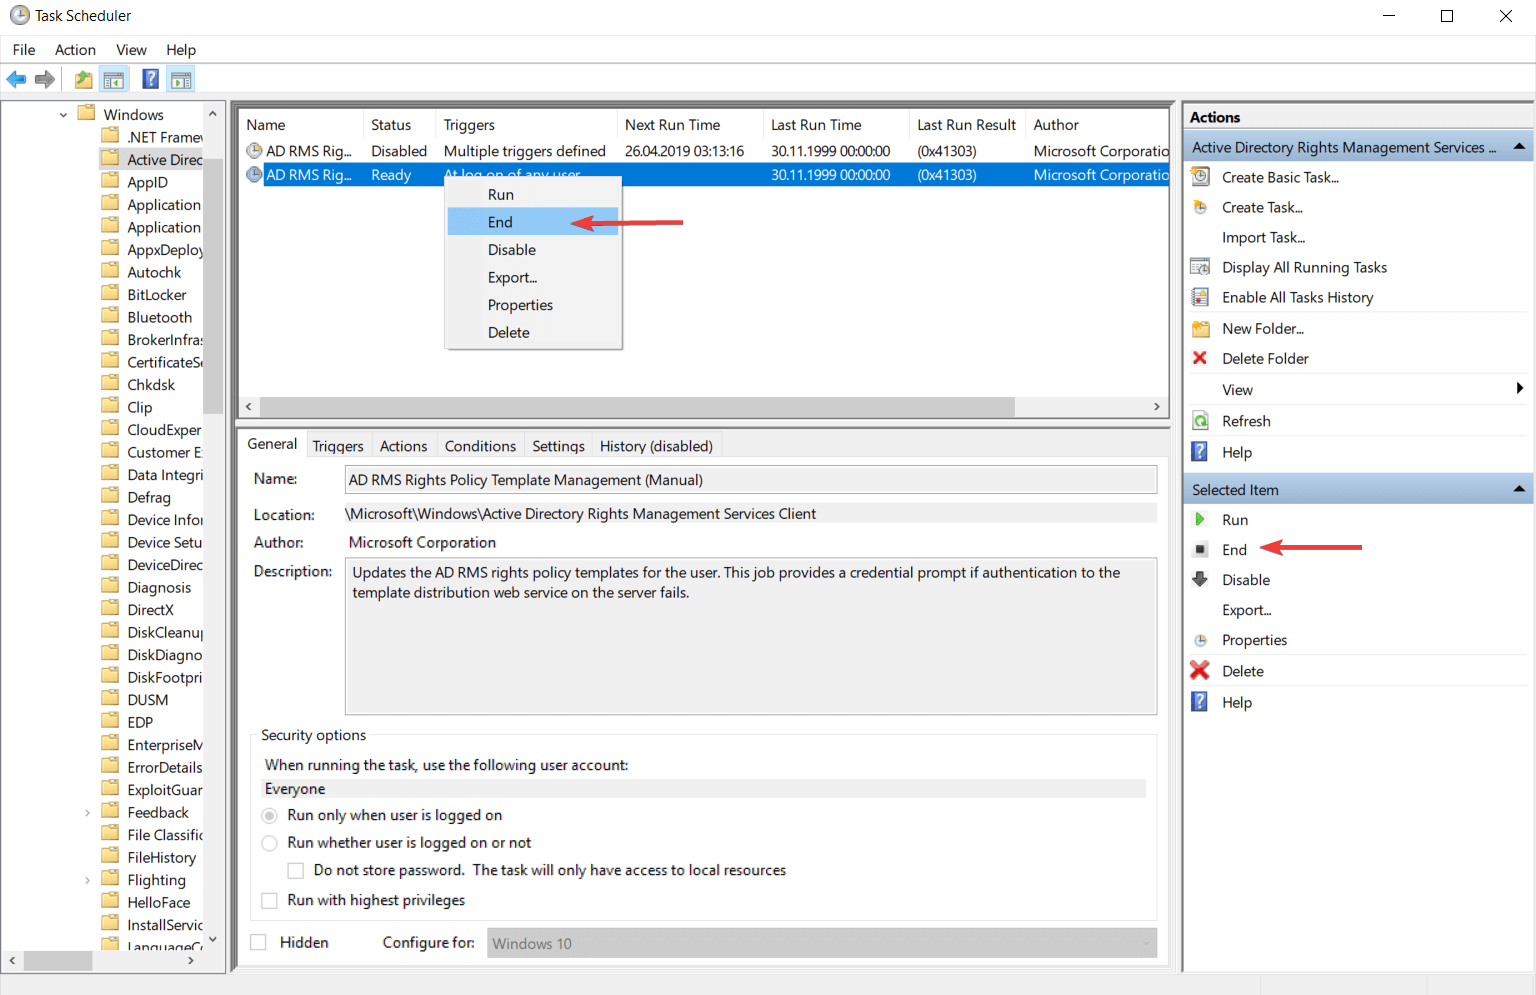
- Using Command Prompt
- Use the Windows Key + R combination to open the Command Prompt.
- Edit and type this command to end the activity of your task:
schtasks /End [/S <system> [/U <username> [/P [<password>]]]] /TN taskname - To see the role of each sequence you can enter the following command in the console to get all the information you need:
schtasks /End /?
Task Scheduler is offering a feature that allows you to end the activity of a task even if it is already running.
To do that, the running task must have the If the running task does not stop when requested, force it to stop setting activated.
This feature is commonly used when a task does not finish its activity when you finish the ending process.
6.11. How to enable a task to run
- Using Windows interface
- Open Task Scheduler, and select the task folder which contains the task you want to enable.
- Right-click on your task, and select the Enable option.

- You can also select your task and run it from the Actions panel.
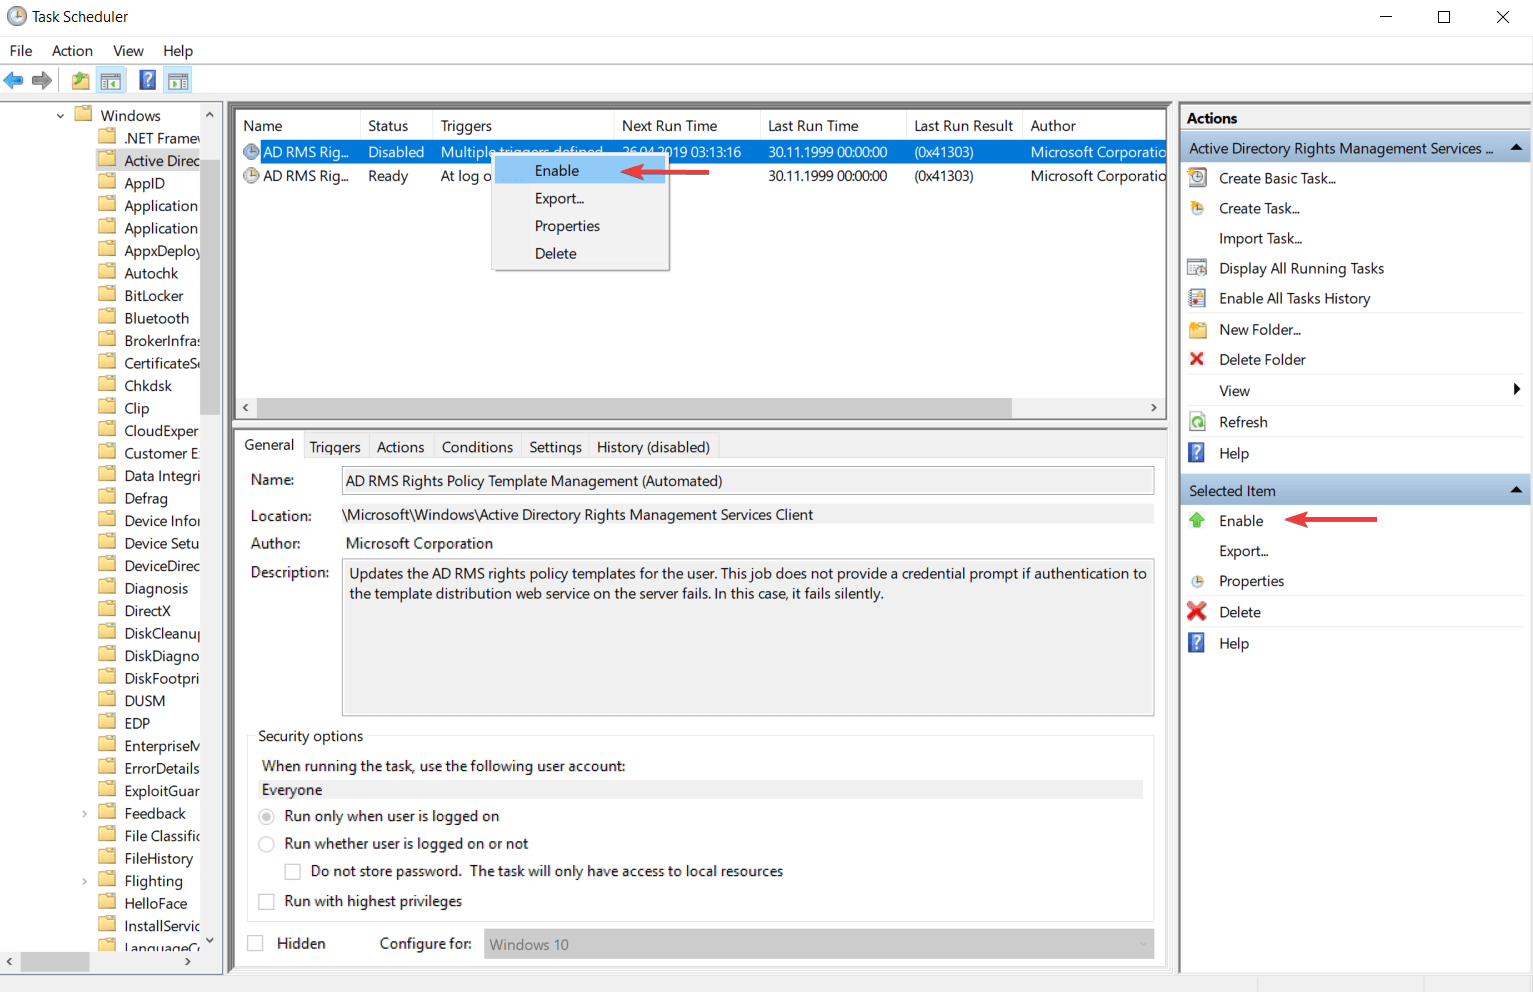
- Using Command Prompt
- Use the Windows Key + R key combination to open Command Prompt.
- Edit the following command and paste it in the console dialog box:
schtasks /Change [/S <system> [/U <username> [/P [<password>]]]] /TN <taskname> [/ENABLE] - Enter this command to obtain more information about the command from above:
schtasks /Change /?
When a task is disabled it can execute the actions. You can create a task and leave it off until the moment you want to use it. Here are two ways to activate a task that any kind of user can implement.
6.12. How to disable a task for running
- Using Windows interface
- Open the Task Scheduler, and select the folder where you have the task.
- This action will display in the console panel all tasks from that folder.
- Search the task that you want to disable and then right-click on it.
- It will display a list with some actions, but in this case, we are only interested in one. Click on the Disable option to stop your task activity.

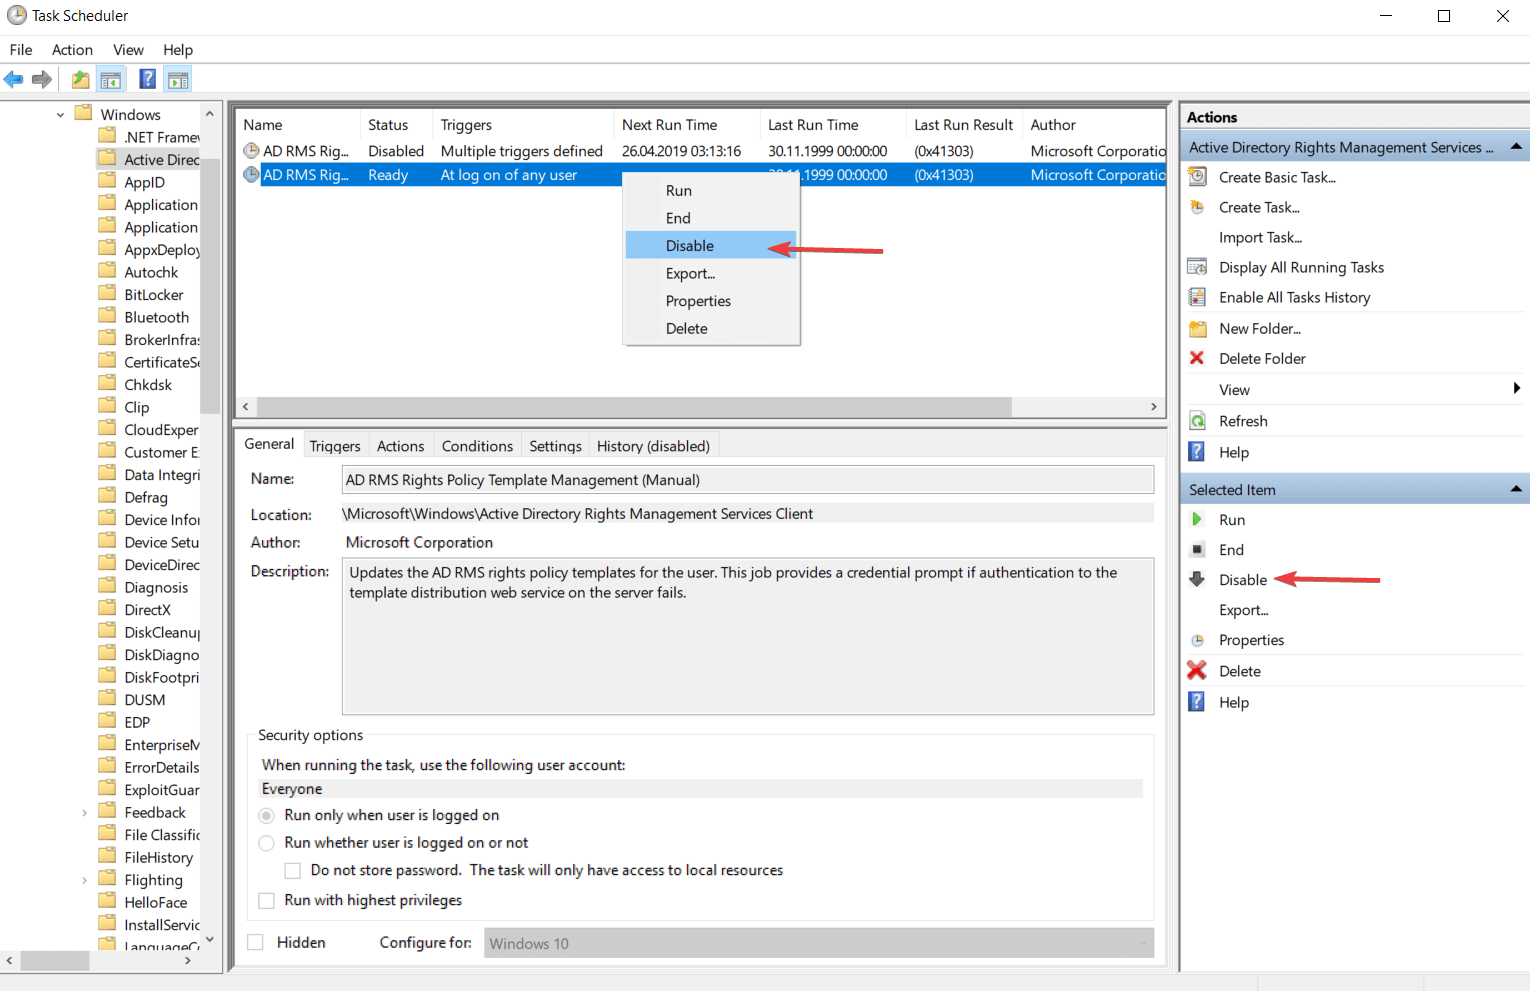
- Using Command Prompt
- To open Command Prompt, right-click on the Windows icon from the bottom left corner of your screen.
- Click on the Command Prompt (Admin) to open the console as an administrator.
- Edit with your information the following command and paste it in the Command Prompt dialog box:
schtasks /Change [/S <system> [/U <username> [/P [<password>]]]] /TN <taskname> /DISABLE - You can find more information about this command line by pasting the following command in the console:
schtasks /Change /?
Task Scheduler has a feature that allows you to disable the activity of a task for a certain period of time. You can enable the task again at any time when you will need it.
6.13. How to view task properties and history
- Using Windows interface
- Open Task Scheduler, and select the folder that contains the task you want to view.
- Right-click your task and select Properties.
- In the Task Properties dialog box, you will find the General, Triggers, Actions, Conditions, and Settings.
- Click on any of these tabs to see the properties.
- Click on the History tab to view the task’s history.
The task history option can be enabled and also disabled from the Action panel. There you will find the Disable All Task History / Enable All Task History buttons, and depending on your wish, you can configure the task’s history.
Also, you can view the description of an event from the events list by clicking on the History tab.
- Using Command Prompt
- Right-click on the Windows icon next to the Windows search bar, and select Command prompt (Admin).
- Paste the following command:
Schtasks /Query /FO LIST /V - For more information about the command line from above, type:
schtasks /Query /?
The task properties contain everything we must know about every task (name, description, actions, triggers, security options, conditions, and settings).
The task history is a list with all the tasks created until that moment and can be viewed along with the properties. This list is based on the events tracked by Microsoft Windows Task Scheduler event log.
Every action related to a task is considered an event, so every time when a task runs is building a line in the event log.
We hope that our detailed guide to Tasks Scheduler has given you a broad overview of this application and that you will be able to successfully schedule your tasks in Windows going forward.
Also, if you own a business and want to make sure you have everything under control, then check out our list of the best scheduling software for employees.
For any questions and more suggestions, please access the comments section below.
![]()