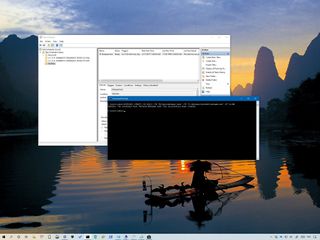
Windows 10 ships with Task Scheduler, which is an advanced tool that allows you to create and run routines automatically. Using this tool, you can automate tasks to perform all sorts of things, including launching an app, running a specific command, or executing a script at a specified day and time, or when a particular condition is met using triggers.
Although there’s a graphical experience to use Task Scheduler, you can also use Command Prompt to create, edit, and delete tasks, which can come in handy in many situations. For instance, when you need to speed up the process to create the same task on multiple computers, and when building an application or script that needs to connect with the tool — just to name a few.
In this Windows 10 guide, we’ll walk you through the steps to get started managing scheduled tasks using the schtasks.exe tool on Command Prompt.
- How to create a scheduled task using Command Prompt
- How to change a scheduled task using Command Prompt
- How to delete a scheduled task using Command Prompt
How to create a scheduled task using Command Prompt
To create a scheduled task with Command Prompt on Windows 10, use these steps:
- Open Start.
- Search for Command Prompt, right-click the top result, and select the Run as administrator option.
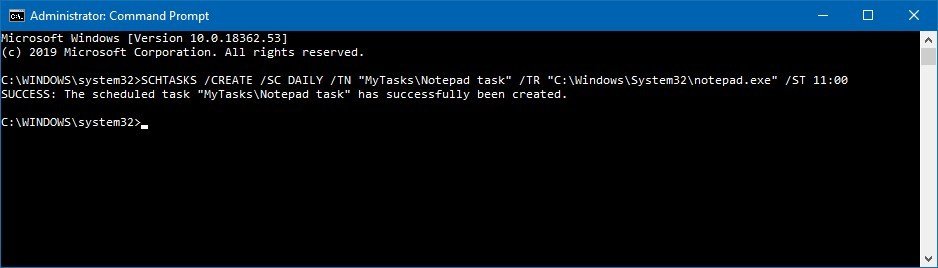
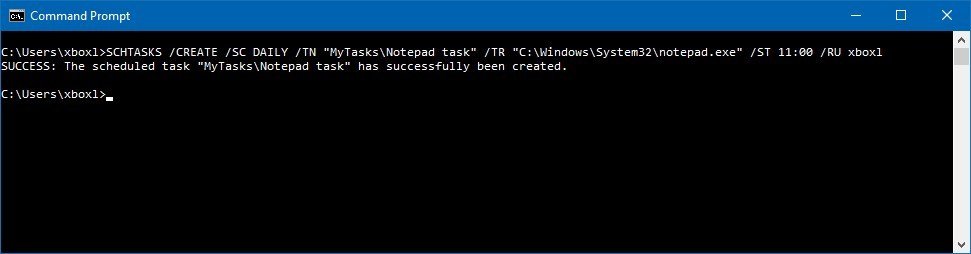
- Type the following command to create a daily task to run an app at 11:00am and press Enter:Syntax
SCHTASKS /CREATE /SC DAILY /TN "FOLDERPATH\TASKNAME" /TR "C:\SOURCE\FOLDER\APP-OR-SCRIPT" /ST HH:MMExampleSCHTASKS /CREATE /SC DAILY /TN "MyTasks\Notepad task" /TR "C:\Windows\System32\notepad.exe" /ST 11:00Quick tip: The folder path before the task name, under the /TN option, is not a requirement, but it’ll help you to keep your tasks separate. If you don’t specify a path, the task will be created inside the Task Scheduler Library folder.
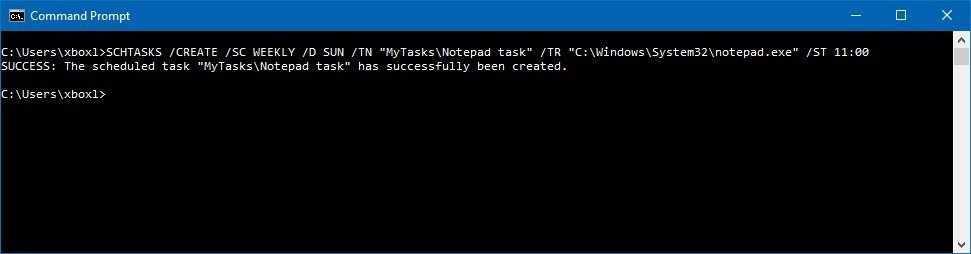
- Type the following command to create a weekly task to run an app at 11:00am and press Enter:Syntax
SCHTASKS /CREATE /SC WEEKLY /D SUN /TN "FOLDERPATH\TASKNAME" /TR "C:\SOURCE\FOLDER\APP-OR-SCRIPT" /ST HH:MMExampleSCHTASKS /CREATE /SC WEEKLY /D SUN /TN "MyTasks\Notepad task" /TR "C:\Windows\System32\notepad.exe" /ST 11:00
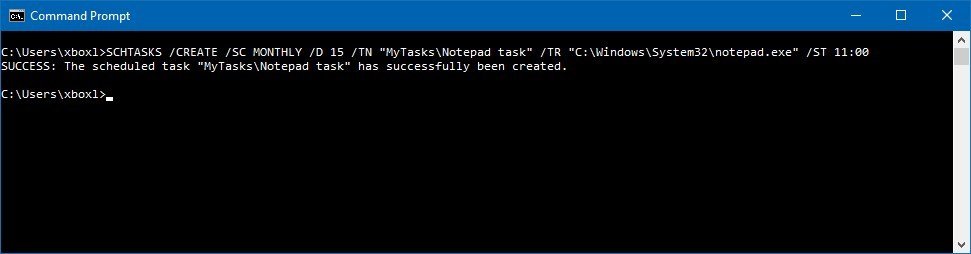
- Type the following command to create a monthly task to run an app at 11:00am and press Enter:Syntax
SCHTASKS /CREATE /SC MONTHLY /D 15 /TN "FOLDERPATH\TASKNAME" /TR "C:\SOURCE\FOLDER\APP-OR-SCRIPT" /ST HH:MMExampleSCHTASKS /CREATE /SC MONTHLY /D 15 /TN "MyTasks\Notepad task" /TR "C:\Windows\System32\notepad.exe" /ST 11:00
- Type the following command to create a scheduled task that runs daily as a specific user and press Enter:Syntax
SCHTASKS /CREATE /SC DAILY /TN "FOLDERPATH\TASKNAME" /TR "C:\SOURCE\FOLDER\APP-OR-SCRIPT" /ST HH:MM /RU USER-ACCOUNTExampleSCHTASKS /CREATE /SC DAILY /TN "MyTasks\Notepad task" /TR "C:\Windows\System32\notepad.exe" /ST 11:00 /RU admin
Once you complete the steps, the task will run during the intervals you specified.
Task Scheduler create options
The command line version of Task Scheduler ships with many options allowing to customize many aspects of a task, and in this guide, we are using the following options to change a scheduled task:
- /CREATE — specifies that you want to create a new an automated routine.
- /SC — defines the schedule for the task. Options available, include MINUTE, HOURLY, DAILY, WEEKLY, MONTHLY, ONCE, ONSTART, ONLOGON, ONIDLE, and ONEVENT.
- /D — specifies the day of the week to execute the task. Options available, include MON, TUE, WED, THU, FRI, SAT, and SUN. If you’re using the MONTHLY option, then you can use 1 — 31 for the days of the month. Also, there’s the wildcard «*» that specifies all days.
- /TN — specifies the task name and location. The «MyTasks\Notepad task» uses the «Notepad task» as the name and stores the task in the «MyTasks» folder. If the folder isn’t available, it’ll be created automatically.
- /TR — specifies the location and the name of the task that you want to run. You can select an app or custom script.
- /ST — defines the time to run the task (in 24 hours format).
- /QUERY — displays all the system tasks.
- /RU — specifies the task to run under a specific user account.
These are just some of the available options. You can learn more about the options to create a scheduled task running the
SCHTASKS /CREATE /?command.
How to change a scheduled task using Command Prompt
To modify a scheduled task on Windows 10 with Command Prompt, use these steps:
- Open Start.
- Search for Command Prompt, right-click the top result, and select the Run as administrator option.
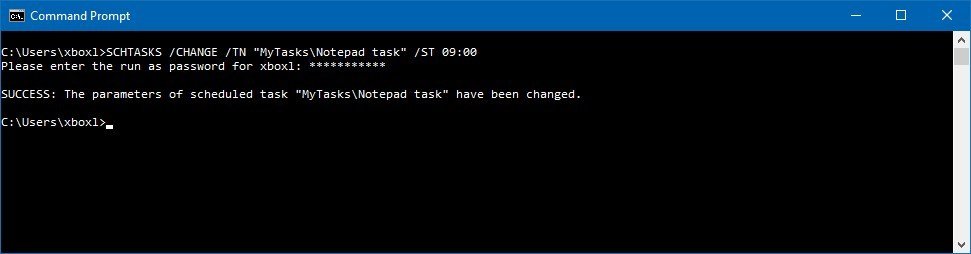
- Type the following command to change the time to run the task 9:00am and press Enter:Syntax
SCHTASKS /CHANGE /TN "FOLDERPATH\TASKNAME" /ST HH:MMExampleSCHTASKS /CHANGE /TN "MyTasks\Notepad task" /ST 09:00
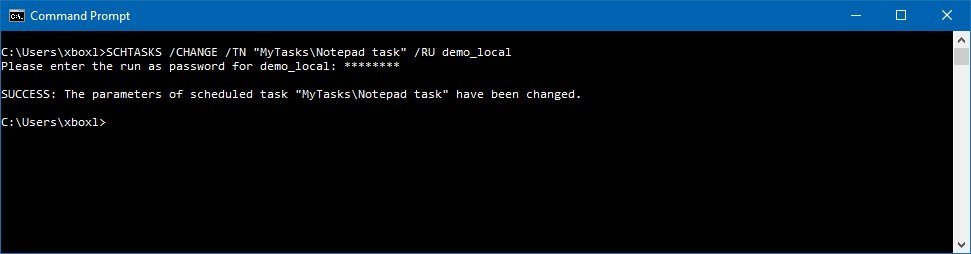
- Type the following command to change the task user information and press Enter:Syntax
SCHTASKS /CHANGE /TN "FOLDERPATH\TASKNAME" /RU NEW-USERNAMEExampleSCHTASKS /CHANGE /TN "MyTasks\Notepad task" /RU admin2
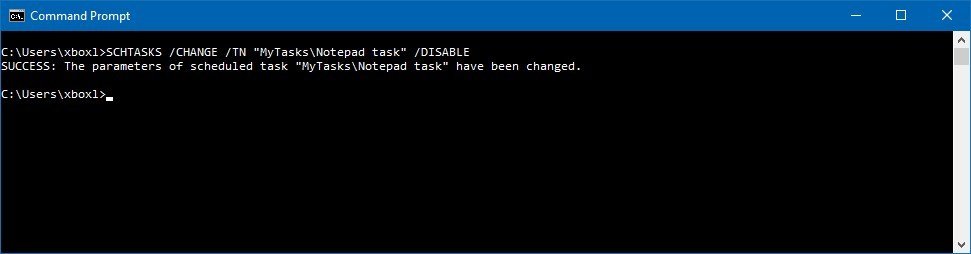
- Type the following command to disable a scheduled task and press Enter:Syntax
SCHTASKS /CHANGE /TN "FOLDERPATH\TASKNAME" /DISABLEExampleSCHTASKS /CHANGE /TN "MyTasks\Notepad task" /DISABLEQuick tip: If you want to re-enable the task, you can use the same command, but make sure to use the/ENABLEoption instead.
After completing the steps, the task will be modified with the information that you’ve specified.
Task Scheduler change options
In this guide, we are using the following options to create a scheduled task:
- /CHANGE — specifies that you want to edit an existing task.
- /TN — specifies the name and location of the task that you want to modify.
- /ST — defines the new time to run the automated routine.
- /DISABLE — disables the task.
These are just some of the available options. You can learn more about the options to change a scheduled task running the
SCHTASKS /CHANGE /?command.
How to delete a scheduled task using Command Prompt
If you no longer need a particular task, you can delete it using these steps:
- Open Start.
- Search for Command Prompt, right-click the top result, and select the Run as administrator option.
- Type the following command to delete a scheduled task and press Enter:Syntax
SchTask /DELETE /TX "FOLDERPATH\TASKNAME"ExampleSCHTASKS /DELETE /TN "MyTasks\Notepad task"
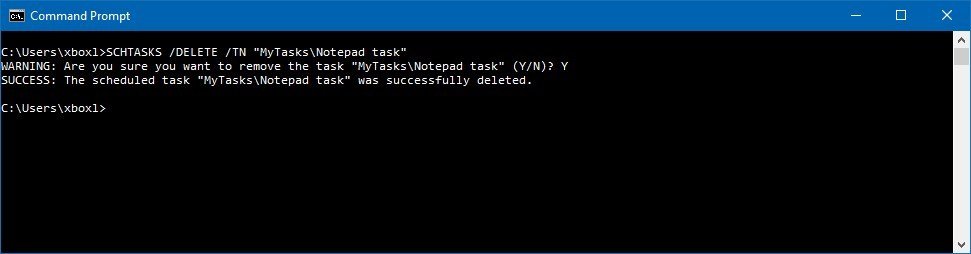
- Press the Y key to confirm.
Once you complete the steps, the task will be removed, and it’ll no longer be available on your device.
Task Scheduler delete options
In this guide, we are using the following options to delete a scheduled task:
- /DELETE — specifies that you want to delete an existing task.
- /TN — specifies the name and location of the task that you want to delete.
We’re focusing this guide on Windows 10, but the ability to use Task Scheduler with Command Prompt has been around for a long time, which means that you can also use these steps on Windows 8.1 and Windows 7.
All the latest news, reviews, and guides for Windows and Xbox diehards.
Mauro Huculak is technical writer for WindowsCentral.com. His primary focus is to write comprehensive how-tos to help users get the most out of Windows 10 and its many related technologies. He has an IT background with professional certifications from Microsoft, Cisco, and CompTIA, and he’s a recognized member of the Microsoft MVP community.
Recurring tasks are generally schedules with scheduled task manager. Scheduled task manager have GUI for management but creating a task in 20 different servers is very hard and trivial job. Windows operating systems provide tool called schtasks which is used to create, modify, delete scheduled tasks.
Help
Help about scheduling tasks command schtasks can be printed with /? option.
$ schtasks /?

Syntax
While using command we will use following syntax.
SCHTASKS /parameter [arguments]
Create A Scheduled Task/Job
In order to create a scheduled task we need to provide following parameters at least.
/SCspecifies/TNspecifies task name which will identify task from other tasks/TRspecifies the tasks executable file or command.
In this example we will create a task named defrag which will run c:\windows\system32\defrag.exe at weekly periods.
$ Schtasks /create /SC weekly /TN defrag /TR c:\windows\system32\defrag.exe

Schtasks Attributes
While creating scheduled jobs we can providing following attributes.
- /S system Specifies the remote system to connect to.
- /U username Specifies the user context under which schtasks.exe
should execute. - /P [password] Specifies the password for the given user context.
Prompts for input if omitted. - /TN taskname Specifies which scheduled task to change.
- /RU username Changes the user name (user context) under which the
scheduled task has to run. For the system account,
valid values are “”, “NT AUTHORITY\SYSTEM” or “SYSTEM”.
For v2 tasks, “NT AUTHORITY\LOCALSERVICE” and
“NT AUTHORITY\NETWORKSERVICE” are also available as well
as the well known SIDs for all three.
/RP password Specifies a new password for the existing user
context or the password for a new user account.
This password is ignored for the system account. - /TR taskrun Specifies the new program that the
scheduled task will run. - /ST starttime Specifies the start time to run the task. The time
format is HH:mm (24 hour time) for example, 14:30
for 2:30 PM. - /RI interval Specifies the repetition interval in
minutes. Valid range: 1 – 599940 minutes. - /ET endtime Specifies the end time to run the task. The time
format is HH:mm (24 hour time) for example, 14:50
for 2:50 PM. - /DU duration Specifies the duration to run the task. The time
format is HH:mm. This is not applicable with /ET. - /K Terminates the task at the endtime or duration time.
- /SD startdate Specifies the first date on which the task runs.
The format is mm/dd/yyyy. - /ED enddate Specifies the last date when the task should run.
The format is mm/dd/yyyy. - /IT Enables the task to run interactively only if the
/RU user is currently logged on at the time the job
runs. This task runs only if the user is logged in. - /RL level Sets the Run Level for the job. Valid values are
LIMITED and HIGHEST. The default is to not change it. - /ENABLE Enables the scheduled task.
- /DISABLE Disables the scheduled task.
- /Z Marks the task for deletion after its final run.
- /DELAY delaytime Specifies the wait time to delay the running of the
task after the trigger is fired. The time format is
mmmm:ss. This option is only valid for schedule types
ONSTART, ONLOGON, ONEVENT.
Create A Scheduled Tasks/Job With More Options
In previous example we have used to very little options. We can provide more needed attributes. In this example we will provide
/RUfor the username/RPfor password/SCfor period/D‘ for date/TNfor task name/TRfor executable file or command/STfor time
$ Schtasks /create /RU jack /RP 123456 /SC weekly /D SAT /TN defrag /TR c:\windows\system32\defrag.exe /ST 10:00:00

List All Ready Created Scheduled Tasks/Jobs
In a IT environment there will be a lot of existing scheduled jobs. We can list these existing tasks just issuing schtasks like below.
$ schtasks

For each task following information is printed.
Foldershows namespace based location.Tasknameshows given name for the task to identifyNext Run Timeshows when will the task will run for the next timeStatusshows whether the task is ready to run or running or there is a problem.
Delete Scheduled Task/Job
All ready scheduled jobs can be deleted if we do not need it. We can delete task with /delete option and specifying the task name. In this example we will delete task named degfrag which is specified with /TN option.
$ schtasks /delete /TN defrag

While deleting we need to confirm the delete operation. If the task is deleted properly we will get a SUCCESS message.
Delete All Scheduled Task/Jobs
If we do not need all of the scheduled jobs and we want to delete them in a single shot we can use asterisks * sign to specify task name.
$ schtasks /delete /TN *
Disable Scheduled Task/Job
Some time we may need to disable scheduledjob for a short period. We can use /change option with /disable option in order to disable a scheduled job. In this example we will disable the job named defrag .
$ schtasks /change /tn defrag /disable
![]()
Enable Scheduled Task/Job
We can enable scheduled job similar to disable operation where we use /enable .
$ schtasks /change /tn defrag /enable
![]()
Modify Scheduled Task/Job
A scheduled task can be changed with /change option. We can specify the attribute we want to change. In this example we will change the username and password of the user which will run task with /RU and /RP .
$ schtasks /change /tn defrag /ru jack /rp 123456
![]()
![]() Планировщик заданий Windows служит для настройки автоматических действий при определенных событиях — при включении компьютера или входе в систему, в определенное время, при различных системных событиях и не только. Например, с его помощью можно настроить автоматическое подключение к Интернету, также, иногда, вредоносные программы добавляют свои задания в планировщик (см., например, здесь: Сам открывается браузер с рекламой).
Планировщик заданий Windows служит для настройки автоматических действий при определенных событиях — при включении компьютера или входе в систему, в определенное время, при различных системных событиях и не только. Например, с его помощью можно настроить автоматическое подключение к Интернету, также, иногда, вредоносные программы добавляют свои задания в планировщик (см., например, здесь: Сам открывается браузер с рекламой).
В этой инструкции — несколько способов открыть планировщик заданий Windows 10, 8 и Windows 7. В целом, независимо от версии, методы будут практически одинаковыми. Также может быть полезно: Планировщик заданий для начинающих.
1. Использование поиска
Во всех последних версиях Windows есть поиск: на панели задач Windows 10, в меню Пуск Windows 7 и на отдельной панели в Windows 8 или 8.1 (панель можно открыть клавишами Win+S).
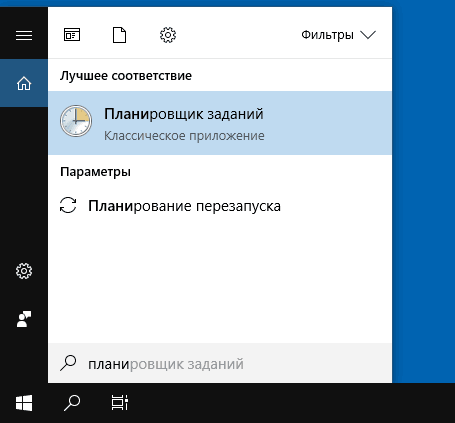
Если в поле поиска начать вводить «Планировщик заданий», то уже после ввода первых символов вы увидите нужный результат, запускающий планировщик заданий.
В целом, использование поиска Windows для открытия тех элементов, для которых возникает вопрос «как запустить?» — наверное, самый эффективный метод. Рекомендую помнить о нем и использовать при необходимости. Одновременно, почти все системные инструменты можно запустить более, чем одним методом, о чем — далее.
2. Как запустить планировщик заданий с помощью диалогового окна «Выполнить»
Во всех версиях ОС от Microsoft этот способ будет одинаковым:
- Нажмите клавиши Win+R на клавиатуре (где Win — клавиша с эмблемой ОС), откроется диалоговое окно «Выполнить».
- Введите в него taskschd.msc и нажмите Enter — запустится планировщик заданий.


Эту же команду можно ввести и в командной строке или PowerShell — результат будет аналогичным.
3. Планировщик заданий в панели управления
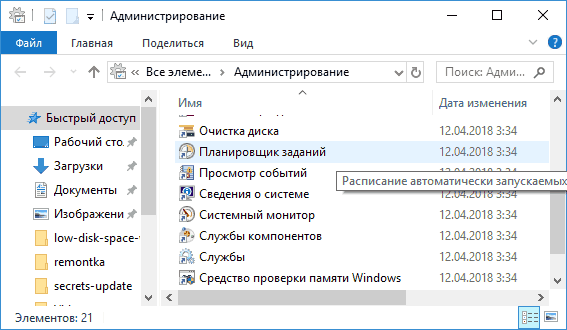
Запустить планировщик заданий можно и из панели управления:
- Откройте панель управления.
- Откройте пункт «Администрирование», если в панели управления установлен вид «Значки», или «Система и безопасность», если установлен вид «Категории».

- Откройте «Планировщик заданий» (или «Расписание выполнения задач» для случая с просмотром в виде «Категорий»).


4. В утилите «Управление компьютером»
Планировщик заданий присутствует в системе и как элемент встроенной утилиты «Управление компьютером».
- Запустите управление компьютером, для этого, например, можно нажать клавиши Win+R, ввести compmgmt.msc и нажать Enter.
- В левой панели, в разделе «Служебные программы» выберите «Планировщик заданий».


Планировщик заданий будет открыт прямо в окне «Управление компьютером».
5. Запуск планировщика заданий из меню Пуск
Планировщик заданий также присутствует и в меню Пуск Windows 10 и Windows 7. В 10-ке его можно найти в разделе (папке) «Средства администрирования Windows».
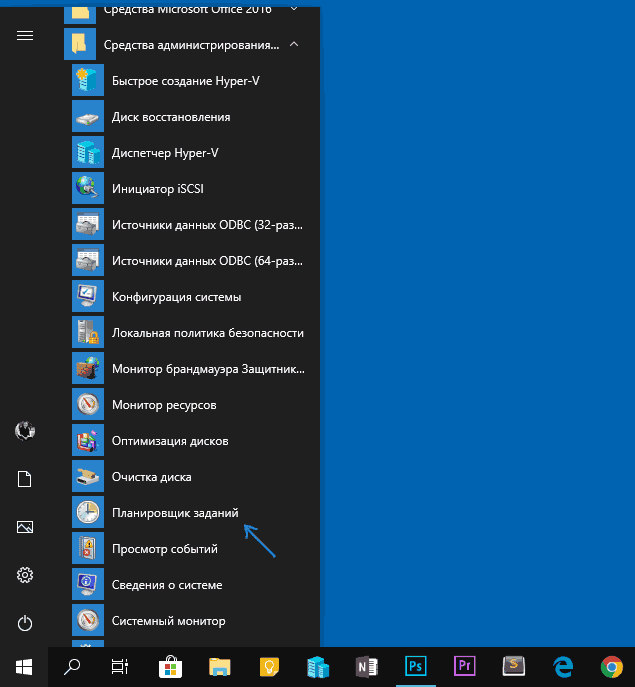
В Windows 7 он находится в Пуск — Стандартные — Служебные.
Это не все способы запуска планировщика заданий, но, уверен, для большинства ситуаций описанных методов будет вполне достаточно. Если же что-то не получается или остаются вопросы, задавайте в комментариях, я постараюсь ответить.
‘Schedule tasks‘ is a GUI application using which we can schedule tasks, There is an equivalent utility which provides the same functionality but with the advantage that it can be used from windows command line. This command is Schtasks. This is an in-built windows command supported by XP, Vista and Windows 7. Let’s see the syntax of this command with the help of few examples.
How to schedule a task ?
If you are logged into the same computer where you want to run the scheduled task, then you can use the below command to create the task.
Schtasks create /RU username /RP password /SC schedule_frequency /MO Schedule_modifier /D days /M months /TN taskname /TR Task_command /ST start_time /SD start_day /ED end_date
Now let’s see few examples.
Example 1: Schedule disk defragmentation on every Saturday at 10AM. User credentials are administrator/password.
Schtasks /create /RU administrator /RP adminpassword /SC weekly /D SAT /TN defrag /TR c:\windows\system32\defrag.exe /ST 10:00:00
If the specified username and password are correct, then you would get the below message when you run the above command.
SUCCESS: The scheduled task "defrag" has successfully been created.
If the credentials are not correct, you may get a warning like below.
WARNING: The Scheduled task "defrag5" has been created, but may not run because the account information could not be set.
If there exists a scheduled task with the same name then the error would be:
specified task name already exists in the system.
If you need to use a domain user account to run the task you can specify domainname\username with /RU option.
How to get the list of scheduled tasks?
Just run Schtasks command and you can see the list of scheduled commands.
C:\>schtasks

TaskName                             Next Run Time            Status
==================================== ======================== ===============
defrag                               10:00:00, 3/12/2011
GoogleUpdateTaskUserS-1-5-21-3567637 11:14:00, 3/6/2011
GoogleUpdateTaskUserS-1-5-21-3567637 13:14:00, 3/5/2011
If you want complete details about each of the tasks you can run the command ‘Schtasks /query /v
Delete a scheduled task
We can delete a schedule task using ‘schtasks /delete /TN task_name‘ command. For example, to delete the task we created in the example 1 we can run the below command.
Schtasks /delete /TN defrag
Delete all the scheduled tasks
You can run the below command to delete all the scheduled tasks.
schtasks /delete /TN *
Disable a scheduled task
There does not seem to be a way to disable a scheduled task from command line. We can delete the tasks as mentioned above.
Modify a scheduled task:
We can change a scheduled task using ‘schtasks /change’ command. Run ‘schtasks /change /?’ for the syntax.

The Task Scheduler enables you to automatically perform routine tasks on a chosen computer. Task Scheduler does this by monitoring whatever criteria you choose (referred to as triggers) and then executing the tasks when those criteria are met. You can use the Task Scheduler to execute tasks such as starting an application, sending an email message, or showing a message box. Tasks can be scheduled to execute in response to these events, or triggers. Kind refer to these related guides: How to create advanced scheduled task on Windows Server with Windows Task Scheduler, how to create a Scheduled task with Windows Admin Center, how to setup Windows server backup and create backup jobs, and how to create Windows Task Scheduler via the command prompt.
Task Scheduler allows you to automate many tasks on Windows 10, 11 a,d on Windows Servers. The Task Scheduler was formerly refferd to as "Scheduled Tasks". Here is a link to all articles relating to task scheduler.How to use the Command Prompt
Windows Server and Windows 10, by default, have the Task Scheduler, and this enables you to run tasks automatically at a scheduled time. Task schedulers can be used to launch applications, word documents and execute scripts at a scheduled time.
The command prompt can be used to create, edit and delete a scheduled task and below are some flags associated with the executable SCHTASKS.EXE file.
Task Scheduler creates options via Command-line: Here are the options allowing to create and customize a scheduled task via the command-line.
| /CREATE | Specifies that you want to create a new an automated routine. |
| /SC | Defines the schedule for the task. Options available, include MINUTE, HOURLY, DAILY, WEEKLY, MONTHLY, ONCE, ONSTART, ONLOGON, ONIDLE, and ONEVENT. |
| /D | specifies the day of the week to execute the task. Options available, include MON, TUE, WED, THU, FRI, SAT, and SUN. If you’re using the MONTHLY option, then you can use 1 – 31 for the days of the month. Also, there’s the wildcard “*” that specifies all day. |
| /TN | Specifies the task name and location. The “MyTasks\Notepad task” uses the “Notepad task” as the name and stores the task in the “MyTasks” folder. If the folder isn’t available, it’ll be created automatically. |
| /TR | Specifies the location and the name of the task that you want to run. You can select an app or a custom script. |
| /ST | Defines the time to run the task (in 24 hours format). |
| /QUERY | Displays all the system tasks. |
| /RU | Specifies the task to run under a specific user account. |
Create Scheduled Task: Below are the space to create a scheduled task via the command prompt. Launch the Command Prompt with the Administrator’s right. Below is the command and please modify it to your desired need
Daily: Type the following command to create a daily task
SCHTASKS /CREATE /SC DAILY /TN "FOLDERPATH\TASKNAME" /TR "C:\SOURCE\FOLDER\APP-OR-SCRIPT" /ST HH:MM
Weekly: Type the following command to create a weekly task
SCHTASKS /CREATE /SC WEEKLY /D SUN /TN "FOLDERPATH\TASKNAME" /TR "C:\SOURCE\FOLDER\APP-OR-SCRIPT" /ST HH:MMMonthly: Type the following command to create a monthly task.
SCHTASKS /CREATE /SC MONTHLY /D 15 /TN "FOLDERPATH\TASKNAME" /TR "C:\SOURCE\FOLDER\APP-OR-SCRIPT" /ST HH:MMTo modify (edit) the Task Scheduler option via the Command: In this guide, we are using the following options to create a scheduled task:
| /CHANGE | Specifies that you want to edit an existing task |
| /TN | Specifies the name and location of the task that you want to modify |
| /ST | Defines the new time to run the automated routine. |
These are just some of the available options. Nonetheless, You can learn more about the options to change a scheduled task by running the SCHTASKS /CHANGE /? command.

Moreover, To delete a scheduled task: Here are some commands associated with the command prompt to delete a scheduled task.
| /DELETE | Specifies that you want to delete an existing task. |
| /TN | Specifies the name and location of the task that you want to delete |

Furthermore, This was tested on Windows 10 and Windows Server 2019. However, If you need any further assistance, please let me know.