Windows может перестать работать, фактически, не запуститься из-за любых изменений оборудования и программного обеспечения. Эти изменения мешают обычному процессу загрузки. В этом посте мы постараемся решить проблему с помощью советов по устранению неполадок.

Windows failed to start a recent — ошибка загрузки
Обычно проблема связана с отсутствующим загрузчиком или подключенным оборудованием. Вам нужно будет сделать загрузочный USB-накопитель для загрузки в режиме расширенного восстановления. Поскольку вы не можете получить доступ к своему компьютеру, вы можете использовать другой компьютер с Windows 10 для создания загрузочного диска.
У вас есть следующие варианты:
- Проверить оборудование
- Восстановление системы
- Восстановить BCD
- Установите правильный порядок загрузки
Вам также понадобится учетная запись администратора в одном из процессов, поэтому обязательно запомните это.
1] Установите правильный порядок загрузки

При запуске Windows загрузчик ищет набор файлов, откуда он может начать загрузку Windows. Если он не найдет нужные файлы, Windows не загрузится. Вы должны убедиться, что загрузочным диском по умолчанию является ваш SSD или HDD.
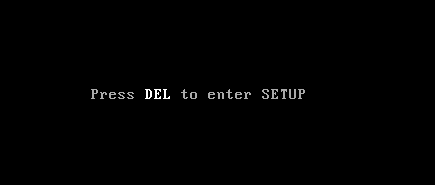
Если он не установлен по умолчанию и у вас подключен USB-накопитель, Windows зависнет. Поэтому загрузитесь в BIOS с помощью клавиши DEL или F2 при включении компьютера и измените порядок, Как изменить порядок загрузки.
2] Проверить оборудование
Если проблемы с порядком загрузки нет, вы можете проверить, есть ли проблема с жестким диском. Первым делом вам следует проверить, может ли BIOS его обнаружить. Если это так, то вам нужно проверить это на другом компьютере. Если жесткий диск или твердотельный накопитель не удается распознать, у вас проблема с оборудованием.
Если вы столкнулись с этим на ноутбуке, вам нужно вручную вынуть его и проверить. Если это аннулирует вашу гарантию. пожалуйста, отнесите его в сервисный центр, и не открывайте его самостоятельно.
3] Автоматическое восстановление при Загрузке

Windows Advanced Recovery предлагает функцию автоматического восстановления (восстановление при загрузке), которая сканирует системные файлы, параметры реестра, параметры конфигурации и многое другое и пытается решить проблему самостоятельно, автоматически. Обычно он запускается автоматически, если процесс перезагрузки прерывается несколько раз.
Вы можете использовать загрузочный USB-накопитель для загрузки в Recovery.
Вам нужно будет выбрать Устранение неполадок> Дополнительные параметры> Автоматическое восстановление. При появлении запроса введите данные учетной записи и позвольте процессу выполнить свою работу.
4] Восстановить BCD

BCD или данные конфигурации загрузки содержат информацию, которая позволяет загрузчику находить нужные файлы для загрузки Windows. Если BCD поврежден или не содержит информации, Windows зависает. Выполните следующие действия, чтобы восстановить BCD:
- Загрузите компьютер в расширенный режим восстановления
- Запустить командную строку, доступную в разделе «Дополнительные параметры».
- Чтобы восстановить BCD или файл данных конфигурации загрузки, используйте команду –bootrec /rebuildbcd
- Он просканирует систему и позволит вам выбрать ОС, которые вы хотите добавить в BCD.
Если он не находит загрузочный раздел, вы можете использовать bootrec /scanos, чтобы найти список раздела, на котором установлена ОС. Затем используйте команду bcdboot, чтобы добавить его в список. После того, как путь установлен, перезагрузите компьютер, и ошибка больше не должна возникать.
Вы также можете попробовать исправить MBR или основную загрузочную запись, выполнив команды в командной строке bootrec/fixMbr and bootrec /fixboot.
If you are facing this error, then chances are you may have installed new hardware or software which is causing the issue. Sometimes installing the latest Windows updates seems to cause this issue but you can’t be sure until you troubleshoot the issue. Now as far as software problems are concerned, these might be the possible reasons as to
why you are facing this error:
- Corrupted BCD information
- System File is damaged.
- Loose or faulty SATA/IDE Cable
- Conflicting 3rd party software
- Virus or malware

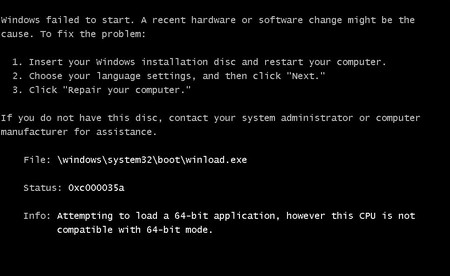
The error which you will get after a reboot will be:
Error: Windows failed to start. A recent hardware or software change might have caused the issue after you install Windows Updates
The main problem is that you won’t boot into Windows and you will be stuck at this error message screen. In short, you will be inside a reboot loop as every time you restart your PC you will again face the same error message until you fix the issue. So without wasting any time let’s see how actually to Fix “Windows failed to start. A recent hardware or software change might be the cause” with the below-listed troubleshooting steps.
Table of Contents
Method 1: Run Startup/Automatic Repair
1. Insert the Windows 10 bootable installation DVD or Recovery Disc and restart your PC.
2. When prompted to Press any key to boot from CD or DVD, press any key to continue.

3. Select your language preferences, and click Next. Click Repair your computer in the bottom-left.

4. On choose an option screen, click Troubleshoot.

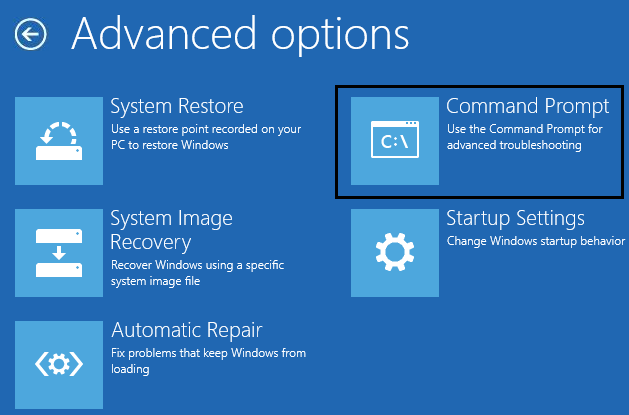
5. On Troubleshoot screen, click the Advanced option.

6. On the Advanced options screen, click Automatic Repair or Startup Repair.

7. Wait till the Windows Automatic/Startup Repairs complete.
8. Restart and you have successfully Fix Windows failed to start. A recent hardware or software change might be the cause, if not, continue.
Also Read: How to fix Automatic Repair couldn’t repair your PC.
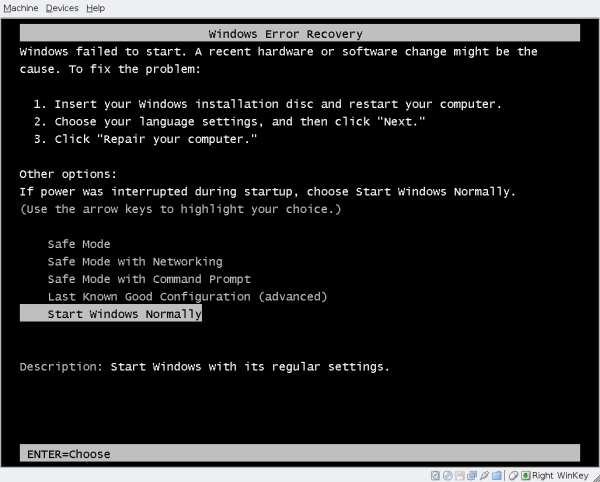
Method 2: Boot into Last Known Good Configuration
Before going any further let’s discuss how to Enable Legacy Advanced Boot Menu so that you can easily get Boot Options:
1. Restart your Windows 10.
2. As the system restarts enter into BIOS setup and configure your PC to boot from CD/DVD.
3. Insert the Windows 10 bootable installation DVD and restart your PC.
4. When prompted to Press any key to boot from CD or DVD, press any key to continue.
5. Select your language preferences, and click Next. Click Repair your computer in the bottom-left.
6. On choose an option screen, click Troubleshoot.
7. On Troubleshoot screen, click the Advanced option.

8. On Advanced options screen, click Command Prompt.

9. When the Command Prompt(CMD) open type C: and hit enter.
10. Now type the following command:
BCDEDIT /SET {DEFAULT} BOOTMENUPOLICY LEGACY
11. And hit enter to Enable Legacy Advanced Boot Menu.

12. Close Command Prompt and back on the Choose an option screen, click Continue to restart Windows 10.
13. Finally, don’t forget to eject your Windows 10 installation DVD to get Boot options.
14. On the Boot Options screen, choose “Last Known Good Configuration (Advanced).”

Method 3: Perform a System Restore
1. Put in the Windows installation media or Recovery Drive/System Repair Disc and select your language preferences, and click Next
2. Click Repair your computer at the bottom.
3. Now, choose Troubleshoot and then Advanced Options.
4. Finally, click on “System Restore” and follow on-screen instructions to complete the restore.

5. Restart your PC to save changes and see if you can fix Windows failed to start. A recent hardware or software change might be the cause error.
Method 4: Run SFC and CHKDSK
1. Again go to command prompt using the method 1, click on command prompt in the Advanced options screen.
2. Type the following command in cmd and hit enter after each one:
sfc /scannow /offbootdir=c:\ /offwindir=c:\windows
chkdsk C: /f /r /x
Note: Make sure you use the drive letter where Windows is currently installed. Also in the above command C: is the drive on which we want to check disk, /f stands for a flag which chkdsk the permission to fix any errors associated with the drive, /r let chkdsk search for bad sectors and perform recovery and /x instructs the check disk to dismount the drive before beginning the process.

3. Exit the command prompt and restart your PC.
Method 5: Rebuild BCD configuration
1. Using above method open command prompt using Windows installation disk.
2. Now type the following commands one by one and hit enter after each one:
bootrec.exe /FixMbr
bootrec.exe /FixBoot
bootrec.exe /RebuildBcd

3. If the above command fails, then enter the following commands in cmd:
bcdedit /export C:\BCD_Backup
c:
cd boot
attrib bcd -s -h -r
ren c:\boot\bcd bcd.old
bootrec /RebuildBcd

4. Finally, exit the cmd and restart your Windows.
5. This method seems to Fix Windows failed to start. A recent hardware or software change might cause the error, but if it doesn’t work for you, then continue.
Method 6: Set Correct Boot Order
1. When your computer starts (Before the boot screen or the error screen), repeatedly press Delete or F1 or F2 key (Depending upon your computer’s manufacturer) to enter BIOS setup.
2. Once you are in BIOS setup, select the Boot tab from the list of options.

3. Now make sure that the computer Hard disk or SSD is set as a top priority in the Boot order. If not, use up or down arrow keys to set hard disk at the top, which means the computer will first boot from it rather than any other source.
4. Finally, press F10 to save this change and exit.
Recommended:
- Fix High CPU Usage By TiWorker.exe
- 10 ways to fix A disk read error occurred
- Fix High CPU Usage by svchost.exe (netsvcs)
- Fix High CPU Usage by RuntimeBroker.exe
That’s it you have successfully Fix Windows failed to start. A recent hardware or software change might be the cause, but if you still have any questions regarding this post, please ask them in the comment’s section.
If you have enabled Windows Boot Manager or use an older Operating System where the UEFI bootloader is not available, you will encounter the error message: “Windows failed to start. A recent hardware or software change might be the cause.” It appears when the Boot Manager can’t access the boot device.
It will also display a possible cause, such as, “A required device isn’t connected or can’t be accessed.” This issue mainly happens because of the corruption of the boot files necessary to start the OS. But it is also possible that the necessary boot device is not connected properly.
Table of Contents
Remove External Devices
Depending on your Boot priority order, your system may be trying to boot from another media, such as a USB or a network device. So, before trying other possible solutions, try removing all unnecessary external devices.
This way, only the normal OS storage device or installation media is available as the current boot device.
Check BIOS Settings
Before you begin repairing the potentially corrupt boot files, you need to ensure that your computer is detecting the OS drive and interfacing with it properly. Also, you need to check the boot order list to make sure that the OS drive is the first priority.
- Start your computer and press the BIOS key immediately after you see the logo to get to BIOS.
- Go to Boot or a similar tab and select something like Boot Priority.

- Make sure your OS drive (generally C Drive) is at the top of the list. If the drive does not show up, it is not connected properly, and you need to reinsert it in this scenario.
- If you are trying to boot from a Windows installation media, you have to move the media to the top instead.
- Now, look for the SATA mode option. You can usually find it under Advanced or Storage Controller settings.
- If you are using older operating systems, IDE is the preferred choice. And for newer systems, set it to AHCI. We recommend checking if the computer boots when enabling each option to ensure what mode you need.

- If you still encounter the error regardless of the mode, set the SATA mode to AHCI for now if you are using Windows Vista and later OS. After trying other methods, you can switch the SATA mode and check which works best for you.


Perform Startup Repair Using Windows Installation Media
Windows includes the Startup Repair feature that automatically checks for errors with the boot configuration data or other boot files and attempts to repair them. You will get an option to perform the startup repair whenever you encounter the error.
However, if it can’t solve it, the source file for the repair may have some issues as well. In such cases, you need to use an installation media to use it as the source.
- Create a Windows installation media with the same version as your system on another computer.
- Boot using this installation media. If you have an MBR disk, you need to manually change the Boot order from the BIOS to prioritize the installation media.
For a GPT disk or UEFI system, you should get the choice to boot from the media. Or you may need to press a certain key to access the boot menu. Search official sources for such a key for your motherboard. - Set the language preferences and agree with any license terms.
- Then, on the installation screen, click on Repair your computer.

- On newer Windows OS, go to Troubleshoot > Advanced options > Startup Repair. For older ones, you can directly select Startup Repair.

- Follow the on-screen instructions to finish the repair and then boot again.
- This time, boot using your original OS drive and then check if you still encounter the error.


Manually Repair Boot Files
Sometimes, the automatic startup repair utility can’t repair the boot files. In such cases, you need to manually repair them using the Command Prompt.
- Boot using the proper Windows installation media (see above solution).
- Specify your language preferences and click Next.
- On the Install screen, click Repair your computer.
- Select Command Prompt or Troubleshoot > Advanced options > Command Prompt.

- Type the two commands below to check if you have a GPT partition system in your OS disk and press Enter after each:
diskpartlist disk(here, the Gpt column should show an asterisk (*) sign if you have a GPT partition on the disk)
- Enter the commands below depending on the partition scheme of your system disk:


For GPT,
For MBR,
exit(to exit out of diskpart)bootrec /fixmbrbootrec /fixbootbootrec /rebuildbcd

Re-create Boot Files
If the boot configuration and file repairing commands don’t work, you must recreate these files from scratch using your operating system files.
- Boot using the proper Windows installation media and go to the Command Prompt (see above method).
- Type the two commands below to check if you have a GPT partition system in your OS disk and press Enter after each:
diskpartlist disk(here, the Gpt column should show an asterisk (*) sign if you have a GPT partition on the disk)
- Enter the commands below depending on the partition scheme of your system disk:
For GPT,
select disk #(replace # with the relevant disk number)list volume(check the number of the volume with the FAT32 partition that is hidden)select volume #assign letter = S:(or any unused drive letter)exitcd /d S:\EFI\Microsoft\Boot\(replace S: with the drive letter you used earlier)ren BCD BCD.old(to create a backup to account for unforeseen situations)bcdboot C:\Windows /l en-us /s S: /f all(here, replace C: with the drive letter of the operating system and S: with the letter you assigned earlier.)
bootrec /rebuildbcd(not necessary if you have a Windows version before Windows 10 Version 1709)

For MBR,
select disk #(replace # with the required disk number)list volume(check the number of the volume with where Info says System)select volume #assign letter = S:(or any unused drive letter)exitbootrec /fixmbrbcdboot C:\Windows /s S:(here, replace C: with the drive letter of the operating system and S: with the letter you assigned earlier.)

Clean Install Windows
If you cannot boot into your operating system after repairing the boot files, your final option is to clean install Windows. A clean install removes the partition containing the boot files as well as the OS partition. This way, you can reinstall all such files (but without corruption) to resolve your issue.
Clean installing Windows will delete all the data on the disk (of your non-system drives as well). So, first, try backing the data on the disk by booting with a Linux live disk or Windows-to-go disk.
- Create a Windows installation media of the version you want (using the same as the Windows in your disk is not necessary).
- Boot using this media and specify your language preferences.
- Click on Install now on the Install screen.
- Enter your product key if you have it. If not, select I don’t have a product key as well as the Windows build you want (Home, Pro, etc.)
- Click on Next.
- Agree with the license agreements and select Next.
- Choose Custom: Install Windows only.
- Select all the partitions for your OS disk (Drive 0) and click Delete for each. Confirm your choice as well.
- After you only have the unallocated space for the disk, select it and click Next.

- Ignore the warning as the setup process will automatically create the necessary partitions.
- Click on the partition that says Primary and then Next.
- Follow the on-screen instructions to clean install Windows.
- After restarting, check if you can boot from the OS drive. Then, you will need to go through the initial account and privacy setup.


Use USB 2.0 Port to Install Older Windows
All computers that already have Windows 10+ may not support installing old OS like Windows 7 from USB 3.0 ports or flash drives. If you try doing so, you’ll get the above error while trying to boot from the installation media.
This is mainly because of the lack of USB 3.0 drivers on the installation media. But on some computers, you might still be able to install the OS. Regardless, it’s better to either use USB 2.0 or include USB 3.0 drivers in the Windows image on the installation media. You may also need to enable CSM or Legacy support on your BIOS settings.
Additionally, if you only have USB 3.0 ports, you have to enable USB debug mode on BIOS to use them as USB 2.0 ports.
Компьютер частенько подкидывает пользователю массу всевозможных проблем. И проблемы эти постоянно разные: то выключение в самом начале старта, то постоянная перезагрузка системы, то пятое, то десятое.
Но довольно часто пользователь сталкивается с проблемами после того, как он почистит компьютер от пыли.
В ТЕМУ: Система запускается со второго раза – как решить проблему?
Вот об этом и поговорим.
Итак – ошибка (0xc000000f).
системные проблемы при загрузке Windows – ошибка 0xc000000f
Вы решили почистить компьютер от пыли? Отличная мысль: это только ускорит его работу! И вот вы почистилисистемный блок, запустили систему и – опа! – вместо полноценной загрузки ОС вы получаете черный экран, на котором, на английском языке, описана системная ошибка.
То бишь, в верхней части экрана будет надпись “Windows Boot Manager”, чуть ниже идет текст, который начинается с “Windows failed to start. Arecent hardware of…”, далее идет алгоритм предлагаемых действий. Но сам номер ошибки вы можете увидеть в пункте “Status: 0xc000000f”.
И ниже идет приписка “Info: The Boot Configuration Dataforyour PCismissingorcontains errors”. В общем, так. Естественно, вы пытаетесь перезапустить систему, но проблема повторяется снова и снова.
В ТЕМУ: Что делать, если компьютер не включается?
Скажем сразу: вы можете миллион раз перезапускать систему, менять батарейку на материнской плате, менять память и тд и тп, но проблема не решается таким способом!
Вся беда в том, что компьютер подвержен синдрому спонтанных сбоев даже в настройках BIOS! И решение данной ошибки кроется именно там.
Переходим к решению ошибки 0xc000000f.
1. Перезапустите систему (нажмите на кнопку “Reset” на передней панели системного блока) и сразу начинайте нажимать клавишу “F1″ (или “Del”, “F2″, в общем ту клавишу, которая прописана в вашей системе для входа в BIOS).
В ТЕМУ: Системная утилита “Монитор стабильности системы” – отличный инструмент Windows 7, который поможет решить многие проблемы
2. Попав в BIOS, переходим в настройки BOOT (там видно, как и что называется).
Находим пункт Hard Disk Drivers, выбираем и открываем его. Вы увидите две строчки: 1stDrive и 2ndDrive. И вот тут и скрывается проблема. Как правило, может быть прописано так: 1stDrive [SATA: 3M-STM3500418], а 2nd Drive [SATA:3M-STM3500418].
Дело в том, что при возникновении ошибки 0xc000000f, у вас, скорее всего, просто слетела правильность настройки устройств, с которых система загружает Windows.
Не поняли? Ну, тогда проще. Если ваша ОС (системная папка Windows со всем “фаршем”) установлена на диске “C”, то ни с какого другого диска она загрузится не сможет! Опять не понятно? В общем, так!
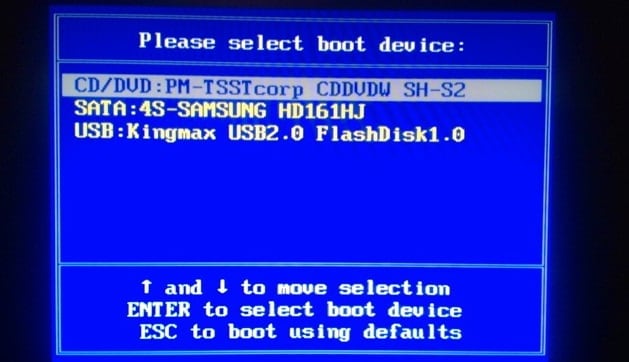
3. Выделяете строку 1st [SATA: 3M-STM3500418], нажимаете на кнопку “Ввод” (Enter). Откроется такое маленькое окошко, в котором вы увидите следующее: SATA: 3M-STM3500418 и SATA: 4S-WDC WD20EARX-00PASB0.
4. Стрелочками выделяете строчку SATA: 4S-WDC WD20EARX-00PASB0, жмете “Ввод” и получаете итог: 1st SATA: 4S-WDC WD20EA.
Это именно то, что вам и необходимо!
5. Теперь нажмите на клавишу “F10″: так вы сохраняете только что сделанные изменения. Компьютер перезагрузится и теперь операционная система загрузится без проблем: ошибка 0xc000000f устранена!
В ТЕМУ: Что делать, если не подключается Интернет?
Удачи!
Кстати, а вот как создается в Одноклассники моя страница!
Сообщение об ошибке «Windows failed to start. A recent hardware or software change might be cause…» часто появляется при неправильной переустановке ОС Виндовс и реже при каких-либо неполадках с комплектующими компьютера. Текст ошибки так и переводится «Невозможно загрузить операционную систему Windows. Проблемы могут быть на аппаратном или программном уровне».
Содержание
- Устраняем ошибку при помощи переустановки Windows с флешки
- Тестируем компьютер на неисправности
- Проблемы с жестким диском способна вызывать ошибку
- Преобразование жесткого диска из MBR в GPT и обратно
Устраняем ошибку при помощи переустановки Windows с флешки
Для того, чтобы решить проблему, нам понадобиться установочная флешка с утилитой от Microsoft или любая другая для создания образов диска. Вы должны иметь загрузочную флешку, которую необходимо вставить в USB разъем проблемного компьютера. Операционную систему желательно выбрать от 7 версии.
- Перезагрузите компьютер.
- Заходим в BIOS при помощи специальной клавиши, которая для каждой материнской платы своя, чаще всего это клавиша DEL.
- Откройте раздел биоса «Boot Menu», или что-то подобное, может быть одно слово «Boot».
- Теперь нашей задачей является установить флешку первым в загрузочной иерархии. По умолчанию загрузка производится из жесткого диска. Вам необходимо знать название вашего съемного накопителя, для этого можно подсмотреть в разделах дисков при записи на нее Windows.
- После чего нажмите F10 для сохранения изменений меню и перезагрузите компьютер.
- При появлении строки внизу экрана «Press any kay from CD or DVD» нажмите любую из клавиш, чтобы запустилась загрузка с флешки и началась установка Windows.
- Далее процесс установки обычный, как и с диска, только в конце, система попытается перезагрузить ваш ПК для входа в оконный режим, нужно будет в момент отчета до перезагрузки вытащить флешку. После этого система загрузиться и настроит самостоятельно компоненты для работы.
Тестируем компьютер на неисправности
Предыдущим способом можно устранить ошибку «Windows failed to start. A recent hardware or software change might be cause…» на программном уровне, но что делать, если ошибка кроется в сбое на аппаратном уровне? Для этого существуют специальные программы, которые способны тестировать все компоненты компьютера на работоспособность. Рассмотрим одну из таких программ, которая называется Aida 64. Она на является самой популярной из-за своей многофункциональности и при этом небольшого размера. Скачать ее можно на странице http://www.aida64.ru/download.
Скачайте ее и запустите.
- Перейдите в окне программы на вкладку «Тест», которую можно найти внизу слева в списке.
- Здесь предоставлены варианты для тестирования различных компьютерных компонентов, таких как память, процессор и т.д. Предоставляются возможности проверить компьютер на задержки в памяти, записи в память, жесткий диск на наличие нерабочих, поврежденных секторов, работоспособность модулей оперативной памяти.
- Чтобы выбрать тест, нажмите одну из предложенных проверок в левом окне и нажмите кнопку старт.
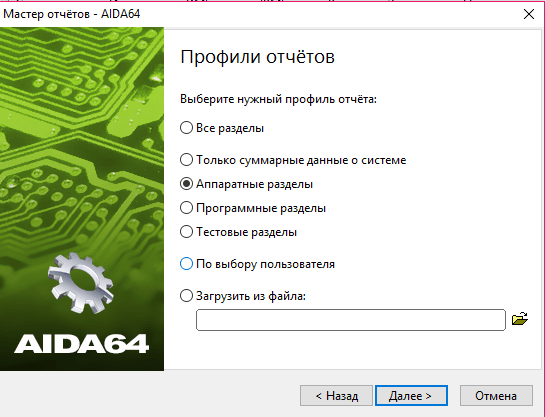
- Для проверки всех компонентов компьютера, нажмите в верхнем баре «Отчет».
- Откроется окно «Мастер отчетов» для продолжения нажмите кнопку «Далее».

Проверьте ПК с помощью «AIDA64» - Из предложенных вариантов выберите «Аппаратные разделы». Выберите вариант отчета и дождитесь завершения процесса.
Проблемы с жестким диском способна вызывать ошибку
Когда у вас стоит два жестких диска на компьютере или компьютер имеет вставленную флешку, то скорее всего проблема в том, что неправильно совершается процесс запуска ОС. Для этого нужно снова зайти в BIOS.
- Нажмите кнопку при перезагрузке Windows, чтобы попасть в настройки BIOS.
- Находим пункт Boot.
- В пункте Priority (у вас может назваться по-другому) выставляем на первую позицию диск, который содержит операционную систему.

- После чего нажмите F10 и подтвердите клавишей «Y».
Если вы столкнулись с ошибкой «Windows failed to start» – отключите и отсоедините все накопители и USB-устройства от компьютера и попробуйте запустить систему снова.
Преобразование жесткого диска из MBR в GPT и обратно
Проблема может решиться изменением типа разделов диска. Для этого в системе есть специальная функция. При этой процедуре вся информация будет удалена. Поэтому решите для себя сами, подходит ли вам этот вариант. Чтобы узнать в чем разница между дисками MBR и GPT перейдите по ссылке.
- Попытайтесь запустить систему в безопасном режиме, нажав F8 при старте компьютера.
- Откройте «Командную строку».
- Затем введите поочередно следующие команды компьютеру – «list disk» и нажмите «Enter».
- Следующая команда «select disk #» — вместо звездочки номер диска в приоритете загрузки, нажмите «0» и Ввод.
- Команда «clean», и Enter. Это очистит все разделы диска.
- Далее пропишите «convert mbr» и подтвердите нажатием Enter. Эта команда конвертирует диск в MBR.
После завершения процесса закройте все окна и перезапустите компьютер. Проделав такие манипуляции с диском ошибка «Windows failed to start. A recent hardware or software change might be cause…» должна исчезнуть.
Опубликовано Обновлено