 Обновлено:
Опубликовано:
Тематические термины: Ping, Windows, Linux.
Мы рассмотрим использование команды ping для Windows и, немного, для Linux.
Параметры команды ping и их описание
В зависимости от используемой операционной системы опции команды будут иметь разные назначения. Поэтому, если мы хотим понять все возможности, стоит ознакомиться с опцией help.
Общий синтаксис
Независимо от системы, команду ping можно применять так:
ping [опции] <имя сервера или IP-адрес>
Windows
Для просмотра в Windows также используйте команду ping /?
Используются часто:
| Параметр | Описание |
|---|---|
| -t | Команда будет отправлять запросы на проверку постоянно, пока ее не прервать клавишами Ctrl + C. Удобно, если сеть не работает и чтобы постоянно не проверять, появилась ли связь. |
| -a | Пытается определить имя узла через DNS. |
| -n | Задает определенное число попыток отправки запроса. |
| -l | Размер пакета. Используется для проверки стабильности сети, создания тестовой нагрузки и так далее. |
| -f | По умолчанию ping разрешает фрагментацию, то есть пакет может быть разбит на несколько для соответствия минимальному пропускаемому размеру (MTU). Данный флаг это запрещает. Используется для определения вышеупомянутого MTU. |
| -i | Задает срок жизни пакета (количество сетевых устройств, через которые может пройти сигнал). Может использоваться в случаях, когда количество оборудования слишком велико. Также можно определить его количества. |
| -w | Устанавливает время ожидания. Применяется, если существуют проблемы производительности на сети или расстояние до узла очень большое. |
| -S | Позволяет выполнить проверку сети с определенного источника. Может быть использовано с узла с несколькими сетевыми адаптерами и отправкой запроса с определенного. |
| -4 | Использовать только IPv4. |
| -6 | Использовать только IPv6. |
Используются редко
| Параметр | Описание |
|---|---|
| -r | Записывает маршрут для указанного числа прыжков. |
| -s | Задает метку времени для указанного числа прыжков. |
| -j | Задает свободный выбор маршрута по списку узлов. |
| -k | Задает жесткий выбор маршрута по списку узлов. |
| -R | Использует заголовок маршрута для проверки и обратного маршрута. |
Linux
При минимальной инсталляциии данной системы или использовании docker, утилиты ping может не быть. В таком случае мы увидим ошибку:
bash: ping: command not found
Для ее установки можно воспользоваться менеджером установки пакетов. В зависимости от типа операционной системы, наши команды будут немного отличаться.
а) для систем на базе deb (Debian, Ubuntu, Mint):
apt install iputils-ping
б) для систем на базе RPM (Rocky Linux, CentOS, Red Hat, Fedora):
yum install iputils
Готово, теперь можно пользоваться командой ping.
Список ключей можно посмотреть так:
ping -h
Примеры использования
Простой пример использования команды ping
ping yahoo.com
Примерный ответ с исправной связью:
Обмен пакетами с yahoo.com [206.190.36.45] с 32 байтами данных:
Ответ от 206.190.36.45: число байт=32 время=191мс TTL=47
Ответ от 206.190.36.45: число байт=32 время=191мс TTL=47
Пример ответа, если узел недоступен:
Обмен пакетами с yahoo.com [206.190.36.45] по с 32 байтами данных:
Превышен интервал ожидания для запроса.
Превышен интервал ожидания для запроса.
* до удаленного узла нет сигнала. Возможно, существуют неполадки на сети.
или
При проверке связи не удалось обнаружить узел
Проверьте имя узла и повторите попытку.
* не удалось определить имя узла. Возможные неполадки: нет связи с DNS, не работает DNS, запрашиваемого имени узла не существует.
В Linux при отсутствии ответа, мы ничего не увидим, но если нам нужно видеть неудачные попытки, то используем ping с опцией -O:
ping -O 206.190.36.45
Открытие порта для Ping
Справедливо заметить, что не во всех случаях отсутствие ответа на ping означает, что удаленный узел недоступен. Администратор ресурса может намеренно отключить ответы на эхо-запросы.
Также важно знать, что ping не использует конкретный номер порта. Чтобы открыть возможность пинга, необходимо либо найти соответствующую опцию (во многих домашних роутерах) или разрешить ICMP (Internet Control Message Protocol) на брандмауэре. Ну, или наоборот — чтобы закрыть возможность пинга, блокируем запросы ICMP.
Проверка портов
С помощью команды ping нельзя проверить открытость того или иного порта.
Для этих целей используется команда telnet или программа, например, nmap.
![]()
Была ли полезна вам эта инструкция?
Да Нет
To ping a specific port on Windows 10, you typically use a utility like Telnet or PowerShell, as the traditional ping command is used to test network connectivity by sending ICMP Echo Requests to an IP address. It does not allow you to specify a port number.
To ping a port on Windows 10, you will need to use the Command Prompt.
- To do this, type «cmd» into the search bar and click on the Command Prompt app.
- Once the Command Prompt is open, type «ping» followed by the IP address and the port number that you want to ping.
For example, if you wanted to ping port 80 on the IP address 192.168.1.1, you would type «ping 192.168.1.1 80» into the Command Prompt.
In order to ping an Ethernet port, you will need to have access to a computer with an Ethernet port and an Internet connection. Once you have these two things, you can ping an Ethernet port by following these steps:
- 1. Connect the computer to the Ethernet port.
- 2. Open a command prompt and type «ping [Ethernet port’s IP address].«
- 3. Press Enter.
- 4. Wait for the results of the ping test.
To ping a port on Windows 10 Using Telnet:
First, ensure Telnet is installed on your Windows 10 machine:
- Go to Control Panel.
- Choose
Programs and Features. - Select
Turn Windows features on or off. - Scroll down and check
Telnet Client. - Click OK and wait for it to install.
Once installed, open the Command Prompt and use the following command:
telnet <Hostname_or_IP> <PortNumber>
If the port is open, the window will go blank or display a connected message. If it’s closed or if there’s an issue, you’ll see a «Could not open connection» error.
Remember that even if a port is not responding to a telnet or PowerShell check, it doesn’t mean the port isn’t being used or active; it might be set to not respond, or there could be a firewall or other security measures in place. Always approach port checks and scans with caution and ensure you have permission to probe the target system.
How do I ping a specific port?
How do I test a port?
Nmap (Network Mapper) is a versatile and powerful tool for network discovery and security scanning. One of its primary uses is to check if specific ports on a system are open. Here’s how you can use Nmap to test a port:
- Install Nmap:
- If you haven’t installed Nmap on your system, you can download and install it from the official website: https://nmap.org/download.html
- Basic Port Scan:
- Open a command-line interface or terminal.
- To test a specific port, use the following command:
nmap -p <PortNumber> <Hostname_or_IP>
- Scan Multiple Ports:
- You can also test multiple ports by separating them with commas or using a range with a hyphen.
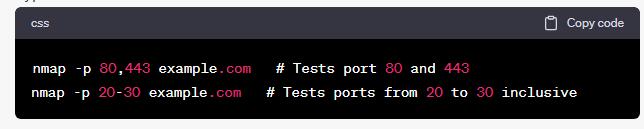
nmap -p 80,443 example.com # Tests port 80 and 443
nmap -p 20-30 example.com # Tests ports from 20 to 30 inclusive
4. Scan Most Common Ports:
- Nmap has a list of the 1,000 most common ports. To scan these, you don’t need to specify any port:
- Use the
-T4option for faster execution (be cautious as this might be flagged by intrusion prevention systems). - Use the
-voption for verbose mode to get more details. - Use the
-sVoption to determine the version of the service running on the port.
Example combining the options:
nmap -p 80,443 -T4 -v -sV example.com
Note: Always ensure you have permission to scan the target. Unauthorized scanning can be illegal and unethical. If you’re scanning a system or network that you do not own or have explicit permission to test, you could face legal consequences.
How do I check if port 22 is open?
If you are using a Windows operating system, you can use the telnet command to check if port 22 is open. Simply open the Command Prompt and type «telnet {hostname} 22«. If the port is open, you will see a blank screen. If the port is closed, you will see an error message.
If you are using a Linux operating system, you can use the nmap command to check if port 22 is open. Simply open the terminal and type «nmap -p 22 {hostname}«. If the port is open, you will see the message «22/tcp open«. If the port is closed, you will see the message «22/tcp closed«.
To ping a port in Windows, you can use the Command Prompt. To do this, open the Command Prompt and type «ping» followed by the IP address and the port number. For example, to ping port 80 on the IP address 192.168.1.1, you would type «ping 192.168.1.1 80«.
How do I test port 8080?
To test port 8080, you can use a tool like nmap or telnet.
How do I check if a port is running?
If you want to check if a port is running, you can use the netstat command. This command will show you a list of all the currently active ports on your system. You can use the -a flag to see all the ports, and the -n flag to see the port numbers.
How do I check if port 443 is open?
If you want to check if port 443 is open on a remote server, you can use the telnet command. For example:
telnet example.com 443
If the port is open, you will see a blank screen. If the port is closed, you will see a message like «Connection refused.«
How can I tell if port 443 is open?
If you want to check if port 443 is open on a remote server, you can use the telnet command to attempt to connect to the server on that port. For example, if you’re trying to check if port 443 is open on http://www.example.com, you would run the following command:
telnet http://www.example.com 443
If the port is open, you will see a blank screen. If the port is closed, you will see a message saying «Could not open connection to the host, on port 443: Connect failed.«
How check port is open in CMD?
To check if a port is open in CMD, you can use the netstat command. This command will show you a list of all the open ports on your computer. To use the netstat command, open the Command Prompt and type «netstat -a«.
- Команда ping
- Как пользоваться ping
- Команда tracert
- Как запустить tracert
В статье мы расскажем, для чего нужны утилиты ping и tracert, как запустить эти утилиты, а также приведем примеры команды ping для диагностики сети.
Ping и tracert — это утилиты для проверки целостности соединений в сетях и определения маршрутов следования данных на основе TCP/IP. Без этих утилит не обойтись не только при администрировании серверов (или целой сети), но и в условиях «домашней» диагностики.
Команда ping
Команда ping — один из базовых инструментов для работы с сетью. С помощью ping можно проверить сервер и его доступность с любого компьютера, а также соединение между устройствами.
Если вы задавались вопросом «Как я могу узнать мой IP адрес и порт?», то мы дадим вам ответ: командой пинг можно как узнать порт компьютера, так и определить его IP.
Также с помощью команды ping можно выполнить такие диагностические задачи, как:
-
измерить время взаимодействия между двумя хостами;
-
проверить IP-адрес конкретного хоста в локальной и глобальной сети;
-
автоматически проверить сетевое устройство (например, когда ping является частью bash-скрипта);
-
проверить пинг до сервера и др.
Как пользоваться ping
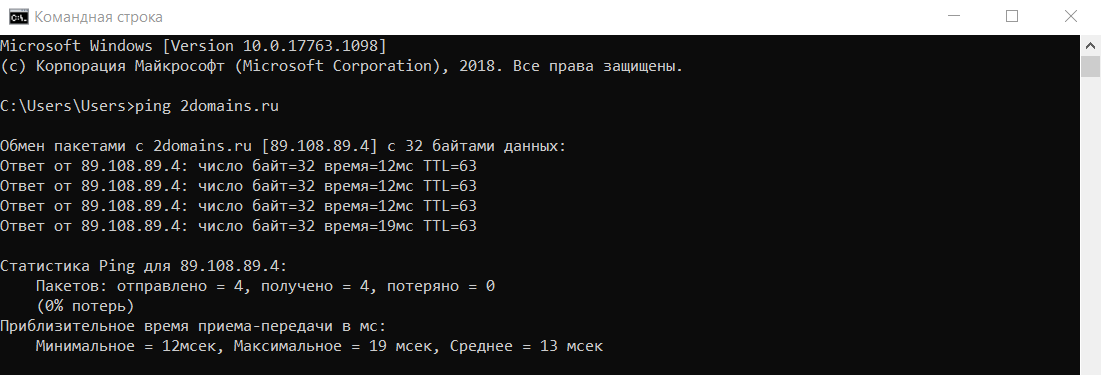
Если у вас Windows
-
Откройте меню «Пуск», кликните по пункту Выполнить или нажмите сочетание клавиш Win + R.
-
В поиске введите команду «cmd» и кликните Enter.
-
В окне терминала введите команду:
ping имя_сайта (домен) или ping IP_сервера.
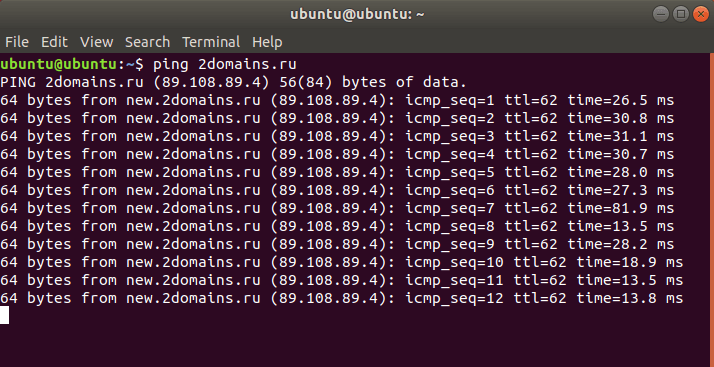
Если у вас Linux
1. Откройте терминал. Для этого:
-
в Unity (Ubuntu): перейдите в «Главное меню» и введите слово «Терминал» в поисковой строке или наберите сочетание клавиш Ctrl+Alt+T;
-
в Xfce (Xubuntu): перейдите в «Главное меню» — «Приложения», затем выберите «Система» — «Терминал»;
-
в KDE (Kubuntu): перейдите в «Главное меню» — «Приложения», затем выберите «Система» — «Терминал».
2. В окне терминала введите команду:
ping имя_сайта (домен) или ping IP_сервера.
Если у вас кириллический домен
Для Windows и Linux кириллические домены нужно вводить в формате Punycode. Перевести домен в формат Punycode можно через сервис. Сконвертируйте имя кириллического домена и вставьте его в окно терминала следующим образом: ping xn--2-8sble8ahe.xn--p1ai
Если у вас MacOS
-
В Spotlight выберите и запустите сетевую утилиту Network Utility.
-
В открывшемся окне перейдите на нужную вкладку.
На вкладке Ping введите имя домена (или IP-адрес) и кликните Отследить: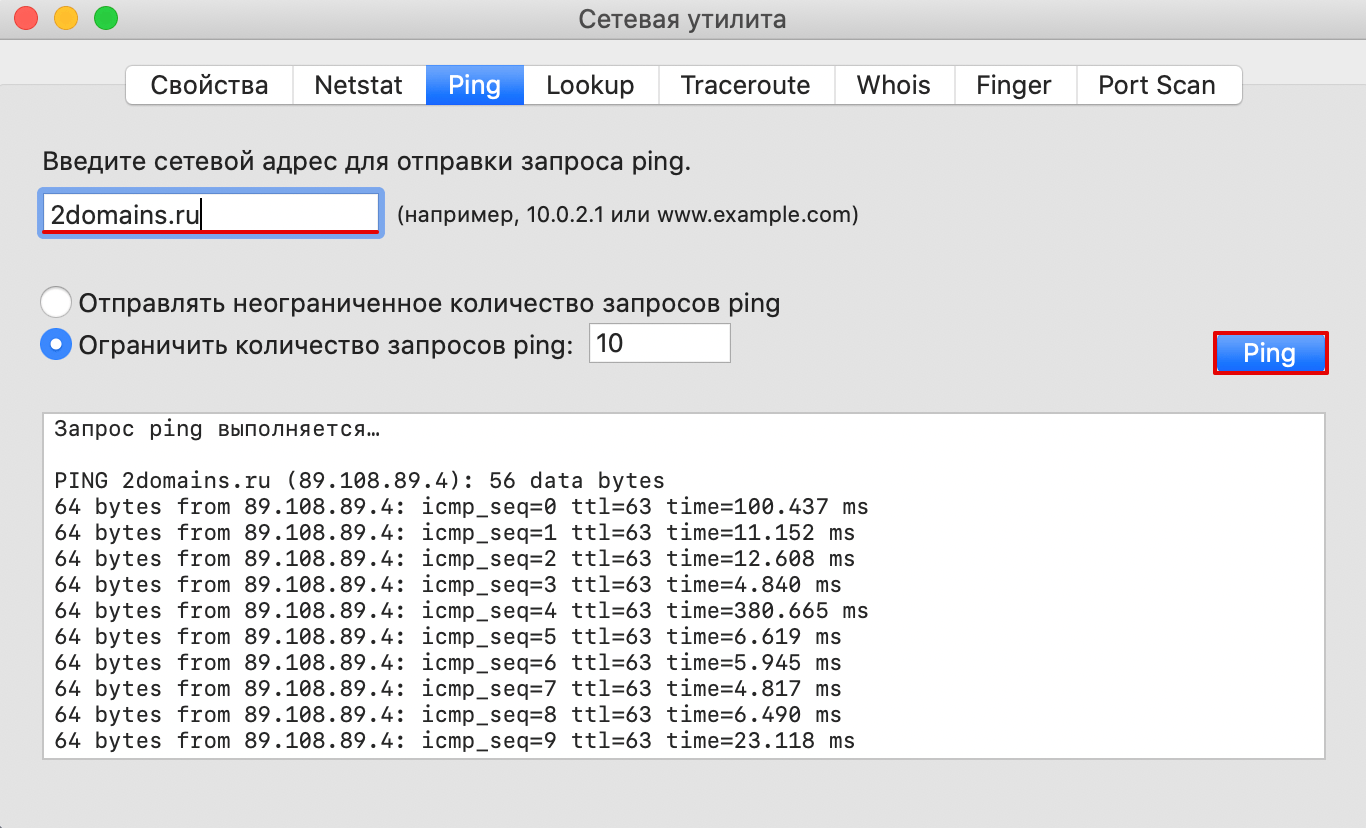
Готово, вы запустили утилиту ping.
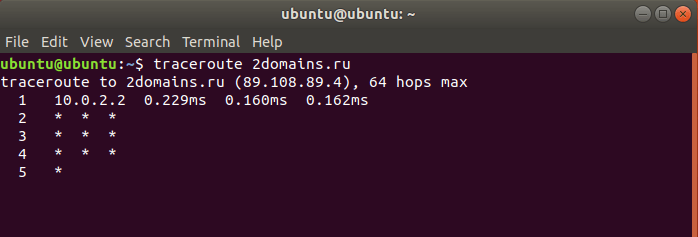
Команда tracert
Команда tracert – самый популярный инструмент сетевой диагностики. С помощью tracert можно проверить путь запроса к серверу и выявить проблемы, связанные с доступностью удаленного сервера. Сообщения отправляются с эхо-запросом по протоколу ICMP, и после каждой передачи выводится сообщение с эхо-ответом.
Командой tracert можно проверить:
-
маршрут от локального компьютера до удаленного узла;
-
количество узлов в сети;
-
время прохождения пакета до конечного, транзитного и промежуточного узлов;
-
точку потери пакета;
-
пинг порта через командную строку.
Как запустить tracert
Если у вас Windows
-
Откройте меню «Пуск», кликните по пункту Выполнить или нажмите сочетание клавиш Win + R.
-
В поиске введите команду «cmd» и кликните Enter.
-
В открывшемся окне терминала введите команду:
tracert имя_сайта (домен) или tracert IP_сервера.

Если у вас Linux
1. Откройте терминал. Для этого:
-
в Unity (Ubuntu): перейдите в «Главное меню» и введите слово «Терминал» в поисковой строке или нажмитесочетание клавиш Ctrl+Alt+T;
-
в Xfce (Xubuntu): перейдите в «Главное меню» — «Приложения», затем выберите «Система» — «Терминал»;
-
в KDE (Kubuntu): перейдите в «Главное меню» — «Приложения», затем выберите «Система» — «Терминал».
2. В окне терминала введите команду:
traceroute имя_сайта (домен) или traceroute IP_сервера.
Если у вас MacOS
-
В Spotlight выберите и запустите сетевую утилиту Network Utility.
-
В открывшемся окне перейдите на нужную вкладку.
На вкладке Traceroute введите имя домена (или IP-адрес) и кликните Отследить:
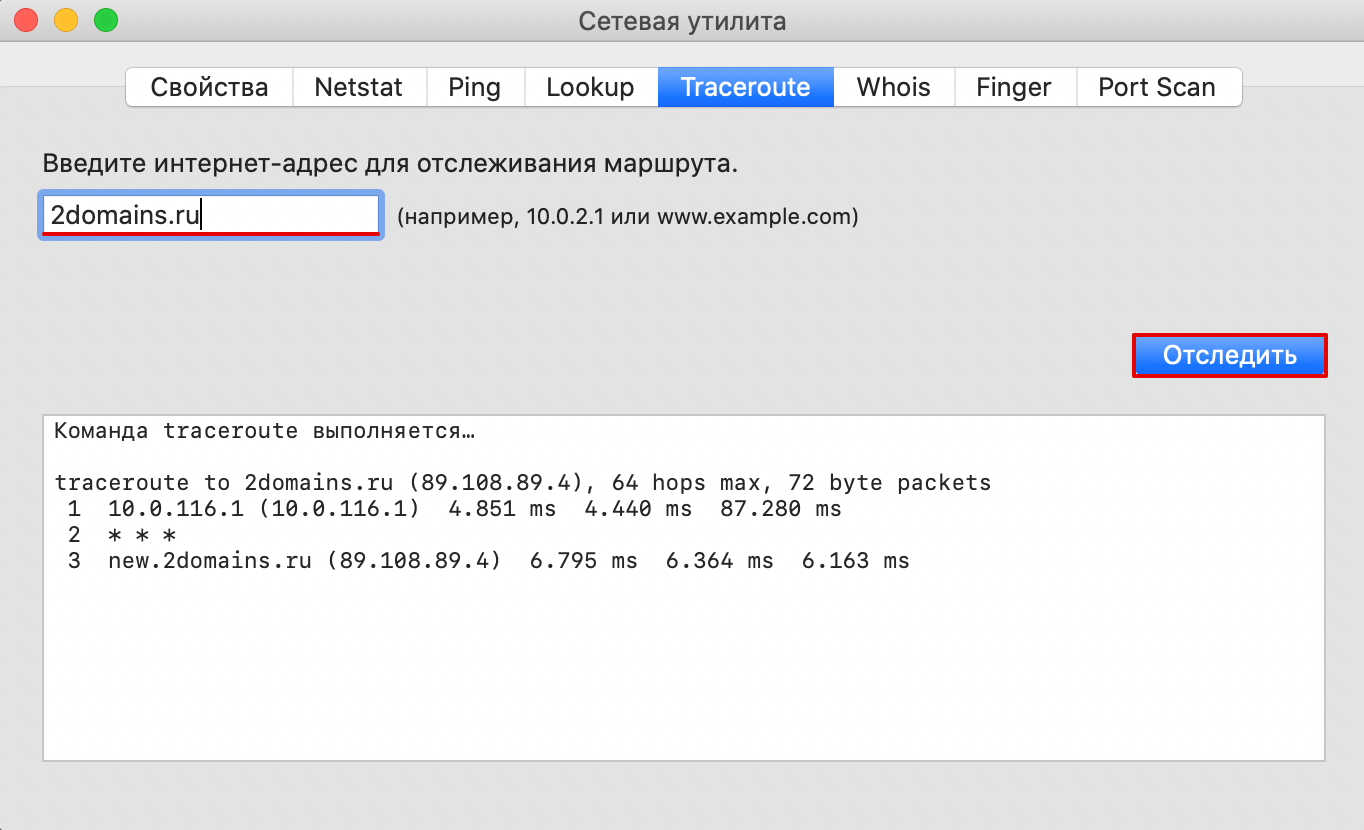
Готово, вы запустили утилиту tracert.
Если у вас установлена ОС Windows и вы хотите упростить диагностику подключения, скачайте утилиту WinMTR. Как пользоваться WinMTR, читайте на тематических блогах.
One of the things I do the most when troubleshooting deployments of services exposing data to the internet is pinging the IP and port where the service is supposed to be alive. In this tutorial, I will show you how to ping IP and port on Linux and Windows.
I think most system administrators know the commands for this, but if you like me normally don’t work like an IT admin (at least not anymore) I tend to forget the commands. Due to that, I have written this article as a reference for myself but also for everyone else, who is in need of pinging services they expect at a location.
Often it’s enough to just ping an IP to validate that you got “life” on the server. However if you like me often got many services running on one server (often when using Docker), I need to ping the specific port number on the server. One of the Kubernetes clusters I manage is running more than 100 services and here I use it a lot.
In this article/reference post, I will show you how to ping IP and port on your Windows or Linux machine using different commands in the terminal (CLI).
Ping IP and port using Telnet
This is my favorite when working on both Windows and Linux. I also think that it’s the easiest one to use and it’s called Telnet. You can with a simple command using Telnet ping IP and port on the remote server you would like to check.
Telnet — Wikipedia
 Wikimedia Foundation, Inc.Contributors to Wikimedia projects

If you want to, you can also use a domain instead of the IP. A domain is often easier for humans to remember instead of numbers to multiple different servers locally or externally.
Below are the commands to ping IP and port on a server using Telnet:
$ telnet <server_ip_address> <server_port_number>

$ telnet <server_domain_name> <server_port_number>
As I mentioned above, you can use Telnet on both Windows and Linux computers/servers which makes it a great choice for most sys-ops.
On most computers, telnet is not installed by default. If you get the annoying error “telnet: command not found”, you have to install Telnet on the machine using the commands below:
Install Telnet on Linux
If you are working on a Linux Server or Desktop, you can use the below command to install Telnet on that machine:
$ sudo apt install telnetInstall Telnet on Windows
By default, Telnet is not an enabled Windows Feature. If you run Telnet on your computer in a Command Prompt, you will get the following error: “Telnet is not recognized as an operable program or batch file.”. So – to install Telnet on Windows, you have to do the following:
- Click on Start.
- Select Control Panel.
- Choose Programs and Features.
- Click Turn Windows features on or off.
- Select the Telnet Client option.
- Click OK.
A dialog box appears to confirm installation when it’s done. The telnet command should now be available in your Command Prompt. Remember to restart your CMD window.
Ping IP and port with Telnet example
Let’s check out how Telnet works. This website is running at IP: 172.67.161.26 – this is the public IP address of the website to which the domain is mapped to.
By default, all requests are redirected to HTTPS (port 443) if a request is made at port 80. This means that the server accepts connections on port 80 too – let’s try and ping both ports:
$ telnet 172.67.161.26 80

Trying 172.67.161.26...
Connected to 172.67.161.26.
Escape character is '^]'.

$ telnet 172.67.161.26 443

Trying 172.67.161.26...
Connected to 172.67.161.26.
Escape character is '^]'.
That went well. We got connected and could see that the server is responding on both ports. This simply means that the service on the port is up and running.
If you would like to escape out of the Telnet utility when connected, you can use “CTRL + ]” or the “q” command.
Ping IP and port using Nmap
Another well-used tool is Nmap. In Nmap, you can ping a port by using the “-p” option including the IP or domain you would like to scan.
Nmap: the Network Mapper — Free Security Scanner
Nmap Free Security Scanner, Port Scanner, & Network Exploration Tool. Download open source software for Linux, Windows, UNIX, FreeBSD, etc.
 Free Security Scanner

$ nmap -p <server_port_number> <server_ip_address>

$ nmap -p <server_port_number> <internet_domain_name>
A heads up – be aware of legal issues!
“When used properly, Nmap helps protect your network from invaders. But when used improperly, Nmap can (in rare cases) get you sued, fired, expelled, jailed, or banned by your ISP.” – Nmap website.
If you get an error telling you that Nmap is not available on your computer/server, you would have to install it.
Install Nmap on Linux
To install Nmap on your Linux machine, you can use the below command:
$ sudo apt install nmapInstall Nmap on Windows
Not as simple as Linux, but it’s still easy to use the official installer from Nmap’s website. Go to this page: Download Nmap and look under the Windows Binaries for the latest available installer file.
Once the installer has completed installing, you are now ready to use Nmap on your Windows computer.
Ping IP and port using Nmap
Let’s try to ping a website at IP “172.67.161.26” on the global internet at the default HTTPS port – 443. If you test this yourself, then don’t use that IP. Cloudflare is protecting the website and will block your access and in the worst-case ban your IP from their global network. Only do this at IPs you own or services that won’t do any damage to others.
C:\Users\christian>nmap -p 443 172.67.161.26
Starting Nmap 7.92 ( https://nmap.org ) at 2022-02-10 06:50 Romance Standard Time
Nmap scan report for 172.67.161.26
Host is up (0.028s latency).
Well, once again the port is returned as open on the server. This means that there is a service accepting data at port 443, which was just verified by Nmap.
Ping IP and port using PowerShell
Normally when I’m not on my own machines, which means I’m working on production servers not related to my own business/platform and it’s a Windows Server Environment, I always use PowerShell to ping IP and port.
A great thing about PowerShell is that you can use the methods in scripts running automated stuff in the background or during the setup of service or multiple services. A great thing if deploying with PowerShell would be to check if the ports were active after deployment and return a status to the terminal.
In PowerShell, we got something called Test-NetConnection which is a command where you specify either an IP or a domain followed by the port you would like to ping.
PS C:\Users\christian> Test-NetConnection <server_ip_address> -p <server_port_number>Below is an example of what this would look like on a local network:
Windows PowerShell
Copyright (C) Microsoft Corporation. All rights reserved.
                                                                                                                                                                                                                                                                             PS C:\Users\christian> Test-NetConnection 192.168.1.1 -p 80                                                                                                                                                                                                                                                                                                                   ComputerName     : 192.168.1.1
RemoteAddress    : 192.168.1.1
RemotePort       : 80
InterfaceAlias   : Wi-Fi
SourceAddress    : 192.168.1.68
TcpTestSucceeded : True
In the test above you can see that the TCP call to my gateway at home succeeded at port 80. If you can’t get through to the service you will status False in TcpTestSucceeded.
Summary
In this quick article on how to ping IP and port using different tools on Windows or Linux machines, we learned how we can use the terminal to check if a given port is open and accepting requests.
If you got any issues, questions, or suggestions, please let me know in the comments below. Happy pinging!

My name is Christian. I am a 27-year-old pragmatic DevOps engineer with a passion for .NET, Cloud, and Containers. In my spare time, I share my knowledge and love teaching other people about tech.
Ping is one of the most fundamental tools when it comes to network troubleshooting. It allows you to quickly test whether a given service/port is responding or not. Due the lightweight nature of ICMP packets, it allows ping to quickly fetch useful information about a given system without sending a series of packets that would otherwise overwhelm the host (in some cases).
Although pinging an entire host can be useful for checking if a given host is up, it does not offer much information about if a target port is up.
Method 1 — Use Telnet
You are probably familiar with telnet. Also known as Terminal or Network, Telnet is a command-line utility that allows you perform interactive network communication using the TELNET protocol.
An telnet tutorial is coming up soo. Stay tuned for that.
To ping a specific port using telnet, use the command syntax as:
telnet [ip_address] [port_number]
The telnet command is available in both Windows and Unix systems. However, you may need to enable Telnet in Windows.
To learn how do that, check the link below:
https://geekbits.io/how-to-enable-telenet-in-windows
On macOS, use brew to install Telnet:
brew install telnet
On Debian and Debian-Based distributions, install telnet:
sudo apt-get install telnet
The example below shows how to use telnet to check if Nginx Server is running.
telnet 67.205.166.236 80
If the service is running, telnet will connect and return an output as:
Trying 67.205.166.236...
Connected to 67.205.166.236.
Escape character is '^]'.
To close the connection, press CTRL + C]
Method 2 — Using Nmap
Nmap is another ‘crazy’ networking tool that every sys admin and security researcher should use. We will be putting out nmap tutorials in a near future. Make sure to subscribe to get notified when we do.
Start by installing nmap:
sudo apt-get install nmap
On macOS:
brew install nmap
REHL:
sudo yum install nmap
Once installed, check if a port is up by running the command:
nmap -p <port> [target_address]
Example:
sudo nmap -p 80 67.205.166.236
Nmap will return detailed information including the latency, port number, associated service and its state. An exmaple output is as shown:
Starting Nmap 7.93 ( https://nmap.org ) at 2022-10-02 10:49 EAT
Nmap scan report for 67.205.166.236
Host is up (0.28s latency).

PORT   STATE SERVICE
80/tcp open  http

Nmap done: 1 IP address (1 host up) scanned in 0.65 seconds
Method 3 — Using Netcat
Netcat is another tool you can use to check if a port is up. Check the nectat cheat sheet to learn more.
https://www.geekbits.io/netcat-command-cheat-sheet/
To ping a port using netcat, run the command:
nc -vz [target_address] [port_number]
Example:
sudo nc -zv 67.205.166.236 80
Connection to 67.205.166.236 port 80 [tcp/http] succeeded!
We can see that the connection to the target address and port is successful. This indicates the port/service is up.
Method 3 — Using cURL
We obviously cannot forget to mention cURL in this list. The command syntax is as shown:
curl -s [host:port]
Example:
curl -s 67.205.166.236:80 >/dev/null && echo Connected. || echo Failed.
The command should «Connected» if the port/service is up.
Method 4 — Using Windows PowerShell
In Windows, you can use the Test-NetConnection cmdlet to test if a port is up and running. The command syntax is as shown:
Test-NetConnection [ip_address] -p [port_number]
Example:
Test-NetConnection 67.205.166.236 -p 80
The command should return details about the target host and the connection status.
ComputerName     : 67.205.166.236
RemoteAddress    : 67.205.166.236
RemotePort       : 80
InterfaceAlias   : Ethernet
SourceAddress    : 192.168.1.101
TcpTestSucceeded : True
Method 5 — Using PsPing Utility
In Windows, you can also use the PsPing utility which is part of Windows SysInternals tools. Download the tool in the resource below:
https://download.sysinternals.com/files/PSTools.zip
You can then use the command synax below to ping a specific port:
psping [address:port]
Example:
psping.exe 67.205.166.236:80
The command should send ping request to the target address and port and return the output as shown:
PsPing v2.10 - PsPing - ping, latency, bandwidth measurement utility
Copyright (C) 2012-2016 Mark Russinovich
Sysinternals - www.sysinternals.com

TCP connect to 67.205.166.236:80:
5 iterations (warmup 1) ping test:
Connecting to 67.205.166.236:80 (warmup): from 192.168.1.101:59835: 239.30ms
Connecting to 67.205.166.236:80: from 192.168.1.101:59837: 239.56ms
Connecting to 67.205.166.236:80: from 192.168.1.101:59838: 239.36ms
Connecting to 67.205.166.236:80: from 192.168.1.101:59839: 237.90ms
Connecting to 67.205.166.236:80: from 192.168.1.101:59842: 237.86ms

TCP connect statistics for 67.205.166.236:80:
  Sent = 4, Received = 4, Lost = 0 (0% loss),
  Minimum = 237.86ms, Maximum = 239.56ms, Average = 238.67ms
The above port is up.
Conclusion
In this post, we explored various methods and tools you can use to ping a specific port in both Windows and Unix based systems.
Thanks for reading and catch you in the next one!!
If you enjoy our content, please consider buying us a coffee to support our work:
