На чтение 5 мин Просмотров 72.4к. Опубликовано
Обновлено
Благодаря этой настройке, должна решиться проблема: почему меня не слышно? Сразу сообщу о том, что данное решение тестировалось только на Win 10. Я не гарантирую работу данного гайда на других операционных системах. Также отмечу, настройки могут не помочь, если у вас сборка windows в которой вырезаны необходимые параметры (на просторах рунета всякое бывает).
Содержание
- Установка и настройка языкового пакета
- Настройка микрофона в Windows
- Настройка микрофона в Steam
- Настройка микрофона в игре
Установка и настройка языкового пакета
В самом начале, нам необходимо выйти на наш рабочий стол и клацнуть правой кнопкой мыши по «Времени и дате». Если забыли где это, ниже приложил скриншот.

Выбираем «Настройка даты и времени».

После мы проследуем в раздел «Язык».

В открывшемся окне, необходимо проверить наличие языкового пакета «Английский (США)» в «Предпочитаемых языках».

Если его у вас нет, то вам нужно сначала его добавить. Для этого, нажимаем на «Добавление языка».

В открывшимся списке, выбираем «Английский (США)».

Ждём его установки, перезапускаем систему и продолжаем настройку по гайду.
Переходим в «Параметры» языкового пакета и проверяем установку.

В открывшимся окне, проверяем пункты: «Языковой пакет» и «Рукописный ввод». Их статус, должен соответствовать статусам на скриншоте ниже. Если данные параметры у нас в ином статусе — ожидаем установку.

Установка завершилась некорректно? Пробуем добавить язык повторно. Возможно, возникли сбои со стороны вашего провайдера и пакету, не удалось корректно установиться.
После завершение установки языкового пакета. Переходим в «Распознавание голоса». Для этого, нажимаем на «Параметры» в «Голосовых функциях». Как указано на примере ниже.

Если вы уже покинули данное окно, то стоит перейти в «Распознавание голоса» из окна «Время и язык».

В окне «Распознавание голоса» проверяем:
- Выбранный язык, на котором мы говорим со своим устройством «Английский».
- Активировано «Распознавание народного акцента этого языка».

Спускаемся вниз и проверяем «Установленные голосовые пакеты». В данном пункте, у нас должен отображаться языковой пакет ««Английский (США)».

Переходим к настройки нашего микрофона.
Настройка микрофона в Windows
В окне «Распознавание голоса», обратим внимание на пункт «Микрофон». В нём нам необходимо приступить к настройке. Для этого клацаем «Начать».

Выбираем в открывшимся окне: «Кортана не слышит меня».

Выбираете микрофон, который вы используете. В нашем случае — это Blue Yeti.

Нажимаем «Далее».
Нас встречает окно в котором: советуют перед использованием голосовых функций настроить микрофон, чтобы нас было хорошо слышно.

Нам предложат пройти «Калибровку микрофона». Для этого, зачитываем фразу, которая нам высветиться в окне. Учтите, необходимо их произносить в тишине. В таком случае, микрофон не захватит посторонние звуки и проверка будет эффективней.

Стоит отметить, что нам, желательно, выбрать микрофон, который у нас будет использоваться «По умолчанию». Если у вас это уже выбрано — пропустите этот шаг.
Для этого, мы переходим к значку спикера в правом нижнем углу рабочего стола. Обычно он скрыт в трее.

Нажимаем по нему правой кнопкой. В списке выбираем «Звуки».

В открывшимся окне «Звук» выбираем вкладку «Запись».

В нём нам необходимо выбрать микрофон, который мы собираемся использовать «По умолчанию». Для этого, выбираем необходимый микрофон из списка. Нажимаем по нему правой кнопкой мыши и выбираем: «Использовать устройство по умолчанию».

Отлично! Большая часть — позади. Осталось ещё пару шагов.
Настройка микрофона в Steam
Запускаем Steam. Открываем список друзей и нажимаем на «Шестеренку».

В всплывающем окне выбираем «Голосовые чаты».

Далее выбираем в «Устройство голосового ввода \ вывода» наш микрофон, который у нас выбран «По умолчанию» и наши динамики.

В качестве примера, приводим вывод на базе Blue Yeti.

Настало время отправиться в саму игру.
Настройка микрофона в игре
Запускаем игру Phasmophobia. Переходим в «Параметры».

Далее в «Аудио».

Обращаем внимание на выбор микрофона. У нас должен располагаться микрофон именно тот, что мы выбирали как микрофон «По умолчанию».

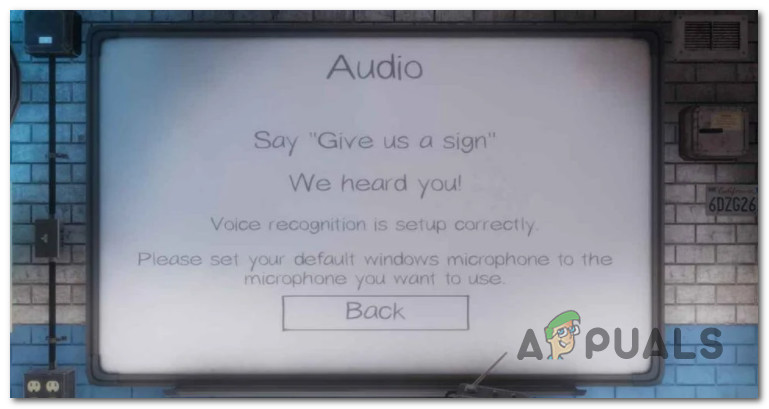
После выбора, нажимаем на «Проверку».

После произнесение указанной на экране фразы (фраза зависит от выбранного вами языка для распознавание речи). Должно появиться следующая надпись: «Вас отлично слышно!». Она означает, что призрак должен вас услышать.

Если данной фразы — не появляется, то следует перейти снова во вкладку «Запись» в самом Windows. И отключить все микрофоны, кроме того, что стоит у нас «По умолчанию».
Надеюсь, данный гайд был вам полезен. Заметили опечатку или знаете, как можно дополнить данную статью? Пожалуйста, отпишите об этом в комментариях ниже. До новых встреч на просторах фазмы!
Содержание
- 1. Проверьте какое устройство для разговора или записи выбрано по умолчанию в вашей системе
- 2. Разрешите игре доступ к вашему микрофону
- 3. Переподключите микрофон
- 4. Обновите аудиодрайвера
- 5. Игра не видит микрофон, как настроить микрофон, как включить микрофон — другие способы
- 6. Не работает проверка микрофона. Что делать?
Многие игроки столкнулись с различными проблемами при использовании микрофона в хорроре Phasmophobia. Если у вас есть работающий микрофон, который не работает в игре, мы подскажем вам несколько способов решить эту проблему.
Проверьте какое устройство для разговора или записи выбрано по умолчанию в вашей системе
При наличии нескольких подключенных микрофонов у некоторых пользователей могут возникнуть проблемы. Помните, что ваш микрофон, который вы хотите использовать, должен быть установлен по умолчанию на панели управления звуком в системе Windows.
Сначала перейдите в окошко настройки «Звук». Затем откройте вкладку «Запись». Дважды щелкните (или щелкните правой кнопкой мыши и перейдите в «свойства») на микрофонный вход, вам нужно перейти на вкладку «Дополнительно» и отключить чекбокс «Разрешить приложениям использовать устройство в монопольном режиме».
Разрешите игре доступ к вашему микрофону
Иногда операционная система запрещает игре доступ к микрофону, чтобы решить проблемы с конфиденциальностью. В таком случае вам необходимо убедиться, что в настройках Windows включен параметр «Разрешить настольным приложениям доступ к вашему микрофону».
Чтобы получить доступ к этой опции, перейдите в меню «Пуск» > «Настройки» > «Конфиденциальность и защита» > вкладка «Микрофон». Разрешите игре доступ к микрофону. Убедитесь, что вы запускаете Phasmophobia от имени администратора после включения этой опции.
Переподключите микрофон
В некоторых случаях микрофон может быть неправильно подключен к соответствующему разъему. Чтобы решить эту проблему, попробуйте отсоединить его и снова подключить к разъему для микрофона. Либо попробуйте использовать другой разъем, если он доступен.
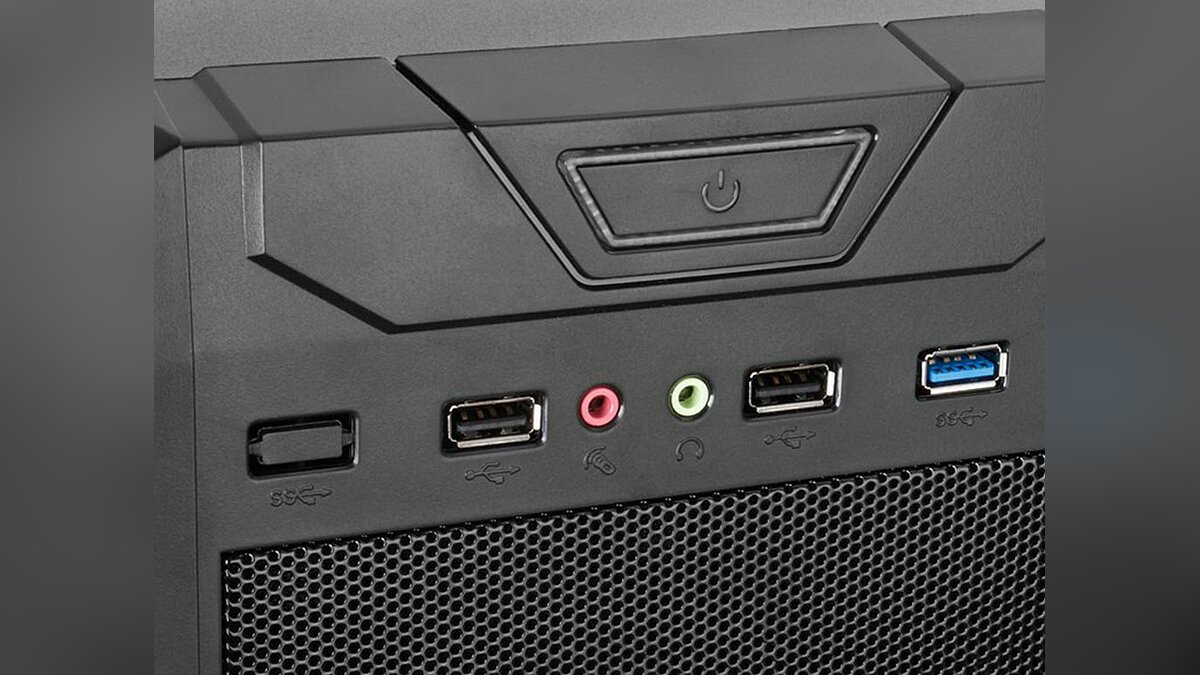
Вы также увидите соответствующее сообщение на панели уведомлений Windows. Убедившись, что микрофон правильно подключен, перезапустите Phasmophobia и проверьте, решена ли проблема.
Обновите аудиодрайвера
Если ваш микрофон не работает в Phasmophobia, вам нужно убедиться, что аудиодрайвер вашей системы обновлен. Лучший способ обновить аудиодрайверы — зайти на сайт производителя материнской платы, выбрать вашу модель и конкретную операционную систему, которую вы используете. Обязательно перезагрузите систему после установки последних версий драйверов.
Игра не видит микрофон, как настроить микрофон, как включить микрофон — другие способы
- Еще один способ исправить это — нажать Alt + Tab, чтобы свернуть игру, но не использовать эту же комбинацию Alt + Tab, чтобы развернуть игру обратно. Вместо этого щелкните значок игры на панели задач, чтобы вернуться в игру. Распознавание голоса прерывается, когда вы сворачиваете игру, и единственный способ исправить это — щелкнуть окно игры, а не нажать Alt + Tab.
- Если вы не сворачивали игру, но микрофон по-прежнему не работает, вам следует проверить, работает ли микрофон с другим программным обеспечением.
- Вы можете использовать микрофон в игре, нажав кнопку V или B на клавиатуре. В новом обновлении рация не включается, если вы говорите, когда начинается фаза охоты.
- Еще один вариант — выйти из продолжающегося расследования и начать новое. По словам разработчика Kinetic Games, проблемы с микрофоном возникают, когда пользователь отключается от голосового сервера при загрузке уровня.
- У некоторых пользователей игра конфликтует с программой Discord. Закрытие программы помогает решить проблему с неработающим микрофоном в игре.
- Могли возникнуть проблемы при установке игры. Сделайте проверку целостности файлов в Steam.
Не работает проверка микрофона. Что делать?
В настройках игры нужно установить интерфейс и голос на английский. Затем перезайти в игру и поставить интерфейс на русский, а голос оставить на английском. Фразы в игре нужно обязательно произносить на английском языке. При проверке микрофона произносим фразу «Give us the sign».
Другие гайды
- Обзор Crash Bandicoot 4: It’s About Time. Вот как нужно делать сиквелы игр 90-х!
- Обзор FIFA 21. Стоит ли переходить с FIFA 20?
- Обзор Medieval Dynasty. Как игра без рыцарей и драконов покорила Steam
Do you want to learn how to fix Phasmophobia’s mic that stopped working on Windows 11/10/8/7? Read the post below to learn the best way to fix Phasmophobia voice chat issues.
If you are a ghost series and movie fan and believe they exist, Phasmophobia, by Kinetic Games and British Indie Game Studio, is only for you. This investigative horror game is for those who love ghost hunting and are die-hard fans of movies like Ghost Rider, Hellboy, etc. Though available only via Steam, this game is popular among millennials.
However, most gamers have recently reported facing Phasmophobia; voice chat is working, but no voice recognition issue. If you are among them, you are in luck. The troubleshooting guide below will help fix the problem. But, before learning how to fix it, let’s understand why Phasmophobia voice chat is not working.
Why is Phasmophobia Mic Not Working
Different reasons can lead to Phasmophobia mic not working issue. Here, we list possible causes for the error as follows.
- Probably, you forgot to configure the Phasmophobia microphone as default.
- The game is not installed on the primary drive.
- Outdated, corrupt, or faulty audio driver.
- You are running an outdated version of the Windows operating system.
- The exclusive mode or enhancements is enabled.
- The Phasmophobia app is not allowed to use the microphone.
- You are not running Steam with admin rights.
Now that we’ve listed out the causes, it’s time to learn how to fix Phasmophobia voice chat working but voice not recognized issue. We will also explain how you can automatically update drivers using Advanced Driver Updater.

Best Way To Resolve Phasmophobia chat stops working mid-game
Different reasons can lead to Phasmophobia mic not working issue. Here, we list possible causes for the error as follows.
Solution 1: Reset Network
Often, during gameplay, network-related issues interfere with the microphone. Therefore, to fix the voice chat not working on Phasmophobia, we will first try to reset the network settings. Follow the steps to learn how to do that:
Step 1: In the Windows search bar, type Network Reset and select the appropriate match.

Step 2: Click the Reset Now option available under Network reset window.

Step 3: Let the process finish and restart the PC to save the change.
Now play Phasmophobia to check if the issue is fixed or not. If it is still troubling you, move to the next step.
Must Read : How To Download and Update SoundMAX Driver For Windows
Solution 2: Grant Microphone Access to Phasmophobia App
When the Phasmophobia app doesn’t have access to the microphone, you encounter the Phasmophobia mic not working error. Hence, to fix it, you need to grant microphone access. To do that, follow these steps:
Step 1: Press Windows + R keys to open the Run utility.
Step 2: Type ms-settings:privacy-microphone > click OK.

Step 2: Slide the button under Allow apps to access your microphone section.

Step 3: Under the apps list, enables the Phasmophobia program to use the mic.
Step 4: Restart the PC and check whether the Phasmophobia mic is working. If the issue persists, no worries; we’ve other fixes.
Solution 3: Fix Misconfigured Sound Settings
If the above two methods didn’t help, let’s try re-configuring sound settings.
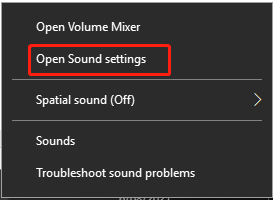
Step 1: Look for the Speaker icon in the system tray > right-click > select the Open Sound Settings.

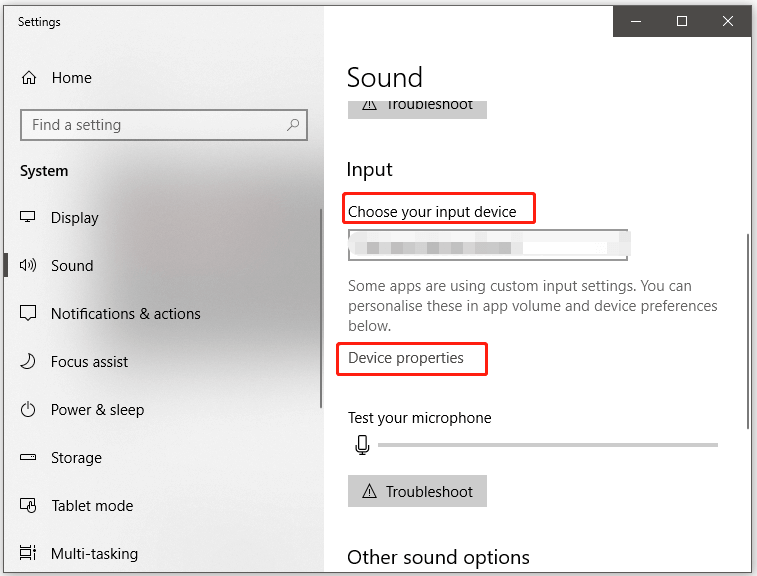
Step 2: Click the Device properties option.

Step 3: Adjust the volume slider to a minimum of 50.

Step 4: Restart the PC and play the game; the issue by now should be fixed.
Must Read : Tips For Troubleshooting Bluetooth Driver Problems on Windows
Solution 4: Update Audio Driver
Usually, when the audio driver is outdated, corrupt, and missing, sound issues occur. Therefore, to troubleshoot the problem, update the driver. You can do it manually or automatically.
You can try the manual method if you have time and computer skills. However, if you are short on time and don’t know how to update genuine drivers, we suggest using Advanced Driver Updater. It is one of the best driver updating tools which offers WHQL signed drivers. It detects outdated drivers and updates them quickly without any issues. Furthermore, you can add incompatible drivers to the exclusion list and schedule driver scanning. Follow the steps below:
Step 1: Download and install Advanced Driver Updater.
Step 2: Open the driver updater software and click Start Scan Now to scan the PC for outdated drivers.

Step 3: Examine scan results and update the driver.

Step 4: The trial user needs to use the Update driver link next to the driver. However, you can benefit from the Update All button if you are a registered user and update all outdated driver.

Step 5: Restart the PC to save changes.
Read Advanced Driver Updater Complete Review here
This is how you download and install the updated audio sound and fix the mic issue with Phasmophobia in five simple steps without manually searching for driver updates.
Solution 5: Set the Microphone as Default
If nothing has fixed the Phasmophobia mic not working, no issues. Try setting the mic as the default device.
Step 1: Right click speaker icon in the system tray.
Step 2: Select the Sound option.
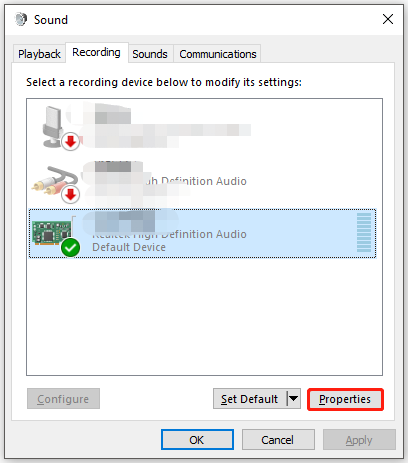
Step 3: Click the Recording tab.
Step 4: Choose the sound device you want to set as Default and click Set Default > OK.

Step 5: Restart the PC; this should help fix the issue.
Solution 6: Disable Exclusive Mode
Sometimes when the Elusive mode is enabled, you might face this problem. Therefore, if nothing has helped, try disabling the exclusive mode.
Step 1: Press Windows + R to open the Run window.
Step 2: Type mmsys.cpl and click Ok.
Step 2: Go to the Recording tab > highlight the active playback device and click on Properties.

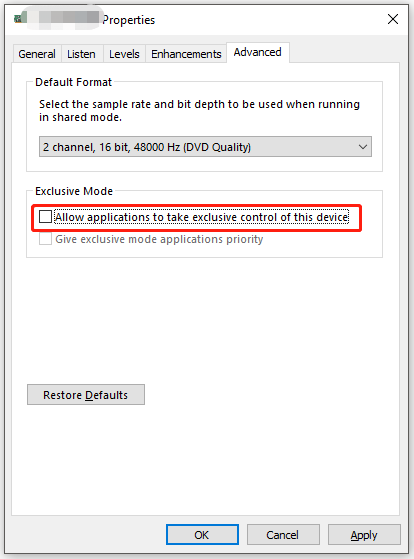
Step 3: Tap the Advanced tab > uncheck the Allow applications to take exclusive control of this device.

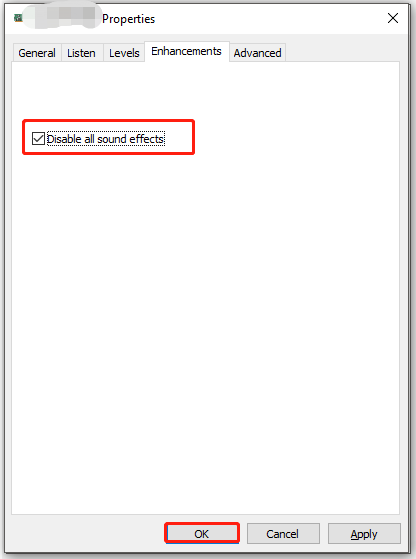
Step 4: Click on the Enhancements tab > check the Disable all sound effects option > Ok.

Step 5: Restart the PC to save changes.
Wrap Up
We hope using the above steps, you can fix the Phamophoiba mic not working issue. The best way to avoid the problem is to keep audio drivers updated. For this, using Advanced Driver Updater is the best option.
Recommended-
How to Download USB PnP Sound Device DriversSound Device Driver
How To Download NVIDIA GeForce RTX 3050 Driver
How To Download & Update AMD RX 5700 XT Drivers
-
Home
-
Partition Manager
- Ultimate Fixes for the Phasmophobia Mic Not Working Issue
By Amy | Follow |
Last Updated
If you are troubled by Phasmophobia mic not working issue, this post is what you need. It analyses the potential causes and offers you some effective solutions. Explore the details with MiniTool now!
Possible Causes for Phasmophobia Mic Not Working
Multiple elements can trigger the Phasmophobia mic not working issue. Here, we list possible causes for the error as follows.
- The game uses an incorrect microphone.
- The Phasmophobia mic is not configured as the default.
- The exclusive mode or enhancements is enabled.
- The game is not installed on the main drive.
- The Phasmophobia app is not allowed to use the microphone.
- The voice recognition drivers are missing from the PC.
- Steam’s admin breaks the voice recognition tech.
Fix 1: Ensure that Apps Have the Access to Microphone
If Phasmophobia app doesn’t have access to the microphone, you will receive the Phasmophobia voice chat not working error. If so, you need to grant the microphone access for the app with steps below.
Step 1: Hold the Windows and R keys to open the Run utility, and then input ms-settings:privacy-microphone and click OK to continue.
Step 2: Drop down the content in the right pane to move to the Allow apps to access your microphone section. Then toggle the button under this section.
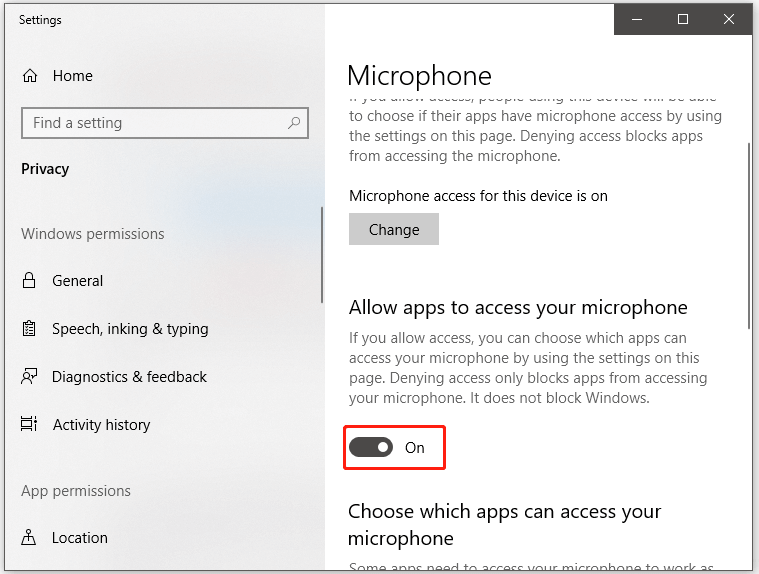
Step 3: Scroll down to the apps list and then find the Phasmophobia program. Change its status to the On position.
Step 4: Now, restart your PC and check if the Phasmophobia mic not working in game issue is solved.
Fix 2: Check and Modify Sound Settings
When your microphone is not detected or chosen incorrectly, the Phasmophobia mic not working issue can occur. In this case, you should check and modify sound settings with steps below.
Step 1: Right-click on the Sound icon in the Taskbar area and then click on Open Sound settings.
Step 2: Scroll down the content in the right side of the window to locate to the Input section. Here, you can see your current input device. If it is not selected correctly, select the correct input device from the drop-down list. After that, click on Device properties.
Step 3: Then set the volume to at least 50.
Fix 3: Disable Exclusive Mode
Follow these steps to disable the exclusive mode.
Step 1: After opening the Run window, type mmsys.cpl and hit Enter.
Step 2: Navigate to the Recording tab, and then highlight the active playback device and click on Properties.
Step 3: Tap the Advanced tab and uncheck the Allow applications to take exclusive control of this device option under the Exclusive Mode section.
Step 4: Click on the Enhancements tab and check the Disable all sound effects option. Finally, click OK to save the changes.
Fix 4: Update Audio Driver
The Phasmophobia voice chat not working error may appear due to the outdated audio driver. For that, update the driver with the following steps.
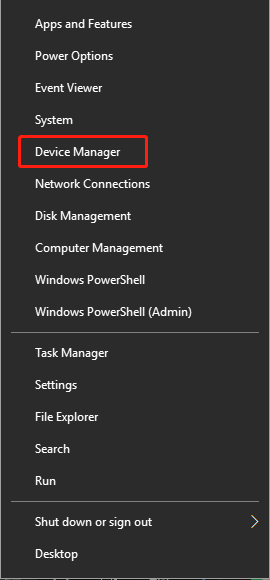
Step 1: Right-click on the Windows icon on the desktop and click Device Manager.
Step 2: Double-click on Audio inputs and outputs to expand it. Then right-click on your audio driver from the expanded list and click Update driver.
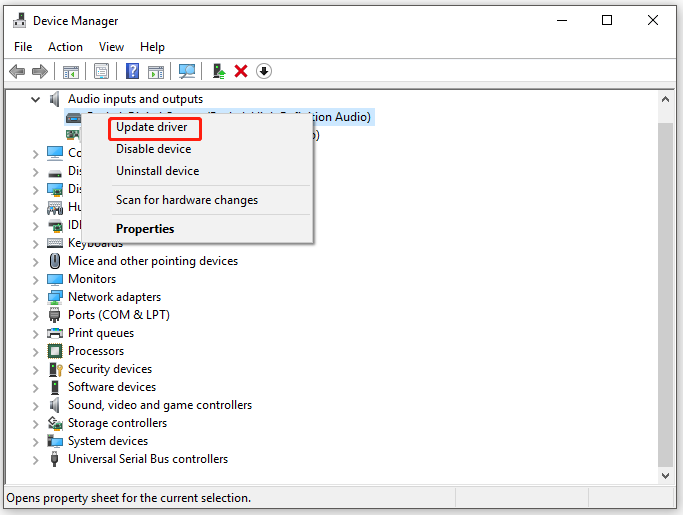
Step 3: In the next window, select a way to update the driver. Then follow the on-screen instruction to finish the operation.
Fix 5: Reset Network
According to user reports, resetting network is also helpful for solving the Phasmophobia voice chat not working issue. Here are detailed steps.
Step 1: Open Settings by pressing Windows + I key.
Step 2: Click on Network & Internet > Status > Network reset.
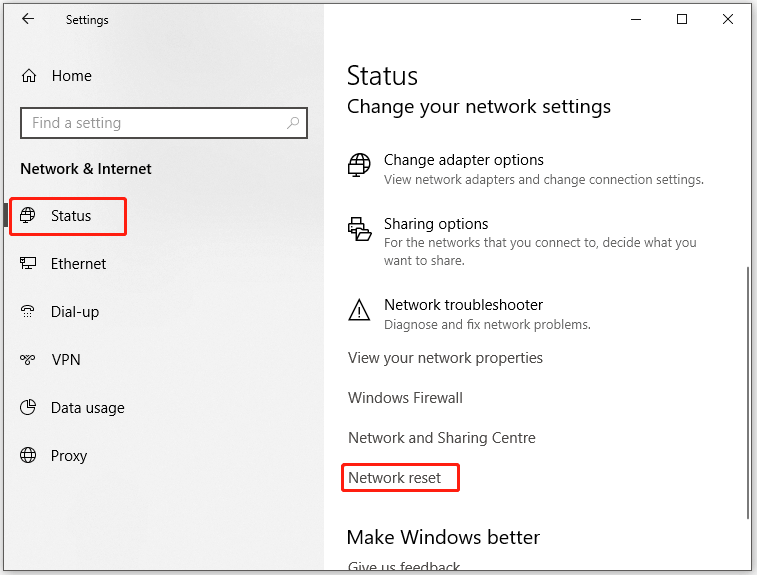
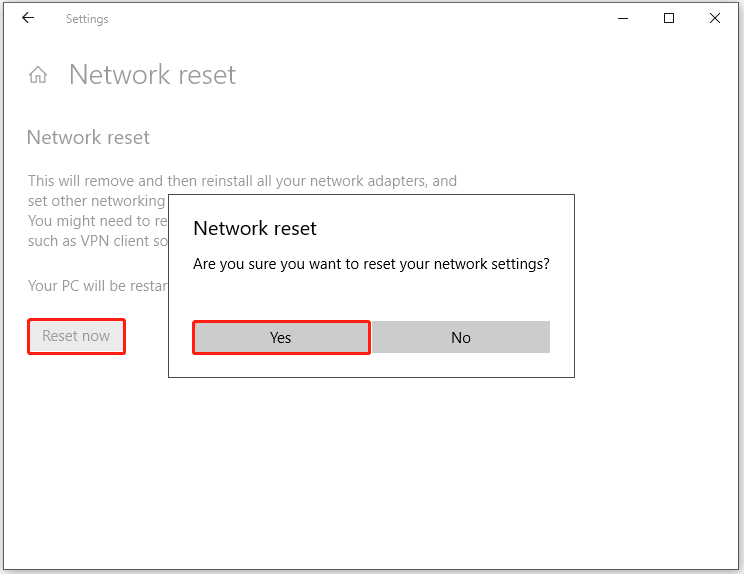
Step 3: Click on Reset now button. If you are prompted with a confirmation window, click Yes to confirm the operation.
About The Author

Position: Columnist
Having writing articles about computer tech for a long time, I am rather experienced especially on the aspect of computer optimization, PC enhancement, as well as tech terms explanation. The habit of looking through tech forums makes me a great computer issues collector. And then, many articles related to these issues are released, which benefit plenty of users. Professional, effective, and innovative are always the pursuit of an editing worker.
In Phasmophobia, players are required to use the microphone in order to complete a lot of objectives. But for some players, an issue is preventing them from using their correctly connected microphone when playing the game.
After investigating this particular issue thoroughly, it turns out that there are several different underlying scenarios that might trigger this particular microphone issue when playing the game. Here’s a shortlist of potential culprits that might be responsible for this issue:
- Incorrect microphone is used by the game – In a lot of situations, the microphone was not working inside the game because the game is defaulting to a different microphone than the one you are trying to use. In this case, you can rectify the issue by using the Audio menu to select the correct microphone.
- The microphone is not set as the Default – You can expect to face this issue if your Windows installation is currently recognizing a different recording device as the default choice. If this scenario is applicable, you should be able to fix the issue by adjusting the Windows Settings for the recording devices.
- Exclusive Mode or Enhancements Enabled – If your recording device is configured to use Exclusive mode or a series of Enhancements in order to adjust the default bitstream, chances are that’s what’s causing the problem with your microphone. In this case, you’ll need to disable Exclusive Mode + any active enhancement.
- Phasmophobia app is not allowed to use the microphone – If you’re using Windows 10, there’s a big chance that Phasmophobia is not permitted to use the microphone. If the voice recognition tech fails due to this reason, all you need to do is re-configure the access page of your microphone to allow Phasmophobia to access the microphone when needed.
- Missing voice recognition drivers – Phasmophobia is unique as a game because it requires a series of voice recognition drivers that are in no way mandatory to the vanilla Windows 10 installation. Fortunately, you can force their installation by accessing the Speech Recognition tab and installing the English (United States) voice pack.
- Outdated Windows 10 build – As it turns out, you need Windows 10 build 2004 or later in order to be able to use the voice recognition tech with Phasmophobia. To ensure this, you’ll need to install every pending Windows update (critical, feature, and security update).
- Steam’s admin breaks the voice recognition tech – We haven’t been able to identify the cause, but it’s proven that Steam’s admin breaks the voice recognition tech on Windows 10 for Phasmophobia and a few other games. In this case, as recommended by the developers, you’ll need to ensure that steam runs WITHOUT admin access to ensure that the voice recognition tech is not affected.
- The game is not installed on the main drive – If you’re trying to enjoy the game in VR, chances are you will need to move the game on the OS drive in before you’ll manage to get the microphone to work with Phasmophobia.
Now that you are aware of every potential instance that might be causing this microphone issue with Phasmophobia, here’s a list of fixes that other affected users have successfully used to fix this problem and play the game normally:
1. Select the correct microphone from the Audio tab
First things first, you should begin this troubleshooting guide by ensuring that the correct microphone is selected from the in-game Audio menu. If you are playing the game on a PC that has an incorporated microphone, the game has a tendency of defaulting it even though you are trying to use a headset.
Several affected users have confirmed that the issue was resolved after they launched the game normally and changed the default Microphone choice from the Audio menu.
If you’re looking for specific instructions on how to do this, follow the steps below to ensure that Phasmophobia is using the correct microphone:
- Launch Plasmophobia from Steam or any other launcher that you’re using and wait until the main menu is loaded.
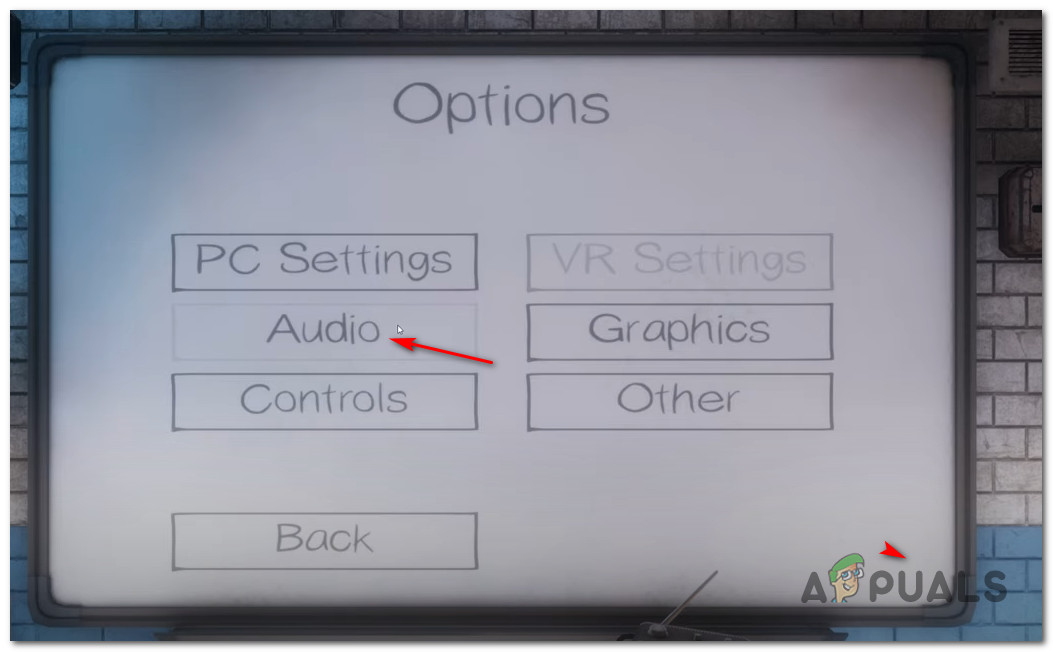
- Once you’re inside the main menu, make your way over to the Options board and access the Audio tab.

Accessing the Audio tab - Once you’re inside the Audio tab, go ahead and adjust the value of the Microphone until the microphone that you actually want to use is selected.
- After the correct microphone is selected, click Apply to save the changes.
Note: While you’re inside the Options menu, go to the Other sub-menu and ensure that the Language is set to English to match the voice recognition tech. - Restart the game, double-check to see if the correct microphone is selected, then play the game normally and see if the problem is now fixed.
In case you’re still experiencing the same mic issues with Phasmophobia, move down to the next potential fix below.
2. Set the correct recording device as default in Windows Settings
Another fairly common scenario that might produce this error is an instance in which the microphone you are trying to use with Phasmophobia is not set as the default choice in the audio settings of your Windows installation.
A few Phasmophobia that we’re also dealing with this problem have confirmed that once they accessed the Sound menu and changed the default Recording device to the correct one.
Follow the instructions below to learn how to do this:
Note: The instructions below will work on every recent Windows version (Windows 7, Windows 8.1, Windows 10, and Windows 11)
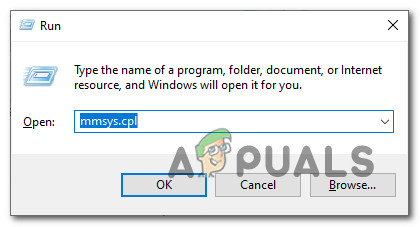
- Start by pressing Windows key + R to open up a Run dialog box. Then, type “mmsys.cpl” and press Enter to open up the Sound menu of the Settings app.

Accessing the Sound menu from Run menu Note: If you’re prompted by the UAC (User Account Control), click Yes to grant admin access.
- Inside the Sound menu, use the ribbon at the top to select Recording.
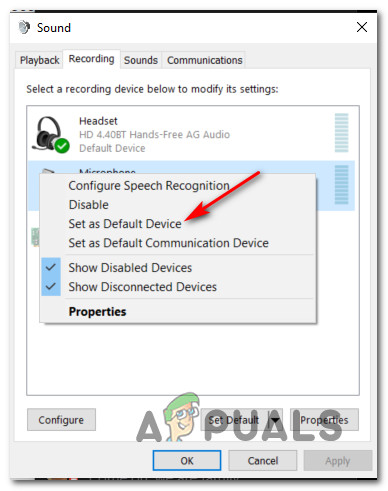
- From the Recording tab, determine which microphone you’re actively using and right-click on it.
- Finally, from the context menu that just appeared, click on Set as Default Device.

Setting the correct Recording device as the default choice - Hit Apply to save the changes, then launch the game normally and see if the problem is now fixed.
If the problem is still not resolved as you’re still unable to complete certain objectives inside Phasmophobia, move down to the next potential fix below.
3. Disable Exclusive Mode and active Enhancements (if applicable)
According to a lot of affected users, you can expect to face this microphone issue with Phasmophobia due to the way the game is developed to pass DTS or DOLBY bitstreams through HDMI / SPDIF. Streams like this cannot be interrupted because the audio is already encoded – No audio can be added to them while they’re making their way to a receiver like a TV.
If you’re using DTS or Dolby bitstreams through HDMI or SPDIF, this is most likely the reason why your microphone is not working while the game is open.
In this case, you should try disabling Exclusive Mode for the Recording device that you’re currently doing and ensure that no enhancements are affecting the audio stream.
For step by step instructions on how to do this, follow the steps below:
- Start by pressing Windows key + R to open up a run dialog box. Then, type ” mmsys.cpl” and press Enter to open up the Sound window. If you’re prompted by the UAC (User Account Control), click on Yes to grant admin access.
- Once you get there, select the Recording tab, then right-click on the playback device that is currently active and choose Properties from the context menu.
Note: It’s important to follow these instructions for the correct Recording device – The device that has a green checkmark near its icon should be your target. - Inside the Device Properties screen, select the Advanced tab from the horizontal menu at the top of the window.
- Next, inside the Advanced tab, go to the Exclusive Mode section and uncheck the box associated with Allow applications to take exclusive control of this device.
- Next, access the Enhancement tab and ensure that the checkboxes associated with Low Frequency Protection, Virtual Surround, Room Correction, and Loudness Equalization are unchecked.
Note: Depending on your microphone model, you might not have this tab present. - Finally, click Apply to save the change, then restart your computer to force the changes to take effect.
- Once the next startup sequence is complete, open the Netflix app again and see if the issue has been resolved.
If you ensured that Exclusive Mode is disabled for your Playback device and no enhancements are currently active, move down to the next potential fix below.
4. Ensure that apps are allowed to access microphone (Windows 10 Only)
According to a lot of users that we’re also dealing with this issue, you can also expect to see this issue in a situation where the Phasmophobia app doesn’t have access to the microphone that the game is attempting to use.
This issue is exclusive to Windows 10 where a privacy setting will prohibit any apps (native or 3rd party) that don’t have the necessary permissions from accessing the microphone.
INFO: This was not standard behavior when Windows 10 launched, but a recent security update is preventing UWP apps from accessing the camera & microphone unless you specifically configure them and grant them access to the active microphone.
If this scenario is applicable to you and you’re suspecting that the Phasmophobia App is prevented from using the microphone, follow the instructions below to make sure that’s not the case:
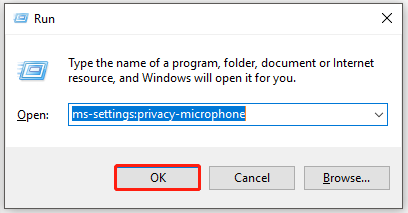
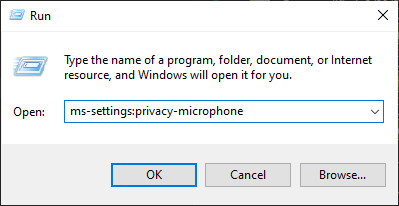
- Press Windows key + R to open up a Run dialog box. Next, type ‘ms-settings:privacy-microphone’ and press Enter to open up the Microphone Privacy window of the Windows Settings app.

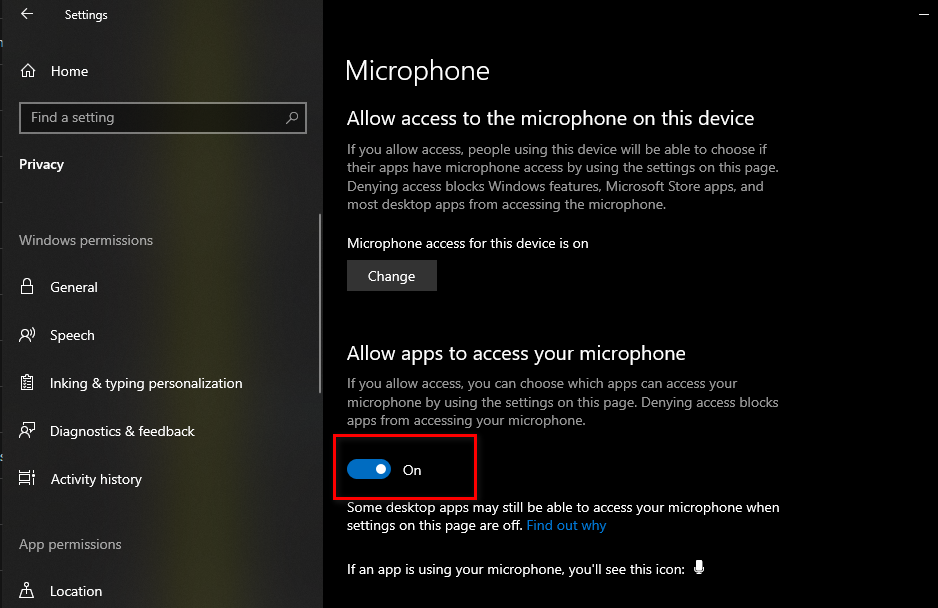
Accessing the microphone app - Once you’re inside the Microphone privacy tab, move over to the right-hand pane and enable the toggle associated with Allow apps to access your microphone.

Allowing access to the microphone - As soon as access is granted, scroll down to the list of apps allowed to use the microphone and ensure that the toggle associated with the Phasmophobia game is Enabled.
- Once the setting is On, restart your computer and launch the game once again to see if the problem is now fixed.
In case the same mic issue is still occurring with Phasmophobia, move down to the next potential fix below.
5. Install the required voice recognition drivers
As it turns out, a fairly common cause of this issue on Windows 10 is an instance in which a series of voice recognition drivers needed by the game is missing from your Windows installation.
This is very likely if your computer is configured for a different language than English US.
Several affected users have managed to fix this issue by accessing the Speech Settings menu and forcing the installation of the English (United States) voice package – This action will also install the missing voice recognition drivers.
To make matters easier for you, we’ve put together a series of step-by-step instructions that will walk you through the whole process:
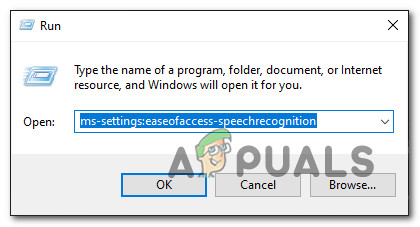
- Press Windows key + R to open up a Run dialog box. Next, type ‘ms-settings:easeofaccess-speechrecognition’ and press Enter to open up the Speech tab of the Settings app.
Opening the Speech tab Note: If you are prompted by the UAC (User Account Control), click Yes to grant admin access.
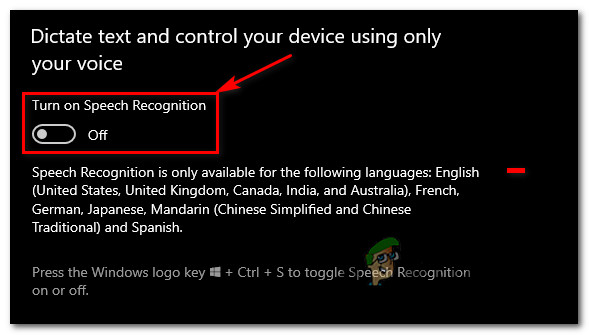
- Once you’re inside the Speech tab, move over to the right-hand side method and check if Speech Recognition is enabled. If it’s not enabled, change the associated toggle to ON.

Enabling Speech Recognition Note: If Voice Recognition is already enabled, skip this step and the next and move directly to step 4.
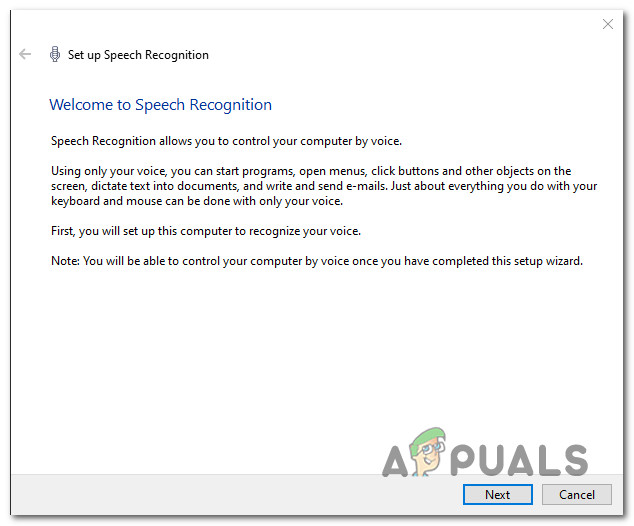
- Next, follow the steps outlined inside the Set up Speech Recognition window that just appeared until the Speech Recognition feature is successfully enabled.

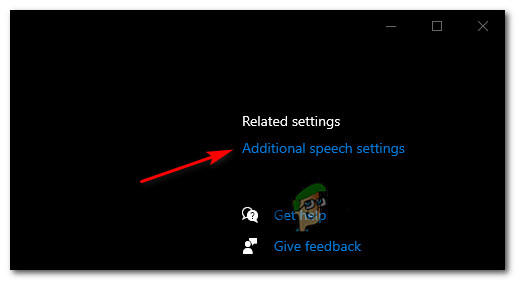
Enabling the Speech Recognition feature - Once Speech recognition is enabled, click on Additional speech settings from the top-right section of the screen.

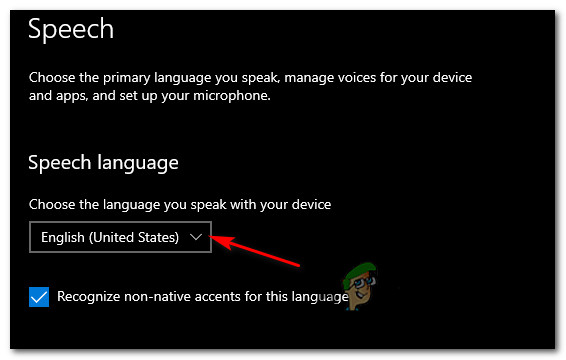
Accessing the Additional Speech menu - Once you’re inside the Additional speech settings, start by ensuring that the default Speech language is et to English (United States). Additionally, if you’re a non-native speaker, ensure that you check the box associated with Recognize non-native accents for this language.

Configuring the speech language features Note: This is not a requirement, but it helps avoid an entire host of mic-related issues when playing Phasmophobia.
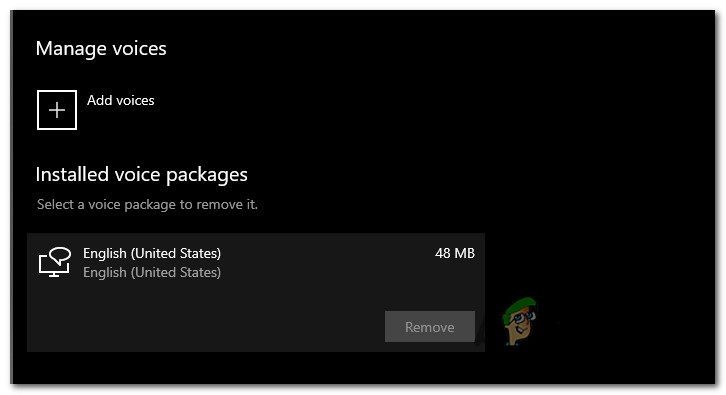
- Next, scroll down to the bottom of the screen and see if English (United States) is present under Installed voice packages. If the package is not yet installed, click on Add Voices and add English (United States) from the list.

Adding the correct voice pack - Once you’ve ensured that the correct voice package is installed, launch the game once again and check if the microphone issues have been resolved.
6. Update Windows 10 to the latest version (if applicable)
Keep in mind that if you’re on Windows 10, installing every pending update and bringing your OS to build to the latest is crucial.
Phasmophobia’s voice recognition tech will require you to use the latest voice recognition drivers which are only installed once you are on Windows 10 build version 2004 or later.
If this scenario looks like it could be applicable and you have a lot of pending updates, you should be able to fix the problem by installing every pending WIndows update following the official channels.
In case it’s necessary, follow the instructions below to open the Windows Update component and use it to install every pending update until you bring your Windows build up to date:
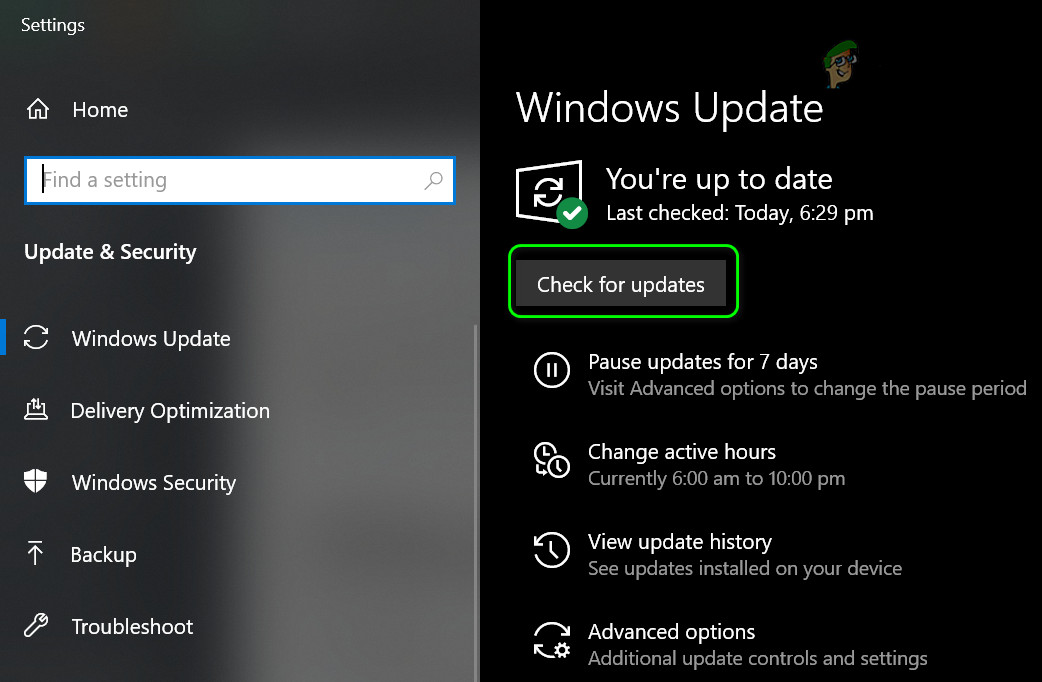
- Open up a Run dialog box by pressing Windows key + R. Next, type “ms-settings:windowsupdate” inside the text box and press Enter to open up the Windows Update tab of the Settings app.
Opening the Windows Update screen - Inside the Windows Update screen, move over to the right-hand pane and click on Check for Updates.
- Next, follow the on-screen instructions to install every pending update.

Checking for Updates Note: If there are a lot of pending updates to handle, the WU component will prompt you to restart before you get the chance to bring your Windows 10 build to the latest. If this occurs, restart when instructed, but make sure to return to the same Windows Update screen at the next startup and complete the download & installation of the remaining updates.
- After you manage to installed every pending WIndows update, do one final restart and see if the problem is fixed by launching the game once the next startup is complete.

If the same problem is still occurring, move down to the next potential fix below.
7. Run Steam without Admin privileges (if applicable)
I know this seems like an unlikely culprit, but a lot of affected users have come forward and reported that Steam’s admin privileges end up breaking Phasmophobia’s voice recognition tech – This is even acknowledged by the developers as they recommend running Steam without admin access while playing the game
If you have previously configured Steam to run with admin access, follow the instructions below to remove the elevated access in order to ensure that the voice recognition feature is not affected:
- First things first, ensure that Steam is closed and no associated process is running in the background.
- Next, open My Computer or File Explorer and navigate to the location where you installed Steam. By default, you’ll find Steam installed in the following location:
C:\Program Files (x86)\Steam
- Next, right-click on Steam.exe and then click on Properties from the newly appeared context menu.
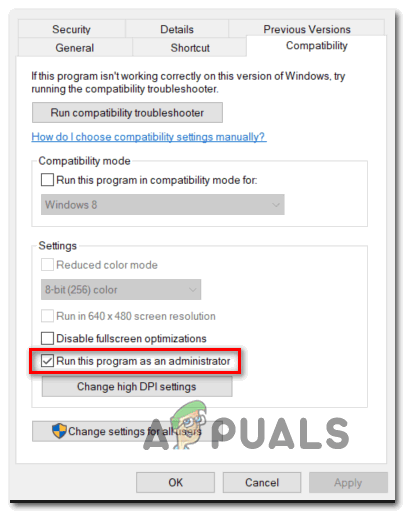
- Inside the Properties screen, access the Compatibility tab from the ribbon menu at the top.
- Next, move down to the Settings category and uncheck the box associated with Run this program as an administrator.

Disable ‘Run this program as an administrator’ - Finally, click on Apply to save the changes permanently before attempting to launch Steam normally (by double-clicking on the executable).
If the problem is still not fixed, move down to the final potential fix below.
8. Move the game to the main drive
According to some users that we’re also launching the game through Steam, you might be also dealing with a permission issue.
Some users have managed to get the issue resolved by manually moving the game to the main drive where Windows is installed (C:/ drive in most cases).
If Phasmophobia is not installed on the C drive, moving the game manually through Steam should be fairly easy to perform.
Follow the instructions below for step by step instructions on moving the game to the main drive:
- Open your Steam installation and log in with your account.
- Next, access the Library tab from the ribbon bar at the top, then right-click on PhasmoPhobia from the menu on the left.
- From the context menu that just appeared, click on Properties.

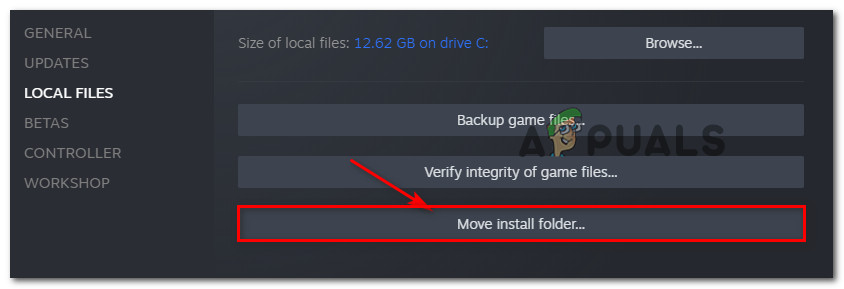
Accessing the Properties menu - Once you’re inside the Properties screen, click on Local Files from the vertical menu on the left, then click on Move Install Folder… from the right pane.

Moving the location of the install folder - From the dialog prompt that just appeared, select a different location somewhere on your main drive and wait for the moving process to complete.
- Launch the game once again and see if the problem is now fixed.