pgAdmin may be deployed as a web application by configuring the app to run in
server mode and then deploying it either behind a webserver running as a reverse
proxy, or using the WSGI interface.
When deployed in server mode, there are two notable differences for users:
-
Users must login before they can use pgAdmin. An initial superuser account
is created when server mode is initialised, and this user can add additional
superusers and non-superusers as required. -
File storage is restricted to a virtual root directory for each individual
user under the directory configured using theSTORAGE_DIRconfiguration
parameter. Users do not have access to the complete filesystem of the server.
The following instructions demonstrate how pgAdmin may be run as a WSGI
application under Apache HTTPD, using mod_wsgi, standalone using uWSGI
or Gunicorn, or under NGINX using using uWSGI or Gunicorn.
See also
For detailed instructions on building and configuring pgAdmin from
scratch, please see the README file in the top level directory of the source code.
For convenience, you can find the latest version of the file
here,
but be aware that this may differ from the version included with the source code
for a specific version of pgAdmin.
Requirements
Important: Some components of pgAdmin require the ability to maintain affinity
between client sessions and a specific database connection (for example, the
Query Tool in which the user might run a BEGIN command followed by a number of
DML SQL statements, and then a COMMIT). pgAdmin has been designed with built-in
connection management to handle this, however it requires that only a single
Python process is used because it is not easily possible to maintain affinity
between a client session and one of multiple WSGI worker processes.
On Windows systems, the Apache HTTP server uses a single process, multi-threaded
architecture. WSGI applications run in embedded mode, which means that only
a single process will be present on this platform in all cases.
On Unix systems, the Apache HTTP server typically uses a multi-process, single
threaded architecture (this is dependent on the MPM that is chosen at
compile time). If embedded mode is chosen for the WSGI application, then
there will be one Python environment for each Apache process, each with it’s own
connection manager which will lead to loss of connection affinity. Therefore
one should use mod_wsgi’s daemon mode, configured to use a single
process. This will launch a single instance of the WSGI application which is
utilised by all the Apache worker processes.
Whilst it is true that this is a potential performance bottleneck, in reality
pgAdmin is not a web application that’s ever likely to see heavy traffic
unlike a busy website, so in practice should not be an issue.
Future versions of pgAdmin may introduce a shared connection manager process to
overcome this limitation, however that is a significant amount of work for
little practical gain.
Configuration
In order to configure pgAdmin to run in server mode, it may be necessary to
configure the Python code to run in multi-user mode, and then to configure the
web server to find and execute the code.
See The config.py File for more information on configuration settings.
Python
From pgAdmin 4 v2 onwards, server mode is the default configuration. If running under
the desktop runtime, this is overridden automatically. There should typically be no
need to modify the configuration simply to enable server mode to work, however it may
be desirable to adjust some of the paths used.
In order to configure the Python code, follow these steps:
-
Create a
config_local.pyfile alongside the existingconfig.pyfile. -
Edit
config_local.pyand add the following settings. In most cases, the default
file locations should be appropriate:NOTE: You must ensure the directories specified are writeable by
the user that the web server processes will be running as, e.g. apache or www-data.
You may specify DATA_DIR in order to create all required directories and files
under DATA_DIR folder.LOG_FILE = '/var/log/pgadmin4/pgadmin4.log' SQLITE_PATH = '/var/lib/pgadmin4/pgadmin4.db' SESSION_DB_PATH = '/var/lib/pgadmin4/sessions' STORAGE_DIR = '/var/lib/pgadmin4/storage' AZURE_CREDENTIAL_CACHE_DIR = '/var/lib/pgadmin4/azurecredentialcache' KERBEROS_CCACHE_DIR = '/var/lib/pgadmin4/kerberoscache'
-
Run the following command to create the configuration database:
-
Change the ownership of the configuration database to the user that the web server
processes will run as, for example, assuming that the web server runs as user
www-data in group www-data, and that the SQLite path is/var/lib/pgadmin4/pgadmin4.db:# chown www-data:www-data /var/lib/pgadmin4/pgadmin4.db
Hosting
There are many possible ways to host pgAdmin in server mode. Some examples are
given below:
Apache HTTPD Configuration (Windows)
Once Apache HTTP has been configured to support mod_wsgi, the pgAdmin
application may be configured similarly to the example below:
<VirtualHost *>
    ServerName pgadmin.example.com
    WSGIScriptAlias / "C:\Program Files\pgAdmin4\web\pgAdmin4.wsgi"
    <Directory "C:\Program Files\pgAdmin4\web">
            Order deny,allow
            Allow from all
    </Directory>
</VirtualHost>
Now open the file C:\Program Files\pgAdmin4\web\pgAdmin4.wsgi with your favorite editor and add the code
below which will activate Python virtual environment when Apache server runs.
activate_this = 'C:\Program Files\pgAdmin4\venv\Scripts\activate_this.py'
exec(open(activate_this).read())
Note: The changes made in pgAdmin4.wsgi file will revert when pgAdmin4 is either upgraded or downgraded.
Apache HTTPD Configuration (Linux/Unix)
Once Apache HTTP has been configured to support mod_wsgi, the pgAdmin
application may be configured similarly to the example below:
<VirtualHost *>
    ServerName pgadmin.example.com

    WSGIDaemonProcess pgadmin processes=1 threads=25 python-home=/path/to/python/virtualenv
    WSGIScriptAlias / /opt/pgAdmin4/web/pgAdmin4.wsgi

    <Directory /opt/pgAdmin4/web>
        WSGIProcessGroup pgadmin
        WSGIApplicationGroup %{GLOBAL}
        Order deny,allow
        Allow from all
    </Directory>
</VirtualHost>
Note: If you’re using Apache HTTPD 2.4 or later, replace the lines:
Order deny,allow
Allow from all
with:
Adjust as needed to suit your access control requirements.
Standalone Gunicorn Configuration
pgAdmin may be hosted by Gunicorn directly simply by running a command such as
the one shown below. Note that this example assumes pgAdmin was installed using
the Python Wheel (you may need to adjust the path to suit your installation):
gunicorn  --bind 0.0.0.0:80 \
          --workers=1 \
          --threads=25 \
          --chdir /usr/lib/python3.7/dist-packages/pgadmin4 \
          pgAdmin4:app
Standalone uWSGI Configuration
pgAdmin may be hosted by uWSGI directly simply by running a command such as
the one shown below. Note that this example assumes pgAdmin was installed using
the Python Wheel (you may need to adjust the path to suit your installation):
uwsgi --http-socket 0.0.0.0:80 \
      --processes 1 \
      --threads 25 \
      --chdir /usr/lib/python3.7/dist-packages/pgadmin4/ \
      --mount /=pgAdmin4:app
NGINX Configuration with Gunicorn
pgAdmin can be hosted by Gunicorn, with NGINX in front of it. Note that these
examples assume pgAdmin was installed using the Python Wheel (you may need to
adjust the path to suit your installation).
To run with pgAdmin in the root directory of the server, start Gunicorn using a
command similar to:
gunicorn --bind unix:/tmp/pgadmin4.sock \
         --workers=1 \
         --threads=25 \
         --chdir /usr/lib/python3.7/dist-packages/pgadmin4 \
         pgAdmin4:app
And configure NGINX:
location / {
    include proxy_params;
    proxy_pass http://unix:/tmp/pgadmin4.sock;
}
Alternatively, pgAdmin can be hosted in a sub-directory (/pgadmin4 in this case)
on the server. Start Gunicorn as when using the root directory, but configure
NGINX as follows:
location /pgadmin4/ {
    include proxy_params;
    proxy_pass http://unix:/tmp/pgadmin4.sock;
    proxy_set_header X-Script-Name /pgadmin4;
}
NGINX Configuration with uWSGI
pgAdmin can be hosted by uWSGI, with NGINX in front of it. Note that these
examples assume pgAdmin was installed using the Python Wheel (you may need to
adjust the path to suit your installation).
To run with pgAdmin in the root directory of the server, start uWSGI using a
command similar to:
uwsgi --socket /tmp/pgadmin4.sock \
      --processes 1 \
      --threads 25 \
      --chdir /usr/lib/python3.7/dist-packages/pgadmin4/ \
      --manage-script-name \
      --mount /=pgAdmin4:app
And configure NGINX:
location / { try_files $uri @pgadmin4; }
location @pgadmin4 {
    include uwsgi_params;
    uwsgi_pass unix:/tmp/pgadmin4.sock;
}
Alternatively, pgAdmin can be hosted in a sub-directory (/pgadmin4 in this case)
on the server. Start uWSGI, noting that the directory name is specified in the
mount parameter:
uwsgi --socket /tmp/pgadmin4.sock \
      --processes 1 \
      --threads 25 \
      --chdir /usr/lib/python3.7/dist-packages/pgadmin4/ \
      --manage-script-name \
      --mount /pgadmin4=pgAdmin4:app
Then, configure NGINX:
location = /pgadmin4 { rewrite ^ /pgadmin4/; }
location /pgadmin4 { try_files $uri @pgadmin4; }
location @pgadmin4 {
  include uwsgi_params;
  uwsgi_pass unix:/tmp/pgadmin4.sock;
}
Additional Information
Note
pgAdmin will spawn additional Python processes from time to time, and
relies on the sys.executable variable in Python to do this. In some cases,
you may need to override that value to ensure the correct interpreter is
used, instead of the WSGI host process. For example, uWSGI offers the
–py-sys-executable command line option to achieve this.
PgAdmin 4 — это мощный инструмент для администрирования PostgreSQL, который позволяет управлять базами данных из удобного веб-интерфейса. Он позволяет создавать, изменять и удалять базы данных, схемы, таблицы, пользователей и другие объекты, а также выполнять SQL-запросы и мониторить состояние сервера.
Для установки PgAdmin 4 на Windows необходимо выполнить несколько простых шагов. Во-первых, скачайте установочный файл с официального сайта PostgreSQL. После этого запустите его и выберите необходимые компоненты для установки: PgAdmin 4 и PostgreSQL Server.
Важно: перед установкой проверьте совместимость версий PgAdmin 4 и PostgreSQL Server.
После выбора компонентов, установите их, следуя указаниям мастера установки. После завершения установки PgAdmin 4 будет готов к использованию.
Теперь вы можете открыть PgAdmin 4, указав адрес сервера, имя пользователя и пароль. После входа в систему вы сможете начать работу с базами данных PostgreSQL прямо из веб-интерфейса PgAdmin 4.
Содержание
- Шаг 1. Установка PostgreSQL
- Шаг 2. Скачивание PgAdmin 4
- Шаг 3. Установка и запуск PgAdmin 4
- Шаг 4. Настройка соединения
- Шаг 5. Создание сервера
- Шаг 6. Открытие PgAdmin 4 в браузере
Шаг 1. Установка PostgreSQL
Для начала загрузите установочный файл PostgreSQL с официального сайта разработчиков и запустите его. Убедитесь, что загружена версия, совместимая с вашей операционной системой.
- Шаг 1: Выберите язык установки и нажмите кнопку «Next».
- Шаг 2: Прочитайте и принимайте лицензионное соглашение. Нажмите кнопку «Next».
- Шаг 3: Выберите путь каталога установки PostgreSQL. Рекомендуется использовать значение по умолчанию. Нажмите «Next».
- Шаг 4: Выберите компоненты, которые вы хотите установить. Рекомендуется выбрать все компоненты для установки полной версии PostgreSQL. Нажмите «Next».
- Шаг 5: Введите пароль для суперпользователя базы данных (администратора). Удостоверьтесь, что пароль надежен и запомните его. Нажмите «Next».
- Шаг 6: Выберите порт для сервера PostgreSQL (обычно 5432) и укажите локальные соединения. Нажмите «Next».
- Шаг 7: Выберите параметры локализации и установки, а также директорию для данных. Нажмите «Next».
- Шаг 8: Подтвердите детали установки и нажмите «Next».
- Шаг 9: Дождитесь завершения процесса установки. Нажмите «Finish», чтобы закрыть установщик.
Поздравляю! Вы успешно установили PostgreSQL на свой компьютер. Теперь вы можете переходить к следующему шагу — установке и настройке сервера PgAdmin 4.
Шаг 2. Скачивание PgAdmin 4
Перед тем как установить PgAdmin 4, необходимо скачать его с официального сайта. Для этого выполните следующие действия:
- Откройте веб-браузер и перейдите на страницу скачивания PgAdmin 4.
- На странице скачивания выберите нужную версию PgAdmin 4 в соответствии с вашей операционной системой. В данном случае выберите Windows.
- Нажмите на ссылку, чтобы начать скачивание.
После завершения скачивания у вас будет установочный файл PgAdmin 4 для Windows.
Шаг 3. Установка и запуск PgAdmin 4
1. После успешного завершения установки PostgreSQL перейдите в папку, в которую был установлен PostgreSQL. Обычно это C:\Program Files\PostgreSQL\версия_PostgreSQL.
2. В папке найдите подпапку с названием «pgAdmin 4» и откройте ее.
3. Внутри папки «pgAdmin 4» найдите файл с названием «pgAdmin4.exe» и запустите его.
4. После запуска появится окно PgAdmin 4. Вам будет предложено указать пароль для учетной записи «admin». Введите пароль и нажмите кнопку «OK».
5. После ввода пароля PgAdmin 4 загрузится и откроется веб-интерфейс. Вы сможете увидеть панель навигации слева и область содержимого справа.
6. Теперь вы можете начать использовать PgAdmin 4 для управления вашим сервером PostgreSQL. На панели навигации слева вы найдете различные разделы, такие как серверы, базы данных, схемы и т.д., которые позволят вам управлять вашими данными.
7. Чтобы создать новое подключение к серверу PostgreSQL, щелкните правой кнопкой мыши на раздел «Серверы» на панели навигации и выберите «Создать» -> «Сервер…». В открывшемся окне введите информацию о сервере, такую как имя, хост, порт и учетные данные, и нажмите кнопку «Сохранить».
8. После этого вы сможете подключиться к серверу PostgreSQL и начать работу с базами данных.
Шаг 4. Настройка соединения
1. Введите следующие данные для настройки соединения с сервером PgAdmin 4:
| Хост | localhost |
| Порт | 5432 |
| Имя пользователя | ваше_имя_пользователя |
| Пароль | ваш_пароль |
| База данных | имя_вашей_базы_данных |
2. Нажмите кнопку «Save» для сохранения настроек соединения.
Шаг 5. Создание сервера
После установки PgAdmin 4 на вашем компьютере, вы можете приступить к созданию сервера для соединения с базой данных PostgreSQL.
1. Запустите PgAdmin 4, и вы увидите окно приветствия. Нажмите на кнопку «Добавить новый сервер».
2. В открывшемся окне введите имя сервера в поле «Имя сервера». Это может быть любое удобное для вас имя.
3. Перейдите на вкладку «Соединение». В поле «Введение» введите IP-адрес или имя хоста сервера PostgreSQL, к которому вы хотите подключиться. В поле «Порт» укажите порт сервера (по умолчанию это 5432).
4. В разделе «Аутентификация» укажите данные для входа на сервер PostgreSQL: имя пользователя и пароль. Если вы не хотите вводить пароль каждый раз при подключении к серверу, отметьте чекбокс «Запомнить пароль».
5. Нажмите на кнопку «Сохранить», чтобы сохранить настройки сервера.
Теперь у вас есть сервер PgAdmin 4, готовый к соединению с базой данных PostgreSQL. Вы можете создать несколько серверов, чтобы подключаться к разным базам данных.
Примечание: Убедитесь, что сервер PostgreSQL запущен и доступен по указанному вами адресу и порту.
Шаг 6. Открытие PgAdmin 4 в браузере
После успешной установки и настройки сервера PgAdmin 4 на Windows, вы можете открыть PgAdmin 4 веб-интерфейс в любом современном веб-браузере на вашем компьютере.
Для этого следуйте этим шагам:
- Откройте веб-браузер (например, Google Chrome, Mozilla Firefox или Microsoft Edge).
- В адресной строке браузера введите URL-адрес PgAdmin 4 сервера. По умолчанию, адрес будет выглядеть следующим образом:
http://localhost:5050.
Если вы использовали другой порт при настройке сервера PgAdmin 4, замените 5050 на соответствующий порт в URL-адресе.
После ввода URL-адреса PgAdmin 4 сервера, нажмите клавишу «Enter» на клавиатуре или выполните соответствующее действие в вашем браузере для перехода по указанному URL-адресу.
Веб-интерфейс PgAdmin 4 откроется в браузере, и вы сможете начать использовать его для управления вашим сервером PostgreSQL и базами данных.
Примечание: Убедитесь, что ваш сервер PgAdmin 4 запущен перед открытием веб-интерфейса. Если сервер не запущен, запустите его, следуя инструкциям в предыдущих шагах.
As a new Postgres user, I did not understand how to make use of Postgres on Ubuntu. So I’m just going to chime in and help out other newbies who perhaps cannot figure out how to work with Postgres on Linux. If you’re using Windows, steps should be similar.
Before you get to using PgAdmin, a bit of configuration is required. Most will happen in your terminal at first.
Open a terminal using Ctrl + Alt + T if you’re on a PC. Or just pres ALT + F1 and begin typing Terminal.
Let’s start with the basics first and make sure you have proper
installation.
1. Installing Postgres Latest
1.1 update the system software packages
sudo apt update
1.2 install latest version of PostgreSQL from default Ubuntu repositories
sudo apt install postgresql
the installer will create a new PostgreSQL collection of databases
that will be managed by a single server instance
Default data directory : /var/lib/postgresql/your-version/main
Configurations files : /etc/postgresql/your-version/main
2. Checking if Postgres Service is Installed
2.1 Check if Postgres is Active
sudo systemctl is-active postgresql
You should see : active
2.2 Check if Postgres is enabled
sudo systemctl is-enabled postgresql
You should see : enabled
2.3 Check Postgres Service status
sudo systemctl status postgresql
You should see : active (exited) marked in green
2.4 Check if Postgres is ready to accept connections
sudo pg_isready
You should see : /var/run/postgresql:5432 — accepting connections
3. Configuring Postgres Authentication
3.1 Opening the pg_hba.conf as SUPERUSER
sudo code --user-data-dir=~/root /etc/postgresql/13/main/pg_hba.conf
I’m using visual studio code so for me code is vsc codename. If you’re using vim or sublime just replace code with your text editor name.
3.2 Configuring pg_hba.conf
Notes: you shouldn’t need to change anything here, just make sure your
configuration files matches the following lines :
host    all             all             127.0.0.1/32            md5
# IPv6 local connections:
host    all             all             ::1/128                 md5
Hit save and close.
3.3 Restart Postgres Service
sudo systemctl restart postgresql
4. Create NEW Server
For me, this is where all my confusion was. Before you use PgAdmin,
you need to create a server in your terminal, then you can connect and
manager it with PgAdmin just like you would with PhpMyAdmin. It’s
actually easier.
4.1 Access the PostgreSQL database shell
sudo su - postgres
psql
You will then see this : postgres=#
4.2 Creating new server and user
postgres=# create user bob with superuser password 'admin';
That’s how you create new user and server in Postgres. Let’s move on to PgAdmin.
5. Installing pgAdmin4
5.1 Add public key for the repository
curl https://www.pgadmin.org/static/packages_pgadmin_org.pub | sudo apt-key add
Notes : if you don’t have curl your Ubuntu will give you the command to install it
5.2 create the repository configuration file
sudo sh -c 'echo "deb https://ftp.postgresql.org/pub/pgadmin/pgadmin4/apt/$(lsb_release -cs) pgadmin4 main" > /etc/apt/sources.list.d/pgadmin4.list && apt update'
5.3 install pgAdmin4
sudo apt update
sudo apt install pgadmin4
5.4 run the web setup script installed with the pgadmin4 binary package
sudo /usr/pgadmin4/bin/setup-web.sh
It will asks you for your email address and password. This email and
password is required to login to the PgAdmin4 web interface
6. Accessing pgAdmin4 Web Interface
6.1 Open your favorite browser
type in the address of the PgAdmin web interface. It usually looks like this
http://127.0.0.1/pgadmin4
Note : After installation the web setup script will tell you exactly
where to access the web interface.
When you see the login screen, enter the email and password you’ve chosen during the web setup script.
6.2 Adding New Server Connection
6.2.1 Click on Add New Server
6.2.2 Under General tab enter a name for your server. ANY name you would like, it doesn’t matter. You could enter PgServer1 or whatever. Don’t change anything else.
6.2.3 Switch to Connection Tab
Hostname/ Address : localhost
Port : 5432
Maintenance database : postgres (always)
Username :  **bob** (the username youve chosen at 4.2)
Password : admin (or any password you chose at 4.2)
Hit Save.
Voila! You should be connected successfully. If not, just open terminal and create a new user like we did at 4.2
Notes : to create databases is very easy just right click on your
servername
create > databases
Useful Resources & Tutorials
PostgreSQL Fundamentals : Queries and the likes
PostgreSQL & JSON : useful for dealing with JS apps
PostgreSQL & Nodejs : Create realtime apps with nodejs and socket.io
More PostgreSQL Nodejs
- https://github.com/supabase/realtime
- https://whatsyourssn.com/posts/real-time-app-socket-postgresql/
UPDATE 2023
While following my own tutorial I ran into certificate issues at step 5 when I tried to create the repository file. The full error I was getting was this.
I want to post the solution that worked for me here.

pgAdmin — это приложение с открытым исходным кодом для администрирования и разработки баз данных PostgreSQL которое позволяет выполнять множество задач, начиная от мониторинга и обслуживания и заканчивая выполнением SQL-запросов. pgAdmin 4 можно установить на локальный компьютер, но в наше время, когда доступ может потребоваться в любое время и из любого места, это не очень удобно. Гораздо удобнее установить pgAdmin 4 в режиме сервера и иметь доступ к нему через браузер из любой точки мира. О том как это сделать мы расскажем в данной статье.
Научиться настраивать MikroTik с нуля или систематизировать уже имеющиеся знания можно на углубленном курсе по администрированию MikroTik. Автор курса, сертифицированный тренер MikroTik Дмитрий Скоромнов, лично проверяет лабораторные работы и контролирует прогресс каждого своего студента. В три раза больше информации, чем в вендорской программе MTCNA, более 20 часов практики и доступ навсегда.
Для установки сервера pgAdmin мы будем использовать платформу Linux и дистрибутив Debian 10, при этом также поддерживаются Debian 9 и Ubuntu 16.04 (Xenial), 18.04 (Bionic), 19.10 (Eoan), 20.04 (Focal).
Мы не рекомендуем устанавливать pgAdmin на сервер с PostgreSQL если вы используете версию СУБД отличную от размещенной в репозитории, например, если вы используете PostgreSQL для 1С, потому что pgAdmin имеет в зависимостях ряд библиотек PostgreSQL, и вы с большой долей вероятности столкнетесь с конфликтом версий. Поэтому мы рекомендуем устанавливать pgAdmin на отдельный сервер, лучше всего виртуальную машину или контейнер. Все приведенные ниже команды следует выполнять с правами суперпользователя (root) или через sudo.
Установка и настройка pgAdmin 4
Для начала установим пакет gnupg для работы с цифровыми подписями:
apt install gnupgЗатем перейдем в домашнюю директорию, скачаем и установим публичный ключ для репозитория pgAdmin:
cd
wget https://www.pgadmin.org/static/packages_pgadmin_org.pub
apt-key add packages_pgadmin_org.pub
Теперь создадим файл со списком источников пакетов и внесем туда запись о репозитории pgAdmin:
echo "deb https://ftp.postgresql.org/pub/pgadmin/pgadmin4/apt/$(lsb_release -cs) pgadmin4 main" > /etc/apt/sources.list.d/pgadmin4.listЗатем обновим список пакетов и установим сервер pgAdmin для работы в web-режиме:
apt update
apt install pgadmin4-web
По окончании установки запустите скрипт начальной настройки сервера:
/usr/pgadmin4/bin/setup-web.shВам потребуется ответить на ряд несложных вопросов: указать адрес электронной почты, который вы будете использовать в качестве логина, пароль (уделите особое внимание его надежности), а также разрешить настроить веб-сервер Apache и перезапустить его.
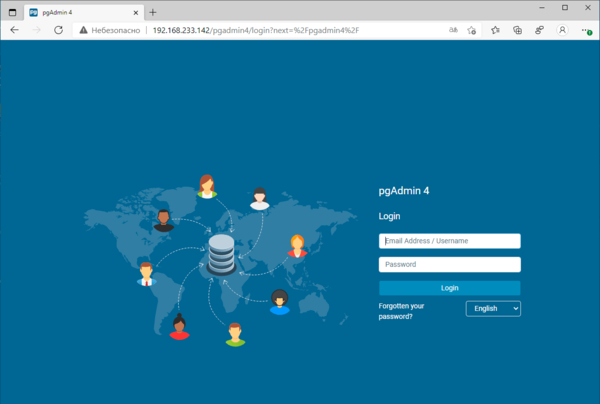
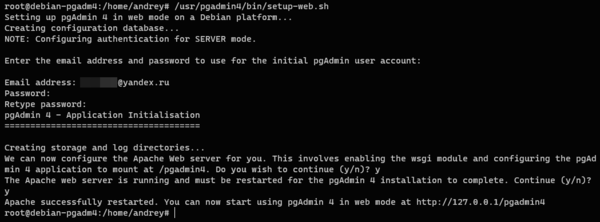 На этом установка и первичная настройка закончена, для доступа к серверу наберите в браузере http://имя_или_ip_сервера/pgadmin4. Если все сделано правильно, то вы увидите страницу входа.
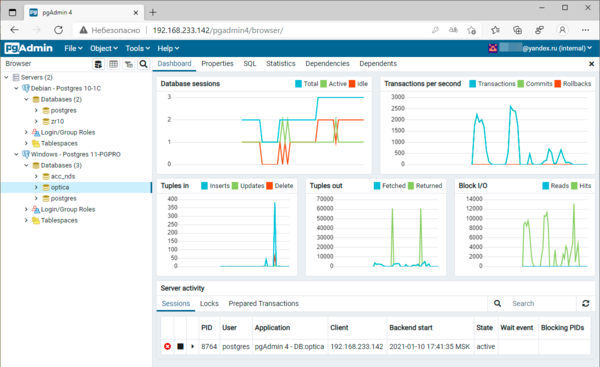
 После авторизации вы попадете в привычную среду pgAdmin, можете подключать свои сервера и работать с базами данных. Инструмент поддерживает любые версии PostgreSQL и платформы установки (Windows, Linux и т.п.). В тестовых целях мы подключили сборку PostgreSQL 10 от 1С на платформе Linux и PostgreSQL 11 от Postgres Pro установленную на Windows Server.
 Настраиваем SSL с самоподписанным сертификатом
 Настраиваем SSL с самоподписанным сертификатом
Вроде бы все хорошо, все настроено и работает. Но есть одно но! По умолчанию pgAdmin 4 работает по незащищенному протоколу HTTP, что в начале третьего десятилетия 21-го века неправильно, даже если вы работаете только в пределах локальной сети. Тем более что в случае несанкционированного доступа некто получит полный доступ ко всем вашим базам данных.
Как быть? Если у вас есть собственное доменное имя, то можно настроить работу с сертификатами от Let’s Encrypt, подробнее читайте в нашей инструкции: Настраиваем Apache для работы по HTTPS (SSL) с сертификатами Let’s Encrypt
В остальных случаях будет вполне достаточно самоподписанного сертификата. Существует расхожее мнение, что шифрование с помощью самоподписанных сертификатов ненадежно, однако это не так. Единственный и существенный недостаток данного вида сертификатов — это отсутствие доверительных отношений. Т.е. мы не знаем кем именно он выпущен и можно ли ему доверять. Для публичных сервисов такой вариант не подходит, так как злоумышленник всегда может подменить такой сертификат своим и перехватить трафик, а пользователь даже не заметит разницы. Но для служебных узлов, когда администратор всегда может убедиться в том, что этот сертификат выпущен именно этим сервером, самоподписанные сертификаты вполне имеют право на существование.
Для создания такого сертификата выполните команду:
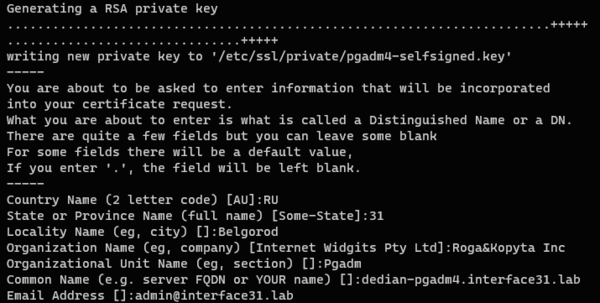
openssl req -x509 -nodes -days 3650 -newkey rsa:2048 -keyout /etc/ssl/private/pgadm4-selfsigned.key -out /etc/ssl/certs/pgadm4-selfsigned.crtНа что здесь следует обратить внимание? На ключ -days, который указывает срок действия сертификата в днях, в нашем случае мы указали 3560 дней или 10 лет,
В процессе генерации сертификата вам потребуется ответить на ряд вопросов, в большинстве их них можно указать произвольные данные и только в поле Common Name следует указать IP-адрес сервера или его FQDN-имя.
Затем откроем файл /etc/apache2/sites-available/default-ssl.conf в котором найдем и приведем к следующему виду две строки:
SSLCertificateFile      /etc/ssl/certs/pgadm4-selfsigned.crt
SSLCertificateKeyFile /etc/ssl/private/pgadm4-selfsigned.key
После чего создадим файл с настройками SSL:
touch /etc/apache2/conf-available/ssl.conf И внесем в него следующие строки:
SSLProtocol all -SSLv3 -TLSv1 -TLSv1.1
SSLCipherSuite ECDHE-ECDSA-AES128-GCM-SHA256:ECDHE-RSA-AES128-GCM-SHA256:ECDHE-ECDSA-AES256-GCM-SHA384:ECDHE-RSA-AES256-GCM-SHA384:ECDHE-ECDSA-CHACHA20-POLY1305:ECDHE-RSA-CHACHA20-POLY1305:DHE-RSA-AES128-GCM-SHA256:DHE-RSA-AES256-GCM-SHA384
SSLHonorCipherOrder off
SSLSessionTickets off

SSLUseStapling On
SSLStaplingCache "shmcb:logs/ssl_stapling(32768)"
Мы не будем в рамках данной статьи подробно разбирать эти параметры, они достаточно сложны, но для получения актуальных настроек SSL вы всегда можете воспользоваться ресурсом ssl-config.mozilla.org, рекомендуемый уровень настроек — Intermediate. Указанный выше блок получен именно оттуда.
Сохраняем изменения и включаем нужные модули, конфигурации и виртуальные хосты:
a2enmod ssl
a2enconf ssl
a2ensite default-ssl
Проверяем конфигурацию Apache на ошибки:
apachectl -tИ перезапускаем веб-сервер:
systemctl reload apache2Теперь подключимся к серверу pgAdmin 4 через браузер с явным указанием защищенного протокола https://имя_или_ip_сервера/pgadmin4:
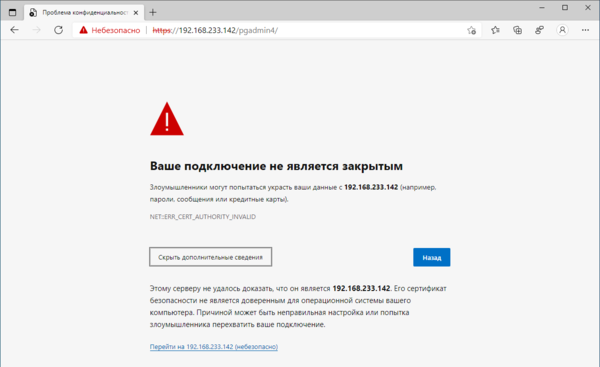 То, что мы получили предупреждение безопасности — это нормально, с точки зрения браузера наш сертификат выпущен непонятно кем и доверять ему нет никаких оснований, но мы то знаем что к чему, поэтому игнорируем это предупреждение и переходим к целевому узлу. Теперь мы можем проверить параметры подключения. Для этого воспользуемся инструментами разработчика:
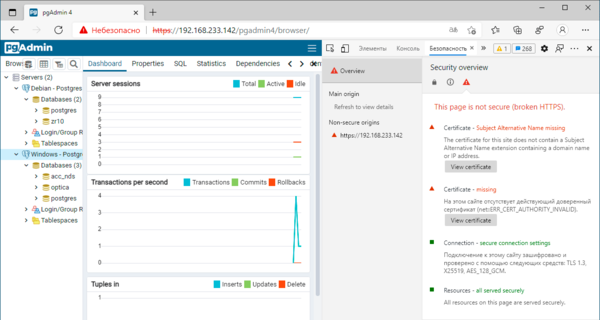 Несмотря на ряд серьезных ошибок все достаточно неплохо. Первая ошибка сообщает нам, что имя сертификата не соответствует нашему узлу, что действительно так, сертификат мы выпустили для FQDN debian-pgadm4.interface31.lab, а обращаемся к серверу по IP-адресу 192.168.233.142. Вторая ошибка предупреждает о том, что сертификат выпущен центром сертификации (CA), который не является доверенным. Но так как мы знаем кто именно выпустил данный сертификат и что указанный IP-адрес совпадает с FQDN сертификата, то смело игнорируем эти ошибки.
Следующие пункты сообщают нам о том, что соединение использует протокол TLS 1.3, прямую секретность на базе 128-битной эллиптической кривой Curve25519 и шифрование AES128-GCM, также на странице нет незащищенных элементов. Это очень неплохой результат, соответствующий современным требованиям к безопасности.
После того, как мы убедились, что наш сервер нормально работает по защищенному протоколу, настроим автоматическую переадресацию с HTTP на HTTPS. Откроем файл /etc/apache2/sites-available/000-default.conf и в пределах секции VirtualHost внесем следующие строки:
RewriteEngine On
RewriteCond %{HTTPS} off
RewriteRule (.*) https://%{HTTP_HOST}%{REQUEST_URI}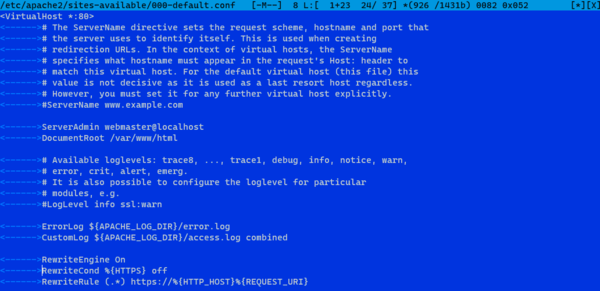 Подключим необходимые модули:
a2enmod rewriteИ перезапустим веб-сервер:
systemctl reload apache2После чего убедимся, что все запросы к нашему серверу автоматически перенаправляются на защищенную версию. Как видим, настроить pgAdmin 4 в режиме сервера достаточно несложно, получив удобный и безопасный инструмент для управления вашими базами данных.
Научиться настраивать MikroTik с нуля или систематизировать уже имеющиеся знания можно на углубленном курсе по администрированию MikroTik. Автор курса, сертифицированный тренер MikroTik Дмитрий Скоромнов, лично проверяет лабораторные работы и контролирует прогресс каждого своего студента. В три раза больше информации, чем в вендорской программе MTCNA, более 20 часов практики и доступ навсегда.
PostgreSQL, also known as Postgres, is a free and open-source relational database management system emphasizing extensibility and SQL compliance.
It supports a large part of the SQL standard and offers many modern features:
- complex queries
- foreign keys
- triggers
- updatable views
- transactional integrity
- multiversion concurrency control
Before you can use PostgreSQL database engine, you need to install it. Depending on your operating system and the distribution you are using PostgreSQL may be already installed. However, for windows users, you will need to install it manually.
Although the installation of PostgreSQL is quite easy, if configured incorrectly, it can cause major problems. In this tutorial, we are going to cover how to install, configure and secure PostgreSQL database.
Navigate to the official PostgreSQL page and download the installer provided by EDB. https://www.enterprisedb.com/downloads/postgres-postgresql-downloads

We recommend you download the stable version of PostgreSQL. Version 14.4 as of publishing.
Next, launch the installer to start the installation process.
Choose the Installation directory — Ensure you have read/write permissions to the target directory
In the next step, select the component you wish to install. WE recommend to unselect «pgAdmin 4» and «Stack Builder» — As we will install these tools later.

In the next step, select the data directory — Accept the default and proceed.
Now, we need to setup the password for the database superuser postgres. Do not skip the section to secure your database.

Choose the port which the server should listen on. Choose a port that is not being used by a different process.

Proceed accepting the defaults and finish the installation process.
Installing pgAdmin 4
PgAdmin is a free, open-source PostgreSQL database administration GUI for Microsoft Windows, Mac OS X, and Linux systems. It offers database server information retrieval, development, testing, and ongoing maintenance. This guide will help you install pgAdmin on Windows. It is assumed that you have already installed PostgreSQL on your computer.
Visit the pgAdmin download page to obtain the most recent version.

Save the installer to your computer and launch it. You’ll be greeted with the following screen; click «Next» to continue.

Read the license agreement and check the box below it to accept the terms. Click «Next» to continue.
Next, select the installation location. Leave it as default or select a custom location you have Read/Write permissions
Next, follow the installer prompts and finish the installation. You may require to restart the computer before you can use pgAdmin
Using pgAdmin
Before continuing, ensure that you PostgreSQL server is running an listening on the specified port in previous section.
Launch pgAdmin and you’ll be directed to the browser window and prompt you to provide the password to secure the pgAdmin interface.

Next, on the top-Left side. Select servers and click on PostgreSQL. This will prompt you to provide the password for the postgres user. Enter the password we set during the PostgreSQL installation.

Once connected to the PostgreSQL server, you will get to the dashboard with all the databases that the postgres user has access to.
Congratulations, you have successfully installed PostgreSQL server and the access it via pgAdmin4

Next steps
If you wish to learn more about PostgreSQL or SQL in general, search SQL on the website and explore more.
If you enjoy our content, please consider buying us a coffee to support our work:

Published by

A highly-skilled software engineer with a passion for teaching and sharing knowledge. From development to hardware, get articles with
high technical accuracy, clarity, and an engaging writing style.