How to generate a .pem CA certificate and client certificate from a PFX file using OpenSSL.
![]()
nyedidikeke
6,9978 gold badges44 silver badges60 bronze badges
asked Mar 14, 2013 at 15:37
![]()
Another perspective for doing it on Linux… here is how to do it so that the resulting single file contains the decrypted private key so that something like HAProxy can use it without prompting you for passphrase.
openssl pkcs12 -in file.pfx -out file.pem -nodes
Then you can configure HAProxy to use the file.pem file.
This is an EDIT from previous version where I had these multiple steps until I realized the -nodes option just simply bypasses the private key encryption. But I’m leaving it here as it may just help with teaching.
openssl pkcs12 -in file.pfx -out file.nokey.pem -nokeys
openssl pkcs12 -in file.pfx -out file.withkey.pem
openssl rsa -in file.withkey.pem -out file.key
cat file.nokey.pem file.key > file.combo.pem
- The 1st step prompts you for the password to open the PFX.
- The 2nd step prompts you for that plus also to make up a passphrase for the key.
- The 3rd step prompts you to enter the passphrase you just made up to store decrypted.
- The 4th puts it all together into 1 file.
Then you can configure HAProxy to use the file.combo.pem file.
The reason why you need 2 separate steps where you indicate a file with the key and another without the key, is because if you have a file which has both the encrypted and decrypted key, something like HAProxy still prompts you to type in the passphrase when it uses it.
answered May 23, 2013 at 21:33
![]()
user2415376user2415376
3,4702 gold badges16 silver badges13 bronze badges
8
You can use the OpenSSL Command line tool. The following commands should do the trick
openssl pkcs12 -in client_ssl.pfx -out client_ssl.pem -clcerts

openssl pkcs12 -in client_ssl.pfx -out root.pem -cacerts
If you want your file to be password protected etc, then there are additional options.
You can read the entire documentation here.
![]()
answered Mar 14, 2013 at 17:32
![]()
JayJay
24.2k25 gold badges93 silver badges141 bronze badges
2
Despite that the other answers are correct and thoroughly explained, I found some difficulties understanding them. Here is the method I used (Taken from here):
First case: To convert a PFX file to a PEM file that contains both the certificate and private key:
openssl pkcs12 -in filename.pfx -out cert.pem -nodes
Second case: To convert a PFX file to separate public and private key PEM files:
Extracts the private key form a PFX to a PEM file:
openssl pkcs12 -in filename.pfx -nocerts -out key.pem
Exports the certificate (includes the public key only):
openssl pkcs12 -in filename.pfx -clcerts -nokeys -out cert.pem
Removes the password (paraphrase) from the extracted private key (optional):
openssl rsa -in key.pem -out server.key
answered Nov 30, 2019 at 21:26
![]()
3
You can extract ca-bundle, .crt and .key from .pfx using this.
# Extracting ca-certs..."
  openssl pkcs12 -in ${filename}.pfx -nodes -nokeys -cacerts -out ${filename}-ca.crt

# Extracting key file..."
  openssl pkcs12 -in ${filename}.pfx -nocerts -out ${filename}.key

# Extracting crt..."
  openssl pkcs12 -in ${filename}.pfx -clcerts -nokeys -out ${filename}.crt

# combine ca-certs and cert files
  cat  ${filename}.crt ${filename}-ca.crt > ${filename}-full.crt

# Removing passphrase from keyfile"
  openssl rsa -in ${filename}.key -out ${filename}.key
Link: https://gist.github.com/mediaupstream/a2694859b1afa59f26be5e8f6fd4806a
answered Oct 29, 2022 at 16:22
![]()
For PFX that is locked with a password
It is recommended to combine the password argument, in one command, with the conversion, to avoid errors.
like this:
This command is for extracting the private key
openssl pkcs12 -in "blablabla.pfx" -out key.key -nodes -passin pass:blablabla
and this command for extracting the public key
openssl pkcs12 -in "blablabla.pfx" -clcerts -nokeys -out crt.crtpem -nodes -passin pass:blablabla
answered Feb 1 at 13:17
![]()
benben
811 silver badge4 bronze badges
I am converting PFX File to .Pem file using OpenSSL in Windows 10.
Some Applications never allow .pfx files to import directly. Running the Ubuntu Bash shell becomes much simpler in Windows 10
In Windows 10, you can have a Linux subsystem. It’s a great feature for sys admins for these sorts of tasks.
Start – Run – Appwiz.cpl – Turn Windows Features on or off.


Note: All Commands and Directory Names are Case Sensitive
List the Drives you can mount –
cd /mnt/
Press TAB to list the Drives. Mounting F Drive.
cd /mnt/f


Change Directories get inside c:\cert –
cd /mnt/f/cert/
List Directories –
ls

To Export the private key from the Pfx File and Make .PEM file –
openssl pkcs12 -in mycert.pfx -nocerts -out key.pem -nodes

To Export Certificate from the Pfx file to .PEM file –
openssl pkcs12 -in mycert.pfx -nokeys -out cert.pem

Remove the Passphrase from Key.Pem File (Optional) –
openssl rsa -in key.pem -out server.key

To Export to .crt
openssl pkcs12 -in mycert.pfx -clcerts -nokeys -out mycert.crt

Remove the Passphrase from Key.Pem File (Optional) –
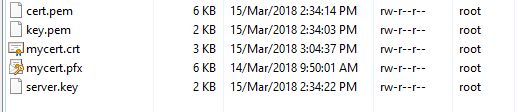
You can see below files –
Known issues –

Error outputting keys and certificates
805BA41FAD7F0000:error:0308010C:digital envelope routines:inner_evp_generic_fetch:unsupported:../crypto/evp/evp_fetch.c:349:Global default library context, Algorithm (RC2-40-CBC : 0), Properties ()
openssl pkcs12 -in mycert.pfx -nokeys -out cert.pem -legacy

Satheshwaran Manoharanhttps://www.azure365pro.com
Award-winning Technology Leader with a wealth of experience running large teams and diversified industry exposure in cloud computing. From shipping lines to rolling stocks.In-depth expertise in driving cloud adoption strategies and modernizing systems to cloud native. Specialized in Microsoft Cloud, DevOps, and Microsoft 365 Stack and conducted numerous successful projects worldwide. Also, Acting as a Technical Advisor for various start-ups.
A common task we have to perform in our iPhone and Android app development projects is moving certificates around mixed platform environments, namely from Windows to Linux, or from Windows to Amazon Web Services (AWS).
For example, you may have a certificate and private key installed on a Windows Server machine and used by IIS, but how do you export it so you can then use it within Apache or NGINX running on a Linux server?
Or what about importing the certificate so you can use it to secure a HTTPs endpoint on AWS Application Load Balancer?
In this post, I will show you very quickly how to export and transform a certificate used in Windows so that it can be used in non-Windows environments.
Pre-requisites
- A Windows Server machine with an installed certificate and private key pair. The private key must have been imported and marked as Exportable, otherwise this tutorial will not work.
- OpenSSL module installed for PowerShell.
Export Certificate from Windows
1.) Open up the local machine Certificate Manager (run “certmgr” from the Windows Search box)
2.) Find your installed certificate within one of your local certificate stores, right click on it, go to All Tasks -> Export.
3.) This launches the “Certificate Export Wizard”. Within this, click Next and make sure to check the “Yes, export the private key” option.
4.) For the Export File Format, make sure to check “Personal Information Exchange – PKCS #12” and accept the default checked values underneath it.
5.) Set a password that will be used to protect the exported PFX file, note this down for later.
6.) Choose a file location and name, and hit “Finish”.
At this point you now have a .PFX file exported that contains both the public and private keys for the certificate we are looking to convert.
Convert PFX File Format to PEM Format
1.) Open up a PowerShell Command window.
2.) The first step is to export the private key from the PFX file, to do that type:
openssl pkcs12 -in <filename>.pfx -nocerts -out key.pem
This will ask you to input the password you set on the PFX file in Step 5 of the previous section. You will also be prompted to provide a new password for the generated key.pem file, just pick any password for now, we are going to remove it at the end of the tutorial.
3.) Next, we will export the certificate from the pfx file itself and put it into its own .PEM file:
openssl pkcs12 -in <filename>.pfx -clcerts -nokeys -out cert.pem
4.) Finally, we will take the output of step 2 and remove the passphrase from it:
openssl rsa -in key.pem -out server.key
That’s it!
The cert.pem file contains the public key of your certificate. The server.key contains the private key associated with that certificate.
Copy PEM and KEY Files to Linux
1.) Copy the cert.pem and server.key files to your Linux instance.
2.) Ensure the right permissions are set on both files:
- Set the directory permission to 700.
- Set the file permission on both the .pem and .key files to 600.
- Ensure the directory and files themselves are owned by the root user.
3.) Modify Apache or NGINX configurations to reference the above copied files.
Import Certificates into Amazon Certificate Manager
If you are looking to use the certificate within AWS as a SSL certificate on an Application Load Balancer, then you will need to first import the certificates into Amazon Certificate Manager.
1.) Login into the Amazon Certificate Manager
2.) Click on Import Certificate
3.) In the box labelled “Certificate Body”, paste the contents of cert.pem file.
4.) In the box labelled “Certificate Private Key”, paste the contents of the server.key file.
5.) If there is an intermediate certificate authority used by your certificate then copy and paste the public key of any intermediate certificates into the Certificate Chain box.
6.) Modify your Application Load Balancer listener endpoints to use the certificate you imported in step 5.
Overview
In the world of SSL certificate management, it’s important to understand how to convert various certificate types like .pem, .cer, .jks, .pfx, .der, .p12, .crt and .p7b files. In this article, we’ll focus on the process of converting a .pfx file to .pem and key files on a Windows operating system. We’ll provide a step-by-step guide and offer helpful tips along the way.
What is a PFX file?
A PFX (Personal Information Exchange) file is a digital certificate that contains both the public and private keys. It’s used primarily for exporting and importing digital certificates and private keys on Windows operating systems. PFX files are commonly used for SSL/TLS certificates, which are essential for securing websites and online transactions.
Step-by-Step Guide
One key takeaway from this text is the importance of understanding how to convert various certificate types like .pem, .cer, .jks, .pfx, .der, .p12, .crt and .p7b files in SSL certificate management. Specifically, the article explains how to convert a .pfx file to .pem and key files on a Windows operating system using OpenSSL and offers helpful tips for creating and backing up certificates, as well as choosing a reputable SSL certificate provider.
Step 1: Install OpenSSL
The first step in converting a PFX file to PEM and key files is to install OpenSSL on your Windows operating system. OpenSSL is a powerful open-source toolkit that provides secure communication over networks using SSL/TLS encryption. You can download OpenSSL from the official website: https://www.openssl.org/.
Step 2: Open Command Prompt
Once OpenSSL is installed, open the Command Prompt by pressing Windows Key + R, typing “cmd” in the Run dialog box, and clicking OK.
Step 3: Navigate to OpenSSL Bin Directory
In the Command Prompt, navigate to the OpenSSL bin directory by typing “cd C:\OpenSSL-Win64\bin” if you installed OpenSSL in the default location.
Step 4: Convert PFX to PEM and Key Files
To convert the PFX file to PEM and key files, type the following command in the Command Prompt:
“`
Replace “filename.pfx” with the name of your PFX file and “filename.pem” with the name of the PEM file you want to create. The “-nodes” option tells OpenSSL not to encrypt the private key.
Step 5: Verify PEM and Key Files
To verify that the PEM and key files were created successfully, type the following commands in the Command Prompt:
Replace “filename.pem” and “filename.key” with the names of your PEM and key files. The “type” command displays the contents of a file in the Command Prompt.
Tips and Tricks
Use a strong password
When creating a PFX file, you’ll be prompted to enter a password to protect the private key. It’s important to use a strong password that is difficult to guess or brute-force. A strong password should be at least 12 characters long and include a mix of uppercase and lowercase letters, numbers, and special characters.
Back up your PEM and key files
Once you’ve converted your PFX file to PEM and key files, it’s important to back up these files in a secure location. This will ensure that you have a copy of your certificate in case of a hardware failure or other disaster.
Use a reputable SSL certificate provider
When purchasing an SSL certificate, it’s important to choose a reputable provider that offers high-quality certificates and excellent customer support. A good SSL certificate provider will help you choose the right certificate for your needs and provide guidance on certificate installation and management.
What is a PFX file format?
PFX stands for Personal Information Exchange. It is a file format that is used to store private keys, public keys, and the associated certificate. The PFX file usually has a .pfx or .p12 extension and is password-protected. PFX files are used in many situations where secure communications are required, such as for SSL/TLS encryption.
What is a PEM file format?
PEM stands for Privacy Enhanced Mail. It is a file format that is commonly used to store certificates, private keys, and other cryptographic information. The PEM file usually has a .pem extension and is base64-encoded. PEM files are used in many situations where secure communications are required, such as for SSL/TLS encryption.
How do I convert a PFX file to a PEM file and key?
To convert a PFX file to a PEM file and key, you can use OpenSSL for Windows. First, open a command prompt and navigate to the directory where OpenSSL for Windows is installed. Then, run the following command:
openssl pkcs12 -in filename.pfx -nocerts -out key.pem
This command will extract the private key into a PEM formatted file called key.pem. Next, run the following command to extract the certificate:
openssl pkcs12 -in filename.pfx -clcerts -nokeys -out cert.pem
This command will extract the certificate into a PEM formatted file called cert.pem. Finally, you can combine the certificate and private key into a single PEM file using the following command:
cat cert.pem key.pem > combined.pem
Do I need a password to convert a PFX file to a PEM file and key?
Yes, you will need the password that was used to protect the PFX file. When you run the OpenSSL commands to convert the PFX file to a PEM file and key, you will be prompted to enter the password. If you do not know the password, you will not be able to convert the PFX file.
Can I convert a PEM file back to a PFX file?
Yes, you can convert a PEM file back to a PFX file using OpenSSL for Windows. First, open a command prompt and navigate to the directory where OpenSSL for Windows is installed. Then, run the following command:
openssl pkcs12 -export -in cert.pem -inkey key.pem -out filename.pfx
This command will create a PFX file called filename.pfx, which contains the certificate and private key from the PEM files. You will be prompted to enter passwords to protect the private key and the PFX file.
How to Split a .pfx File into .pem and .key Files Using OpenSSL for Windows 10 or Linux
Use the instructions in this guide to use OpenSSL to split a .pfx file into .pem and .key files.
Requirements:
- A .pfx file
- OpenSSL for Windows 10 or Linux
Note: OpenSSL will use the current path in the command prompt – remember to navigate the command prompt to the correct path before running OpenSSL.
Remember to change the details of the commands to fit your filenames and setup.
- The following command will generate a private key file without a password from your .pfx file (requires password):
pkcs12 -in certificate.pfx -out privateKey.key -nocerts -nodes
-
The following command will generate a .pem certificate file from your .pfx file which will include any intermediate and root certificates that may be included in the .pfx file. (requires password):
pkcs12 -in certificate.pfx -out certificate.pem -nokeys -clcerts
The .key and .pem files will be available at the path used in the command prompt.
Get in touch with us for a non-binding quote
We will contact you as soon as possible.
Go for the TRUSTZONE
TRUSTOZONE was founded in 2004 and has since come a long way being the
leading SSL/TLS certificate provider in Scandinavia. We also lead the way in
supplying the scalable PKI and IoT solutions for encryption, authentication,
and automated certificate lifecycle management.
The solutions we offer meet the requirements of various types of companies
and organizations. What your business is certain to gain is a complete palette
of compatibility-optimized, fully scalable certificate products and solutions.
Certificate Lifetime gets shortened as new challenges emerge and that is where
our SL360 platform can assist with SSL monitoring and SSL certificates renewal.
Our options fit all company sizes — from singlehandedly run operations and
startups needing one or two SSL/TLS certificates to market’s giants looking for
full-scale, enterprise-grade solutions.
According to recent numbers, digital certificates are harvested and hacked
every ten minutes or less on average. That is the only reason you need to decide
to monitor your SSL certificates.
Over 16 years of experience with PKI, SSL/TLS, and certificate management in
our line of work truly stands for something. More than 3,000 companies and more
than 80% of the Danish banking sector is protected by TRUSTZONE certificates.Get in touch with us for a non-binding quote
We will contact you as soon as possible.
Follow us on LinkedIn to get the latest updates, news and insights.