Microsoft Windows XP Professional Microsoft Windows XP Home Edition Windows Server 2008 Datacenter without Hyper-V Windows Server 2008 Enterprise without Hyper-V Windows Server 2008 for Itanium-Based Systems Windows Server 2008 R2 Datacenter Windows Server 2008 R2 Enterprise Windows Server 2008 R2 Standard Windows Server 2008 Service Pack 2 Windows Server 2008 Standard without Hyper-V Windows Server 2008 Datacenter Windows Server 2008 Enterprise Windows Server 2008 Standard Windows Vista Enterprise 64-bit Edition Windows Vista Home Basic 64-bit Edition Windows Vista Home Premium 64-bit Edition Windows Vista Ultimate 64-bit Edition Windows Vista Business Windows Vista Enterprise Windows Vista Home Basic Windows Vista Starter Windows Vista Ultimate Windows 7 Enterprise Windows 7 Home Premium Windows 7 Professional Windows 7 Ultimate Windows 7 Home Basic Windows 8 Enterprise Windows 8 Pro Windows 8 Windows 8.1 Enterprise Windows 8.1 Pro Windows 8.1 More…Less
You can try to reset TCP/IP if you have Internet connection issues. This article describes two ways to reset TCP/IP. To have us reset TCP/IP for you, go to the «Here’s an easy fix» section. If you prefer to reset TCP/IP manually, go to the «Let me fix it myself» section.
Reset TCP/IP automatically
To reset TCP/IP automatically, click the Download button. In the File Download dialog box, click Run or Open, and then follow the steps in the easy fix wizard.
Windows 8.1, Windows 8, Windows RT, Windows 7, Windows Server 2012 R2, Windows Server 2012, Windows Server 2008 R2
Windows Vista, Windows XP, Windows Server 2008 or Windows Server 2003
Notes:
-
This wizard may be in English only. However, the automatic fix also works for other language versions of Windows.
-
If you’re not on the computer that has the problem, save the easy fix solution to a flash drive or a CD, and then run it on the computer that has the problem.
Manually reset TCP/IP
To manually reset TCP/IP, follow these steps:
-
On the Start screen, type CMD. In the search results, right-click Command Prompt, and then select Run as administrator.
-
At the command prompt, enter the following command, and then press Enter:
netsh int ip reset c:\resetlog.txt
Note If you don’t want to specify a directory path for the log file, run the following command instead:netsh int ip reset
-
Restart the computer.
-
To open a command prompt, select Start and then type cmd in the Search programs and files box.
-
Under Programs, right-click the CMD.exe icon, and then select Run as administrator.
-
When the User Account Control box appears, select Yes.
-
At the command prompt, enter the following command, and then press Enter:
netsh int ip reset c:\resetlog.txt
Note If you don’t want to specify a directory path for the log file, run the following command instead:netsh int ip reset resetlog.txt
-
Restart the computer.
-
To open a command prompt, select Start > Run. In the Open box, enter the following command, and then press Enter:
netsh int ip reset c:\resetlog.txt
Note If you don’t want to specify a directory path for the log file, run the following command instead:netsh int ip reset resetlog.txt
-
Restart the computer.
When you run the reset command, it overwrites the following registry keys, both of which are used by TCP/IP:
SYSTEM\CurrentControlSet\Services\Tcpip\Parameters
SYSTEM\CurrentControlSet\Services\DHCP\Parameters
This has the same effect as removing and reinstalling TCP/IP. To run the manual command successfully, you must specify a name for the log file in which the netsh actions will be recorded. (This log file is referred to as «resetlog.txt» in the manual procedures earlier in this section.)
Note You must be logged on to the computer as an administrator to perform the steps.
More Information
Did this fix the problem? Check whether the problem is fixed. If it is, you are finished with this article. If the problem is not fixed, you can contact Support.
The following is a sample of the log file that is generated by netsh when an IP reset command is issued. The actual log file might vary, depending on the configuration of the computer. When the TCP/IP registry keys have not been altered from their original configuration, there might be no actions logged in the file. reset SYSTEM\CurrentControlSet\Services\Dhcp\Parameters\Options\15\RegLocation
old REG_MULTI_SZ =
SYSTEM\CurrentControlSet\Services\Tcpip\Parameters\Interfaces\?\DhcpDomain
SYSTEM\CurrentControlSet\Services\TcpIp\Parameters\DhcpDomain
added SYSTEM\CurrentControlSet\Services\Netbt\Parameters\Interfaces\Tcpip_{2DDD011E-B1B6-4886-87AC-B4E72693D10C}\NetbiosOptions
added SYSTEM\CurrentControlSet\Services\Netbt\Parameters\Interfaces\Tcpip_{BAA9D128-54BB-43F6-8922-313D537BE03E}\NetbiosOptions
reset SYSTEM\CurrentControlSet\Services\Netbt\Parameters\Interfaces\Tcpip_{BD2859BA-B26A-4E2B-A3FE-3D246F90A81A}\NameServerList
old REG_MULTI_SZ =
10.1.1.2
deleted SYSTEM\CurrentControlSet\Services\Netbt\Parameters\EnableLmhosts
added SYSTEM\CurrentControlSet\Services\Tcpip\Parameters\Interfaces\{2DDD011E-B1B6-4886-87AC-B4E72693D10C}\AddressType
added SYSTEM\CurrentControlSet\Services\Tcpip\Parameters\Interfaces\{2DDD011E-B1B6-4886-87AC-B4E72693D10C}\DefaultGatewayMetric
added SYSTEM\CurrentControlSet\Services\Tcpip\Parameters\Interfaces\{2DDD011E-B1B6-4886-87AC-B4E72693D10C}\DisableDynamicUpdate
deleted SYSTEM\CurrentControlSet\Services\Tcpip\Parameters\Interfaces\{2DDD011E-B1B6-4886-87AC-B4E72693D10C}\DontAddDefaultGateway
reset SYSTEM\CurrentControlSet\Services\Tcpip\Parameters\Interfaces\{2DDD011E-B1B6-4886-87AC-B4E72693D10C}\EnableDhcp
old REG_DWORD = 0
added SYSTEM\CurrentControlSet\Services\Tcpip\Parameters\Interfaces\{2DDD011E-B1B6-4886-87AC-B4E72693D10C}\NameServer
added SYSTEM\CurrentControlSet\Services\Tcpip\Parameters\Interfaces\{2DDD011E-B1B6-4886-87AC-B4E72693D10C}\RawIpAllowedProtocols
added SYSTEM\CurrentControlSet\Services\Tcpip\Parameters\Interfaces\{2DDD011E-B1B6-4886-87AC-B4E72693D10C}\TcpAllowedPorts
added SYSTEM\CurrentControlSet\Services\Tcpip\Parameters\Interfaces\{2DDD011E-B1B6-4886-87AC-B4E72693D10C}\UdpAllowedPorts
added SYSTEM\CurrentControlSet\Services\Tcpip\Parameters\Interfaces\{5B3675C3-6EB9-4936-B991-04DA31024C4E}\DisableDynamicUpdate
reset SYSTEM\CurrentControlSet\Services\Tcpip\Parameters\Interfaces\{5B3675C3-6EB9-4936-B991-04DA31024C4E}\EnableDhcp
old REG_DWORD = 0
reset SYSTEM\CurrentControlSet\Services\Tcpip\Parameters\Interfaces\{5B3675C3-6EB9-4936-B991-04DA31024C4E}\IpAddress
old REG_MULTI_SZ =
12.12.12.12
deleted SYSTEM\CurrentControlSet\Services\Tcpip\Parameters\Interfaces\{5B3675C3-6EB9-4936-B991-04DA31024C4E}\IpAutoconfigurationAddress
deleted SYSTEM\CurrentControlSet\Services\Tcpip\Parameters\Interfaces\{5B3675C3-6EB9-4936-B991-04DA31024C4E}\IpAutoconfigurationMask
deleted SYSTEM\CurrentControlSet\Services\Tcpip\Parameters\Interfaces\{5B3675C3-6EB9-4936-B991-04DA31024C4E}\IpAutoconfigurationSeed
reset SYSTEM\CurrentControlSet\Services\Tcpip\Parameters\Interfaces\{5B3675C3-6EB9-4936-B991-04DA31024C4E}\RawIpAllowedProtocols
old REG_MULTI_SZ =
0
reset SYSTEM\CurrentControlSet\Services\Tcpip\Parameters\Interfaces\{5B3675C3-6EB9-4936-B991-04DA31024C4E}\SubnetMask
old REG_MULTI_SZ =
255.255.255.0
reset SYSTEM\CurrentControlSet\Services\Tcpip\Parameters\Interfaces\{5B3675C3-6EB9-4936-B991-04DA31024C4E}\TcpAllowedPorts
old REG_MULTI_SZ =
0
reset SYSTEM\CurrentControlSet\Services\Tcpip\Parameters\Interfaces\{5B3675C3-6EB9-4936-B991-04DA31024C4E}\UdpAllowedPorts
old REG_MULTI_SZ =
0
added SYSTEM\CurrentControlSet\Services\Tcpip\Parameters\Interfaces\{BAA9D128-54BB-43F6-8922-313D537BE03E}\AddressType
added SYSTEM\CurrentControlSet\Services\Tcpip\Parameters\Interfaces\{BAA9D128-54BB-43F6-8922-313D537BE03E}\DefaultGatewayMetric
added SYSTEM\CurrentControlSet\Services\Tcpip\Parameters\Interfaces\{BAA9D128-54BB-43F6-8922-313D537BE03E}\DisableDynamicUpdate
deleted SYSTEM\CurrentControlSet\Services\Tcpip\Parameters\Interfaces\{BAA9D128-54BB-43F6-8922-313D537BE03E}\DontAddDefaultGateway
reset SYSTEM\CurrentControlSet\Services\Tcpip\Parameters\Interfaces\{BAA9D128-54BB-43F6-8922-313D537BE03E}\EnableDhcp
old REG_DWORD = 0
added SYSTEM\CurrentControlSet\Services\Tcpip\Parameters\Interfaces\{BAA9D128-54BB-43F6-8922-313D537BE03E}\NameServer
added SYSTEM\CurrentControlSet\Services\Tcpip\Parameters\Interfaces\{BAA9D128-54BB-43F6-8922-313D537BE03E}\RawIpAllowedProtocols
added SYSTEM\CurrentControlSet\Services\Tcpip\Parameters\Interfaces\{BAA9D128-54BB-43F6-8922-313D537BE03E}\TcpAllowedPorts
added SYSTEM\CurrentControlSet\Services\Tcpip\Parameters\Interfaces\{BAA9D128-54BB-43F6-8922-313D537BE03E}\UdpAllowedPorts
reset SYSTEM\CurrentControlSet\Services\Tcpip\Parameters\Interfaces\{BD2859BA-B26A-4E2B-A3FE-3D246F90A81A}\DefaultGateway
old REG_MULTI_SZ =
10.1.1.2
reset SYSTEM\CurrentControlSet\Services\Tcpip\Parameters\Interfaces\{BD2859BA-B26A-4E2B-A3FE-3D246F90A81A}\DefaultGatewayMetric
old REG_MULTI_SZ =
0
added SYSTEM\CurrentControlSet\Services\Tcpip\Parameters\Interfaces\{BD2859BA-B26A-4E2B-A3FE-3D246F90A81A}\DisableDynamicUpdate
reset SYSTEM\CurrentControlSet\Services\Tcpip\Parameters\Interfaces\{BD2859BA-B26A-4E2B-A3FE-3D246F90A81A}\EnableDhcp
old REG_DWORD = 0
reset SYSTEM\CurrentControlSet\Services\Tcpip\Parameters\Interfaces\{BD2859BA-B26A-4E2B-A3FE-3D246F90A81A}\IpAddress
old REG_MULTI_SZ =
10.1.1.1
deleted SYSTEM\CurrentControlSet\Services\Tcpip\Parameters\Interfaces\{BD2859BA-B26A-4E2B-A3FE-3D246F90A81A}\IpAutoconfigurationAddress
deleted SYSTEM\CurrentControlSet\Services\Tcpip\Parameters\Interfaces\{BD2859BA-B26A-4E2B-A3FE-3D246F90A81A}\IpAutoconfigurationMask
deleted SYSTEM\CurrentControlSet\Services\Tcpip\Parameters\Interfaces\{BD2859BA-B26A-4E2B-A3FE-3D246F90A81A}\IpAutoconfigurationSeed
reset SYSTEM\CurrentControlSet\Services\Tcpip\Parameters\Interfaces\{BD2859BA-B26A-4E2B-A3FE-3D246F90A81A}\NameServer
old REG_SZ = 10.1.1.2,10.1.1.3
reset SYSTEM\CurrentControlSet\Services\Tcpip\Parameters\Interfaces\{BD2859BA-B26A-4E2B-A3FE-3D246F90A81A}\RawIpAllowedProtocols
old REG_MULTI_SZ =
0
reset SYSTEM\CurrentControlSet\Services\Tcpip\Parameters\Interfaces\{BD2859BA-B26A-4E2B-A3FE-3D246F90A81A}\SubnetMask
old REG_MULTI_SZ =
255.255.255.0
reset SYSTEM\CurrentControlSet\Services\Tcpip\Parameters\Interfaces\{BD2859BA-B26A-4E2B-A3FE-3D246F90A81A}\TcpAllowedPorts
old REG_MULTI_SZ =
0
reset SYSTEM\CurrentControlSet\Services\Tcpip\Parameters\Interfaces\{BD2859BA-B26A-4E2B-A3FE-3D246F90A81A}\UdpAllowedPorts
old REG_MULTI_SZ =
0
deleted SYSTEM\CurrentControlSet\Services\Tcpip\Parameters\DontAddDefaultGatewayDefault
deleted SYSTEM\CurrentControlSet\Services\Tcpip\Parameters\EnableIcmpRedirect
deleted SYSTEM\CurrentControlSet\Services\Tcpip\Parameters\EnableSecurityFilters
deleted SYSTEM\CurrentControlSet\Services\Tcpip\Parameters\SearchList
deleted SYSTEM\CurrentControlSet\Services\Tcpip\Parameters\UseDomainNameDevolution
<completed> Note In Windows Server 2003 Service Pack 1, you can use the netsh winsock reset command to repair Winsock.
For more information, click the following article numbers to view the articles in the Microsoft Knowledge Base:
314067 How to troubleshoot TCP/IP connectivity with Windows XP
811259 How to determine and recover from Winsock2 corruption in Windows Server 2003, in Windows XP, and in Windows Vista
314053 TCP/IP and NBT configuration parameters for Windows XP
Need more help?
Want more options?
Explore subscription benefits, browse training courses, learn how to secure your device, and more.
Communities help you ask and answer questions, give feedback, and hear from experts with rich knowledge.
1. Автоматическое восстановления с помощью avastfix
2. Ручное копирования файла/файлов
3. Проверка nettcpip.inf
4. Переустановка стека используя Microsoft Fix it 50199
5. TCPIP.Sys RestoreTool
6. Сброс настроек TCP/IP
7. Ручная переустановка стека
Что делать если не работают сетевые протоколы? При попытки пропинговать сервер / ip-адресс вы получаете ошибку «Не удается обратиться к драйверу IP. Код ошибки 2»? Тогда у вас что-то со стеком TCP/IP, разберём подробнее.
Начну с лёгкого и простого, заканчивая более сложными решениями проблемы.
Возможно у вас на компьютере стоит Аваст и проблемы начались после обновления антивирусных баз, 6 декабря 2012 года аваст добавил в свои базы файл C:\Windows\system32\drivers\TCPIP.sys, вскоре после обновления баз аваст нашёл этот файл в системных файлах и удалил (возможно поместил в карантин).
Не беда, ниже я напишу как восстановить работоспособность стека TCP/IP, после чего сеть должна заработать (если она конечно раньше работала):
1. Самый простой способ — воспользоваться avastfix.zip зеркало:
- для начала нужно скачать avastfix (ссылки строчкой выше)
- распаковать, допустим на диск C:\ (в архиве есть папка, так что после извлечения будет путь такой C:\avastfix\)
- если у вас стоит аваст, то отключите его: в правом нижнем углу найдите значок аваста (возле часов), нажмите на него правой кнопкой мышки и выберите управление экранами avast, далее нужно указать отключение навсегда
- запустите fixtcpip.bat, после чего компьютер перезагрузится
- после перезагрузки проверяем работу сети например пингом на сервер гугла: на клавиатуре нажмите одновременно на флажок (логотип windows), между Ctrl и Alt, и букву R, то есть Win+R. В появившемся окне напишите cmd, у вас открылась командная строка, в ней напишите ping 8.8.8.8, должно появиться
Обмен пакетами с 8.8.8.8 по 32 байт:
Ответ от 8.8.8.8: число байт=32 время=55мс TTL=48
или что-то похожее, но не ошибка драйвера сети
- надеюсь сеть/интернет у вас заработал, теперь нужно обновить базы аваста, если нет возможности обновить, то можно в настройках аваста исключить из проверки этот файл:
C:\Windows\system32\drivers\TCPIP.sys (у вас может быть установлен windows на другой раздел, например D:) - теперь можно включить антивирус, там же где вы его отключали, только теперь включить все экраны
Давайте теперь рассмотрим что в этом «чудо» архиве:
fixtcpip.bat — некий скрипт, который импортирует в реестр стандартные настройки стека, распаковывает архив tcpip.rar при помощи UnRAR.exe в C:\Windows\system32\drivers\ и перезагружает компьютер
2. Рассмотрим теперь ручное восстановление/копирование файла
- для начала всё же отключим аваст (см. выше 3-ий пункт » если у вас стоит …»)
- файл tcpip.sys можно скопировать из папки C:\Windows\system32\dllcache, но возможно аваст его то же удалил, тогда можно взять загрузочный CD/DVD/USB диск и там найти этот файл в …\I386\TCPIP.SY_ . Так же файл можно взять с рабочей системы. Но если взять этот файл вам не откуда, тогда вот ссылка для SP3 (если у вас SP2, то можете попросить) tcpip.sys
- перезагрузите компьютер
- проверьте работоспособность сети/интернета, если работает, тогда обновите аваст и запустите аваст (см. последний пункт 1-го способа)
3. Если не помогли предыдущие способы, то скорее всего виноват не аваст. Проверьте, существует ли файл C:\windows\inf\nettcpip.inf, если существует, тогда приступайте к следующему способу. Если файла нет, тогда его нужно скопировать с рабочей системы, нет рабочей системы? Не беда, скачайте отсюда nettcpip.inf
4. Переустановка стека TCP/IP используя Microsoft Fix it 50199 зеркало
5. Можно попробовать утилиту TCPIP.Sys RestoreTool от фирмы UnHackMe, этой утилитой я не пользовался, но по описанию она должна переустанавливать стек TCP/IP в операционных системах: Windows 2000/XP/Vista/Seven/8 32 и 64-бит
6. Сброс настроек стека TCP/IP вручную. На сайте Microsoft в статье kb299357 написано, что для переустановки достаточно выполнить выполнить всего одну команду в командной строке:
- запустите cmd
- выполните netsh int ip reset resetlog.txt
- перезагрузите компьютер
7. А теперь самое сложное переустановка стека TCP/IP в windows XP вручную.
- Загрузите windows в Безопасный режим, то есть включаете компьютер и многократно нажимайте на F8 пока не появится меню загрузки windows, выберите Безопасный режим
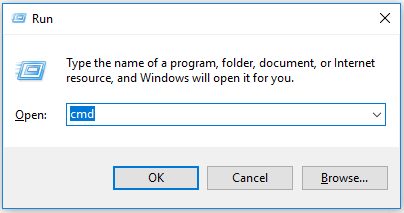
- Зайдите в реестр (Пуск — Выполнить — regedit — OK или Win+R)
- Удалите два ключа и выйдите из реестра:
HKEY_LOCAL_MACHINE/System/CurrentControlSet/Services/Winsock
HKEY_LOCAL_MACHINE/System/CurrentControlSet/Services/WinSock2 - Далее нужно зайти в папку %windir%\inf (обычно C:\Windows\inf), в которой необходимо найти файл Nettcpip.inf и отредактировать его (можно обычным блокнотом), изменить нужно в разделе [MS_TCPIP.PrimaryInstall] ключ Characteristics = 0xa0 на Characteristics = 0x80. Сохраните и закройте редактор
- Зайдите в Сетевые подключения, далее в свойства и выберете сетевое подключение (любое, так как протокол один на всю операционную систему) . Нажмите Установить — Протокол — Установить с диска — вставьте C:\windows\inf (меняю букву диска на свою) — ОК — выберете Протокол Интернета (TCP/IP) — ОК
- Вы должны были остаться в свойствах подключений на вкладке Общие (без дополнительных окон), теперь можно удалить Протокол Интернета (TCP/IP), нажатием на кнопку Удалить
- Перезагрузите компьютер
- Выполните второй способ (если файл существует, то заменить), а именно скопировать tcpip.sys в %windir%\system32\dllcache и %windir%\system32.
- Теперь нужно установить протокол, как было написано чуть выше (5 пункт)
- Должно заработать сразу, если не работает, то перезагрузите компьютер
- Надеюсь у вас всё заработало, с чем вас Поздравляю!
WinITPro.ru / Windows 7 / Сброс настроек протокола TCP/IP в Windows 7/Windows 2008
 14.09.2011

Достаточно часто в случае поражения вашего компьютера вирусами или другими системными сбоями, могут наблюдаться непонятные проблемы с сетевыми приложениями, начиная с того, что могут просто не отображаться Web-станицы и заканчивая невозможностью подключиться к сети. Поэтому в таких случаях бывает целесообразно выполнить полный сброс параметров протокола TCP/IP в Windows 7 или Windows 2008, в результате можно вернуть все сетевые настройки и состояние библиотеки WinSock в первоначальные «чистые» настройки, т.е. фактически это переустановка TCP/IP. Сбросить настройки TCP/IP можно следующим образом:
- Запустите командную строку cmd с правами администратора («Run As Administrator»)
- Затем последовательно выполните следующие команды.
ipconfig /flushdns

nbtstat -R

nbtstat -RR

netsh int reset all

netsh int ip reset

netsh winsock reset

- Затем выполните следующую команду, отключающую TCP автотюнинг
netsh interface tcp set global autotuninglevel=disabled
- Перезагрузите компьютер
You can use commands via PowerShell or CMD to reset TCP/IP
by Henderson Jayden Harper
Passionate about technology, Crypto, software, Windows, and everything computer-related, he spends most of his time developing new skills and learning more about the tech world. He also enjoys… read more
Updated on
- TCP/IP (Transmission Control Protocol/Internet Protocol) on Windows 11 deals with the interconnecting process between network devices on the internet.
- Resetting the TCP/IP Stack rewrites the registry and resets your computer’s Internet Protocol to default.
- You may reset the TCP/IP Stack on Windows 11 via the Command Prompt and PowerShell.
Many protocols and services are responsible for the communication between your computer and other destinations or devices on the internet. The TCP/IP (Transmission Control Protocol/Internet Protocol) is one of the essential elements.
However, it can get corrupted or encounter other network issues, causing you to reset TCP/IP Stack on Windows 11.
What does Reset TCP/IP Stack mean?
TCP/IP (Transmission Control Protocol/Internet Protocol) is a suite of communication protocols that controls how digital information is broken into packets. It is responsible for interconnecting network devices on the internet.
Also, it ensures packets are properly routed between your computer and its destinations. Furthermore, the Stack lodges these TCP/IP protocols.
How we test, review and rate?
We have worked for the past 6 months on building a new review system on how we produce content. Using it, we have subsequently redone most of our articles to provide actual hands-on expertise on the guides we made.
For more details you can read how we test, review, and rate at WindowsReport.
The TCP/IP Stack processes data through layers and defines the interconnection between the Internet & other networks functions.
Sometimes, you may run into problems with the network connection on your PC if your packet size is larger than required. A quick change in your MTU size or resetting TCP/IP Stack will refactor the network configuration on your PC.
Also, it resets your computer’s Internet Protocol to default and fixes network issues on Windows 11.
How can I reset TCP/IP Stack on Windows 11?
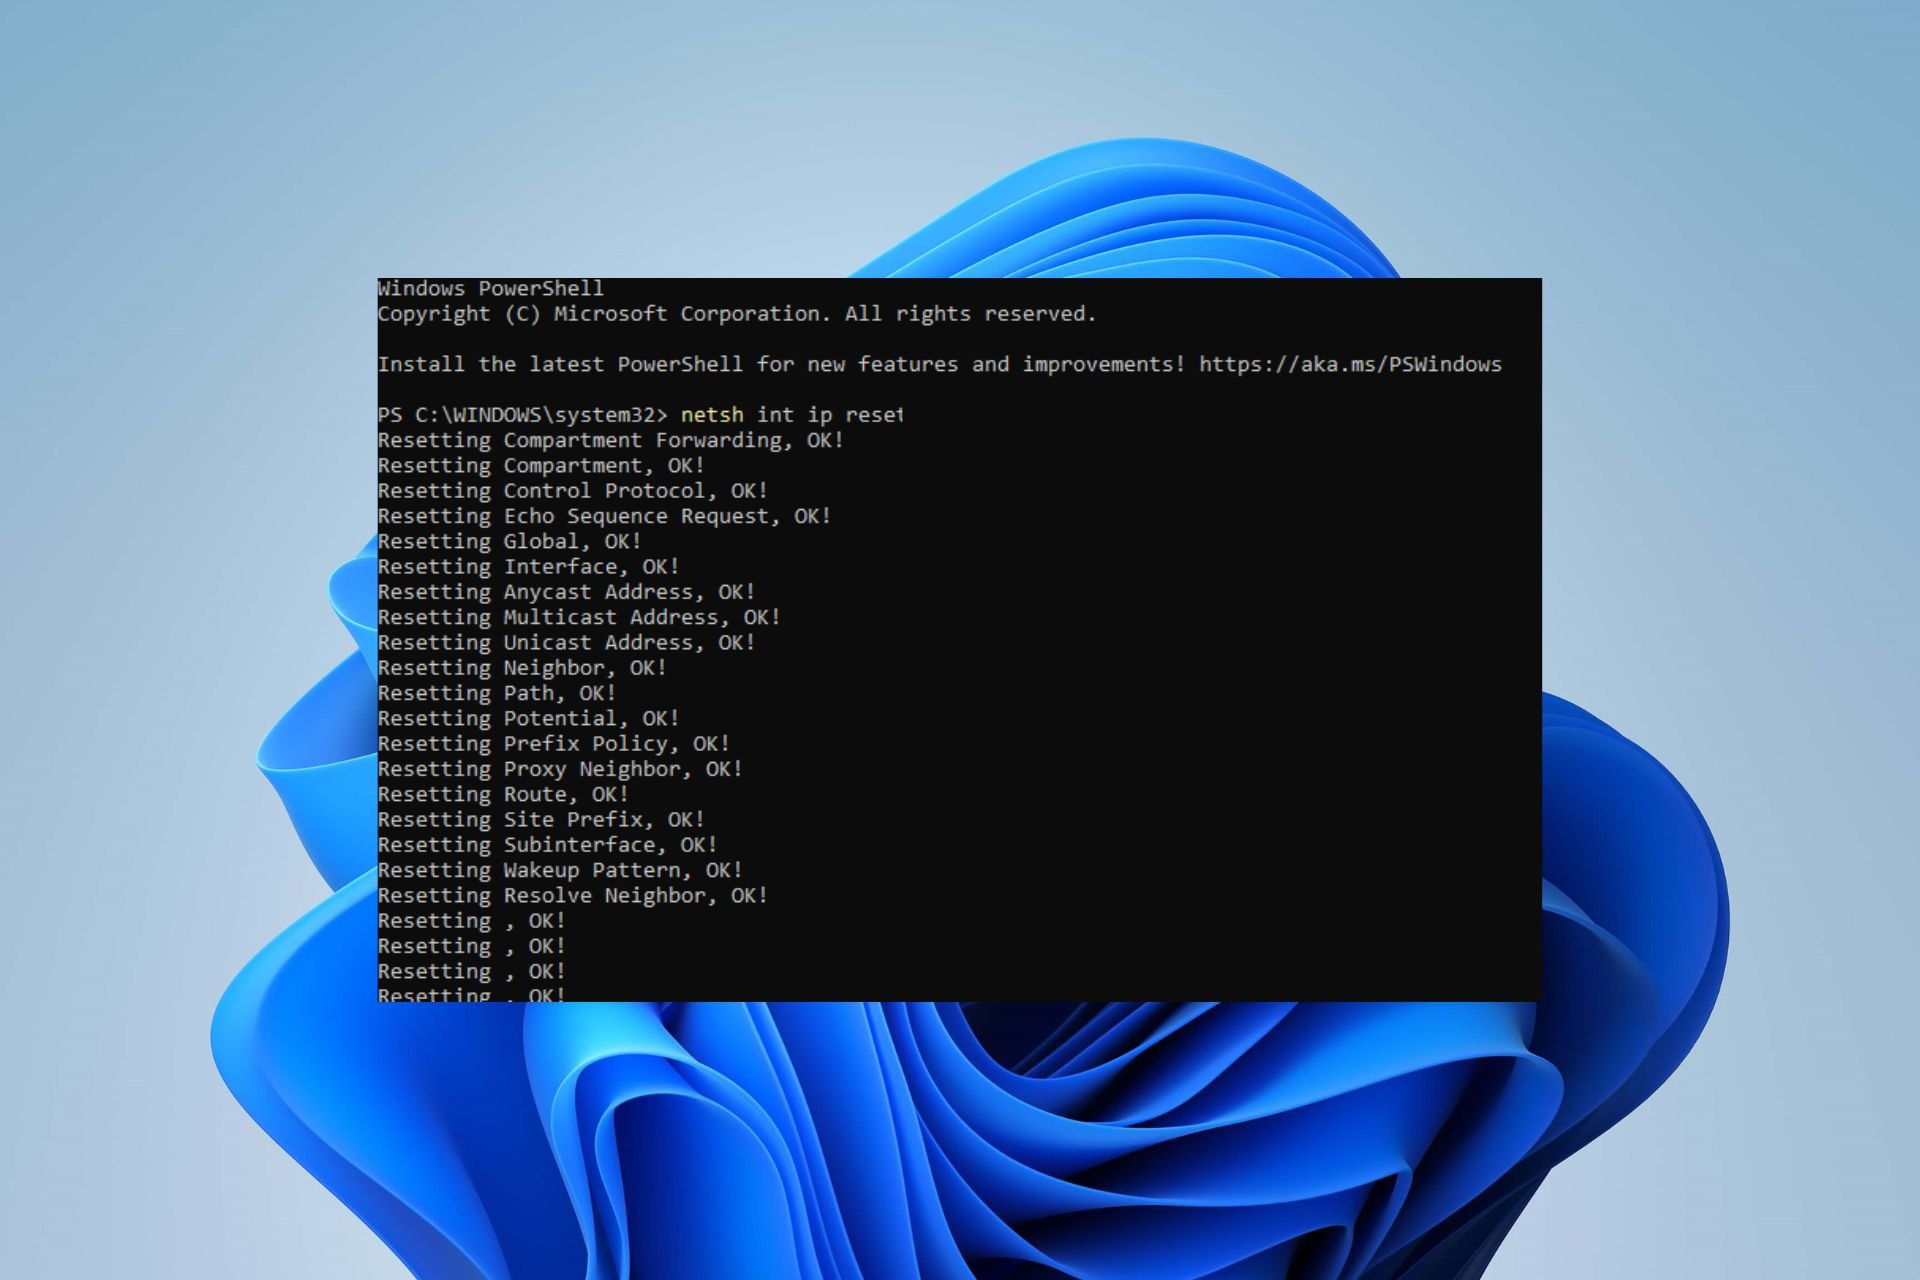
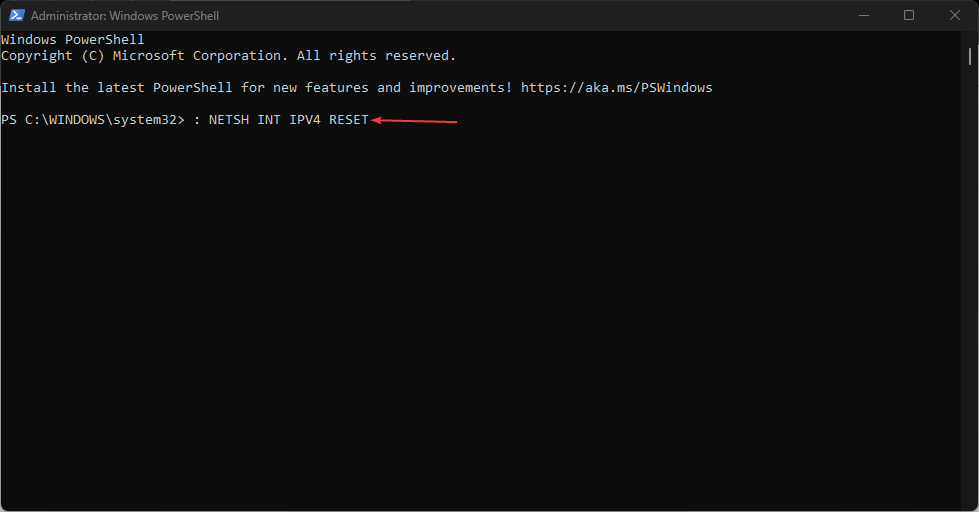
1. Use Windows PowerShell
- Left-click the Start button, type powershell, and click Run as administrator.
- Click Yes on the User Account Control prompt.
- Then, copy and paste the following lines and press Enter:
netsh int ip reset
- If you’re using IPv4, type the following command and press the Enter key:
NETSH INT IPV4 RESET - For IPv6 users, type this command and press the Enter key:
NETSH INT IPV6 RESET - If the command executes successfully, you should see a repeated result on your screen saying Resetting, OK!
- Then, restart your computer to sync the reset process with your network settings.
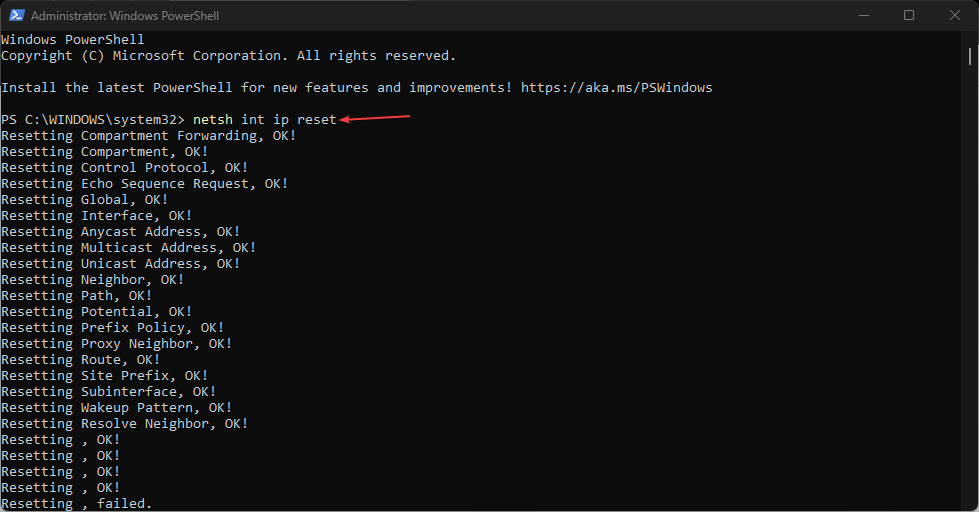
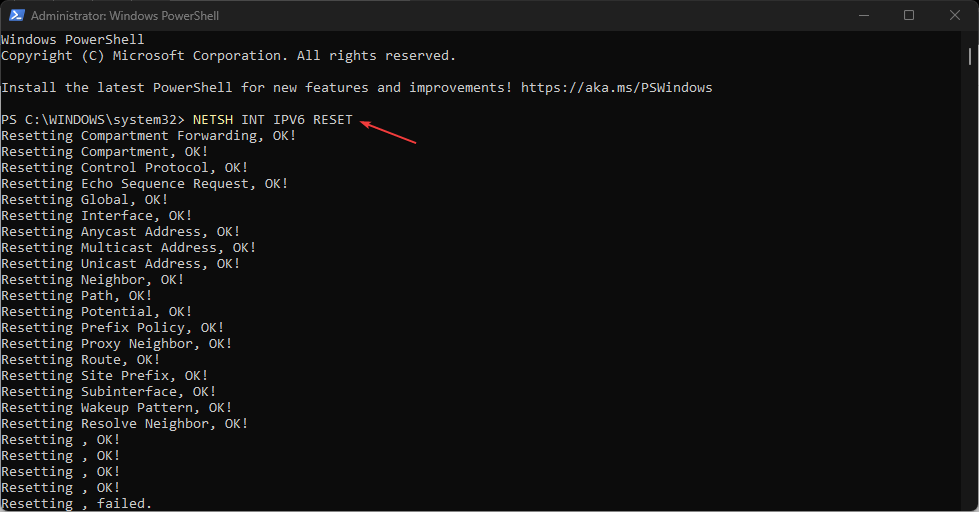
The above steps will reset the TCP/IP Stacks on your PC.
- Fix: Stuck at CHKDSK is Verifying USN Journal
- Windows Terminal Canary is now available to users everywhere
- Users are now able to quickly refresh Windows Copilot convos
- The Windows 11’s weather widget now offers a detailed weather forecast
2. Reset the TCP/IP Stack via Command Prompt
- Left-click the Start button, type command prompt, and click the Run as administrator option.
- Click Yes on the User Account Control prompt.
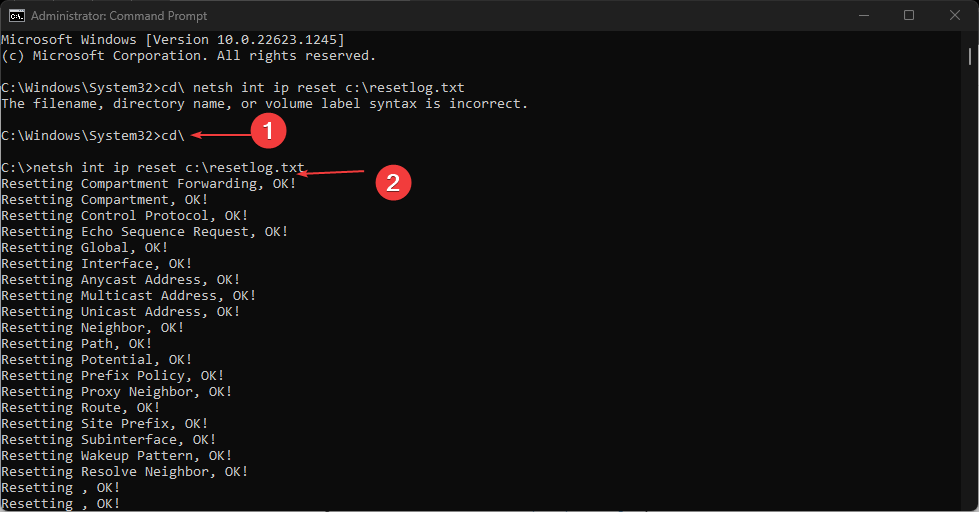
- Then, type the following commands and press Enter:
cd\netsh int ip reset c:\resetlog.txt - If you’re using IPv4, type the following command and press the Enter key:
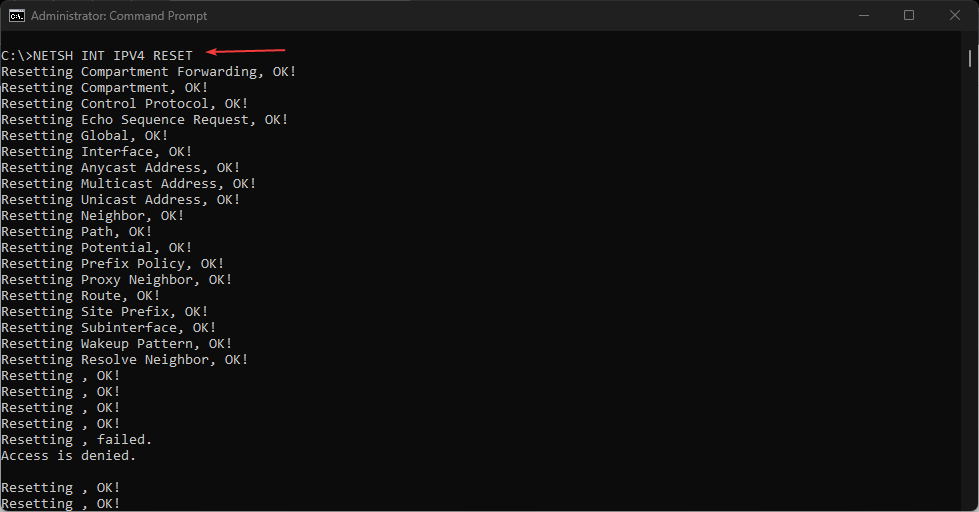
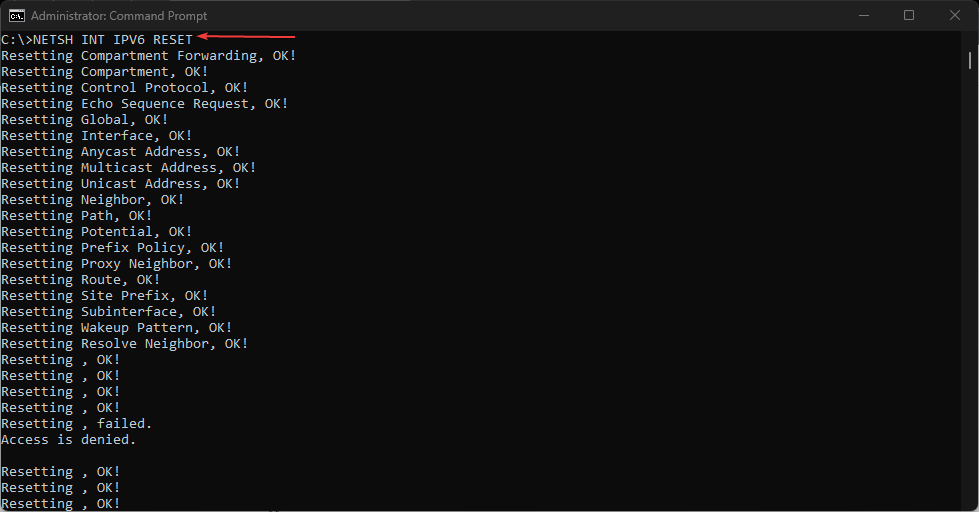
NETSH INT IPV4 RESET - IPv6 users, type this command and press the Enter key:
NETSH INT IPV6 RESET - Close the Command Prompt and restart your PC.
Check our guide on what to do if Command Prompt keeps crashing on your PC.
Our readers may be interested in how to fix the Ethernet doesn’t have a Valid IP Configuration error on Windows 11.
Alternatively, you can check out methods to change the IP address of a domain controller on Windows 11.
Also, we have a detailed guide about slow internet on one computer but fast on another and how to fix it.
In conclusion, this guide should help you easily reset TCP/IP Stack on Windows 11. If you have further questions or suggestions concerning this guide, kindly leave them in the comments section.
![]()
-
Home
-
News
- 3 Steps to Reset TCP/IP Stack Windows 10 with Netsh Commands
By Alisa |
Last Updated
Detailed instructions for how to reset TCP/IP on Windows 10 to fix Internet connection problems. Check how to reset TCP/IP Internet Protocol, reset IP address, and renew TCP/IP settings with Netsh commands. For other issues on Windows 10, e.g. data loss, partition management, backup and restore, video editing, etc. MiniTool software helps.
Internet can work only if the TCP/IP (Transmission Control Protocol/Internet Protocol) is intact and functions normally. TCP/IP plays an important role in Internet connection and the communication on the Internet.
However, sometimes you may encounter Internet connection problems. The Internet connection issues can be caused by corrupted Internet Protocol or incorrect settings of IP.
To fix this, knowing how to reset TCP/IP on Windows 10 is a good trick to make your computer connect to network again. You can also fix no Internet connection, WiFi connected but no Internet access, etc. by resetting TCP/IP stack on Windows 10.
Check below how to use Netsh commands to reset TCP/IP stack, reset IP address, renew TCP/IP settings, etc.
Step 1. Open Command Prompt Windows 10
Netshell is a Windows command-line utility which allows you to check and modify the network configuration of your computer. To use Netsh commands to reset TCP/IP, you should enter into Command Prompt Windows 10.
You can press Windows + R at the same time on the keyboard, type cmd, and press Ctrl+ Shift + Enter to open and run Command Prompt as administrator.
Step 2. Reset TCP/IP Stack Windows 10 with Netsh Commands
Then you can type Netsh command lines as follows to reset TCP/IP stack on Windows 10. Remember to hit Enter after typing each command line.
Type the following command line to completely reset TCP/IP configuration and restore TCP/IP to its original state. The command takes effect after you restart your computer.
- netsh int ip reset
To reset TCP/IP and generate a log file to a specific path, use the following command:
- netsh int IP reset c:\resettcpip.txt
If you use IPv4 or IPv6, use the command lines below to reset IP address:
- netsh int ipv4 reset
- netsh int ipv6 reset
To reinstall TCP/IP, type the command lines below:
- SYSTEM\CurrentControlSet\Services\Tcpip\Parameters
- SYSTEM\CurrentControlSet\Services\DHCP\Parameters
Additionally, you can also use Netsh commands to flush DNS and reset network settings to fix Internet connection problems. The command lines are as follows:
- ipconfig /release (this command removes the current IP configuration)
- ipconfig /renew (this command requests your DHCP client to reset an IP address)
- ipconfig /flushdns (use this Netsh command to clear corrupted or incorrect DNS cache)
- netsh winsock reset (this command line resets Winsock settings and recovers your computer from any socket errors. Winsock contains your computer Internet connectivity configurations)

Hola VPN Free Download for Chrome, PC, Mac, Android, iOS, etc.
Learn how to download free Hola VPN for Chrome, Edge, PC, Mac, Android, iOS, etc. to use it to unblock and access worldwide content online with no limit.
Read More
Step 3. Restart Computer
After you use all the Netsh commands above to reset TCP/IP stack and troubleshoot other Internet connections problems, you can restart your computer and your computer should be able to connect to Internet now. If your computer still has no Internet connection after resetting the TCP/IP Internet Protocol, you may contact your Internet Service Provider for help.
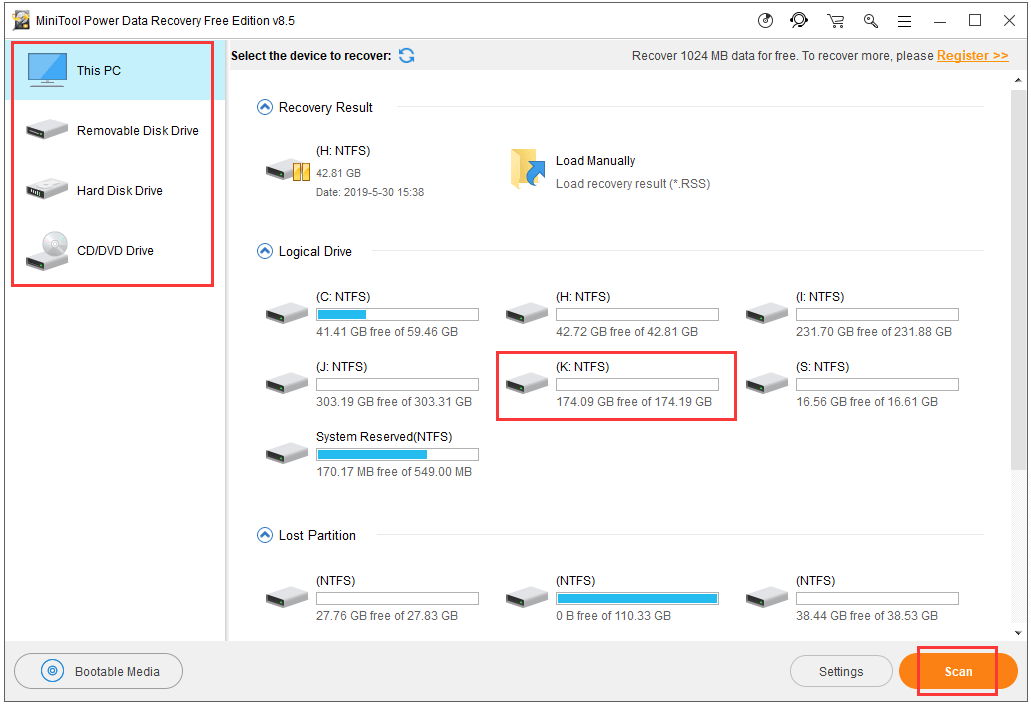
Tip: If you lost some important data on your Windows 10/8/7 computer because of computer error, OS crash or other causes, best free data recovery software – MiniTool Power Data Recovery – can help you easily recover lost data from PC and other storage devices in 3 simple steps. It’s a 100% clean and free program.

Download VeePN for PC, Mac, Mobile, and Browser
This post gives a VeePN review and offers guides on how to download VeePN for Chrome, Edge, Firefox, PC, Mac, Android, iOS, etc. to use this VPN service.
Read More
About The Author
Position: Columnist
Alisa is a professional English editor with 4-year experience. She loves writing and focuses on sharing detailed solutions and thoughts for computer problems, data recovery & backup, digital gadgets, tech news, etc. Through her articles, users can always easily get related problems solved and find what they want. In spare time, she likes basketball, badminton, tennis, cycling, running, and singing. She is very funny and energetic in life, and always brings friends lots of laughs.