Want to take a screenshot but nothing happens after pressing the Windows logo key + Shift + S shortcut? This can be very annoying. But don’t worry. In this post, we’ll show you how to fix the Windows + Shift + S not working issue easily and quickly.
Quick fixes to Windows + Shift + S not working
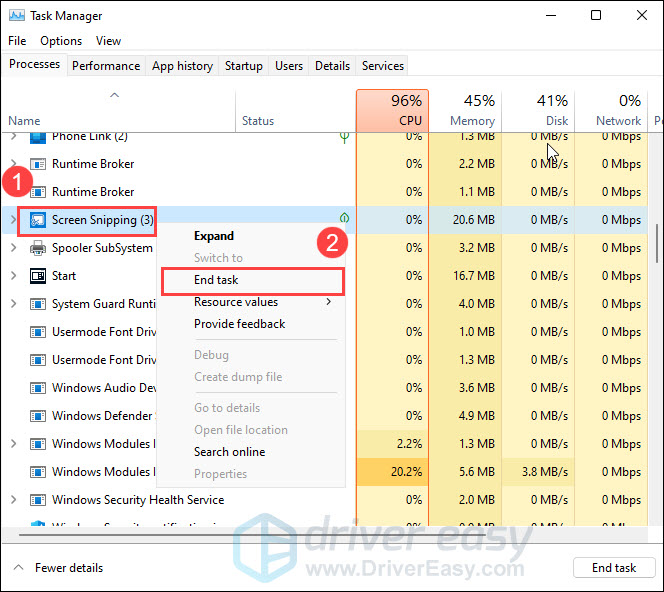
Before you begin, try to kill the Screen Snipping process in Task Manager. Here’s how:
- On your keyboard, press Ctrl + Shift + Esc at the same time to open Task Manager.
- Under Background processes, right-click Screen Snipping and select End task.

Check to see if your problem is resolved. If not, don’t worry, there are a few fixes you can try.
Try these fixes
You don’t have to try all of them, just work your way down the list until you find the one that works for you.
- Enable notifications for Snip & Sketch
- Turn on clipboard history
- Reset Snip & Sketch
- Reinstall Snip & Sketch
- Check for Windows updates
- Use an alternative to take screenshots
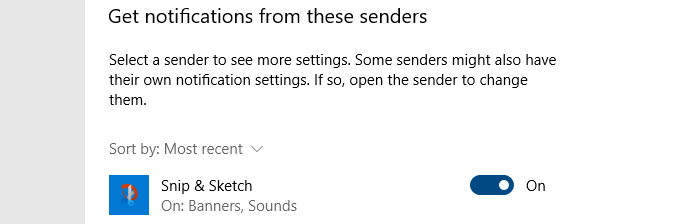
Fix 1: Enable notifications for Snip & Sketch
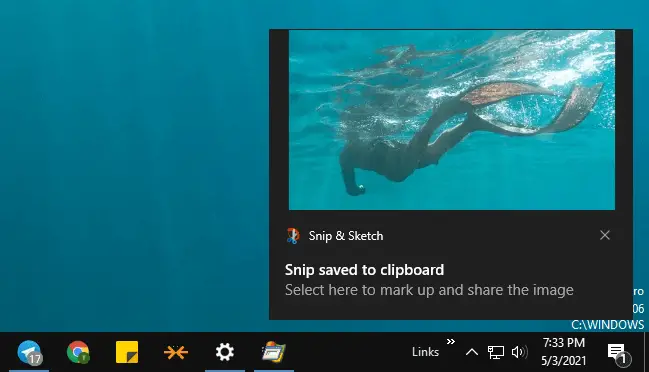
Normally, when you take a screenshot by hitting the Windows logo key + Shift + S, a notification that says Snip saved to clipboard appears in the lower right corner of your screen. However, if you’ve turned off notifications for Snip & Sketch, you’ll have to turn them on again. Here’s how to do it:
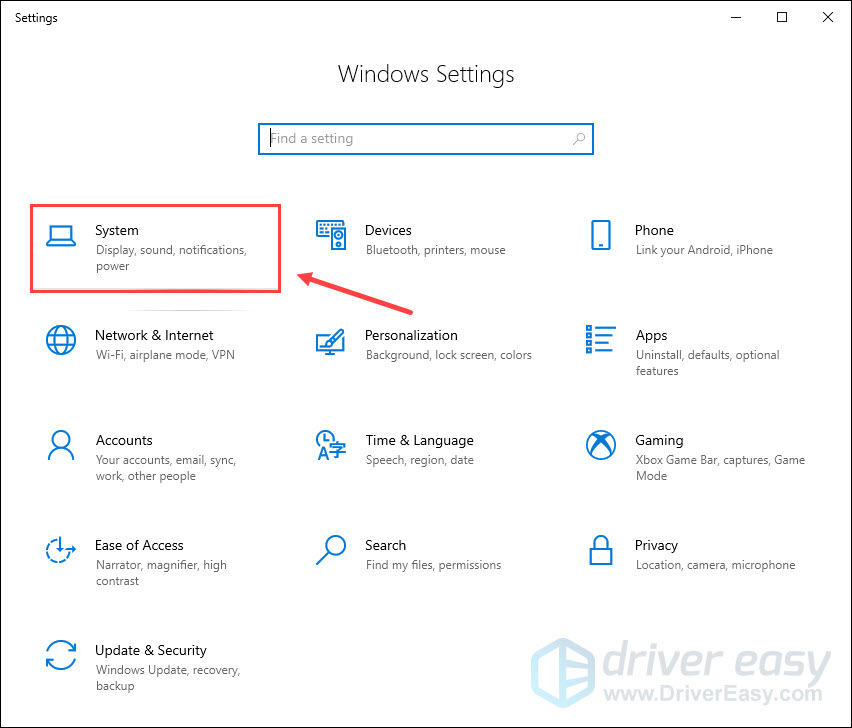
- On your keyboard, press the Windows logo key + I simultaneously to open Windows Settings, then select System.

- In the left panel, select Notifications & actions. Under Get notifications from these senders, locate Snip & Sketch and make sure it is set to On.
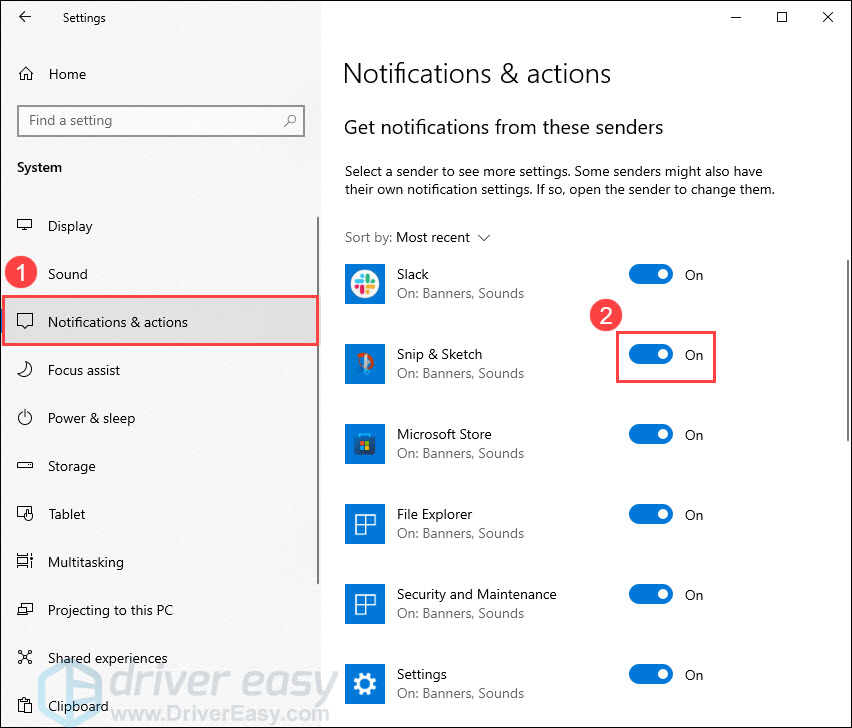
If you’ve enabled notifications for Snip & Sketch but the keyboard shortcut still doesn’t work properly, check out the next fix.
Fix 2: Turn on clipboard history
The screenshot you captured will be automatically copied to your clipboard. To view the screenshot, you can turn on clipboard history. Here’s how:
- On your keyboard, press the Windows logo key + I simultaneously to open Windows Settings, then select System.
- In the left panel, select Clipboard, then turn on Clipboard history.
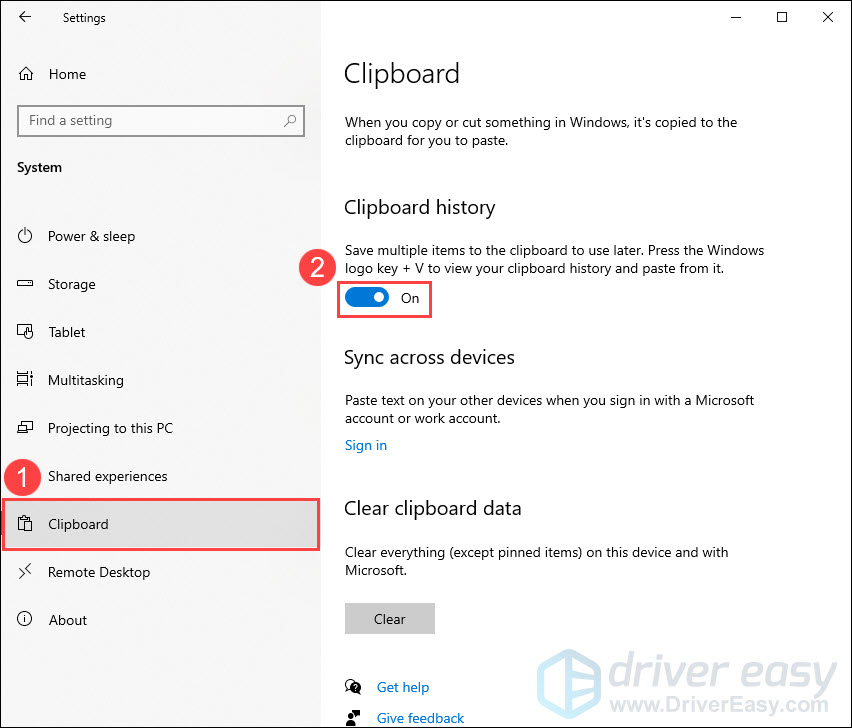
Now press the Windows logo key + Shift + S to take a screenshot and check if the screenshot appears on the clipboard by hitting the Windows logo key + V.
Fix 3: Reset Snip & Sketch
The Windows logo key + Shift + S allows you to take a screenshot without starting Snip & Sketch. But if this keyboard shortcut isn’t working right, you can try resetting Snip & Sketch. Here’s how:
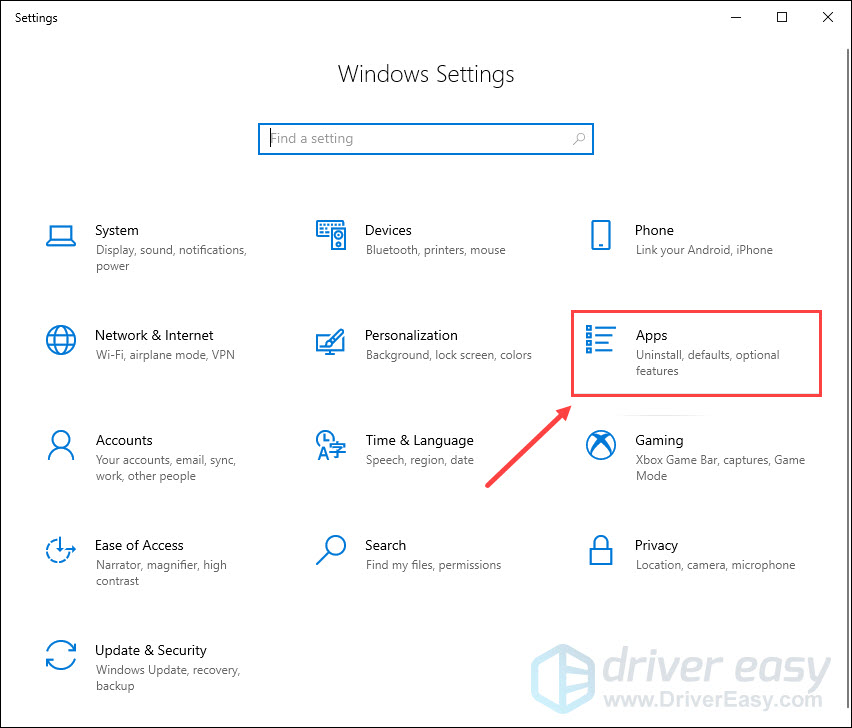
- On your keyboard, press the Windows logo key + I simultaneously to open Windows Settings, then select Apps.
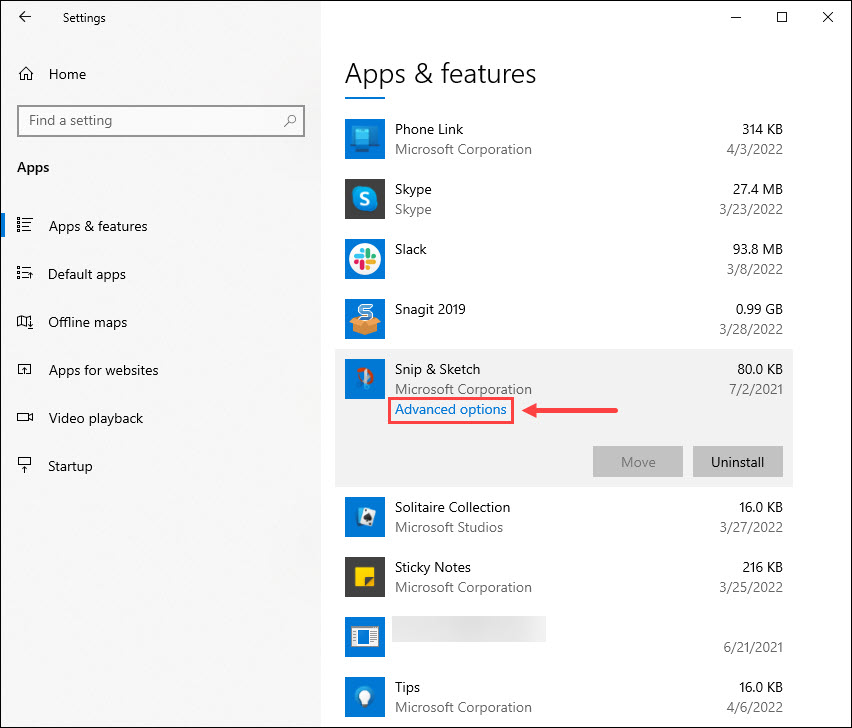
- Under Apps & features, scroll down the page and click Snip & Sketch. Then select Advanced options.
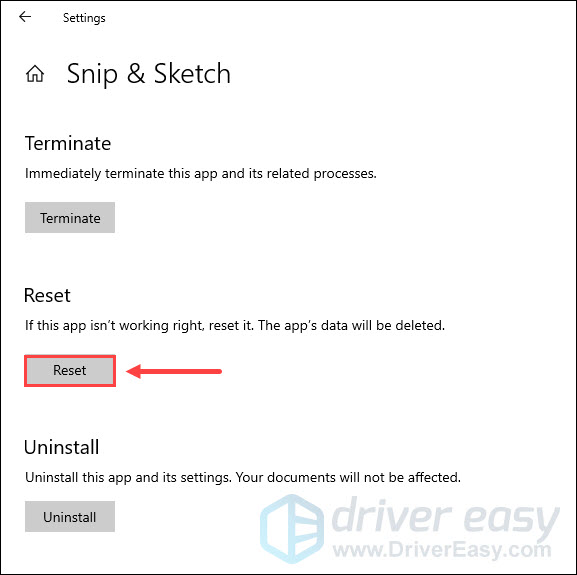
- Click Reset.

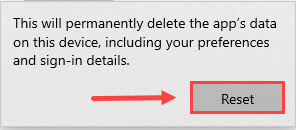
- When prompted to confirm your action, click Reset again.

Once the process is finished, restart your computer and check if the Windows logo key + Shift + S hotkey works properly. If not, take a look at the next fix.
Fix 4: Reinstall Snip & Sketch
If resetting Snip & Sketch doesn’t help, try reinstalling this app. To do so:
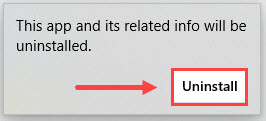
- On your keyboard, press the Windows logo key to open the Start menu. Then right-click Snip & Sketch and select Uninstall.

- In the pop-up window, click Uninstall again.

- After uninstalling Snip & Sketch, go to Microsoft Store to download and reinstall the app again on your system.
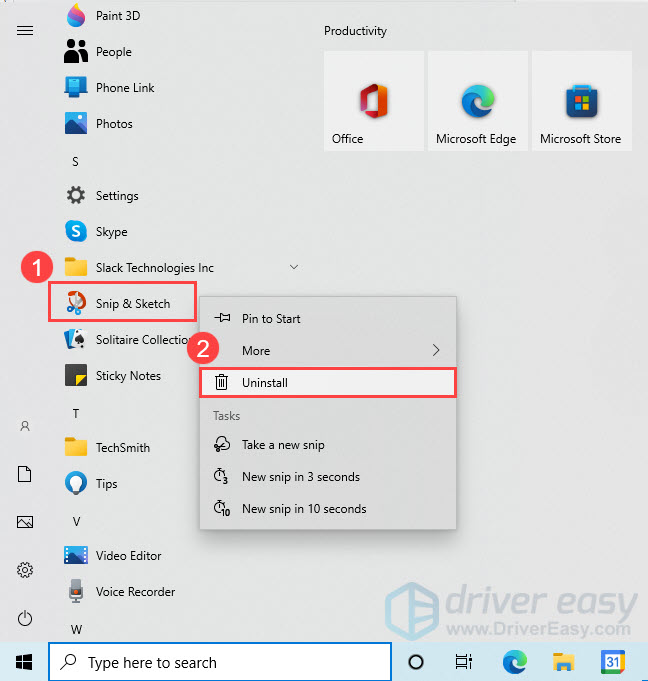
Once you’ve reinstalled Snip & Sketch, press the Window logo key + Shift + S to see if it works properly. If not, check out the next fix.
Fix 5: Check for Windows updates
Windows updates often contain bug fixes and security improvements. To ensure the snipping tool works properly, you should install the latest updates on your system. Here’s how to do it:
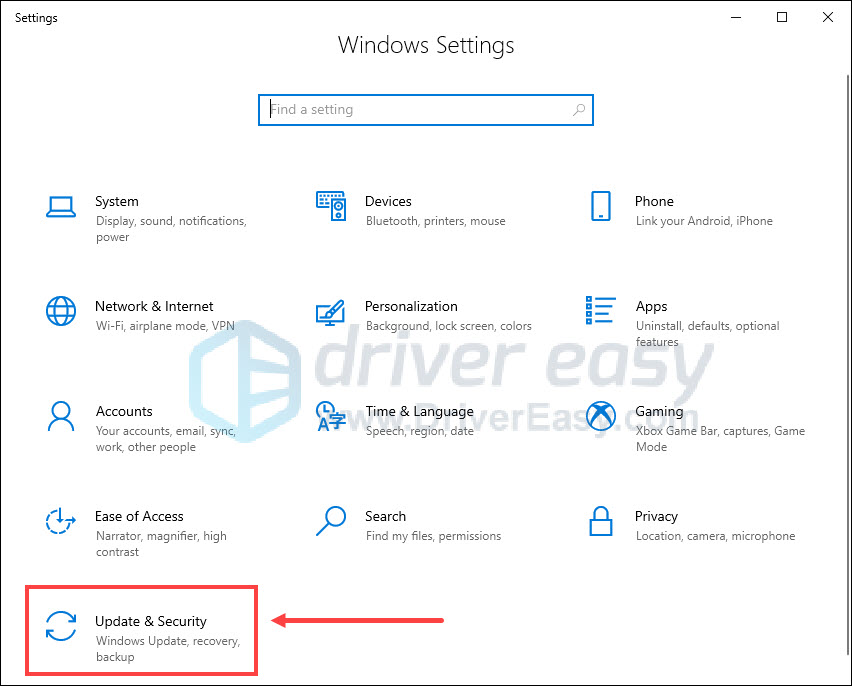
- On your keyboard, press the Windows logo key + I at the same time to open Windows Settings. Then select Update & Security.

- Under Windows Update, click Check for updates. Windows will automatically scan for, download and install the available updates.
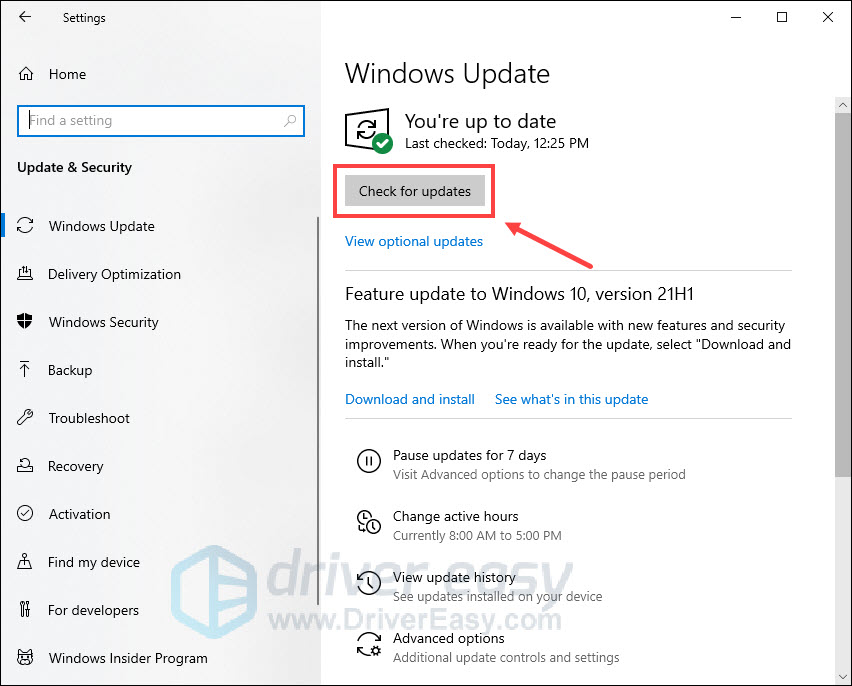
After installing all available updates, restart your computer and check if the Windows logo key + Shift + S shortcut works fine.
If this keyboard shortcut is still not working, consider using an alternative to take screenshots.
Fix 6: Use an alternative to take screenshots
If all the above methods fail to solve your problem, you can try either of the following ways to take screenshots.
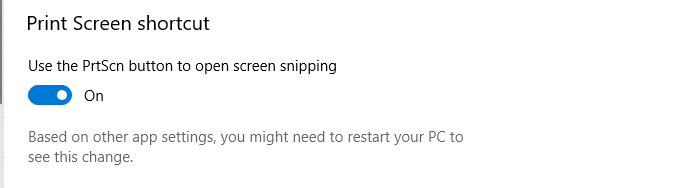
Option 1 – Print Screen shortcut
The Print Screen or PrtScn key on your keyboard allows you to capture an image of your entire screen. To use this button, you need to enable it in settings. Here’s how:
- On your keyboard, press the Windows logo key + I at the same time to open Windows Settings. Then select Ease of Access.
- In the left panel, select Keyboard. Under Print Screen shortcut, toggle the switch to On.

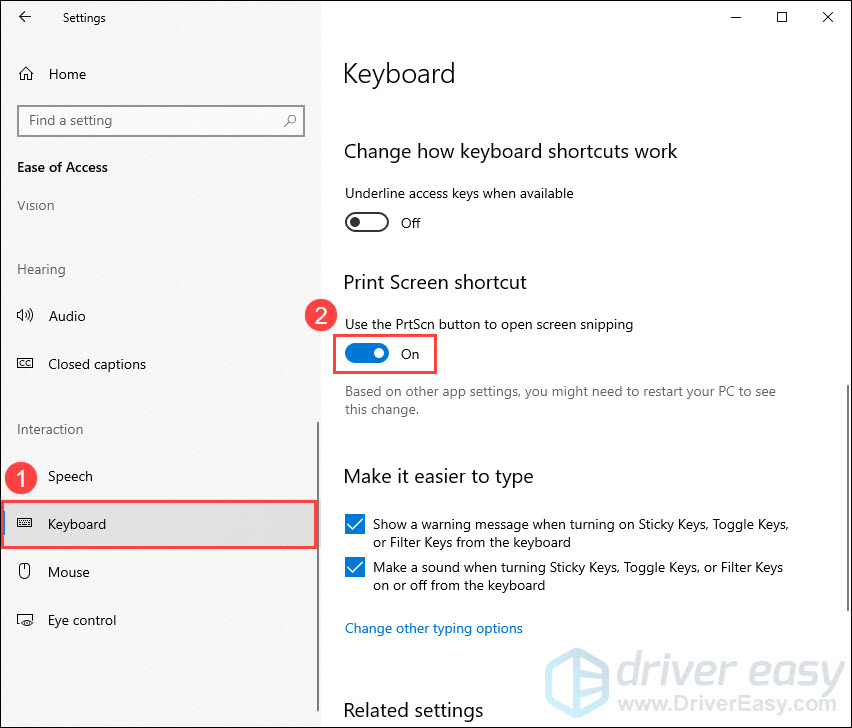
Now you can use the PrtScn key to open screen snipping.
If your keyboard’s PrntScrn key has two jobs then you may need to press the Fn key + PrtScn at the same time to capture an image.
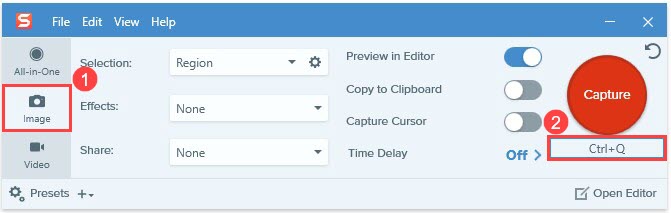
Option 2 – Snagit
Snagit is a simple and powerful screen capture and recording software. With Snagit, you can quickly take screenshots, add additional context, and share images, GIFs, or videos across your preferred platforms.
To take a screenshot with Snagit:
- Download and install Snagit.
- Open Snagit. Then select Image, click the Shortcut field and press the desired key combination on your keyboard. The new keyboard shortcut will appear in the field.

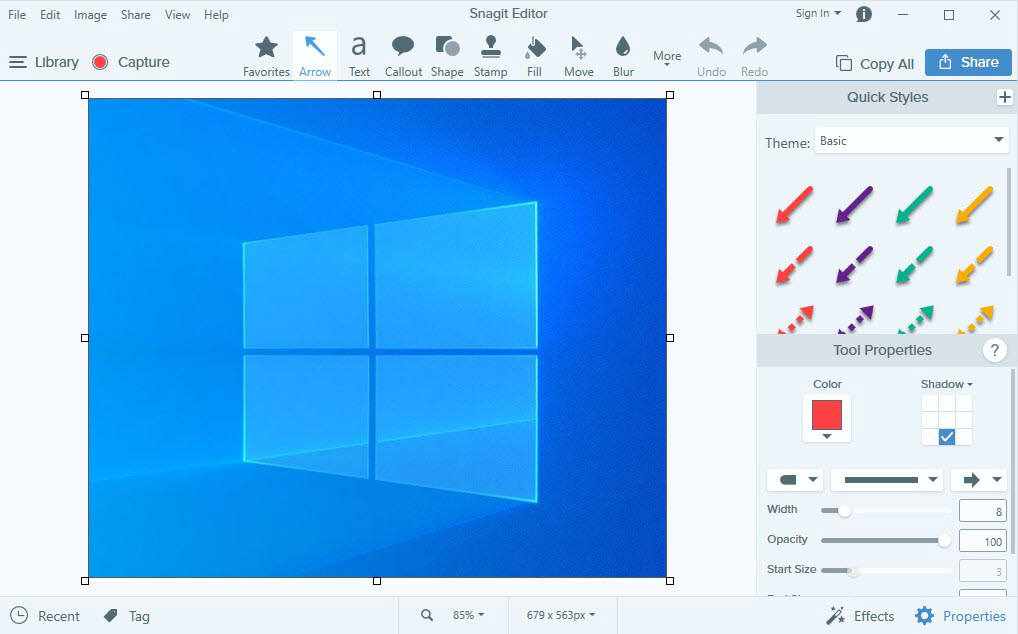
- Press the new shortcut you set in Step 2. The screen will be grayed out allowing you to select the screen area for capture by dragging the orange crosshairs.

- Once taken, the screenshot will open up in the Snagit Editor. From there, you can edit the image, such as cropping the image, blurring particular areas, and adding arrows, shapes, icons or text. Once done, you can choose to save it on your desktop, copy it to your clipboard, email it to someone or share it online.


You can get a free trial for 15 days and click here for the detailed tutorial.
That’s all for now. Hopefully, this post helped you solve the snipping tool shortcut (Windows + Shift + S) not working issue. If you have further questions or suggestions, feel free to drop us a line.
49
49 people found this helpful
ZeEnd
Было так недавно, но я забил. На следующий день всё было нормально.
Ответить
Развернуть ветку
Аккаунт удален
Комментарий недоступен
Ответить
Развернуть ветку
dozeMax
Откройте «Параметры» > «Приложения» > «Приложения и возможности».
Справа найдите «Набросок на фрагменте экрана» нажмите по нему, и ниже нажмите на «Дополнительные параметры».
В новом окне нажмите на «Сбросить».
Если сброс не помог, то попробуйте нажать «Удалить».
После удаления перейдите в магазин Microsoft и скачайте это приложение.
Ответить
Развернуть ветку
klopizh
было такое, нужно перевести часы системы на октябрь 30 или 31 2021 года, точно не помню, это не шутка
ну и по идее это пофиксили через апдейт KB5008295
UPD: November 4, 2021
1. Start>Settings
2. Time & language
3. Date & time
4. Toggle «Set time automatically» to off
5. Set the date and time manually .. change button
6. Choose Oct. 30 2021
7. Click Change button
7.2. Restart PC (optional)
7.5 Launch Snipping Tool and click «+New». After confirming that it worked (didn’t crash), proceed to step 8.
8. Set time automatically — toggle back on.
9. Launch Snipping Tool
10. Choose «+New»
Ответить
Развернуть ветку
0 комментариев
Раскрывать всегда
В Победить + Сдвиг + S сочетание клавиш на базе инструмента Snip & Sketch позволяет быстро сделать снимок экрана определенной области или всего экрана. Некоторые пользователи сталкиваются с ситуацией, когда комбинация горячих клавиш не работает на их компьютере с Windows 10. Например, при использовании горячих клавиш ничего не может произойти. Или вы не получаете уведомление о снимке экрана Snip & Sketch в области уведомлений панели задач.if(typeof __ez_fad_position!=’undefined’){__ez_fad_position(‘div-gpt-ad-winhelponline_com-medrectangle-3-0′)};if(typeof __ez_fad_position!=’undefined’){__ez_fad_position(‘div-gpt-ad-winhelponline_com-box-3-0’)};
Давайте посмотрим, как исправить функцию обрезки экрана Snip & Sketch в Windows 10.
Контрольный список перед запуском: если при нажатии ничего не происходит Победить + Сдвиг + S:
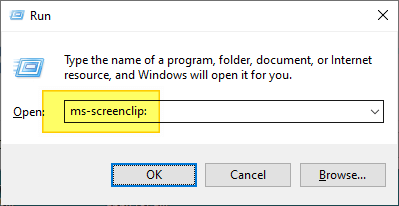
- Щелкните правой кнопкой мыши «Пуск», выберите «Выполнить» и введите «ms-screenclip:»И нажмите« ОК ». Посмотрите, запускает ли он меню снайперов. Это необходимо, чтобы проверить, связана ли проблема с приложением или с клавиатурой.

- Есть вероятность, что один из ключей застрял. Лучше сначала протестировать с новой клавиатурой.
- Убедитесь, что Winkey не отключен в вашей системе для игр.
- Проверьте другие ярлыки Winkey, чтобы узнать, Ключ победы не отключен.
- Если буфер обмена в целом не работает, сначала выполните процедуру устранения неполадок с буфером обмена.
[Исправлено] Горячая клавиша Win + Shift + S не работает в Windows 10
Один из следующих шагов должен исправить Победить + Сдвиг + S Возможность обрезки экрана Snip & Sketch для вас.
1) Проверьте настройки горячих клавиш Snip & Sketch
Комбинацию горячих клавиш Snip & Sketch можно изменить в Настройках. Возможно, что в качестве горячей клавиши Snip & Sketch выбрана кнопка Print Screen.
- Нажмите Пуск → Настройка → Легкость доступа → Клавиатура.
- Если вы хотите использовать Победить + Сдвиг + S для обрезки отключите «Используйте кнопку PrtScn, чтобы открывать обрезку экрана».

![]() Или вы можете включить вышеуказанный параметр и проверить, работает ли горячая клавиша Snip & Sketch, нажав клавишу Print Screen. Это может быть полезно, особенно если сторонняя программа взяла на себя Победить + Сдвиг + S комбинация горячих клавиш.if(typeof __ez_fad_position!=’undefined’){__ez_fad_position(‘div-gpt-ad-winhelponline_com-box-4-0’)};
Или вы можете включить вышеуказанный параметр и проверить, работает ли горячая клавиша Snip & Sketch, нажав клавишу Print Screen. Это может быть полезно, особенно если сторонняя программа взяла на себя Победить + Сдвиг + S комбинация горячих клавиш.if(typeof __ez_fad_position!=’undefined’){__ez_fad_position(‘div-gpt-ad-winhelponline_com-box-4-0’)};
if(typeof __ez_fad_position!=’undefined’){__ez_fad_position(‘div-gpt-ad-winhelponline_com-medrectangle-4-0’)};
2) Включите историю буфера обмена
Некоторые пользователи указали, что включение функции истории буфера обмена помогло решить проблему Snip & Sketch.
- Откройте окно настроек, нажмите Система → Буфер обмена.
- Включите историю буфера обмена.
3) Включить уведомления переключателя Snip & Sketch
- Откройте окно настроек, нажмите Система → Уведомления и действия.
- Включите переключатель «Получать уведомления от приложений и других отправителей».
- В разделе «Получать уведомления от этих отправителей» включите переключатель для Snip & Sketch.

![]() Примечание. Независимо от вашего уведомления или настройки Focus Assist, отрывок экрана все равно будет скопирован в буфер обмена Windows. Если вы хотите проверить это, вы можете открыть окно Paint и вставить изображение из буфера обмена. Под капотом инструмент Snip & Sketch также сохраняет ваш снимок экрана во временную папку.
Примечание. Независимо от вашего уведомления или настройки Focus Assist, отрывок экрана все равно будет скопирован в буфер обмена Windows. Если вы хотите проверить это, вы можете открыть окно Paint и вставить изображение из буфера обмена. Под капотом инструмент Snip & Sketch также сохраняет ваш снимок экрана во временную папку.
4) Отключите поддержку фокусировки
Помощь при фокусировке (также называемая «Тихими часами» в более ранних версиях Windows 10) позволяет избежать отвлекающих уведомлений, когда вам нужно сосредоточиться, и по умолчанию настроена на автоматическую активацию при определенных условиях. Функция Focus Assist может скрывать уведомления Snip & Sketch на вашем устройстве.
Вы можете включить или выключить помощь при фокусировке с помощью значка центра уведомлений на панели задач или в настройках.
- Откройте Пуск → Настройки → щелкните Система → Помощь при фокусировке.
- Отключите поддержку фокусировки.
- Нажмите «Настроить список приоритетов» в режиме «Только приоритет».
- Убедитесь, что Snip & Sketch добавлен в список приложений на экране «Список приоритетов».
- После установки параметра «Помощь при фокусировке» на «Выкл.» Или «Приоритетный режим» закройте окно «Настройки».
(Некоторые пользователи сообщают, что даже если их Focus Assist был отключен, им пришлось вручную повторно добавить приложение Snip & Sketch в список приоритетов, чтобы уведомления Snip & Sketch работали.)
В следующий раз, когда вы воспользуетесь Победить + Сдвиг + S и создайте клип экрана, вы должны увидеть сообщение в области уведомлений, подобное этому:
 if(typeof __ez_fad_position!=’undefined’){__ez_fad_position(‘div-gpt-ad-winhelponline_com-banner-1-0’)};
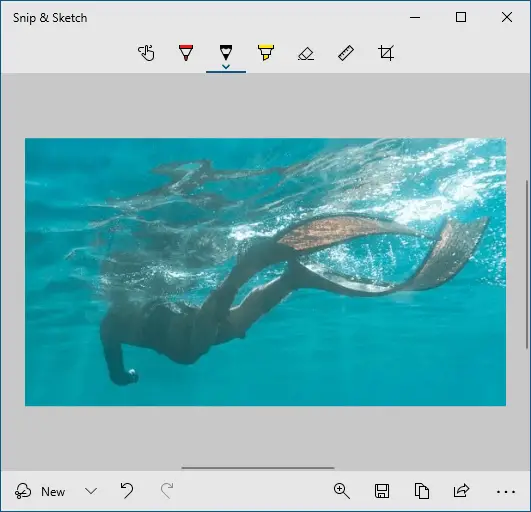
При нажатии на нее откроется окно Snip & Sketch, в котором вы можете редактировать, комментировать или публиковать изображение.
(Чтобы узнать, как работает горячая клавиша Winkey + Shift + S, ознакомьтесь со статьей Скриншот части экрана с помощью Winkey + Shift + S.)
5) Сбросить Snip & Sketch
Если указанные выше настройки не помогли, посмотрите, поможет ли сброс Snip & Sketch.
- Откройте Настройки → Приложения → Приложения и функции.
- Выберите из списка Snip & Sketch.
- Щелкните ссылку Дополнительные параметры.
- В появившемся экране нажмите «Сброс».
См. Также Как сбросить настройки приложения Windows 10, когда оно не работает.
6) Удалите и переустановите Snip & Sketch
В качестве последнего варианта вы можете попробовать удалить Snip & Sketch и переустановить его.
- Откройте Настройки → Приложения → Приложения и функции.
- Выберите из списка Snip & Sketch.
- Щелкните Удалить.
- Откройте приложение Microsoft Store, найдите Snip & Sketch и установите его. Кроме того, вы можете использовать эту официальную ссылку Microsoft Store, чтобы быстро открыть экран установки приложения Snip & Sketch в приложении Microsoft Store.
7) Несовместимое стороннее программное обеспечение
Стороннее программное обеспечение может мешать функции обрезки экрана Snip & Sketch.
Примеры:
Инструмент Win + Shift + S ломается, когда maxto работает https://github.com/digitalcreations/MaxTo/issues/386
Сочетание клавиш Win + Shift + S не работает - CorelDRAW Graphics Suite 2020: https://community.coreldraw.com/talk/coreldraw-graphics-suite-2020/f/coreldraw-graphics-suite-2020-for-windows/62012/win-shift-s-shortcut-not-working
Например, с помощью Snip & Sketch вы можете выбрать область экрана, но мышь может оставаться в виде перекрестия, когда вы отпускаете щелчок. И ничего не может быть сохранено в буфер обмена.
Желательно очистить загрузочную Windows и посмотреть, правильно ли работает функция обрезки экрана Snip & Sketch.
 Переустановите компоненты оболочки Windows, чтобы исправить ошибку «ms-screenclip».
 Переустановите компоненты оболочки Windows, чтобы исправить ошибку «ms-screenclip».
На некоторых устройствах ошибка «Вам понадобится новое приложение, чтобы открыть эту ссылку ms-screenclip»Появляется при нажатии кнопки« Создать »(фрагмент) в окне« Snip & Sketch ».
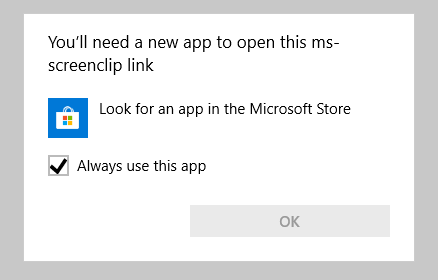
Если вы получаете указанную выше ошибку, переустановите пакет Windows Feature Experience Pack Feature on Demand.
Что такое Windows Feature Experience Pack?
Этот пакет Feature on Demand включает функции, критически важные для функциональности Windows. Microsoft предлагает не удалять этот пакет никакими способами — DISM, PowerShell и т. Д.
Функция: Пакет возможностей Windows
Имя возможности: Windows.Client.ShellComponents ~~~~ 0.0.1.0 Пример имени пакета: Microsoft-Windows-UserExperience-Desktop-Package ~ 31bf3856ad364e35 ~ amd64 ~~ .cab Размер установки: 44,15 МБ Спутники: Нет Доступность: Windows 10 версии 2004 и новее.
Чтобы переустановить Windows Feature Experience Pack, выполните следующие действия:
- Убедитесь, что ваша система подключена к Интернету.
- Выполните следующую команду в окне командной строки администратора.
DISM / Online / Добавить возможность /CapabilityName:Windows.Client.ShellComponents~~~~0.0.1.0
Это переустанавливает компоненты клиентской оболочки Windows (Windows Feature Experience Pack).
Если указанная выше команда по какой-либо причине не работает, вы можете попробовать сначала удалить компонент, а затем переустановить его, выполнив следующие действия:
- Выполните следующую команду в окне командной строки администратора.
DISM / Online / Remove-Capability /CapabilityName:Windows.Client.ShellComponents~~~~0.0.1.0
- Перезагрузите Windows.
- Затем выполните следующую команду, чтобы переустановить
DISM / Online / Добавить возможность /CapabilityName:Windows.Client.ShellComponents~~~~0.0.1.0
Когда команда завершит выполнение, вы должны увидеть следующий вывод:
[========================== 100,0% ===================== =====] Операция завершилась успешно.
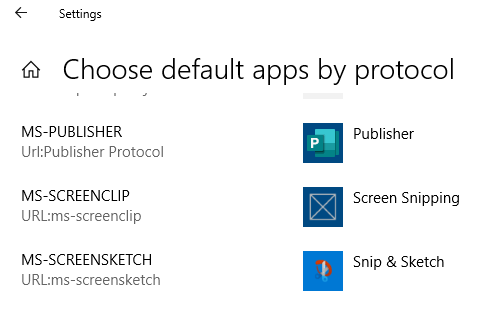
После переустановки ms-screenclip ассоциация протокола должна быть исправлена.
(Вы можете проверить это через Настройки → Приложения → Приложения по умолчанию → Выбрать приложения по умолчанию по протоколу.)
Кнопка New snip в приложении Snip & Sketch теперь должна работать правильно!
Помог ли один из вышеперечисленных методов? И если да, то какой? Сообщите об этом в разделе комментариев ниже.
Сочетание клавиш Win + Shift + S в Windows 10 позволяет пользователю захватывать часть или полный экран и копировать их в буфер обмена. В большинстве случаев эта функция работает должным образом, но иногда она может не срабатывать. Если вы столкнулись с этой проблемой, то этот пост поможет вам.
Win + Shift + S не работает в Windows 10
Когда вы нажимаете клавиши «Win + Shift + S» вместе, экран вашего компьютера покрывается белым / серым наложением. Курсор мыши превращается в символ плюс (+), указывая, что режим захвата включен. Таким образом, когда вы выбираете область и отпускаете курсор, выбранная область экрана автоматически копируется в буфер обмена. Однако, когда вы этого не видите, вот что вам нужно сделать:
- Включить переключатель истории буфера обмена
- Проверьте переключатель Snip & Sketch
- Сброс Snip & Sketch.
Snip & Sketch — это новый инструмент, который заменяет устаревший Snipping Tool.
1] Включить переключатель истории буфера обмена
Нажмите кнопку «Пуск» и выберите «Настройки».
Выберите плитку «Система»> и прокрутите вниз, чтобы найти «Буфер обмена».

Нажмите на нее и на правой панели увидите, включен ли переключатель «Журнал буфера обмена».
Если нет, переведите переключатель в положение «Вкл».
2] Проверьте переключатель Snip & Sketch
Снова откройте «Настройки», выберите раздел «Система» и перейдите в раздел «Уведомления и действия».
Здесь убедитесь, что переключатель «Snip & Sketch» установлен в положение «On».
3] Сброс Snip & Sketch
Если вышеуказанные методы не дают желаемых результатов, сбросьте Snip & Sketch. Для этого, Перейдите в Настройки> Приложения> Приложения и функции. Здесь нажмите на «Обрезать и рисовать».
Вы должны увидеть ссылку « Дополнительные параметры », появляющуюся под этой опцией. Нажмите на нее и нажмите кнопку « Сброс » на последующем экране.
Также, в крайнем случае, вы можете удалить и переустановить приложение из Microsoft Store. Перейдите в « Настройки »> « Приложения» > « Приложения и функции», и вы увидите кнопку «Удалить» для Snip & Sketch. Найдите и удалите приложение. Позже зайдите в Microsoft Store и переустановите приложение.
Надеюсь, это вам поможет.
Give a try to these quick tips right away
by Matthew Adams
Matthew is a freelancer who has produced a variety of articles on various topics related to technology. His main focus is the Windows OS and all the things… read more
Updated on
- Some users have fixed the OneNote 2016 hotkey for screen clippings by changing the keyboard shortcut.
- Alternatively, you can disable the global Windows + S hotkey using a few quick steps.

Since the Creators Update, some users have stated on forums that OneNote 2016’s Windows + Shift + S hotkey (Windows + S in earlier versions) doesn’t work in Win 10.
Windows + Shift + S is now the default hotkey for the Snipping Tool. Thus, the Snipping Tool and OneNote have a keyboard shortcut conflict. Here are a few resolutions for fixing OneNote’s hotkey so that it opens the Select Location in the OneNote window for screen clippings.
1. Change the OneNote Hotkey
Some users have fixed the OneNote 2016 hotkey for screen clippings by changing the keyboard shortcut. OneNote doesn’t include any built-in options for customizing hotkeys. As such, you must modify its hotkey with the Registry Editor as follows.
How we test, review and rate?
We have worked for the past 6 months on building a new review system on how we produce content. Using it, we have subsequently redone most of our articles to provide actual hands-on expertise on the guides we made.
For more details you can read how we test, review, and rate at WindowsReport.
- Press the Windows key + R hotkey to open Run.
- Input ‘regedit’ in Run and click OK to open the Registry Editor.
- Then open this key in the Registry Editor: HKEY_CURRENT_USER\Software\Microsoft\Office\16.0\OneNote\Options\Other.
- Select Other and then right-click an empty space on the right of the Registry Editor window to open the context menu. Select New > DWORD (32-bit) Value to set up a new DWORD.

- Then enter ‘ScreenClippingShortcutKey’ as the title for the new keyword.
- Double-click ScreenClippingShortcutKey to open the Edit DWORD window.
- Then input ‘5A’ in the Value data text box to change the OneNote 2016 clipping tool’s hotkey to Win + Shift + Z.
- Press the OK button to close the window.
- Then close the Registry Editor, and restart your laptop or desktop.
2. Disable the Global Hotkey
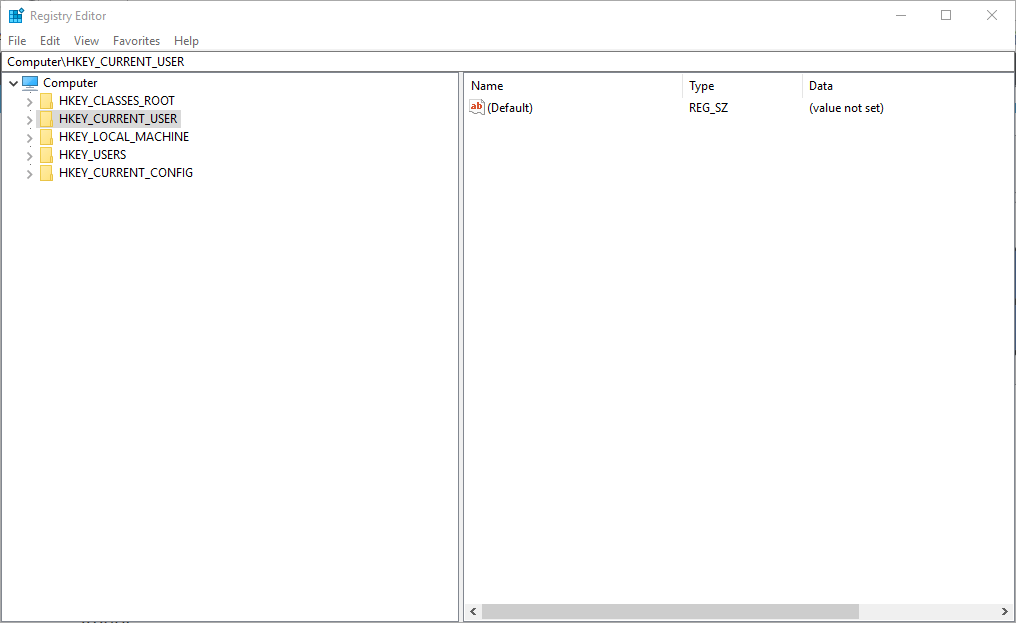
Alternatively, you can disable the global Windows + S hotkey so that the Snipping Tool doesn’t open when you press the Win key + Shift + S keyboard shortcut. Windows doesn’t include options to customize its default keyboard shortcuts. However, you can disable the Windows + S global keyboard shortcut with the Registry Editor as follows.
- Enter ‘regedit’ in Run to open the Registry Editor.
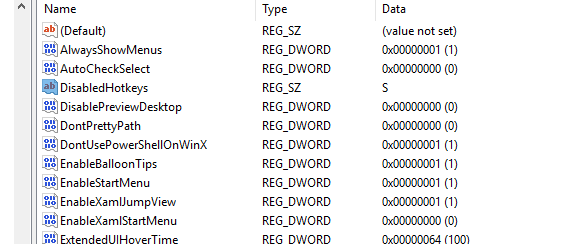
- Then browse to this registry key: HKEY_CURRENT_USER\Software\Microsoft\Windows\CurrentVersion\Explorer\Advanced.
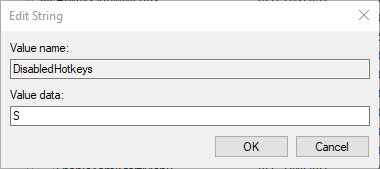
- Right-click Advanced and select New > String Value.
- Enter DisabledHotkeys as the title for the new string value.

- Double-click DisabledHotkeys to open the Edit String window.
- Enter ‘S’ in the Edit String window, and click OK to close the window.

- Now close the Registry Editor, and click Restart to restart Windows.

3. Capture Screenshots With OneNote’s System Tray Icon
OneNote 2016 users don’t need to press the Windows + Shift + S hotkey to capture screenshots. Instead, you can configure the application to capture snapshots when you click its system tray icon. This is how you can capture snapshots with the OneNote system tray icon.
- Right-click the OneNote system tray icon to open its context menu. You might need to click the notification area’s up arrow to right-click that icon.

- Select the Take screen clipping option on the context menu.
- Then you can select an area to capture in the snapshot, and the Select Location in the OneNote window will open.
- Thereafter, you can click the OneNote system tray icon to capture snapshots and open the Select Location in the OneNote window.
- If you can’t find OneNote’s system tray icon, right-click the Win 10 taskbar and select the Taskbar settings option. Click Select which icons appear on the taskbar to open a list of icons as shown below. Toggle the Send to OneNote Tool icon on to include it in the system tray.

So that’s how you can fix the OneNote hotkey for screen clippings and capture snapshots without it. Then, you can select a OneNote location to save the snapshots instead of pasting them into notebooks with the Ctrl + V hotkey.
And if you also find that keyboard shortcuts are not working in Word, the problem is just as easy to fix.
To share more solutions with us, drop a comment below.
![]()