It doesn’t matter whether you are a gamer, coder, or editor, as everybody wants their computer to run as fast as possible. SSDs proved to be a major step forward in this dream due to their absurd speed compared to HDDs. NVMe SSDs are immensely popular because they are the fastest SSDs available to consumers.
If you are able to get one for your system, you should move the Windows OS there for increased computer performance. This article will teach you how to clone Windows from SSD to NVMe.
Is It Worth Cloning Windows from SSD to NVMe?
Yes, you should always upgrade to NVMe from SSD if you can afford one and your computer is compatible. An NVMe SSD is about 20 times faster than a standard SSD. It has an average read/write speed of 4000 MB/s compared to 400 MB/s of a standard SSD. The reason is that a standard SSD uses SATA and SAS interface, while an NVMe SSD uses the latest PCIe interface.
That’s why, if your computer has an NVME SSD, you should clone Windows from SSD to NVMe. It will increase your system performance significantly and provide many other benefits.
Benefits of Moving from SSD to NVMe
| ⏱Quicker Boot: | Once the Windows is cloned to the NVMe drive, the boot time for your system will be reduced significantly. Since an NVMe drive is much faster than an SSD, the computer will be able to load up the Windows operating system files in no time. |
| ?Better Gaming: | Upgrading from SSD to NVMe will also boost the gaming performance of your system. A faster hard drive means fewer lags and glitches during your gameplay. It will also reduce the game load time by a lot. |
| ?Improve Computer Performance: | An NVMe drive is much faster and has low latency, so your computer performance will become top-notch. You will be able to perform all the actions at a much higher speed due to its high read and write speed. |
| ?Longer Battery Life: | If you are using a laptop, upgrading to NVMe SSD can increase your device’s battery life. That’s because NVMe drives are more power efficient than standard SSDs. These drives are also sturdier than their competitors. |
Best Tool to Clone Windows from SSD to NVMe Recommend
You are going to need a Windows cloning tool to clone Windows from SSD to NVMe. There is no in-built tool in Windows to help you in this process. The best tool to clone Windows without any complex processes or issues is EaseUS Partition Master. It is a complete toolbox for hard drives and can easily clone one drive to another, including a system drive.
The process required to clone Windows from SSD to NVMe is easy to follow and fast in this tool. You can download and use EaseUS Partition Master to clone Windows for free.
Key Features
- 4K Alignment: Even the fastest NVMe SSDs are also prone to the accumulation of junk data in the drive. It results in degraded computer performance. With EaseUS Partition Master, you can run 4K Alignment on NVMe SSD to restore their speed by allowing it to adopt the smallest 4K sector to store data.
- Cluster Size Adjustment: When using EaseUS Partition Master, you no longer need to format your NVMe drive to change cluster size. It allows you to adopt the cluster size of your choice without affecting the data in the drive.
- Wipe Partition: After you have moved to the new NVMe SSD, you can wipe clean the old SSD using EaseUS Partition Master. It will permanently clean the data off the drive to ensure no one can access your data.
- Clone Partitions: Want to transfer data from one partition to another? EaseUS Partition Master allows you to clone one partition to another in a few simple clicks. The process will be extremely fast, and no data will be lost during the process. You can even clone system drives without any issues.
Guide to Clone Windows from SSD to NVMe SSD in Simple Clicks
As mentioned above, the process to clone Windows from SSD to NVMe SSD is simple and quick when using EaseUS Partition Master. Once you have installed this tool and attached the new NVMe SSD to your system, you are ready to clone Windows. Follow the guides given below to flawlessly clone Windows from SSD to NVMe SSD in simple clicks.
1. Clone Windows from SSD to NVMe SSD
If the NVMe drive is for another computer and you want to clone Windows OS and other programs from your old computer, follow this guide. By cloning Windows from your older computer, you can easily move all your settings, programs, and the same OS to the new computer. Follow these steps to clone Windows from SSD to NVMe SSD:
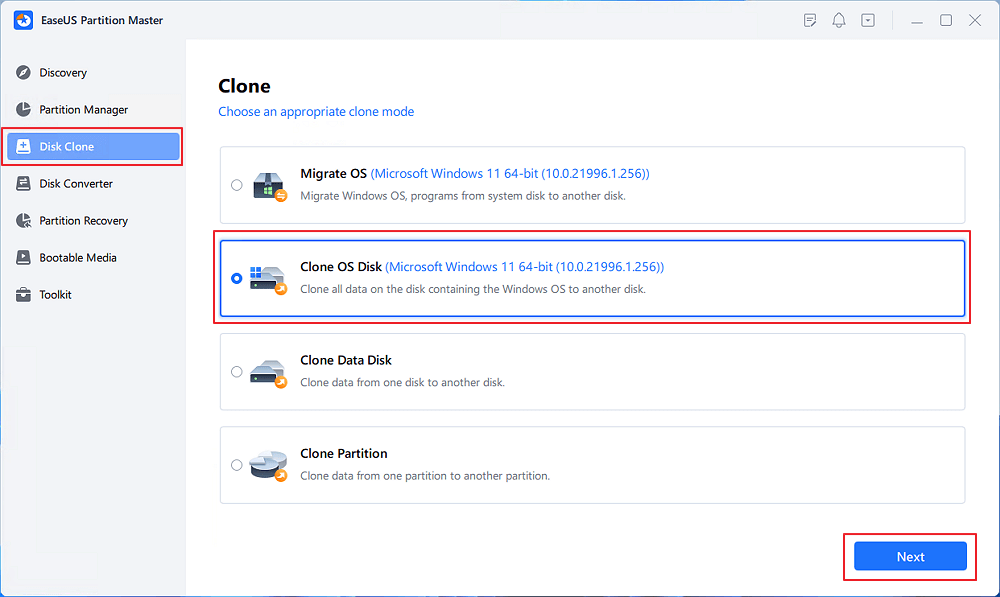
Step 1. Launch EaseUS Partition Master, go to the Disk Clone tab, select «Clone OS Disk» and click «Next».
Step 2. Select the target new drive where you want to clone the OS to, and click «Next».
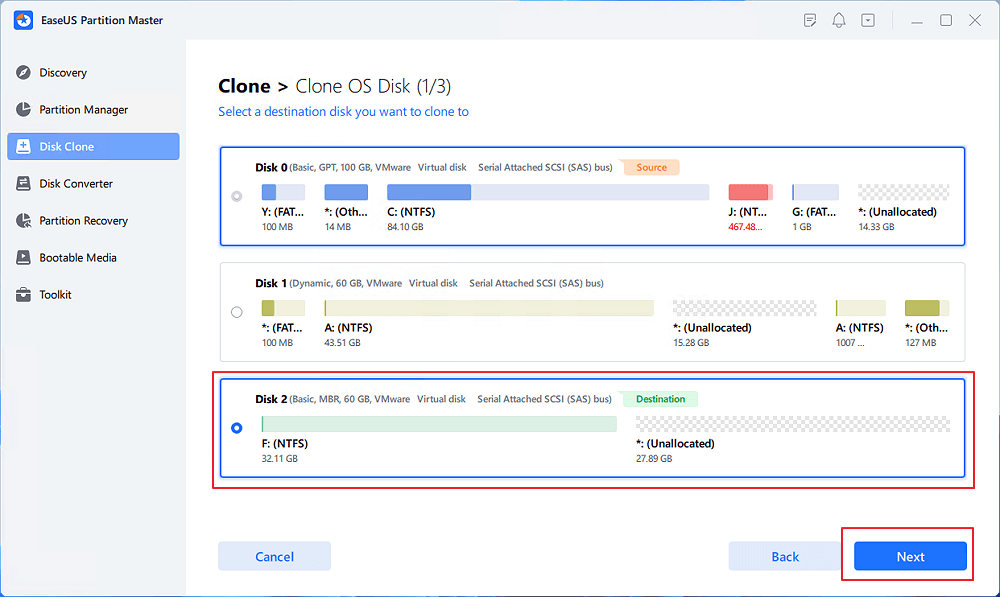
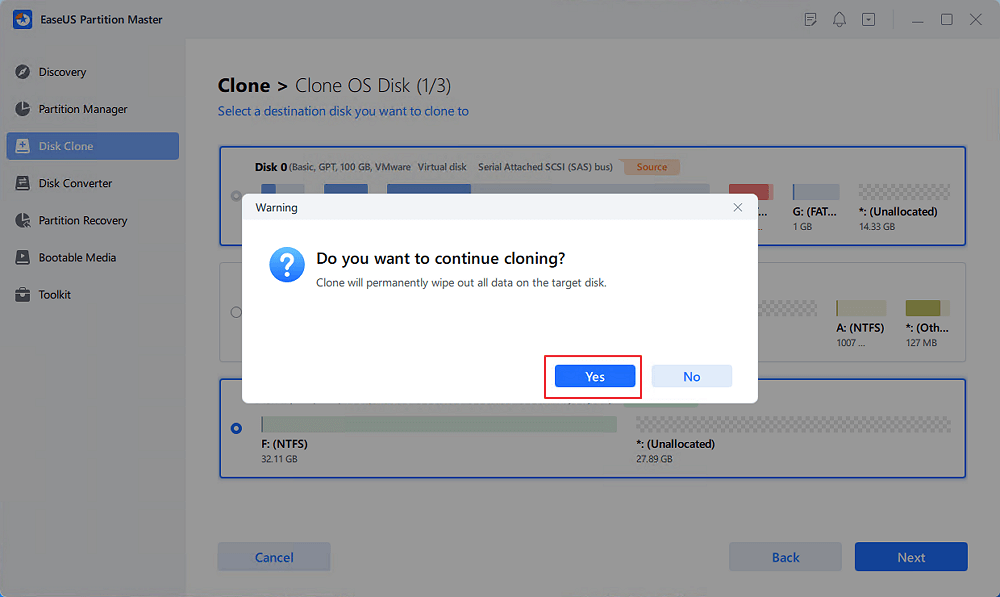
Click «Yes» to confirm that you want to continue the OS disk cloning process.
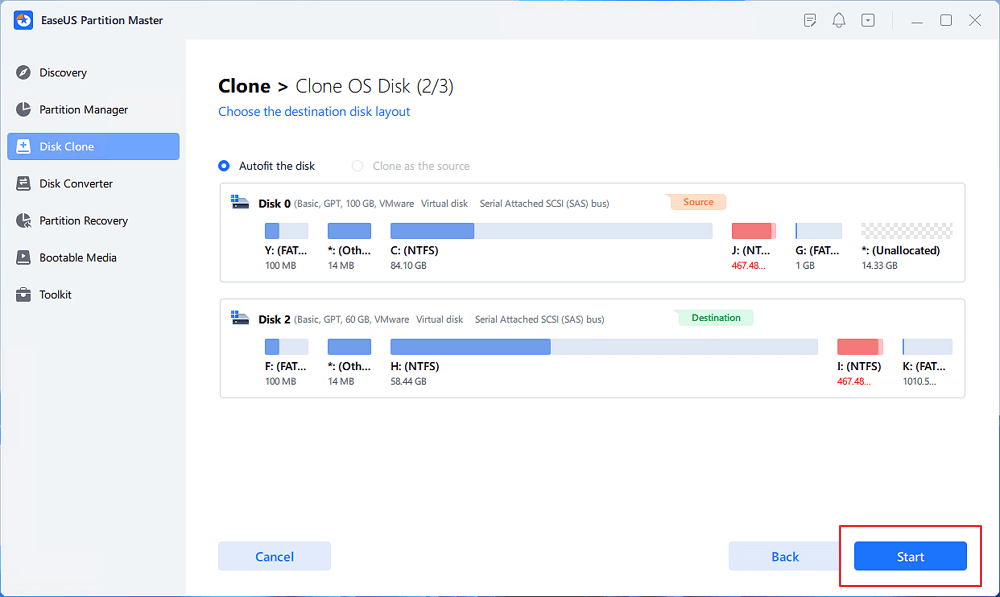
Step 3. View the disk layout, and click «Start» to begin the OS cloning process.
Step 4. When the process completes, you’ll see a confirming message, asking «if you want to start up computer from the clone target disk».
- Reboot Now means to reboot your PC and configure the computer to boot OS from the new disk immediately.
- Done means you want to make the changes later.

2. Migrate OS from SSD to NVMe
In the case of copying the Windows OS from an SSD to an NVMe SSD on the same computer, follow the steps mentioned in this section.
Moving your Windows OS to a faster drive will mean a faster boot time and increased computer responsiveness and performance. Use these steps to migrate OS from SSD to NVMe:
Steps to migrate OS to HDD/SSD:
- Run EaseUS Partition Master, and select «Clone» from the left menu.
- Check «Migrate OS» and click «Next».
- Select the SSD or HDD as the destination disk and click «Next».
- Check Warning: the data and partitions on the target disk will be deleted. Make sure that you’ve backed up important data in advance. If not, do it now.
- Then click «Yes».
- Preview the layout of your target disk. Then click «Start» to start migrating your OS to a new disk.
- After this, click «Reboot Now» or «Done» to determine if you want to reboot the computer from the new disk immediately.
«Reboot Now» means to keep the changes instantly, while «Done» means you need to restart the computer later manually.
Note: The operation of migrating OS to SSD or HDD will delete and remove existing partitions and data on your target disk when there is not enough unallocated space on the target disk. If you saved important data there, back up them to an external hard drive in advance.
3. Make NVMe Bootable
Once you have completed the process to clone Windows from SSD to NVMe SSD, you need to set the new drive as the boot drive. Only then will your computer reboot using the Windows OS located in the new NVMe SSD. You will need to access your computer’s BIOS settings using the following steps to make NVMe bootable:
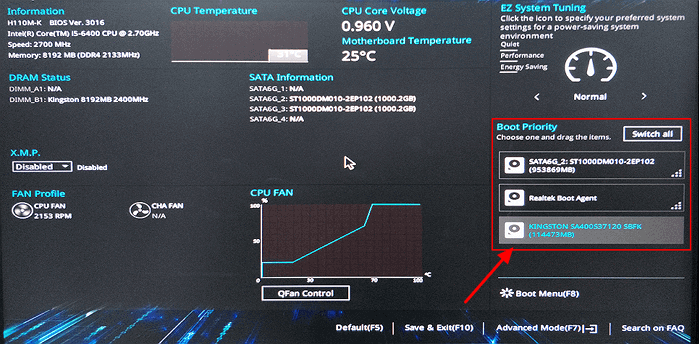
Step 1: Reboot your computer after cloning Windows OS and press the BIOS key to access the BIOS settings of your computer. The BIOS key differs for different computer models and can be F10, F12, F1, F2, DEL, or Esc.
Step 2: Use the arrow keys on your keyboard to find the «Boot» option in BIOS settings. Here find the «Boot Device Priority» option or a similar one.
Step 3: Now, use the «+» or «-» keys to give your new NVMe drive the highest boot priority. When done, press “F10” to save and exit the BIOS interface and restart your system.
Final Verdict
In a nutshell, moving your Windows OS to the new NVMe drive is the recommended choice. However, it isn’t a simple process, and you need a trusted and reliable cloning tool. EaseUS Partition Master is an excellent tool that allows you to clone Windows from SSD to NVMe in no time. With it, you can clone Windows to a new computer or migrate OS within the same computer.
FAQs about Clone Windows from SSD to NVMe
The process of cloning Windows from SSD to NVMe SSD can be confusing. That’s why below are answers to some FAQs regarding this topic from the internet:
1. Why Clone SSD to NVMe Won’t Boot?
The most likely reason for the newly cloned Windows OS in NVMe SSD not booting is its low booting priority. You need to change the booting order in the BIOS settings of your computer to assign NVMe Drive the highest booting priority. It can be done through the «Boot» settings in BIOS.
2. How to transfer OS from SSD to M.2?
You can easily transfer OS from SSD to M2 with the help of EaseUS Partition Master. It is an incredible OS cloning tool that provides a simple way to clone a system from one drive to another. During the cloning process, your destination device must be equal to or larger than the source drive.
3. Can you transfer OS from SSD to NVMe?
Yes, you can transfer OS from SSD to NVMe. You will need a third-party tool like EaseUS Partition Master to transfer OS from SSD to NVMe. It is a reliable and secure tool with a quick and straightforward cloning process. You can also download and use this tool for free.
Привет, друзья. В этой публикации рассмотрим, как перенести Windows 10 на SSD M.2. Казалось бы, тема клонирования Windows с одного накопителя на другой универсальная, и здесь просто нужно подобрать оптимальный для себя способ клонирования. Но когда лично я стал переносить Windows 10 на SSD M.2, не все использованные мной инструменты завершили операцию успешно, при том, что с переносом операционной системы на обычные диски HDD и SSD SATA эти инструменты справлялись отлично. Поэтому я решил написать отдельную статью о переносе Windows 10 именно на накопитель SSD M.2 с поддержкой NVMe. И я решил выбрать для переноса системы универсальный инструмент, который подойдёт для всех накопителей SSD M.2, а не только для накопителей отдельных производителей. Это и универсальный инструмент, и точно рабочий, но самое главное – он обеспечивает самый простой способ решения поставленной задачи. И это программа AOMEI Backupper Professional.
Как перенести Windows 10 на SSD M.2
Как перенести Windows на SSD M.2 NVMe мы рассмотрим на примере Windows 10, но версия операционной системы здесь не принципиальна. Если вы используете Windows 8.1 или Windows 7, изложенное ниже подходит вам в равной степени. Чтобы на SSD M.2 можно было перенести Windows, он, соответственно, должен быть видим операционной системой, а для этого его необходимо правильно подключить к компьютеру. Кстати, насчёт подключения, гляньте статью сайта «Как подключить SSD M.2 к компьютеру» и проверьте, правильные ли вы настройки в BIOS сделали.
 Для переноса Windows будем использовать программу AOMEI Backupper в её платной редакции Professional. Только редакция Professional предусматривает интеллектуальное клонирование Windows на другие диски – клонирование с автоматической коррекцией системного загрузчика, дабы он загружал клонированную операционную систему, находящуюся уже на новом диске компьютера. AOMEI Backupper в редакции Professional – платная программа, но вы можете использовать её совершенно бесплатно, активировав бесплатным лицензионным ключом, привязанным к конкретной версии программы. Детали смотрим в статье «Бесплатный ключ для программы AOMEI Backupper Professional 6.4».
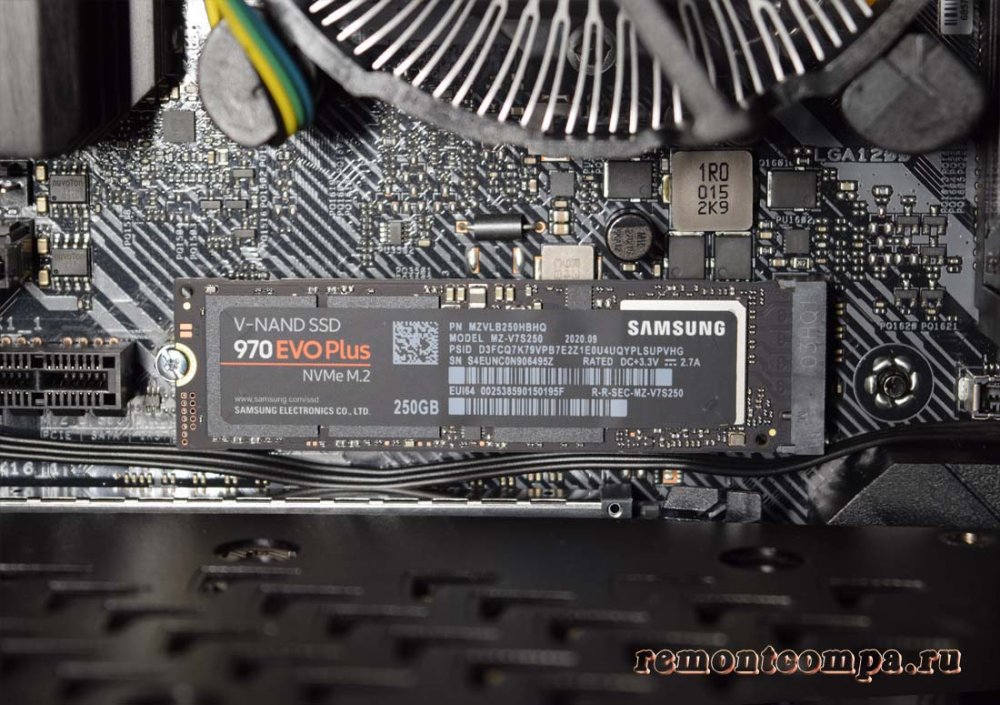
Клонирование Windows 10 на SSD M.2 в программе AOMEI Backupper Professional
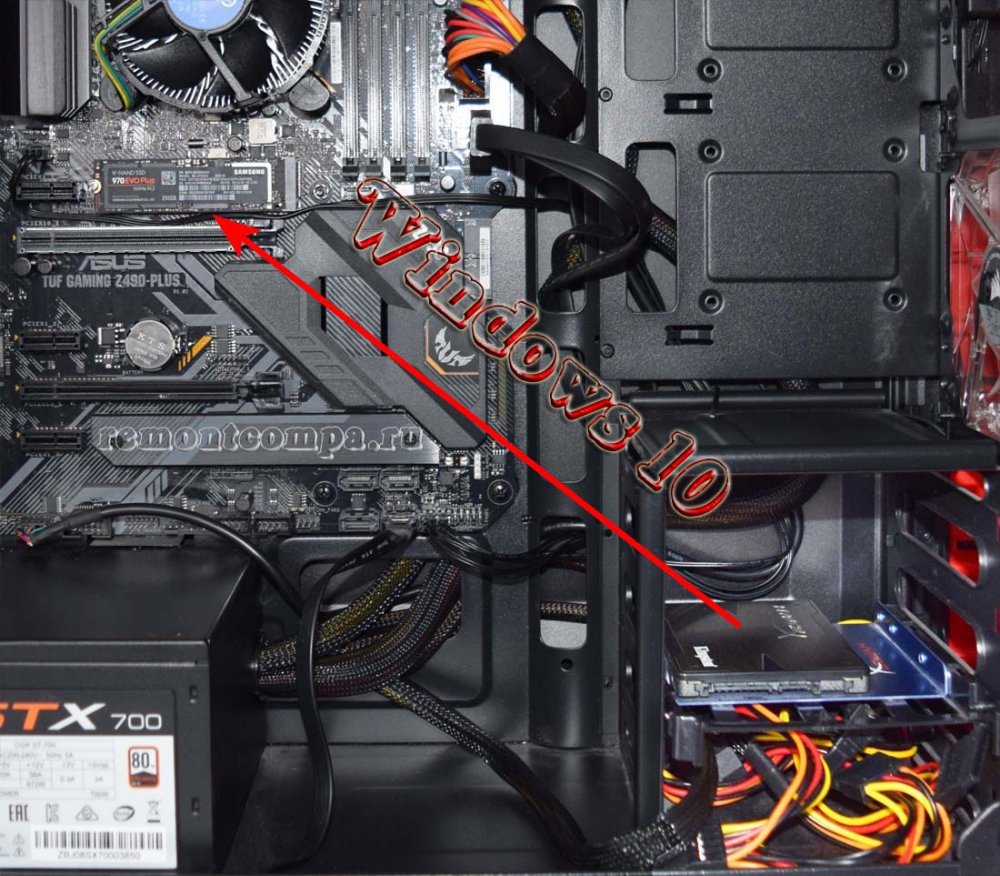
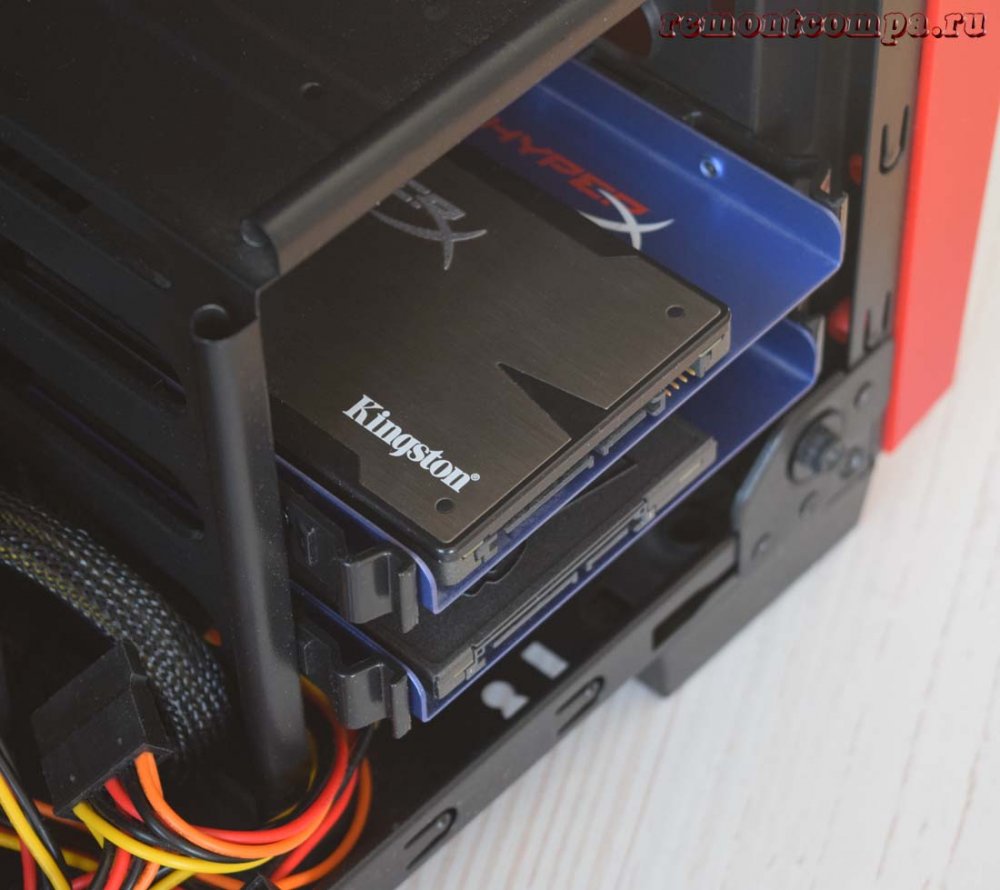
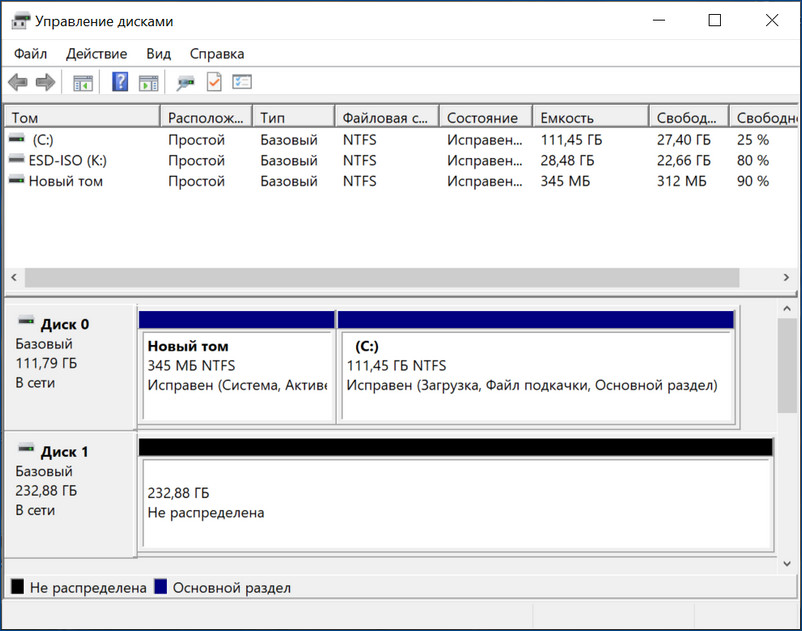
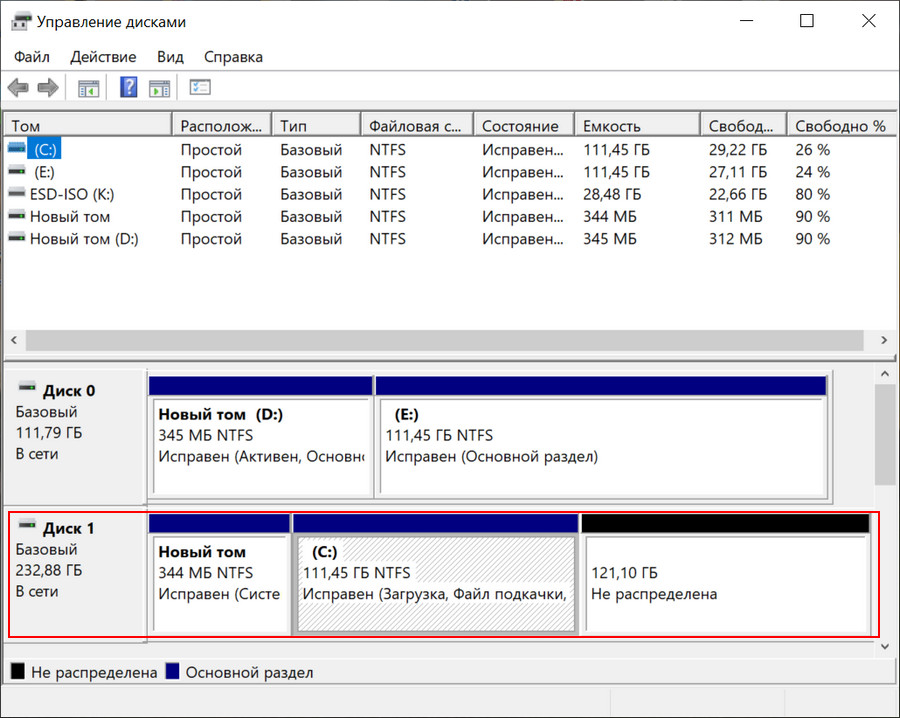
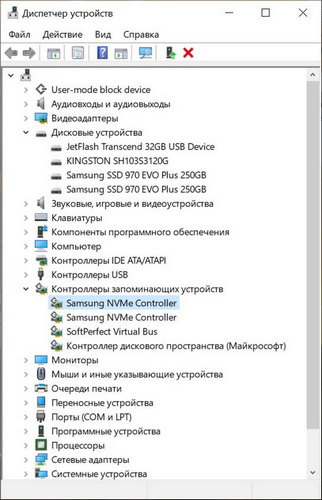
Условия переноса Windows 10 у нас элементарные: имеем наработанную систему на старом SSD SATA номинальным объёмом 120 Гб, и имеем новый SSD M.2 NVMe Samsung 970 EVO Plus с номинальным объёмом 250 Гб, чистый, без разметки. Вот как эта ситуация выглядит в управлении дисками.
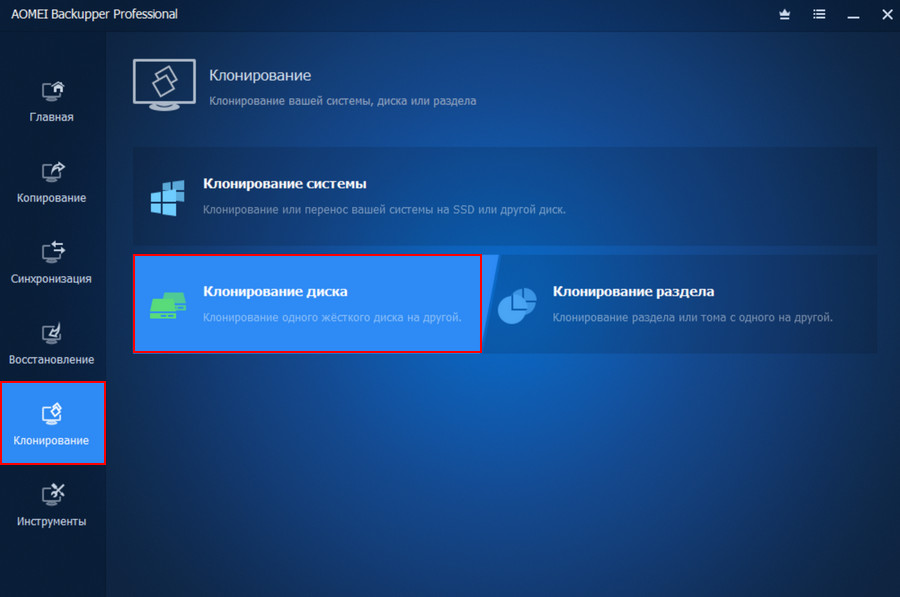
И давайте клонируем операционную систему с SSD SATA на SSD M.2. Запускаем AOMEI Backupper Professional. Идём в программный раздел «Клонирование», запускаем функцию «Клонирование диска».
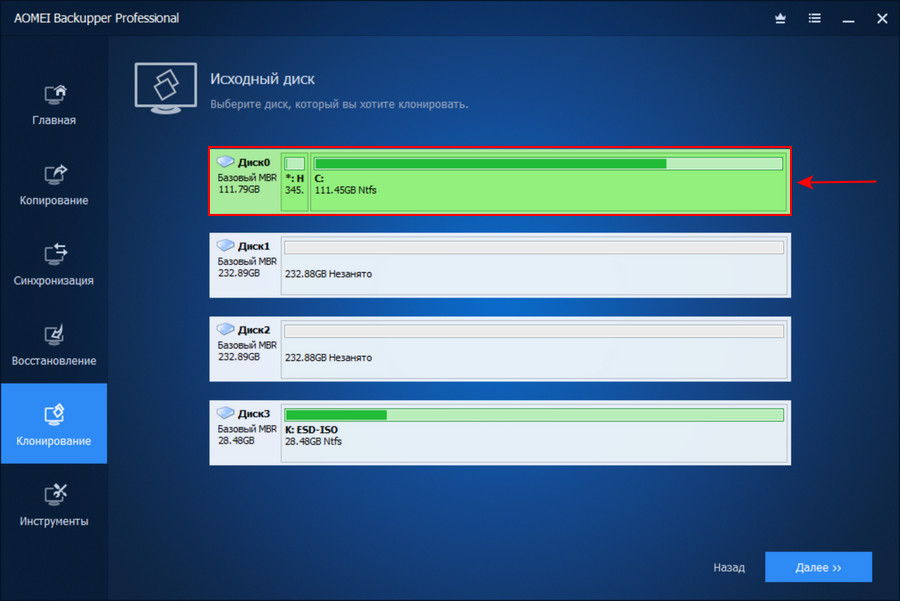
В качестве исходного диска указываем SSD SATA. Жмём «Далее».
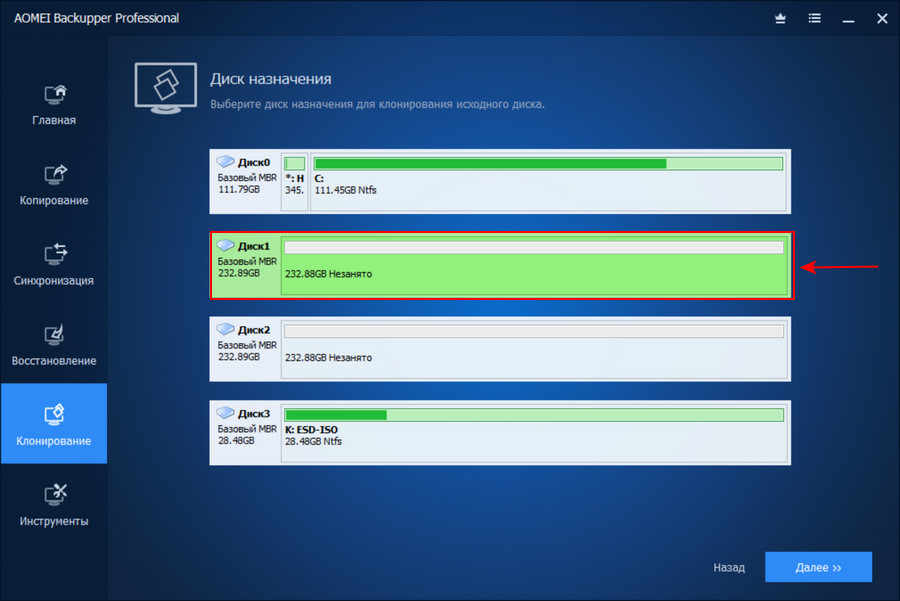
 В качестве диска назначения указываем всё чистое дисковое пространство нового SSD M.2.
На этапе сводки операции активируем опцию «Выравнивание SSD», это нужно для корректной разметки накопителя. Если интересно, подробнее о выравнивании разделов, зачем это нужно, и почему это важно, смотрим здесь. И жмём «Запуск».

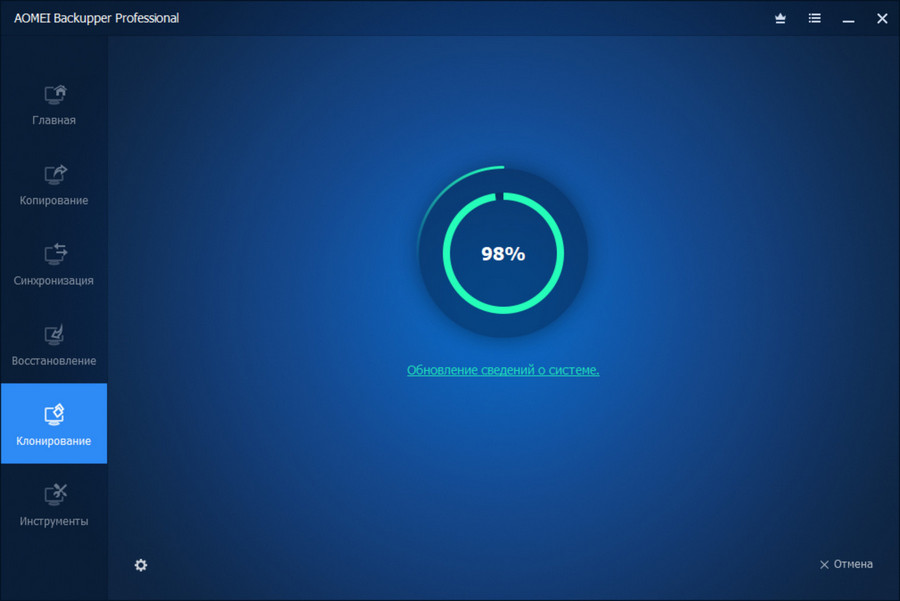
Ожидаем завершения операции, наблюдаем её прогресс в окне программы.

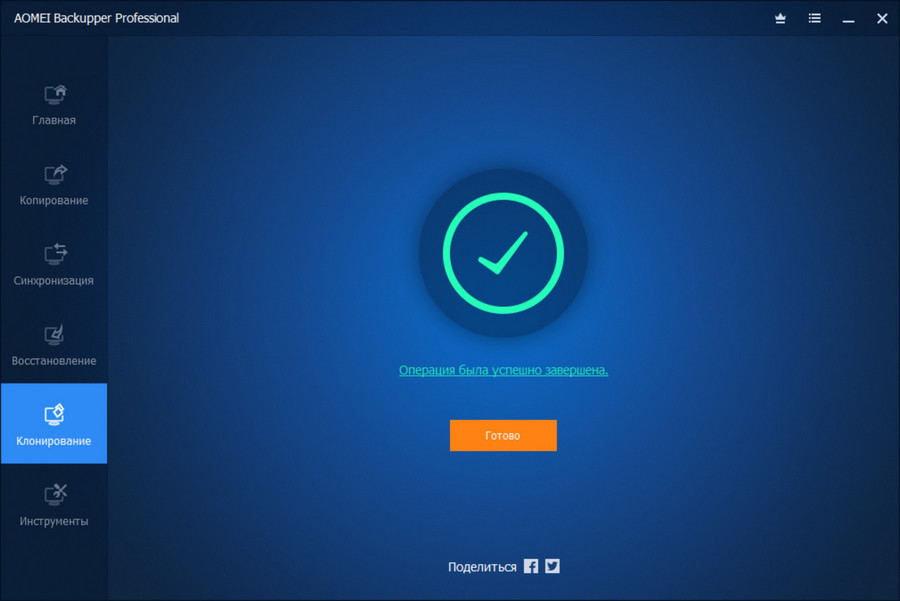
И всё – готово.
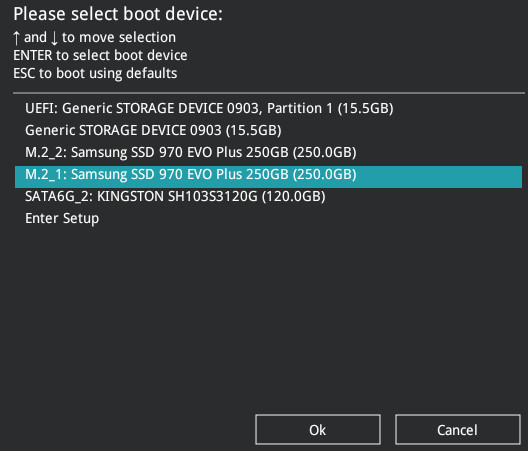
 Вот так просто происходит перенос Windows 10 на другой диск, и более ничего не нужно. Просто перезагружаем компьютер и в приоритете загрузки BIOS выставляем новый накопитель SSD M.2.
 И уже внутри клонированной «Десятки» можем посмотреть на ситуацию в управлении дисками. AOMEI Backupper Professional скопировала все системные разделы Windows 10. Из-за разности размера накопителей в конце дискового пространства на SSD M.2 осталась часть пространства в размере 121 Гб, эту часть потом можно оформить в пользовательский раздел.
После клонирования обновите драйвера на чипсет материнской платы и драйвера накопителя SSD M.2 NVMe с сайта производителя.
Друзья, если у вас что-то не получается с программой AOMEI Backupper Professional, попробуйте другие способы переноса Windows на SSD. В статье «Как перенести Windows 10 на SSD» мы сделали подборку лучших программ, в том числе бесплатных, для этих целей: AOMEI Partition Assistant, Paragon Migrate OS to SSD, HDClone, R-Drive Image, Dism++. Годность способов переноса Windows с использованием этих программ могу гарантировать только для SSD SATA, но, возможно, эти способы подойдут конкретно в вашем случае с SSD M.2.
Переход на более быстрый и эффективный накопитель NVMe SSD может значительно улучшить производительность и скорость работы вашего компьютера под управлением Windows 10. Однако многие пользователи сталкиваются с проблемой переноса операционной системы на новый диск. В этой статье мы рассмотрим подробное руководство по клонированию Windows 10 на NVMe SSD.
Для начала вам потребуется специальное программное обеспечение, которое поможет осуществить процесс клонирования. Одним из самых популярных и надежных инструментов является AOMEI Backupper. С его помощью вы сможете легко и быстро создать точную копию вашей текущей операционной системы на новый NVMe SSD диск.
Прежде чем приступить к клонированию, убедитесь, что ваш компьютер оборудован подключением NVMe SSD диска и у вас есть свободное место для его установки. Также рекомендуется создать резервную копию всех ваших важных данных перед началом процедуры, чтобы избежать потери информации в случае непредвиденных ситуаций.
Клонирование операционной системы на NVMe SSD диск — это отличный способ улучшить производительность вашего компьютера без необходимости переустановки Windows 10 и всех ваших приложений. Следуйте нашему подробному руководству и наслаждайтесь быстрым и эффективным функционированием своей системы!
Содержание
- Подготовка к клонированию
- Создание резервной копии
- Выбор подходящего программного обеспечения
- Клонирование Windows 10
- Установка NVMe SSD диска
- Запуск программы клонирования
Подготовка к клонированию
Перед тем как приступить к клонированию операционной системы на NVMe SSD диск, необходимо выполнить несколько шагов подготовки, чтобы избежать потери данных и обеспечить успешное выполнение процесса. Вот некоторые рекомендации, которые помогут вам подготовиться к клонированию:
1. Резервное копирование данных:
Перед началом клонирования, рекомендуется сделать резервную копию всех важных данных. На случай непредвиденных ситуаций или ошибок в процессе клонирования, резервная копия поможет сохранить данные и обеспечить их безопасность.
2. Очистка диска:
Если на NVMe SSD диске уже есть данные или операционная система, которые необязательны для дальнейшего использования, рекомендуется их удалить. Выполнение полной очистки диска позволит избежать возможных проблем при клонировании и обеспечит наиболее эффективное использование нового диска.
3. Проверка наличия свободного места на новом диске:
Убедитесь, что NVMe SSD диск имеет достаточно свободного места для размещения всей информации с исходного диска. Проверьте объем данных, которые будут клонированы, и убедитесь, что новый диск обладает достаточной емкостью.
4. Обновление драйверов и программного обеспечения:
Перед клонированием рекомендуется установить последние версии драйверов для NVMe SSD и соответствующего программного обеспечения. Это позволит обеспечить совместимость и оптимальную работу диска после завершения процесса.
5. Проверка наличия утилиты клонирования:
Убедитесь, что у вас есть необходимое программное обеспечение для клонирования операционной системы. Обычно такие утилиты доступны у производителя NVMe SSD диска или сторонних разработчиков.
Следуя этим руководствам по подготовке, вы сможете успешно склонировать Windows 10 на NVMe SSD диск и насладиться быстрой и стабильной работой системы с использованием нового диска.
Создание резервной копии
Прежде чем клонировать Windows 10 на NVMe SSD диск, важно создать резервную копию всех важных данных. Это обеспечит безопасность в случае возникновения проблем в процессе клонирования или если что-то пойдет не так.
Существует несколько способов создать резервную копию:
- Использование встроенного средства резервного копирования Windows 10. В Windows 10 есть встроенное приложение «Резервное копирование и восстановление», которое позволяет создавать резервную копию файлов и папок. Чтобы воспользоваться этим средством, откройте Панель управления, найдите и выберите раздел «Система и безопасность», затем «Резервное копирование и восстановление». Следуйте инструкциям на экране, чтобы создать резервную копию своих данных.
- Использование специализированного программного обеспечения. Существует множество программных продуктов, способных создавать резервные копии диска, таких как Acronis True Image, Macrium Reflect и другие. Загрузите и установите выбранную программу, следуйте инструкциям по ее использованию для создания резервной копии системы и важных данных.
Независимо от выбранного способа, убедитесь, что резервная копия создается на надежном и надежном устройстве хранения данных, чтобы гарантировать сохранность ваших файлов и системы.
Выбор подходящего программного обеспечения
Перед тем, как приступить к клонированию операционной системы Windows 10 на NVMe SSD диск, вам потребуется выбрать подходящее программное обеспечение для этой задачи. Существует несколько популярных программ, которые обладают функциональностью клонирования и могут работать с NVMe SSD дисками.
Одним из самых распространенных и надежных инструментов является AOMEI Backupper. Эта программа позволяет клонировать систему, диски и разделы с высокой степенью надежности. Она также поддерживает NVMe SSD диски, что делает ее отличным выбором для данной задачи.
Еще одной хорошей альтернативой является программное обеспечение Macrium Reflect. Оно предлагает широкий выбор функций, включая возможность создания резервных копий, клонирования и восстановления системы. Macrium Reflect также хорошо работает с NVMe SSD дисками.
Кроме того, среди других популярных программ можно отметить Acronis True Image, EaseUS Todo Backup и Paragon Hard Disk Manager. Все они обладают функциональными возможностями клонирования системы и поддерживают NVMe SSD диски.
Перед выбором программного обеспечения для клининга Windows 10 на NVMe SSD диск, рекомендуется ознакомиться с официальными веб-сайтами каждой программы, чтобы подробнее узнать об их функциях и возможностях.
| Программа | Ссылка |
|---|---|
| AOMEI Backupper | Ссылка |
| Macrium Reflect | Ссылка |
| Acronis True Image | Ссылка |
| EaseUS Todo Backup | Ссылка |
| Paragon Hard Disk Manager | Ссылка |
Клонирование Windows 10
Чтобы клонировать Windows 10 на NVMe SSD диск, выполните следующие шаги:
- Подготовка к клонированию:
- Подключите NVMe SSD диск к компьютеру и убедитесь, что он работает и виден в системе.
- Установите на компьютер программу для клонирования дисков.
- Создайте резервную копию всех важных данных на другом носителе.
- Запуск программы для клонирования:
- Откройте программу для клонирования дисков.
- Выберите опцию клонирования диска или системы.
- Выберите исходный диск (Windows 10) и целевой диск (NVMe SSD).
- Настройка параметров:
- Установите параметры клонирования, такие как размер раздела, исключение файлов и т. д.
- Проверьте, что все настройки корректны.
- Запуск клонирования:
- Нажмите кнопку «Клонировать» или подобную.
- Дождитесь завершения процесса клонирования.
- Проверка и изменение загрузочного устройства:
- Перезагрузите компьютер и зайдите в BIOS или UEFI.
- Настройте загрузочное устройство, чтобы система загружалась с NVMe SSD.
- Проверка клонирования:
- Загрузите компьютер с клонированным диском.
- Убедитесь, что Windows 10 работает без проблем на NVMe SSD.
Следуя этому руководству, вы сможете успешно клонировать Windows 10 на NVMe SSD диск и наслаждаться улучшенной производительностью вашей операционной системы.
Установка NVMe SSD диска
Установка NVMe SSD диска представляет собой простую и быструю процедуру, которая позволит вам ускорить работу вашей операционной системы Windows 10. Чтобы установить NVMe SSD диск, следуйте приведенным ниже шагам:
- Откройте корпус вашего компьютера. Для этого выключите компьютер, отсоедините его от электрической сети и откройте боковую панель компьютерного корпуса.
- Найдите свободный слот M.2. NVMe SSD диски обычно имеют форм-фактор M.2 и требуют специального слота для установки. Найдите свободный слот M.2 на вашей материнской плате.
- Вставьте NVMe SSD диск в слот M.2. Осторожно вставьте NVMe SSD диск в слот M.2, обратив внимание на соответствие контактов. Убедитесь, что диск установлен надежно и плотно.
- Закрепите NVMe SSD диск. В зависимости от вашего компьютерного корпуса, возможно потребуется закрепить NVMe SSD диск с помощью винтов или специальных держателей. Установите диск так, чтобы он был надежно закреплен и не сдвигался.
- Закройте корпус компьютера. После установки NVMe SSD диска закройте боковую панель компьютерного корпуса. Убедитесь, что все винты и фиксаторы надежно закреплены.
- Включите компьютер и проверьте распознавание диска. После установки NVMe SSD диска включите компьютер и убедитесь, что диск правильно распознается в операционной системе Windows 10. Если диск не распознается, проверьте подключение и установку диска еще раз.
После установки NVMe SSD диска вы будете готовы к клонированию вашей операционной системы Windows 10 для повышения ее производительности. Не забудьте также перенести данные с вашего старого диска на новый NVMe SSD диск, чтобы сохранить все важные файлы и программы.
Запуск программы клонирования
После подключения NVMe SSD диска к компьютеру и установки необходимого ПО, вы готовы начать процесс клонирования Windows 10. Для этого запустите программу клонирования.
Ниже приведена таблица с примерами популярных программ клонирования, которые вы можете использовать:
| Название программы | Описание | Ссылка для скачивания |
|---|---|---|
| Acronis True Image | Мощное и надежное решение для клонирования дисков. | https://www.acronis.com/en-us/personal/computer-backup/ |
| Macrium Reflect | Программа с широкими возможностями и простым интерфейсом. | https://www.macrium.com/reflectfree |
| AOMEI Backupper | Бесплатная программа с поддержкой различных типов дисков. | https://www.aomeitech.com/ab/standard.html |
Выберите программу, которая лучше соответствует вашим потребностям, и скачайте ее с официального сайта. Установите программу на свой компьютер, следуя инструкциям установщика.
После установки программы, запустите ее и перейдите к следующему шагу.
Updated by
Daisy on Sep 19, 2023
NVMe refers to Non-Volatile Memory express. It is the host controller interface used to connect SSD. It has replaced the SATA interface in many instances due to its high read speeds, low latency, and low consumption. The speed of booting Windows from NVMe SSD will be optimized and enhanced. That’s why the NVMe interface is already built into many computers as a standard.

If you want higher computer read and write speeds, or want to upgrade your Windows 11/10 system, it is a good idea to clone Windows to NVMe. This article will provide a quick way to avoid installing Windows on NVMe and run Windows on an NVMe SSD. Let’s see how this works.
You can clone Windows to NVMe with professional disk cloning software, but there are some preparations you need to take care of before cloning. Let’s look at these additional actions and see a detailed step-by-step approach to help us clone Windows to NVMe successfully.
Preparations for Cloning Windows to NVMe
1. Prepare newer computer hardware. NVMe works better with Skylake chipsets or higher.
2. The motherboard needs to have an adapter for an M.2 slot that supports NVMe, such as an M.2 PCI-E x4 slot.
3. The computer supports UEFI boot mode and needs UEFI firmware.
4. If it is a new NVMe SSD, initialize it to GPT format.
5. Make sure that the space available on the NVMe SSD is larger than the space for the data on the source disk within Windows.
6. Backup all essential data on the target NVMe SSD. Because the cloned new data will overwrite the old data.
7. Download the professional cloning software: EaseUS Partition Master. This software can save time and effort and help you clone Windows to NVMe quickly.
Next, let’s see how this software works and follow the step-by-step guide to cloning Windows to NVMe.
Steps for Cloning Windows to NVMe
You can use EaseUS Partition Master to clone partitions and clone systems. It supports SSD 4K alignment, which can solve SSD cloning problems and maintain good SSD performance. And it has a good user interface and supports all Windows users.
Before using EaseUS Partition Master, please connect NVMe to the M.2 PCI-E x4 slot and make sure your computer can detect the NVMe SSD. Then, follow the steps below to clone Windows to NVMe.
Step 1. Launch EaseUS Partition Master, go to the Disk Clone tab, select «Clone OS Disk» and click «Next».
Step 2. Select the target new drive where you want to clone the OS to, and click «Next».
Click «Yes» to confirm that you want to continue the OS disk cloning process.
Step 3. View the disk layout, and click «Start» to begin the OS cloning process.
Step 4. When the process completes, you’ll see a confirming message, asking «if you want to start up computer from the clone target disk».
- Reboot Now means to reboot your PC and configure the computer to boot OS from the new disk immediately.
- Done means you want to make the changes later.
Once the cloning is complete, you can set the NVMe SSD as the boot disk and boot your computer from the NVMe. If you don’t know how to set up the boot disk, please refer to the following simple steps.
Step 1. Click F2/F8/Del to enter BIOS setup.
Step 2. Change the boot disk and set the NVMe SSD as the boot drive.
Step 3. Save the settings and exit.
- Tip
- If the cloned SSD won’t boot, you can check if you have cloned the system and set the target disk as a bootable drive.
The above describes how to clone Windows to NVMe with EaseUS Partition Master and how to set the target drive as a bootable drive. In addition to the cloning feature, EaseUS Partition Master has many more features:
- Format NVMe SSD
- Clone HDD to SSD
- Clone Windows to new SSD
- Clone Windows to another drive
If you are interested, click the link above to see the exact cloning method. If you have other problems related to disk partition, you can download EaseUS Partition Master for help.
Conclusion
If you want to clone Windows to NVMe for faster read/write speeds, you can use EaseUS Partition Master. This article provides detailed tutorials on preparing for cloning before using the tool and how to use the professional cloning tool. If you have any cloning related or partition related issues like formatting partitions, or resizing partitions. You can use this tool to solve your problems.
FAQs About How to Clone Windows to NVMe
This section lists other frequently asked questions about cloning Windows to NVMe. Please check out the questions and answers below if you have other questions.
1. Can you put Windows on NVMe?
You can put Windows on NVMe. And here are two ways to put Windows on NVMe. You can download and reinstall Windows on NVMe SSD. Or you can use EaseUS Partition Master to clone the system and partition to NVMe.
2. How do I convert Windows to NVMe?
Download EaseUS Partition Master and easily migrate Windows to NVMe SSD without reinstalling the system. And the software is very easy to use.
Step 1. Launch EaseUS Partition Master and select «Disk Clone» on the left side.
Step 2. Choose «Clone OS disk» and click «Next.»
Step 3. Select target drive and click «Next» to continue.
Step 4. Click «Yes» and choose «Start» to begin the cloning process.
3. Can you make NVMe bootable?
You can make NVMe bootable. You need to clone the OS to the NVMe SSD first. Then go to BIOS setup and change the boot order. And set the target drive to be bootable.