Если вы выполняете переход на новый компьютер, вам не нужно оставлять фотографии, видео, файлы и папки. Вы можете перенести их вместе с вами на новый компьютер, используя один из следующих вариантов.
Мы рекомендуем использовать OneDrive для быстрого сохранения файлов в облаке. Затем вы можете получить доступ к файлам на новом компьютере и на всех устройствах, включая телефон, планшет и т. д. Ваши файлы также будут архивироваться и защищены в облаке, поэтому они будут доступны, даже если что-то произойдет на вашем компьютере.
Вы можете получить OneDrive хранилище несколькими способами— с 5 ГБ бесплатного хранилища при входе с помощью учетной записи Майкрософтили с 1 ТБ хранилища при подписке на Microsoft 365. Сравнение планов
Параметр резервного копирования
Факторы, которые следует учитывать
СOneDrive :
-
Ваши данные безопасно хранятся в облаке
-
Вы можете легко получить доступ к содержимому на нескольких устройствах.
-
Вам не нужно приобретать оборудование
-
Восстановление файлов выполняется легко и мгновенно
Вам потребуется:
-
Расположение OneDrive хранилища
-
Доступ к Интернету
Вам потребуется:
-
Внешний жесткий диск или сетевой диск
Примечание: Если вы переходите с компьютера с Windows 7, а не с Windows 10, см. статью «Перемещение на компьютер Windows 10», чтобы узнать, как перенести файлы вместе с вами.
Указанные выше параметры помогут вам переместить файлы на новый компьютер. Чтобы получить доступ к избранным приложениям и службам Майкрософт с любого устройства, войдите с помощью своей учетной записи Майкрософт. Он подключит вас к вашим средствам и подпискам, а также поможет вам управлять цифровой жизнью, параметрами конфиденциальности, работоспособностью и безопасностью устройств.
Нужна дополнительная помощь?
Нужны дополнительные параметры?
Изучите преимущества подписки, просмотрите учебные курсы, узнайте, как защитить свое устройство и т. д.
В сообществах можно задавать вопросы и отвечать на них, отправлять отзывы и консультироваться с экспертами разных профилей.

Замена персонального компьютера, сбой системы, переустановка Винды – причины для переноса сохраненных данных с текущей Windows 10 на новую Windows 10 могут быть разными. В ранних версиях операционной системы такой функции не было. В «десятке» можно использовать несколько инструментов – уже встроенные в корневую структуру приложения или скачанные со сторонних ресурсов программы.
Что можно перенести?
Настройки десятой версии операционной системы позволяют переносить несколько типов файлов на новое устройство (компьютер, ноутбук). К ним относят:
- документы пользователя различного назначения (фото, папки, видео и многое другое);
- некоторые программы и приложения;
- настроенные показатели отдельных разработок, сети;
- разного рода библиотеки (даже если они находятся вне корневых каталогов).

Более быстрый вариант копирования данных пользователя – создание цельного образа носителя жесткого типа «старого» компьютера, последующий перенос.
Внимание! Осуществить копирование данных можно между процессорами одного разряда (64 или 32). Для разноразрядных действует следующее правило – с 64 на 32 перенос недопустим, с 32 на 64 возможен.
Как перенести данные в Windows 10
В ранних версиях операционки Windows 10 отсутствовали встроенные инструменты для переноса необходимых данных с одного устройства на другое. Благодаря последним обновлениям разработчиков компании Microsoft появилась возможность скопировать информацию без установки дополнительных приложений. Пользователю необходимо ознакомиться заранее с представленными методами, чтобы выбрать подходящий вариант.

Встроенные средства Виндовс 10
Перенести данные с одного ноутбука (стационарного компьютера) на новое устройство или временный носитель можно с помощью функции резервного копирования. Настройка позволяет формировать полный образ операционной системы с текущими параметрами и файлами для дальнейшего использования (возврата до предыдущего состояния, например). Инструкция:
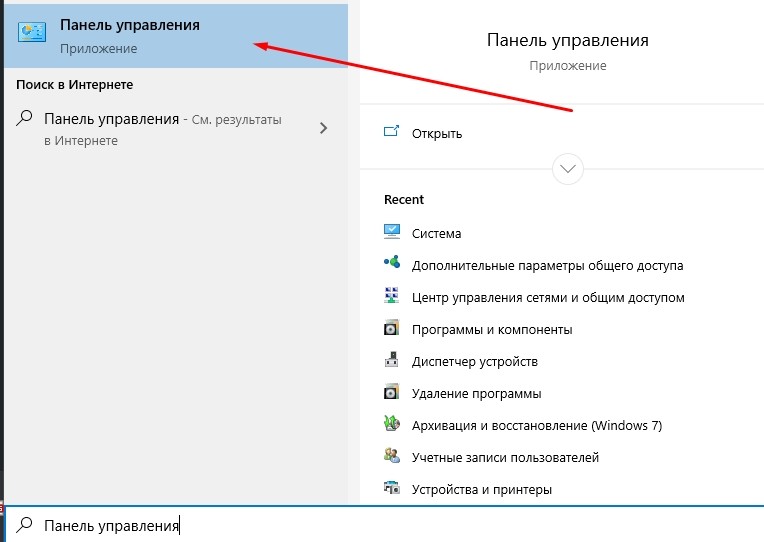
- вызвать контекстное меню кнопки Пуск на рабочем столе (кликнуть правой кнопкой мышки), перейти на раздел «Панель управления»,
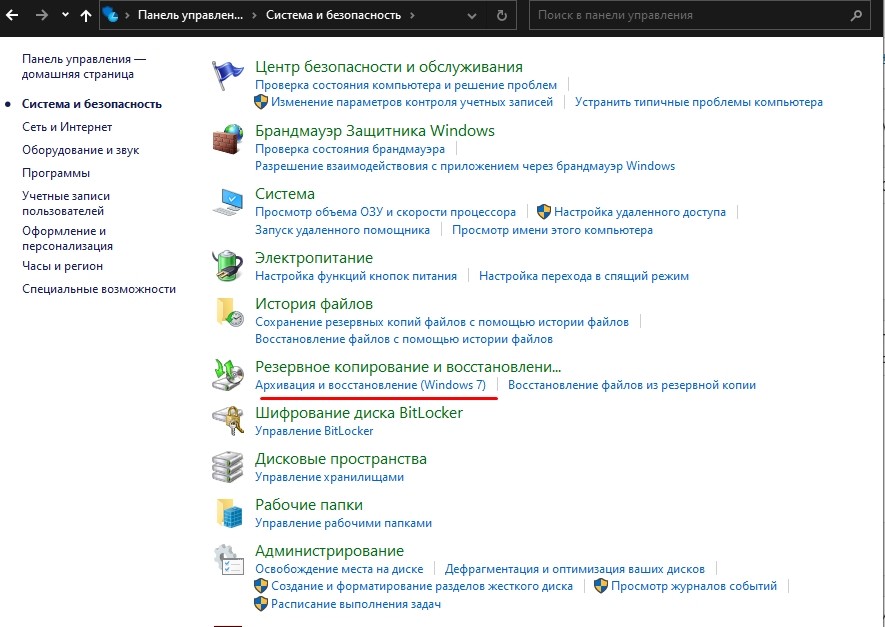
- затем – вкладка «Архивация и восстановление». Внимание! Отдельные разделы и документы можно открывать через поисковую строку, которая находится на панели рядом с обозначением кнопки Пуск;
- открыть блок «Создание образа системы»;
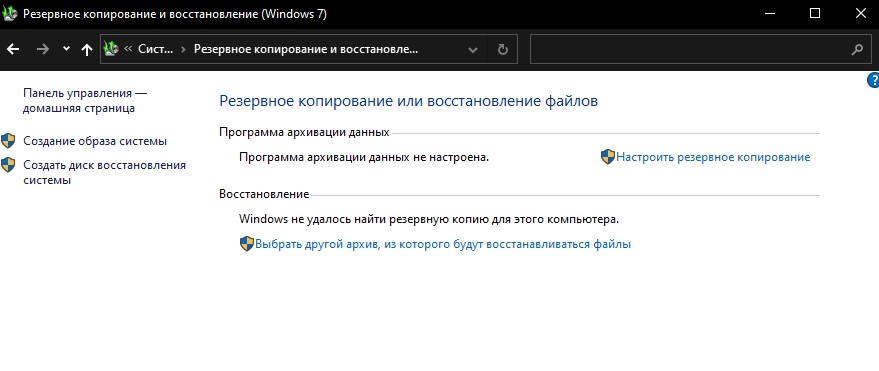
- откроется дополнительное окно с указанием возможных параметров, где следует указать расположение скопированного образа операционки.
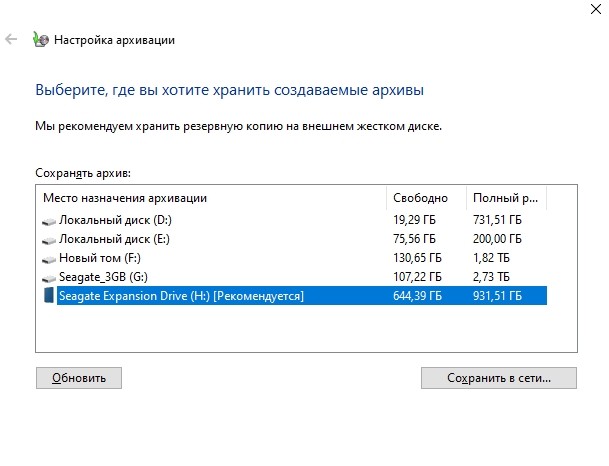
Важно учитывать размер свободного пространства. Размер планируемых для копирования файлов может весить несколько Гигабайт. Мастера рекомендуют использовать внешний носитель.
PCmover
Полное наименование стороннего приложения – Laplink PCmover Express. Программа распространяется бесплатно, интерфейс не сложный, команды и описание настроек выполнены на русском языке. Утилита прошла процедуру официальной сертификации Microsoft, несмотря на разработку сторонней организацией. Этапы действий:
- скачать установочный файл, активировать и пройти установку;
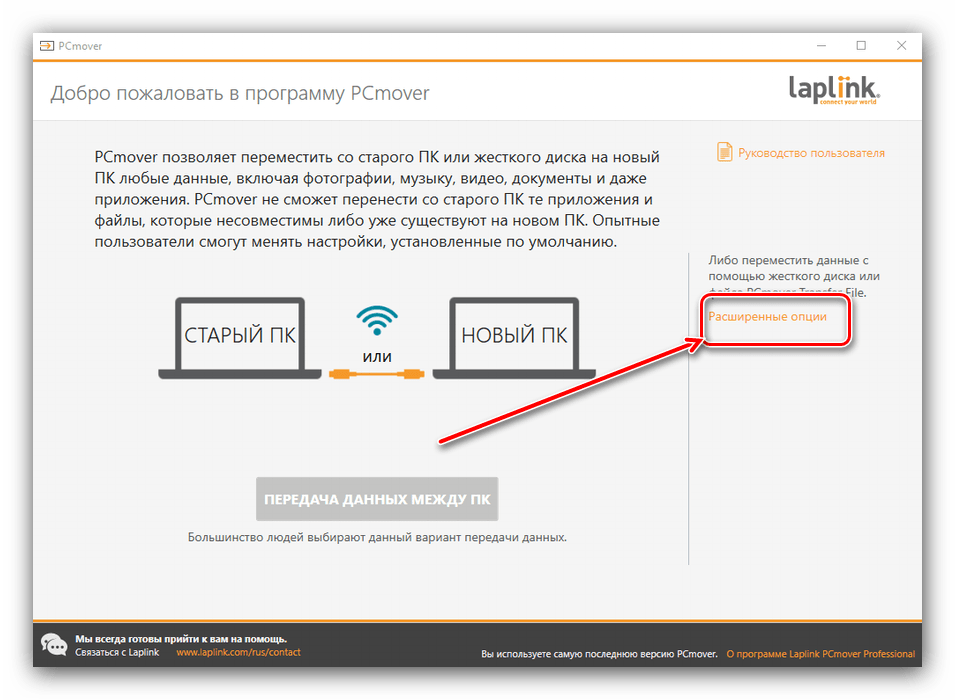
- кликнуть дважды по новому ярлыку приложения (появится на рабочем столе);
- выбрать раздел «Расширенные опции» (находится в правой части окна программы);
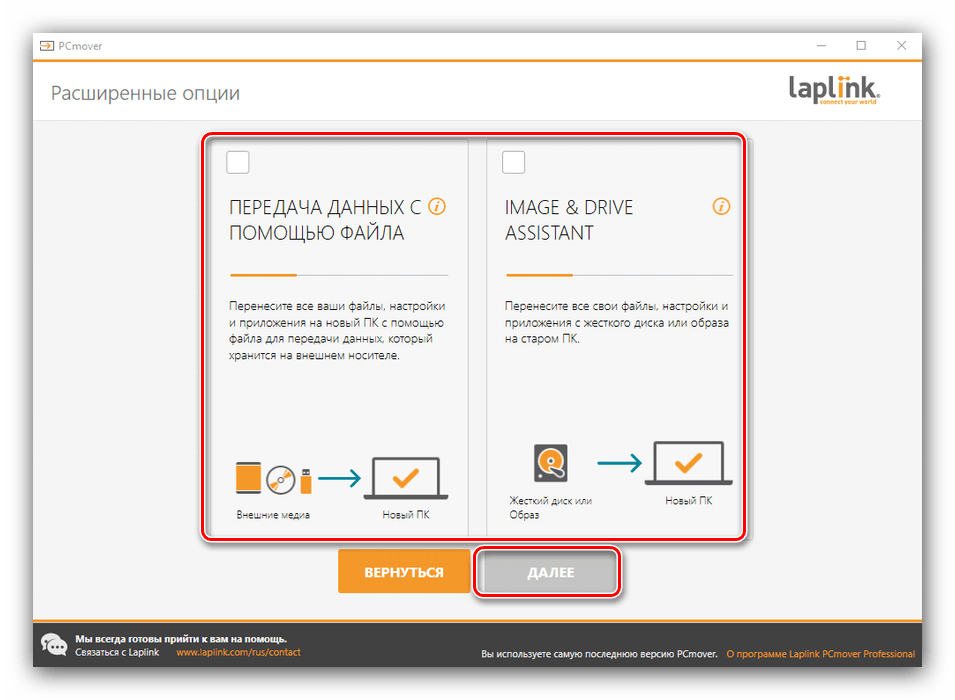
- система предложит два способа сохранения и переноса данных – в формате архива или на дополнительный носитель в образе текущего жесткого диска (первый вариант считается более совместимым);
- на следующем этапе подтвердить операцию «Это мой старый компьютер»;
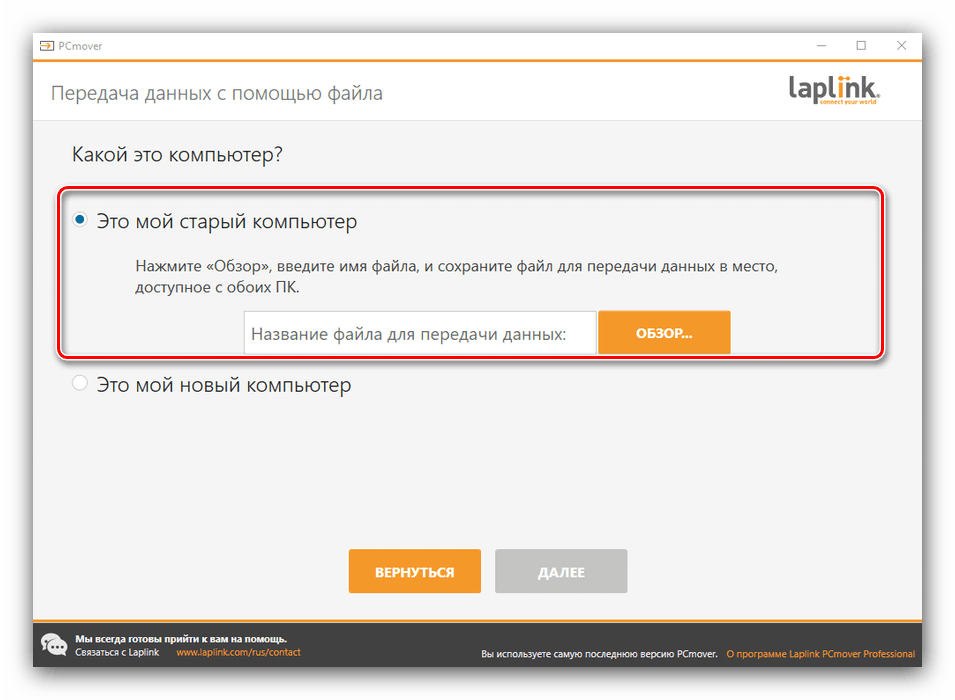
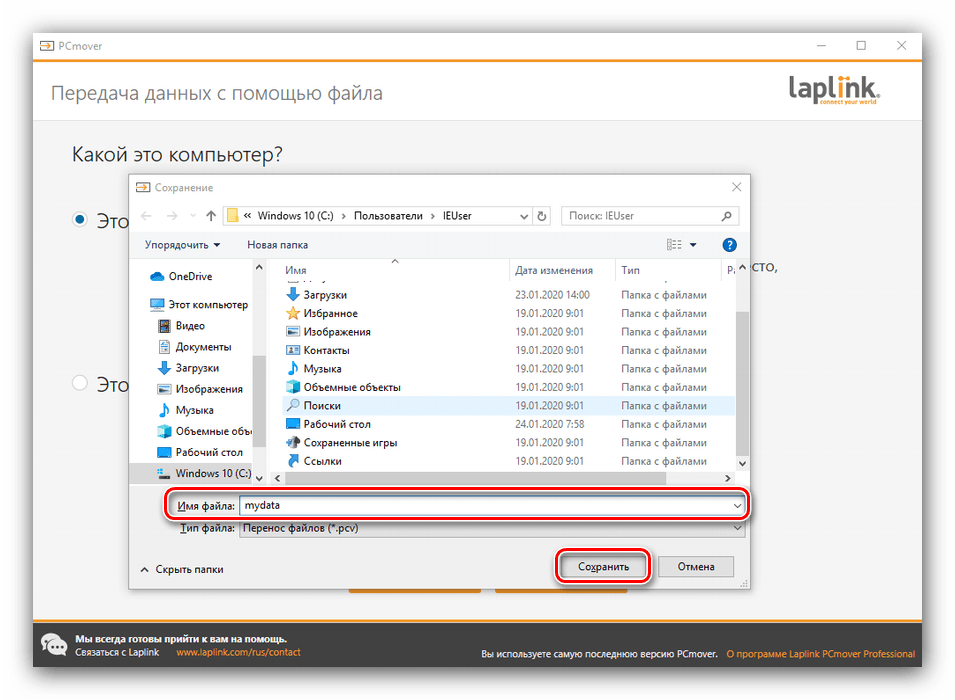
- затем выбирают месторасположение нового архива данных (нажать «Сохранить», «Далее»).
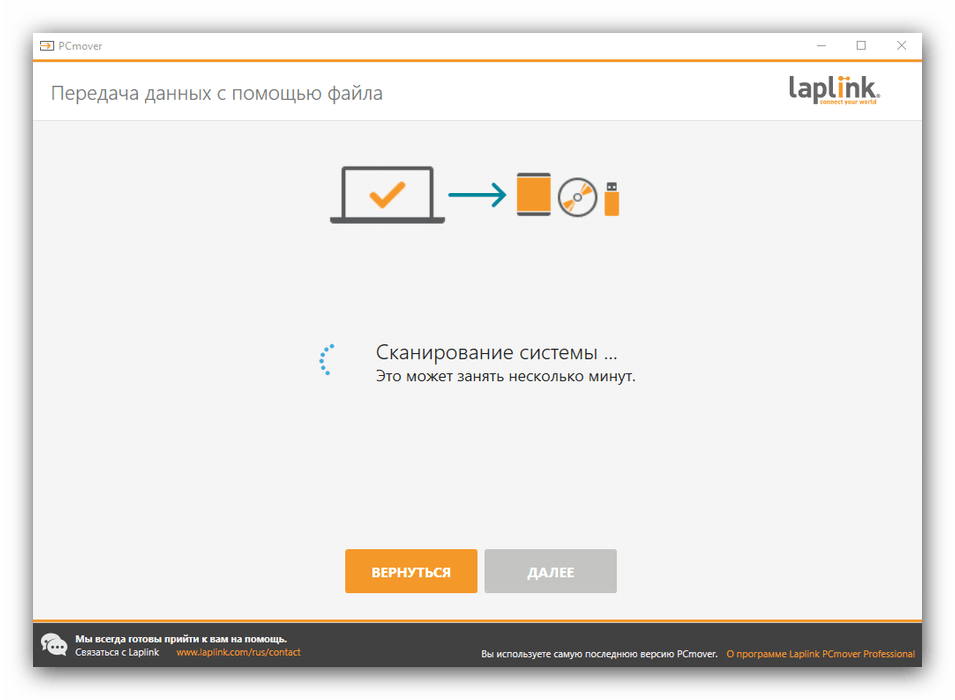
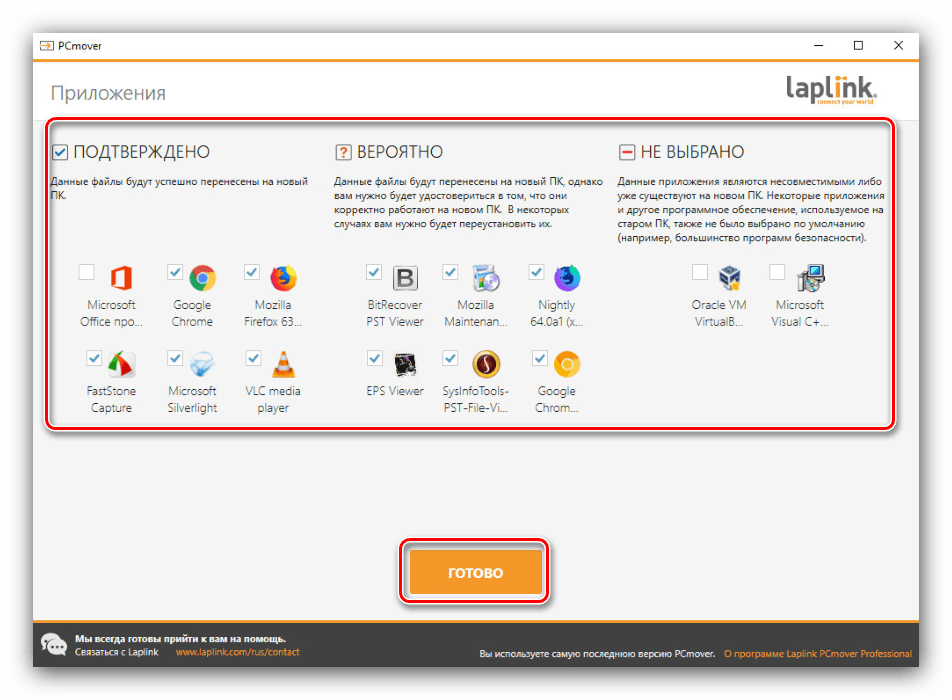
Проверка заданных параметров и возможности переноса занимает некоторое время. По завершении процесса кликнуть «Далее». Программа предложит настроить новый образ. После просмотра напротив каждого пункта ставят галочку – подтверждается копирование или нет.
Внимание! Если отметка стоит в столбце «Не выбрано», значит, перенос информации невозможен – либо указанный файл оказался несовместимым, либо аналогичный документ уже существует на новом носителе.
После настройки переносимых документов и программ необходимо нажать клавишу «Создать файл для передачи данных», затем «Завершить». На новом устройстве выполняют настройки (повторение шагов с 1 по 3 в инструкции, затем кликнуть «Это мой новый компьютер»). Для активации переноса нажимают два раза «Далее». Компьютер перезагрузится, что означает готовность к работе.
USMT
Дополнительная утилита для копирования информации с компьютера. Этапы работы с приложением:
- скачать установочный пакет, активировать запуск, дождаться установки, перезагрузить устройство;
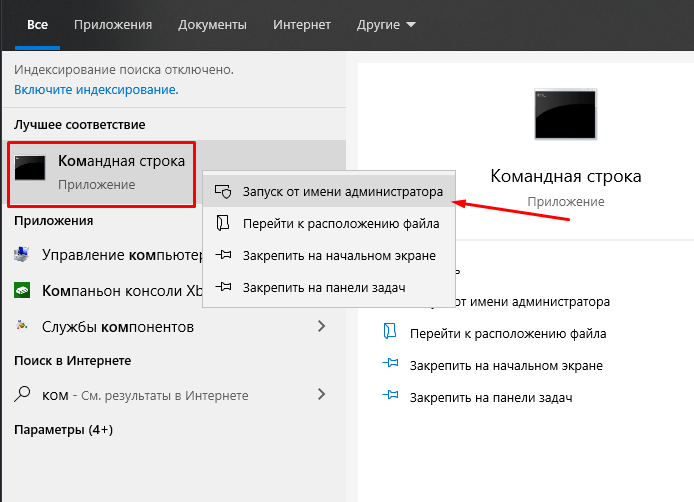
- открыть командную строку
- ввести команду CD /D C:\Program Files (x86)\Windows Kits\10\ADK\User State Migration Tool\amd64;

- далее вписать scanstate d:\migr\ /o /c /i:miguser.xml /localonly /uel:180 /ue:%computername%\;

- затем перейти в указанную папку и скопировать созданный файл.
Внимание! Настройка команд подобным образом требует определенных навыков и знаний. Если опыта работы с внутренними изменениями недостаточно, следует обратиться к мастеру.
Приложение WinWin
Стороннее приложение, которое работает через локальные сети и Wi-Fi. После запуска программа требует обозначить на каждом устройстве – это старый или новый компьютер (но втором появляется после активации и соединения). Утилита позволяет настраивать реестр переносимых данных в ручном режиме. После редактирования необходимо кликнуть «Далее» и дождаться завершения процесса.

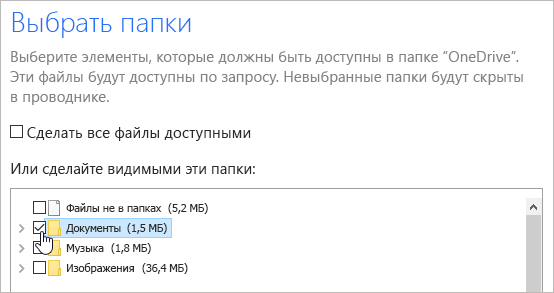
Использование OneDrive
Дополнительная программа сохраняет необходимые данные пользователя на новом устройстве и в «Облаке». Инструкция:
- скачать и установить приложение (если нет на «десятке»);

- зайти через учетную запись;

- проверить сохраненную информацию.
Выбранные папки и файлы синхронизируются в автоматическом порядке. На втором компьютере документы копируют из приложения OneDrive.
Копирование и перенос информации с одного устройства на другое в операционной системе Windows 10 возможны несколькими способами. Какой выбрать – встроенные утилиты или сторонние – пользователь решает самостоятельно.
Bought a new Windows 10 computer and want to transfer files from old PC to new PC? This tutorial introduces best 10 free ways to help you easily transfer files, apps, games, programs, or entire data to new Windows 10 computer. Each solution comes with a step-by-step guide.
Many of you may ever face the issue: After buying a new PC or laptop, there are so much data awaiting to be transferred from the old PC to new PC. Is there a secure, easy and fast way to do this?
Actually, transferring files/data from PC to PC is not that difficult. But if you have many big files, folders, programs, apps, game files, etc. it would cost a very long time to manually transfer the data.
This post aims to provide solutions to help you transfer various files or the whole hard drive data from old PC to new PC like a new Windows 10 computer.
Best 10 Free Ways to Transfer Files/Data from Old PC to New PC
Below we sift top 10 free ways to help you easily move files/data from PC to PC in Windows 10/8/7. Namely, you can transfer (big) files from PC to new PC using MiniTool Partition Wizard, external hard drive, USB, WiFi/Internet, OneDive, transfer cable, Ethernet cable, HomeGroup, etc.
Some of the 10 free ways allows to manually transfer needed files from PC to PC, while some can allow you to copy everything in the old hard drive or a specific partition (incl. OS partition) to new Windows 10 computer.
Each method is attached with a step-by-step guide. Hope it can give you some solutions in PC to PC data transfer.
How to Transfer Files from PC to PC – 10 Ways
- Use MiniTool Partition Wizard
- Via USB
- Use External Hard Drive
- Via USB Transfer Cable
- Use WiFi/Network/Internet
- Via Ethernet Cable
- Use OneDrive
- Use Email
- Use HomeGroup
- Utilize PC-to-PC Transfer Software
The first free PC to PC data transfer tool you can use is a program named MiniTool Partition Wizard.
This program is actually an all-in-one disk partition manager. It has many powerful functions and aids you to manage your hard drive and computer from many aspects. Hard drive data transfer from PC to PC (also laptop) can be easily realized with this tool.
Its copy disk, copy partition functions should be helpful when you change a new PC/laptop. It is extremely easy-to-use and delivers an ultrafast speed in operation.
No 1. Copy the whole hard drive data to new PC
If you’d like to copy and transfer all data from the old PC to the new one, you can use its copy disk function to create an exact copy of the old PC hard drive. Check below how to do it.
Free download and install MiniTool Partition Wizard Free on your old PC. The whole installation process is very fast.
MiniTool Partition Wizard FreeClick to Download100%Clean & Safe
Step 1 – Connect an external hard disk to old computer
At first, connect an external HDD or SDD to your old PC or laptop. And launch this free data migration software – MiniTool Partition Wizard – to enter into its main UI.
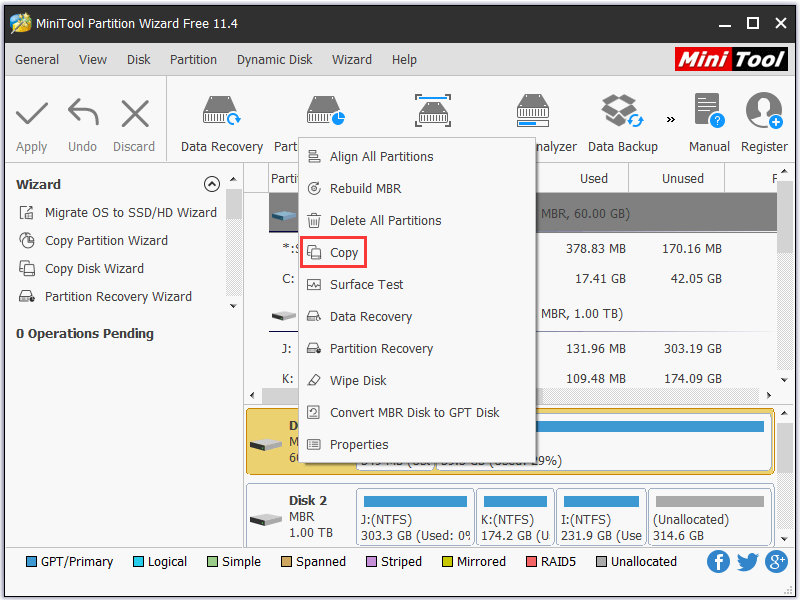
Step 2 – Select the old disk you’d like to copy
Right-click the source disk and click Copy. Optionally you can also select the source disk and choose Copy Disk Wizard or Convert Disk -> Copy Disk from the left action panel. And click Next.
Tip: Make sure the target disk have enough space to hold all data in the old hard drive. And it’s suggested to use a blank external hard drive, because when you copy the old disk content to the new hard drive, the data on the target drive would be deleted. You can also backup data on the external hard drive in advance.
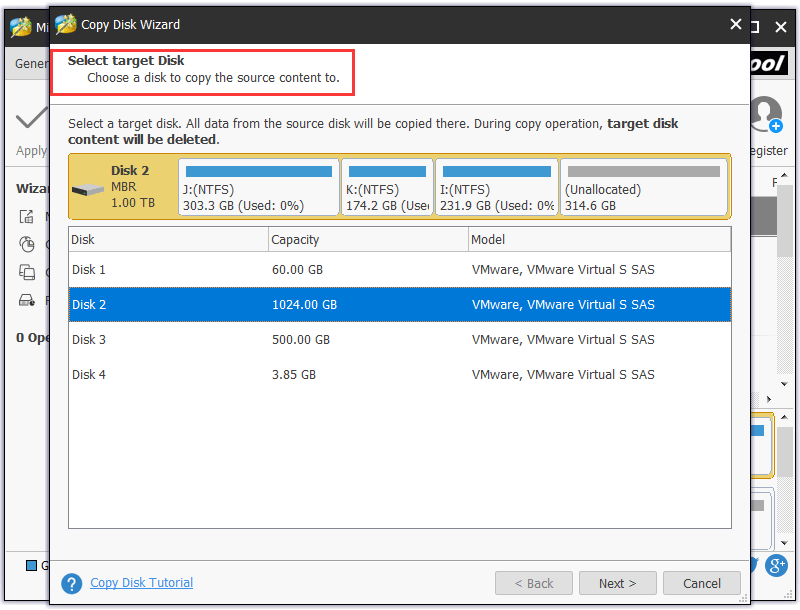
Step 3 – Choose the target disk to copy the data to
Select the target disk which you’d like to copy all content of source disk to. And click Next.
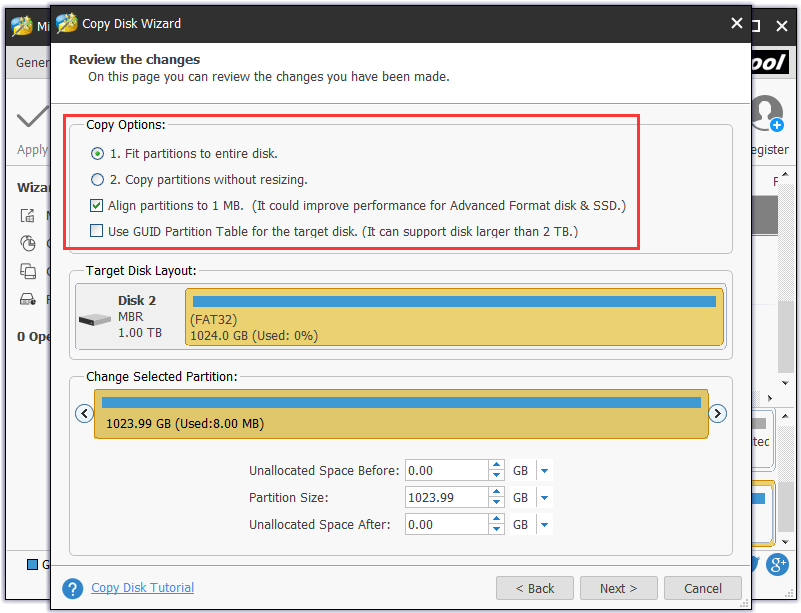
Step 4 – Choose a disk copy mode
In this window, you can choose some copy options. Normally you can tick Fit partitions to entire disk, and all partitions in the old drive will auto fill up the whole target disk.
Note:
If you tick Copy partitions without resizing, then you must make sure the target disk storage space is larger than the source drive.
If you the destination disk is an SSD, it’s recommended you also tick Align partitions to 1MB option, and this can improve the disk performance.
If you want to copy disk (which contains an OS) to a GPT disk and tick Use GUID Partition Table for the target disk option, then the free edition doesn’t support this operation. If you want to do this, you may turn to its Pro or higher editions.
Step 5 – Start copying whole hard drive data
Finally, you can hit Apply button on the left of the tool bar to execute the operation. And the whole data and files in your old computer hard drive incl. OS drive will be transferred to connected target external hard disk.
You can then connect the external hard drive to your new computer to access or transfer any data to your new Windows (10) PC.
Tip: If your old PC is already broken and can’t be boot any more, then you may turn to MiniTool Partition Wizard Pro or Pro Ultimate edition which has a Bootable Media Builder function. You can use this function to create a bootable media to USB drive or CD/DVD to boot the old computer without operating system. In the WinPE mode, you can launch MiniTool Partition Wizard bootable version to copy the old hard drive data or specific partition, access and recover needed files or data from the hard drive in old computer, recover lost or deleted partitions, etc.
No 2. Copy specific partition from old PC to new PC
What if you only want to transfer some important or needed data and files from PC to PC? You can use the Copy Partition function of MiniTool Partition Wizard to do this.
At the beginning, you can copy and transfer all your needed files into a specific hard drive partition, and then copy the whole partition to target disk latter. This would be faster than transferring files from PC to PC manually.
MiniTool Partition Wizard FreeClick to Download100%Clean & Safe
Step 1 – Connect an external HDD or SSD to old PC
Still, you can use an external hard drive and connect it to your old computer.
Step 2 – Select the source partition in old PC
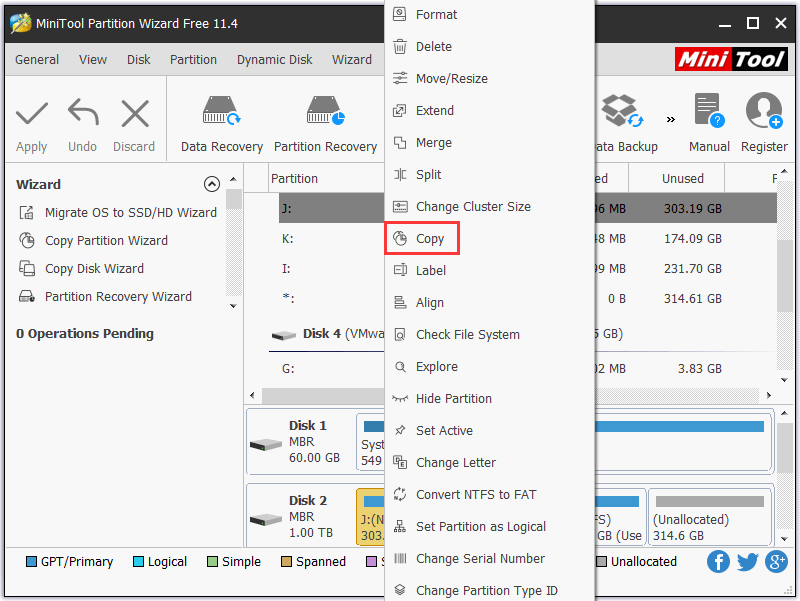
Run MiniTool Partition Wizard and click the partition in the old hard disk which you’d like to copy. Right-click this partition and click Copy option.
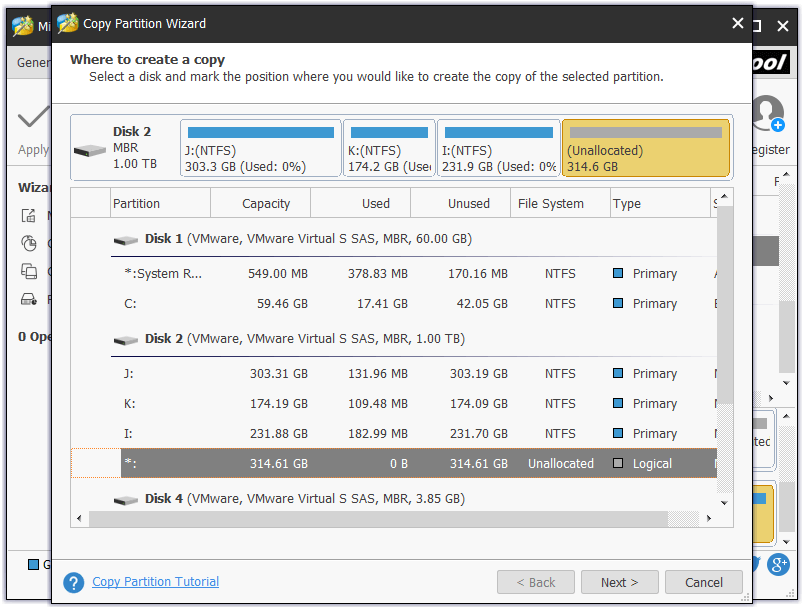
Step 3 – Choose where you want to copy the partition to
Choose the unallocated space in the connected external hard disk as the copy destination (how to shrink partition to get unallocated space).
Tip: You can only copy the selected partition to the unallocated space of a basic disk.
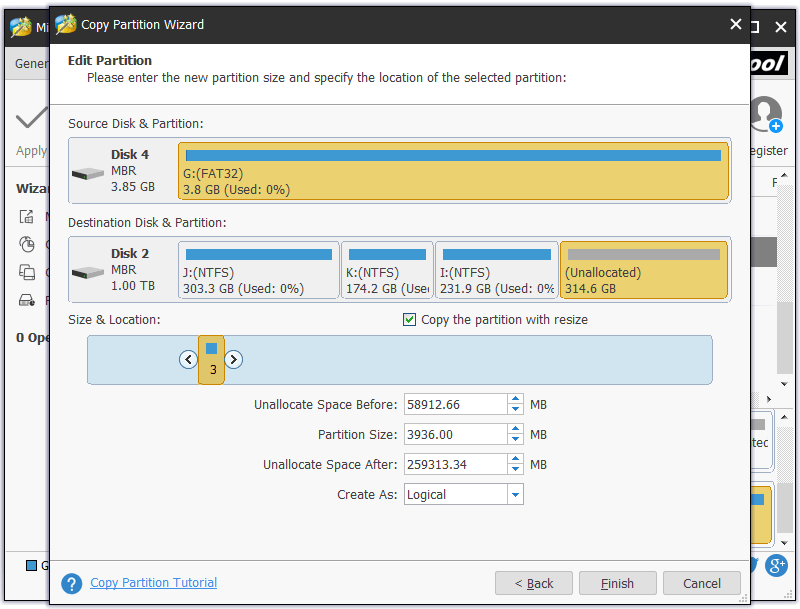
Step 4 – Edit the size and location of the partition
Here you can further edit the partition size and location, as well as choose the partition format. Then click Finish.
Step 5 – Transfer files and data to new Windows (10) PC
You can then connect the external hard drive to your new computer and follow the same 1-4 steps to copy the partition with all data to your new computer in a one-stop way.
Copy Disk and copy partition functions of MiniTool Partition Wizard are totally free. You can use them to transfer files from PC to PC for free in a secure, easy and fast way.
MiniTool Partition Wizard FreeClick to Download100%Clean & Safe
#2 How to Transfer Files from PC to PC for Free via USB
If you only need to transfer some important data from one computer to another, most of you may do it via an USB drive since USB is small, portable, removable and not expensive. Many of you may at least have one in hand.
Step 1. Plug in your USB to one of the USB port on your old computer. Double-click This PC icon on computer screen. Find and open your USB drive.
Step 2. Browse the different drives on your old PC to find the files, folders, apps, programs or any other data you’d like to transfer to new computer. Just use copy and paste to copy the files to USB. Then you can plug out the USB. Please safely eject the USB in case causing some error or data loss of the USB because of the wrong operation.
Step 3. Connect USB to your new Windows (10) PC and drag the files to new PC.
#3 Transfer Data from Old PC to New PC with External Hard Drive
For those who have many large files to transfer to new computer, an external hard drive may be a good choice due to its large-capacity.
Step 1. Simply connect your external hard drive to your old PC via USB cable. Some computers have eSATA ports which is designed for external hard drive. It can move data fast than using USB cable.
Step 2. Copy and paste needed data from computer to external hard drive, and then disconnect it.
Step 3. Connect the external hard drive with new PC, and offload the copied data to the new Windows (10) PC to laptop.
#4 Transfer Data from Old PC to New PC via USB Transfer Cable
You can also use a transfer cable to transfer files from PC to PC in Windows (10) directly. This is also faster than manually migrating data to new computer.
Step 1. Use this USB transfer cable to connect both your old computer and new Windows (10) computer. Insert one end of the transfer cable to old PC and the other end to new PC.
Step 2. After the two computers recognize the USB cable, it will start an installation wizard.
Click USB Super link adapter -> click Mode menu and choose High Speed Data Bridge -> press Windows + R key on the keyboard, and enter devmgmt.msc -> click System Devices to find Hi-Speed USB Bridge Cable.
Step 3. Insert the installation disk to DVD-ROM, and follow the instruction to install the data transfer software. Do the same thing on another computer.
Step 4. Open the software on both computers and you’ll see a two-sided window. Then you can select the files or folders from partitions on old PC, then drag and drop them to the destination of new computer.
In this way, you can share files between two computers directly.
#5 Transfer Files from PC to PC with WiFi/Network/Internet
Windows 10 April 2018 update introduces a new feature – Nearby sharing. This features allows Windows 10 users to quickly transfer files and data wirelessly to nearby devices by using Wi-Fi or Bluetooth.
Step 1. You can right-click on your Windows 10 computer screen and click Settings. Then click Shared experiences, and turn on Nearby sharing.
Step 2. After that, choose I can share or receive content from Everyone nearby or My devices only.

Step 3. Click This PC on your computer to open File Explorer, and right-click the file you want to share and click Share option.
Step 4. Select the second Windows 10 computer from the device list. The new Windows 10 PC should also run in version 1803 or newer and is within the Bluetooth or same WiFi/network range.
Step 5. After it transfers the file to new Windows 10 PC, the new PC will receive a notification to accept or decline the transferring file. You can click Save to receive the file.
This PC to PC file transfer method cannot be applied to large amount data transfer.
#6 How to Transfer Files from PC to PC with Ethernet Cable
You can also connect your two computers via an Ethernet cable. To avoid possible issues, it’s advised to use a crossover Ethernet cable.
Step 1. Plug in one end of the Ethernet cable to old PC and the other end to new PC.
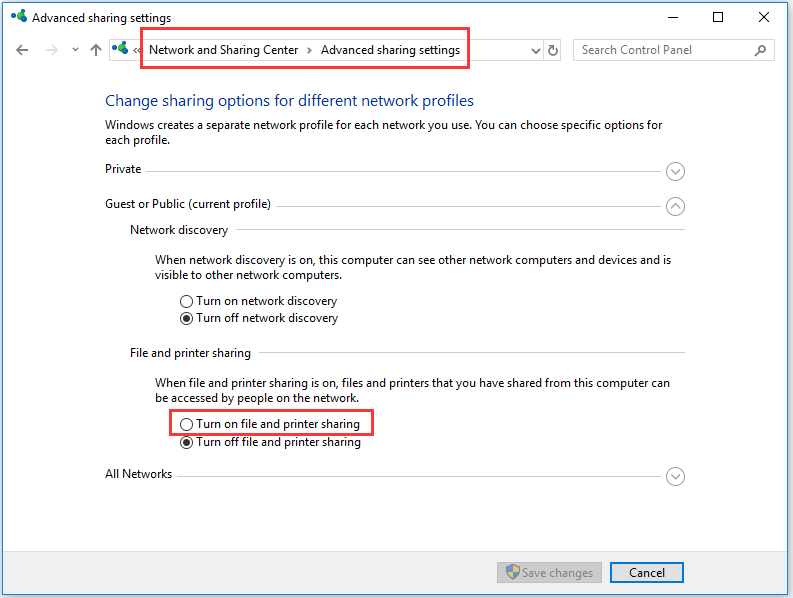
Step 2. Click Start on your computer. Then click Control Panel -> Network and Internet -> Network and Sharing Center -> Change advanced sharing settings -> tick Turn on file and printer sharing box -> click Save changes.
Step 3. Open the file or folder, and click Share on the tool bar. Then click Specific people -> Everyone -> Share –> Done.
Step 4. You can open File Explorer on new PC and click the old computer name to view the shared files and copy them to the new PC.
#7 Transferring Files from PC to PC for Free with OneDrive
Another easy to transfer data from old PC to new PC is to use Microsoft OneDrive cloud service. When you sign up a Microsoft account, you have a 5GB free storage space. If 5GB is not enough, you can subscribe a fee for more storage space, namely, $2 for 50GB per month, $7 for 1TB a per month.
You can transfer your files or folders in your old PC to OneDrive cloud service only if the computer has an internet connection. And then you can log in OneDrive with your Microsoft account on the new PC, and download the files to new Windows 10 PC.
You can only use OneDrive to transfer files and folders from computer to new computer. Other data can’t be transferred.
There are many other popular cloud services like OneDrive allowing you to transfer files from PC to PC. Google Drive, Dropbox are also good choices.
Click to Tweet
#8 How to Transfer Files from PC to PC for Free via Email
You can also attach files into email to send them to new computer, but it’s not suitable to send or transfer big files. You can compress the files before sending. Most computers equip a built-in file compressing utility. You can also find many free file compressors online like youcompress and more. However, Apps and many other data cannot be transferred to new computer with email.
#9 Transfer Files from PC to PC for Free with HomeGroup
To transfer files to new computer in Windows 10, you may also use HomeGroup to share data among multiple PCs securely.
#10 Transfer Data to New PC with PC-to-PC Transfer Software
As for how to transfer data from one computer to another, there are also some professional PC transfer/migration software in market to help you do the job. PCmover Express which replaces Windows Easy Transfer may be a good choice. ShadowMaker is also one of the best free data backup software for Windows 10/8/7.
Bottom Line
These best 10 free ways enable you to easily transfer files/data from old PC to new PC in Windows 10. Some allow you to fast create a copy of the old computer disk. Some can help you copy and transfer large files to new PC without internet. Some let you upload and view files and folders from new computer without using an external hard drive. You can choose any one of these 10 ways based on your own needs. If you have any other question, please contact [email protected].
Transfer Files from PC to PC FAQ
Can you transfer files from PC to PC with USB cable?
Yes, you can use a USB transfer cable to transfer files from PC to PC. It may deliver a faster data transfer speed than using wireless network. The detailed steps in included in the fourth method in this tutorial.
What is the fastest way to transfer files from PC to PC?
To fast transfer files from PC to PC, you can try to use USB transfer cable, Ethernet cable, network, external hard drive, USB, OneDrive, third-party PC-to-PC transfer software, etc. If you want to transfer everything from old PC to new PC, you can use MiniTool Partition Wizard to copy the whole partition or hard disk content to new PC.
How do I transfer files from my old computer to my new computer Windows 10?
You can use external storage devices like USB or external hard drive to copy files from the old computer to new computer. You can also use free Cloud storage services like OneDrive, Google Drive, etc. to backup files to the Cloud and then log into your Cloud service account to download them to your new computer.
How do I transfer files from PC to PC offline?
You can use USB, external hard drive or MiniTool Partition Wizard to move files between computers without internet. You can check the detailed guide above.
Windows 11 is just around the corner and will be on most PCs by the end of 2022. If you upgrade from a Windows 10 machine, downloading and installing the Windows 11 version should not be a huge issue. You can retain all your files and documents as they were on your previous software version.
However, what if your current laptop or PC does not support Windows 11, and you are forced to upgrade your device to a new PC? How to transfer files from Windows 10 to Windows 11?
Let us check out the steps and tools involved in transferring your files to your new Windows 11 device:
| ⏱️Duration |
3-5 minutes (depending on the data size and the transfer method) |
| ✂️Tools to Transfer Files |
|
| 💻Supported Systems |
Windows 10 and Windows 11 |
| ✍️Operations to Transfer Files |
|
Can I Share Files Between Windows 10 and Windows 11?
Yes, Microsoft does let you transfer files from Windows 10 to Windows 11 without hassles and complications. However, if you have opted for a new PC and need to set it up completely from scratch, it may be essential to check out a few extra steps for setting up and transferring your Windows 10 files to Windows 11.
You can utilize a software solution to simplify the transfer with a one-click migration. You may also check out the other manual methods, such as using a USB transfer cable or an external hard drive to transfer your files.
One of the best methods that can be utilized for transferring your content between Windows 10 and Windows 11 computers would be to make use of the network. You can connect the two devices to a safe Wi-Fi network (or even wired connectivity) and use additional tools to transfer files between the two PCs.
1. Use EaseUS Todo PCTrans Free
If you have chosen the free option to transfer files from Windows 10 to Windows 11 using a network connection, standalone software such as EaseUS Todo PCTrans Free can be a great option. The software comes with stunning options that you can make use of.
The free software assists you in transferring the entire content of the old computer onto the new computer. You can easily transfer practically all your apps, settings, preferences, images, documents, and other important data. The software can also be used for transferring an entire disk image. Of course, choosing the files and services you want to migrate would make it one of the most formidable options.
The one-click auto-transfer mode can be a great option if you want to transfer all the data from the old PC to the new one. The Pro version is free to transfer unlimited files and apps. Check out the free version before you can opt for the Pro version. That can give you an insight into the basic features of the software.
Step 1. Launch EaseUS Todo PCTrans on both old and new computers. Click the «PC to PC» on the main screen to continue.

Step 2. Choose the right transfer direction.
«New»: Transfer data from old PC to current new PC.
«Old»: Transfer data from current old PC to remote PC.
Step 3. Connect the two PCs on the same LAN by entering the password or verification code of the target PC. Choose the right transmission direction and click «Connect» to continue.
The verification code is on the right top of the «PC to PC» main screen on the target computer. Turn on button behind Connection Verification.

Step 4. Go to «Files» section, select the individual files you need to move.
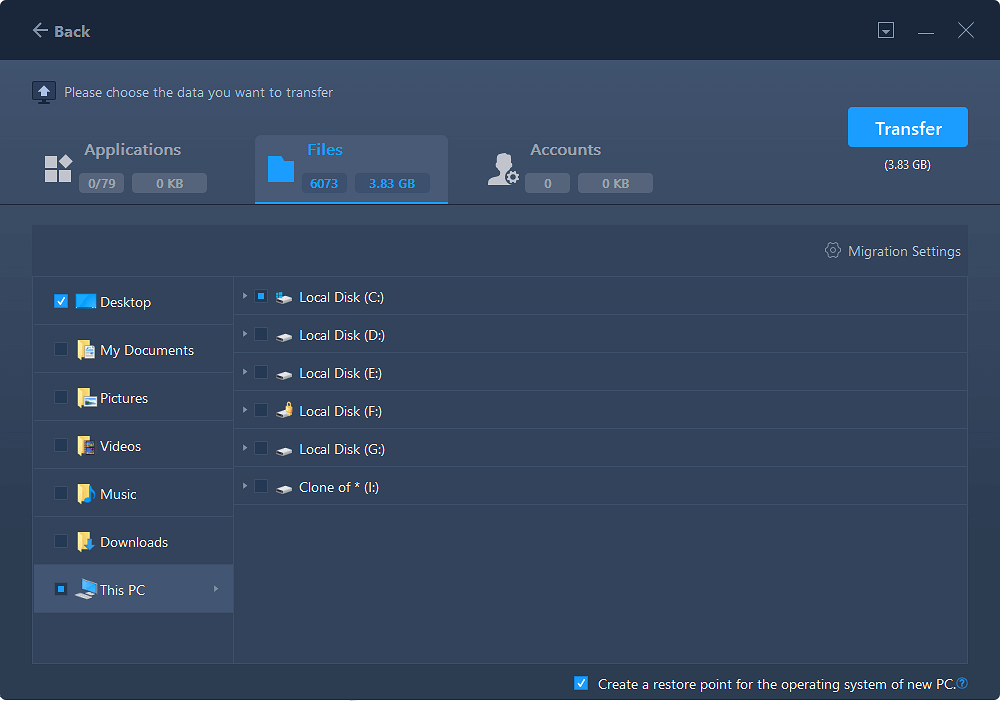
Step 5. And, click the «Transfer» button to begin the data migration. Wait for the transferring finishes. The time of the process varies based on the size of the files.

2. Share Files via OneDrive
If you are moving onto a new PC, OneDrive should be the perfect choice for meeting most of the expectations that you may have. The cloud storage option from Microsoft can help you transfer all your data, including files, photos, and videos, onto your new PC.
Here is how you can go with it –
- Install and set up OneDrive on your current PC. Since you plan to migrate all the content from your old PC to your new PC, you may need to opt for a subscription plan on OneDrive.
- Sync all the files you want to migrate with OneDrive. You can either do it on the OneDrive website or the OneDrive app. Select the option for Upload and add up all the files you want to migrate.
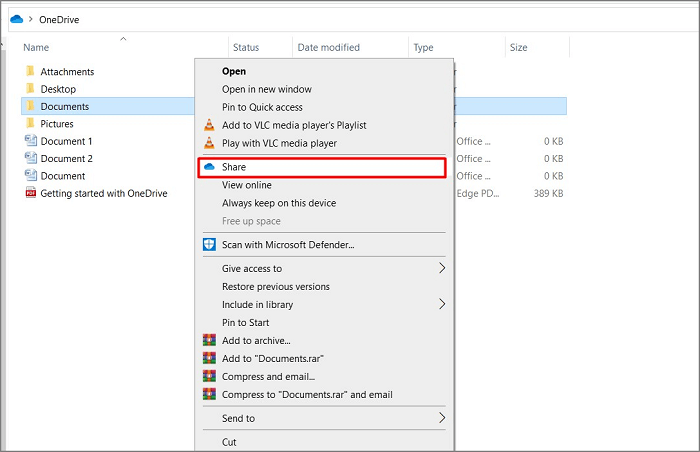
- You can even use File Explorer to move the files onto OneDrive
- Install and set up OneDrive on the new Windows 11 PC. Make sure that you have signed in to the same OneDrive account on your Windows 11 PC
- Select the files and download them onto your Windows 11.
-
That does it. The method lets you select the files you want to migrate to the new PC.
3. Use Email
If you are not sending the whole bunch of files from the old Windows 10 PC to the new Windows 11 PC, email can be one of the easiest and simplest options that you can utilize for an effective file transfer. Email has been considered one of the most secure and safe options for transferring files from one device to another.
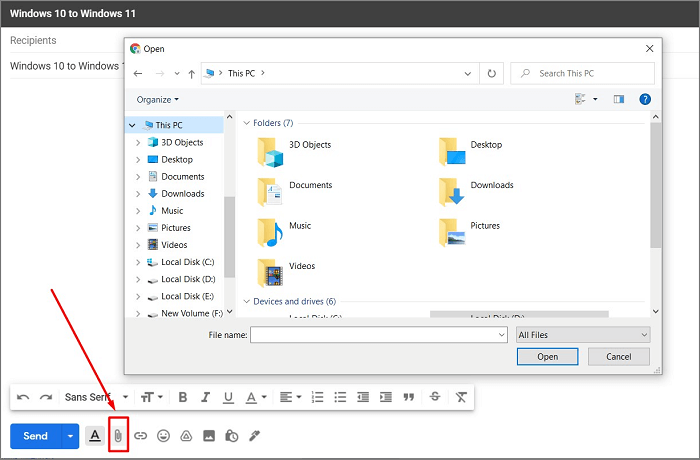
However, the file transfer using email can pose a few issues. None of the information transferred through email comes with any encryption option. Moreover, there may be a limitation on the attachment’s file size that can be sent with an email. Most email service providers restrict the size to 10 MB. That may be a truly lower value for a PC-to-PC data transfer.
If you think this passage is helpful for you to transfer files from Windows 10 to Windows 11, you can also share it with other people in need!
Transfer Files from Windows 10 to Windows 11 without Network
If you do not have network connectivity to assist you in transferring files from Windows 10 to Windows 11, you need not fret. Several other options can be helpful enough in transferring the files without hassles of any nature whatsoever.
1. Copy and move files via external hard drive
Flash drives and external hard drives can be one of the prime options for transferring files in a highly comfortable manner. You can simply connect your external hard drive to your Windows 10 PC and copy all the files you want to transfer to Windows 11.
Once that is done, you can connect the external hard drive to your Windows 11. Then, copy the content from the external hard drive onto your new Windows 11 PC. Isn’t that quite simple and easy enough to opt for? The external drive method would be helpful enough to provide you with a great degree of experience in a backup of your files, just in case something goes wrong.
2. Backup and restore files via EaseUS Todo PCTrans
EaseUS Todo PCTrans software can also be a great option for providing an enhanced file transfer experience. The Backup and Restore functionality on the software can be helpful in providing you with outstanding functionality in transferring your files from Windows 10 to Windows 11.
The software lets you back up the files on Windows 10, and then you can transfer the files onto your new PC. The software offers access to various advanced functionalities, making it one of the most rewarding experiences ever. You can even opt for recovering the data from a dead computer.
Step 1. Create a backup file to transfer
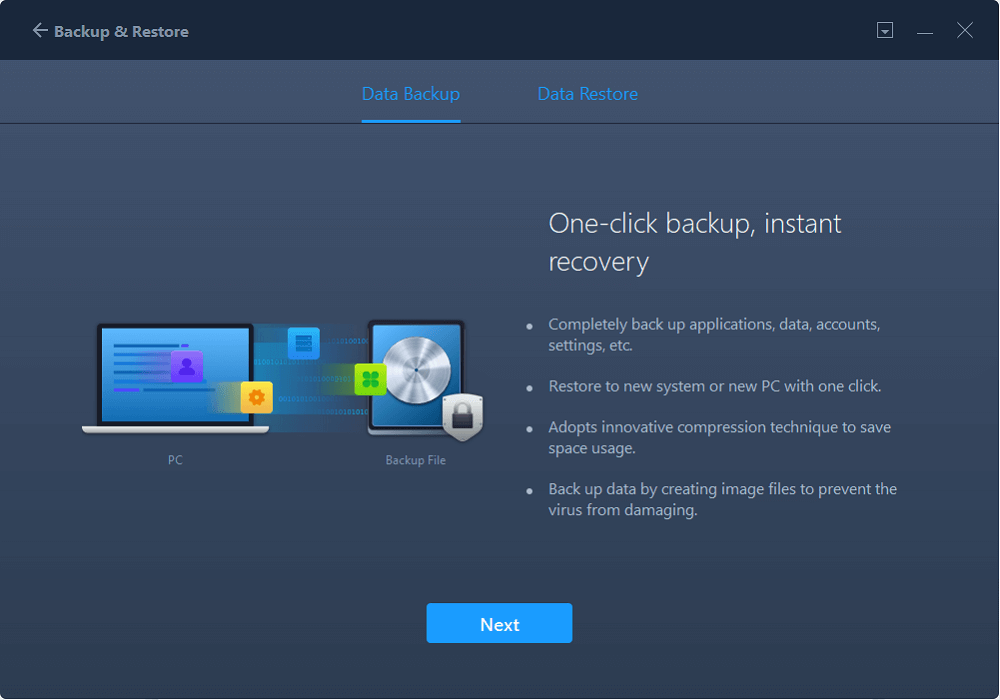
- Launch EaseUS Todo PCTrans on the source PC. Click «Backup & Restore» and click «Start» to go on.
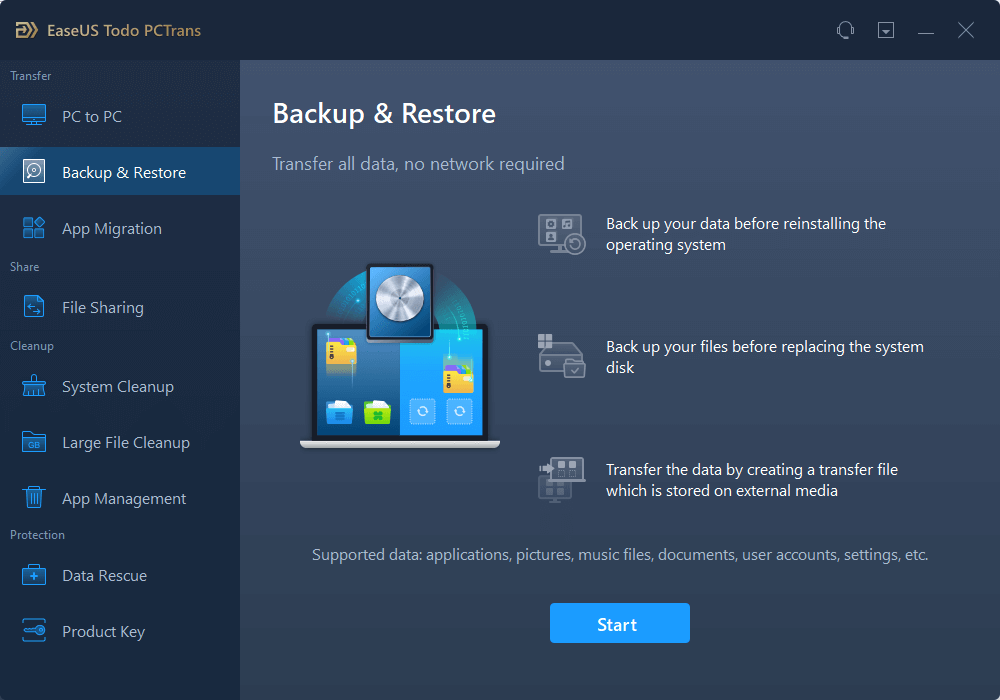
- Choose «Data Backup» and click «Next». Name the backup file, and set the external USB drive as the backup location.
- Click the «Files» section to choose files. Then, click «Backup» to wait for the process to complete.

When the creating process has completed, click «OK» to confirm. Safely eject the USB drive and connect it to the target PC. Move to recover the backup of files to the new PC using USB.
Step 2. Restore and transfer backup files to PC without network
- Connect the external USB drive with the file created from the source PC to the target PC. Launch PCTrans, click «Backup & Restore» > «Start» > «Data Restore» > «Next».
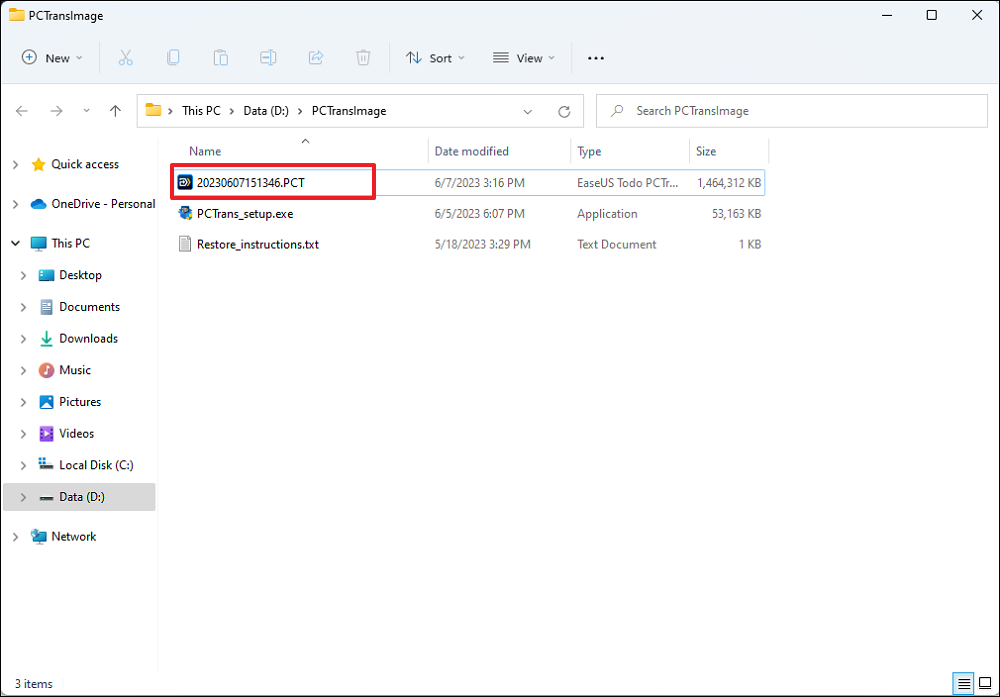
- Click «Browse» to find the image file in your USB drive. Then, choose the correct backup file and click «Restore» to continue.
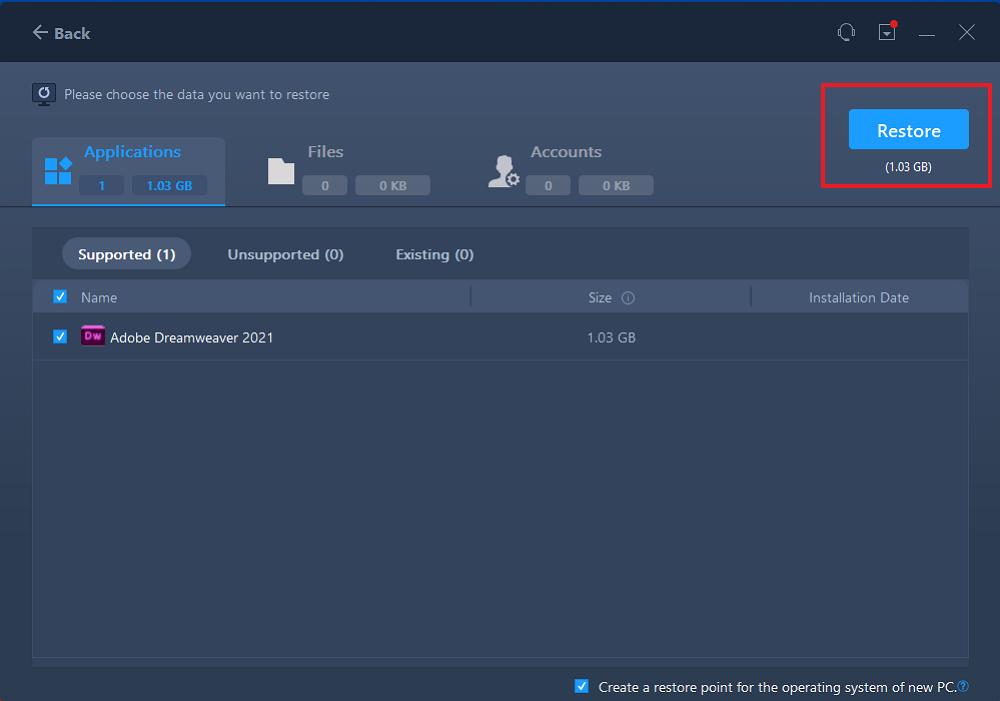
- Choose specific files and click «Restore».
These are the solutions to transfer files. We highly recommend you use EaseUS Todo PCTrans to enjoy the journey. If you think this guide is useful, you can share this tool to your social media and help more people.
The Final Wrap Up
With the launch of Windows 11 just around the corner, it should not take a huge effort to transfer the files on your old device onto the new Windows 11 PC. The steps and tutorials outlined here should be very helpful in achieving the goal.
The standalone software option should be an excellent choice in this context, and we would treat EaseUS Todo PCTrans as something you would find quite interesting in every aspect.
How to Transfer Files from Windows 10 to Windows 11 FAQs
Transferring files from Windows 10 to Windows 11 is not difficult on this page. And this part will give more related questions and answers about today’s topic. Keep reading, and hope it can be helpful to you.
1. How do you transfer everything from the old computer to the new computer?
Various ways allow you to transfer everything from your old computer to the new one, such as using PC data transfer software, external storage devices, cloud storage tools, etc. The most convenient and effective way is to use a PC migration tool, EaseUS Todo PCTrans, which allows you to transfer all your content with just a few clicks:
Step 1. Launch EaseUS Todo PCTrans on your old computer and click on PC to PC.
Step 2. Select the correct transfer direction.
Step 3. Enter the password or authentication code to connect the two PCs.
Step 4. Select the file and start the Transfer.
2. How to transfer programs to New PC?
EaseUS Todo PCTrans is a reliable free PC transfer tool. You can quickly transfer programs to another computer whether you have Internet access. The following is a step-by-step guide:
Step 1. Run EaseUS Todo PCTrans on both computers and select PC to PC.
Step 2. Select the transfer direction and connect the two computers by IP address or device name.
Step 3. Select the program to be transferred and click Transfer.
3. What is the best Windows 11 migration tool?
EaseUS Todo PCTrans is a Windows migration tool that I highly recommend. The best Windows 11 migration tool should satisfy your programs, data, settings, files, and system migration. It can quickly help you migrate your target files to another drive or computer.
Время неумолимо движется вперед и на рынке компьютерных технологий неизбежно выходят новые интересные девайсы, которые превосходят старые устройства в несколько раз. И это вполне естественно, что пользователи стремятся обновить свои устаревшие компьютеры.
Особенно данный вопрос актуален для геймеров или же людей, использующих свои ПК для работы с “тяжелыми программами”.

Нередко в такой ситуации может возникнуть резонная мысль “А как же быть с данными?”. Компьютер обновлен и теперь его эффективность стала в несколько раз выше, тем не менее многие ценные файлы остались на старом устройства.
В данной статье мы рассмотрим простые и эффективные способы перенести ваши данные со старого ПК на новый!
Содержание статьи:
- Облачное хранилище OneDrive
- Внешний жесткий диск
- Специализированный кабель USB 3.0
- Приложение PCmover
- Macrium Reflect
- Услуга Windows HomeGroup
Облачное хранилище OneDrive

Если вы — пользователь операционной системы Windows 10, то должны знать об этой услуге от Microsoft. Тем же, кто не знаком с OneDrive, мы сообщаем, что это облачное хранилище, работающее по принципу всем известного Google Диск.
OneDrive является одним из самых простых решений резервного копирования и передачи данных. Тем не менее, оно доступно только для владельцев лицензионной версии системы и предоставляет для хранения файлов 5 Гб свободного пространства.
Должно быть, вы задаетесь вопросом “Почему так мало?”, особенно если на вашем стареньком ПК накопилось информации, которой, вероятно, раз в 10 больше. К сожалению, Microsoft не готовы предоставлять свои услуги бесплатно. Приобретя соответствующий пакет, вы можете расширить пространство OneDrive вплоть до 1 Тб.
Тем не менее, данное облачное хранилище является лучшей защитой персональных данных пользователей. Ваши файлы могут автоматически копироваться в OneDrive и быть восстановленными в случае неожиданного сбоя операционной системы. Единственный минус программы — невозможность переноса настроек Windows.
Внешний жесткий диск
Использование внешнего HDD так же может стать хорошим решением на пути резервного копирования файлов. Данный процесс проходит исключительно вручную и, следовательно, может отнять у вас чуть больше времени, чем работа с OneDrive.
Подключите жесткий диск к компьютеру и просто перенесите на него все нужные файлы. Аналогично поступите и с новым устройством, только теперь выгрузите данные на другое устройство. Обратите внимание, что этот способ не позволит вам перенести настройки приложений и Windows — он только для файлов и папок.
Специализированный кабель USB 3.0 для высокоскоростной передачи данных
Если вы не любите пользоваться облачными хранилищами или же не имеете в наличии внешнего HDD, то для вас вполне подойдет простой, но не менее эффективный вариант — передаточный кабель.
Данный кабель передачи данных Windows от Plugable стоит всего 30 долларов и имеет два рабочих интерфейса USB 3.0, предназначенных для подключения к двум ПК.
Как только вы соедините два устройства, прилагаемое программное обеспечение проведет вас по несложному процессу передачи настроек, файлов и имеющихся учетных записей. Если ваш ПК не поддерживает порт USB 3.0, воспользуйтесь опцией USB 2.0 от UGREEN.
Приложение PCmover
![]()
В прежние времена, когда все еще были актуальны Windows 7 и Windows 8, Microsoft разработали услугу Easy Transfer, предоставлявшую услуги по перемещению файлов и настроек между несколькими ПК с использованием кабеля USB, DVD-дисков, внешнего жесткого диска и сети-интернет.
К сожалению, с выходом Windows 10, Microsoft по какой-то причине утилизировали данное приложение. Тем не менее, важно отметить, она не исчезла полностью. Благодаря сотрудничеству с дружественной компании, софт перешел под руководство Laplink PCmover. Хорошая новость в том, что вы все еще можете воспользоваться этой утилитой, и, возможно, плохая — она стала платной.
PCmover Express
Всем пользователям операционной системы Windows 10, Microsoft предлагает приобрести PCmover Express за половину ее стоимости — 15 долларов США. Купив программу, вы получаете лицензию и право на одно перемещение интересующих вас файлов и настроек.
Все что нужно сделать, это подключить два компьютера к интернету и запустить приложение. PCmover сделает все возможное для того, чтобы новое устройство выглядело идентично прежнему.
Версия PCmover Express совместима со всеми версиями операционной системы Windows, включая Windows XP. К сожалению, она имеет ограниченный функционал и не позволяет переносить приложения.
PCmover Professional
Пакет PCmover Professional обойдется вам несколько дороже — 50 долларов США за один сеанс работы. Тем не менее она позволит вам перенести все нужные приложения, папки, файлы, профили пользователей и другие системные настройки.
Важной составляющей приложения является возможность связаться со службой поддержки, работающей 24/7 и способной помочь вам в решении возникших вопросов.
Программа работает со всеми версиями операционной системы Windows.
Macrium Reflect
![]()
Клонирование жесткого диска позволяет пользователям создать точную копию старого HDD на новом. Со стороны это будет выглядеть как два устройства с абсолютно идентичным содержанием.
Существует несколько инструментов клонирования, однако среди всех мы хотим выделить именно Macrium Reflect. Он предлагает как бесплатную версию, которая подойдет подавляющему большинству пользователей, так и бизнес-версию, предполагающую различные услуги и ценовые категории.
Услуга Windows HomeGroup
С одним из последних обновлений, вышедшего 10 апреля 2018 году, утилита HomeGroup была удалена из операционной системы. Это говорит нам о том, что каждый, кто ею раньше пользовался теперь должен искать другие пути. Microsoft не полностью удалили функцию обмена данными по сети — она изменена, переименована и в настоящий момент неактивна.
Похожие статьи про восстановление данных:
Дата:
Теги: USB диск, Windows, Жесткий диск, Носитель информации