The advent of computers and the Internet has changed the way we write. Digital writing is fast gaining acceptance in today’s digital world. Among a few of the innovative technologies explored, digital writing occupies a prominent space. Microsoft has embarked on a mission to make this experience more innovative and unique. As such, it has decided to expand its Pen support through the new Windows Ink experience.
Technology is dynamic and it is getting updated every minute. Earlier we used buttons on our devices and now the touch is ruling the roost. Touch and pen are giving immense scope to the users to better their Windows user experience. You can draw, do many tasks using them and customize them. Windows 11 has all the features like Windows 10 to let the users use Pen and touch. It has even bettered some features in Windows 11. In this guide, we show you how to Configure Pen shortcuts & Touch settings in Windows 11/10.
Windows Ink experience is just another change in name that the software giant uses to refer to the existing pen support, with new improvements added. For example, you could use your pen to annotate screenshots but you have to configure its settings first. So, let us in this post learn how to configure Pen shortcuts & Touch settings in Windows 11/10.
If you want to use Pen shortcuts and touchpad on your Windows 11 PC and customize them to your use, you can follow the below steps and use them effectively.
- Pair pen with PC
- Add or remove shortcuts to the Pen menu
- Change what the pen does on single or double clicks
- Turn on Touch gestures and Touchpad gestures
- Change your touch gestures
Let’s get into the details of each one and configure them for our usage.
1] Pair pen with PC

Before you start using the pen on your Windows 11/10 PC, you need to pair the pen to the PC. Only, then you can customize and use the pen on various programs.
To pair a pen with your PC on Windows 11,
- Open the Settings app using the Win+I keyboard shortcut
- Click on the Bluetooth & devices on the left sidebar
- Select Add a device and then Bluetooth. Select the pen from the list of available devices to pair. Make sure the pen is in pairing mode by holding down the shortcut button for seven seconds to make it to that list.
- Select the pen and click on Pair
To pair a pen with your PC on Windows 10,
- Open the Settings app from the Start menu
- Select Devices and then Bluetooth & other devices
- Now, hold down the shortcut button on your pen for seven seconds to turn on pairing mode. Choose the pen from the list of available devices and select Pair
2] Add or remove shortcuts to the Pen menu
You can easily add or remove shortcuts to your Pen menu in just a few clicks. Before that, you need to tap on the screen with the pen to show the pen menu on Windows 11. On Windows 10, you can select Windows Ink Workspace from the taskbar to start using the pen for different purposes.
To add or remove shortcuts to the Pen menu on Windows 11,
- Tap anywhere on the screen with your pen to open the pen menu. It will appear on the corner of your taskbar.
- Select Settings in the pen menu and then select Edit pen menu
- To add apps, select Add or Remove to remove apps from the pen menu.
On Windows 10, you don’t have much to do with the pen menu as it can only be used on Whiteboard, Snip & Sketch. If you open Windows Ink Workspace from the taskbar, you can select Whiteboard or Fullscreen Snip on it. You can also access Pen settings from there.
Read: Best free software to Draw on Screen in Windows PC
3] Change what the pen does on single or double clicks

You can also customize what the pen does on different clicks you make using it or its shortcut button on Windows 11/10.
To change what the pen does when you click double-click or hold down the pen’s shortcut button on Windows 11, open the Settings app, select Bluetooth & devices and go to Pen & Windows Ink.
To change what the pen does when you click double-click or hold down the pen’s shortcut button on Windows 10, open the Settings app, select Devices, and then Pen & Windows Ink. You can select what the pen clicks do by using the drop-down boxes under Click once, Double-click, or Press and hold (only supported on some pens).
Read: Configure Pen and Windows Ink Settings
4] Turn on Touch gestures and Touchpad gestures

You can use touch gestures on Windows 11/10 PC to do various tasks easily. There are various default touch gestures you can use when you enable them.
| ACTION | GESTURES |
| Select an item | Tap on the item |
| Scroll | Slide two fingers on the screen horizontally or vertically. |
| Zoom in or out | Pinch in or stretch out two fingers on the screen |
| Show more options or commands (Right-click options) | Press and hold on to the item |
| Show all open windows | Swipe three fingers up on the screen |
| Show the desktop | Swipe three fingers down on the screen |
| Switch to the last open app | Swipe three fingers left or right on the screen |
| Open notification center | Swipe with one finger from the right edge of the screen |
| See widgets | Swipe with one finger from the left edge of the screen |
| Switch desktops | Swipe four fingers to the left or right on the screen |
You can use the above touch gestures when you enable touch on your Windows 11.
To turn on touch gestures on Windows 11,
- Open the Settings app from the Start menu
- Click on Bluetooth & devices
- Select Touch and then turn on Three-and four-finger touch gestures
Like touch gestures, there are some default touchpad gestures, you can use once you enable touchpad gestures on Windows 11.
| ACTION | GESTURES |
| Select an item | Tap the touchpad |
| Scroll | Scroll two fingers on the touchpad horizontally or vertically |
| Zoom in or out | Pinch in or Stretch out two fingers on the touchpad |
| Show more options or commands (right-click menu) | Tap two fingers on the touchpad or press down in the lower-right corner |
| Show all open windows | Swipe three fingers up on the touchpad |
| Show the desktop | Swipe three fingers down on the touchpad |
| Switch between open apps or windows | Swipe three fingers left or right on the touchpad |
| Switch desktops | Swipe four fingers to the left or right on the touchpad |
To turn on touchpad gestures on Windows 11,
- Open the Settings app from the Start menu
- Click on Bluetooth & devices
- Select Touchpad and toggle the button beside it to turn it on, on the Touchpad settings page.
The touchpad is turned on by default on Windows 11 and Windows 10. The actions and gestures on the touchpad on Windows 10 are similar to Windows 11, except Windows 10 has some more.
To open Cortana on Windows 10 using the touchpad, you need to tap three fingers on the touchpad, to open action center, you need to tap four fingers on the touchpad, and to switch virtual desktops, you need to swipe four fingers left or right on the touchpad.
5] Change your touch gestures
There are touch gestures that are set by default on Windows 11/10. You can also customize or change them to your convenience in a simple way.
To change the default touch gestures on Windows 11,
- Open the Settings app from the Start menu
- Click on Bluetooth & devices
- Select Touchpad. Then, select Three-finger gestures or Four-finger gestures to change them.
To change the default touch gestures on Windows 10,
- Open the Settings app from the Start menu
- Select Devices and then Touchpad.
- You can customize the gestures on the Touchpad settings page.
These are the steps to configure pen shortcuts and touch settings on Windows 11/10 PC.
Pen shortcuts & Touch settings in Windows 10
First, open Settings > Devices. Here, you can see a new option – ‘Pen and Windows Ink‘ added to the ‘Devices’ section.

Now, for configuring the shortcuts, open the Windows Ink Workspace. Under ‘Click Once’ heading, select ‘Click once to open my Windows Ink Workspace notes even when the device is locked‘. This setting enables you to open your Workspace even if the device is locked.
The “Double-click” and “Press and hold” options that can be seen below the ‘Click Once’. The Double-click action enables a user to send screenshots to note-taking apps like OneNote, and the “Press and hold” action fires up Cortana, instantly. You can change these settings here.
In addition to the above, you can adjust how accurately your screen should respond whenever you decide to use a pen or finger. To change this, enter ‘Pen and Touch‘ in the search box. Select the Action and then click on the Settings button. Next, you will be able to calibrate and configure settings for Pen and Touch.
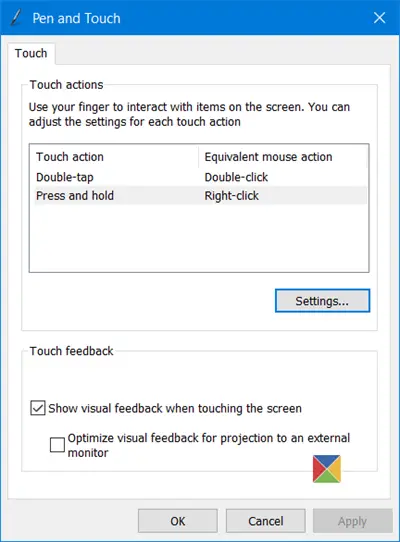
The settings available are:
1] Single click
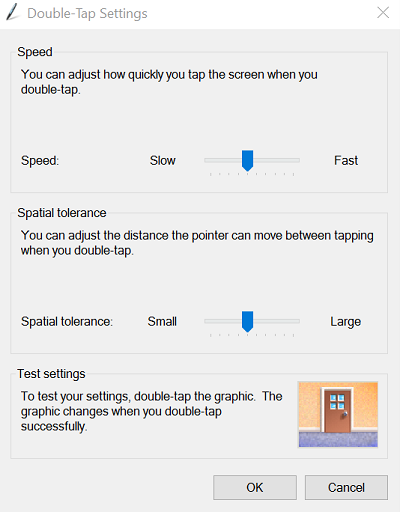
2] Double click – Under this, you can adjust how quickly you can tap a screen when you double-tap. You can also adjust the distance the pointer can move between tapping when you double-tap.
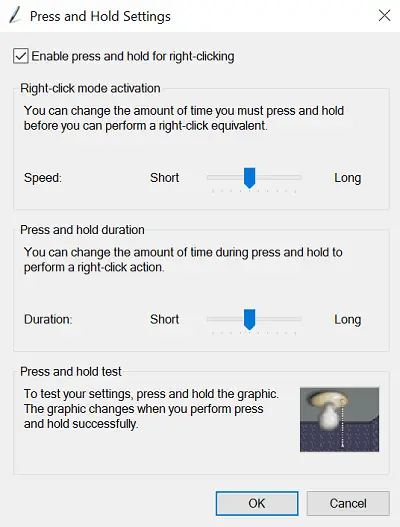
3] Press and hold – Here you can adjust the amount of time during the press and hold to perform a right-click action.
Thus, the Pen shortcuts and Touch settings let you personalize your pen experience, even more, to assure you do not miss out on the settings that rightly fits your needs.
To get to the pen and touch settings in Windows 10, follow these steps:
1. Type ‘Pen and Touch’ in your Windows 10 search bar.
2. Click on ‘Pen and Touch’ in the search results.
3. This will open the ‘Pen and Touch’ control window.
4. To customize your pen and touch settings, click on each tab on the ‘Pen and Touch’ control window.
You can also access the ‘Pen and Touch’ window by going to the Windows 10 Start Menu and selecting ‘Settings’. Under Settings, select ‘Devices’, then
select ‘Pen and Touch’ for further customization options.
Customize the settings to suit your needs. All changes you make in the ‘Pen and Touch’ window will be reflected in all applications that use pen and touch input.
Once you are finished, click ‘OK’. Your pen and touch settings will be updated according to your preferences.
Adding a pen to Windows 10 is easy and can be done in a few steps. First, you’ll need to make sure you have a compatible pen. There are various pens available and they vary in their compatibility with Windows 10.
Next, you’ll need to connect your pen to your Windows 10 device. Many pens use a USB connection, so you may need to plug a USB cable into your device. Some pens will come with Bluetooth technology, so you may need to pair it with your device.
Once your pen is connected to your Windows 10 device, you’ll need to open up your Settings and find the Pen & Windows Ink tab. This tab allows you to customize and configure your pen to your liking. You can adjust the pen pressure, toggle palm rejection and even calibrate your pen.
Once you’re done configuring your pen, you can start using it with your Windows 10 device. You can use it to take notes, draw sketches, sign documents, and more. You can even use your pen in combination with the Windows Ink feature, allowing you to turn your handwritten doodles into art.
How do I enable my touch screen pen?
Enabling your touch screen pen is a relatively simple process that will vary slightly depending on your specific device and the type of pen that you are using. Generally, the steps will be similar to the following:
1. Connect the touch pen to your device. Depending on the device and pen you are using, this could require connecting the pen to your device via Bluetooth, a USB-C port, or a USB-A port.
2. Once the pen is connected to your device, you may need to install the necessary drivers. Depending on the device and pen, this could be done by installing specific software or connecting to the manufacturer’s website to get the latest drivers.
3. Once the drivers have been installed, you will then need to open the pen settings on your device and configure the available parameters for your pen. This could include setting the pressure sensitivity, button functions, palm rejection, and more.
4. Finally, test the pen to make sure it is working properly. Once the pen is enabled and configured, you should be able to write and draw with it on your device’s touch screen.
Does Windows 10 support stylus pen?
Yes, Windows 10 does support stylus pen. Microsoft offers its own stylus, called the Microsoft Pen Protocol (MPP), which allows the stylus to be used with many compatible Windows devices, such as the Surface Pro, Surface Laptop, and Surface Book.
The Windows Ink Workspace allows you to quickly send digital ink to any app that uses it, including Office, Adobe, AutoCAD, and 3D artists. You can even create a digital sticky note or handwritten to-do list with Windows Ink.
The stylus also works with digital drawing and art apps, giving you the versatility to create beautiful digital art.
How do I know if my laptop supports pen?
To determine if your laptop supports pen, you can consult the product manual or manufacturer’s website. Alternatively, check the laptop’s specifications to see if it is listed as a feature or if the laptop supports a specific type of pen.
If your laptop is a touchscreen, it is likely that it supports pen. Some laptop models also feature removable active pens, which can be used with specific model laptops. If the laptop has a built-in pen compartment, it likely supports a pen.
Additionally, some laptop models allow for pens and other input devices to be positioned next to the laptop for use. Finally, you can also test the laptop by inserting a specific pen into the device and attempting to write with it.
If it works then your laptop supports pen.
Can you use a stylus on a non touch screen laptop?
No, you cannot use a stylus on a non-touch screen laptop as it is not equipped with a touch-sensitive display. Most laptop screens are not pressure sensitive and so are unable to interpret the input from a stylus.
Many laptop computers feature a track pad or other pointing accessories that can be used to navigate the interface. Additionally, some laptops feature a touchscreen display, which is designed for stylus input.
However, this is not the norm for most laptops and typically only found on select models.
How do I connect a stylus pen to my laptop?
Connecting a stylus pen to your laptop typically requires a Bluetooth connection. This can be done in a few simple steps:
1. Make sure your laptop supports Bluetooth and that it is turned on.
2. On your stylus pen, usually there will be a button that enables it to enter pairing mode. Usually this mode is indicated by a blinking light.
3. On your laptop, go to the Bluetooth settings and start looking for devices.
4. When your stylus appears on the list, click on it and follow the instructions that appear to pair it with your laptop.
5. Once it is connected, you should be able to use the stylus pen to interact with applications, write, draw and take notes.
What is the pen for Windows?
The pen for Windows is a digital input device that can be used as an alternative to a mouse or keyboard when using a Windows computer. It usually takes the form of a stylus that is connected to the device via Bluetooth or USB, and allows users to take advantage of pen input features like handwriting recognition and drawing.
Other pen features may include pressure sensitivity and support for specialty inking technologies like tilt and rotation. The pen can be used to write, draw and make annotations on documents, images, and other files.
With the Windows 10 Fall Creators Update, users can now use the pen even more intutively with Windows Ink, a suite of apps and experiences which allows you to sketch, draw, write notes, collaborate, and even navigate around your device.
How can I use digital pen on my laptop?
Using a digital pen on your laptop is a great way to add an extra element of creativity to your projects. Most newer laptops have built-in support for styluses, which allow you to draw, write and doodle on the screen directly with your digital pen.
Depending upon your laptop, there are different methods of setting up a digital pen. If your laptop has a touchscreen, then it should be compatible with a stylus. You may need to calibrate the screen in your laptop settings to ensure that the digital pen responds accurately.
If your laptop is not touchscreen compatible, then you will need to purchase a digital pen that is compatible with your device. Some digital pens come with interchangeable tips, so you can choose the one that best fits your laptop.
Additionally, some digital pens sell with a USB receiver, which is used to connect the pen to your laptop.
In order to be able to use a digital pen on your laptop, you will also need to install software for the pen. Many digital pen manufacturers provide software that allow you to do different things, such as drawing and writing notes.
This software may also allow you to export images that you have drawn with the pen directly to the laptop in a variety of file formats.
Once you have installed the required drivers and software, you will be able to use your digital pen with your laptop. To get started, you may want to familiarize yourself with the different functions that the software offers, such as changing brush sizes and colors.
Using a digital pen with your laptop also allows you to take advantage of digital drawing and painting programs. These programs are designed to mimic the experience of a traditional art program, but in a digital setting.
With these programs, you will be able to create intricate designs, patterns, and paintings that you can then save to your laptop.
Overall, using a digital pen on your laptop is a great way to add a unique touch to your projects. With the right setup, software and tools, you will be able to make use of the digital pen for everything from designing a logo to creating complex artwork with ease.
How do I reinstall HID compliant touch after uninstalling?
Reinstalling an HID compliant touch after uninstalling it can be done by following these steps:
1. Connect your HID compatible touch device to your computer.
2. Open the Device Manager by typing “device manager” into the Start menu and selecting the appropriate option.
3. Find the HID compatible touch device in the list of hardware under either “Human Interface Devices” or “Universal Serial Bus Controllers” subfolders.
4. Right-click on the touch device and select “Uninstall Device” from the drop-down menu.
5. Confirm the uninstallation by selecting “OK” when prompted.
6. Disconnect your HID compatible touch device from your computer.
7. Restart your computer.
8. Reconnect your HID compatible touch device to your computer.
9. Open the Device Manager again and find the HID compatible touch device in the list of hardware.
10. Right-click the HID compatible touch device and select “Scan for hardware changes” from the drop-down menu.
11. This should re-install the HID compatible touch device, allowing you to use it with your computer again.
Why is my touch screen not working Windows 11?
First, you can check that the touch screen device is properly connected and that it is enabled. You can do this by going to the Device Manager, opening the Human Interface Devices section, and then locating the touch screen device in the list.
Make sure that it says that it is enabled and that there are no errors associated with it.
You may also need to make sure that the driver software for your device is up to date. To do this, first use the Device Manager to find what device you have and then visit the website of the manufacturer of the touch screen device.
Look for an updated driver software and follow the instructions to install it.
If the touch screen still isn’t working after connecting and updating the driver, you should consider resetting Windows 11 and attempting to reinstall the touch screen driver. To do a reset, search for the “Reset this PC” option in the Windows settings.
Follow the instructions to reset the system and then reinstall the latest driver again.
If the touch screen still isn’t working after this, you may have a hardware issue that can only be solved by having a technician look at your device.
How to Enable the Touchscreen in Windows 10
Select the Start button .
Select Control Panel.
Select Pen and Touch.
Select the Touch tab.
Select the box next to Use your finger as an input device. The box needs to be checked for the touchscreen to work.
Verify that your touchscreen works.
How do I Enable my Pen on Windows 10?
To access pen settings, open the Settings app and select Devices > Pen & Windows Ink. The “Choose which hand you write with” setting controls where menus appear when you use the pen.
How do I Turn on my Touch Pen?
Go to Start > Settings > Devices > Add Bluetooth or other device > Bluetooth .
Press and hold the top button of your pen for 5-7 seconds until the LED flashes white to turn on Bluetooth pairing mode.
Select your pen to pair it to your Surface.
How do you Fix No Pen or Touch Input is Available for this Display?
Verify touch screen is enabled.
Try updating, reinstalling, or rolling back the touch screen driver.
Try cleaning the machine.
Update drivers.
Contact Support.
How do I Activate the Touchscreen on my Laptop?
In the search box on the taskbar, type Device Manager, then select Device Manager.
Select the arrow next to Human Interface Devices and then select HIDcompliant touch screen. There may be more than one listed.
Select the Action tab at the top of the window.
How To Enable and Disable the Touch Screen In Windows 10
Drawing on a computer screen has become a popular activity for all types of people, from professional graphic designers to casual doodlers. If you’re a Windows 10 user, you’re in luck – the operating system has many built-in features that make it easier than ever to sketch, draw, and paint directly on your screen. In this guide, we’ll go through the different ways you can draw on your Windows 10 screen, so you can start creating beautiful digital art right away.
How to Draw on Screen Windows 10:
- Open the Snipping Tool by searching for it in the Windows 10 search bar.
- Choose the type of snip you would like to make by clicking the Mode button.
- Select the area of the screen you would like to capture.
- Draw on the image by selecting the Pen button.
- Choose your desired color, thickness and erasing options.
- When finished, click the Save Snip button.

Draw on Screen with Windows 10
Windows 10 offers a convenient way to draw on the screen with its Windows Ink feature. With Windows Ink, you can use a stylus, finger, or mouse to draw, write, and edit on your screen. This article will provide step-by-step instructions on how to draw on the screen with Windows 10.
Step 1: Enable Windows Ink
The first step is to enable Windows Ink. To do this, open the Start Menu and type “pen and touch”. Select the Pen and Touch option. In the Pen and Touch window, click the checkbox next to “Use Windows Ink”. This will enable the Windows Ink feature on your device.
Step 2: Choose Your Drawing Tool
Once Windows Ink is enabled, you will need to choose the drawing tool you want to use. Windows 10 offers a variety of drawing tools, including pens, markers, brushes, highlighters, erasers, and more. To choose the drawing tool you want to use, open the Start Menu and type “pen and touch”. Select the Pen and Touch option. In the Pen and Touch window, select the “Pen” tab. This will open a window that allows you to select the drawing tool you want to use.
Step 3: Draw on the Screen
Once you have chosen your drawing tool, you can begin drawing on the screen. To draw, simply press the stylus, finger, or mouse to the screen and move it around. You can use the drawing tool to draw, write, and edit on the screen.
Step 4: Change the Color and Size of the Drawing Tool
You can also change the color and size of your drawing tool. To change the color, open the Start Menu and type “pen and touch”. Select the Pen and Touch option. In the Pen and Touch window, select the “Pen” tab. This will open a window that allows you to select the color of the drawing tool. To change the size of the drawing tool, use the slider in the Pen and Touch window.
Step 5: Save Your Drawings
Once you are finished drawing, you can save your drawings. To do this, open the Start Menu and type “pen and touch”. Select the Pen and Touch option. In the Pen and Touch window, select the “Save” tab. This will open a window that allows you to save your drawings.
Top 6 Frequently Asked Questions
Q1. What is the process for drawing on the screen in Windows 10?
Answer: To draw on the screen in Windows 10, you need to use the Windows Ink Workspace. To access the Windows Ink Workspace, you can press the Windows key + W to open the Action Center and select the pen icon. This will open the Windows Ink Workspace, where you can draw on the screen with a stylus or your finger. You can also use the Windows Ink Workspace to access Sticky Notes, Sketchpad, and Screen Sketch.
Q2. What tools are available in the Windows Ink Workspace?
Answer: The Windows Ink Workspace provides a range of tools for drawing on the screen. These include a pen, an eraser, a ruler, a highlighter, a color palette, and a selection tool. You can also access Sticky Notes, Sketchpad, and Screen Sketch from the Windows Ink Workspace.
Q3. How do I change the size of my pen in Windows Ink Workspace?
Answer: To change the size of your pen in the Windows Ink Workspace, you can use the slider bar at the top of the workspace. You can also select the “More Strokes” icon to access a range of different pen sizes.
Q4. How do I save my drawings in Windows Ink Workspace?
Answer: To save your drawings in the Windows Ink Workspace, you can use the “Save As” option. This can be accessed by pressing the three dots at the top right corner of the workspace. Once you have selected “Save As”, you can select the folder you want to save your drawing to and give it a name.
Q5. How do I undo my drawings in Windows Ink Workspace?
Answer: To undo your drawings in the Windows Ink Workspace, you can press the “Undo” icon at the top of the workspace. You can also press the “Redo” icon to redo your drawings.
Q6. How do I share my drawings in Windows Ink Workspace?
Answer: To share your drawings in the Windows Ink Workspace, you can use the “Share” option. This can be accessed by pressing the three dots at the top right corner of the workspace. Once you have selected “Share”, you can select the app you want to share your drawing with and follow the instructions.
How to Draw on Your Screen (for Free!) for Presentations or Video Conferences
If you have ever wanted to draw on your computer screen in Windows 10, this guide has given you the steps to do so. With this guide, you can now take screenshots and mark them up with drawings and annotations. Drawing on your Windows 10 screen has never been easier and can be a great way to provide feedback, create visual aides, or just have fun.
This menu can be accessed through the Control Panel.
- Select the Start button.
- Select Control Panel.
- Select Pen and Touch.
- Select the Touch tab.
- Select the box next to Use your finger as an input device. The box needs to be checked for the touchscreen to work.
- Verify that your touchscreen works.
Where is pen and touch settings Windows 10?
First, open Settings > Devices. Here, you can see a new option – ‘Pen and Windows Ink’ added to the ‘Devices’ section. Now, for configuring the shortcuts, open the Windows Ink Workspace.
Can you use a pen on Windows 10?
This feature is built into Windows 10’s touch keyboard. To open it, tap the touch keyboard icon next to the clock on your taskbar. Tap the keyboard button at the bottom right corner of the touch keyboard. Tap the handwriting keyboard icon, which looks like a pen over an empty panel.
What does pen support mean Windows 10?
Pen support means you can enter text into any application with a pen or other stylus. https://www.howtogeek.com/297443/how-to-use-han… put-on-windows-10/ You can use stylus even if you have non touch screen keyboards.
Can I use Windows ink without a pen?
Open the Windows Ink Workspace If you’re using a Windows 10 PC with or without a touchscreen, but no pen, you may need to add the Windows Ink Workspace button to the Taskbar. The button looks like script capital “I” and would be on the right side of the Taskbar next to the time and date.
How do I calibrate my pen in Windows 10?
To get started, open the Control Panel and select Tablet PC Settings. Or, hit the Windows key and type: calibrate and select the “Calibrate the screen for pen or touch input” result at the top.
How do I get out of pen mode in Windows 10?
To do this, head to Settings > Personalization > Taskbar > Turn System Icons On or Off. Locate the Windows Ink Workspace icon here and set it to “Off”.
How do I use a stylus pen on my desktop?
Introducing the digital pen
- Tap the Start button.
- Choose the Settings icon.
- Tap Devices.
- From the categories on the left side of the window, choose Pen & Windows Ink. If you see a Pen heading on the right side of the screen, your tablet PC can use a digital pen.
How do I know if my laptop supports pen?
Go To Settings, Devices on the left pane click Pen & Windows Ink. Under Windows Ink Work, do you see a Pen shortcuts? There should be several drop-down menus if your laptop screen supports an active stylus.
Is my computer compatible with a pen?
Pen(s) compatible with your computer are marked with a “check mark” to the right of your computer model, in the column(s) under the Pen name / description(s). Additional information can sometimes be found in Advisory Documents for your computer. The document is updated as new information becomes available.
Why is my Windows 10 touch screen not responding?
For instance, if it is the touch screen communicate with the system’s processor. It might be due to the faulty driver. By following certain instructions, right click on HID-complaint touch screen and select the update driver software in order to fix asus touch screen not working windows 10 troubleshooting issue.
Does Windows 10 require a touch screen?
While Windows 10 has native support for touch-oriented devices (tablets, touchscreen monitors, etc), you are not required to have a touchscreen in order to use Windows 10.
How to calibrate the touchscreen on Windows 10?
How to Calibrate My Touchscreen Windows 10 Click on Hardware and Sound. Under “Tablet PC Settings,” click the Calibrate the screen for pen or touch input link. Under “Display options,” select the display (if applicable). Quick Tip: Under “Details,” you can tell whether your screen has full support for pen and touch with Windows 10. Click the Calibrate button. Select the Touch input option. See More….
How do I activate touch screen?
Tap the screen to log in or to activate an app. If nothing happens, you need to configure the Windows Touch settings. Direct the cursor to the bottom right corner of the screen with your mouse and move it up. Click “Settings,” then “Change PC Settings.”. Select “PC and Devices,” then click “PC Info.”.
https://www.youtube.com/watch?v=jBRU5kfhBTE