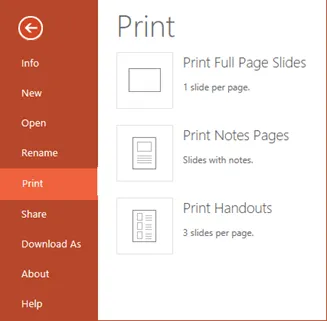
Microsoft Print to PDF — это виртуальный принтер, встроенный в операционные системы Windows 10 и Windows 11, который позволяет пользователям создавать PDF-файлы из любого приложения, через которое можно напечатать документ. Однако, что делать, если у вас установлена Windows 7 и у вас нет доступа к этому полезному инструменту? В этой статье мы расскажем, как установить Microsoft Print to PDF на Windows 7.
Первым шагом является скачивание и установка бесплатной программы PDFCreator. Однако перед установкой следует убедиться, что у вас на компьютере не установлены другие программы для создания PDF-файлов, такие как Adobe Acrobat или CutePDF Writer, так как они могут создать конфликты с PDFCreator.
После скачивания и установки PDFCreator, вам будет предложено выбрать главный язык программы и установить PDFCreator в качестве принтера по умолчанию. Выберите русский язык, если это необходимо, и установите PDFCreator в качестве принтера по умолчанию.
Теперь, когда PDFCreator установлен и настроен, вы можете печатать документы и сохранять их в формате PDF. Просто откройте документ, который вы хотите преобразовать в PDF, и выберите команду «Печать» в меню приложения. В качестве принтера выберите PDFCreator, а затем нажмите кнопку «Печать». После этого, вас попросят указать путь и имя для сохранения PDF-файла, и ваш документ будет преобразован в формат PDF.
Содержание
- Шаг 1: Скачивание установщика Microsoft Print to PDF
- Программа для создания PDF файлов по умолчанию
- Шаг 2: Запуск установки Microsoft Print to PDF
- Начало установки в несколько кликов
- Шаг 3: Выбор директории установки
- Выбираем место, где будет расположена программа
- Шаг 4: Подтверждение установки
- Вопрос-ответ
- Как установить Microsoft Print to PDF на компьютере с операционной системой Windows 7?
- Какие преимущества дает установка Microsoft Print to PDF?
- Существуют ли альтернативные способы создания PDF-файлов на Windows 7?
- Какие требования должны быть выполнены для установки Microsoft Print to PDF на компьютере с Windows 7?
- Какие есть альтернативные виртуальные принтеры для создания PDF-файлов на Windows 7?
Шаг 1: Скачивание установщика Microsoft Print to PDF
Microsoft Print to PDF — это виртуальный принтер, позволяющий сохранять документы и файлы в формате PDF. Однако по умолчанию он не доступен на операционной системе Windows 7. Чтобы установить Microsoft Print to PDF на Windows 7, необходимо скачать и установить специальный установщик. В этом разделе мы пошагово рассмотрим, как скачать установщик Microsoft Print to PDF на Windows 7.
- Перейдите на официальный сайт Microsoft (www.microsoft.com) в любом веб-браузере.
- Найдите раздел «Поддержка» или «Скачать».
- В поисковой строке введите «Microsoft Print to PDF для Windows 7» или «Установщик Microsoft Print to PDF для Windows 7».
- Найдите ссылку на страницу загрузки установщика Microsoft Print to PDF для Windows 7.
- Нажмите на ссылку для скачивания установщика. Обычно файл будет сохраняться в формате .exe.
После завершения скачивания установщика Microsoft Print to PDF, вы будете готовы перейти к следующему шагу — установке виртуального принтера на операционной системе Windows 7.
Программа для создания PDF файлов по умолчанию
Большинство пользователей Windows знакомы с возможностью создания PDF файлов с помощью программы Microsoft Print to PDF. Однако, в операционной системе Windows 7, эта программа не установлена по умолчанию. В этой статье мы расскажем, как установить Microsoft Print to PDF на Windows 7.
Прогамма Microsoft Print to PDF представляет собой виртуальный принтер, который позволяет создавать файлы в формате PDF из любых приложений, поддерживающих печать. После установки, Microsoft Print to PDF будет доступен в списке принтеров и вы сможете выбрать его для сохранения документов в формате PDF.
- Перейдите на официальный сайт Microsoft и скачайте установочный файл Microsoft Print to PDF.
- Запустите установочный файл и следуйте инструкциям мастера установки.
- После завершения установки, откройте любое приложение, поддерживающее печать, например, Microsoft Word или браузер.
- Откройте документ или страницу, которую вы хотите сохранить в формате PDF.
- Нажмите на кнопку «Печать» в меню приложения или используйте комбинацию клавиш Ctrl + P.
- В списке доступных принтеров выберите «Microsoft Print to PDF».
- Настройте параметры печати по вашему усмотрению, например, задайте имя и место сохранения файла.
- Нажмите на кнопку «Печать» или «Сохранить», чтобы создать PDF файл.
Поздравляем, теперь у вас есть возможность создавать PDF файлы с помощью программы Microsoft Print to PDF на вашем компьютере с операционной системой Windows 7. Эта программа отлично подходит для создания PDF версий документов, которые вы можете легко распространять и открывать на любом устройстве, поддерживающем PDF формат.
Шаг 2: Запуск установки Microsoft Print to PDF
После того, как выполнен первый шаг и подготовлен необходимый инсталляционный файл Microsoft Print to PDF, можно перейти к процессу его установки:
- Двойным щелчком мыши откройте файл, который вы загрузили в первом шаге. Это может быть файл с расширением .exe или .msi.
- Откроется мастер установки Microsoft Print to PDF.
- Прочитайте и принимайте условия лицензионного соглашения, если они требуются.
- Выберите папку, в которую будет установлен Microsoft Print to PDF.
- Нажмите кнопку «Установить» или «Далее», чтобы начать процесс установки.
- Дождитесь завершения установки Microsoft Print to PDF. Это может занять несколько минут.
- После завершения установки можно закрыть мастер установки и перейти к следующему шагу.
Теперь, когда Microsoft Print to PDF установлен на вашем компьютере, вы можете использовать его для создания PDF-файлов из различных приложений.
Начало установки в несколько кликов
Установка Microsoft Print to PDF на операционной системе Windows 7 достаточно проста и может быть выполнена всего за несколько кликов. Этот инструмент позволяет создавать PDF-файлы с помощью любого приложения, поддерживающего печать.
- Откройте меню «Пуск» и выберите пункт «Панель управления».
- В открывшемся окне «Панель управления» найдите раздел «Программы» и выберите пункт «Включение или отключение компонентов Windows».
- В появившемся окне «Включение или отключение компонентов Windows» прокрутите список до раздела «Печать и документирование» и раскройте его, выбрав значок «+» слева от него.
- Найдите компонент «Микрософт Печать в формате PDF» в списке и установите флажок напротив него.
- Нажмите кнопку «OK», чтобы закрыть окно «Включение или отключение компонентов Windows».
- Процесс установки Microsoft Print to PDF начнет загрузку компонента и выполнение всех необходимых действий.
- По окончании установки вы сможете использовать Microsoft Print to PDF для создания PDF-файлов.
Теперь, после завершения установки, вы сможете выбирать опцию «Микрософт Печать в формате PDF» в качестве принтера при печати из любого приложения. В результате, вместо печати на бумаге, вы создадите PDF-файл, который можно сохранить на компьютере или отправить по электронной почте.
Шаг 3: Выбор директории установки
На этом шаге установки Microsoft Print to PDF на Windows 7 вам будет предложено выбрать директорию, в которую будет установлен драйвер виртуального принтера.
Обычно по умолчанию выбирается системная директория, но вы также можете выбрать любую другую доступную директорию, в которой у вас достаточно свободного места.
Чтобы выбрать директорию, вам нужно выполнить следующие действия:
- Нажмите на кнопку «Обзор» или «Просмотреть» рядом с полем ввода пути установки.
- В открывшемся окне проводника выберите нужную директорию.
- Нажмите кнопку «ОК» или «Выбрать» для подтверждения выбранного пути.
После того, как вы выбрали директорию установки, нажмите кнопку «Далее» или «Установить», чтобы перейти к следующему шагу установки.
Выбираем место, где будет расположена программа
Для начала установки Microsoft Print to PDF на операционной системе Windows 7, следует выбрать место, где программа будет расположена. Обычно, по умолчанию, программа устанавливается в системную папку, но пользователь может выбрать любую доступную для его устройства директорию.
Шаги по выбору места установки программы:
- Запустите установочный файл Microsoft Print to PDF, который может быть получен с официального веб-сайта Microsoft или других надежных источников.
- В появившемся окне установщика, выберите язык, который будет использован во время процесса установки.
- Нажмите кнопку «Далее», чтобы перейти к следующему шагу установки.
- Появится окно, где вы должны принять лицензионное соглашение. Ознакомьтесь с условиями соглашения и, если согласны с ними, выберите соответствующий пункт.
- В следующем окне установщика вы можете выбрать место установки программы. Чтобы выбрать другое место, нажмите кнопку «Обзор» и укажите путь к нужной папке или директории.
- Нажмите кнопку «Установить», чтобы начать процесс установки Microsoft Print to PDF на выбранное вами место.
- Подождите, пока установка завершится. По окончании установки программа будет готова к использованию.
Обратите внимание, что для успешной установки программы требуются права администратора на вашем устройстве. Установка может занять некоторое время, в зависимости от производительности вашего компьютера.
Шаг 4: Подтверждение установки
После успешной загрузки необходимого файла установки Microsoft Print to PDF на компьютер, нужно выполнить следующие действия для его установки:
- Запустите загруженный файл установщика, дважды щелкнув на нем.
- Откроется окно установки. Нажмите на кнопку «Далее», чтобы продолжить.
- Вам будет предложено прочитать и принять лицензионное соглашение. Ознакомьтесь с текстом соглашения и поставьте галочку в поле «Я принимаю условия лицензионного соглашения». Затем нажмите на кнопку «Далее».
- Выберите папку для установки Microsoft Print to PDF. Нажмите на кнопку «Обзор», чтобы выбрать другую папку, если требуется. По умолчанию программа установит файлы в папку «C:\Program Files\Microsoft Print to PDF». Нажмите на кнопку «Далее», чтобы перейти к следующему шагу.
- Процесс установки Microsoft Print to PDF начнется. Подождите, пока установка завершится.
- По окончании установки вы увидите сообщение «Установка завершена». Нажмите на кнопку «Готово», чтобы закрыть установщик.
Теперь Microsoft Print to PDF установлен на вашем компьютере и готов к использованию.
Вопрос-ответ
Как установить Microsoft Print to PDF на компьютере с операционной системой Windows 7?
Для установки Microsoft Print to PDF на компьютере с операционной системой Windows 7, вам понадобится установочный диск с Windows 10 или скачанный образ Windows 10 в формате ISO. Вам нужно будет обновить вашу операционную систему до Windows 10 и затем активировать соответствующую опцию. Не забудьте создать резервную копию всех важных данных перед началом процесса обновления операционной системы.
Какие преимущества дает установка Microsoft Print to PDF?
Установка Microsoft Print to PDF позволяет добавить виртуальный принтер Microsoft Print to PDF на ваш компьютер. С его помощью вы сможете создавать PDF-файлы из любых документов или веб-страниц. Это очень удобно, если вам нужно создать PDF-версию документа для дальнейшей печати или распространения.
Существуют ли альтернативные способы создания PDF-файлов на Windows 7?
Да, существуют альтернативные способы создания PDF-файлов на компьютере с операционной системой Windows 7. Например, вы можете использовать сторонние программы для создания PDF, такие как Adobe Acrobat или Nitro PDF. Также вы можете использовать онлайн-сервисы для создания PDF-файлов, которые позволяют загрузить документ и преобразовать его в PDF-формат.
Какие требования должны быть выполнены для установки Microsoft Print to PDF на компьютере с Windows 7?
Чтобы установить Microsoft Print to PDF на компьютере с операционной системой Windows 7, вы должны выполнить несколько требований. Во-первых, у вас должна быть установлена Windows 10. Во-вторых, у вас должна быть административная учетная запись. В-третьих, у вас должно быть достаточно свободного места на жестком диске для установки Windows 10 и дополнительного ПО.
Какие есть альтернативные виртуальные принтеры для создания PDF-файлов на Windows 7?
Если у вас нет возможности установить Microsoft Print to PDF на компьютере с операционной системой Windows 7, вы можете воспользоваться другими альтернативными виртуальными принтерами для создания PDF-файлов. Некоторые из популярных альтернативных виртуальных принтеров включают Bullzip PDF Printer, PDFCreator и doPDF. Эти программы также позволяют создавать PDF-файлы из любых документов или веб-страниц.
The Microsoft «Print to PDF» feature was a much-awaited feature that Microsoft finally introduced with Windows 10. Mac and Linux have already provided this feature to their users for quite some time now. Although Microsoft joined the party a bit late, the Print to PDF feature is now available in almost all the printable applications of Microsoft, such as Word, Excel, PowerPoint, etc. With this feature, you can now create a printable PDF document easily and instantly. So, if you have just heard of the Print to PDF feature and want to learn how to use it, then this article is for you. Here we will present a detailed step-by-step guide on how to use Print to PDF in Windows 11, 10, and 7. Besides, a universal PDF editing tool for all platforms will be introduced. Read on to find out.
Supports Windows 7 or later100% secure
Supports macOS 10.14.6 or later100% secure
Part 1. Everything You Should Know About Print to PDF
Print to PDF is a useful feature for anyone who wants to quickly create a PDF file from a Microsoft application. So, let’s now cover all the basics about the Print to PDF feature worth knowing.
1.1 What is «Print to PDF»? Does it Actually Print Anything?
As the name implies, Print to PDF is a feature that allows you to save a file in a printable PDF format. If you are using one of Microsoft’s printable applications, such as Word, Excel, or PowerPoint, you can use the Microsoft Print to PDF feature to instantly create a PDF document of the Microsoft application file.
Although it has the word «print» in its name, it does not print the file immediately. Instead, it saves the file in PDF format but allows you to customize the PDF file according to your printing needs, such as orientation, paper size, margins, etc. This way, when you want to print the PDF file, you can instantly print it with the desired settings. In short, Print to PDF in Windows 10 and 11 lets you save the file in PDF easily and instantly.
1.2 What’s the Difference between «Print to PDF» and «Save as PDF»?
Many users question that Microsoft already provides us the option to «Save as PDF», then what difference does «Print to PDF» bring?
The «Save as PDF» feature saves the original file version and converts it into PDF format without making any changes. On the other hand, the «Print to PDF» feature lets you create a PDF file in the digital paper layout, showing how it will look when printed. Therefore, it only extracts the data from the file that fits with the requested print dimensions.
Some of the other differences between “Print to PDF” and “Save as PDF” are as follows:
- Fixed Layout: Print to PDF automatically creates a fixed layout that fits the paper size, while Save as PDF saves the original layout structure of the file.
- Hyperlinks: Print to PDF most likely makes the hyperlinks in the file inactive, while Save as PDF keeps the hyperlink active.
- Bookmarks: Print to PDF removes bookmarks from the file, while Save as PDF keeps the bookmarks.
- Background: Print to PDF will not always save the same background color of the file, while Save as PDF will keep the same background color.
In short, Print to PDF and Save as PDF features have their own benefits and outputs. If you want to create a printable PDF layout, then Print to PDF should be your pick, while if you want to convert an original file version in PDF, then Save as PDF should be your pick.
Part 2. A Simple and Instant Way to Print to PDF in Microsoft
Microsoft Print to PDF looks like a handy feature to instantly create a PDF of any file. In Part 3, we’ll show you the steps on how to use Print to PDF in Microsoft. But before that, it is important to mention the limitations of this feature, as follows:
- It creates a PDF with a large file size.
- Once it creates a PDF, you cannot edit it unless you use a third-party tool.
- It makes hyperlinks inactive, removes bookmarks, and even changes the background/layout.
So, what if we tell you that you have a better alternative than Microsoft Print to PDF, which not just instantly creates PDFs but also provides other wide range of customization options. That’s where UPDF comes into action.
UPDF is a one-stop tool for creating PDFs from any printable application on Windows without losing formatting. It provides all the powerful PDF tools you need to print and edit PDFs without hassle. Moreover, it offers a user-friendly interface, making it easy for anyone to quickly print a PDF on Windows.
Key Features of UPDF
- It provides a click-based interface to instantly generate printable PDFs of files.
- It provides rich printing settings.
- It is compatible with all major platforms, including Windows, Mac, iOS, and Android.
- It provides feature-rich editing capabilities, such as editing text, modifying images, etc.
- It allows annotating PDFs with highlights, sticky notes, stickers, stamps, underlines, etc.
- Its enterprise version is available for businesses.
Follow the below steps to use UPDF to print a PDF in Windows:
Step 1. Open the file with UPDF and click File > Print.

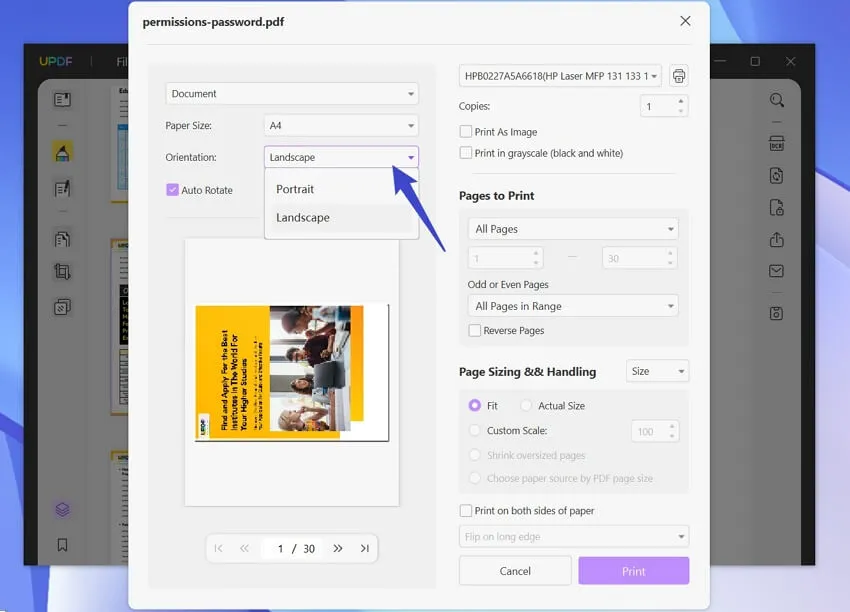
Step 2. Set the printing properties, such as page size, orientation, pages to print, etc.
Step 3. Click the «Print» button.
That’s it! So, a three-step process lets you quickly print a PDF no matter which Windows version you are using.
Part 3. How to Print to PDF in Microsoft (Win 10 & 11 Only)
Every Microsoft printable application allows you to use the Print to PDF feature in its own way. So, let’s now explore how to use Print to PDF in popular Microsoft applications:
3.1 Print to PDF in Microsoft Word
Open the file in Microsoft Word and follow the below steps:
- Click «File» from the top left corner and then click «Print«. Alternatively, press the «Ctrl + P» shortcut keys.
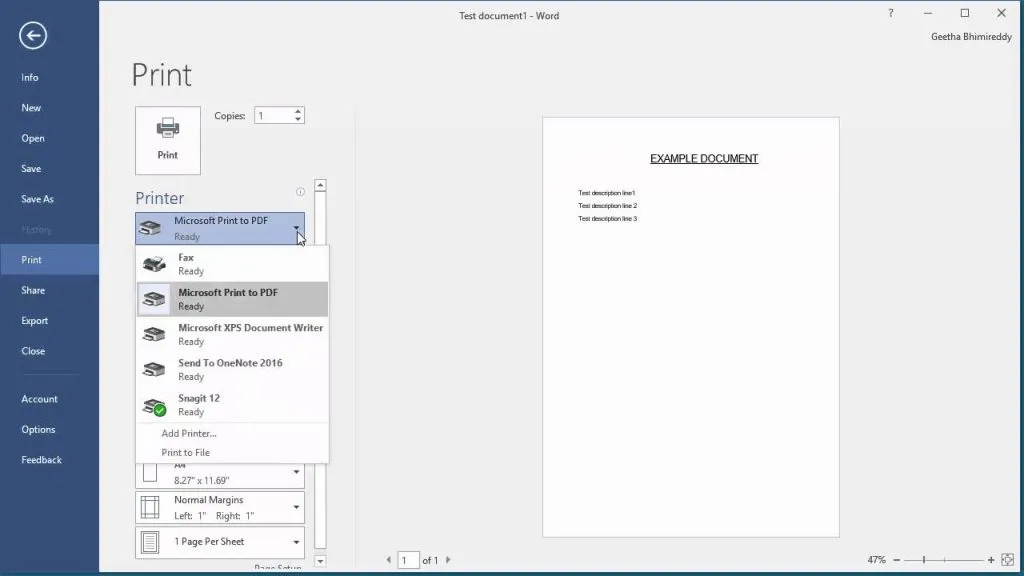
- Click the drop-down menu under the «Printer» section and choose «Microsoft Print to PDF«. You can also customize other print-related settings, such as orientation, paper size, margins, etc.
- Lastly, click the «Print» button.
This way, a PDF file will be created of your Word document.
3.2 Print to PDF in Microsoft Excel
The «Print to PDF» feature in Microsoft Excel is similar to using in Microsoft Word. Just open the file in Microsoft Excel and follow the below steps:
- Click «File» > «Print» or press the «Ctrl + P» alternatively.
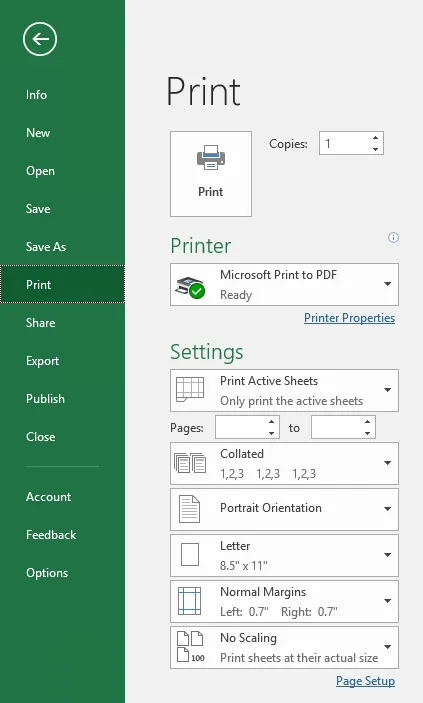
- Click «Printer» > «Microsoft Print to PDF«.
- Finally, click the «Print» button.
This way, a PDF file will be created of your Excel file.
3.3 Print to PDF in Microsoft PowerPoint
Like Microsoft Word and Excel, you can easily create a printable PDF in PowerPoint using the Print to PDF feature. You can follow the steps mentioned above to do so since they are similar.
Part 4. Bonus Tips Related to «Microsoft Print to PDF»
4.1 What if «Microsoft Print to PDF» is missing from the printer list?
If the «Microsoft Print to PDF» feature is missing from your printer list, then it is likely that the feature is disabled currently. However, please note that this feature is only available in Windows 10 and 11. So, if you are looking for Microsoft Print to PDF in Windows 7, then you won’t find it.
For Windows 10 and 11, follow the below steps to enable Microsoft Print to PDF feature:
- Click the «Win + X» keys and select «Control Panel«.
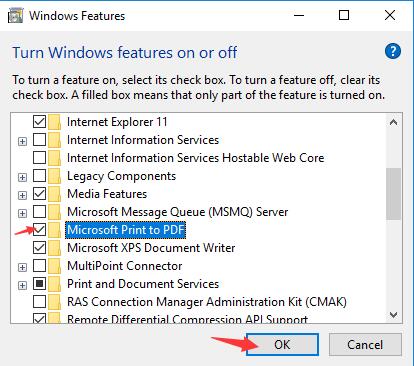
- Click «Program» and then click «Turn Windows features on or off«.
- Tick the checkbox next to «Microsoft Print to PDF» and then click «OK«.
That’s it. Now the Microsoft Print to PDF option should be available in your printer list.
4.2 What can I do when a Microsoft PDF printer is printing pages in the wrong order?
If the Microsoft PDF printer is printing pages in the wrong order, you can follow the below steps to fix the problem:
- Rename the files according to the page number, such as 1.jpg, 2.jpg, and so on.
- Sort the files in ascending order by clicking View > Sort by Name > Ascending.
- Select all the files by pressing «Ctrl + A«.
- Right-click the first file and select «Print«. It should now provide the preview of pages in the right order.
- Lastly, choose «Print to PDF» and click «Print«.
This way, you can use the Microsoft PDF printer with the right order of pages.
Conclusion
Microsoft Print to PDF feature is a handy feature to quickly create a printable PDF file from any printable application of Microsoft. However, it only works with Windows 10 and 11, creates a large-size PDF file, and also lacks editing and other customization features. Therefore, if you are looking to use the Print to PDF feature on Windows or other operating systems without losing formatting, along with access to all the editing and customization features, then UPDF is the ideal pick for you. Its intuitive interface and feature-rich capabilities make it the best PDF tool to save, print, or edit PDFs.
Many users may want to add PDF as a printer, but sometimes you may notice that Windows print to PDF is missing or unavailable. You are disabled to print as a PDF. When you feel like to install this feature again, Windows print to PDF can’t reinstall.
In fact, printing PDF has some unspeakable advantages over other forms of the printer. Print to PDF enables you to print from any program, not restricting to Microsoft Word or text document.
And maybe that is why so many users are eager to remove the Microsoft print to PDF disappeared issue and hope to learn well how to print to PDF on Windows 7, 8, and 10.
Fix it for Windows 10
Fix it for Windows 7, 8
Part 1: Fix Missing Print to PDF on Windows 10
Prior to Windows 10, there is no Microsoft print to PDF. But as for the users who are running on Windows 10, print to PDF can’t either be used, it is high time to solve this printing error for your PC.
You may know that print as PDF is a feature pre-installed on Windows 10, so as long as you couldn’t print to PDF Windows, you need to deal with this issue instantly if you would like to print as you wish in programs.
Now in this part, it will mainly help you resolve Windows 10 Microsoft print to PDF not working.
1. Press Windows + R to activate the Run box and then in this box, input optionalfeatures.exe.

At last, click OK to turn on Windows features window.
2. In Windows Features window, scroll down to locate Microsoft Print to PDF and tick the box of it to turn on the feature –Microsoft Print to PDF. Then hit OK to save changes.
Step 1 to 2 is to enable Microsoft print to PDF. After that, you may also fail to print as PDF Windows 10. This time, you are supposed to obey the following steps below to further fix Windows 10 Microsoft print to PDF.
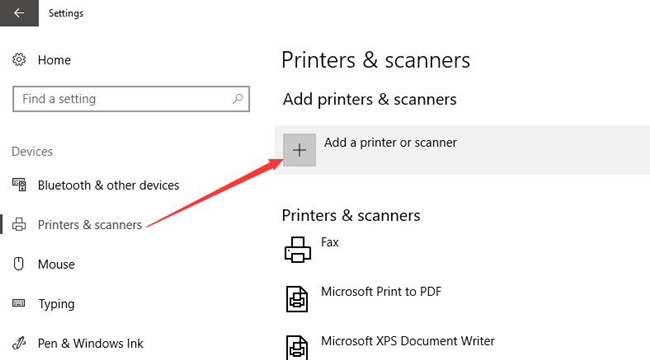
3. Then go to Start > Settings > Devices.
4. Under Printers &scanners, hit Add a printer or scanner.
5. Click The printer that I want isn’t listed.
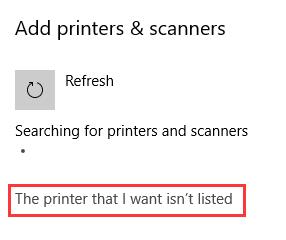
Here if Windows 10 couldn’t detect any printer, you are able to choose the option – The printer that I want isn’t listed.
6. Then you will go to Add printer window, tick the box of Add a local printer or network printer with manual settings. Finally, hit Next.

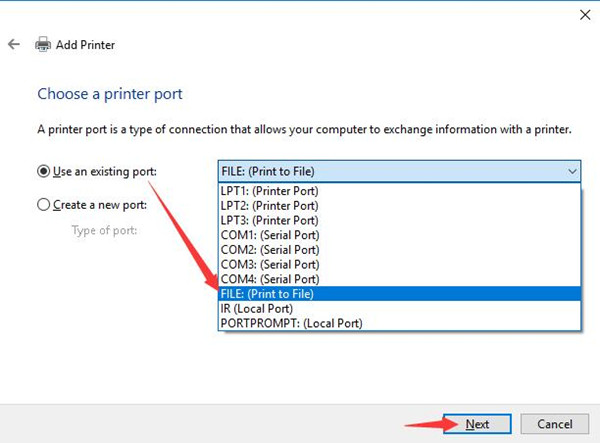
7. Choose to Use an existing port and then select FILE: (Print to File). Soon after that, stroke Next.
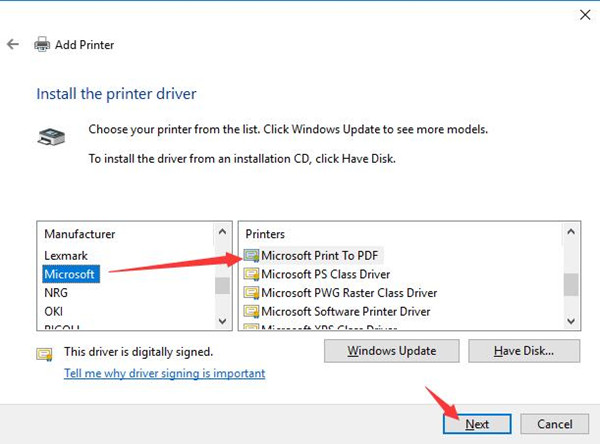
8. In Add printer window, under Manufacturer, choose Microsoft. And under Printers, select Microsoft print to PDF. After that, click Next to go on.
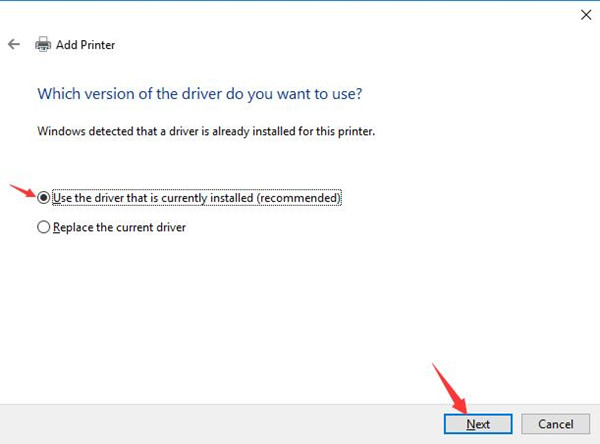
9. Decide to Use the driver that is currently installed (Recommended) and then click Next.
10. Input a Printer name. And then hit Next for more steps.
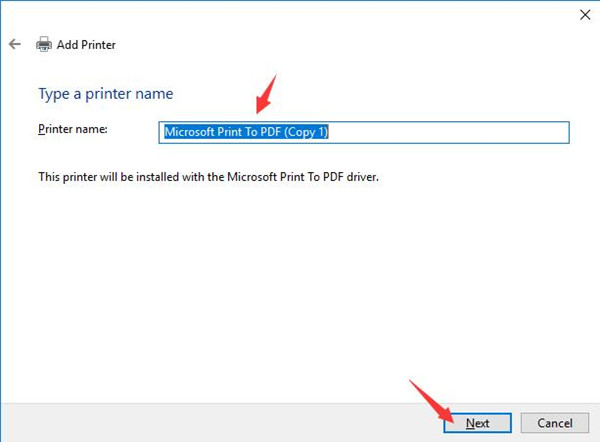
Then you can see a printer with the name you have just added will be installed with the Microsoft print to PDF driver. And the Windows 10 missing print to PDF would be fixed in this way.
Related: How to add a printer on Windows 10
Part 2: Microsoft Print to PDF Missing on Windows 7, 8
With regard to Windows 7 or 8 consumers, although you have no Microsoft print to PDF choice, this post would let you know how to add print to PDF when print to PDF disappeared from Windows features on Windows 7 and Windows 8.
Since there is no Microsoft Print to PDF, you would better make use of tools which are able to install this feature on Windows 8.1.
To replace print to PDF, you can use some helper to help you to achieve this goal, such as Adobe Acrobat and doPDF.
Even if you couldn’t print as PDF on Windows 7, 8 with built-in applications, these tools can assist you to print to PDF Windows.
To make a summarization, whatever it is on Windows 7, 8 or 10, to better solve unavailable print to PDF issue, this article will introduce to you how to effectively remove print to PDF unable usable problem.
More Articles:
Fixed: Printer Driver is Unavailable on Windows 10/11
6 Ways to Fix Printer Offline Status on Windows 10/11
Fix Print Management Issue on Windows 10/11
-
Главная -
Драйверы
-
Принтеры
-
Принтеры Microsoft
- Microsoft Print To PDF

-
Microsoft Print To PDF
Версия:
10.0.19041.1
(21 июн 2006)
Файл *.inf:
prnms008.inf
Windows Vista
,
7
,
8
,
8.1
,
10/11
В каталоге нет драйверов для Microsoft Print To PDF под Windows.
Скачайте DriverHub для автоматического подбора драйвера.
Драйверы для Microsoft Print To PDF собраны с официальных сайтов компаний-производителей и других проверенных источников.
Официальные пакеты драйверов помогут исправить ошибки и неполадки в работе Microsoft Print To PDF (принтеры).
Скачать последние версии драйверов на Microsoft Print To PDF для компьютеров и ноутбуков на Windows.
Версия: 1.3.10.2240 для Windows 7, 8, 10 и 11
Бесплатное ПО
В комплекте идет опциональное ПО
- Yandex Browser
- Opera Browser
- Avast Free Antivirus
- World of Tanks
- World of Warships

Microsoft print to PDF is a native option available in Windows 10. By default, it allows users to print any document in PDF format. Unlike macOS or Linus, printing to PDF was never so easy in Windows OS. Especially in Windows 7 or 8, this option was not there.
In those Win versions, users had two options either to add a Microsoft PDF printer or use third-party software. This was the only way to enable the Microsoft print to PDF option.
As for Windows 10 users, a moment comes, when this option disappears, or they accidentally remove Microsoft Print to PDF. If you are facing this same issue and you want to add or reinstall the Microsoft PDF printer, then you came to the right place.
We have a solution for this problem, using our helpful guidelines to enable Microsoft Print to PDF option while printing in Windows 10.
The term PDF stands for “Portable Document Format” which is an electronic document. The PDF file contains the original formatting sequence. Even if you use a different device, system, or OS, the PDF format views remain the same.
The Microsoft Print to PDF in Windows 10 is native support to print as PDF using a virtual Microsoft PDF printer. This way your document’s format setting doesn’t change and you get a clean error less printed file.
How to Add Microsoft Print To PDF Printer Driver in Windows 10
If you have accidentally deleted Microsoft Print to PDF or you need to create another PDF printer. Then this article will show you how.
Step 1:
Go to Windows 10 setting page, Click on the Start button and click on the settings icons. Alternatively press Windows + I > Device > Printers and Scanning.
Step 2:
Here you should be able to see all the available Microsoft printers. If Microsoft Print to PDF is not there then click on Add a Printer or Scanner

Step 3:
When you click on add printer button, Windows will start scanning to your required printer. Once the scanning finishes click on The Printer that I want isn’t listed.
Step 4:
A new window will appear, here Click on Add a local printer or network printer with manual settings then click Next.

Step 5:
Here you will see two options, select Use an existing port then click in the list box then select PDF (Local Port)

Step 6:
In this window select Microsoft appearing under Manufacturer. Then scroll down the adjacent list and select Microsoft Print to PDF under Printers. Now click Next. If you are unable to see the “Microsoft Print to PDF” option then click on Windows Update. That should solve your issue.

Step 7:
Now give that new printer a name, but it is wise to leave it as a default, click Next, and then Finish. The Microsoft Print to PDF option is enabled. Go to any web page or document which you want to convert to PDF. Select the PDF options from the list and then click “print”. Your file will automatically convert into PDF format.
How To Add Microsoft Print to PDF Printer in Windows 7
As already mentioned the option to print as PDF in Windows was not introduced till Win 10. So if you are a Windows 7 user and you need to add a Microsoft PDF printer then you need to download third Part Software. The Adobe Acrobat Reader is the best solution for this problem.
But sometimes, the Adobe PDF reader is installed in the system but still, the print as PDF option remains absent. To solve PDF printers in Windows 7, use these steps.
[Alternate] Print to pdf Windows 7 download
As already explained in windows 7 print to pdf option wasn’t included until the windows 10 release. So Win 7 users can download print to PDF driver. The pdf printer for windows 7 is free to download software. They are designed to give you ease while printing documents in PDF format.
There is much free software you can find i.e. free print to PDF, Win2PDf, Sejda PDF editor, and doPDF are the best software to download and add print to PDf option in Windows 7.
How To Manually Install PDF Printer
- Click Start > Control Panel > Devices and Printers
- Select Add a printer
- Select Add a local printer
- Check to Use an existing port and select Documents\*.pdf (Adobe PDF) from the drop-down menu. Click Next
- Click the Have Disk… button
- Click the Browse… button
- Navigate to C:\Program Files (x86)\Adobe\Acrobat 10.0\Acrobat\Xtras\AdobePDF or any destination where you saved Adobe Acrobat.
- Select AdobePDF.inf from the list, then click the OK button
- You will see a good of Adobe PDF Converters in the list, however, count six down from the top and click Next (you may need to try this numerous times to find the correct Converter from the list that works with your version of Windows)
- Name your printer, e.g. Adobe PDF
- Follow the rest of the prompts and your PDF printer should now be installed correctly
Note- The method to enable Adobe PDF Printer functionality to create PDF files will only work if you have Adobe Acrobat (paid version), and not with Adobe Reader (free version).
However, if you can’t afford Adobe paid version then you can also try free PDF converters such as doPDF or CutePDF. These are compatible with the latest as well as old Windows OS.