This article will examine how to set up and configure Windows 98 FE (First Edition) on a new virtual computer using the Oracle VM VirtualBox 7.0 virtualization program on the Windows 11 or 10 operating system.
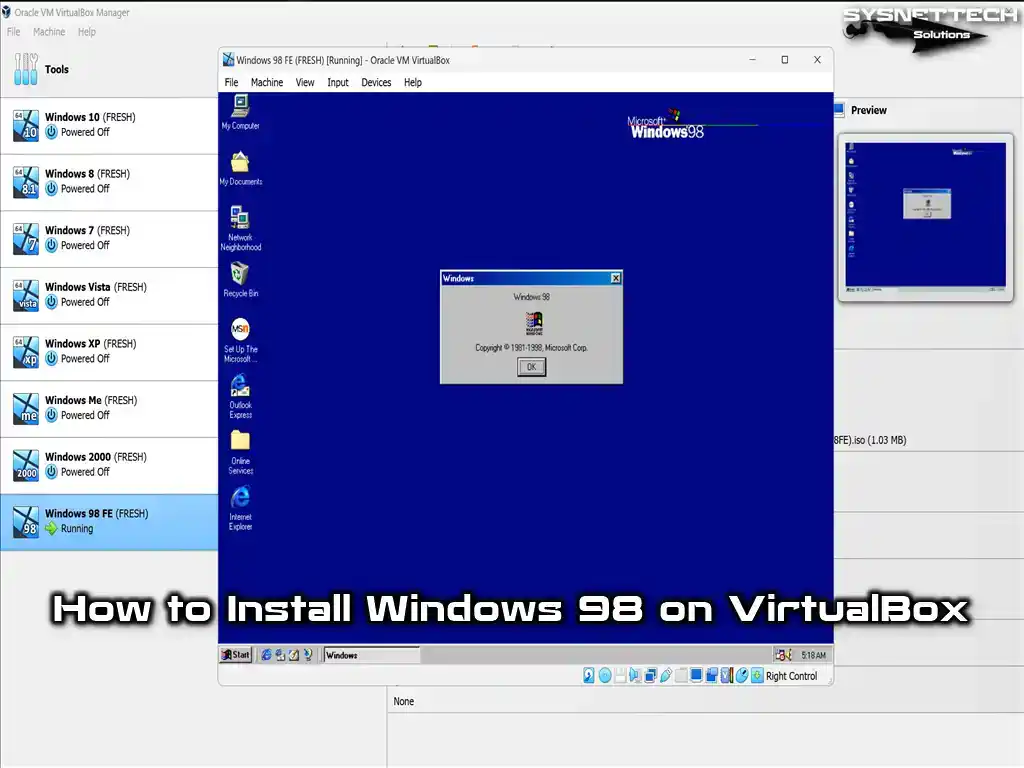
How to Set Up Windows 98 FE (First Edition) / SE (Second Edition) on Windows 10 / 11 using Oracle VM VirtualBox 7
Windows 98 is a distribution of 9x editions from Microsoft and was first officially made commercially available on June 25, 1998. It is an operating system with a graphical user interface, thus offering users easier use of icons, shortcuts, and software.
One of its most significant innovations is the FAT32 file system, which supports longer filenames and efficiently uses resources. It also facilitates the use of many peripheral devices, such as printers and scanners, by enabling faster integration of USB devices.
Windows 98 makes it easier for users to access the Internet, avoiding more complex network connection configurations.
Thanks to the user interface development, most software the developers produce is GUI-managed, but configuring some advanced settings requires using MSDOS.
Microsoft officially ended mainstream support for the Windows 98 First Edition (FE) operating system on June 30, 2002, and comprehensive support on July 11, 2006.
Windows 98 Second Edition (SE), which fixed many of the vulnerabilities and bugs of the first version, was released on May 5, 1999, but was discontinued on June 30, 2002, on this system.
Suppose you have a penchant for old operating systems. You can effectively utilize them at that juncture by leveraging virtual machine platforms such as VirtualBox or VMware. This method eliminates the need to install outdated systems on an old computer. Instead, it lets you use them on your Windows 10 or Windows 11 host computer.
When desiring to encounter an outdated OS, one can employ virtual machine programs like VirtualBox or VMware. Consequently, instead of installing an OS on an old computer, it is feasible to utilize archaic operating systems on a Windows 10 or Windows 11 host computer.
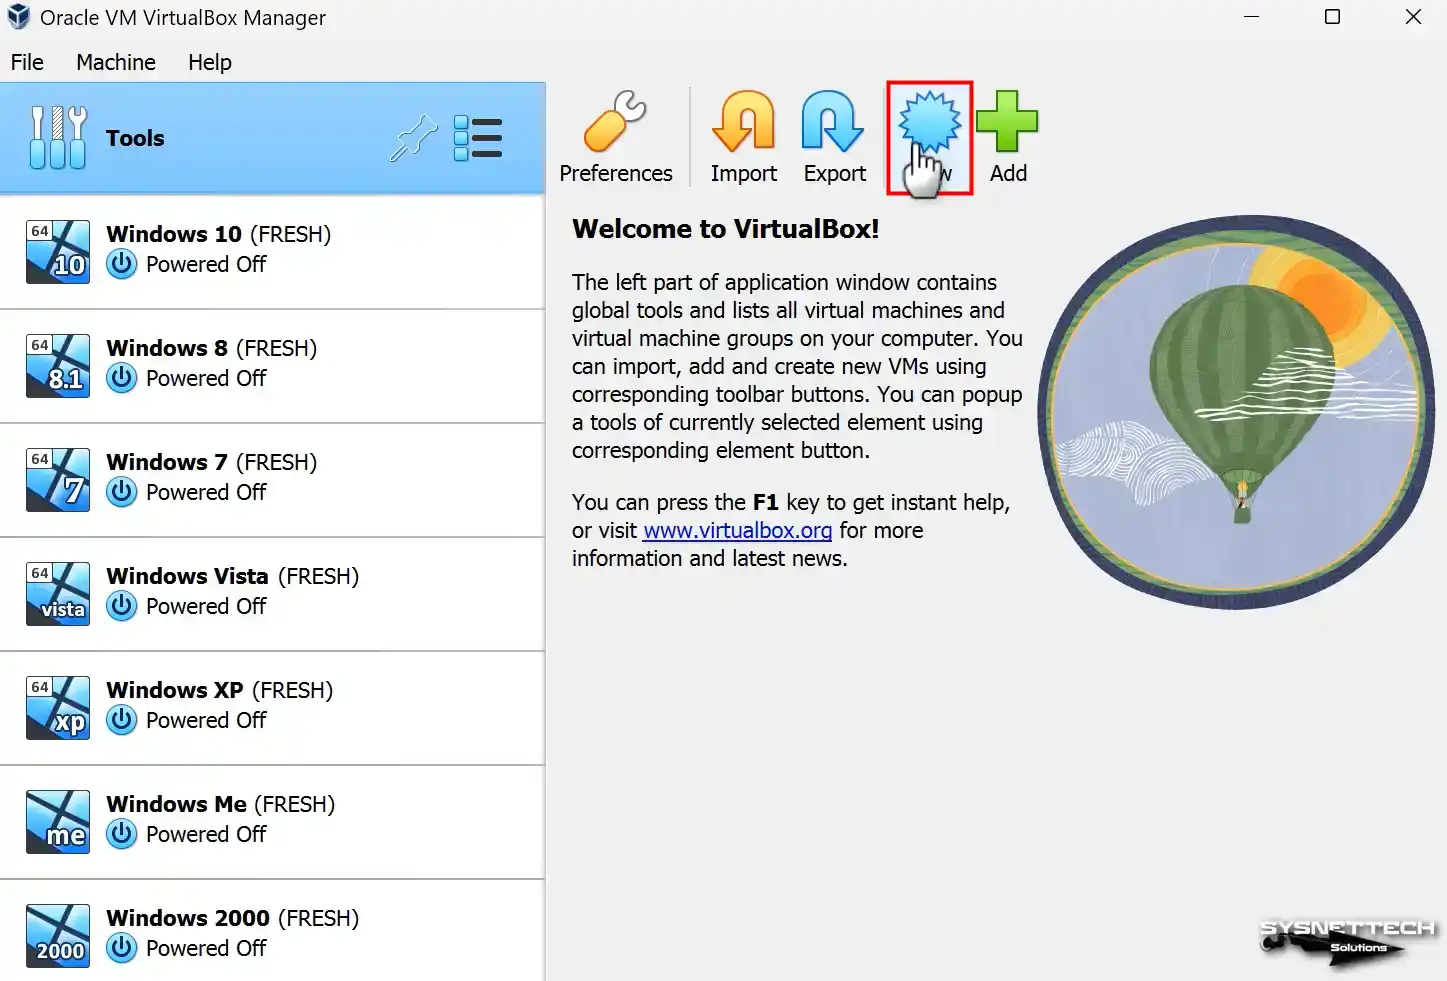
How to Create a New Virtual Machine for Windows 98
Suppose you want to install one of the 9x versions of Windows after installing the Oracle VM VirtualBox virtualization software on your host computer. In that case, you must configure the virtual machine’s settings correctly.
Step 1
After running the VirtualBox software, start the virtual machine preparation wizard by clicking the Machine / New option from the tool menu or the New icon on the right.
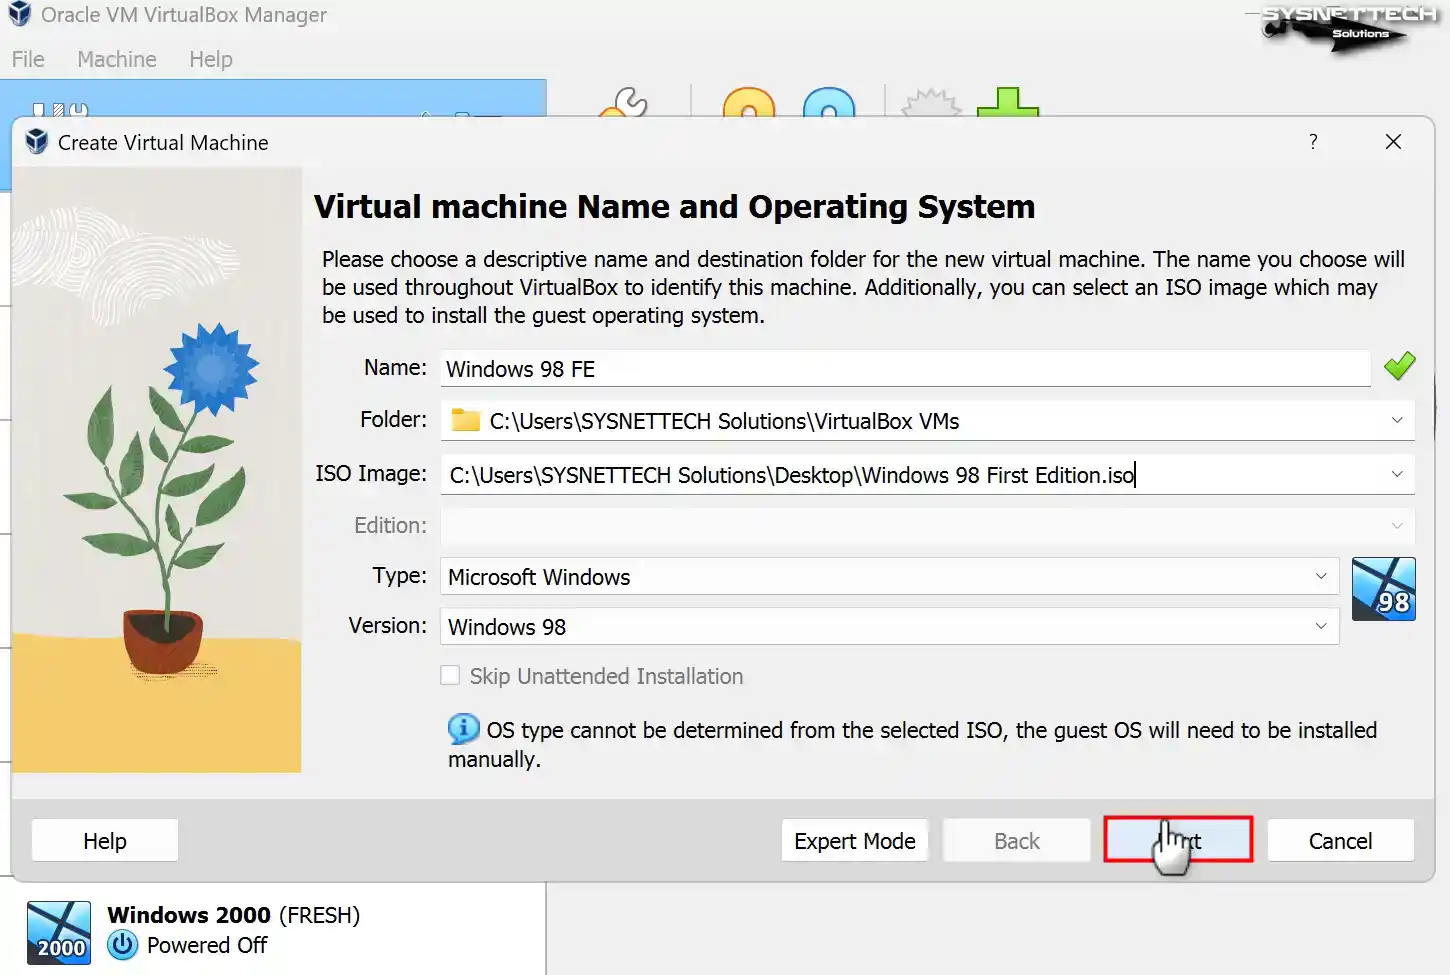
Step 2
After typing the operating system’s name, you will install the Name field in the virtual machine wizard, and the program will automatically configure the values in the Type and Version sections.
Suppose you see the 32 Bit architecture value instead of 64 Bit in the Version section while installing the more current Windows operating versions. In that case, you must manually adjust the architectural structure according to your installed OS. If you want to store the Windows 98 operating platform on your host disk, leave the Folder location as default. However, you want to fill up your host disk sparingly. In that case, locating it on an external disk may be better.
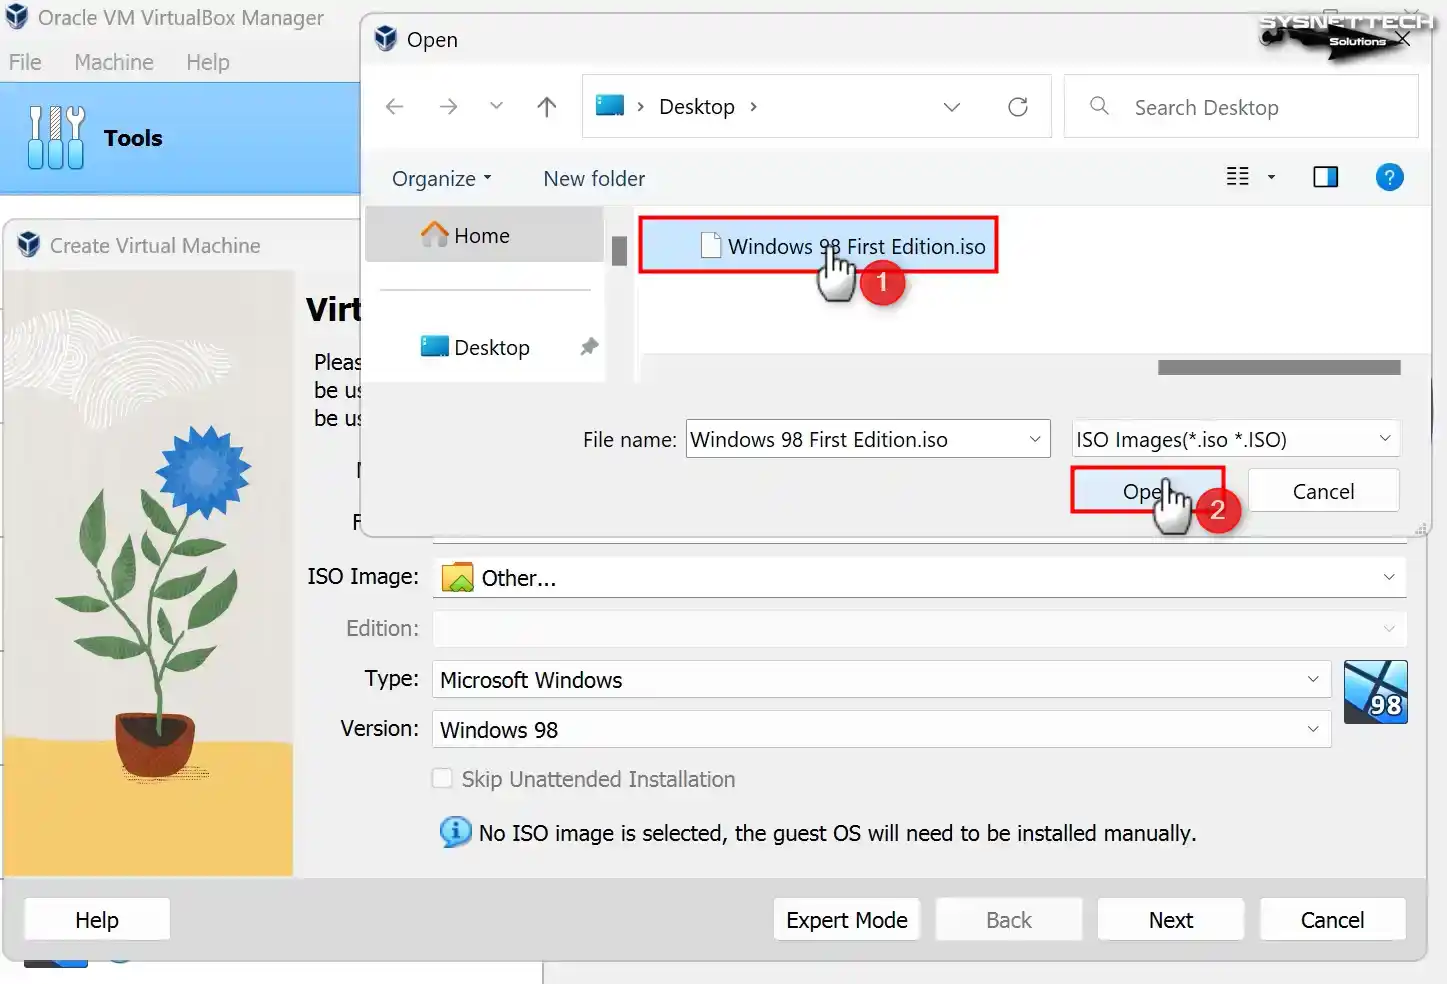
To add a Windows 98 FE (First Edition) or SE (Second Edition) ISO file to the virtual computer you are preparing, select Other from the ISO Image section.

Step 3
From the table below the article, select the ISO file of the Windows 98 FE or SE platform you downloaded to your computer and add it.
Step 4
You can make faster system setups with the unattended installation feature in the VirtualBox 7.x versions. Hence, this may not be the case with older operating versions, so click Next to continue the manual setup.
Step 5
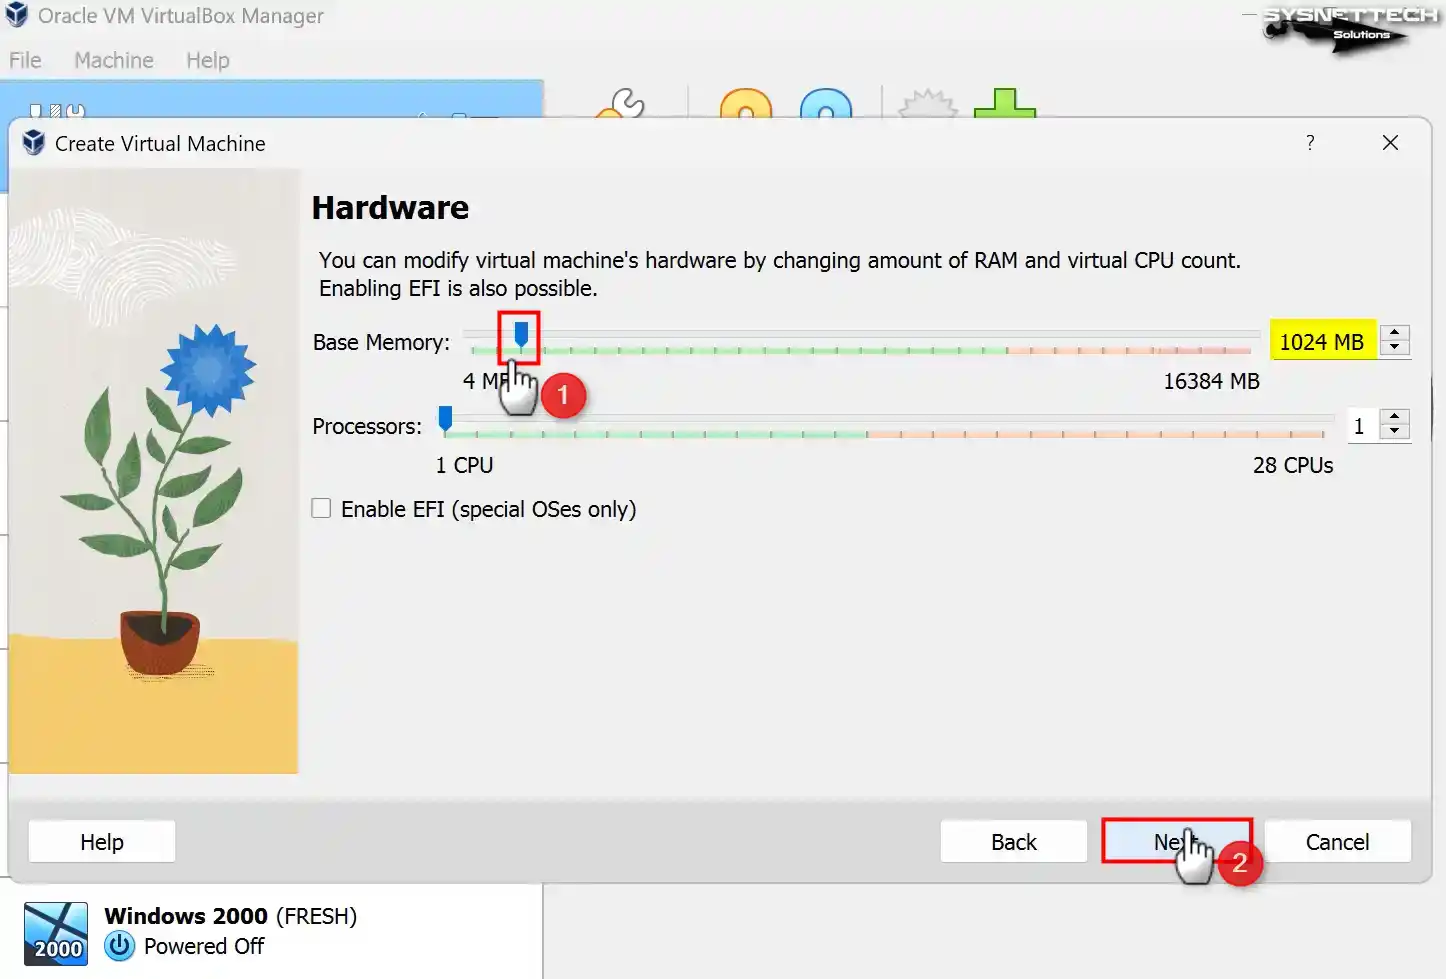
The maximum RAM size of the Windows 98 platform on a physical computer is 1.5 GB. However, you can configure a smaller RAM size for a more stable installation in the virtual machine.
In the Hardware window, in the Base Memory section, set the RAM size of 1024 MB (1 GB) for Win98 and click Next.
Step 6
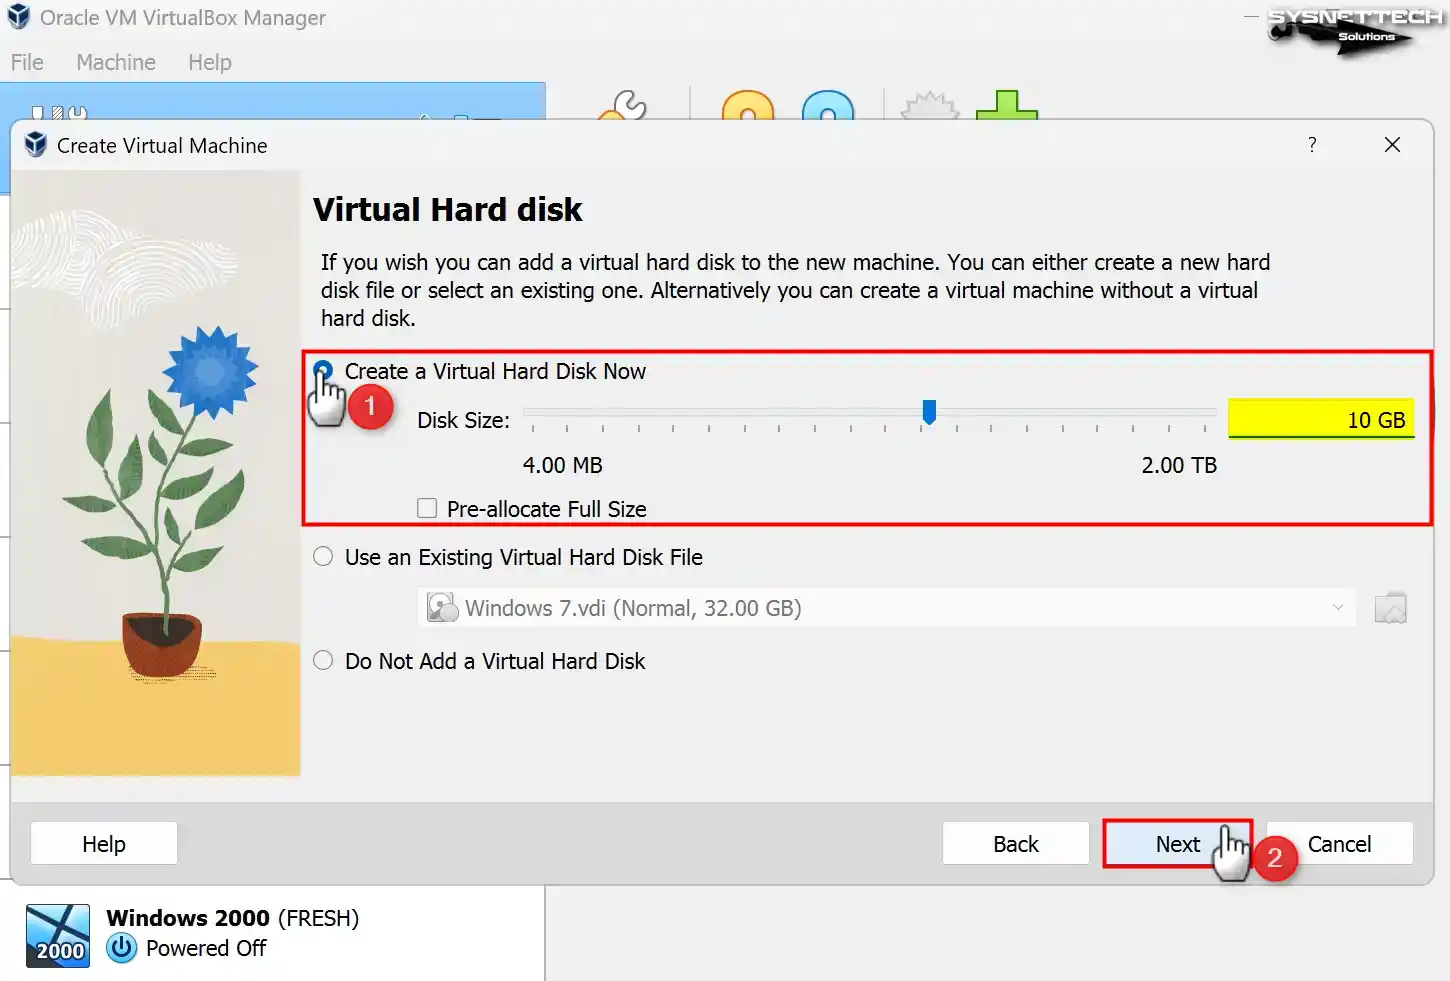
You must create a new virtual hard disk to install a clean software platform. You can add the virtual disk through this window if a previously installed virtual machine exists. Configure a new virtual disk size of 10 GB for Win98 and click Next.
Step 7
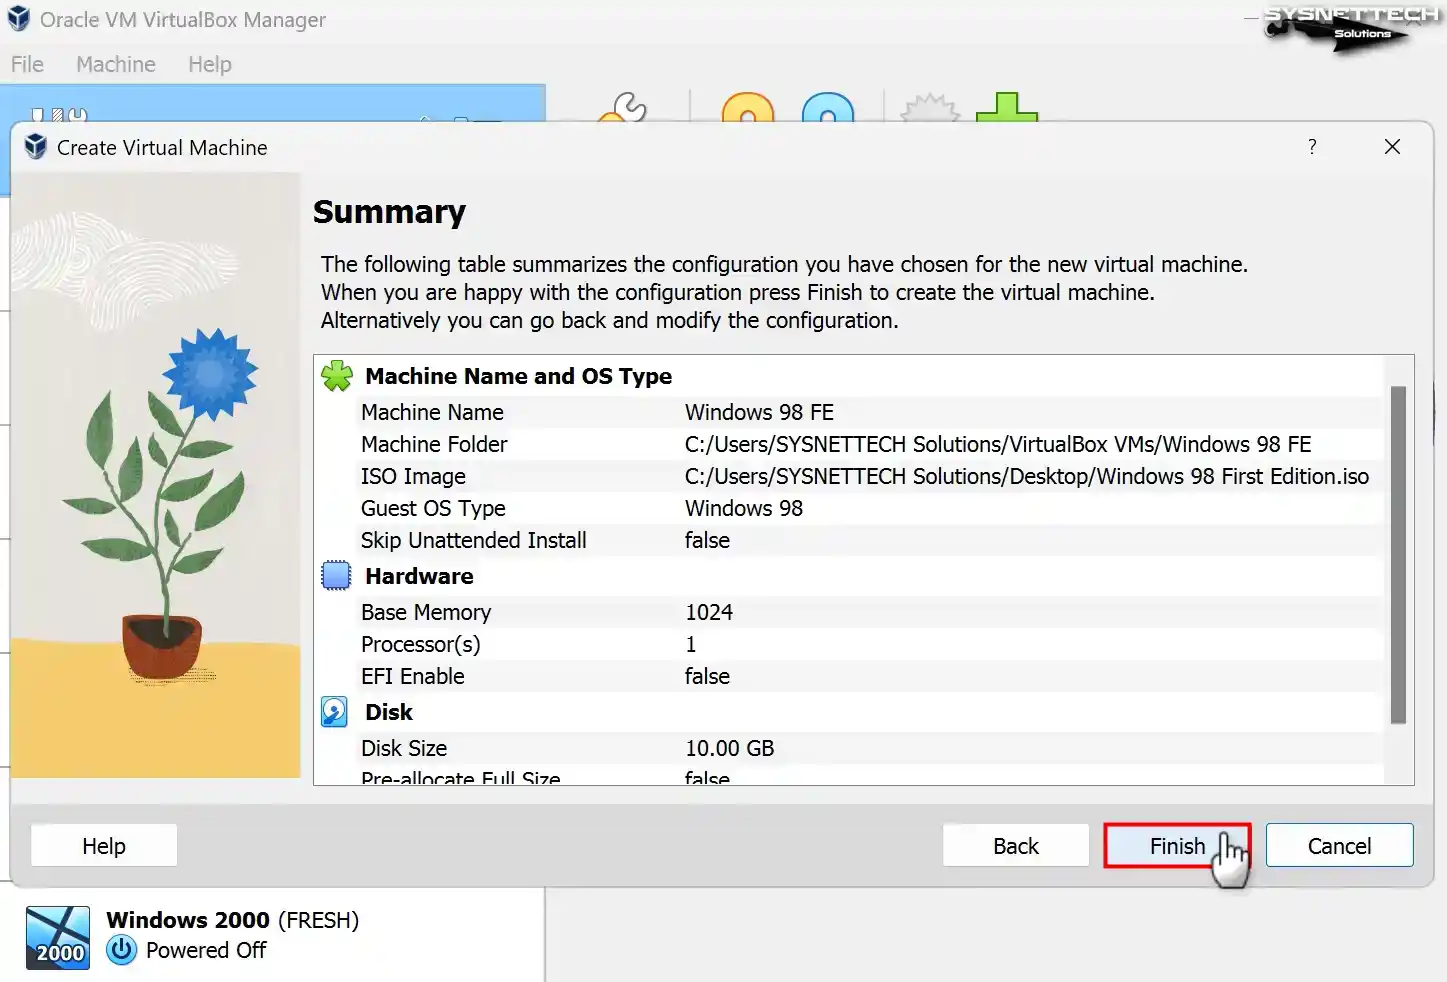
Check the virtual hardware summary information of the Win98 guest VM you created and click Finish to close the wizard.
Step 8
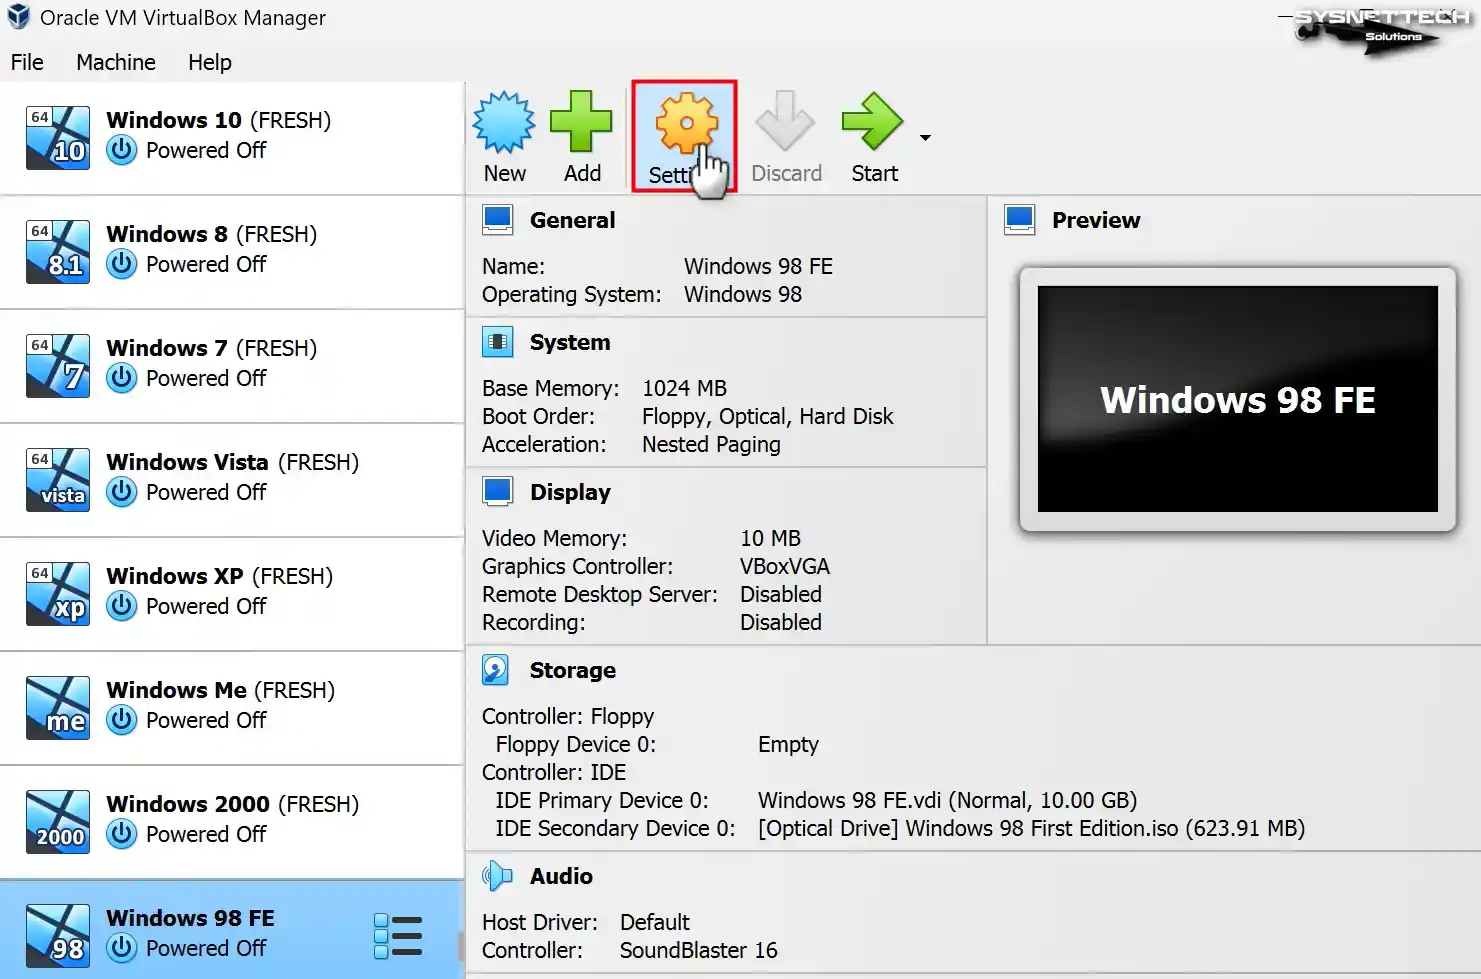
After preparing the Windows 98 virtual machine, you need to make some basic settings for performance. Therefore, click Settings before starting your virtual PC.
Step 9
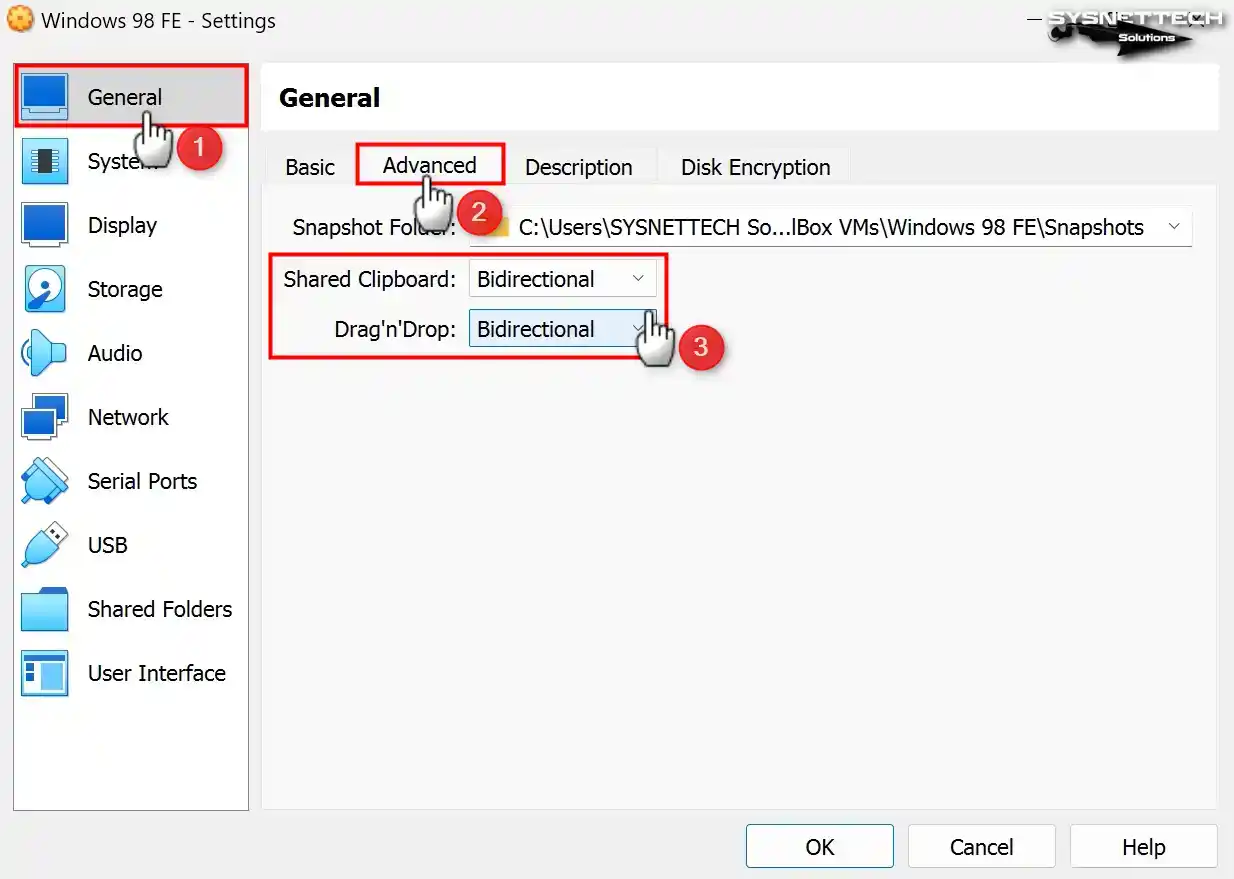
You can enable Shared Clipboard and Drag’n’Drop features in the Advanced tab of the virtual machine’s General settings, but this will not work in Win98. Suppose you plan to run the virtual PC using one of the old versions of VirtualBox. In that case, you can use your guest machine more efficiently by enabling these features, as Guest Additions will be supported in a suitable version.
Suppose you have one of the installed VirtualBox 7.x versions on your host computer. In that case, you can skip enabling the file transfer features. We advise allowing it only for older versions, as this article suggests.
Step 10
Configure the boot devices in the System / Motherboard tab in the VM’s settings window and enable the I/O APIC feature to use the virtual PC more efficiently.
NOTE: If your VM is constantly failing or not installing, you can enable Nested Paging in the Acceleration tab in the settings.

Step 11
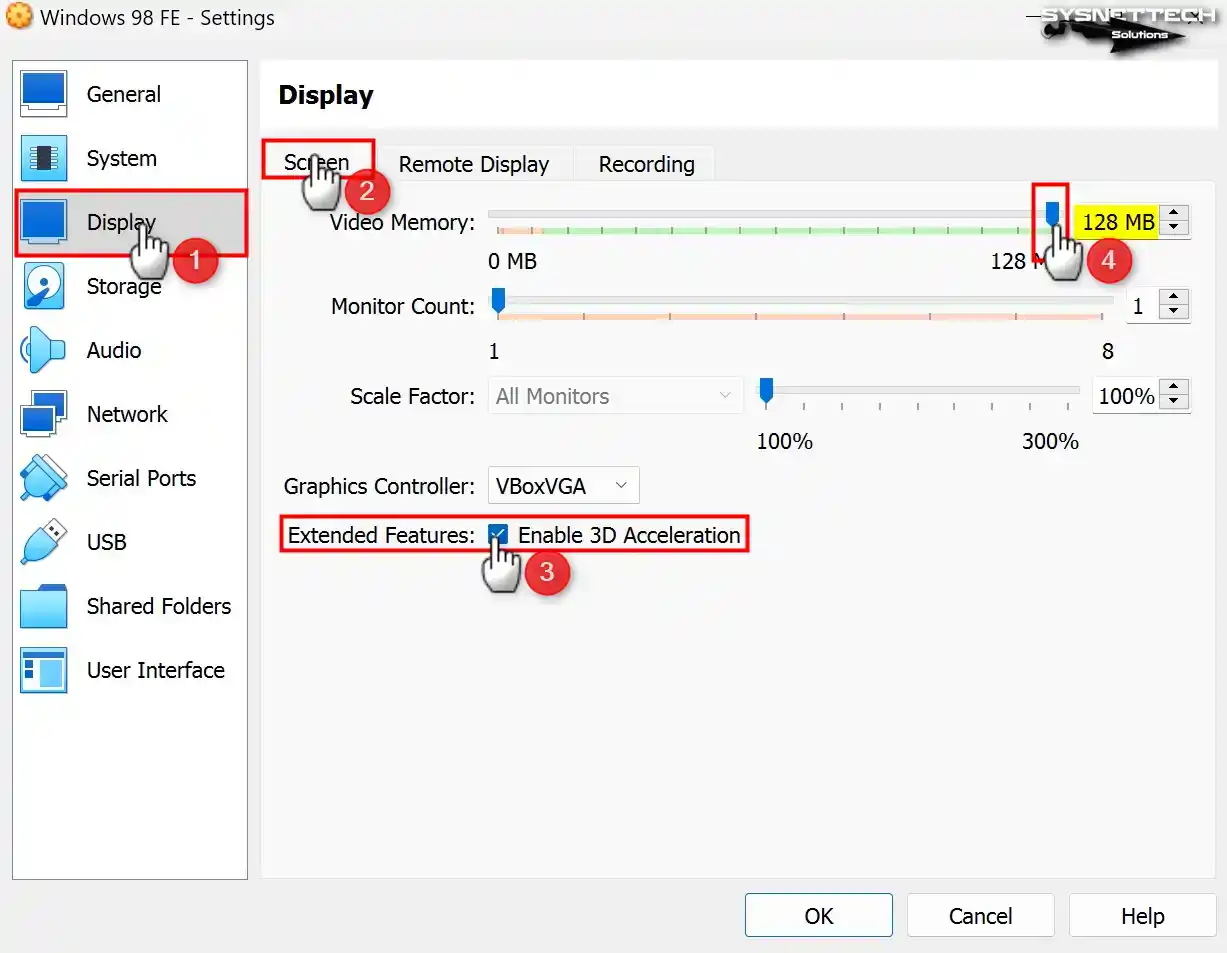
As we mentioned, new versions of the Oracle virtualization program are not fully supported for Win98, so you may be unable to use display and 3D acceleration settings. If you use a version that fully supports Win98, enable 3D acceleration in the Display / Screen settings and modify the video memory to 128 MB.
Step 12
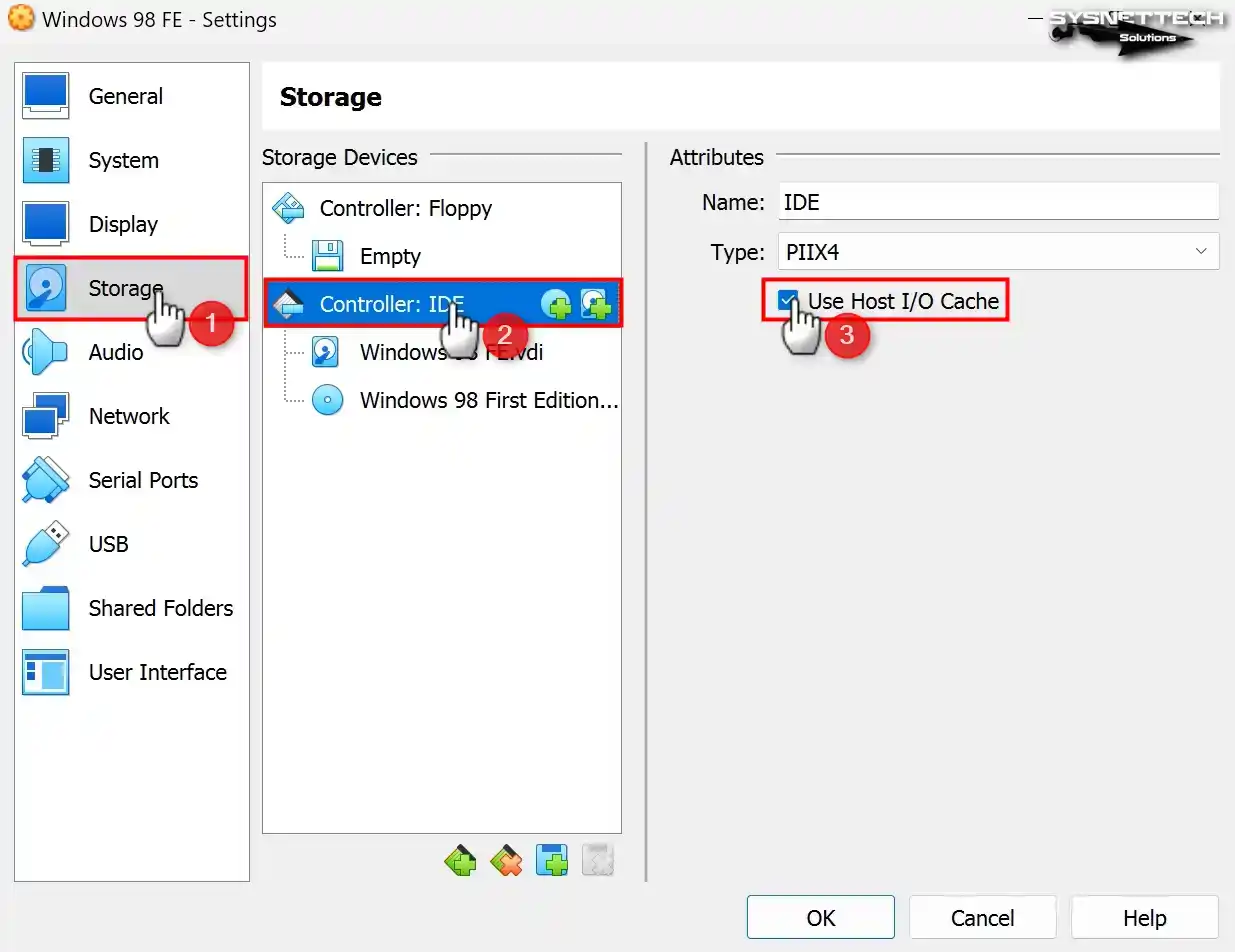
After selecting the IDE controller, check if the Host I/O Cache feature on the right is enabled.
Step 13
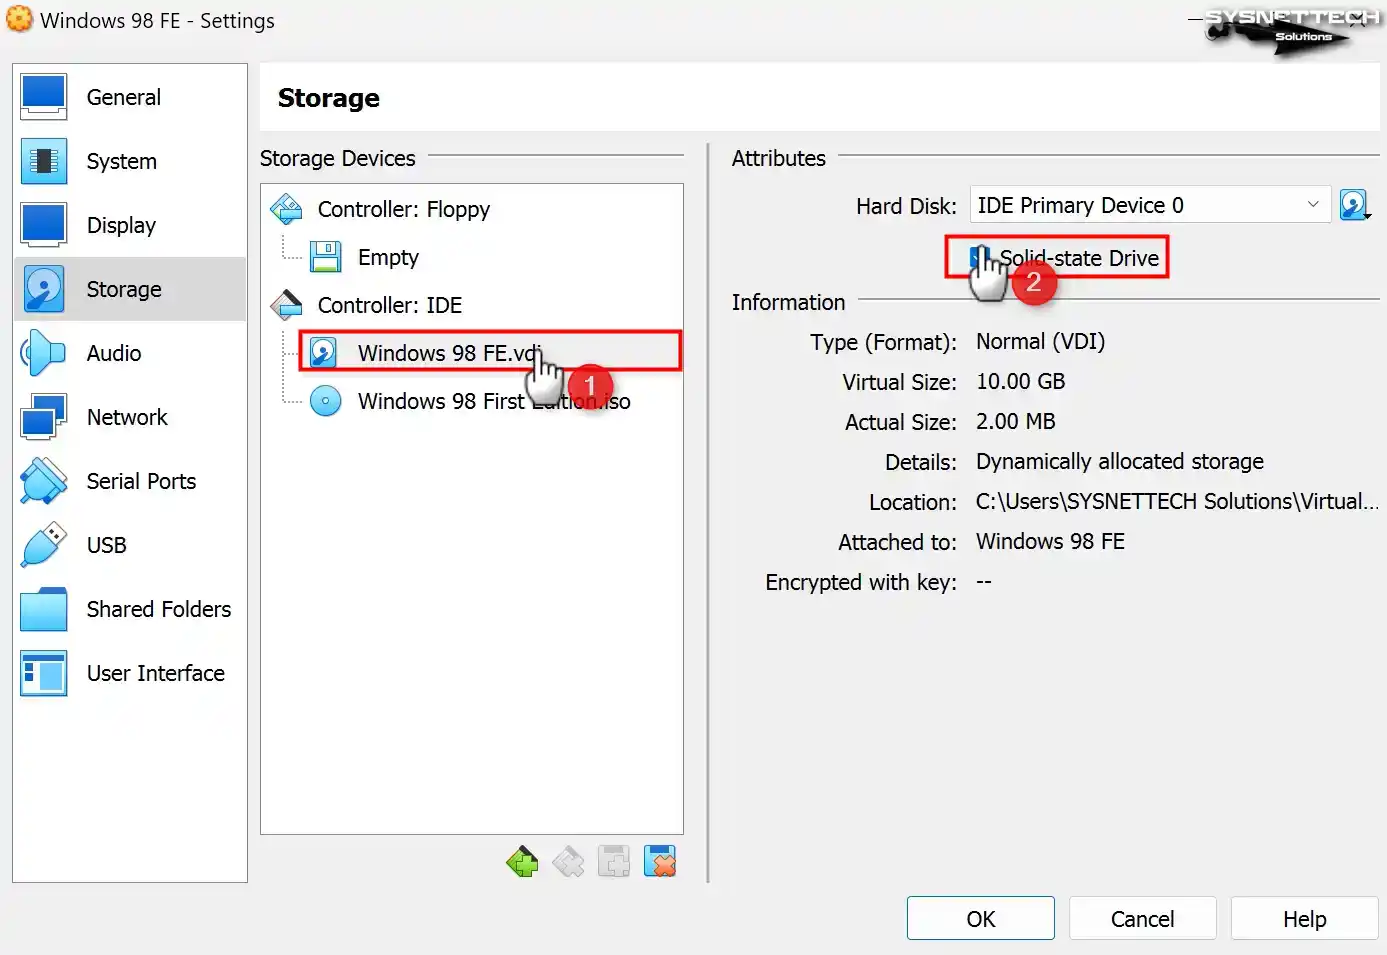
Select the Solid-State Drive option to configure the working principle of the Windows98.vdi virtual disk file as SSD.
Step 14
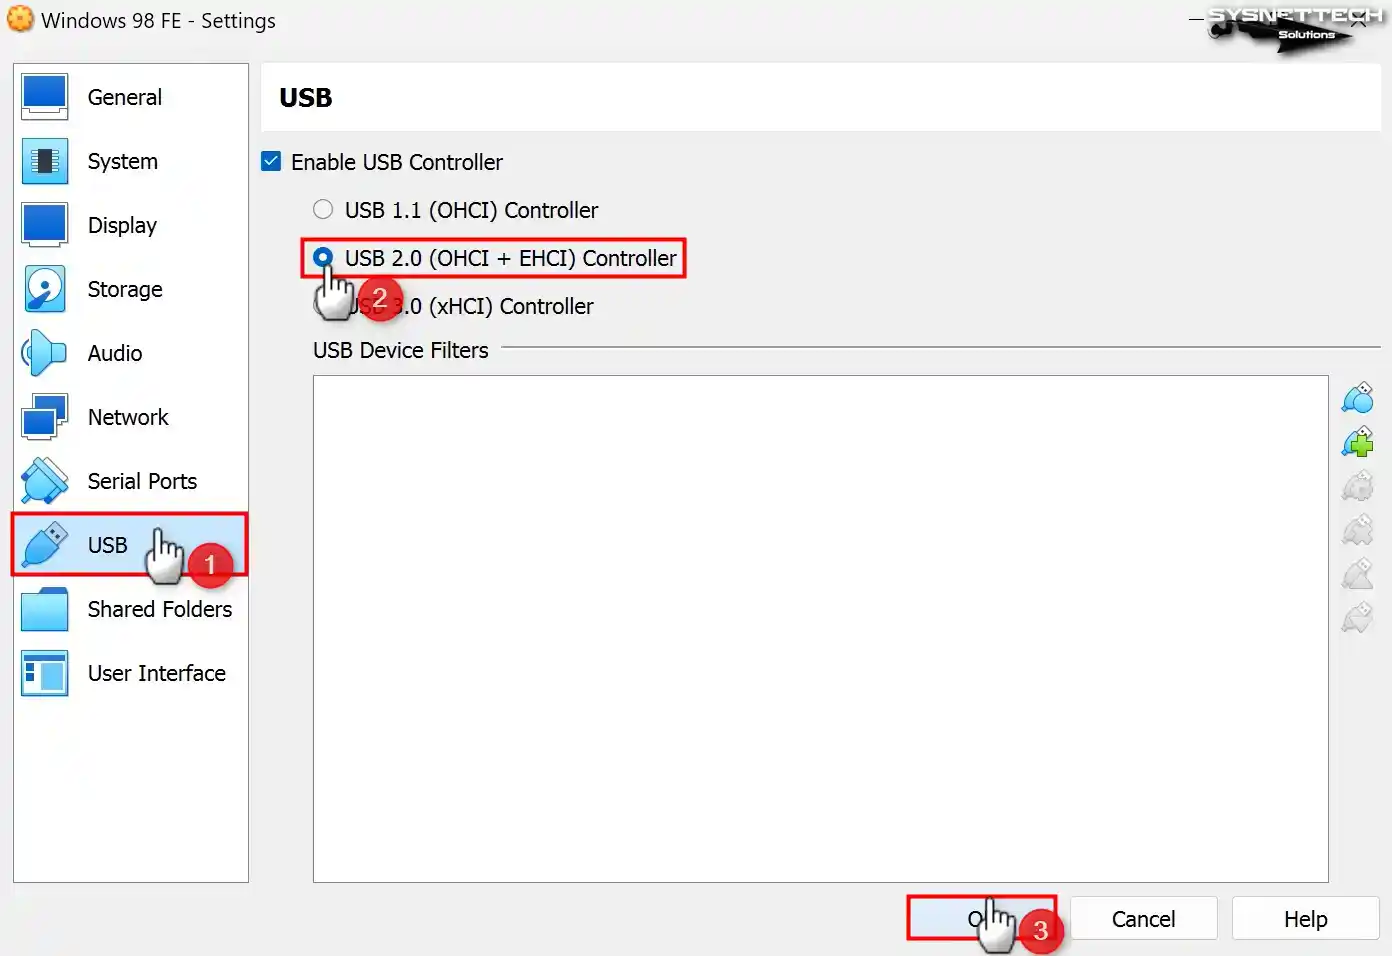
To transfer files using your USB devices on your Windows 98 virtual guest machine, tick the 2.0 (OHCI + EHCI) Controller and turn off your VM’s settings.
Step 15
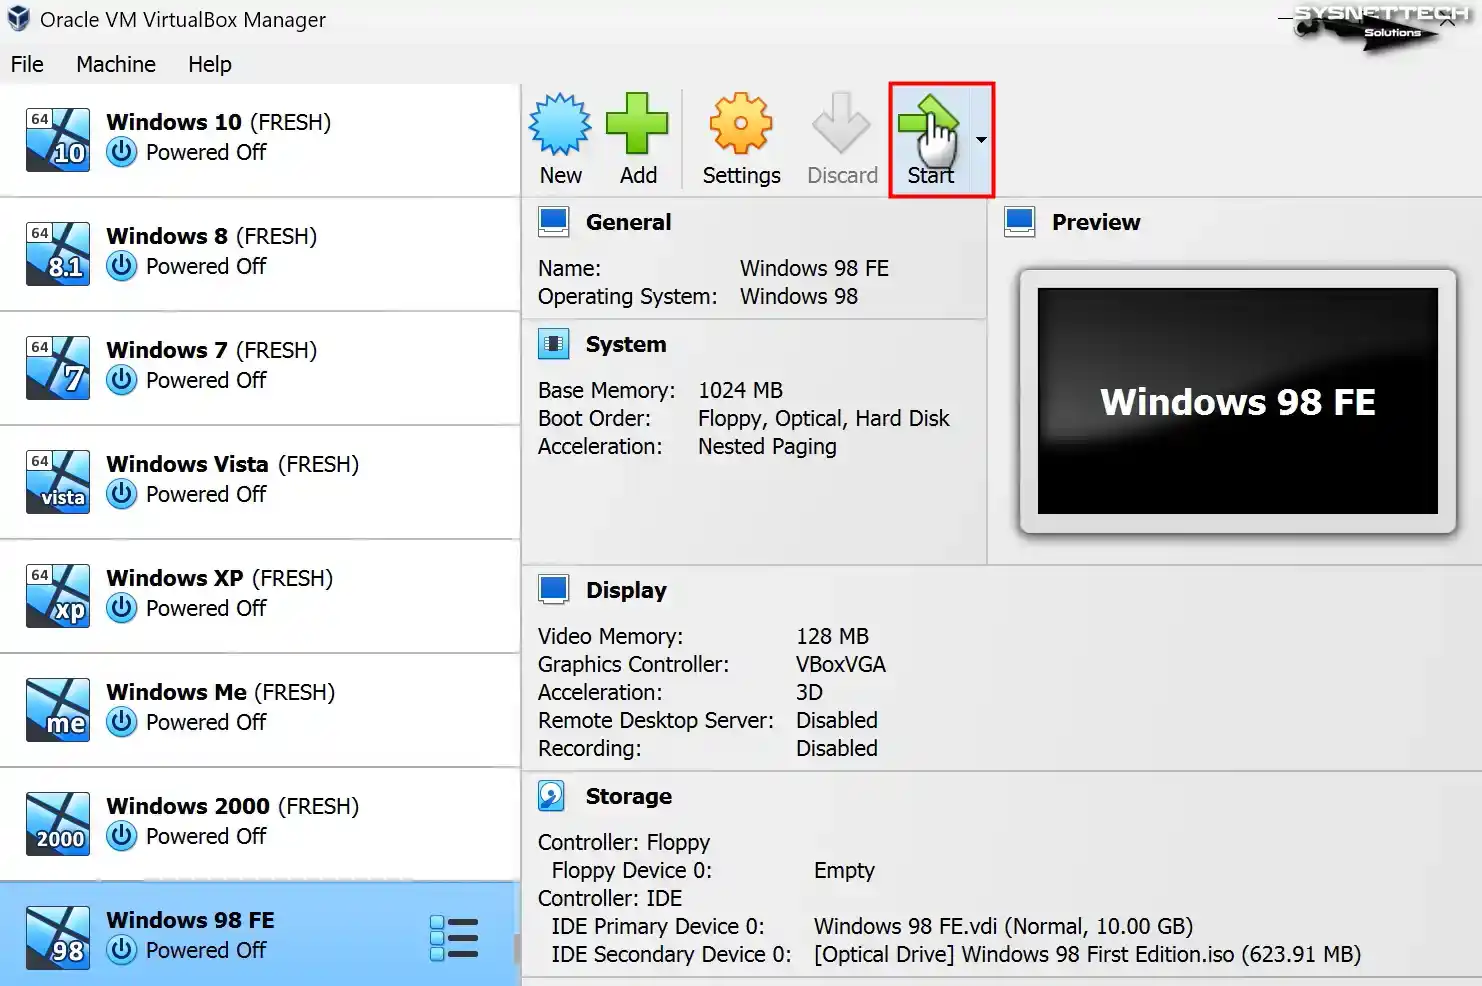
After making all the necessary preparations, run your virtual computer to install Windows 98 with VirtualBox. After running the VM, when the Select Start-Up Disk window opens, select the ISO image you added to the guest machine and click Start again.
How to Install Windows 98
After booting the virtual computer with the startup disk, you can install Windows just as you would on a physical computer.
Step 1
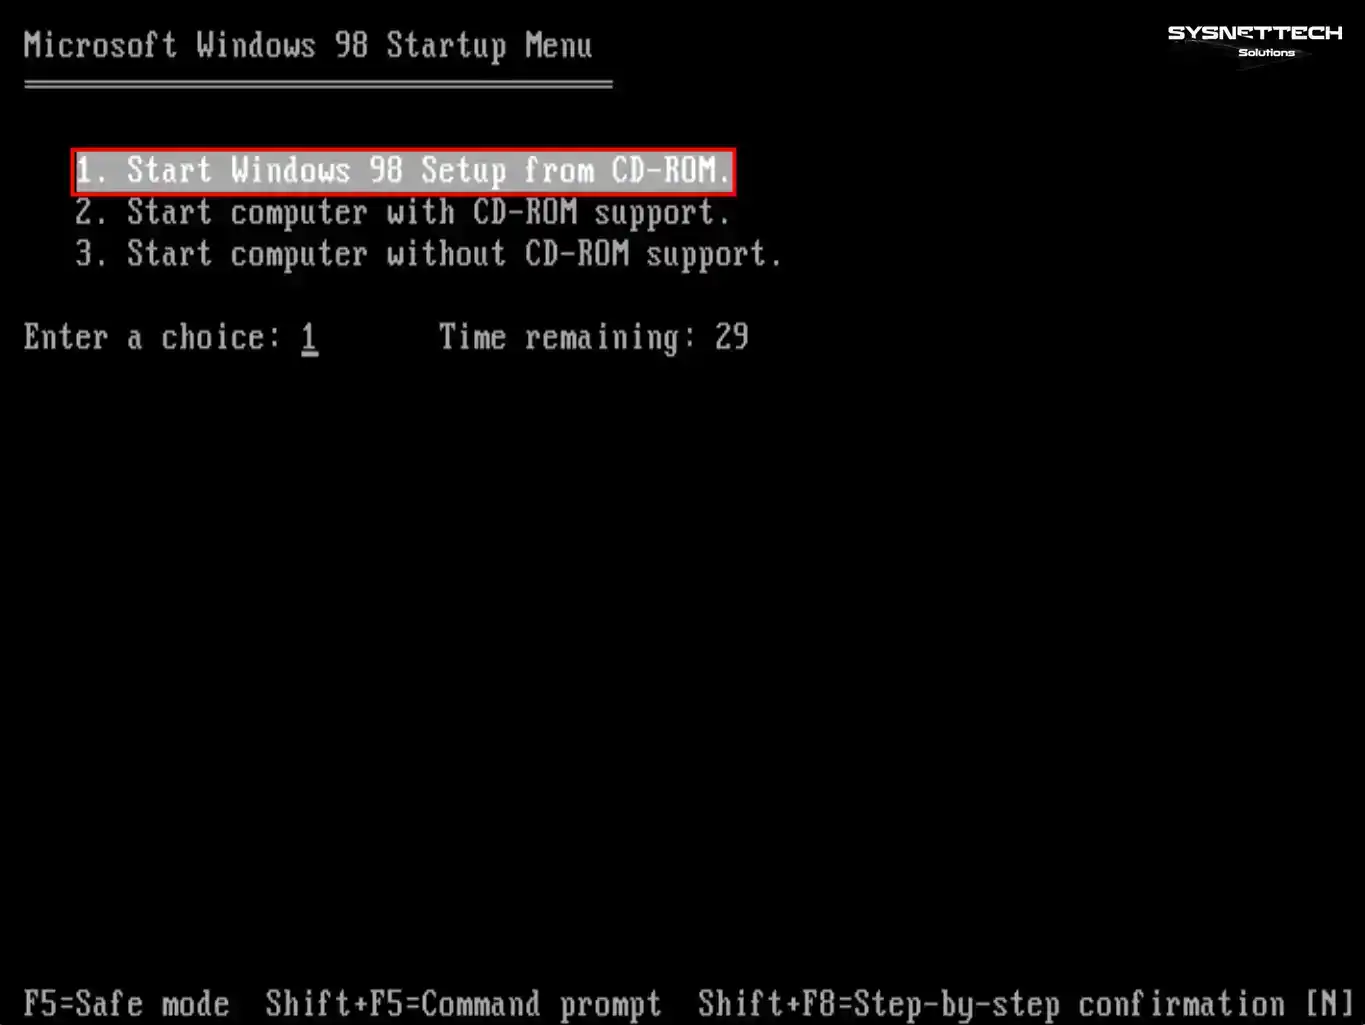
When the Microsoft Windows 98 start menu is opened, press Enter on the Boot from CD-ROM option to install the OS with the ISO image.

Step 2
Press Enter again on the Start Windows 98 Setup from CD-ROM option and continue.
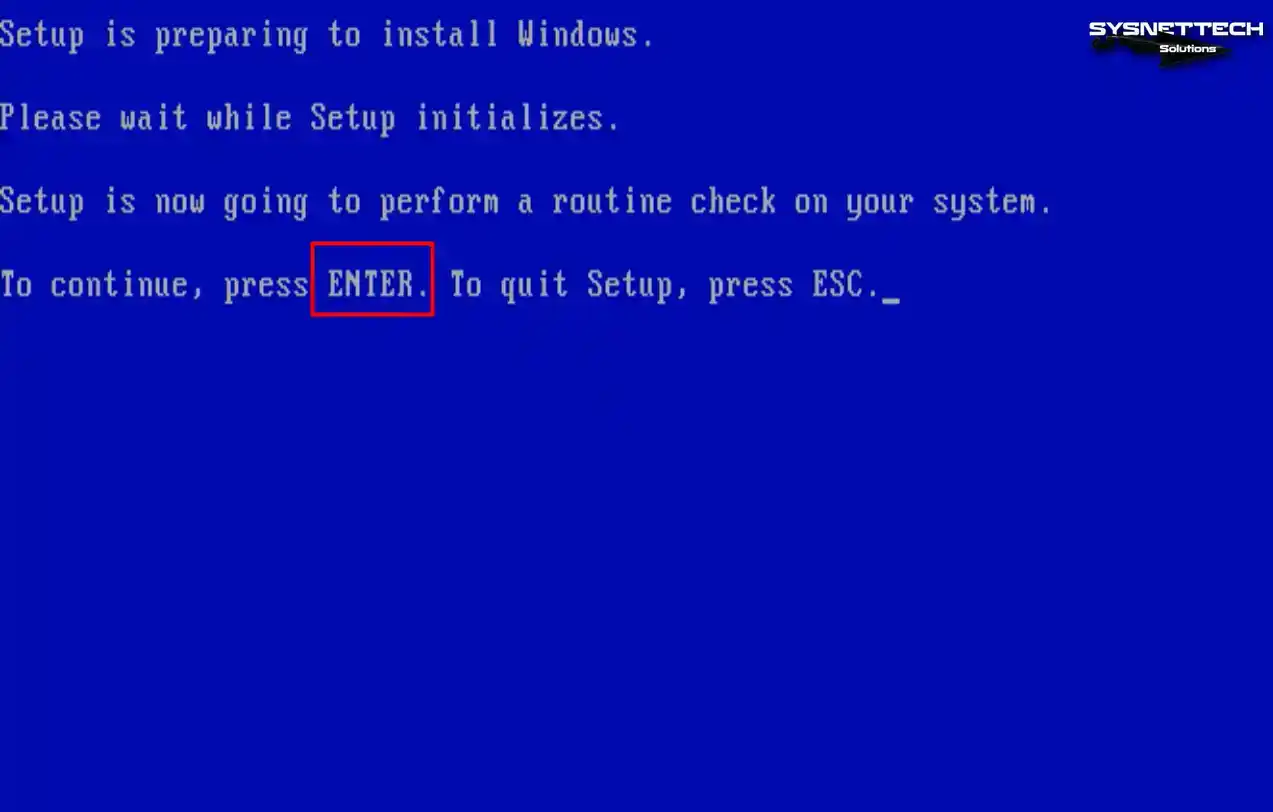
Step 3
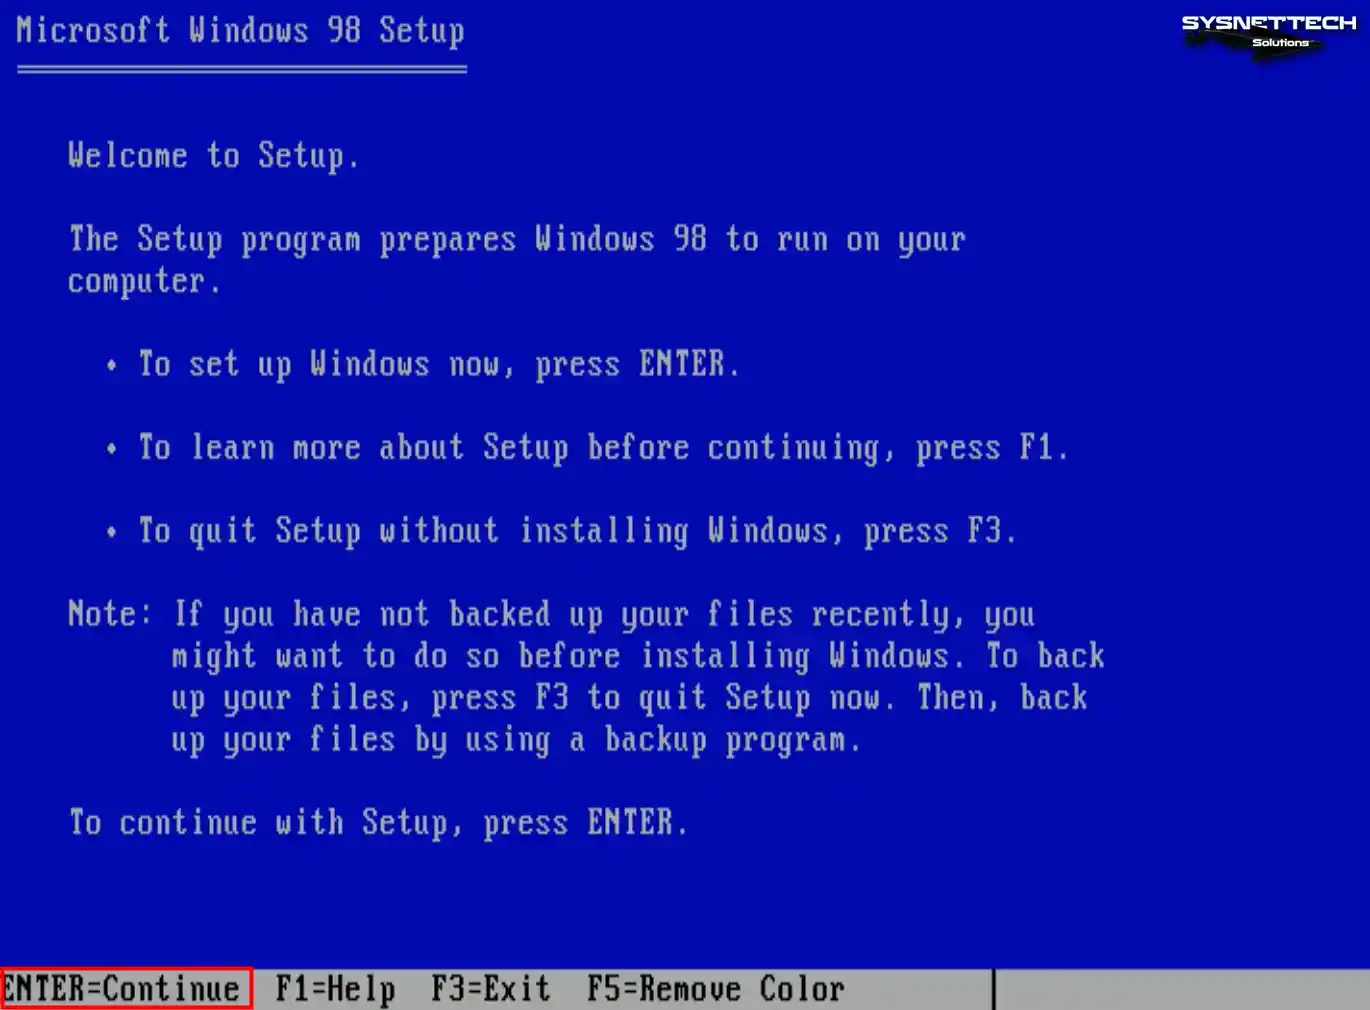
Press the Enter key on the Microsoft Windows 98 Setup screen to initiate the setup. If you need additional details about the installation, press F1 or F3 to leave the wizard.
Step 4
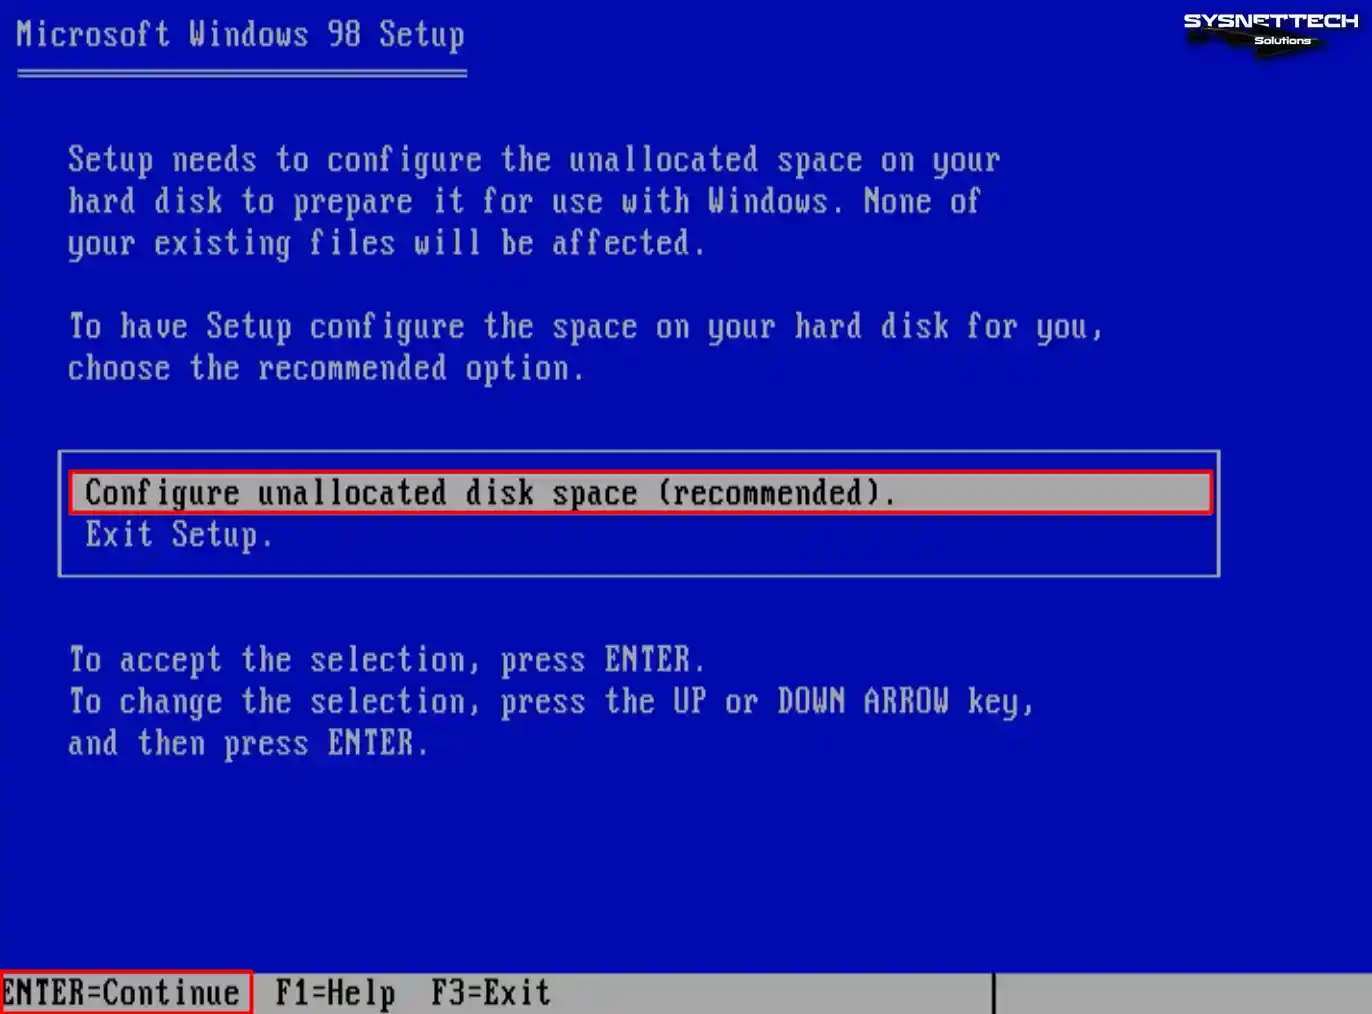
To edit the virtual disk of the virtual machine, you must configure the unallocated space. Press Enter on the Configure unallocated disk space option and continue.
Step 5
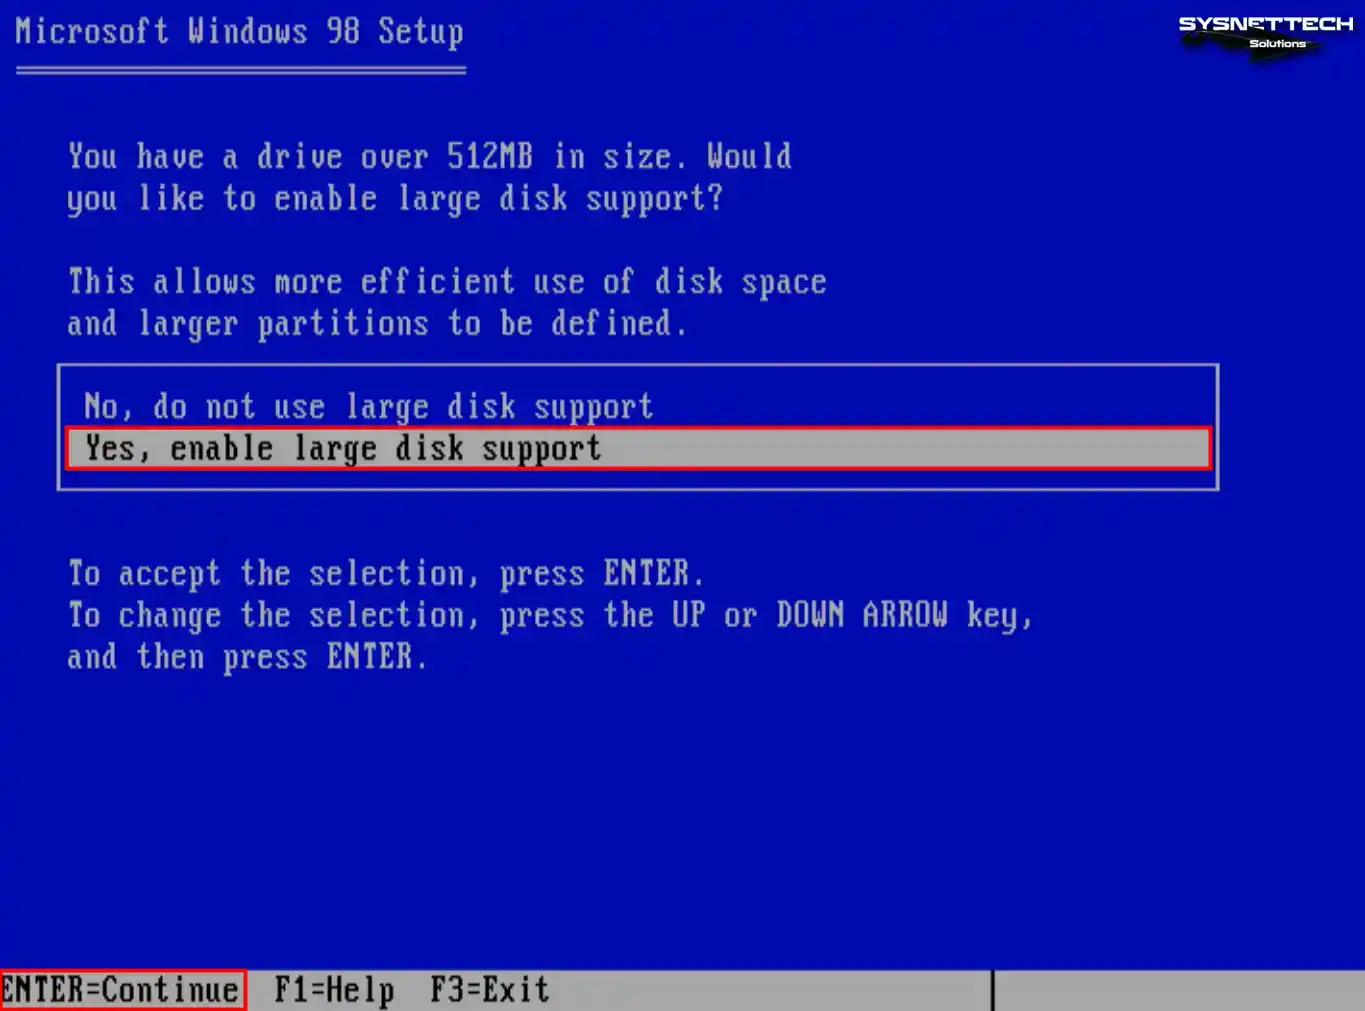
Enable large disk support if the virtual PC’s capacity exceeds 512 MB.
Step 6
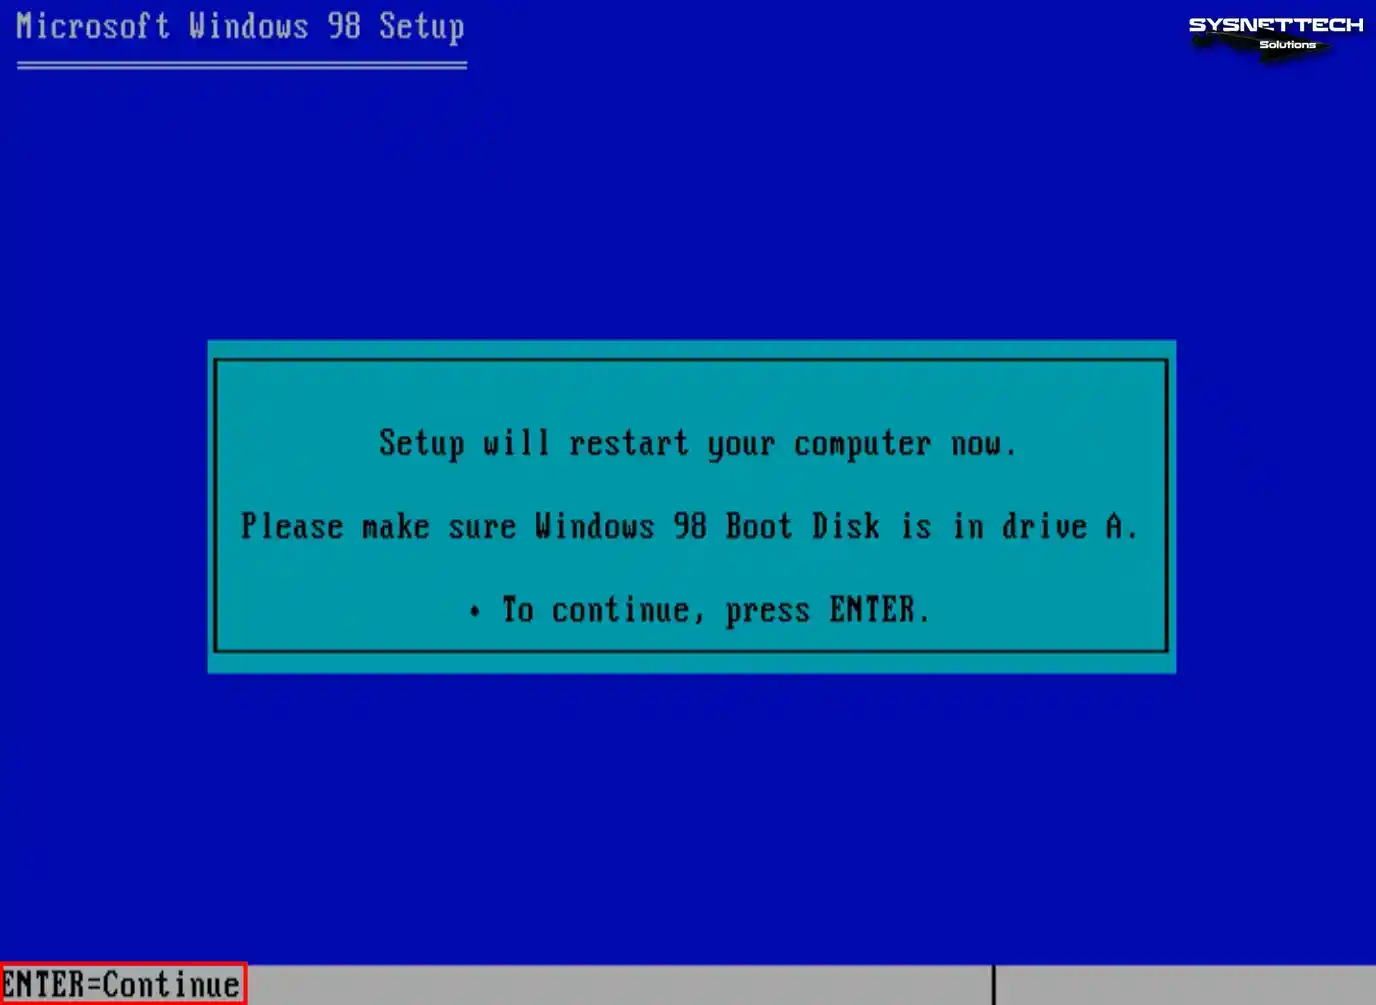
After enabling extensive disk support, you must restart your virtual computer. Since you will start the installation from scratch, repeat the above Steps.
Step 7
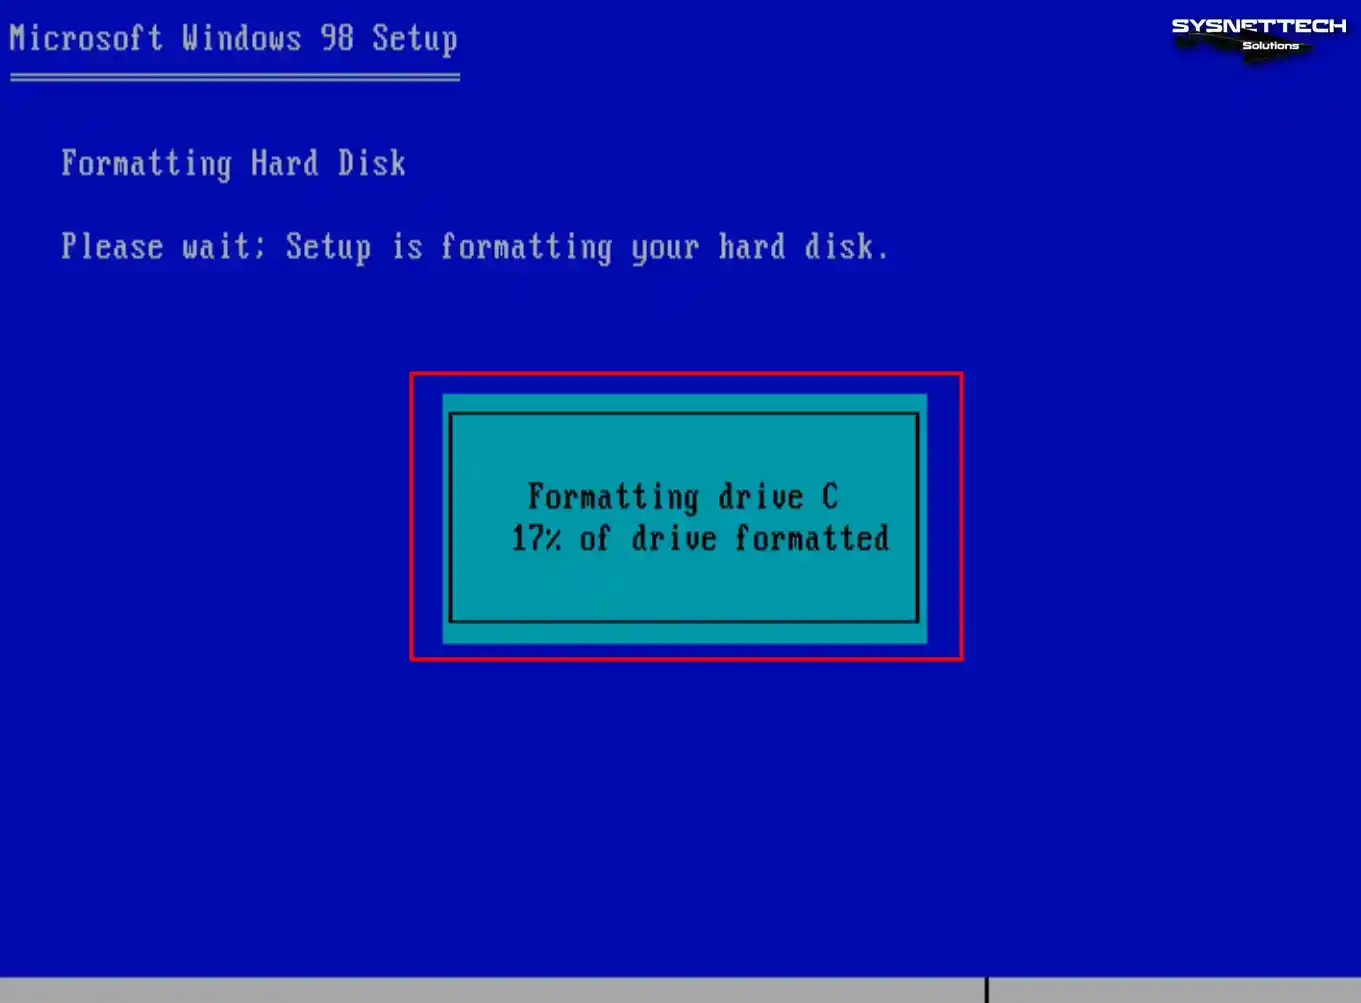
The C drive will be automatically formatted after the virtual machine restarts.
Step 8
After the virtual disk is formatted, press Enter to continue the installation.
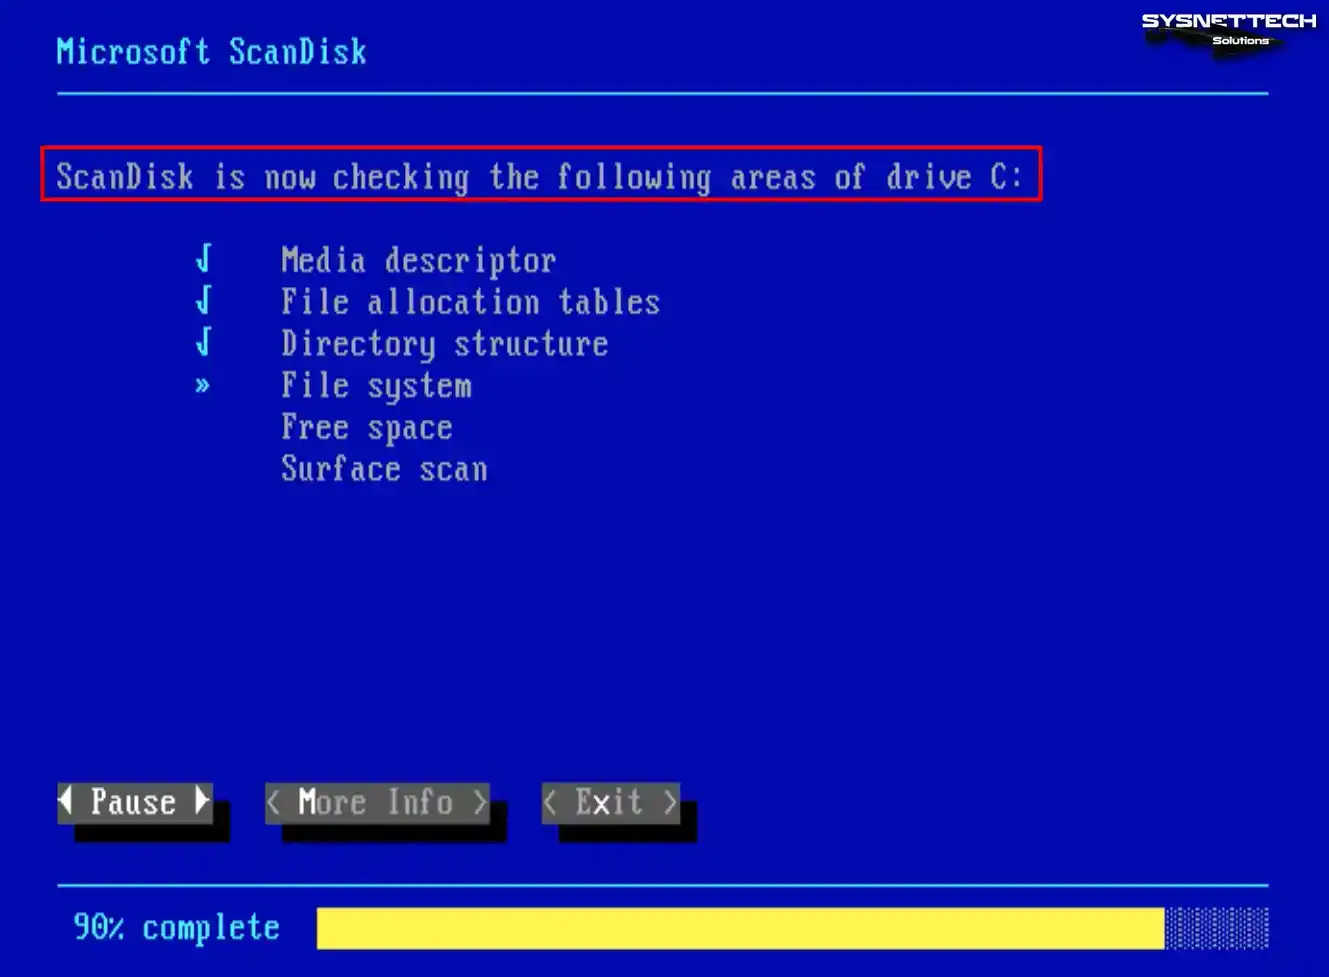
Step 9
The file structure on the C drive will be checked automatically when the Microsoft ScanDisk tool is opened.
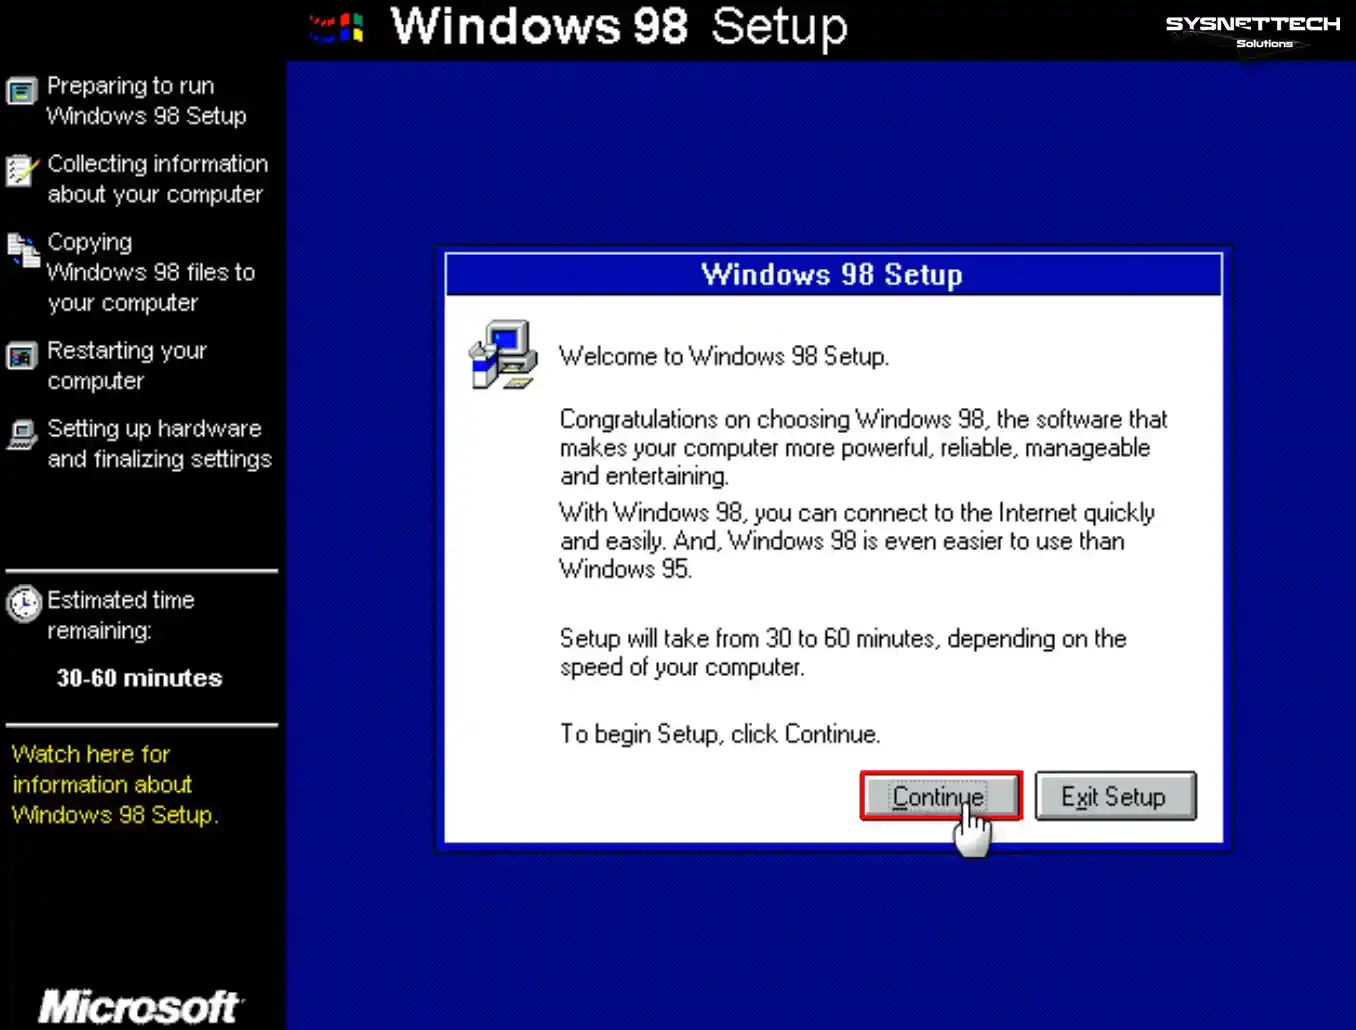
Step 10
After checking the disk structure, click the Continue button when the Windows wizard opens.
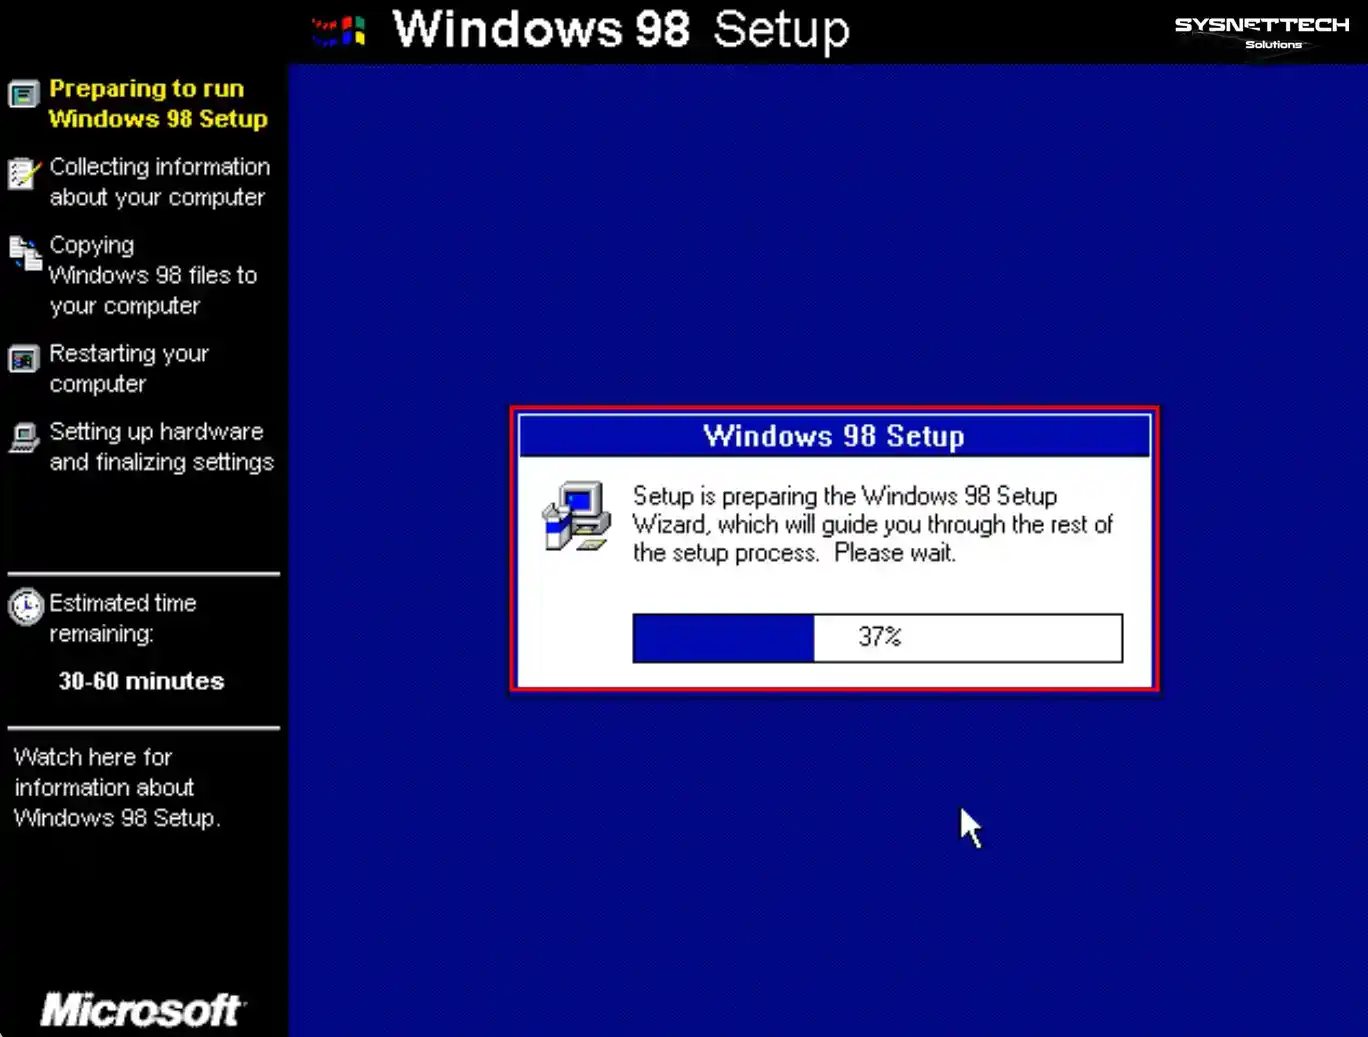
Step 11
Wait while the Windows 98 setup wizard is being prepared.
Step 12
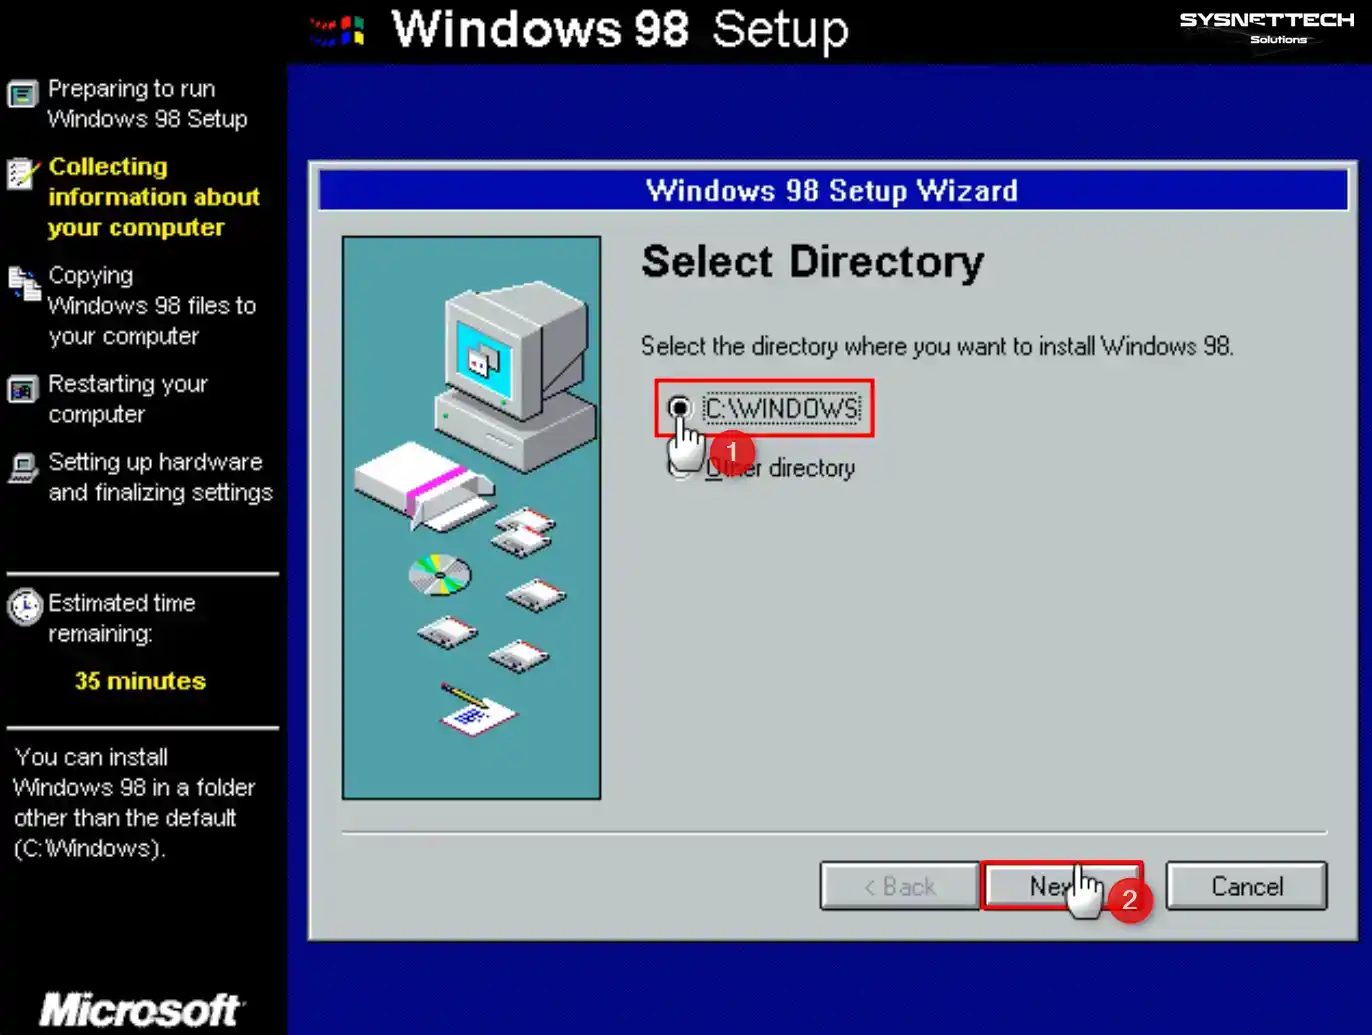
You can change the directory where you want to install Windows 98 with the Other Directory option. Click Next directly to install Windows to the default C:\WINDOWS directory.
Step 13
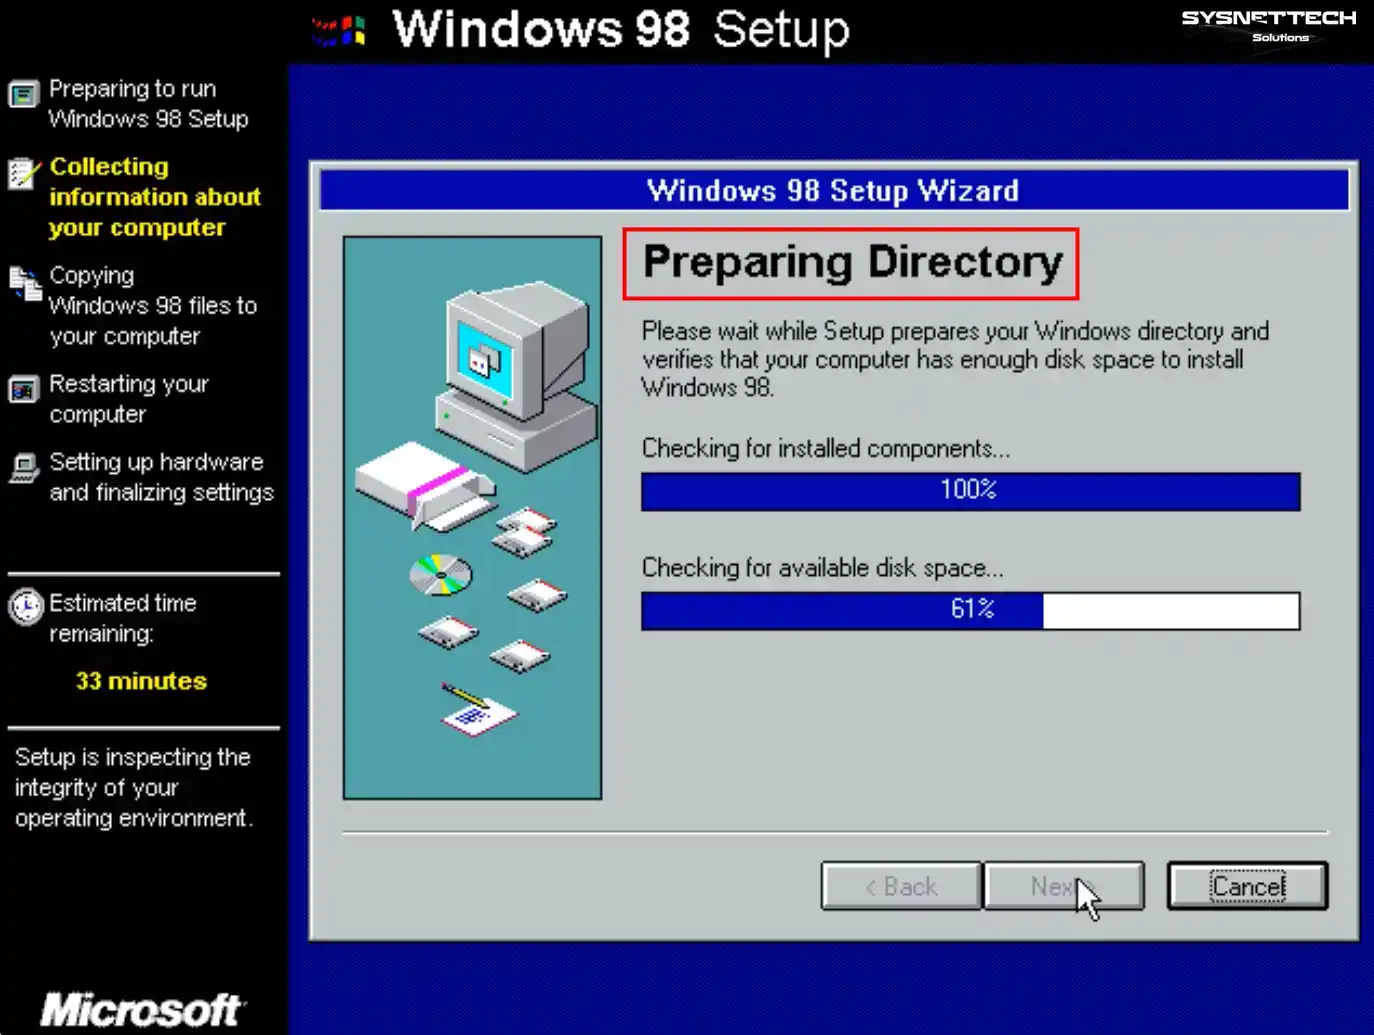
Wait while the setup wizard checks for installed components and disk space.
Step 14
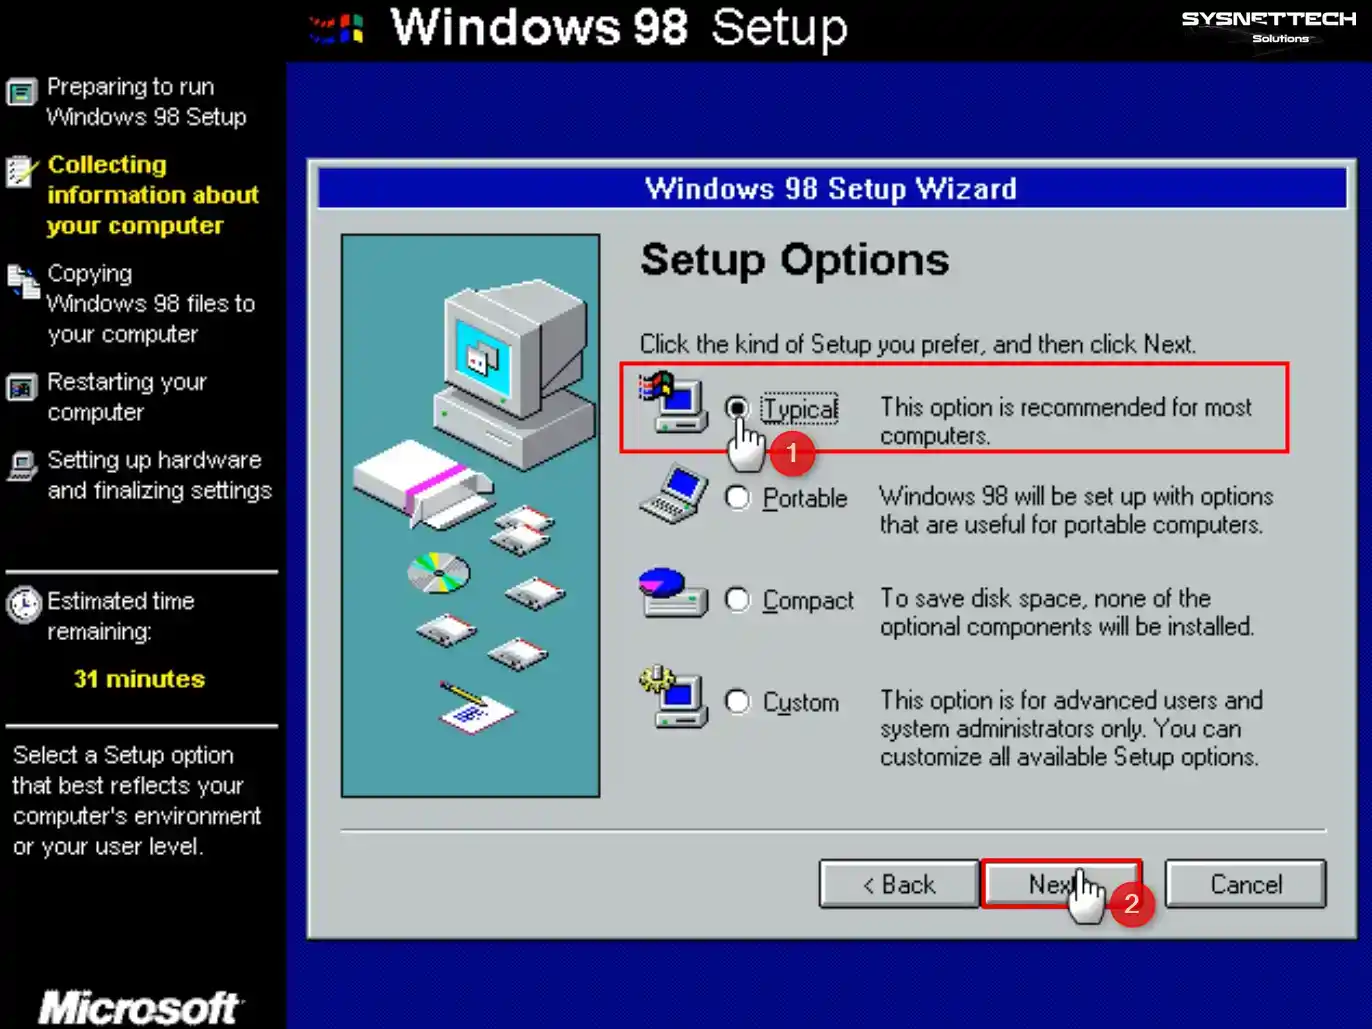
In the Windows installation options window, select Typical, enabled by default, and click Next.
Step 15
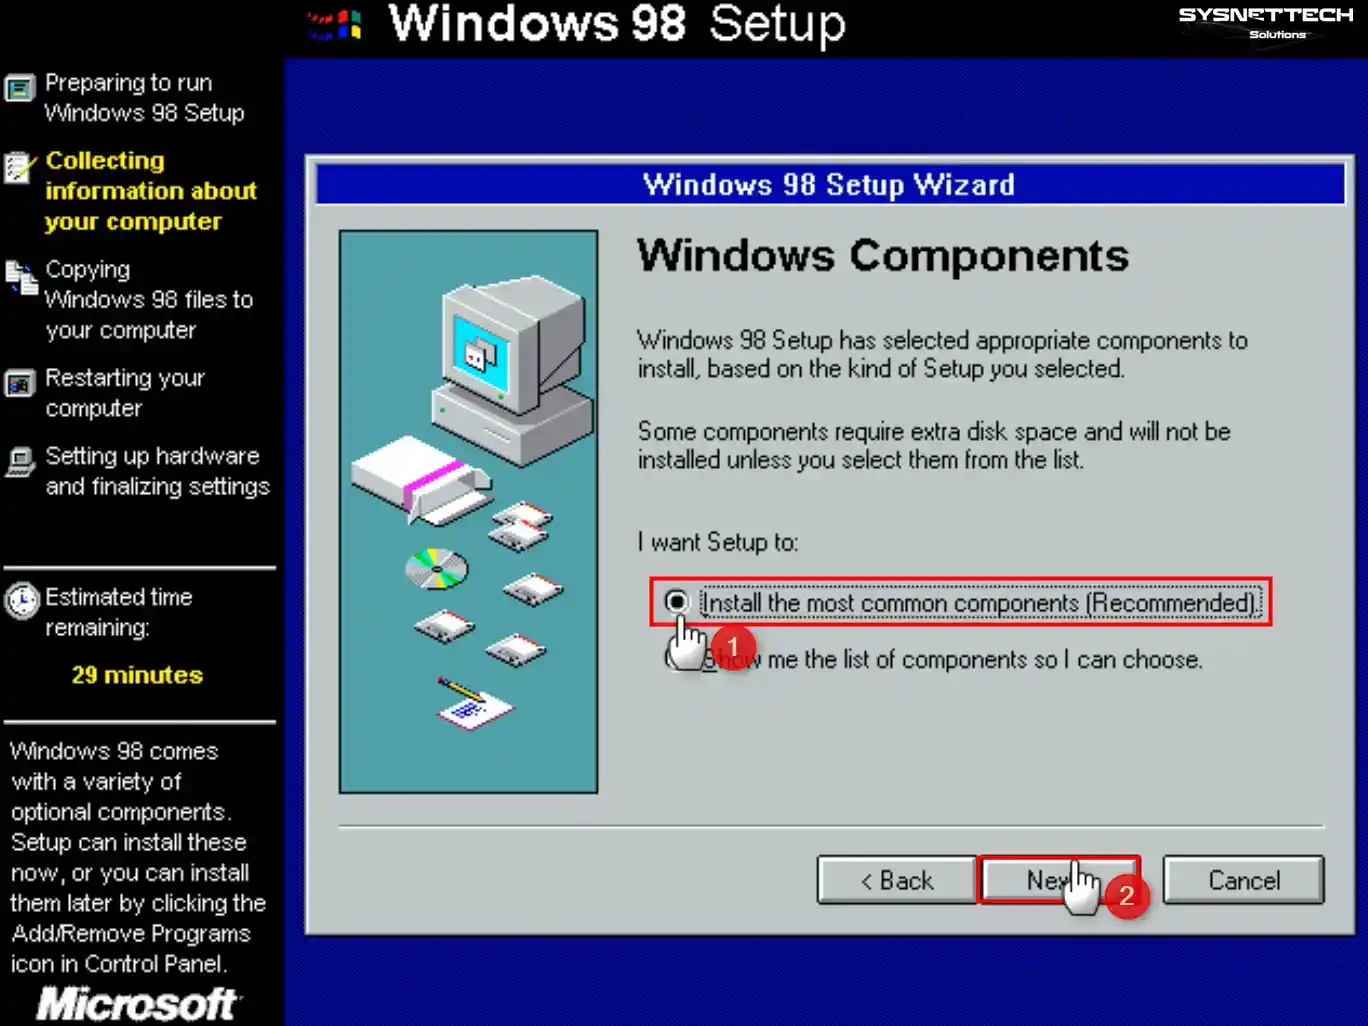
Check the Install most common Windows components option and click Next.
Step 16
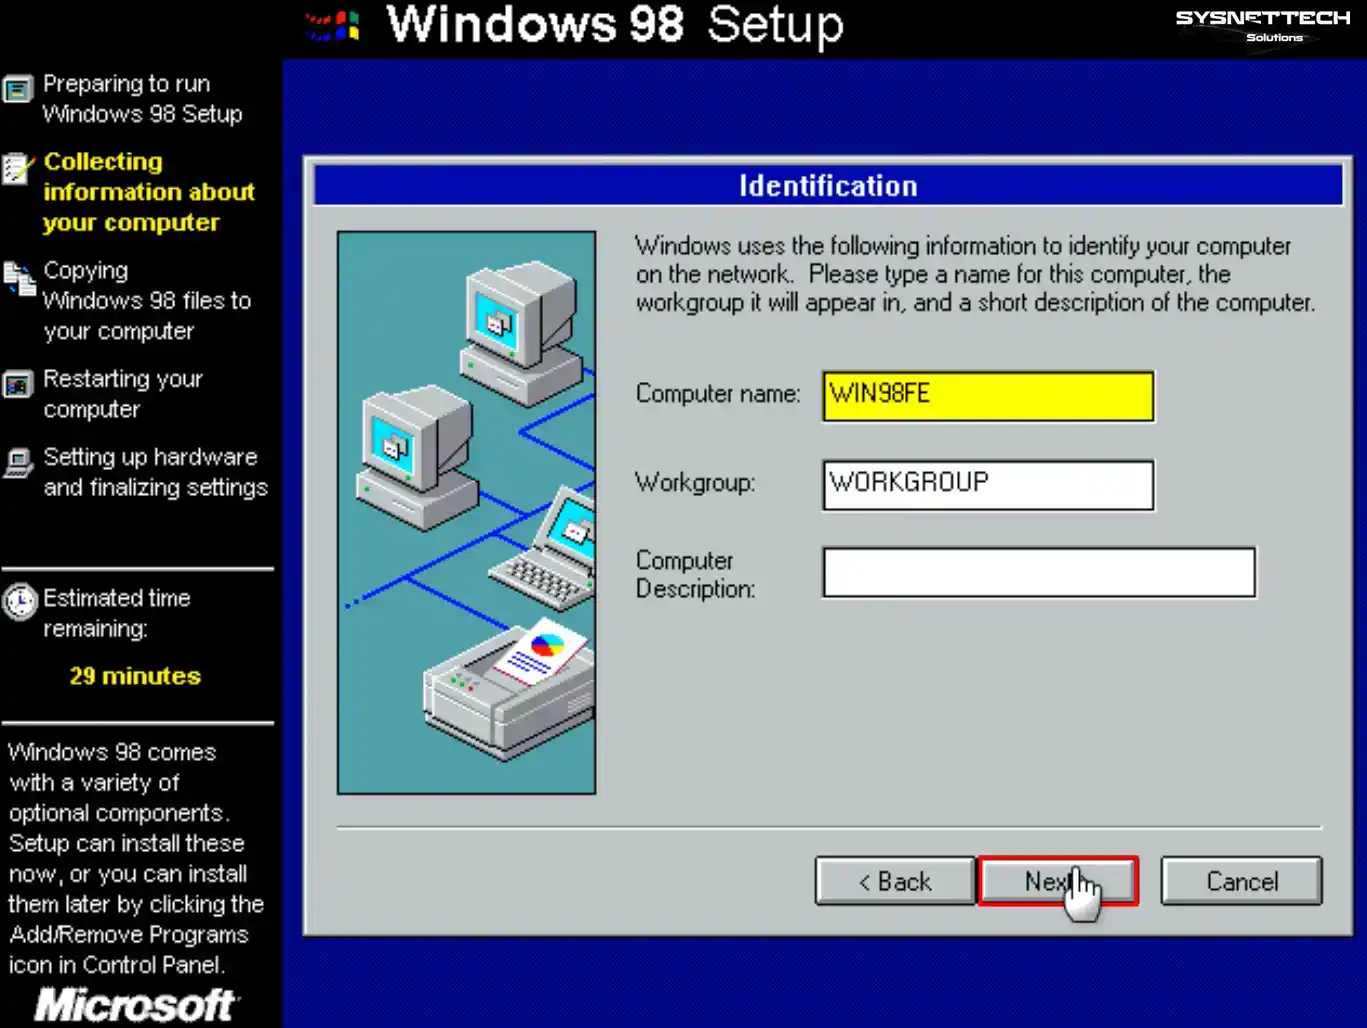
Type a different computer name and description from other computers in your network.
Step 17
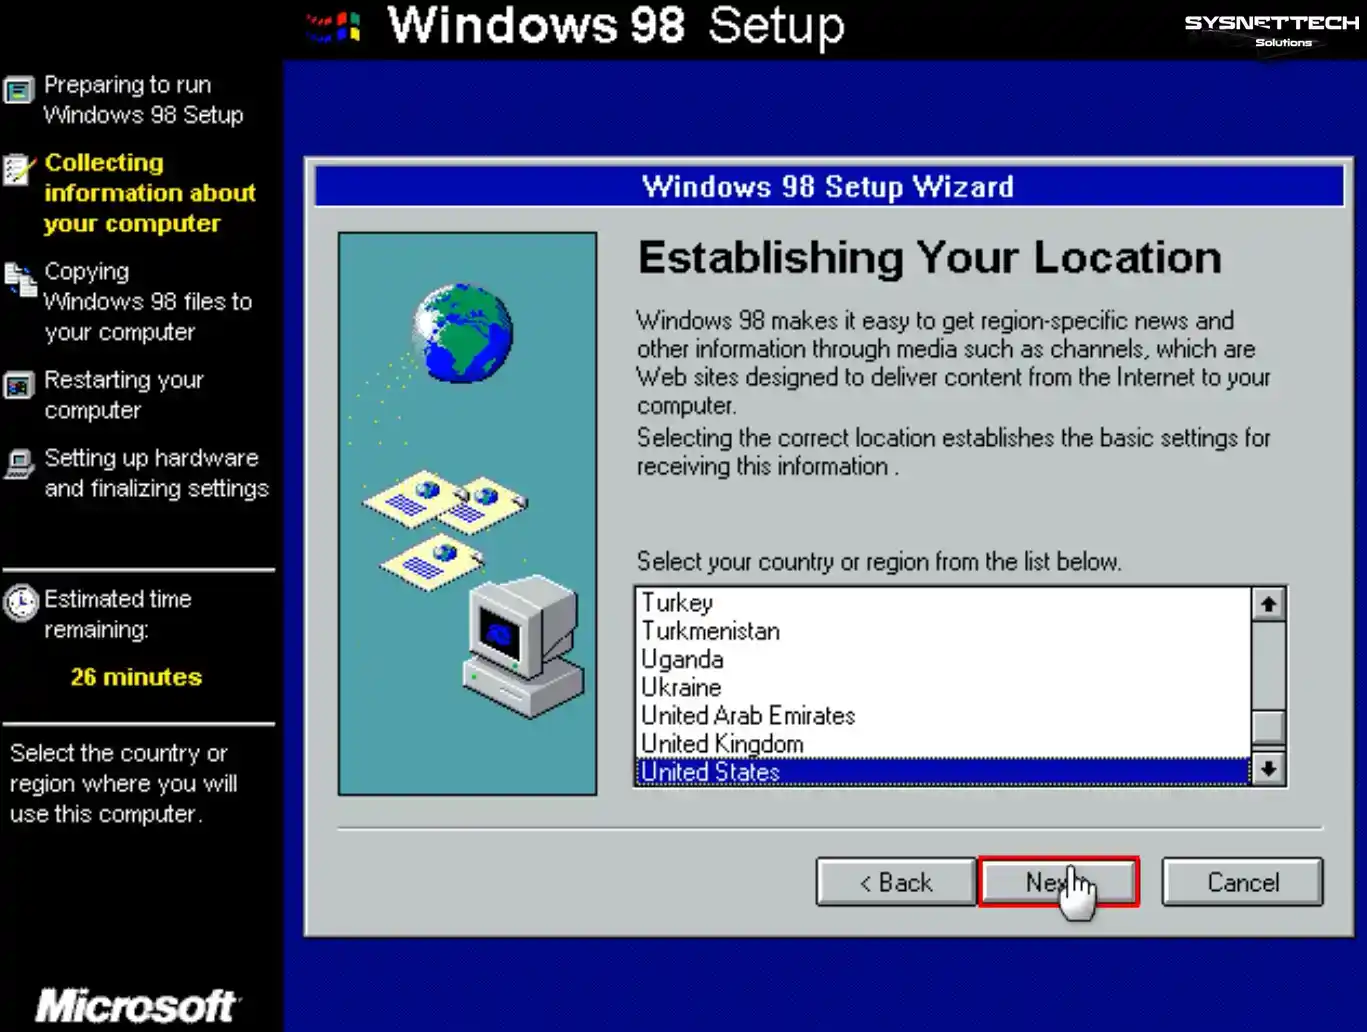
To list news or related content from the Internet specific to your region, select the country you live in and continue.
Step 18
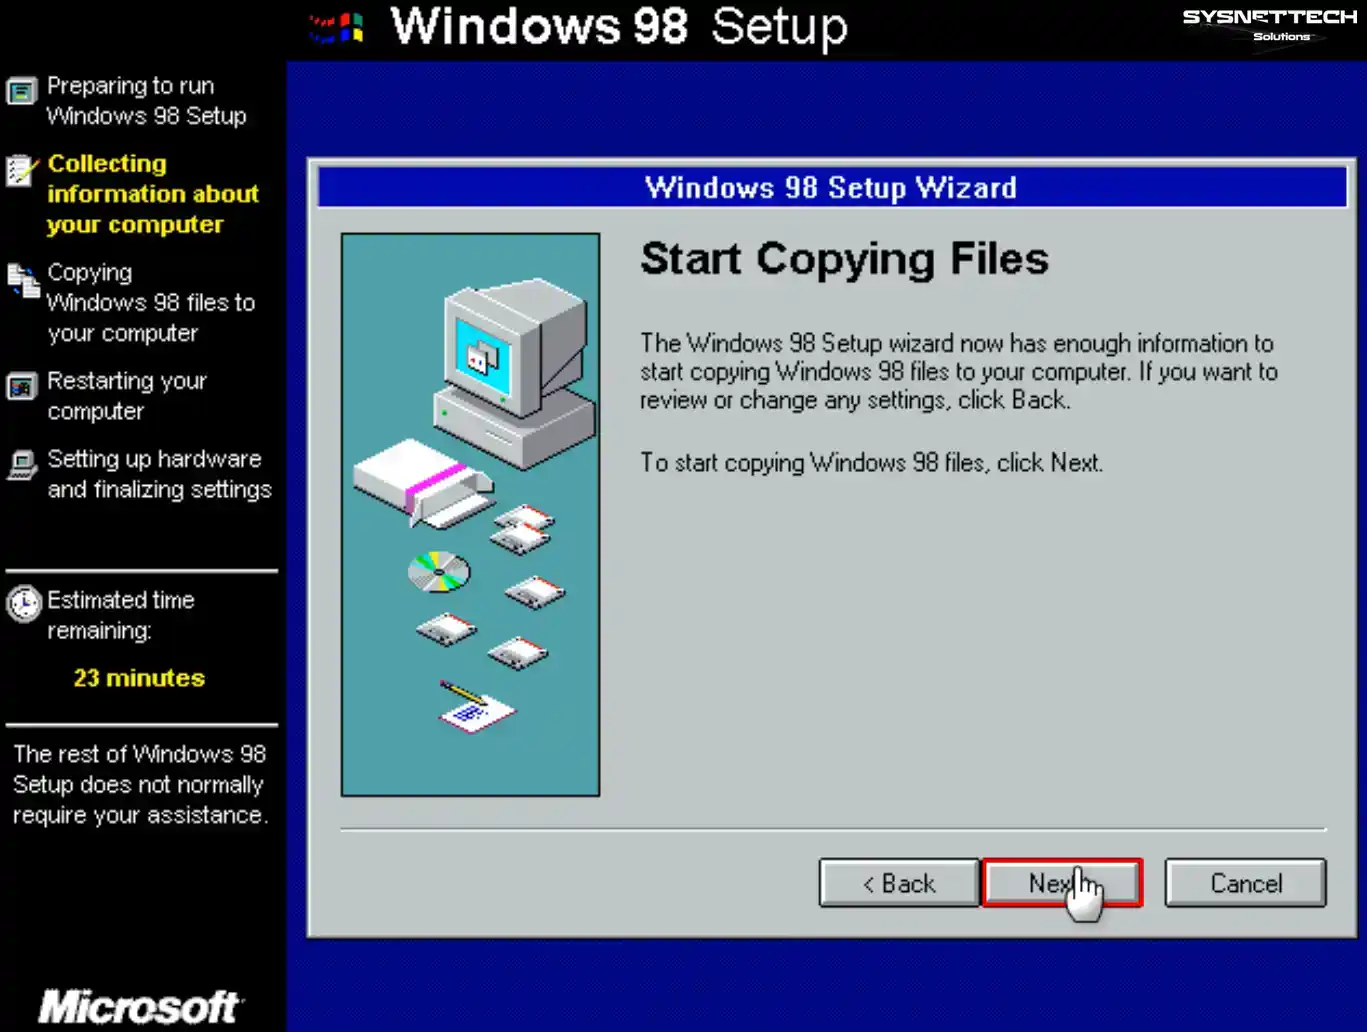
Click Next to continue copying the Windows 98 software platform files.
Step 19
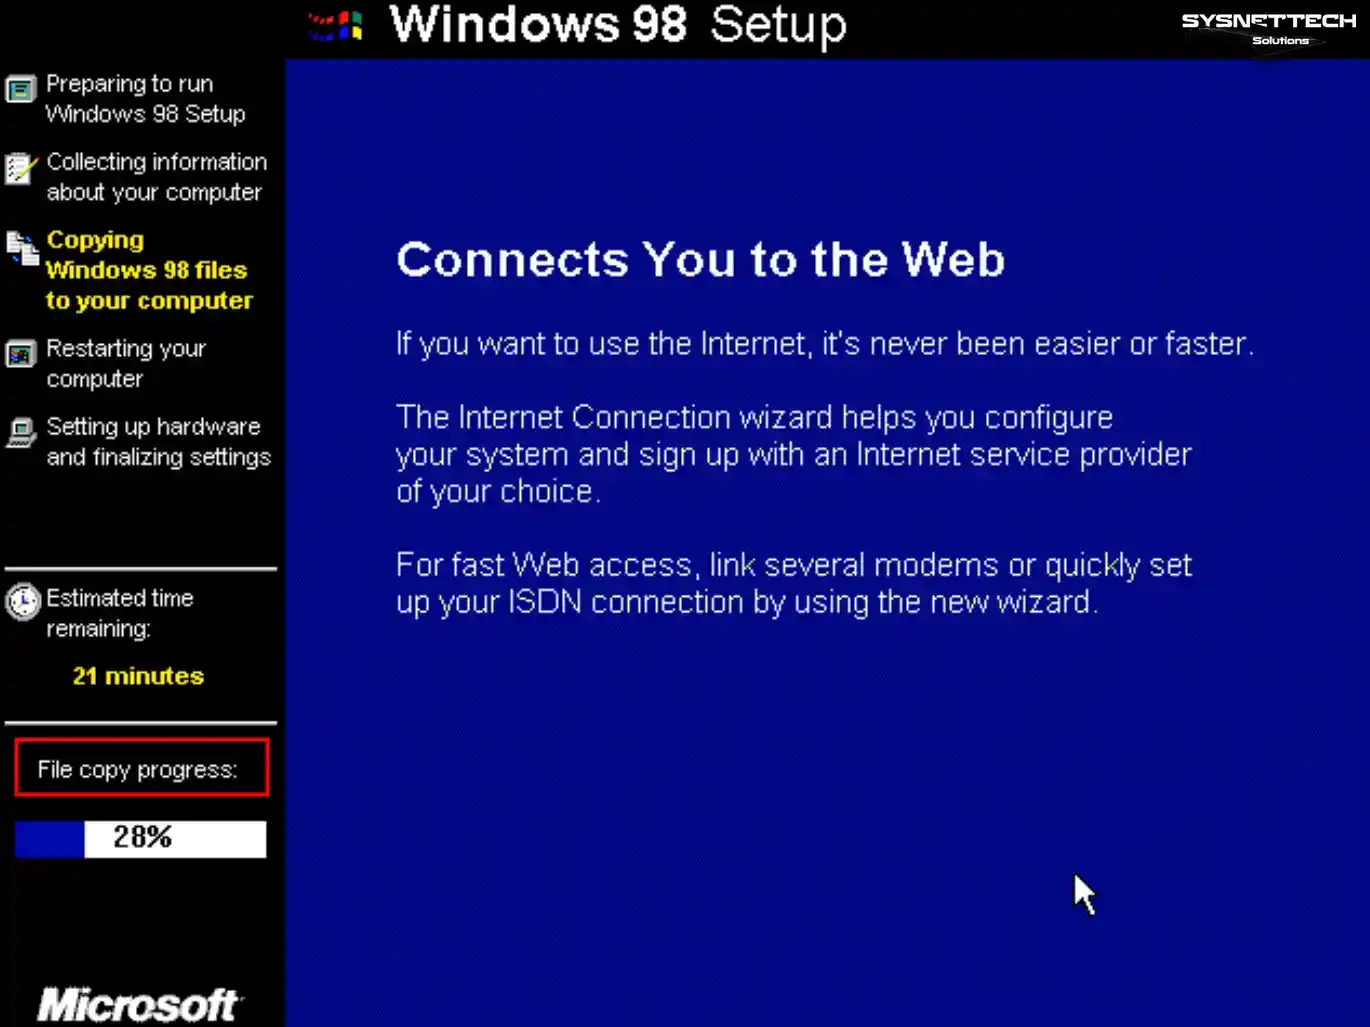
Installing Windows in the virtual machine might require some time, contingent upon the hardware performance of your host computer. Therefore, kindly await the completion of the installation process.
Step 20
After the necessary files are copied, restart your virtual computer.
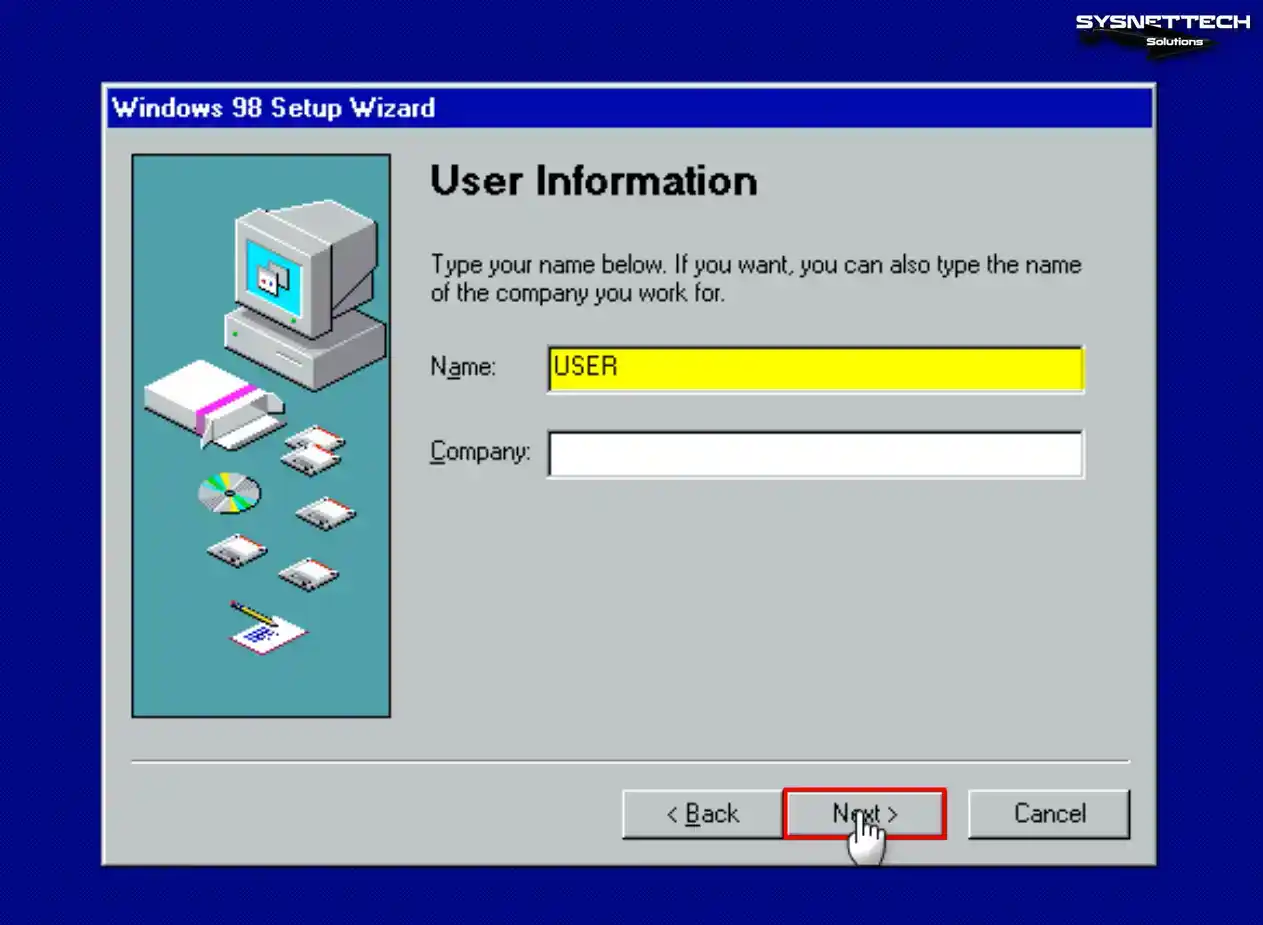
Step 21
If the ISO file is mounted on the guest machine when restarting your virtual machine, boot your system from the Hard Disk. When your virtual PC restarts, type a new username and click Next.
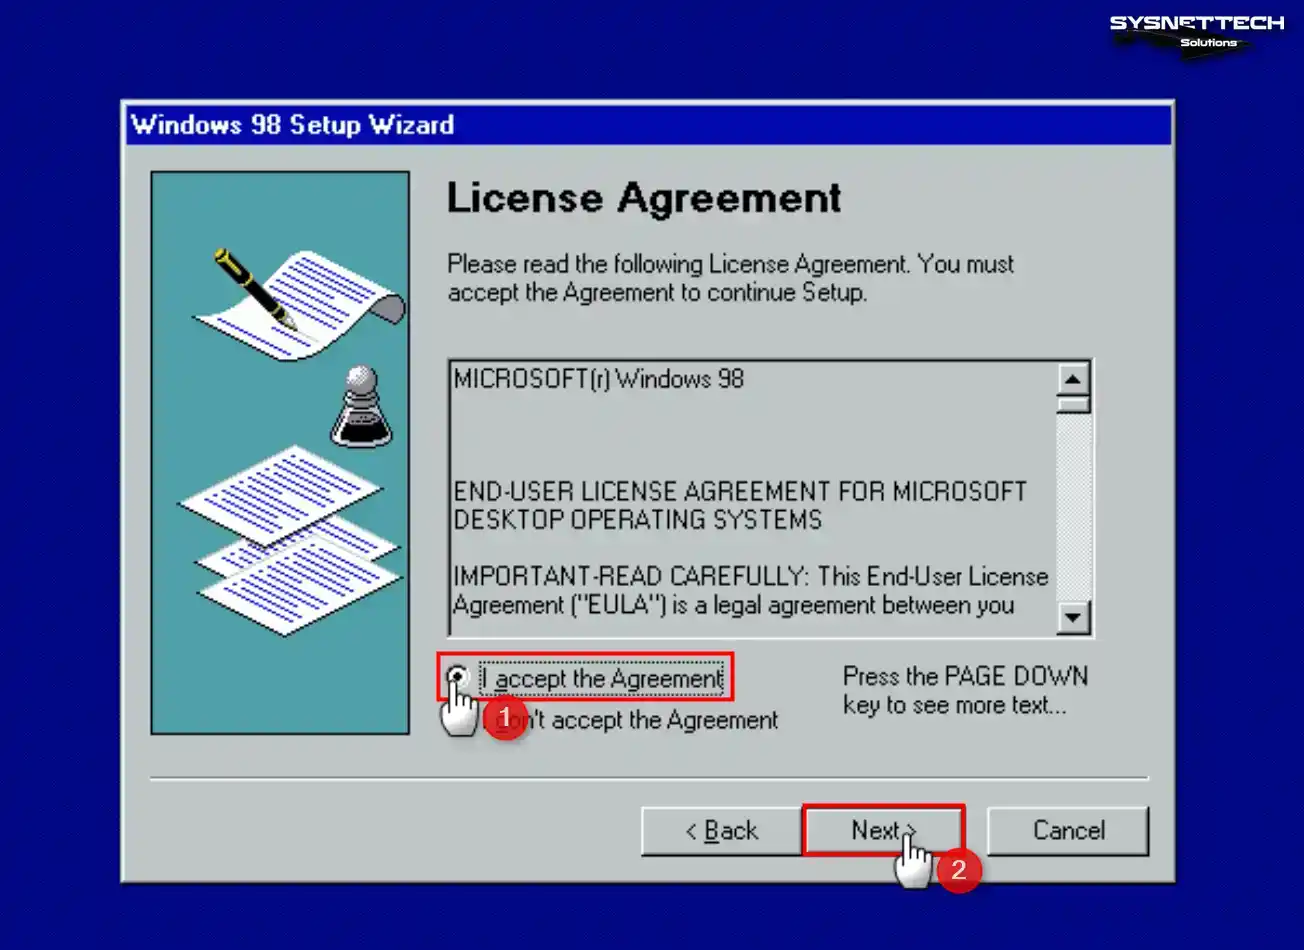
Step 22
Accept the Microsoft Windows 98 license agreement and click Next.
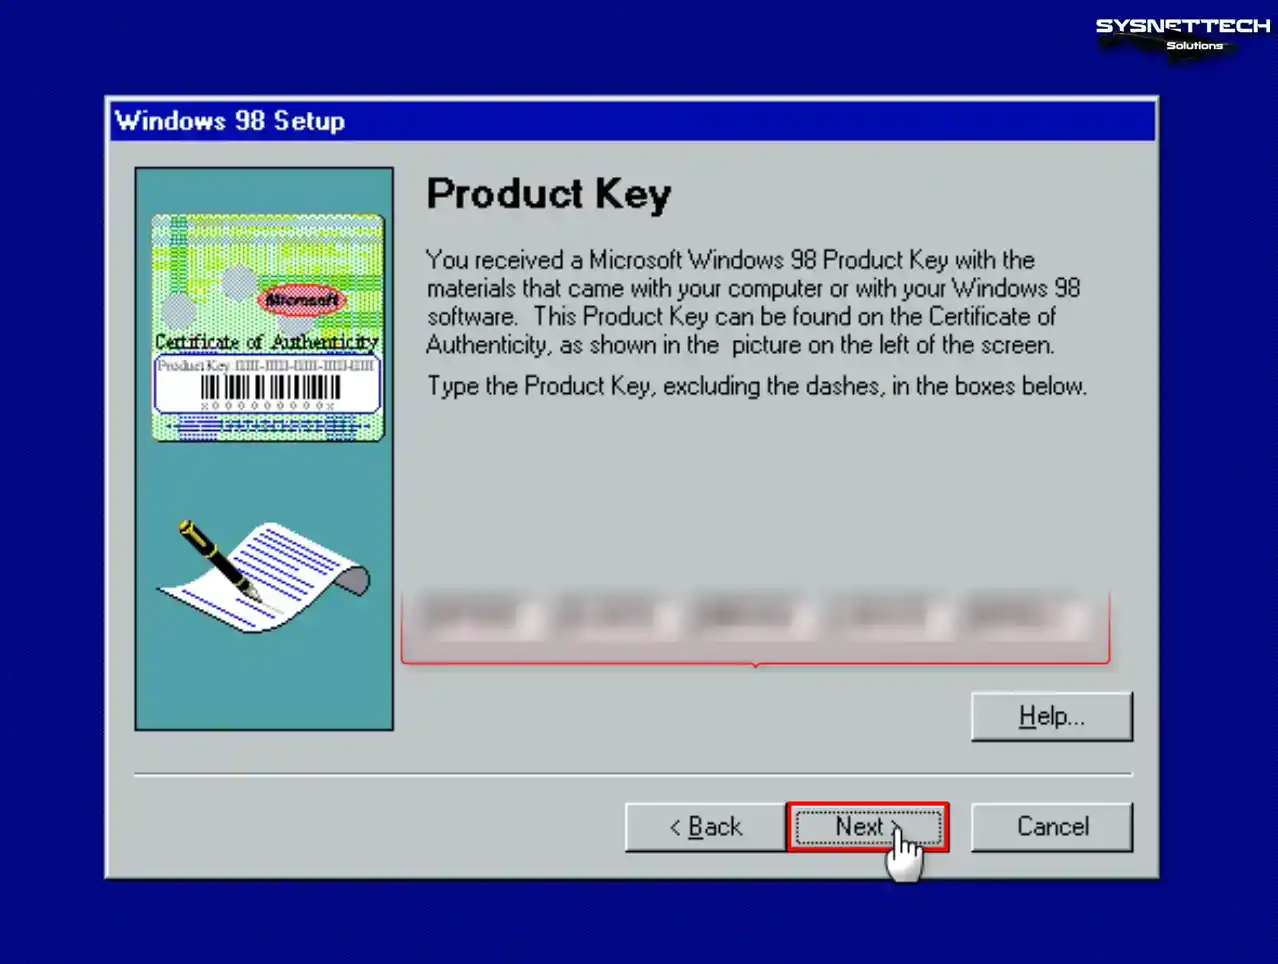
Step 23
Type the Windows 98 FE product key and continue.
Step 24
After the wizard saves the necessary information, click the Finish button.

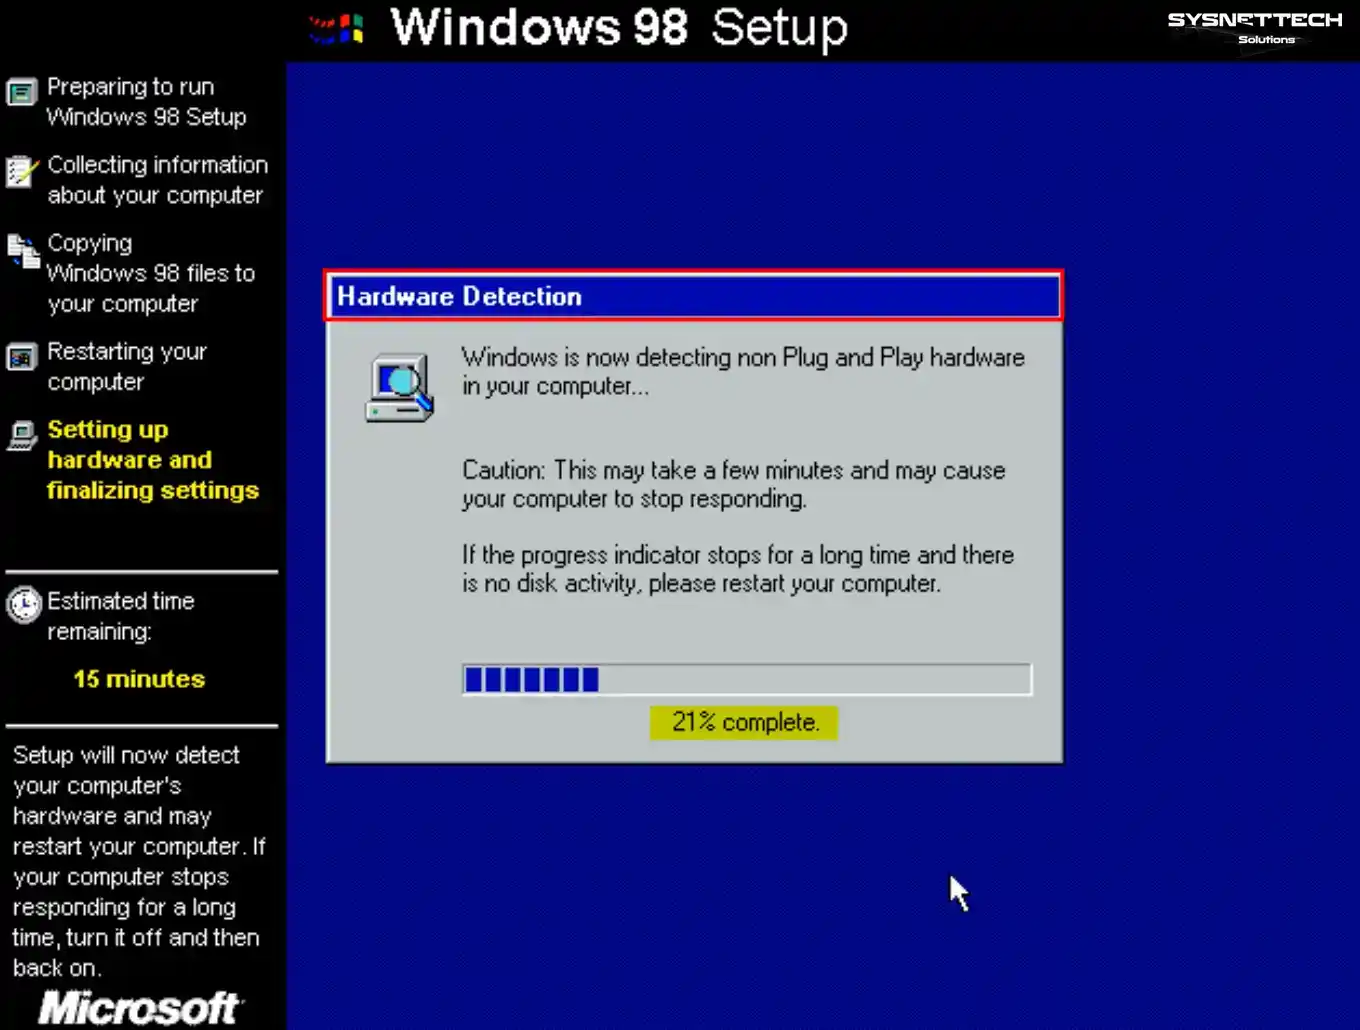
Step 25
When your virtual computer restarts, the setup wizard will open again and configure the plug-and-play devices. Wait while the installer scans for non-plug-and-play hardware on the guest machine.
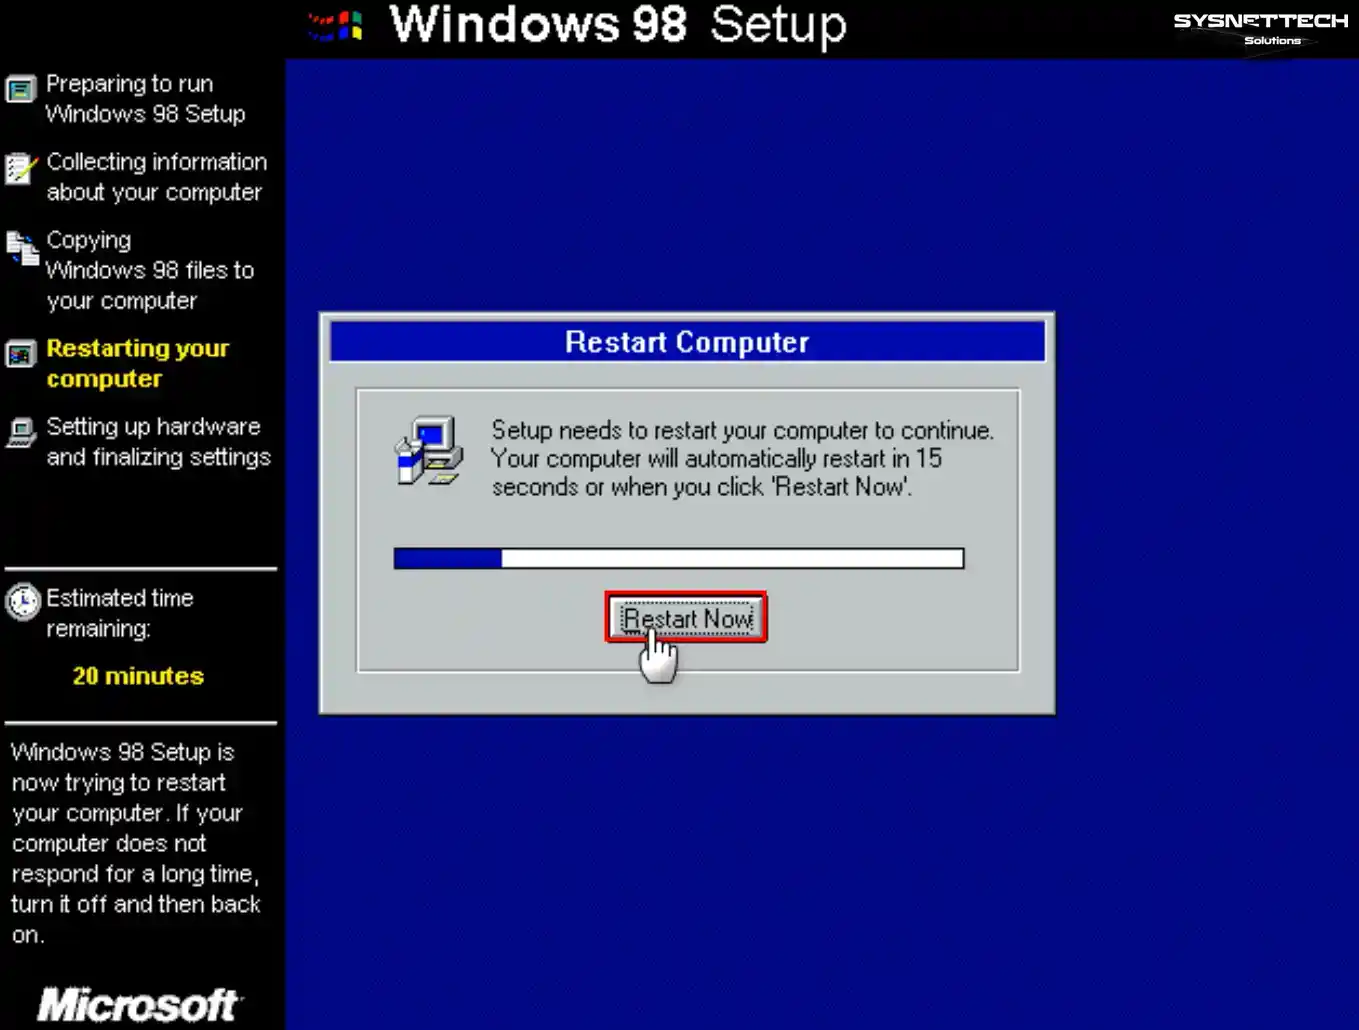
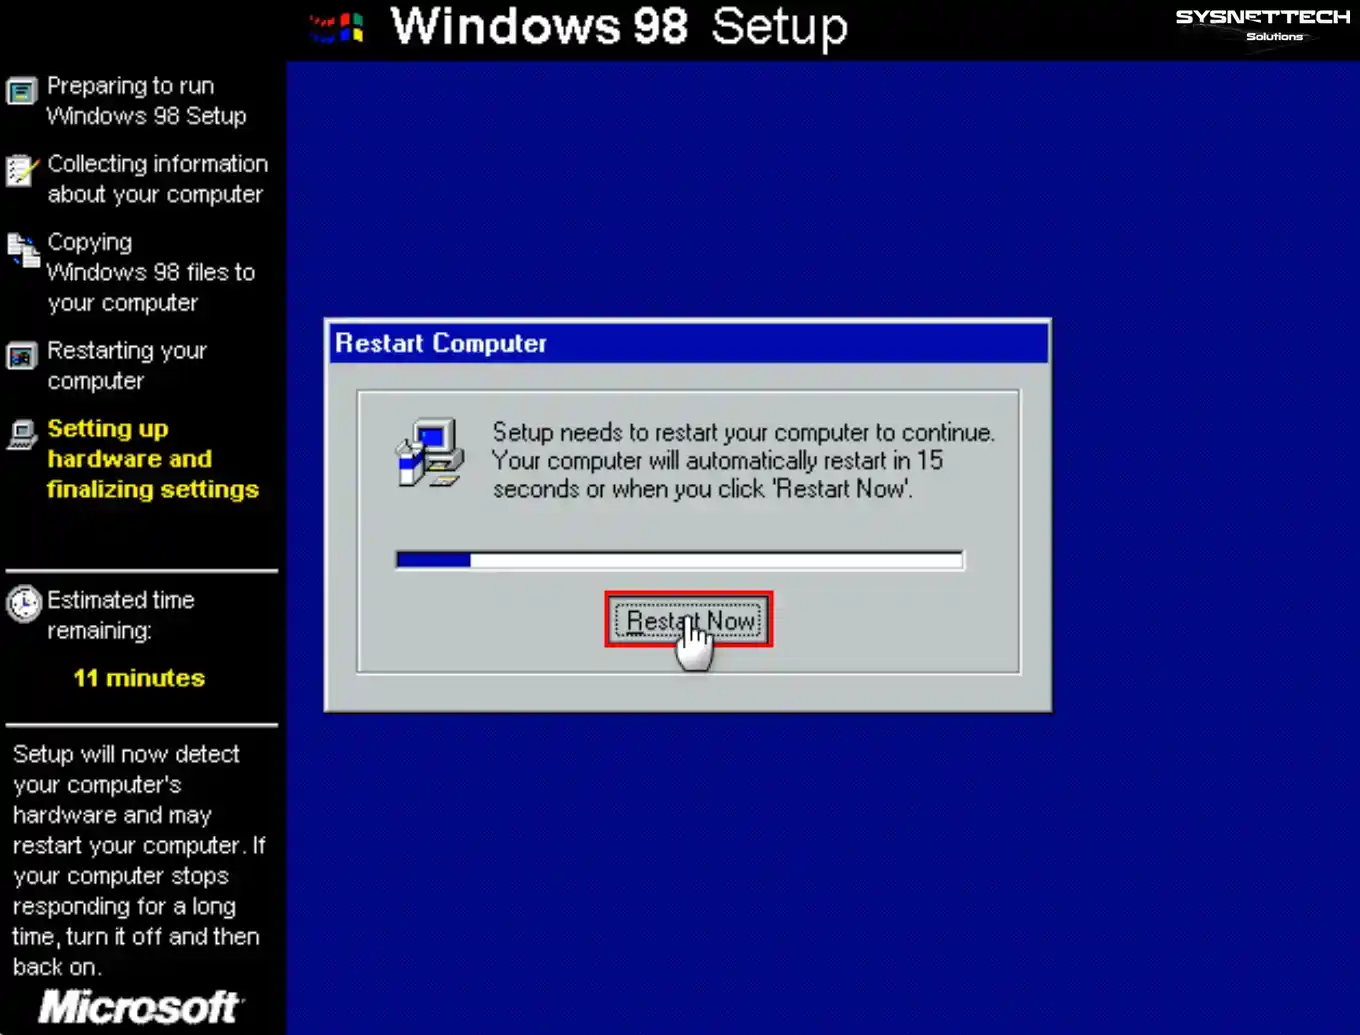
Step 26
Restart your virtual computer when the hardware scan is complete.
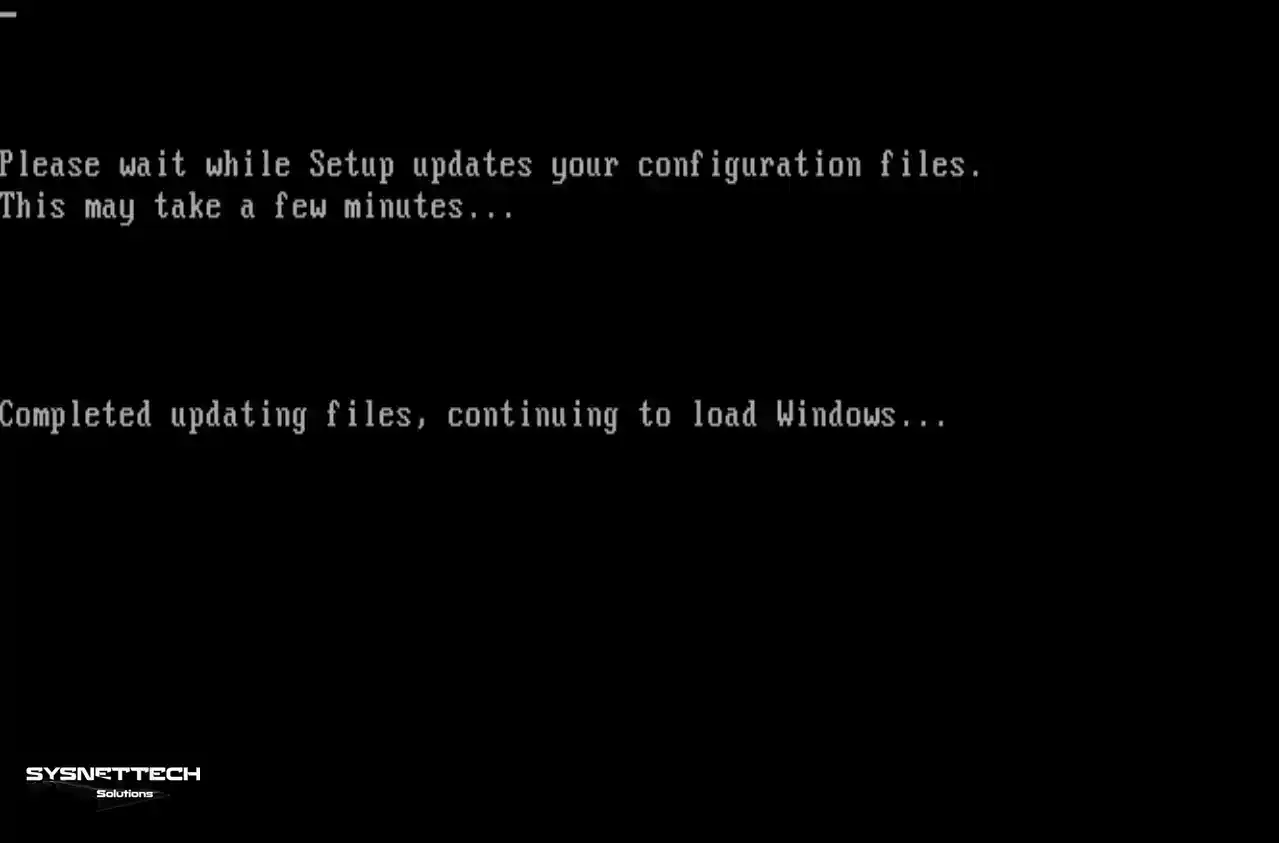
Step 27
Wait while the setup wizard updates the configuration files.
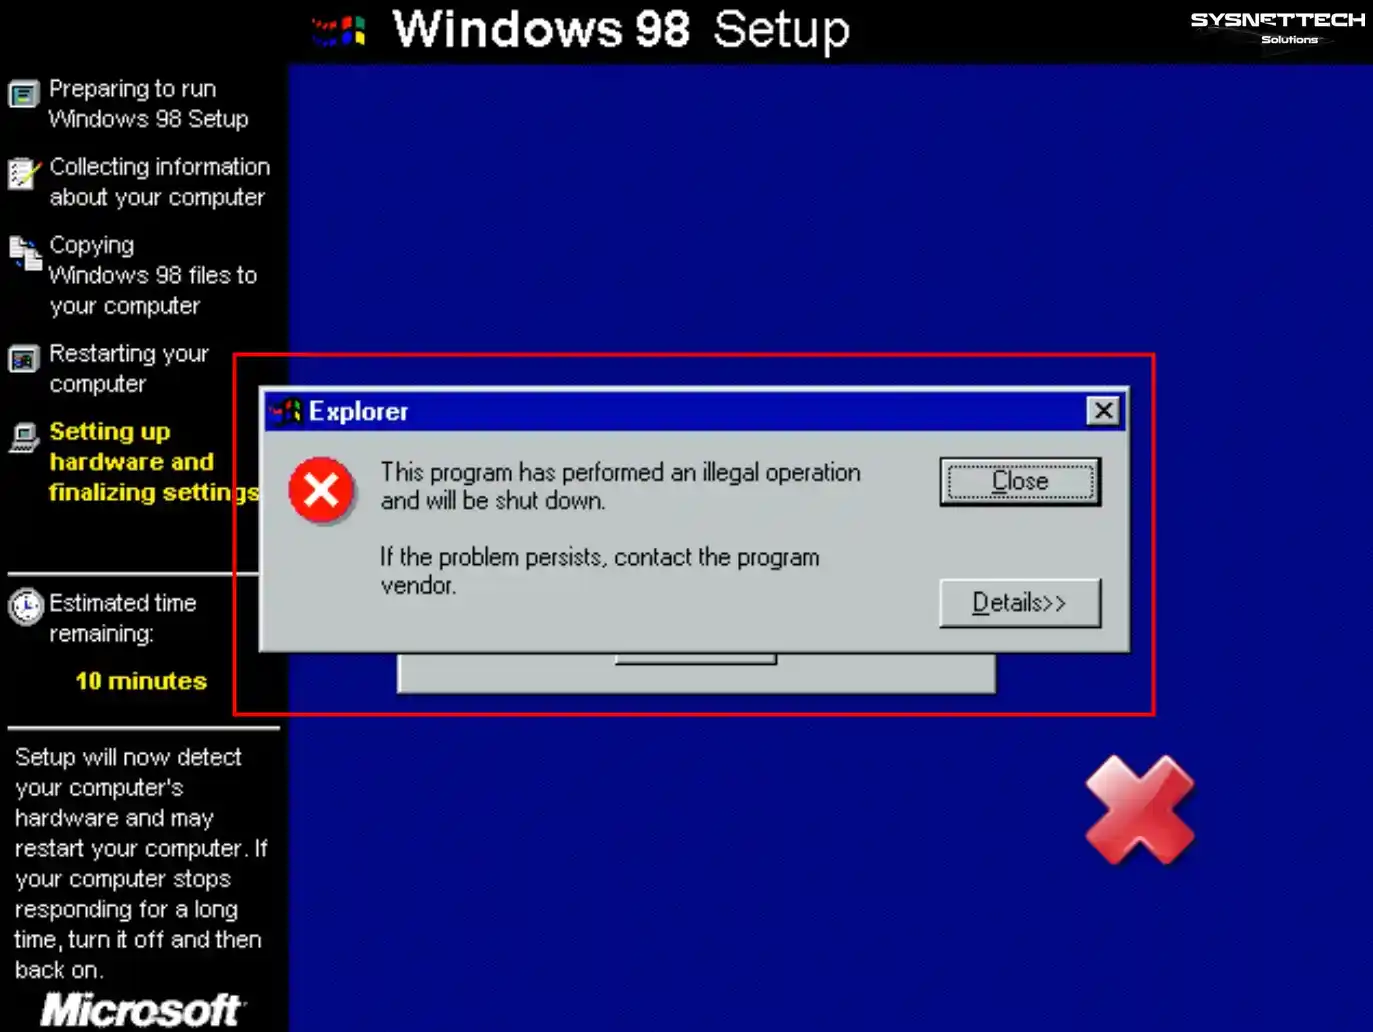
Step 28
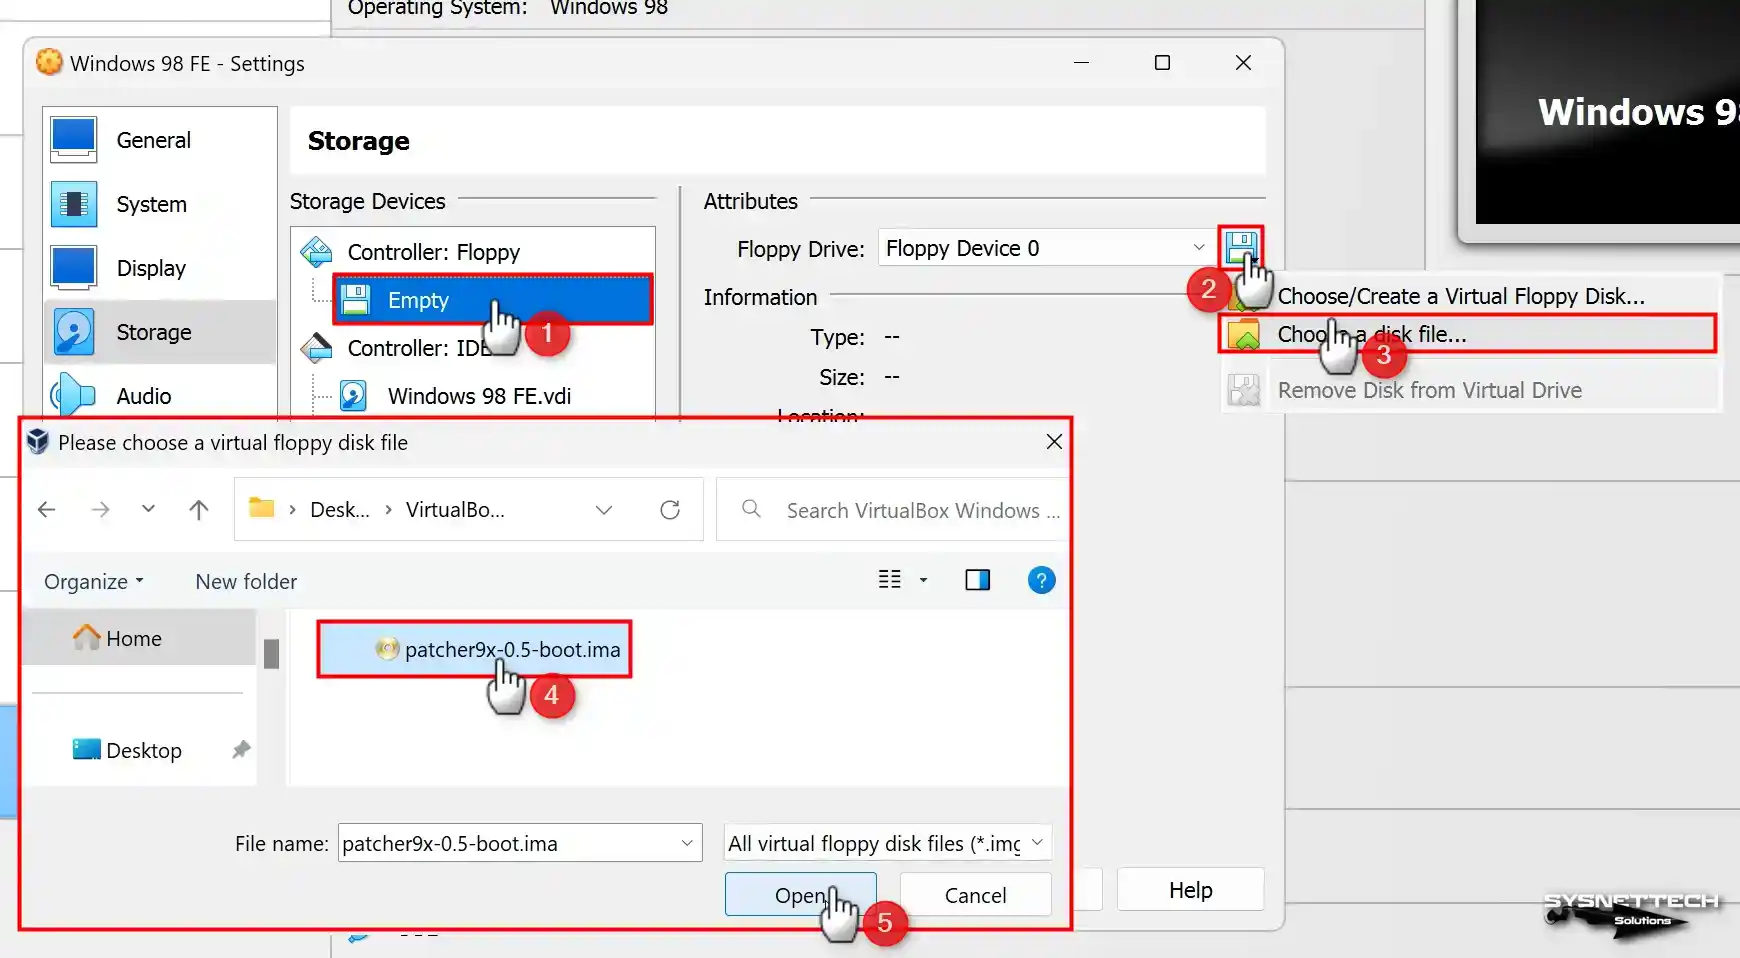
When the Windows 98 platform restarts, it configures the system settings. However, at this stage, “This program has performed an illegal operation and will be shut down.” If you get an error, you must patch the guest machine. So click X and then Power Off to turn off the virtual PC.
Step 29
After turning off the virtual machine, open its settings and add the Patcher9x-0.5-boot.ima file you downloaded from the button below to the Floppy device from the Storage settings and rerun the VM.
NOTE: Ensure the Floppy device is set as the primary boot device. If not, press F12 when you start the guest machine, open the Oracle Boot menu, and press the “F” key to select Floppy.
You can download the Patcher9x-0.5-boot.ima file directly to your computer from the GitHub website shared by the developer or by clicking the button below.
Windows 98 FE – SE Fix CPU – Floppy Boot – Intel 12th Alder Lake Download
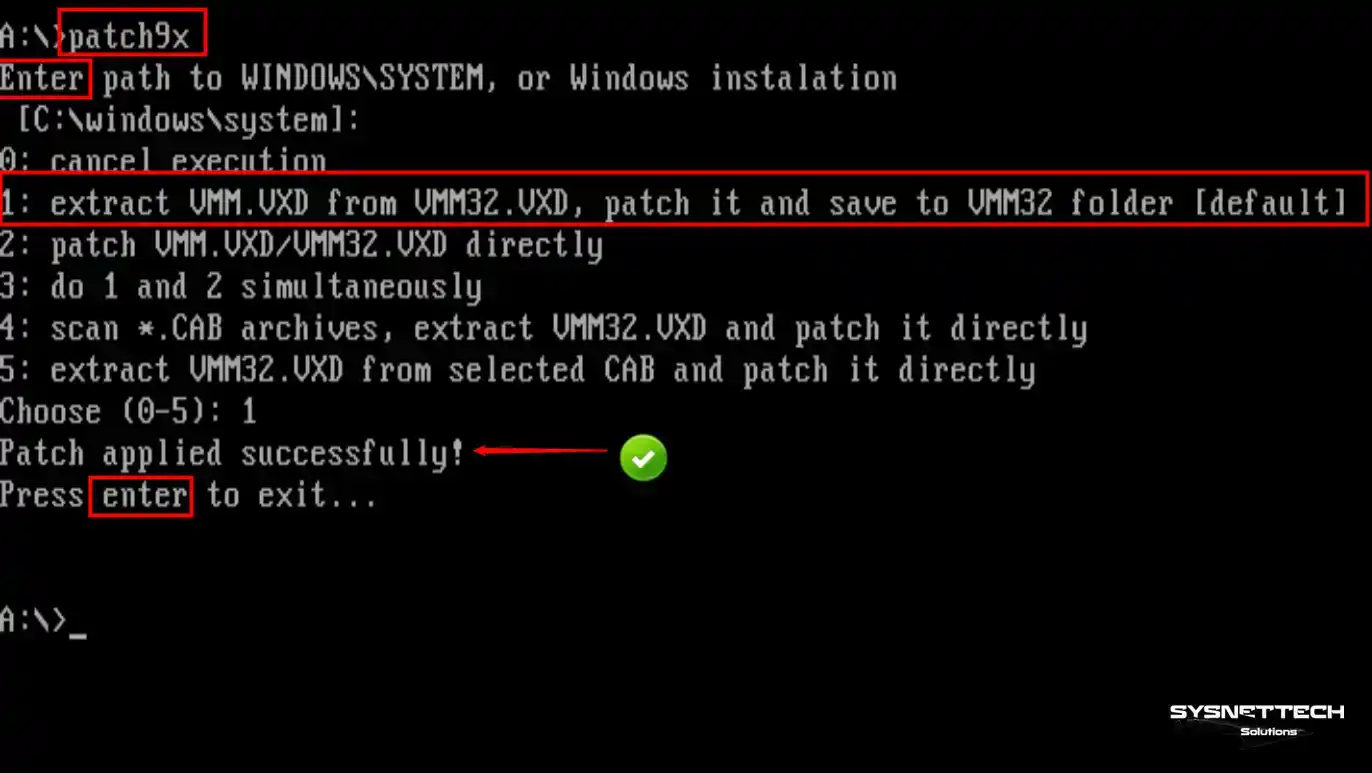
Step 30
When you boot the guest machine from Floppy, execute the “patch9x” command on the A:\ command line and press Enter directly to patch to WINDOWS\SYSTEM.
patch9xFrom the drop-down options, select the default option suggested by the developer, 1, and press Enter again. After configuring the processor settings of the virtual PC, start your VM.
Step 31
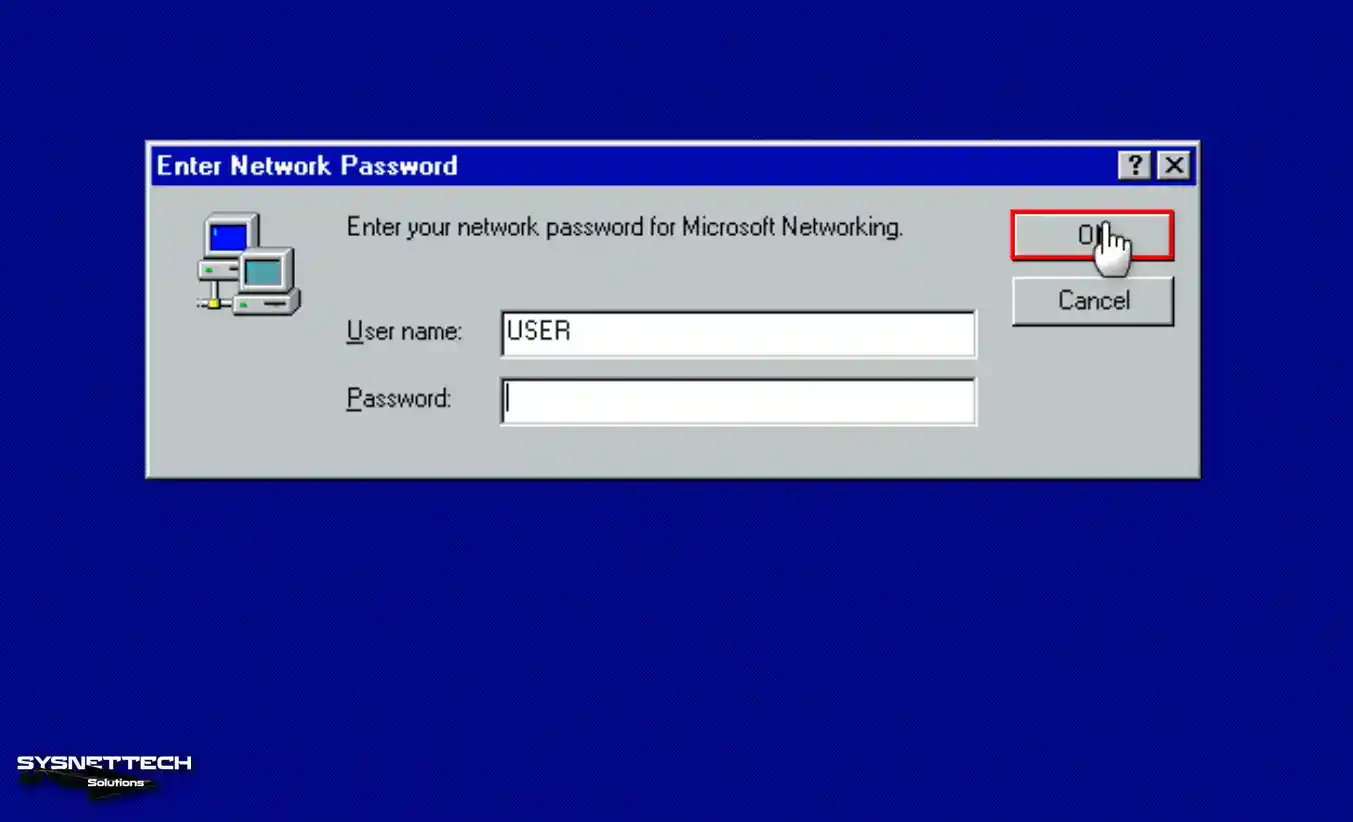
Upon powering your Windows 98 OS, you will be greeted with the login screen. Enter the username you created into the designated field and click the OK button.
Step 32
Configure your system’s time and date settings and click the Close button.
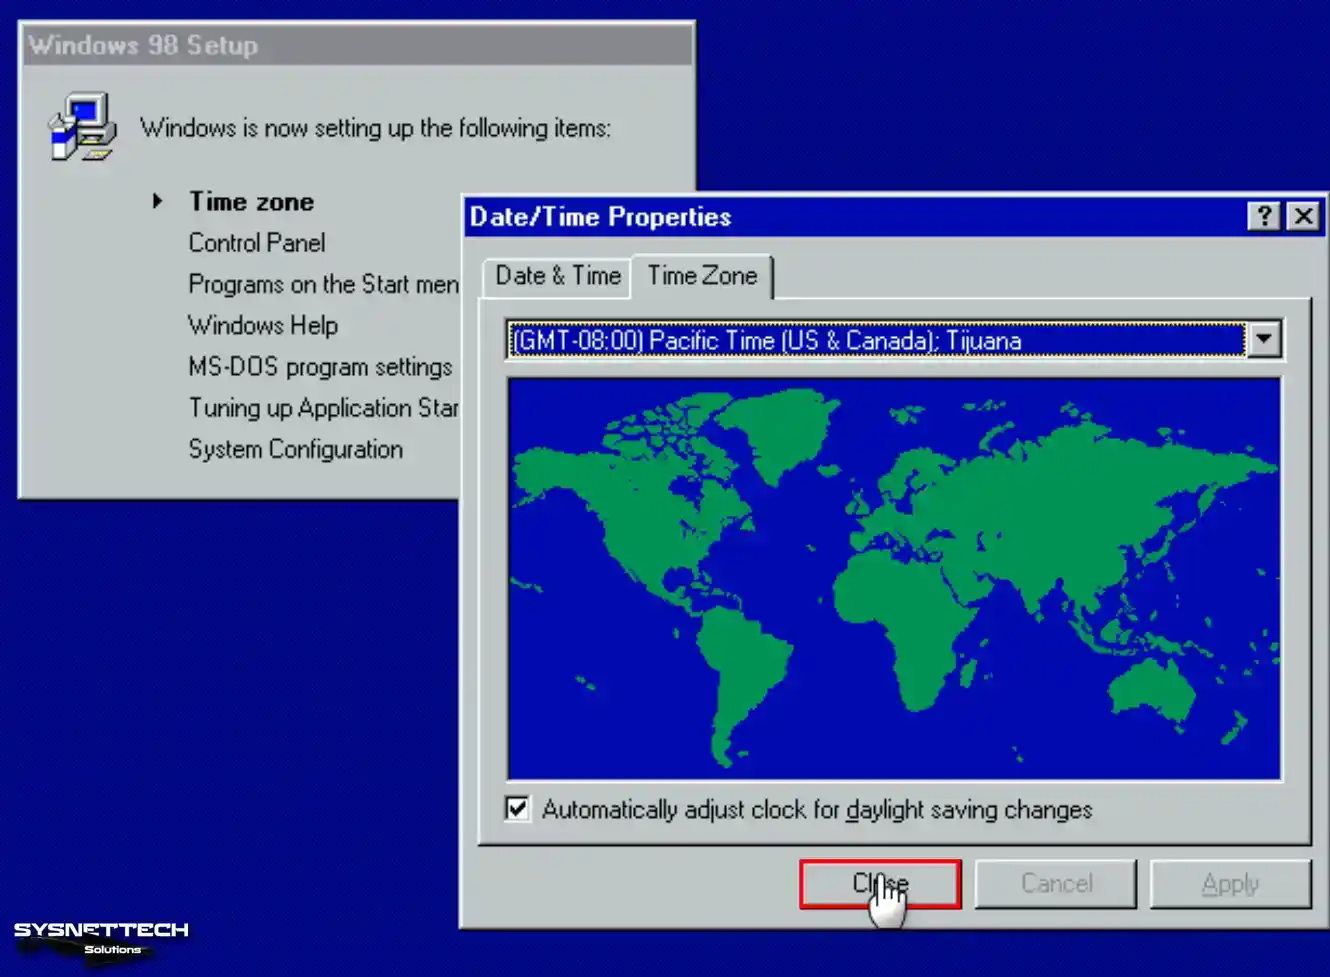
Step 33
Wait while the setup wizard configures the operating system’s control panel items, time and date settings, Windows help, and programs in the start menu.

Step 34
To close the Windows 98 welcome window at the next boot, uncheck the appropriate option and close the window.

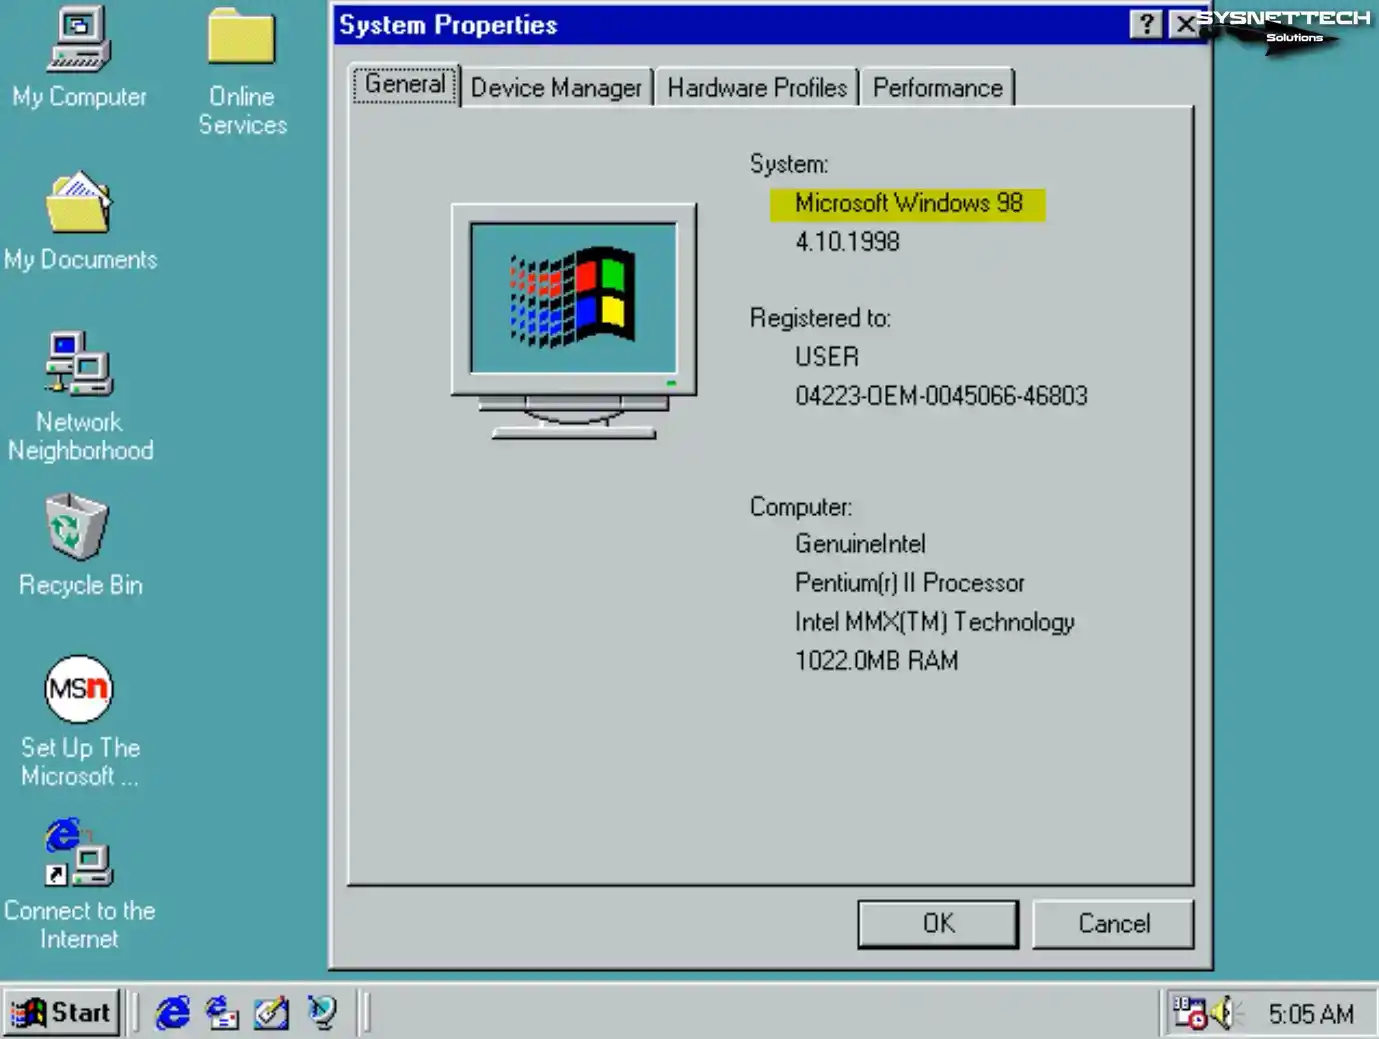
Step 35
Right-click on My Computer and choose Properties to access the comprehensive system properties of Windows.
How to Install Display Driver and Change Screen Resolution/Color
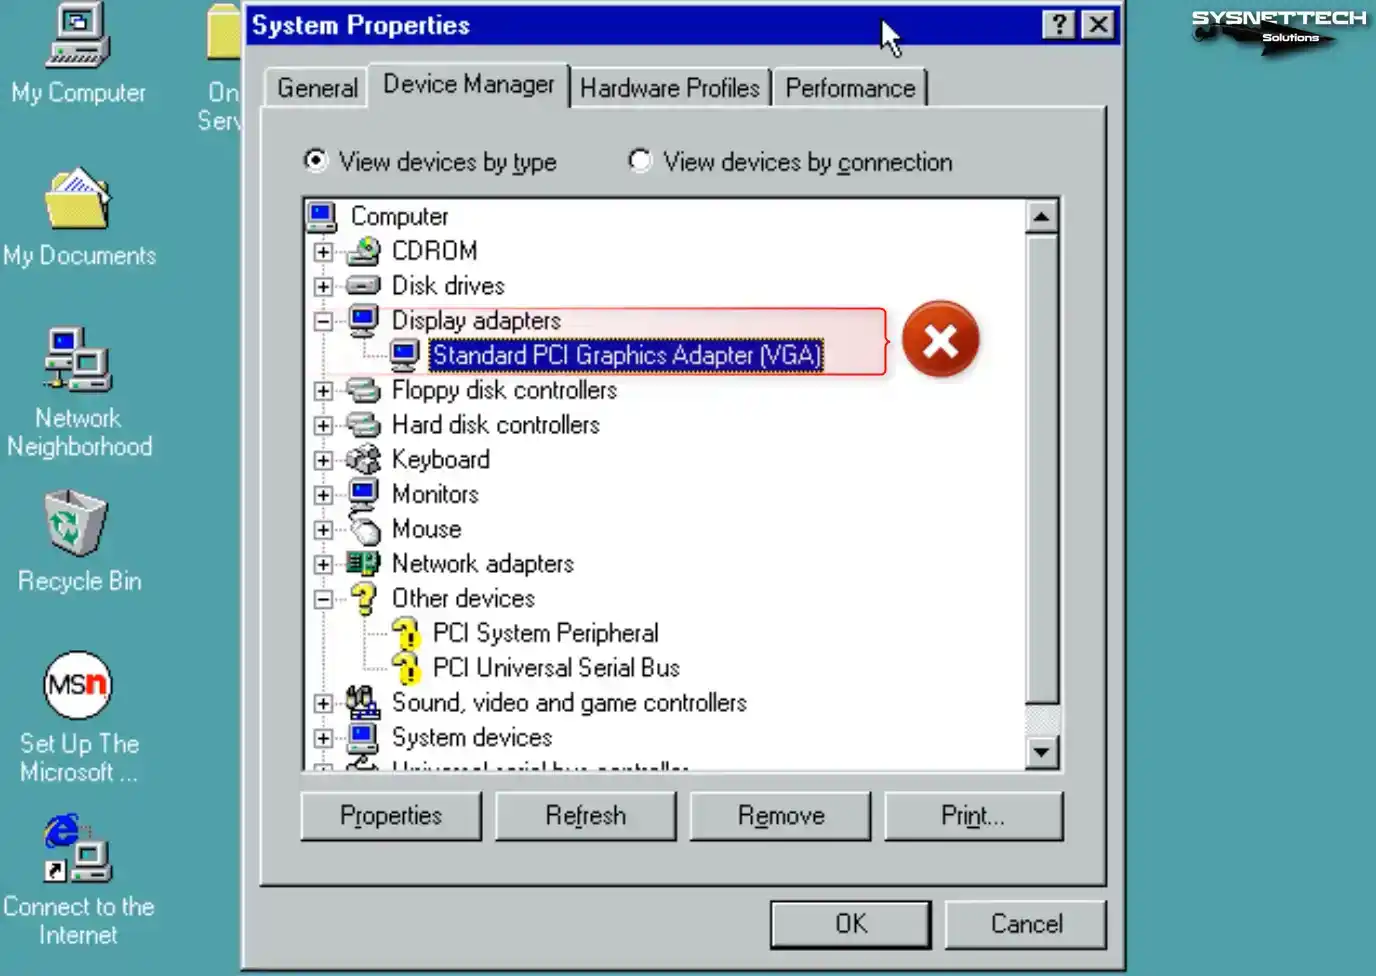
The VirtualBox virtualization program does not officially support Guest Additions for 9x versions of Windows. Therefore, you may need help fully installing the drivers of the old platforms you installed on the virtual machine.
Once you have successfully installed Windows 98, it is essential to configure the display adapter to modify the screen resolution per your requirements.
Step 1
First, open My Computer / Properties / Device Manager on the guest machine and check the device under Display Adapters.
Step 2
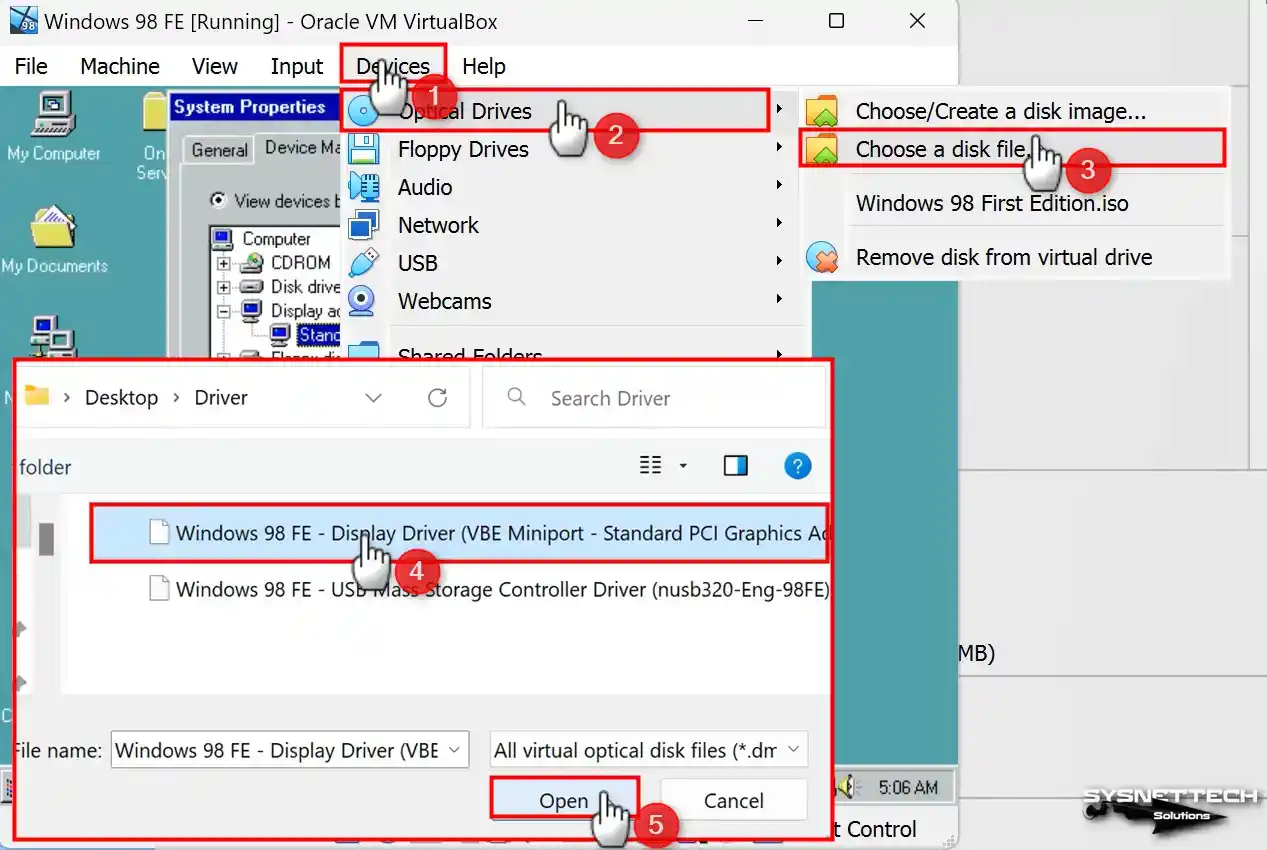
Then, while the guest machine is running, click the CD/DVD icon and click Choose a disk file from the options that appear. Select the Windows 98 FE Display Driver (VBE Miniport) ISO file you downloaded to your computer from the table below the article and click the Open button.
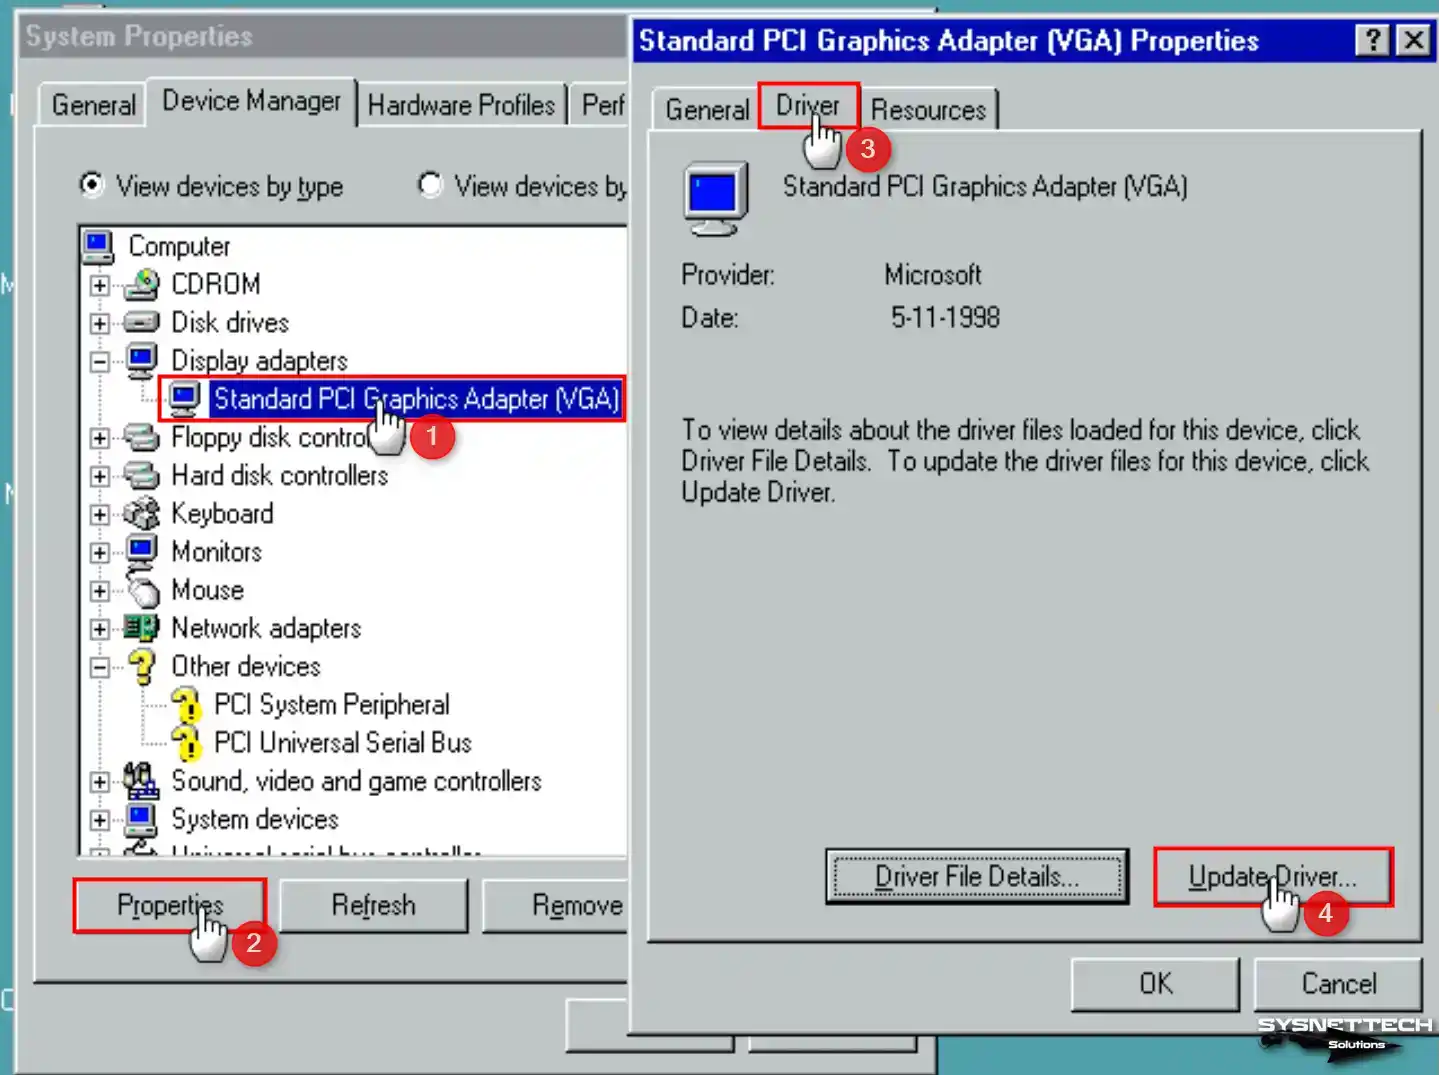
Step 3
After double-clicking on Standard PCI Graphics Adapter (VGA), click the Driver tab in the open window, and then click the Update Driver button. Then continue by clicking Next in the driver update window.
Step 4
Check the View all drivers list option and click Next. Then click Next in the Update Device Driver Wizard window.
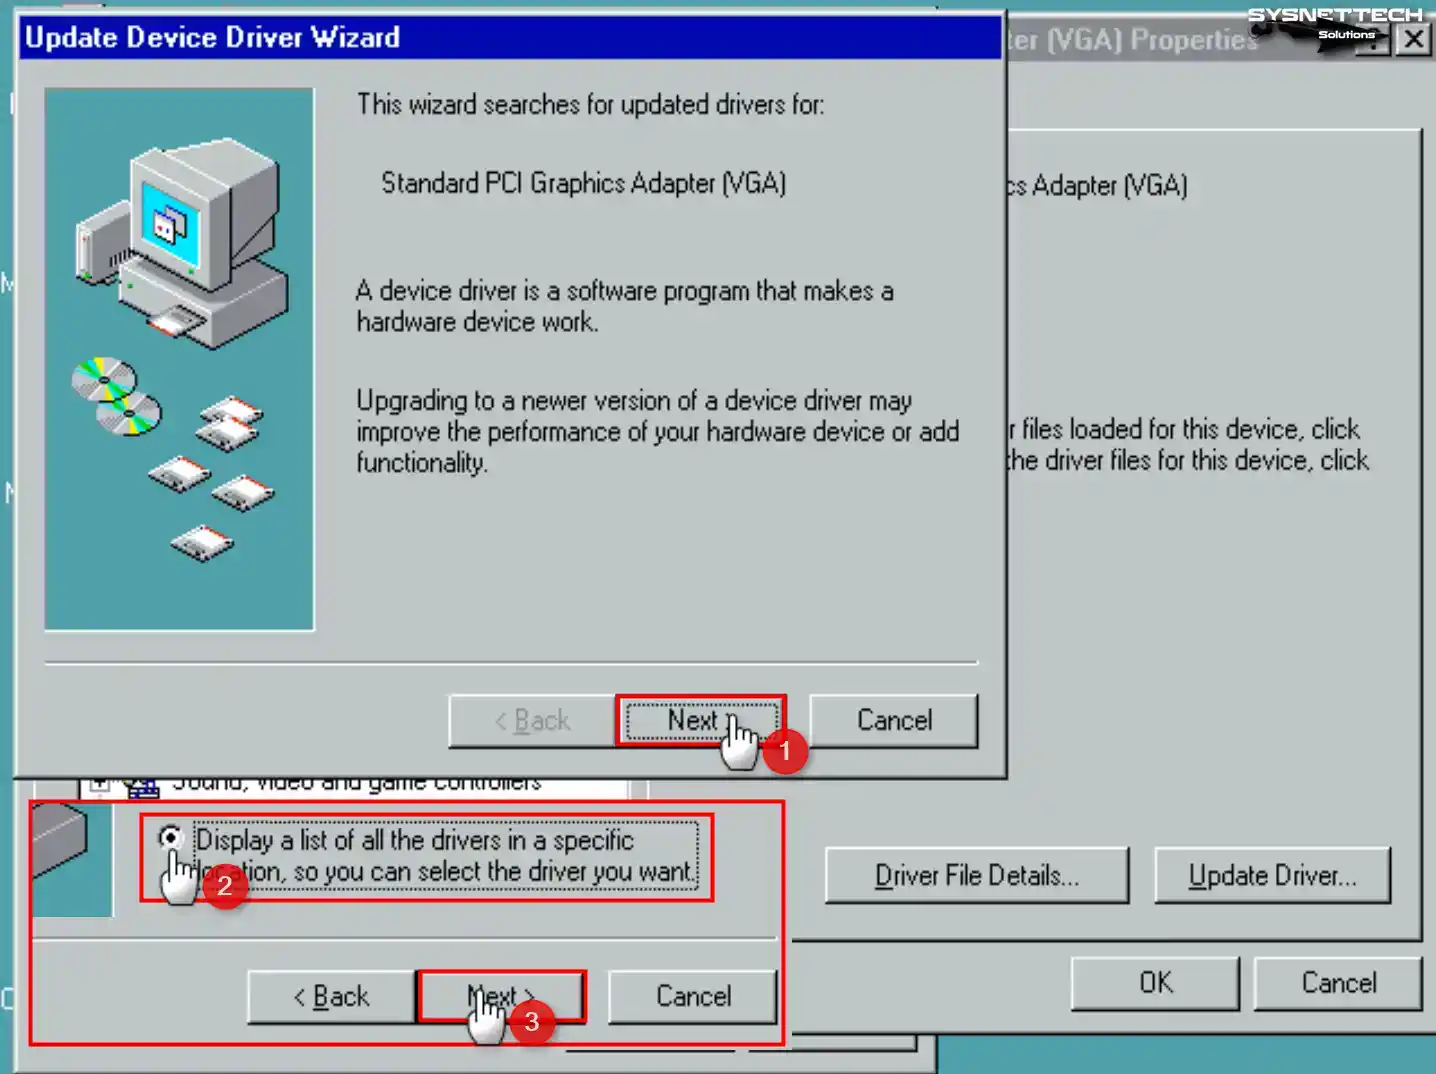
Step 5
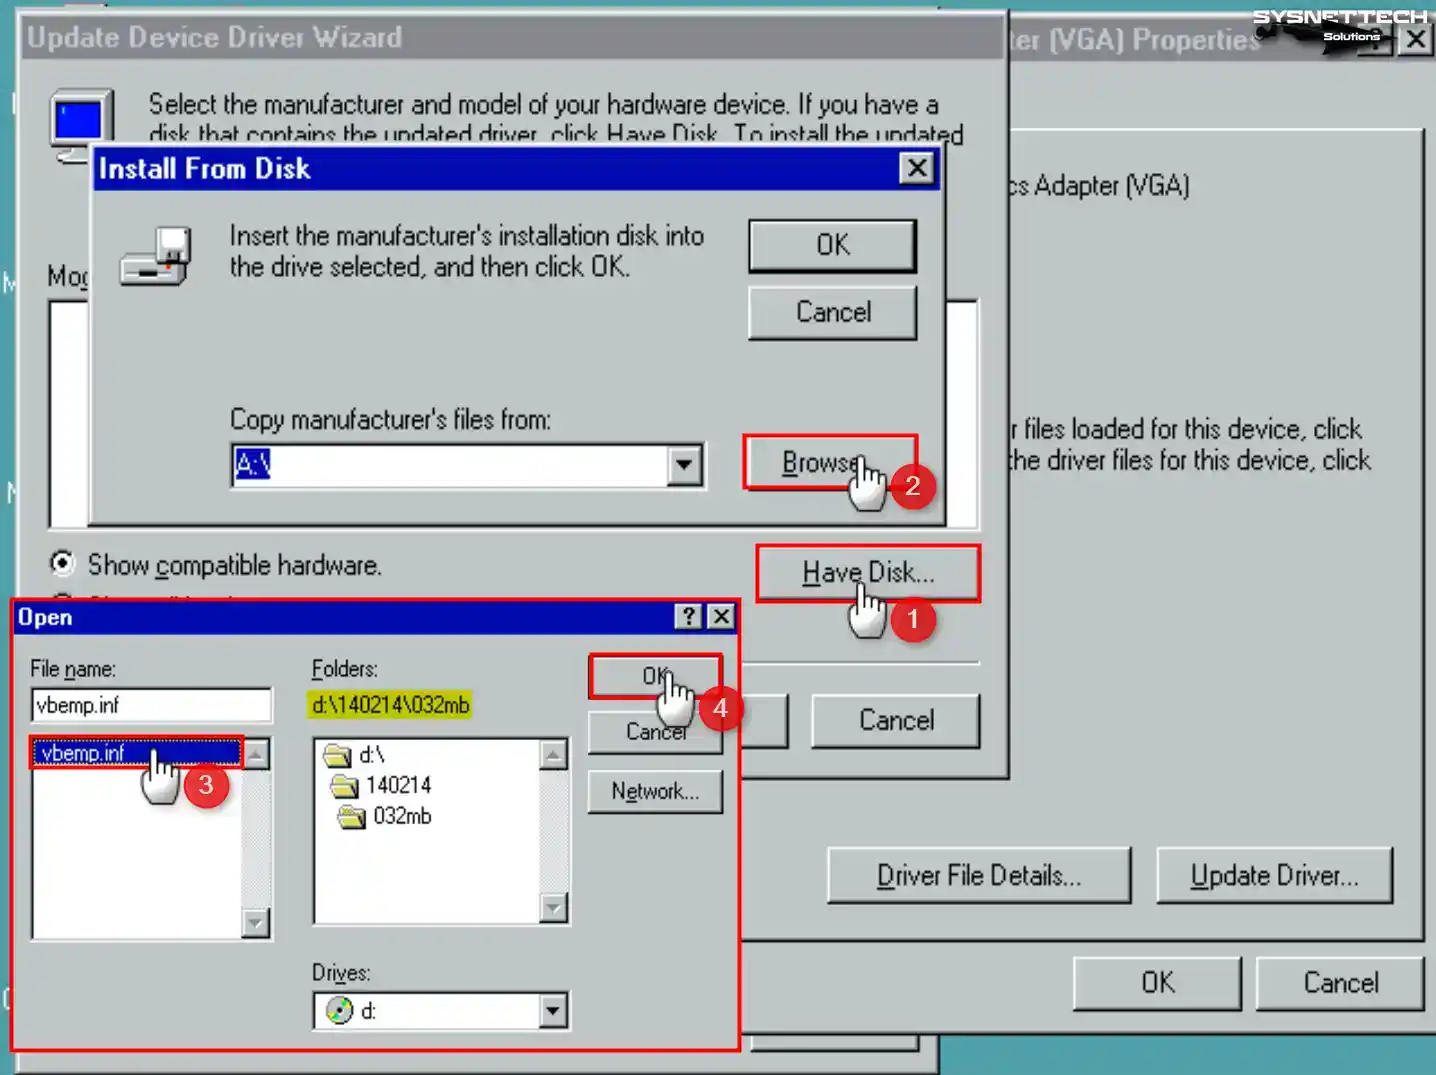
This time, click the Have Disk button in the open window and then click Browse. To update the driver manually, open the ISO file location and select the vbemp.inf file in the 032mb folder and click OK to continue.
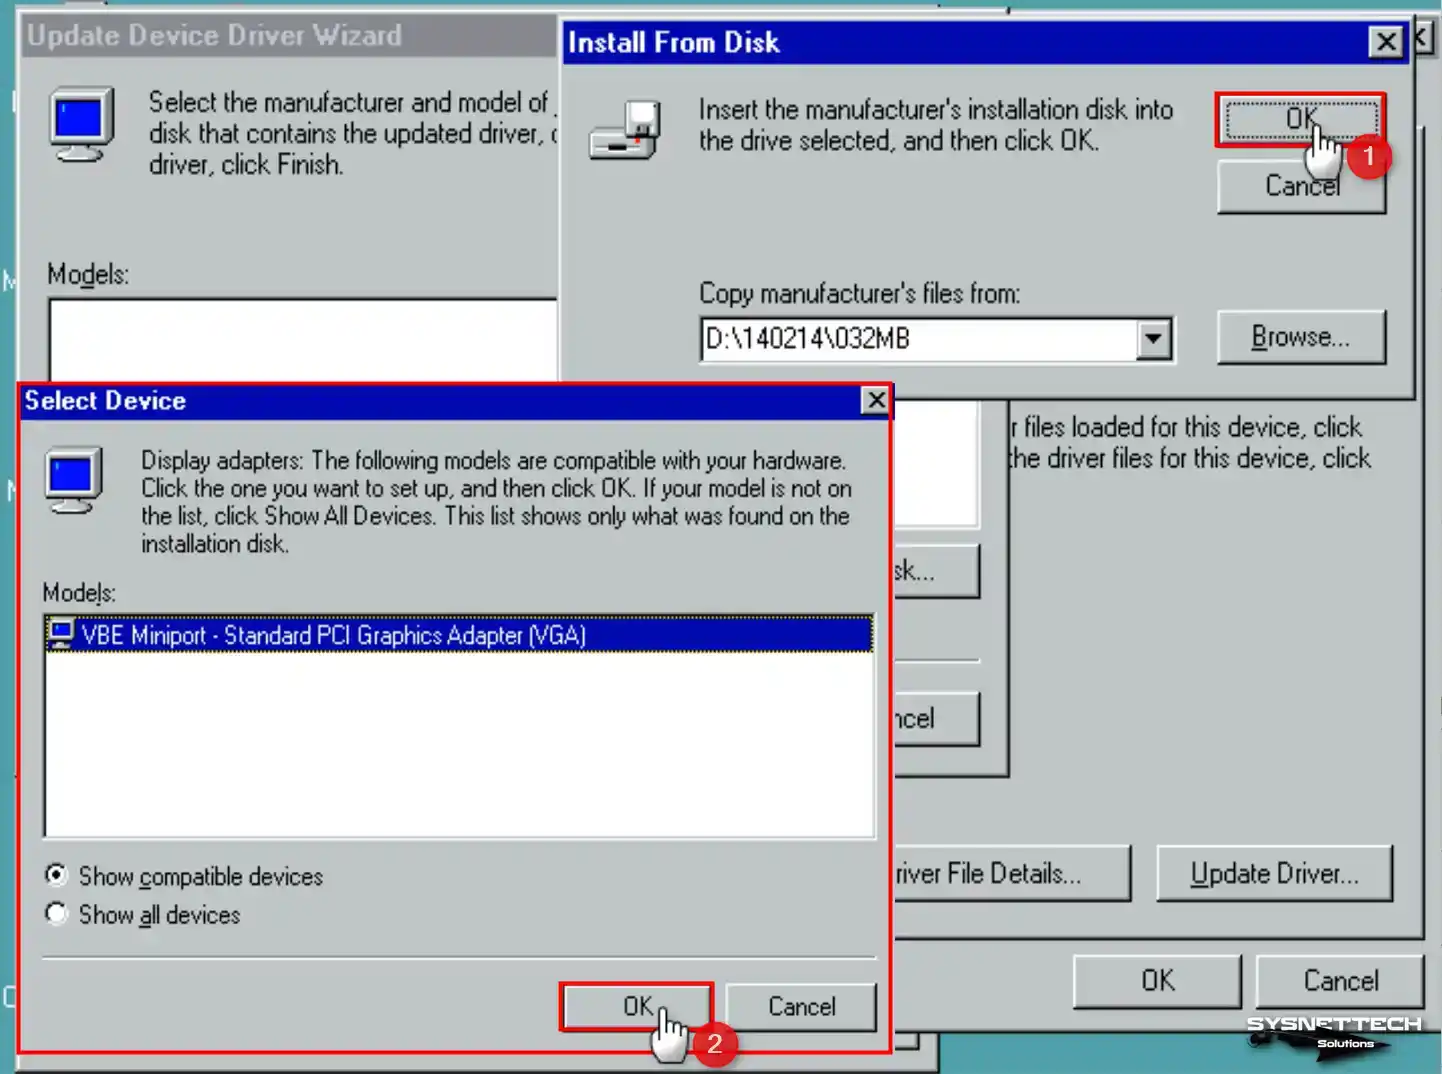
Step 6
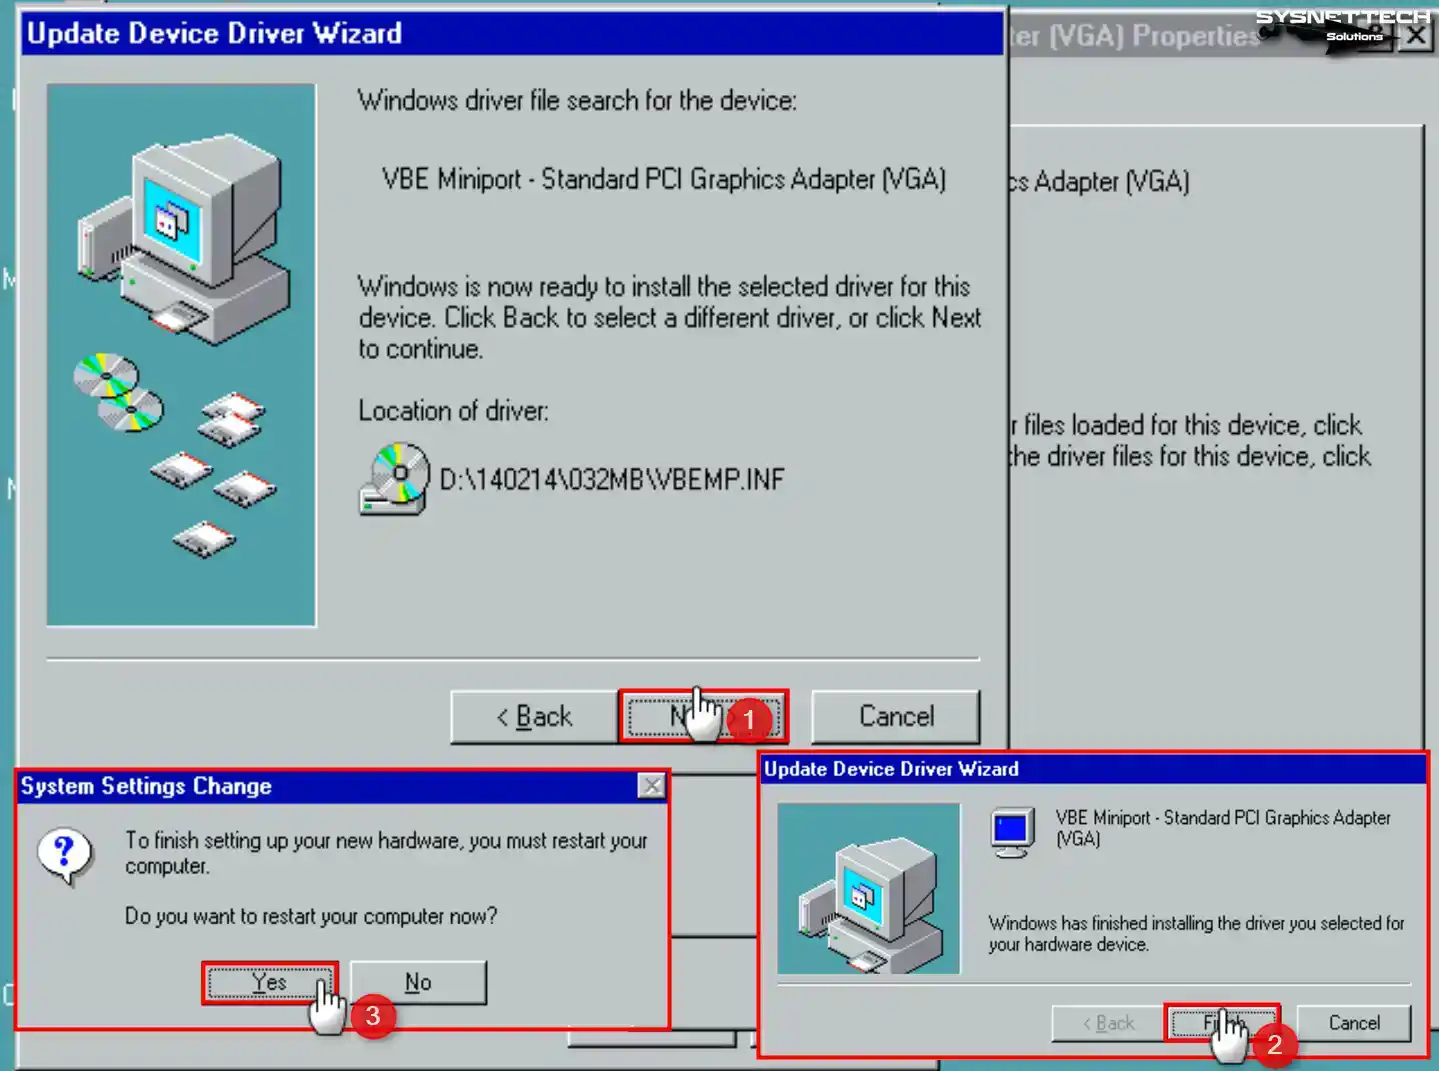
Select VBE Miniport – Standard PCI Graphics Adapter (VGA) and click Next after checking the driver location.
Step 7
After updating the display device, restart your virtual machine.
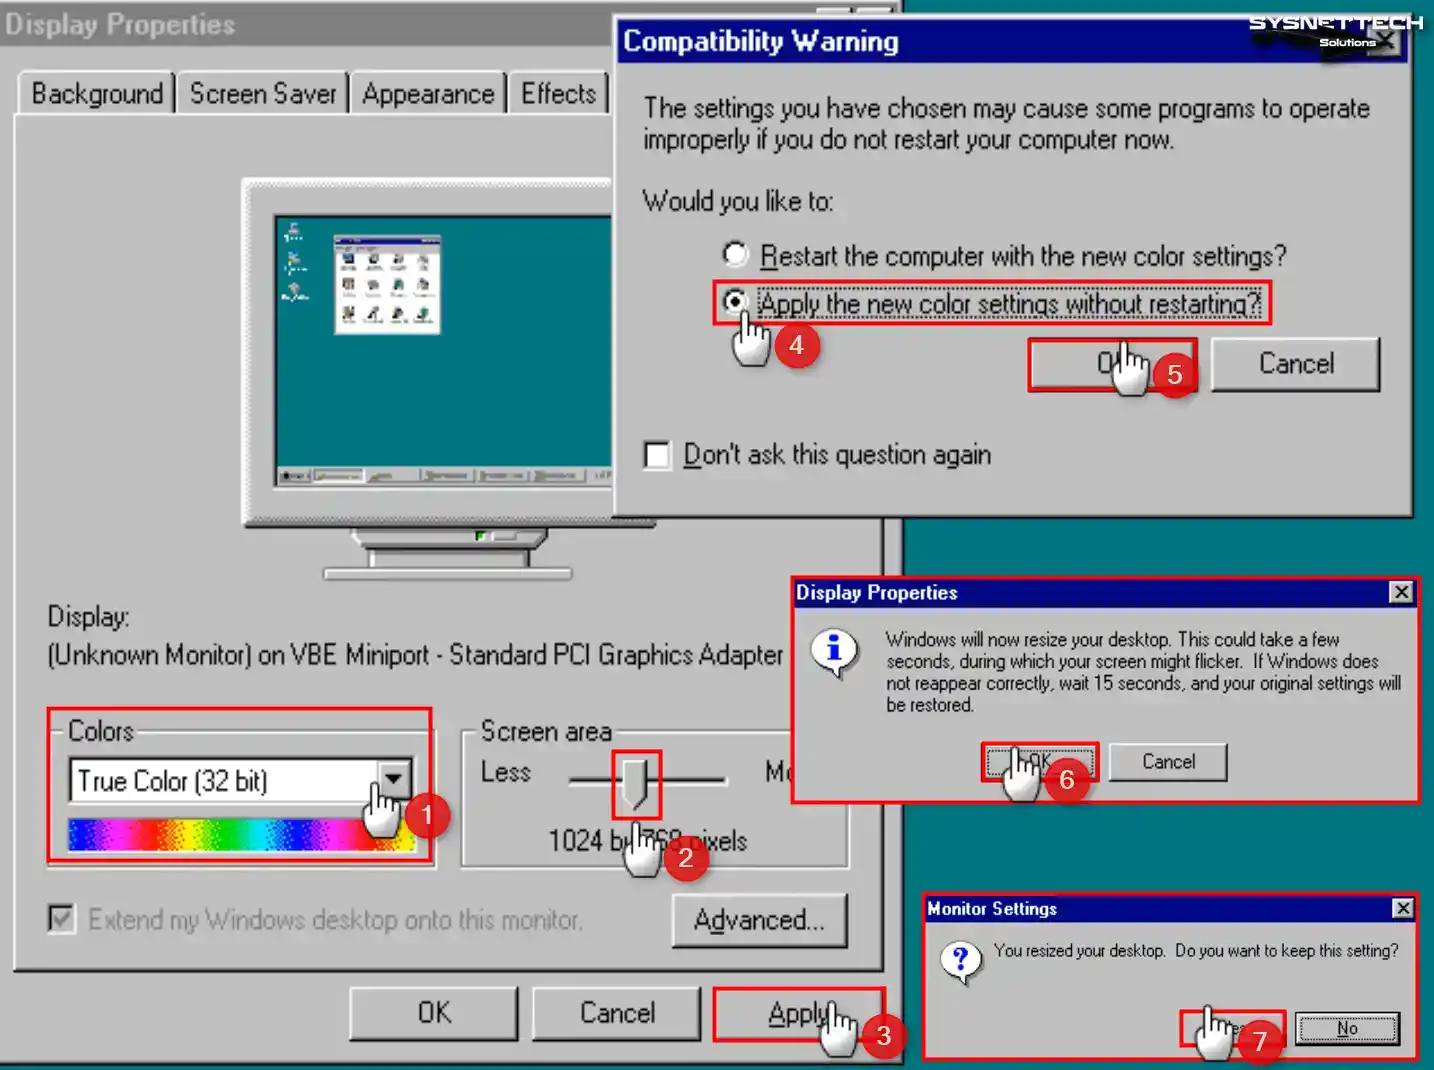
Step 8
After your VM is turned on, open the Right Click / Display Properties on the desktop and change the value under Colors to True Color (32-bit), and after setting the screen resolution to 1024 x 768, apply the changes without restarting the virtual computer.
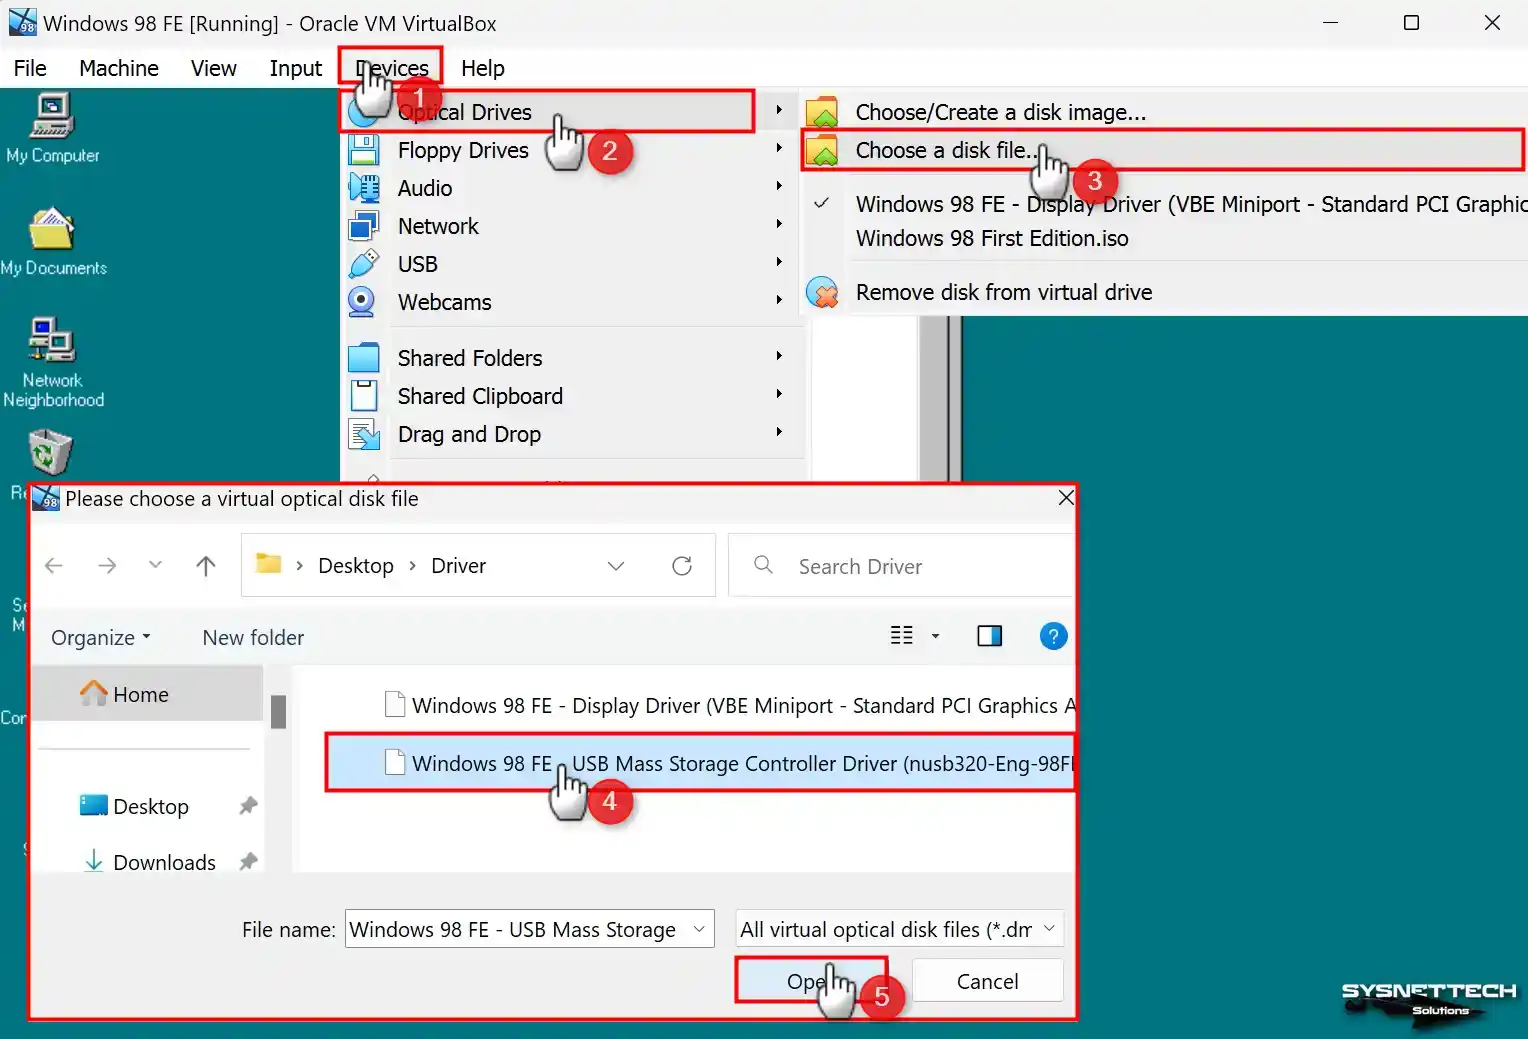
How to Install USB 2.0 Driver
Drivers of USB 2.0 controller in Windows 98 virtual machine are not installed automatically after setup. So before you can use the flash drives in your VM, you must install the USB drivers.
Step 1
Select the USB Mass Storage Controller Driver (nusb320-Eng-98FE) ISO file you downloaded to your computer from the table below the article and click the Open button.
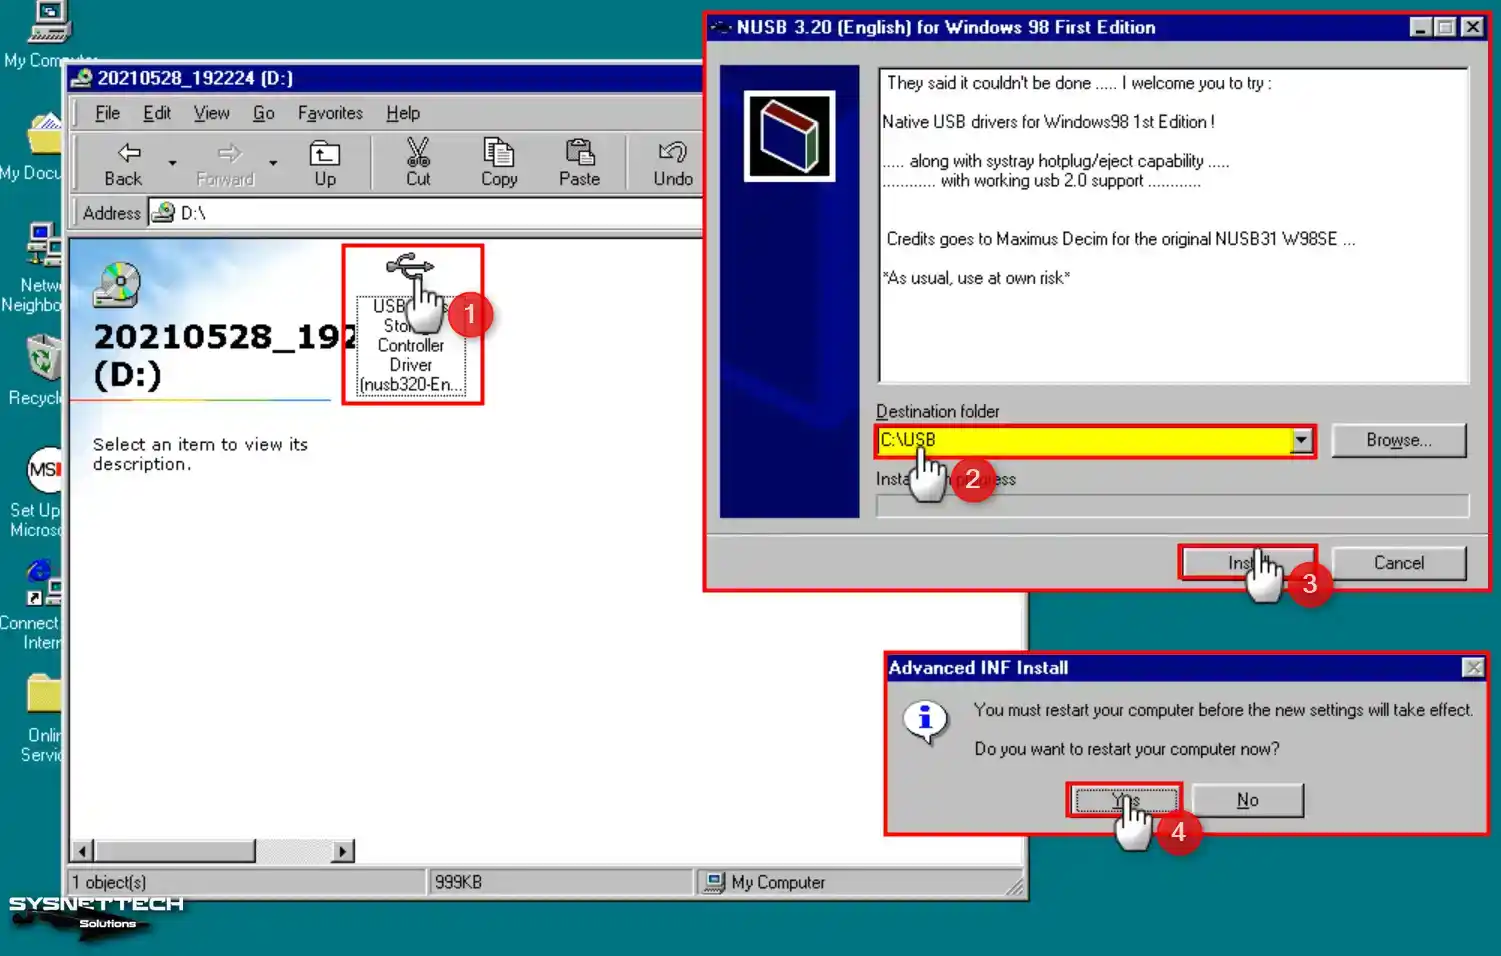
Step 2
Create a new folder named USB on the desktop and after viewing the CD content, double-click the USB drive and extract the archived file to C:\USB.
Step 3
Click the Reinstall Driver button in the device manager to install the driver for the PCI Universal Serial Bus device, and click Next in the following windows.
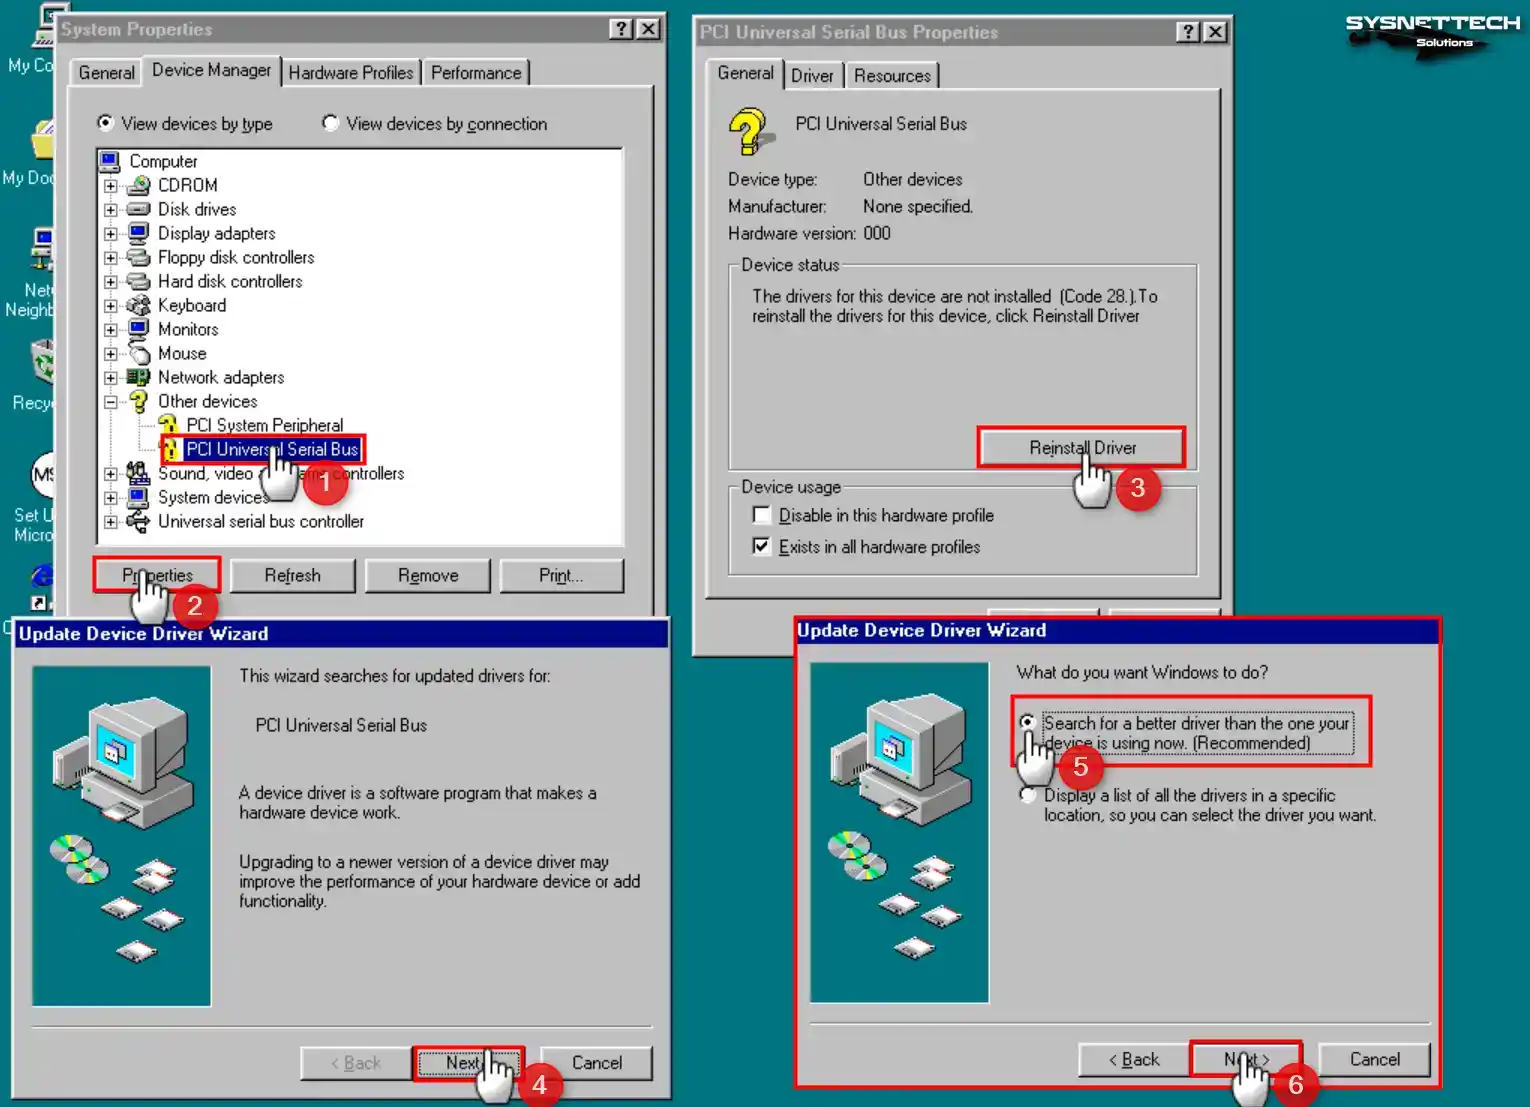
Step 4
To show the location of the driver files you extracted to the folder, check the Specify a location option, click the Browse button to specify the location of the USB folder, and then install the driver.

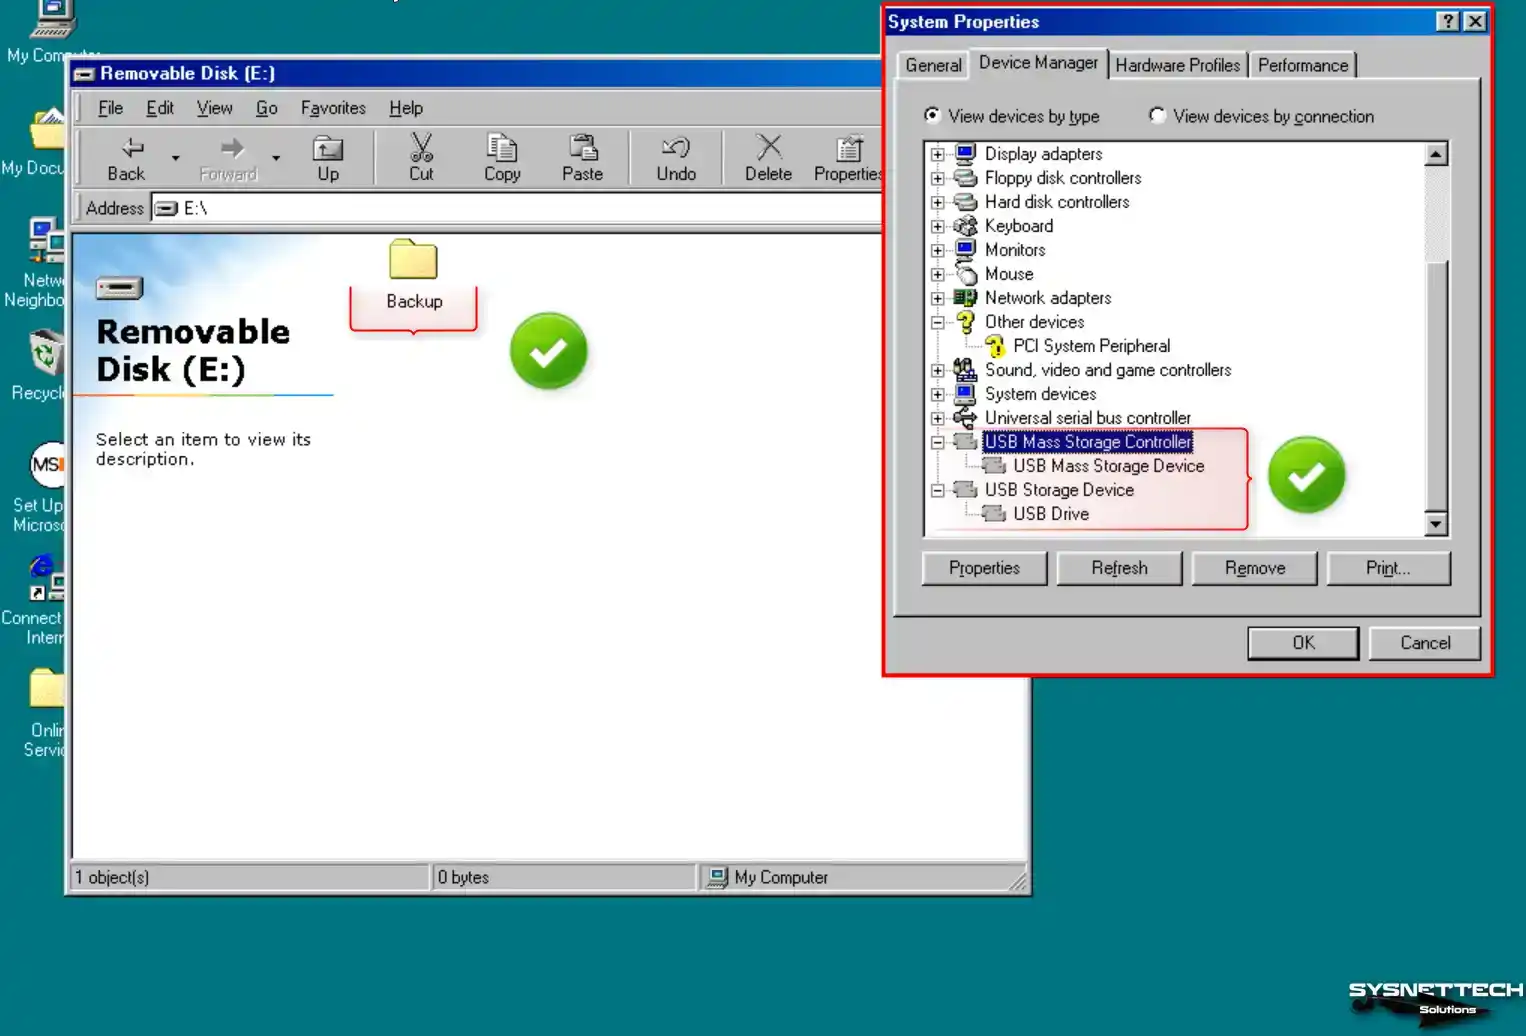
Step 5
Insert your flash disk memory into any USB 2.0 ports on your host computer. Next, format the disk as FAT32 and create a folder named “Backup” as an illustrative example.
Step 6
Click Devices / USB / Kingston DataTraveler to add your USB stick to the guest machine.
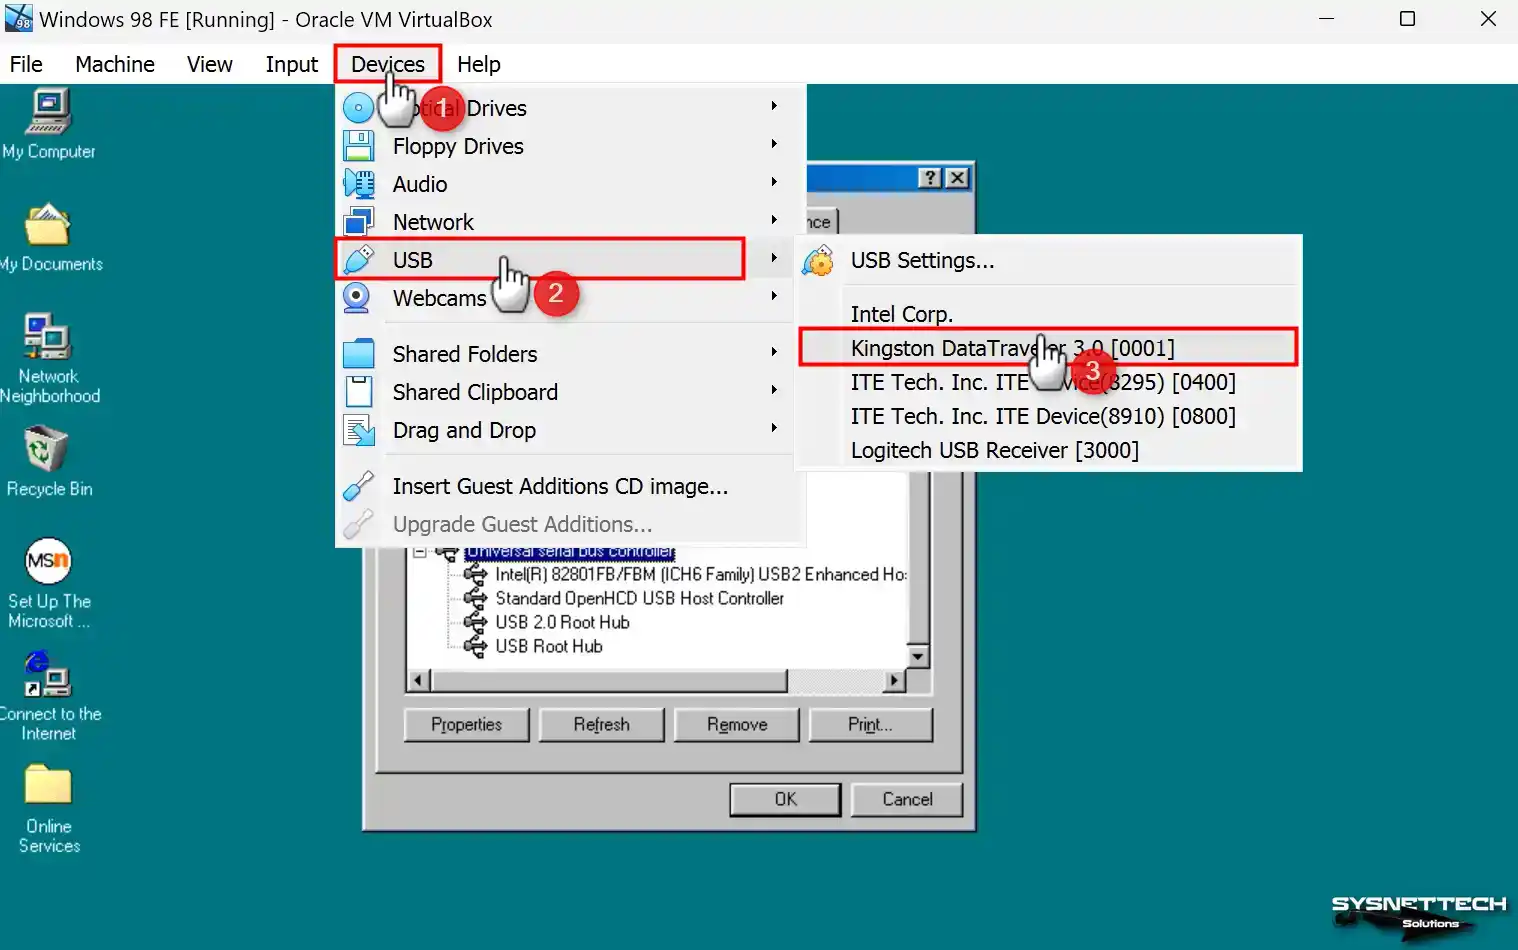
Step 7
You can check that your USB flash drive works on my computer or device manager.
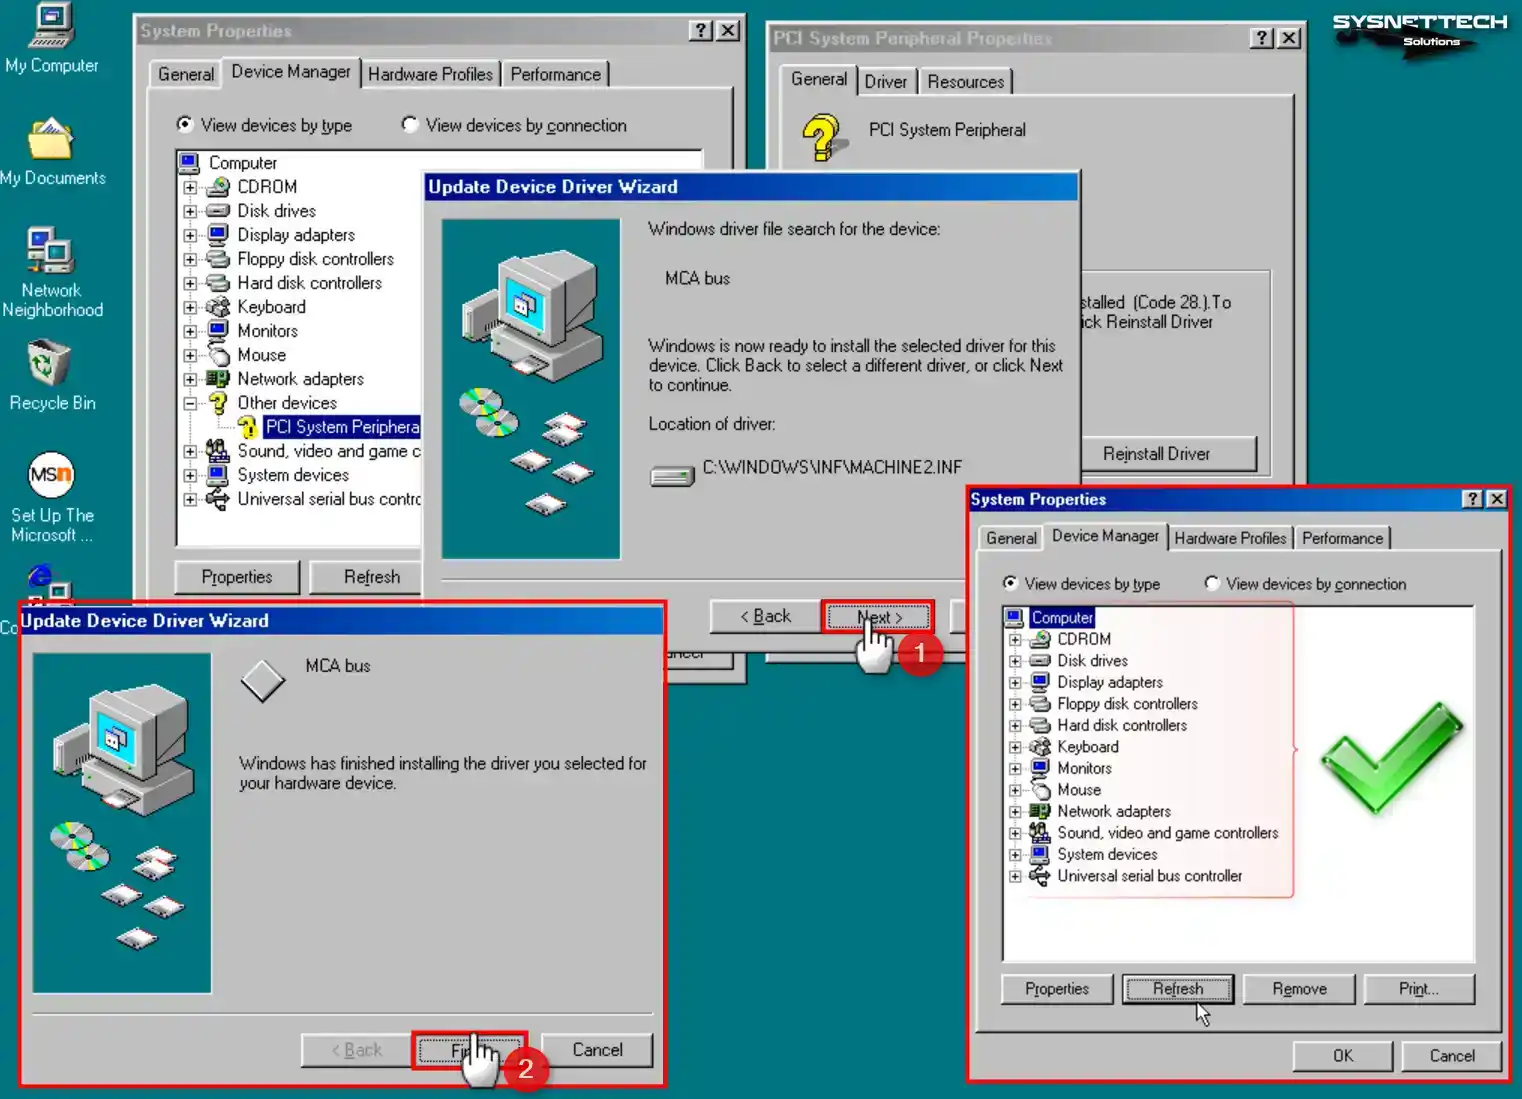
How to Install PCI System Peripheral Driver
You may be unable to install drivers for some devices because Windows 98 is not fully supported by the VBox software. This is fine for some devices; your software will run smoothly.
Step 1
Click the Properties / Reinstall Driver button to install the driver for the PCI System Peripheral device. After clicking Next in the driver update window, select view all drivers and continue.
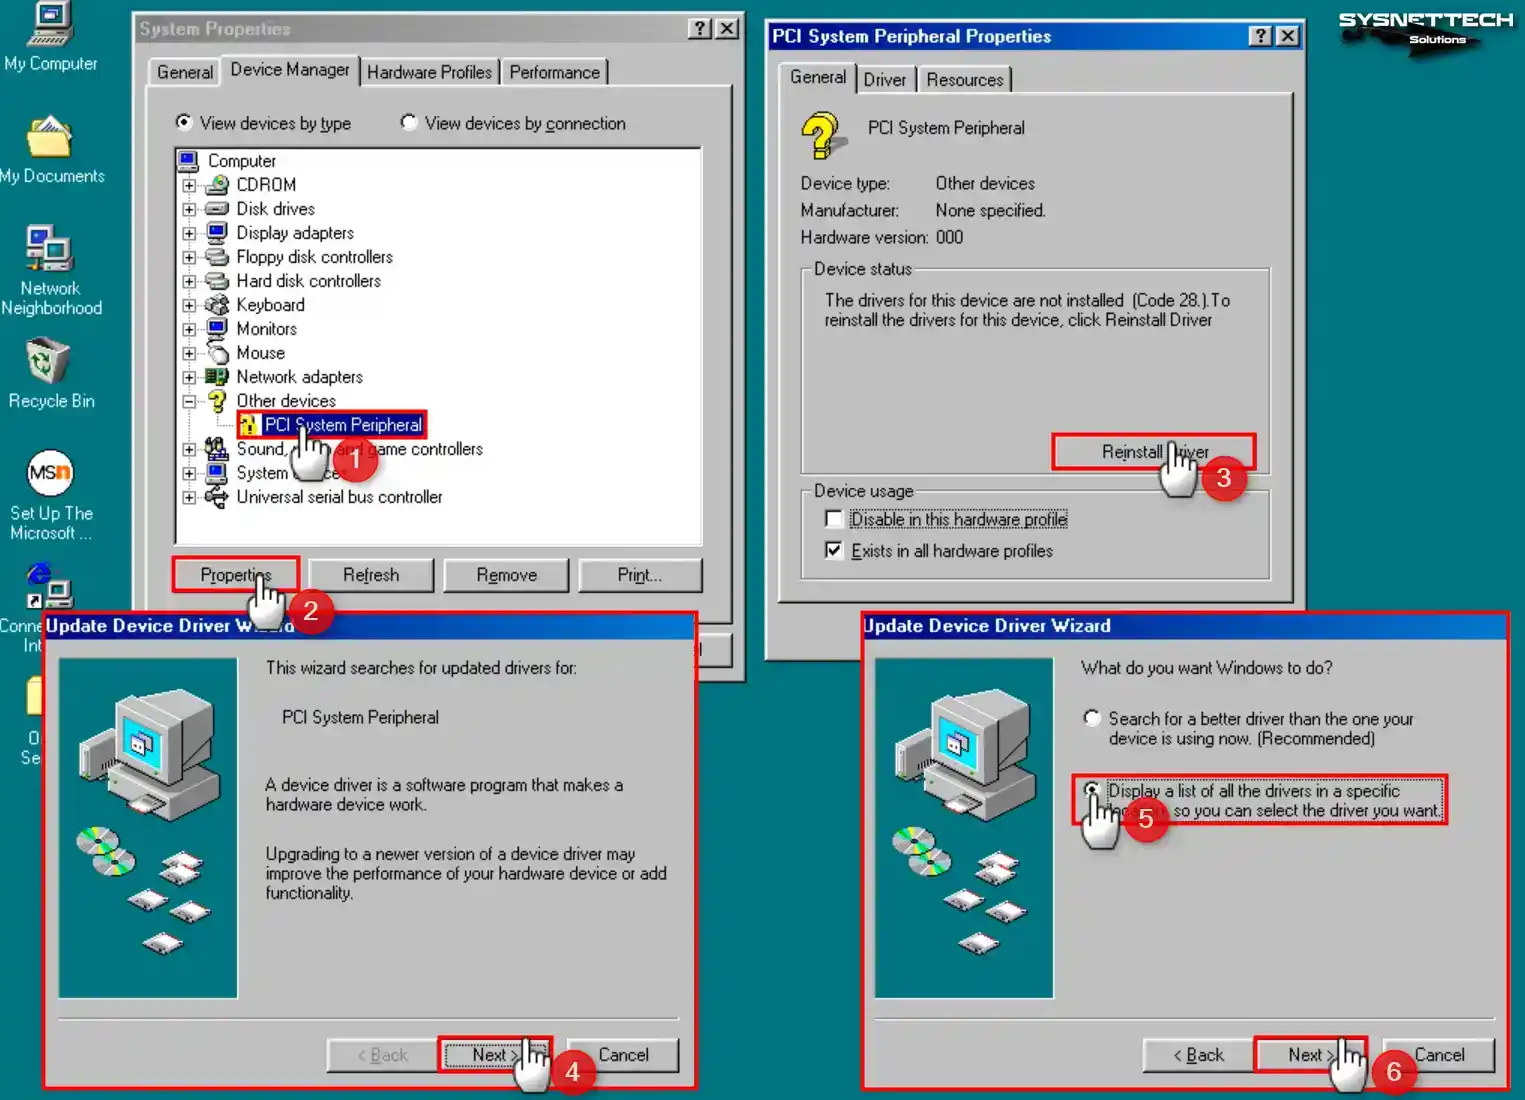
Step 2
In the driver list that opens, select System Devices, and proceed. Then choose System Standard Devices / MCA Bus from the Manufacturers section and confirm the installation of the driver.

Step 3
You will see that all drivers have been successfully installed by clicking the Refresh button in the device manager and scanning for uninstalled drivers.
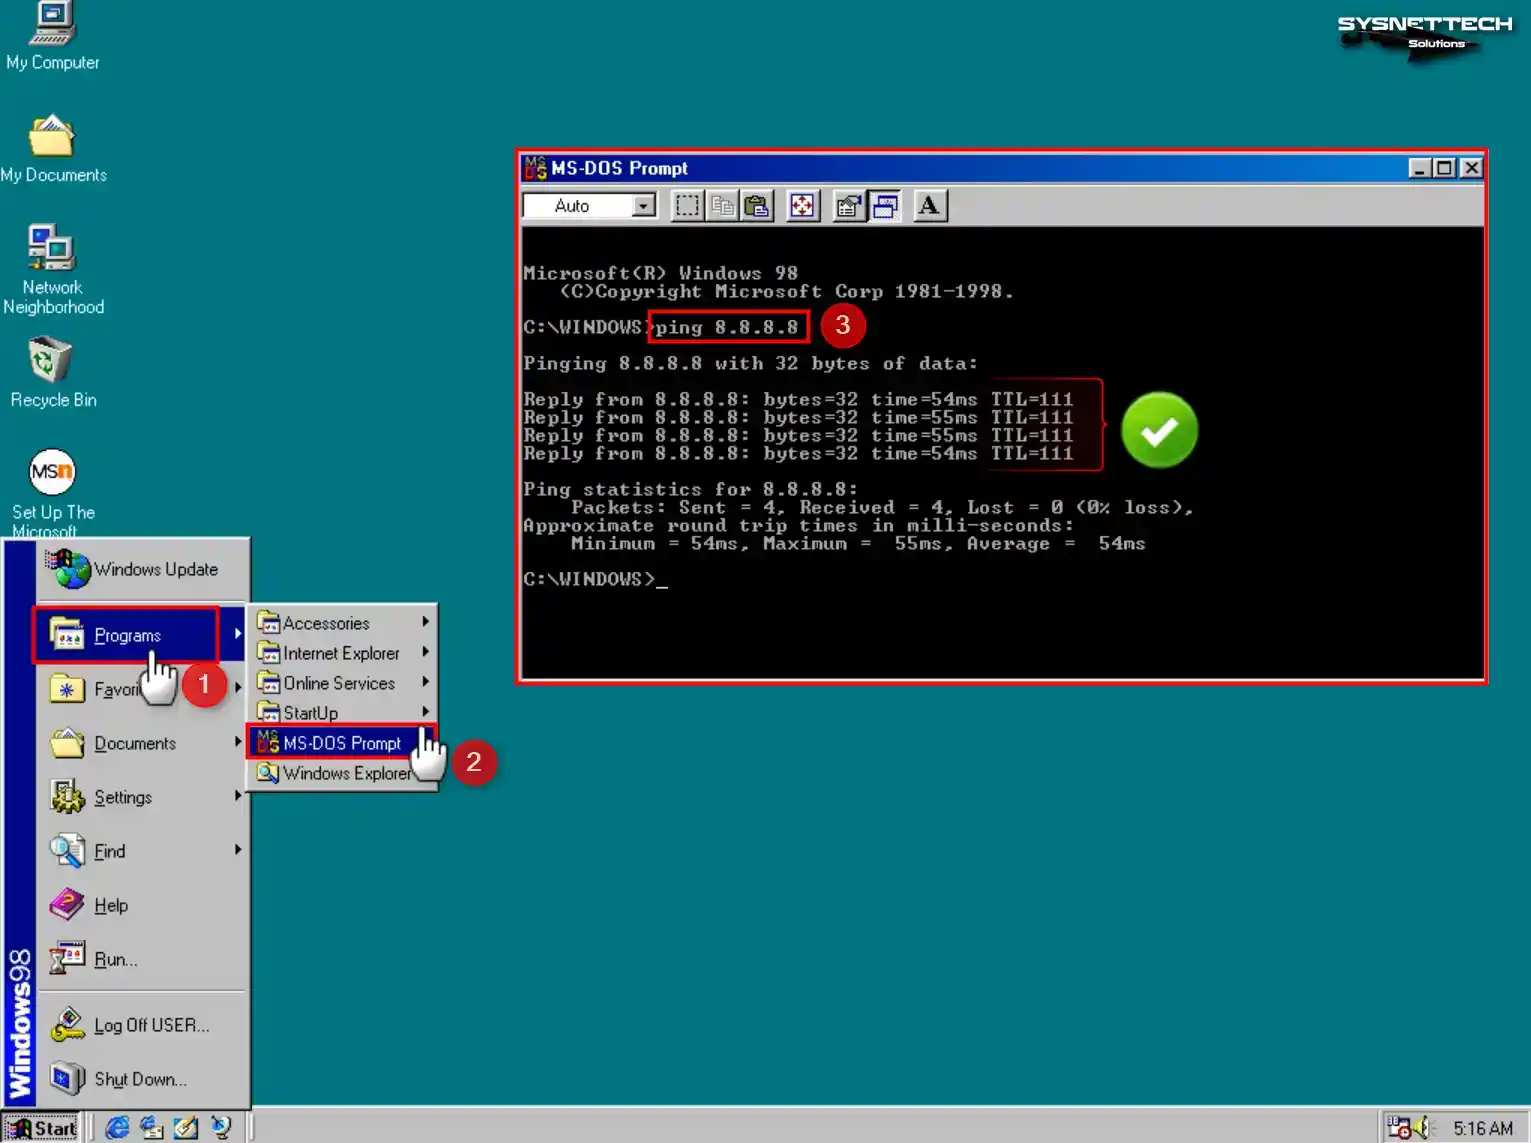
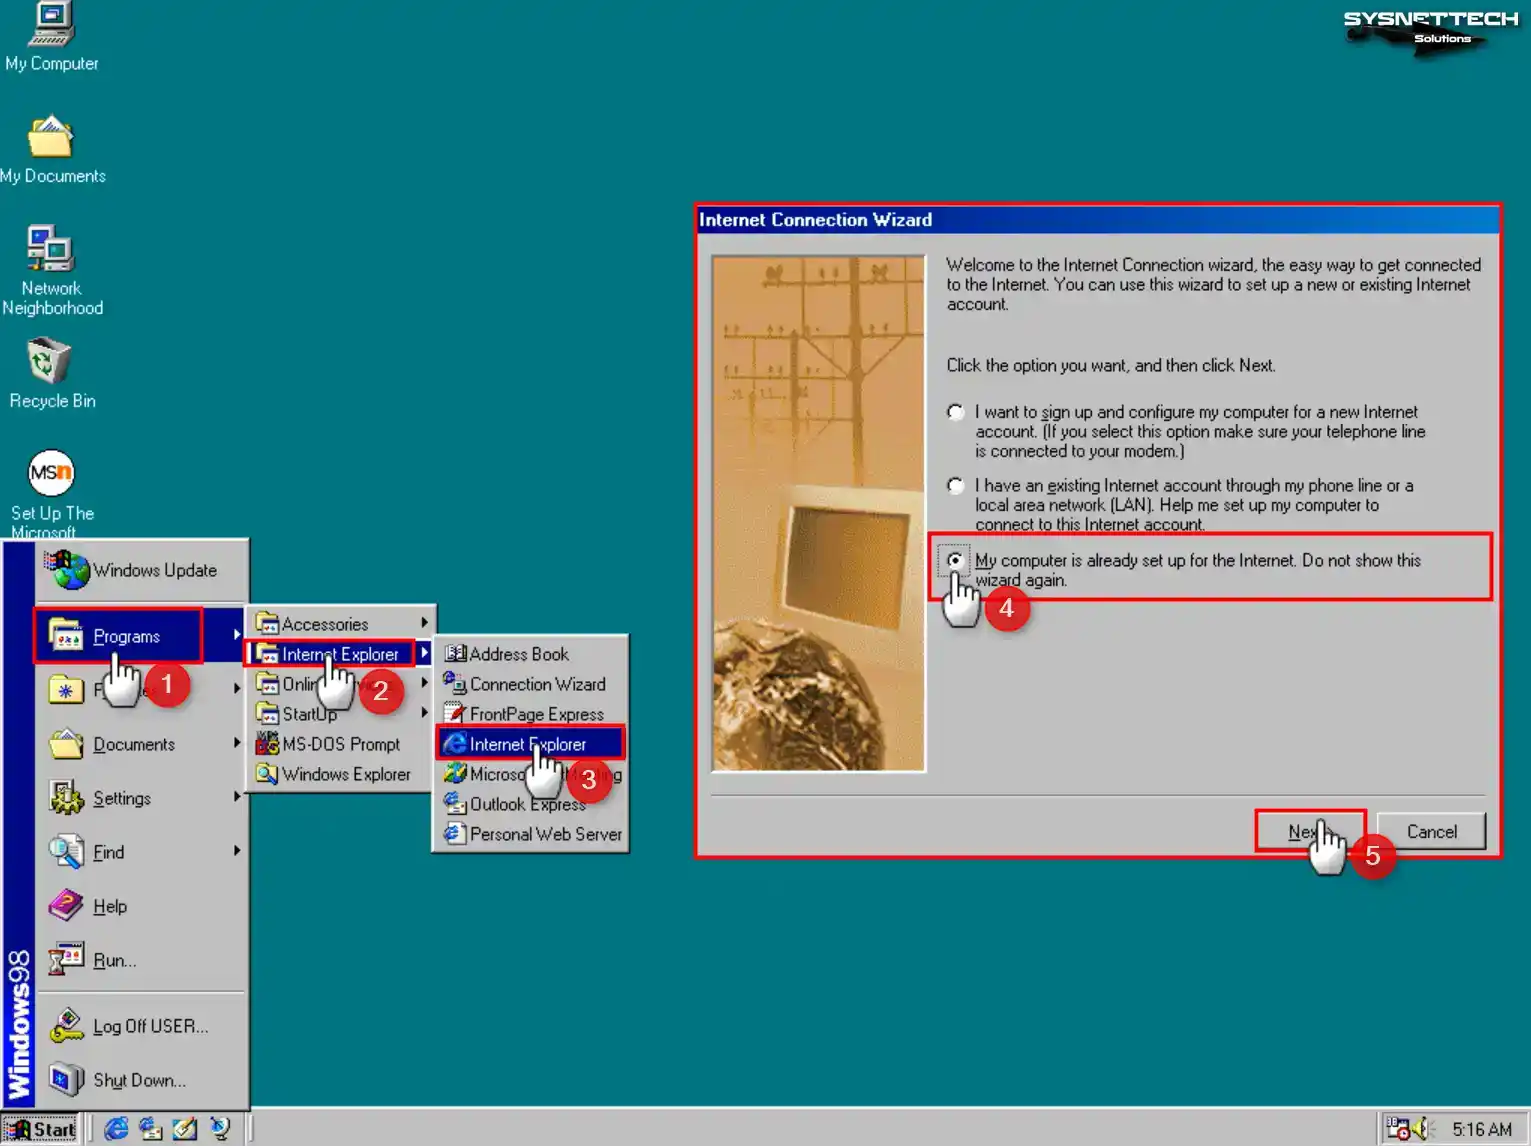
How to Configure and Check Internet Connection
Since the network connection of guest machines is automatically configured in the Oracle VM VirtualBox program, every virtual machine you set up will have an Internet connection.
Step 1
Open Start / Programs / MS-DOS Prompt and test your Internet connection by pinging Google servers with the “ping 8.8.8.8” command.
Step 2
After clicking the Start / Programs / Internet Explorer shortcut, when the Internet Connection Wizard window opens, Select the “My computer is already set up for the Internet. Do not show this wizard again.” option and click Next.
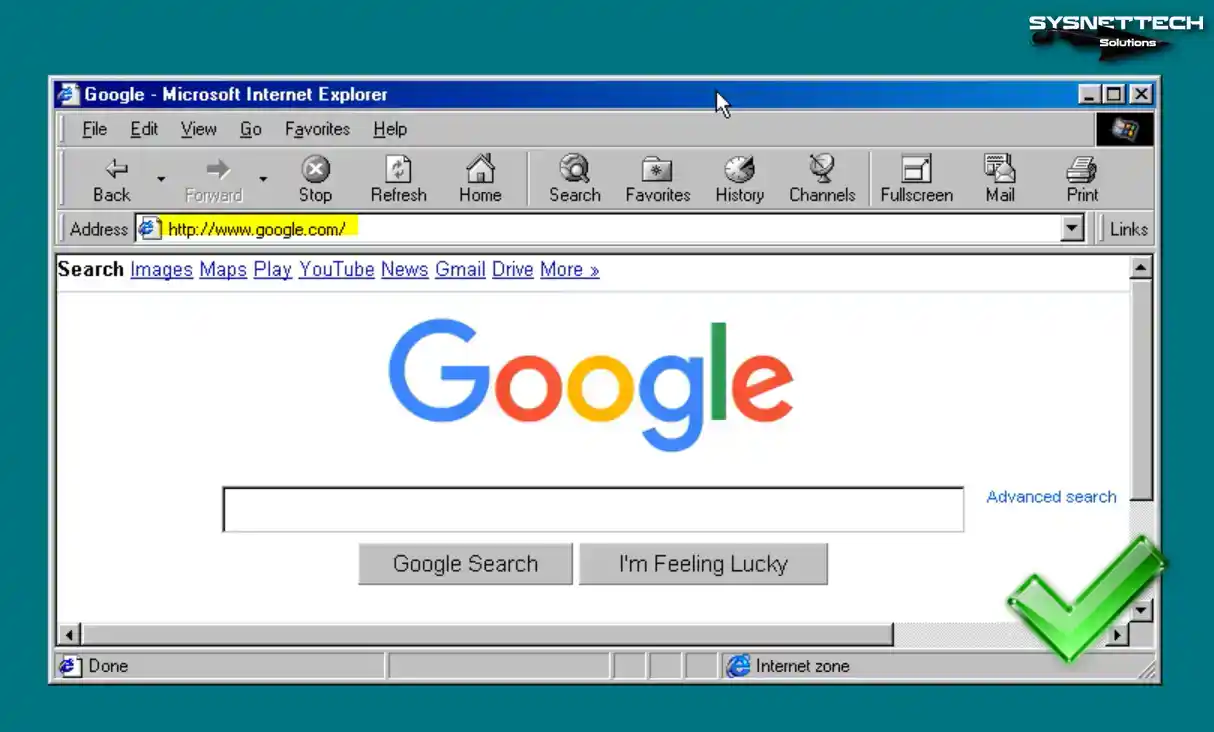
Step 3
When the Internet Explorer web browser starts automatically, you can check your web connection by visiting the Google search engine.
Video 1
Video 2
Installing Old Versions
VirtualBox Version
YouTube Video
Slide
Windows 98 FE (First Edition) Driver Download
Windows 98 FE (First Edition) ISO
Display Driver (VBE Miniport – Standard PCI Graphics Adapter VGA)
USB Mass Storage Controller Driver (nusb320-Eng-98FE)
Windows 98 FE Fix CPU – Floppy Boot – (patcher9x-0.5-boot.ima)
Windows 98 SE (Second Edition) Driver Download
Windows 98 SE (Second Edition) ISO
Display Driver (VBE Miniport – Standard PCI Graphics Adapter VGA)
USB Mass Storage Controller Driver (nusb36e-2694)
Windows 98 SE Fix CPU – Floppy Boot – (patcher9x-0.5-boot.ima)
Related Articles
1) How to Install Windows 2000 on VirtualBox
2) How to Install Windows Millennium on VirtualBox
3) How to Install Windows XP on VirtualBox
4) How to Install Windows 7 on VirtualBox
5) How to Install Windows 10 on VirtualBox
-
BabaLooey
- Posts: 8
- Joined: 11. Oct 2011, 00:00
- Primary OS: MS Windows 2003
- VBox Version: OSE other
- Guest OSses: Windows 98
Win98 — PCI System Peripheral and Advanced Power Management
Hi,
I was able to install VB on Win2k3 host without any problems, and then installed Win98SE in virtual PC. There were some problems, but I was able to solve all of them, apart from these two:
I have two items in System Manager that I cannot solve, marked with question marks:
1) Other devices — PCI System Peripheral, and
2) System devices — Advanced Power Management support
Thanks in advance
Last edited by BabaLooey on 14. Oct 2011, 05:10, edited 1 time in total.
-
mpack
- Site Moderator
- Posts: 38867
- Joined: 4. Sep 2008, 17:09
- Primary OS: MS Windows 10
- VBox Version: PUEL
- Guest OSses: Mostly XP
Re: Win98 — PCI periph and Adv power
Post
by mpack »
The «PCI system peripheral» issue is normal. It’s some device virtualized by VBox which Win98 does not recognize. Win98SE is not a fully supported OS.
As to the APM issue, I doubt that VirtualBox even has APM support — it’s a very old standard, and VBox supports its successor, ACPI. Did you follow the instructions in the «Howtos and Tutorials» forum for installing Win98SE with ACPI support?
-
BabaLooey
- Posts: 8
- Joined: 11. Oct 2011, 00:00
- Primary OS: MS Windows 2003
- VBox Version: OSE other
- Guest OSses: Windows 98
Re: Win98 — PCI periph and Adv power
Post
by BabaLooey »
Thanks for reply.
OK on «PCI system peripheral» issue. Will ignore ![]()
Nah, I missed that part about installing ACPI during W98 setup. Any way to fix it now?
-
BabaLooey
- Posts: 8
- Joined: 11. Oct 2011, 00:00
- Primary OS: MS Windows 2003
- VBox Version: OSE other
- Guest OSses: Windows 98
-
BabaLooey
- Posts: 8
- Joined: 11. Oct 2011, 00:00
- Primary OS: MS Windows 2003
- VBox Version: OSE other
- Guest OSses: Windows 98
Re: Win98 — PCI System Peripheral and Advanced Power Managem
Post
by BabaLooey »
I’m glad to help, but please be sure to test it by yourself. Although I used to work in PC and LAN setup/repair/maintenance, it was a long time ago, and I forgot a lot.
Also, despite solving my APM/ACPI problem with above links, it now generated a new problem, with a printer port (see separate topic).
There are other advices around www. This one was among the first that popped out after googling for «install acpi support windows 98», and it looked like it should work.
Win98 — PCI System Peripheral and Advanced Power Management
- Reply with quote
Win98 — PCI System Peripheral and Advanced Power Management
Hi,
I was able to install VB on Win2k3 host without any problems, and then installed Win98SE in virtual PC. There were some problems, but I was able to solve all of them, apart from these two:
I have two items in System Manager that I cannot solve, marked with question marks:
1) Other devices — PCI System Peripheral, and
2) System devices — Advanced Power Management support
Thanks in advance
Last edited by BabaLooey on 14. Oct 2011, 05:10, edited 1 time in total.
- BabaLooey
- Posts: 8
- Joined: 11. Oct 2011, 00:00
- Primary OS: MS Windows 2003
- VBox Version: OSE other
- Guest OSses: Windows 98
- Reply with quote
Re: Win98 — PCI periph and Adv power
![]() by mpack » 12. Oct 2011, 13:06
by mpack » 12. Oct 2011, 13:06
The «PCI system peripheral» issue is normal. It’s some device virtualized by VBox which Win98 does not recognize. Win98SE is not a fully supported OS.
As to the APM issue, I doubt that VirtualBox even has APM support — it’s a very old standard, and VBox supports its successor, ACPI. Did you follow the instructions in the «Howtos and Tutorials» forum for installing Win98SE with ACPI support?
- mpack
- Site Moderator
- Posts: 38123
- Joined: 4. Sep 2008, 17:09
- Primary OS: MS Windows 10
- VBox Version: PUEL
- Guest OSses: Mostly XP
- Reply with quote
Re: Win98 — PCI periph and Adv power
![]() by BabaLooey » 13. Oct 2011, 23:41
by BabaLooey » 13. Oct 2011, 23:41
Thanks for reply.
OK on «PCI system peripheral» issue. Will ignore ![]()
Nah, I missed that part about installing ACPI during W98 setup. Any way to fix it now?
- BabaLooey
- Posts: 8
- Joined: 11. Oct 2011, 00:00
- Primary OS: MS Windows 2003
- VBox Version: OSE other
- Guest OSses: Windows 98
- Reply with quote
Re: Win98 — PCI System Peripheral and Advanced Power Managem
![]() by mpack » 14. Oct 2011, 13:16
by mpack » 14. Oct 2011, 13:16
Thank you for that link. That is useful information, if I get time I’ll try to add it to the existing Win98 «howto» thread.
- mpack
- Site Moderator
- Posts: 38123
- Joined: 4. Sep 2008, 17:09
- Primary OS: MS Windows 10
- VBox Version: PUEL
- Guest OSses: Mostly XP
- Reply with quote
Re: Win98 — PCI System Peripheral and Advanced Power Managem
![]() by BabaLooey » 14. Oct 2011, 14:02
by BabaLooey » 14. Oct 2011, 14:02
I’m glad to help, but please be sure to test it by yourself. Although I used to work in PC and LAN setup/repair/maintenance, it was a long time ago, and I forgot a lot.
Also, despite solving my APM/ACPI problem with above links, it now generated a new problem, with a printer port (see separate topic).
There are other advices around www. This one was among the first that popped out after googling for «install acpi support windows 98», and it looked like it should work.
- BabaLooey
- Posts: 8
- Joined: 11. Oct 2011, 00:00
- Primary OS: MS Windows 2003
- VBox Version: OSE other
- Guest OSses: Windows 98
Return to Windows Guests
Who is online
Users browsing this forum: No registered users and 19 guests
Theres the vmx file:
.encoding = «windows-1255»
config.version = «8»
virtualHW.version = «7»
scsi0.present = «TRUE»
memsize = «512»
ide0:0.present = «TRUE»
ide0:0.fileName = «25-games-test-cl2.vmdk»
ide1:0.present = «TRUE»
ide1:0.autodetect = «TRUE»
ide1:0.deviceType = «cdrom-raw»
floppy0.startConnected = «FALSE»
floppy0.fileName = «»
floppy0.autodetect = «TRUE»
ethernet0.present = «TRUE»
ethernet0.connectionType = «bridged»
ethernet0.wakeOnPcktRcv = «FALSE»
ethernet0.addressType = «generated»
usb.present = «TRUE»
mks.enable3d = «TRUE»
serial0.present = «TRUE»
serial0.fileType = «thinprint»
pciBridge0.present = «TRUE»
pciBridge4.present = «TRUE»
pciBridge4.virtualDev = «pcieRootPort»
pciBridge4.functions = «8»
pciBridge5.present = «TRUE»
pciBridge5.virtualDev = «pcieRootPort»
pciBridge5.functions = «8»
pciBridge6.present = «TRUE»
pciBridge6.virtualDev = «pcieRootPort»
pciBridge6.functions = «8»
pciBridge7.present = «TRUE»
pciBridge7.virtualDev = «pcieRootPort»
pciBridge7.functions = «8»
vmci0.present = «TRUE»
usb.vbluetooth.startConnected = «TRUE»
displayName = «Clone of WIN985»
guestOS = «win98»
nvram = «Clone of WIN985.nvram»
virtualHW.productCompatibility = «hosted»
powerType.powerOff = «hard»
powerType.powerOn = «hard»
powerType.suspend = «hard»
powerType.reset = «hard»
extendedConfigFile = «Clone of WIN985.vmxf»
ide1:0.fileName = «auto detect»
ethernet0.generatedAddress = «00:0C:29:7D:84:19»
vmci0.id = «-238461774»
tools.syncTime = «FALSE»
uuid.location = «56 4d e8 f2 aa a7 27 1f-76 49 8f cf 7d 7d 84 19»
uuid.bios = «56 4d e8 f2 aa a7 27 1f-76 49 8f cf 7d 7d 84 19»
cleanShutdown = «TRUE»
replay.supported = «FALSE»
replay.filename = «»
ide0:0.redo = «»
usb.autoConnect.device0 = «»
pciBridge0.pciSlotNumber = «17»
pciBridge4.pciSlotNumber = «21»
pciBridge5.pciSlotNumber = «22»
pciBridge6.pciSlotNumber = «23»
pciBridge7.pciSlotNumber = «24»
scsi0.pciSlotNumber = «16»
usb.pciSlotNumber = «32»
ethernet0.pciSlotNumber = «33»
vmci0.pciSlotNumber = «36»
usb:1.present = «TRUE»
ethernet0.generatedAddressOffset = «0»
ethernet0.virtualDev = «e1000»
tools.remindInstall = «FALSE»
vmotion.checkpointFBSize = «16777216»
usb:1.speed = «2»
usb:1.deviceType = «hub»
usb:1.port = «1»
usb:1.parent = «-1»
tools.upgrade.policy = «manual»
ide1:0.startConnected = «TRUE»
unity.wasCapable = «FALSE»
bios.forceSetupOnce = «FALSE»
checkpoint.vmState = «»
ide0:1.present = «TRUE»
ide0:1.fileName = «25-games-test-0-cl2.vmdk»
ide0:1.redo = «»
checkpoint.vmState.readOnly = «FALSE»
policy.vm.mvmtid = «»
vc.uuid = «»
serial0.startConnected = «FALSE»
sound.present = «TRUE»
sound.fileName = «-1»
sound.pciSlotNumber = «34»
sound.autodetect = «TRUE»
softPowerOff = «FALSE»
usb.generic.allowHID = «TRUE»
mks.keyboardFilter = «allow»
hpet0.present = «FALSE»
ehci.present = «FALSE»
Wednesday, November 27, 2013
Vmware Windows 98 Pci System Peripheral
Driver compatible with Vmware Windows 98 Pci System Peripheral. File is 100% safe, added from safe source and passed Norton virus scan!
Driver Info:
File name: vmware_windows_98_pci_system_peripheral.exe
Driver version: 2.4.7
File size: 7.99 MB
OS: Win XP, Win Vista, Windows 7, Win 8, Windows 10
Download File: Vmware Windows 98 Pci System Peripheral
Posted by
xasd
at
![]()
Labels:
drivers
No comments:
Post a Comment
Форум
Zimn
Новенький![]()
Создано
тем: 1ответов: 0
Тема Создана: 31.03.2013 20:25:33
Привет! Установил в VMWare гостевой системой Windows 98. Нужны драйверы чтоб активировать в ней звук и прочее. Уже скачивал базы драйверов с рутрекера — всё не то. Вот ID оборудования под которое ищу:
PCI Multimedia Audio Device
VEN_1274&DEV_1371
PCI System Peripheral
VEN_15AD&DEV_0740
PCI Universal Serial Bus
VEN_15AD&DEV_0770
Благодарю за внимание!
![]()
![]()
Antonio
Главный![]()
Создано
тем: 2ответов: 6507
Ответ от: 31.03.2013 20:40:44
![]()
![]()
Новые сообщения на форуме
105418
Гость
06-02-2023 22:37 
20545
Гость
05-02-2023 23:42
486
lokeshwarah
09-12-2022 21:31
10974
Гость
03-12-2022 20:33
1813
САПСАН
03-11-2022 23:36
768
kapit0n
14-10-2022 15:21
571
Гость
05-10-2022 15:04
1114
koordiant
23-06-2022 16:08
14132
Vladimir8
26-05-2022 20:32
15542
Гость
21-05-2022 13:29
Thursday, April 19, 2012
Pci System Peripheral Vmware Windows 98
Information about pci system peripheral vmware windows 98.
Details:
File name: pci-system-peripheral-vmware-win-98.zip
Driver version: 2.3.2
Size: 3.728 MB
Works with Windows!
Driver Download: Pci System Peripheral Vmware Windows 98
Posted by
Novy
at
![]()
Labels:
drivers
No comments:
Post a Comment
Newer Post
Older Post
Home
Subscribe to:
Post Comments (Atom)
Saturday, July 20, 2013
Pci System Peripheral Windows 98
Here you can download pci system peripheral windows 98 for Windows. It’s 100% safe, uploaded from safe source and passed Norton virus scan!
Driver Info:
File name: pci-system-peripheral-windows-98.cab
Driver version: 1.4.4
File size: 11 645 KB
OS: Windows
Upload source: manufactuter website
Download Pci System Peripheral Windows 98
Posted by
Driver
at
![]()
Labels:
windows
No comments:
Post a Comment
Newer Post
Older Post
Home
Subscribe to:
Post Comments (Atom)
Wednesday, November 6, 2013
Pci System Peripheral Windows 98
Software compatible with pci system peripheral windows 98. This file is safe, uploaded from secure source and passed Symantec virus scan!
Driver Info:
File name: pci-system-peripheral-windows-98.zip
Driver version: 1.4.2
File size: 2.72 MB
OS: Windows 7, Win Vista, Windows 8, Win XP
Download File: Pci System Peripheral Windows 98
Posted by
driveragent010
at
![]()
Labels:
drivers
No comments:
Post a Comment
-
Maddy1991
- Posts: 4066
- Joined: Tue Feb 10, 2009 3:37 am
Pci System Peripheral Windows 98 Driver
Welcome every1
Need a driver for pci system peripheral windows 98, Win7 64bit.
-
Detective
- Site Admin
- Posts: 291425
- Joined: Sat Jan 31, 2009 3:19 pm
Re: Pci System Peripheral Windows 98 Driver
Post
by Detective » Wed Sep 10, 2014 9:01 am
Below you can download pci system peripheral windows 98 driver for Windows.
File name: pci_system_peripheral_win_98.exe
Version: 1.1.5
File size: 12.862 MB
Upload source: original install disk
Antivirus software passed: McAfee
Download Driver
(click above to download)
Sunday, May 13, 2007
Pci System Peripheral Windows 98
Download pci system peripheral windows 98.
Informations:
File name: pci_system_peripheral_WIN_98.exe
Driver version: 1.5.5
File size: 8 464 KB
This driver works with Windows OS and it’s safe for computer.
Posted by
Adam
at
2:01 AM
![]()
Labels:
driver
No comments:
Post a Comment
Newer Post
Older Post
Home
Subscribe to:
Post Comments (Atom)