In this post, we will see about how to set java path in windows 10 using cmd. To set java path, you need to first understand about JAVA_HOME and how to set JAVA_HOME in windows 10.
Let’s first understand about JAVA_HOME and then we will see how to set JAVA_HOME in windows 10.
What is JAVA_HOME?
JAVA_HOME is environment variable which contains installation directory of Java development kit(JDK) or Java Runtime environment(JRE). This environment variable is setup at operating system level.
|
JAVA_HOME=C:\Program Files\Java\jdk—11.0.9 |
Why do you need JAVA_HOME?
JAVA_HOME environment variable points to directory where java is installed on your system, so many java based applications such as TOMCAT use JAVA_HOME environment variable to locate java executables.
How to set JAVA_HOME in Windows 10?
- Locate JDK on your machine.
- If you are using 64-bit java, then it will be in
C:\Program Files\Java\ - If you are using 32-bit java, then it will be in
C:\Program Files (x86)\Java\
- If you are using 64-bit java, then it will be in
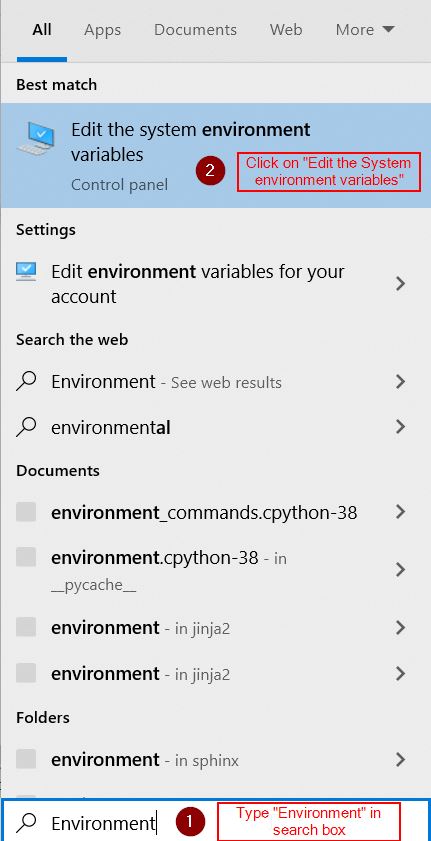
- Open windows search, type
environmentand click onEdit the system environment variables.
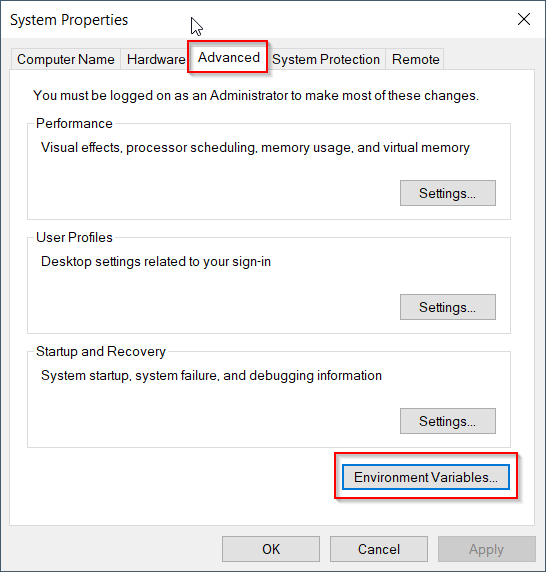
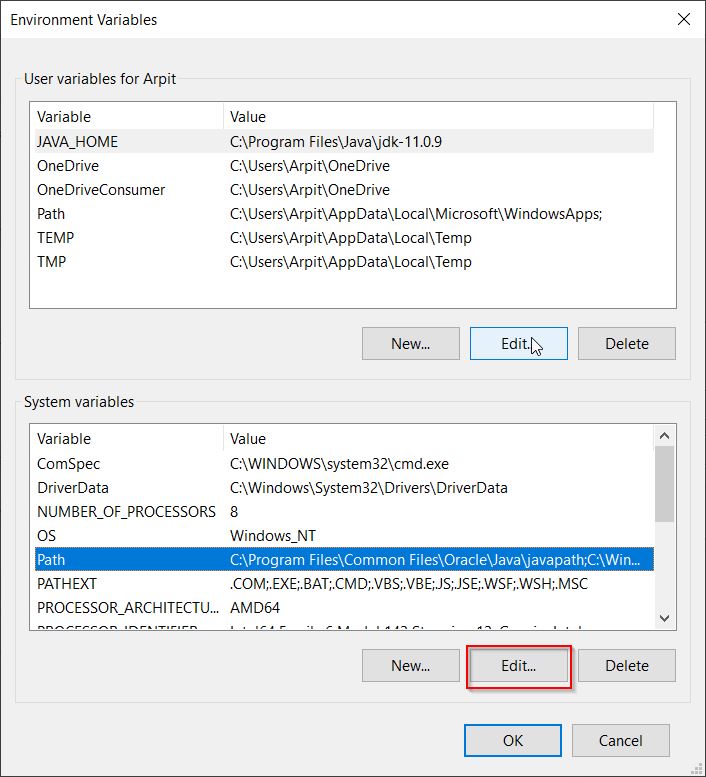
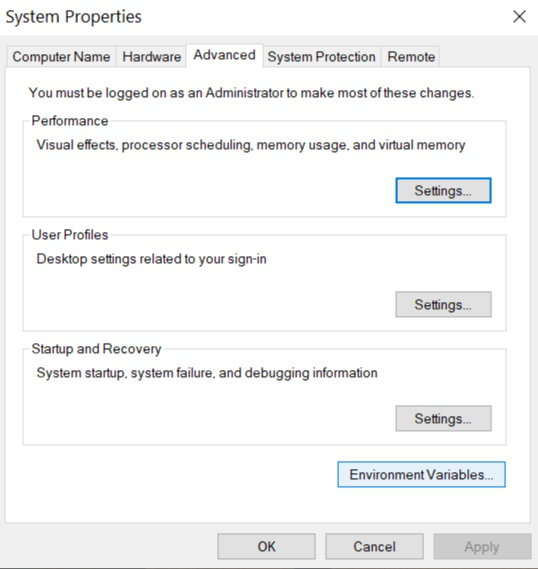
- In System properties dialog, go to Advanced tab and click on button
Enviroment Variables.
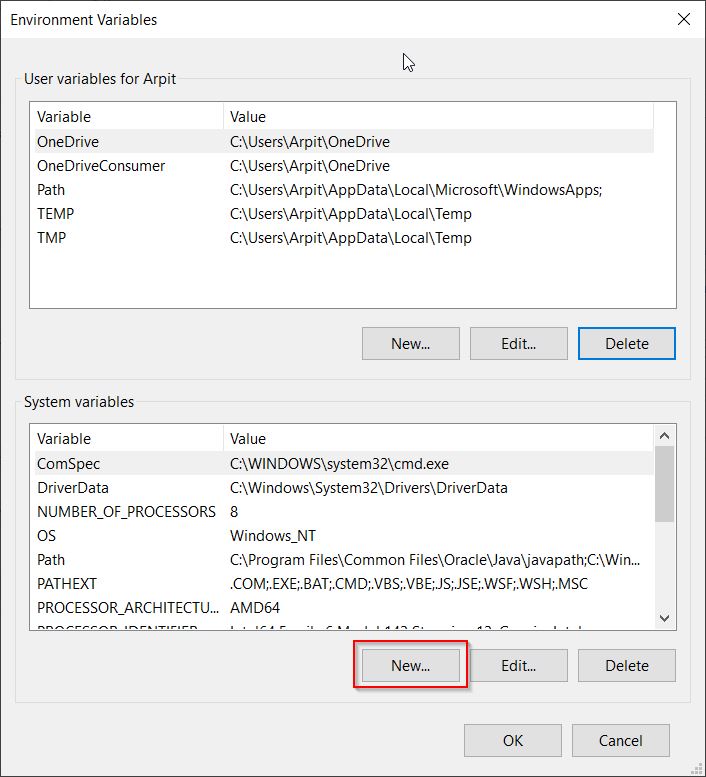
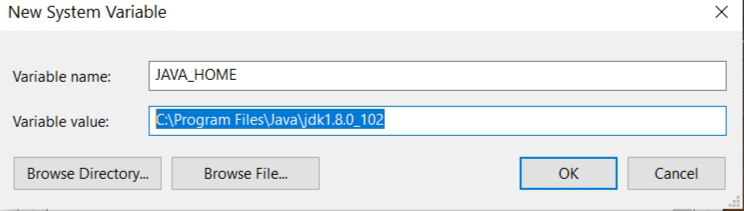
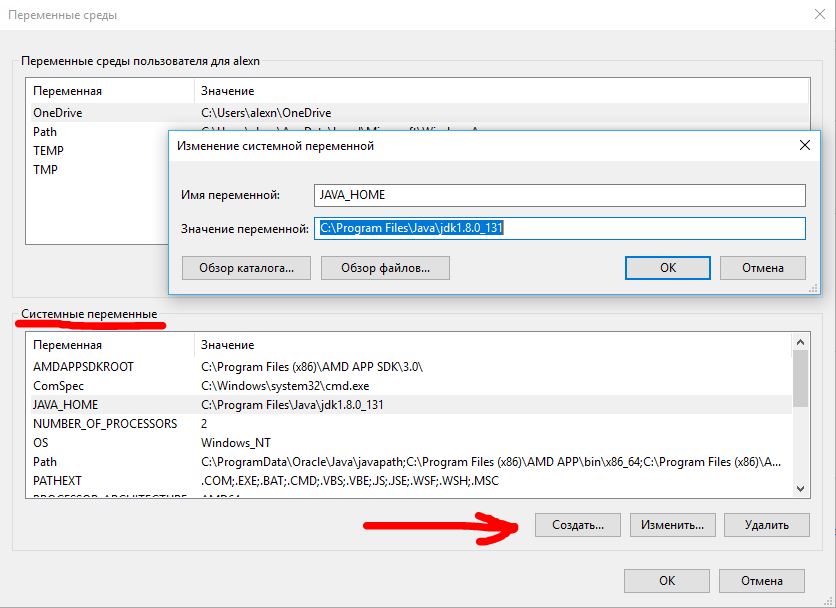
- In System variables, click
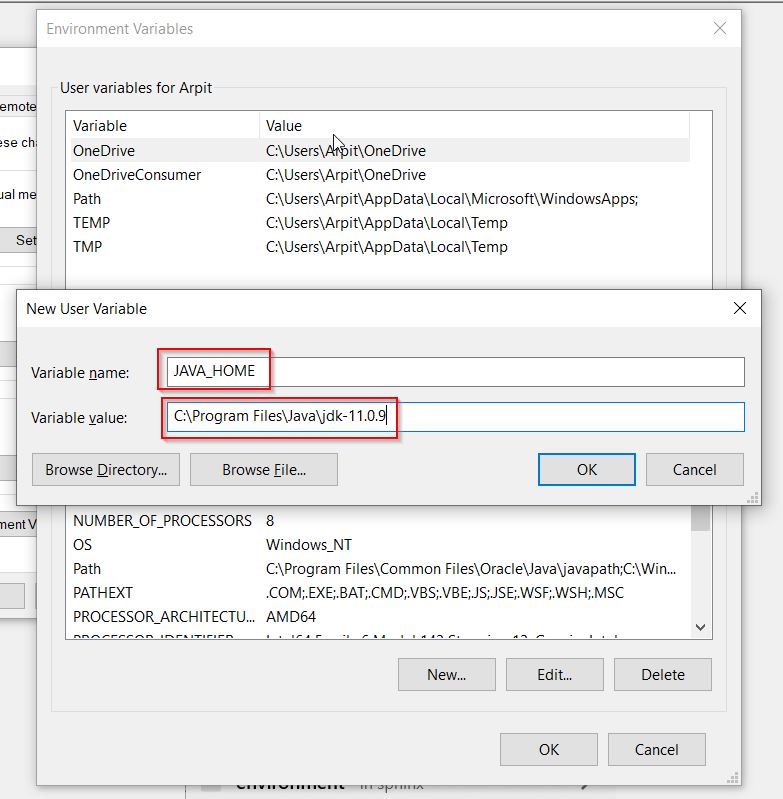
NEW...button to add JAVA_HOME environment variable. - Provide variable name as
JAVA_HOMEand value as Java installation directory.
Now let’s see how to set java in path environment variable in windows 10.
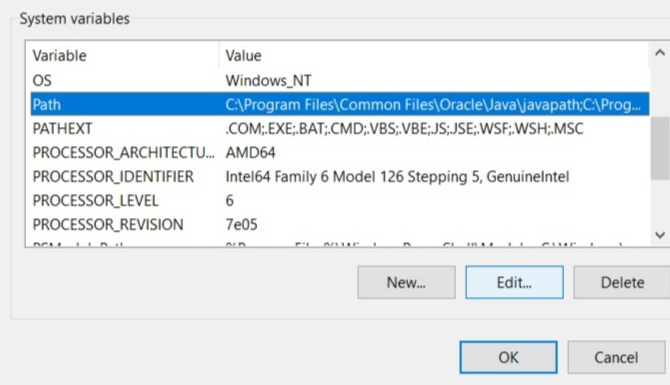
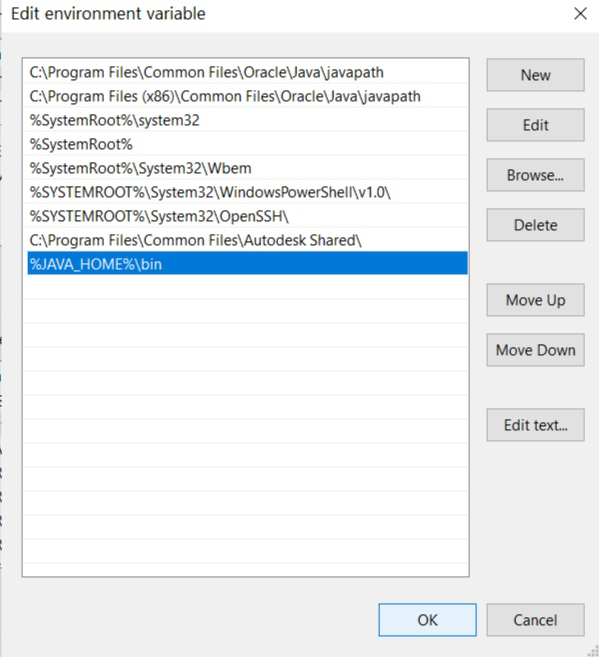
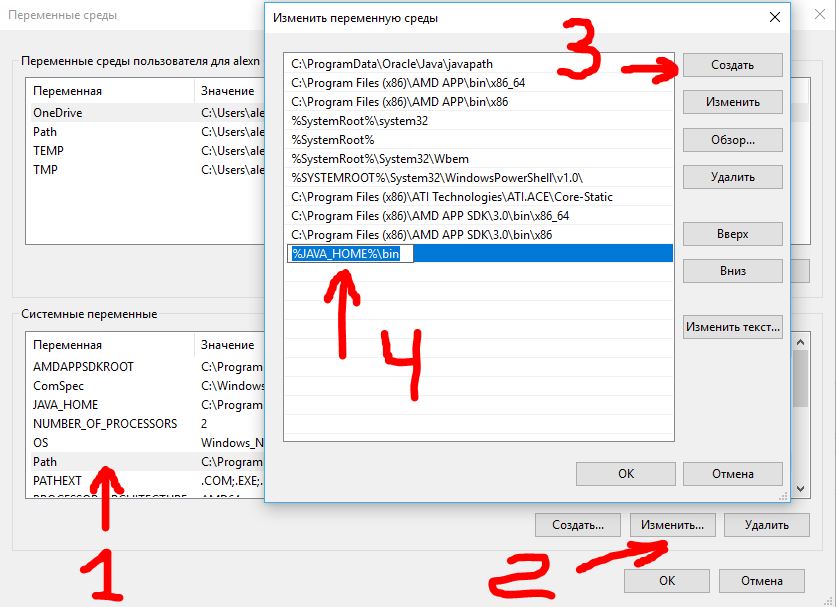
- In System variable window, locate
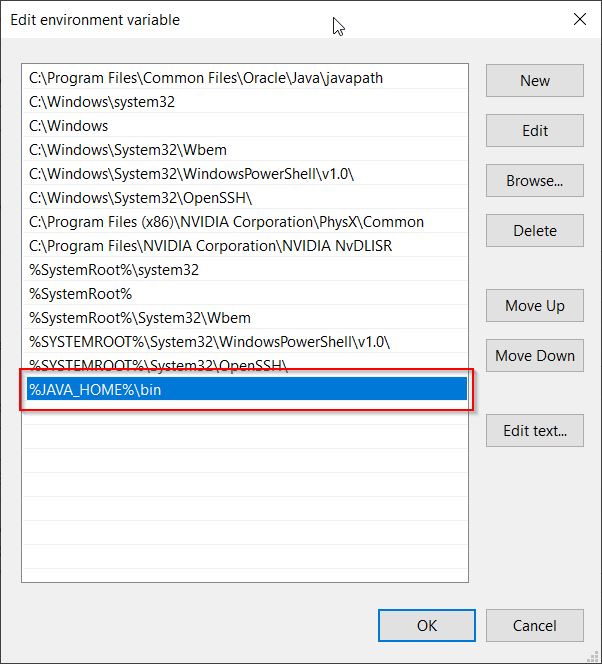
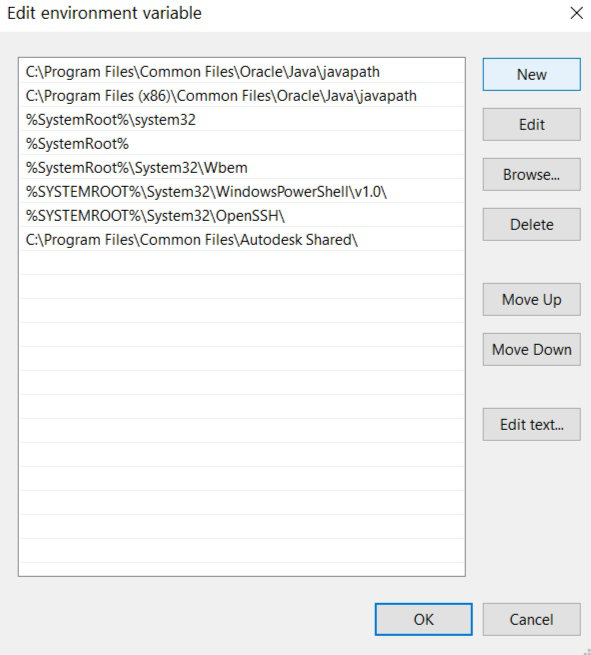
Pathand click onEdit.... - Double click on the empty row and add
%JAVA_HOME%\bin.
Here,%symbol is used to locate JAVA_HOME environemt variable and\binprovides location forjava.exeand h=javac.exe - Close the command prompt and launch again.
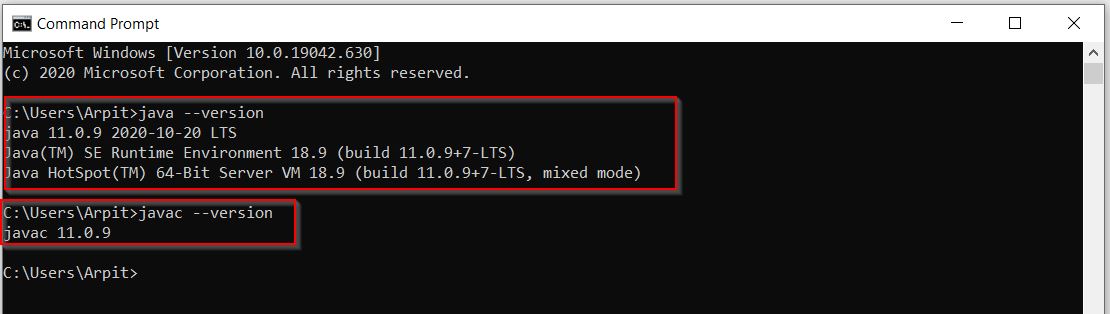
- Check java version as below:
That’s all about How to set java path in windows 10.
I got a new laptop with Windows 10 and I want to set it up so I can use java and javac from the command line.
I have searched online but all the guides are for previous versions, and I don’t want to mess around with something I don’t understand.
![]()
asked Aug 27, 2015 at 5:13
![]()
0
Just set the path variable to JDK bin in environment variables.
Variable Name : PATH
Variable Value : C:\Program Files\Java\jdk1.8.0_31\bin
But the best practice is to set JAVA_HOME and PATH as follow.
Variable Name : JAVA_HOME
Variable Value : C:\Program Files\Java\jdk1.8.0_31

Variable Name : PATH
Variable Value : %JAVA_HOME%\bin
answered Aug 27, 2015 at 5:31
![]()
isurujayisurujay
1,38610 silver badges15 bronze badges
3
Here are the typical steps to set JAVA_HOME on Windows 10.
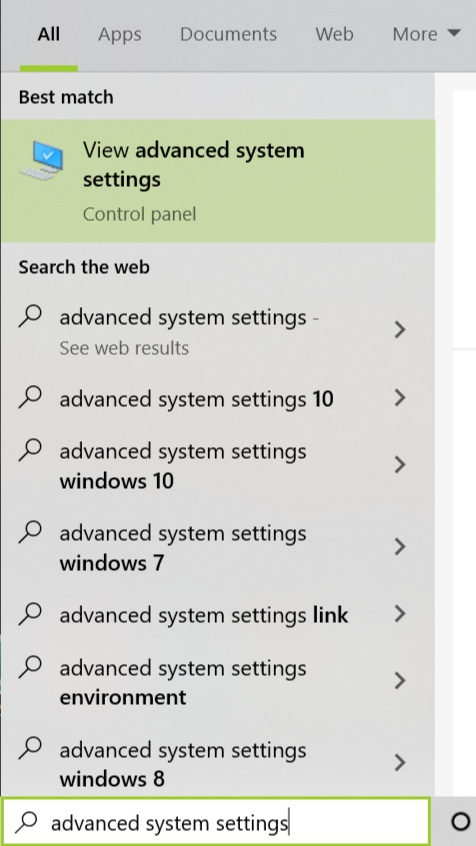
- Search for Advanced System Settings in your windows Search box. Click on Advanced System Settings.
- Click on Environment variables button: Environment Variables popup will open.
- Goto system variables session, and click on New button to create new variable (HOME_PATH), then New System Variables popup will open.
- Give Variable Name: JAVA_HOME, and Variable value : Your Java SDK home path. Ex: C:\Program Files\java\jdk1.8.0_151 Note: It should not include \bin. Then click on OK button.
- Now you are able to see your JAVA_HOME in system variables list. (If you are not able to, try doing it again.)
- Select Path (from system variables list) and click on Edit button, A new pop will opens (Edit Environment Variables). It was introduced in windows 10.
- Click on New button and give %JAVA_HOME%\bin at highlighted field and click Ok button.
You can find complete tutorials on my blog :
How to set JAVA_HOME in 64 bit Windows 10 OS
![]()
answered Dec 20, 2017 at 8:51
![]()
0
- Right click Computer
- Click the properties
- On the left pane select Advanced System Settings
- Select Environment Variables
- Under the System Variables, Select PATH and click edit,
and then click new and add path as C:\Program
Files\Java\jdk1.8.0_131\bin (depending on your installation path)
and finally click ok - Next restart your command prompt and open it and try javac
answered Jun 7, 2017 at 7:40
![]()
Navin prasadNavin prasad
5681 gold badge8 silver badges18 bronze badges
0
To find the env vars dialog in Windows 10:
Right Click Start
>>  Click Control Panel  (Or you may have System in the list)
>>  Click System
>>  Click Advanced system settings
>>  Go to the Advanced Tab
>>  Click the "Environment Variables..." button at the bottom of that dialog page.
answered Mar 24, 2016 at 10:31
![]()
theINtoytheINtoy
3,3982 gold badges37 silver badges60 bronze badges
1
Its still the same concept, you’ll need to setup path variable so that windows is aware of the java executable and u can run it from command prompt conveniently
Details from the java’s own page: https://java.com/en/download/help/path.xml
That article applies to: •Platform(s): Solaris SPARC, Solaris x86, Red Hat Linux, SUSE Linux, Windows 8, Windows 7, Vista, Windows XP, Windows 10
answered Aug 27, 2015 at 5:21
![]()
2
if you have any version problems (javac -version=15.0.1, java -version=1.8.0)
windows search : edit environment variables for your account
then delete these in your windows Environment variable: system variable: Path
C:\Program Files (x86)\Common Files\Oracle\Java\javapath
C:\Program Files\Common Files\Oracle\Java\javapath
then if you’re using java 15
environment variable: system variable : Path
add path C:\Program Files\Java\jdk-15.0.1\bin
is enough
if you’re using java 8
environment variable: system variable : JAVA_HOME
JAVA_HOME = C:\Program Files\Java\jdk1.8.0_271
add path = %JAVA_HOME%\bin
answered Nov 27, 2020 at 8:27
![]()
1
PATH is an environment variable that is used by Operating System to locate the exe files (.exe) or java binaries ( java or javac command). The path once it is set, cannot be overridden. The PATH variable prevents us from having to write out the entire path to a program on the Command Line Interface every time we run it. Moreover, the path is just a variable that stores a bunch of shortcuts.
To execute java console-based programs in windows or Linux environments we have to use java and javac commands. The commands java and javac are not known to the operating system as we don’t specify where the executables reside. Hence, we need to specify the path where the executables are located. This is the reason we set the path and specify the path of the bin folder because the bin contains all binary executable files. After setting the path it can load all necessary items in the program including the compiler or interpreter itself.
Below is the procedure for setting the path for both Windows and Linux:
Setting Java Path in Windows
1. Go to the Search box and type advanced system settings in it. Now click on the View advanced system settings.
2. Select the Advanced tab and then click environment variables.
3. In the system, variables click the New button. Now in the edit system variable, type variable name as JAVA_HOME and variable path as the path where the JDK folder is saved and click on OK button Usually the path of the JDK file will be C:\Program Files\Java\jdk1.8.0_60.
4. Now in the system variables go to the path and click the edit button.
5. Click the New button.
6. Now add the following path: %JAVA_HOME%\bin
Setting Java Path in Linux
- Open the terminal and enter the following command:
sudo nano /etc/environment.
- A file will be opened and add the following command to that file:
JAVA_HOME = "YOUR_PATH".
- Replace YOUR_PATH with the JDK bin file path.
- Now restart your computer or virtual machine that you are using (or) reload the file: source /etc/environment
- You can test the path by executing
echo $JAVA_HOME
- If you get the output without any error, then you’ve set the path correctly.
- If you get any errors, try repeating the procedure again.
Last Updated :
08 Sep, 2022
Like Article
Save Article
Java Development Kit (сокр. JDK) – комплект разработки приложений для работы с языком программирования java. Включает в себя: интерпретатор, облегченный интерпретатор jre, компилятор, отладчик, java библиотеки классов, программу сбора документации, диcассемблер, программу архивации и сжатия jar.
- Загрузка с сайта пакета JDK (Java Development Kit)
- Установка JDK (Java Development Kit)
- Настройка переменных окружения
Как установить Java JDK (Java Development Kit) в Windows 11
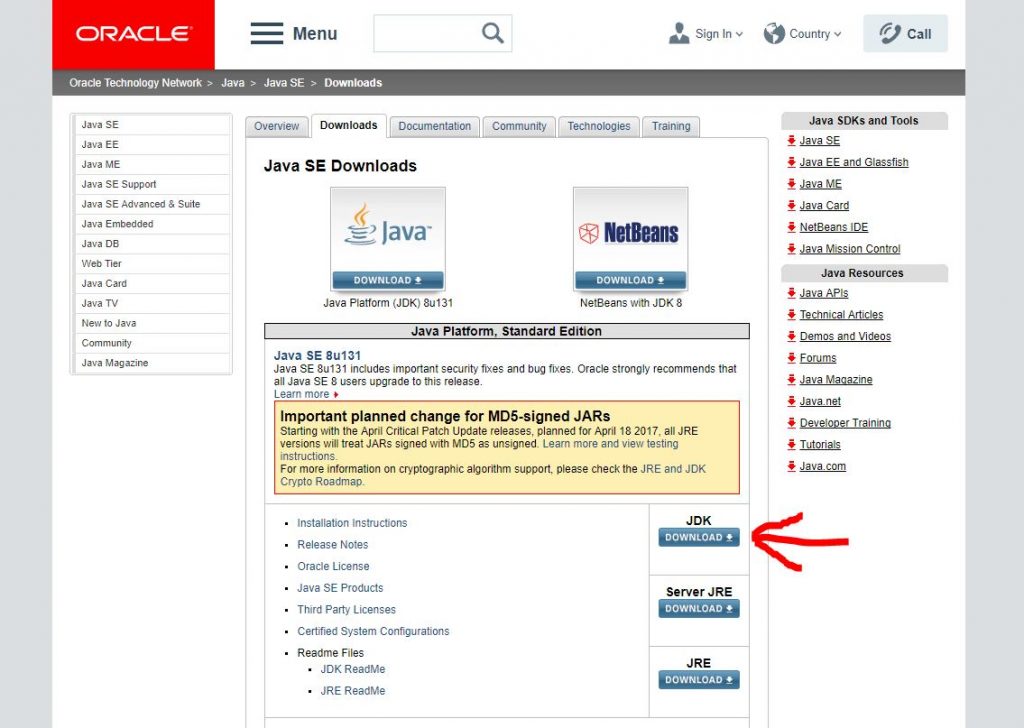
1. Загрузка с сайта пакета JDK (Java Development Kit)
Переходим на сайт Oracle по ссылке и выбираем JDK (Download)
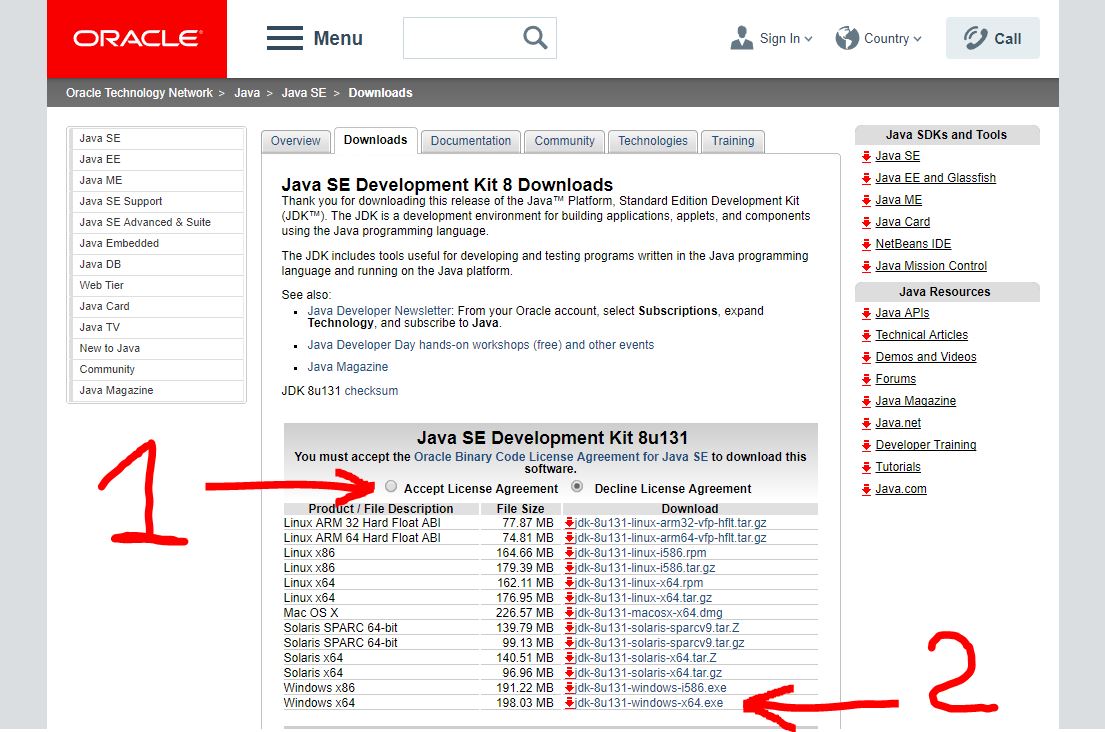
На следующей странице нужно согласится с условиями и загрузить пакет соответствующий нашей ОС. В моём случае это 64-разрядная Windows 10.
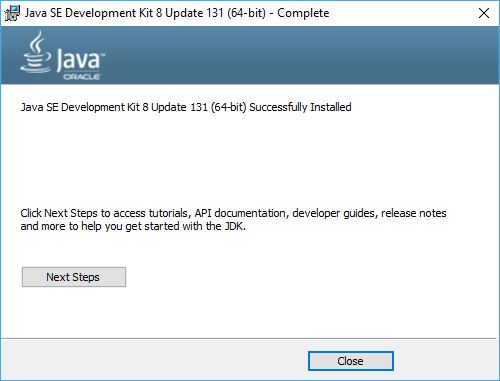
2. Установка JDK (Java Development Kit)
Запускаем установщик с правами администратора и устанавливаем всё по умолчанию, ничего не меняя в процессе.
3. Настройка переменных окружения
Инсталлятор Java не выполняет настройку переменных окружения, поэтому придётся нам это делать вручную после установки.
JAVA_HOME — переменная, указывающая на директорию, в которую установлена Java. Программы её используют чтобы определить, где установлена Java.
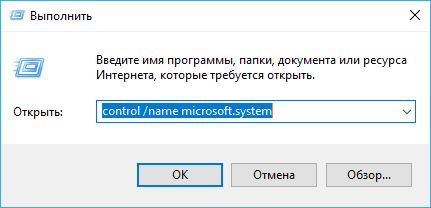
Для этого комбинацией клавиш Win+R открываем окно «Выполнить«. Набираем команду: «control /name microsoft.system« без кавычек.
Затем нужно выбрать «Дополнительные параметры системы» и в открывшемся окне «Свойства системы» нажимаем кнопку «Переменные среды«. Если Вы ничего не меняли при установке JDK, то путь будет таким: «C: \ Program Files \ Java \ jdkНомерВерсии».
Далее необходимо отредактировать значение переменной PATH, добавив туда путь к директории, где находятся исполняемые файлы Java, то есть
%JAVA_HOME%\bin
4. Тест конфигурации
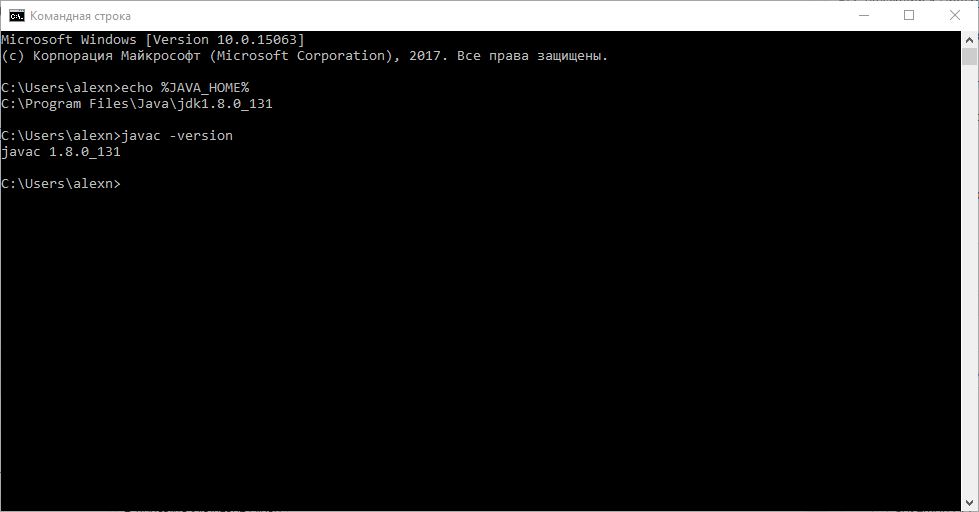
Открываем командную строку и вводим:
echo %JAVA_HOME%
Выводит директорию где установлено Java JDK.
javac -version
Выведет версию java-компилятора, если переменная PATH установлена правильно.
Java is almost a mandatory learning computer programming language by any engineering or diploma student. Learning Java, in fact, is the starting point of becoming a successful Android developer. Java is used in many electronic equipments like ATMs, Blue Ray Drives, Android Phones, Android Smart Wear, Games, Financial Application for Banks, Embedded Systems and others. Students find installing Java is difficult for the first time. It is easy to setup Java Environment in Windows 10 after following this tutorial.
Setup Java Environment in Windows 10 or Install Java Manually
To setup Java Environment in Windows 10 or older Windows operating systems, you need to download Java from Oracle website and Install it in the computer. There are two variations of Java.
- JDK or Java SE ( Java Standard Edition )
- JRE ( Java Runtime Environment )
1. Java SE
Java SE installs both JDK and JRE. JDK is Java Developer Kit. If you are developing Java applications, you need to compile the java programs. Hence JDK is the right option to install in this case.
2. JRE
JRE is useful only to run Java Applications but not for development works. Some websites force users to install JRE in order to display customized information that is displayed only on Java Supported (Or installed) browsers. If you do not develop any java programs or software, just install JRE on your machine.
Setting up Java Environment in Windows is nothing but adding Java Installation Path to Operating System Variables. It is called Setting Up Java Home.
There are two path variables to be set up in a Windows 10 Computer.
- Setup JAVA_HOME or Java Home Directory — To access JDK, JRE Tools
- Setup CLASSPATH or Class Path — To attach or add Libraries and Helper Classes
1. Setting Up Java Home or Java_Home Path
Step 1
Open Control Panel. Go to System & Security. Open System.
or
Right Click on My Computer and goto Properties.
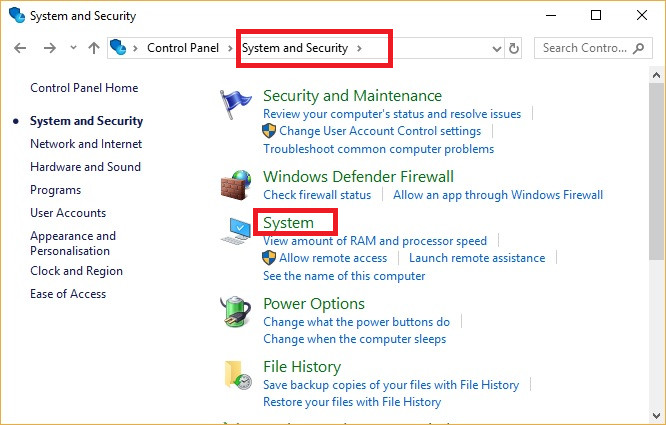
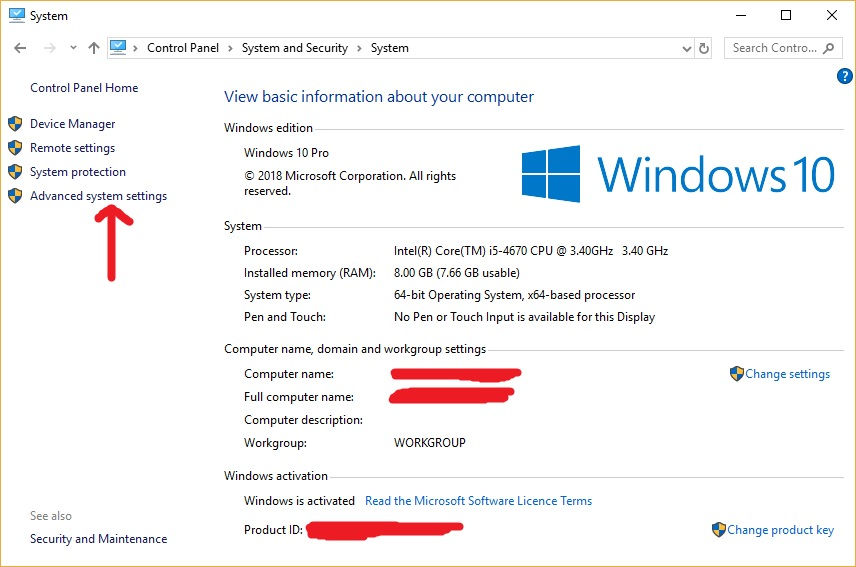
Step 2
Here you can see your computer hardware specifications like RAM, Processor Type and Windows Activation status etc. Go to Advanced System Settings on the left side.
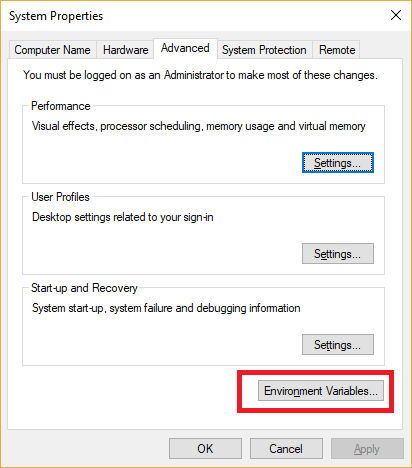
Step 3
Under system properties, go to Advanced Tab. On the bottom, you can find a button with name ‘Environment Variables..‘. Just click.
Step 4
Under Environment Variables, you can see two sections. The top section shows User variables and the bottom section shows System Variables. In either of them, find for Variable name PATH or path. If it is not available click New on any section and add PATH as variable NAME and Value as C:\Program Files\Java\jdk1.8.0_131\bin for example.
If the PATH variable is already existing in any section, simply click Edit and add the Java Installation Path.
If the requirement is to set up java_home as required by any applications like Tomcat, add the Variable name as java_home and the path requested by the application.

2. Setting Up Java Class Path or CLASSPATH in Windows
Java programmers need to know how to set up CLASSPATH on a Windows 10 PC. Class Path or CLASSPATH refers to the path containing Library JAR and ZIP files along with CLASS files. These libraries are predefined or supplied by a third party vendor to enhance the functionality of a Java Application. Software companies develop their own libraries which are packed as JAR files that can be used by different projects.
You should copy the JAR files in a particular location and mention the JAR file path a CLASSPATH while compiling and running java programs.
There are two ways to add or include a CLASSPATH.
- Using the Command Prompt (CMD) to add Class Path dynamically
- Using Environment Variables in Windows Operating System
A. Setting CLASSPATH using Command Prompt or CMD
The advantage of adding Class path in command prompt is that you can include or add different libraries for different projects. This can be achieved using -cp or -classpath options as part of JAVAC and JAVA commands.
C:\myfolder>javac -cp "c:\folder1\files\abc.jar" Hello.java

C:\myfolder>java -classpath "c:\folder1\files\abc.jar" Hello
B. Adding CLASSPATH to Windows Environment Variables
This approach is not recommended as you can not have different libraries for different projects. Libraries required for one java project may not be required for another java project. Including unnecessary libraries consume memory and affects performance. Follow the below steps to add CLASSPATH to Windows Environment Variables.
Step 1: Open Environment Variables screen as shown in the above JAVA_HOME tutorial.
Step2: Check for CLASSPATH variable Under User Variables or System Variables. If CLASSPATH variable is available, add an entry with the path of your Libraries or Class Files.
Step 3: If the CLASSPATH variable is not available, add it manually under User Variables or System Variables and then add an entry or multiple entries with Paths of your libraries or JAR files.
Step 4: Restart Windows once. Now you can access the Java Libraries added in the CLASSPATH in your Hello.java program or any other programs or any projects running on the PC.
CLASSPATH Path Rules for Adding multiple Jar and Class Files
Rule 1: You can mention the full path of a Class file or Jar file for inclusion in Class Path.
Rule 2: You can mention the path up to a directory name to include all Jar files and Class Files in that directory.
Rule 3: Take care of the order of inclusion of files as some libraries depend on other libraries to be loaded first.
Rule 4: On a Windows machine, use Semicolon (;) to separate paths. If you are using Command Prompt, use Colon (:) to separate multiple paths.
How to Check Java is Installed or Not
You can cross check whether you successfully installed Java or not using the command prompt. This check also covers whether Java Environment is setup properly or not.
Step 1: Open CMD or Command Prompt
Step 2: If you can get reply to java command, it means JRE is successfully setup for running java programs.
C:\> java
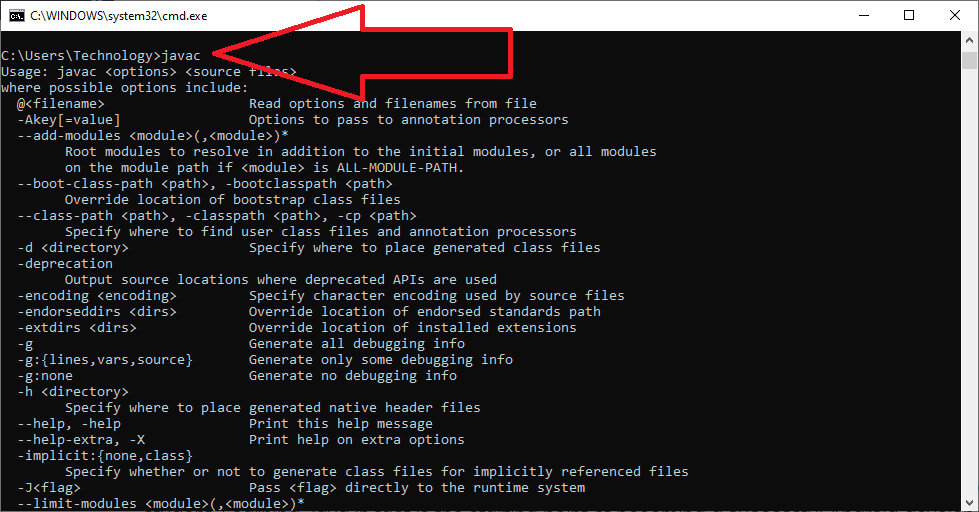
Step 3: If you can get reply to javac command, it means JDK or Java SE is successfully setup for compiling java programs. This check ensures successful setting up of JAVA_HOME path.
C:\> javac
Step 4: You can also check the installed JAVA Version using -version command.
C:\Users>javac -version
javac 10.0.2

C:\Users>java -version
java version "10.0.2" 2018-07-17
Java(TM) SE Runtime Environment 18.3 (build 10.0.2+13)
Java HotSpot(TM) 64-Bit Server VM 18.3 (build 10.0.2+13, mixed mode)
How to solve error javac is not recognized as an internal or external command
Step 1: Check whether you installed Java on the System or not by pinging ‘javac’ in command prompt. You should install Java SE or JDK but not JRE.
Step 2: Set up Java Home Path as explained in the above tutorial. BIN directory path should be either added to User Variables or System Variables under Environmental Variables.
Step 3: Restart CMD or Command Prompt.
Step 4: Restart Windows and ping javac again.
You can also read our good stuff articles / exams.
More Exams