 Привет друзья
  Если у вас на компьютере много файлов, то я вас понимаю, ибо у меня такое было недавно. Короче у меня было очень много всяких файлов, папок, а часть их я упаковал в архив, чтобы сэкономить место на диске. То есть упаковал часть бардака в архив. Но потом конечно я все таки взял и сделал порядок со всем этим, и кстати времени ушло совсем не много
Разработчики Windows сели и начать думать, что делать таким пользователям, у которых очень много всякого на компе есть и они не хотят наводить порядок. Как сделать так, чтобы они могли быстро получить доступ к какому-то файлу, зная его только имя. И вот тут они создали службу Windows Search, которая помогает находить любые файлы за считанные секунды.
Как она работает? Ну, я думаю что описывать тонкости ее работы на программистском языке просто нет смысла, ибо это вряд ли вам будет интересно. Если по простому, то все происходит примерно так. Когда вы за компьютером не работаете или занимаетесь каким-то легкими задачами, то Windows начинает смотреть жесткий диск. В прямом смысле начинает его сканировать. Но не просто.. а очень медленно, потихонечку, чтобы не мешать вам или программам которые работают.
Сканирует она его до тех пор, пока не просканирует полностью. Все результаты, что где лежит, какой файл, все это она записывает в свою специальную базу. Эта база, это такое быстрое место, там все операции выполняются очень быстро. И вот когда вы пытаетесь что-то найти на компьютере, то используется эта база и находится все просто мгновенно. Но косяк службы в том, что она добавляет новые данные в эту базу. И бывает что добавляет часто. Так что это вызывает тормоза, но мной эта инфа не была проверена 
Служба Windows Search работает под управлением процесса SearchIndexer.exe, так что если вы его заметили в диспетчере, то теперь будете знать что это за процесс.
Когда стоит отключать службу Windows Search? В том случае, если у вас на компьютере все файлы и папки упорядочены, в общем порядок со всем. И вы редко когда что-то ищите. Да и вообще, не всем эта служба нравится, все таки я не один раз встречал мнение в интернете, что она замедляет работу жесткого диска, что грузит немного Windows ну и все в этом духе.
Итак, давайте теперь я покажу как ее отключить. Открываем диспетчер задач, идем там на вкладку Службы и нажимаем эту кнопку:

Откроется список служб (сразу рекомендую переключить на стандартны вид, это внизу окна есть опция), в этом списке ищем Windows Search:

Нажимаем два раза по этой службе, откроется такое окно свойств. Так вот, что тут нужно сделать, чтобы службу отключить? Тип запуска выбираем Отключена, а потом нажимаем на кнопку Остановить, чтобы текущая работа службы была прекращена. Вот что и где нужно нажимать:

Все, теперь служба Windows Search уже не работает. Кстати, отключение данной службы также отключит и сервис индексации файлов, ну хотя это наверно одно и тоже. То есть скорее всего используется для этого та же технология.
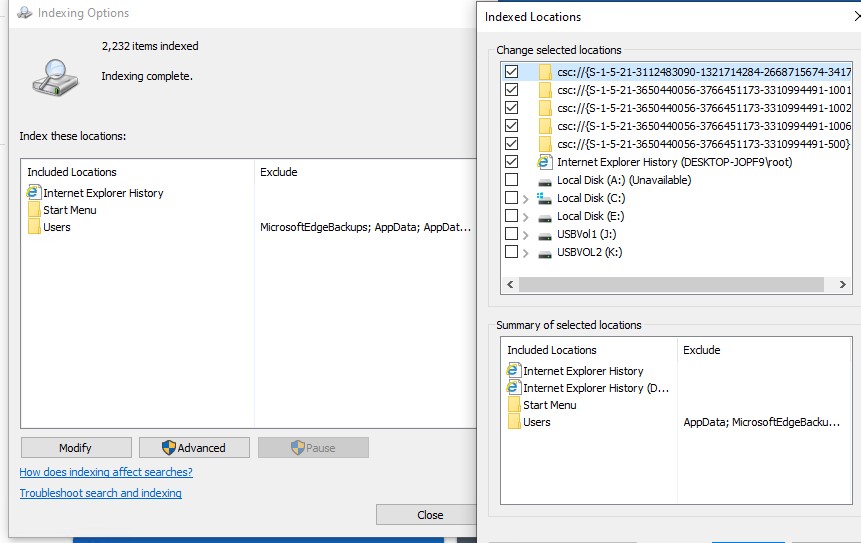
То есть если в панели управления открыть значок Параметры индексации:

То вы увидите, что индексирование файлов не выполняется:

Так что теперь вы знаете и как отключить индексирование файлов в Windows 
Вообще разработчики из Microsoft говорят что в принципе отключать эту службу Windows Search не стоит. Но при этом они согласны с тем, что таки да, могут быть глюки или тормоза, в случае если очень мало оперативной памяти.
Есть еще одна опция по поводу индексирования файлов.
В общем смотрите, заходим в свойства диска вот так:

Теперь тут будет галочка, которую можно снять:

Данную опцию рекомендуют отключать для SSD и оставлять для обычных жестких дисков. Если будете отключать эту функцию, там будет окошко, где нужно выбрать к чему применить это действие. Выбирайте что к диску и ко всем вложенным папкам и файлам:

Потом будет еще такое окошко:

И потом начнется применение атрибутов:

Если будет сообщение что мол там что-то сделать нельзя, и если будет кнопка пропустить все, то нажимаете ее Процесс может быть немного длительным, в это время лучше ничего не делать за компом, ну это просто мой совет.
Ну вот вроде бы все что касается индексирования, то мы отключили.
Хотите мое мнение? На современных Windows и на современном железе все эти штуки отключать не стоит, это уже не те времена, когда что-то глючило. Нет, ну может быть в Windows 7 некоторые глюки и есть, хотя я думаю что они уже исправили многое что в обновлениях. Но вот Windows 10 лично у меня работает четко. Ни одного глюка и все эти технологии включены, и индексирование, и SuperFetch, и все остальное. Я просто их не отключал, поэтому не помню что там еще есть И у меня реально работает все быстро, программы запускаются быстро, браузеры работают очень быстро. И все эти плюшки остаются включенными. Это просто мой опыт, вы сами решайте что отключать а что нет.
Ну все, теперь вы знаете что это за служба Windows Search и как ее отключать. Ну а нужно это делать или нет, я думаю вы сможете решить для себя сами, я инфу для раздумий предоставил. Удачи вам 
На главную!
неизвестные службы
11.03.2016
Служба Windows Search отвечает за поиск файлов и папок на устройстве. Она способна искать данные не только по наименованию файлов, но и по содержанию этих файлов (метаданным, свойствам и т.д.). Например, поиск по содержанию файлов по умолчанию активирован для текстовых и офисных документов (txt, doc, docx, xls, xlsx, pdf).
На компьютере может быть очень много файлов и папок. Чтобы поиск по устройству не занимал много времени, служба Windows Search использует индексацию файлов. Процесс индексирования представляет собой чтение диска с данными и запись информации о просканированных файлах в базу данных. Индексирование осуществляется в фоновом режиме. Когда вы сохраните новый документ в индексированном расположении, служба Windows Search проиндексирует его и сохранит собранную информацию о нём в своей базе.
Индексатор службы Microsoft Windows Search грузит процессор?
Обычно индексатор службы Microsoft Windows Search не грузит процессор. В нашем случае, когда все файлы проиндексированы, нагрузка на центральный процессор составляет 0%, а объём используемой оперативной памяти составляет порядка 80МБ.
Поэтому, если на вашем устройстве индексатор службы Microsoft Windows Search грузит процессор, это означает, что в настоящее время идёт индексирование файлов. Если вы активно пользуетесь устройством, нажимаете на клавиши клавиатуры, водите мышкой, служба Windows Search замедляет скорость сканирования. В нашем случае при сниженной скорости индексирования нагрузка на процессор составляет 0,6-1,2%.
Конечно, нагрузка будет больше, если процессор относительно старый и имеет одно-два логических ядра. Поэтому приведённые значения нагрузки индексатора службы Microsoft Windows Search на процессор следует считать условными.
Как можно уменьшить нагрузку службы Microsoft Windows Search на процессор?
Определяем папки, которые служба поиска должна индексировать
- Найдите и запустите «Параметры индексирования» в классическом варианте Панели управления.
Как открыть классическую Панель управления?
Несколько простых способов в отдельной статье

- В открывшемся окне нажмите кнопку «Изменить».

- Отметьте галочками папки или диски, которые вы хотите индексировать в фоновом режиме. Оставьте пустым квадрат, чтобы не индексировать папку или диск. После выбора индексируемых расположений нажмите кнопку «ОК».

Уменьшив количество папок и дисков в окне «Индексируемые расположения», вы сможете сократить нагрузку индексатора службы Microsoft Windows Search на процессор. Но имейте в виду, что поиск в исключенных расположениях будет долгим. А в случае использования кнопки поиска в панели задач поиск в неиндексированных расположениях осуществляться не будет. Поэтому не старайтесь исключать все папки. Оставьте папки, в которых вы часто используете функцию поиска.
Устанавливаем классический режим поиска
В Windows 10 предусмотрено 2 режима поиска: классический и расширенный. При классическом режиме поиск осуществляется только в библиотеках пользователя и на рабочем столе. Расширенный режим позволяет искать файлы по всему компьютеру, за исключением системных папок. Расширенный режим, как предупреждает операционная система, может снизить уровень заряда и увеличить нагрузку на центральный процессор. Особенно это актуально для владельцев ноутбуков, которым важно, чтобы их устройство проработало в автономном режиме как можно дольше.
- Перейдите в новые «Параметры Windows» (нажмите на клавиатуре кнопку с логотипом Windows + I ).
- Нажмите на раздел «Поиск».

- В левом боковом меню нажмите на «Поиск в Windows».
- Прокрутите список настроек и выберите параметр «Классический стиль».

Активируем привязку производительности индексатора к параметрам питания устройства
Изменять режим производительности индексатора стало возможным с момента появления Windows 10 версии 2004 (майское обновление 2020 года). Если включить параметр «Использовать параметры режима питания устройства», служба Windows Search будет оценивать, запущен ли на компьютере режим энергосбережения, пониженного электропотребления или игровой процесс. Если да, то служба поиска приостановит индексацию в фоновом режиме.
Также при включении производительности индексатора служба поиска приостановит индексацию файлов в фоновом режиме, если загрузка центрального процессора превысит 80% или загрузка жесткого диска поднимется свыше 70%.
- Перейдите в новые «Параметры Windows» (нажмите на клавиатуре кнопку с логотипом Windows + I ).
- Нажмите на раздел «Поиск».
- В левом боковом меню нажмите на «Поиск в Windows».
- Прокрутите список настроек и включите параметр «Использовать параметры режима питания устройства».

Отключаем службу Windows Search
Отключая службу Windows Search, вы отключите индексирование папок и файлов в фоновом режиме.
Вы сможете осуществлять поиск по устройству, но он будет медленным.
- Запустите приложение «Выполнить» (нажмите на клавиатуре кнопку с логотипом Windows + R ).
- Наберите текст
services.mscи нажмите кнопку «ОК».

- В открывшемся окне найдите службу Windows Search.

- Дважды нажмите на строку службы «Windows Search». Откроется окно с настройками.
- Выберите тип запуска «Отключена».
- Нажмите кнопку «Остановить», чтобы завершить активный процесс выполнения службы Windows Search.
- Нажмите кнопку «ОК», чтобы сохранить настройки службы.

А как у вас работает служба поиска в Windows? Испытываете ли вы проблемы при ее работе в фоновом режиме?
Расскажите о своем опыте в комментариях 😉

The search pane in Windows 11 showing suggested/recent files on the left and Bing search on the right. |
|
| Developer(s) | Microsoft |
|---|---|
| Initial release | January 30, 2007; 16 years ago |
| Operating system | Microsoft Windows |
| Predecessor | Indexing Service, Windows Desktop Search |
| Service name | Windows Search (WSearch) |
| Type | Desktop search |
| Website | https://support.microsoft.com/en-us/help/17190/windows-10-search-for-anything |
Windows Search (also known as Instant Search) is a content index desktop search platform by Microsoft introduced in Windows Vista as a replacement for both the previous Indexing Service of Windows 2000 and the optional MSN Desktop Search for Windows XP and Windows Server 2003, designed to facilitate local and remote queries for files and non-file items in compatible applications including Windows Explorer. It was developed after the postponement of WinFS and introduced to Windows constituents originally touted as benefits of that platform.
Windows Search creates a locally managed Index of files — documents, emails, folders, programs, photos, tracks, and videos — and file contents, as well as of non-file items including those of Microsoft Outlook for which users can perform incremental searches based on details such as authors, contents, dates, file names, file types, people, and sizes; the Index stores actual prose from inside documents and metadata properties from other content. Control Panel and Settings can also be searched.
Windows Search was introduced in Windows Vista as a replacement for the previous Indexing Service to facilitate data discovery and management, promote greater rapidity of search results, and to unify desktop search platforms across Microsoft Windows; it was also available as an optional download for Windows XP. There have been several updates to its functionality since its introduction, and it is also included in Windows 7, Windows 8, Windows 8.1, Windows 10, and Windows 11.
History[edit]
Windows Search is the successor of the Indexing Service, a remnant of the Object File System feature of the Cairo project which never materialized. Microsoft began development of Windows Search after the postponement of WinFS; it introduces features originally touted as benefits of that platform, such as content indexing, incremental searching, and property stacking.
Overview[edit]
Windows Search creates a locally stored index of files and non-file items stored on a computer.
The time required for the initial creation of this index depends on the amount and type of data to be indexed, and can take up to several hours, but this is a one-time event.[1] Once a file’s contents have been added to this index, Windows Search is able to use the index to search results more rapidly than it would take to search through all the files on the computer. Searches are performed not only on file names, but also on the contents of the file (provided a proper handler for the file type is installed such as a PDF reader) as well as the keywords, comments and all other forms of metadata that Windows Search recognizes. For instance, searching the computer for «The Beatles» returns a list of music files on the computer which have «The Beatles» in their song titles, artists or album names, as well as any e-mails and documents that include the phrase «The Beatles» in their titles or contents.
Windows Search features incremental search (also known as «search as you type»). It begins searching as soon as characters are entered in the search box, and keeps on refining and filtering the search results as more characters are typed in. This results in finding the required files even before the full search text is entered.
Windows Search supports IFilters, components that enable search programs to scan files for their contents and metadata. Once an appropriate IFilter has been installed for a particular file format, the IFilter is used to extract the text from files which were saved in that format.[2]
By default, Windows Search includes IFilters for common filetypes, including Word documents, Excel spreadsheets, PowerPoint presentations, HTML files, text files, MP3 and WMA music files, WMV, ASF and AVI video files and JPEG, BMP and PNG images.[3]
Windows Search uses property handlers to handle metadata from file formats. A property handler needs a property description and a schema for the property for Windows Search to index the metadata.[4] Protocol handlers are used for indexing specific data stores. For example, files are accessed using File System Protocol Handler, Microsoft Office Outlook data stores using the Outlook Protocol Handler and Internet Explorer cache using the IE History/Cache Protocol Handler.[5]
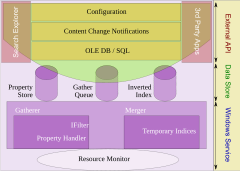
Architecture[edit]
Windows Search is implemented as a Windows Service. The search service implements the Windows Search configuration and query APIs and also controls, as well as all indexing and query components. The most important component of Windows Search is the Indexer, which crawls the file system on initial setup, and then listens for file system notifications to pick up changed files in order to create and maintain the index of data. It achieves this using three processes:[6]
- SearchIndexer.exe, which hosts the indexes and the list of URIs that require indexing, as well as exposes the external configuration and query APIs that other applications use to leverage the Windows Search features.
- SearchProtocolHost.exe, which hosts the protocol handlers. It runs with the least permission required for the protocol handler. For example, when accessing filesystem, it runs with the credentials of the system account, but on accessing network shares, it runs with the credentials of the user.
- SearchFilterHost.exe, which hosts the IFilters and property handlers to extract metadata and textual content. It is a low integrity process, which means that it does not have any permission to change the system settings, so even if it encounters files with malicious content, and by any chance if they manage to take over the process, they will not be able to change any system settings.
The search service consists of several components, including the Gatherer, the Merger,[7] the Backoff Controller, and the Query Processor, among others. The Gatherer retrieves the list of URIs that need to be crawled and invokes proper protocol handler to access the store that hosts the URI, and then the proper property-handler (to extract metadata) and IFilter to extract the document text. Different indices are created during different runs; it is the job of the Merger to periodically merge the indices.[7] While indexing, the indices are generally maintained in-memory and then flushed to disk after a merge to reduce disk I/O. The metadata is stored in property store, which is a database maintained by the ESE database engine.[7] The text is tokenized and the tokens are stored in a custom database built using Inverted Indices.[7] Apart from the indices and property store, another persistent data structure is maintained: the Gather Queue.[7] The Gather Queue maintains a prioritized queue of URIs that needs indexing. The Backoff Controller mentioned above monitors the available system resources, and controls the rate at which the indexer runs. It has three states:[7]
- Running: In this state, the indexer runs without any restrictions. The indexer runs in this state only when there is no contention for resources.
- Throttled: In this state, the crawling of URIs and extraction of text and metadata is deliberately throttled, so that the number of operations per minute is kept under tight control. The indexer is in this state when there is contention for resources, for example, when other applications are running. By throttling the operations, it is ensured that the other operations are not starved of resources they might need.
- Backed off: In this state, no indexing is done. Only the Gather Queues are kept active so that items do not go unindexed. This state is activated on extreme resource shortage (less than 5 MB of RAM or 200 MB of disk space), or if indexing is configured to be disabled when the computer is on battery power, or if the indexer is manually paused by the user.
Advanced Query Syntax[edit]
Windows Search queries are specified in Advanced Query Syntax (AQS) which supports not only simple text searches but provides advanced property-based query operations as well.[8] AQS defines certain keywords which can be used to refine the search query, such as specifying boolean operations on searched terms (AND, OR, NOT) as well as to specify further filters based on file metadata or file type. It can also be used to limit results from specific information stores like regular files, offline files cache, or email stores. File type specific operators are available as well.[9] Windows Desktop Search also supports wildcard prefix matching searches.[10] It also includes several SQL-like operators like GROUP BY. AQS is locale dependent and uses different keywords in international versions of Windows 7.
Programmability[edit]
Users can access the Windows Search index programmatically using managed as well as native code.[11] Native code connects to the index catalog by using a Data Source Object retrieved from the Indexing Service OLE DB provider. Managed code use the MSIDXS ADO.NET provider. One can query a catalog on a remote machine by specifying a UNC path. Programmers specify the criteria for searches using SQL-like syntax. The SQL query can either be created by hand, or by using an implementation of the ISearchQueryHelper interface. Windows Search provides implementations of the interface to convert an AQS or NQS queries to their SQL counterpart.[12][13]
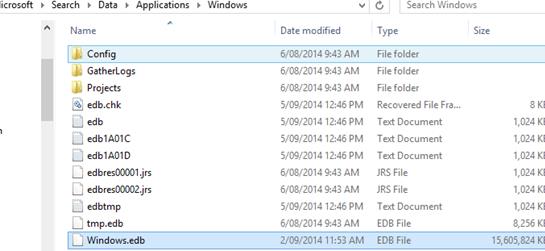
The OLE DB/SQL API implements the functionality for searching and querying across the indices and property stores. It uses a variant of SQL in which to represent the query (regular SQL with certain restrictions) and returns results as OLE DB Rowsets.[7] Whenever a query executes, the parts of the index it used are temporarily cached so that further searches filtering the result set need not access the disk again, in order to improve performance. Windows Search stores its index in an Extensible Storage Engine file named Windows.edb that exists, by default, in the \ProgramData\Microsoft\Search\Data\Applications\Windows\ folder at the root of the system drive in Windows Vista or in later versions of Windows. (The corresponding location in Windows XP is \All Users\Application Data\Microsoft\Search\Data\Applications\Windows\ inside the Documents and Settings folder.)
The index store, called SystemIndex, contains all retrievable Windows IPropertyStore values for indexed items.
Within the SystemIndex folder lurk SystemIndex.*.Crwl and SystemIndex.*.gthr files.[14]
The names and locations of documents in the system are exposed as a table with the column names System. ItemName and System. ItemURL respectively.[15] A SQL query can directly reference these tables and index catalogues and use the MSIDXS provider to run queries against them. The search index can also be used via OLE DB, using the CollatorDSO provider.[16] However, the OLE DB provider is read-only, supporting only SELECT and GROUP ON SQL statements.
Windows Search also registers a search-ms application protocol, which can be used to represent searches as URIs.[17] The search parameters and filters are encoded in the URI using AQS or its natural language counterpart, NQS. When Explorer invokes the URI, Windows Search (which is the default registered handler for the protocol) launches the Search Explorer with the results of the search. In Windows Vista SP1 or later, third-party handlers can also register themselves as the application protocol handler, so that searches can be performed using any search engine which the user has set as default, and not just Windows Search.
The Windows Search service provides the Notifications API component to allow applications to «push» changed items that need indexing to the Windows Search indexer.[7] Applications use the component to supply the URIs of the items that need to be indexed, and the URIs are written to the Gather Queue, where they are read off by the indexer. Microsoft Outlook and Microsoft OneNote use this ability to index the items managed by them and use Windows Search queries to provide the in-application searching features. The internal USN Journal Notifier component of Windows Search also uses the Notifications API, monitoring the Change Journal in an NTFS volume to keep track of files that have changed on the volume.[18] If the file is in a location indexed by Windows Search and does not have the FANCI (File Attribute Not Content Indexed) attribute set,[7] the Windows Search service is notified of its path via the Notification API.
Windows Search Configuration APIs are used to specify the configuration settings, such as the root of the URIs that needs to be monitored, setting the frequency of crawling or viewing status information like number of items indexed or length of the gather queue or the reason for throttling the indexer.[7][19]
It[clarification needed] also exposes APIs to register protocol handlers (via the ISearchProtocol() interface, property handlers (via the IPropertyStore() interface) or IFilter implementations (via the IFilter() interface). IFilter implementations allow only read-only extraction of text and properties, whereas IPropertyStore allows writing properties as well.[7]
Windows Desktop Search[edit]

Windows Desktop Search running in Windows XP, with preview pane showing thumbnails of search results. |
|
| Developer(s) | Microsoft |
|---|---|
| Stable release |
4.0 |
| Written in | C++[20] |
| Operating system | Windows 2000 Windows XP Windows Server 2003 |
| Type | Desktop search |
| License | Freeware |
| Website | www |
Windows Desktop Search, a standalone add-on made available as freeware, is the implementation of Windows Search for Windows 2000, Windows XP and Windows Server 2003.
Windows Desktop Search and Windows Search share a common architecture and indexing technology and use a compatible application programming interface (API).
Searches are specified using the Advanced Query Syntax and are executed while the user types (incremental find). By default, it comes with a number of IFilters for the most common file types—documents, audio, video as well as protocol handlers for Microsoft Outlook e-mails. Other protocol handlers and IFilters can be installed as needed.
Windows Desktop Search allows network shares to be added to the index.[21][22]
User interface[edit]
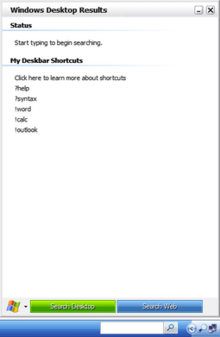
The Windows Desktop Search functionality is exposed via a Windows Taskbar mounted deskbar, accessible via a ⊞ Win+⇧ Shift+F keyboard shortcut. It provides a text field to type the query and the results are presented in a flyout pane. It also integrates as a Windows Explorer window. On selecting a file in the Explorer window, a preview of the file is shown in the right hand side of the window, without opening the application which created the file. Web searches can be initiated from both interfaces, but that will open the browser to search the terms using the default search engine.
The deskbar also has the capability to create application aliases, which are short strings which can be set to open different applications. This functionality is accessed by prefixing the ! character to the predefined string. For example, «!calc» opens the Windows Calculator. The help documentation includes syntax for creating application aliases out of any text string, regardless of prefix. This feature can also be used to create shortcut for URLs, which when entered, will open the specified URL in browser. It can also be used to send parametrized information over the URL, which are used to create search aliases. For example, «w text» can be configured to search «text» in Wikipedia.
Releases[edit]
Windows Desktop Search was initially released as MSN Desktop Search, as a part of the MSN Toolbar suite. It was re-introduced as Windows Desktop Search with version 2, while still being distributed with MSN Toolbar Suite.
For Windows 2000, Windows XP and Windows Server 2003, it came in two flavors, one for home users and the other for enterprise use. The only difference between the two was that the latter could be configured via group policy. The home edition was bundled with MSN Toolbar, while the other was available as a standalone application. Later, when MSN Toolbar was discontinued in favor of Windows Live Toolbar, the home edition of Windows Desktop Search was discontinued as well. The last version available for Windows 2000 is Windows Desktop Search 2.66.
For Windows XP and Windows Server 2003, version 3.0 of Windows Desktop Search was provided as a standalone release – separate from Windows Live Toolbar. One of the significant new features is Windows Desktop Search 3.0 also installs the Property System on Windows XP introduced in Windows Vista.[23] Windows Desktop Search 3.0 is geared for pre-Windows Vista users, hence the indexer was implemented as a Windows Service, rather than as a per-user application, so that the same index as well as a single instance of the service can be shared across all users – thereby improving performance. Windows Desktop Search found itself in the midst of a controversy on October 25, 2007, when Windows Desktop Search 3.01 was automatically pushed out and installed on Windows when updated via Windows Server Update Services (WSUS). Microsoft responded with two posts on the WSUS Product Team Blog.[24][25]
Windows Vista[edit]
Windows Vista and Windows Server 2008 introduced Instant Search in the Start menu and in Windows Explorer.
It offers a superset of the features provided by Windows Desktop Search (WDS), while being API compatible with it. Unlike WDS, it can seamlessly search indexed as well as non-indexed locations – for indexed locations the index is used and for non-indexed locations, the property handlers and IFilters are invoked on the fly as the search is being performed. This allows for more consistent results, though at the cost of searching speed over non-indexed locations. Windows Search uses Group Policy for centralized management.[26] Windows Search also supports queries against a remote index.
Windows Search indexes offline caches of network shares, in addition to the local file systems. This means if the file server, on which a network file share is hosted, is running either Windows Vista or a later version of Windows or Windows Search 4.0 on Windows XP, any searches against the share will be queried against the server’s index and present the results to the client system, filtering out the files the user does not have access to. This procedure is transparent to the user.
Microsoft Outlook e-mail stores starting with Outlook 2007, though Outlook 2002 and Outlook 2003 and Microsoft OneNote stores are also indexed if installed alongside Windows Search.[27]
Unlike Windows Desktop Search on Windows XP, the Windows Search indexer performs the I/O operations with low priority, the process also runs with low CPU priority. As a result, whenever other processes require the I/O bandwidth or processor time, it is able to pre-empt the indexer, thereby significantly reducing the performance hit associated with the indexer running in the background.
Windows Search supports natural language searches; so the user can search for things like «photo taken last week» or «email sent from Dave». However, this is disabled by default.[28] Natural language search expresses the queries in Natural Query Syntax (NQS), which is the natural language equivalent of AQS.
User interface[edit]

The search functionality is exposed using the search bars in the Start menu and the upper right hand corner of Windows Explorer windows, as well as Open/Save dialog boxes. When searching from the Start menu, the results are shown in the Start menu itself, overlapping the recently used programs. From the Start menu, it is also possible to launch an application by searching for its executable image name or display name. Searching from the search bars in Explorer windows replaces the content of the current folder with the search results. The Explorer windows can also render thumbnails in the search results if a Thumbnail Handler is registered for a particular file type. It can also render enhanced previews of items in a Preview Pane without launching the default application, if the application has registered a Preview Handler. This can provide functionality such as file type-specific navigation (such a browsing a presentation using next/previous controls, or seeking inside a media file).[29] Preview handlers can also allow certain kind of selections (such as highlighting a text snippet) to be performed from the preview pane itself. In the Control Panel, the search bar in the window can also search for Control Panel options. However, unlike WDS, Windows Search does not support creating aliases.
There is also a Search Explorer, which is an integrated Windows Explorer window that is used for searches. It presents the user interface to specify the search parameters, including locations and file types that should be searched, and certain operators, without crafting the AQS queries by hand. With Windows Vista SP1, third-party applications will be able to override the Search Explorer as the default search interface so that the registered third-party application will be launched, instead of bringing up the Search Explorer, when invoked by any means.[30]
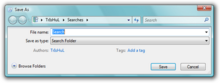
It is also possible to save a search query as a Virtual Folder, called a Saved Search or Search Folder which, when accessed, runs the search with the saved query and returns the results as a folder listing. Physically, a search folder is just an XML file (with a .search-ms extension) which stores the search query (in either AQS or NQS), including the search operators as well. Windows Vista also supports query composition, where a saved search (called a scope) can be nested within the query string of another search.[31][32] Search Folders are also distributable via RSS. By default, Windows references the profile of the user who originally created a Search Folder as part of the query’s scope.[33] This design choice does not prevent saved searches from being shared with other users, but it prevents them from operating on different user profiles. While users can manually modify the contents of a saved search so that the scope references the %USERPROFILE% environment variable, which will enable it to operate on other machines or profiles regardless of the original author, Microsoft has released a SearchMelt Creator utility that automates this process for the user.[33]
Windows Search 4.0[edit]
Windows Search 4.0 (also previously referred to as Windows Live Search, codenamed Casino or OneView) is the successor to the Windows Search platform for both Windows Desktop Search 3.0 on Windows XP as well as Instant Search on Windows Vista. It is mainly an update to the indexing components, with few changes to the Windows XP user interface and none on Windows Vista. It added remote query support to Windows XP and Windows Server 2003 based systems, which used to be a Vista-only feature. This allows a user with a Vista client (or an XP client with Windows Search 4.0) to search the index of networked machines which are also running a supported operating system.

Windows Search 4.0 was originally proposed by Microsoft’s Windows Live division as an application that would unify local and remote indexed search[34] in a new interface. Early screenshots of the program featured the new «flair» interface design seen in other Windows Live client applications of the time such as Windows Live Messenger and Windows Live Mail.
Windows Live Search Center could search web services which used the OpenSearch specification to make search results available as web feeds.[35] It could aggregate searches from various indexes including the Windows Desktop Search index, Windows RSS Platform common feed store, and Microsoft Exchange and Microsoft SharePoint indexes, among others.[36]
The first beta of Windows Search 4.0 was released on March 27, 2008.[37] It included numerous performance improvements to the indexer and brought new features, including previously Vista-exclusive ones, to XP, including Group Policy integration, federation of searches to remote indexes, support for EFS-encrypted files and Vista-style preview handlers that allow document-type specific browsing of documents in the preview pane.[38][39]
Windows Search 4.0 was released on June 3, 2008, and is supported on XP, Windows Server 2003, Vista, Windows Server 2008 and Windows Home Server.[39][40]
Windows 10[edit]

In Windows 10, Windows Search was added to the taskbar in place of the Start menu in earlier versions of Windows.
A new landing page was added showing users their top apps and recent activities on their computer.[41][42]
The landing page also provides quick searches provided from Bing for the weather, top news stories, today in history and new movies.
The landing page also serves as a space that Microsoft can advertise in, such as with the new Chromium-based version of Microsoft Edge.
A preview pane from within the Search UI was added that supports apps and documents. When searching for a program, the taskbar jumplists for each program are shown in the preview pane and when searching for documents, file metadata such as file location, date last modified and the document author was also added.
The landing page allows the user to filter searches depending on whether the user looking for documents, pictures or settings.
Spell-correction was also added to Windows Search when searching for Apps & Settings to ensure a wider range of results were shown.
The search box in File Explorer now opens as soon as you click in the box and provides a dropdown of recent searches. Microsoft OneDrive content is also now integrated in addition to the indexed results.[43] When clicking on the search result, the file will open immediately. Each search result also has a right click menu allowing the user to open the file’s location.
Privacy Concerns[edit]
The Windows Search index is built locally on the PC and no information is sent to Microsoft.[44]
See also[edit]
- Enterprise search
- List of desktop search engines
- Microsoft Outlook
- Microsoft Search Server
References[edit]
- ^ «Technical FAQ: How long does it take for Windows Search to finish indexing a computer?». Microsoft Corporation. Archived from the original on 24 September 2011. Retrieved 28 May 2014.
- ^ «IFilter Interface». MSDN. Microsoft Corporation. Retrieved 2012-01-02.
- ^ «List of searchable file types». Microsoft. Archived from the original on September 26, 2011.
- ^ «Developing Property Handlers for Windows Search». MSDN. Microsoft Corporation. 2011-09-07. Retrieved 2012-01-02.
- ^ Paddock, Brandon (2007-06-20). «FAQ: How does indexing work? What are IFilters and Protocol Handlers?». BrandonLive.com. Retrieved 2007-06-23.
- ^ Brandon Paddock (21 June 2007). «FAQ: Why does WDS / Windows Vista use so many processes?». Retrieved 2007-06-23.
- ^ a b c d e f g h i j k «Good Citizenship When Developing Background Services That Run on Windows Vista». Microsoft. Retrieved 2007-07-14.
- ^ «Advanced Query Syntax». MSDN TechNet. Retrieved 2007-06-23.
- ^ Nick White. «Advanced search techniques». Archived from the original on 2007-06-13. Retrieved 2007-06-23.
- ^ «Seek and Ye Shall Find». Microsoft. Archived from the original on 2007-07-09. Retrieved 2007-07-05.
- ^ «Searching data». 2 November 2006. Retrieved 2007-03-17.
- ^ «Development Platform Overview». MSDN. Retrieved 2007-10-12.
- ^ «Querying the Index programmatically». MSDN. Retrieved 2007-10-12.
- ^
Tulloch, Mitch; Northrup, Tony; Honeycutt, Jerry; Wilson, Ed (2009). Windows 7 Resource Kit. Resource Kit. Pearson Education. ISBN 9780735642775. Retrieved 2014-09-08.The SystemIndex subfolder contains a number of SystemIndex.*.Crwl and SystemIndex.*.gthr files.
- ^ Catherine Heller (2006-11-10). «Windows Vista Search: Syntax Update».
- ^ «Querying the Index Programmatically». MSDN. Retrieved 2007-06-23.
- ^ «Using the search-ms Protocol». Retrieved 2007-09-24.
- ^ «Change Journals (Windows)». Retrieved 2007-07-14.
- ^
«Managing the Index». MSDN. Retrieved 2007-10-12. - ^
- ^ «Windows Desktop Search: Add-in for Files on Microsoft Networks». Microsoft Download Center. Microsoft Corporation. 2008-06-30. Retrieved 2007-07-14.
- ^ «Availability of the Windows Desktop Search add-in for Files on Microsoft Networks (Revision: 5.0)». Microsoft Support. Microsoft Corporation. 2008-12-10. Retrieved 2012-01-02.
- ^ «Windows Search as a Development Platform». 20 June 2022.
- ^ «WDS revision update, expanded applicability rules, auto-approve revisions». Retrieved 2010-02-01.
- ^ «WDS update revision follow – up». Retrieved 2010-02-01.
- ^ «Windows Search». Retrieved 2019-11-04.
- ^ Posey, Brian (April 21, 2009). «How Windows Desktop Search works in Microsoft Outlook 2007». SearchExchange. TechTarget. Archived from the original on September 27, 2010. Retrieved January 3, 2017.
- ^ «Natural Language Search in Windows Vista». Retrieved 2007-06-22.
- ^ «Windows Search 3.x». MSDN. Retrieved 2007-10-12.
- ^ «Overview of the Windows Vista desktop search changes in Windows Vista Service Pack 1». Retrieved 2007-07-14.
- ^ Bentz, Ben (October 31, 2006). «Query Composition: Building a search upon another search». Shell: Revealed Blog. Microsoft. Archived from the original on December 15, 2006. Retrieved October 20, 2015.
- ^ Shultz, Greg (December 11, 2007). «Narrow a saved search with Vista’s Query Composition feature». TechRepublic. CBS Interactive. Archived from the original on March 11, 2017. Retrieved November 11, 2015.
- ^ a b White, Nick (May 14, 2007). «Searcing, part III: Do you know what a SearchMelt is?». Windows Vista Team Blog. Microsoft. Archived from the original on May 16, 2007. Retrieved October 20, 2015.
- ^ Brandon Paddock. «The fate of codename «Casino»«. Archived from the original on 2008-10-21. Retrieved 2007-06-14.
- ^ Brandon Paddock. «Open Search». Retrieved 2007-06-14.[permanent dead link]
- ^ Brandon Paddock. «Where is YOUR stuff?». Retrieved 2007-06-14.[permanent dead link]
- ^ Mary Jo Foley. «Microsoft releases first public test build of Windows Search 4.0». Archived from the original on 2008-03-30. Retrieved 2008-03-28.
- ^ Brandon Paddock (28 March 2008). «Windows Search 4.0 Preview Release». Retrieved 2008-03-28.
- ^ a b «Description of Windows Search 4.0 and Multilingual User Interface Pack for Windows Search 4.0». Microsoft. Retrieved 2008-06-06.
- ^ LeBlanc, Brandon (3 June 2008). «Windows Search 4.0 Released to Web». Windows Experience Blog. Microsoft Corporation. Retrieved 6 January 2012.
- ^ «What’s new in Windows 10 version 1903». Archived from the original on 2020-05-22. Retrieved 2020-05-08.
- ^ «What’s new in Windows 10 version 20H1». Archived from the original on 2020-05-16. Retrieved 2020-05-08.
- ^ «What’s new in Windows 10 version 1909». Archived from the original on 2020-05-10. Retrieved 2020-05-08.
- ^ «Search indexing in Windows 10: FAQ». support.microsoft.com. Retrieved 2020-05-08.
Further reading[edit]
- Protalinski, Emil (27 March 2010). «Mastering Windows Search using Advanced Query Syntax». Ars Technica. Condé Nast Digital. Retrieved 1 February 2011.
- «Description of Windows Search 4.0 and the Multilingual User Interface Pack for Windows Search 4.0 (Revision: 8.2)». Microsoft Support. Microsoft Corporation. 13 August 2008. Retrieved 1 February 2011.
- «Windows Desktop Search: Feature comparison by version». Microsoft.com. Microsoft Corporation. Retrieved 1 February 2011.
External links[edit]
- iFilter.org
Файл Windows.edb представляет собой индексную базу данных службы поиска Windows (Windows Search). Поисковый индекс позволяет пользователям выполнять быстрый поиск данных и файлов на диске по индексной базе файлов, электронных писем в pst файлах и другого контента. Индексирование выполняется в фоновом режиме процессом
SearchIndexer.exe
. Естественно, чем больше файлов в системе, тем больший размер может быть у файла Windows.edb. В некоторых случаях он может вырастать до десятков и даже сотен Гб, занимая все свободное место на системном диске.
Файл Windows.edb является скрытым и по-умолчанию хранится в каталоге C:\ProgramData\Microsoft\Search\Data\Applications\Windows\.
Примечание. Файл Windows.edb есть во всех современных клиентских и серверных ОС Microsoft: от Windows 7/Server 2008 R2 до Windows 10/Server 2019.
Например, в моем случае файла Windows.edb вырос до 15,5 Гб (а это почти 15% на моем 100 Гб SSD диске).
Текущий размер файла Windows.edb в Windows можно получить следующей командой PowerShell:
((Get-Item $env:programdata'\Microsoft\Search\Data\Applications\Windows\Windows.edb').length/1GB)

Далее рассмотрим, как уменьшить размер индексного файла Windows.edb службы поиска Windows.
Содержание:
- Перестройка поискового индекса WindowsSearch
- Уменьшаем размер Windows.edb дефрагментацией с помощью утилиты Esentutl
- Удаление и пересоздание файла Windows.edb
- Перенос файла Windows.edb на другой диск
- Патч для предотвращения чрезмерного роста файла Windows.edb в Windows 8 / Windows Server 2012
- Почему сильно растет размер файла Windows.edb
Перестройка поискового индекса WindowsSearch
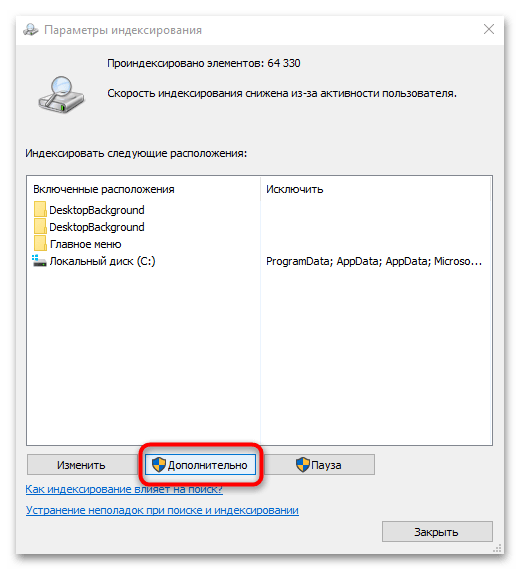
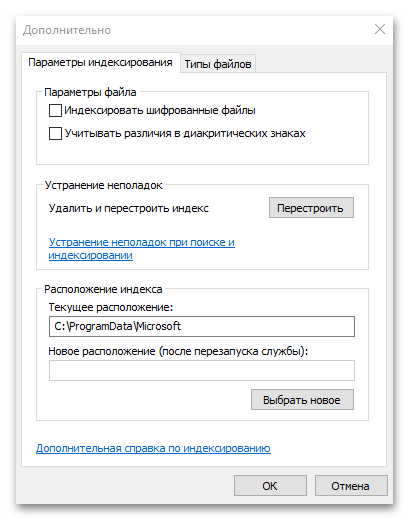
Самый “правильный”, но не самый эффективный способ уменьшить размер файла Windows.edb – выполнить переиндексацию данных на диске. Для этого откройте Панель Управления -> Indexing Options -> Advanced и нажмите кнопку Rebuild (для открытия этого диалогового окна достаточно выполнить команду:
Control srchadmin.dll
). 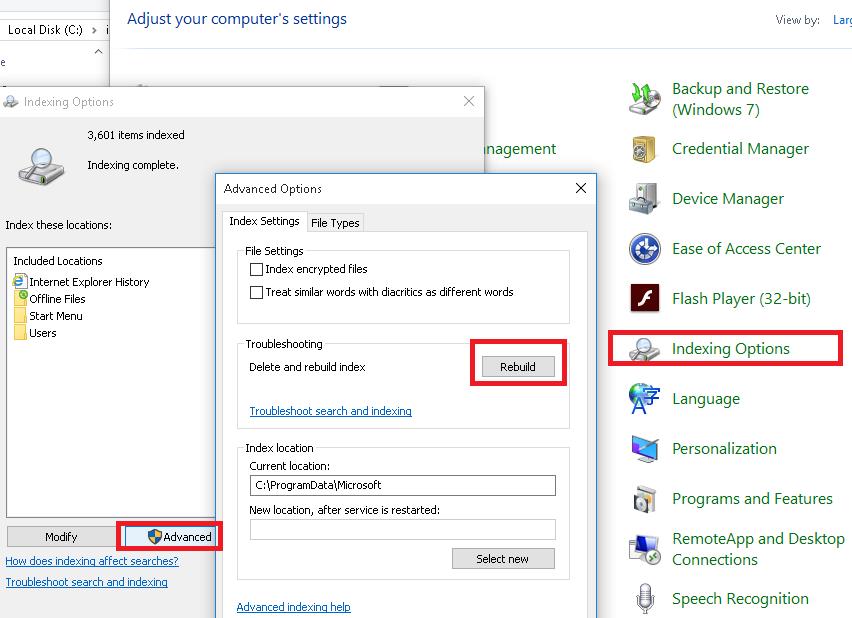
Через некоторое, Windows Search закончит полную переиндексацию данных на диске и размер edb файла несколько уменьшится время (у меня на компьютере ребилд поискового индекса занял несколько часов).
Уменьшаем размер Windows.edb дефрагментацией с помощью утилиты Esentutl
Индексный файл службы поиска Windows представляет собой базу в формате EDB. Вы можете выполнить дефрагментацию EDB базы с помощью стандартной утилиты обслуживания таких баз — esentutl.exe (Extensible Storage Engine Utilities — должна быть хорошо знакома администраторам Exchange). Дефрагментация базы выполняется в офлайн режиме (база не должна использоваться), поэтому сначала придется остановить службы поиска. Все эти операции можно объединить в один bat/cmd скрипт:
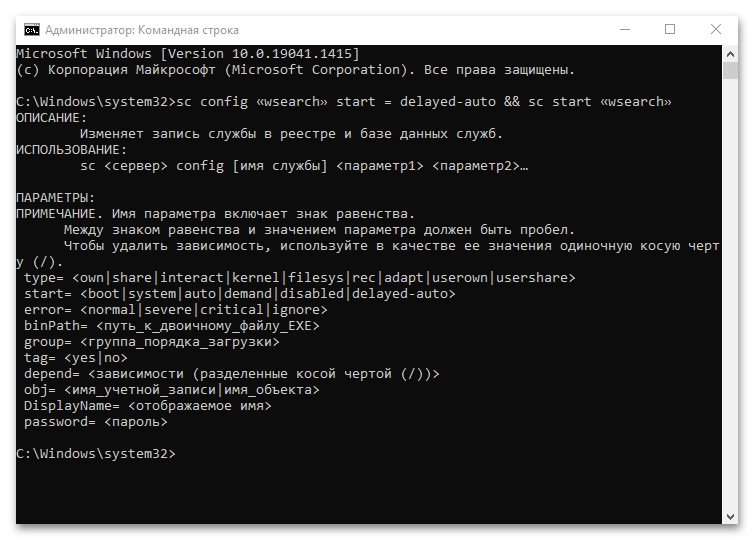
sc config wsearch start=disabled
sc stop wsearch
esentutl.exe /d %ProgramData%\Microsoft\Search\Data\Applications\Windows\Windows.edb
sc config wsearch start=delayed-auto
sc start wsearch
Совет. Для выполнения дефрагментации EDB базы на диске должно быть достаточно свободного места, т.к. будет создана копия edb файла.
При работе утилита esentutl выводит прогресс выполнения дефрагментации файла EDB на экран.
Примечание. Если при выполнении команды esentutl появляется ошибка:
Operation terminated with error -1213 (JET_errPageSizeMismatch, The database page size does not match the engine) after 10.125 seconds
Это означает что ваша система 64 битная и для выполнения дефрагментации нужно использовать x32 версию esentutl. В этом случае третья команда будет выглядеть так:
"C:\Windows\SysWOW64\esentutl.exe" /d %AllUsersProfile%\Microsoft\Search\Data\Applications\Windows\Windows.edb
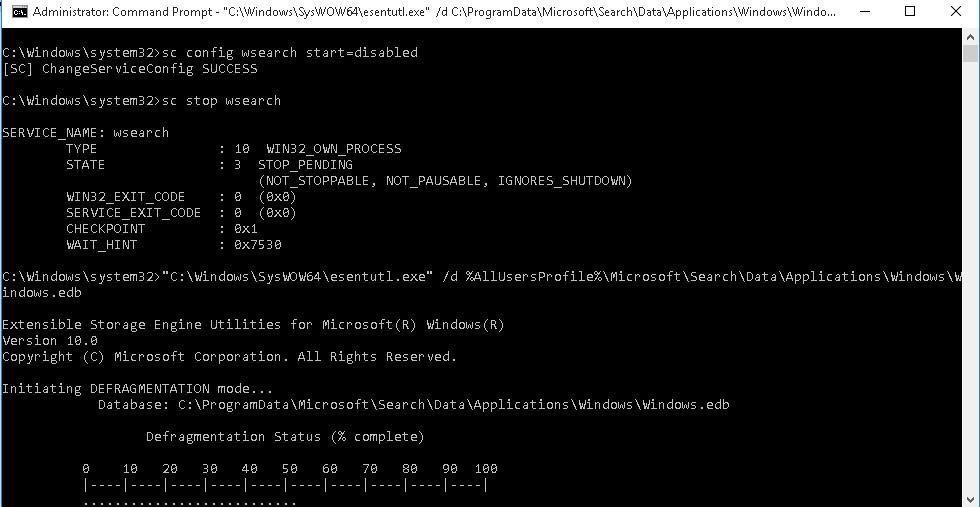
В моем случае размер файла Windows.edb после дефрагментации уменьшился на 30%.
Удаление и пересоздание файла Windows.edb
Если места на диске критически мало, можно удалить файл Windows.edb. Это действие безопасно, т.к. вы не теряете никакие данные, сбрасывается только поисковый индекс. Для удаления файла Windows.edb остановите службу Windows Search, затем удалите файл и запустите службу.
net stop "Windows Search"
 REG ADD "HKLM\SOFTWARE\Microsoft\Windows Search" /v SetupCompletedSuccessfully /t REG_DWORD /d 0 /f
del %PROGRAMDATA%\Microsoft\Search\Data\Applications\Windows\Windows.edb
net start "Windows Search"
Значение параметра реестра
SetupCompletedSuccessfully = 0
в ветке HKEY_LOCAL_MACHINE\SOFTWARE\Microsoft\Windows Search заставляет службу Windows Search при следующем запуске сбросить текущие настройки и пути индексирования, восстановит стандартные параметры wsearch и добавит пути для индексирования по-умолчанию.
После перезапуска, служба Windows Search начнет процесс переиндексации данных на дисках компьютера и пересоздаст файл Windows.edb (в процессе полной переиндексации производительность системы может снизится).
Перенос файла Windows.edb на другой диск
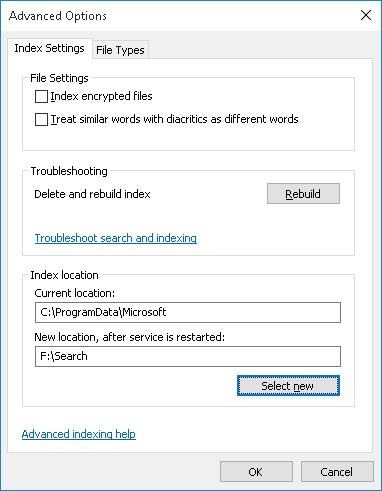
В некоторых случаях, когда размер файла постоянно увеличивается Windows.edb, имеет смысл перенести индексную базу поиска Windows на другой диск (раздел). Тем самым экстремальный рост поисковой базы не приведет к остановке ОС из-за исчерпания свободного места на системном разделе. Довольно часто файл Windows.edb переносят на на терминальных серверах RDS, на которых пользователи активно работают с файлами, личными папками и другим индексируемым контентом.
Для смены местоположения файла перейдите в Control Panel –> Indexing Options -> Advanced -> Index location-> New Location и укажите путь к новому местоположению файла Windows.edb и нажмите OK.
Перезапустите службу поиска:
Restart-Service wsearch
Патч для предотвращения чрезмерного роста файла Windows.edb в Windows 8 / Windows Server 2012
Для решения проблема постоянного роста размера файла Windows.edb в Windows 8 и Windows Server 2012 было выпущено специальное исправление, которое включено в состав пакета обновлений от мая 2013 года – KB 2836988. Рекомендуется вручную скачать и установить его в данных версиях Windows. Обратите внимание, что обновление не уменьшает текущий размер файла Windows.edb, а только исправляет проблемы, вызывающие его чрезмерный рост. Для уменьшения размера edb файла вам нужно перестроить поисковый индекс или выполнить дефрагментацию как описано выше.
Почему сильно растет размер файла Windows.edb
Если после дефрагментации и/или перестройки поискового индекса, его размер опять начинает сильно расти, попробуйте следуующие методики, которые могут помочь решить проблему.
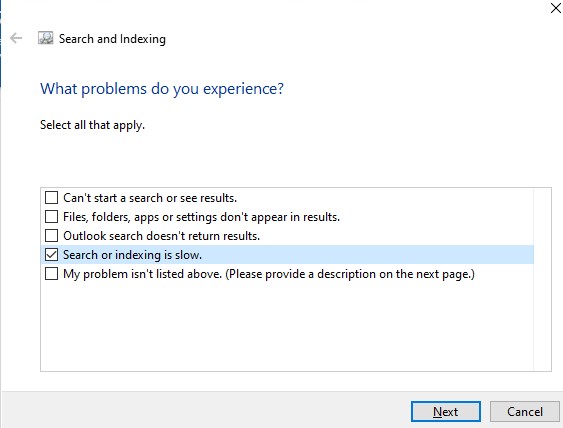
- Запустите встроенное средство исправления неполадок поиска Windows 10 (Search and Indexing Troubleshooter). Чтобы запустить его, выполните команду:
msdt.exe -ep SystemSettings_Troubleshoot_L2 -id SearchDiagnostic
. В списке проблем выберите, что поиск или индексация выполняется медленно (Search or indexing is slow). Далее мастер устранения неполадок попробуем вернуть службу Windows Search в нормальное состояние;
- Старайтесь индексировать только необходимые контент. Исключайте из поискового индекса элементы, поиск в которых вы не используете. Нажмите кнопку Modify в настройках индексирования и в окне Indexing Location отключите пути и приложения, которые не нужно индексировать. После изменения настроек путей индексирования нужно каждый раз перестраивать индекс Advanced -> Rebuild;

Также обратите внимание, что размер файла Windows.edb в Windows 10/8.1 растёт гораздо быстрее, чем в Windows 7. Дело в том, что в современных версиях Windows индексируются все содержимое файлов, не зависимо от их размеров. А Windows 7 индексировалась только первая часть больших документов.
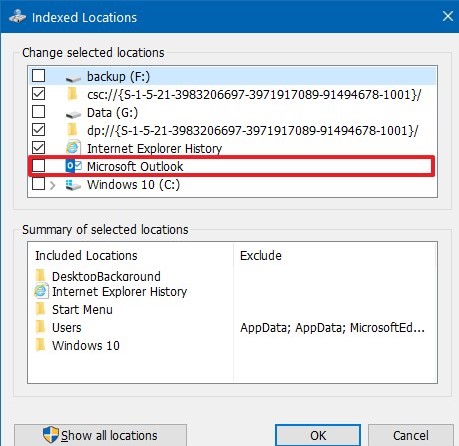
- Если вы используете на компьютере Outlook с PST файлами, то при их индексировании размер файла Windows.edb растет пропорционально размеру PST файлов. Это может привести к исчерпанию места на диске и проблемам с производительностью. В этом случае Microsoft рекомендует исключить Outlook из списка индексируемых элементов.
 Естественно при это в Outlook перестанет работать поиск (это не будет проблема, если вы храните своя ящик на сервере Exchange с включенным поисковым индексом).
 - Если ничего не помогает, и размер файла постоянно растет, вы можете полностью отключить службу wsearch, или настроить логон скрипт, который сбрасывает поисковый индекс при каждой загрузке компьютера.
 Естественно при это в Outlook перестанет работать поиск (это не будет проблема, если вы храните своя ящик на сервере Exchange с включенным поисковым индексом).
Содержание
- Способ 1: «Службы»
- Способ 2: «Командная строка»
- Способ 3: Свойства диска
- Способ 4: Настройка параметров индексирования
- Вопросы и ответы

Способ 1: «Службы»
Служба индексирования помогает быстро отыскать нужные файлы и документы, но при этом она может нагружать компоненты системы, поскольку практически постоянно производит запись в индексный файл. Если средство отключено, то активировать ее можно через приложение со службами операционной системы:
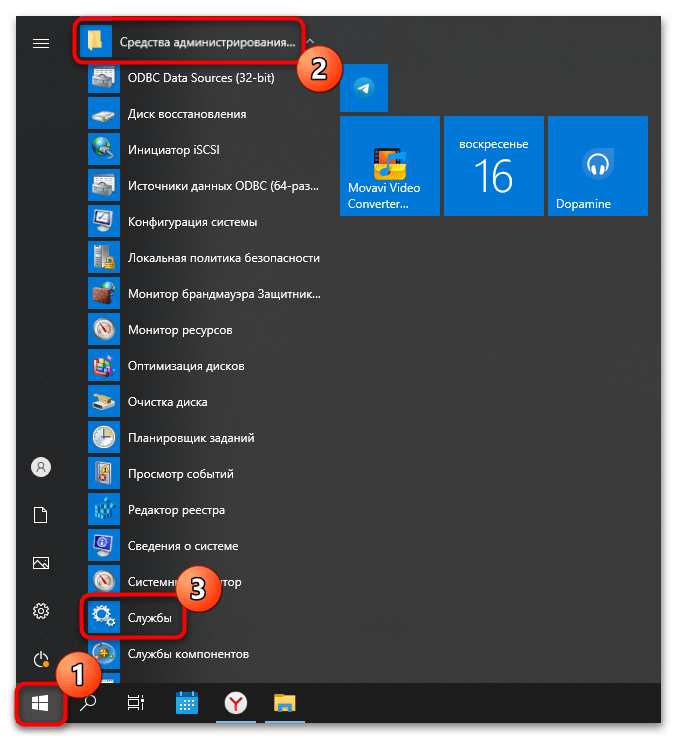
- Откройте приложение «Службы». По умолчанию оно располагается в папке «Средства администрирования Windows» главного меню, его вы также можете отыскать, просто начав набирать слово «службы» в «Пуске».
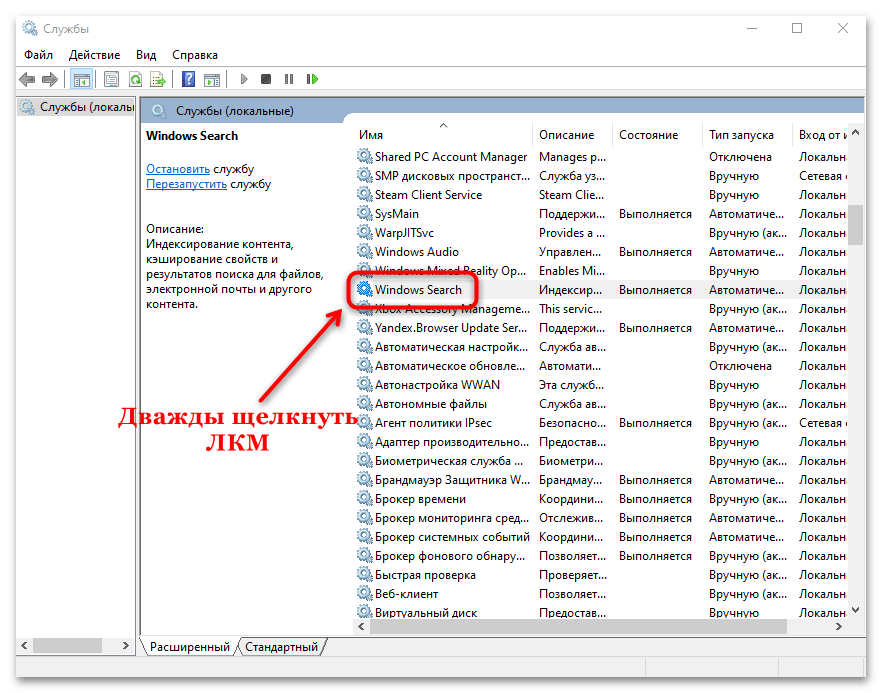
- В списке служб отыщите «Windows Search» и дважды щелкните по ее названию левой кнопкой мыши.
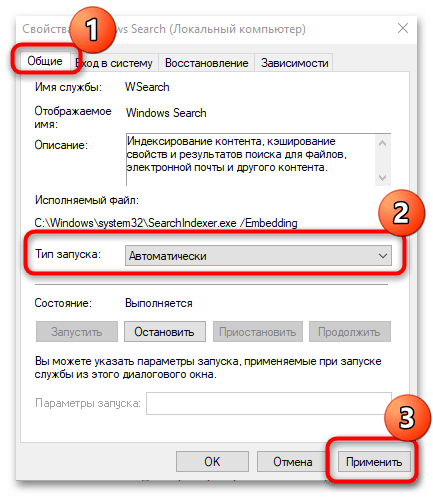
- В новом окне с настройками службы на вкладке «Общие» определите тип запуска, выбрав значение «Автоматически». Нажмите на кнопку «Применить».
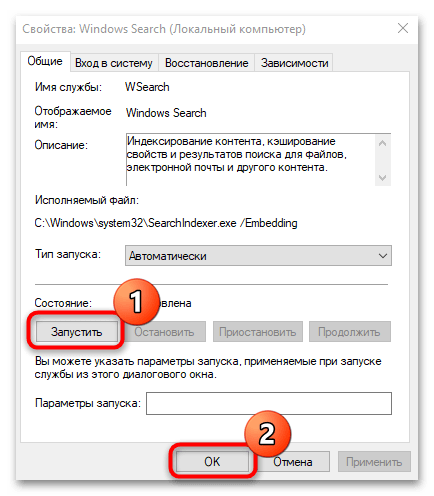
- После этого останется включить индексирование в Windows 10, нажав на кнопку «Запустить». Подтвердите действие кнопкой «ОК».
Отключается индексирование в окне со свойствами службы. Также можно выбрать ручной тип запуска.
Способ 2: «Командная строка»
Через консоль «Командная строка» есть возможность активировать индексирование операционной системы, зная определенные команды:
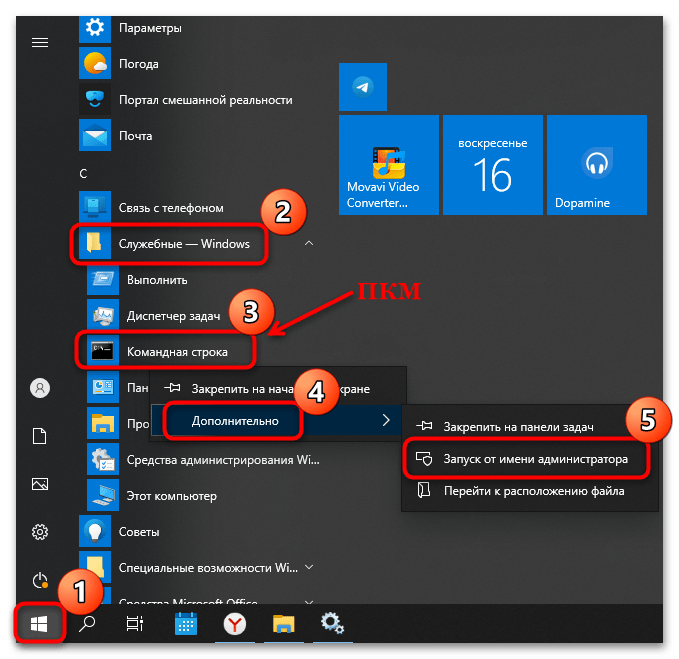
- Запустите консоль с расширенными правами. Найдите средство в главном меню, развернув папку «Служебные — Windows». Кликните правой кнопкой мыши по строке «Командная строка» и наведите курсор на пункт «Дополнительно» в меню. В списке нажмите на опцию «Запуск от имени администратора».
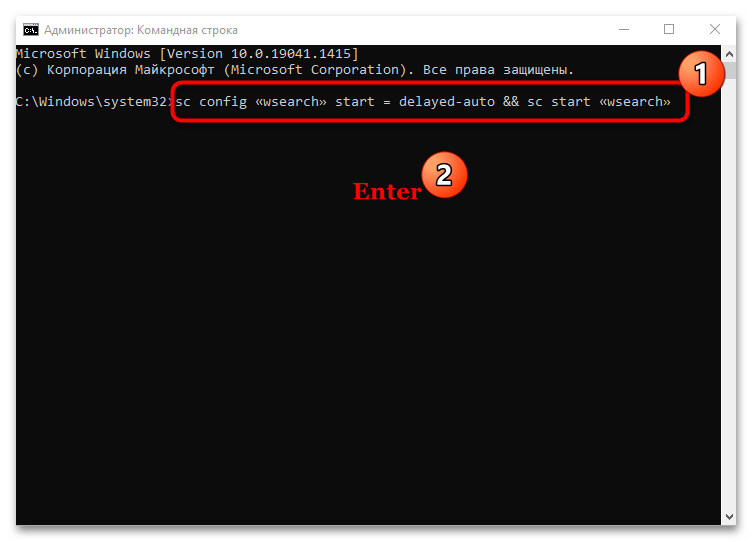
- Чтобы активировать службу, вставьте в интерфейсе
sc config «wsearch» start = delayed-auto && sc start «wsearch». Нажмите на клавишу «Enter». - Служба поиска немедленно станет активна, и, соответственно, запустится индексирование Windows 10.
Для деактивации индексирования через «Командную строку» используется команда sc stop «wsearch» && sc config «wsearch» start=disabled.
Способ 3: Свойства диска
Если нужно включить индексирование только для определенного раздела на жестком диске, то можно воспользоваться окном с его свойствами:
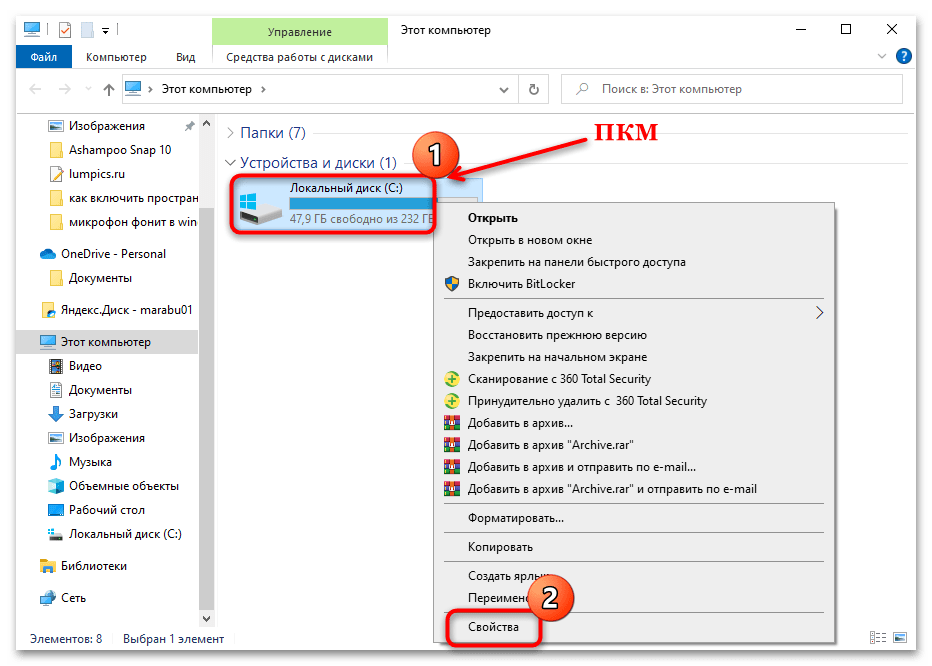
- Перейдите в список томов через «Проводник» или иконку «Этот компьютер» на рабочем столе. Кликните правой кнопкой мыши по нужному локальному диску и из контекстного меню выберите пункт «Свойства».
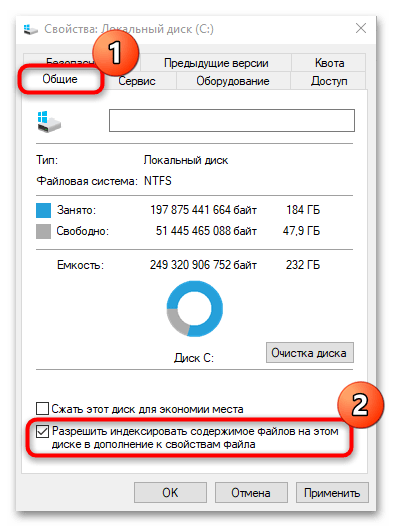
- На вкладке «Общие» отметьте опцию разрешения индексирования файлов на диске. Она находится внизу.
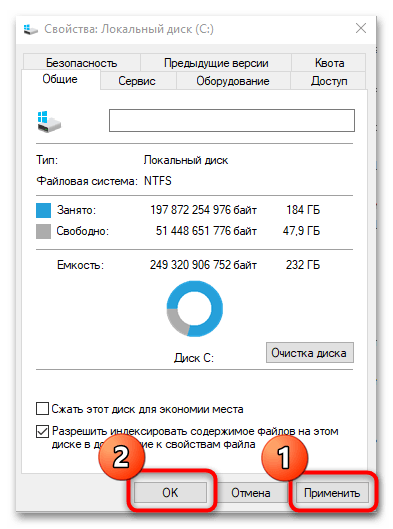
- Поочередно нажмите на кнопки «Применить» и «ОК».
После настройки раздела все файлы будут проиндексированы, и пользователь сможет выполнять поиск по ним на этом диске.
Способ 4: Настройка параметров индексирования
В Windows реализован раздел с настройками параметрами индексирования, который можно найти в классической «Панели управления», чтобы тонко отрегулировать работу службы. С помощью инструмента пользователь может вручную выбрать те каталоги и места, которые будут индексироваться:
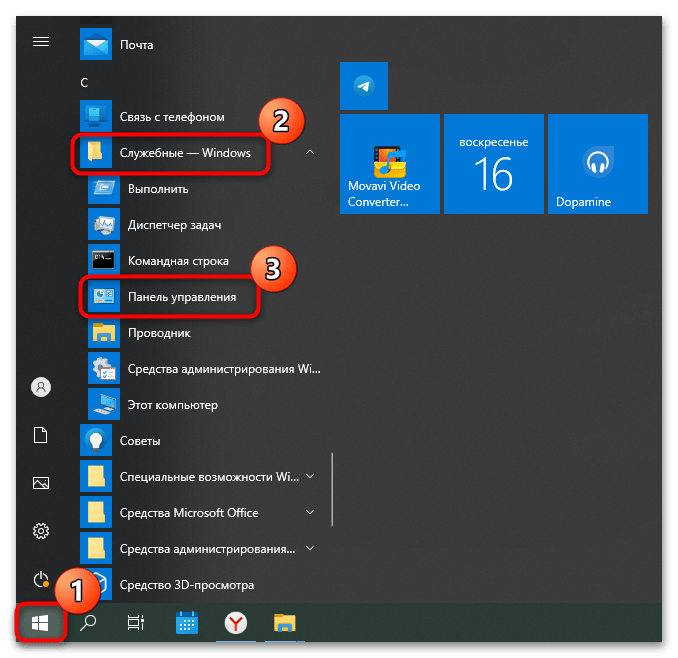
- Откройте «Панель управления» через главное меню. Она находится в каталоге «Служебные – Windows».
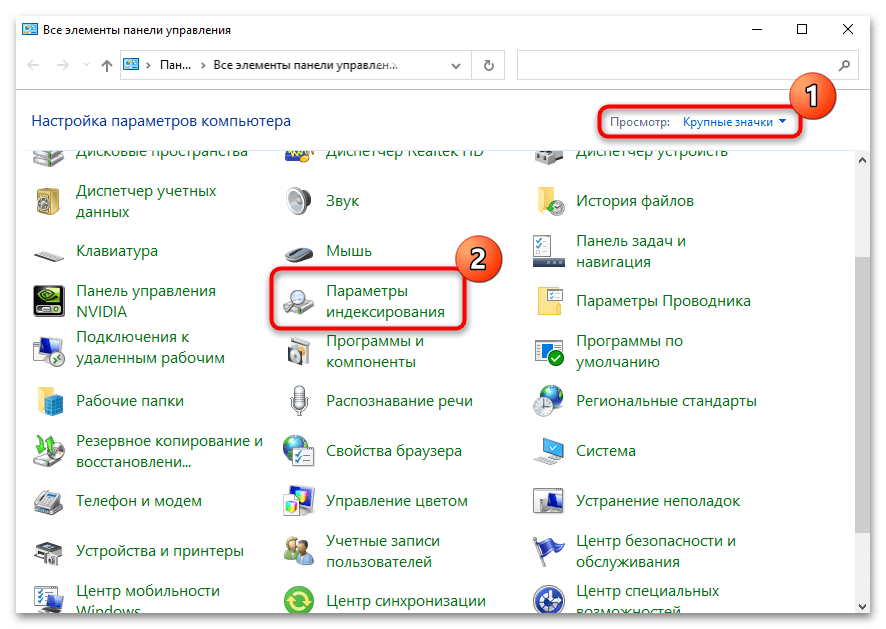
- Для более быстрого поиска по разделам выберите их отображение как мелкие или крупные значки, выбрав соответствующий вид в меню «Просмотр». Нажмите на строку «Параметры индексирования».
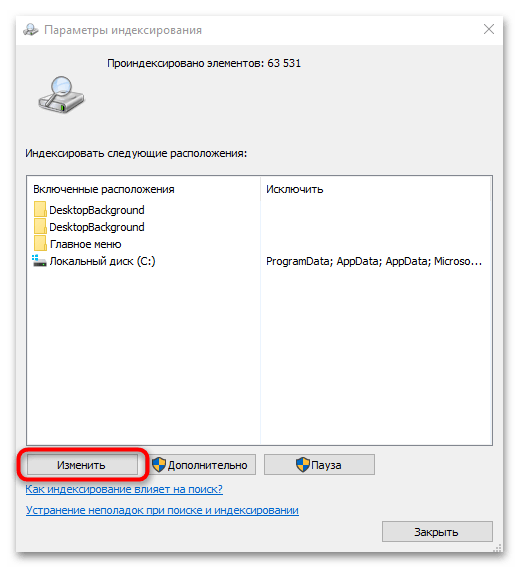
- Отобразится список местоположений, которые в данный момент индексируются. Нажмите на кнопку «Изменить» внизу.
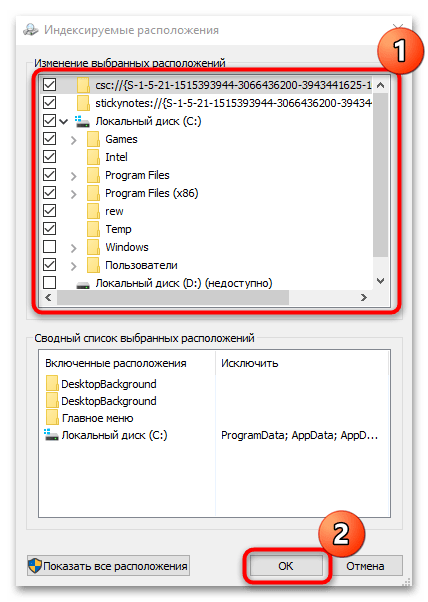
- В новом окне выберите те места, которые нужно индексировать. Если это отдельная папка на локальном диске, то разверните его содержимое и отметьте конкретный каталог. Нажмите на кнопку «ОК», чтобы подтвердить действие.
Вспомогательные возможности доступны в отдельном окне, если нажать на кнопку «Дополнительно» в окне с параметрами индексирования.
Здесь можно активировать индексацию шифрованных файлов, изменить путь к файлу индекса, устранить неполадки, возникшие в работе службы. На отдельной вкладке определяются типы файлов, которые индексируются в системе, а также их свойства и содержимое.
Еще статьи по данной теме: