Starting over without starting over.
You can use the Windows 10 Out Of Box Experience, or «OOBE», at any time to reset a variety of items most commonly associated with initial setup.
You may or may not remember setting up Windows 10 the first time you used it. You were walked through a process of questions and answers and options and waiting … probably lots of waiting … while Windows completed setting up your machine.
It’s called the “Out Of Box Experience”, or OOBE.
Turns out you can re-live the experience any time.

The Windows Out Of Box Experience (OOBE) resets a number of user interface and configuration options, allowing you to make new choices similar to those offered when Windows was first set up. After backing up, you can run the OOBE using the System Preparation utility: “%WINDIR%\system32\sysprep\sysprep.exe”.
Why would you want to?
The OOBE restores a number of things (though not all) to their initial post-set-up state. It can be a way to return your Windows 10 installation to something short of a full reset or reinstall without having to perform an actual reset or reinstall.
My belief is that the OOBE focuses mostly on user interface, settings, and preferences. What it likely does not affect is the initial hardware configuration of the set-up process.
It is, for example, one way to re-visit your initial privacy selections and perhaps make a different choice.
Before you begin
In my experience, running the OOBE on an already set-up system does not uninstall software or erase any of your data. As I said, it’s mostly about configuration and user interface choices.
However, I’m not going to guarantee that something important to you can’t be lost.
Back up first. Take a full system image backup. That way, should things turn out other than you want after running the OOBE, you can always restore your machine to the state it was in prior to starting.
Running OOBE
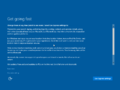
The OOBE is presented by a program called the System Preparation Tool, or SysPrep. To run it, right-click on the Start menu, click on Run, and enter:
%WINDIR%\system32\sysprep\sysprep.exe
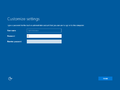
This will run the utility and present a small dialog with actions.
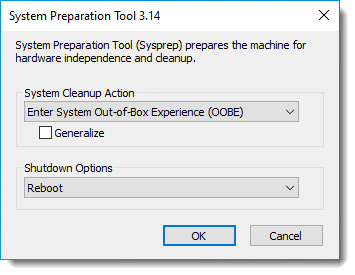
The default settings are appropriate: run the OOBE, leaving “Generalize” unchecked (this removes additional customizations made by Windows Setup that we generally don’t need to concern ourselves with), and “Reboot” as the thing to do when complete.
Click OK, and after a few seconds of preparation, the machine will reboot.
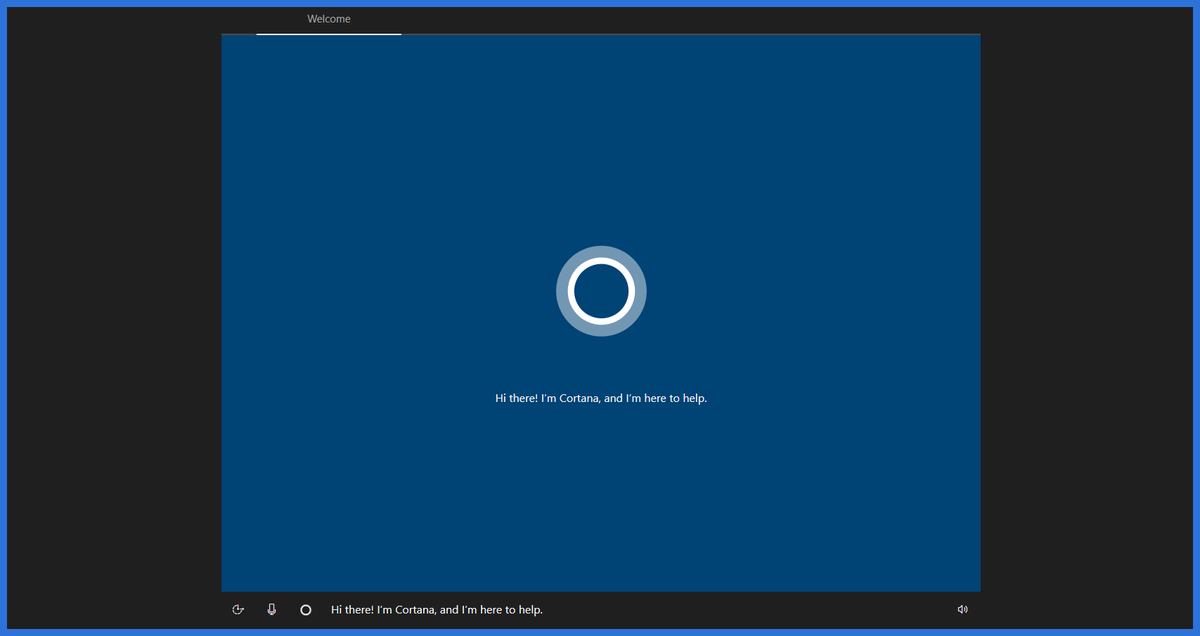
After some amount of “Just a moment” delay, the Out Of Box Experience begins.
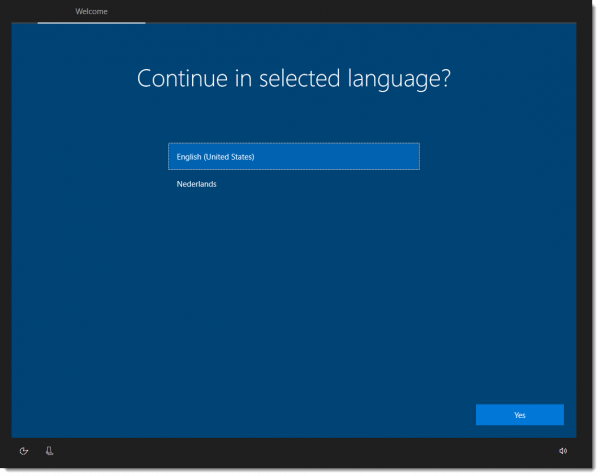
Your “experience” may well be different than mine. I have a Dutch language pack installed, and this was not reset by the OOBE, but rather presented as an alternative language to use for the process.
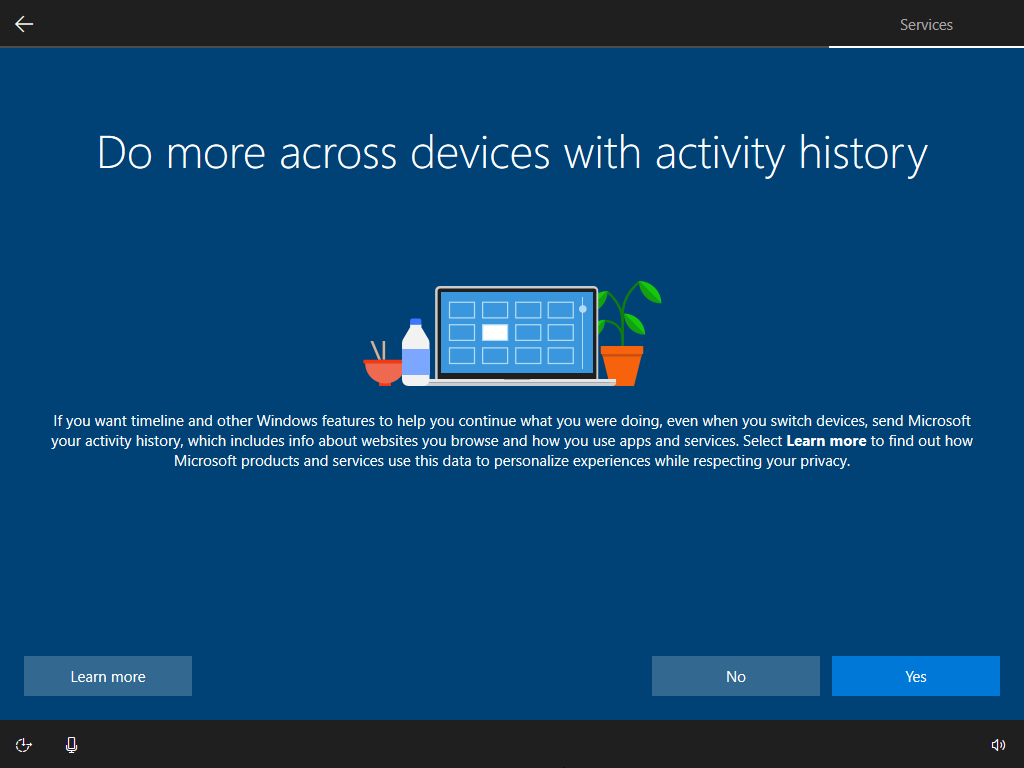
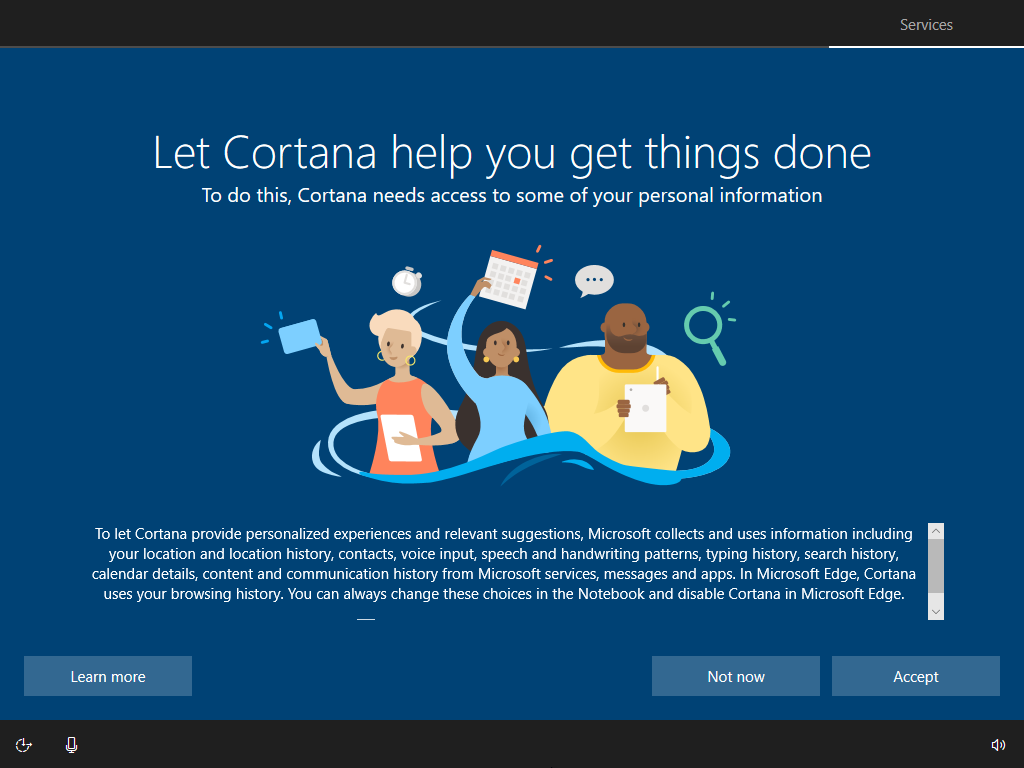
The OOBE includes (but is not limited to):
- Setting up (or turning off) Cortana.
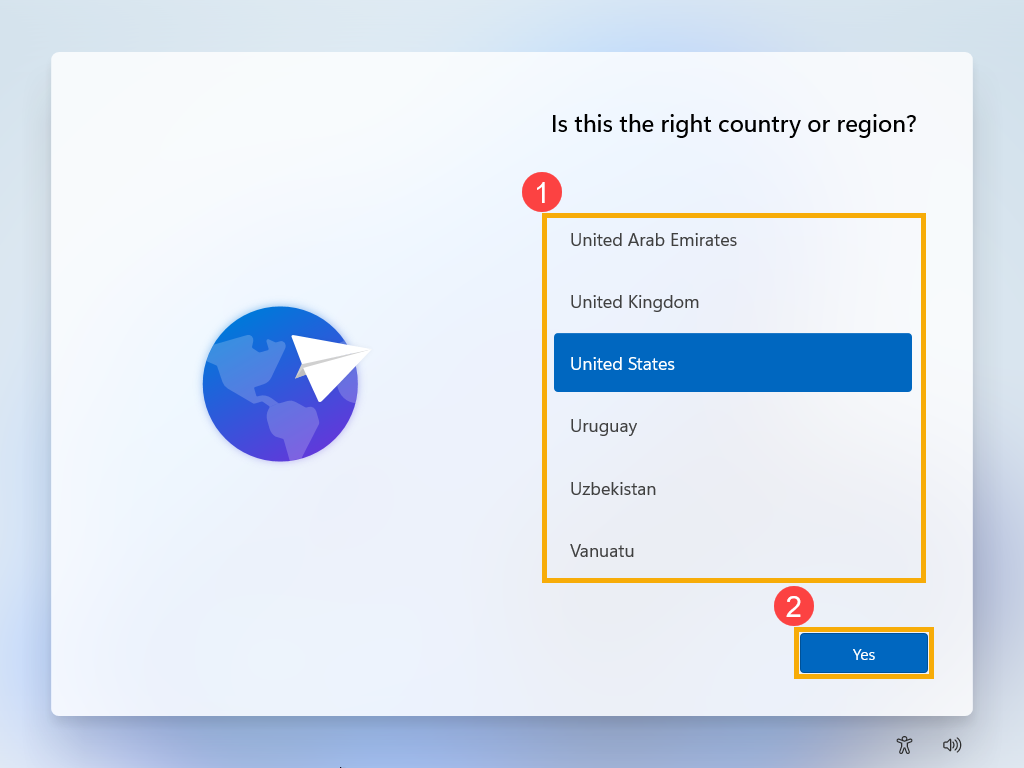
- Region and keyboard selections.
- Accepting the Windows 10 License Agreement.
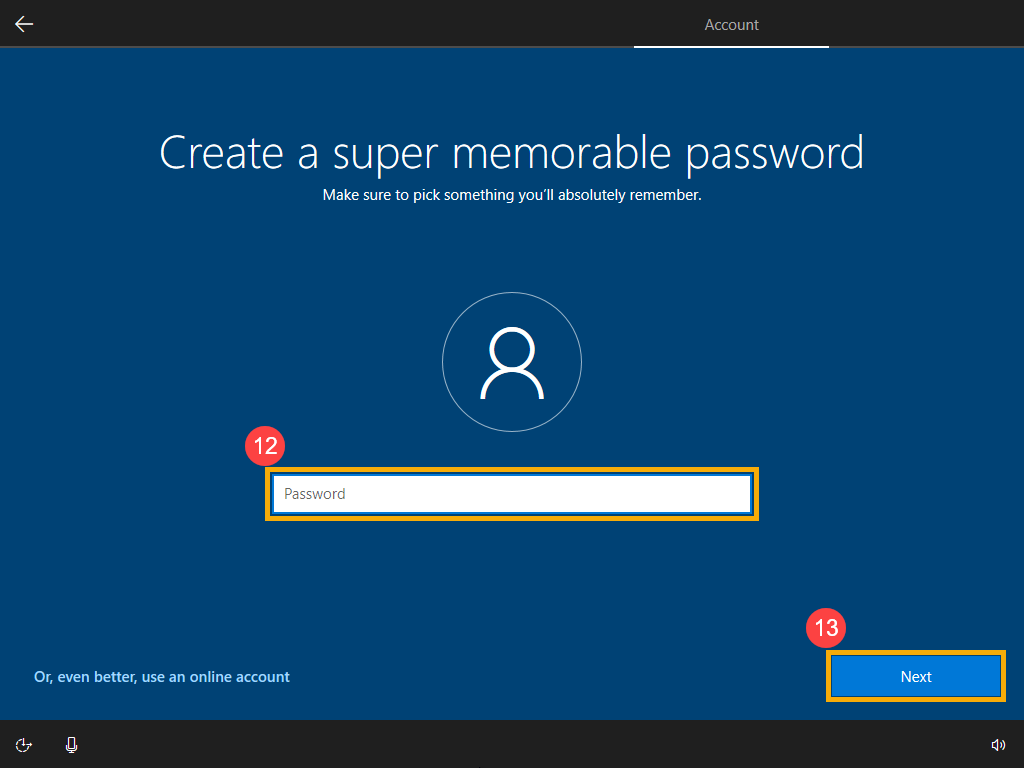
- Selecting the account with which to sign in to Windows.
- Setting up a PIN.
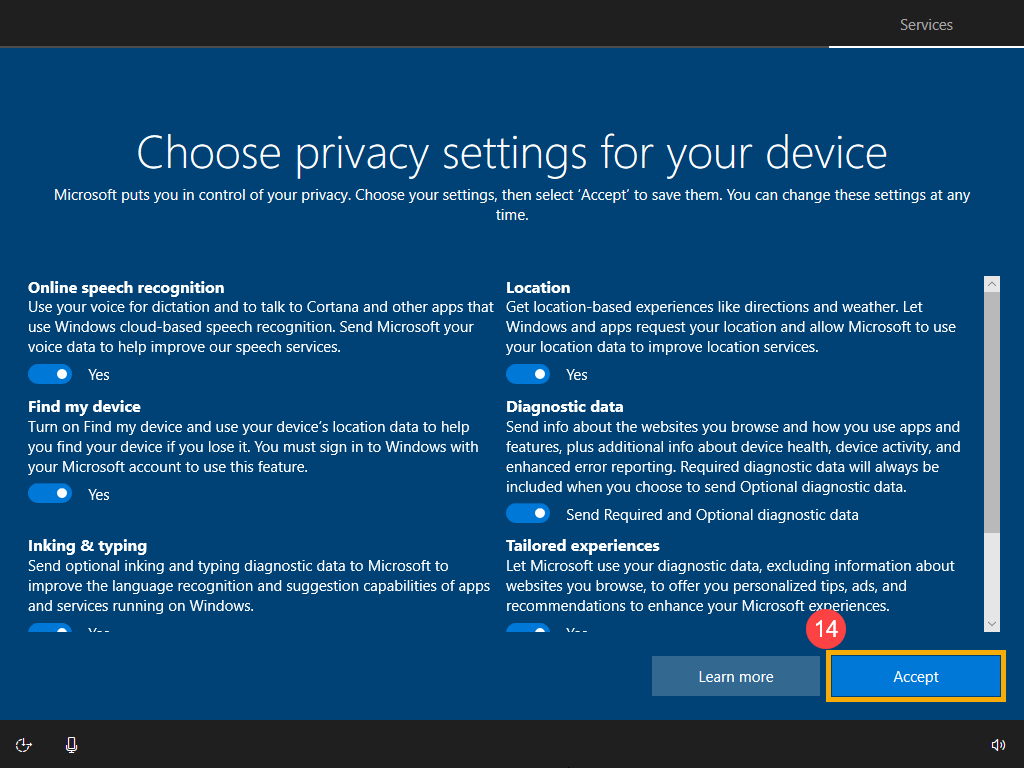
- Privacy settings.
- Customizations & optional features.
- Setting up (or deferring) OneDrive.
- Setting up (or deferring) Microsoft Office.
And finally, after some time to complete its work, you have a new(ish) Windows 10 experience.

Have you used it?
Given that it’s not advertised as heavily as other reset and repair features, I’d love to hear if you’ve used OOBE, and what problems it may or may not have fixed for you. Leave a comment down below.
Podcast audio
FAQ
[Windows 11/10] Первый запуск Windows (Windows OOBE)
При первом включении компьютера Вы столкнетесь с интерфейсом Windows Out of Box Experience (OOBE), который включает в себя ряд экранов, помогающих выполнить основные настройки операционной системы Windows 11/10.
Примечание. Приведенные ниже иллюстрации могут различаться в зависимости от модели вашего устройства или версии системы.
Чтобы предоставить Вам более подробную инструкцию Вы также можете щелкнуть ссылку на видео ASUS YouTube ниже, чтобы узнать больше о том, как настроить новый ноутбук ASUS https://www.youtube.com/watch?v=ERDXu6jxxFM
Пожалуйста, перейдите к соответствующей инструкции для текущей операционной системы Windows на Вашем компьютере:
- Windows 11
- Windows 10
Windows 11
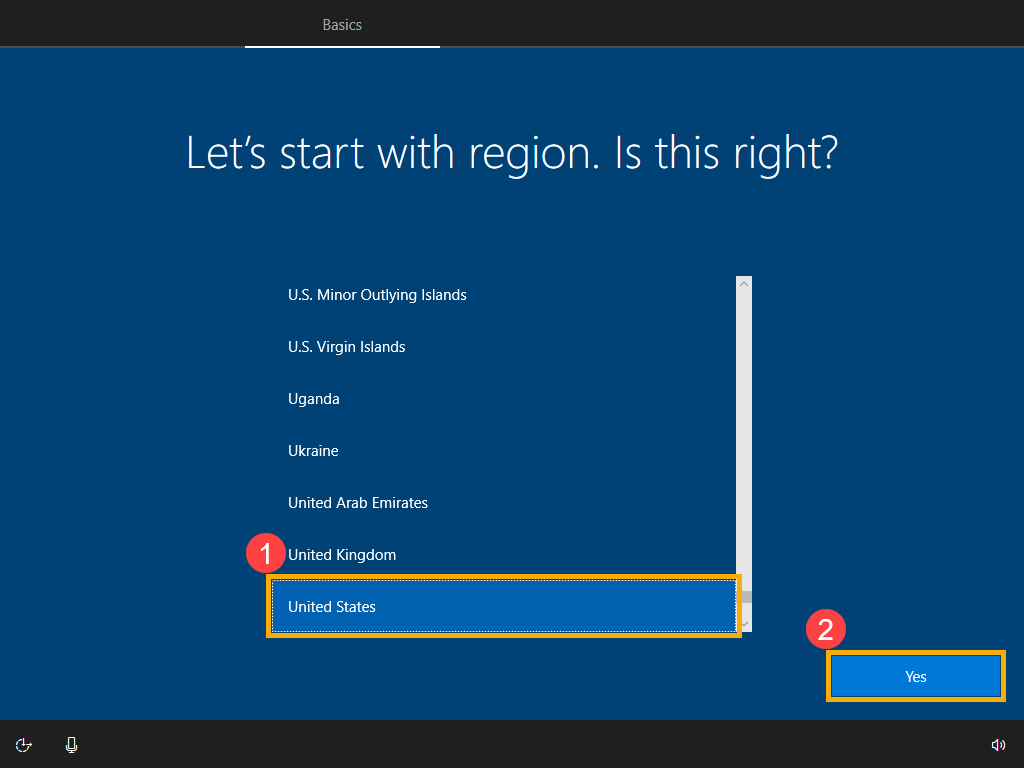
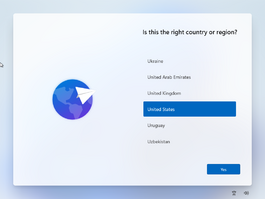
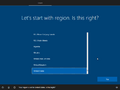
- Выберите ваш регион или страну①, затем нажмите [Да]②.

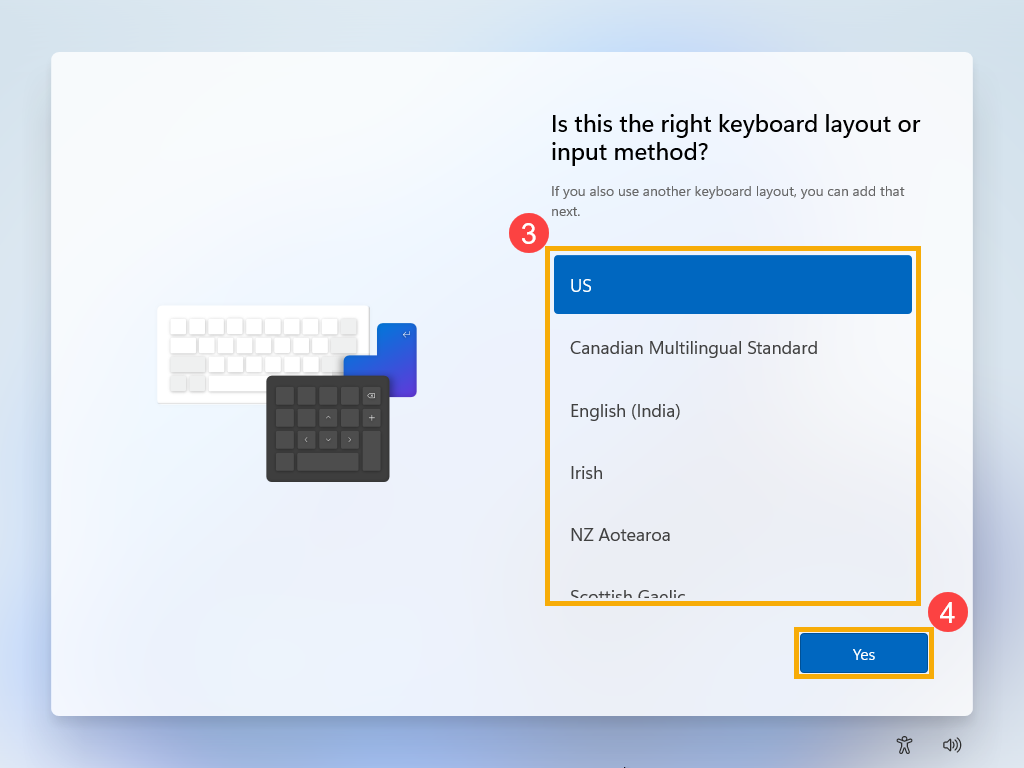
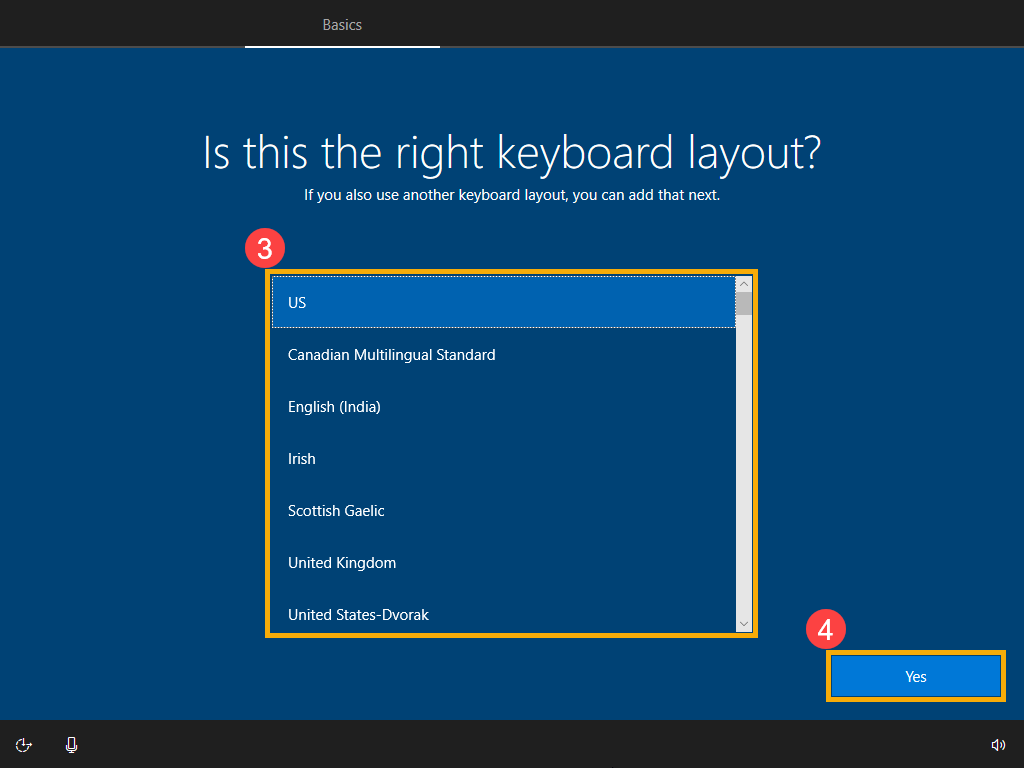
- Выберите раскладку клавиатуры③, затем нажмите [Да]④.
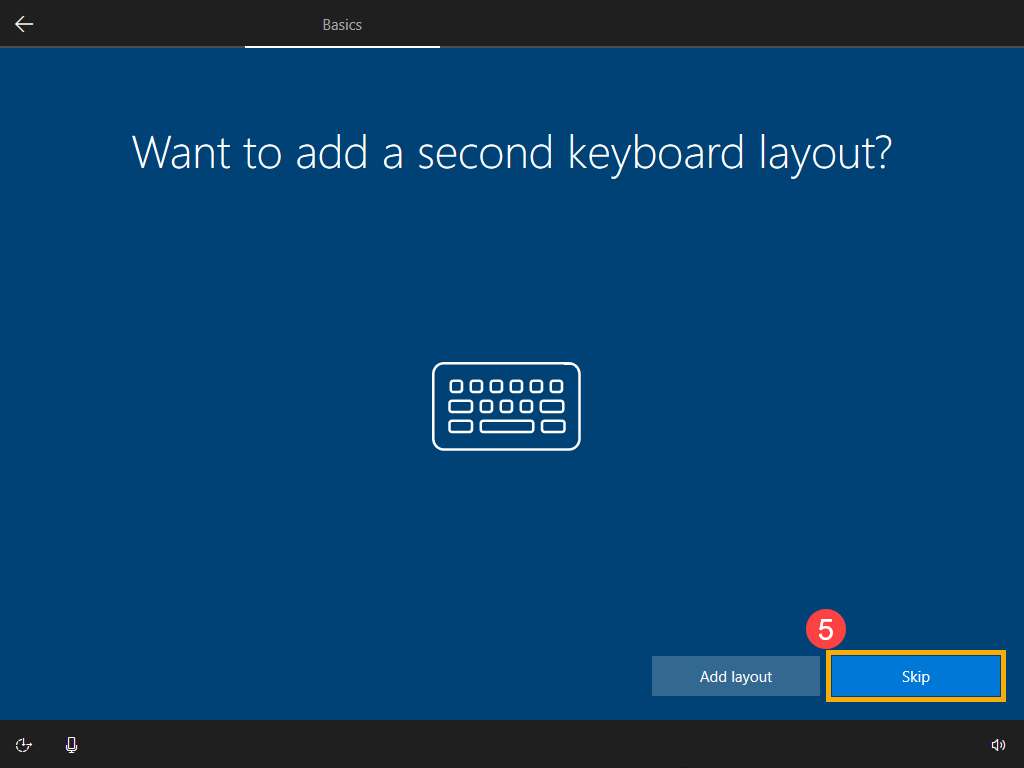
- Если Вы хотите добавить вторую раскладку клавиатуры, пожалуйста, выберите Добавить раскладку. В противном случае, пожалуйста, выберите [Пропустить]⑤.
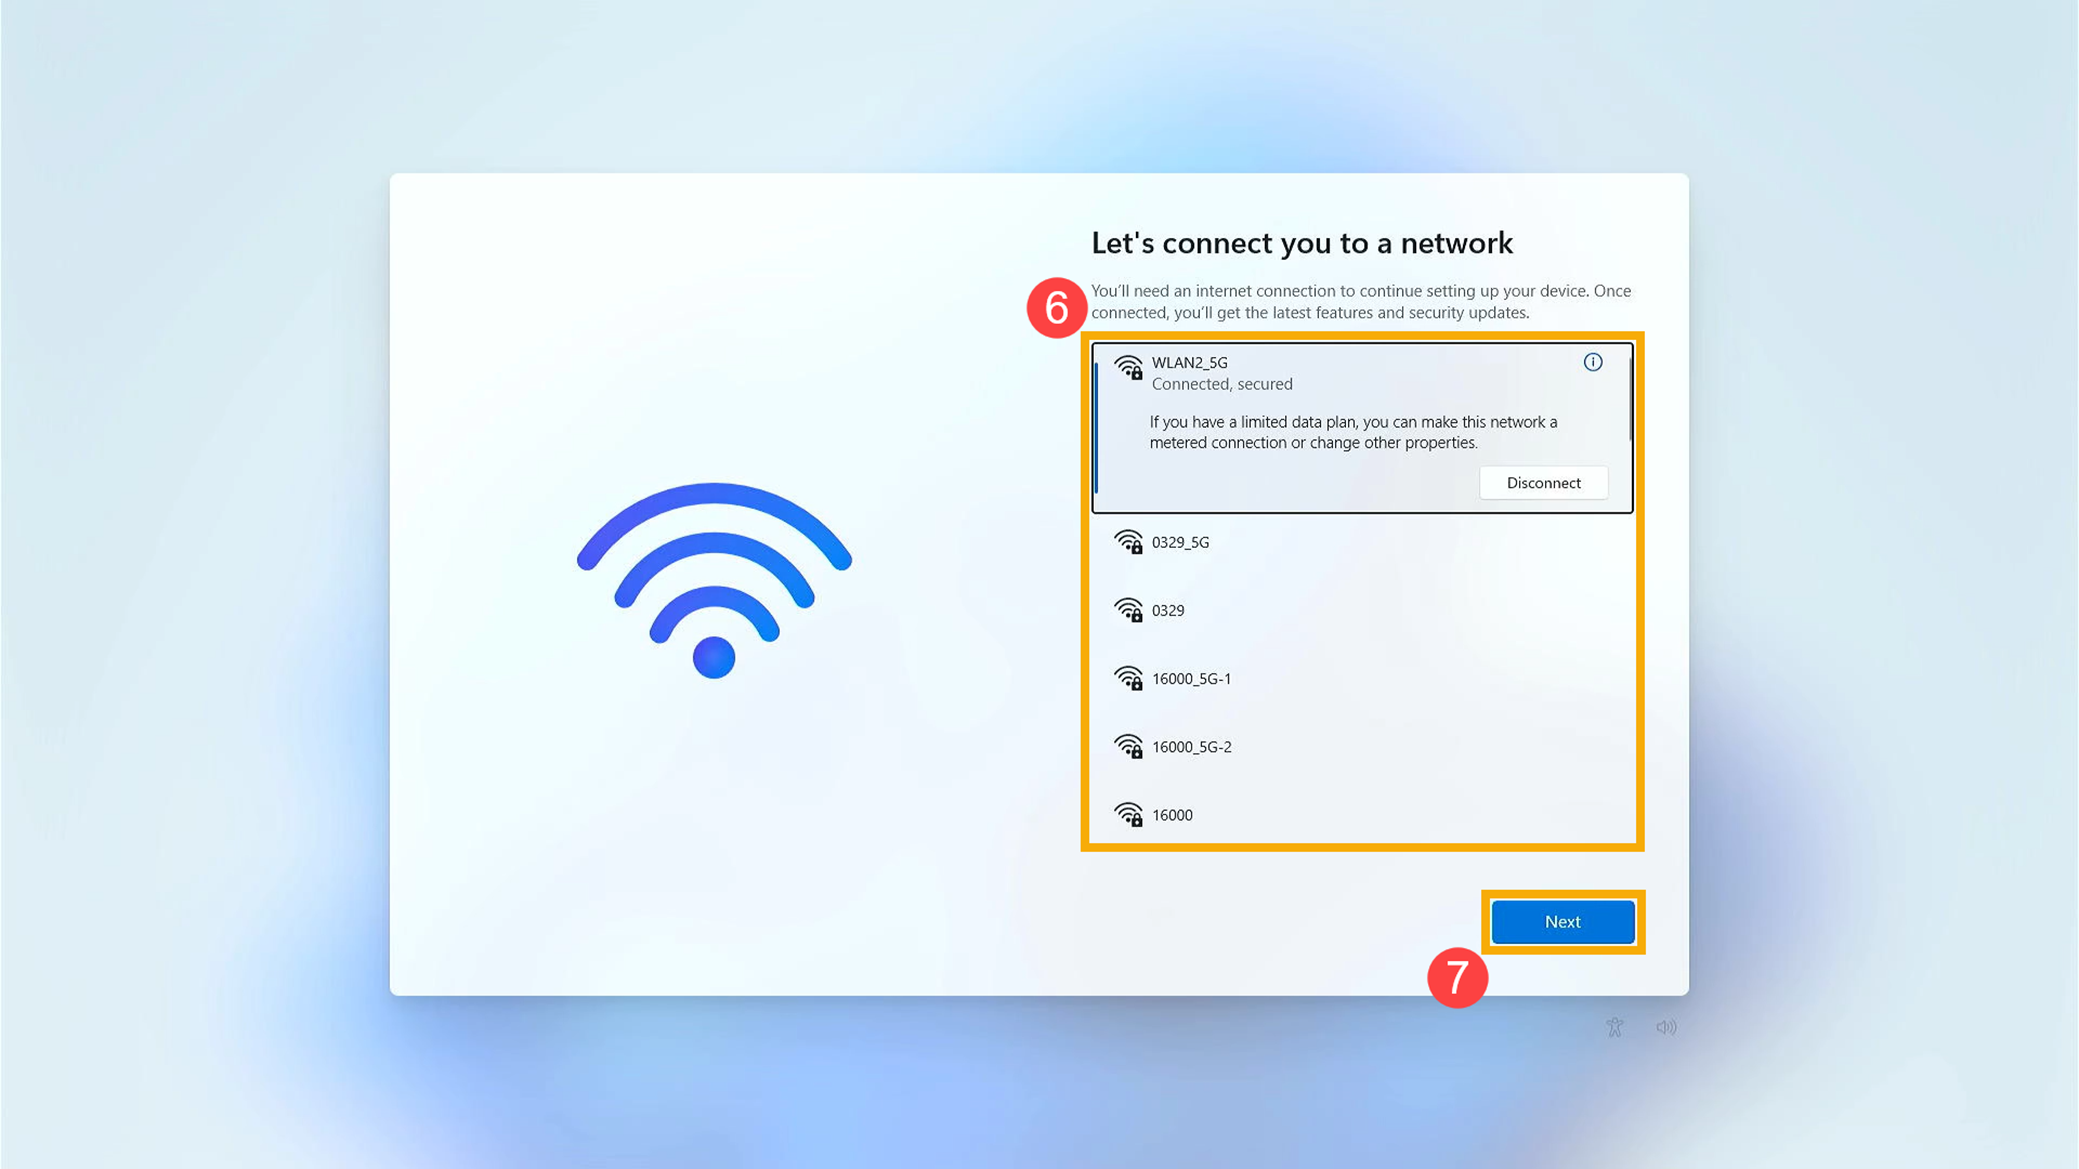
- Выберите сеть, к которой вы хотите подключиться⑥. После подключения нажмите [Далее]⑦.
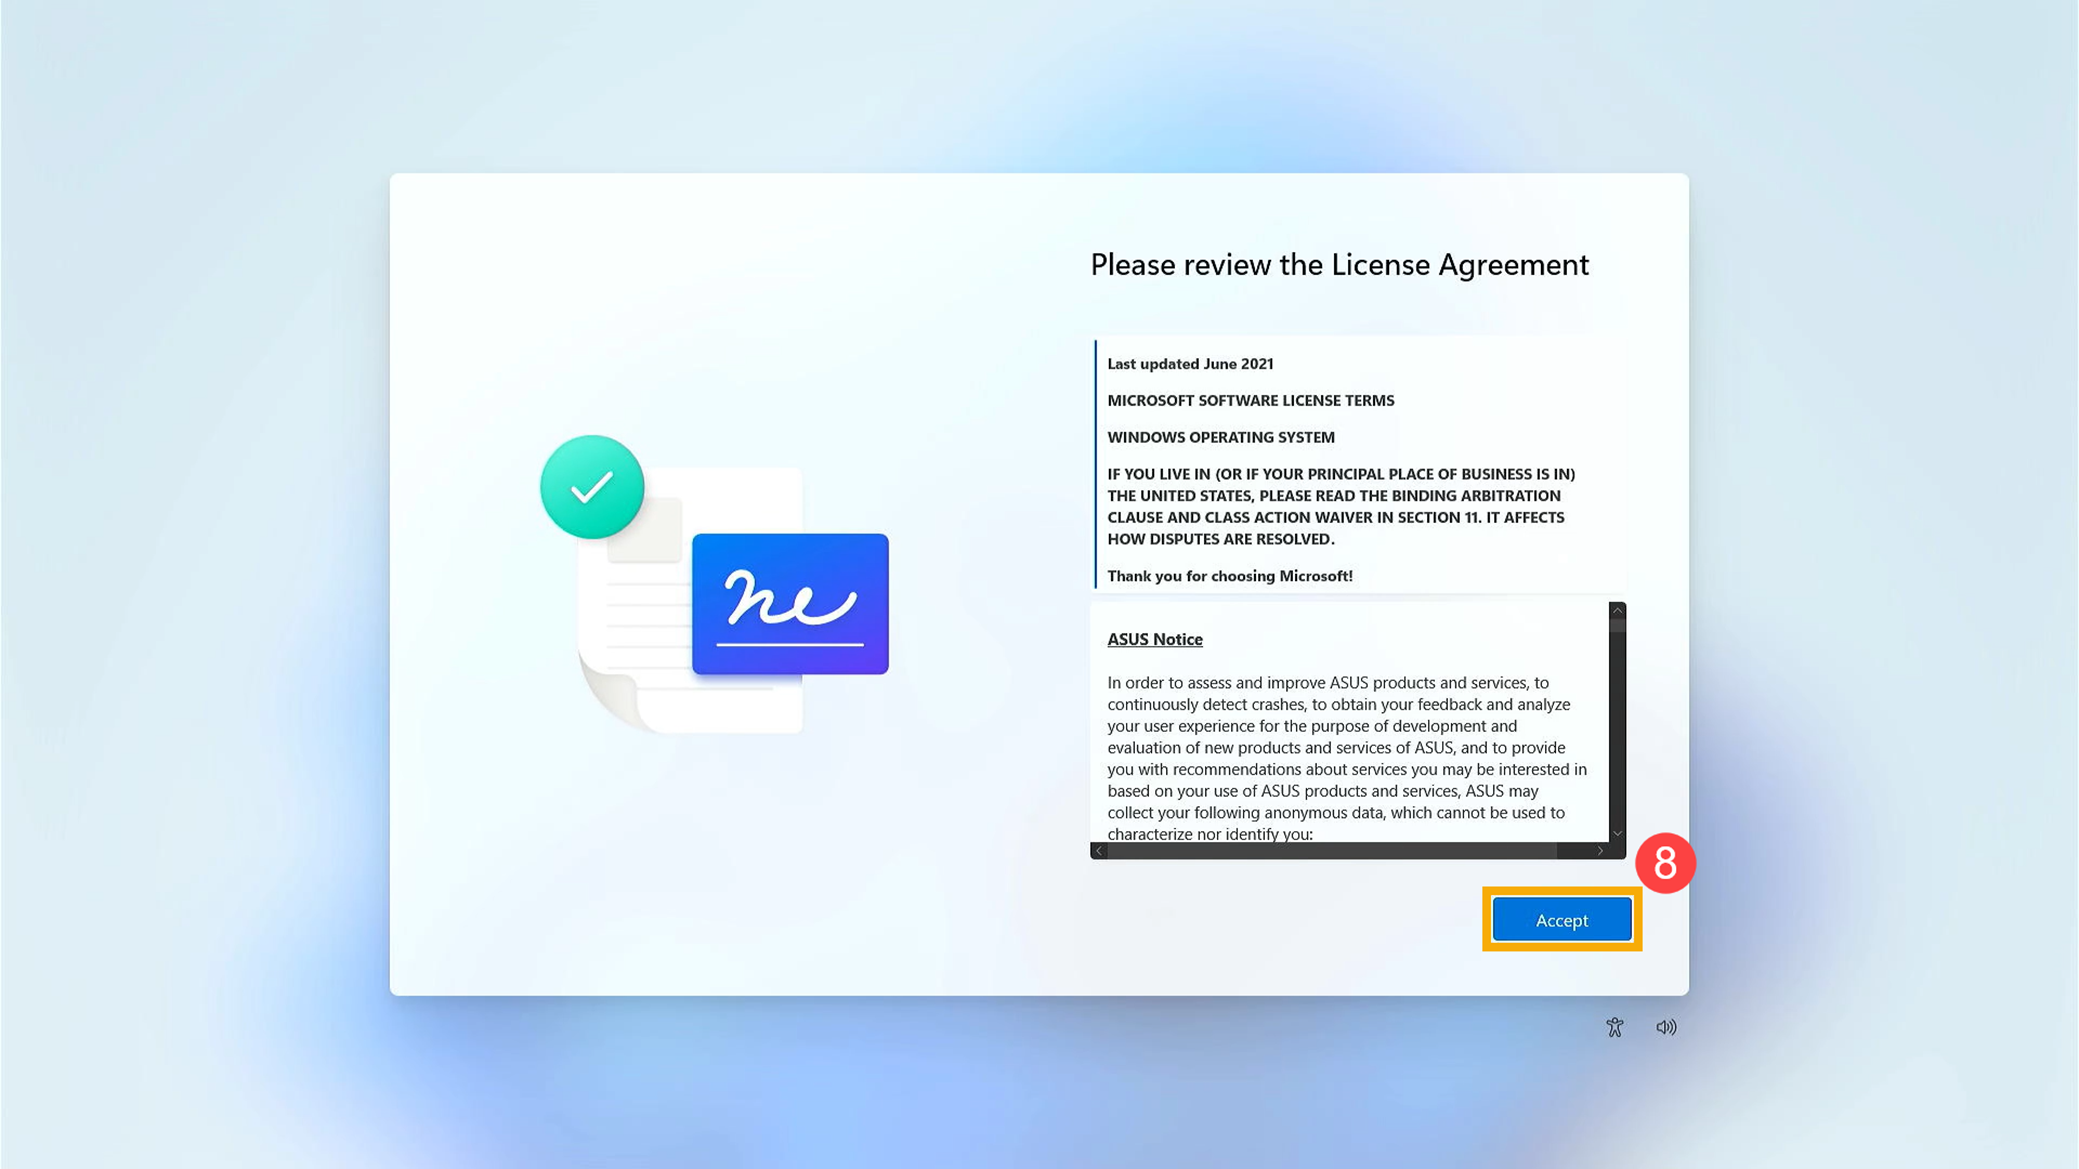
Примечание: Если Вы используете беспроводную сеть, убедитесь, что Вы подключены к сети Wi-Fi с самым сильным сигналом, чтобы избежать потенциальных проблем с настройками системы и сбоев обновления, которые могут возникнуть при слабом сигнале соединения. - Пожалуйста, ознакомьтесь с Лицензионным соглашением. Нажмите [Принимаю]⑧ для перехода к следующему шагу.
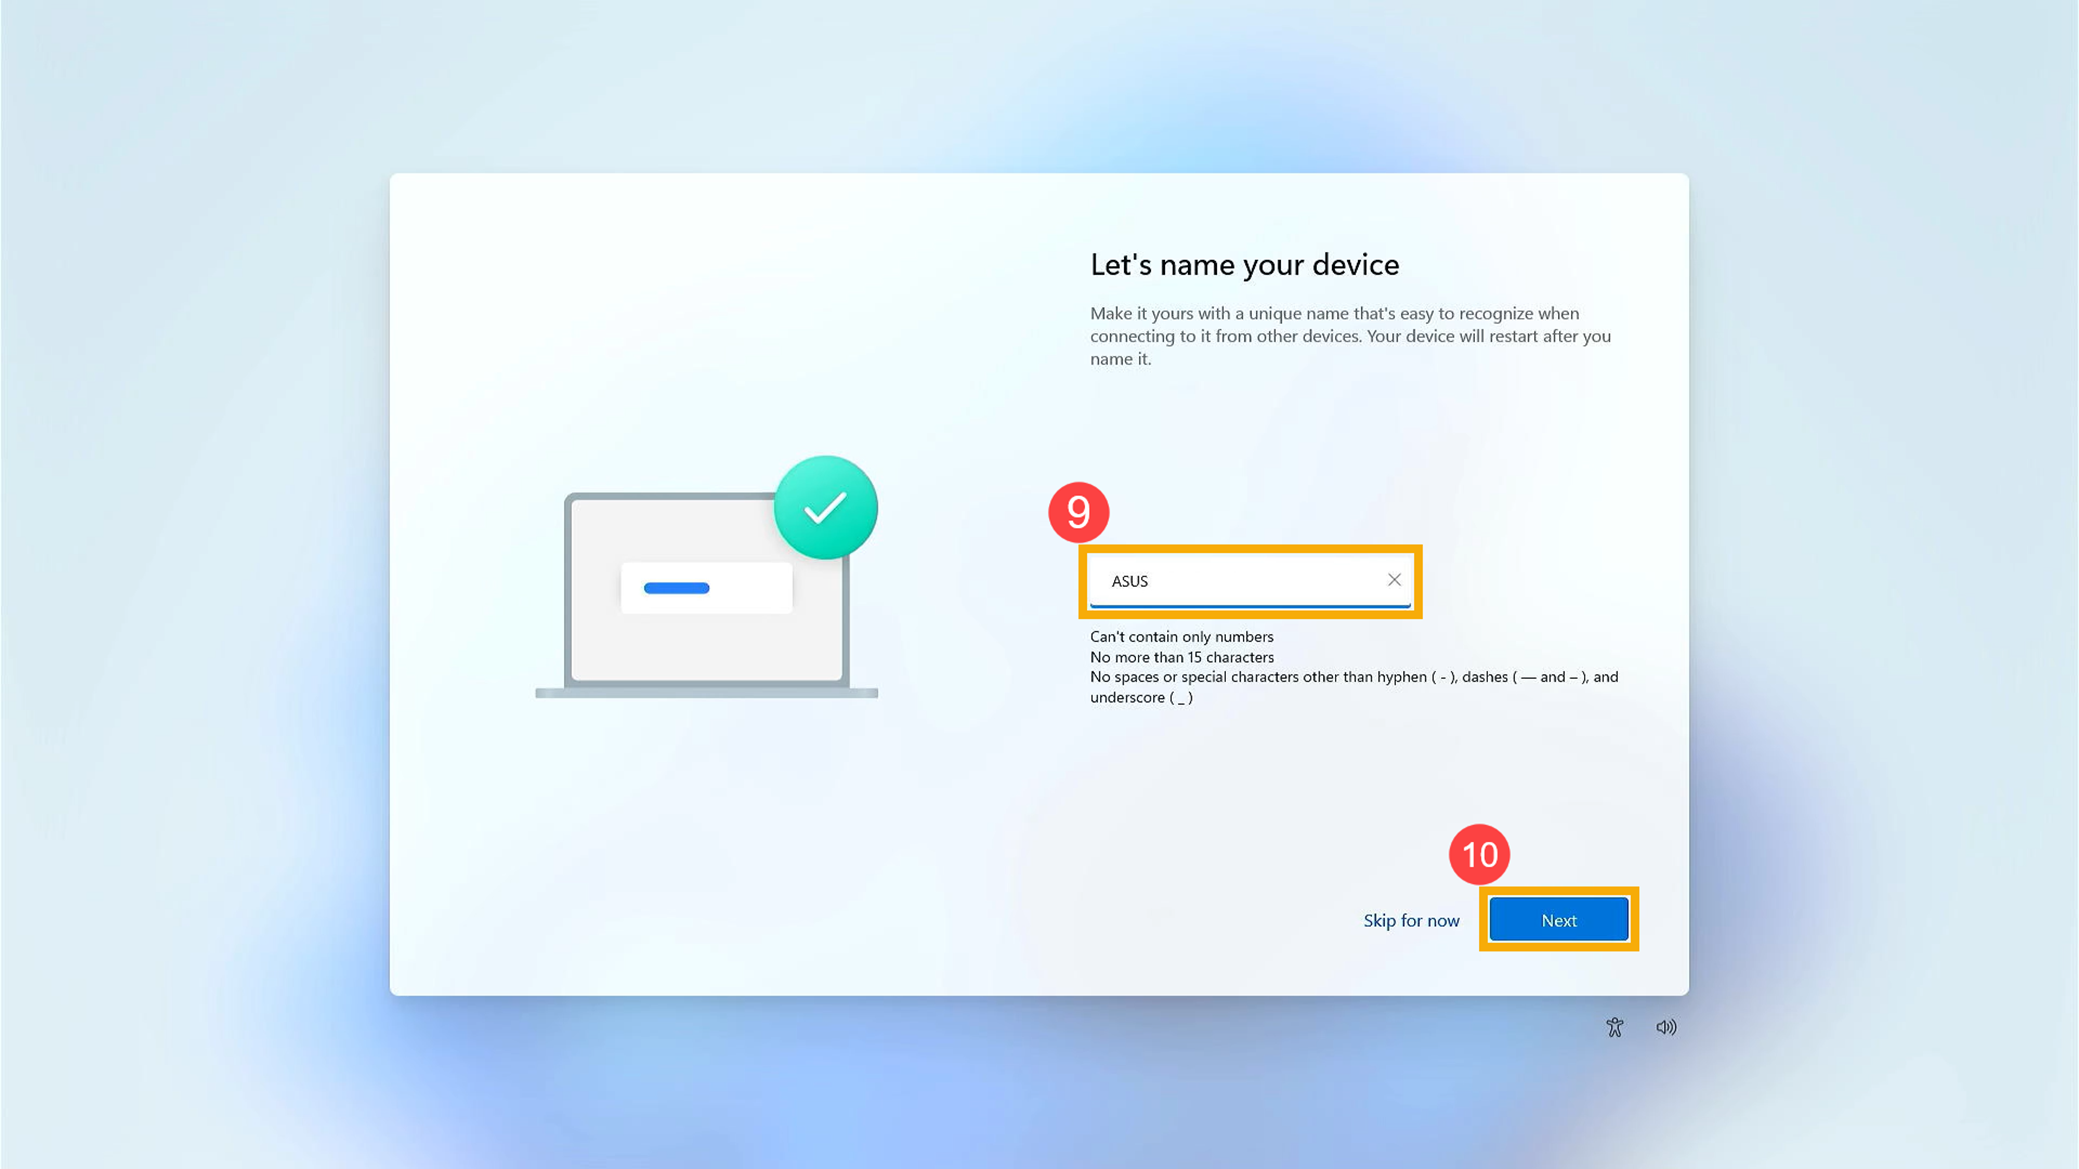
- Введите предпочитаемое имя устройства⑨, затем нажмите [Далее]⑩.
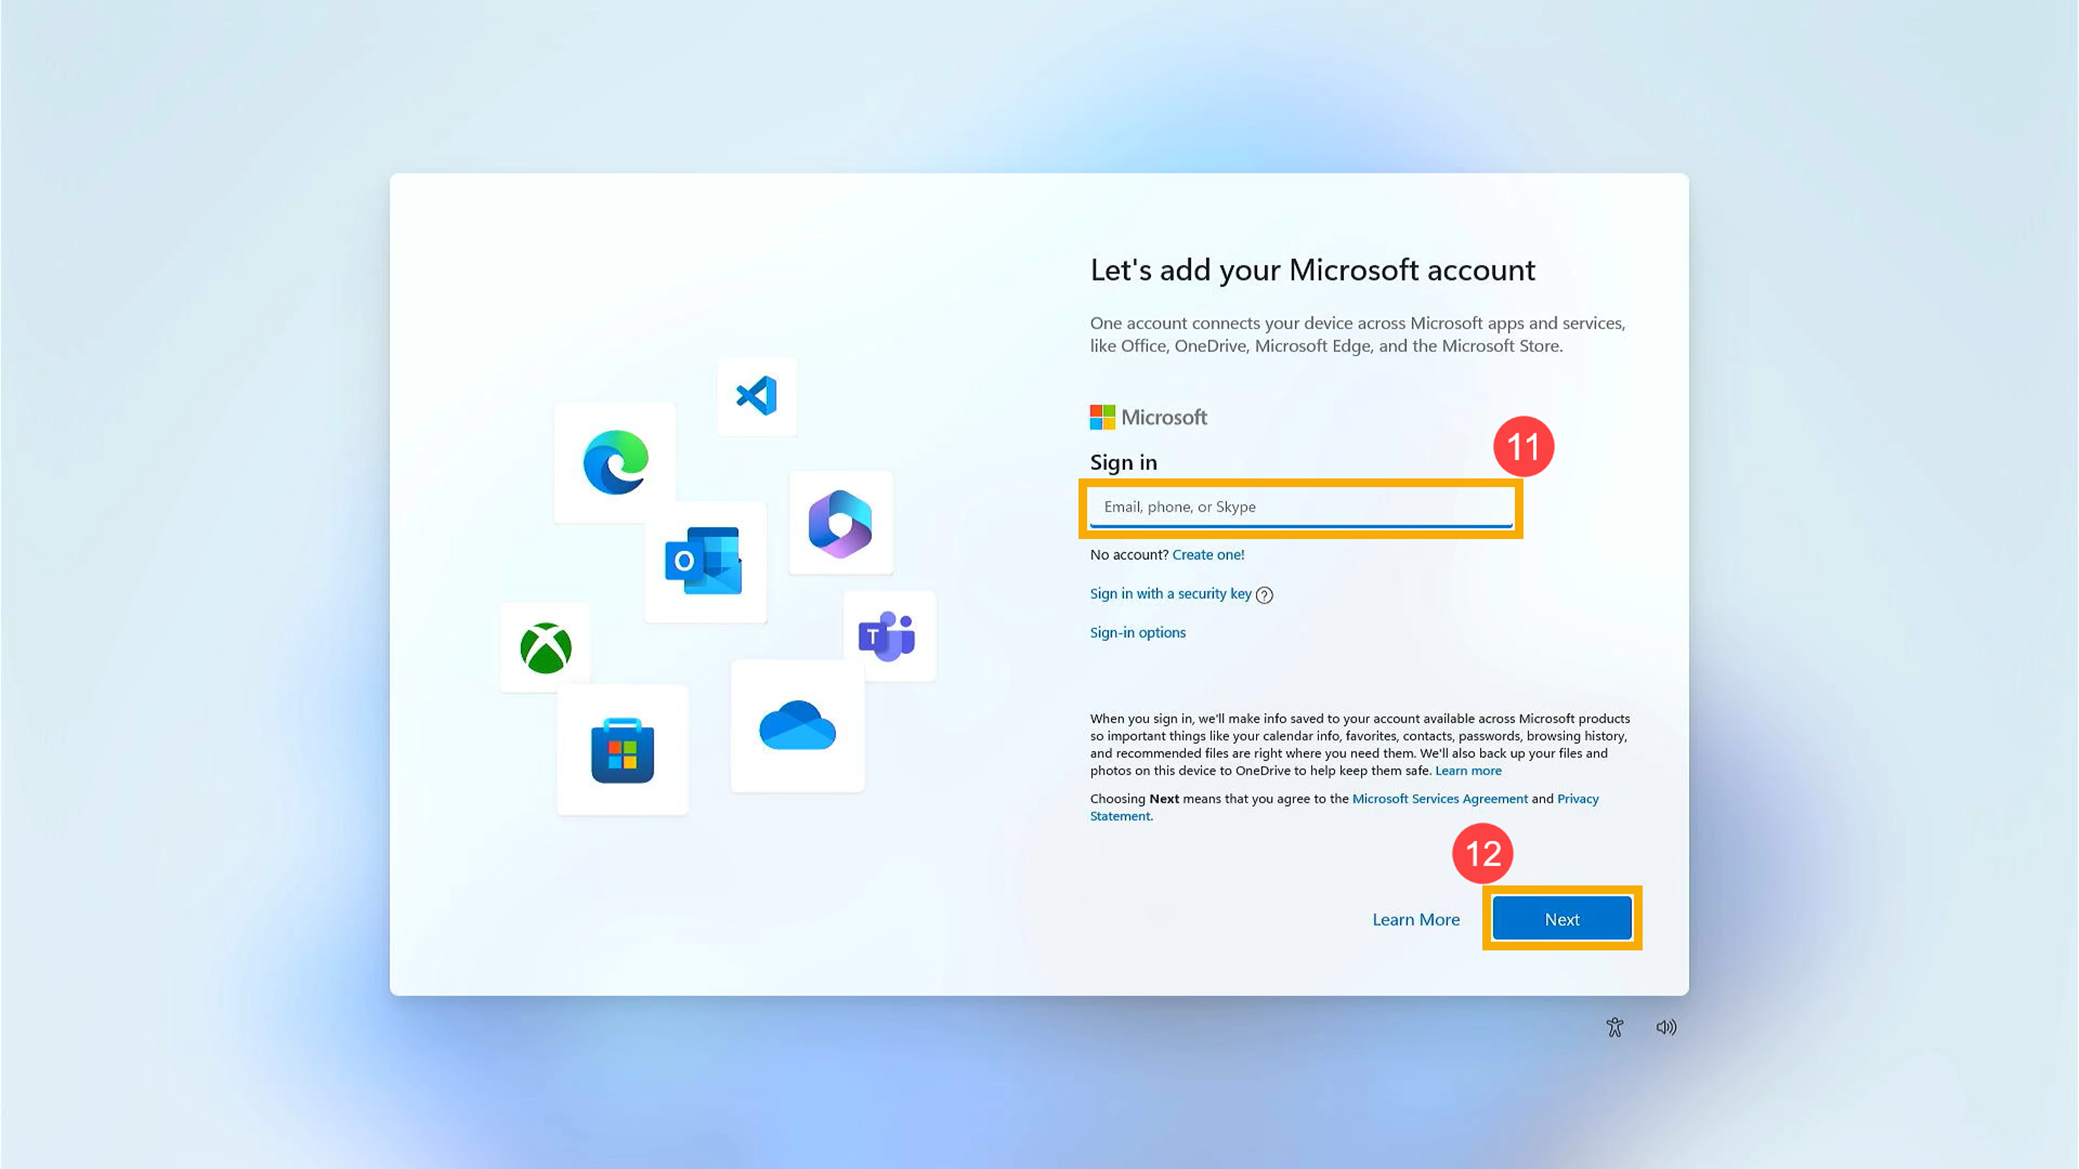
- Введите Ваш аккаунт Microsoft ⑪, нажмите [Далее]⑫.
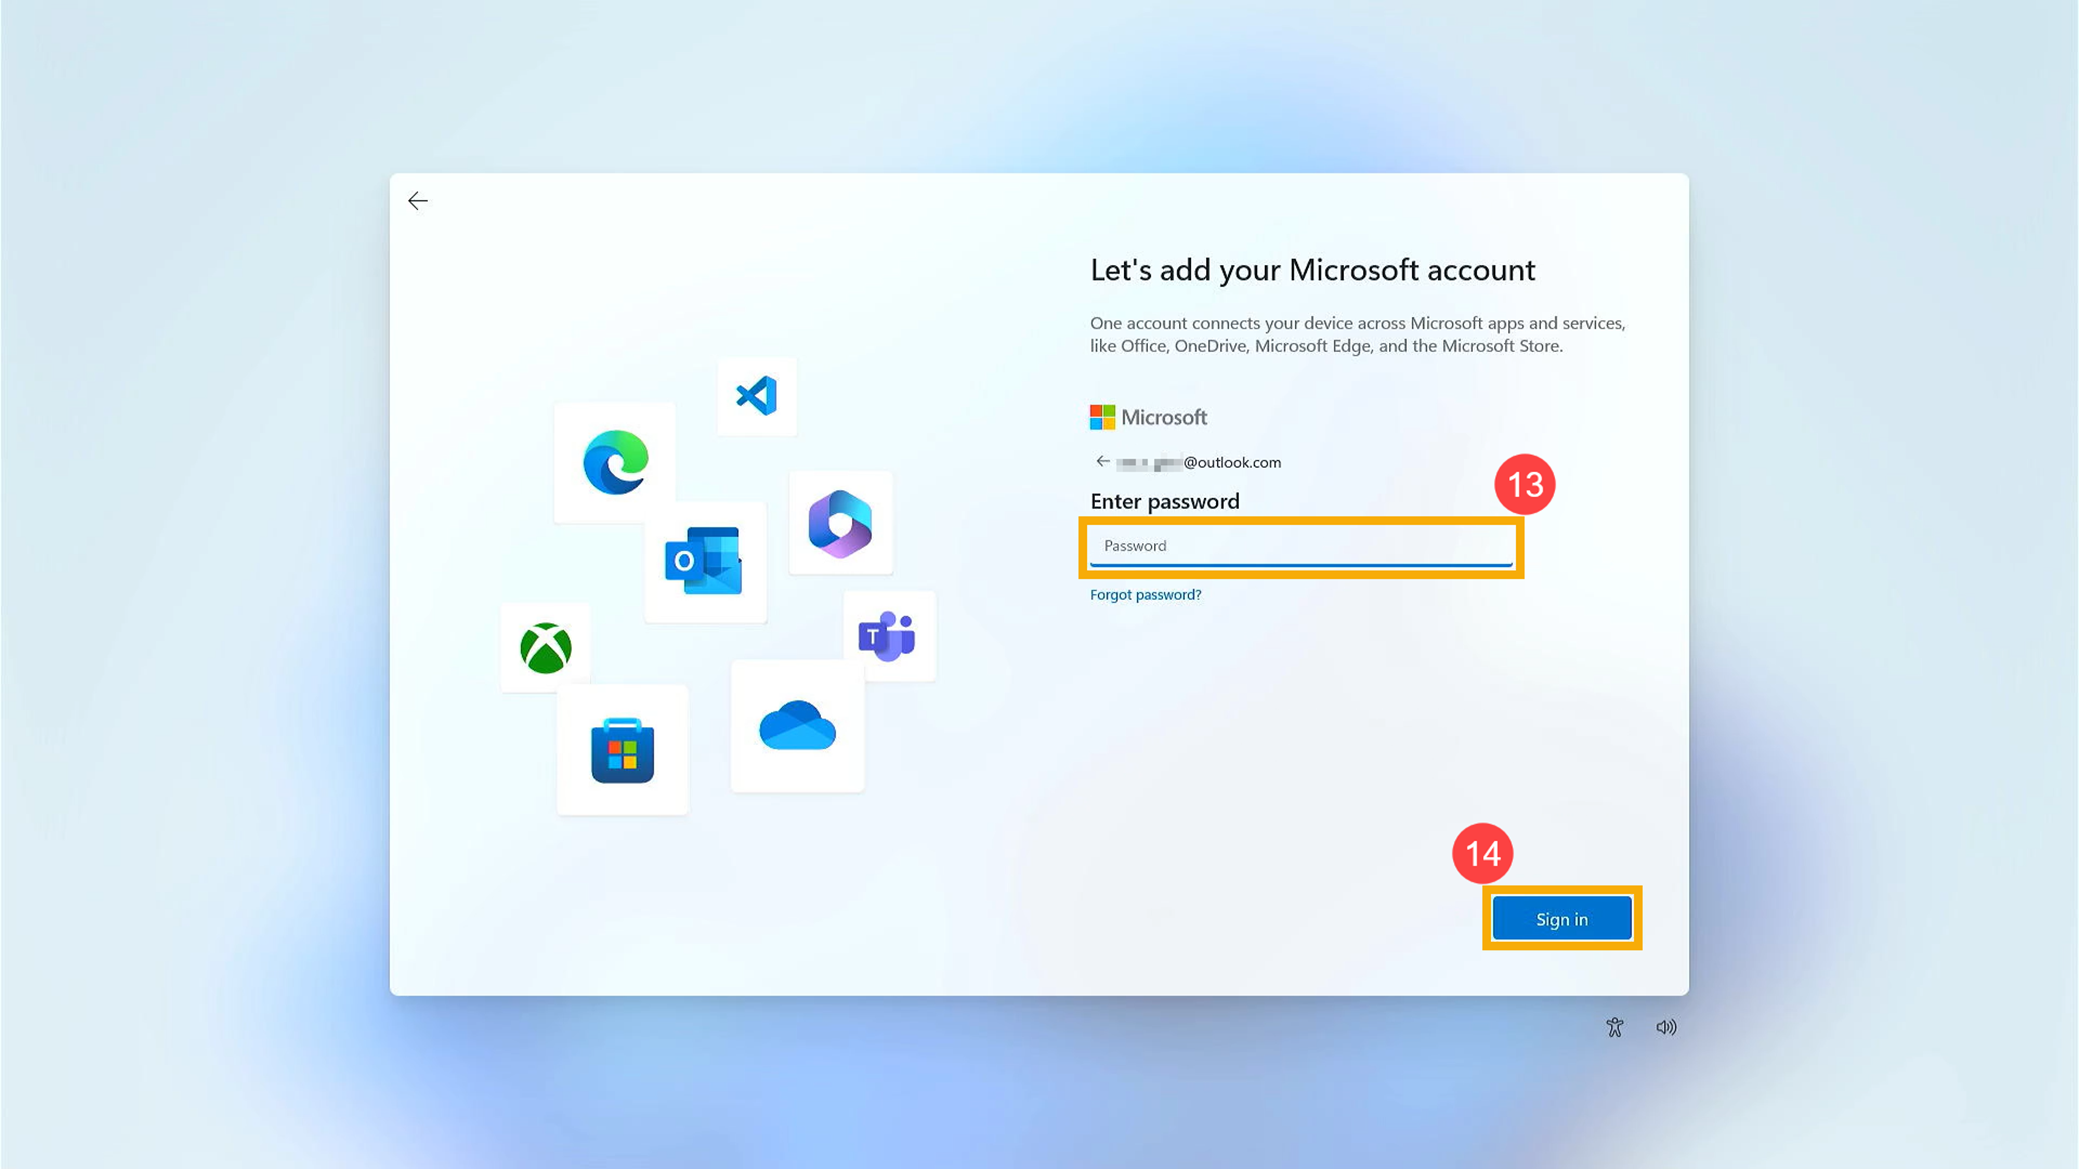
Примечание: Если у Вас еще нет учетной записи Microsoft, Вы можете создать новую и нажать Создать. Дополнительные сведения об учетной записи Microsoft смотрите Введение в учетную запись Майкрософт. - Введите пароль аккаунта Microsoft⑬, нажмите [Войти]⑭.
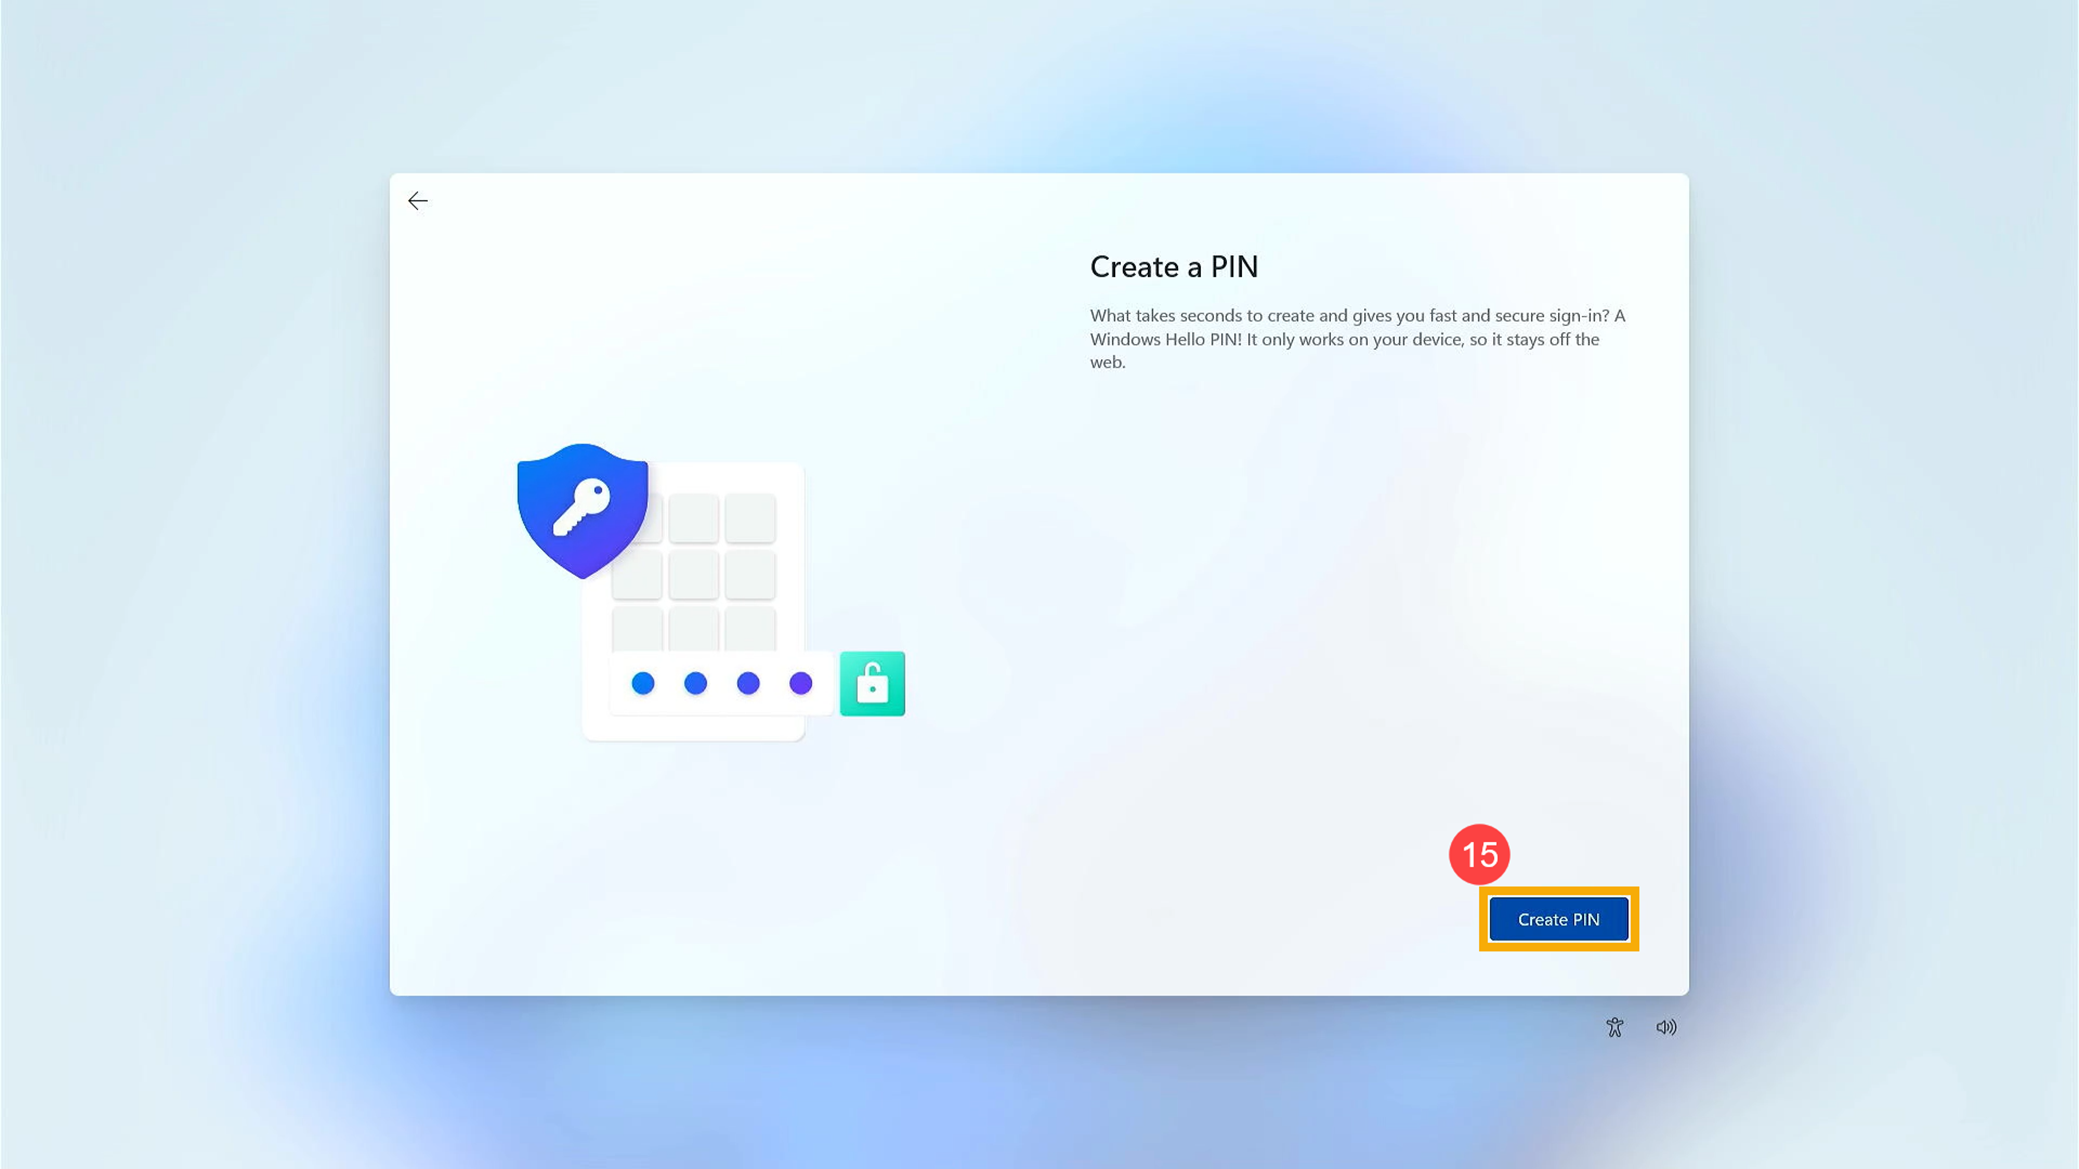
- Создайте PIN-код Windows Hello, чтобы обеспечить быстрый и безопасный вход. Пожалуйста, нажмите [Создать PIN]⑮.
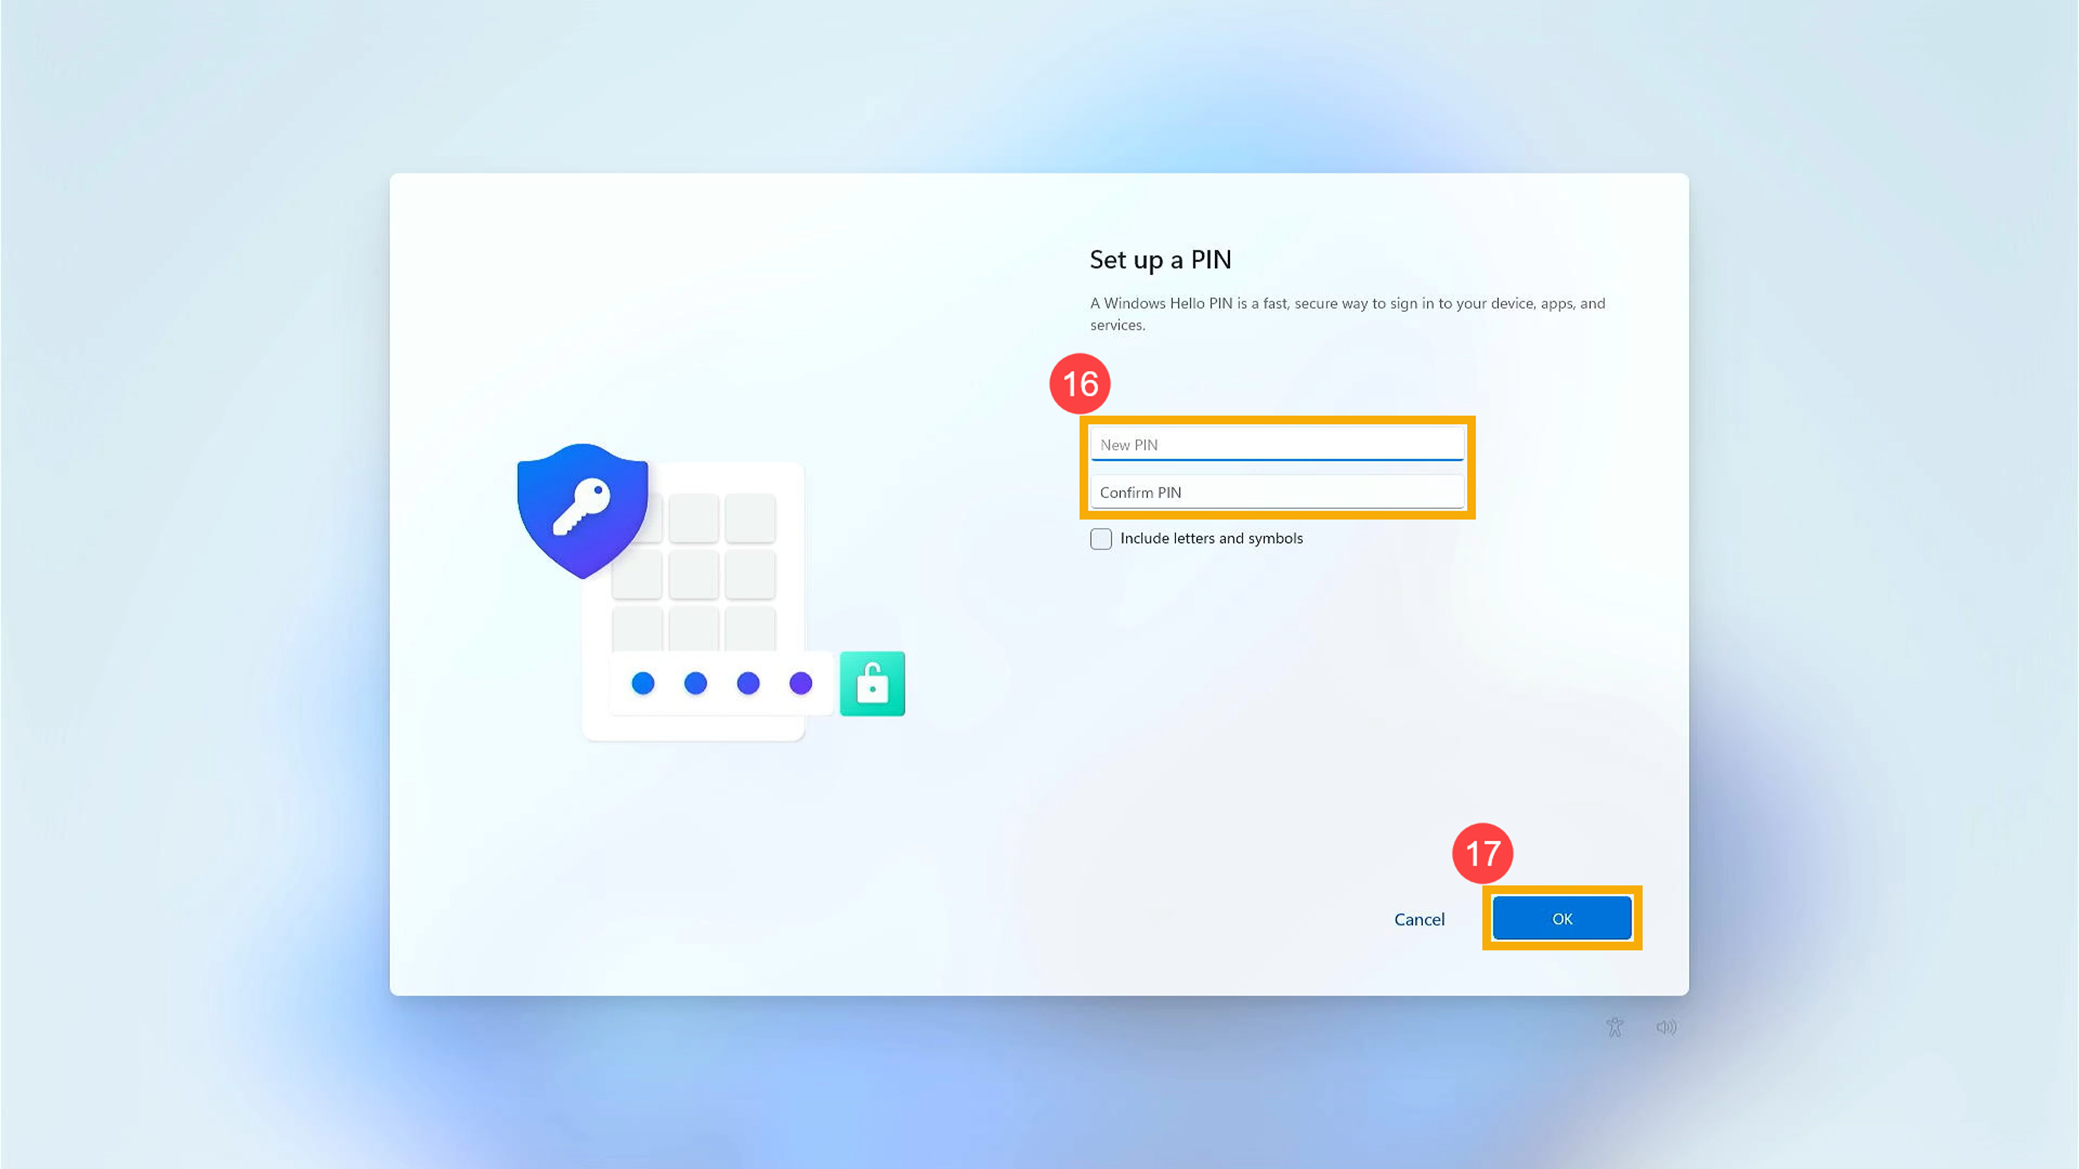
- Введите PIN, который Вы хотите использовать⑯, нажмите [OK]⑰.
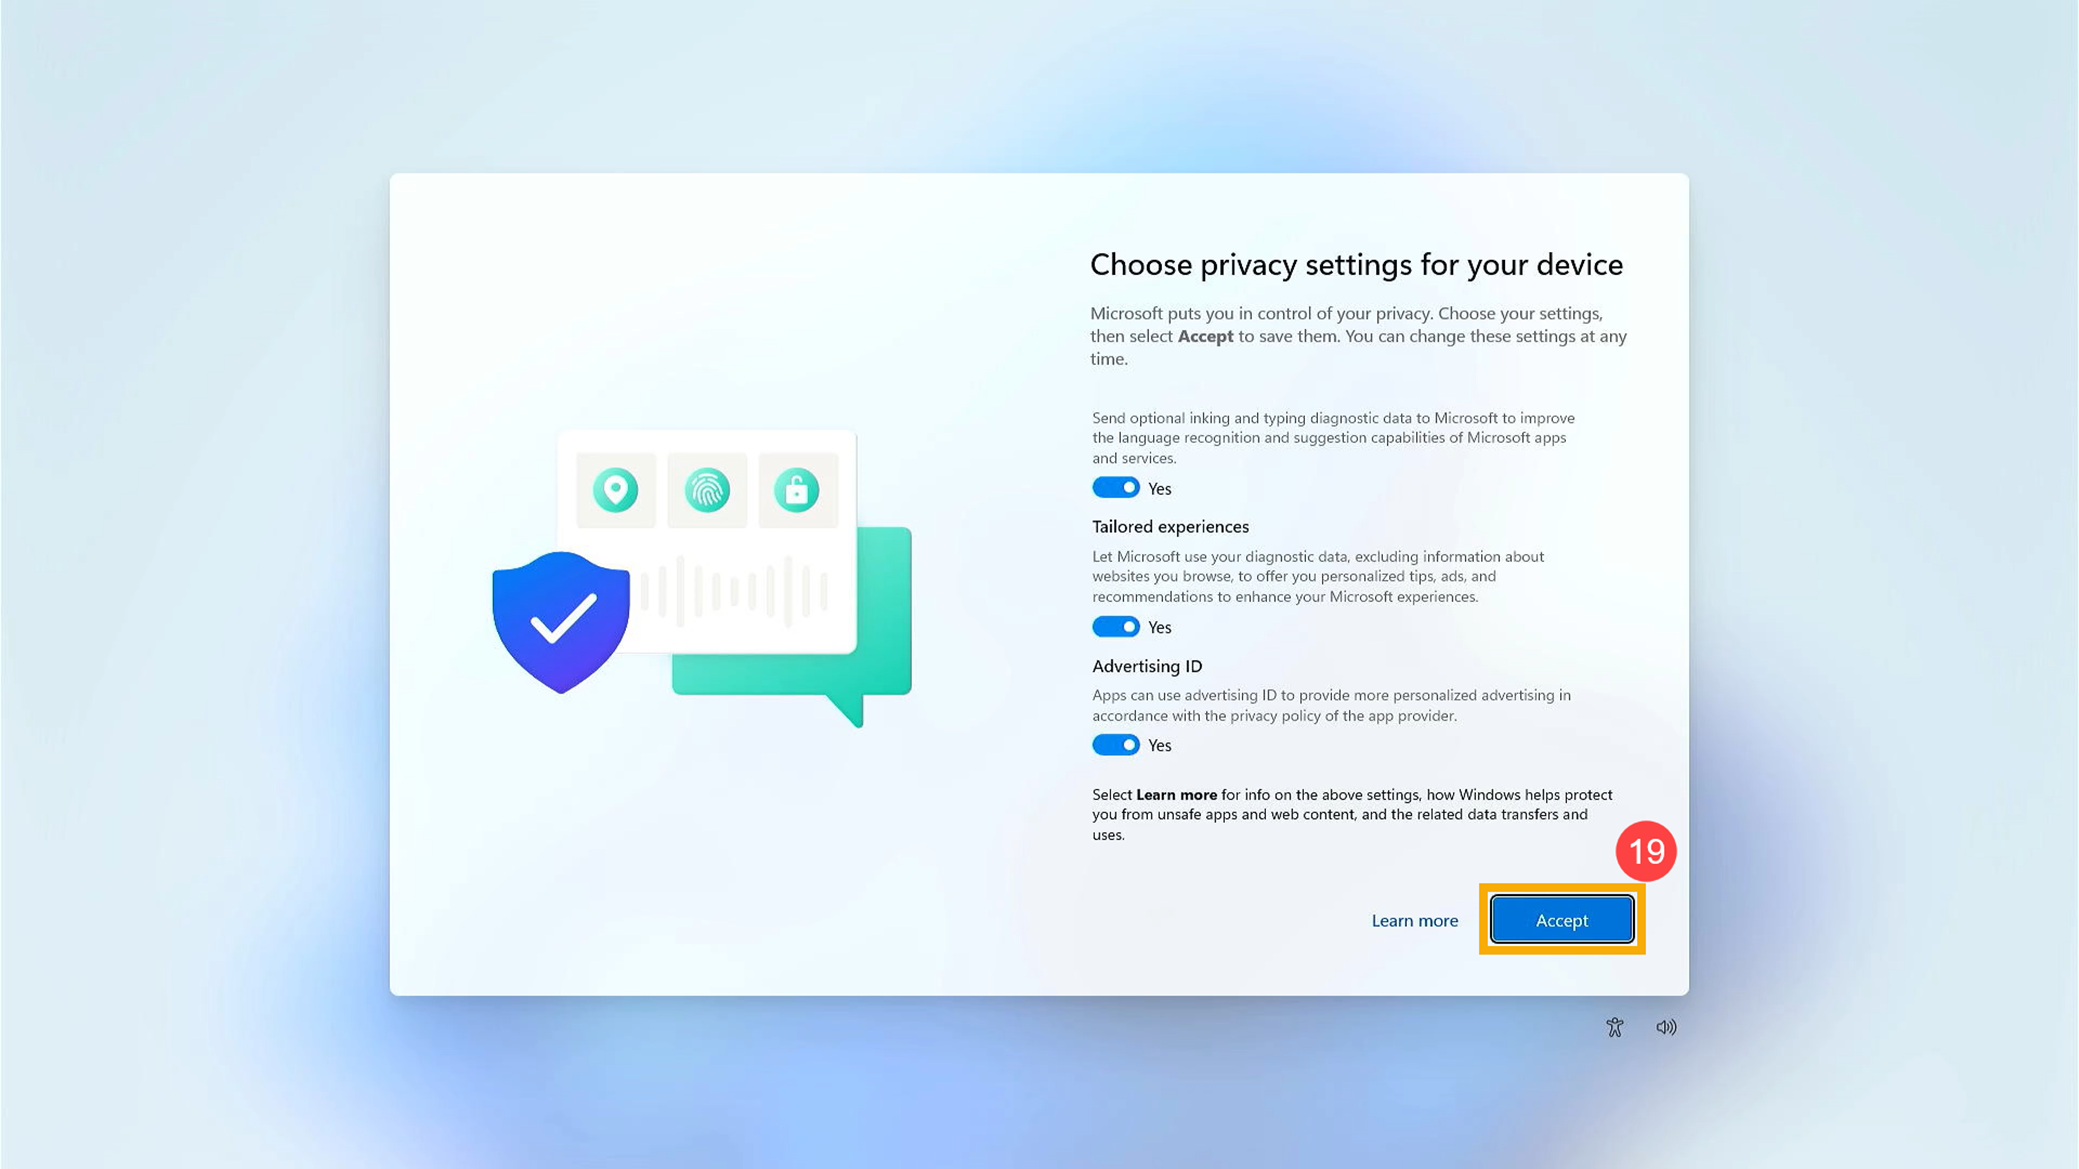
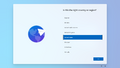
- Настройки конфиденциальности. Пожалуйста, выберите настройки конфиденциальности, к которым Вы согласны предоставить доступ Microsoft, затем нажмите [Далее]⑱ и нажмите [Принять]⑲.
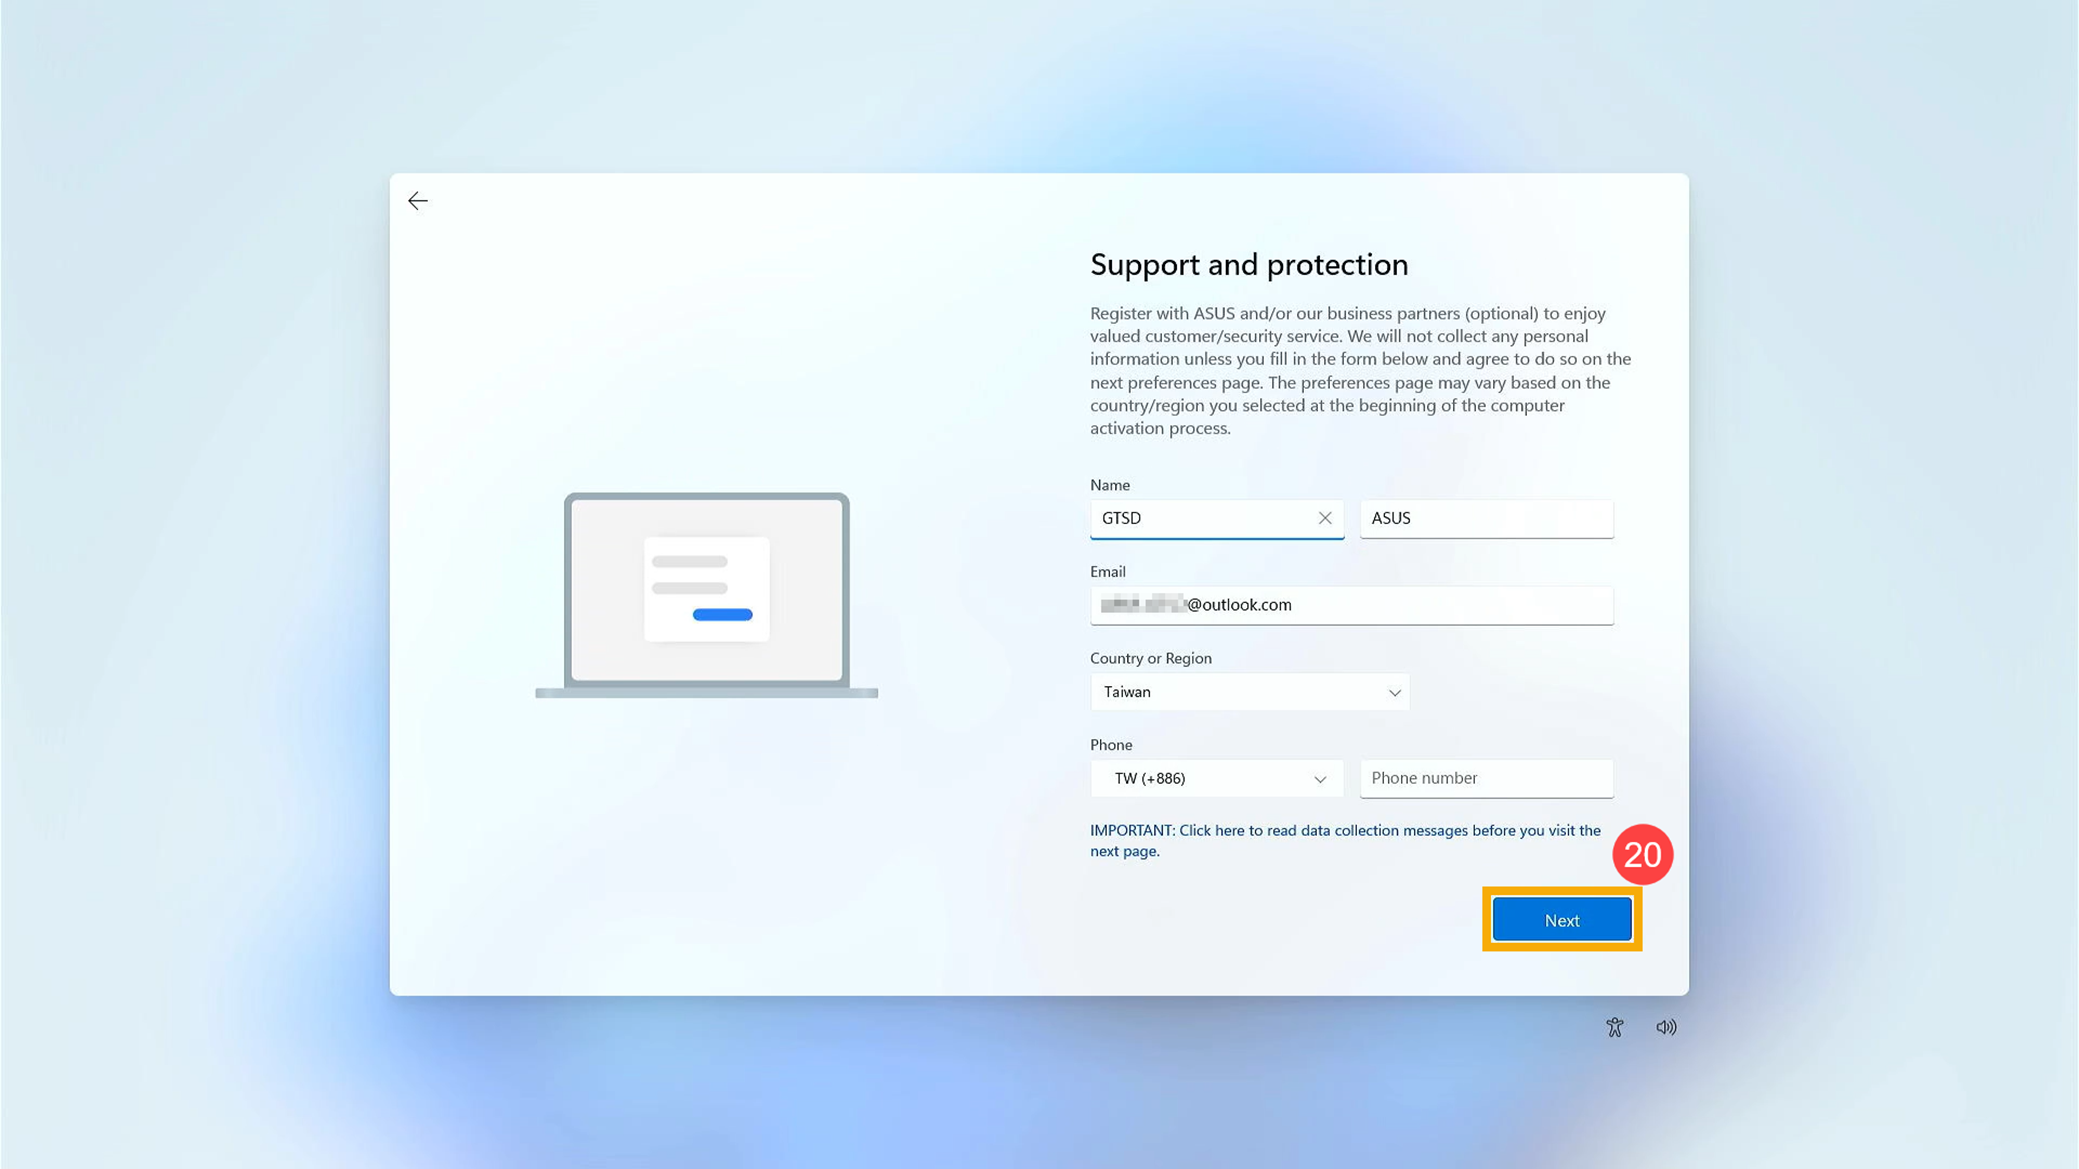
- Поддержка и защита. Вы можете зарегистрироваться в ASUS и/или у наших деловых партнеров (необязательно), чтобы пользоваться ценным обслуживанием клиентов/службой безопасности. Нажмите [Далее]⑳ для перехода к следующим настройкам.
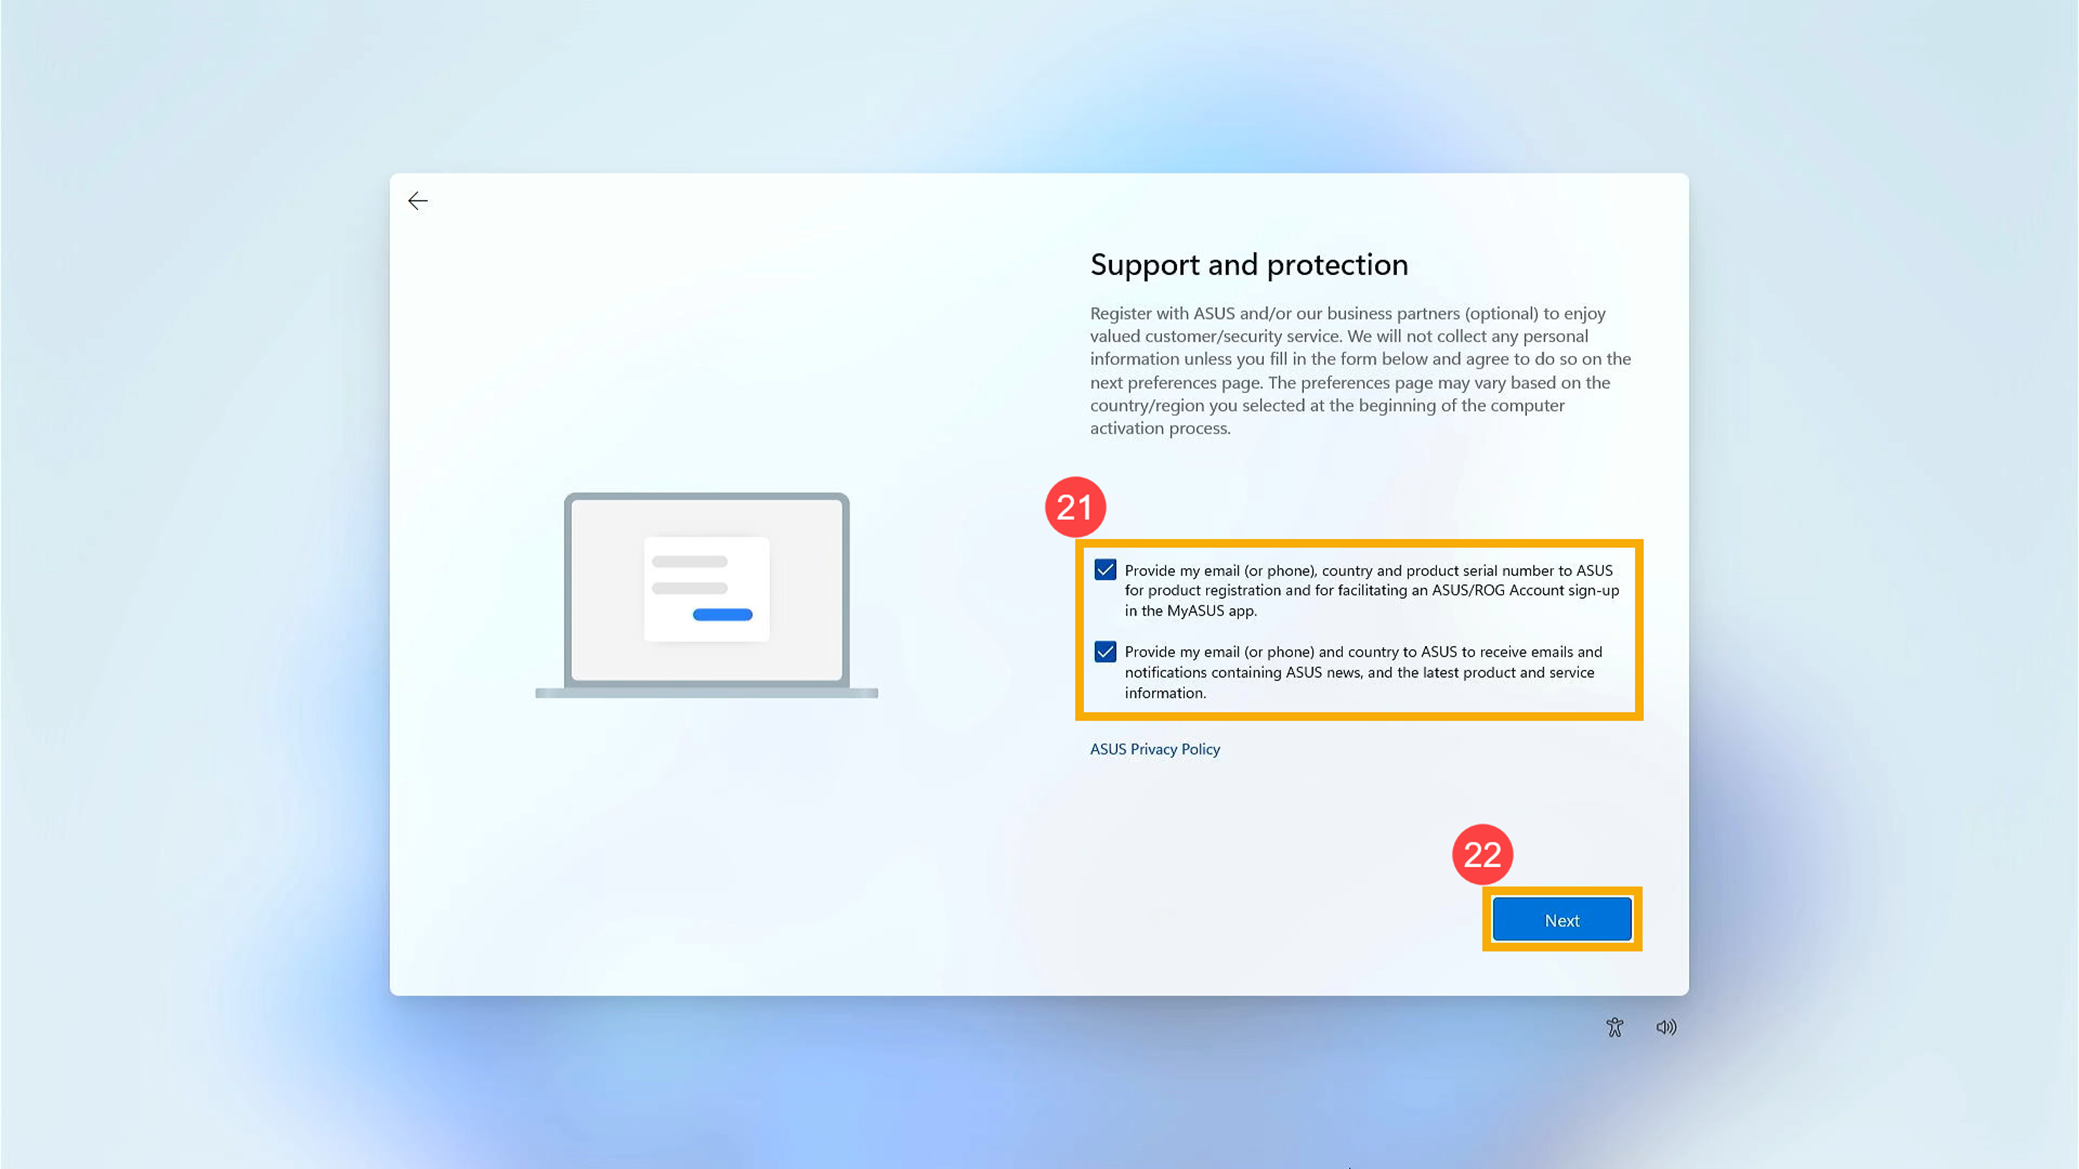
- Установите флажки, если Вы согласны предоставить свою информацию ASUS㉑, нажмите [Далее]㉒.
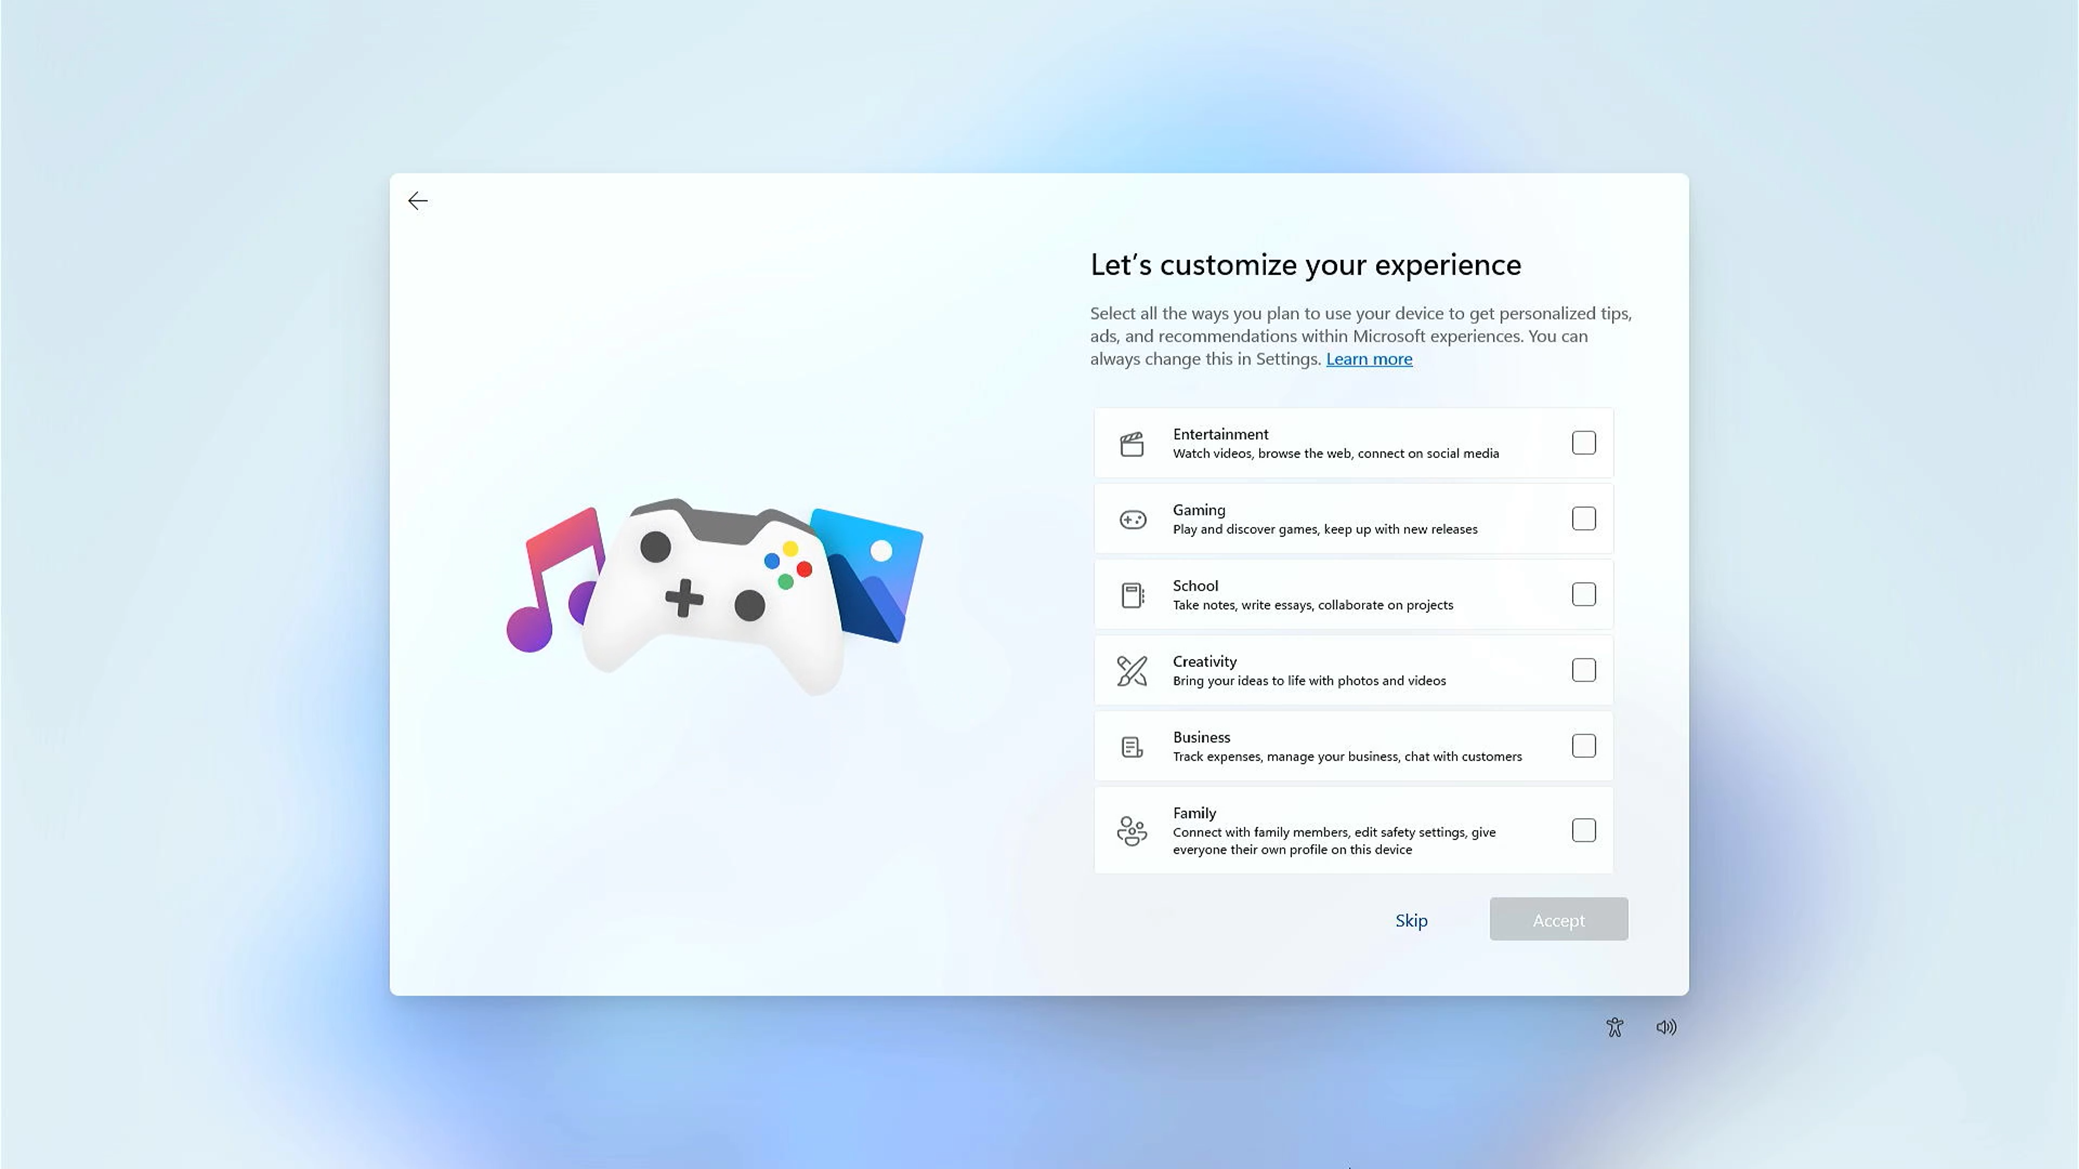
- Вы можете выбрать, как Вы планируете использовать свое устройство, чтобы получать персонализированные советы, рекламу и рекомендации с опытом Microsoft.
- Вы можете выбрать, привязываете ли Вы свой телефон к своей учетной записи Microsoft.
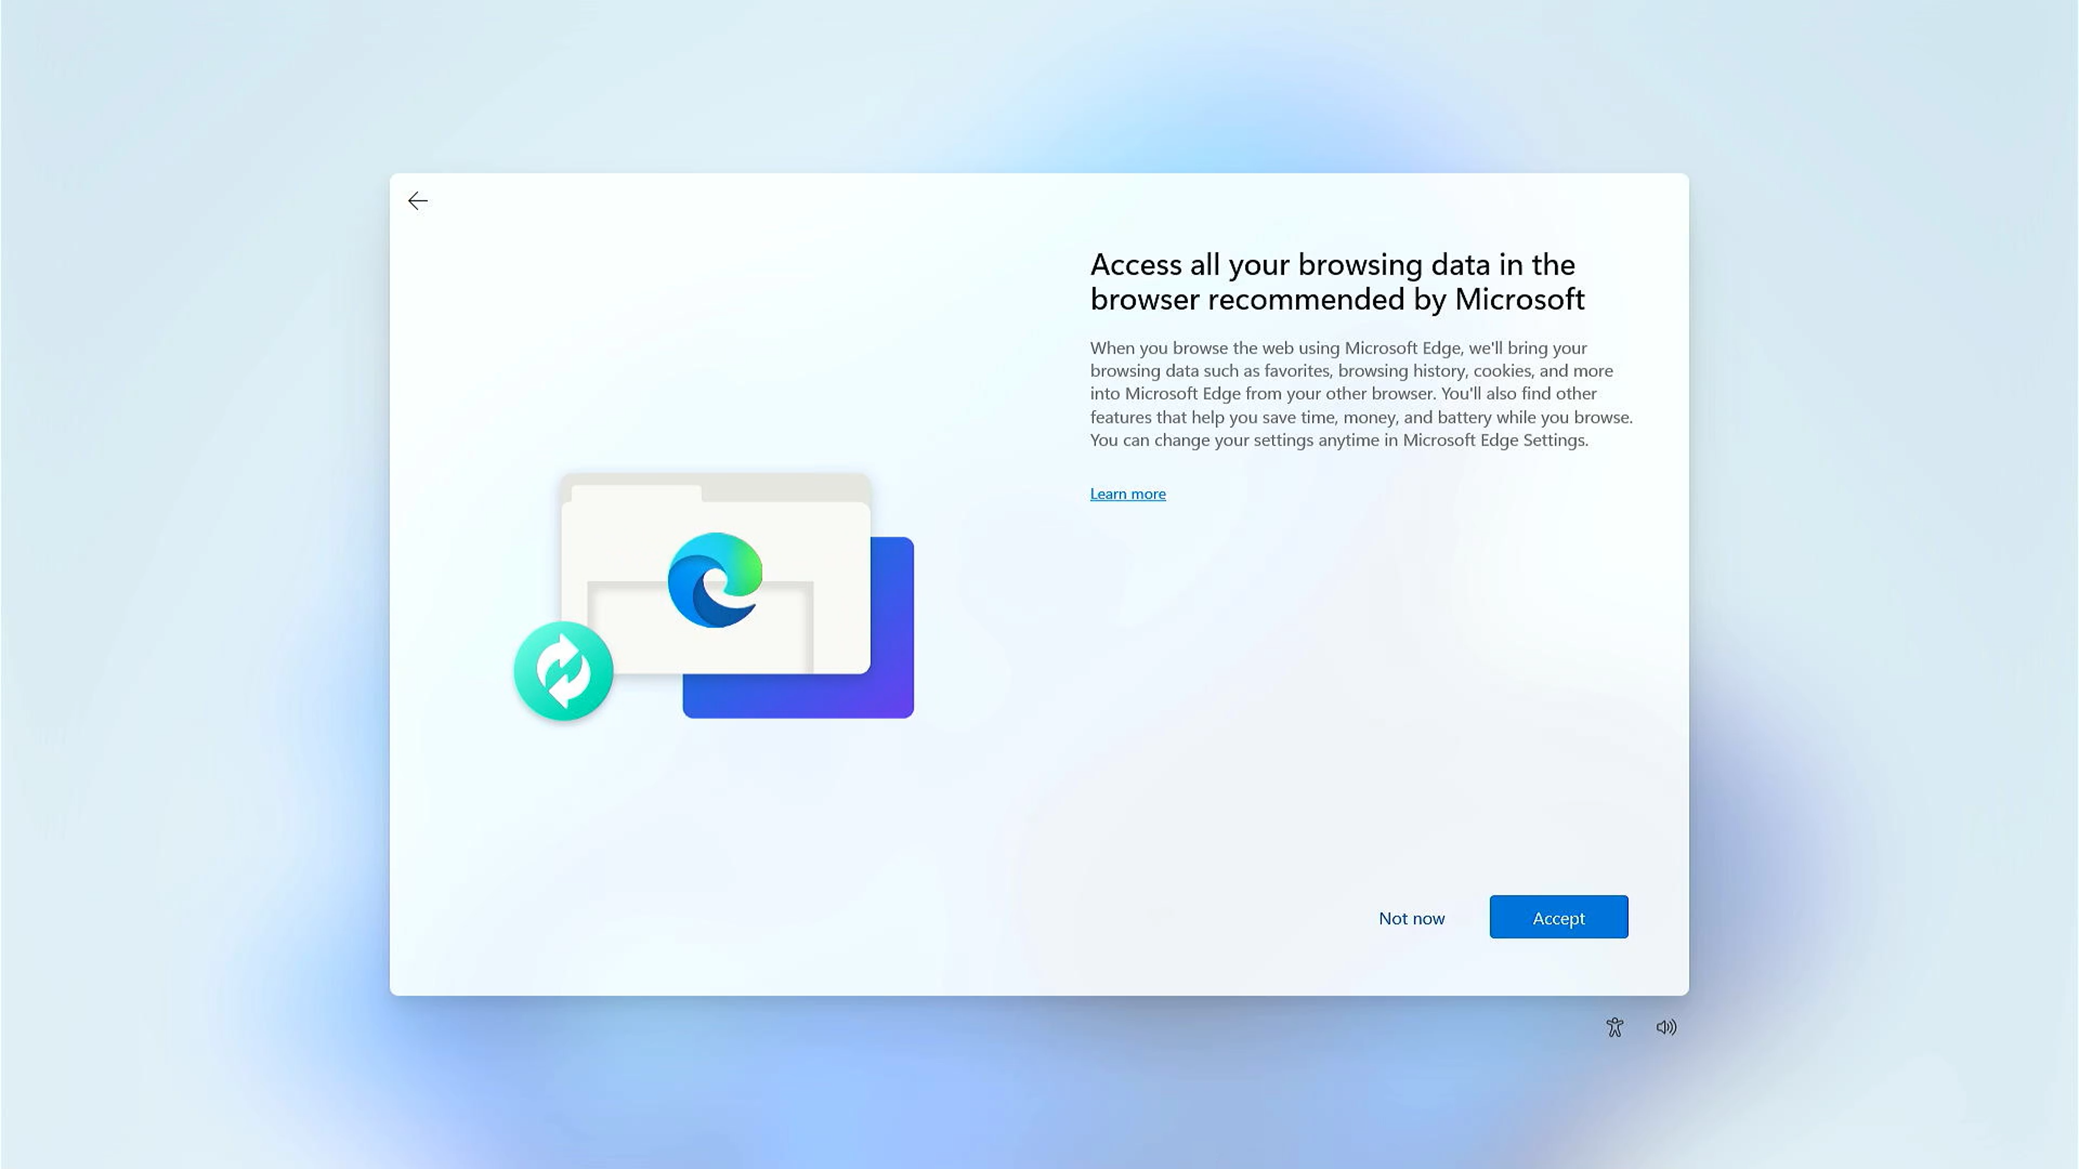
- Вы можете выбрать, получать ли доступ ко всем Вашим данным просмотра в браузере, рекомендованном Microsoft.
- После выполнения вышеуказанных основных настроек Windows 11 начнет установку приложений и предпочтительных настроек. Пожалуйста, убедитесь, что компьютер имеет достаточный заряд батареи во время процесса.
Он загрузится до рабочего стола Windows 11 после завершения всех процедур настройки.


Windows 10
- Выберите ваш регион или страну①, нажмите [Yes]②.
- Выберите раскладку клавиатуры③, нажмите [Yes]④.
- Если Вы хотите добавить еще одну раскладку, нажмите Добавить раскладку. Или нажмите [Пропустить]⑤, чтобы пропустить шаг.
- Лицензионное соглашение с Microsoft, нажмите [Принять] для перехода к следующему шагу⑥.
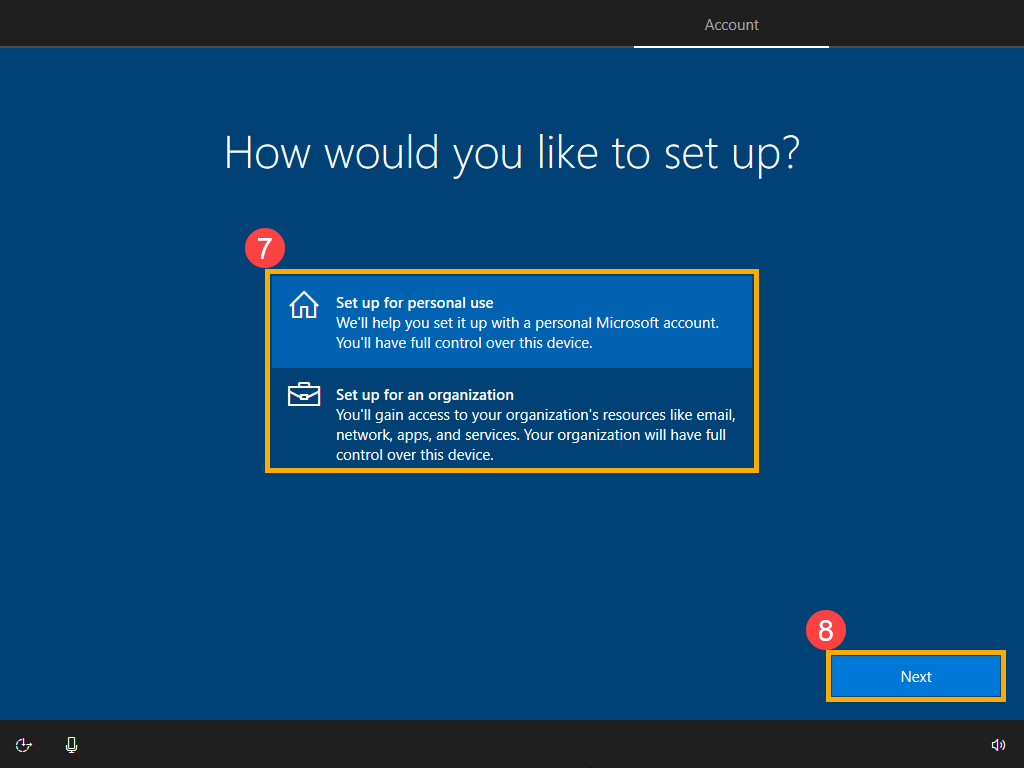
- Выберите, что хотите настроить⑦, затем нажмите [Далее]⑧.
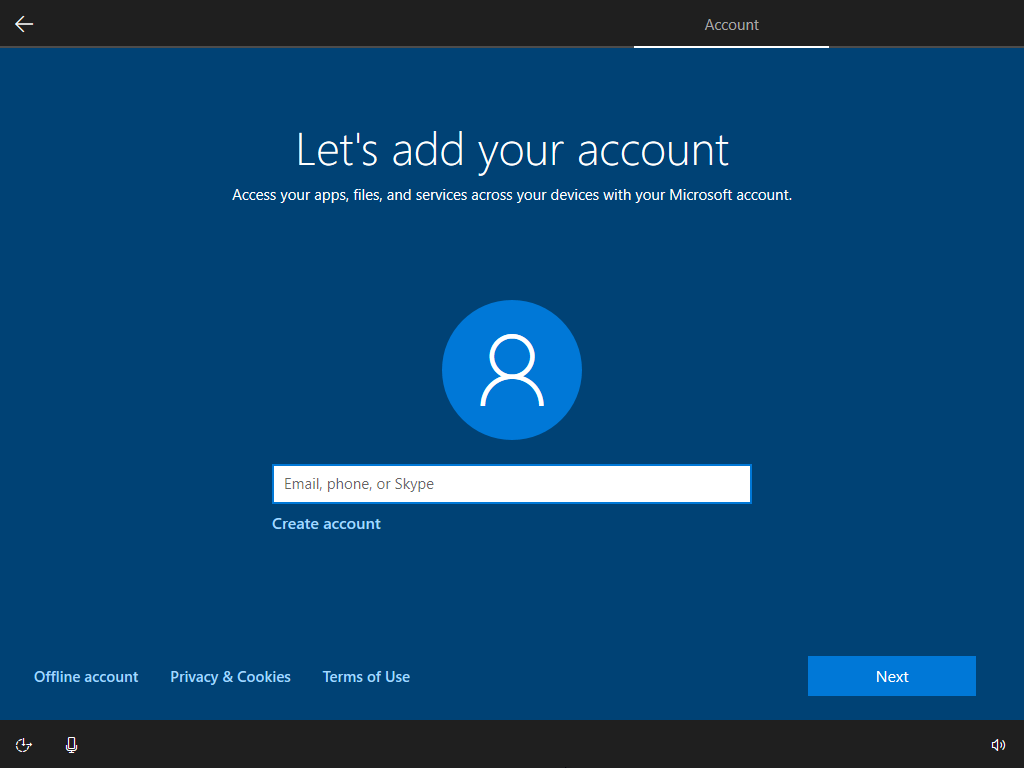
- Войдите в свою учетную запись Майкрософт. Если у Вас есть учетная запись Microsoft, нажмите Далее после ввода. Если у Вас еще нет учетной записи Microsoft, вы можете создать новую и выбрать Создать учетную запись.
Примечание: Если Вы входите под учётной записью Microsoft, пожалуйста, перейдите к Шагу 8, чтобы продолжить основные настройки Windows 10.
В противном случае выберите Автономную учетную запись, если Вы пока не хотите ее создавать. Базовые настройки операционной системы Windows сохранятся, и Вы сможете снова создать учетную запись после того, как настройки будут завершены и компьютер перейдет на рабочий стол. - Если Вы войдете в автономную учетную запись на последнем шаге, Вы увидите экран ниже, а затем выберите [Ограниченный опыт] ⑨. Если Вы выберете Далее на этом экране, Вам необходимо будет войти в систему с учетной записью Microsoft, чтобы перейти к следующему шагу.
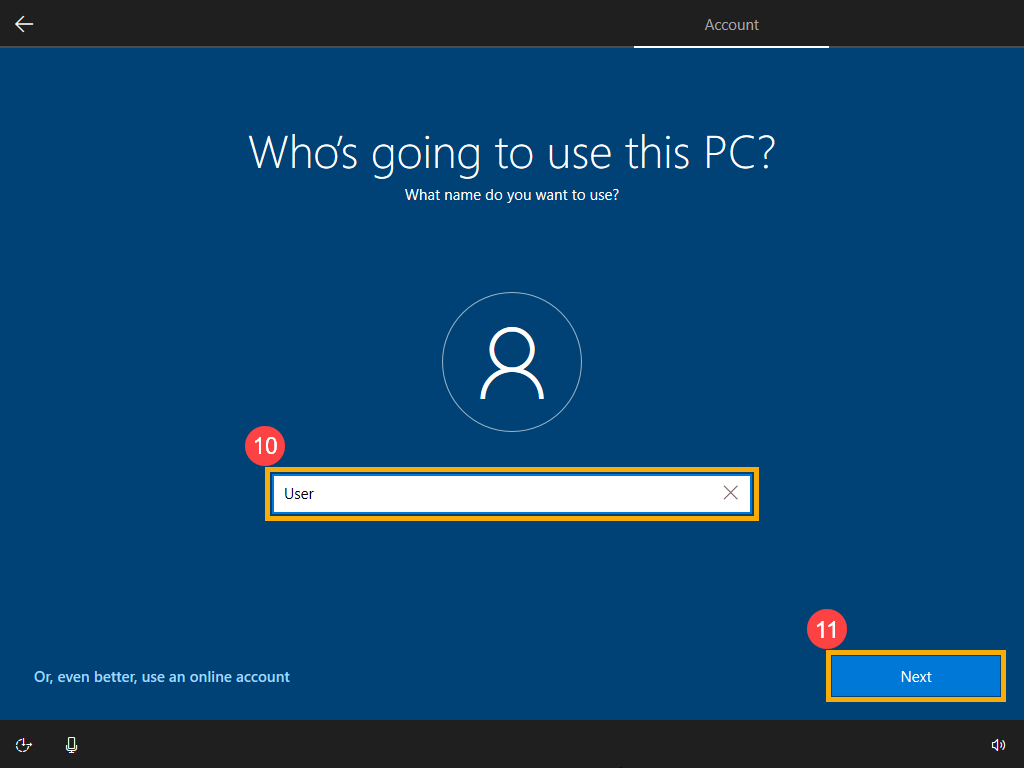
Поскольку Вы не вошли в систему с учетной записью Microsoft, Вам необходимо использовать этот компьютер через локальную учетную запись. Пожалуйста, введите желаемое имя⑩, затем нажмите [Далее] ⑪.
Чтобы защитить Вашу личную жизнь, установите пароль, который будет использоваться для входа в Windows⑫, затем нажмите [Далее] ⑬.
Если Вы не хотите создавать пароль, оставьте столбец пустым и нажмите кнопку Далее. - Настройки конфиденциальности. Выберите параметры конфиденциальности, к которым Вы согласны предоставить доступ Microsoft, а затем выберите [Принять] ⑭ после выбора параметров.
- Выберите, согласны ли Вы предоставить Microsoft доступ к истории ваших действий, Microsoft будет использовать эти данные для персонализации Вашего опыта.
- Выберите, согласны ли Вы, чтобы Cortana помогала Вам.
- После завершения вышеуказанных основных настроек Windows 10 начнет установку приложений и предпочтительных настроек. Пожалуйста, убедитесь, что компьютер имеет достаточный заряд батареи для завершения этого процесса.
Система войдет на рабочий стол Windows 10 после завершения всех процедур настройки.


Эта информация была полезной?
Yes
No
- Приведенная выше информация может быть частично или полностью процитирована с внешних веб-сайтов или источников. Пожалуйста, обратитесь к информации на основе источника, который мы отметили. Пожалуйста, свяжитесь напрямую или спросите у источников, если есть какие-либо дополнительные вопросы, и обратите внимание, что ASUS не имеет отношения к данному контенту / услуге и не несет ответственности за него.
- Эта информация может не подходить для всех продуктов из той же категории / серии. Некоторые снимки экрана и операции могут отличаться от версий программного обеспечения.
- ASUS предоставляет вышеуказанную информацию только для справки. Если у вас есть какие-либо вопросы о содержании, пожалуйста, свяжитесь напрямую с поставщиком вышеуказанного продукта. Обратите внимание, что ASUS не несет ответственности за контент или услуги, предоставляемые вышеуказанным поставщиком продукта.
(Image credit: Future)
As part of the Windows 11 September 2023 Update with Copilot, Microsoft is also adding some changes to the Out-of-box Experience (OOBE).
On Windows 11, the OOBE is the wizard that helps you finish setting up a new installation or device. This is the experience where you typically create a new account, choose your language, configure the keyboard layout, and select your privacy settings.
Although, for the most part, the Out-of-box Experience is similar to the previous version, you will notice some changes. For example, there are some changes to restore settings, files, and apps from another device. Voice Access is now available in this experience, and depending on how you select some of the settings, the system will set up the desktop differently.
This guide will walk you through the most important changes coming to the OOBE experience on the Windows 11 2023 Update.
OOBE changes on Windows 11 September 2023 Update
These are the most significant changes for the Out-of-box Experience on the Windows 11 September 2023 update with Copilot.
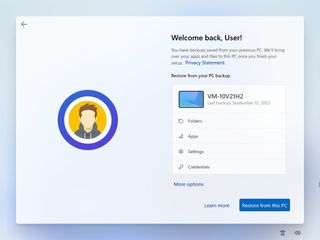
OOBE with backup settings
Starting on the Windows 11 September 2023 Update, in addition to the OOBE, the setup also includes the Second-chance Out-of-box Experience (SCOOBE), and in this part of the wizard, you will now have the option to create or restore your apps, settings, credentials, and files from backup.
If you’re setting up a new computer, the initial setup will guide you to restore your files, settings, and apps from the OneDrive backup previously created through the «Windows Backup» settings or the new «Windows Backup» applications.
On the other hand, if you’re setting up a new installation and the system detects that there aren’t previous backups, you will have the option to configure the backup to the cloud.
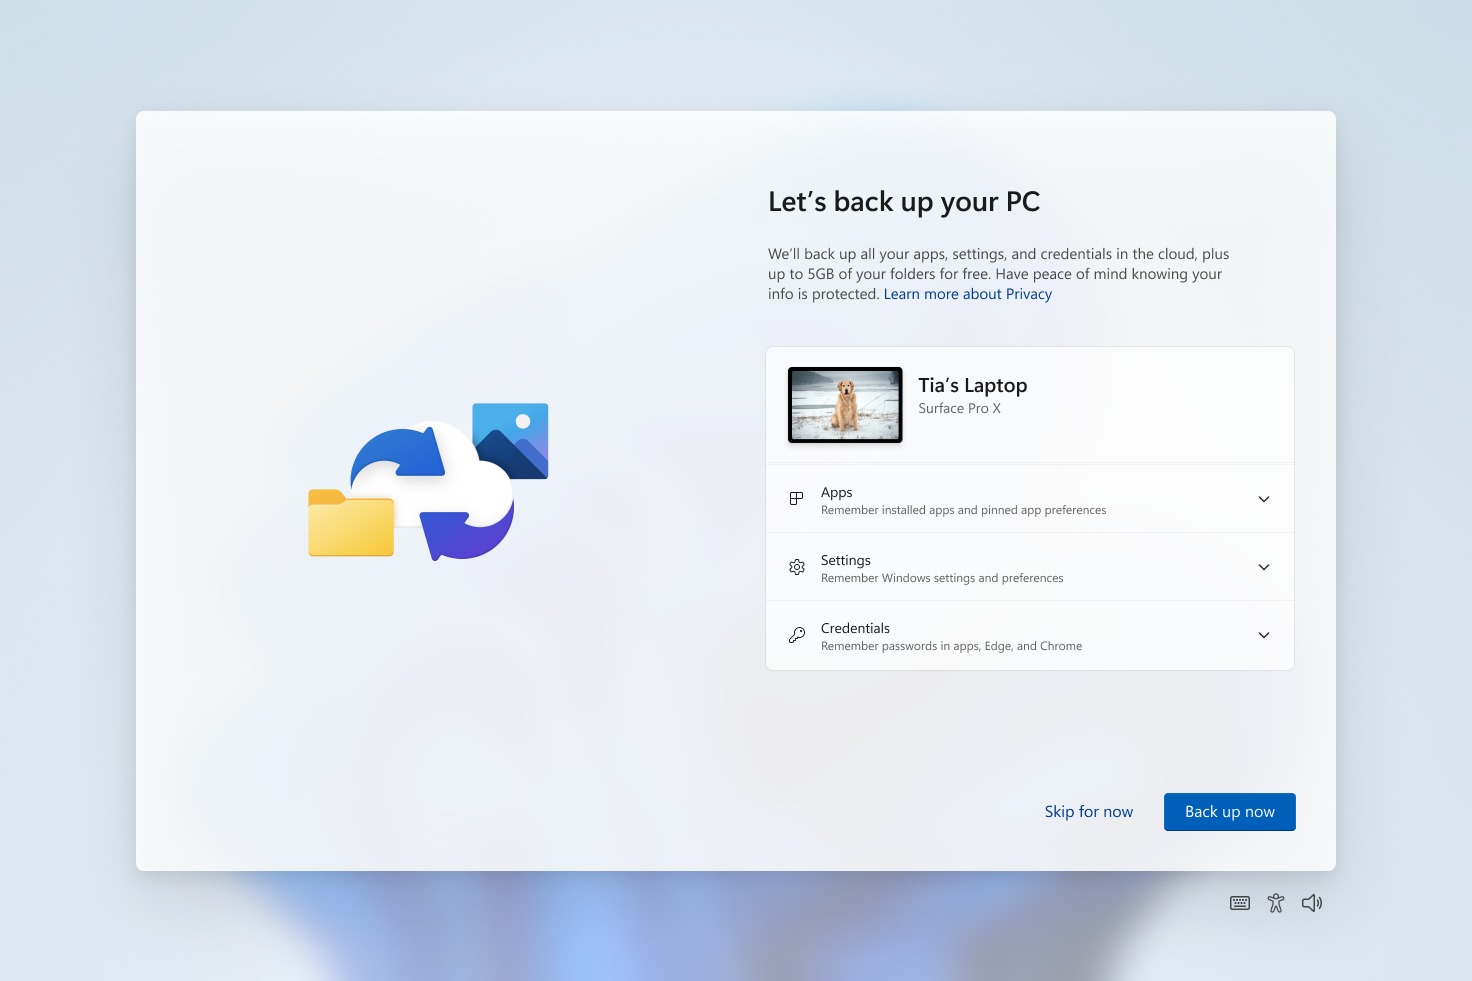
Of course, you can always use the «Skip for now» option to skip this step. After the setup, you can use the new Windows Backup app or the Settings app to configure the backup.
OOBE with Voice Access
As part of the changes, during the initial setup, you can now access Voice Access from the Accessibility menu in the bottom-right corner. On Windows 11, Voice Access is a feature that allows you to control your computer using only your voice.
The feature uses an on-device speech recognition engine to understand your spoken words without an internet connection. Using this feature, it’s possible to use voice commands to open and switch applications, dictate emails, browse the web, and more. In the case of the Out-of-box Experience, the feature is meant for people who may find it challenging to finish setting up Windows 11 with the keyboard and mouse.
OOBE updated recommendations
The development is trying a few different actions on the «Let’s Customize Your Experience» page.
For example, if you choose the «Development» option, then the new «Dev Home» app will launch automatically after the initial setup to help you configure the device for testing and building applications.
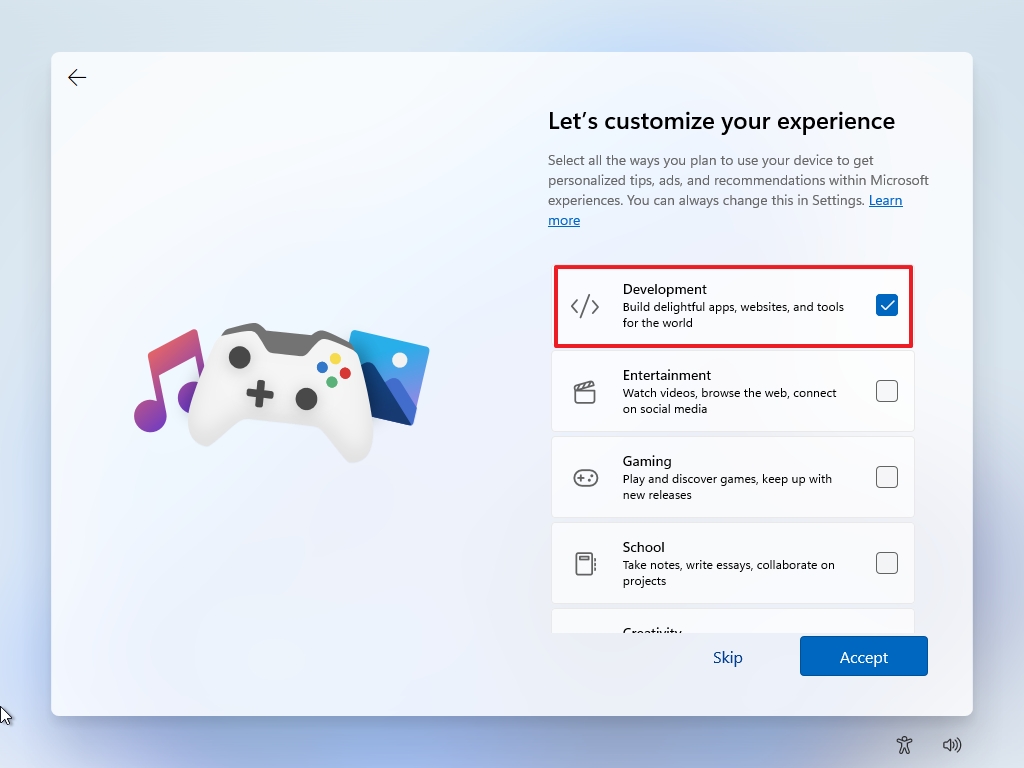
If you choose the same option, the system may instead open the «Get Started» app after the setup. In this case, the app will show you a personalized flow to learn more about the «Dev Home» with the option to launch this experience.
Finally, if you choose the «Restore» option, the «Get Started» app will launch automatically, but after the second login after the Out-of-box experience. However, in this case, the app will show you a personalized flow to learn about some essential apps and settings. In addition, the app will inform you that the device has been restored and show you how to access your restored apps.
The idea of these behaviors is to help you learn more about the features of Windows 11 and help you complete the setup on your computer.
More resources
For more helpful articles, coverage, and answers to common questions about Windows 10 and Windows 11, visit the following resources:
- Windows 11 on Windows Central — All you need to know
- Windows 10 on Windows Central — All you need to know
All the latest news, reviews, and guides for Windows and Xbox diehards.
Mauro Huculak is technical writer for WindowsCentral.com. His primary focus is to write comprehensive how-tos to help users get the most out of Windows 10 and its many related technologies. He has an IT background with professional certifications from Microsoft, Cisco, and CompTIA, and he’s a recognized member of the Microsoft MVP community.
Система Windows 11 ‘Out of Box Experience’ является одной из лучших. Вот как получить максимальную отдачу от него

Одной из особенно совершенных функций Windows 11 является обновленный ‘Out of Box Experience’ (OOBE). В основном, это просто набор сценариев, выполняющих настройку аппаратного и программного обеспечения; однако процесс OOBE является важнейшим первым шагом в настройке любой системы Windows
Итак, насколько сильно отличается процесс Out of Box Experience для Windows 11? Давайте посмотрим
В основном, ничего особенного.Windows 11 OOBE выполняет те же действия, что и последняя версия Windows 10, только с новым внешним видом. Ушли тусклые голубые цвета, а появились яркие, сглаженные края
Но это не значит, что впечатления полностью совпадают. В Windows 11 OOBE появилось несколько новых функций, а также несколько новых ограничений. Давайте посмотрим, чего можно ожидать от Windows 11 Out of Box Experience
Прежде чем мы начнем, стоит отметить, что OOBE может меняться в разных версиях Windows.OOBE в Windows 10 прошла через несколько различных итераций. Если ваши опции расположены в другом порядке или отсутствуют вовсе, причина может быть в этом. Мы постараемся сделать все возможное, чтобы это руководство обновлялось и включало все новые дополнения к OOBE Windows 11
Регион, Настройки клавиатуры и Подключение к Интернету

Вас встретит знакомый вид, хотя и очень новый.Windows 11 начинается, как и 10, с настройки параметров региона и клавиатуры
Это довольно стандартная процедура, и здесь мало что изменилось. После проверки наличия обновлений можно заметить довольно большую разницу для пользователей Windows 11 Домашняя

Для продолжения работы потребуется подключение к Интернету. Это не относится к другим редакциям Windows 11, и, к счастью, есть способы обойти этот шаг. Ознакомьтесь с нашим руководством по настройке Windows 11 без подключения к Интернету, чтобы узнать больше
Это изменение произошло относительно недавно, и скоро оно будет применяться ко всем версиям Windows 11
Назовите свой ПК и настройте устройство
Следующий шаг – присвоение имени ПК, и здесь тоже мало что изменилось. После присвоения имени ПК Windows 11 перезагрузит систему. Однако вам не придется начинать опыт заново.OOBE начнется с того места, на котором вы остановились
Если вы нерешительны, вы можете пропустить эту часть и назвать свой ПК позже в Настройках

После перезагрузки пользователи, использующие не домашние версии Windows 11, получат возможность настроить свое устройство как рабочее или личное. Этот процесс в основном такой же, как и в Windows 10
Добавление учетной записи Microsoft, установка PIN-кода и параметры восстановления

Именно здесь Windows 11 начинает больше всего отличаться от OOBE в Windows 10. Войти в учетную запись Microsoft легко, а пропустить – нет
Если у вас есть учетная запись Microsoft, вы можете войти в нее на этом этапе и продолжить настройку. Если вы хотите создать автономную учетную запись для этой системы, вам может не повезти, в зависимости от точного номера версии Windows 11, которую вы устанавливаете

Вы можете нажать на Параметры входа , чтобы узнать, находитесь ли вы на версии, позволяющей легко создать автономную учетную запись. Если это так, вы увидите здесь пункт Offline Account. В противном случае вам придется отключить систему от Интернета и вернуться обратно, чтобы получить такую возможность
Похожие: Плюсы и минусы использования учетной записи Microsoft в WindowsЕсли вы используете онлайн-учетную запись, вам будет предложено создать PIN-код для входа в систему, как и в более поздних версиях Windows 10. Если вы используете автономную учетную запись, вы пропустите этот шаг. В любом случае, вы можете пропустить этот шаг, нажав Отмена на экране, где создается PIN-код

Еще одним существенным отличием является возможность восстановления предыдущих установок системы с помощью OneDrive. Если у вас имеются файлы восстановления, Windows 11 предложит вам эту возможность
Настройки конфиденциальности, Настройте свой опыт и Параметры резервного копирования

На этом этапе вам будут предложены знакомые настройки конфиденциальности для включения и выключения. Они в основном такие же, как и в Windows 10: пользователь может включить такие параметры, как отслеживание местоположения , отправка диагностических данных в Microsoft и включение индивидуальной рекламы.
Многие из этих опций требуют тщательного рассмотрения, и если вы отключите все из них, то на этом опыт Out of Box закончится. Вы завершите настройку и пойдете дальше
Если вы оставите некоторые из этих опций включенными, вам будет предложено несколько дополнительных экранов настройки

Customize Your Experience позволяет выбрать некоторые общие категории, чтобы Microsoft рекомендовала вам приложения и опыт. Категории: Развлечения , Игры , Школа , Творчество , Бизнес и Семья. Включение любого из этих параметров позволит вам изучить дополнительные возможности для вашей установки
Как и в предыдущих версиях Windows 10, при установке вам будет предложено создать резервную копию файлов на One Drive. Вы можете нажать Только сохранение файлов на этом компьютере , чтобы пропустить этот шаг

Наконец, Windows предложит вам установить приложения Office из Microsoft 365. Это совершенно необязательный шаг. Если у вас есть подписка или вы планируете ее приобрести, будет неплохо установить ее на этом этапе. В противном случае нажмите Нет, спасибо , чтобы двигаться дальше
Более чистая работа из коробки
Вот и все, вы закончили с OOBE. На этом этапе ваша система должна перейти к экрану блокировки
В целом, это очень похоже на Windows 10, но в более чистом виде. Пользовательский интерфейс в целом более отзывчивый, и имеется более широкий спектр возможностей настройки для тех, кто использует включенные службы
Однако она также поставляется с некоторыми неудобными требованиями к подключению к Интернету и, возможно, одним или двумя новыми шагами
Прежде всего, она более удобна для пользователя, чем предыдущие версии, и, несомненно, поможет обычным пользователям быстрее освоить Windows 11
The Out-of-box experience (OOBE), sometimes referred to as the First Time Setup, is a setup wizard related to Windows, macOS and other operating systems which launches after the user installs/resets the OS. The OOBE allows the user of the computer to setup their account, choose their keyboard layouts, and other important information the OS requires.
History[edit | edit source]
Microsoft Windows[edit | edit source]
In Windows NT-based systems, the files for the «Microsoft Out-of-box experience» are located in the oobe directory in %WinDir%\System32, with the main file being msoobe.exe.
Predecessors[edit | edit source]
Before a real out-of-box experience existed, Windows 3.1 included a tutorial program, which shows how to use the mouse and could be launched during setup.
A similar introducing program is included in Windows NT 3.x, which shows the user what Windows NT is and how to use it. Unlike the tutorial in Windows 3.1, however, it needs to be started from the Program Manager after setup.
After first-booting into Windows 95, a simple welcome program (WELCOME.EXE) starts, which includes tips for using Windows 95 and links to Help topics for new and existing Windows 3.1 users, as well as an option to register to Microsoft. After a second start, there is an option to no longer launch the Welcome program after boot. A similar program is also included in Windows NT 4.0. While it was slightly redesigned and continued to exist in Windows 98 pre-releases, it no longer launches in Windows NT 5.0 Beta 1 builds and returned in Beta 2, albeit completely redesigned. Also a significant interface overhaul received the application in the Beta 2 of Windows 98, where it first played a sample video before playing a sample track. It includes links to the Registration and the Tune-up Wizard, as well as a tour, showing the new features of Windows 98.
In Beta 2 and 3 builds, there is also a link to the Beta Guide. The Begin button goes through the list, while in the second edition, it changed to a Close button, which simply exits the application.
In Windows Me, it is full-screen and now plays a video showing new features of Windows Me. Then, it turns into an interactive program with more details to these features.
The Welcome program was replaced by the Windows XP Tour in said OS.
Windows 98 and Me[edit | edit source]
The Out-of-box experience was introduced in Windows 98 SE. However, it does not start at first boot since the OOBE was intended to be customized by OEMs which can set the start of the OOBE at first boot.
In Windows Me, the Microsoft Agent character Merlin was introduced. However, it was intended to be a placeholder for OEMs to put in their MS Agent character (like HP did) or modify the text spoken by Merlin. Merlin also appeared as an Office Assistant in Office 2000, 2001, XP, 2003, v.X and 2004 as well as being a Search Companion in Windows XP.
Windows 2000[edit | edit source]
Windows 2000 introduced the «Network Identification Wizard», where the user account is being created. It launches after clean installs starting with build 2072. On upgrades from Windows 9x instead, the user is prompted to set a password for each account, which is the case since build 1796. On upgrades from Windows NT 3.5x and Windows NT 4.0, the user is not prompted either but never due to the user information being transferred from those earlier builds, which is only partially the case for Windows 9x. It no longer launches after clean installs starting with Windows XP build 2276.
Windows XP (Whistler) and Server 2003[edit | edit source]
The Out-of-box experience was ported to NT-based Windows beginning with Windows XP build 2223. In this build, it has Windows Me branding due to being copied from a Windows Me Beta 3 build without any modification. It also does not close after the final page (it just loops back to start), so its process (msoobe.exe) must be terminated to exit. The OOBE starts after an upgrade starting with build 2257. Merlin was ported with build 2250, albeit being absent in the next builds until build 2410. Also with this build, Windows Product Activation has been implemented into msoobe.exe and can be invoked with the /a switch. However, it was non-functional until build 2428.
The OOBE was overhauled with a Luna-esque design in Windows XP build 2416. Also beginning with this build, it starts after a clean install. Merlin was replaced with the Microsoft Agent character «Question Mark» in build 2469. The music played during OOBE, title.wma, was composed by Stan LePard[1] and first appears in build 2481. It previously appeared in Internet Explorer Starter Kit, and is known as «Windows Welcome music» within the metadata and as «Velkommen» on LePard’s SoundCloud.
In Windows Server 2003, the OOBE is non-functional and is only used for Product Activation. Attempts to launch OOBE with msoobe.exe /f lead to a black screen until the process has been killed. Despite the OOBE not being functional, the previous music was replaced with «No Hay Problema» by Pink Martini in build 3615.
Windows Vista (Longhorn) and Windows 7[edit | edit source]
Due to being forked from a Windows Server 2003 pre-release, the OOBE in Milestone 3 plays «No Hay Problema» in the background and has not changed much from its inclusion in Windows XP.
With the introduction of WIM-based Setup in Windows Longhorn build 4001 the OOBE received a major refresh. It no longer features background music as well as MS Agent characters and was branded as Windows Setup. Beginning with Milestone 5, the OOBE no longer starts at first boot. This has been changed with the development reset, where it returned to its Windows XP design, but the «Question Mark» character is absent.
After the Omega-13 branch, the OOBE was again absent until build 5259, where it gained a huge redesign. Also, it launched directly after setup and before the last restart. This has been changed with RC1, where it launched after the restart. The final page contains an orb with the Windows logo. Clicking on it or the Start button located in the bottom right of the window leads the user to the login screen. Such page was removed with Windows 7, where it directly leads the user to the login screen after it finalizes the settings. Windows 7 also introduced the new HomeGroup page in OOBE when the user set up their network location as home.
Windows 8 and 8.1[edit | edit source]
Early Windows 8 builds had two versions of OOBE: a nearly unchanged design of Windows 7 and a new one based on the Metro interface behind Redpill. In Milestone 3, the wallpaper of the old OOBE has been corrupted, but this would not be fixed by Microsoft.
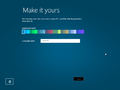
The new Metro OOBE firstly was a full screen version of the old OOBE. This changed rapidly, as later builds introduced a color background as well as customization options. The background was at the beginning a gradient blue with flower patterns in the corners of the screen. These were removed later and in the Developer Preview, the color has become solid and the default is purple, later green. After 8155, it added more colors and change default color to teal.
The Developer Preview added the option to create a Windows Live ID (now known as Microsoft Account). Build 8155 added more colors and changed Windows live ID to Microsoft Account, The Consumer Preview added few more customization options into OOBE and switched back to blue as default color. With the Release Preview, the Express Settings have been introduced to speed up OOBE along with adding more colors. The RTM changed the default color back to purple.
Windows 8.1 keeps purple as the default background color, but has a different color picker. Other than that, not much has been changed.
Windows 10, 10X and 11[edit | edit source]
The OOBE has not gained many new features, although the background color was changed to blue and can no longer be customized. This design is still included in LTSC releases of Windows 10 and Windows Server 2016 or later.
With Windows 10 Creators Update, OOBE gained huge changes: Express settings have been removed in response to criticism of the operating system’s data collection; the user must set up privacy settings manually,[2] and Cortana has made its debut in OOBE.
Windows 10X introduced a new design for OOBE, which is based on the Fluent Design System. After the cancellation of Windows 10X, it merged into Windows 11 with some modifications.
For the Home and SE SKUs of Windows 11, the OOBE requires an Internet connection and a Microsoft account to continue the setup. This requirement is not applied to most of non-Home SKUs, including Pro (up until build 22543), Education and Enterprise. Starting with build 22557, however, it has been applied to the Pro SKU as well. This requirement can be bypassed by the following methods:
- (For Pro SKU only) Select «Set up for work or school» on the «How would you like to set up this device?» screen. On the «Let’s set things up for your work or school» screen, select «Sign in options», and then «Domain join instead».
- Press ⇧ Shift+F10 to open Command Prompt, and execute the following command:
oobe\bypassnro - Use an answer file on top of an Windows installation image to perform an unattended setup.
- Sign in with a locked Microsoft account such as
no@thankyou.comand any password. When the message “Oops, something went wrong” appears, select Next.
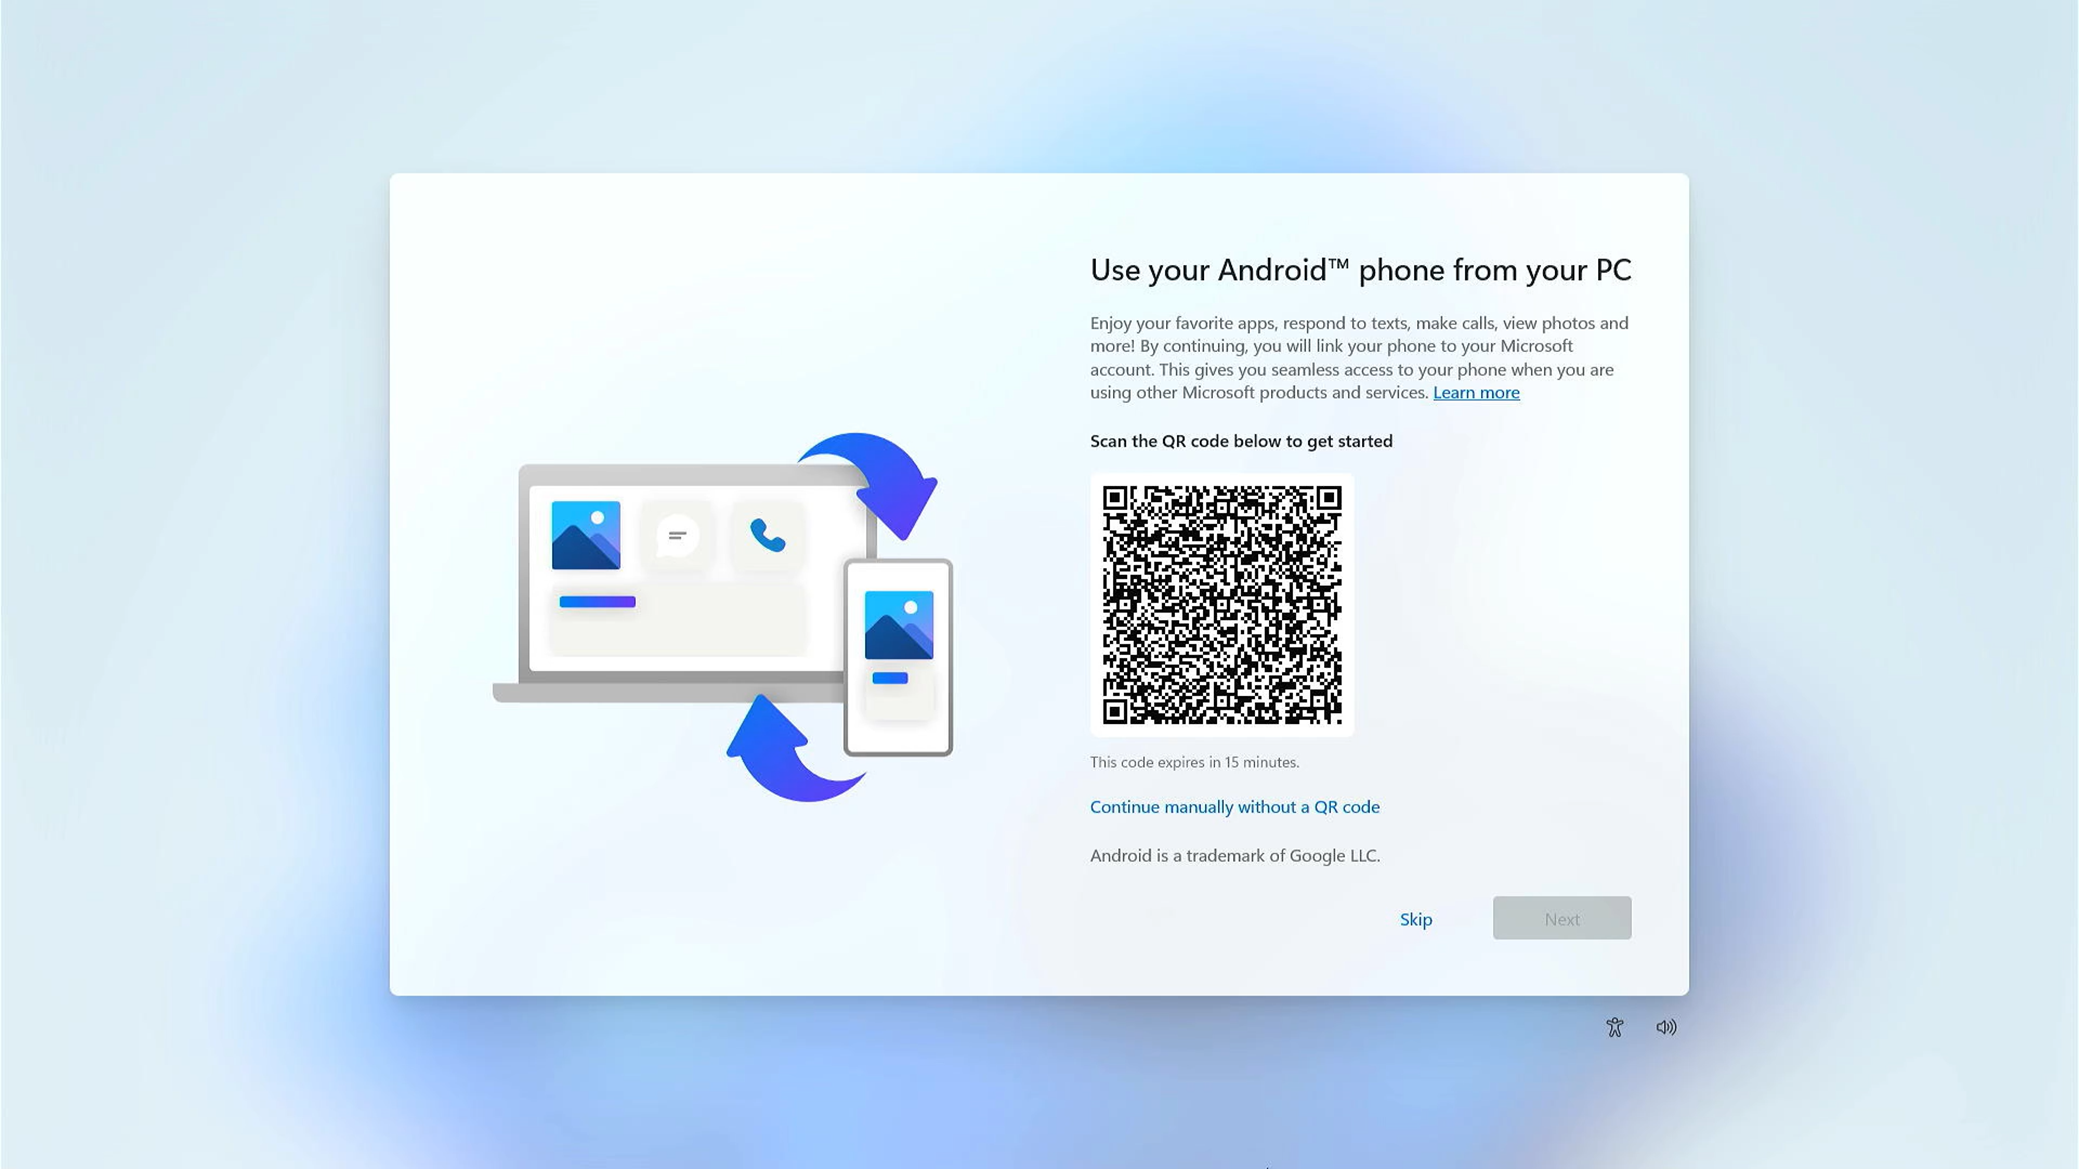
In build 22567, a new page has been added to the OOBE for linking Android phones to the device.
Classic Mac OS and Mac OS X[edit | edit source]
Mac OS 8 and 9[edit | edit source]
Before getting into OOBE, the system will play some Mac OS-relating clips until the user begins to interact with the system.
Mac OS X Server 1.x (Rhapsody)[edit | edit source]
Apple Rhapsody Developer Release 2 introduced the «Rhapsody Setup Assistant», which is an OOBE-like experience where the OS can be configured. When the Setup Assistant reached its end, it will restart the system. After the release of Mac OS X Server 1.0 (which only supports PowerPC), its name was shortened to simply «Setup Assistant». It was ported to Mac OS X Developer Preview 2.
Mac OS X[edit | edit source]
Setup Assistant gained an Aqua redesign in Mac OS X Developer Preview 3 and a massive overhaul in the Mac OS X Public Beta.
The Setup Assistant was replaced with a full-screen OOBE. Mac OS X Cheetah, Puma and Jaguar played a short video clip before entering the OOBE, which shows water dropping to promote their new Aqua interface. The latter introduced the ability to register / sign in for a .Mac subscription.
A new clip is used in Mac OS X Panther, and the OOBE now goes completely full-screen on low-resolution displays.
A remake of the clip is used in Mac OS X Tiger. It bears a slightly lighter background as well as some more OOBE-related changes.
Mac OS X Leopard uses a completely new intro clip and changes the appearance of the OOBE, which is now windowed. Also, this version introduced the ability to sign in for a MobileMe subscription, since it succeeded the former .Mac service. Not much has been changed in Mac OS X Snow Leopard.
Mac OS X Lion removed the intro clip.
Linux[edit | edit source]
There are also some Linux distributions which come with an OOBE. OOBE is usually in distros which use the Anaconda installer from Red Hat, meaning that it is used by distros from the surroundings of Red Hat and Fedora. Later versions of GNOME 3 also have a post-install utility.
Gallery[edit | edit source]
Windows[edit | edit source]
Windows 9x[edit | edit source]


Windows NT-based releases[edit | edit source]
Windows XP/Server 2003[edit | edit source]


Windows Vista/7[edit | edit source]
Windows 8.x[edit | edit source]

Windows 10 onwards[edit | edit source]
Classic Mac OS and Mac OS X[edit | edit source]
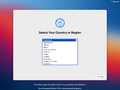
Linux[edit | edit source]

References[edit | edit source]
- ↑ https://soundcloud.com/stanlepard/windows-98-velkommen
- ↑ Windows 10 Creators Update to rejig privacy settings in a move unlikely to please anyone. Ars Technica. 11 January 2017. Retrieved 14 November 2021.