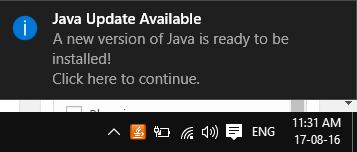
По-умолчанию, установленная на компьютере Java периодически проверяет наличие обновлений и напоминает пользователю о необходимости обновиться в не зависимости от того является ли он администратором на компьютере или нет. В небольших организациях с малым парком компьютерной техники это, вероятно не является значимой проблемой, однако в больших сетях всплывающее окно, предлагающее обновить Java и окно UAC, требующее для этого прав администратора, может создать неудобство пользователям и дополнительный шквал запросов в техподдержку. В этой статье мы покажем, как можно отключить проверку обновлений Java, в результате чего пользователи перестанут видеть следующее всплывающее окно:

Java Update Available. A new version of Java is ready to be installed.
Начну, пожалуй, с предостережения. Отключение обновления в сторонних программах не освобождает вас от необходимости поддерживать их актуальность, периодически устанавливая обновления или свежие версии ПО. Ведь дыры в стороннем ПО – это дыры в вашей сети. Для обновления стороннего (не Microsoft ПО) мы, например, используем SCCM.
Отключить уведомление об обновления Java достаточно просто. Все параметры обновления Java и всплывающих оповещений хранятся в ветке реестра HKEY_LOCAL_MACHINE\SOFTWARE\JavaSoft\Java Update\Policy\. За функционал автоматического обновления Java отвечает ключ EnableJavaUpdate (1- автообновление работает, 0 –обновление отключено).
Указанный выше ключ относится к 32 битной версии Java, запущенной на x86 ОС, а также к 64-битной Java на x64 ОС. Если вы используете 32 битную версию Java в x64 разрядной Windows вышесказанное относится к ветке реестра HKEY_LOCAL_MACHINE\SOFTWARE\Wow6432Node\JavaSoft\Java Update\Policy

Конечно, данный ключик можно поправить на ПК вручную, но массово лучше распространить его с помощью групповых политик. Управлять содержимым реестра можно, например, с помощью Group Policy Preferences. Создаем новую политику или берем существующую и переходим в раздел: Computer Configuration -> Preferences -> Windows Settings -> Registry. Правой кнопкой мыши вызываем контекстное меню и выбираем New > Registry Item.
Задайте следующие параметры:
Action: Update
Hive: HKEY_LOCAL_MACHINE
Key Path: SOFTWARE\JavaSoft\Java Update\Policy
Value name: EnableJavaUpdate
Value type: REG_DWORD
Value data: 00000000 (восемь нулей)

После применения данной политики к рабочим станциям (автоматически или с помощью gpupdate.exe), можно убедиться, что значение ключа в реестре поменялось.
Кроме того если открыть консоль управления Java (Java Control Panel) из панели управления, можно убедиться, что вкладка Update отсутствует.

Данное руководство по отключению автоматического обновления Java работает для Java 6 (в т.ч. Update 18, Update 33)и Java 7. Если для новых версий эта инструкция работать не будет – прошу сообщить об этом, я постараюсь разобраться и обновить статью.
Про систему обновления Adobe Flash можно почитать тут.
-

1
Open the Java Control Panel. To do so:
- Windows — Open Start, type in «Configure Java», and click the Java icon.
- Mac — Click the Apple icon, click System Preferences, and click the Java icon.
-
2
Click the Update tab. It’s at the top of the Java Control Panel window.
Advertisement
-
3
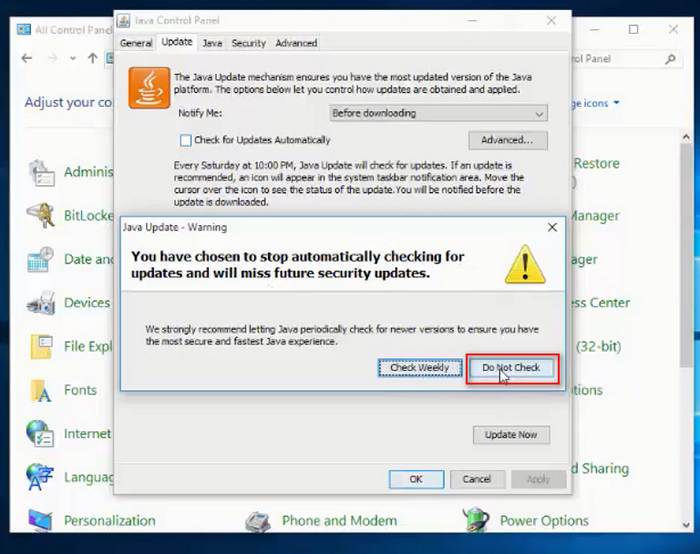
Uncheck the «Check for Updates Automatically» box. It’s in the middle of the window.
-
4
Click Do Not Check when prompted. Doing so will prevent Java from checking for updates.
-
5
Click OK. It’s at the bottom of the window. Your preferences should be saved.


Advertisement
-
1
Determine whether your system is 32- or 64-bit. To do so:
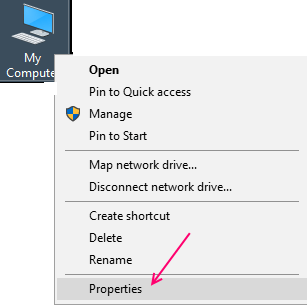
- Right-click the This PC (or My Computer) icon.
- Click Properties.
- Look for the number to the right of the «System type» heading.
-
2
Open the Start menu. Either press the ⊞ Win key or click the Windows logo in the bottom-left corner of the screen.
-
3
Type regedit into Start. Doing so will bring up the Registry Editor icon, which resembles a cluster of blue blocks, in the Start window.
-
4
Click the Regedit icon. This will open the Windows Registry Editor.
-
5
Click
left of the «HKEY_LOCAL_MACHINE» folder. It’s in the top-left corner of the Registry Editor window. Doing so will display any folders that are in the «HKEY_LOCAL_MACHINE» folder below it.
-
6
Click
left of the «SOFTWARE» folder. This option is below the «HKEY_LOCAL_MACHINE» folder.
-
7
Click
left of the «Wow6432Node» folder. Skip this step if you’re on a 32-bit bit system.
-
8
Click
left of the «Java Soft» folder.
-
9
Click
left of the «Java Update» folder.
-
10
Click the «Policy» folder. Doing so will display its contents in the pane on the right side of the window.
-
11
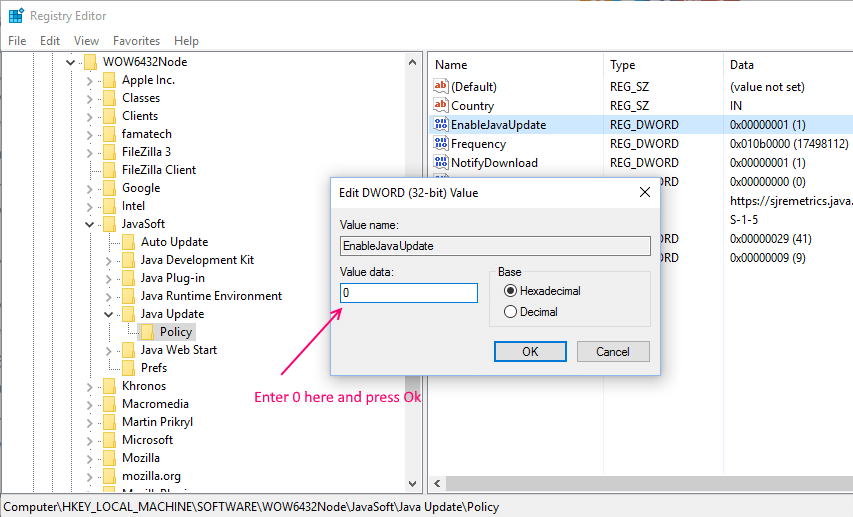
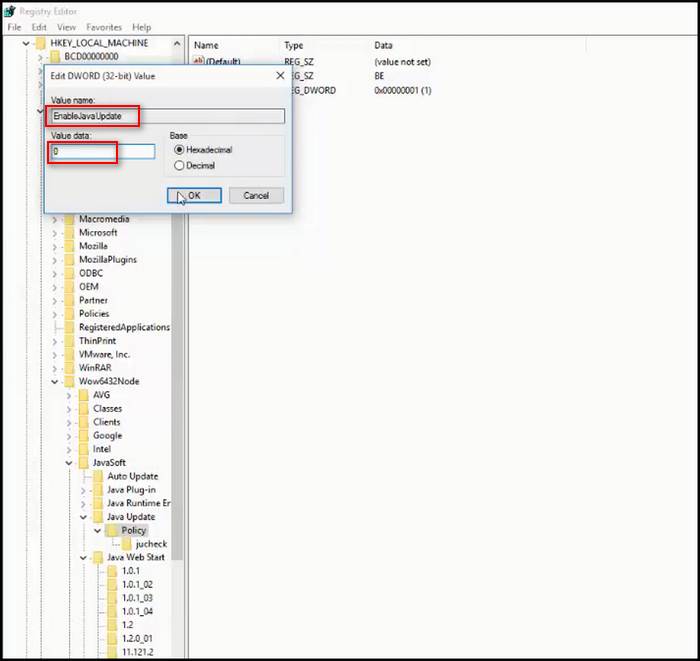
Double-click the «Enable Java Update» file. It should be on the right side of the window.
-
12
Type «0» into the file. This will change the file’s value of «1», which allows updates, to «0», which blocks updates.
-
13
Click OK. This will disable the Java update prompt that occurs while your computer is already running.
-
14
Press Ctrl+⇧ Shift+Esc. You’ll find all three of these keys on the left side of the keyboard. Pressing them opens the Windows Task Manager.
-
15
Click the Startup tab. It’s near the top of the Task Manager window.
-
16
Locate and click jucheck. This file is the Java update prompt that runs whenever you turn on your PC.
-
17
Click Disable. It’s in the bottom-right corner of the Task Manager window. This will prevent the Java update from running at startup regardless of your settings.


Advertisement
-
1
Open Spotlight. To do so, click the magnifying glass icon in the top-right section of your Mac’s menu bar.
- If you aren’t using an account with administrator privileges, you might not be able to disable the Java update.
-
2
Type in Terminal. Typing «Terminal» into the Spotlight text field will bring up a black box; this is the Terminal icon.
-
3
Click the Terminal icon. Doing so will open Terminal.
-
4
Enter the Java Update disable command. The command is as follows:
sudo defaults write /Library/Preferences/com.oracle.java.Java-Updater JavaAutoUpdateEnabled -bool false. -
5
Press ⏎ Return. This will run the command. The Java update should no longer appear when you start your Mac.


Advertisement
Add New Question
-
Question
What about Windows 8? How does one get rid of Java update notifications for this version?

Follow the same steps, but instead of the suggested Step 1, go into the main menu with the tiles of W8, and type in ‘msconfig’ there. The App-search should give you an option to get to the msconfig.
-
Question
Do the steps above apply to the Supremo download as well?
The steps suggested should work for every version. The name of the program (Steps 3 to 5) might be a bit different. Look for any name including «Java» and «auto update.»
Ask a Question
200 characters left
Include your email address to get a message when this question is answered.
Submit
Advertisement
Video
-
You can use the Startup tab in the Task Manager to disable other startup programs, which will improve your computer’s start time.
Thanks for submitting a tip for review!
Advertisement
-
Disabling the Java update places your computer’s at risk, since non-updated versions of Java are not secure.
Advertisement
About This Article
Thanks to all authors for creating a page that has been read 239,902 times.
Is this article up to date?
В этой статье я собираюсь описать шаги по отключению уведомления об обновлении Java в Windows 10. Это раздражающее уведомление об обновлении Java появляется каждый раз при загрузке Windows 10. Просто следуйте инструкциям ниже, чтобы выключить это.
Как отключить уведомление об обновлении Java в Windows 10
Теперь, если вы перейдете на java из панели управления и включите параметр «Никогда не проверять наличие обновлений», это не сработает. Единственный способ, с помощью которого он будет работать, — это отредактировать ключ реестра.
Прежде всего выясните, что ваш компьютер 32-битный или 64-битный. Чтобы узнать об этом, щелкните правой кнопкой мыши значок «Этот компьютер» или «Мой компьютер» на рабочем столе.
Теперь посмотрите на это, как показано на рисунке.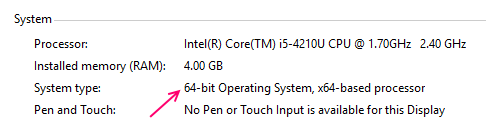
Случай 1: — Если ваш компьютер 64-битный
#1 . Нажмите клавиша Windows + R и как только откроется окно команды запуска, введите regedit в этом.
#2. Откроется редактор реестра. Перейдите по пути, указанному ниже.
HKEY_LOCAL_MACHINE \ SOFTWARE \ WOW6432Node \ JavaSoft \ Java Update \ Policy
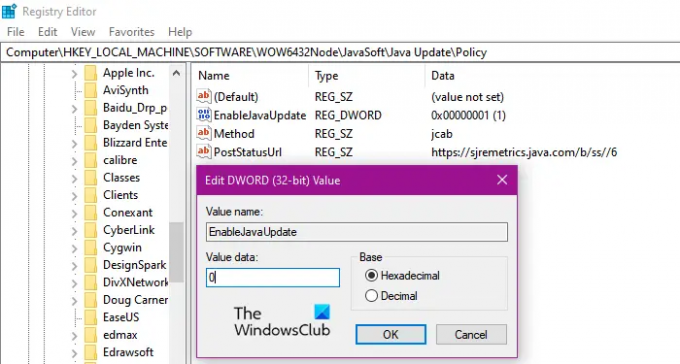
#3. Теперь изменим EnableJavaUpdate дважды щелкнув по нему и затем введя в него 0.
Случай 2: — Если ваш компьютер 32-битный
#1 . Нажмите клавиша Windows + R и как только откроется окно команды запуска, введите regedit в этом.
#2. Откроется редактор реестра. Перейдите по пути, указанному ниже.
HKEY_LOCAL_MACHINE \ SOFTWARE \ JavaSoft \ Обновление Java \ Политика
#3. Теперь изменим EnableJavaUpdate дважды щелкнув по нему и затем введя в него 0.
Это оно. Вы успешно отключили уведомление об обновлении Java на своем ПК с Windows 10.
Как отключить уведомление об обновлении Java с помощью панели управления
1. Открыть панель управления
2. Теперь нажмите на Вид и выберите большие иконки
3. Теперь найдите и нажмите Ява.
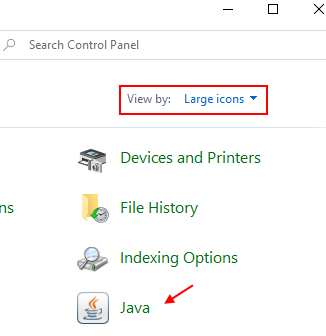
4. Нажмите на Обновлять Табл.
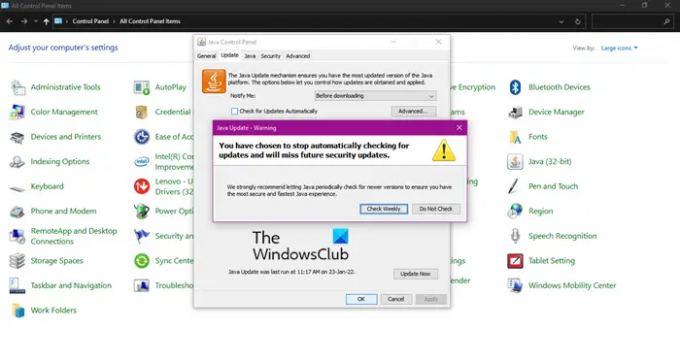
5. Снимите отметку Проверять обновления автоматически.
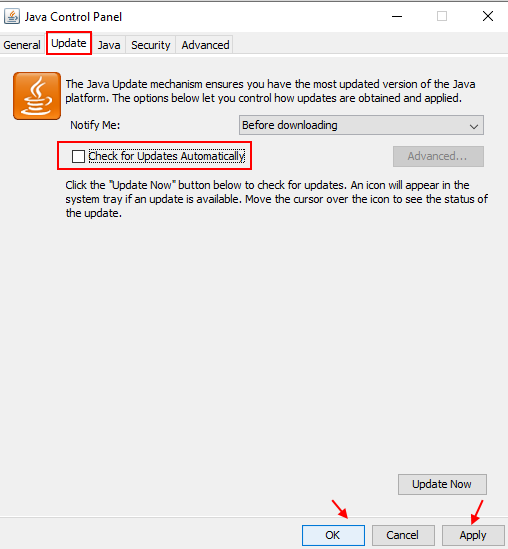
6. Выбирать Не проверять в появившейся подсказке.
7. Нажмите на Применять а также ОК.
Are you bored of getting popups notifications that a Java update is available to appear whenever you turn on your Microsoft Windows system?
If your answer is yes and if it’s annoying, don’t worry. You have in the right place, then.
Today, in this post, I will teach you why you keep the java update popup messages and how you stop the java update popup on your Windows 10.
Don’t miss any part and carefully follow the instructions.
So, let’s get started.
Why Does Java Update Keep Popping Up?
Java is a powerful high-level Windows feature. When you install java into your system, Java Update helps to keep your machine updated regularly with the most recent Java versions.
When auto-update is turned on, your system regularly scans for new Java releases. If a new release java version is available, it shows a popup message to users to ask for permission to update the java.
Java shows popups notifications that a new update is available to appear whenever you boot your Windows system until you update the latest version. You have the option of setting a schedule for checking for updates or manually checking at any time.
You can also permanently disable the Java update popup messages if you don’t want to see them. So, follow the next section to know how you stop java update popup messages on your system.
Check out the easiest way to fix Discord not working with audio interface.
If your Java auto-update is turned on, your system regularly scans for new Java releases shows a popup message to users to update the java. Every time you turn on your Microsoft Windows system, it shows a popup message until you finish updating your java.
It’s very annoying to see too much of the same notification. You need to update your Java application or turn off your Java notification manually to solve this problem.
If you don’t need to update your java application and don’t want to see the update notifications, follow some methods to keep turning off the Java update notification.
Here are the steps to stop Java update popup on Windows 10:
1. Use Java Control Panel
The Java Control Panel can use to turn off the Java notification pop-ups. There is a setting in the Java Control Panel that disables Java update notifications. However, for new update settings to be saved, you may need to visit the Java Control Panel as an administrator.
Follow these steps to turn off the Java update pop-ups on Windows 10:
- Click on the Windows icon on the bottom-left side of the screen to open the Start menu or,
- Press Windows Key on your keyboard to open the Start menu.
- Type Configure Java and then click on Configure Java icon in the search result to open the Java Control Panel.
- Go to the Update tab.
- Uncheck the Check for Updates Automatically options in the center of the Java Control Panel window.
- Choose Do Not Check when the prompt window will appear on the screen.
- Click on Apply to save the changes.
- Click Ok to finish the settings.
Another way to open the Java control panel is:
- Click on the Windows Start icon to open the Start menu or,
- Press Windows Key on your keyboard to open the Start menu.
- Type Control Panel and then click on the Control Panel icon in the search result to open the Control Panel.
- Choose Large icons on the View option on the top-right side of the screen.
- Find out Java in the control lists.
- Click on Java to open the Java Control Panel and follow the following steps that I described earlier.
After you turn off the check Java update automatically, Java will no longer check for updates, and the update popup message will no longer appear on your Windows system screen.
Check out the easiest way to Fix Discord Airpods Not Working.
2. Use Windows Registry
You can disable Java Update Available notifications by editing the registry. The Windows Registry is an essential component for your Microsoft Windows operating systems.
Windows and your apps both use information from the Registry. It can help the operating system manage the computer, assist programs in utilizing the computer’s resources, and serve as a repository for custom settings made in Windows and applications.
To disable the Java update popup message, first, you need to know what bit of Windows Operating system you use, like 32 bit or 64 bit, because the Registry feature differs between those two versions.
So,
How I use Windows Registry to disable the Java update popup messages?
Follow these steps to disable the Java update popup messages:
For 64 Bit:
Follow the steps below to turn off the Java update pop-ups on 64 bit Windows 10:
- Press Windows Key + R on your keyboard to open the Windows Run program.
- Type regedit and press the Enter button to open the Registry Editor.
- Navigate to HKEY_LOCAL_MACHINE\SOFTWARE\WOW6432Node\JavaSoft\Java Update\Policy
- Click on EnableJavaUpdate to edit DWORD Value.
- Enter the value 0 in the Value data field.
- Click on Ok to save the changes.
- Open Task Manager and go to the Startup tab.
- Find out Java Update Scheduler and select it.
- Click on Disable button to stop the update popup message.
For 32 Bit:
Follow the steps below to turn off the Java update pop-ups on 32 bit Windows 10:
- Press Windows Key + R on your keyboard to open the Windows Run program.
- Type regedit and press the Enter button to open the Registry Editor.
- Navigate to HKEY_LOCAL_MACHINE\SOFTWARE\JavaSoft\Java Update\Policy
- Click on EnableJavaUpdate to edit DWORD Value.
- Enter the value 0 in the Value data field.
- Click on Ok to save the changes.
- Open Task Manager and go to the Startup tab.
- Find out Java Update Scheduler and select it.
- Click on Disable button to stop the update popup message.
Now, in Windows 10, you’ve successfully disabled the java update notification.
Note: The value 1 means Enabled, and 0 means Disabled. If you enter the value 0, that means you disabled the java update notification. If you again want to enable the java update notification, you enter the value 1 in the Value data field.
Check out our epic guide on how to fix Discord rich presence not working.
Java application is also used on the macOS platform. Like Windows 10 operating system, Java also shows update popup messages on macOS devices. That situation is also annoying for macOS users.
So if you are a macOS user, you can also stop Java update popup messages. There are two ways to stop Java update popup messages on macOS. These steps are discussed below.
Here are the steps to stop Java update popup messages on macOS:
1. Use Java Control Panel
Java notification pop-ups can be turned off using the Java Control Panel. The Java Control Panel has a setting that blocks Java update notifications. So, for new update settings to be saved, you need to open the Java Control Panel.
Follow these steps to turn off the Java update pop-ups by using Java Control Panel:
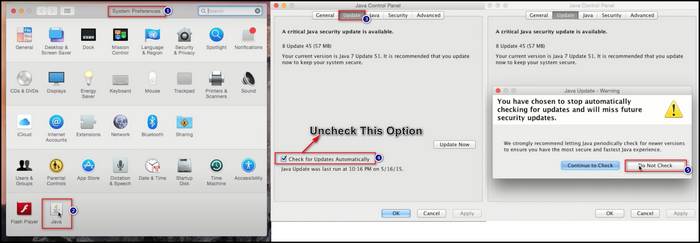
- Click on the Apple icon to open the System Menu.
- Choose System Preferences.
- Click on the Java icon to open the Java Control Panel.
- Go to the Update tab.
- Uncheck the Check for Updates Automatically options in the center of the Java Control Panel window.
- Choose Do Not Check when the prompt window will appear on the screen.
- Click on Apply to save the changes.
- Click Ok to finish the settings.
When you turn off the automatically Java update checking feature, Java will no longer check for updates, and the update popup message will no longer appear on your macOS system.
2. Use The Terminal
You can also use the MacOs terminal to disable the Java update pop-ups messages. To turn off the Java update pop-ups on MacOS by using the terminal, follow these steps:
- Click on the Search icon on Mac’s menu bar to open Spotlight.
- Type Terminal and click on the search result to open Terminal.
- Enter sudo defaults write /Library/Preferences/com.oracle.java.Java-Updater JavaAutoUpdateEnabled -bool false commands.
- Hit the Return button to disable the Java update.
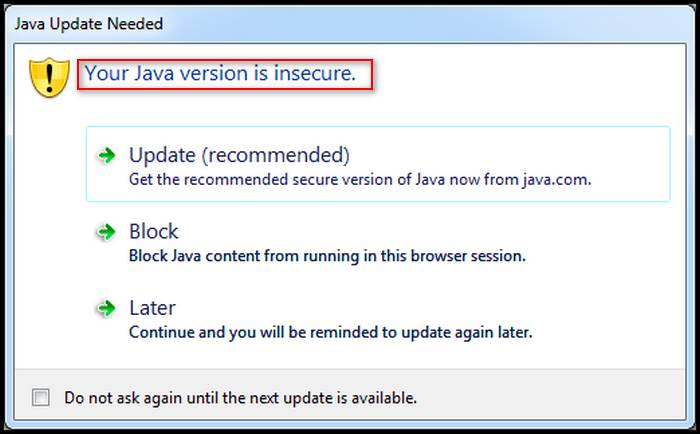
Sometimes, your browser shows a fake alert message that you need to update Java. This alert message indicates that your browser is affected by malware or viruses.
You can use some methods to remove the Install Java update popup scam. These methods are effective in removing all kinds of malware and viruses on your computer.
Also, check out how to fix discord screen share no audio on Windows 10.
Here are the steps to remove the popup scam on your computer:
1. Uninstall The Malicious Programs
Malware or viruses installed on your computer is most likely to blame for this pop-up ad. These malware programs come with other free software that you can get from the Internet, and you may discover that you have unintentionally installed malware.

So, if you want to remove the malware or viruses on your computer, you need to uninstall the malicious programs. To remove the malware or viruses on your computer, follow these steps:
- Click on the Start menu icon on the bottom-left side of the windows screen. Or,
- Press Windows Key on your keyboard to open the Start menu.
- Type Control Panel and click on the search result to open Control Panel.
- Select Uninstall a program under the Programs section.
- Find out the malicious program in the program lists.
- Select the malicious program.
- Right-click and choose Uninstall.
- Wait some minutes to complete the uninstall process successfully.
- Restart your computer if needed.
I hope this method solves your popup scam problems. After successful uninstall and restart your computer, check whether your problem is solved. If not, then follow the next following solution.
Also, check our exclusive tutorial on Airpods Not Working with Microsoft Teams
2. Reset Your Browser Settings
When your browser is affected by spyware, malicious or viruses, your browsing behavior changes. If you click to open on the tab, it will open another tab automatically, where you will see the Install Java Update tab.
These kinds of browser behavior are so much annoying and frustrating for users. To solve this problem, you can reset your browser settings. This method helps you to solve your problem quickly and effectively.
Here I will show you how you reset your Chrome browser settings as an example to solve scam issues. Though all browser reset systems work similarly, it is a bit different.
So,
How do I reset my browser settings?
Follow the steps below to reset your browser settings:
- Open your Chrome browser.
- Click on the three-dot icon on the right side corner of the screen.
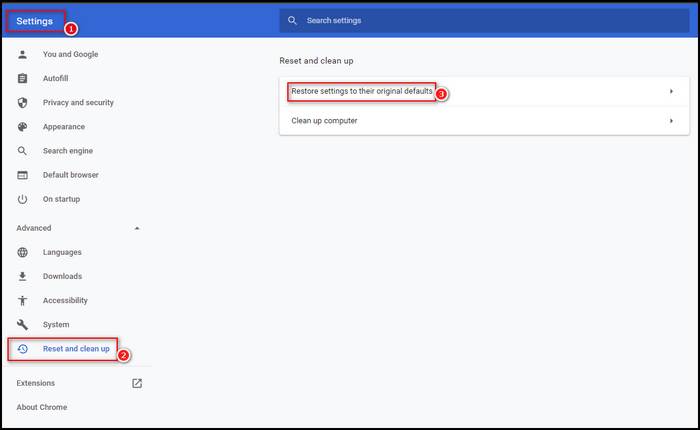
- Select and open Settings.
- Click on the Search box or icon on the top of the browser screen.
- Type reset to find out the Reset and clean-up options.
- Select Restore settings to their original defaults option.
- Click on the Reset settings button to make your browser settings default.
- Close the browser.
- Relaunch your Chrome browser.
After reopening your browser, now you check whether your issue is solved. I hope this method can help you to solve your popup scam.
Have some time to spare? Check out our latest fix for Airpods Not Working in Zoom on Mac.
Final Thoughts
It’s very annoying to see too much of the same notification. When your Java auto-update is turned on, your system regularly scans for new Java releases shows a popup message to users to update the java. Every time you turn on your system until you finish updating your java.
To solve this problem, you need to turn off your Java update popup messages manually. You can use Java Control Panel or Windows Registry program to disable the Java update popup messages. If you are a macOS user, you can also disable the Java update popup messages using Java Control Panel and Terminal.
Let me know in the comments which method you use to disable your Java update popup messages and share this post with your friends who need it.
Всякий раз, когда доступно обновление Java, оно уведомляет вас. Для многих пользователей уведомление появляется каждый раз, когда они открывают свою систему, и это раздражает. Вот почему мы собираемся увидеть, как отключить уведомление об обновлении Java на компьютере с Windows, если вы хотите.

Что такое Ява?
Ява — это язык программирования на основе ООП, который используется для создания программ. Тем не менее, тот, что на вашем компьютере, не сделает вас программистом, вместо этого он позволяет запускать на вашем компьютере множество других программ. Существует множество веб-сайтов, игр и программного обеспечения, которые не запустятся в вашей системе, если у вас нет Java. Вы должны знать, что это отличается от JavaScript.
Как сделать так, чтобы обновление Java не появлялось в Windows 10 или 11?
Если вы хотите, чтобы обновление Java не появлялось, вы можете остановить уведомление. Это может остановить всплывающее окно. Тем не менее, вам нужно знать, что, если оставить ее на долгое время, Java может устареть и в конце концов может помешать работе некоторых приложений, сайтов и игр на вашем компьютере. Итак, если вы останавливаете уведомление об обновлении, вы должны вручную посмотреть, есть ли обновление Java, и установить его на свой компьютер.
Многие люди порекомендуют вам полностью удалить Java с вашего компьютера, чтобы избавиться от уведомления об обновлении. Но это просто излишество, есть методы, с помощью которых вы можете просто отключить уведомление, и все будет хорошо. Если вы удалите Java со своего компьютера, многие приложения, веб-сайты и игры не будут работать в вашей системе, поскольку для их работы требуется Java.
Отключить уведомление об обновлении Java на ПК с Windows
Чтобы отключить уведомление об обновлении Java на компьютере с Windows, вы можете выбрать любой из двух методов.
- Отключить уведомление об обновлении Java с помощью редактора реестра
- Остановить всплывающие окна Java из панели управления
Поговорим о них подробно.
1] Отключите уведомление об обновлении Java с помощью редактора реестра.
Прежде чем использовать редактор реестра, чтобы остановить уведомление об обновлении Java, вы должны знать, является ли операционная система на вашем компьютере 32-разрядной или 64-разрядной.

Для этого найдите «Системная информация». Затем проверьте Тип системы, вы увидите архитектуру, на которой основана ваша система.
Теперь откройте «Выполнить» Win + R, введите «Редактировать»и нажмите «ОК». Это откроет для вас редактор реестра.
Если вы работаете в 32-разрядной системе, перейдите по следующему адресу.
HKEY_LOCAL_MACHINE\ПРОГРАММНОЕ ОБЕСПЕЧЕНИЕ\JavaSoft\Обновление Java\Политика
Если вы используете 64-разрядную систему, перейдите по следующему адресу.
HKEY_LOCAL_MACHINE\SOFTWARE\WOW6432Node\JavaSoft\Java Update\Policy
Дважды щелкните по Включить JavaUpdate установить Значение данных к О и нажмите ОК.
Теперь вы не увидите уведомления об обновлении Java.
2] Остановить всплывающие окна Java из панели управления
Если вам не нравится редактор реестра, попробуйте сделать то же самое из панели управления. Этот метод рекомендуется использовать нетехническим специалистам. Выполните указанные шаги, чтобы сделать то же самое.
- Открытым Панель управления выполнив поиск в меню «Пуск».
- Измените свой Просмотр по к Большие иконки.
- Нажмите на Java.
- Перейти к Обновления вкладку и снять галочку Автоматически проверять наличие обновлений.
- Теперь вы можете выбрать либо Проверять еженедельно или Не проверять. Рекомендуется выбрать Не проверять.
- Нажмите Применить> Хорошо.
Вот как вы можете легко отключить уведомление об обновлении Java на вашем компьютере.
Как навсегда отключить обновления Java?
Оба метода, о которых мы упоминали ранее, навсегда отключат обновления Java, пока вы не включите их вручную. Так что технически это навсегда. Но, к сожалению, а может быть, и к счастью, нет способа, с помощью которого можно было бы их навсегда вывести из строя.
Также проверьте:
- Обновление, отключение, удаление, удаление Java в системах Windows
- Управление настройками Java в Windows.