Microsoft Teams – официальное приложение, которое теперь по умолчанию установлено в Windows 11. Его дополнение «Чат» автоматически добавляется на панель задач и используется для вызова соответствующего окна мессенджера. Далеко не все юзеры пользуются данным приложением, поэтому заинтересованы в его отключении или удалении, о чем я и расскажу далее.
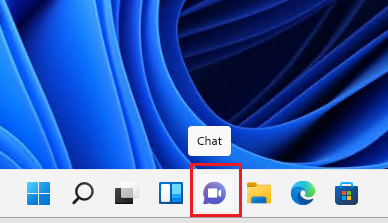
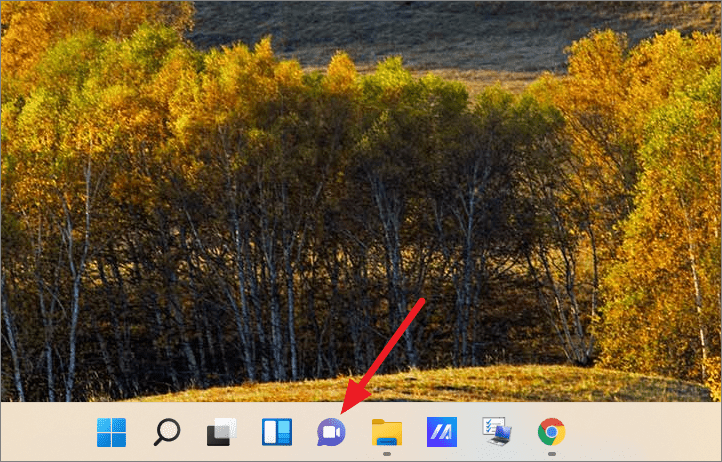
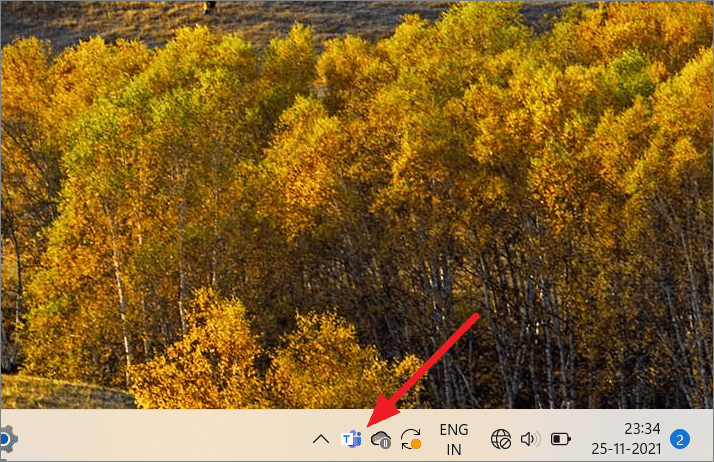
На следующем скриншоте вы видите значок чата из Microsoft Teams. Это то самое, от чего мы с вами будем избавляться.

Вариант 1: Отключение значка «Чат»
Самый простой метод решения ситуации без вмешательства в файлы операционной системы – просто отключить сам «Чат», поскольку от него избавиться напрямую не получится (разве что искать файл в реестре и самостоятельно удалять его). Я рекомендую использовать именно отключение, поскольку есть вероятность того, что в других случаях «Чат» все равно вернется в операционную систему после установки обновлений.
-
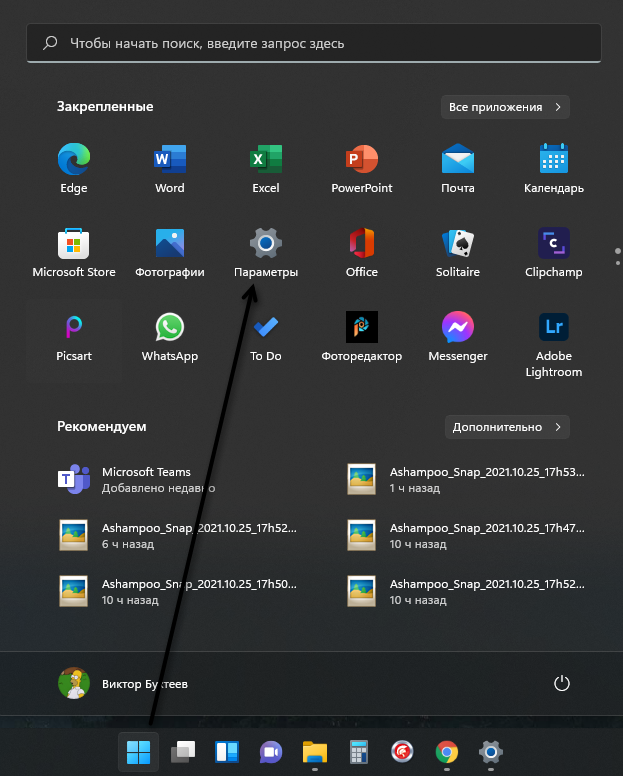
Для открытия соответствующей настройки через меню «Пуск» перейдите в «Параметры».

-
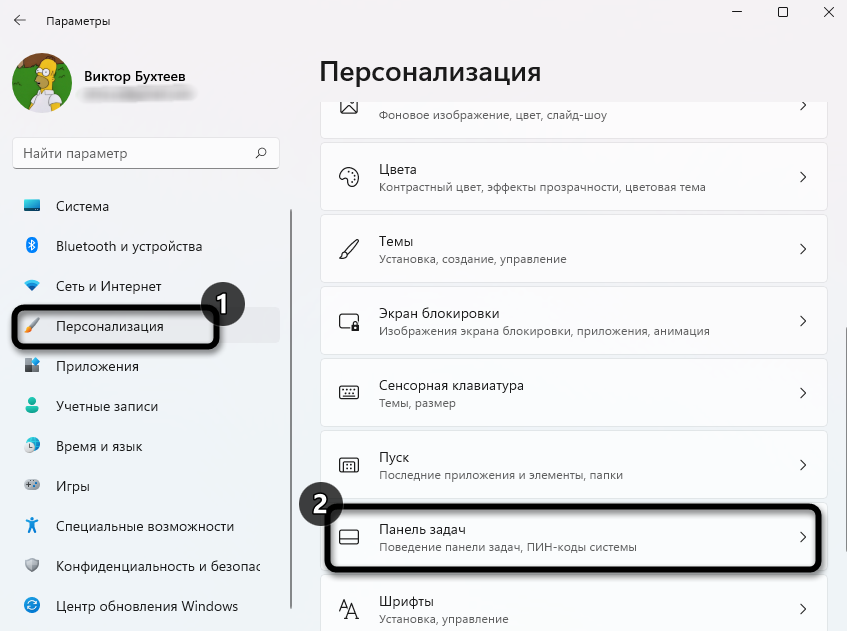
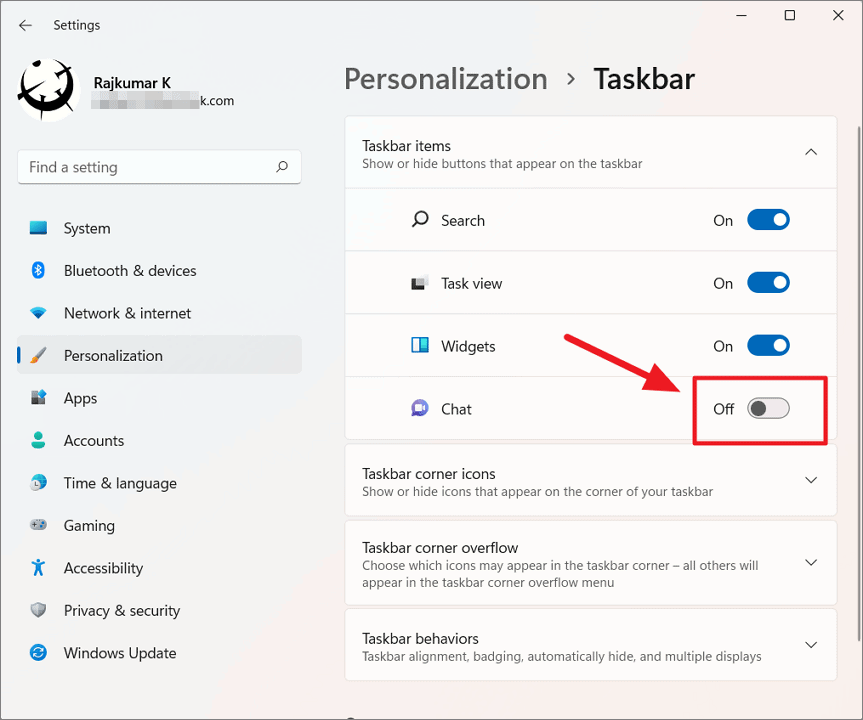
Откройте раздел «Персонализация» и выберите категорию «Панель задач».
-
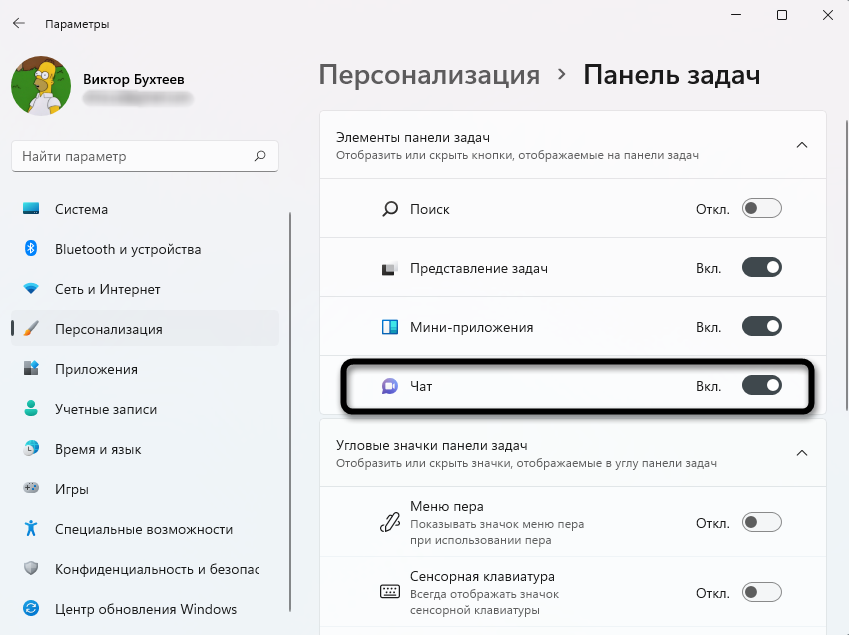
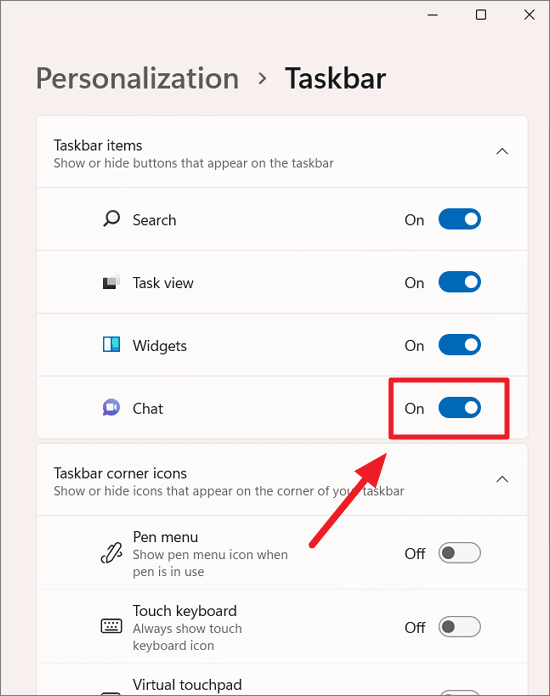
Среди всех элементов панели задач вы найдете «Чат» и сможете отключить значок, передвинув переключатель в соответствующее положение.
Как видно, ничего сложного в удалении самого значка нет. Теперь панель задач станет свободнее, и у вас перед глазами не будет маячить раздражающая иконка. Про полное удаление приложения Teams читайте далее.
Комьюнити теперь в Телеграм
Подпишитесь и будьте в курсе последних IT-новостей
Подписаться
Вариант 2: Удаление Microsoft Teams через список приложений
Хоть Teams по умолчанию и есть в ОС, разработчики не запрещают пользователям удалять программу, что уже радует. Сделать это можно буквально в пару кликов через то же окно «Параметры», но в другом разделе.
-
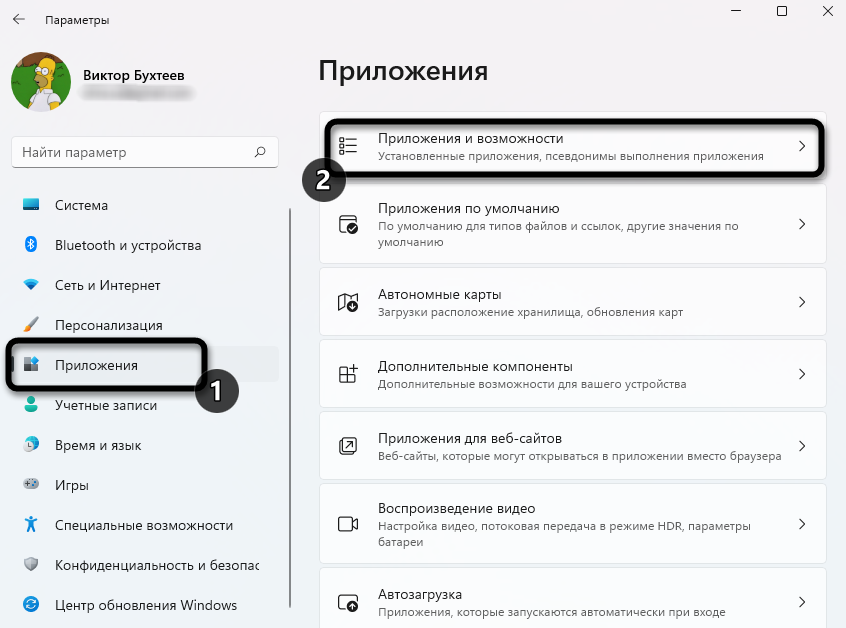
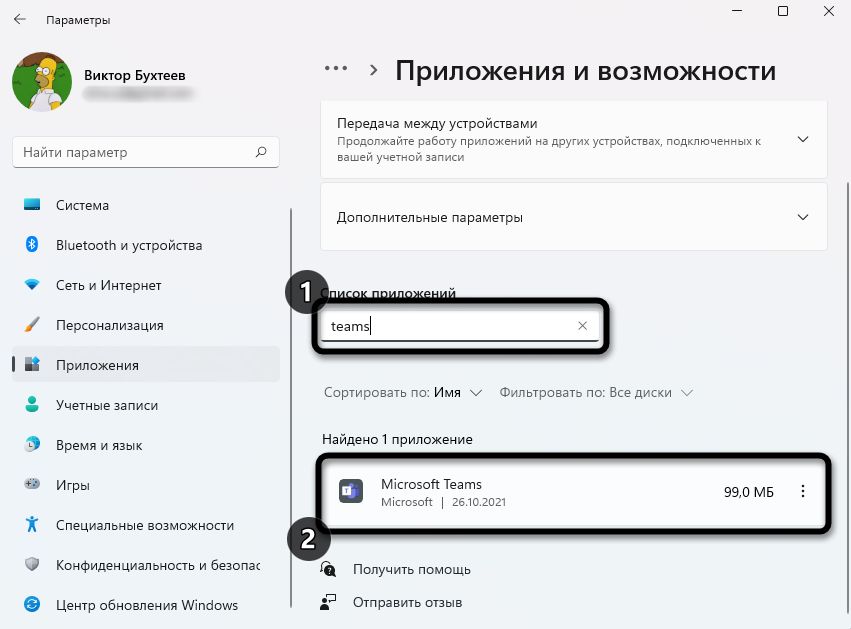
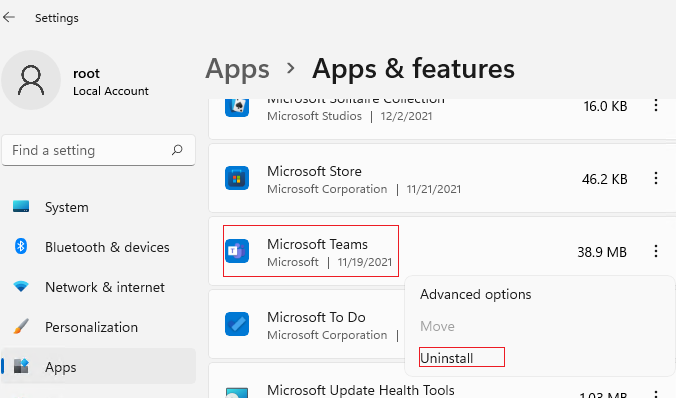
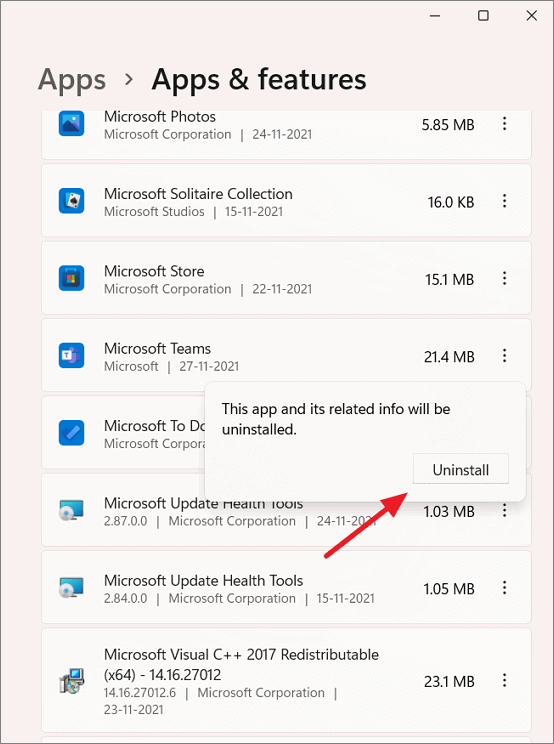
Перейдя в «Параметры» выберите пункт «Приложения» и щелкните по плитке «Приложения и возможности».
-
Используйте поиск, чтобы быстро отыскать требуемую программу.
-
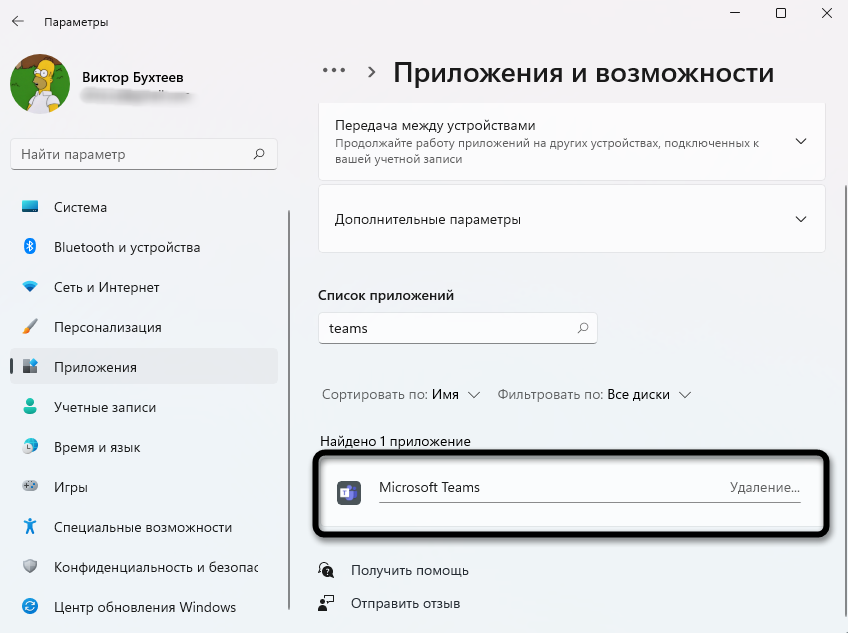
Нажмите по трем точкам справа от ее названия и из контекстного меню выберите пункт «Удалить».
-
Ожидайте завершения деинсталляции. Теперь память ПК не засоряет лишний софт.

Вариант 3: Удаление Teams через PowerShell
Я не исключаю того факта, что в будущем, с выходом новых обновлений, в Windows 11 удалить рассматриваемое приложение станет проблематично. Поэтому сразу предлагаю альтернативный вариант – использование Терминала для очистки пакетов. Процесс несложный, и выглядит он следующим образом:
-
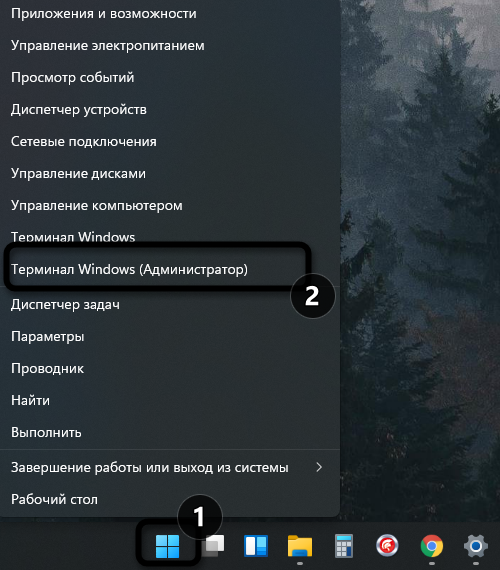
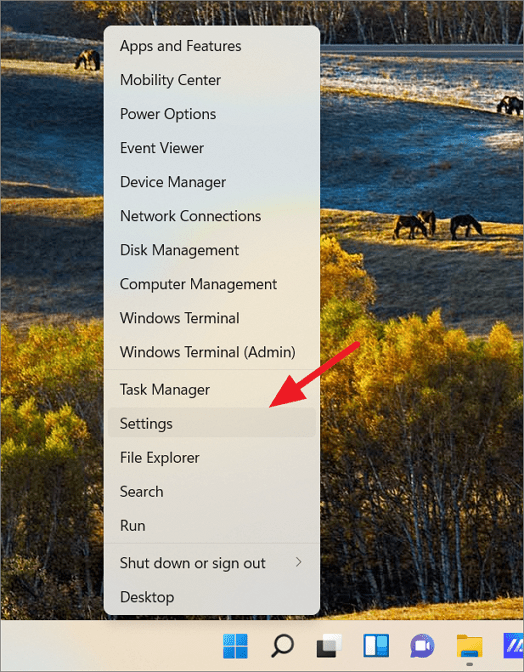
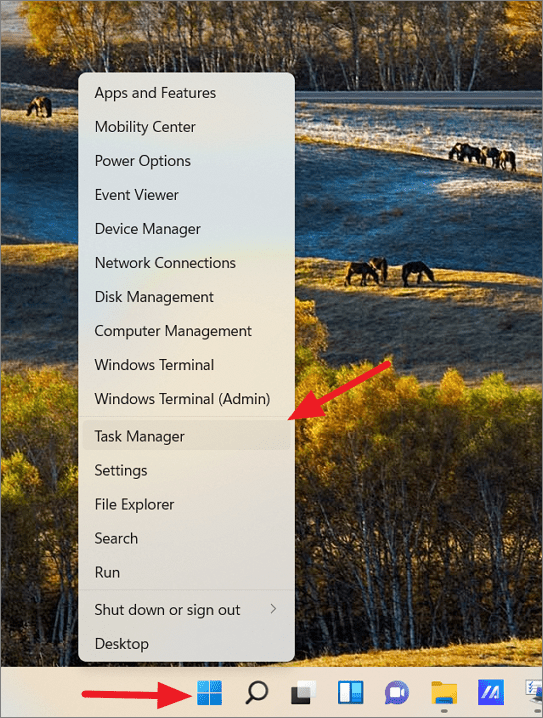
Щелкните правой кнопкой мыши по «Пуск» и из появившегося меню выберите пункт «Терминал Windows (Администратор)».
-
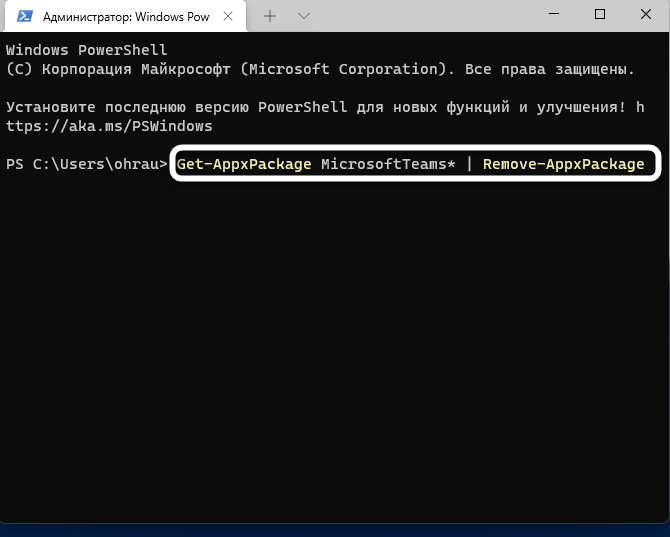
Введите команду Get-AppxPackage MicrosoftTeams* | Remove-AppxPackage и нажмите Enter для ее применения.
-
Следующая строка должна быть пустой, что означает успешное выполнение очистки пакетов приложения.

В завершение отмечу, что при удалении Microsoft Teams значок чата все равно остается на панели задач. При нажатии по нему и выборе кнопки «Начало работы» скачивание приложения произойдет автоматически, и оно снова будет добавлено в Windows 11. Поэтому советую сначала убрать саму иконку, а уже потом удалить программу.
 На панели задач Windows 11 по умолчанию присутствует кнопка «Чат», а среди предустановленных приложений — Microsoft Teams, которое, к тому же, находится в автозагрузке. Если вы не используете Teams, разумным будет удалить это приложение.
Далее в инструкции пошагово показано, как полностью удалить Microsoft Teams в Windows 11, отключить его автозагрузку, а также убрать кнопку приложения с панели задач.
Удаление Microsoft Teams в Windows 11 пошагово
Чтобы полностью удалить предустановленный Microsoft Teams в Windows 11 достаточно выполнить следующие простые шаги:
- Если приложение Microsoft Teams запущено и его значок есть в области уведомлений (в том числе скрытый за «стрелкой»), нажмите по значку и выберите пункт «Выйти» в контекстном меню.

- Нажмите правой кнопкой мыши по пустому месту панели задач, нажмите «Параметры панели задач», а затем отключите пункт «Чат».

- В Параметрах Windows 11 перейдите в Приложения — Автозагрузка и отключите автозагрузку Microsoft Teams. Подробнее: Как убрать программы из автозагрузки Windows 11.

- Перейдите в Параметры — Приложения и возможности, найдите в списке Microsoft Teams, нажмите по кнопке меню (три точки) справа и выберите пункт «Удалить».

- Подтвердите удаление приложения.


На этом Microsoft Teams будет полностью удален с компьютера или ноутбука. Действия выше приведены с некоторой избыточностью, но лучше выполнить их все.
Дополнительные способы
Обычно, какие-либо дополнительные средства для удаления Microsoft Teams не требуются, однако при желании вы можете:
- Использовать команду PowerShell (запустив Терминал Windows от имени администратора)
Get-AppxPackage MicrosoftTeams* | Remove-AppxPackage
- Использовать сторонние программы для очистки компьютера с возможностью удаления встроенных приложений.
Если в дальнейшем вы захотите вернуть Microsoft Teams, сделать это просто: используйте действия из 2-го шага, чтобы включить кнопку «Чат» на панели задач, а после включения — нажмите по ней, а затем — по кнопке начала использования Microsoft Teams.

Приложение будет скачано и установлено автоматически.
Microsoft решила добавить в Windows 11 встроенный клиент чата Microsoft Teams, и его кнопка его запуска по-умолчанию отображается в панели задач. Если вы не используете Microsoft Teams, то можете удалить его и убрать значок Chat в панели задач.
Содержание:
- Скрыть значок чата Teams в панели задач Windows 11
- Удаление Microsoft Teams в Windows 11
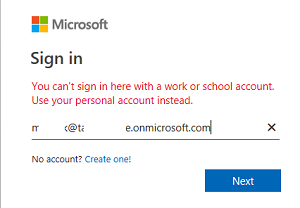
Встроенный клиент Chat Teams можно использовать только с личными аккаунтами Microsoft. Для установки полноценного корпоративного MS Teams (из Microsoft 365 Apps), нужно ставить другое приложение. При попытке входа под своей корпоративной учеткой Azure, я получил ошибку:
You can’t sign in with a work or school account. Use your personal account instead.
Скрыть значок чата Teams в панели задач Windows 11
Если вы не хотите полностью удалять клиент Чат Teams, можно просто убрать его из автозагрузки и скрыть значок с панели задач.
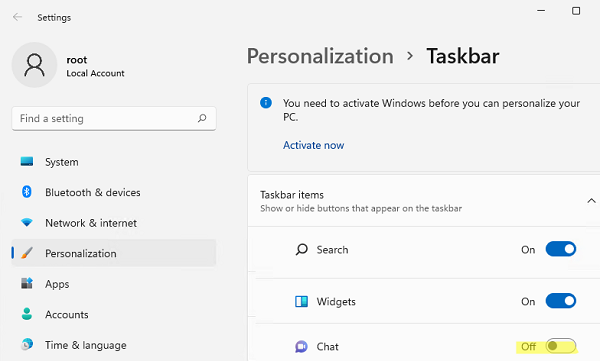
Чтобы скрыть значок Chat Teams в панели задач, перейдите в Settings -> Personalization -> Taskbar (можно выполнить команду быстрого доступа
ms-settings:taskbar
)и отключите Chat.
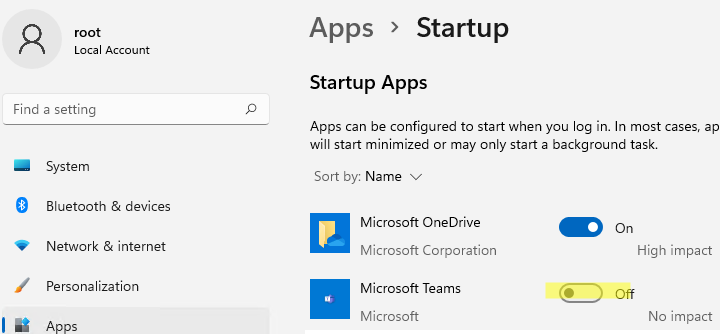
Отключить автозапуск Microsoft Teams можно через Settings -> Apps -> Startup (
ms-settings:startupapps
).
Обратите внимание, что недостаточно просто отключить автозапуск Teams через Settings или Task Manager -> Startup. Если вы запустите клиент Teams, то он автоматически пропишется в автозагрузку.
При установке очередного билда Windows 11, чат Teams опять может вернуться в панель задач и автозагрузку. Поэтому можно использовать другие способы отключения иконки Teams.
- В новых административных admx шаблонах GPO для Windows 11 появилась опция Configure the Chat icon on the taskbar (Computer Configuration -> Administrative Templates -> Windows Component -> Chat). Если изменить эту политику на Disabled, значок Teams перестанет отображаться в панели задач;
- Также можно скрыть значок чата Teams через реестр:
reg add "HKEY_LOCAL_MACHINE\SOFTWARE\Policies\Microsoft\Windows\Windows Chat" /f /v ChatIcon /t REG_DWORD /d 3
Удаление Microsoft Teams в Windows 11
Чтобы удалить клиент appx приложение Chat Teams у текущего пользователя, перейдите в Settings -> Apps -> Apps and features (
ms-settings:appsfeatures
). Найдите Microsoft Teams в списке установленных приложение и удалите его (Uninstall в меню).
Но это удалит приложение Teams только у текущего пользователя. Если вы хотите удалить Teams у всех пользователей и из образа Windows 11 (как Staged приложение), воспользуйтесь PowerShell.
Get-AppxPackage MicrosoftTeams*|Remove-AppxPackage -AllUsers
Get-AppxProvisionedPackage -online | where-object {$_.PackageName -like "*MicrosoftTeams*"} | Remove-AppxProvisionedPackage -online –Verbose

Staged приложения Windows 11 хранятся в каталоге C:\Program Files\WindowsApps и устанавливаются в профиль любого нового пользователя. После выполнения указанных выше команд, проверьте, что на диске удалены каталоги Teams:
Dir “C:\Program Files\WindowsApps”| where-object {$_.Name -like "*MicrosoftTeams*"}
Подробнее про удаление встроенных UWP/APPX приложений в Windows.
После удаления Teams можно запретить его автоматическую установку:
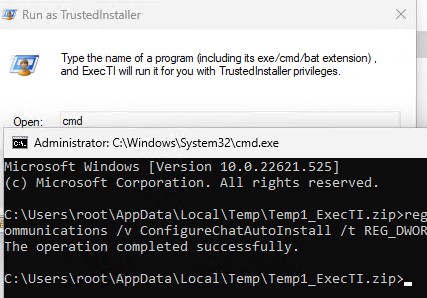
reg add HKLM\SOFTWARE\Microsoft\Windows\CurrentVersion\Communications /v ConfigureChatAutoInstall /t REG_DWORD /d 0 /f
По умолчанию в Windows 11 22H2 у пользователя нет прав на внесение изменений в ветку реестра HKLM\SOFTWARE\Microsoft\Windows\CurrentVersion\Communications.
При попытке создать параметр реестра ConfigureChatAutoInstall появится ошибка
ERROR: Access is denied.
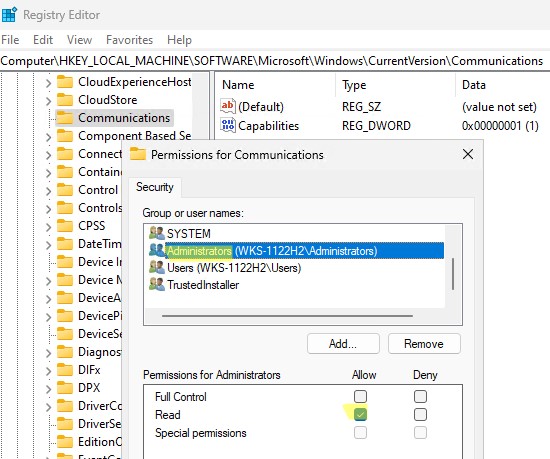
Права на запись в ветку реестра есть только у Trusted Installer.
Чтобы создать этот параметр реестра, нужно использовать параметр файла автоответов:
<component name="Microsoft-Windows-Shell-Setup" processorArchitecture="amd64" publicKeyToken="31bf3856ad364e35" language="neutral" versionScope="nonSxS" xmlns:wcm="http://schemas.microsoft.com/WMIConfig/2002/State" xmlns:xsi="http://www.w3.org/2001/XMLSchema-instance">
<ConfigureChatAutoInstall>false</ConfigureChatAutoInstall>
</component>
Или вы можете выполнить команду добавления в реестра от имени TrustedInstaller с помощью утилиты ExecTI от Winaero (https://winaero.com/download-execti-run-as-trustedinstaller/).
Thanks to https://www.outsidethebox.ms/21375/
Что интересно: приложение Chat Teams не встроено в дистрибутив Windows 11, этот APPX пакет устанавливается автоматически после установки Windows. Поэтому вы не сможете удалить его из установочного образа Windows (install.wim) по этой методике.
На данный момент единственный способ запретить автоматическую установку Teams – прописать параметр реестра ConfigureChatAutoInstall во время установки Windows.
Проще всего это сделать с помощь файла AutoUnattend.xml, который нужно положить в корень установочного образа/ флешки с Windows 11 (по аналогии со статьей Установка Windows 11 без TPM, Secure Boot и других проверок). Вот фрагмент файла автоответов:
<RunSynchronousCommand wcm:action="add">
<Order>1</Order>
<Path>reg add HKLM\Software\Microsoft\Windows\CurrentVersion\Communications /v ConfigureChatAutoInstall /t REG_DWORD /d 0 /f</Path>
</RunSynchronousCommand>
Microsoft really wants you to use its Microsoft Teams app that why the app is deeply integrated into Windows 11 as the native experience. Microsoft Teams is a free collaboration platform for audio and video calls, one-on-one chat conversations, group messaging, and synchronizing schedules, among other things.
When you login into your Windows 11 PC, you would see that the Microsoft Teams Chat app is integrated into your Taskbar (by default) and the Teams app is running in the background. Not everyone needs Microsoft Teams since most people are already using other services such as Zoom, Google Chat, Slack, or Skype.
Besides, Microsoft Teams icons can clutter your taskbar and system tray and the app will be running in the background every time you start the computer. If you are not a fan of Microsoft Teams and not going to use it, you can hide the Microsoft Teams icon from the taskbar and the system tray, stop it from starting automatically, remove the app from Startup or uninstall it completely from your Windows 11 computer.
Hide the Microsoft Teams Chat Icon from Taskbar
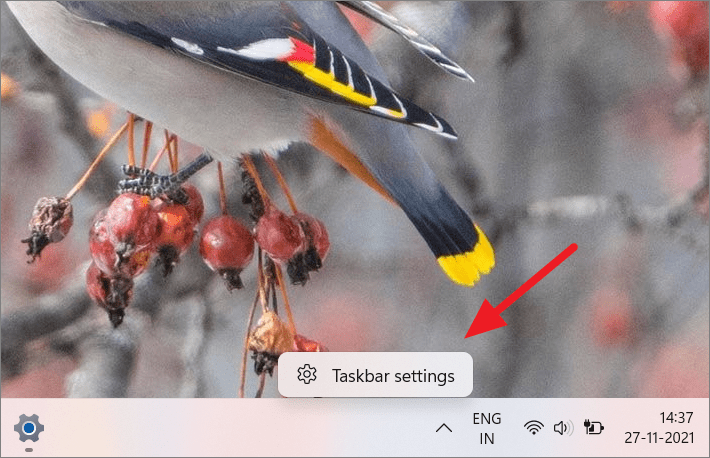
In Windows 11, you will see the Microsoft Teams Chat icon in the middle of the Taskbar whether you have use for it or not. Unlike other taskbar icons, you cannot remove the Chat icon simply by right-clicking on the taskbar and selecting ‘Hide from taskbar’.
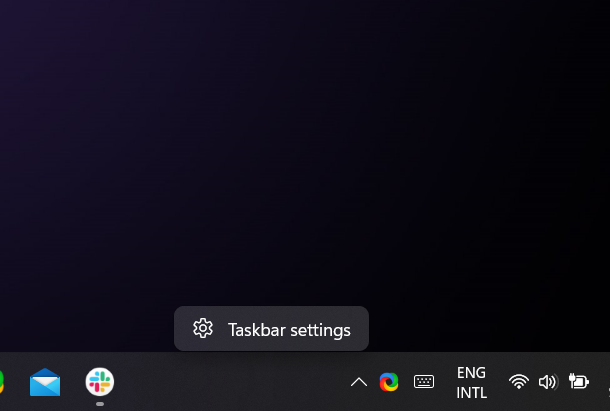
If you want to hide the Teams Chat icon from the taskbar, you do it through the taskbar settings. To do this, right-click any empty area on the taskbar and select ‘Taskbar settings’.

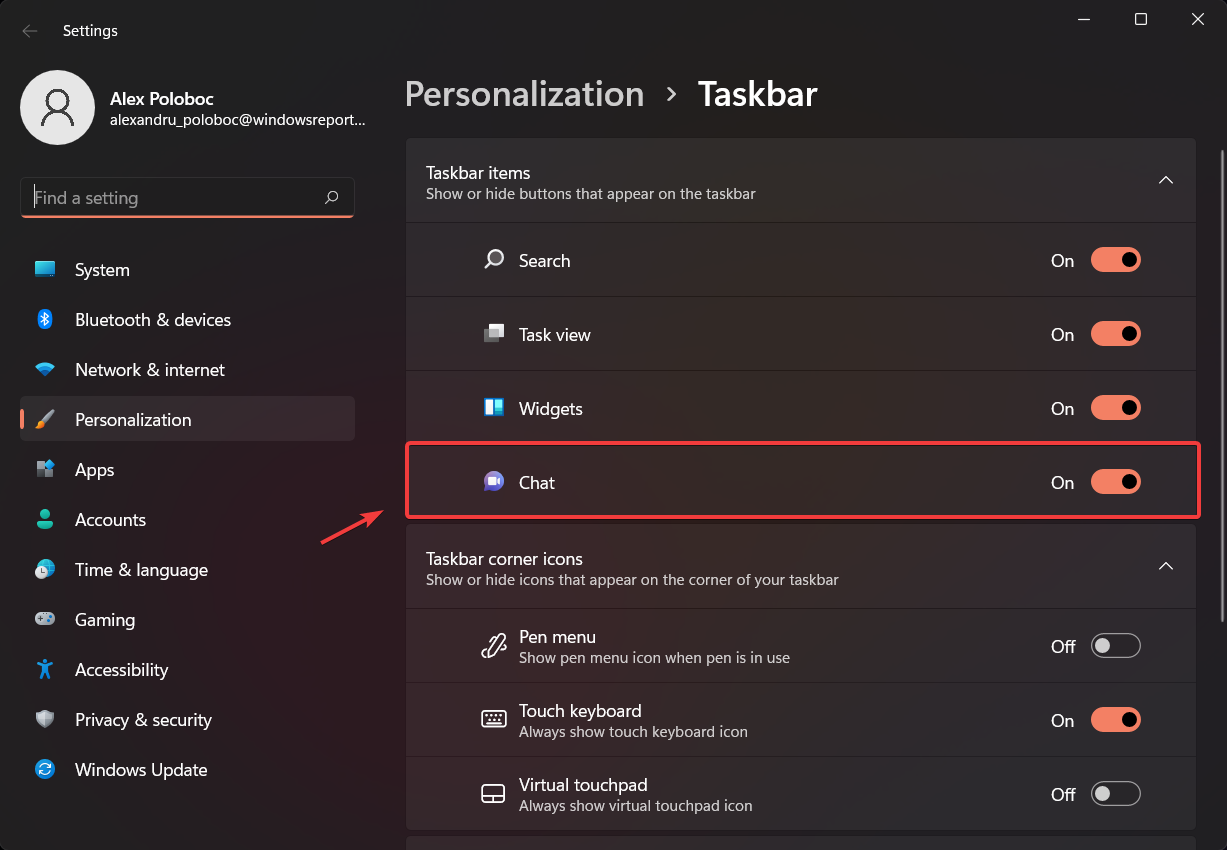
This will open up the Taskbar settings page. Here, simply turn off the toggle next to ‘Chat’ under Taskbar items to hide the Teams Chat icon.
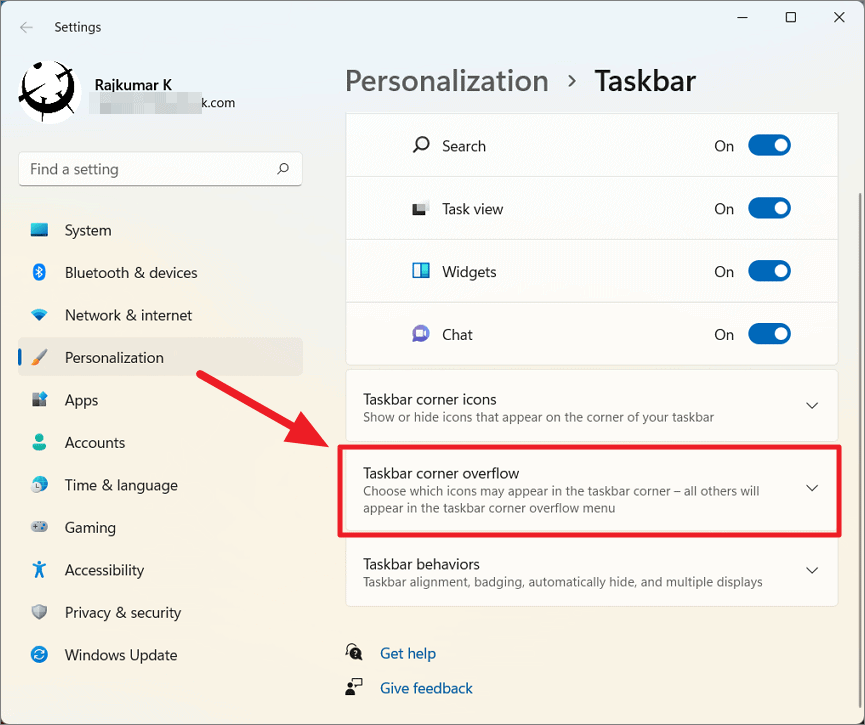
If you want to hide the Microsoft Teams icon from the taskbar corner near the tray area, follow these steps:
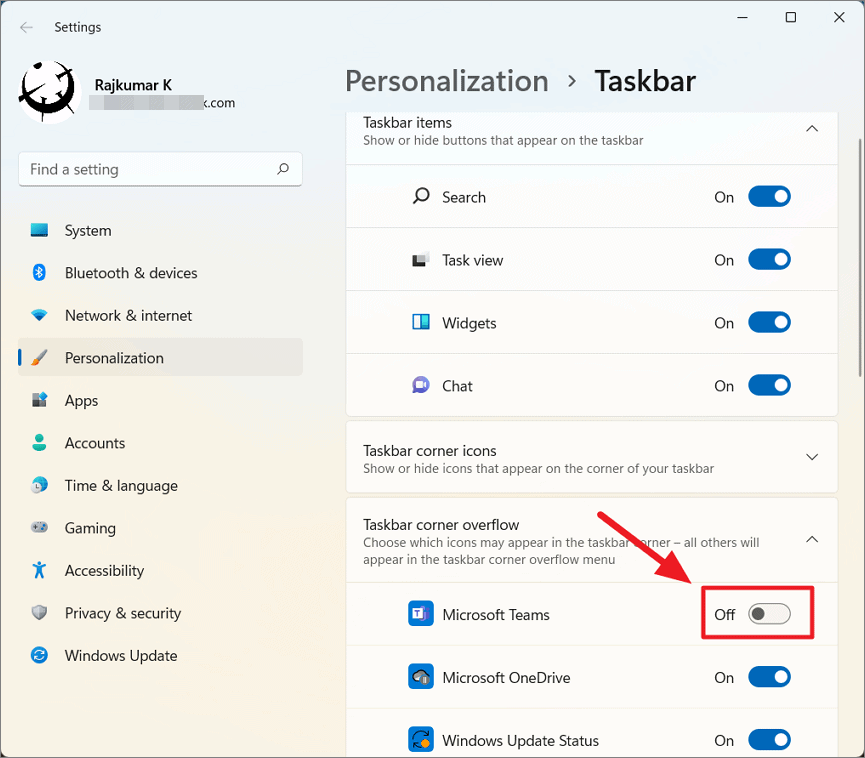
First, right-click anywhere on the taskbar and choose ‘Taskbar settings’ as you did above. Then, expand the ‘Taskbar corner overflow’ option in the Taskbar settings.
After that turn off the toggle next to ‘Microsoft Teams’ to remove the Teams icon from the Taskbar corner.
Stop Microsoft Teams from Running in the Background
Even when you are not using Microsoft Teams, the app would be running in the background consuming quite a resource. If you want to stop the Teams app from running in the background when you are not using it, follow these steps:
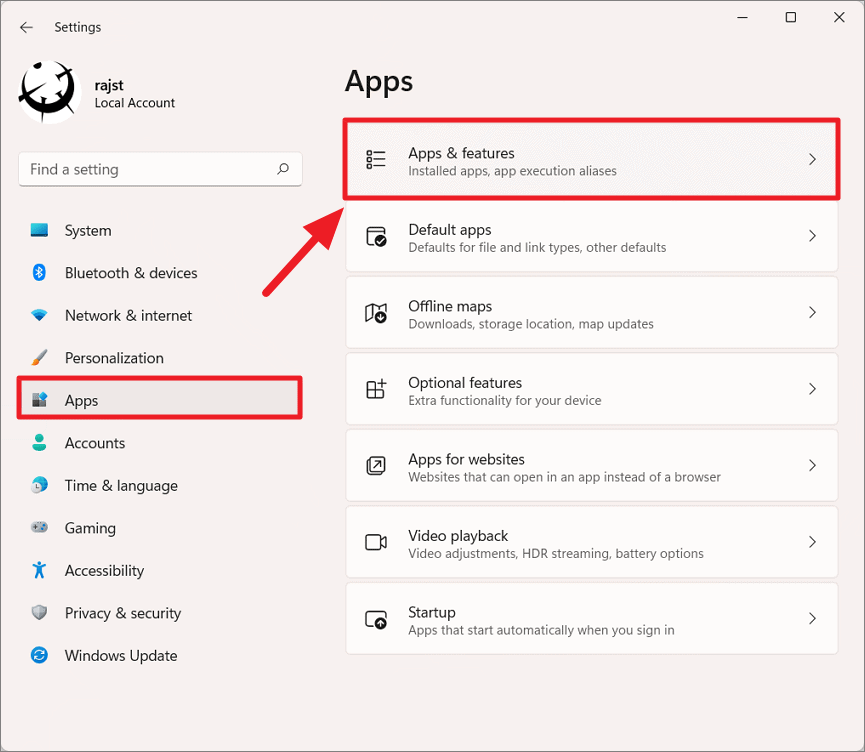
To start with, right-click the Start menu and select ‘Settings’ or press Win+I shortcut to open the Settings app.
On the Setting app, click on the ‘Apps’ tile on the left and select ‘Apps & features’ on the right.
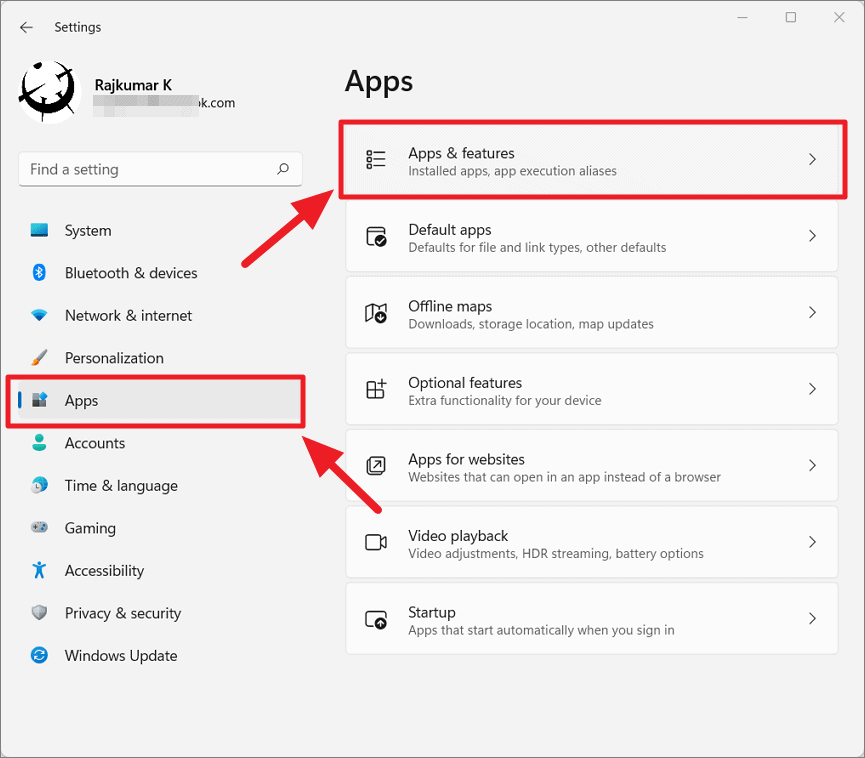
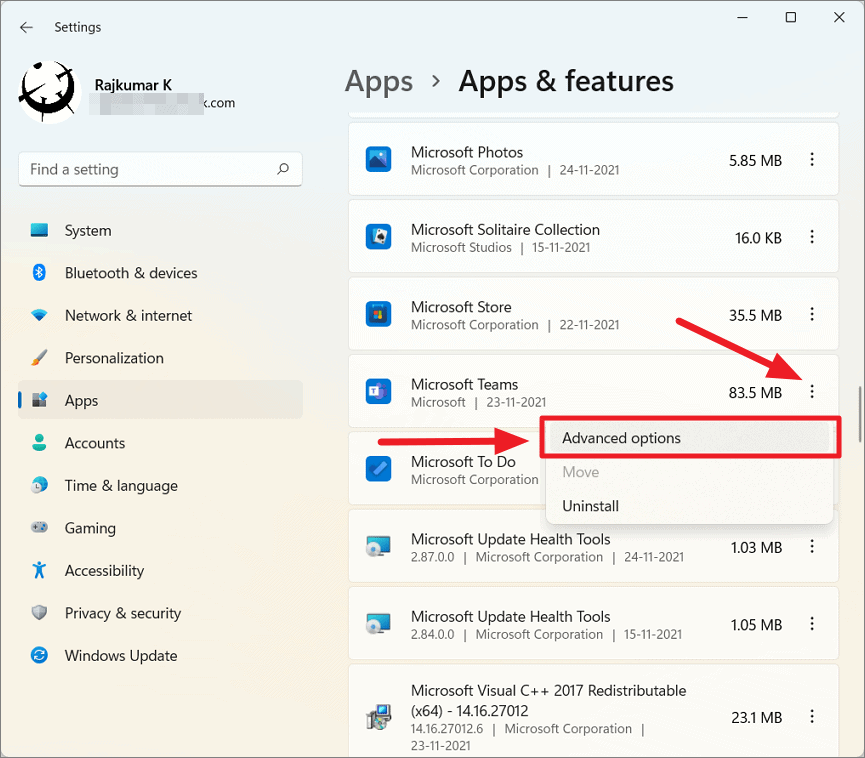
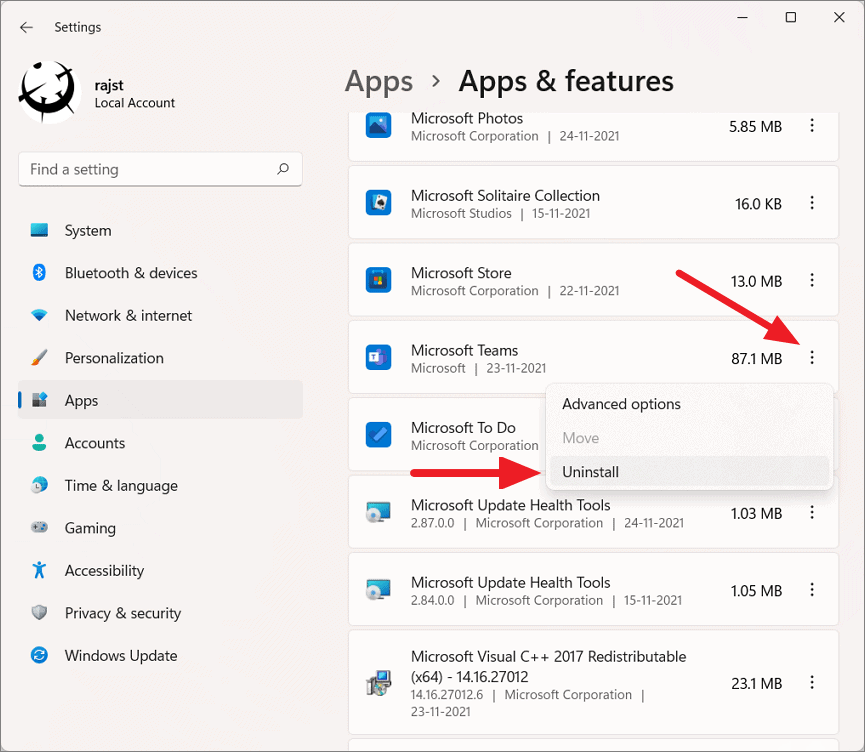
Next, scroll down the list of apps and locate the ‘Microsoft Teams’. Then, click the vertical three-dot icon next to Microsoft Teams app and select ‘Advanced options’.
This will open up the Microsoft Teams app settings page. Here, you will find the ‘Let this app run in background’ drop-down under Background apps permissions.
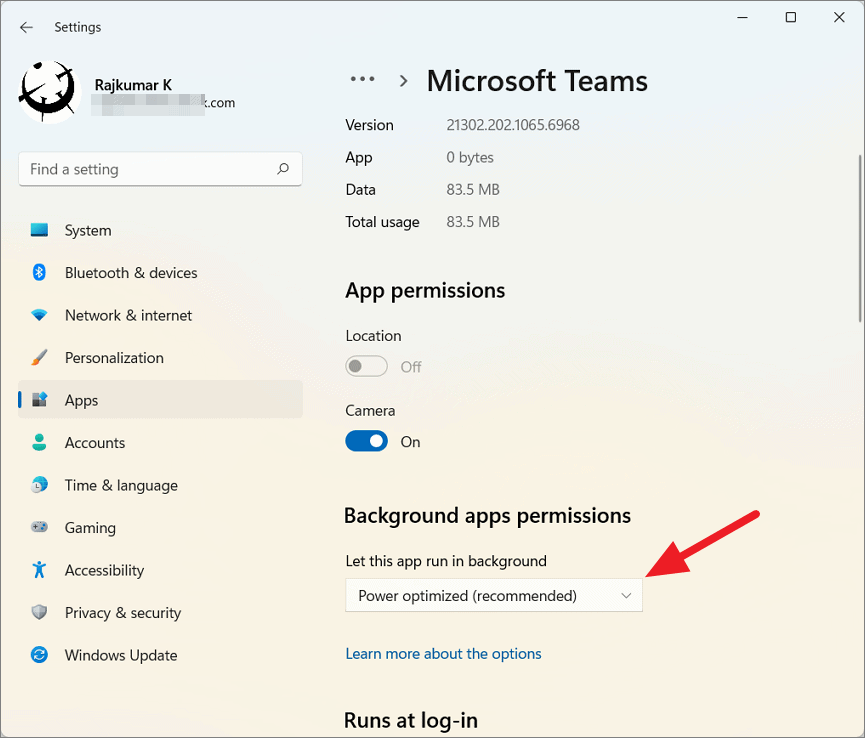
Click on that drop-down and choose ‘Never’ to stop the app from running in the background.
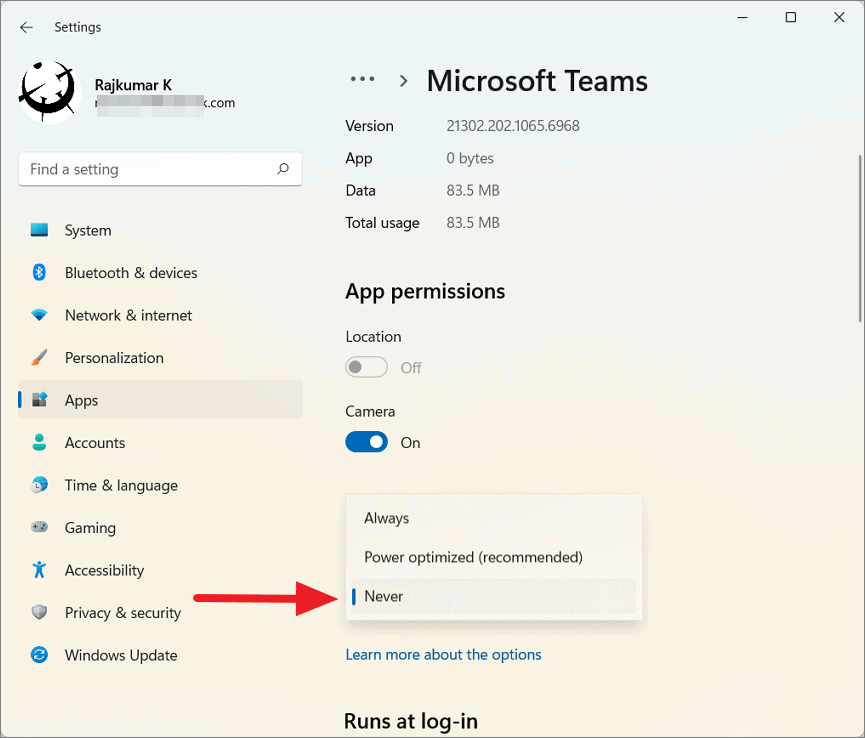
This will prevent the Microsoft Teams app from running in the background when you are not actively using it. This will also turn off notifications or updates for the app when it’s inactive. Doing this can also help save power, free memory, and disk.
Disable Microsoft Teams Without Uninstalling it in Windows 11
Microsoft Teams is pre-configured to start automatically every time you turn on your Windows 11 computer and log in to your user account. If you don’t use Microsoft Teams often, you can disable it from starting automatically using Settings, Task Manager, or from within the app itself. Disabling Teams at automatic startup can significantly increase your system boot time and free resources to perform other tasks.
Stop Microsoft Teams for the Current Session
If you finished your chats and meeting for the day in the Microsoft Teams and close it, the application won’t stop instead it will run in the background unnecessarily eating up precious resources. If you only want to kill the app for the current session, here’s what you need to do:
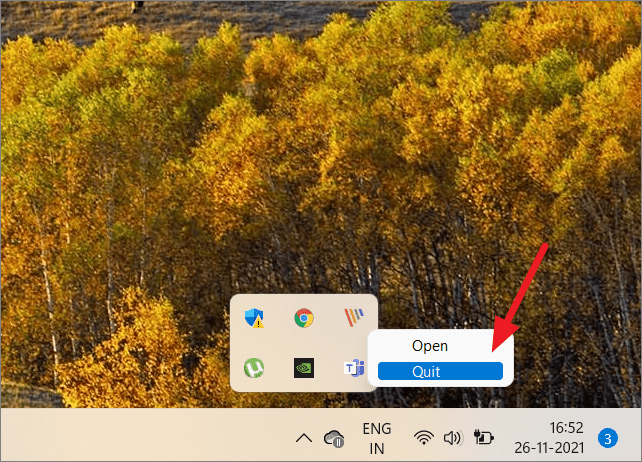
First, locate the Microsoft Teams icon in the taskbar corner on the right. If you don’t see the Teams icon there, then click the ‘Show hidden icons’ up arrow (overflow area) and find the app icon there.
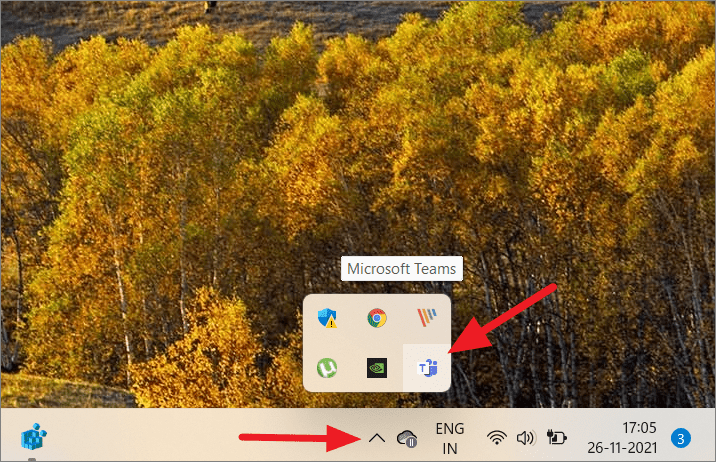
Then, right-click the Teams icon and select ‘Quit’ to kill the app immediately.
Prevent Microsoft Teams from Starting Automatically from Team settings
If you don’t want Microsoft Team to pop up on your screen unnecessarily, you can restrict the app from automatically starting up from the app settings. Follow these steps to do that:
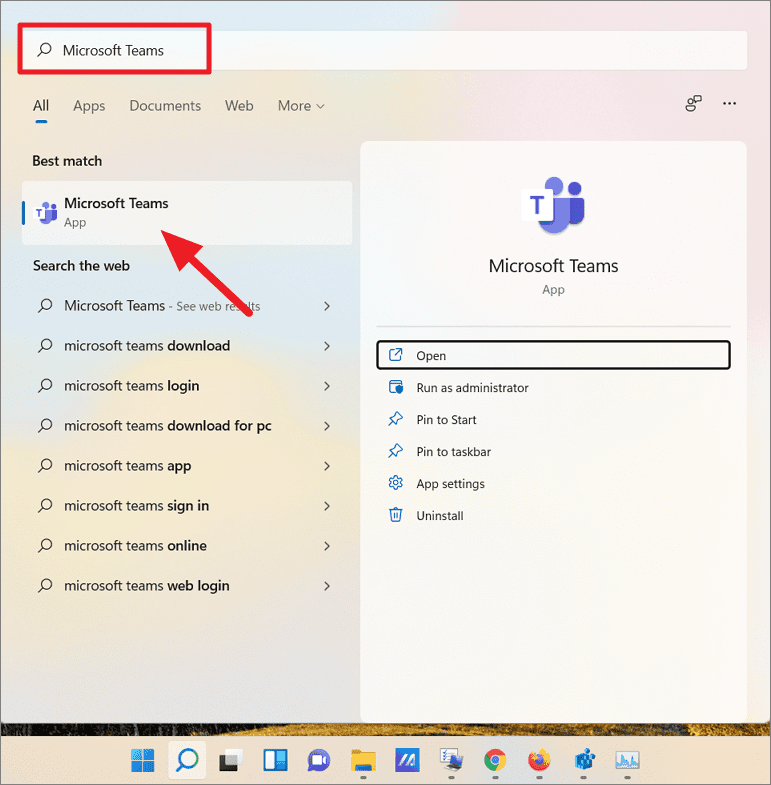
First, open the Microsoft Teams app. To do that, search for ‘Microsoft Teams’ in the Windows search and select the app from the result or click on the Teams icon from the Taskbar corner or the overflow.
On the Microsoft Teams app, click the ‘Settings and more’ button (three-dot menu) on the Title Bar, and select ‘Settings’.
On the Settings page, go to the ‘General’ tab on the left and deselect the ‘Auto-start Teams’ option under System.

Now, Microsoft Teams won’t start unless you open the Teams app or the Chat app from the Taskbar manually.
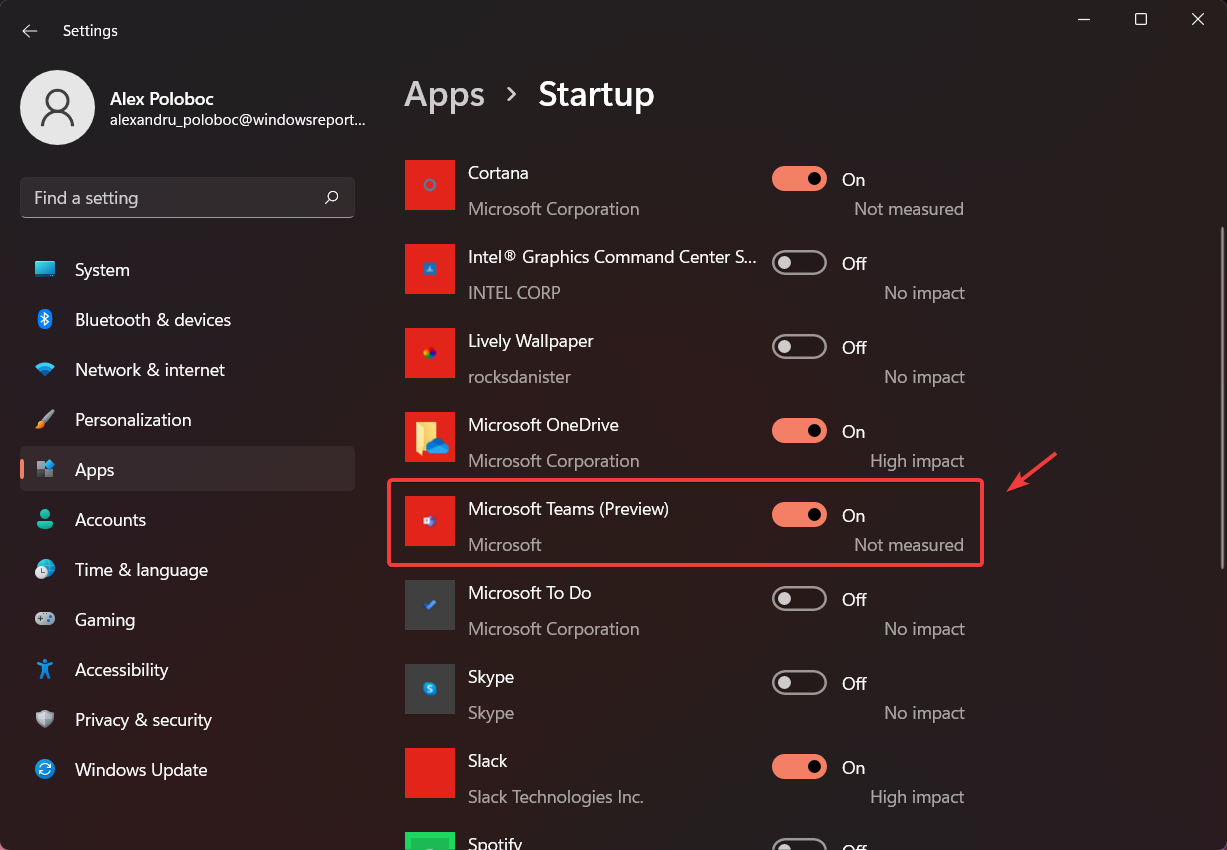
Disable Microsoft Teams from Startup using Settings
If you don’t want to completely remove Microsoft Teams app, you can remove it from the Windows Startup list to stop it from automatically loading every time you start your device. Here’s what you need to do:
Open the Settings app on Windows 11 and head over to the ‘Apps’ section on the left.
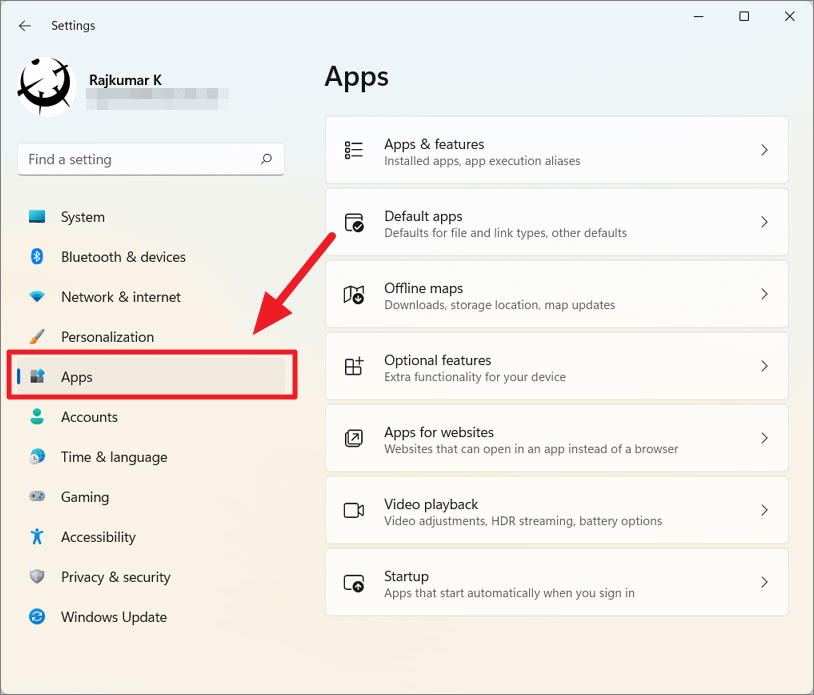
Then, select the option for ‘Startup’ on the right.
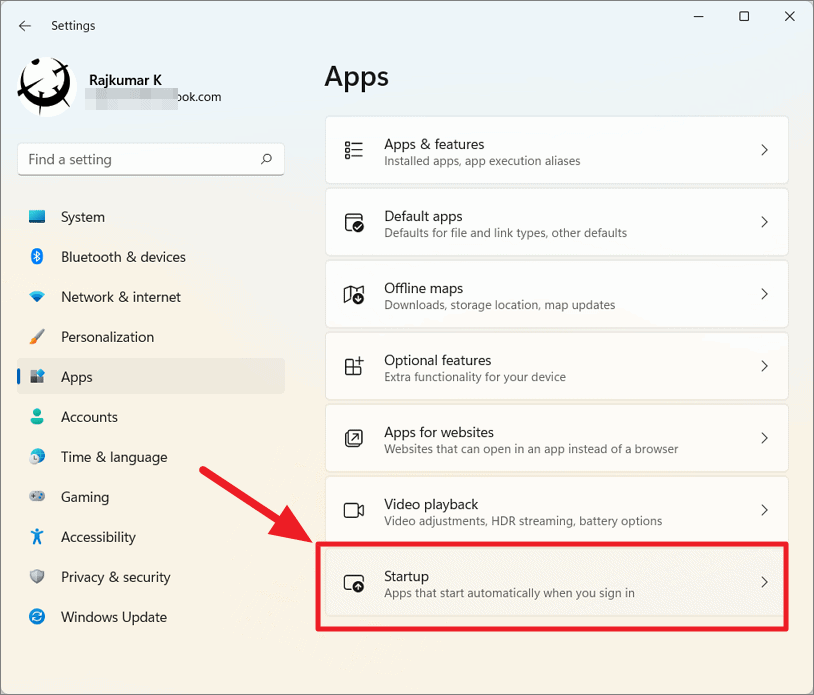
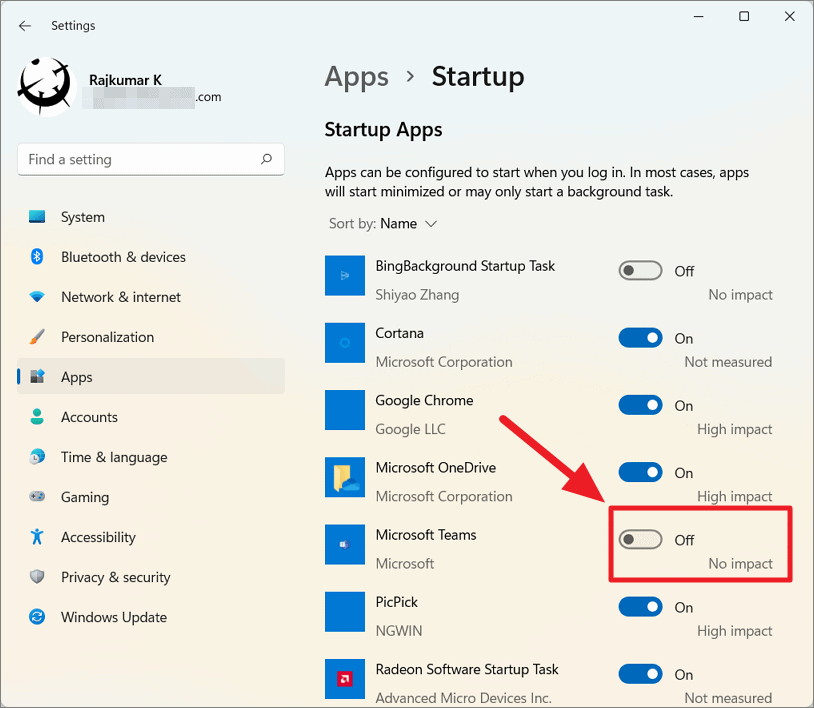
In Startup Settings, you’ll see a list of apps that start when you log in to your PC. Here, locate ‘Microsoft Teams’ and turn off the toggle to remove it from the startup apps.
Disable Microsoft Teams from Startup using Task Manager
Another way to remove Microsoft Teams from the startup list is through the task manager. Here’s how:
Open Task Manager by right-clicking the Start menu and selecting the ‘Task Manager’ from the overflow menu or pressing Ctrl+Shift+Esc keys at the same time.
In the Task Manager, go to the ‘Startup’ tab and locate ‘Microsoft Teams’. Then, either right-click on the app and select ‘Disable’ or select the app and click the ‘Disable’ button at the bottom.
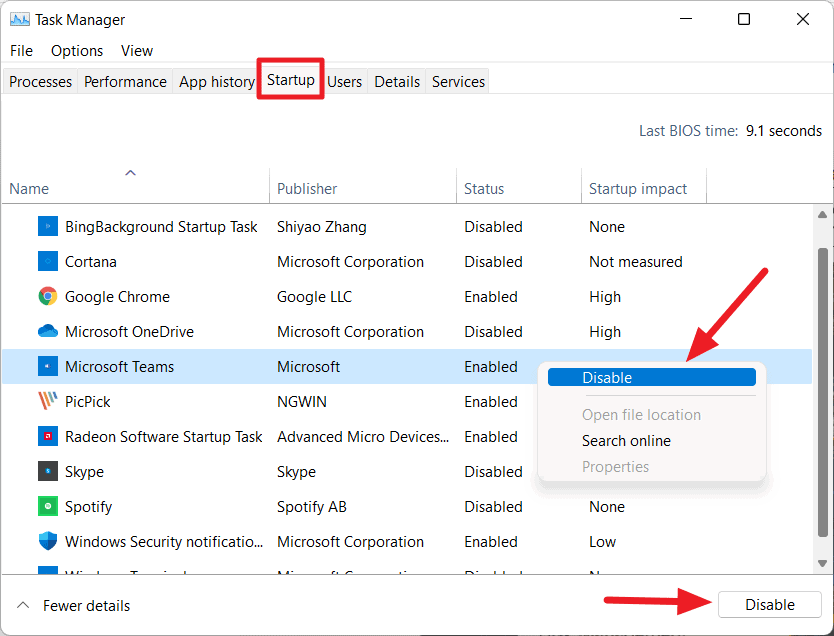
Now, Microsoft Teams will not run automatically when you turn on your PC.
Uninstall Microsoft Teams in Windows 11
In case you have other communication apps like Skype, Zoom, Google Chat, etc., and don’t want Teams around or you no longer need it, you can uninstall it from your system. There are three ways to go about this:
Uninstall Microsoft Teams using Settings
If you want to completely remove Microsoft Teams from your Windows 11 system, follow these steps:
First, open Settings by pressing Windows+I. In the Settings app, go to ‘Apps’ on the left navigation pane and select ‘Apps & features’ on the right pane.
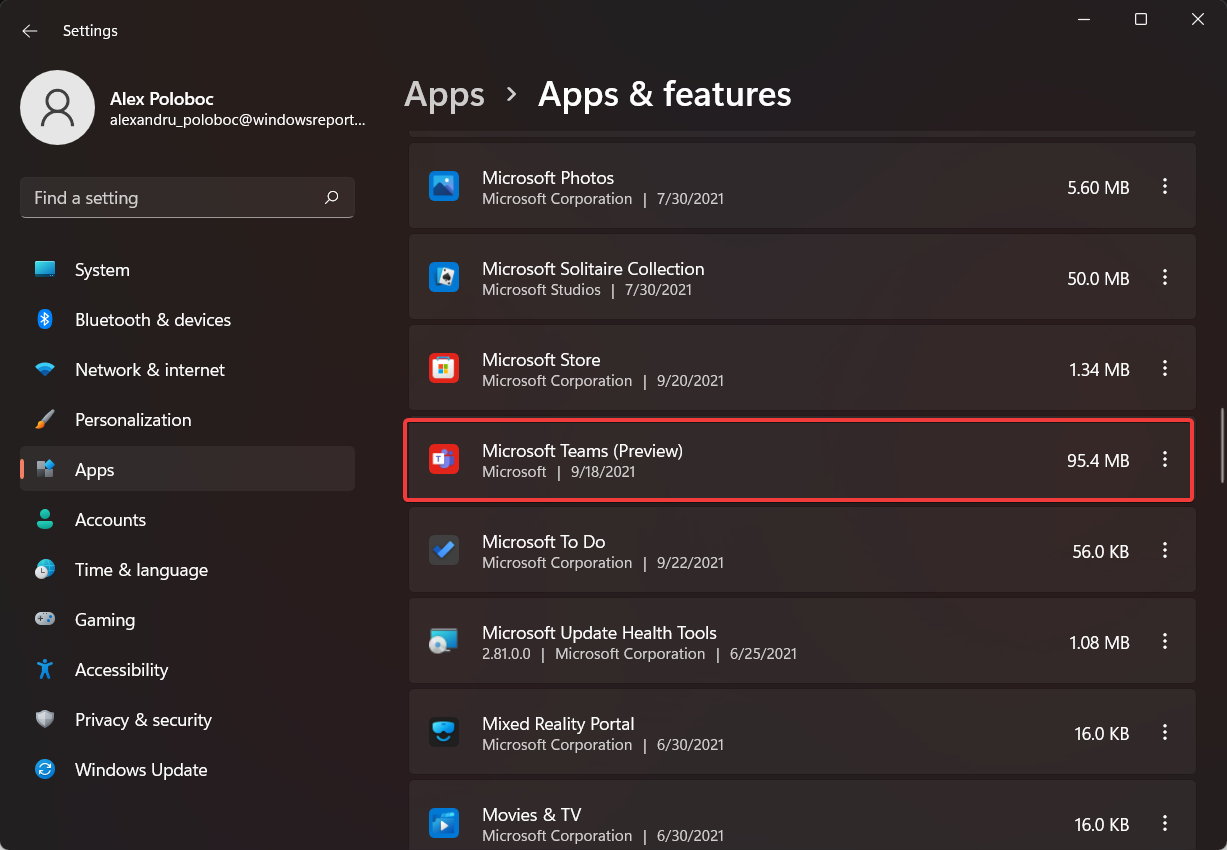
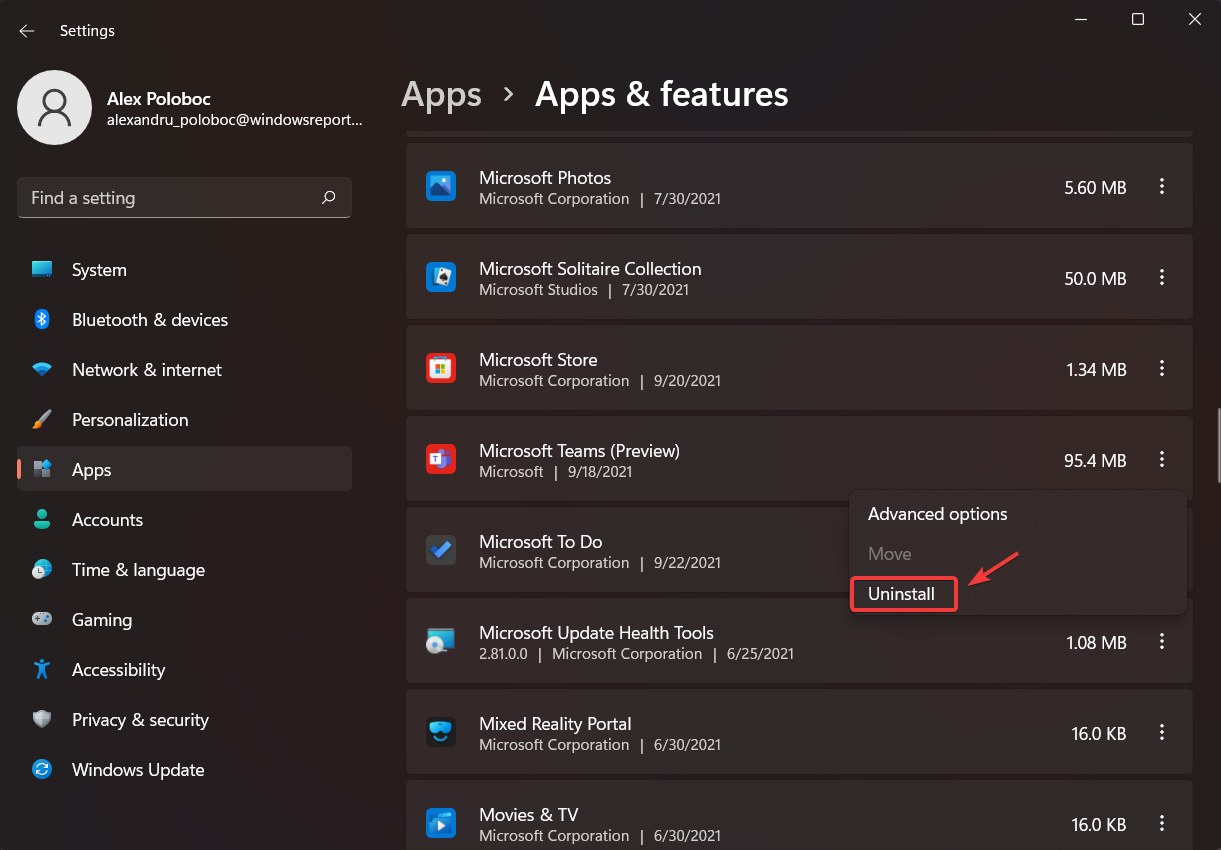
Scroll down the list of apps and find ‘Microsoft Teams’. If you can’t find it, search for it in the search bar above. Then, click on the three-dot menu next to the app name and select ‘Uninstall’.
Then, click ‘Uninstall’ again in the pop-up to remove the app.
Now, the Microsoft Teams app is uninstalled from your PC.
Uninstall Microsoft Teams from the Start Menu
The easiest way to remove the Teams app from Windows 11 is from the Start menu.
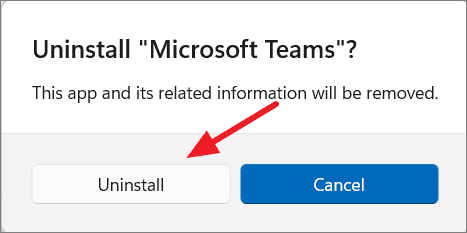
First, click on the ‘Start’ menu icon in the Taskbar and search for ‘Microsoft Teams’. Then, right-click on the ‘Microsoft Teams’ app from the result and choose ‘Uninstall’ or select the ‘Uninstall’ option on the right.
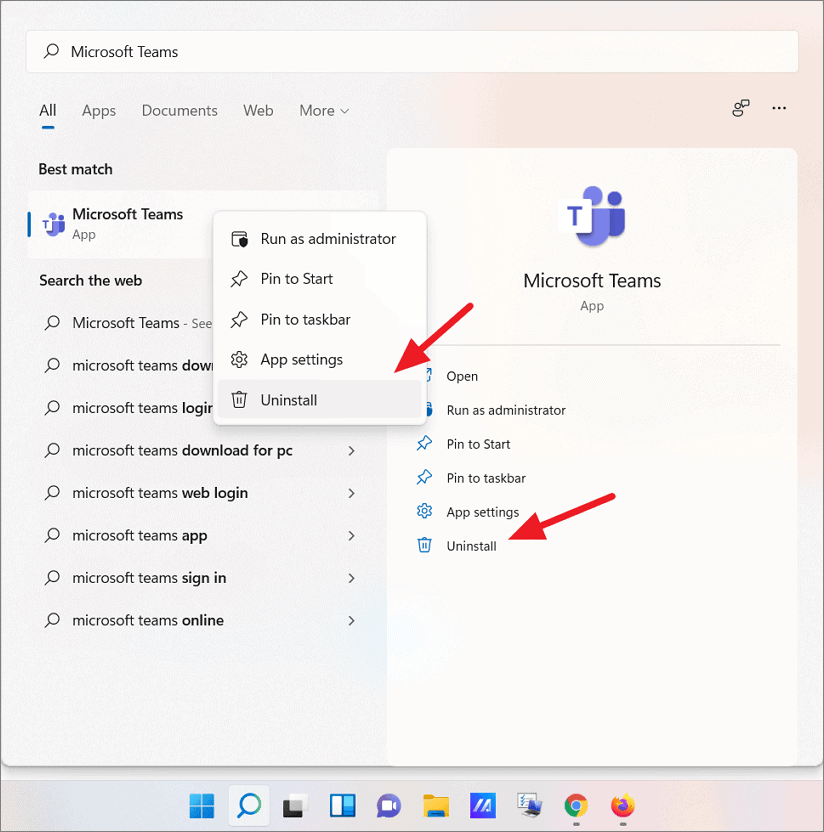
In the confirmation box, click ‘Uninstall’ again to fully uninstall the app.
Uninstall Microsoft Teams using PowerShell
You can also uninstall the Microsoft Teams app using Windows PowerShell. To do this, follow these steps:
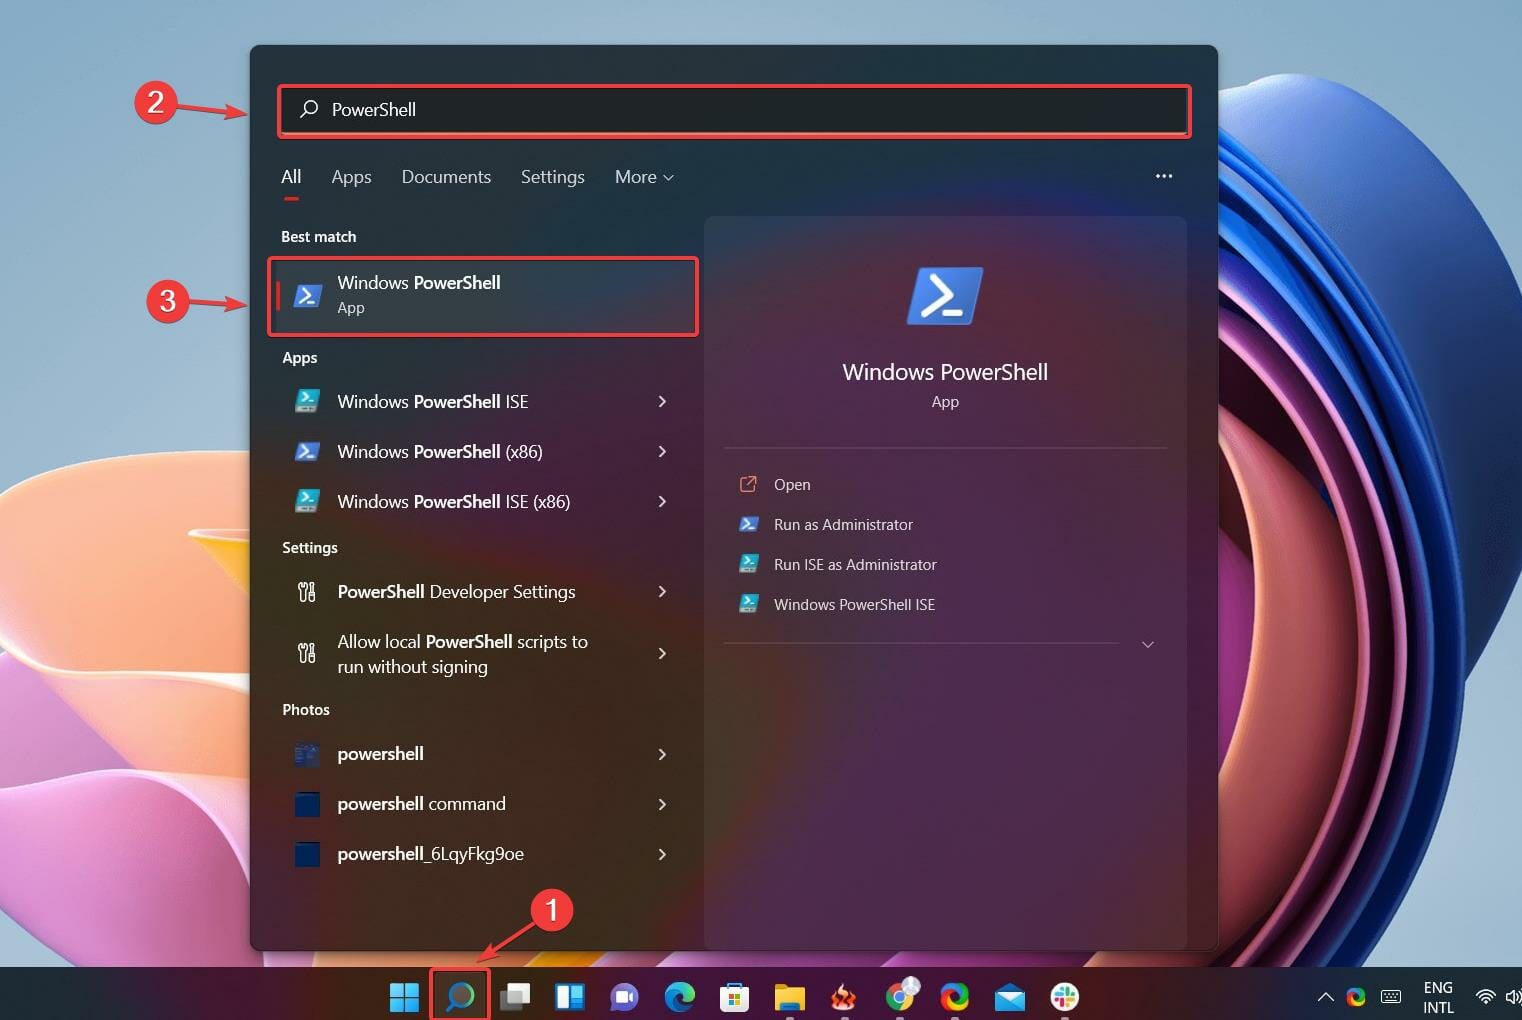
First, open Windows PowerShell with administrative privileges. To do this, search for ‘PowerShell’ in the Windows search, right-click on the top result, and select the ‘Run as administrator’ option. Click ‘Yes’ to continue if you see the User Account Control window.

Type the following command or copy and paste the below command to PowerShell and press Enter:
Get-AppxPackage MicrosoftTeams* | Remove-AppxPackage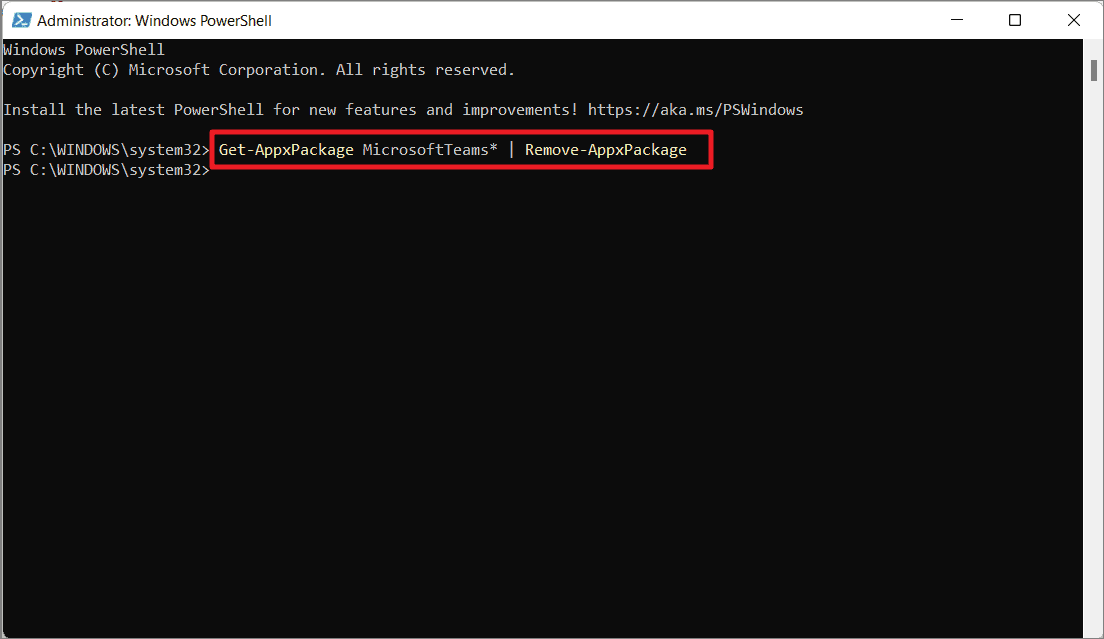
This will completely remove the Microsoft Teams application from your computer.
Reinstall Microsoft Teams on Windows 11
If you have a need for Microsoft Teams again after uninstalling the app, you can easily reinstall it with a single click. Even after uninstalling the app, the Microsoft Teams Chat icon will remain in the Taskbar unless you have hidden it using the Settings. Here’s how you reinstall the Teams app:
All you have to do is click the Microsoft Teams’ ‘Chat’ icon on the Taskbar and in the flyout window, click the ‘Continue’ button to reinstall the application.
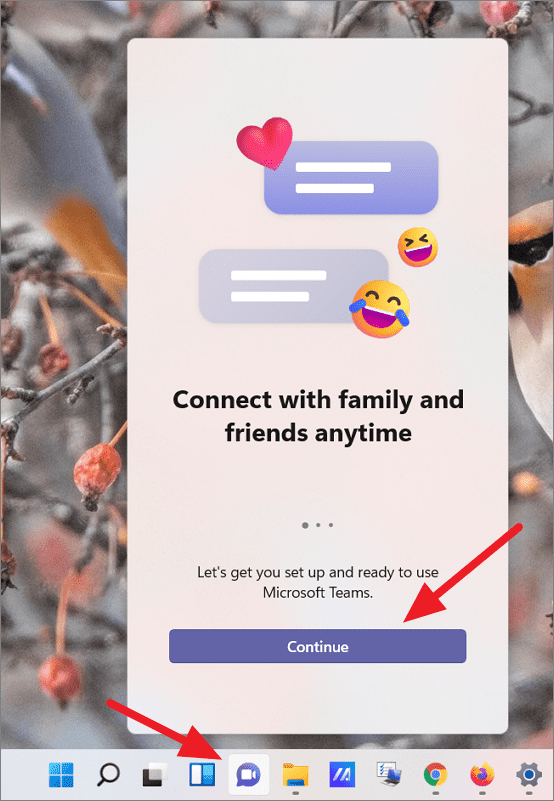
Windows keeps the app packages of the default Windows apps in the system files. When you click the ‘Continue’ button, it will reinstall the app from the backup copy. It will take only a few seconds to reinstall the app.
If you don’t see the Chat icon on the Taskbar, it is probably hidden. To show the Teams ‘Chat’ icon, right-click on an empty on the taskbar and select ‘Taskbar settings’.
Then, toggle the slider in front of Chat to the ‘On’ position to show the icon on the Taskbar.
You can also download and install Microsoft Teams from the Microsoft website. If you want to use Microsoft Teams without installing the app on your system, you can sign in to https://teams.microsoft.com on your favorite browser.
That’s it.
A comprehensive guide on getting rid of this built-in app
by Alexandru Poloboc
With an overpowering desire to always get to the bottom of things and uncover the truth, Alex spent most of his time working as a news reporter, anchor,… read more
Updated on
Reviewed by
Vlad Turiceanu

Passionate about technology, Windows, and everything that has a power button, he spent most of his time developing new skills and learning more about the tech world. Coming… read more
- So Microsoft really wants us to use Teams, but what if we don’t actually want to?
- There are a few ways to go about it, depending on what actions you want to take.
- You can remove the app from your taskbar, or stop it from loading at startup.
- Or, if Teams is no longer needed, why not go the extra mile and uninstall it completely?
When you install Windows 11 for the first time, you will see that there is a new icon on your taskbar, or it will be new if you haven’t been using Microsoft’s Teams collaboration app lately.
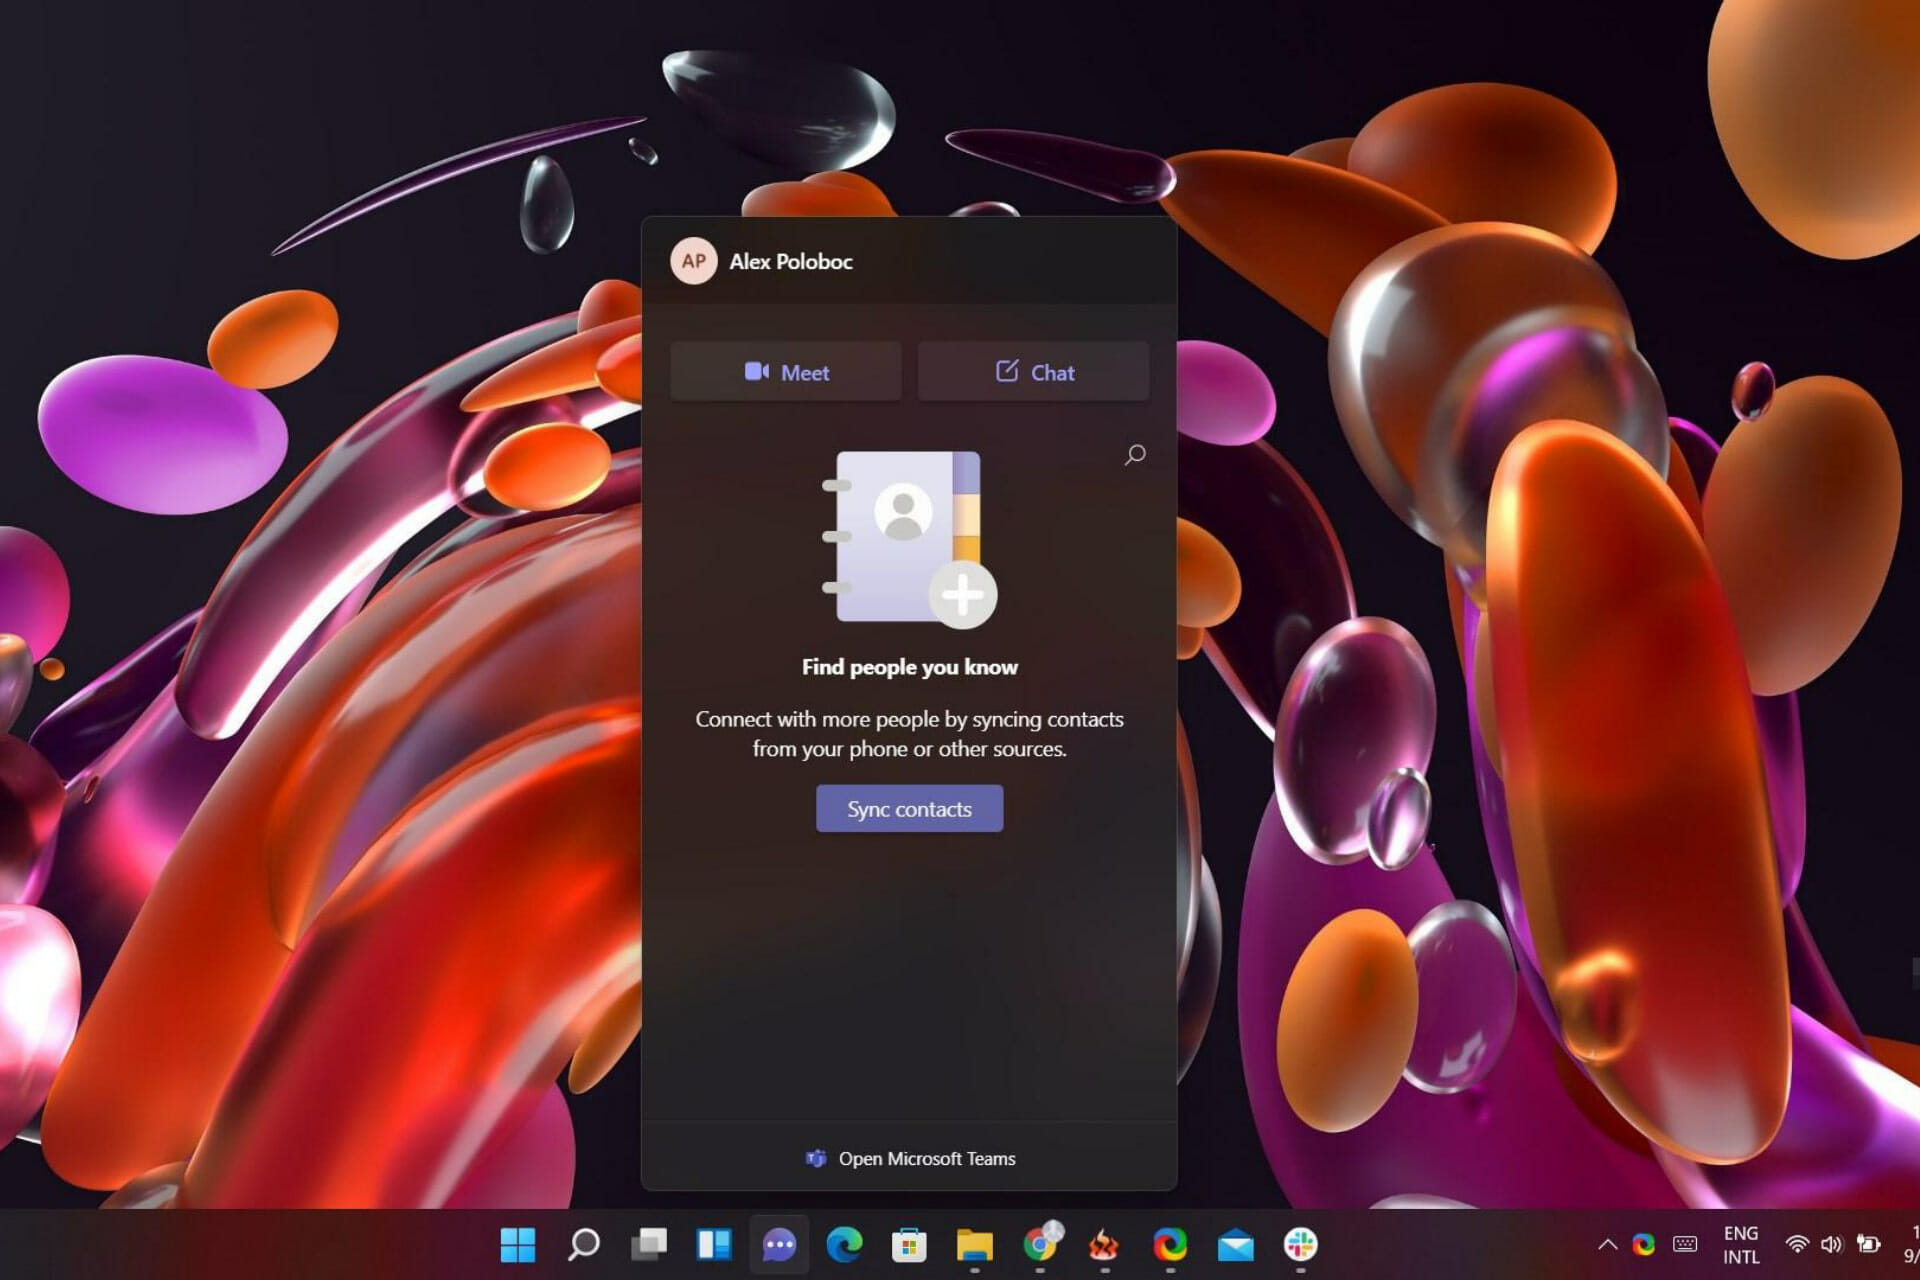
When you hover your cursor above the icon, which looks like a camera inside of a cartoon speech balloon, it will say Chat. If you click on it, you’ll be invited to Meet and chat with friends and family using the application.
But, of course, the obvious question arises: What if you’re not interested in using Teams at all?
How can I remove Teams on Windows 11?
Rest assured that there are several things you can do if you find the push to Teams to be a bit irritating. You can stop the app from automatically loading every time you start your machine.
You can remove the Chat icon from the Taskbar, or, if you really want to go all the way, you can even uninstall it.
How we test, review and rate?
We have worked for the past 6 months on building a new review system on how we produce content. Using it, we have subsequently redone most of our articles to provide actual hands-on expertise on the guides we made.
For more details you can read how we test, review, and rate at WindowsReport.
1. Stop Teams from loading at startup
- Press Windows key + I to open the Settings app.
- Select the Apps category, and then press on the Startup button.

- Locate the Teams app and turn it off.
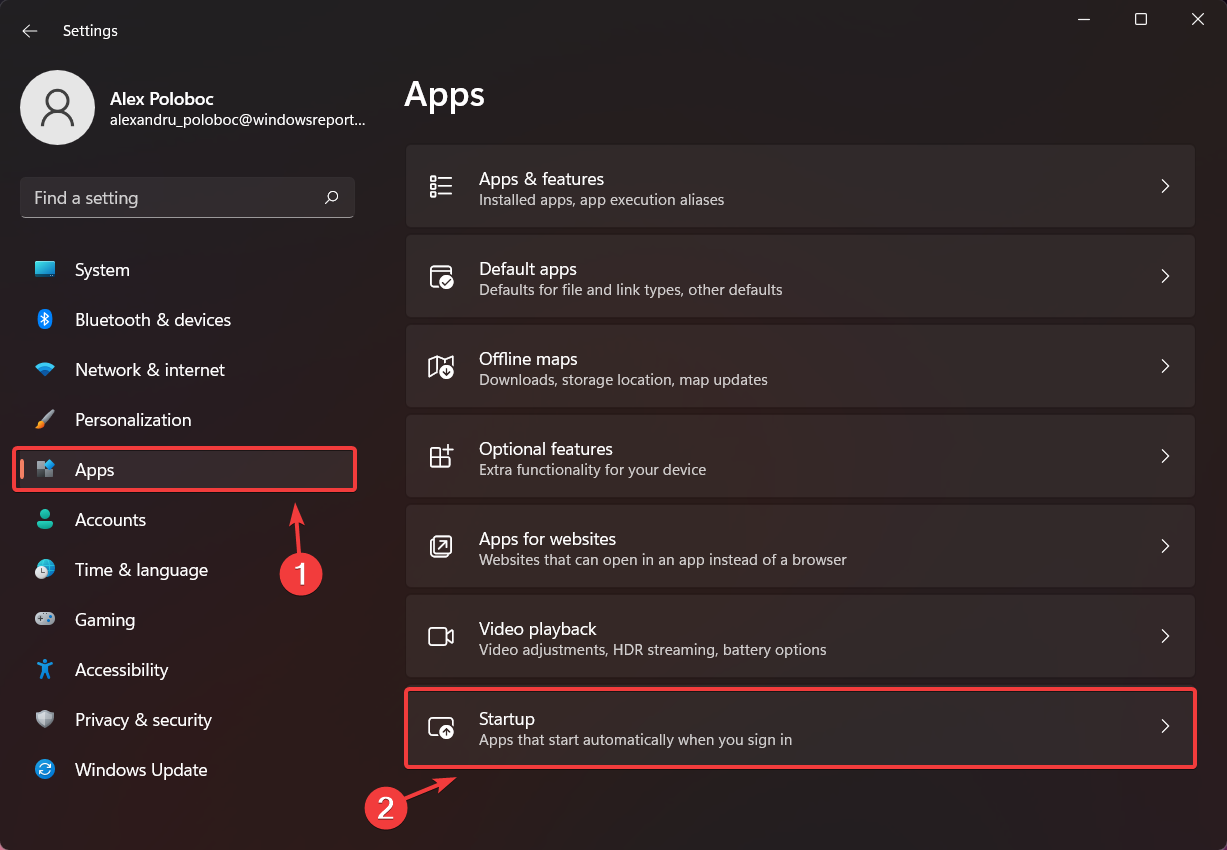
Also, while you’re in the Startup menu, you can take a look at some of the other apps that automatically start up with your computer that you would like to disable.
2. Remove Microsoft Teams from the taskbar
- Right-click on the taskbar and access Taskbar settings.

- Under Taskbar items, locate the Chat option and turn it off.
3. Uninstall the app via Settings
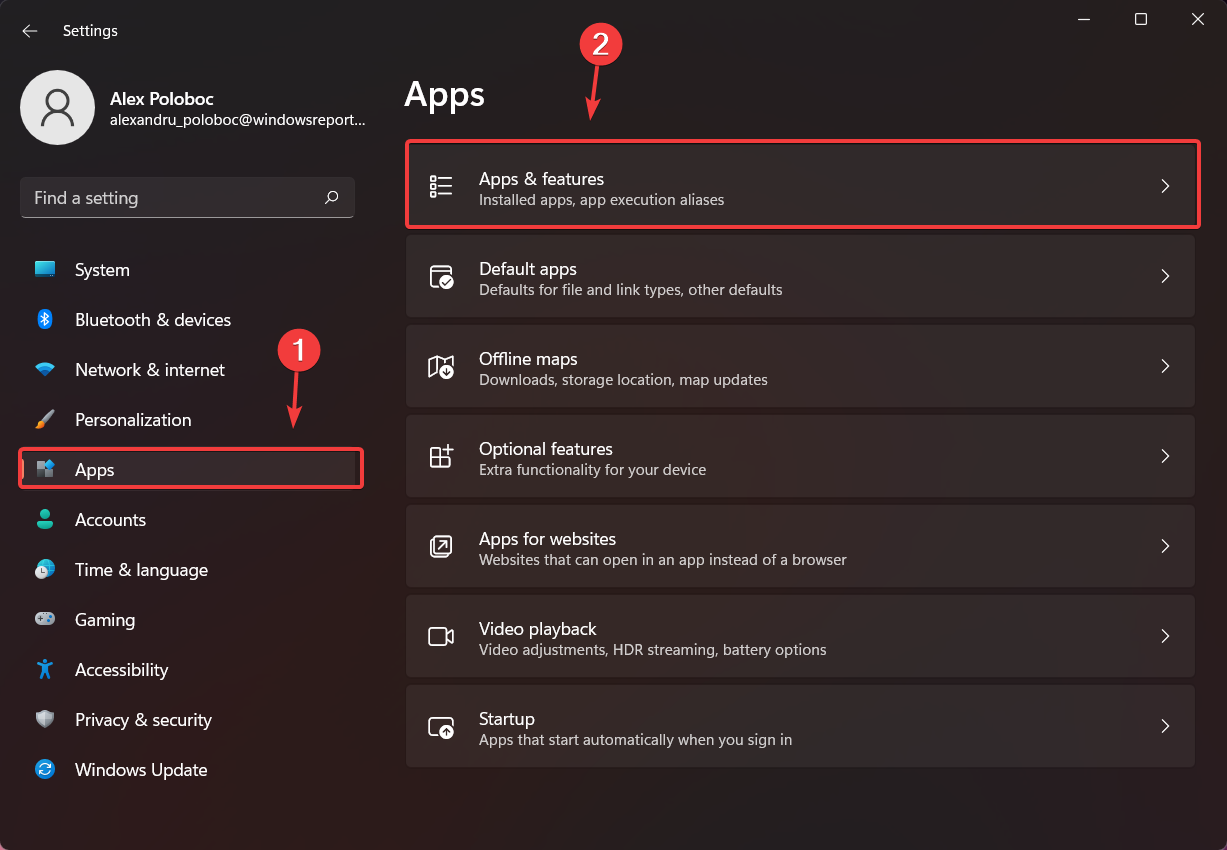
1. Press Windows key + I to open the Settings app.
2. Select the Apps category, and then click on Apps & features.
3. Locate the Microsoft Teams app in the list and click on the three vertical dots next to it.
4. Click on Uninstall.
If you want to completely remove Teams from your Windows 11 PC, then you should uninstall it using the built-in Apps and Features settings. In just a few clicks, Teams will be gone forever from your PC.
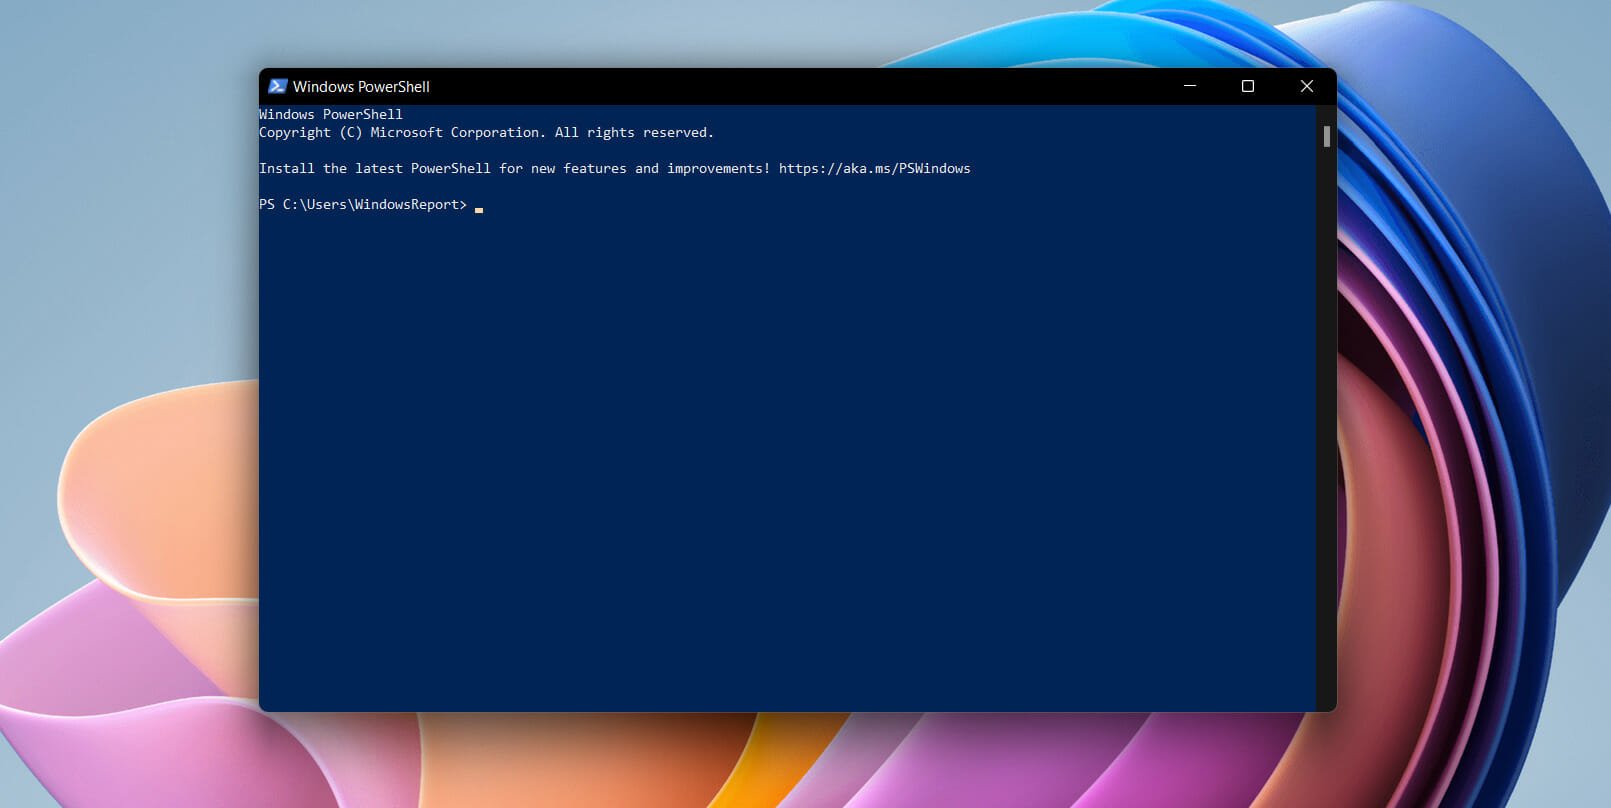
4. Uninstall Teams using PowerShell
- Use the Search option on your taskbar, search for PowerShell and open the application.

- Run the following script in PowerShell.

$Teams = Get-Team

for ($i = 0; $i -lt $Teams.Count; $i++)
{
    "{0}: {1}" -f $i, $Teams[$i].DisplayName
}

# multiple can be selected if comman seperated
$Selection = (Read-Host -Prompt "Select Team(s) to remove").Split(',').Trim()

foreach ($number in $Selection)
{
    $Teams[$number]
    #Remove-Team -GroupId $Teams[$number].GroupID
}

<# Output
0: TeamsOne
1: TeamsTwo
#>
All that’s left to do is prompt for the number of teams to remove and re-select it using the index number.
- Used the -f string format operator as it should allow you to assign the current iteration of $i to the choice number, and the Display Name of the teams; giving it a feel of choice selection.
- Using the .Split() method let’s you make a multiple choice selection given that it’s separated by a comma.
- Finally, use a foreach loop to iterate through the numbers input into our Read-Host assigned to $selection. Which gives you the same index number that will be used to select our choice from $Teams.
That’s pretty much the entire process, depending on which step you choose to take. Pretty simple, right?
Things are also quite simple if you want to remove OneDrive in Windows 11.
So, whether you just don’t want Microsoft’s Teams app to also start when your device does, remove it from your taskbar, or completely uninstall it, now you know how to do so in under two minutes.
Was this guide helpful to you? Let us know in the comments section below.
![]()