Download Windows Speedup Tool to fix errors and make PC run faster
As the name suggests, the Remote Desktop feature in Windows helps us to access another computer from our computer remotely. This feature plays an important role to solve issues on our system, in case any support representative wants to access our computer remotely and fix it. Today, while using this feature, I noticed that I could connect to other computers from mine, but then the Remote Desktop connection cut off automatically. So, I tried to connect to another computer of mine and found the same result.

First of all, I ensured that Windows Firewall was switched off to ensure that the Firewall was not the culprit. It did not help. I’ve read somewhere that WiFi printers could also cause the issue while using the Remote Desktop feature, so I disconnected them too but that too did not solve the problem. I came around the following solution and it worked:
Windows Remote Desktop disconnects frequently or automatically
1. Press Windows Key + R; type sysdm.cpl and hit Enter. Switch to Remotetab. Make sure you have selected the options highlighted in the below image:

2. Moving on, press Windows Key + R combination, type put Regedt32.exe in Run dialog box and hit Enter to open the Registry Editor.
2. Navigate to the following location:
HKEY_LOCAL_MACHINE\SYSTEM\CurrentControlSet\Services\TermService
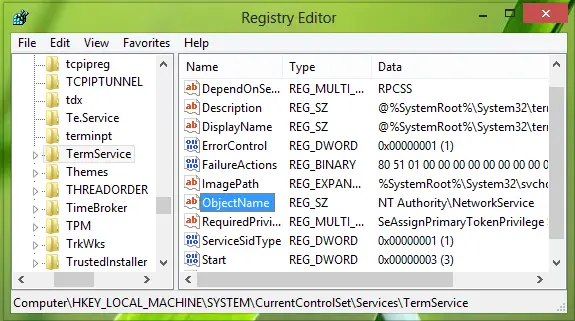
3. In the right pane of this location, look for the registry string (REG_SZ) named ObjectName, if you’re really facing the issue, then this string must have Value data as LocalSystem. Double click on the same string to modify its Value data:
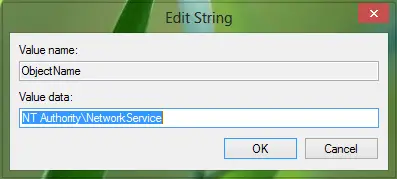
4. In the above-shown box, input the Value data as NT Authority\NetworkService. Click OK then and close the Registry Editor and reboot the machine to get the issue fixed.
I hope the fix helps you. If it does not, you may try the following suggestions:
1] Verify Remote Desktop is enabled
Open the System item in Control Panel. To start the System tool, click Start, click Control Panel, click System, and then click OK.
Open Control Panel > System > Remote settings. Click the Remote tab. Under Remote Desktop, select either of the available options:
- Allow connections from computers running any version of Remote Desktop (less secure)
- Allow connections from computers only from computers running Remote Desktop with Network Level Authentication (more secure)
2] Verify Remote Desktop Services Limit number of connections policy
Open the Local Security Policy and locate the following:
Local Computer Policy > Computer Configuration > Administrative Templates > Windows Components > Remote Desktop Services > Remote Desktop Session Host > Connections Limit number of connections
Click Enabled, and in the RD Maximum Connections allowed box, type the maximum number of connections that you want to allow, and then click OK.
3] Restart Remote Desktop Services
To stop and start the Remote Desktop Services service, follow these steps:
- On the Remote Desktop server, open the Services snap-in. To do this, click Start, point to Administrative Tools, and then click Services.
- If the User Account Control dialog box appears, verify that the action it displays is what you want, and then click Continue. In the Services pane, right-click Remote Desktop Services, and then click Restart.
- Verify that the Status column for the Remote Desktop Services service displays a Started status.
Related posts:
- No Remote Desktop License Servers; Remote session disconnected
- The connection was denied because the user account is not authorized for remote login
- Remote session was disconnected. No Remote Desktop client access licenses available.
An Electrical Engineer by profession, Kapil is a Microsoft MVP and a Windows Insider MVP. Please read the entire post & the comments first & create a system restore point before making any changes to your system.
Как следует из названия, функция Удаленный рабочий стол в Windows помогает нам получить удаленный доступ к другому компьютеру. Эта функция играет важную роль в решении проблем в нашей системе, если какой-либо представитель службы поддержки хочет получить удаленный доступ к нашему компьютеру и исправить его. Сегодня, используя эту функцию, я заметил, что могу подключаться к другим компьютерам с моего компьютера, но затем соединение Удаленный рабочий стол автоматически отключается. Итак, я попытался подключиться к другому компьютеру и нашел тот же результат.

Прежде всего, я убедился, что Брандмауэр Windows был отключен, чтобы Брандмауэр не был виновником. Это не помогло. Я где-то читал, что WiFi-принтеры также могут вызывать проблему при использовании функции Удаленный рабочий стол , поэтому я тоже отключил их, но это тоже не решило проблему. Я нашел следующее решение, и оно сработало:
Удаленный рабочий стол часто отключается
1. Нажмите клавишу Windows + R ; введите sysdm.cpl и нажмите Enter . Перейдите на вкладку Удаленный . Убедитесь, что вы выбрали параметры, выделенные на изображении ниже:

2. Чтобы продолжить, нажмите сочетание клавиш Windows + R , введите команду Regedt32.exe в диалоговом окне Выполнить и нажмите Enter, чтобы открыть редактор реестра .
2. Перейдите в следующее местоположение:
HKEY_LOCAL_MACHINE \ SYSTEM \ CurrentControlSet \ Services \ TermService

3. На правой панели этого места найдите строку реестра ( REG_SZ ) с именем ObjectName , если вы действительно столкнулись с проблемой. тогда эта строка должна иметь значение данных как LocalSystem . Дважды щелкните ту же строку, чтобы изменить ее данные значения:

4. В показанном выше поле введите Значение данных как NT Authority \ NetworkService . Нажмите ОК и закройте Редактор реестра и перезагрузите компьютер, чтобы устранить проблему.
Надеюсь, исправление поможет вам.
В современных версиях Windows 10/11 и Windows Server 2022/2019/2016 при подключении к серверу RDP (RDS) кроме стандартного порта TCP/3389, дополнительно используется UDP порт 3389. Когда ваш RDP клиент подключается к серверу, устанавливается несколько сессий. В управляющей TCP (HTTP) сессии передаются клавиатура и мышь, а несколько UDP сессий используются для передачи картинки.
Вы можете проверить, использует ли ваш клиент mstsc режим UDP, если щелкните по значку Connection Info в верхней полоске RDP подключения. В нашем случае протокол UDP используется:
The quality of the connection to the remote computer is excellent and UDP is enabled.
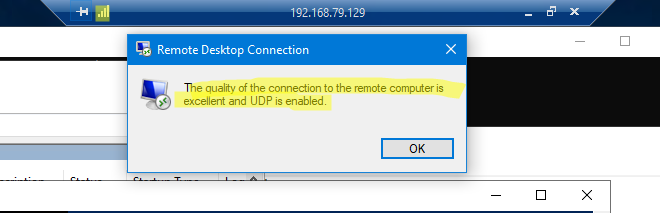
По утверждениям Microsoft использование UDP для RDP сессий позволяет существенно повысить отзывчивость удаленного рабочего стола за счет сокращения ретрансмиссии и возможности работать на нестабильных подключениях с высокими задержками.
Зависание RDP сессий при использовании UDP
В некоторых случаях использование протокола UDP для RDP подключения может вызывать проблемы: периодическое замирание картинки, обрывы RDP сессий, пользователи видят черных экран вместо удаленного рабочего стола, сообщение о внутренней ошибке при RDP подключении и т.д. В таких случаях обычно помогает переподключение к RDP сессии. Но иногда такая проблема происходит очень часто и мешает нормальной работе.
Проблема с замиранием RDP сессий встречается:
- При использовании RDP сессий внутри VPN туннелей ( чаще всего наблюдается при использовании сервера OpenVPN). Это вызывается фрагментированием UDP пакетов (может быть вызвано разными настройками MTU) при пересылке через VPN туннель;
- После обновления до билда 22H2 в Windows 11/10;
- При использовании шлюза Remote Desktop Gateway на Windows Server 2022 и порта 3391 для UDP трафика.
Причем проблема не связана с плохой производительностью RDS сервера как описано в кейсе по ссылке: на сервере достаточно свободных ресурсов, память и CPU не нагружены.
Отключить использование протокола UDP для RDP
Для решения проблемы с зависанием RDP сессий при использовании VPN туннелей вы можете попробовать отключить использование протокола UDP.
Можно отключить протокол UDP для RDP через групповые политики.
- Откройте консоль редактора локальной GPO (
gpedit.msc
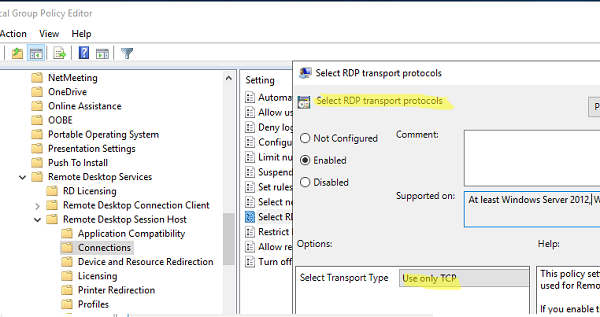
); - Перейдите в раздел Computer Configuration -> Administrative Templates -> Windows Components -> Remoter Desktop Services -> Remote Desktop Session Host -> Connections;
- Включите параметр политик Select RDP transport protocols и установите Select Transport Type = Use only TCP;

- Перезагрузите RDS/RDP сервер, чтобы применить настройки;
- Подключитесь к RDP серверу и нажмите на значок информации о подключении. Здесь должна появиться надпись:
The quality of the connection to the remote computer is good.
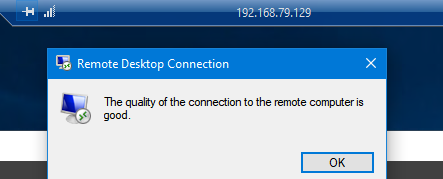
Это означает, что для RDP подключения используется только TCP.
Этот способ позволяет отключить использование UDP на стороне сервера RDP/RDS. Если вы хотите запретить использовать UDP для RDP на стороне клиента, нужно включить параметр Turn off UDP on Client в разделе Computer Configuration -> Administrative Templates -> Windows Components -> Remoter Desktop Services -> Remote Desktop Connection Client. 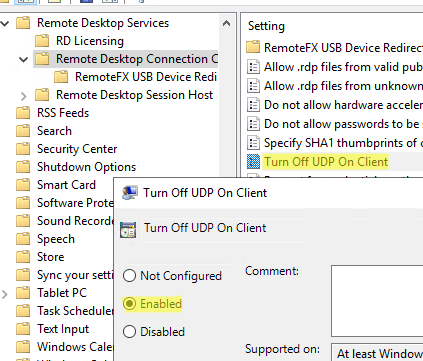
После внесения изменений, нужно обновить локальные политики командой
gpupdate /force
и перезапустить клиент mstsc.exe.
Также можно включить этот параметр через реестр (параметр GPO соответствует ключу fClientDisableUDP в реестре):
reg add "HKLM\software\policies\microsoft\windows nt\Terminal Services\Client" /v fClientDisableUDP /d 1 /t REG_DWORD
If you could not connect to a remote computer through Remote Desktop after installing Windows 11 22H2 Update, follow the instructions below to fix the problem.
Several Windows 11 users have reported that they are having problems connecting to Remote Desktop (RDP) after the installation of 22H2 update. More specifically, they report that they are either unable to connect to the remote computer with error code 0x10b, or the remote connection drops after a while.
The aforementioned remote desktop connection issues do not occur when connecting from computers running Windows 10/8/7, or Windows 11 version 21H2, and this means that they are due to a bug in Windows 11 version 22H2.
This guide contains several methods to fix the following issues with remote desktop on Windows 11 22H2:
- RemoteApp and Desktop Connections hang on «Loading the virtual machine».
- Windows 11 22H2 breaks the Remote Desktop Connection.
- Windows 11 22H2 cannot connect to remote desktop computer with error 0x10b.
How to Fix Windows 11 22H2 Remote Desktop Connection problems.
Method 1. Prevent Remote Desktop Client to connect through UDP.
Remote desktop connection problems in Windows 11 22H2 are due to a bug in the Remote Desktop client (mstsc.exe), which tries to connect to the remote computer over a UDP port instead of TCP. So, the way to solve the problem is to prevent the RDP client from using the UDP protocol to connect to the remote computer and use only the TCP port. To do that, use one of the ways below:
Way 1. Disable UDP Port in RDP Client through Registry.
To disable the UDP protocol in Remote Desktop client using Registry, create the fClientDisableUDP DWORD and set it’s value data to 1 at the following registry location:
HKEY_LOCAL_MACHINE\SOFTWARE\Policies\Microsoft\Windows NT\Terminal Services\Client
To do that:
1. Restart the client PC, or terminate the «mstsc.exe» process using Task Manager.
2. Open Command Prompt as Administrator.
3. In command prompt, copy and paste the following command:
REG ADD «HKLM\SOFTWARE\Policies\Microsoft\Windows NT\Terminal Services\Client» /v fClientDisableUDP /t REG_DWORD /d 1 /f

4. Restart you PC and then try to connect to the remote computer using remote desktop. *
* Note: If you want to undo this change an to re-enable the UDP on RDP on the future, navigate to the above mentioned registry location and delete the fClientDisableUDP DWORD value.

Way 2. Turn Off the UDP Port in RDP in Group Policy.
To disable the UDP port in remote desktop client, using Group Policy:
1. Restart the client PC, or terminate the «mstsc.exe» process using Task Manager.
2. Open the Group Policy Editor. To do that:
1. Press simultaneously the Windows
+ R keys to open the run command box.
2. Type gpedit.msc & press Enter to open the Group Policy Editor.

2. At the left pane navigate to:
- Computer Configuration > Administration Templates > Windows Components > Remote Desktop Services > Remote Desktop Connection Client
3. At the right-pane open the Turn Off UDP on Client policy.

4. Set the policy to Enabled and click OK

Method 2. Replace MSTSC.EXE & MSTSCAX.DLL Files from another machine with Windows 11 21H2.
To second method to fix the remote desktop connections issues on Windows 11 22H2, is to copy the files mstsc.exe and mstscax.dll from a Windows 11 21H2 computer and to copy them to your Windows 11 22H2 computer. to do that:
1. From a Windows 11 21H2 PC, copy the mstsc.exe and mstscax.dll files from the C:\Windows\System32 folder on a USB disk.

2. On the Windows 11 22H2 PC, proceed and take the ownership of the mstsc.exe and mstscax.dll files as instructed below, in order to be able to replace them with the files from the Windows 11 21H2 machine. *
* Note: Before proceeding below, I suggest to copy to mstsc.exe and mstscax.dll files to another location on the disk as a backup.
3. Navigate to C:\Windows\System32 folder, right-click on mstsc.exe file and select Properties.

4. In Security tab, click Advanced.

5. Click Change next to TrustedInstaller.

6. Type your username and hit OK.

7. Now select the Users group and click Edit

8. Check the Full Control box and click OK.

9. Click OK.

10. Click Yes at Windows Security message to change the permissions.

11. Click OK and close the file properties.
12. Repeat the same steps and change the owner and the permissions on the mstscax.dll file.
13. Finally copy the files mstsc.exe and mstscax.dll from the USB disk to C:\Windows\System32 folder and then connect to remote desktop computer.
Method 3. Rollback to Windows 11 21H2.
The final method to fix Remote Desktop issues in Windows 11 22H2 is to roll back your system to the previous version 21H2 until Microsoft fixes the issue in the future. To do that:
1. Go to Start > Settings > Update and Security and click Advanced Options on the right pane.
2. Then click Recovery and click Go back under the Recovery Options.

That’s all folks! Which method worked for you?
Please leave a comment in the comment section below or even better: like and share this blog post in the social networks to help spread the word about this solution.
If this article was useful for you, please consider supporting us by making a donation. Even $1 can a make a huge difference for us.

Как победить постоянно отваливающийся удаленный рабочий стол
В процессе работы с удаленным рабочим столом, клиенты нашей компании часто жаловались на то, что окно подключения к удаленному рабочему столу теряет подключение. При этом сессия остается активной и при переподключении продолжает работать без потери информации. Проблема касается как обычных пользователей, так и администраторов, в том числе и меня. Работая из дома, на своем рабочем компьютере я запустил обновление групповых политик, что привело к разрыву подключения с удаленным рабочим столом. Вот здесь у меня закралось подозрение, что проблема кроется именно в групповых политиках. Повтроное обновление групповых политик подтвердило эту гипотезу.
При дальнейшем изучении проблемы было выяснено, что причина постоянно отваливающегося удаленного рабочего стола кроется в том, что на компьютере, по умолчанию отключены подключения к удаленному рабочему столу, а включаются они через применение групповых политик. При обновлении групповых политик, они сперва удаляются и, на небольшой промежуток времени, служба удаленных столов видит параметр, запрещающий к нему подключения и разрывает соединение. После того, как политика снова применена, можно снова подключиться к удаленному рабочему столу.
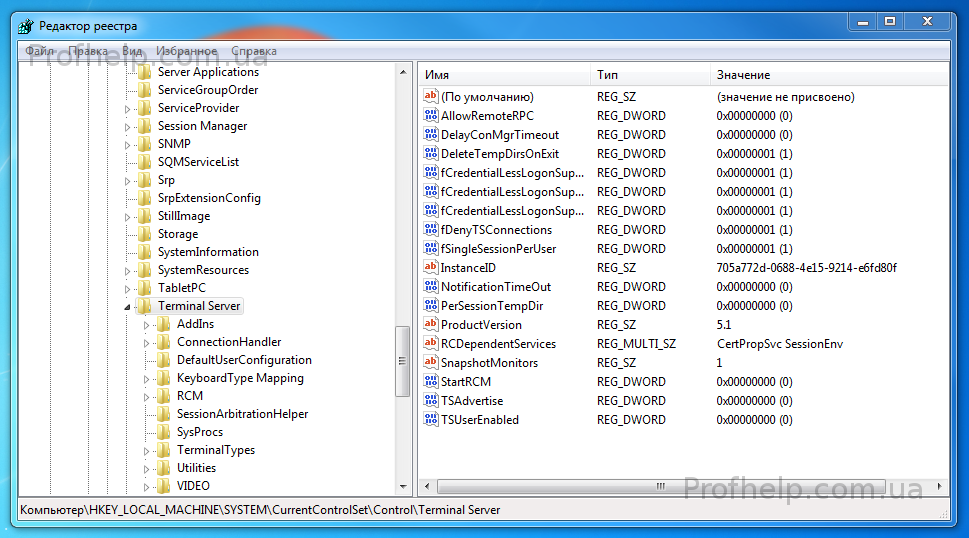
Решить проблему можно следующим образом: Открыть редактор реестра, развернуть ветвь HKEY_Local_machine\System\Currentcontrolset\Control\Terminal server и изменить значение параметра fDenyTSConnections из 1 в 0. Тем самым вы разрешите службе удаленных рабочих столов принимать подключения. После этого, независимо от состояния примененной групповой политики, подключение разрывать не будет.