В данной статье показаны способы, с помощью которых можно открыть оснастку «Управление печатью» в операционной системе Windows 10.
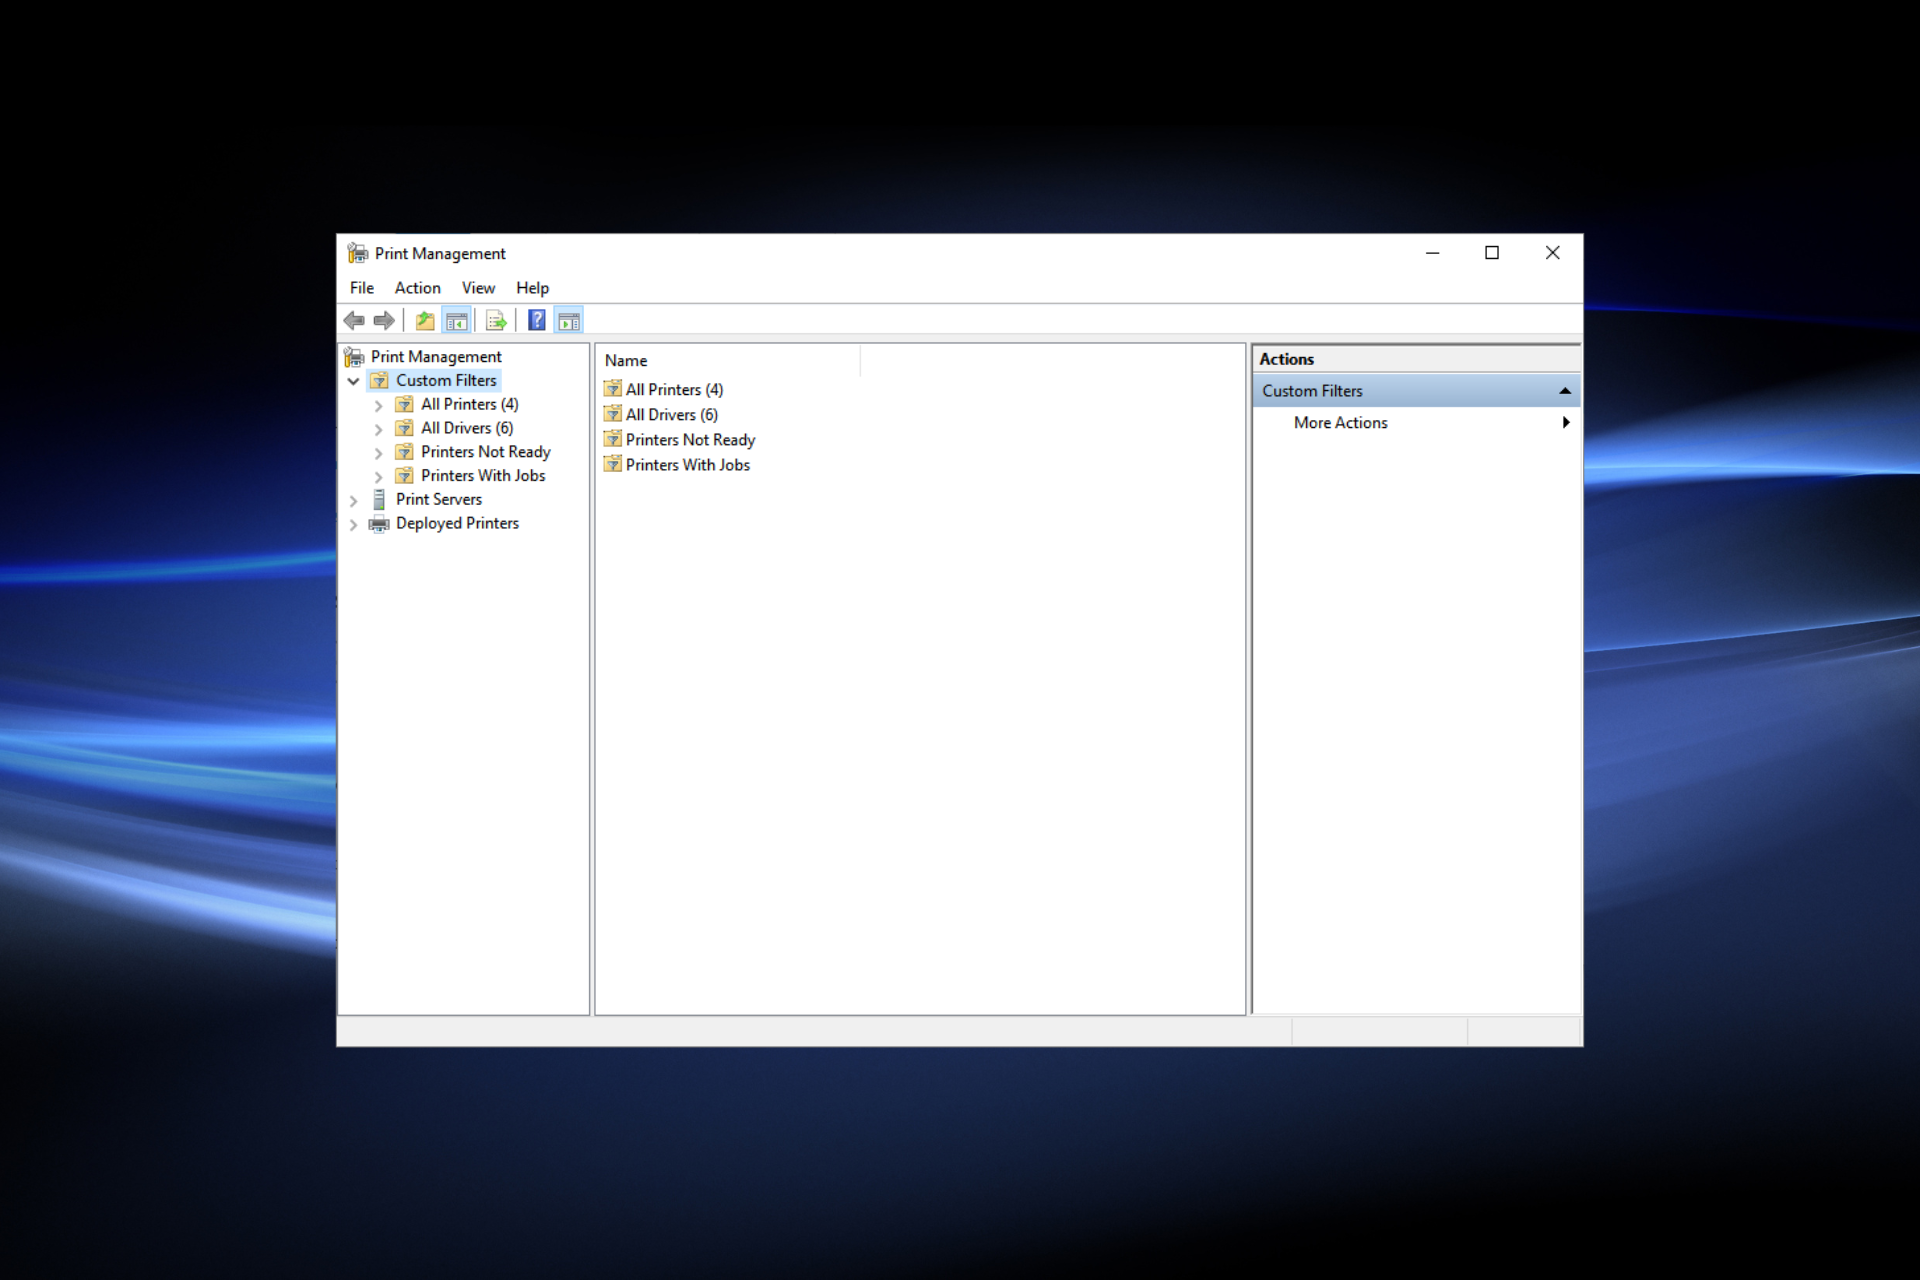
Управление печатью — оснастка которая позволяет устанавливать, просматривать и управлять локальными принтерами и удаленными серверами печати. С помощью данного инструмента можно просмотреть состояние принтеров, управлять общим доступом к принтеру, а также открыть очередь печати принтера, приостановить печать. Кроме того, при необходимости можно удалить принтер и его драйверы.
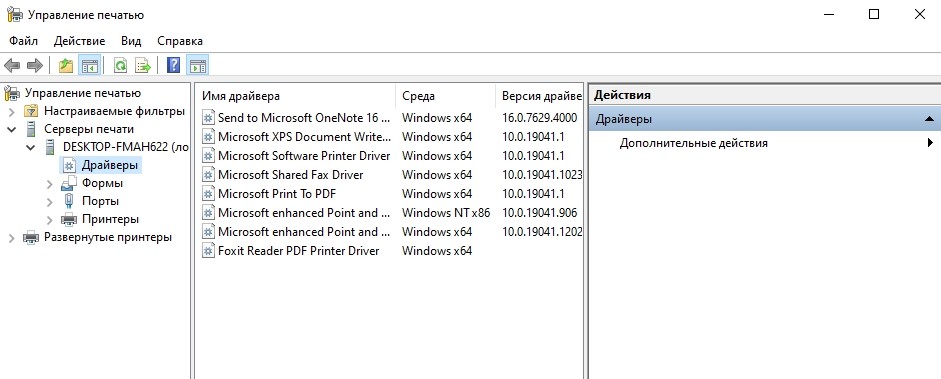
Пример папки «Управление печатью» показан на скриншоте ниже.

Содержание
- Как открыть «Управление печатью» в окне «Выполнить»
- Как открыть «Управление печатью» используя «Поиск»
- Как открыть «Управление печатью» используя «Средства администрирования Windows»
Как открыть «Управление печатью» в окне «Выполнить»
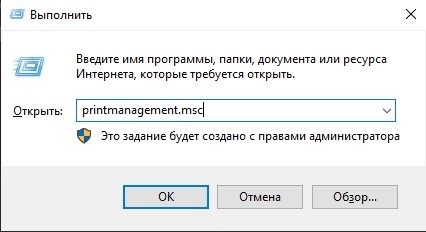
Чтобы открыть оснастку «Управление печатью», нажмите сочетание клавиш ![]() + R, в открывшемся окне Выполнить введите (скопируйте и вставьте) printmanagement.msc и нажмите клавишу Enter ↵.
+ R, в открывшемся окне Выполнить введите (скопируйте и вставьте) printmanagement.msc и нажмите клавишу Enter ↵.

Как открыть «Управление печатью» используя «Поиск»
Чтобы открыть оснастку «Управление печатью», используйте «Поиск в Windows», для этого нажмите на значок поиска ![]() в панели задач или нажмите сочетание клавиш
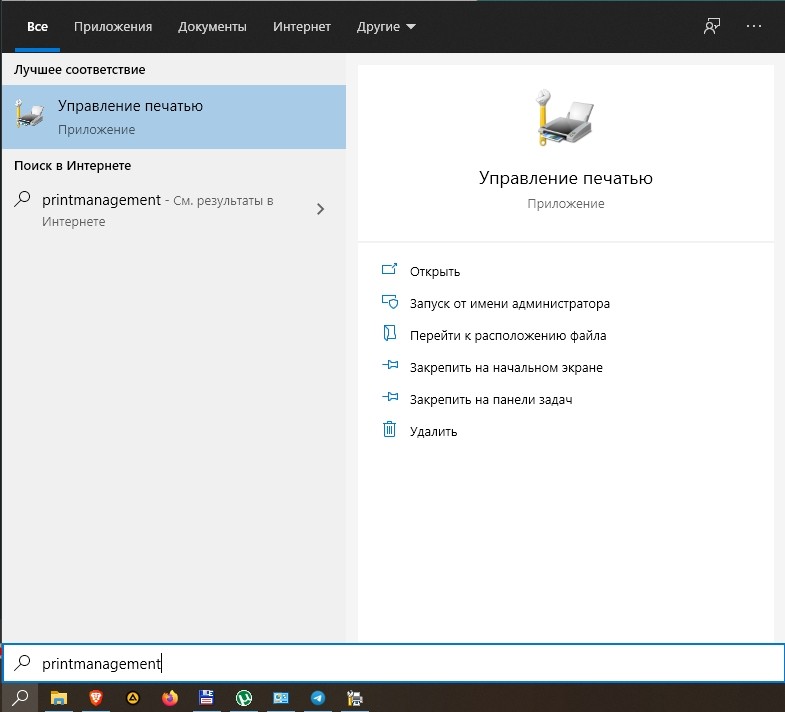
в панели задач или нажмите сочетание клавиш ![]() + S, в строке поиска начните вводить printmanagement и в результатах поиска выберите Управление печатью.
+ S, в строке поиска начните вводить printmanagement и в результатах поиска выберите Управление печатью.

Как открыть «Управление печатью» используя «Средства администрирования Windows»
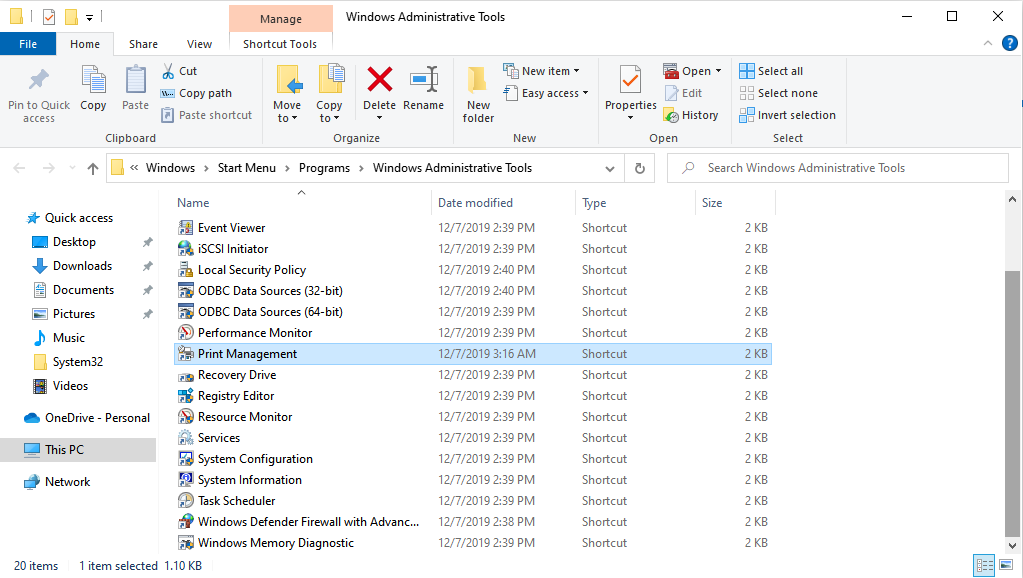
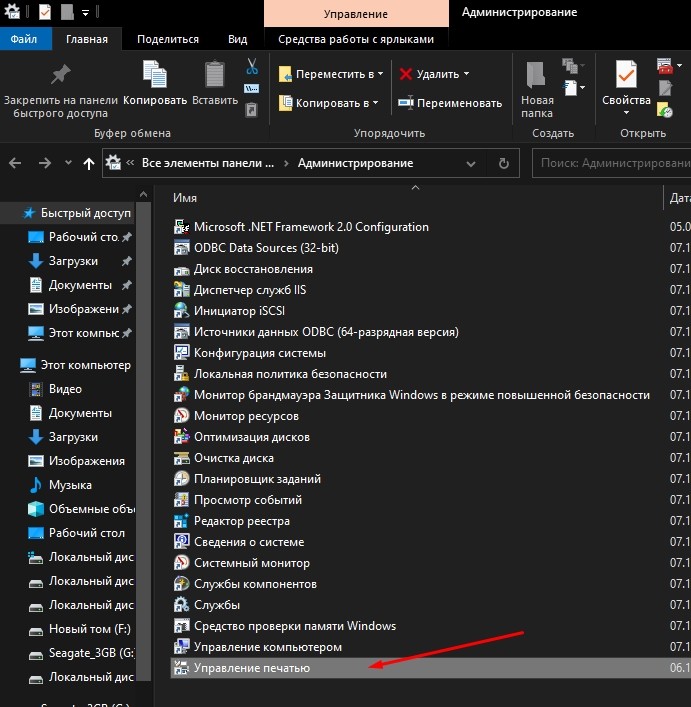
Откройте «Средства администрирования Windows» любым из способов и в папке «Администрирование» выберите Управление печатью.

.
Используя рассмотренные способы, можно открыть оснастку «Управление печатью» в операционной системе Windows 10.
Print Management is an optional feature in Windows
by Matthew Adams
Matthew is a freelancer who has produced a variety of articles on various topics related to technology. His main focus is the Windows OS and all the things… read more
Updated on
Reviewed by
Vlad Turiceanu

Passionate about technology, Windows, and everything that has a power button, he spent most of his time developing new skills and learning more about the tech world. Coming… read more
- Some Windows features can be missing for various reasons, and today we’ll show you how to install Print Management in Windows 10.
- How to go to Print Management in Windows 10? Updating your drivers with specialized software is the fastest way to get access to it.
- Clearing files for certain printer services might also help with printing problems on your PC.
- When the printmanagement.msc download in Windows 10 Pro is missing, you should be able to fix it with built-in system tools.
XINSTALL BY CLICKING THE DOWNLOAD
FILE
Windows Pro and Enterprise editions have a Print Management utility. However, some users have said on Microsoft’s forum that their Print Management tools are missing.
Those users can’t find Print Management in Administrative Tools and open that utility. One user forum post said this:
I just upgraded from Windows 10 Home to Windows 10 Pro and I can’t find Print Management anywhere. Also, printmanagement.msc is not available. I suspect other Windows 10 Pro administration utilities are also missing.
Print Management is a Microsoft Management Console (MMC) that allows users to view, install, access, and manage the various printers on the network through a single device running Windows Server.
It’s an effective way of modifying the various parameters and streamlines the whole process. Without the console, users would have to install and manage the printers individually through the connected computers, which takes considerable time and effort.
Why is Print Management missing?
There are various reasons why Print Management is not showing in Windows 10. It includes issues with the installed driver, corrupt system files, or problems with the relevant service. These issues can also lead to the Print action missing from context menu.
Also, remember that the Print Management Console is only available on Pro and Enterprise editions of Windows. If you are running the Home edition, upgrade or look for other similar third-party software.
Other issues with the Print Management Console in Windows 10 are as follows:
How we test, review and rate?
We have worked for the past 6 months on building a new review system on how we produce content. Using it, we have subsequently redone most of our articles to provide actual hands-on expertise on the guides we made.
For more details you can read how we test, review, and rate at WindowsReport.
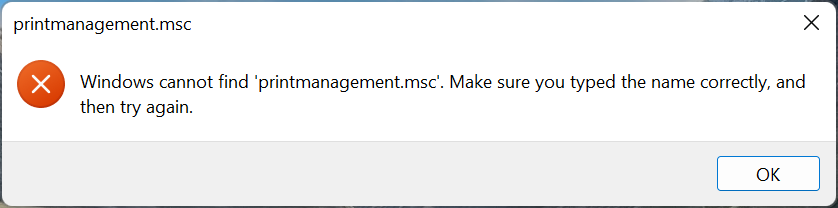
- Windows cannot find printmanagement.msc
- Print management console install failed
- Print Management missing from administrative tools
- Windows 10 Print Management not showing printers/all printers missing
- Print Management missing Server 2012 r2/2008 r2
- Print Management Snap In missing
- More Windows versions can be impacted (Print Management missing in Windows 11 or 8.1, but also in Windows 10 Home/Pro 20h2/2004)
- Printmanagement.msc missing or not found Windows 10 Home, 2004, Pro 20H2, 21H1, Windows 11
- Print management not opening
How do I restore Print Management in Windows 10?
- Why is Print Management missing?
- How do I restore Print Management in Windows 10?
- 1. Update the printer driver
- 2. Add the Print Management tool to Windows 10
- 3. Clean the Print Spooler
- 4. Run a system file scan
- 5. Reset or reinstall Windows
- What can I do if Print Management is missing on Windows 11?
- Where is Print Manager in Windows 10?
If printmanagement.msc is not found in Windows when you try accessing it through the Run command, the console has not yet been added.
Print Management Console is an optional feature in Windows that has to be manually downloaded and installed and does not come built in with it. So, installing Printer Management will restore it on your computer.
1. Update the printer driver
Updating the printer driver can help fix a wide range of printer-related issues. You can check if you need to update your printer’s driver with driver updater software.
Driver updater software lists all your PC’s devices with outdated drivers and lets you quickly download and install updated ones.
Most common Windows errors and bugs can result from faulty or incompatible drivers. An outdated system can lead to lags, system issues, or even BSoDs.
You can prevent these problems by using an automatic tool that will search and install the correct drivers on your computer with just a few clicks. That’s why we recommend you use Outbyte Driver Updater.
Here’s how to do it:
- Download and install the Outbyte Driver Updater app.
- Launch the software.
- Wait for the app to detect all incompatible drivers.

- Afterward, it will show you a list of the drivers found to select the ones to Update or Ignore.
- Click on Update & Apply Selected to download and install the newest versions.
- Restart your PC to ensure the applied changes.


Outbyte Driver Updater
Use this software and solve all driver-related issues from your PC.
Disclaimer: You may need to upgrade the app from the free version to perform specific actions.
2. Add the Print Management tool to Windows 10
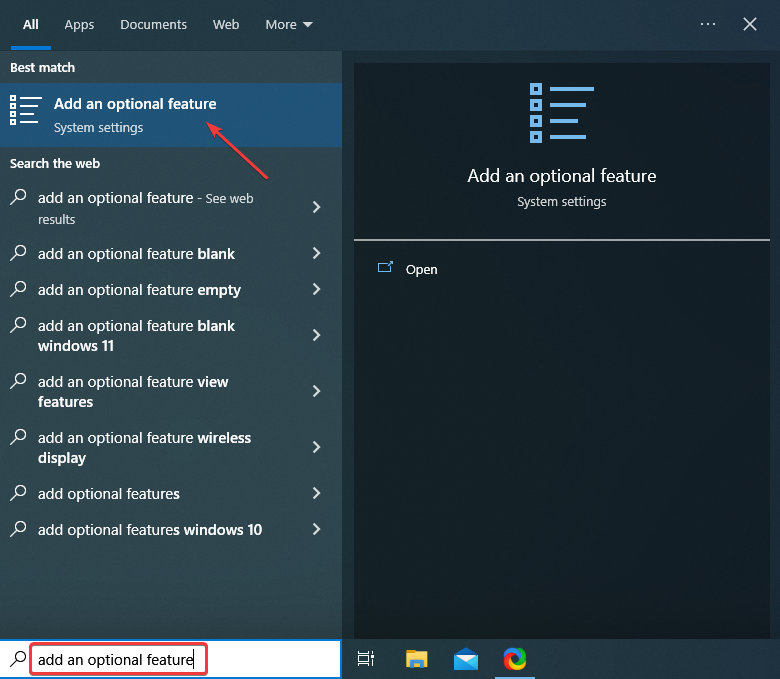
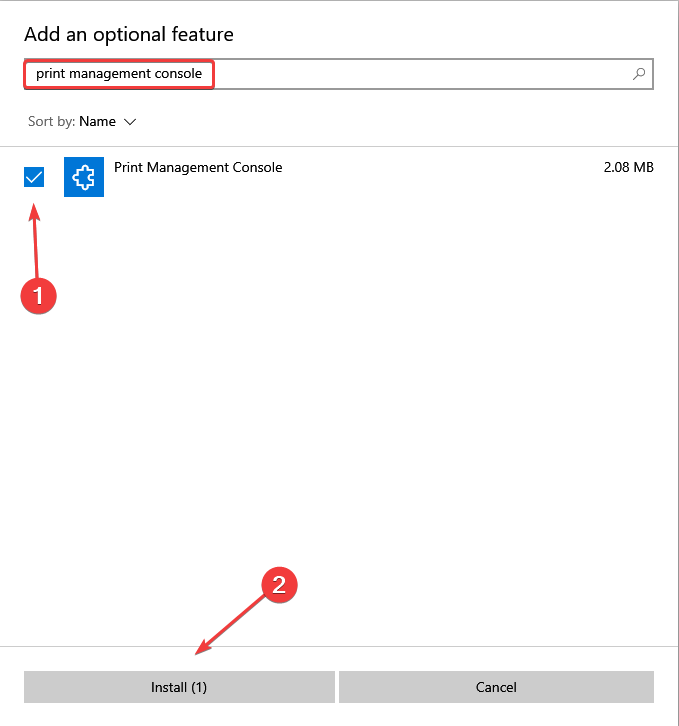
- Add an optional feature in the Search bar at the bottom, and click on the relevant result.

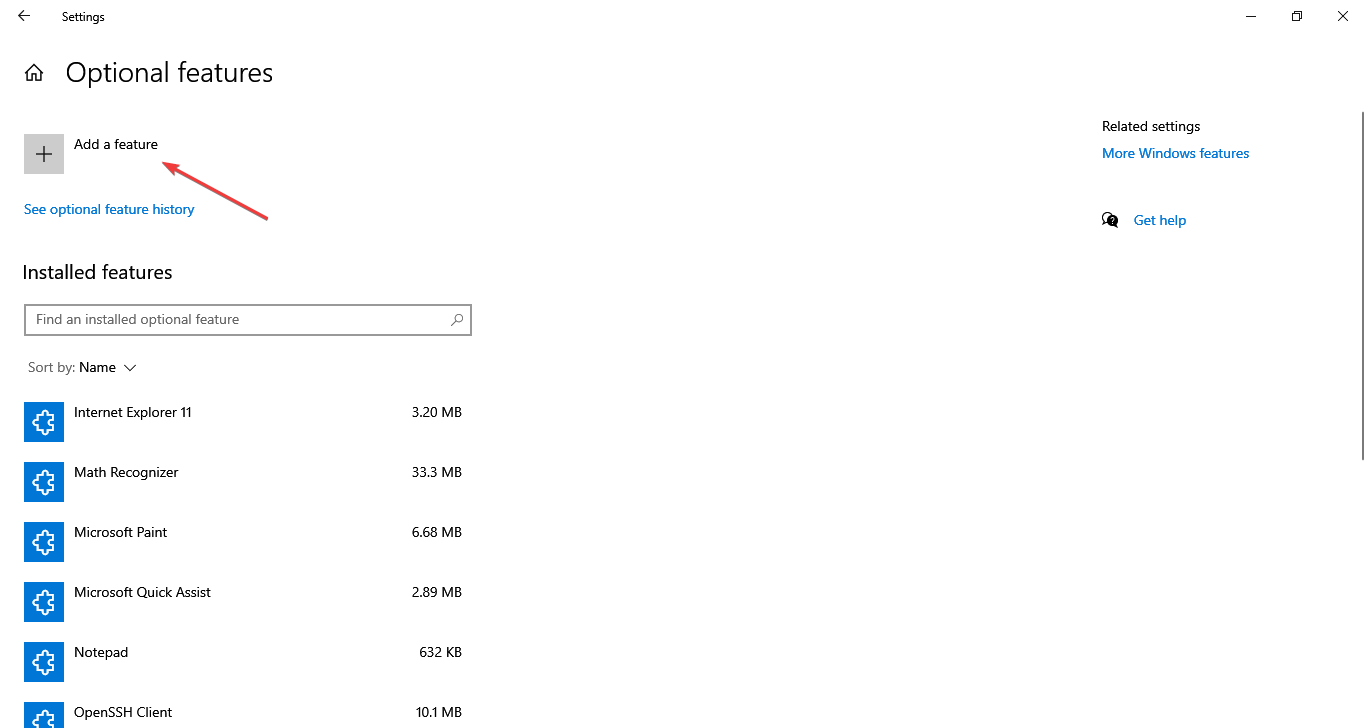
- Click on the Add a feature option at the top.

- Now, search for Print Management Console, tick the entry when it appears, and then click on Install at the bottom.

This simple method can help if Print Management is missing in Windows 10 or 11. This solution can also help if you’re getting the print program error in Photoshop, so be sure to try it out.
3. Clean the Print Spooler
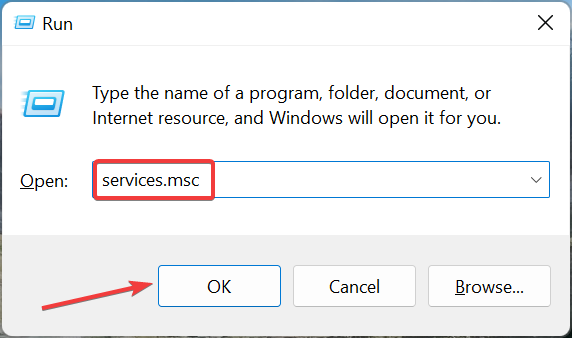
- Press Windows + R to open the Run command, enter services.msc in the text field, and click OK.

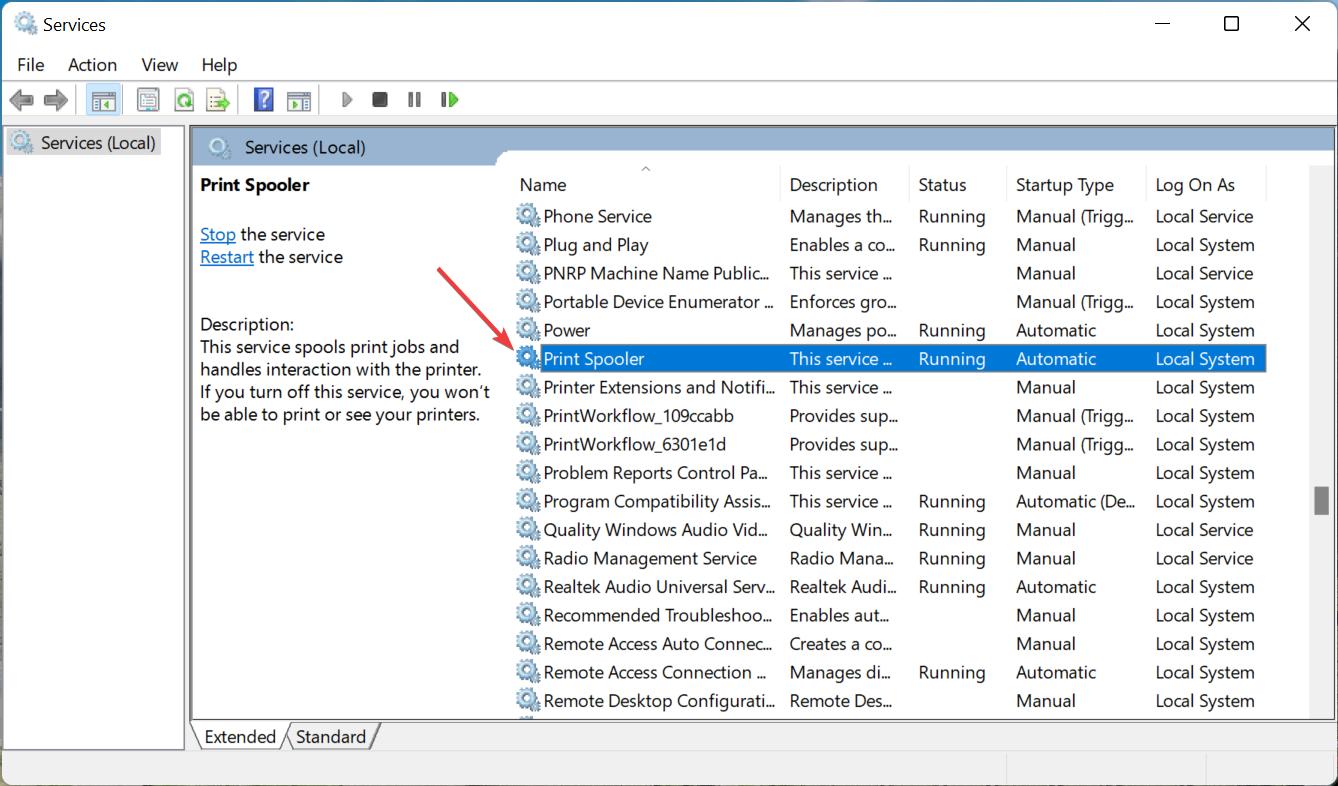
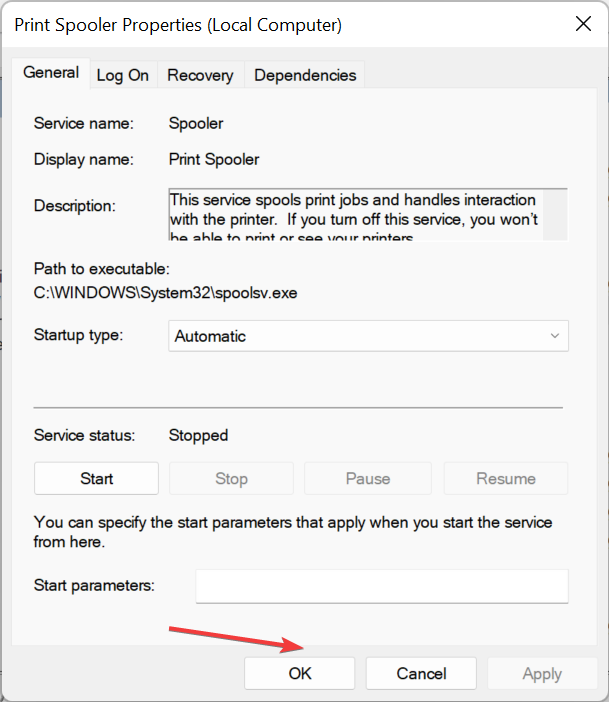
- Double-click Print Spooler to open the properties window for that service.

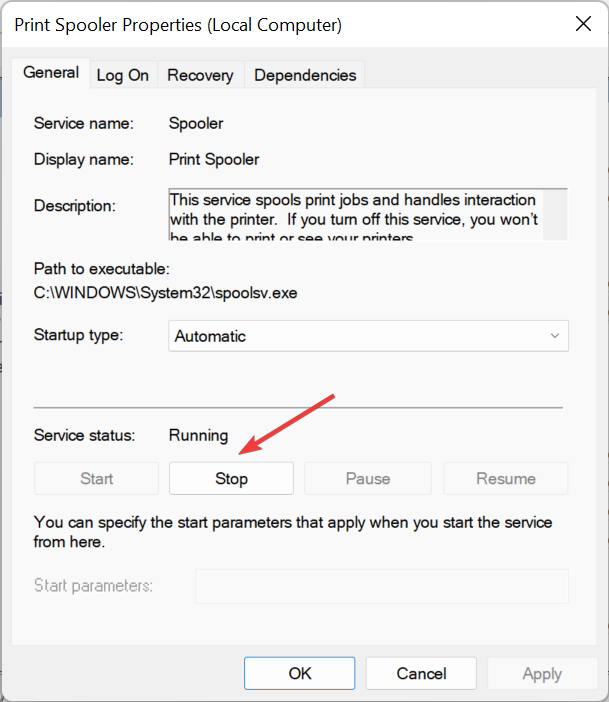
- Click the Stop button under Service status.

- Next, click OK at the bottom to save the changes and close the window.
- Again, press Windows + R to open Run, paste the following path, and click OK:
%WINDIR%\system32\spool\printers - Next, press Ctrl + A to select all the files, and hit the Del key.
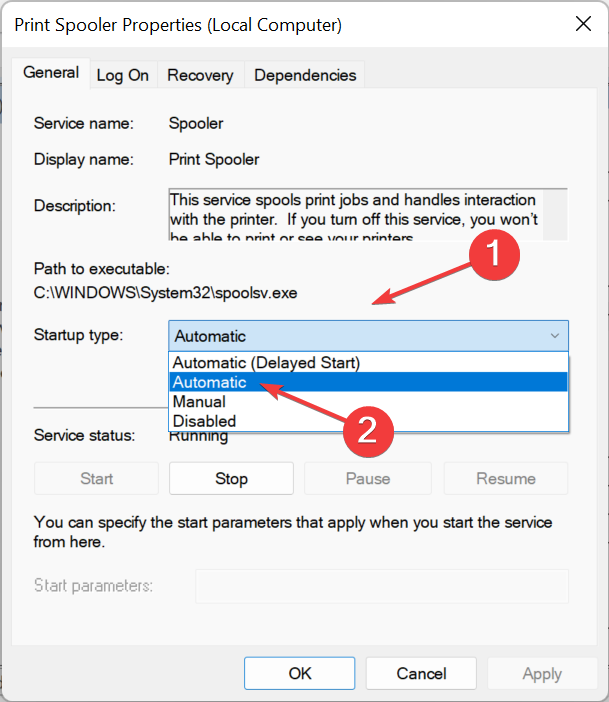
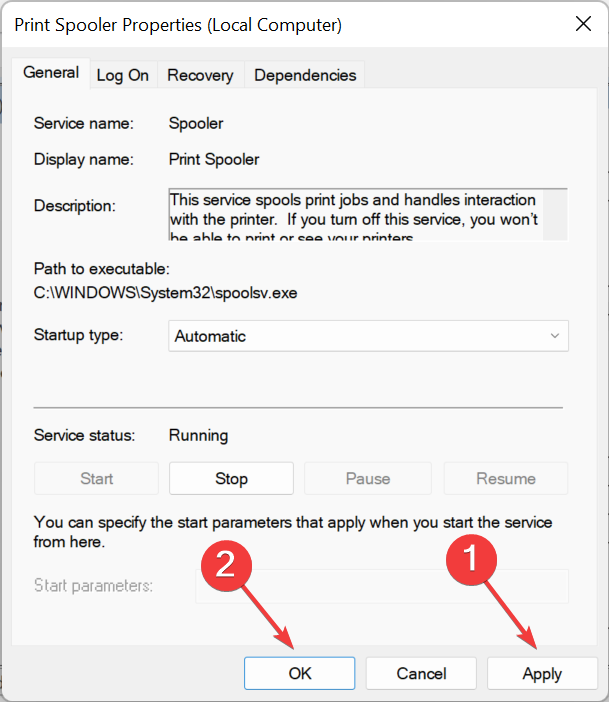
- Now, head back to the Print Spooler Properties window, and click on the Start button to run the service.
- Select the Automatic setting on the Startup type dropdown menu.
- Don’t forget to click on Apply and OK to save the settings.


This quick fix can fix all problems with printmanagement.msc in Windows 11. If Print Management is still missing in Windows, head to the following method.
- Best printer management software for Windows
- Full Fix: Printer needs user intervention
- Can’t remove the printer in Windows 10/11
- How to fix Print Spooler Service high CPU usage in Windows 10/11
4. Run a system file scan
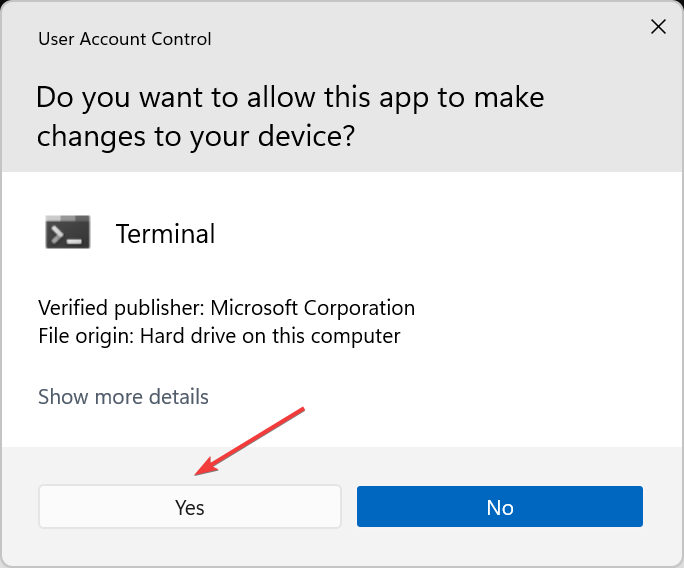
- Press Windows + S to open the Search menu, enter Terminal, right-click on the relevant search result, and select Run as administrator.

- Click Yes in the UAC prompt that appears.

- Press Ctrl + Shift + 2 to open Command Prompt in a new tab.
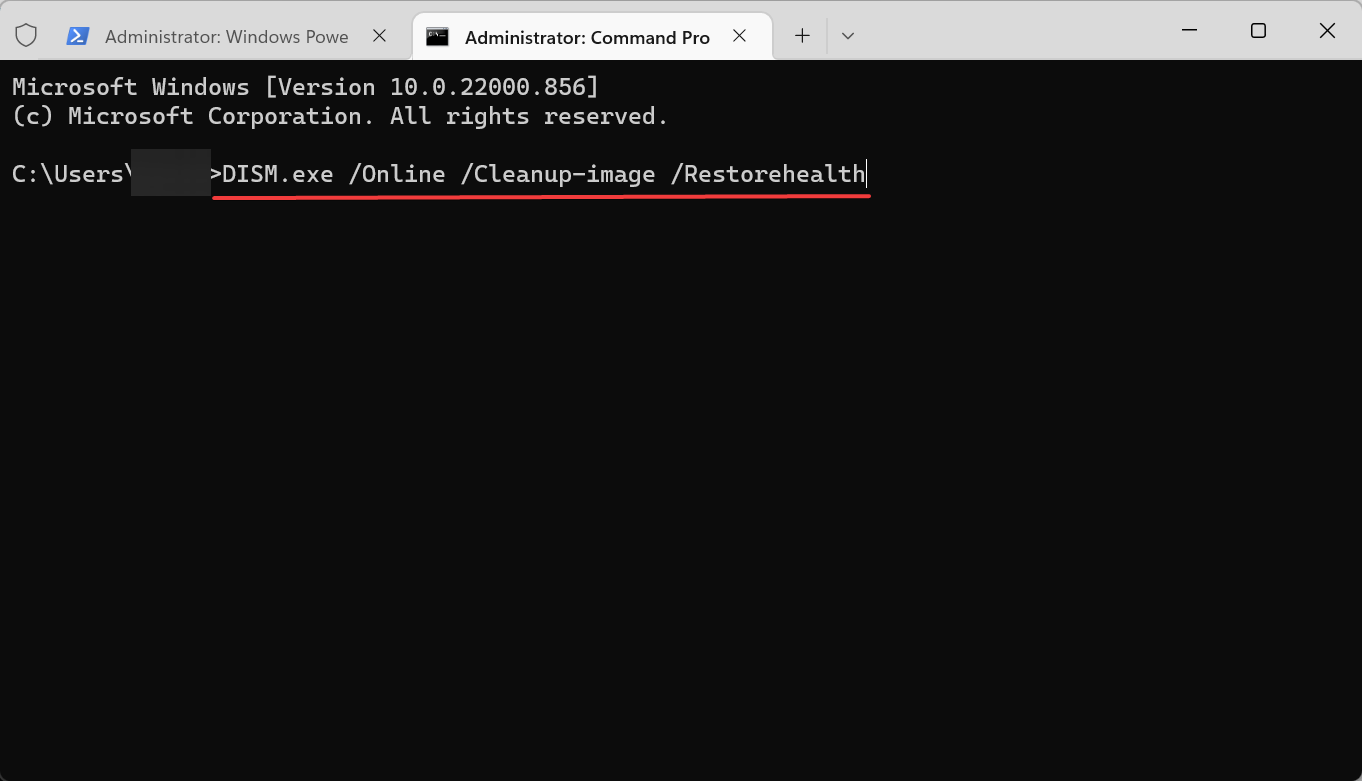
- First, paste the following command and hit Enter to run the DISM tool:
DISM.exe /Online /Cleanup-image /Restorehealth
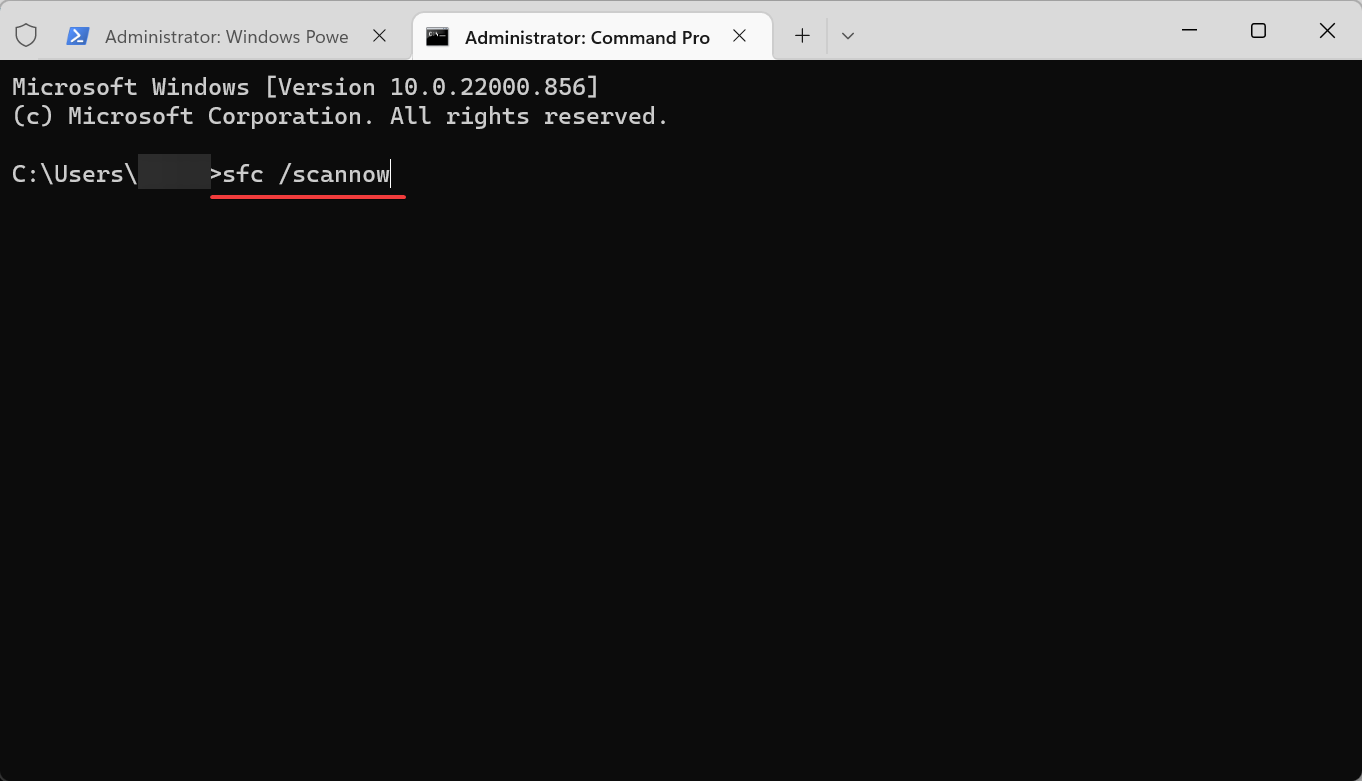
- Once done, execute the following command to run the SFC scan:
sfc/scannow - Wait for the scan to reach 100% verification.
- Then, restart your PC if the scan says Windows Resource Protection repaired corrupt files.

Corruption of system files can cause Print Management to go missing on Windows 10, but you should be able to fix it with the DISM (Deployment Image Servicing and Management) and SFC (System File Checker) scans.
5. Reset or reinstall Windows
If none of the methods listed here have worked, you have no option but to reset Windows to the factory settings. In this case, you will lose all data and installed applications, but it’s one of the most effective troubleshooting methods.
Also, many reported that reinstalling Windows from a USB drive fixed issues with Print Management and made it reappear. In case you run the previous iteration, the Windows 10 reinstall process is very similar.
What can I do if Print Management is missing on Windows 11?
In addition to the methods listed earlier, you can try performing a System Restore if Print Management is missing in Windows 11.
Besides, the problem may arise due to complex or conflicting applications. So look for similar programs or ones known to create conflicts, and uninstall these apps from the device.
Suppose none of the methods listed earlier or the ones here work, and you cannot find the Print Management Console in Optional features. In that case, you are most certainly running the Home edition of Windows 11, in which case upgrading to the Pro or Enterprise edition is the only solution.
Where is Print Manager in Windows 10?
The Print Management Console can be found at the following address in Windows 10: C:\ProgramData\Microsoft\Windows\Start Menu\Programs\Administrative Tools
However, you don’t necessarily need to navigate the path to launch it each time. Instead, simply press Windows + R to open the Run command, paste printmanagement.msc, and hit Enter.
These fixes will likely restore most users’ missing Print Management tools in Windows 10 and 11.
There might be more ways to fix the same issue, and users who have restored a missing Print Management tool with other resolutions are welcome to share their methods in the comment section.
![]()
Print Management in Windows 10 is the present day topic of talk. There are many users who are partially aware of the functioning of the Print Management console on Windows 10. This is not a new thing to note down as it was pretty much famous in the previous editions of Windows. To brief Print Management, its key function is to control numerous print servers or printers. And also it can give a fast performance about the reference resource for relevant driver information. So let us see 2 Ways to Open Print Management in Windows 10, How to handle Custom Filters and Print Servers segments moreover Actions Menu.
Outline of Print Management
Print Management allows the users to observe the print series or queues and gather notifications when the lists of prints stop while carrying out the print sessions. It also activates the users to relocate print servers and positioning printer connections with the help of Group Policy. Print Management also gives the present information about the printers’ condition and also about the print servers of the network. To a certain group of clients, you can install printer connections and also keep an eye on the print lines with the help of Print Management. By using the filters of Print Management, you can trace out the printers which are facing errors. Whenever a printer requires attention, the Print management sends an email alert.
You may like to read
Master Guide to fix Printer Problems in Windows 8 and 8.1
2 Ways to Open Print Management in Windows 10
We present you 2 different ways applying which you can procure the Print Management console in Windows 10.
Way 1: Search
Get yourself into the Taskbar and get your attention to the Search field. There you will enter the phrase printmanagement.msc. On the occurred list of results, you will see an option print management.

Way 2: Administrative Tools
Administrative Tools is another location from where you can procure Print Management. To do so, you need to navigate the following location: Control Panel -> Administrative Tools -> Print Management.
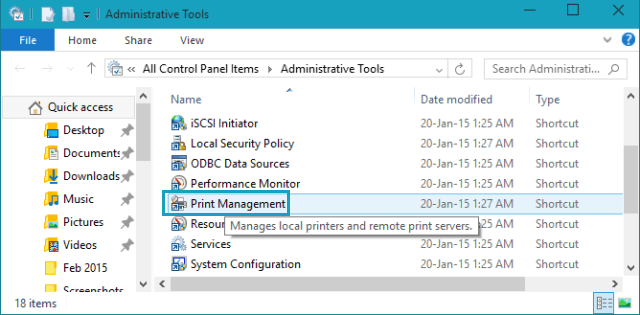
Apply any of the methods; you will see the same result. This is how the Print Management window looks.

How to Work with the Custom Filters Section of Print Management in Windows 10
Take your look in the left column of the Print Management window. You will see that the first section is of Custom Filters. The Printers and Drivers parts are common with Custom Filters and Print Servers section. The new things that we see here are the Printers With Jobs and Printers Not Ready.
The Printers With Jobs lets provides you the information about the printers that are presently printing and also lets you know the numbers of prints (jobs) are in the queue.
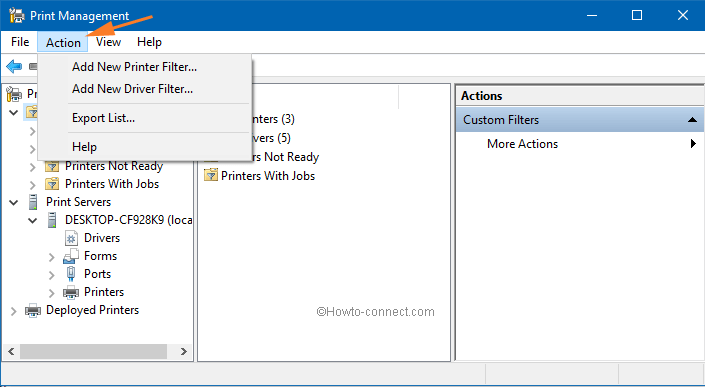
What is the Use of Actions Menu or Right Click on Categories?
The options that you find in the Actions menu of the Print Management will be the same that you see when you perform a right click on the categories.
To give an illustration, the Custom Filters section permits you to create custom printer filter or driver filter. See the below screenshot.
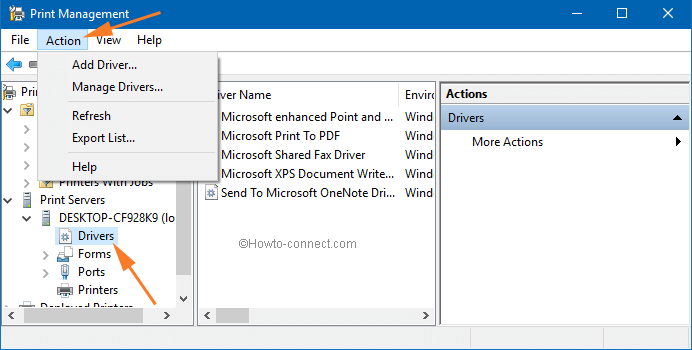
Now going to the Print Servers Drivers part, you can add or manage Drivers.
In the Printers section of the Print Servers, you will be offered to export printers to a file or import printers from a file.
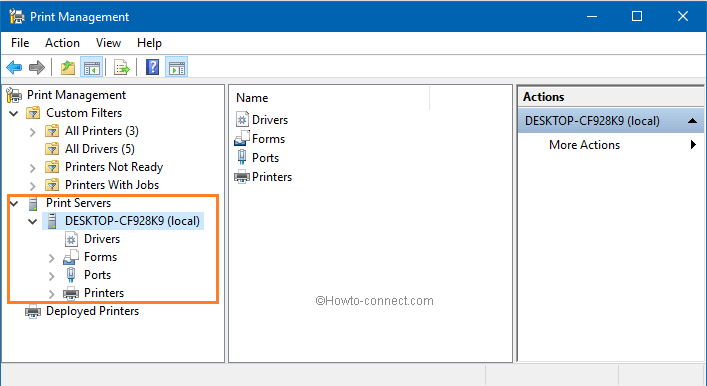
How to Work with Print Servers Section of Print Management in Windows 10
This is said to be the most useful and important part of Print Management. You will see the Print Servers located at the second spot in the left column of the Print Management. When you select the Print Servers, you will see your computer listed there. With the possession of administrative authorities, if you are a part of a network, you will be able to see the other computers who are part of the same network domain. For every computer listed, you will see information concerned with the installed drivers, installed printers, ports used and the printing forms.
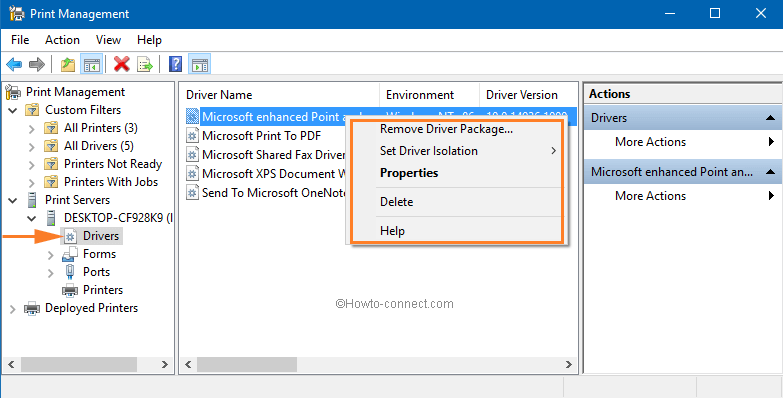
On the particular computer, the list of installed drivers will be exhibited in the Drivers part. This includes the drivers installed by the software.
Make a right click on any driver and see the range of things that you can manage from here. You can delete the chosen driver or set driver isolation or even take a look at its properties.
Coming to the Forms section you will be able to view all the forms. These forms can be applied for printing. You will find minute details of every form such as its type, width, or height.
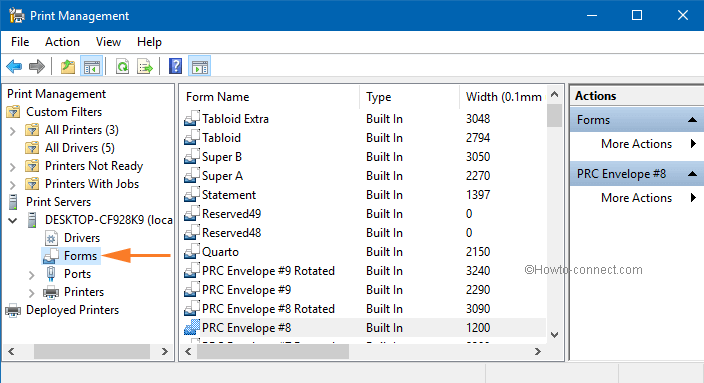
The Type column is treated as an important one. If you see carefully, you will notice that the most used values for it were the Printer and Built in. The Printer forms are the ones installed by your printers. You can remove them by making a right click on them followed by a click on the Delete option. But the Built in forms are those with Windows. You cannot change or remove them.
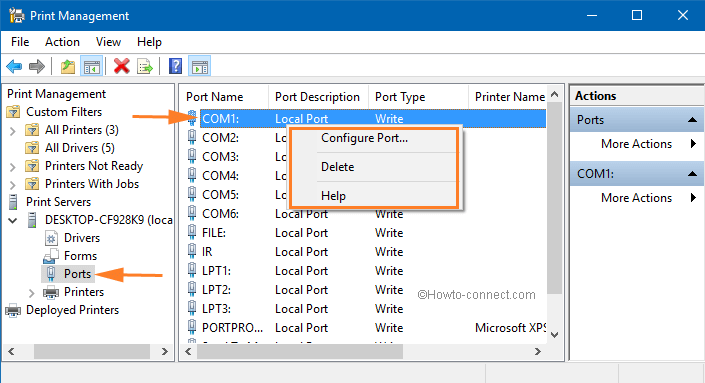
Ports section is on the third spot. The installed printing ports will be exhibited here. Few are the standard ports available in the computers and mostly they never come to use. Right click on a port and you will have options to Configure it or Delete it. Once you have deleted the real printer connected to your PC, you will no longer be able to put into use until you reinstall it.
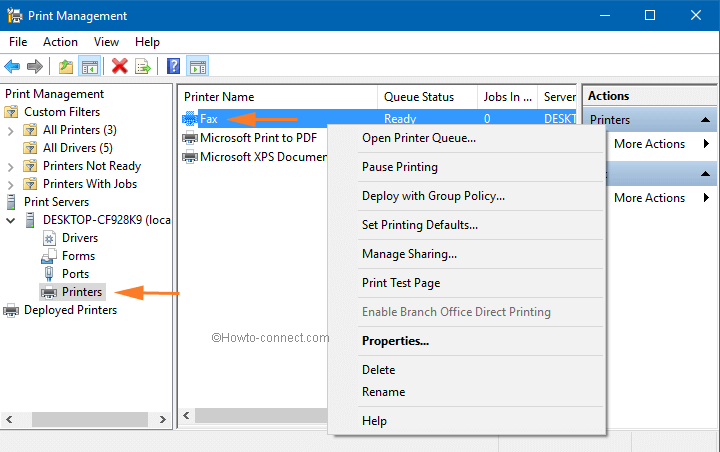
Now, we come to the important section, Printers. All the printers installed along the software ones are listed here. When you perform a right-click on a printer, you will see a lot of configuration options. The options available are open printer queue, pause printing, deploy with group policy, set printing defaults, manage sharing, print test page, properties, delete, rename, and help.
Coming to the End
With the above piece of information about the Print Management, you must have learned that the Print Management is definitely an important tool to work with. This tool is really very helpful. Share with us some of your important reviews about this subject and also enlighten us with your reviews. Please leave your thoughts in the comments below. Eagerly waiting for your reactions!!
Прошли те времена, когда для каждого сотрудника или офиса требовался отдельный принтер. Теперь, с развитием Интернет-протоколов, можно как физически подключить печатающее устройство (через провод), так и удаленно (через Интернет). В Windows 10 есть специальная утилита для обоих этих методов: сервер печати. Поговорим о его преимуществах и способах взаимодействия с ним.
Как открыть «Управление печатью»
Поскольку печать считается одной из основных задач, сервер печати изначально включен в список компонентов системы Windows. Это значит, что дальше устанавливать его не нужно, но можно сразу запустить.

В окне «Выполнить»
Большинство системных утилит поддерживают запуск как из командной строки, так и из окна «Выполнить». Это довольно удобно, потому что эти утилиты открываются из любого окна и поэтому к ним легко получить доступ. Для этого выполните следующие действия:
- Откройте окно “Выполнить”. Для этого воспользуйтесь сочетанием клавиш «Win» + «R».
- В открывшемся окне введите команду «printmanagement.msc».

- Если вместо требуемого окна появляется ошибка «Не удается найти команду», это означает, что данная функциональность ограничена администратором или требуемый компонент отключен.
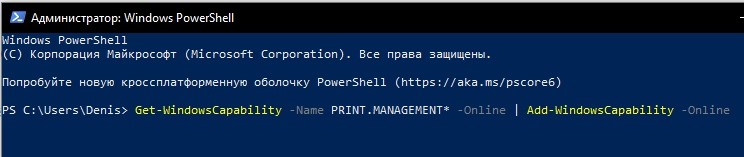
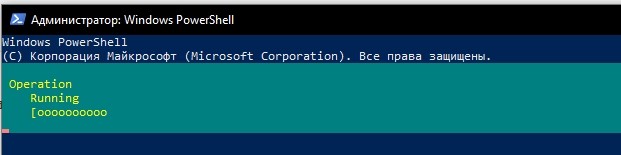
- Чтобы связать компонент, введите в интегрированный поиск текст «Управление дополнительными функциями». Щелкните Добавить компонент. Найдите пункт «Консоль управления печатью» и установите флажок рядом с ним. Щелкните Установить. Если нужный компонент не найден, вам нужно открыть PowerShell («Win» + «X») и ввести команду: «Get-WindowsCapability -Name PRINT.MANAGEMENT * -Online | Add-WindowsCapability –Online». Повторите алгоритм с первой точки.
- Если команда наконец сработала, вы должны открыть окно с названием «Диспетчер печати». В активной области будут отображаться принтеры и их свойства.
В некоторых сборках Windows этот метод не всегда работает, а добавление нового компонента в команду нерационально (но необходимо). Поэтому мы предлагаем второй, более простой способ.
Используя «Поиск»
Возможности поиска в Windows 10 намного шире, чем в предыдущих версиях Windows. С помощью этой утилиты пользователь может выполнить команду, найти программу, встроенную утилиту, параметры, файл или даже выполнить поисковый запрос в Интернете. Чтобы выполнить опцию поиска, вам необходимо следовать приведенному ниже алгоритму:
- Откройте панель поиска. Для этого нажмите на значок лупы в системном трее или зажмите комбинацию клавиш «Win» + «S».
- В открывшемся поле введите команду «Управление печатью» или фразу «Управление печатью».
- Откройте найденный результат.
Готовый. Однако, если ничего не найдено, то, скорее всего, вы неправильно установили требуемый компонент или ваша операционная система не поддерживает описанную функцию. Однако есть третий способ, возможно, он поможет.
Средства администрирования Windows
Инструменты администрирования – довольно мощный инструмент, обеспечивающий быстрый доступ ко многим встроенным утилитам для работы как с операционной системой, так и с оборудованием. Алгоритм действий:
- В меню «Пуск» найдите системную папку. Разверните его.
- Внутри найдите раздел «Администрирование».
- Откроется новое окно, в котором вам нужно найти подраздел «Управление печатью».
Готовый. По сути, все вышеперечисленные методы приведут к одному и тому же результату. Примечание. Эти методы не работают в Windows 10 Домашняя. В этом случае пользователю доступна только утилита «Принтеры и сканеры», которую легко найти через встроенный поиск.
Особенности управления принтерами
Теперь, когда желаемое окно наконец-то открылось, вам нужно подключить и настроить необходимые принтеры. Поговорим о каждом этапе настройки отдельно.
Добавление принтера
Как упоминалось выше, с развитием Интернета стало возможно удаленно подключать определенные компоненты не только через физический порт, но и удаленно. В любом случае для подключения следуйте инструкциям ниже:
- Откройте окно настроек».
- Перейдите в раздел Принтеры и сканеры».
- Щелкните Добавить принтер».
- Windows автоматически найдет устройство в локальной сети.
- Выберите найденное устройство.
Если нужный принтер не найден, его нужно указать вручную. Для этого выберите пункт «Устройства нет в списке», затем вручную введите его имя.
Настройки
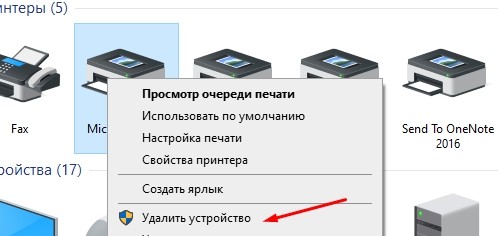
Чтобы настроить само устройство и способы печати (размер бумаги, формат, очередь и т.д.), Вам необходимо повторно открыть утилиту «Принтеры и сканеры». Затем найдите в списке нужный компонент. Интересно, что помимо реального принтера в списке могут быть виртуальные устройства. Настраивать их пока нет смысла. Щелкните по желаемому устройству. Перед вами откроются следующие предметы:
- Открыть очередь печати.
- Тестовая печать.
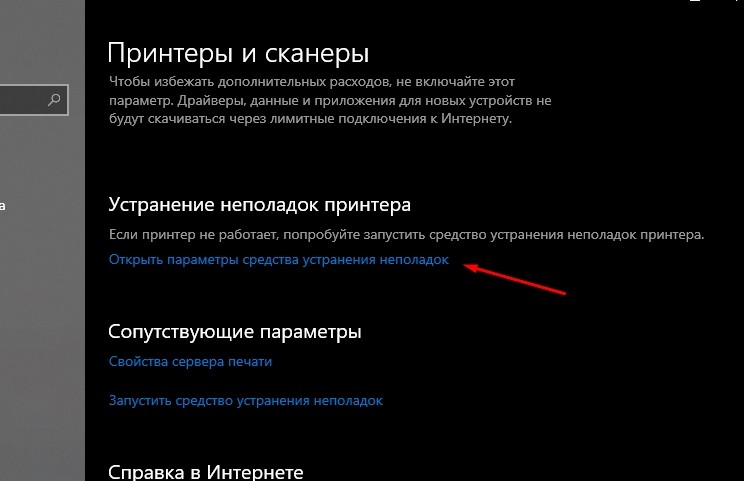
- Инструмент устранения неполадок.
- Имущество.
- Удалить устройство.
Нет необходимости описывать каждый пункт, потому что настройки имеют интуитивно понятный интерфейс и поэтому просты для понимания.
Управления очередью
Однако мы остановимся на одном из моментов, а именно на управлении очередью. Это список задач, которые должен выполнять принтер. В домашних условиях это особо не заметно, ведь устройству нужно только работать с компьютером. В корпоративных сетях одновременно печатается несколько документов.
Используя утилиту «Управление очередью», пользователь может установить приоритет для некоторых документов или полностью отменить все задания, отправленные на печать. Для этого просто откройте раздел «Очередь печати». Все документы, отправленные на печать, будут отображаться перед вами.
Настройка профилей и общего принтера
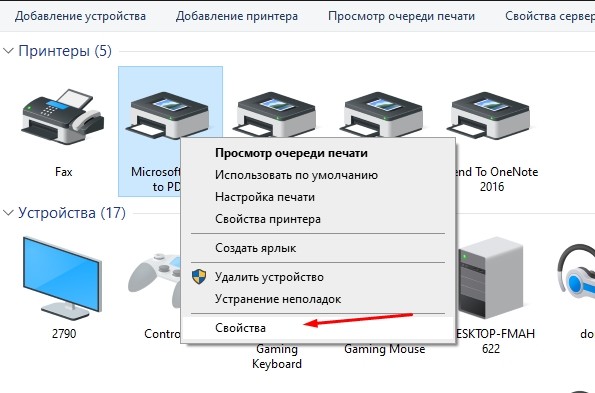
Если у вас установлен цветной принтер, но вы не удовлетворены качеством цвета при печати, вы можете изменить настройки цветовой палитры через свойства оборудования. Внимание: работает только при наличии в устройстве необходимых чернил (картриджа). Алгоритм действий:
- Откройте настройки принтера (как это сделать, описано выше).
- Перейдите в Свойства принтера. Затем откройте вкладку «Управление цветом».
- Откройте подраздел «Управление цветом».
- Перейдите на вкладку «Все профили», затем нажмите кнопку «Добавить профили».
- Откроется окно проводника, в котором вам нужно будет выбрать файл с профилем. Его можно найти в Интернете.
После выполнения этих действий мы рекомендуем перезагрузить компьютер.
Спасибо за прочтение.
Источник изображения: it-tehnik.ru

Позади те времена, когда для каждого работника или кабинета нужен был отдельный принтер. Теперь, с развитием интернет-протоколов, появилась возможность как физического подключения устройства печати (через провод), так и удаленного (через интернет). В Windows 10 для обоих этих методов существует одна специальная утилита – сервер печати. Расскажем о ее преимуществах и методах взаимодействия с ней.
Как открыть «Управление печатью»
Так как печать считается одних из базовых задач, сервер печати изначально входит в список системных компонентов Windows. Это значит, что его не нужно дополнительно устанавливать, а можно сразу запускать.
В окне «Выполнить»
Большинство системных утилит поддерживают запуск как из командной строки, так и из окна «Выполнить». Это довольно удобно, ведь эти утилиты открываются из любого окна, а потому к ним легко обратиться. Для этого необходимо выполнить следующие действия:
- Откройте окно «Выполнить». Для этого используйте сочетание клавиш «Win» + «R».
- В открывшемся окне введите команду «printmanagement.msc».
- Если вместо нужного окна отобразилась ошибка «Не удается найти команду», значит, эта возможность ограничена администратором либо отключен необходимый компонент.
- Для подключения компонента введите во встроенном поиске текст «Управление дополнительными функциями». Нажмите «Добавить компонент». Найдите пункт «Консоль управления печатью» и поставьте галочку напротив пункта. Нажмите «Установить». Если нужного компонента не нашлось, то вам необходимо открыть PowerShell («Win» + «X») и ввести команду: «Get-WindowsCapability -Name PRINT.MANAGEMENT* -Online | Add-WindowsCapability –Online». Повторите алгоритм с первого пункта.
- Если команда, наконец, сработала, то у вас должно открыться окно с названием «Управление печатью». В активной области будут отображаться принтеры и их свойства.
В некоторых сборках Windows этот метод не всегда работает, да и добавление нового компонента ради одной команды – это нерационально (но необходимо). Потому предлагаем второй, более легкий способ.
Используя «Поиск»
Возможности «Поиска» в Windows 10 намного шире, чем в более старых версиях Винды. Через эту утилиту пользователь может выполнить команду, найти программу, встроенную утилиту, параметр, файлы или даже совершить поисковый запрос в интернет. Для запуска через опцию поиска необходимо следовать алгоритму ниже:
- Откройте строку поиска. Для этого кликните по значку лупы в панели задач, либо зажмите сочетание клавиш «Win» + «S».
- В открывшемся поле введите команду «printmanagement» либо фразу «Управление печатью».
- Откройте найденный результат.
Готово. Однако, если ничего не было найдено, то, скорее всего, вы некорректно установили нужный компонент либо ваша ОС не поддерживает описываемую возможность. Однако существует и третий метод, возможно, поможет именно он.
Средства администрирования Windows
Средства администрирования – это довольно мощный инструмент, предоставляющий быстрый доступ к множеству встроенных утилит для работы как с ОС, так и аппаратной составляющей. Алгоритм действий:
- В меню пуск найдите папку «Служебные». Раскройте ее.

- Внутри найдите раздел «Администрирование».
- Откроется новое окно, в котором нужно найти подраздел «Управление печатью».
Готово. По сути, все перечисленные выше методы приведут к одному и тому же результату. Примечание: эти методы не будут работать в ОС Windows 10 Home. В таком случае пользователь может использовать только утилиту «Принтеры и сканеры», которую легко найти через встроенный поиск.
Особенности управления принтерами
Теперь, когда нужное окно, наконец, открылось, необходимо подключить и настроить нужные принтеры. Расскажем о каждом этапе настройки по отдельности.
Добавление принтера
Как говорилось выше, с развитием интернета появилась возможность удаленного подключения некоторых компонентов не только через физический порт, но и удаленно. В обоих случаях для подключения следуйте инструкции ниже:
- Откройте окно «Параметры».
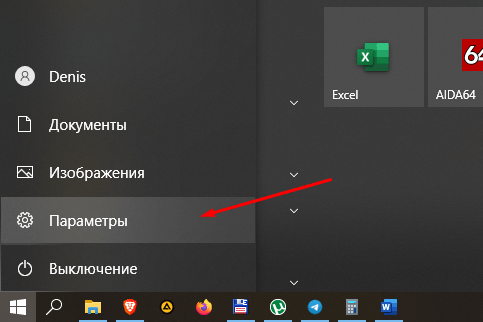
- Перейдите в раздел «Принтеры и сканеры».

- Нажмите «Добавить принтер».
- Windows в автоматическом режиме найдет устройство в локальной сети.
- Выберите найденное устройство.

Если нужный принтер не был обнаружен, то вам необходимо указать его вручную. Для этого выберите пункт «Устройство отсутствует в списке», а после вручную введите его название.
Настройки
Для настройки самого устройства и способов печати (размер бумаги, формат, очередь и так далее) необходимо снова открыть утилиту «Принтеры и сканеры. После найдите нужный компонент в списке. Примечательно, что, помимо настоящего принтера, в списке могут находиться виртуальные устройства. Их настраивать пока нет смысла. Кликните по нужному устройству. Перед вами откроются следующие пункты:
- Открыть очередь печати.

- Пробная печать.
- Средство устранения неполадок.

- Свойства.
- Удалить устройство.
Нет необходимости описывать каждый пункт, ведь настройки имеют интуитивно понятный интерфейс, а потому с ними легко разобраться.
Управления очередью
Однако мы остановимся на одном из пунктов, а именно на управлении очередью. Это такой список задач, который должен выполнить принтер. В домашних условиях это не особо заметно, ведь устройству необходимо работать только с одним компьютером. В корпоративных сетях на печать приходят сразу несколько документов.
С помощью утилиты «Управление очередью» пользователь может задать приоритет для некоторых документов либо полностью очистить все пришедшие на печать задания. Для этого достаточно открыть раздел «Очередь печати». Перед вами отобразятся все документы, отправленные на печать.

Настройка профилей и общего принтера
Если установлен цветной принтер, но вас не устраивает качество цвета при печати, вы можете изменить настройки цветовой палитры через свойства оборудования. Внимание: работает это только в том случае, если в устройстве есть нужная краска (картридж). Алгоритм действий:
- Откройте настройки принтера (как это сделать, описано выше).
- Перейдите в раздел «Свойства принтера». После откройте вкладку «Управление цветом».
- Откройте подраздел «Управление цветом».
- Перейдите во вкладку «Все профили», а после нажмите кнопку «Добавить профили».

- Откроется окно проводника, где необходимо выбрать файл с профилем. Его можно найти на просторах интернета.
После выполнения этих действий рекомендуем перезагрузить компьютер.
Благодарим за прочтение.