Пользователи Windows иногда сталкиваются с проблемой чрезмерной загрузки ЦП от процесса «Изоляция графов аудиоустройств». Она может проявляться в подвисании компьютера и даже в полном отключении звука. Что в этой ситуации нужно предпринять? Почему так происходит? За что именно отвечает данный процесс? Ответим сегодня подробно на эти вопросы.
Процесс «Изоляция графов аудиоустройств»: за что отвечает и почему грузит компьютер
Малознакомый обычным пользователям процесс «Изоляция графов аудиоустройств» является системным компонентом Windows 10. На нём лежит ответственность за исполнение аудиоэффектов, улучшение качества звука и его усиление. Его можно назвать дополнительным «аудиодвижком» Windows. Разработчики Microsoft решили отделить данный процесс от главного Windows Audio, чтобы звук воспроизводился стабильно, а сама система работала без сбоев.
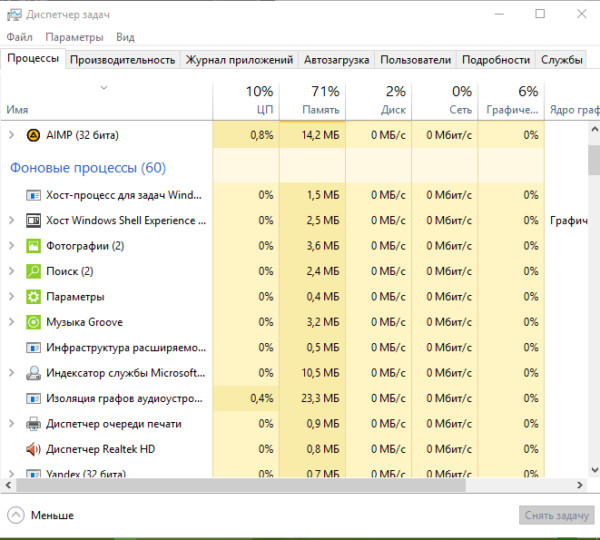
Как правило, рассматриваемый процесс должен потреблять не более 3 – 4 МБ оперативной памяти ПК. Этот объем может увеличиваться в некоторой степени при включении определённых эффектов, но затем он снижается до нормы. Проблема появляется, когда нагрузка составляет 30 – 50%.
Почему процесс может так нагружать аппаратную часть компьютера и тормозить его работу? Существуют три объяснения:
- Проблемы в запускаемой утилите для воспроизведения и улучшения качества звука или драйвере подключаемого оборудования. Плохо написанное ПО будет работать некорректно.
- Системные сбои. В этом случае необходимо найти повреждённые файлы и исправить их с помощью «Командной строки».
- Не обновлённый аудиодрайверы Realtek HD. Здесь необходимо произвести апдейт.
Что делать для снижения нагрузки
Снизить уровень загруженности ЦП позволят несколько методов. Начинать необходимо со сканирования ПК на наличие «неправильных» системных файлов, которые могли вызвать данную аномалию.
Сканирование в «Командной строке»
Если в памяти компьютера присутствуют повреждённые файлы, связанные с аудипроцессами, это может повлиять на работу «Изоляции графов аудиустройств». В этом случае необходимо запустить проверку с помощью окна «Командная строка». Как это сделать?
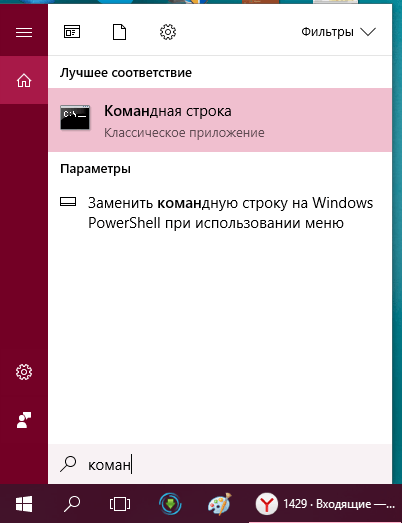
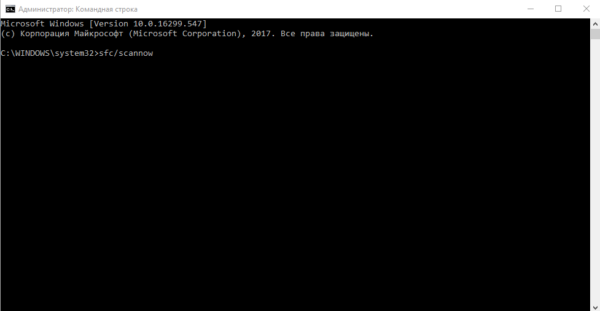
- Сначала запустим саму «Командную строку». Кликаем по иконке в виде лупы на «Панели задач» и в появившейся области вводим соответствующий запрос. При этом вам не нужно вводить его полностью, так как система будет давать вам подсказки и выводить возможные варианты.

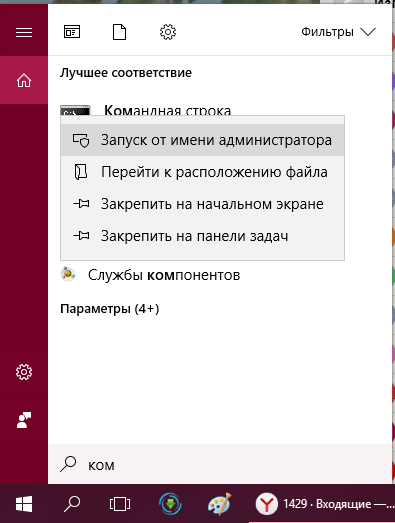
Введите в строку поиска запрос «Командная строка» - Щёлкаем правой клавишей мыши по нужному пункту в результатах поиска и выбираем «Запуск от имени администратора».

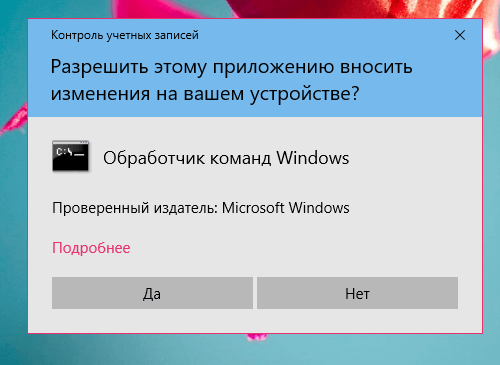
Кликните в контекстном меню по «Запуск от имени администратора» - Кликаем по «Да», чтобы разрешить стандартной утилите вносить изменения на компьютере.

Нажмите на кнопку «Да», чтобы разрешить «Командной строке» вносить изменения на устройстве - В окне чёрного редактора вставляем следующую скопированную команду: sfc/scannow. После этого нажимаем на Enter на клавиатуре.

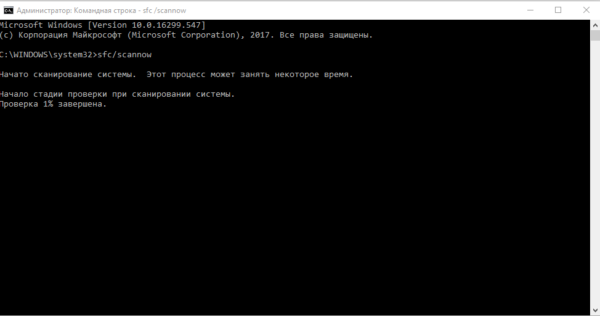
Вставьте или напечатайте самостоятельно команду sfc/scannow в чёрном редакторе - Windows запустит сканирование системы на наличие повреждённых файлов. В окне будет отображаться ход выполнения проверки в процентах.

В чёрном редакторе вы увидите ход выполнения сканирования - После сканирования система исправит сама все недочёты, если они будут. Если проверка ничего не обнаружила, переходите к следующим методам решения проблемы.
Видео: проверяем целостность системных файлов
Обновление аудиодрайверов
Некорректная работа процесса может быть из-за того, что на ПК установлены старые версии драйверов. Особенно это актуально для систем, которые давно не получали апдейт. Проверьте, есть ли обновление для ваших аудиодрайверов следующим образом:
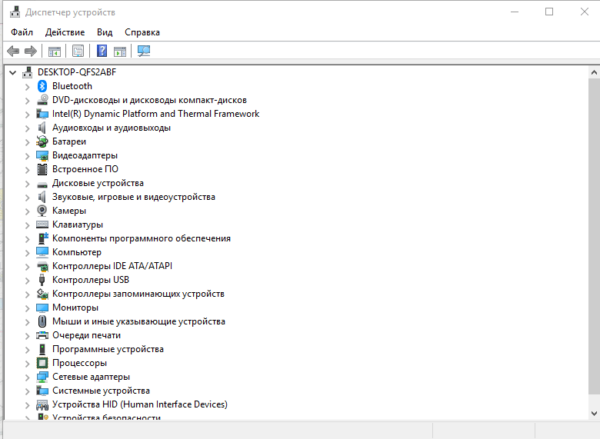
- Через «Поиск Windows» (значок в виде лупы на «Панели задач») находим системное окно Windows «Диспетчер устройств».

Введите запрос «Диспетчер устройств» в «Поиске Windows» - В списке ищем пункт «Звуковые, игровые и видеоустройства». Сразу разворачиваем его двойным щелчком мышки.

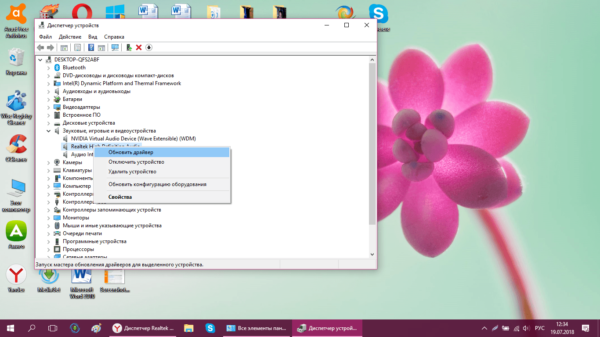
Найдите пункт «Звуковые, игровые и видеоустройства» в «Диспетчере устройств» - Теперь кликаем правой клавишей мыши по объекту Realtek High Definition Audio. В небольшом перечне опций делаем выбор в пользу «Обновить драйвер».

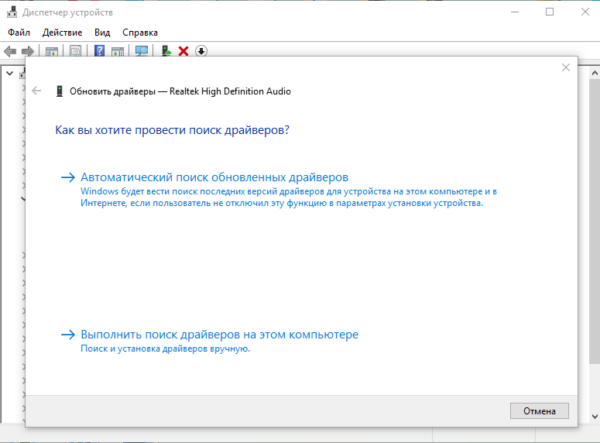
Выберите в контекстном меню пункт «Обновить драйвер» - В новом окне, которое запустится поверх «Диспетчера устройств», кликаем по ссылке «Автоматический поиск обновлённых драйверов».

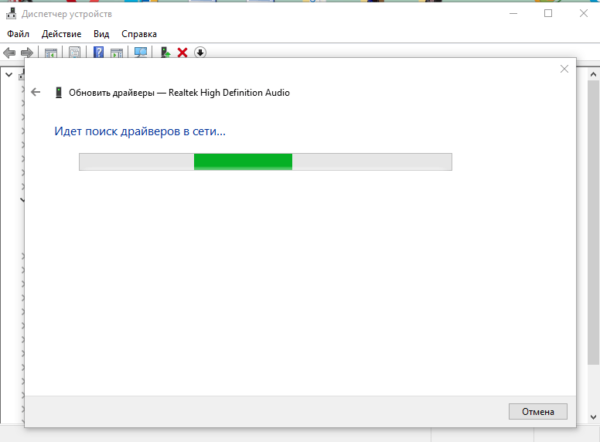
Кликните по ссылке «Автоматический поиск обновлённых драйверов» - Система запустит проверку на наличие доступного апдейта.

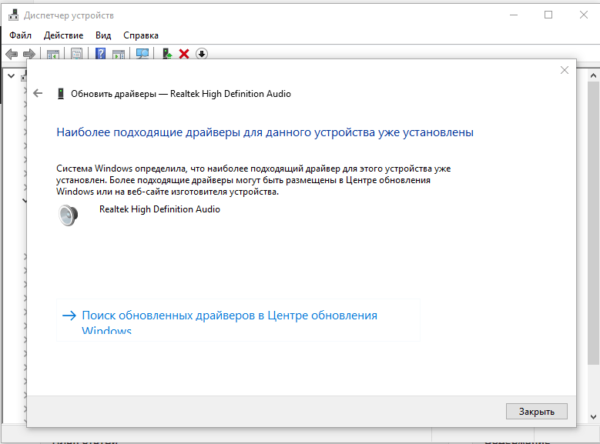
Подождите, пока система найдёт доступные обновления для ваших драйверов - Если Windows обнаружит обновления, она тут же их сама установит.
- В случае если апдейт не обнаружится, она оповестит вас в окне об этом.

Для аудиодрайвера нет доступных обновлений в сети - Вернитесь в «Диспетчер устройств» и повторите те же действия для двух других драйверов в разделе «Звуковые, игровые и видеоустройства».

Видео: обновляем аудиодрайверы в Windows 10
Отключение всех звуковых эффектов
Если сканирование и обновление не помогло, попробуйте отключить звуковые эффекты в настройках «Динамиков». Как это сделать?
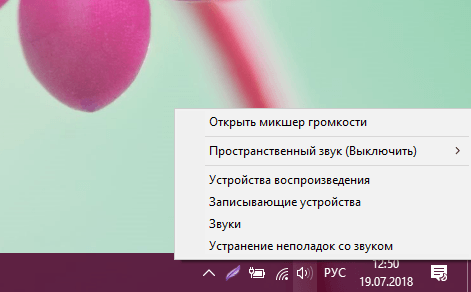
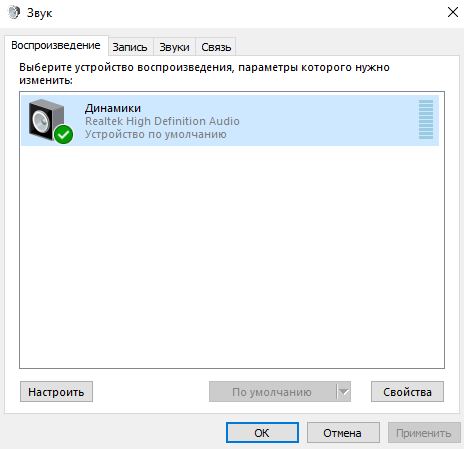
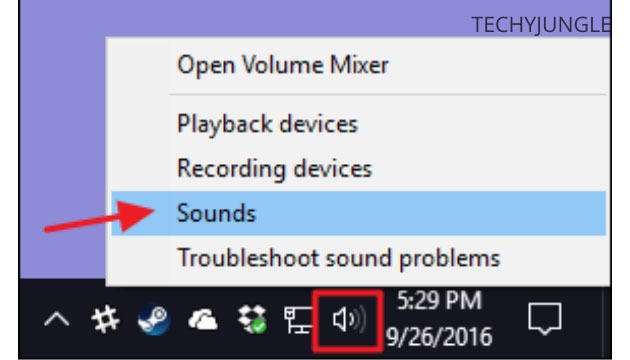
- На «Панели задач» в правом углу есть «Область уведомлений». На ней расположены стандартные значки Windows. Нам необходима иконка «Звук». Кликаем по ней правой клавишей мышки. В перечне выбираем раздел «Устройства воспроизведения».

Нажите правой кнопкой на иконку в виде громкоговорителя и выберите «Устройства воспроизведения» - В первой же вкладке кликаем один раз левой кнопкой по объекту «Динамики». После этого жмём на «Свойства» в правом нижнем углу. Окно с параметрами можно также вызвать с помощью двойного щелчка по пункту.

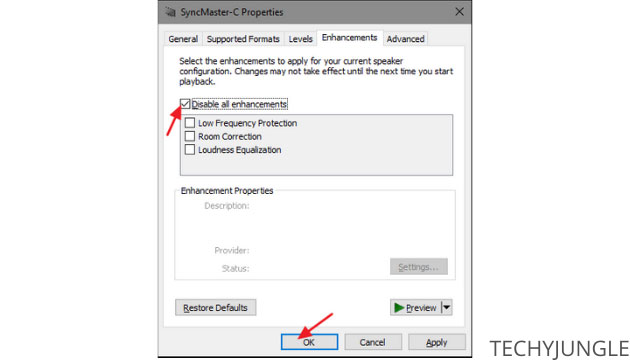
Щёлкните по кнопке «Свойства» - На экране появится ещё одно окно. Здесь уже переходим на третий раздел «Улучшения». Снимаем галочки со всех пунктов в меню и кликаем по кнопке «Применить», расположенной внизу.

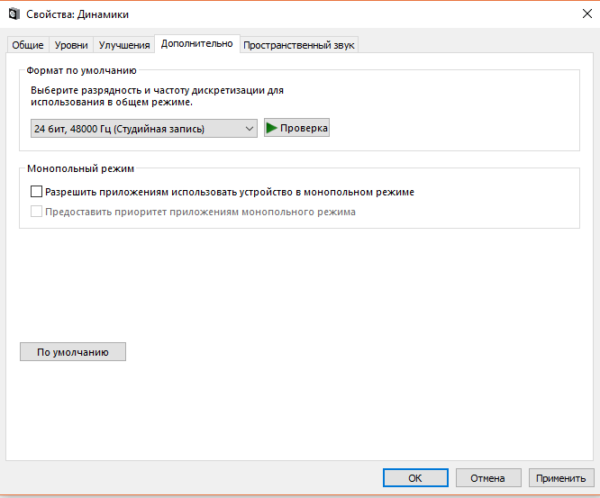
Во вкладке «Улучшения» снимите галочки со всех пунктов и кликните по «Применить» - Во следующем блоке «Дополнительно» убираем отметки с двух параметров, которые отвечают за активацию монопольного режима в приложениях для воспроизведения аудиозаписей. Снова кликаем по «Применить» и закрываем все окна.

Снимите две галочки в разделе «Монопольный режим» и нажмите на «Применить»

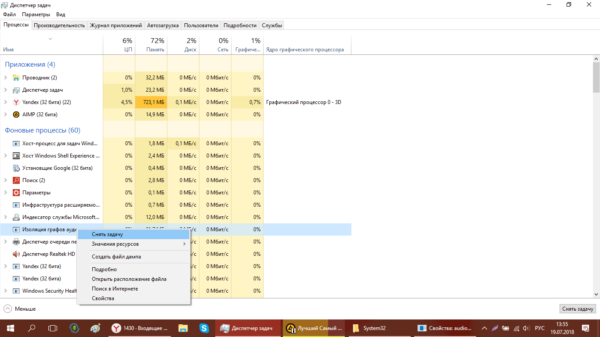
Снимите задачу с процесса в «Диспетчере задач»
Завершение работы описываемого процесса — самый быстрый метод снять нагрузку с ЦП. Его минус в том, что он будет отключённым только до следующего запуска Windows, то есть с каждым включением компьютера и открытием проигрывателя он запускается сам автоматически. Тем не менее этот способ поможет в срочном порядке «разгрузить» аппаратную часть ПК.
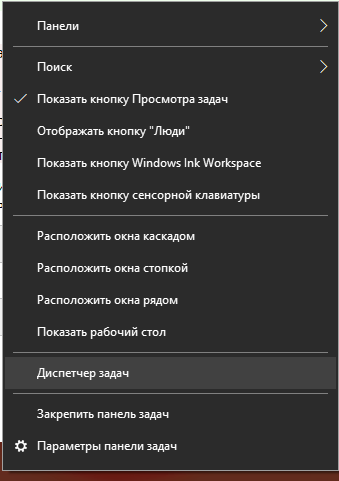
- Запустите на экране «Диспетчер задач». Для этого щёлкните правой клавишей мыши по области на «Панели задач», свободной от иконок. В перечне на чёрном фоне выберите одноимённый раздел. Вы также можете вызвать его с помощью комбинации, состоящей из трёх клавиш: Ctrl + Alt + Delete.

Выберите «Диспетчер задач» в контекстном меню «Панели задач» - В самой первой вкладке ищем строку с названием процесса.
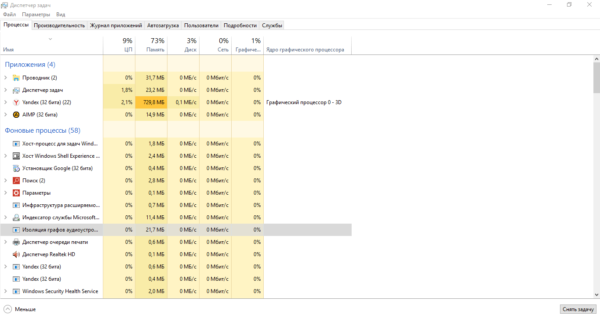
- Выделяем её левой клавишей мышки и жмём на кнопку «Снять задачу», которая находится справа в нижнем углу.

Выберите левой кнопкой процесс и нажмите на «Снять задачу» - Эта же опция завершения процесса доступна в контекстном меню процесса. Вызовите его на экране щелчком левой кнопкой мыши по строке. Системный компонент ту же отключится, а память ЦП станет более свободной.
Кликните по процессу правой клавишей и выберите пункт «Снять задачу»
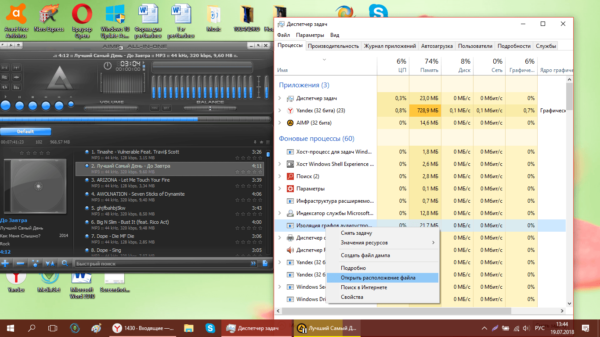
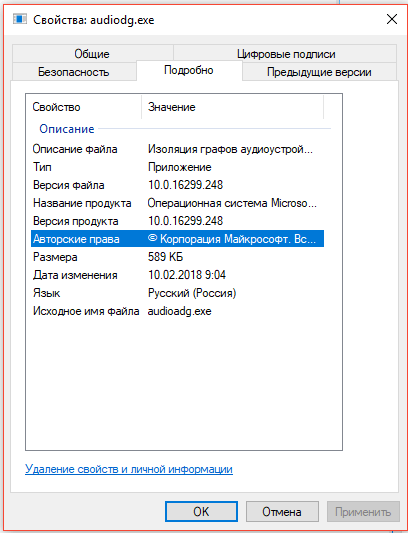
Под названием объекта «Изоляция графов аудиоустройств» может скрываться не одноимённый процесс, а вирус. Это и может стать причиной большой загруженности центрального процессора. Чтобы убедиться, что процесс не является вирусом, сделайте следующее:
- Вызовите «Диспетчер задач», используя инструкцию из предыдущего раздела этой статьи.
- Отыщите в списке процесс «Изоляция графов аудиоустройств». Теперь кликаем по нему правой клавишей для запуска контекстного меню. В перечне выбираем опцию «Открыть расположение файла».
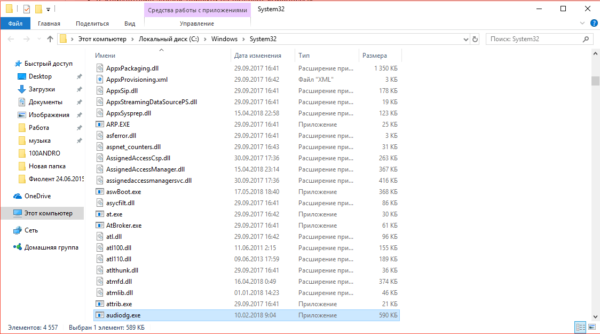
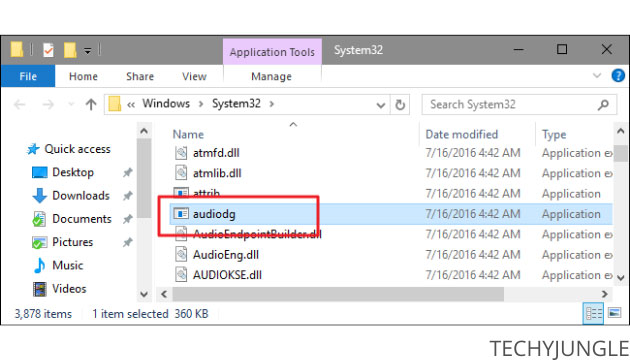
Щёлкните по пункту «Открыть расположение файла» в контекстном меню процесса - В «Проводнике Windows» откроется папка System 32. Система сразу выделит файл audiodg. Это и есть файл процесса.

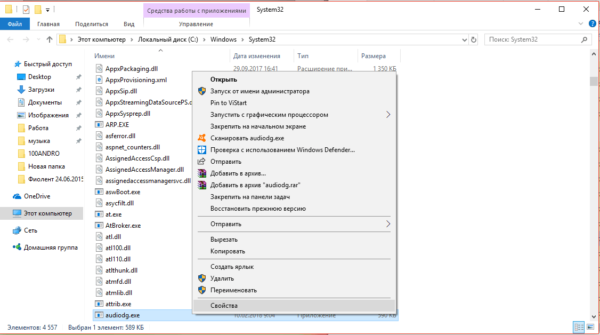
Система откроет папку System 32, в которой будет файл audiodg, отвечающий за процесс - Щёлкаем по нему правой клавишей мышки и выбираем самый последний объект «Свойства» для запуска ещё одного окна.

Кликните по пункту «Свойства» в контекстном меню файла - В нём переходим сразу на блок «Подробно». Все подписи должны быть точно такими же, как на скриншоте ниже за исключением чисел в версии продукта и файла. Если всё соответствует, процесс не является вирусом.

Сравните подписи в окне с теми, чтобы изображены на скриншоте - Если вы обнаружили другую информацию или же файл процесса открылся в окне «Проводника» в совершенно другой папке, скорее всего, это вирус. Необходимо просканировать ПК антивирусом на наличие вредоносного ПО. Крайне рекомендуется в этом случае использовать функцию полной проверки. Антивирус сам обнаружит вирус и вылечит систему за счёт его удаления.
Процесс «Изоляция графов аудиоустройств» может сильно нагружать систему, мешая ей работать в нормальном режиме. Если на этот объект приходится 30 – 50% памяти ЦП, необходимо в первую очередь провести сканирование системы на наличие повреждённых файлов с помощью «Командной строки». Если этот метод не помог, обновите драйвера и отключите все звуковые эффекты в настройках.
- Распечатать
Оцените статью:
- 5
- 4
- 3
- 2
- 1
(12 голосов, среднее: 4.8 из 5)
Поделитесь с друзьями!
ЕслиИзоляция графа аудиоустройств Windows перестала работатьна вашем компьютере с Windows 11/10, этот пост вам поможет. Эта функция позволяет пользователю подключать несколько аудиоустройств к своему ПК и настраивать их как отдельные устройства ввода или вывода. Это могут быть микрофоны, веб-камеры, динамики и т. д.
Чтобы устранить проблему, из-за которой изоляция графа аудиоустройств Windows перестала работать, перезагрузите компьютер и отключите любое стороннее аудиопрограммное обеспечение и посмотрите, поможет ли это. Если это не так, то следуйте этим советам:
- Запустите средство устранения неполадок со звуком
- Обновить аудиодрайверы
- Отключить улучшения звука
- Устранение неполадок в режиме чистой загрузки
Теперь давайте посмотрим на это подробно.
1] Запустите средство устранения неполадок со звуком.
Прежде чем вносить какие-либо изменения в свою систему, попробуйте запустить средство устранения неполадок со звуком. Он может сканировать и исправлять любые ошибки, связанные со звуком. Вот как:
- НажиматьОкна + ЯоткрытьНастройки.
- Перейдите кСистема > Устранение неполадок > Другие средства устранения неполадок.
- Прокрутите вниз и нажмитеБегатьрядомАудио.
2] Обновить драйверы устройств.

Далее проверьте, обновлены ли драйверы устройств до последней версии. Изоляция графа аудиоустройств Windows может не работать, если драйверы устарели или повреждены. Вот как вы можете обновить драйверы:
- НажиматьОкна + ЯоткрытьНастройки.
- Перейдите кЦентр обновления Windows > Дополнительные параметры > Дополнительные обновления..
- Здесь будет доступен список обновлений, которые вы можете установить, если столкнулись с проблемой вручную.
Вы также можете скачать аудиодрайверы и установить их.
3] Отключить улучшения звука

Если у вас активированы какие-либо улучшения звука, возможно, именно поэтому изоляция графа аудиоустройств Windows перестала работать. Служба предназначена для обработки дополнительных улучшений звука. Однако некоторые улучшения звука или эффекты могут конфликтовать с этим процессом. Выполните следующие действия, чтобы узнать, как отключить его:
- нажмитеКлавиша Windows + ЯоткрытьНастройки.
- Перейдите кСистема > Звук > Все звуковые устройстваи выберите аудиоустройство.
- Помимо улучшений звука щелкните раскрывающееся меню и выберитеВыключенный.
4] Устранение неполадок в режиме чистой загрузки

Если эти предложения не помогают, устраните неполадки в режиме чистой загрузки. Когда ваше устройство загрузится в режиме чистой загрузки, будут работать только необходимые драйверы и программы. Это позволит устранить большинство причин и легко установить обновления Windows.
Если ошибка не появляется в состоянии чистой загрузки, вручную включите один процесс за другим и найдите виновника. Как только вы его определили, отключите или удалите программное обеспечение.
Читать:Изоляция графа аудиоустройств Windows (Audiodg.exe) высокая загрузка ЦП
Мы надеемся, что эти предложения помогут вам.
Как исправить изоляцию графа аудиоустройств Windows?
Чтобы исправить любые ошибки с изоляцией графа аудиоустройств Windows, обновите аудиодрайверы и отключите все улучшения звука. Однако, если это не помогло, попробуйте устранить неполадки в режиме чистой загрузки.
Как отключить изоляцию Windows графа аудиоустройств Windows?
Чтобы отключить изоляцию графа аудиоустройств Windows на устройствах Windows, откройте диспетчер задач и перейдите на вкладку «Процессы». Найдите здесь процесс AUDIODG.EXE, щелкните его правой кнопкой мыши и выберите «Завершить задачу».
If you’re struggling with high CPU or disk usage, you might have turned to the Windows Task Manager to uncover the culprit. If you notice Windows Audio Device Graph Isolation spiking or staying at a consistently high CPU usage value, it’s time to dive into the problem to find a solution. The name alone might not mean much at first, but it’s an issue many others have faced and overcome.
Once you figure out the cause, you’ll see your CPU or disk usage go back to more normal levels.
It sounds very cryptic, doesn’t it? From the name alone you can derive that it’s something to do with the computer’s audio. Past that, however, it’s hard to tell what exactly this process does.
This process is mostly aimed toward developers creating drivers that can interact with the computer’s sound and to add additional effects. Because this will affect all sounds coming from the computer, they have to talk to Window’s audio service.
To aid with this, Microsoft isolated a part of their audio service into a separate process, which is Windows Audio Device Graph Isolation. Having a separate service from Window’s core process means that a crashing third-party audio driver won’t take out the entire operating system with it. It also supplies tools to aid with DRM.
Fixing the Issues
Now that we know what the process does, we can apply what we learned to fix it, should it go out of control.
Disabling Sound Effects
Windows Audio Device Graph Isolation was created to handle additional sound enhancements on your PC. Therefore, if we disable the PC’s ability to play sound enhancements, this may solve the problem. This is especially useful if you have zero desire to use sound enhancements on your PC. Note that this isn’t the same as disabling the computer’s sound — it’s just disabling the ability to add fancy effects to it, such as an echo.
To disable all sound enhancements, first right-click the speaker symbol in your tray, then click Sounds.

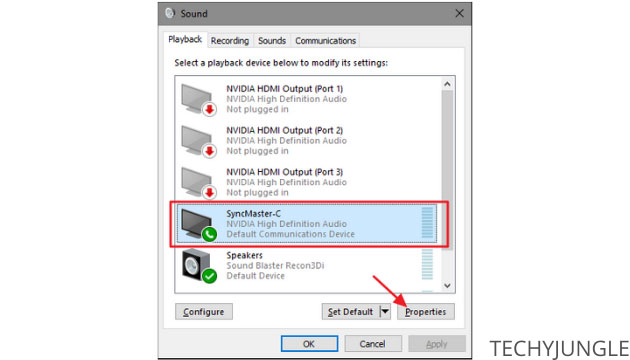
Select the Playback tab, and you’ll see a list of different ways your computer can output sound. Find the default device your PC uses to output sound. You can tell which this is because it’s labelled as «Default Device,» and the green bar to the right will light up as you play sounds on your PC.

Right-click this and click «Properties» or click on it and click the «Properties» button below.

In the window that pops up, go to the «Enhancements» tab. You’ll see a list of sound effects you can apply to your sound. Of course, we’re not here to use these — we’re here to turn them off! At the top, you should see an option to disable all sound effects. Check this and OK out of all windows.

This tells Windows you don’t want any additional sound effects, which should put a little less strain on the audio device graph isolation process.
If you don’t see an Enhancements tab, you may need to update the driver for your default sound device, such as Realtek.
Reinstall Audio Drivers
If this doesn’t do the job, the problem might not be with the sound effects. Instead, it might be with the audio driver that handles these effects.
To solve this, first download the current version of your audio drivers. You can do this from your PC manufacturer’s site. Alternatively, you can find the model of your motherboard and search for audio drivers associated with it.
Once done, you can either install these straight away (follow any instructions included with the download) and see if it solves the problem or do a «clean sweep» of the drivers to ensure nothing from the old driver installs interferes.
To do a clean sweep, expand «Sound, video and game controllers,» right-click your audio driver, and click Uninstall.

In the pop-up that appears, check the box that asks if you want to delete your drivers and click OK.

Restart the PC. Windows will likely install audio drivers for you, but if you want to be absolutely sure you’re installing the best drivers for your PC, you can manually install them with the drivers you downloaded earlier.
If this fixes the issue, but you start having Windows Audio Device Graph Isolation problems again, a Windows update might have changed the driver. Repeat the process above to install your chosen driver.
Check for a Virus
If neither of the above options work, it might be a case of a virus disguising itself as the Windows Audio Device Graph Isolation process to perform its nasty deeds. In order to make sure you don’t have a virus on your hands, right-click the «Windows Audio Device Graph Isolation» process and click «Open file location.»

A folder will open. Check the file path for the folder. If it’s in System32, there’s a good chance it’s not a virus.

If it’s anywhere else, or if you’re still suspicious that a virus could be the problem, perform a full virus scan with your trusted antivirus solution immediately.
Audio Woes
With such a cryptic name as Windows Audio Device Graph Isolation, it’s hard to know how to troubleshoot problems with it. Now, however, you know what the process does, what areas of Windows it uses, and thus, how to control it should it go awry.
Did the above work for you? Let us know below.

Crystal Crowder has spent over 15 years working in the tech industry, first as an IT technician and then as a writer. She works to help teach others how to get the most from their devices, systems, and apps. She stays on top of the latest trends and is always finding solutions to common tech problems.
Subscribe to our newsletter!
Our latest tutorials delivered straight to your inbox
The first thing most users do when they notice their PC slowed down is checking the CPU usage. Needless to say, realizing it is abnormally high can be both frustrating and worrying.
Unfortunately, some Windows errors and bugs, such as the one we cover in this guide, can cause similar issues on a user’s computer.
So, if you’ve recently experienced high CPU usage caused by the Windows Audio Device Graph Isolation process, now’s the right time to learn more about it.
Without further ado, let’s get into it.
What Is The Windows Audio Device Graph Isolation Process?

Windows Audio Device Graph Isolation, also known as audiodg.exe, is a legitimate process built into the Windows operating system.
Its role is to provide the ability to connect multiple audio devices to the computer, such as microphones, headsets, or webcams, and allow the user to set each one as a separate input or output device in specific software and for various tasks.
Also, this process allows your audio devices to “handle” their audio, which means each can have separate settings, filters, enhancements, and more.
That can be helpful in situations where the user hasmultiple audio devices installed and often needs to switch between them. Audio hobbyists, musicians, and streamers can all benefit from this.
However, there are times when the Windows Audio Device Graph Isolation process starts malfunctioning, which results in extremely high CPU and memory usage.

This issue has been troubling a lot of users, and many reported it multiple times on support websites, including the Microsoft forums.
It’s not the simplest one to solve as it requires a bit of troubleshooting, but luckily, we’ve tested some methods and prepared step-by-step explanations that will guide you until you fix the problem.
Read the following sections for more information.
Fix 1: Re-Plug All Audio Devices Into Your PC

One of the fixes that helped some users overcome this problem is a simple re-plug of all audio devices.
Whether they’re connected to an audio jack or a USB port, disconnecting them, restarting your PC and reconnecting can help. That applies to Bluetooth devices as well.
This method could work because a “stuck” process may continuously affect one of the devices, so when you unplug that device, the process will terminate and no longer use your memory or CPU.
However, this does not work for everyone, so if you find no success with it, move on to the next method below.
Fix 2: Disable Nvidia Broadcast

Many users reported that disabling Nvidia Broadcast fixed the problem, so we recommend doing that if you’re experiencing high CPU and memory usage caused by the Windows Audio Device Graph Isolation process.
Although Nvidia Broadcast is endorsed by the community for the superior effects and enhancements, many agree that it’s sometimes frustrating to work with this software as crashes and malfunctions happen too often.
So, as a potential fix, we recommend disabling Nvidia Broadcast to see if that solves the issue.
Nvidia Broadcast is known to be a so-called “power vampire” process, but in this specific case, it seems like the audiodg.exe is the problem, when in fact it’s Nvidia Broadcast demanding the power through the built-in Windows process.
Some software for peripherals, such as Logitech’s G-Hub, have integrated settings for Nvidia Broadcast. You can tweak settings in G-Hub to disable Nvidia Broadcast effects for specific devices or uninstall the software altogether. Try both methods.
Fix 3: Disable All Sound Enhancements

Sound Enhancements are sometimes useful, but they’re also known to be quite problematic on Windows, causing issues such as high CPU and memory usage.
When one of the sound enhancements (which are often interlinked or controlled by the Windows Audio Device Graph Isolation process) doesn’t work properly, you may experience problems and get a false picture that the audiodg.exe process is causing it.
Many users reported successfully fixing this problem by disabling sound effects within the Windows sound panel.
Here’s how you can do that:
- Press Windows + S simultaneously on your keyboard to open the search box.
- Type Control Panel and press Enter.

- In the top-right corner, set the view to Large Icons.

- Click on Sound.

- In the Playback section, right-click on the default listening device you currently use, then choose Properties.

- Navigate to the Enhancements tab and “tick” the box next to the Disable All Enhancements option. Click Apply and then OK.


You can repeat this for all devices you use on the computer.
Although not always necessary, we recommend restarting your PC after making these changes.
Now, the problem should be gone.
Fix 4: Update Your Audio Drivers Through The Device Manager

Another possible reason for this issue is an outdated audio driver. Luckily, this is easily fixable as Windows can automatically detect and download the latest drivers through the Device Manager panel.
Here’s what you need to do:
- Simultaneously press the Windows and S buttons on your keyboard to open the search box.
- Type in Device Manager and click on the first result shown on the list.


- In Device Manager, click on the arrow to expand the Sound, Video, and Game Controllers category.
- Right-click the items listed within, then choose Update Driver and Search Automatically For Drivers for each one separately.


When all drivers are up to date, restart your PC and see if the problem is gone. It should be, as this method helped a lot of users.
Fix 5: Uninstall Skype

Lastly, a few users who claimed to have attempted all recognized techniques to resolve this issue without any triumph were able to resolve it by removing Skype.
This method may seem like a “wild guess” solution. However, the reason it works may be that Skype is interlinked with the Audio Device Graph Isolation process and tries to use the enhancements it provides, leading to a high CPU and memory usage on your computer.
Although Skype is a widely used communication tool, we advise uninstalling it when dealing with this problem.
If nothing changes after uninstalling Skype, you can always re-download it.
Conclusion
That’s pretty much everything you need to know about the Windows Audio Device Graph Isolation process that can sometimes cause high CPU and memory usage on your computer.
There haven’t been any official answers from Microsoft regarding this widespread problem, but community-tested methods managed to help a lot of users fix it.
If you consume a lot of time in Task Manager managing things, you must have seen something named “Windows Audio Device Graph Isolation,” And you must have wondered why my system goes a little crazy with resource usage when it comes to this? So we’ll tell you why it does this and what you can do here.
Table of Contents
While working in Windows, there are times when a sound doesn’t explain anything. Hence, it is an official part of Windows. This process works for the primary audio engine of Windows 10. Its function is to handle digital signal processing, which includes refined audio enhancement impacts procured by Windows.
“Windows Audio Device Graph Isolation” is distinct from the standard Windows Audio service. Windows audio is so deeply embedded in Windows that it can take down the entire system instead of your voice if anything moves wrong. By doing this, developers of hardware audio products can incorporate their self audio enhancements without making any modifications to the audio enhancements.

Such separation ensures that Windows always offers you a suggestion to turn off audio enhancements in the OS, No matter what hardware you are using. Whatever the reason, manufacturers of audio hardware don’t automatically give you this option.
Users have to pay special attention to Manufacturers of audio hardware that have made a total effort to replace “Windows Audio Device Graph Isolation” with their self digital signal processing service.
Even if “Windows Audio Device Graph Isolation” isn’t working on your system, you won’t require troubleshooting it much!
So this is it, the complete explanation about “Windows Audio Device Isolation” Now you have become aware of it and its working, further we will tell you how it can be disabled.
Also Read: Reboot and Select Proper Boot Device Fixed Windows
How to Disable Windows Audio Device Graph Isolation?
You cannot disable “Windows Audio Device Graph Isolation” without disabling the leading Windows Audio service. With it disabled, you will not get anything else without the computer’s sound, Nor can the work end it temporarily. If you ever try to do this, Windows bestowal pops up a piece of advice if you need to inaugurate the Audio Troubleshooter instead.
And the truth is the problem server does not harm any computer. If you’ve already tried disabling the enhancement, it is somewhat difficult not to find a solution to your problem. Go to the troubleshooter by pressing the Start button, typing “troubleshoot,” and pressing Enter.
If it has confirmed that Audio Device Graph Isolation is not malware in disguise, you should try to turnabout your sound settings – this opinion sways improve your high CPU mode issue.
For this, use the following steps:
- Right-click on the speaker symbol on your Taskbar.
- Choose Playback devices.

- Navigate to the Playback tab.
- Choose Speakers or Headphones.
- Tap Properties.
- Continue to the Augmentations tab.
- Inhibit Disable all sound effects and tap on OK.
Those are the simple steps you can use for disabling audio probably; it might help you.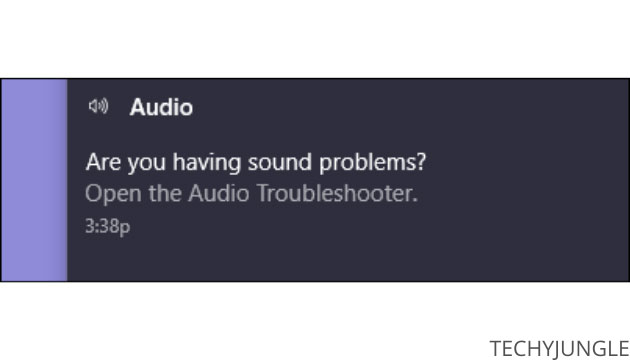
Also Read: How to Solve Windows Driver Foundation High CPU Problem
What Is Windows Audio Device Graph Isolation Windows 10?
Windows Audio Device Graph Isolation is the primary audio engine in Windows 10, handling the audio supplied to Windows and overseeing audio enhancements.
Windows Audio Device Graph Isolation” is very different from the standard Windows Audio service in that it can play the sound of third-party apps on your computer without touching the Windows Audio service. It is the ability to allow any app to play sound on your computer.
How to Check Windows Audio Device Graph Isolation Windows
Statements by malware disguised as system techniques are communal. For example, to determine whether the Windows Audio Device Graph Isolation process is a virtual system process, you can use the Windows Task Manager.
1) First, right-click on the taskbar and type Task Manager to start.
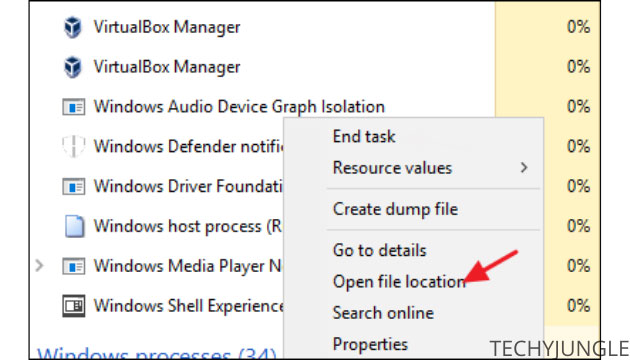
2) In the Task Manager window, right-tap Windows Audio Device Graph Isolation in the Processes tab, then select Open File Location.
3) When WindowsWindows Audio Graph Isolation has opened. If the audiodg.exe file is located there in the C:\Windows\System32 folder, relax because it is a correct Windows process.
If your file has been installed elsewhere, it may suggest a probable malware affliction, which you will prefer to scan and remove using Windows Defender or a third-party resource.
Also Read: Windows 10 Taskbar Not Working (Various Methods)
Video Guide To Solve Windows Audio Graph Isolation
Also Read: Reboot and Select Proper Boot Device Fixed Windows
Conclusion
We have given information about Windows Audio Graph Isolation, Disabled Sound; check Window in the blog; we hope you have found this informative, do tell us about it. To get your self-update in the era, keep in touch with us. We will be back with our new blog post.