Содержание
- Способ 1: Проверка интернет-соединения
- Способ 2: Очистка памяти
- Способ 3: Перезапуск служб
- Другие решения
- Вопросы и ответы

Способ 1: Проверка интернет-соединения
Несмотря на то что обновление операционной системы – процесс в основном автоматизированный, определенные условия для этого пользователь все же обязан обеспечить. Поскольку апдейты загружаются с серверов Microsoft, компьютер должен иметь доступ в интернет, и желательно, чтобы это было стабильное соединение.
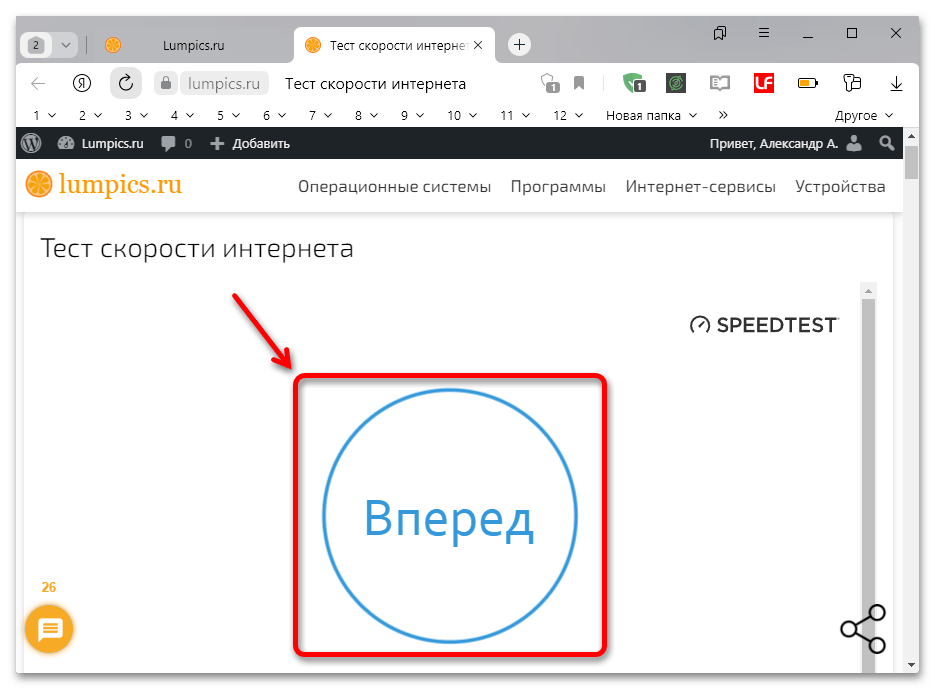
Подробнее: Проверка стабильности интернет-соединения
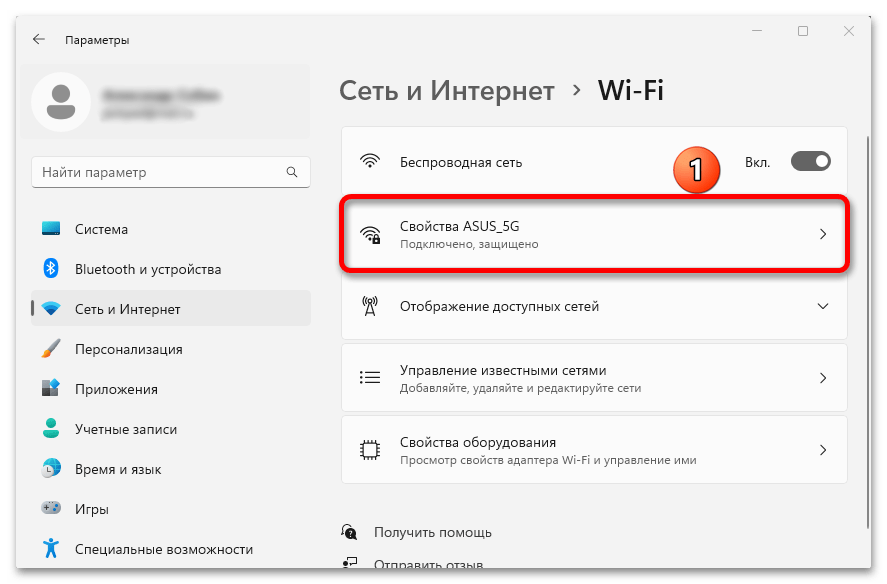
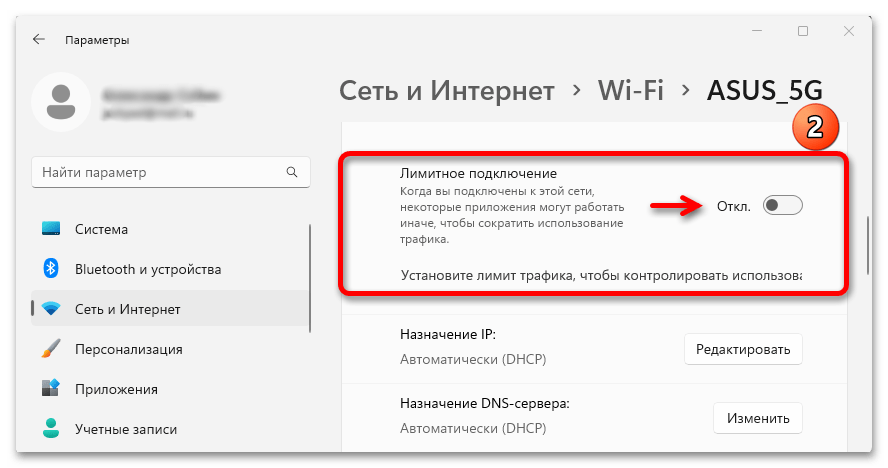
Для лимитных подключений, например через 4G-модем, в операционной системе предусмотрена специальная функция, способная контролировать расход трафика. Убедитесь, что она отключена, иначе загрузка обновлений, а также работа некоторых приложений, которые используют данные сети, может быть ограничена.
- Сочетанием клавиш «Windows+I» вызываем системные параметры, переходим во вкладку «Сеть и Интернет» и кликаем активное подключение, в данном случае «Wi-Fi».
- Открываем свойства сети,

и если контроль трафика активен, отключаем его.

Способ 2: Очистка памяти
Для обновления ОС всегда требуется место на диске, но нам обычно неизвестно, сколько конкретно нужно тому или иному апдейту. Microsoft пишет, что в случае недостатка памяти должно появиться соответствующее уведомление, но теоретически вы можете его и не получить. Так что оцените дисковое пространство самостоятельно, и если на системном разделе менее 8-10 ГБ, постарайтесь освободить их.
Подробнее: Освобождение места на диске C в Windows 11

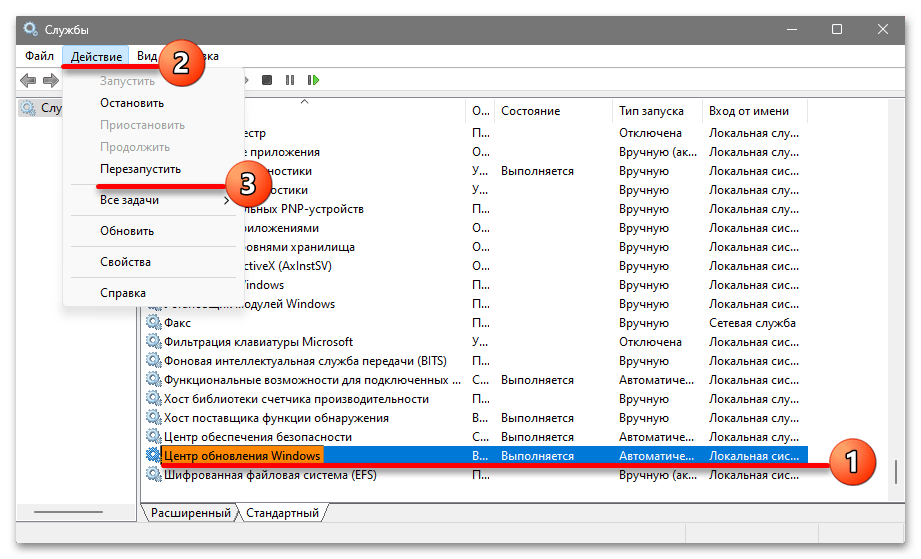
Способ 3: Перезапуск служб
Служба, обеспечивающая работу ЦО во время загрузки и установки обновлений, в нужный момент должна запускаться автоматически, но в текущей ситуации есть смысл проверить ее статус.
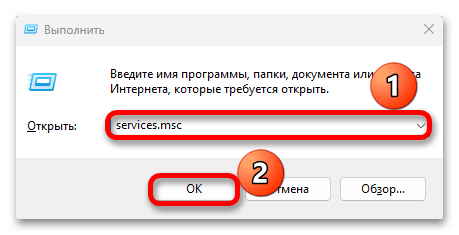
- Сочетанием клавиш «Windows+R» вызываем окно «Выполнить», вводим
services.mscи нажимаем «OK».

Читайте также: Как открыть «Службы» в Windows 11
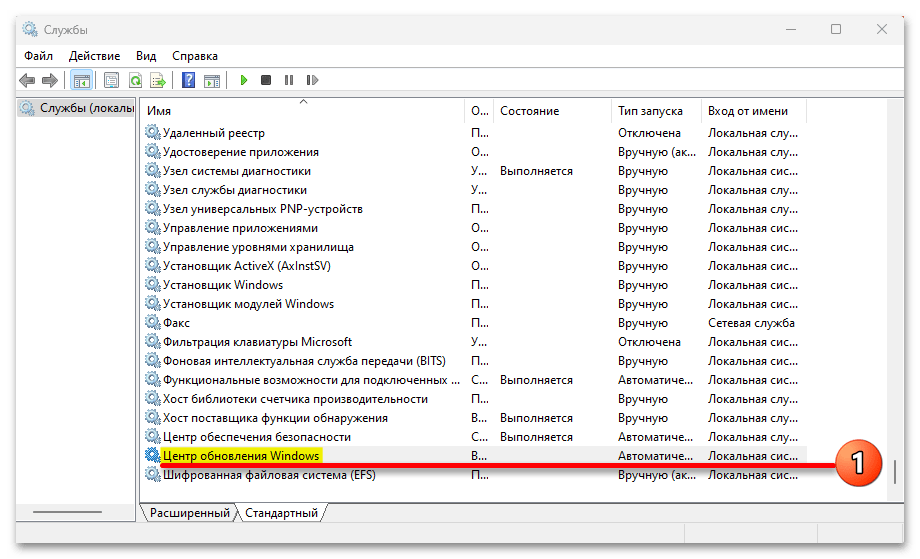
- Находим службу «Центр обновления Windows». Если она выполняется, выделяем ее, открываем вкладку «Действие» и перезапускаем компонент.

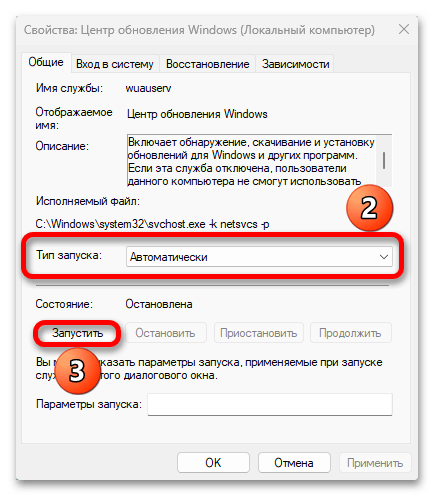
Если служба отключена, открываем ее свойства двойным кликом,

ставим автоматический тип запуска и включаем ее.
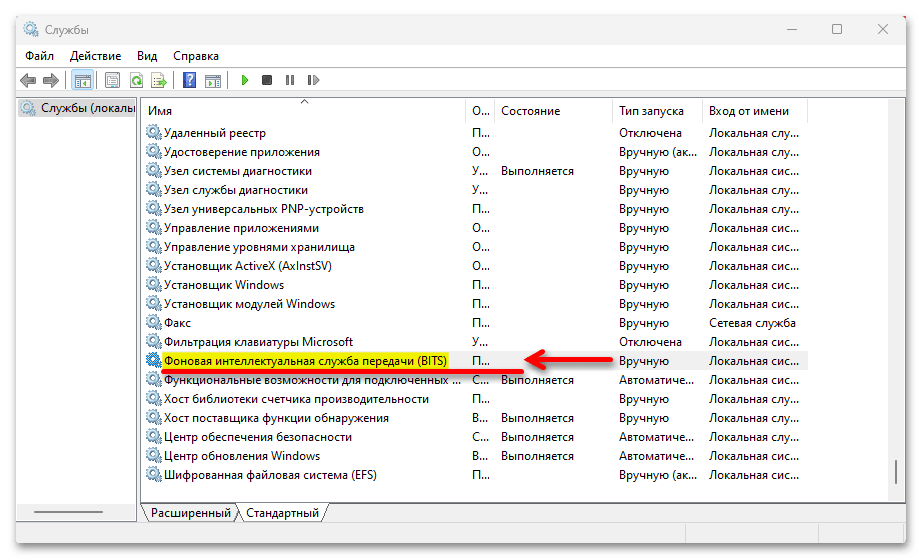
- Таким же образом поступаем с фоновой интеллектуальной службой передачи (BITS), которая также может использоваться для загрузки обновлений в ОС.
Другие решения
Если апдейты до сих пор не установились, возможно, в «Центре обновления» неполадки, поэтому в первую очередь запускаем специальное средство для их устранения.
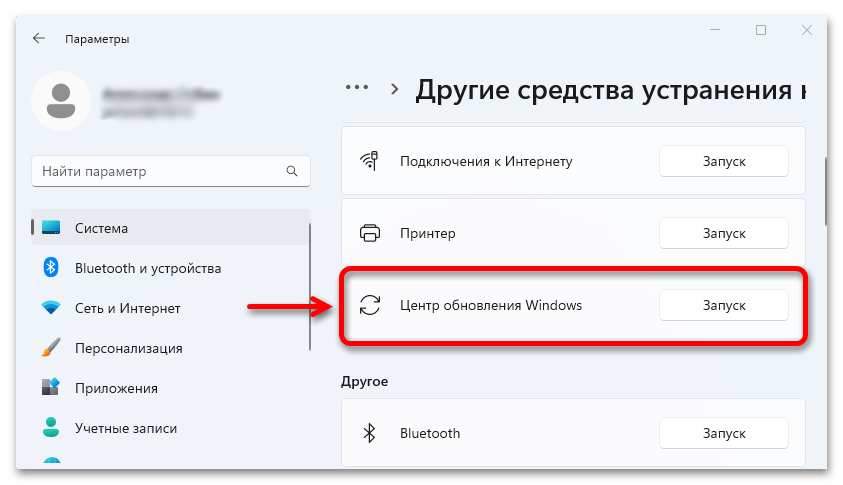
Несмотря на то что ЦО является основным источником получения обновлений, не стоит пренебрегать альтернативными вариантами. Например, можно скачать нужный апдейт из каталога Microsoft и установить его вручную или воспользоваться фирменным помощником, который проанализирует текущую версию системы и установит недостающие апдейты.
Кроме того, конфликт может быть вызван повреждением системных файлов, ошибками HDD/SSD, сторонним программным обеспечением, антивирусом, а также другими причинами, способы устранения которых описаны в отдельных статьях на нашем сайте.
Подробнее:
Восстановление работы Центра обновления в Windows 11
Как отключить антивирус
Еще статьи по данной теме:
Помогла ли Вам статья?
Вы можете легко устранить ошибку «Ошибка обновления» на вашем ПК с Windows 11, используя эти простые инструкции.
Как часы, Microsoft выпускает более поздние обновления для операционной системы Windows. Однако многие пользователи Windows не могут обновить устройство. Windows 11 их с конкретным кодом ошибки установки — «0x800f0988».
Ошибка обновления обычно легко устраняется самой Windows и редко требует вмешательства человека. Но с этим кодом ошибки дело обстоит иначе.
Поскольку может возникнуть ряд проблем, препятствующих обновлению вашей системы, вам может потребоваться выполнить несколько исправлений, перечисленных ниже.
1. Загрузите и установите обновление вручную.
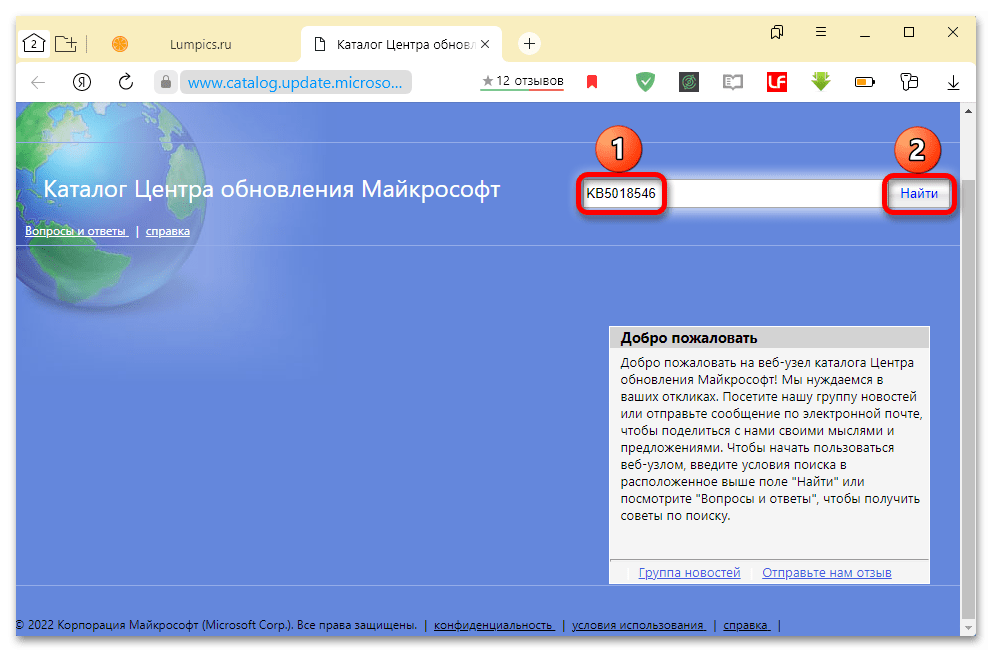
Microsoft также предоставляет способ вручную установить обновление для вашего устройства Windows. Учитывая это, вы знаете номер базы знаний для обновления, который можно легко найти на экране Центра обновления Windows в приложении «Настройки» на вашем устройстве.
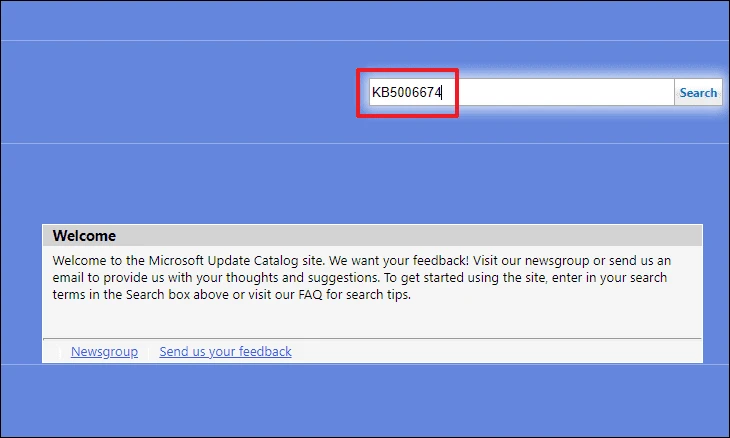
Чтобы загрузить обновление вручную, перейдите на официальный сайт Microsoft Update Index. catalog.update.microsoft.com используя ваш любимый браузер.
Затем введите номер КБ обновления, которое вы хотите загрузить, в строке поиска справа от веб-страницы и нажмите Enter выполнить поиск.
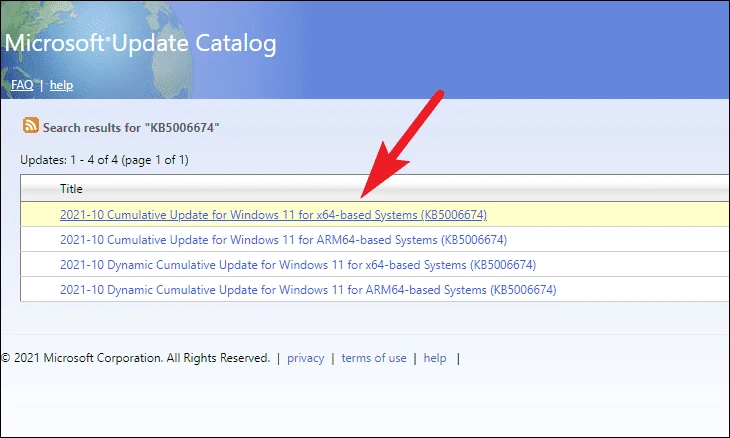
Теперь будет заполнен список доступных обновлений, соответствующих номеру базы знаний. Чтобы узнать больше о пакете обновления, щелкните его заголовок. На вашем экране откроется отдельное окно браузера.
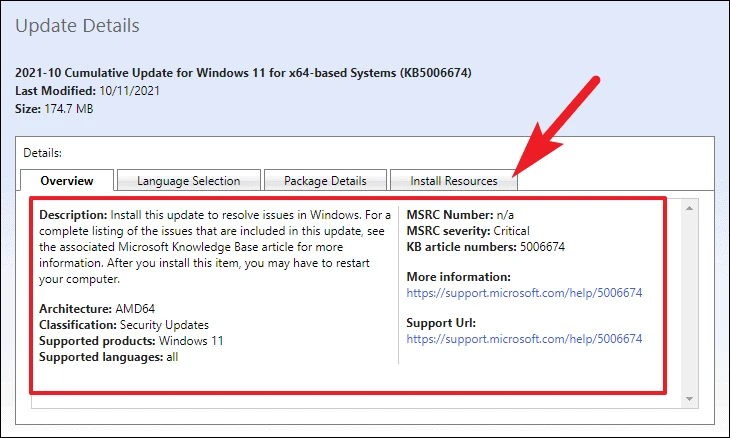
Узнайте больше об обновлении, его рейтинге, поддерживаемых продуктах, а также о языках, которые поддерживает пакет обновления. Вы также можете перейти на соответствующую вкладку, чтобы узнать больше об установочных ресурсах, деталях пакета и многом другом.
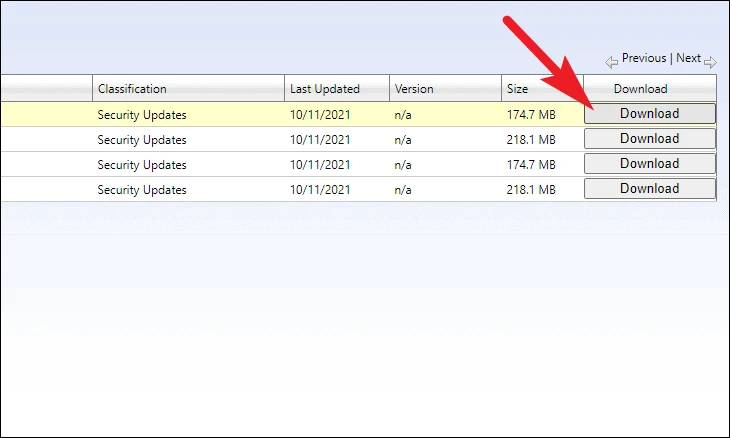
Чтобы загрузить определенный пакет обновления, нажмите кнопку «Загрузить» в правом дальнем углу отдельной строки. На вашем экране откроется отдельное окно браузера.
Затем щелкните ссылку в окне правой кнопкой мыши и выберите в контекстном меню параметр «Сохранить ссылку как».
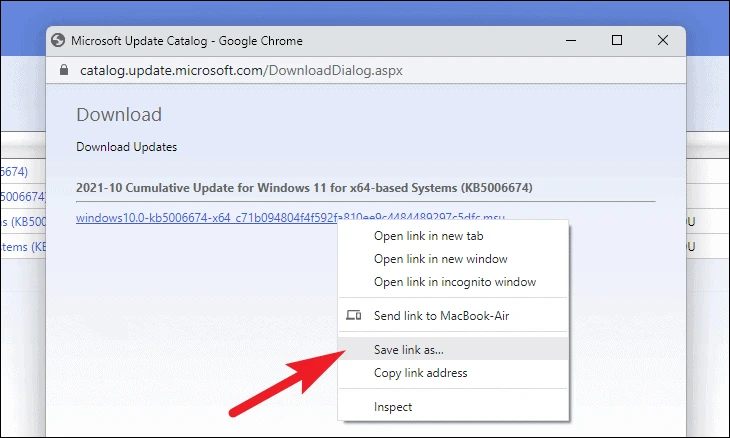
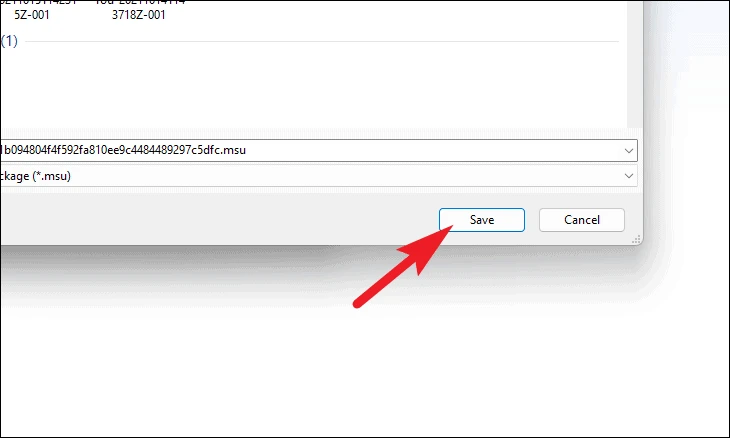
Затем выберите нужный каталог и нажмите кнопку «Сохранить», чтобы загрузить пакет Центра обновления Windows на свой компьютер. После того, как вы сделали свой выбор, загрузка должна начаться через мгновение.
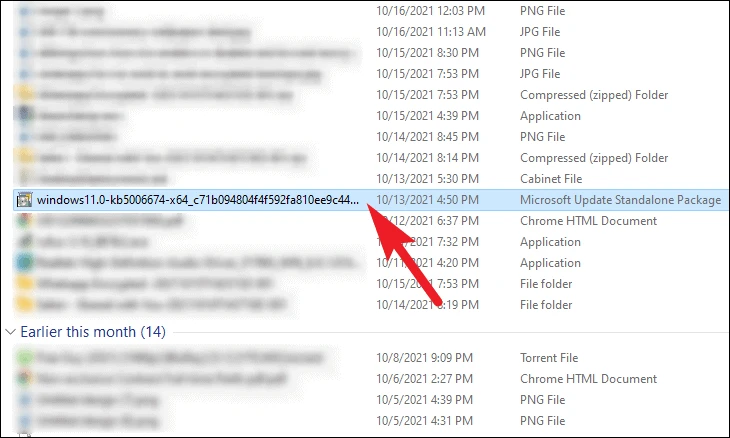
После загрузки перейдите в каталог загрузок по умолчанию и дважды щелкните файл пакета, чтобы запустить его.
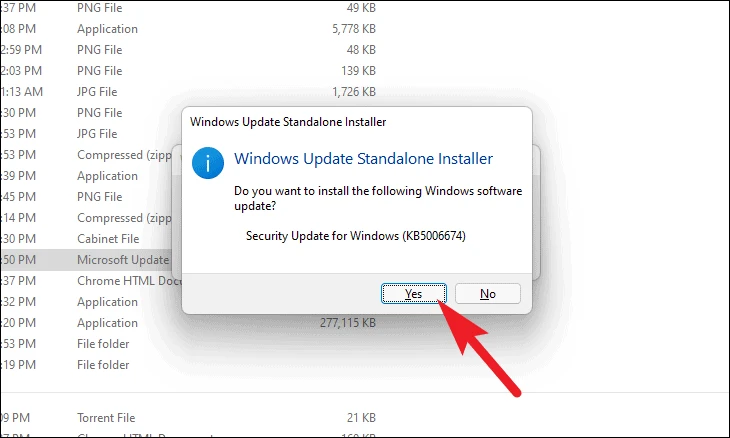
Затем автономный установщик Центра обновления Windows подготовит систему к установке, и это может занять несколько минут. Когда обновление будет готово к установке, на экране появится запрос для подтверждения установки; Нажмите кнопку «Да», чтобы продолжить.
Установщик пакетов начнет установку обновления Windows на ваш компьютер, дождитесь завершения установки.

После завершения установки, в зависимости от типа обновления, вам может быть предложено перезагрузить устройство. Сделайте это, чтобы завершить обновление.
DISM означает Служба развертывания и управления образами. Это инструмент командной строки, используемый для Windows Image Service. Он содержит большое количество приложений, однако в этом случае он будет использоваться для восстановления работоспособности образа Windows, развернутого в настоящее время в вашей системе.
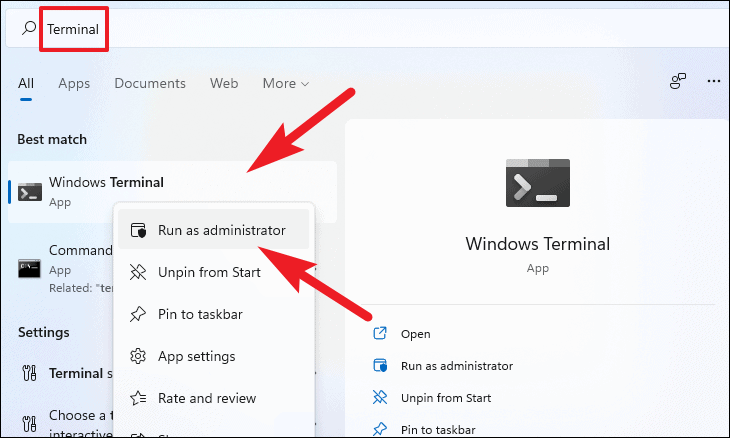
Для этого откройте Windows Search на панели задач вашего устройства и введите Терминал. Затем щелкните правой кнопкой мыши панель «Терминал Windows» и выберите в контекстном меню пункт «Запуск от имени администратора».
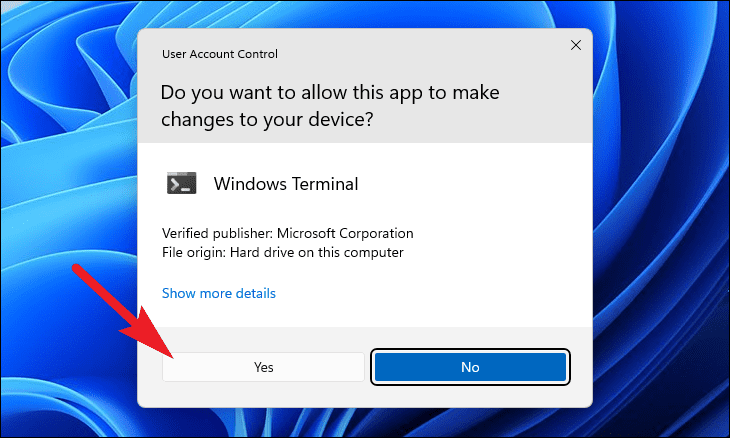
После этого на вашем экране появится окно UAC (User Account Control). Если вы не вошли в систему с учетной записью администратора, укажите учетные данные для нее. В противном случае нажмите кнопку «Да».

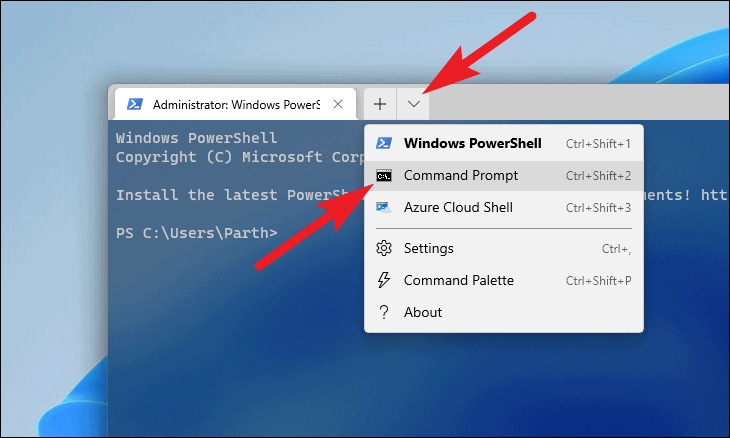
Затем в окне Терминала щелкните символ карака (стрелка, направленная вниз) и выберите параметр «Командная строка». Как вариант, вы также можете нажать ярлык Ctrl+ Shift+ 2 Чтобы открыть вкладку Командная строка.
Теперь введите или скопируйте / вставьте следующую команду и нажмите Enter на клавиатуре.
dism /online /cleanup-image /startcomponentcleanup
Процесс может занять несколько минут. Рекомендуется не прерывать процесс. После этого вы получите сообщение об этом.
3. Удалите дополнительные языки.
Из-за огромной базы пользователей Windows операционная система поддерживает множество языков для удобства пользователей. Однако существует вероятность, что проблема связана с языком по умолчанию / дополнительным языком.
Чтобы удалить языковой пакет, перейдите в приложение «Настройки» из меню «Пуск». Кроме того, вы также можете нажать ярлык Windows+ Iна клавиатуре, чтобы открыть окно настроек.
Затем щелкните вкладку «Время и язык», расположенную на левой панели окна «Настройки».
Затем щелкните панель «Язык и регион», расположенную в правой части окна.
Затем найдите поле дополнительного языка в разделе «Язык» и щелкните значок с многоточием (три горизонтальные точки). Затем выберите из полного списка опцию «Удалить».
После удаления перезагрузите компьютер из меню «Пуск» и попробуйте снова установить пакет обновления.
5. Очистите кеш Центра обновления Windows.
Очистка кеша Центра обновления Windows также может решить проблемы, вызванные повреждением или повреждением файла обновления. Хотя решение несколько универсальное, оно может быть очень эффективным.
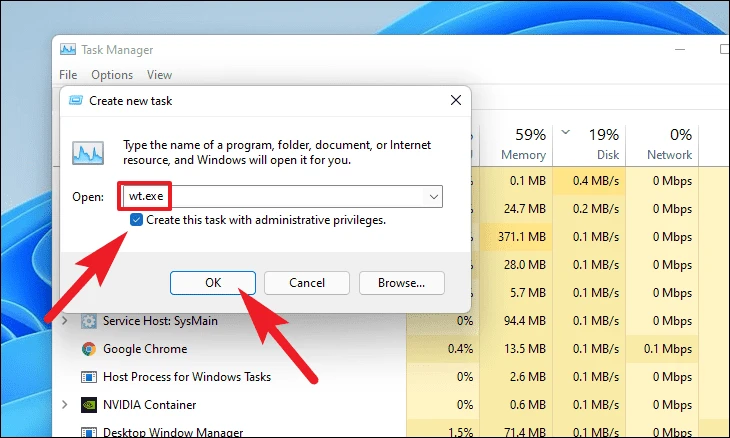
Для этого нажмите Ctrl+ Shift+ Esc Ярлык на вашем ПК вызывает диспетчер задач. Затем щелкните вкладку «Файл», расположенную в верхнем левом углу окна. Затем нажмите на опцию «Запустить новую задачу».
Затем в окне «Создать новую задачу» введите wt.exe Установите флажок перед полем «Создать задачу с правами администратора». Теперь нажмите ОК, чтобы открыть Терминал Windows.
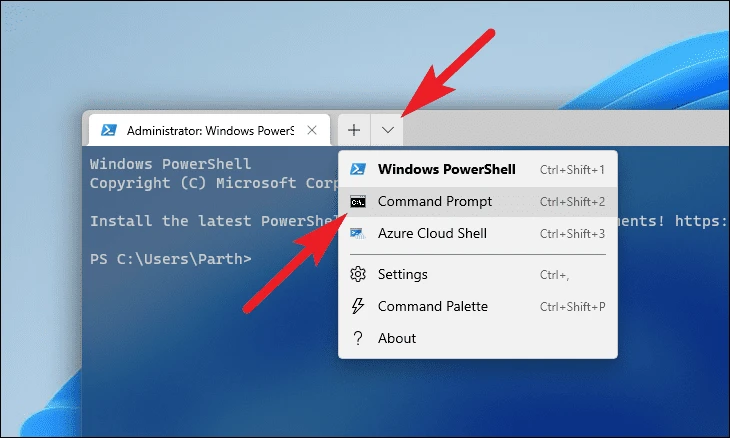
Теперь в окне Терминала щелкните символ карака (стрелка, направленная вниз) и выберите опцию Командная строка. Как вариант, вы также можете нажать ярлык Ctrl+ Shift+ 2на клавиатуре, чтобы открыть его.
Затем введите или скопируйте + вставьте следующую команду одну за другой и нажмите EnterЧтобы остановить службы, связанные с Центром обновления Windows.
net stop bits
net stop wuauserv
net stop cryptsvc
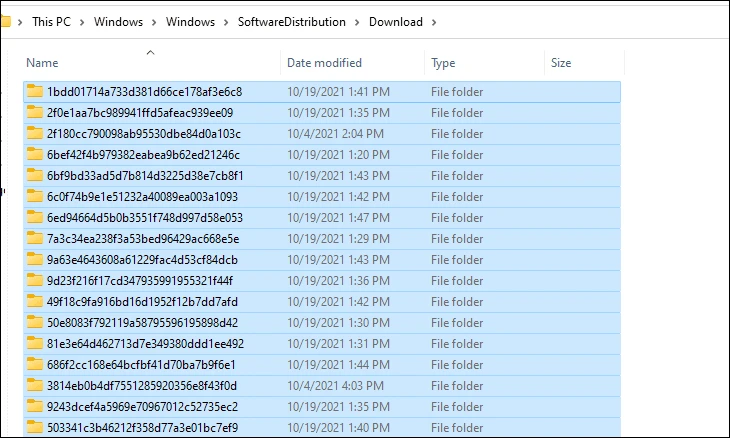
После остановки служб запустите служебную программу «Выполнить команду», нажав сочетание клавиш win + R на клавиатуре, введите или скопируйте и вставьте следующий каталог и нажмите Enter на клавиатуре.
C:\windows\SoftwareDistribution\Download
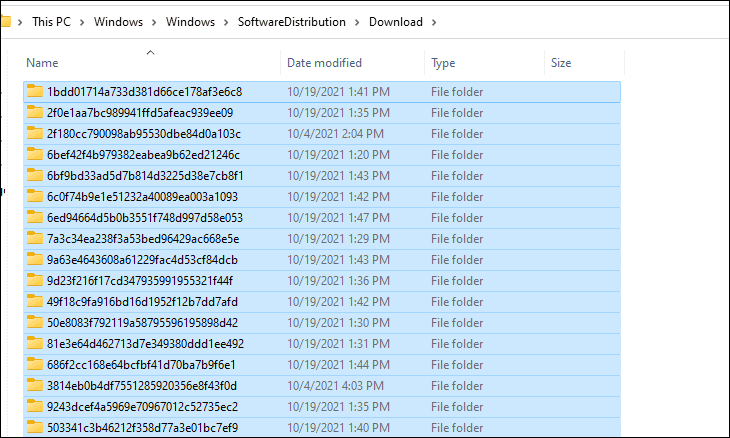
Затем в окне проводника выберите все файлы, нажав Ctrl+ A Затем удалите его навсегда, нажав ярлык Shift+ Удалить на клавиатуре.
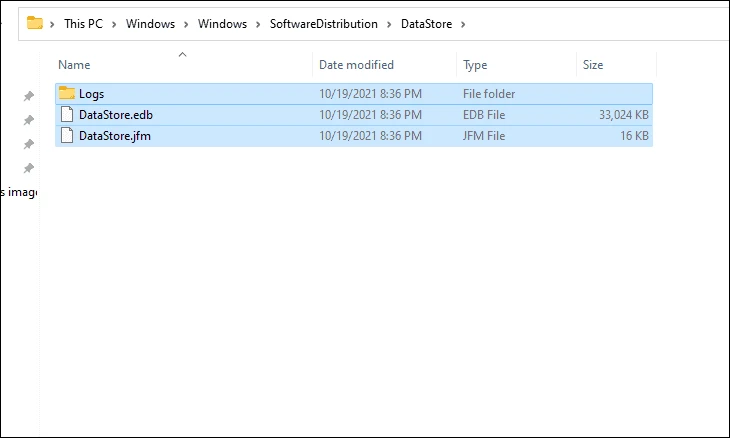
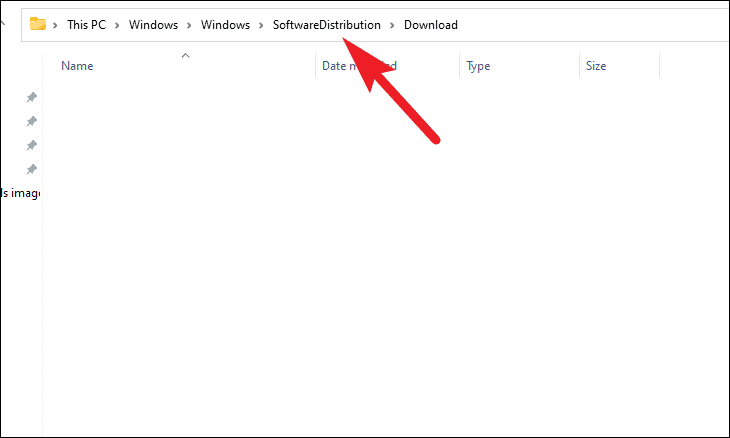
Затем щелкните каталог «SoftwareDistribution» в адресной строке.

Затем щелкните папку «DataStore».
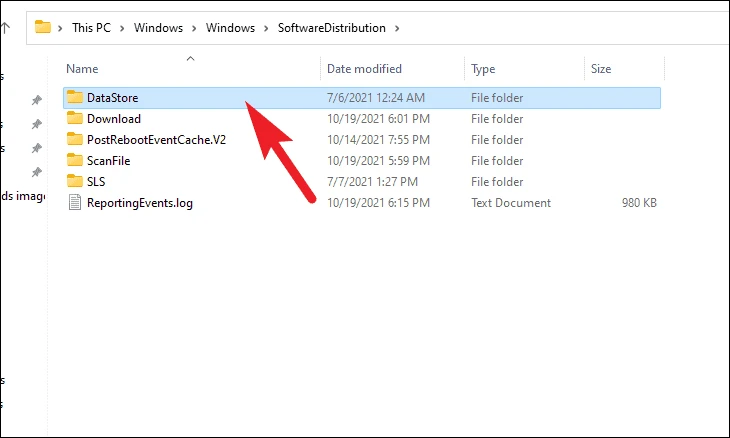
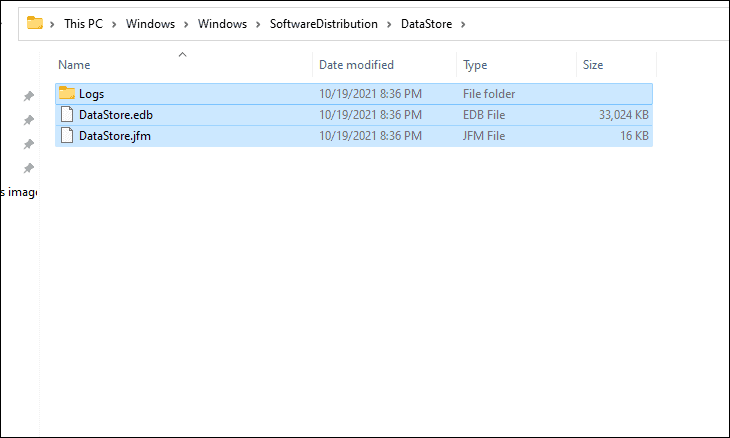
Теперь выберите все файлы и папки, нажав Ctrl+ A на клавиатуре и удалите его навсегда, нажав Shift+ Удалить на клавиатуре.
Наконец, вернитесь в окно командной строки с повышенными привилегиями, введите или скопируйте и вставьте следующую команду одну за другой и нажмите Enter, чтобы запустить службы, которые вы отключили ранее.
net start bits
net start wuauserv
net start cryptsvc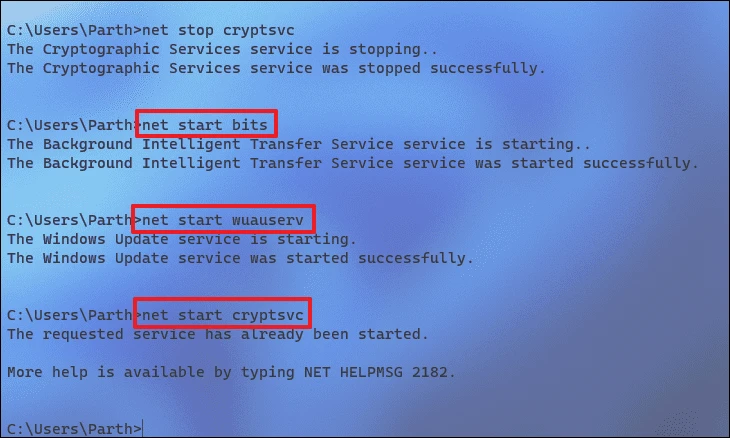
После этого перезагрузите компьютер с Windows из меню «Пуск» и попробуйте снова установить обновление, чтобы проверить, решена ли проблема.
6. Выполните обновление на месте.
Если ничего не помогает, вы всегда можете выполнить обновление на месте до последней версии Windows, не затрагивая ваши личные файлы и папки. Однако для этого вам понадобится последняя версия Windows 11 ISO.
чтение: Как скачать Windows 11 ISO
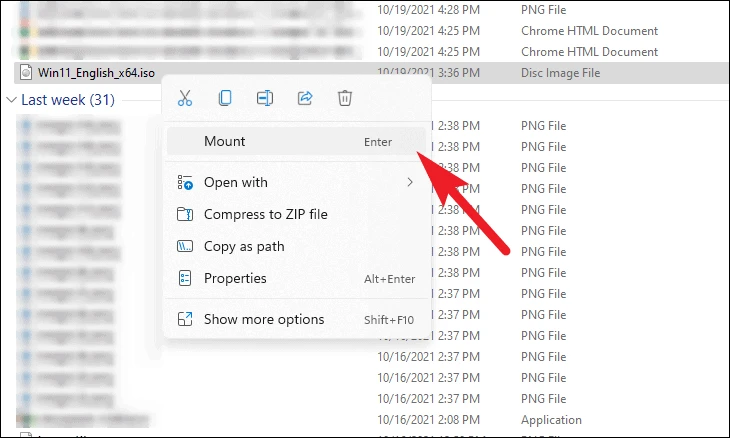
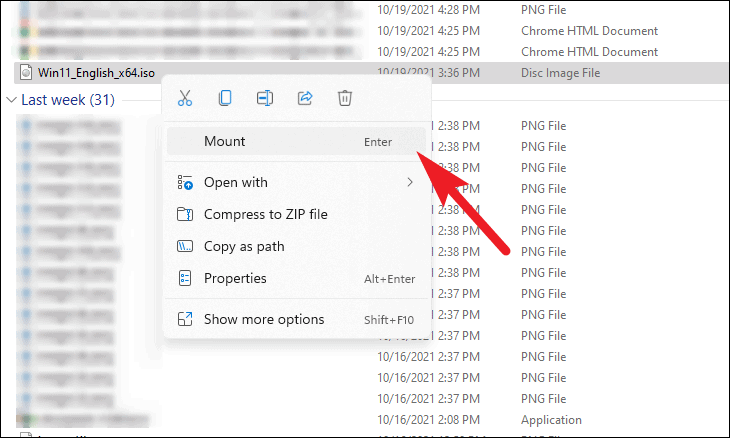
После получения ISO-файла Windows 11 щелкните правой кнопкой мыши ISO-файл и выберите опцию «Смонтировать диск» в контекстном меню.
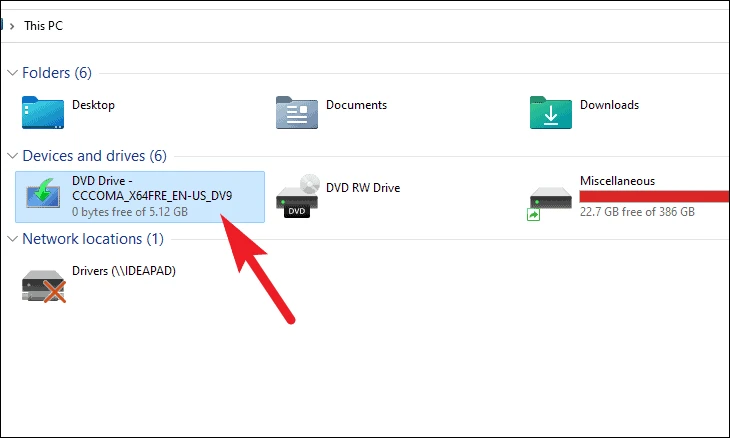
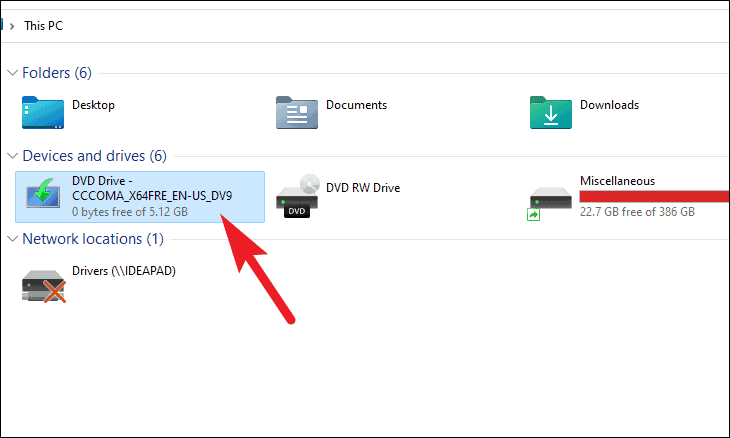
Теперь перейдите в «Этот компьютер» и дважды щелкните установленный диск, чтобы запустить установку Windows 11.
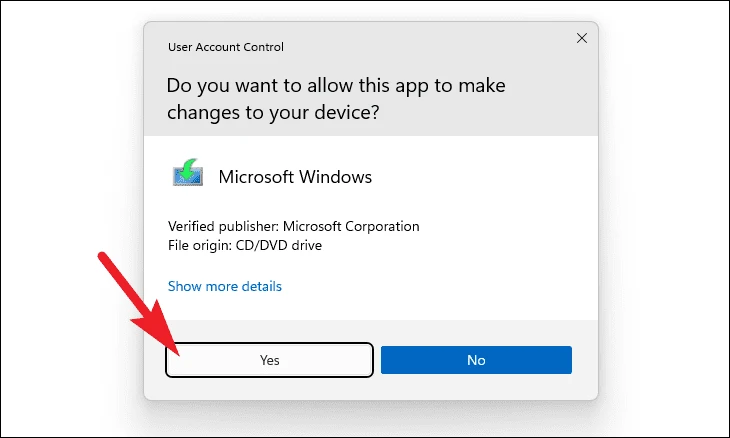
После этого на вашем экране появится окно UAC (User Account Control). Введите учетные данные администратора, если вы в настоящее время не вошли в систему с учетной записью администратора. В противном случае просто нажмите кнопку «Да», чтобы продолжить.
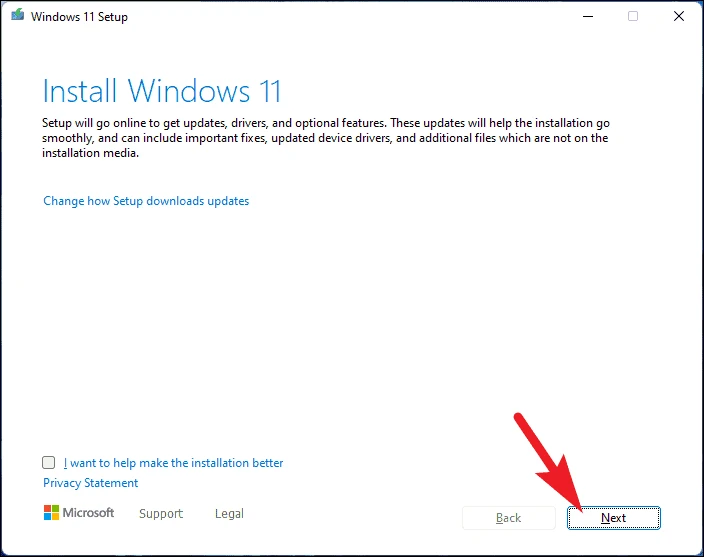
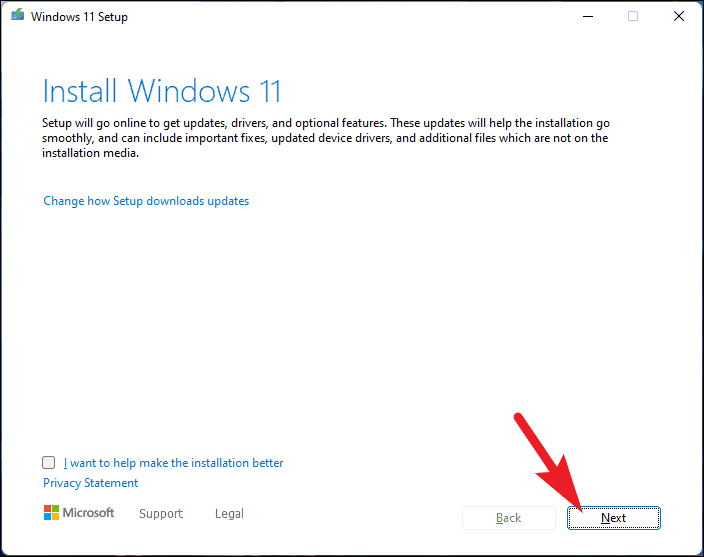
Затем в окне установки Windows 11 нажмите кнопку «Далее», расположенную в правом нижнем углу.
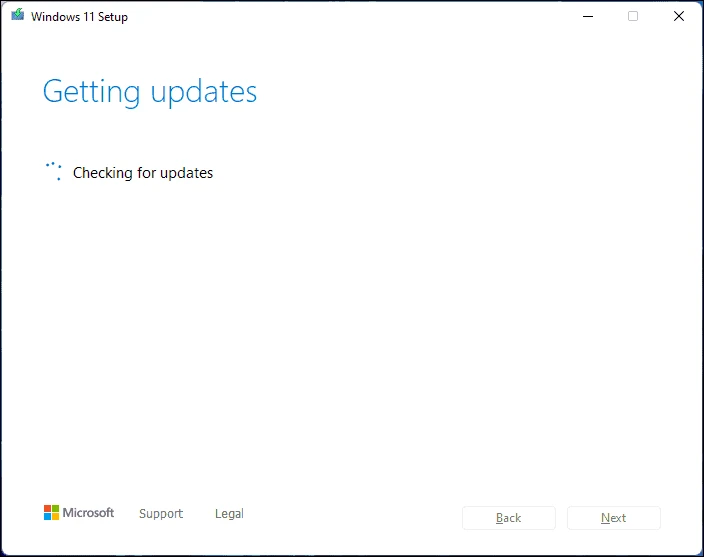
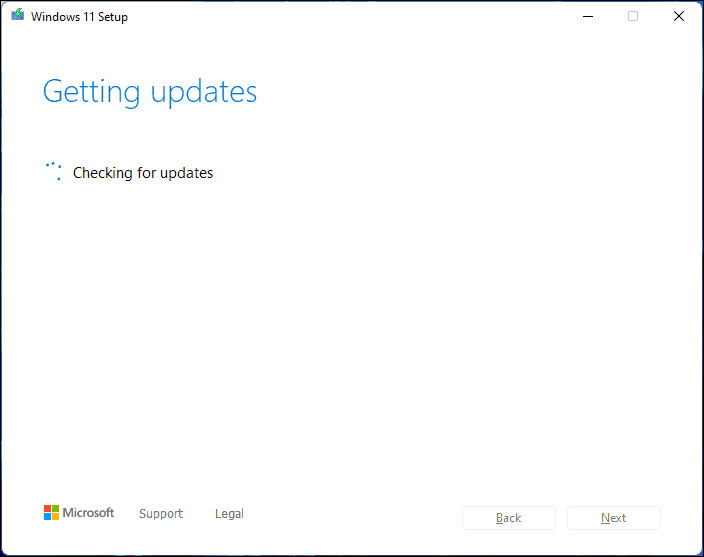
После этого программа установки проверит наличие обновлений. Это может занять некоторое время, подождите, пока программа установки загрузит последние ресурсы с серверов Microsoft.
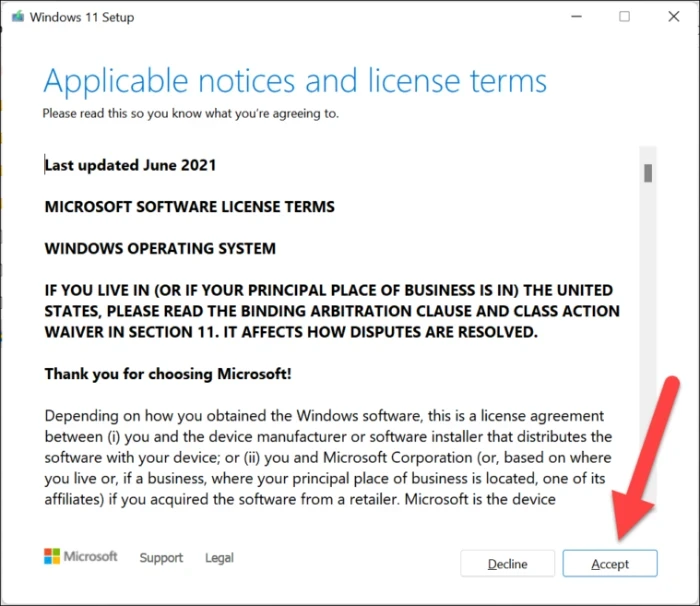
Затем прочтите лицензионное соглашение с конечным пользователем Microsoft и нажмите кнопку «Принять».
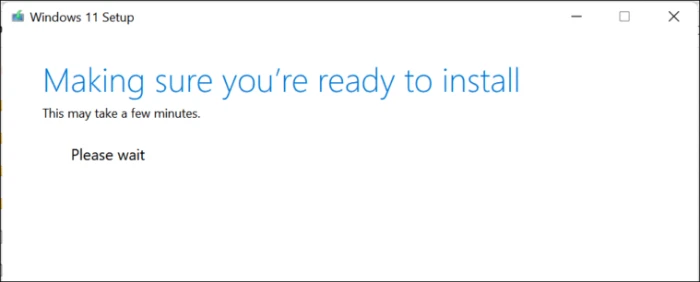
После этого мастер установки Windows настроится на установку последней версии операционной системы на ваше устройство. Подождите, пока процесс выполняется в фоновом режиме.

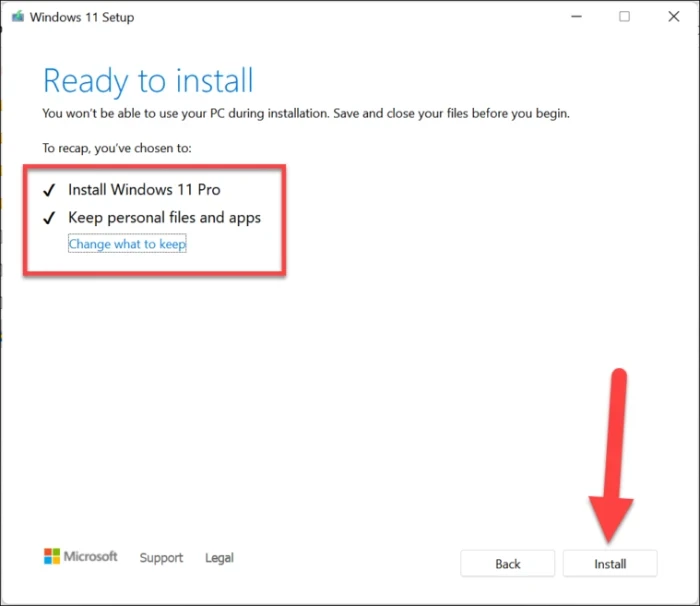
Наконец, на следующем экране мастер установки перечислит версию Windows для установки на ваш компьютер вместе с выбором по умолчанию для хранения личных файлов и приложений. Нажмите кнопку «Установить», чтобы начать установку.
Вот и все, одно из этих решений наверняка сработает на вашем устройстве, чтобы исправить ошибку обновления, и вы вернетесь, чтобы получать и устанавливать обновления на свой компьютер в обычном режиме в кратчайшие сроки.
Like clockwork, Microsoft releases subsequent updates for Windows. However, reportedly, many Windows users have been experiencing a failure to update their Windows 11 machine with a specific install error code — ‘0x800f0988’.
Usually, an update failure is easily fixable by Windows itself, and very rarely it requires human intervention. But that is not the case with this particular error code.
Since there can be a number of issues preventing your system from getting updated, you might need to perform more than one fix listed below.
1. Download and Install the Update Manually
Microsoft also provides a way to manually install an update for your Windows machine. Given that, you know the knowledge base number of the update, which can be easily found on the ‘Windows Update’ screen from the Settings app on your machine.
To download an update manually, head to the official Microsoft Update Catalog website catalog.update.microsoft.com using your preferred browser.
Then, enter the KB number of the update you want to download in the search bar situated to the right of the webpage and hit Enter to perform a search.

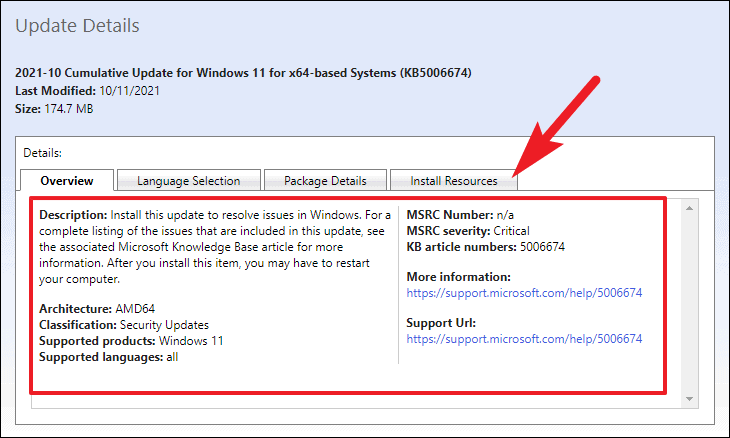
Now, a list of the available updates corresponding to the KB number will be populated. To know more information about the update package, click on its title. This will open a separate browser window on your screen.

You can learn more about the update, its classification, products supported, and also the languages supported by the update package. You can also head to the respective tab to learn more about Install resources, Package details, and more.
To download a particular update package, click the ‘Download’ button present on the far right edge of the individual row. This will open a separate browser window on your screen.

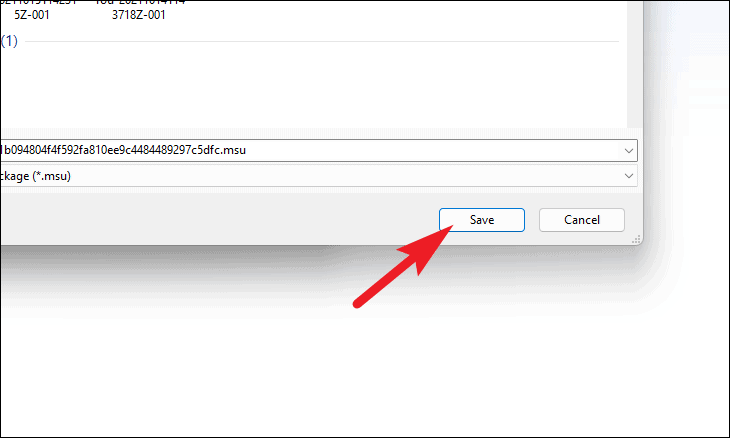
Next, right-click on the link present on the window, and choose the ‘Save link as’ option from the context menu.
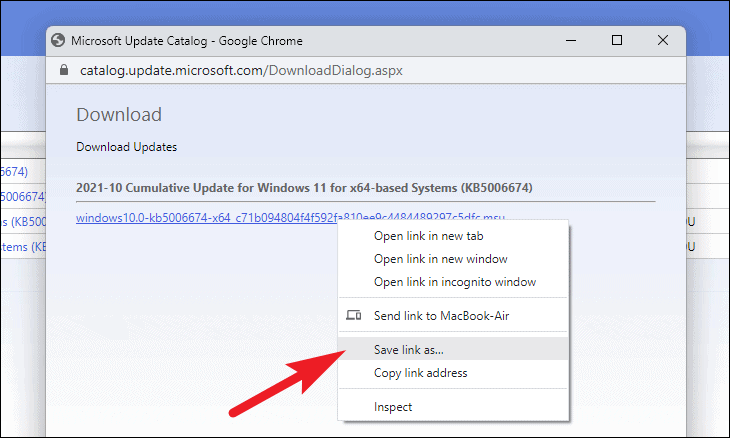
Then, choose your desired directory and click on the ‘Save’ button to download the Windows Update Package on your computer. Once chosen, Your download should begin in a moment.
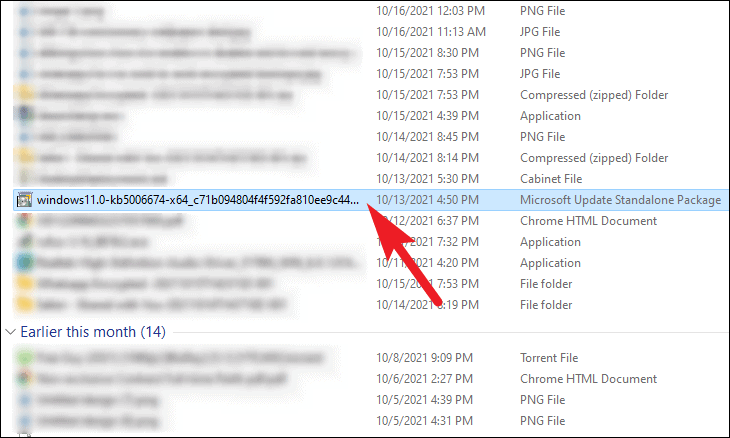
Once downloaded, head to your default downloads directory and double-click on the package file to run it.
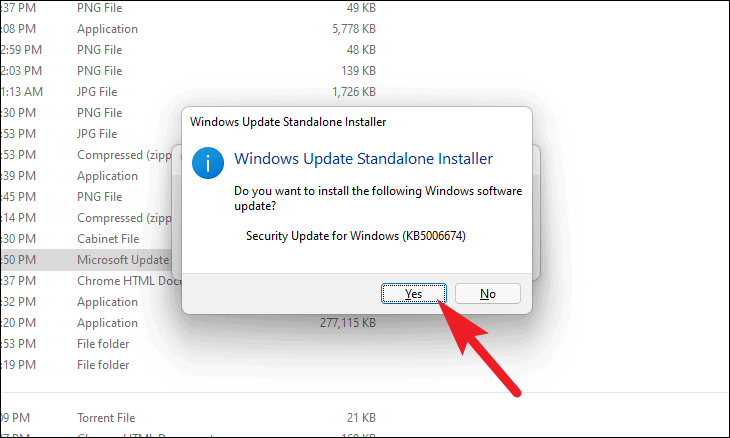
Next, the Windows Update Standalone Installer will prepare the system for installation and that might take a few minutes or so. Once the update is ready to install, a prompt will appear on the screen to confirm the installation; click on the ‘Yes’ button to proceed.
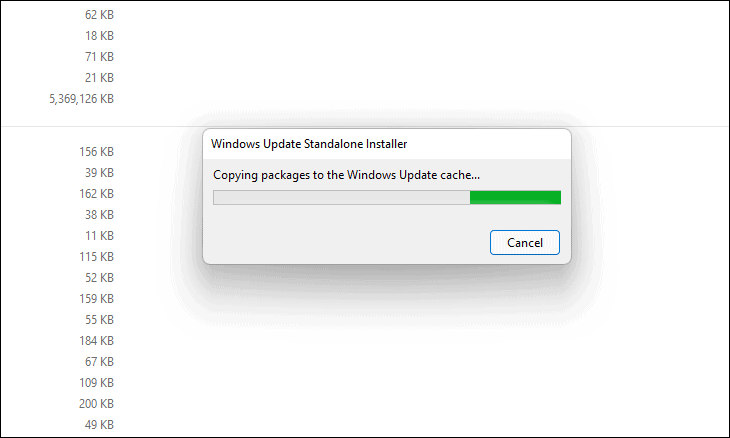
Package Installer will now start installing the Windows update on your PC, wait while the installation completes.
Once the installation completes, depending on the type of update, you might be prompted to restart the machine. Do so to complete the update.
DISM stands for Deployment Image Servicing and Management. It is a command-line tool used to service Windows images. It has a plethora of applications, however, in this case, will be used to restore the health of the currently deployed Windows image on your system.
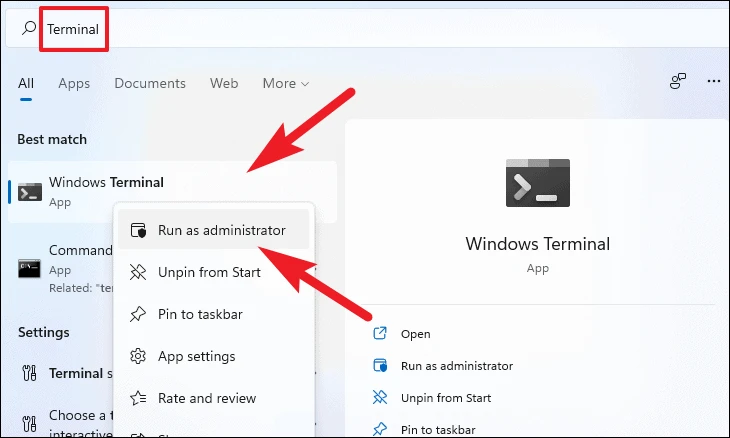
To do so, open Windows Search present on the taskbar of your machine and then type Terminal. Then, right-click on the ‘Windows Terminal’ tile and choose ‘Run as administrator’ option from the context menu.
After that, an UAC (User Account Control) window will appear on your screen. If you are not logged in with an admin account, provide credentials for one. Otherwise, click on the ‘Yes’ button.
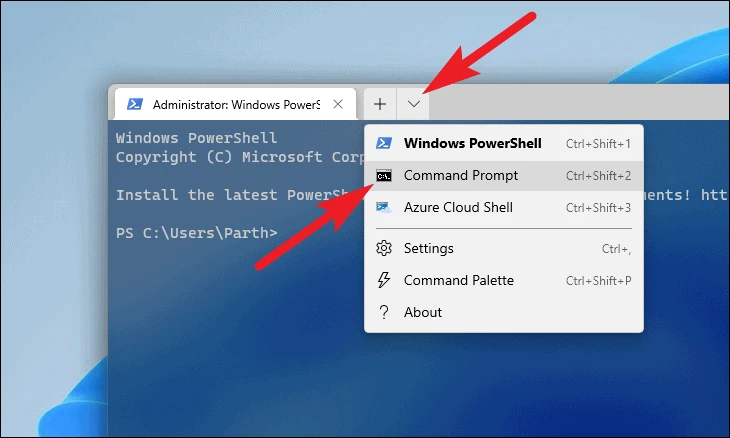
Next, from the Terminal window, click on the carat icon (downward arrow) and choose the ‘Command Prompt’ option. Alternatively, you can also press the Ctrl+Shift+2 shortcut to open a Command prompt tab.
Now, type or copy/paste the following command and hit Enter on your keyboard.
dism /online /cleanup-image /startcomponentcleanup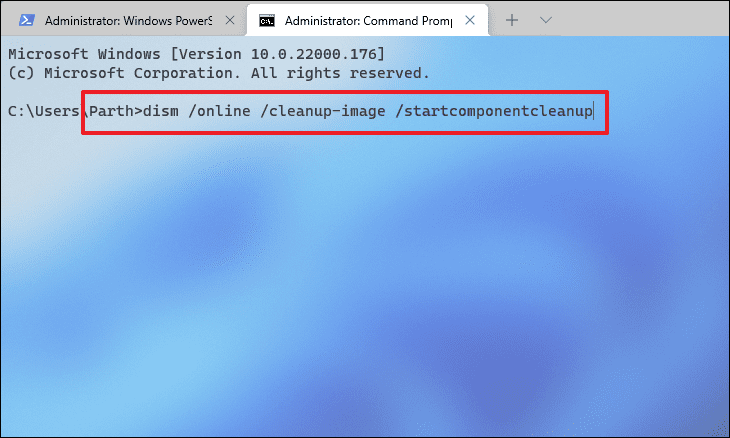
The process may take a few minutes to complete. It is recommended that you do not interrupt the process. Once completed, you will receive a message stating so.
3. Uninstall Additional Languages
Due to the humongous user base of Windows, the operating system supports a variety of languages for users’ ease of convenience. However, there might be a possibility that default/ additional language is the culprit behind the issue.
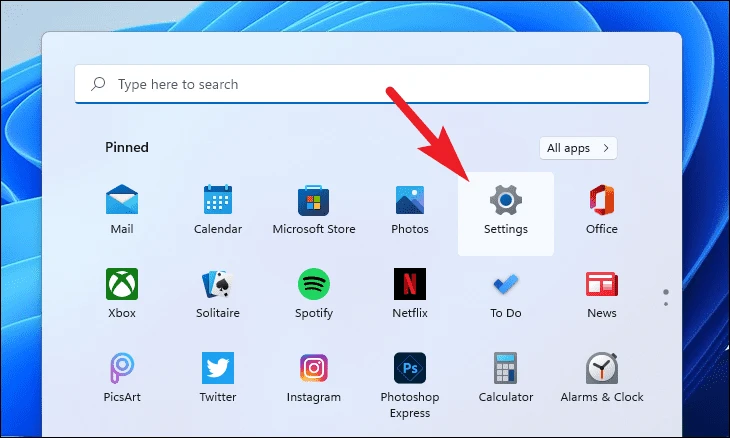
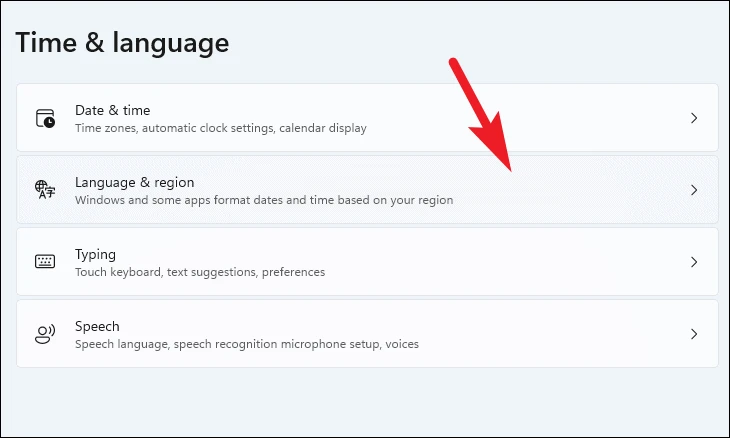
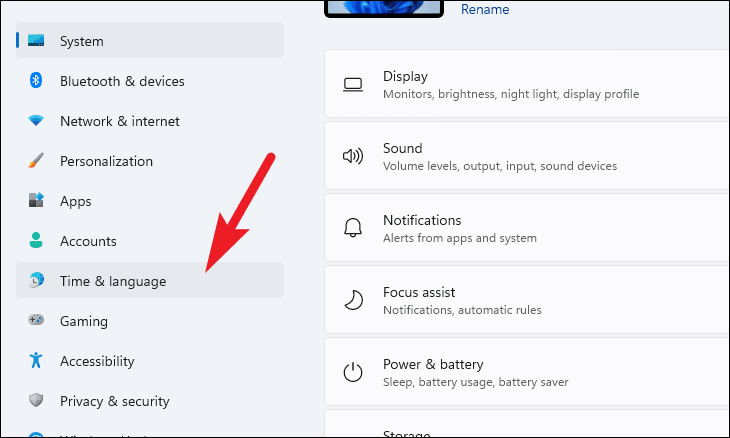
To uninstall a language pack, head to the Settings app from the Start Menu. Alternatively, you can also press the Windows+I shortcut on your keyboard to open the Settings window.

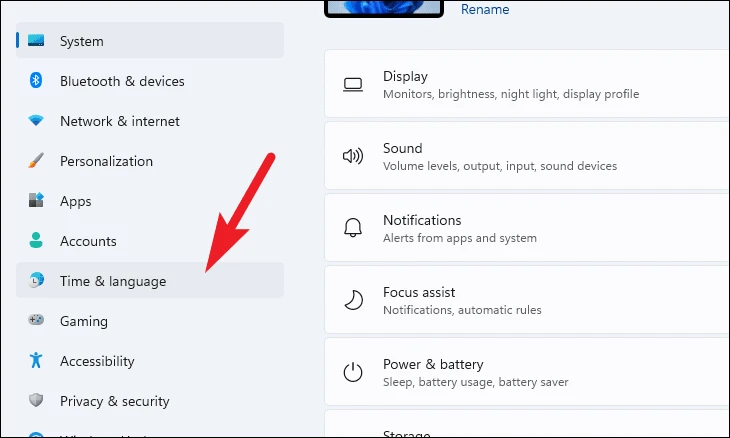
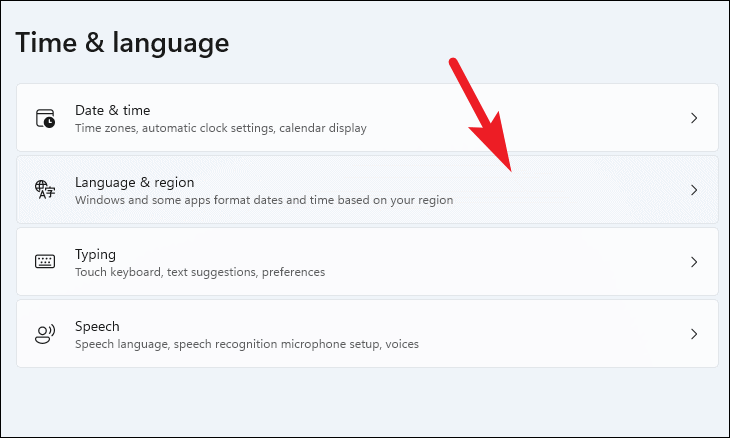
Next, click on the ‘Time & Language’ tab situated on the left panel of the Settings window.
After that, click on the ‘Language & region’ tile present to the right of the window.
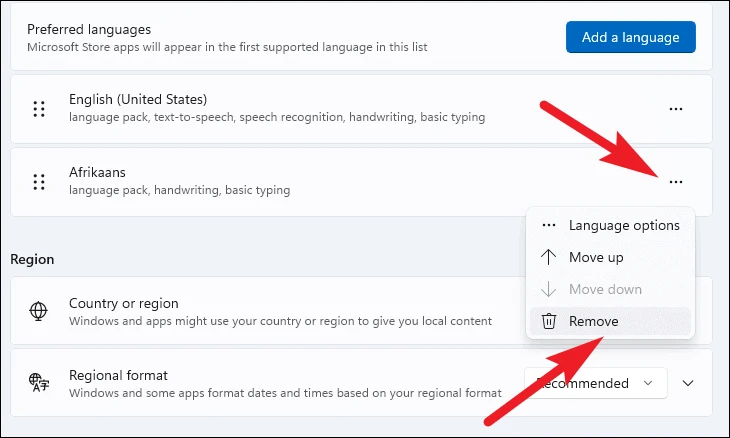
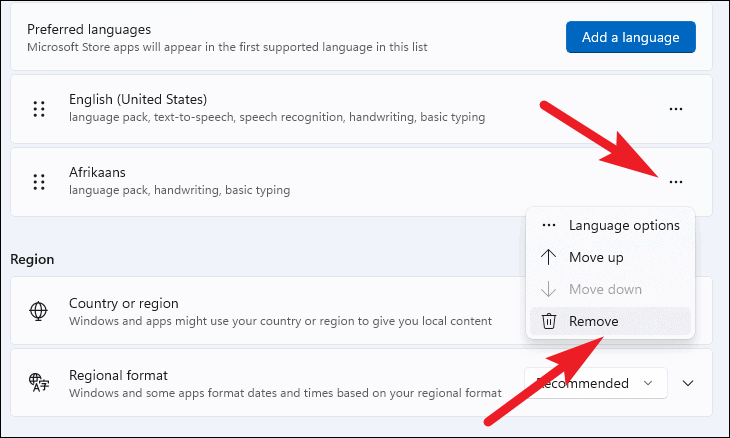
Then, locate the additional language tile under the ‘Language’ section and click on the ellipsis icon (three horizontal dots). Next, choose the ‘Remove’ option from the overflow menu.
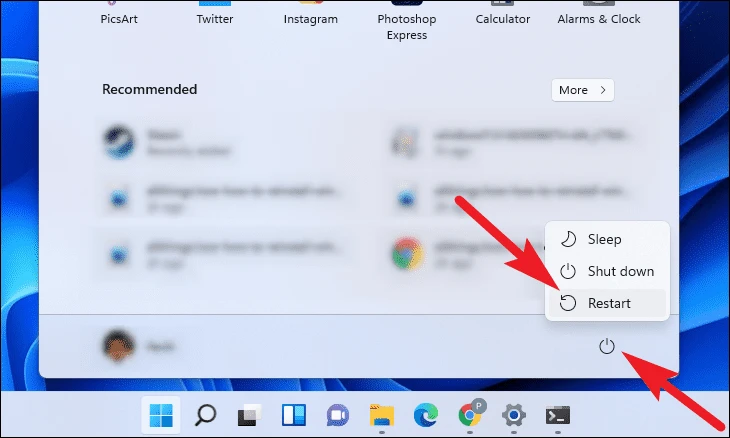
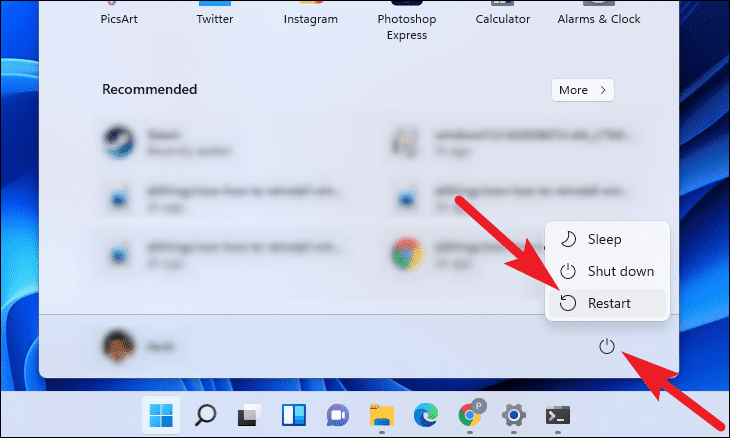
Once uninstalled, restart your PC from the Start Menu and try installing the update package once again.
5. Empty the Windows Update Cache
Emptying the Windows Update cache can also resolve issues emerging due to a damaged or corrupted update file. Though the solution is a tad bit generic, it can prove to be very effective.
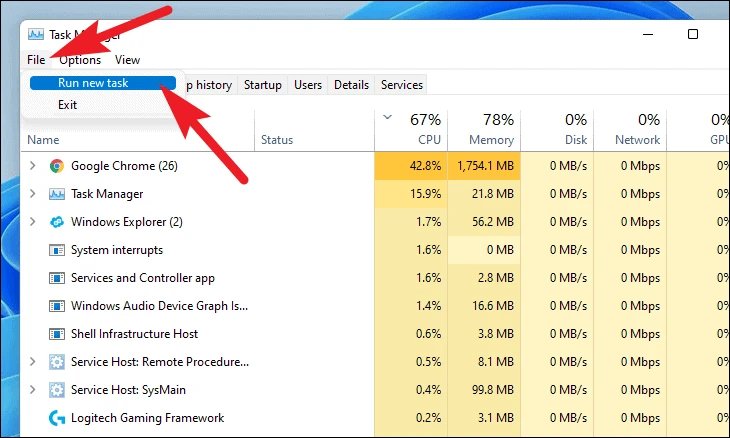
To do so, press the Ctrl+Shift+Esc shortcut on your computer to bring up the Task Manager. Next, click on the ‘File’ tab present on the top left corner of the window. Then, click on the ‘Run new task’ option.
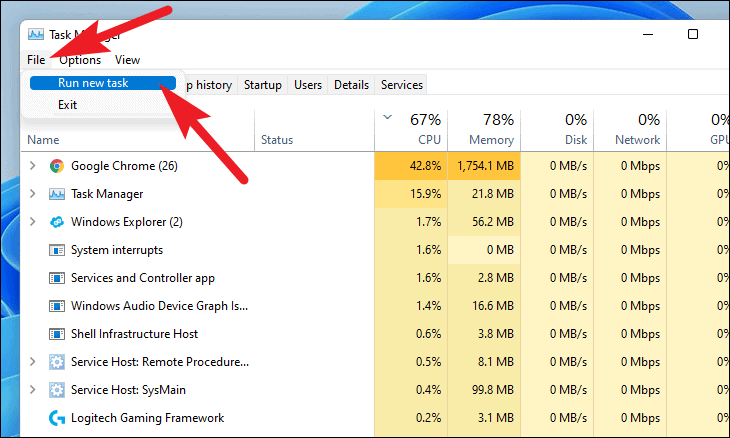
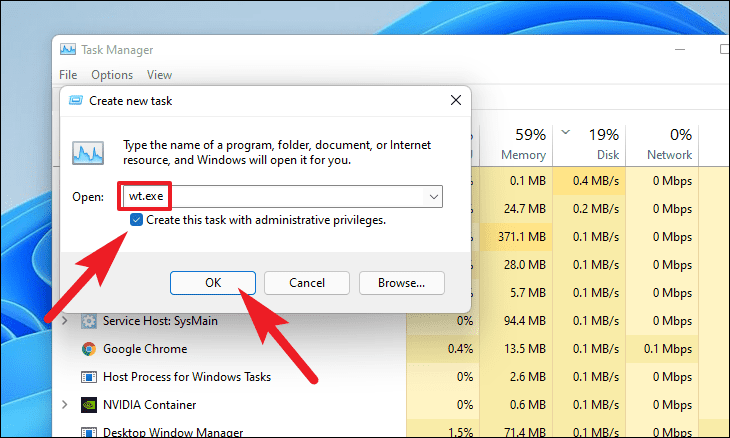
After that, from the ‘Create new task window’, type wt.exe and click the checkbox preceding the ‘Create this task with administrative privileges’ field. Now, click on ‘OK’ to open Windows Terminal.
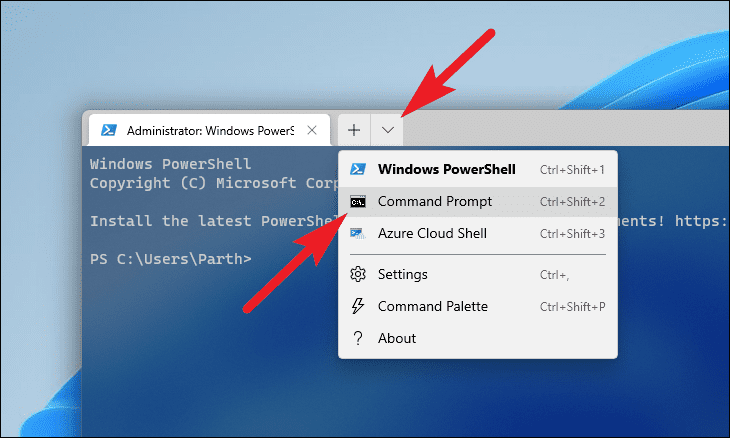
Now, from the Terminal window, click on the carat icon (downward arrow) and choose the ‘Command Prompt’ option. Alternatively, you can also press the Ctrl+Shift+2 shortcut on your keyboard to open it.
Next, type or copy+paste the following command one by one and hit Enter to stop the services associated with Windows Update.
net stop bits
net stop wuauserv
net stop cryptsvc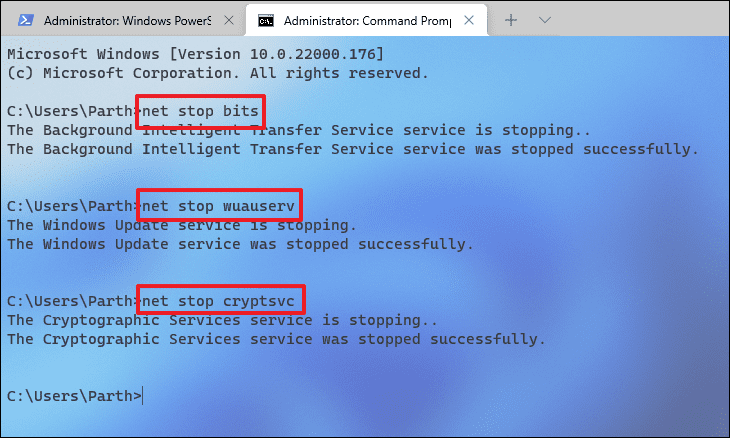
Once the services have been stopped, bring up the Run Command utility by pressing the Windows+R shortcut on your keyboard and type or copy+paste the following directory, and hit Enter on your keyboard.
C:\Windows\SoftwareDistribution\Download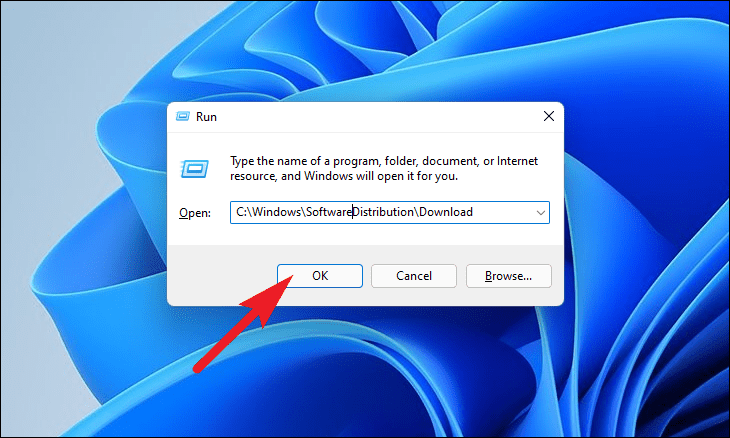
After that, from the explorer window, select all files by pressing Ctrl+A and then permanently delete them by pressing the Shift+Delete shortcut on your keyboard.
Then, click on the ‘SoftwareDistribution’ directory from the address bar.
After that, click on the ‘DataStore’ folder.

Now, select all files and folders by pressing Ctrl+A on your keyboard and permanently delete them by pressing Shift+Delete on your keyboard.
Finally, head back to the elevated Command Prompt window, and type or copy+paste the following command one-by-one and hit Enter to start the services you disabled earlier.
net start bits
net start wuauserv
net start cryptsvc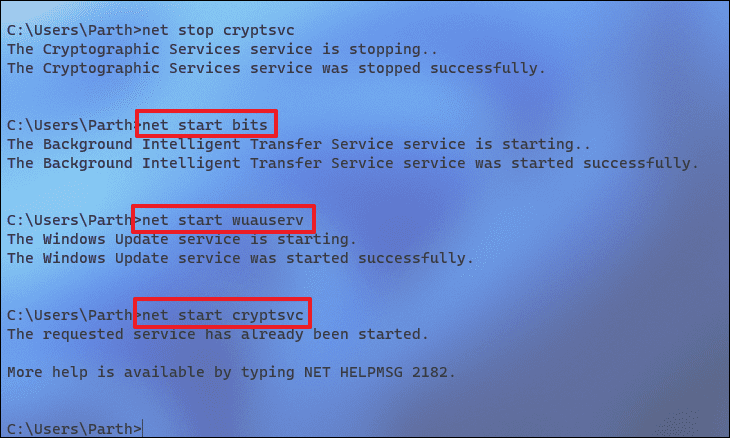
Next, restart your Windows PC from the Start Menu and try to install the update again to check if the issue has been resolved or not.
6. Perform an In-place Upgrade
If all else fails, you can always do an in-place upgrade to the latest version of Windows without affecting your personal files and folders. However, in order to do so, you will need the latest Windows 11 ISO.
Read: How to Download Windows 11 ISO File
After acquiring the Windows 11 ISO file, right-click on the ISO file and choose the ‘Mount disk’ option from the context menu.
Now, head to ‘This PC’ and double-click on the mounted drive to run the Windows 11 setup.
Next, a UAC (User Account Control) window will appear on your screen. Enter the admin credentials if you are not logged in with an admin account currently. Otherwise, simply click the ‘Yes’ button to proceed.

Then, from the Windows 11 setup window, click on the ‘Next’ button present at the bottom right corner.
After that, the setup will check for updates. It may take some time, wait while the setup downloads the latest resources from Microsoft servers.
Next, read the ‘End User License Agreement’ from Microsoft and click on the ‘Accept’ button.

After that, the Windows installation wizard will now configure itself to install the latest build of the OS on your machine. Please wait while the process runs in the background.
Finally, on the next screen, the setup wizard will list down the Windows version to be installed on your PC along with the default selection of keeping the personal files and apps. Click on the ‘Install’ button to commence the installation.

That’s it folks, one of these solutions will definitely work on your machine to fix the update error and you will be back to receiving and installing updates on your PC normally in no time.
Время на прочтение
1 мин
Количество просмотров 4.4K
Некоторые пользователи уже несколько месяцев не могут установить обновления Windows 11 из Центра обновления Windows. Проблема также возникает при установке ежемесячных исправлений Microsoft.

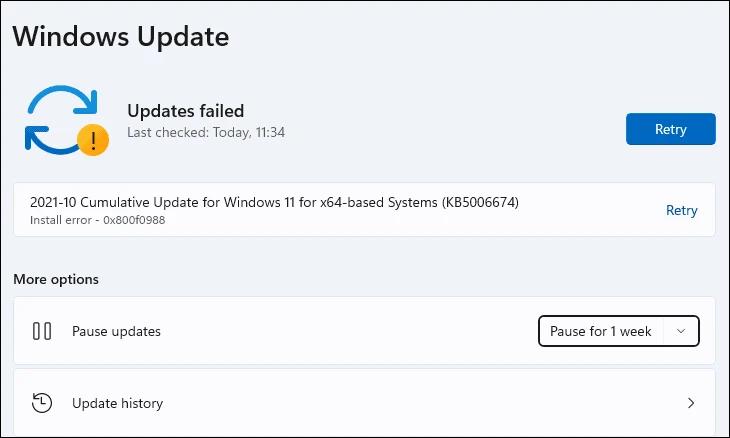
Так, пользователи не могут установить обязательное обновление безопасности KB5022303. При попытке запуска оно выдаёт сообщения об ошибках, причём наиболее распространённым кодом ошибки стал 0x800f0831. Та же проблема возникает с необязательным обновлением KB5022360.
«Мой ноутбук HP не смог успешно установить самое последнее обновление: накопительное обновление 2023-01 для Windows 11 версии 22H2 для систем на базе x64 (KB5022303). В нём выдаётся следующее сообщение/код ошибки: «Не удалось установить на 1/15/2023 — 0x800f0988″», — пожаловался один из пользователей.
«=update пытается установиться уже более недели и продолжает выдавать ошибку 0x80070005. Я пробовал перезапускать систему, выходить из неё, выключать ПК, очищать кэши и т. д. Проблема сохраняется», — добавил другой.
Подобные проблемы с Центром обновления Windows уже регистрировали начиная с августа.
В настоящее время Microsoft расследует проблему.
Аналогичные ошибки ранее уже наблюдались в Windows 10.
Microsoft уже начала связывать SSU (обслуживание обновлений стека) с ежемесячным накопительным обновлением, но этот подход не сработал.
Другим обходным решением может стать обновление на месте с помощью Media Creation Tool, но это может быть долгим и утомительным процессом. Сообщается, что Microsoft начала работать над опцией, которая позволит выполнить его на месте без установочного носителя в Windows 11 с помощью новой опции в настройках Центра обновления Windows.
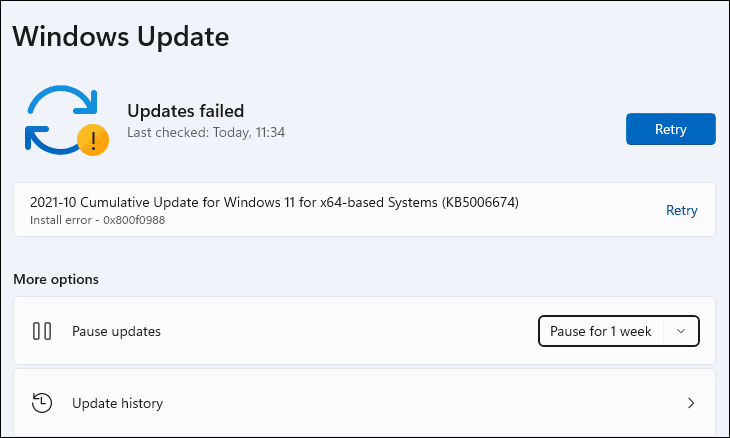
Microsoft rolls out its cumulative updates for Windows almost every month. We have often seen that pending updates notification on the bottom right corner of our screen and kept postponing it. The updates are often invariably bug-free and are quite efficient for the performance of our PC. However, it’s not the same in some cases and it has been noticed that the update fails to load and an error message is displayed. The message might appear something similar to this – There was a problem installing some updates, but we’ll try again later Error: 0X800f0988, but often it changes too.
Basically, this Windows 11 or 10 update error could have emanated due to a number of reasons. Most common reasons are buggy patches, interference of some application, an external hindrance to the PC in between the updating process. Installation of third party shady application may also lead Error 0x800f0988 to come up. However you don’t need to bother, what may be the cause, we have the solutions ahead.
Here is How to fix or repair Windows 11/10 update error 0x800f0988 –
1] Manually install the update
One of the ways to fix the Error Code 0x800f0988 is to install the updates manually instead of the automatic process. Microsoft releases patches and builds with upgraded features and bug fixes quite often. These updates, following built-in configurations, are automatically downloaded and installed in the availability of an internet connection. However, sometimes the settings become a reason for Windows update not working issue the situation might fit with this the occurrence here.
Therefore, Downloading updates manually helps in eradicating this error. Follow the steps ahead –
- Click the Search icon or bar from Taskbar and type the – update.
- Press the – Enter.
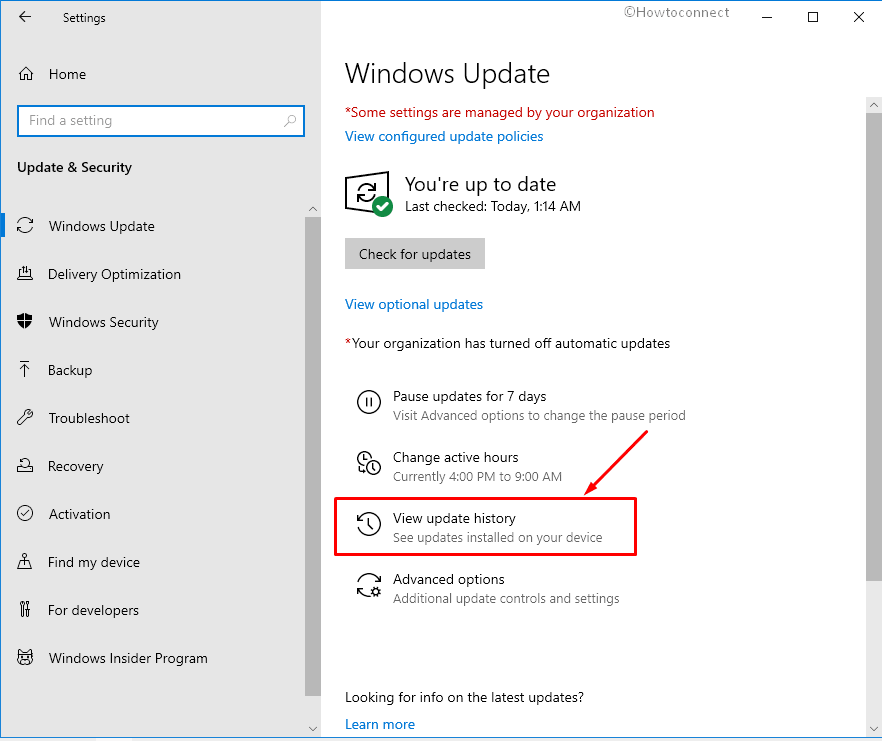
- Select the – View update history.
- Find and copy the failed update KB number.
- Click this link and go to Microsoft Update Catalogue.
- Paste the KB number in the search box and then hit the – Enter.
- Find and download compatible architecture.
- Double click the MSU file and follow the onscreen guidelines until the end.
This way you can avoid the Error Code 0x800f0988 during the installation of updates.
2] Use the Windows Update Troubleshooter
Microsoft has designed this troubleshooter utility to help users to deal with any update and installation errors. This tool deeply checks the system to detect issues and presents on-screen guidance to ending up with resolving them. Same with the update problems as the troubleshooter dig out the proper reason and repair once executed. The built-in tool allows solving some common windows issue quite easily and in a hassle-free manner.
So run the Windows Update TroubleShooter to fix Error Code 0x800f0988 using the following guidelines –
- Press Win+S, type troubleshoot and then hit the – Enter.
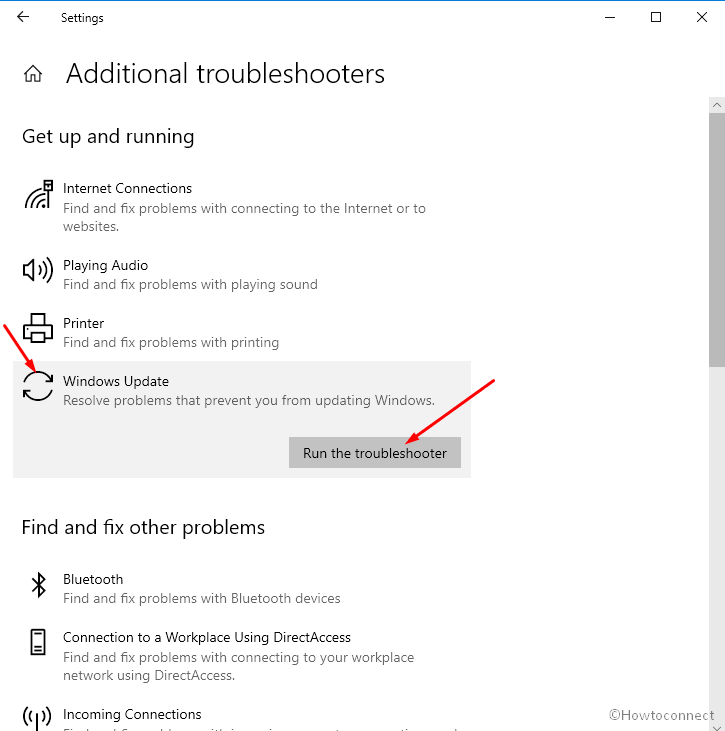
- After the settings page appears, select the – Additional troubleshooters.
- Find and click the – Windows Update.
- Finally, click the – Run the troubleshooter.
3] Uninstall additional language packs
Windows comes with a feature to install and use the operating in different prominent languages around the globe. The feature helps make windows more feasible and render an immersive experience to its users. But sometimes during the installation of updates, if you have selected English as your default language, it may cause some trouble. This could result in the Error: 0x800f0988 to arrive on your system screen.
Here’s how you can uninstall the additional language packs using a few simple instructions –
- Type language in the search on Taskbar and hit the – Enter.
- Under the Preferred languages section, there would be some language pack showing.
- Click to expand and select Remove.
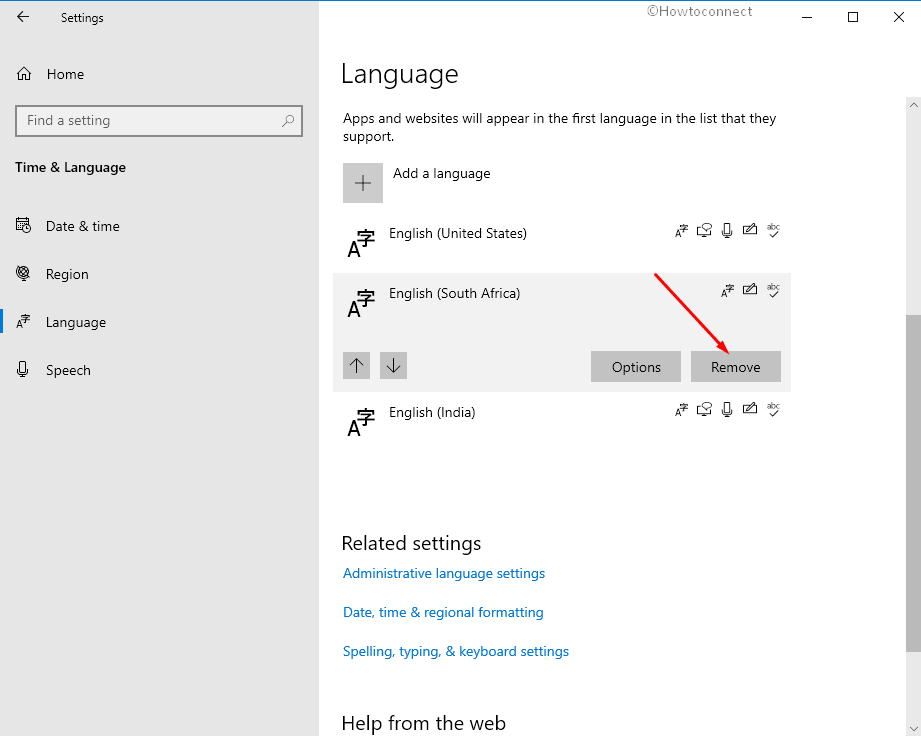
- Reboot the computer and see if error Code 0x800f0988 still persists.
See – How to Reinstall Windows 10 Language Pack.
4] Evacuate the WinSxS folder to fix Windows 10 update error 0x800f0988 Windows 11
Excessive accumulation of unwanted data in the Winsxs folder could also be one of the reasons for error 0x800f0988 to appear. The folder prevents installing any sort of cumulative update patches on the system. A great number of users have come forward to tell us that cleaning this directory using DISM could solve this glaring issue.
Here’s how you can proceed with this method –
- Type in CMD in the windows search box on the taskbar
- From the result window, select the – Run as administrator.
- In the command prompt window type in the following code exactly as it is and hit enter –
dism /online /cleanup-image /startcomponentcleanup
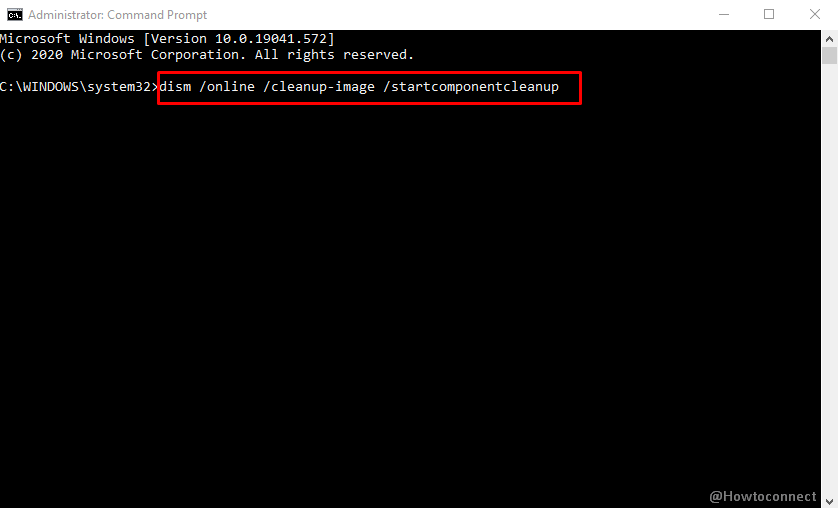
- When the process gets over and the directory is cleaned, reboot your system and try to reinstall the pending updates.
5] Purge the Windows Update Components
A corrupted or mismanaged windows update component has often come out as one of the major causes why Error: 0x800f0988 trouble us all. An online survey reveals that 6 out of 10 people would face this issue because of a corrupt windows update component only. Let’s see how we can resolve this nagging issue in a few simple steps –
- Hit Win+Q and Type in – CMD.
- Once the result pop up appears, click the – Run as administrator.
- On the command prompt window type in the following syntax exactly as it and don’t forget to hit enter after each line.
net stop wuauserv
net stop cryptSvc
net stop bits
net stop msiserver

- These commands will render the above of the services running in the background disabled temporarily.
- Now, what you need to do is rename the SoftwareDistribution and catroot2 folder using these two different commands in the command prompt
ren C:windowsSoftwaredistribution SoftwareDistribution.old
ren C:windownsSystem32catroot2 catroot2.old
- After you are done with that, you must restart the services that you disabled earlier. In order to do that type in the following command exactly as it is and hit enter after each line –
net start wuauserv
net start cryptSvc
net start bits
net start msiserver
Once you have concluded this method your system would have successfully reset the windows update components and now you’ll be able to install the pending.
6] Reset the Windows 10 to repair Windows 10 or 11 update error 0x800f0988
In some rare cases where all of the above four solutions don’t seem to help then resetting your PC is the only way out of this mess. This should always be your last resort as it could wipe your data from the C drive or on the particular drive where your windows is installed.
Let’s see how you can do that in a few simple steps
- Type in “Reset this PC” in the windows search box present on the bottom left side of your taskbar
- Hit the – Enter.
- Click on the Get Started button under from within Reset this PC section.
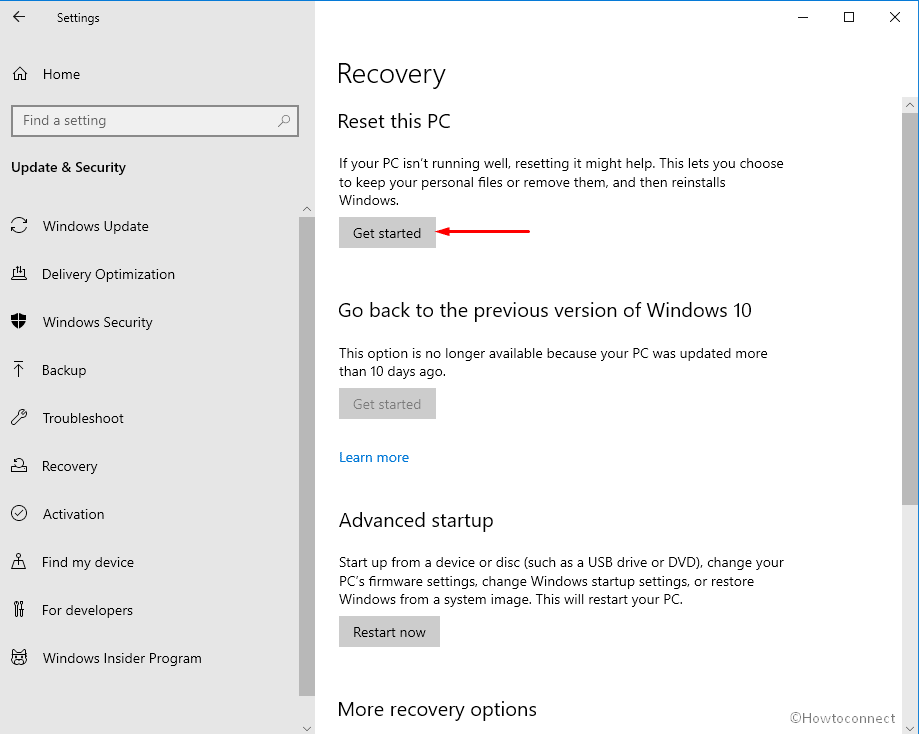
- Select the – “Keep my files” option and then move ahead
- On the next prompt click on “Reset” and then Confirm to get the process started.
This would have most certainly resolved the persisting issue of Error: 0x80040988 and you will be able to install your pending updates now.
Methods list
1] Manually install the update
2] Use the Windows Update Troubleshooter
3] Uninstall additional language packs
4] Evacuate the WinSxS folder
5] Reset the Windows Update Components
6] Reset the Windows 10
That’s all!!
Repair any Windows problems such as Blue/Black Screen, DLL, Exe, application, Regisrty error and quickly recover system from issues using Reimage.