0x800f0831 — это ошибка Windows 11, с которой можно столкнуться при попытке загрузить и установить новое накопительное обновление в систему. В большинстве случаев пользователи сообщали об этой проблеме при работе с обновлениями KB5008212, KB5005033 или KB5005190. Хотя причина этой конкретной проблемы неоднозначна, собранная информация указывает на то, что она может быть связана с поврежденными/отсутствующими элементами системы, внутренними ошибками или конфликтами, вызванными сторонним программным обеспечением. Что бы это ни было, рекомендуем попробовать каждое решение из руководства ниже, от более простого до более сложного. В какой-то момент одно из них должно окончательно решить проблему.

Скачать средство восстановления Windows
Скачать средство восстановления Windows

Существуют специальные утилиты для восстановления Windows, которые могут решить проблемы, связанные с повреждением реестра, неисправностью файловой системы, нестабильностью драйверов Windows. Мы рекомендуем вам использовать Advanced System Repair Pro для исправления «Ошибка Центра обновления Windows 0x800f0831» в Windows 11, Windows 10, Windows 8, Windows 7, Vista или XP.
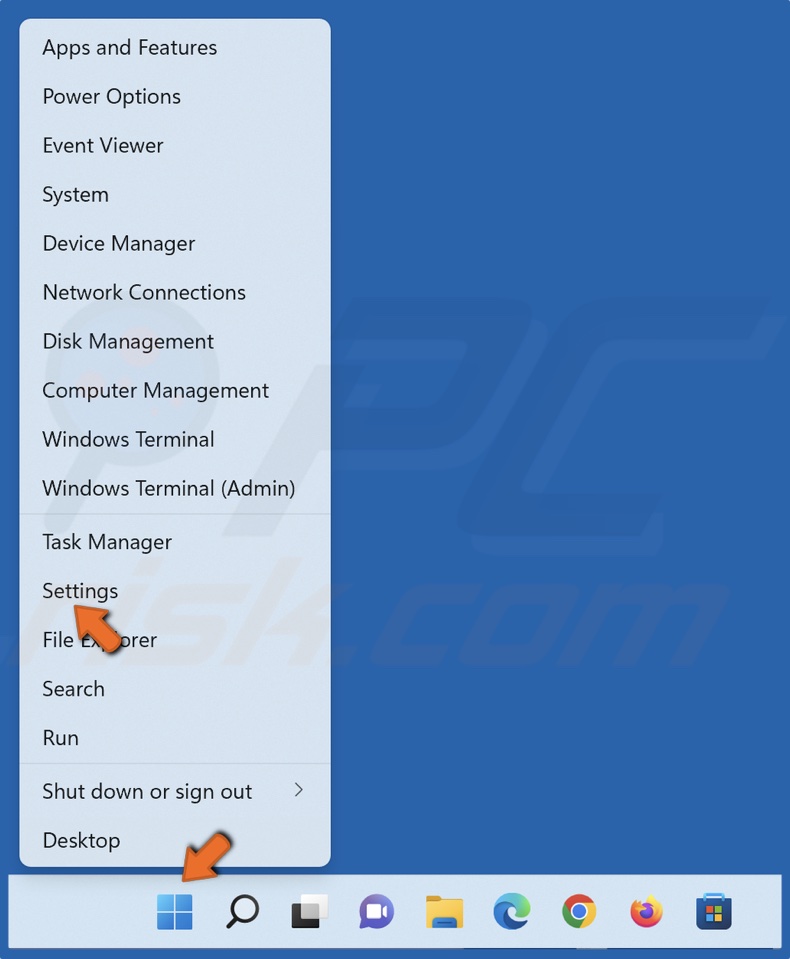
1. Воспользуйтесь средством устранения неполадок Центра обновления Windows
Встроенные функции устранения неполадок Windows, которые часто считаются неэффективными, иногда все же могут решить проблемы с обновлениями. В Windows есть собственный набор утилит для устранения неполадок, предназначенных для поиска и устранения существующих проблем в различных областях системы. Вы можете воспользоваться им для обнаружения и исправления проблем с обновлением. Вот что вы можете сделать:
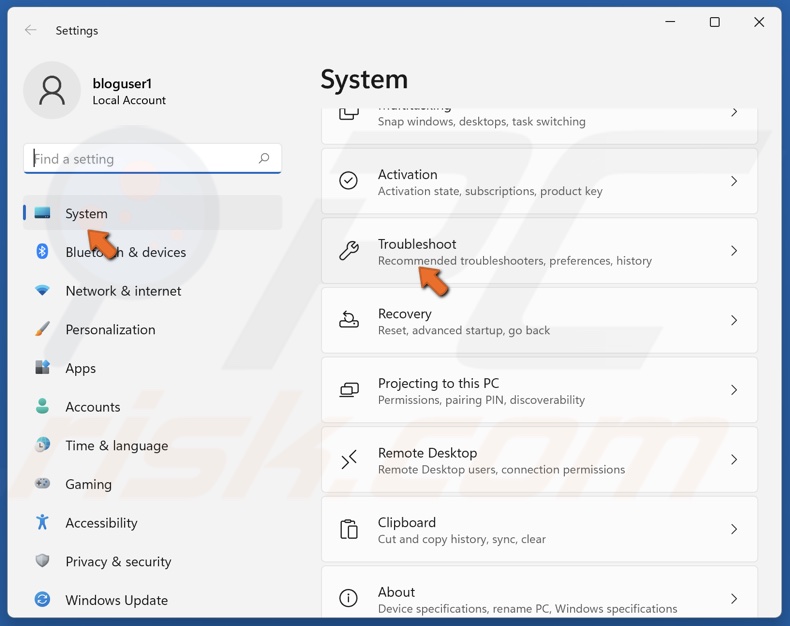
- Открытые Настройки из нижней панели задач.
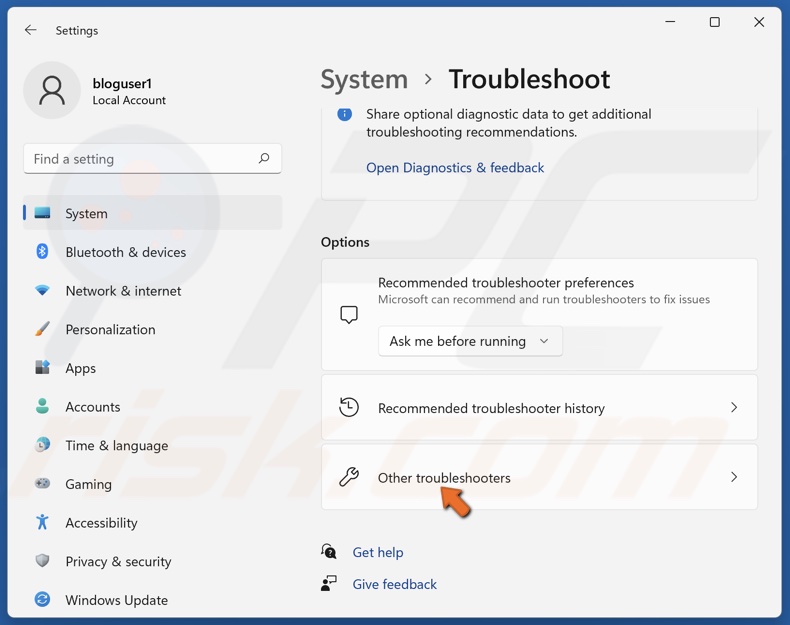
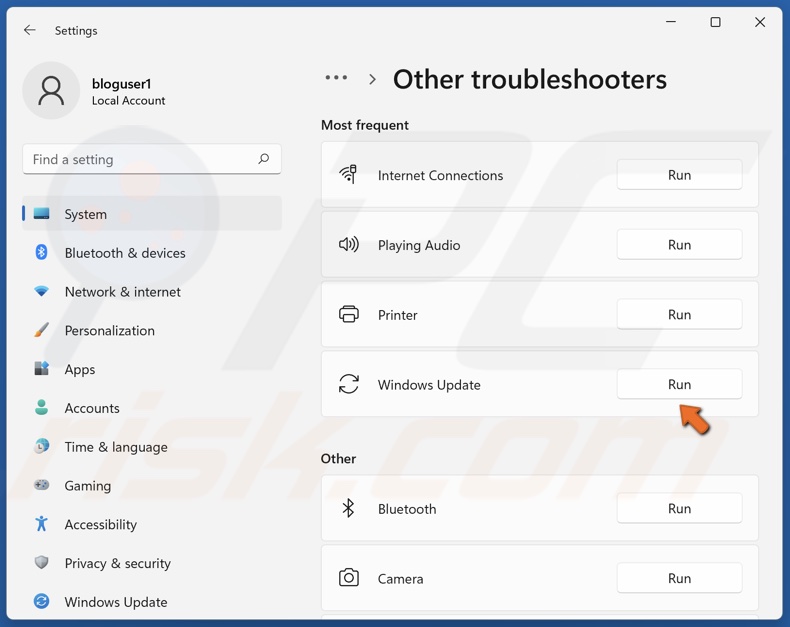
- Выберите Система слева и перейдите в Устранение неполадок > Другие средства устранения неполадок на правой панели.
- Затем найдите Центр обновления Windows и нажмите Run рядом с ним.
- Завершите процесс, следуя инструкциям на экране, и перезагрузите компьютер.
После этого попробуйте выполнить обновление еще раз. Если это не сработает, попробуйте другие решения ниже.
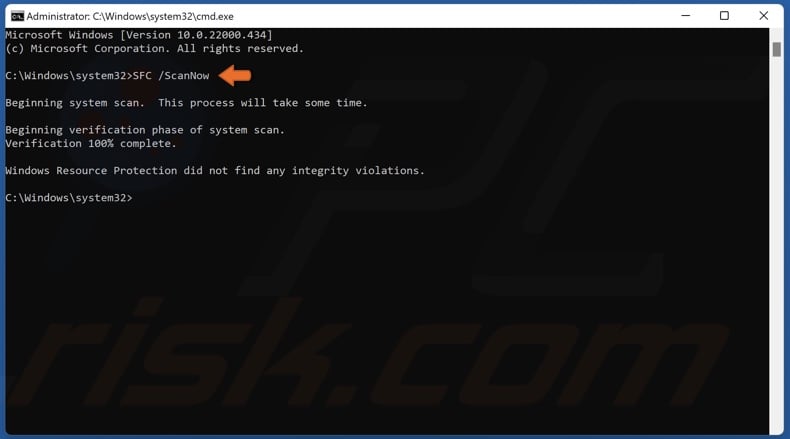
2. Проверьте целостность системных файлов.
Как было сказано выше, одной из причин возникновения таких ошибок является отсутствие в системе важных файлов. Мы рекомендуем использовать утилиты SFC (System File Checker) и DISM (Deployment Image Servicing and Management) для обнаружения и восстановления отсутствующих компонентов, если таковые имеются. Обязательно попробуйте обе утилиты, так как они могут по-разному влиять на решение проблемы. Вот как:
С помощью SFC
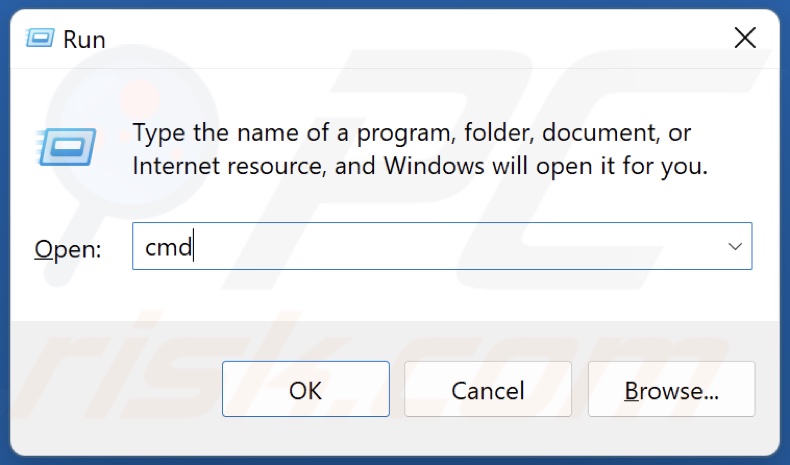
- Открытые Командная строка , введя
cmdв поиск рядом с Меню Пуск кнопку. - Щелкните правой кнопкой мыши по Командная строка , а затем выбрать Запуск от имени администратора.
- После открытия консоли введите
sfc /scannowкоманду и нажмите Enter. - Когда процесс восстановления будет завершен, перезагрузите компьютер.
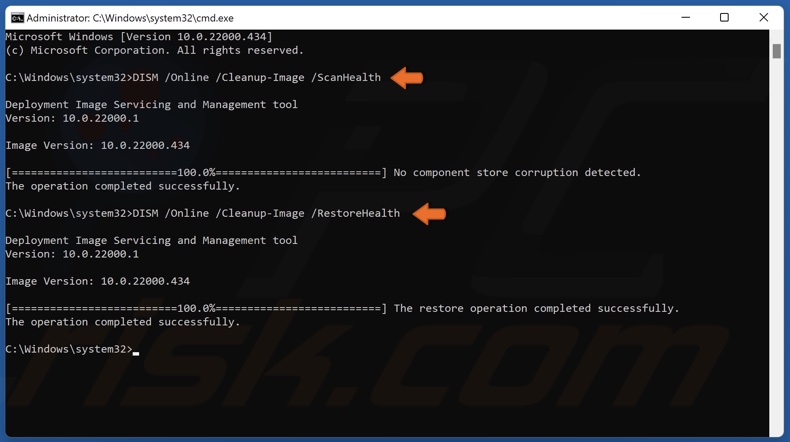
С помощью DISM
- Открытые Командная строка как мы это делали на предыдущем шаге.
- Скопируйте и вставьте эту команду
DISM.exe /Online /Cleanup-image /Restorehealth. - Нажмите Enter и подождите, пока Windows закончит сканирование и исправление.
- После этого перезагрузите компьютер и попробуйте открыть проблемную программу снова.
После выполнения обоих этих сканирований попробуйте снова установить обновление.
3. Включите Чистый запуск Windows.
Возможно, какое-то стороннее ПО вызывает конфликт с вашей системой. Если вы не знаете, что бы это могло быть, то можно войти в так называемый режим чистой загрузки. Этот режим позволяет пользователям загружать свою систему только со встроенными службами и приложениями, чтобы предотвратить проблемы несовместимости. В результате это позволит узнать, действительно ли проблема связана со сторонним программным обеспечением или нет. Если вы уже подозреваете, что какое-то стороннее приложение (возможно недавно установленное) является причиной проблемы, попробуйте отключить или полностью удалить его. В противном случае выполните шаги, чтобы войти в режим чистой загрузки:
- Нажмите Windows Key + R кнопки одновременно и вставьте
msconfig. - Затем в открывшемся окне перейдите в Услуги сверху.
- Установите флажок рядом с Не отображать службы Майкрософт и нажмите на Отключить все кнопку.
- Теперь перейдите в Общие и выберите Выборочный запуск вариант. Удостоверься что Загружать системные службы и Загружать элементы автозагрузки выбраны.
- Нажмите Применить и OK. Затем перезагрузите компьютер.
Теперь вы можете попробовать обновить систему, находясь в режиме чистой загрузки. Вне зависимости от того, удалось вам добиться того, что хотели, следует вернуть Windows к настройкам обычного запуска. Для этого просто повторите все шаги, которые вы выполнили выше, включив отключенные службы и изменив параметр запуска с Выборочный запуск в нормальная.
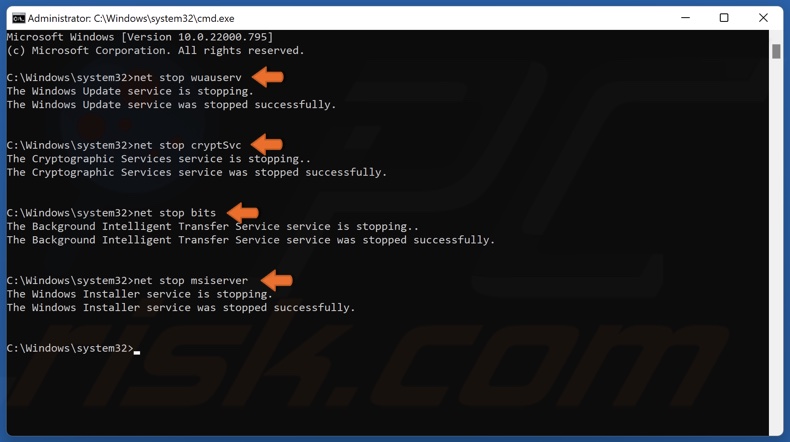
4. Сбросьте компоненты Центра обновления Windows.
Вы также можете попробовать сбросить настройки Центра обновления Windows. Статистически этот метод доказал свою эффективность при решении широкого круга проблем с обновлением. Вся процедура включает перезапуск служб BITS, Cryptographic, MSI Installer и Windows Update, а также переименование некоторых папок обновлений (SoftwareDistribution и Catroot2). Эти папки содержат временные файлы, необходимые для реализации обновлений Windows. Исходя из этого, мы заставим Windows удалить поврежденные элементы и создать компоненты, связанные с обновлением, с нуля. Ниже мы покажем два способа выполнения этого метода. Первый требует ввода и выполнения каждой консольной команды в последовательности вручную. Другой делается с помощью так называемого пакетного сценария, написанного в Блокноте и сохраненного как WUReset.bat. Нет никакой реальной разницы в том, какой из них вы выберете. Хоть вся процедура и может показаться немного сложной, она не потребует у вас слишком много времени и знаний. Просто следуйте последовательности шагов, указанной ниже:
Вручную
- Открытые Командная строка , введя
cmdв поле поиска рядом с Меню Пуск кнопку. - Щелкните правой кнопкой мыши по Командная строка , а затем выбрать Запуск от имени администратора.
- Скопируйте и вставьте этот список команд одну за другой, нажимая Enter после каждой. (Это действие отключит службы, ответственные за Обновления Windows)
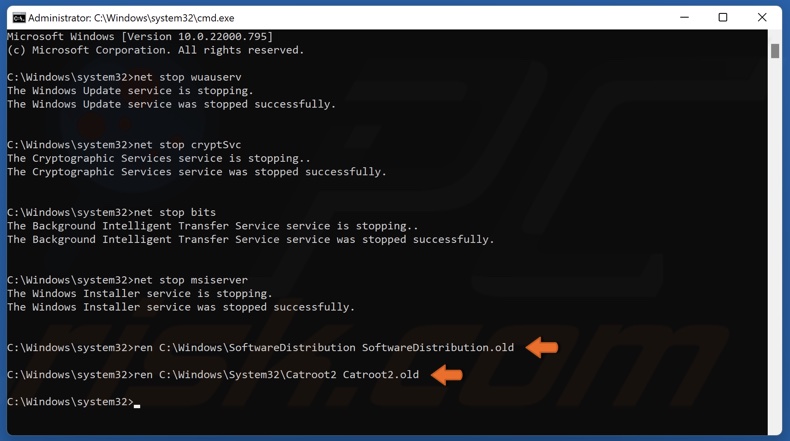
- Затем мы должны переименовать вышеупомянутые папки. Просто вставьте эти команды, нажимая Enter после каждой.
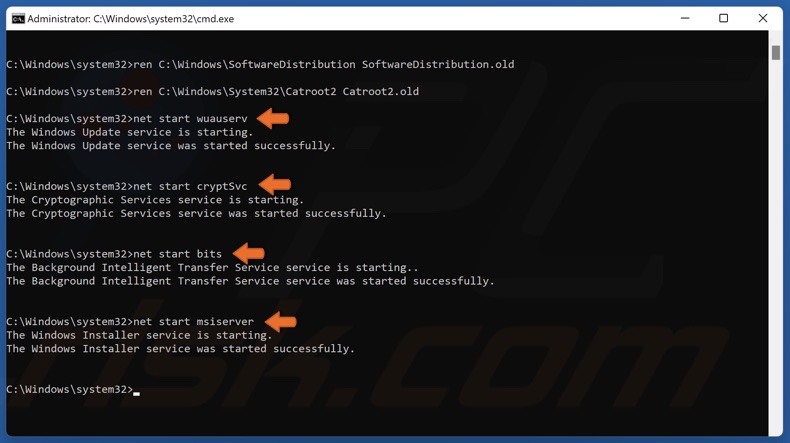
- Наконец, все, что осталось сделать, это вернуть отключенные службы. Введите эти команды так же, как мы делали ранее.
- На этом все. Перейдите в центр обновления Windows и попробуйте выполнить установку снова.
net stop wuauserv
 net stop cryptSvc
 net stop bits
 net stop msiserver
ren C:\Windows\SoftwareDistribution SoftwareDistribution.old
 ren C:\Windows\System32\catroot2 Catroot2.old
net start wuauserv
 net start cryptSvc
 net start bits
 net start msiserver
С помощью Пакетного файла
Это альтернативный метод вышеописанному. Пакетный сценарий используется для выполнения того же набора команд для сброса всех компонентов Центра обновления Windows, служб шифрования и папок, таких как SoftwareDistribution. Это не так сложно, как может показаться на первый взгляд — даже проще, чем предыдущий способ. Все, что вам нужно, это Блокнот Windows и немного магии копирования-вставки. Пакетные сценарии лучше ручного ввода тем, что позволяют выполнять все необходимые команды одновременно. Если вы когда-нибудь столкнетесь с подобными проблемами в будущем, вы можете выполнить уже созданный .bat файл и для сброса компонентов обновления:
- Откройте новый Блокнот . Для этого щелкните правой кнопкой мыши на любую свободную область на рабочем столе, выберите Новая и Текстовый документ.
- Затем вставьте этот список команд в блокнот:
- После вставки всех команд, нажмите Файл > Сохранить как и назовите файл WUReset.bat, Обязательно установите Кодирование в ANSI и сохраните файл в любом месте.
- Наконец, нажмите на файл правой кнопкой мыши и выберите Запуск от имени администратора и наслаждайтесь автоматическим сбросом компонентов обновлений Windows.
@ECHO OFF
 echo Simple Script to Reset / Clear Windows Update
 echo.
 PAUSE
 echo.
 attrib -h -r -s %windir%system32catroot2
 attrib -h -r -s %windir%system32catroot2*.*
 net stop wuauserv
 net stop CryptSvc
 net stop BITS
 ren %windir%system32catroot2 catroot2.old
 ren %windir%SoftwareDistribution sold.old
 ren "%ALLUSERSPROFILE%\Application Data\Microsoft\Network\Downloader" downloader.old
 net Start BITS
 net start CryptSvc
 net start wuauserv
 echo.
 echo Task completed successfully...
 echo.
 PAUSE
5. Загрузите конфликтующее обновление из каталога Microsoft.
Если вы все еще хотите, чтобы обновление было установлено и исчезло естественным образом, тогда можно загрузить проблемное обновление из каталога Microsoft и установить его вручную. Для этого просто выполните шаги, перечисленные ниже:
- Открытые Настройки из нижней панели задач.
- Затем перейдите в Центр обновления Windows на левой панели.
- В правой части окна выберите История обновлений.
- После этого найдите и запишите название самого последнего обновления (обычно начинается с «KB» и находится вверху списка).
- Вы также можете узнать это, записав имя неудачного обновления (если оно отображается).
- После этого найдите и загрузите нужное обновление из Microsoft Update Catalog.
6. Используйте Media Creation Tool.
Если по-прежнему нет никаких сигналов в пользу решения проблемы, то наша последняя рекомендация сводится к тому, чтобы попробовать Media Creation Tool — отличную утилиту Microsoft, предназначенную для переустановки Windows, а также выступающую в качестве альтернативного инструмента для получения последних доступных обновлений в обход различных проблем. Следуйте инструкциям ниже:
- Сначала вам нужно скачать утилиту с веб-сайта Microsoft.
- Затем запустите загруженный файл.
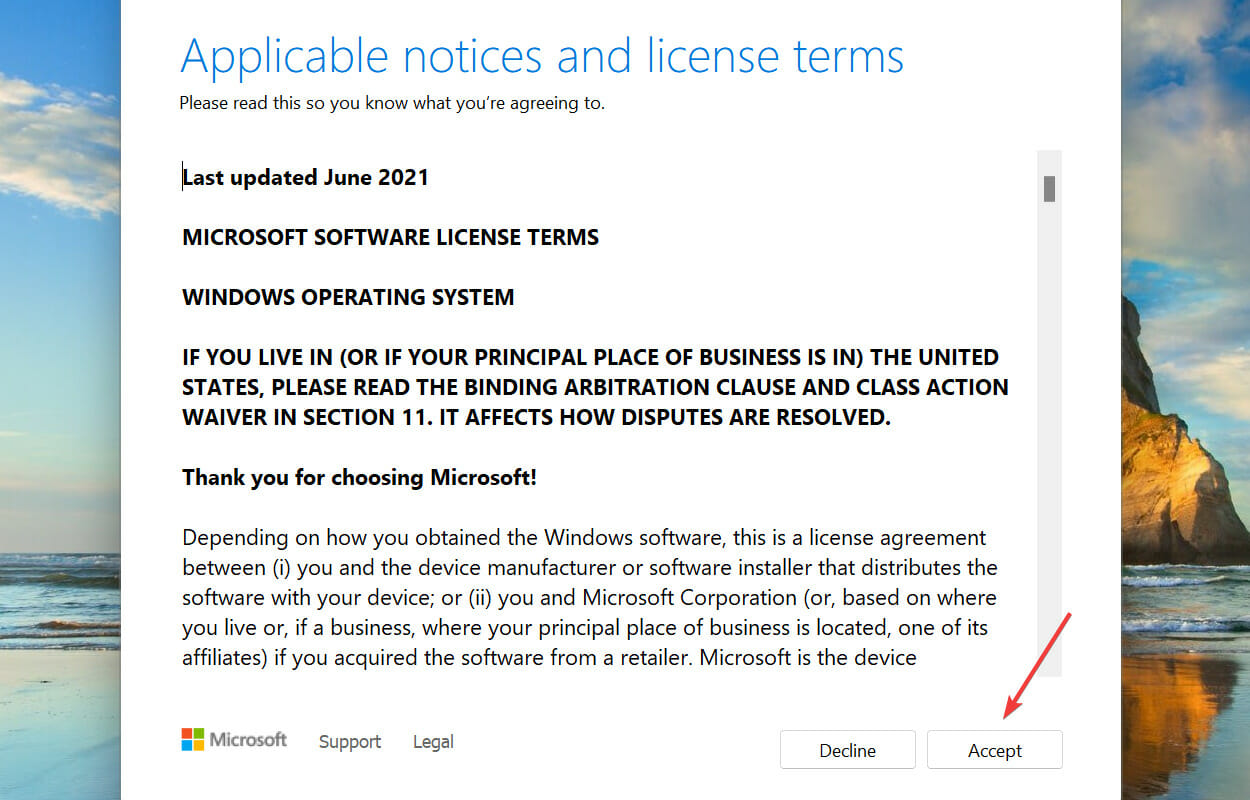
- После того, как вы согласитесь с Условиями использования, вам будет предложено два варианта на выбор. Выберите Обновить этот компьютер сейчас.
- Выберите Сохранить личные файлы чтобы они не пострадали.
- Наконец, запустите процесс и дождитесь его завершения.
- Надеемся, этот метод помог вам избавиться от ошибки 0x800f0831.
Итоги
Надеемся, что этих 6 методов или даже меньше было достаточно, чтобы устранить ошибку 0x800f0831 и позволить наконец установить обновление. Если вам нужна помощь в чем-то еще, можете поискать соответствующую статью на нашем сайте, чтобы получить инструкции по решению других проблем или удалению вирусов.
Get rid of this Windows Installation error in a few minutes with our guide
by Kazim Ali Alvi
Kazim has always been fond of technology, be it scrolling through the settings on his iPhone, Android device, or Windows. And at times, unscrewing the device to take… read more
Updated on
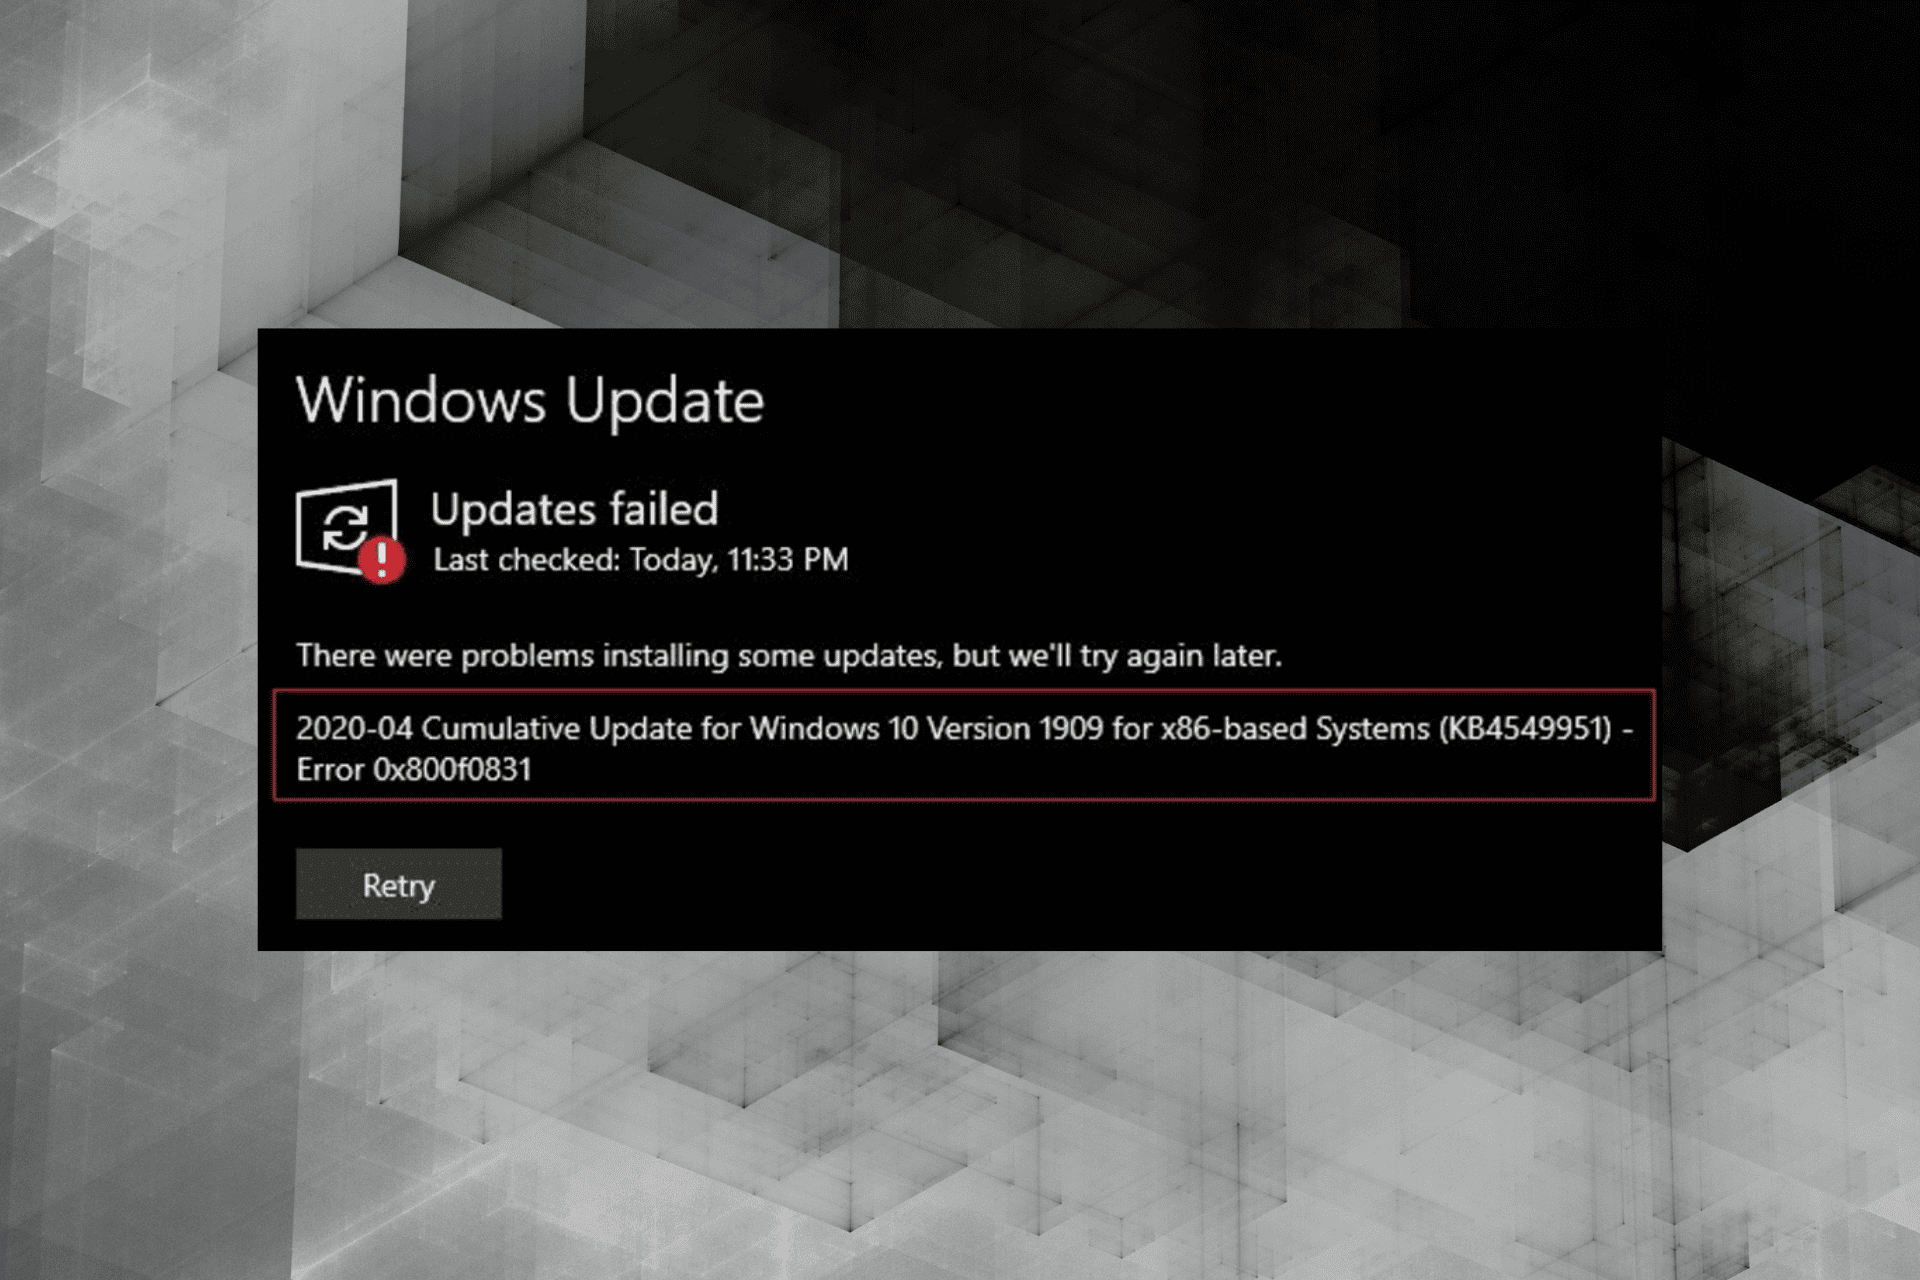
- A lot of users have reported encountering the 0x800f0831 installer error.
- Note that it doesn’t allow the process to complete.
- The Windows Update error 0x800f0831 could be due to corrupt system files, misconfigured VPN, or problems with the Windows Update service, amongst other issues.
- Also, learn how to fix the other Windows installation errors, in case you come across any.
XINSTALL BY CLICKING THE DOWNLOAD
FILE
Windows 10, like the previous iterations, is prone to errors and ever since it was released, we have come across a bunch of them.
And, the worst are the ones that prevent you from updating the OS. One of these is the 0x800f0831, a Windows 10 install error.
Note that it is encountered while updating Windows and doesn’t allow the process to complete. We all know how important it is to keep up-to-date with the latest version of the OS.
When running an outdated version, you don’t just miss out on several new features but the PC is also exposed to threats and the chances of encountering errors are high.
Before we delve into the solutions, let’s first walk you through the underlying issues that may cause the install error – 0x800f0831.
What causes the install error 0x800f0831?
There are numerous underlying issues that are known to cause this Windows installation error. Some of these occur more frequently than others, and we have listed them in the same sequence:
- Missing files from the previous update
- Corrupt system files
- Antivirus conflicting with Windows Update
- Misconfigured VPN
- Issues with the Windows Update service

With a basic understanding of the problem, you are now in a far better position to proceed to troubleshoot the error. First, we recommend reverting any change that you made in the recent past on your Windows PC.
How we test, review and rate?
We have worked for the past 6 months on building a new review system on how we produce content. Using it, we have subsequently redone most of our articles to provide actual hands-on expertise on the guides we made.
For more details you can read how we test, review, and rate at WindowsReport.
If that doesn’t fix the 0x800f0831 Windows 10 install error, execute the fixes listed here as given.
How can I fix the Windows Update error 0x800f0831?
- What causes the install error 0x800f0831?
- How can I fix the Windows Update error 0x800f0831?
- 1. Use a PC repairing software
- 2. Run the Windows Update troubleshooter
- 3. Run the SFC and DISM scan
- 4. Restart the Windows Update service
- 5. Reset Windows Update components
- 6. Disable VPN
- 7. Enable .Net Framework 3.5
- 8. Perform an in-place upgrade to repair Windows
- Are there other Windows 11 installation errors?
1. Use a PC repairing software
If you require a faster and more effective method to bypass the 0x800f0831 Windows Update install error, you can use a specialized repair tool.
2. Run the Windows Update troubleshooter
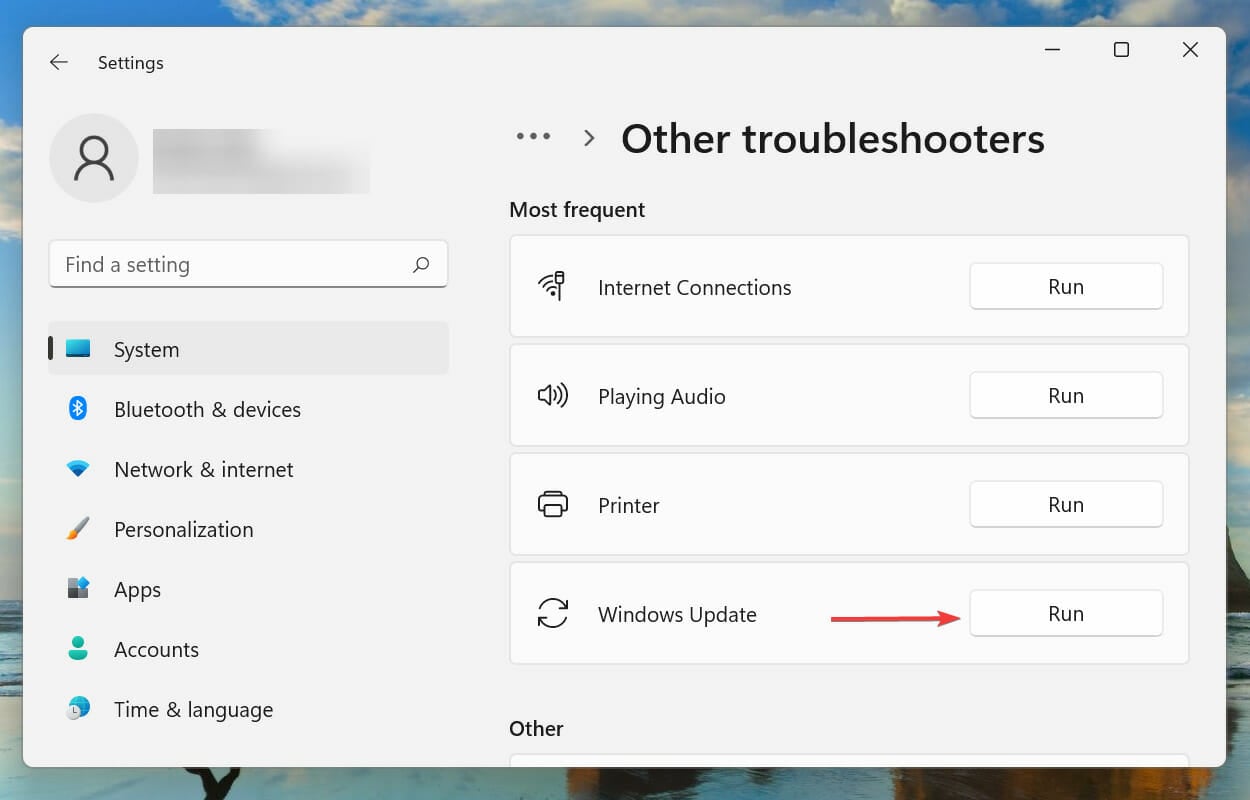
- Press Windows + I to launch the Settings app, then click on Troubleshoot on the right in the System tab.

- Click on Other troubleshooters.
- Next, locate the Windows Update troubleshooter and click on the Run button next to it.
- Wait for the troubleshooter to diagnose the issue, and choose the appropriate repsonse, when prompted, to fix them.
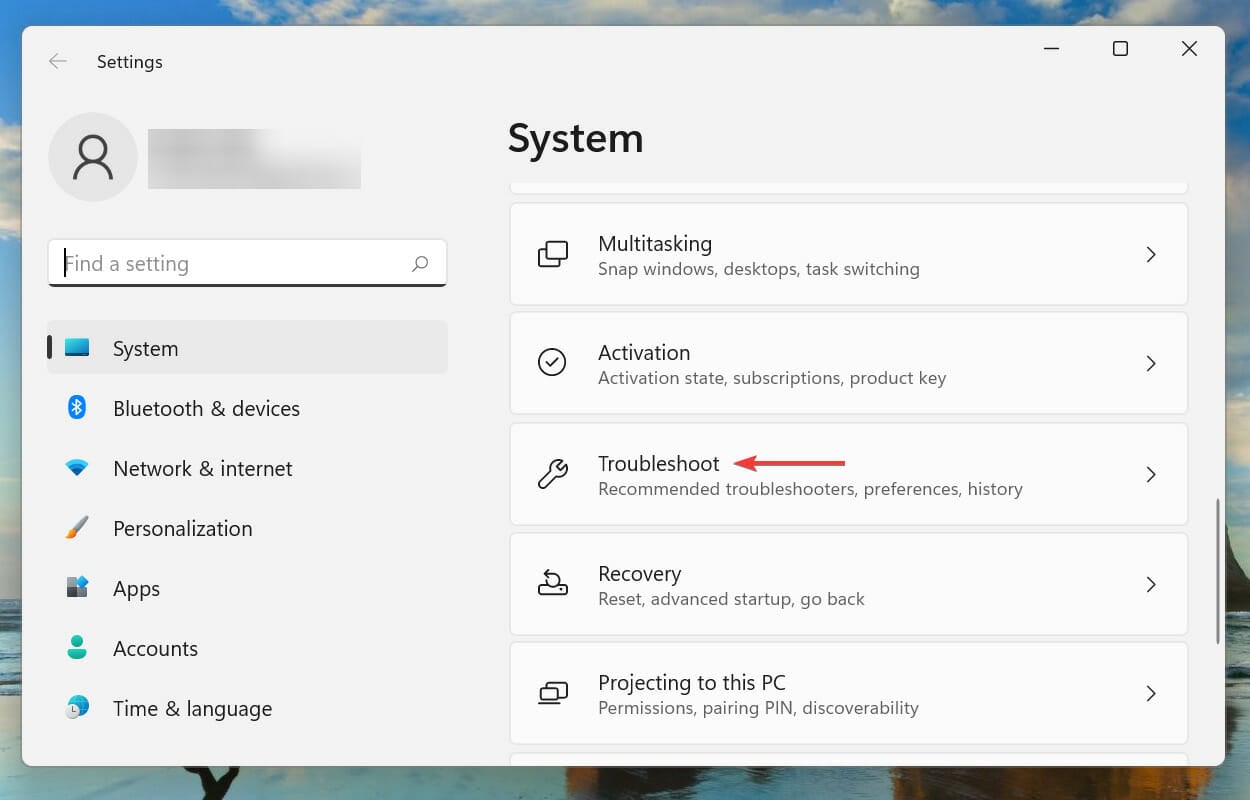
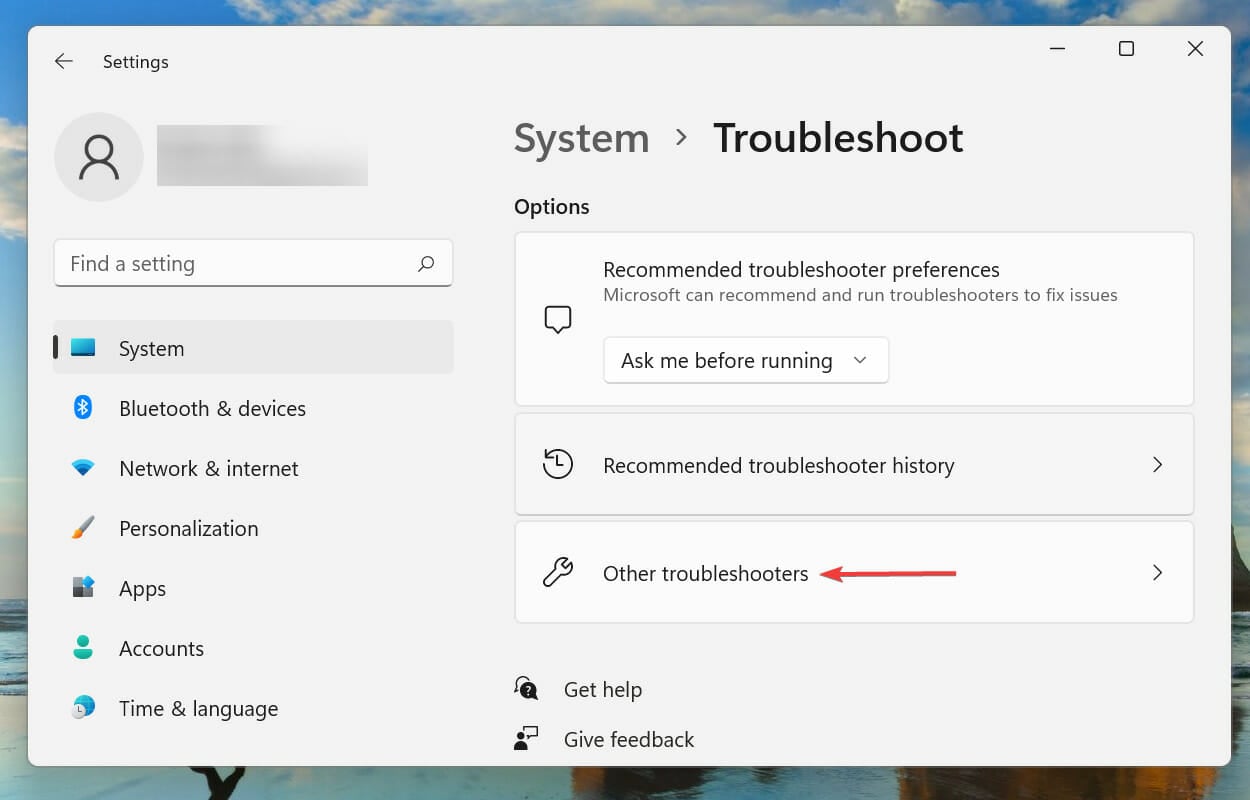
Whenever you encounter an error in Windows, it’s recommended that you first look for a relevant troubleshooter. These are more than capable of fixing a wide variety of errors, both hardware, and software, and do not require much effort from your end.
3. Run the SFC and DISM scan
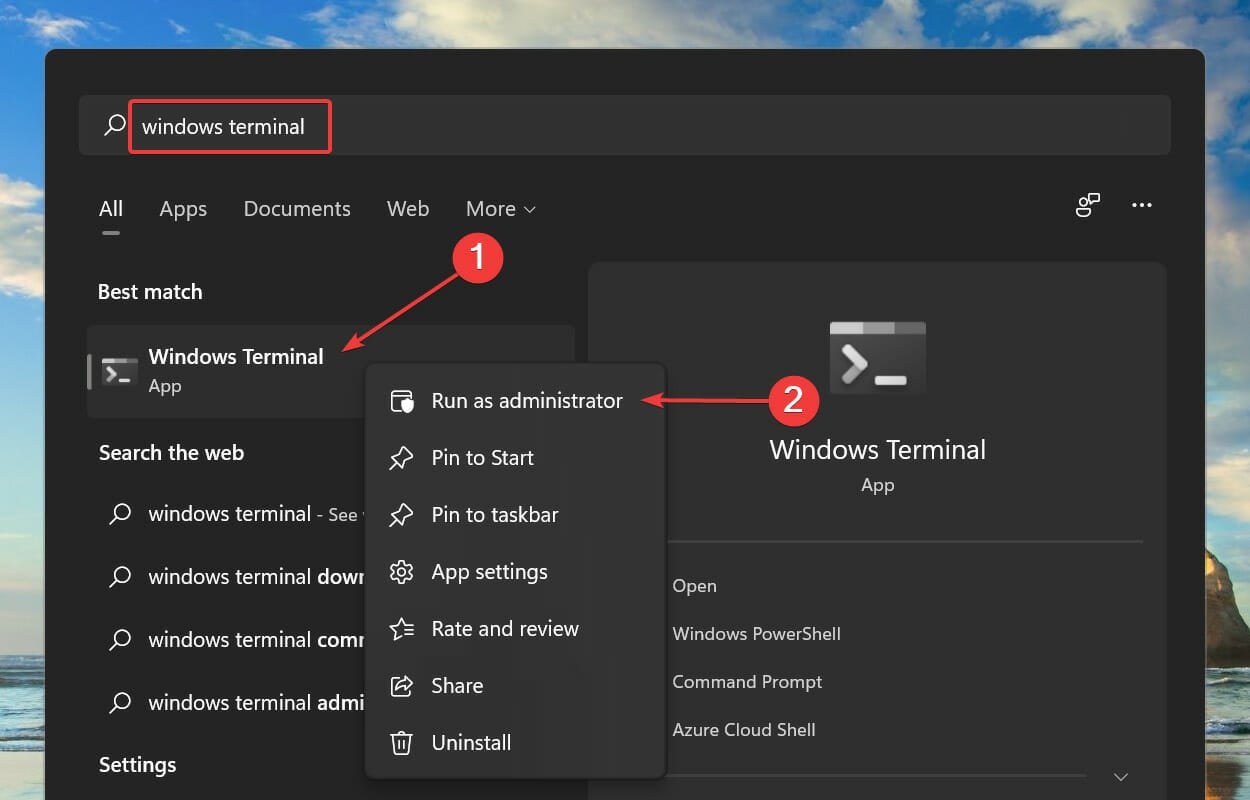
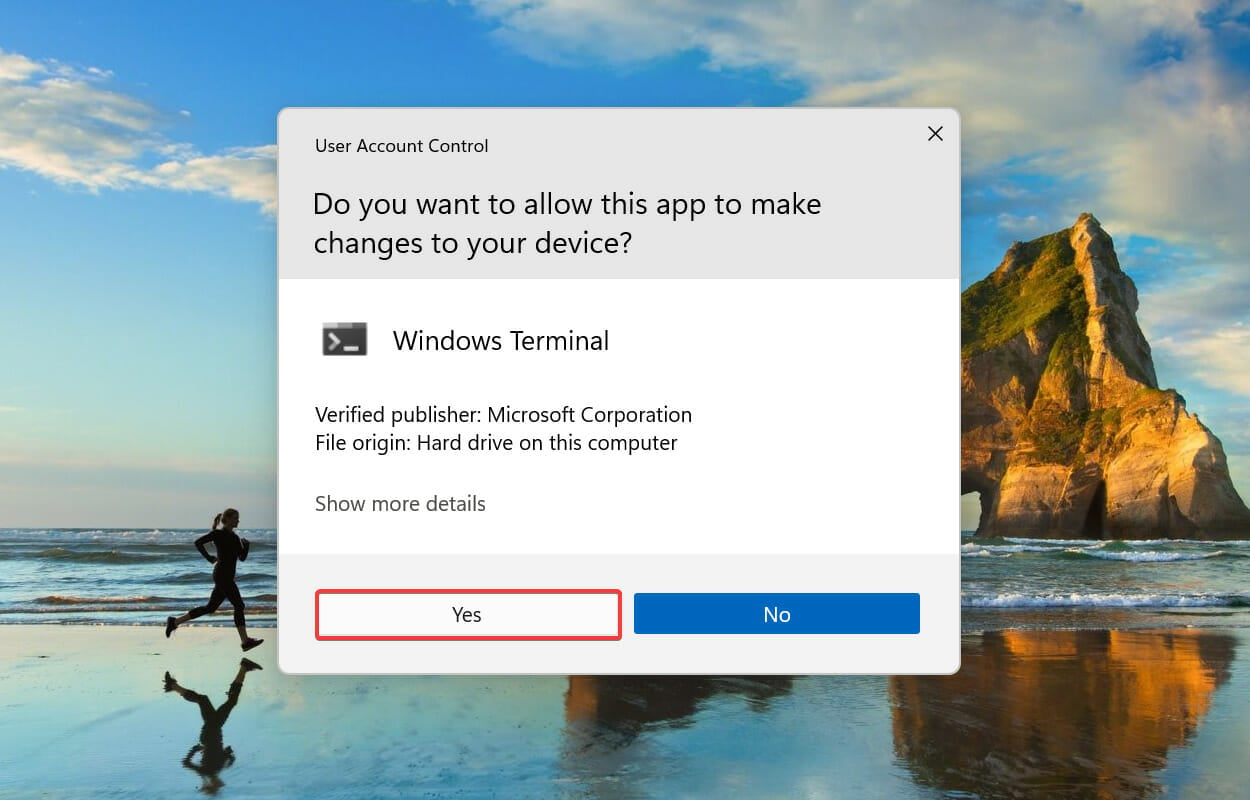
- Press Windows + S to launch the Search menu. Enter Windows Terminal in the text field at the top, right-click on the relevant search result, and select Run as administrator from the context menu.
- Click Yes on the UAC (User Account Control) prompt that pops up.
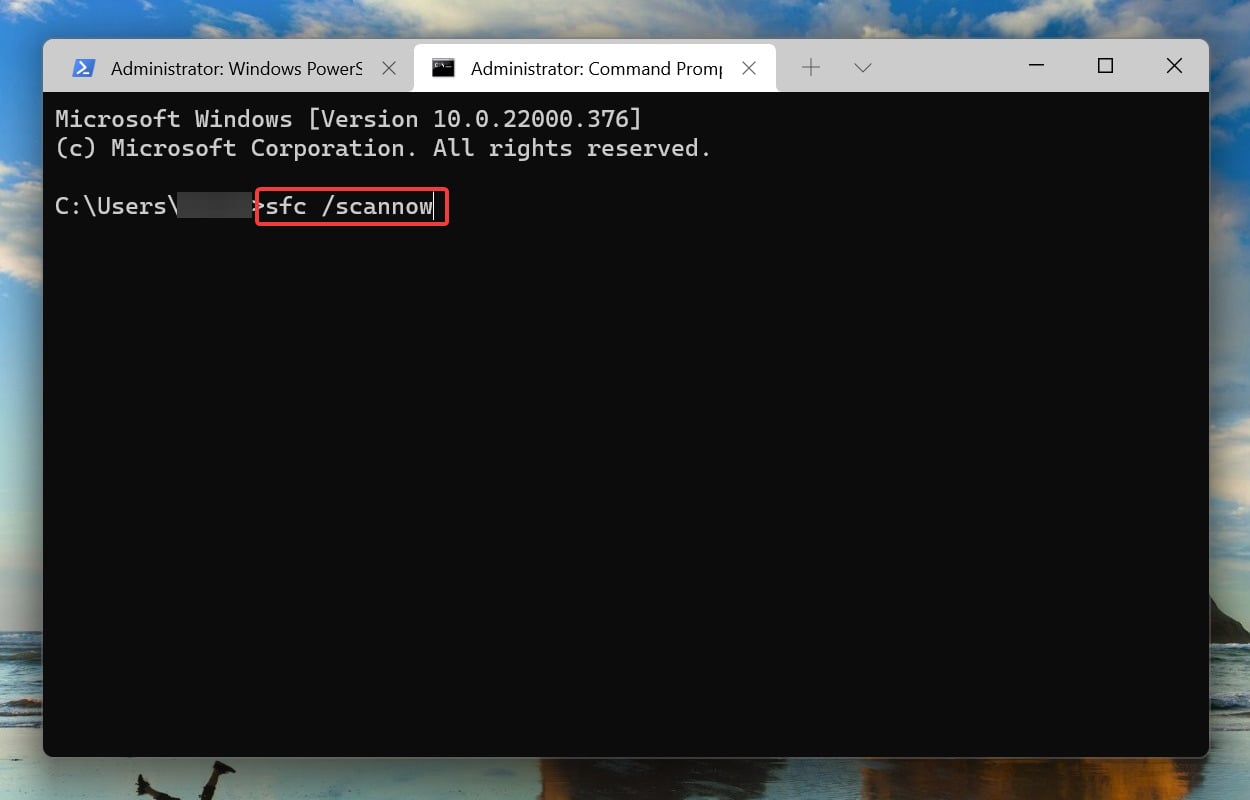
- Next, click on the down arrow at the top, and select Command Prompt from the list of options. Alternatively, you can press Ctrl + Shift + 2 to launch the Command Prompt tab.
- Now, type/paste the following command and hit Enter to run the SFC scan:
sfc /scannow - Once it’s complete, paste the following command and hit Enter to run the DISM tool:
DISM /Online /Cleanup-Image /RestoreHealth - Wait for the scan to complete, then restart the computer and check if the 0x800f0831 Windows 10 install error is fixed.

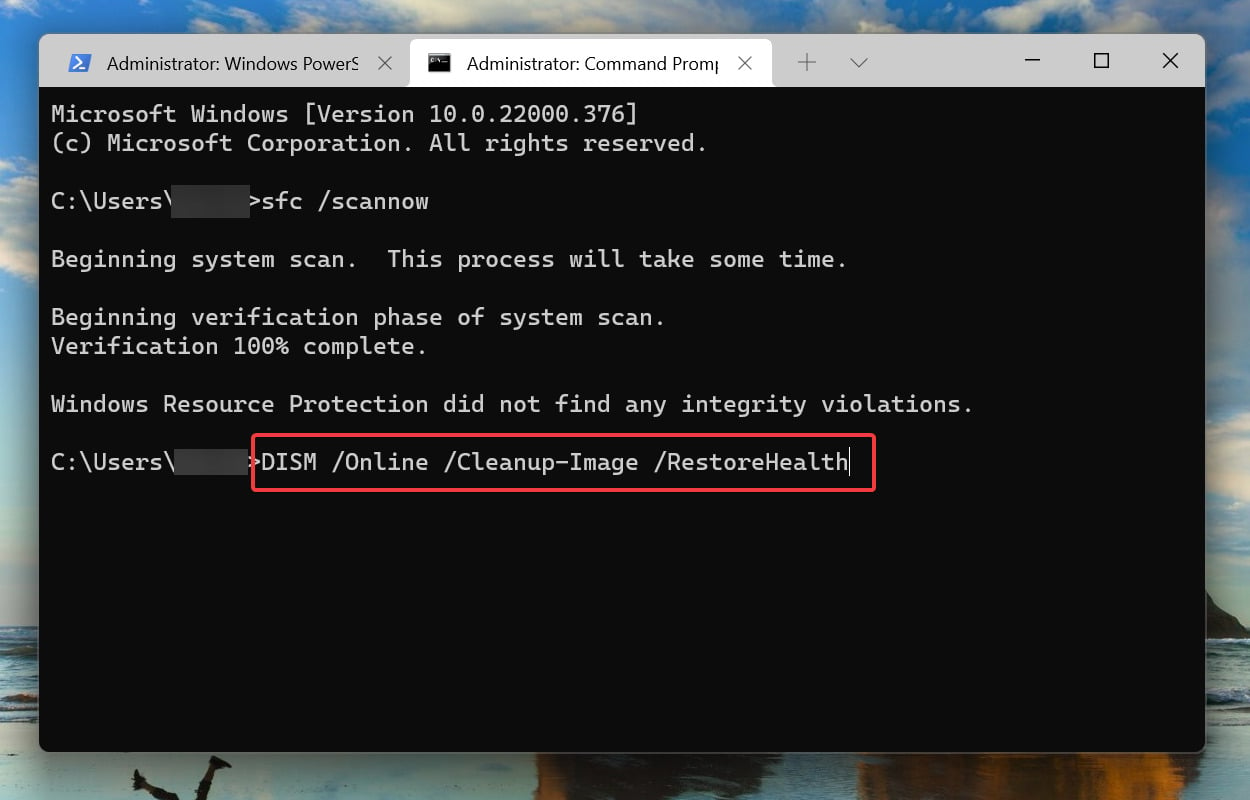
Both the SFC and DISM are critical in detecting problems with the update process. The SFC (System File Checker) scan identifies corrupt system files, and if any are found, replaces them with their cached copy stored on the system.
The DISM (Deployment Image Servicing & Management) tool, on the other hand, looks for problems with the Windows image and can modify the installation media, if required.
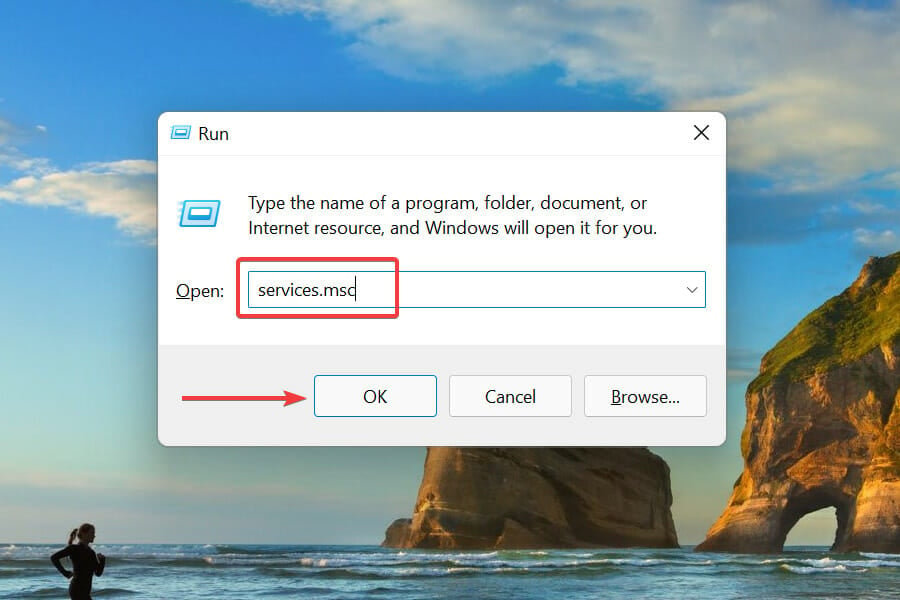
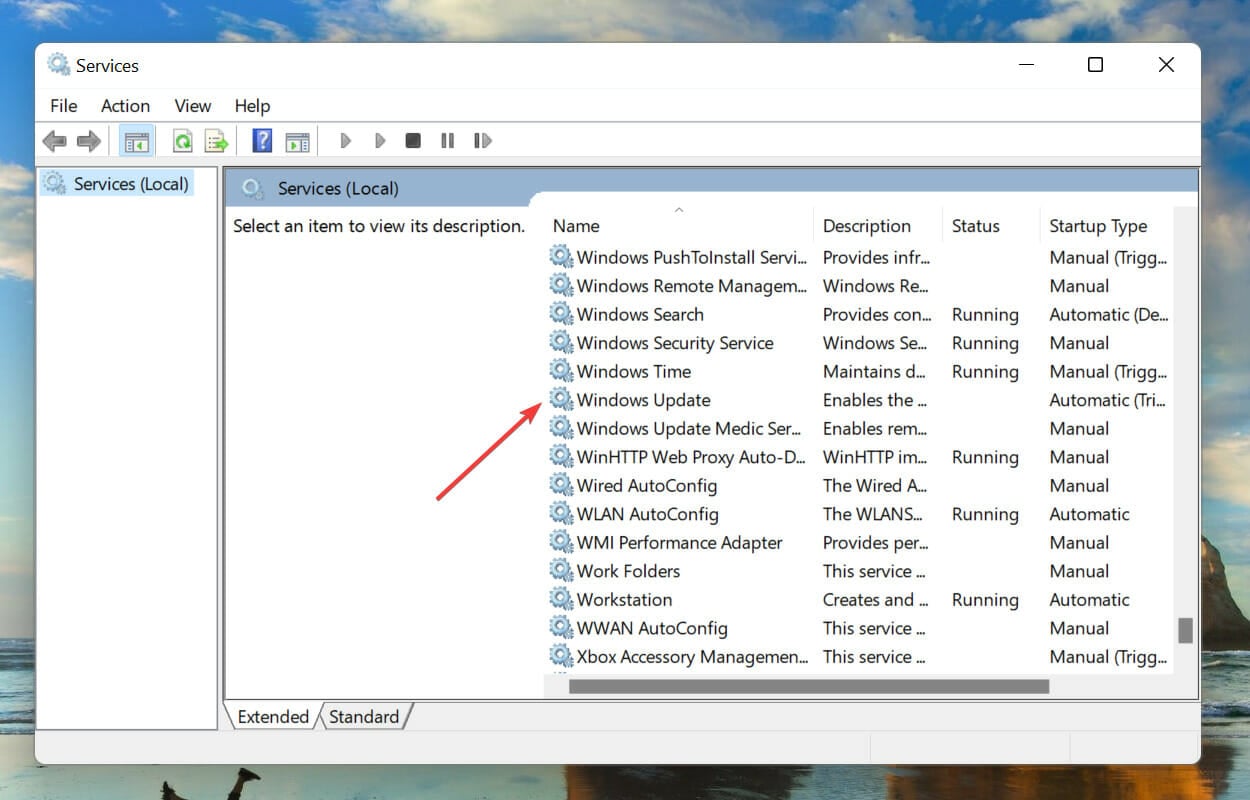
4. Restart the Windows Update service
- Press Windows + R to launch the Run command. Type services.msc in the text field, and either click on OK or hit Enter to launch the Services app.

- Locate and double-click on the Windows Update service to launch its Properties.
- Click on the Startup type dropdown menu, and select Automatic from the list of options.
- Next, click on the Start button under Service status, and then click on OK to save the changes.
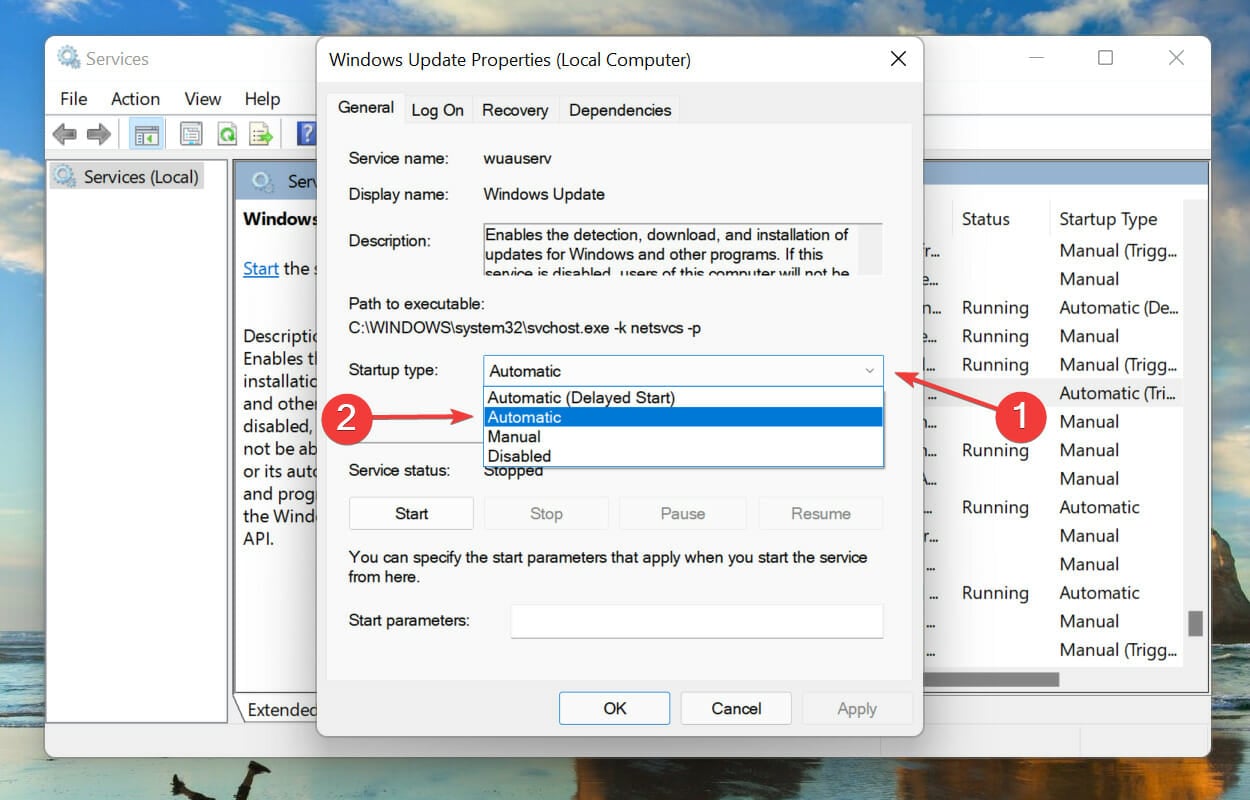
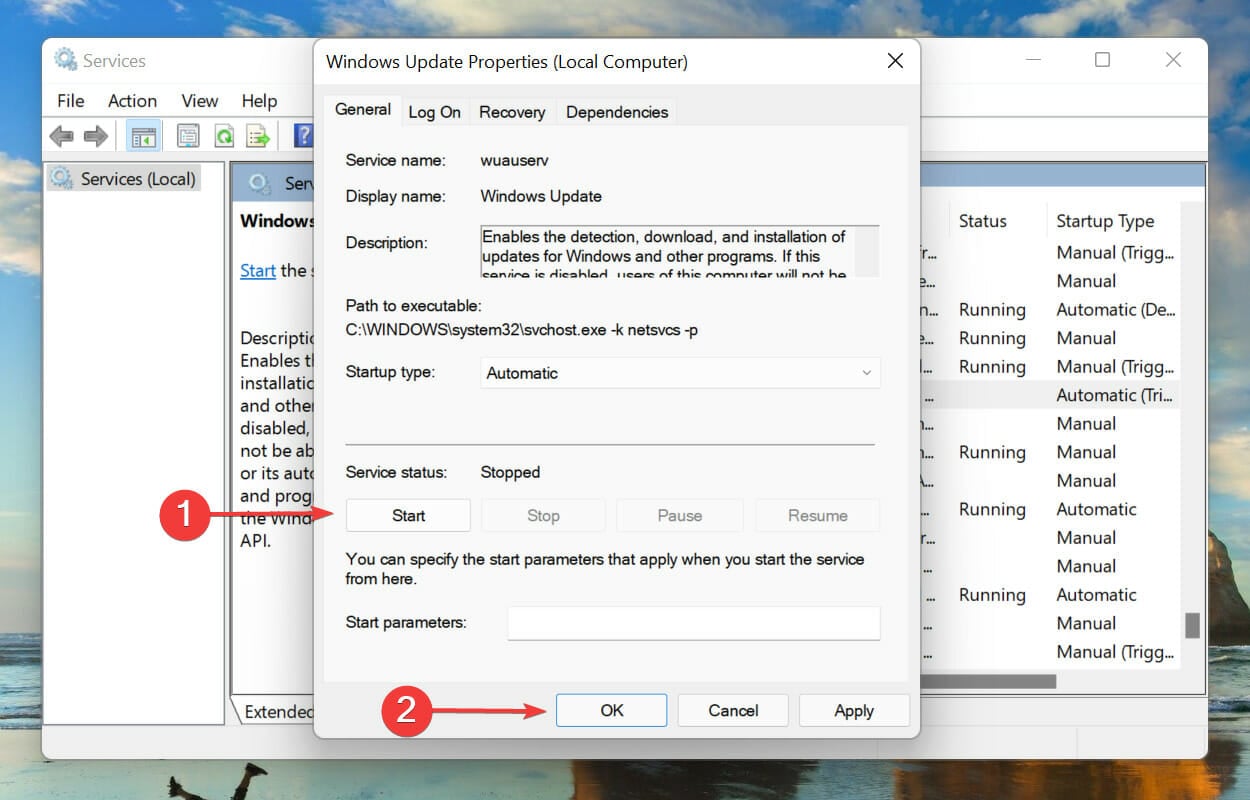
After starting the Windows Update service, check if the 0x800f0831 install error is fixed.
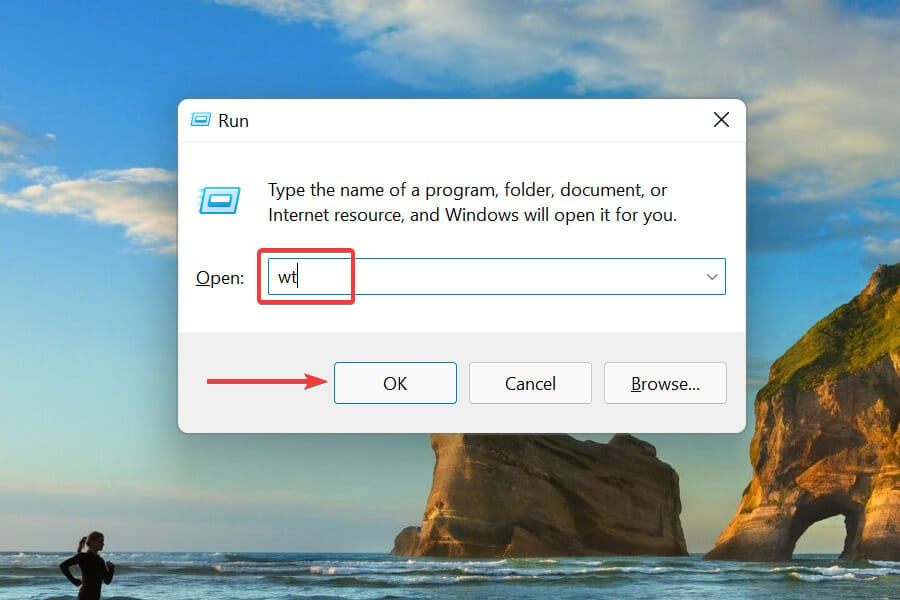
5. Reset Windows Update components
- Press Windows + R to launch the Run command. Type wt in the text field, hold the Ctrl + Shift, and either click on OK or hit Enter to launch an elevated Windows Terminal.
- Click on the downward arrow at the top, and select Command Prompt from the menu to open it in a new tab.
- Now, type/paste each of the following commands and hit Enter after each to reset the Windows Update components and fix the 0x800f0831 Windows Update error.
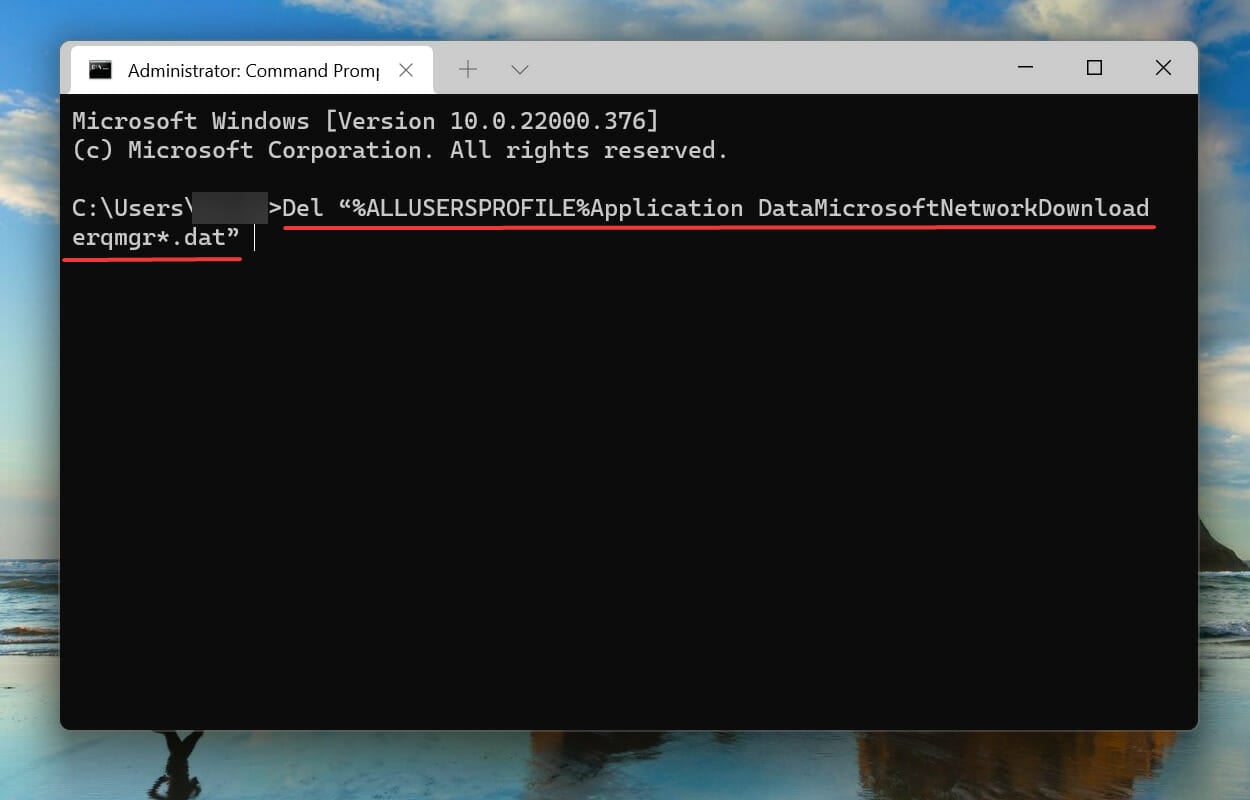
- Execute the following two commands to stop the BITS and Windows Update services:
net stop bitsnet stop wuauserv - Next, execute the following command to delete the qmgr*.dat files:
Del “%ALLUSERSPROFILE%Application DataMicrosoftNetworkDownloaderqmgr*.dat” - The following commands will rename some critical folders. Though if you are attempting the reset the process for the first time, skip this step, and if the process doesn’t go through, try it the next time.
Ren %Systemroot%\SoftwareDistribution\DataStore DataStore.bakRen %Systemroot%\SoftwareDistribution\Download Download.bakRen %Systemroot%\System32\catroot2 catroot2.bak - Execute the following two commands to reset the BITS and Windows Update service:
sc.exe sdset bits D:(A;;CCLCSWRPWPDTLOCRRC;;;SY)(A;;CCDCLCSWRPWPDTLOCRSDRCWDWO;;;BA)(A;;CCLCSWLOCRRC;;;AU)(A;;CCLCSWRPWPDTLOCRRC;;;PU)sc.exe sdset wuauserv D:(A;;CCLCSWRPWPDTLOCRRC;;;SY)(A;;CCDCLCSWRPWPDTLOCRSDRCWDWO;;;BA)(A;;CCLCSWLOCRRC;;;AU)(A;;CCLCSWRPWPDTLOCRRC;;;PU) - Next, type/paste the following command and hit Enter to execute it:
cd /d %windir%\system32 - Now, execute each of the following commands individually to re-register the BITS and Windows Update files:

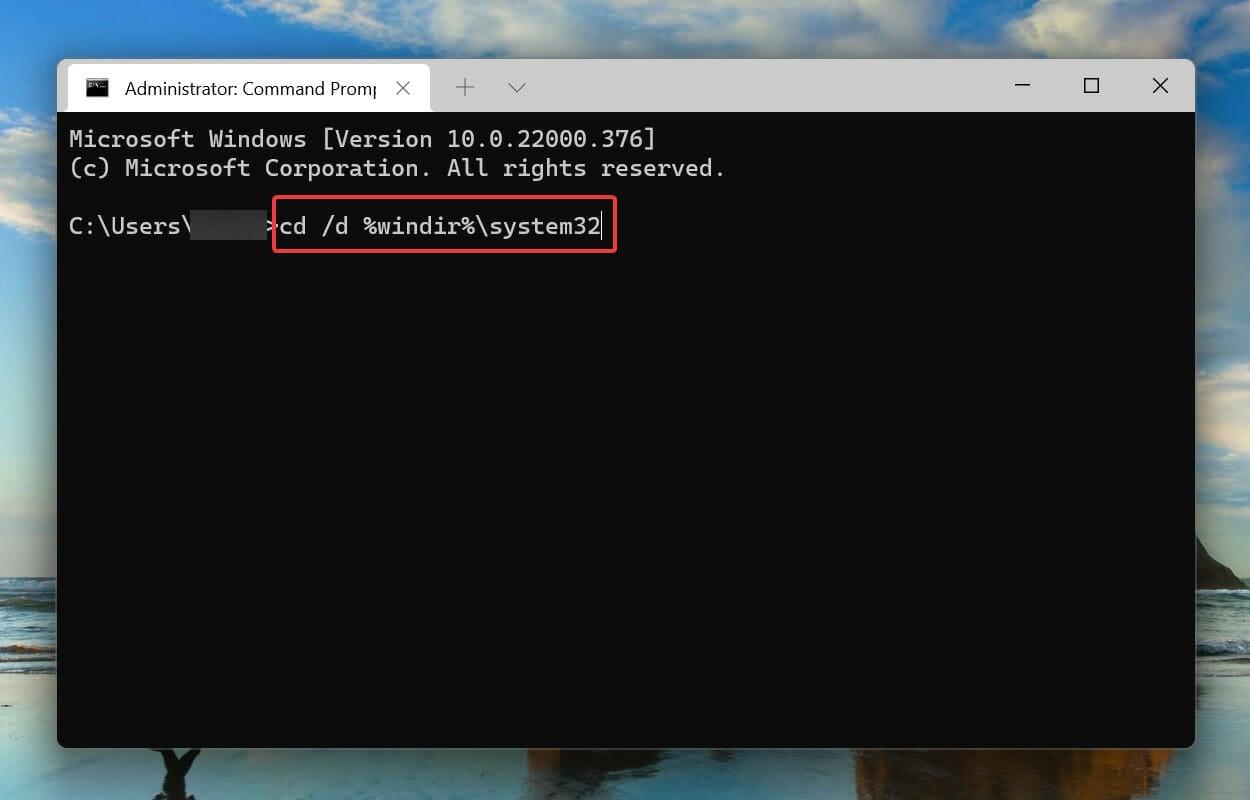
regsvr32.exe atl.dll
regsvr32.exe urlmon.dll
regsvr32.exe mshtml.dll
regsvr32.exe shdocvw.dll
regsvr32.exe browseui.dll
regsvr32.exe jscript.dll
regsvr32.exe vbscript.dll
regsvr32.exe scrrun.dll
regsvr32.exe msxml.dll
regsvr32.exe msxml3.dll
regsvr32.exe msxml6.dll
regsvr32.exe actxprxy.dll
regsvr32.exe softpub.dll
regsvr32.exe wintrust.dll
regsvr32.exe dssenh.dll
regsvr32.exe rsaenh.dll
regsvr32.exe gpkcsp.dll
regsvr32.exe sccbase.dll
regsvr32.exe slbcsp.dll
regsvr32.exe cryptdlg.dll
regsvr32.exe oleaut32.dll
regsvr32.exe ole32.dll
regsvr32.exe shell32.dll
regsvr32.exe initpki.dll
regsvr32.exe wuapi.dll
regsvr32.exe wuaueng.dll
regsvr32.exe wuaueng1.dll
regsvr32.exe wucltui.dll
regsvr32.exe wups.dll
regsvr32.exe wups2.dll
regsvr32.exe wuweb.dll
regsvr32.exe qmgr.dll
regsvr32.exe qmgrprxy.dll
regsvr32.exe wucltux.dll
regsvr32.exe muweb.dll
regsvr32.exe wuwebv.dll
11. Now, paste the following command and hit Enter to reset Winsock:netsh winsock reset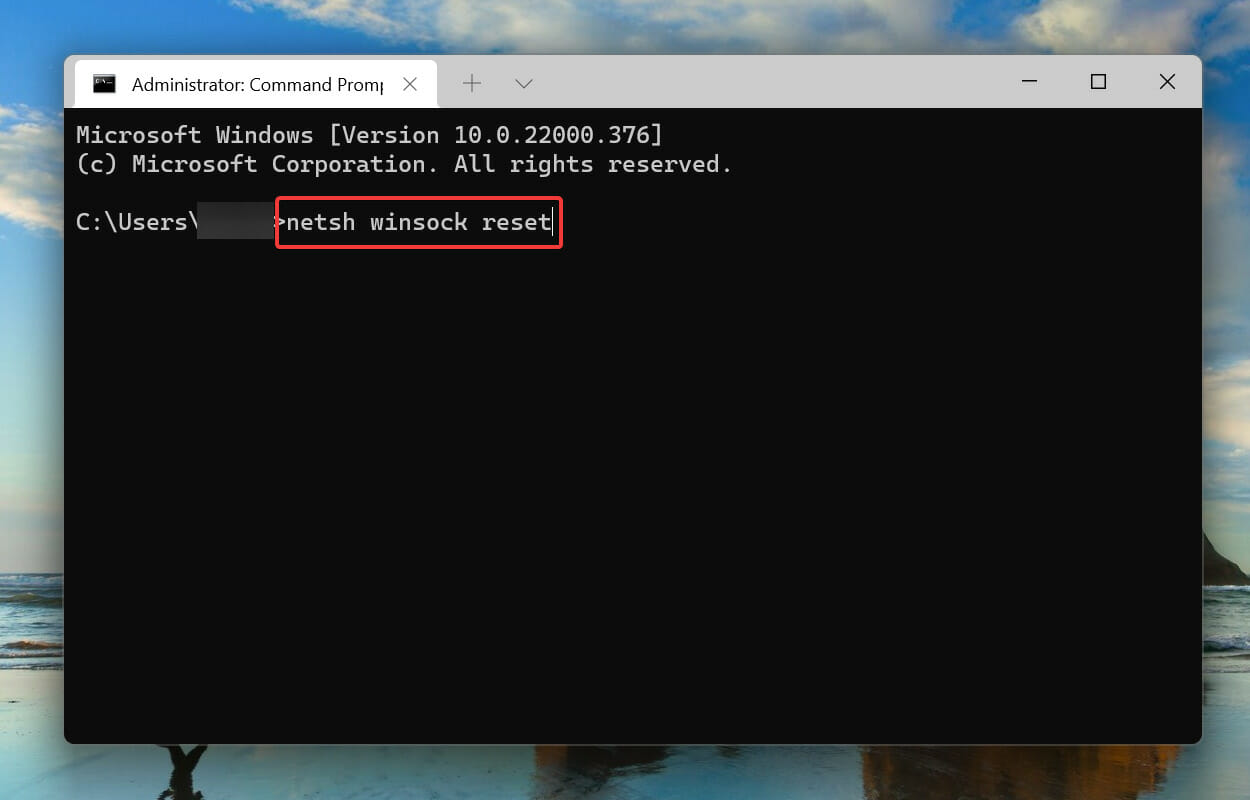
12. The last step is to restart the BITS and Windows Update service, so execute the following commands to do that:net start bits net start wuauserv
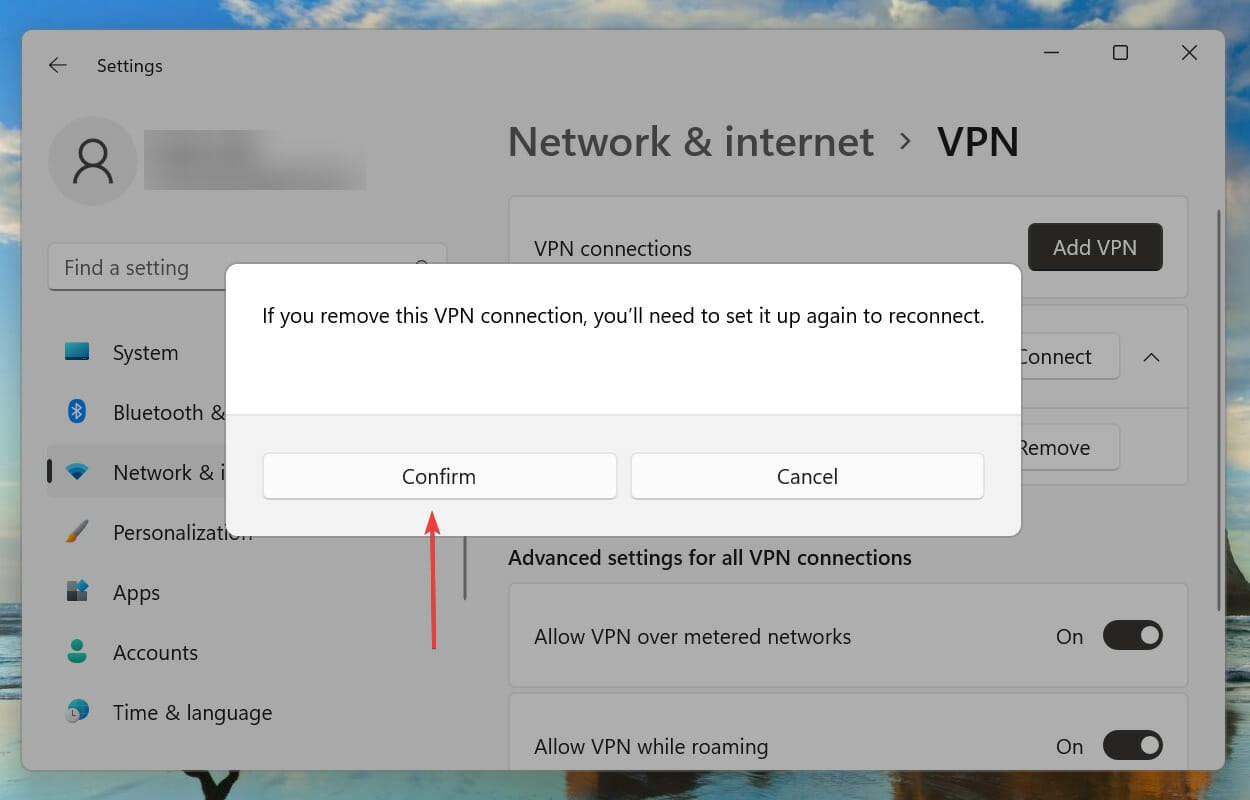
6. Disable VPN
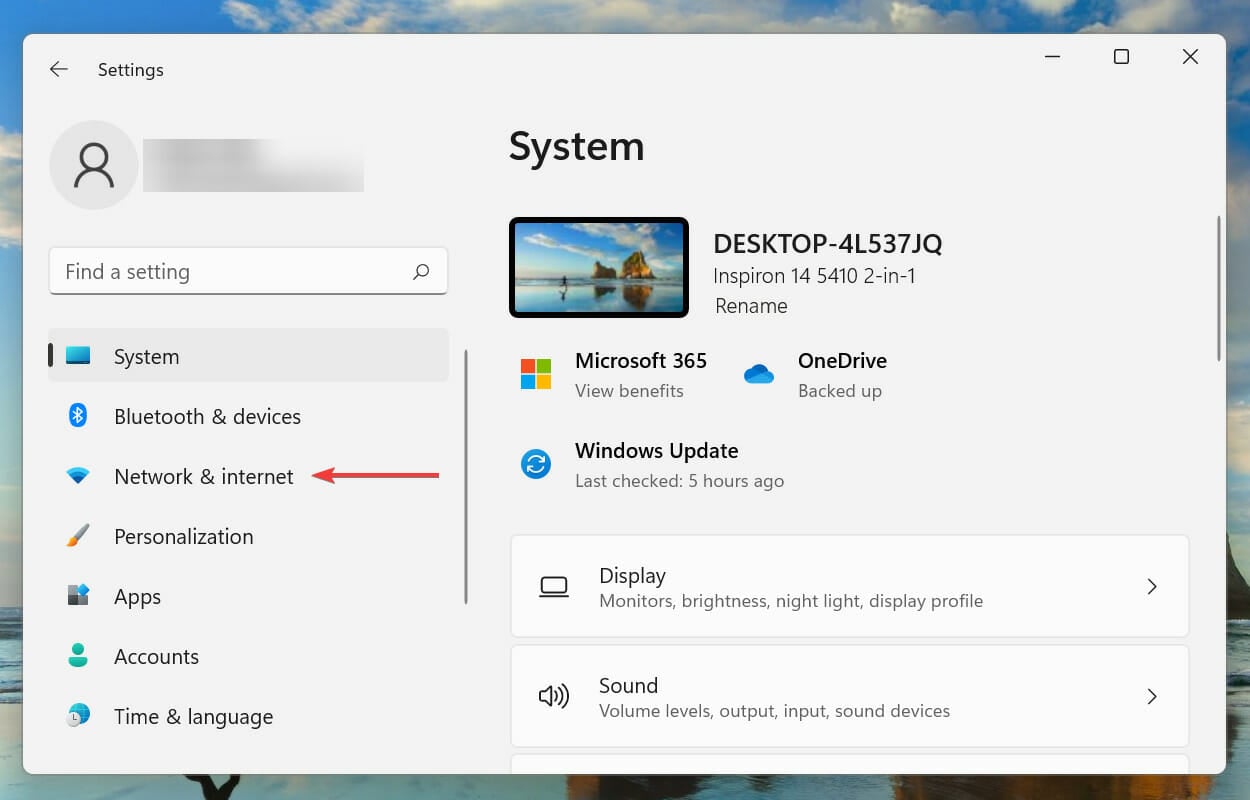
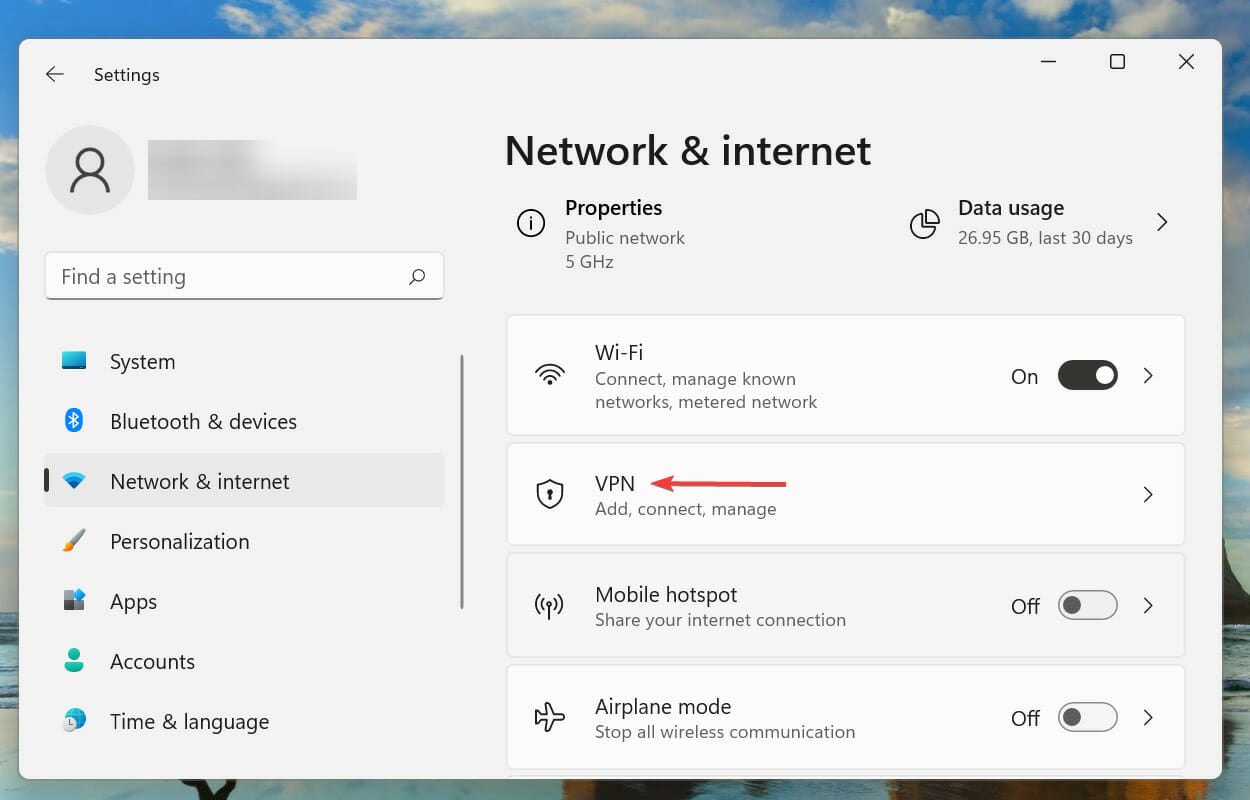
- Press Windows + I to launch the Settings app, and select Network & Internet from the navigation pane on the left.
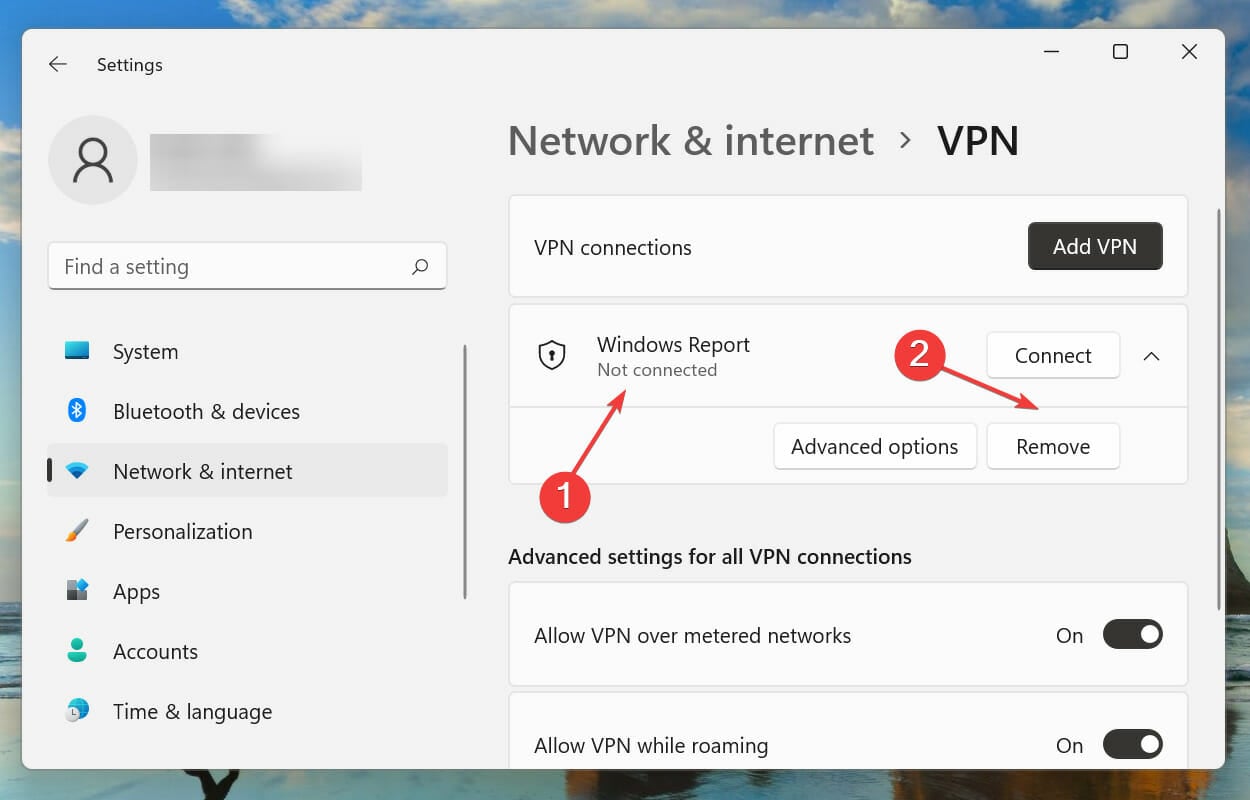
- Click on VPN on the right.
- Next, click on the configured VPN, and select Remove from the options that appear.
- Click Confirm on the pop up.
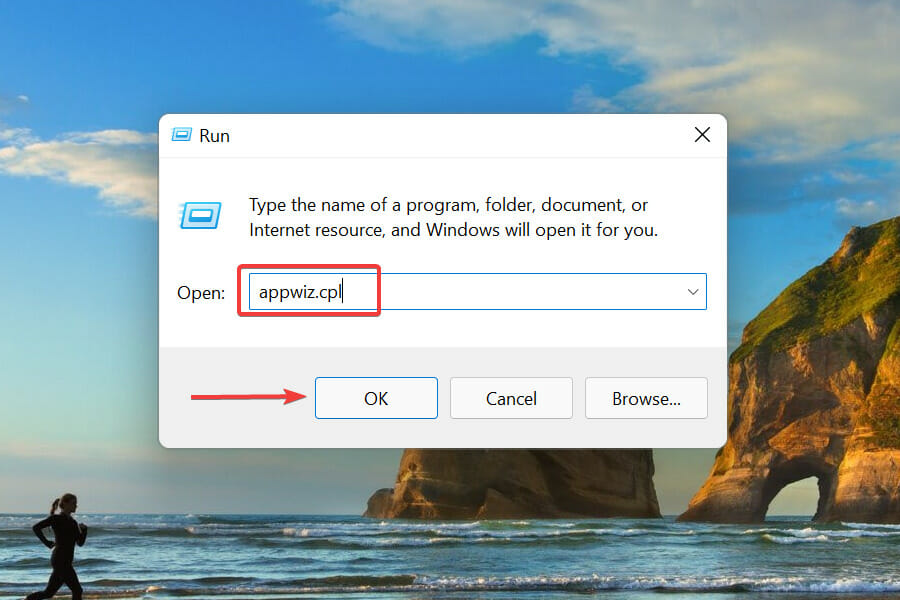
7. Enable .Net Framework 3.5
- Press Windows + R to launch the Run command. Type appwiz.cpl in the text field, and click on OK or hit Enter to launch the Programs and Features window.
- Click on Turn Windows features on or off from the left.
- Now, tick the checkbox for .Net Framework 3.5 (includes .Net 2.0 and 3.0), and click on OK to save the changes.
- If required, follow the on-screen instructions to download the relevant files.

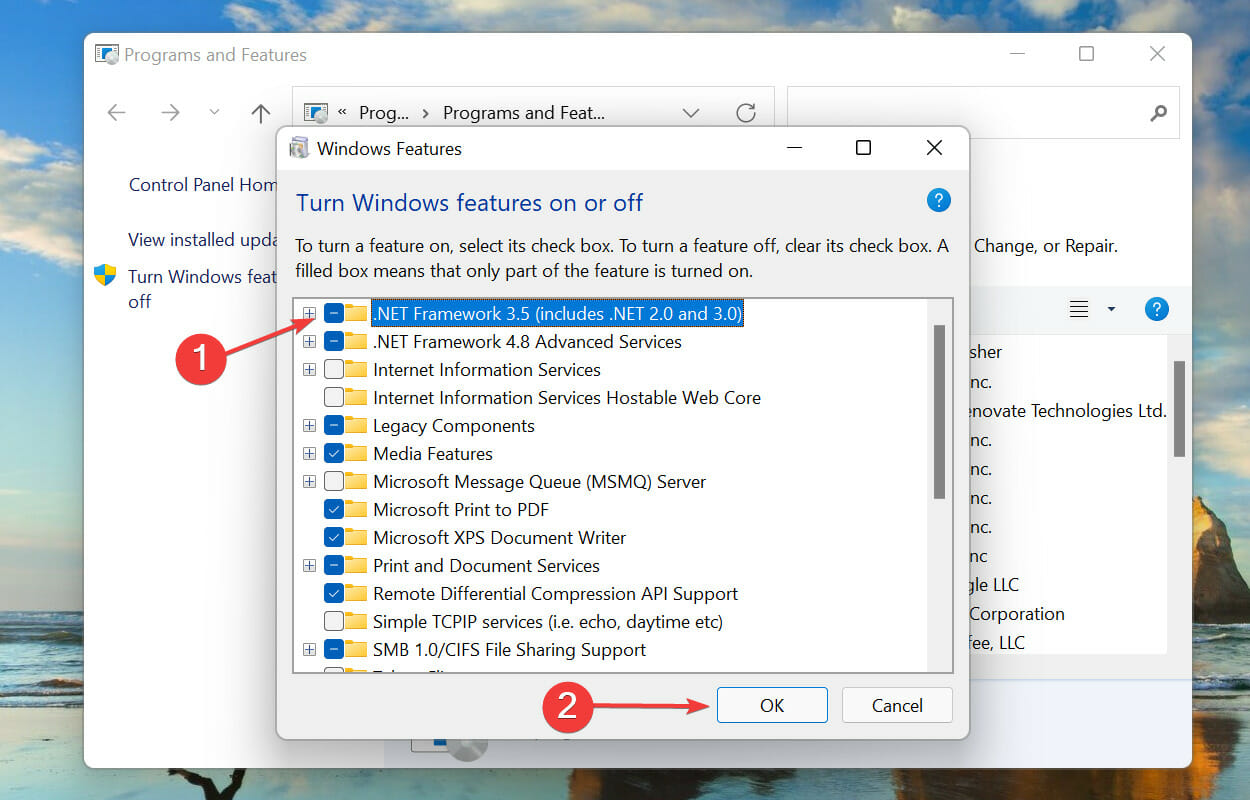
Now, restart the computer and check if the 0x800f0831 install error is fixed.
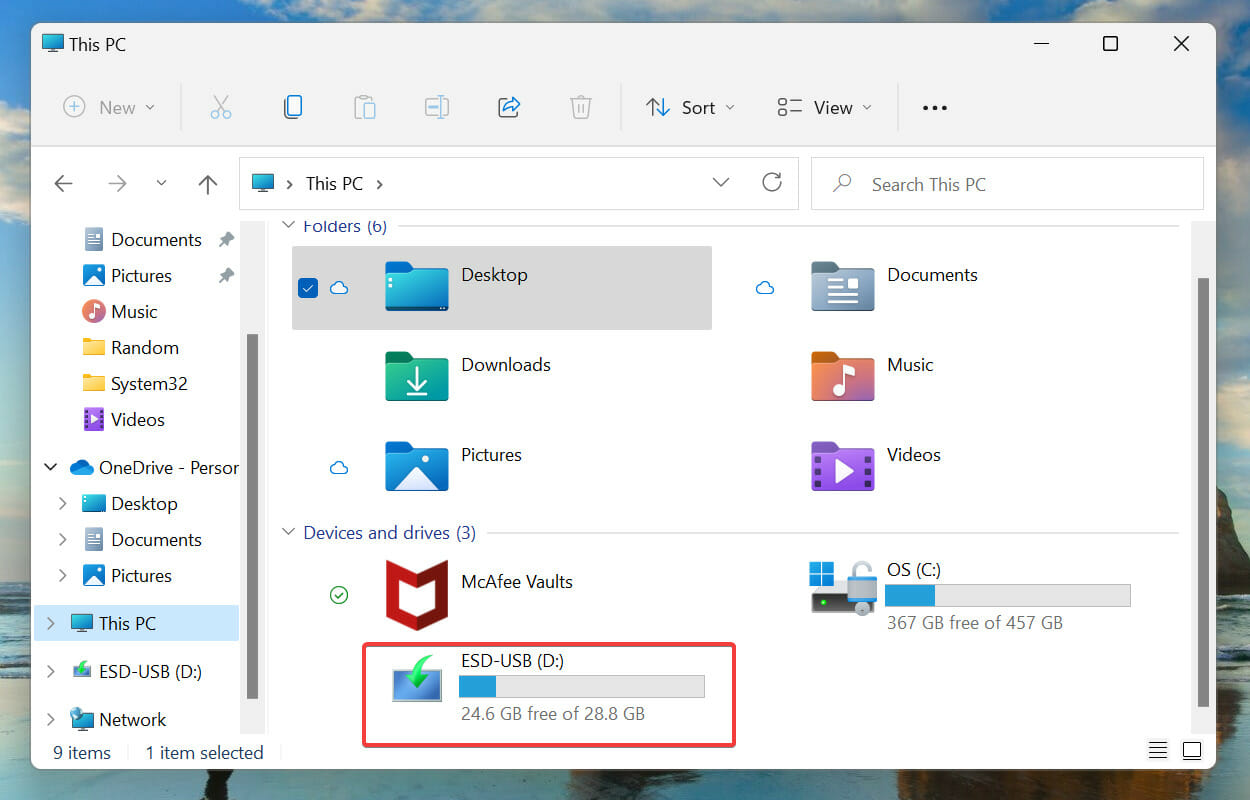
8. Perform an in-place upgrade to repair Windows
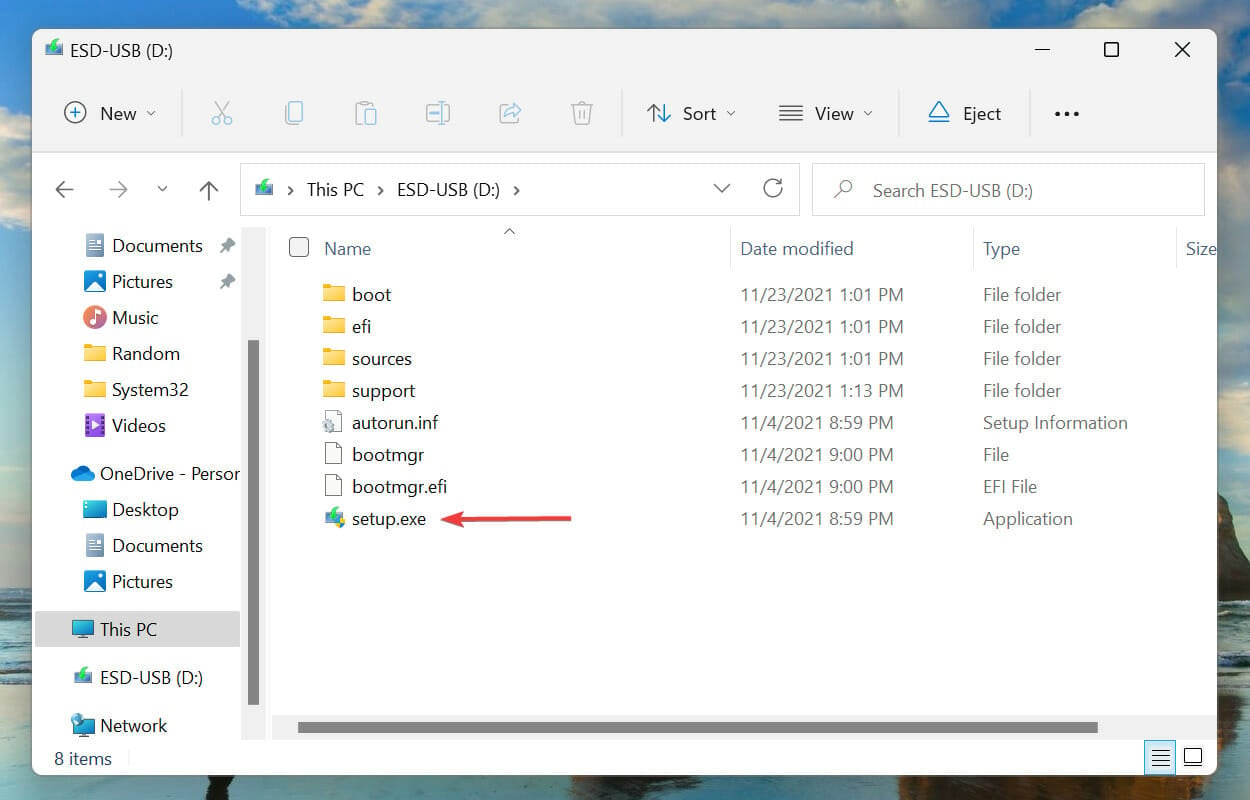
- Create a bootable USB drive for Windows.
- Connect the USB drive and double-click on it in the File Explorer to view its contents.
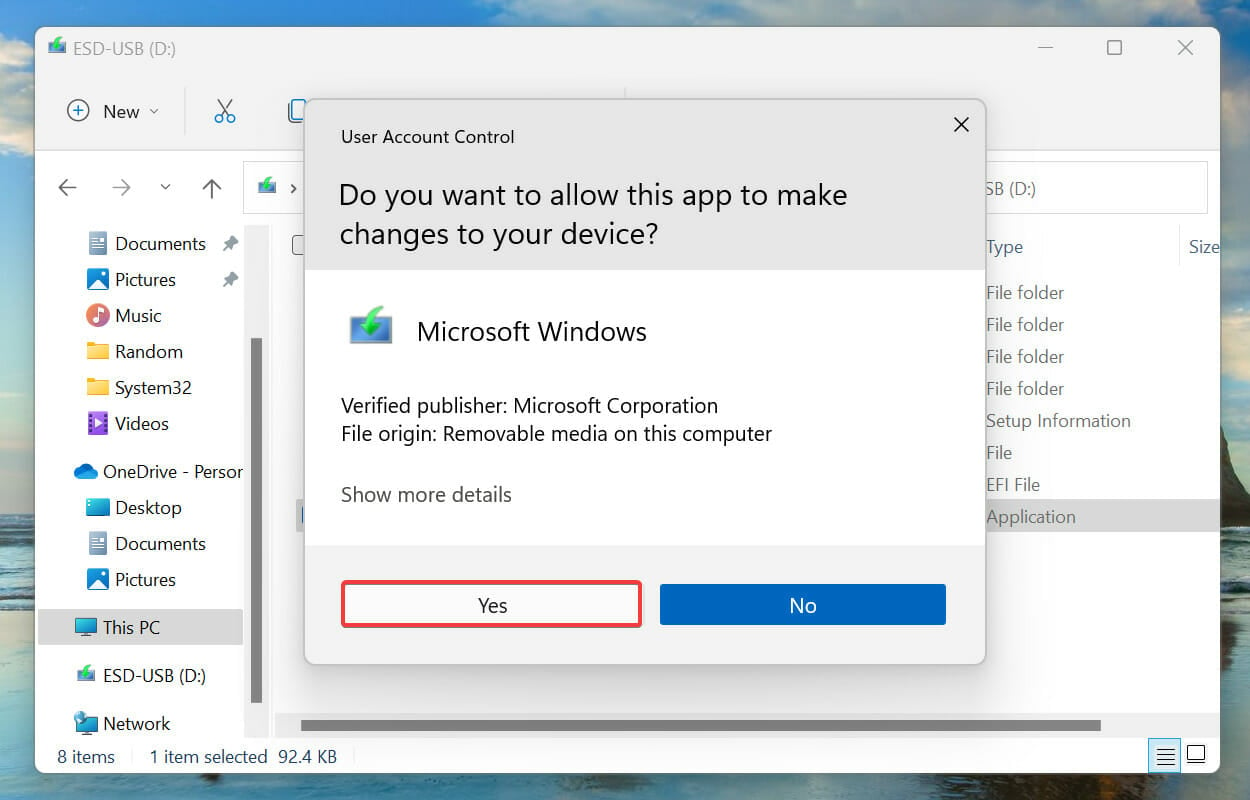
- Double-click on the setup.exe file.
- Click Yes on the UAC (User Account Control) prompt that pops up.
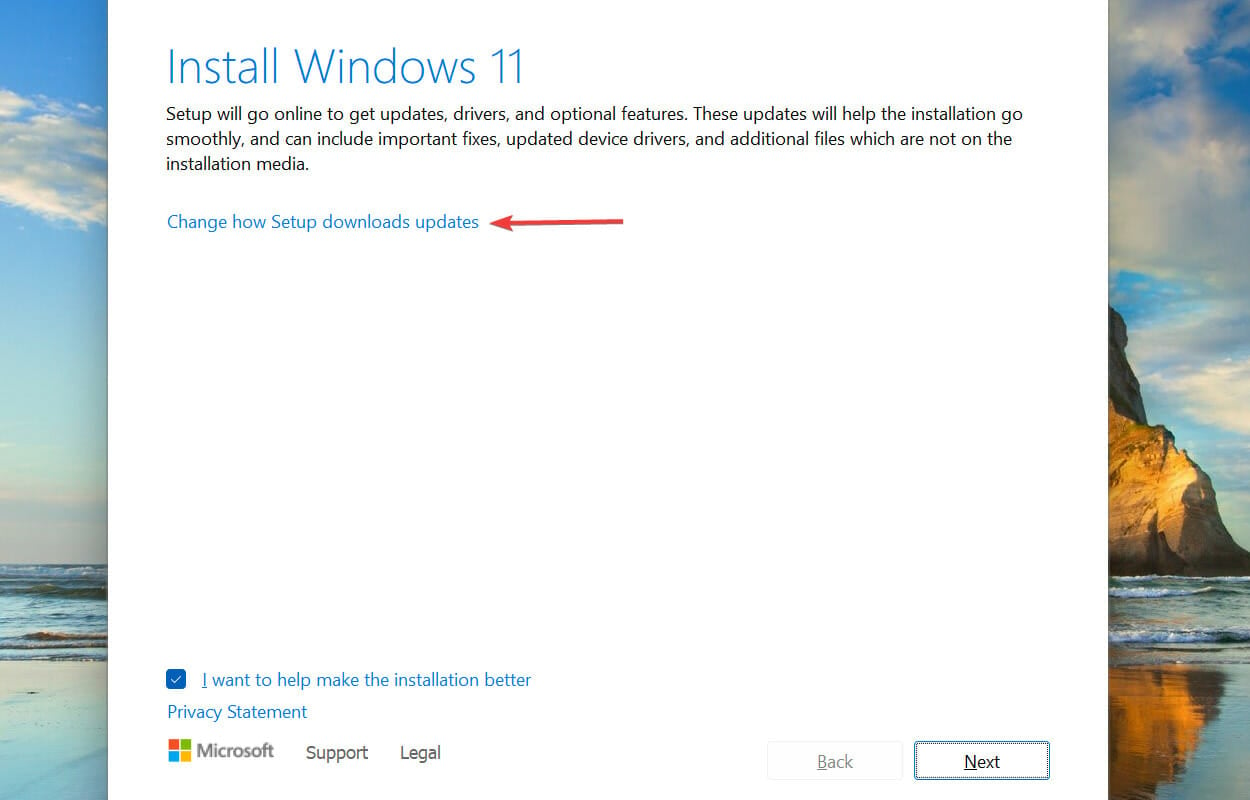
- Then, click on Change how Setup downloads updates.
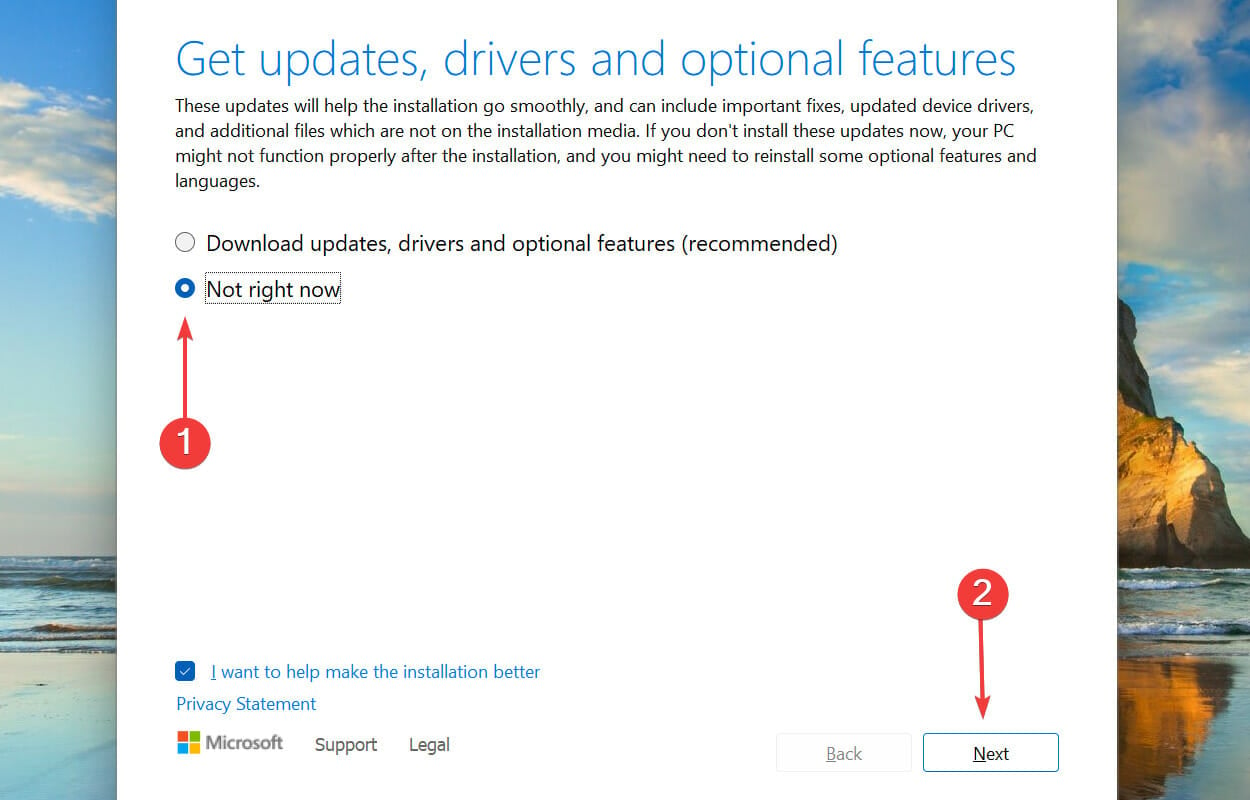
- Select the Not right now option and click on Next. We choose this option to keep the repair process as straighfortward as possible.
- Click on Accept.
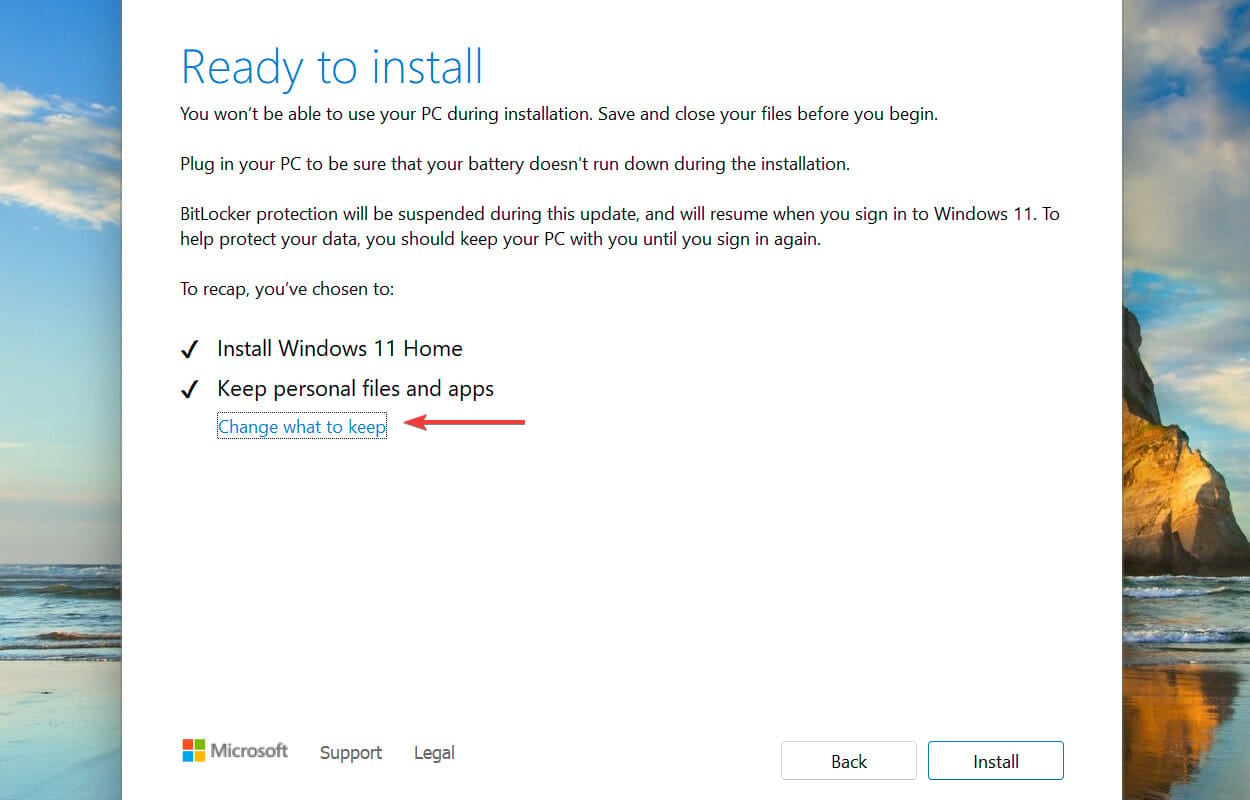
- Click on Change what to keep.
- Select Keep personal files and apps and click on Next.
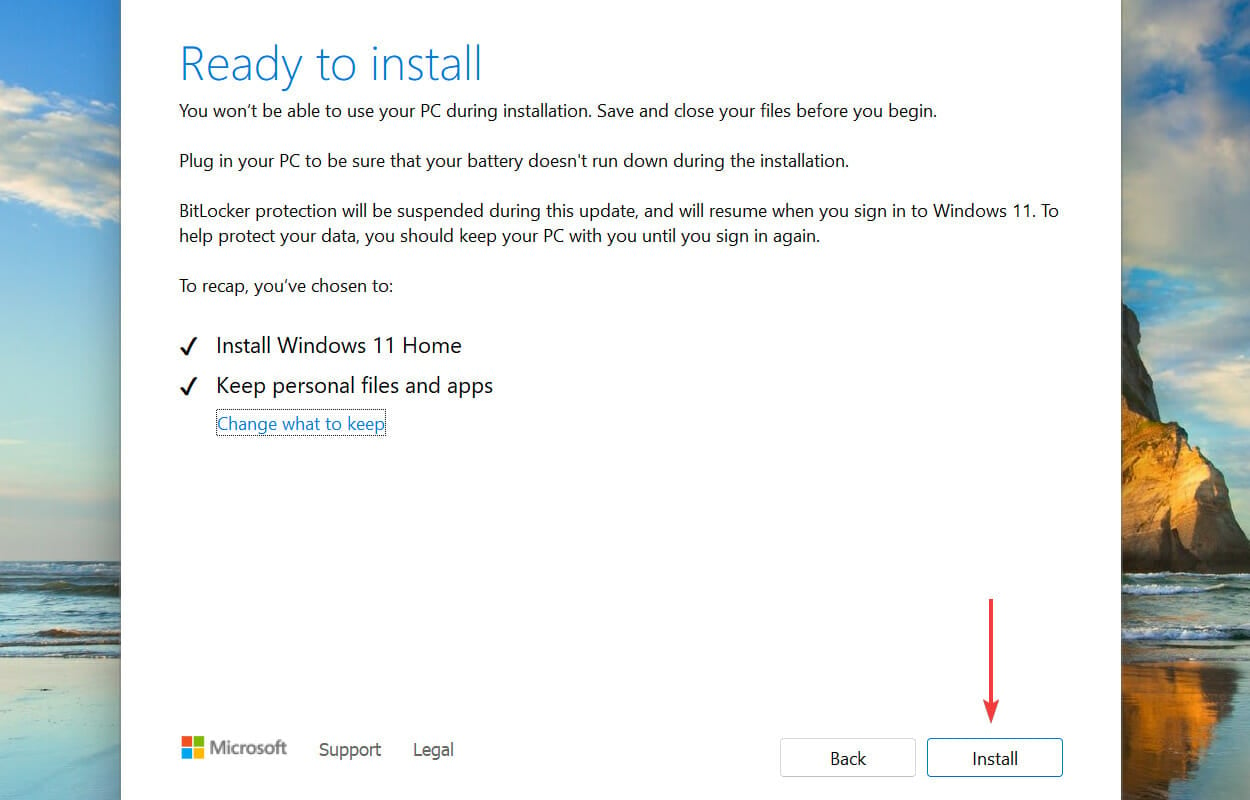
- Finally, click on Install to start the process.

We also have a dedicated guide on how to fix the 0x800f0831 install error in Windows 11 that you can check out for more info.
Are there other Windows 11 installation errors?
There are various installation issues, apart from 0x800f0831, in Windows 11. To help you fix these, we have a dedicated set of guides that you should know about.
For example, learn how to fix Windows 11 installation error 0xc1900101 or what to do if the Windows 11 installation has failed.
Also, note that there are a few elements that need to be set up properly before starting the OS upgrade process, or else you risk getting an error saying Windows 11 update stuck at 100%.
As you can see, if you ever encounter an installer error, just find the relevant guide, and get your system back up and running in no time.
That’s all there is to the 0x800f0831 installer error in Windows 11, along with the most relevant fixes for it. If these don’t work, you can reset Windows 11 to its factory settings.
Tell us which fix worked and your experience of Windows 11 thus far, in the comments section below.
![]()
Время на прочтение
1 мин
Количество просмотров 4.4K
Некоторые пользователи уже несколько месяцев не могут установить обновления Windows 11 из Центра обновления Windows. Проблема также возникает при установке ежемесячных исправлений Microsoft.

Так, пользователи не могут установить обязательное обновление безопасности KB5022303. При попытке запуска оно выдаёт сообщения об ошибках, причём наиболее распространённым кодом ошибки стал 0x800f0831. Та же проблема возникает с необязательным обновлением KB5022360.
«Мой ноутбук HP не смог успешно установить самое последнее обновление: накопительное обновление 2023-01 для Windows 11 версии 22H2 для систем на базе x64 (KB5022303). В нём выдаётся следующее сообщение/код ошибки: «Не удалось установить на 1/15/2023 — 0x800f0988″», — пожаловался один из пользователей.
«=update пытается установиться уже более недели и продолжает выдавать ошибку 0x80070005. Я пробовал перезапускать систему, выходить из неё, выключать ПК, очищать кэши и т. д. Проблема сохраняется», — добавил другой.
Подобные проблемы с Центром обновления Windows уже регистрировали начиная с августа.
В настоящее время Microsoft расследует проблему.
Аналогичные ошибки ранее уже наблюдались в Windows 10.
Microsoft уже начала связывать SSU (обслуживание обновлений стека) с ежемесячным накопительным обновлением, но этот подход не сработал.
Другим обходным решением может стать обновление на месте с помощью Media Creation Tool, но это может быть долгим и утомительным процессом. Сообщается, что Microsoft начала работать над опцией, которая позволит выполнить его на месте без установочного носителя в Windows 11 с помощью новой опции в настройках Центра обновления Windows.
How to Fix Windows Update Error 0x800f0831 on Windows 11
On Windows 11, error code 0x800f0831 primarily occurs when installing a cumulative update. This article will discuss the causes of this error and provide you with ways to fix it.
Many Windows 11 users have reported getting this error when installing KB5008212, KB5005190, and KB5005033 updates.
What Causes 0x800f0831?
Our research has revealed that this error can occur for multiple reasons, which are listed below.
- Corrupted Windows Update components. If some core Windows Update components are missing or have been corrupted, the service may fail to install the update.
- Limited disk space. If your system disk has little to no storage left, Windows has no free space to save the update files and trigger the 0x800f0831 error.
- Software conflicts. Sometimes, this error can occur due to the Windows Update service conflicting with a third-party application, such as a VPN app, antivirus, or firewall software. Disabling or removing such software should fix the error. Boot up Windows 11 in Clean Boot Mode and try updating Windows
- A previous update is not installed. In some cases, this error occurs when an update requires the manifest of a prior update package.
- Windows Update is offline. The error can occur if Windows Update servers are down or experience other problems.
Video Instructions on How to Fix Windows Update Error 0x800f0831
Table of Contents:
- Introduction
- Method 1. Run the Windows Update Troubleshooter
- Method 2. Run the Deployment Image & Servicing Management (DISM) Scan
- Method 3. Run the System File Checker (SFC) Scan
- Method 4. Clear Windows Update Cache Folder
- Method 5. Reset Windows Update Components
- Video Instructions on How to Fix Windows Update Error 0x800f0831
Method 1. Run the Windows Update Troubleshooter
1. Right-click Start and select Settings.
2. In the System panel, scroll down and click Troubleshoot.
3. Select Other troubleshooters.
4. Run the Windows Update troubleshooter.
5. Apply the proposed fixes and restart your PC.
[Back to Table of Contents]
Method 2. Run the Deployment Image & Servicing Management (DISM) Scan
1. Hold down Windows+R keys to open Run.
2. In the Run dialog box, type in CMD and hold down Ctrl+Shift+Enter keys to open the Command Prompt as an administrator.
3. In the Comand Prompt window, type in DISM /Online /Cleanup-Image /ScanHealth and press Enter.
4. Type in DISM /Online /Cleanup-Image /RestoreHealth and press Enter.
5. Restart your PC once the scan is complete.
[Back to Table of Contents]
Method 3. Run the System File Checker (SFC) Scan
1. Hold down Windows+R keys to open Run.
2. In the Run dialog box, type in CMD and hold down Ctrl+Shift+Enter keys to open the Command Prompt as an administrator.
3. In the Command Prompt window, type in SFC /ScanNow and press Enter.
4. Restart your PC once the scan is complete.
[Back to Table of Contents]
Method 4. Clear Windows Update Cache Folder
1. Hold down Windows+R keys to open Run.
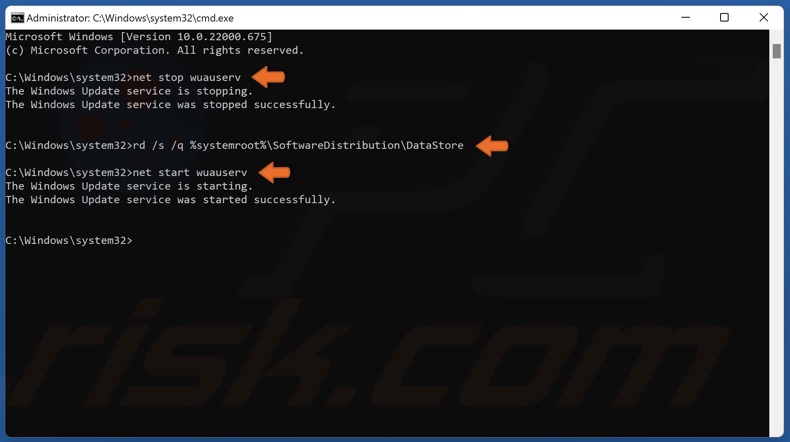
2. In the Run dialog box, type in CMD and hold down Ctrl+Shift+Enter keys to open the Command Prompt as an administrator.
3. In the Command prompt window, type in net stop wuauserv and press the Enter key.
4. Type in rd /s /q %systemroot%\SoftwareDistribution and press Enter.
5. Then, type in net start wuauserv and press Enter.
[Back to Table of Contents]
Method 5. Reset Windows Update Components
1. Hold down Windows+R keys to open Run.
2. In the Run dialog box, type in CMD and hold down Ctrl+Shift+Enter keys to open the Command Prompt as an administrator.
3. In the Command Prompt window, type in the commands below, and press the Enter key after entering each one:
- net stop wuauserv
- net stop cryptSvc
- net stop bits
- net stop msiserver
4. Then, type in ren C:\Windows\SoftwareDistribution SoftwareDistribution.old and press Enter.
5. Type in ren C:\Windows\System32\catroot2 Catroot2.old and press Enter.
6. Type in the commands below, and press the Enter key after entering each one to restart the stopped services:
- net start wuauserv
- net start cryptSvc
- net start bits
- net start msiserver
7. Try updating Windows.
Did this article help? Let us know by commenting below.
[Back to Top]
Are you having problems updating your Windows PC?
The 0x800f0831 error occurs when the users try to install the pending system updates on their Windows computers. Like other update errors, it is frustrating and can lead to inconvenience.
In this guide, we will take a detailed look at the causes of this problem and discuss several solutions that can help you fix the issue once and for all.
What Causes the Update Error 0x800f0831 in Windows?
There can be several reasons why you cannot install the latest updates on the system due to the 0x800f0831 error code. This issue typically occurs when the update you attempt to install requires a manifest file of an older update package.
When you install an update package on Windows, it comes with a manifest file that contains the update components and other relevant settings. In some cases, the update package you are trying to install requires the manifest file of an older package, but that update is not present in the system. This results in issues like the one at hand.
Other than this, it can also be caused by one or more of the following:
- Corruption errors within the system: Your system might be corrupted or infected by malware, preventing the update services from working properly.
- Update services are disabled: The services required to install updates on your system might be disabled or corrupt, affecting their functionality and causing the update error.
- VPN interference: The VPN you are using might be blocking the protocols used by Windows Update to download and install the latest updates. The same problem can also be caused due to a third-party security program installed on the system.
Having identified the possible causes of the problem, let’s examine the troubleshooting techniques that can help you resolve the problem at hand permanently.
1. Install the Missing Update
As we mentioned, this issue occurs when an older update with the required manifest file is missing from the system. It could be that the update was never installed or was accidentally removed.
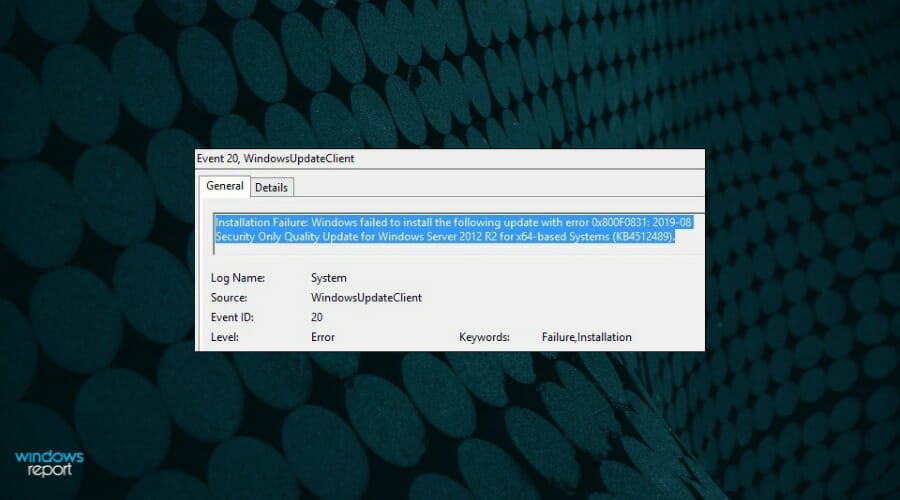
In most cases, it occurs when the KB4512489 update is missing from Windows. You can manually install this update using the Microsoft Update catalog to fix the problem.
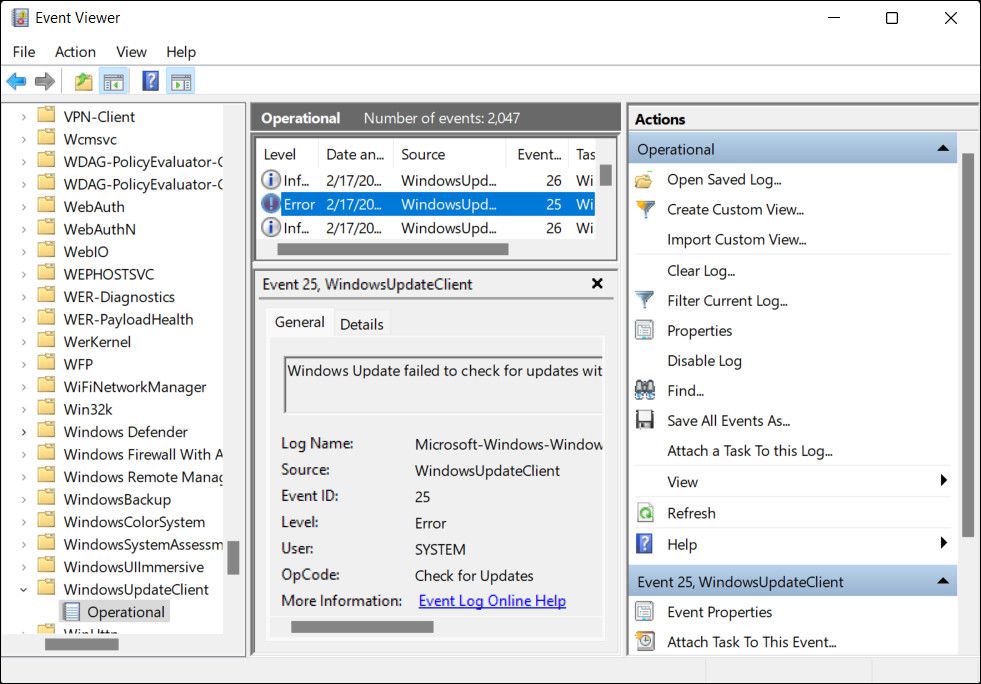
We recommend using the Windows Event Viewer to confirm the KB number of the update that is causing the problem. For this, you can open the Event Viewer and navigate to the following location:
Applications and Service Logs\Microsoft\Windows\WindowsUpdateClient\Operational
Here, look for the error and click on it. In the description area of the General tab, you should be able to view which missing update is causing the problem. Once you find that, use the Microsoft Update Catalog to search for this update. Take your time to download it.
After downloading the update, navigate to the download location and right-click on the .inf file. Choose Install and wait for the process to complete successfully. You should be able to install the update triggering the 0x800f0831 error once the missing update is launched in the system.
2. Eliminate Corruption Errors
You might also face the problem if the system is infected with a corruption error or malware.
You can repair corrupt Windows files with Window’s built-in tools like SFC and DISM scan. Both these utilities are built into Windows by default and can be accessed using the Command Prompt.
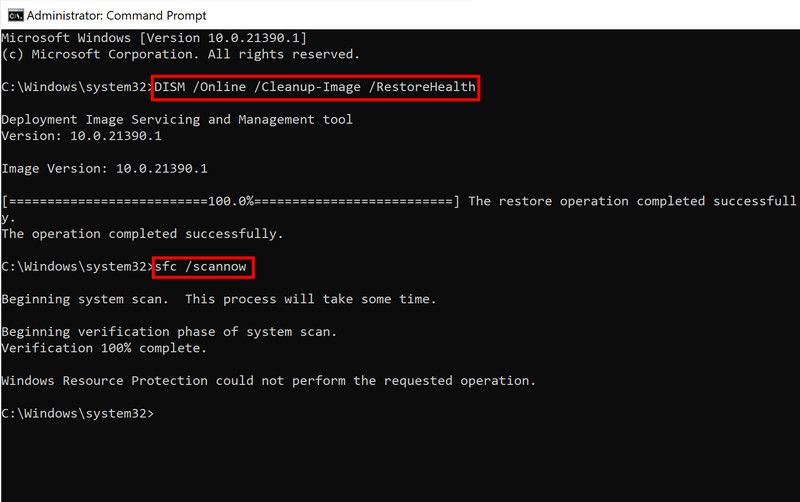
Here’s how you can do both steps:
- Run the Windows Command Prompt as an Administrator
- Type the following command and press enter:
sfc /scannow
- After the process completes, type the next command and press enter:
DISM /Online /Cleanup-Image /RestoreHealth
Once the process completes, try running Windows Update again and see if this fixes the problem.
The System File Checker scans the critical operating system files for underlying issues. If a problem is discovered, the tool with replace the file with its functional cached counterpart. DISM, on the other hand, can repair system images to fix problems. It is typically considered more powerful than SFC and is used to fix issues the System File Checker cannot resolve.
But if your computer is infected with malware, you should try one of the best malware removal tools to clean up your PC.
3. Repair the Component Store
Some of the update components required for an app or system update to install can be missing or might have gotten corrupt, which is preventing you from installing the desired update.
If this scenario is applicable, you can fix the problem by resetting the Windows update components using the Command Prompt. While you are at it, we also recommend restarting the critical update services in the Services utility of Windows. Restarting these services will eliminate any temporary bugs or glitches within them, fixing the issue in the process.
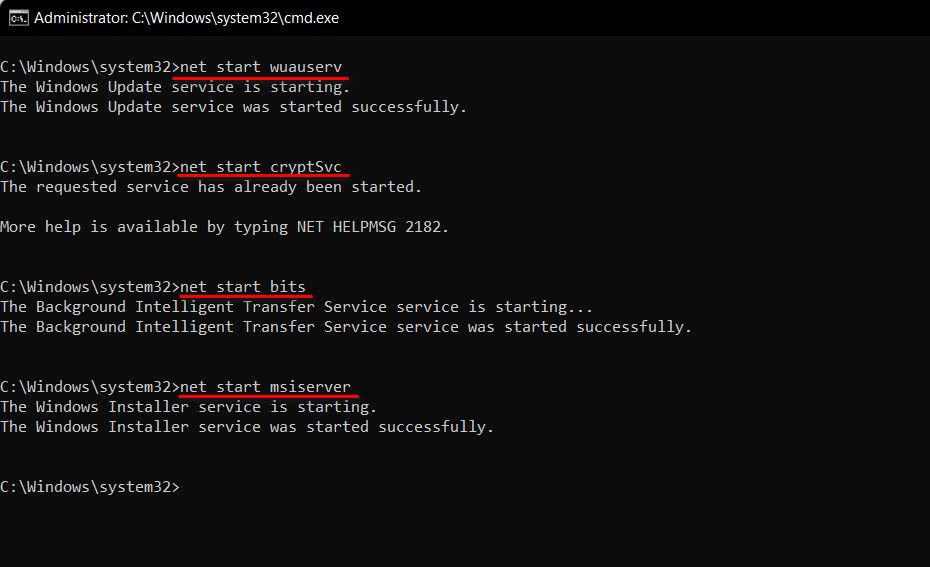
Here are some services that we recommend restarting:
- Windows Update
- Background Intelligent Transfer Service (BITS)
- Cryptographic Services
Here’s how you can do so:
- Run the Windows Command Prompt as an Administrator.
- Type the following commands and press Enter individually:
- net start wuauserv
- net start cryptSvc
- net start bits
- net start msiserver
Once they restarted, close the Services window and check if the problem is resolved.
4. Disable Your VPN and Other Third-Party Security Software

Using a VPN on your computer might block the protocols and ports Windows requires to download and install update packages.
We recommend disconnecting the VPN and trying to install the update to check if this is the case. If it works, then it implies that the VPN was the culprit; in this case, you can switch to a better alternative to avoid this issue.
We also recommend disabling your antivirus program before you attempt to install updates on the system. Like the VPN, third-party security programs can also interfere with the legitimate system process and cause issues like the one at hand. They might also block the updates altogether due to a false alarm.
Install the Targeted Updates Easily
Installing important system and app updates should be simple, but unfortunately, that is not always the case. Hopefully, the methods listed above will help you fix the update error 0x800f0831 once and for all.
If you still struggle to resolve the problem, consider resetting the system to its default state or performing a clean install. However, remember that these are time-consuming methods and should be only used as a last resort. Alternatively, you can report the issue to Microsoft and wait for them to release an official fix for the problem.