Running the update troubleshooter is an easy fix
by Vladimir Popescu
Being an artist his entire life while also playing handball at a professional level, Vladimir has also developed a passion for all things computer-related. With an innate fascination… read more
Updated on
- Microsoft .NET Framework is an important software to run software and applications on Windows OS.
- If there are some issues with the .NET Framework, then you may experience Windows 11 update error 0x800f081f.
- To fix this, you can try to tweak the Group Policy files, install Windows updates manually, or remove WUServer and WIStatusServer from registry.
XINSTALL BY CLICKING THE DOWNLOAD
FILE
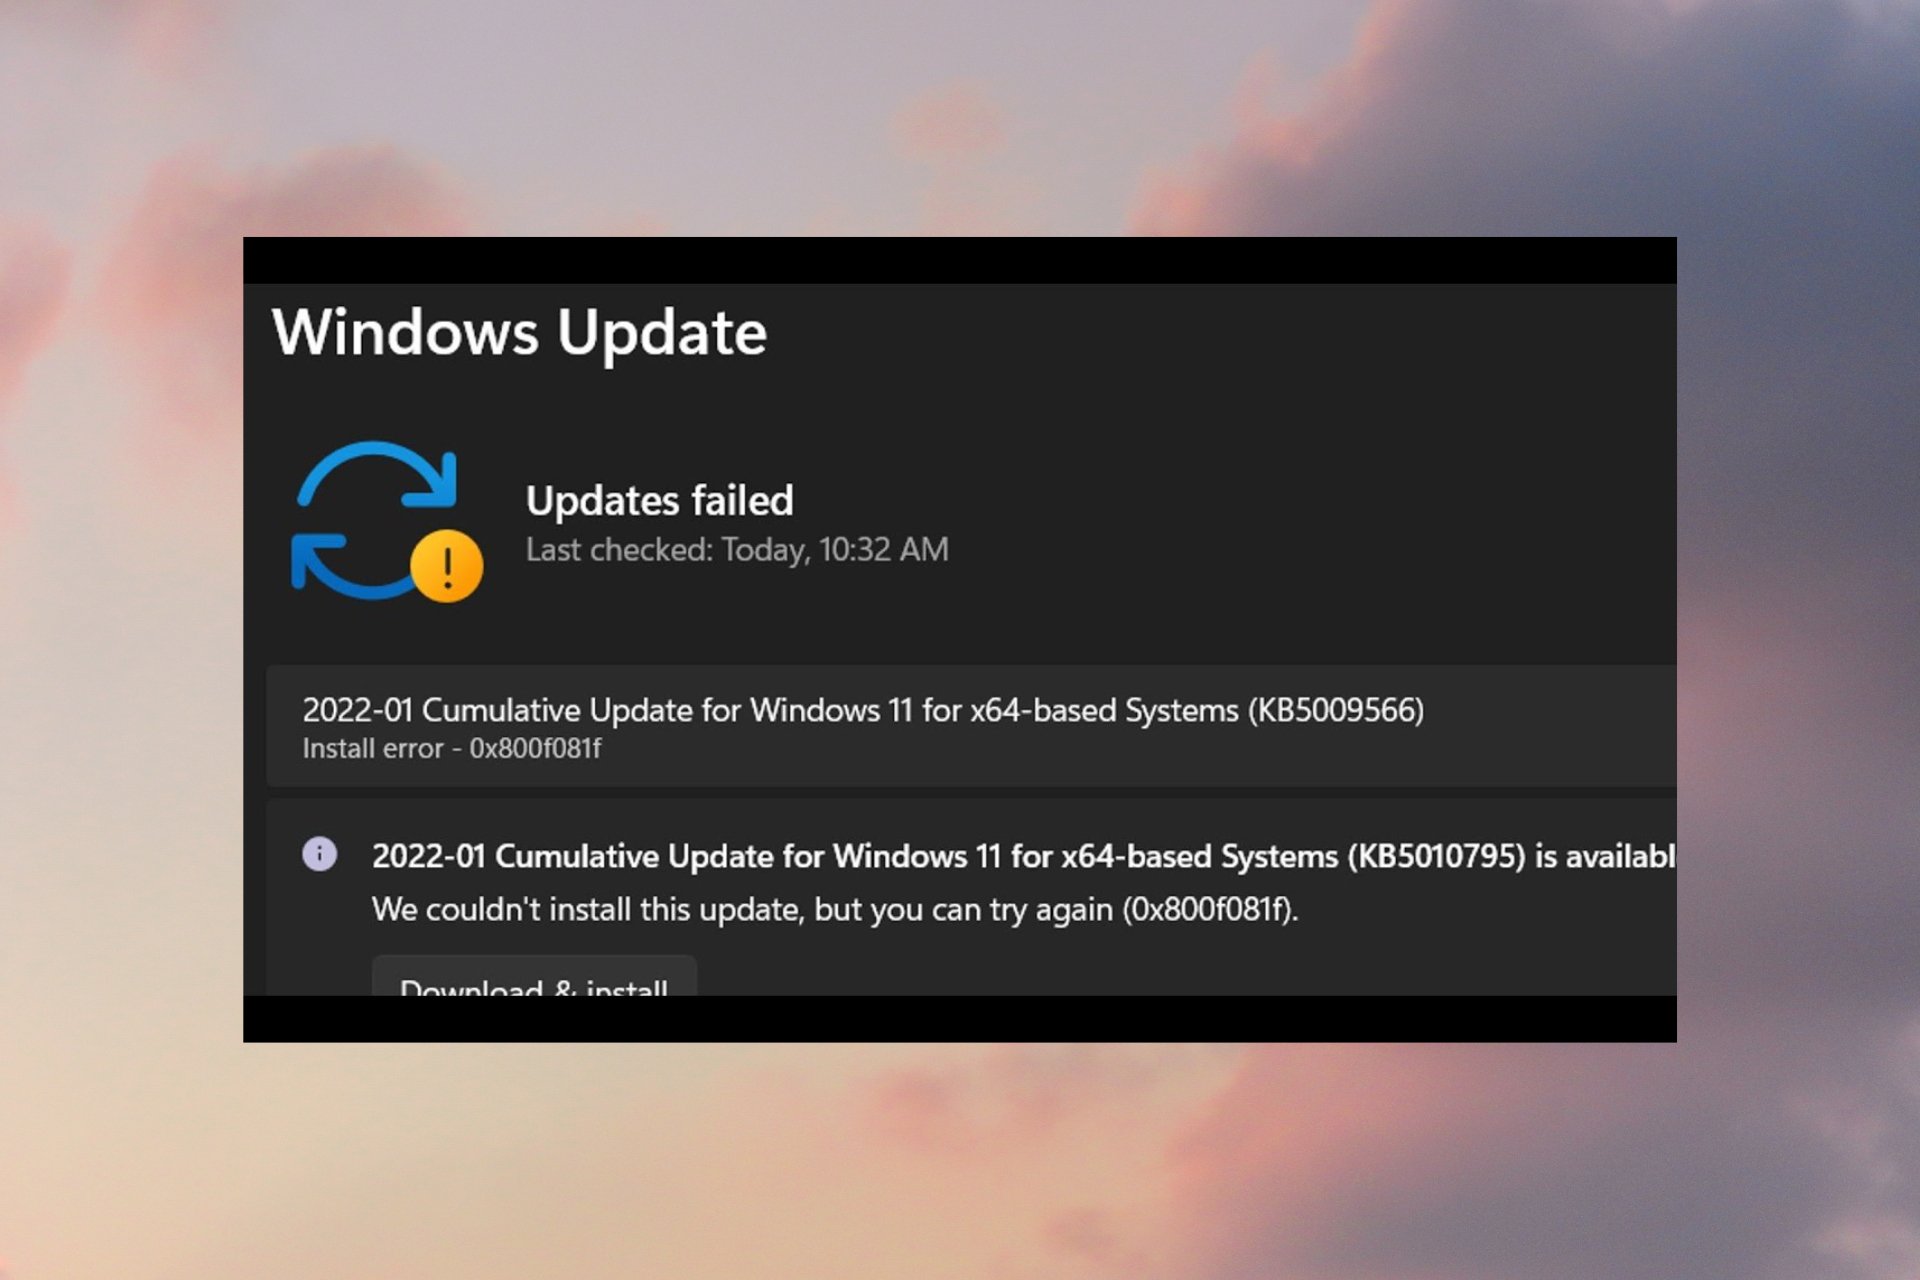
Installing the latest Windows 11 updates is essential for multiple reasons. But our readers have been complaining about the Windows 11 install error 0x800f081f. This error code is mainly related to the Microsoft .NET Framework 3.5 incompatibilities.
Notably, similar issues were reported by users with the Windows 10 OS as well. Here’s what to do to fix it.
What does Windows 11 error code 0x800f081f mean?
Error 0x800f081f is a system error code related to updates in Windows 11. The interesting fact about this error code is that it’s among the most common ones that pop up for the same reason. Here are some of the causes of this error:
- Improper connection – This happens because Windows cannot download the critical files from the available update.
- .Net Framework issue – Microsoft .Net Framework incompatibilities also cause this problem so updating .Net Framework can be a viable solution.
- Improper commands – It may also come up because of the DISM (Deployment Image Servicing and Management) tool, or some Windows PowerShell commands.
The other three error codes are 0x800F0906, 0x800F0907, and 0x800F0922. All these error codes, including error code 0x800F081f, will show you an error message:
There were some problems installing updates, but we’ll try again later. If you keep seeing this and want to search the web or contact support for information, this may help.
Now that we know what we’re dealing with, let’s fix the problem with the solutions below.
How do I fix error code 0x800f081f in Windows 11?
- What does Windows 11 error code 0x800f081f mean?
- How do I fix error code 0x800f081f in Windows 11?
- 1. Run the Windows Update troubleshooter
- 2. Tweak your group policy
- 3. Repair Windows system files
- 4. Download Windows 11 update manually
- 5. Clear Windows Update Cache and components
- 6. Remove WUServer and WIStatusServer from registry
- Why do my Windows updates keep failing?
- What else can I do to avoid Windows 11 update error 0x800f081f?
1. Run the Windows Update troubleshooter
Multiple users reported that Windows Update troubleshooter can help you restore the 0x800f081f error on Windows 11 OS.
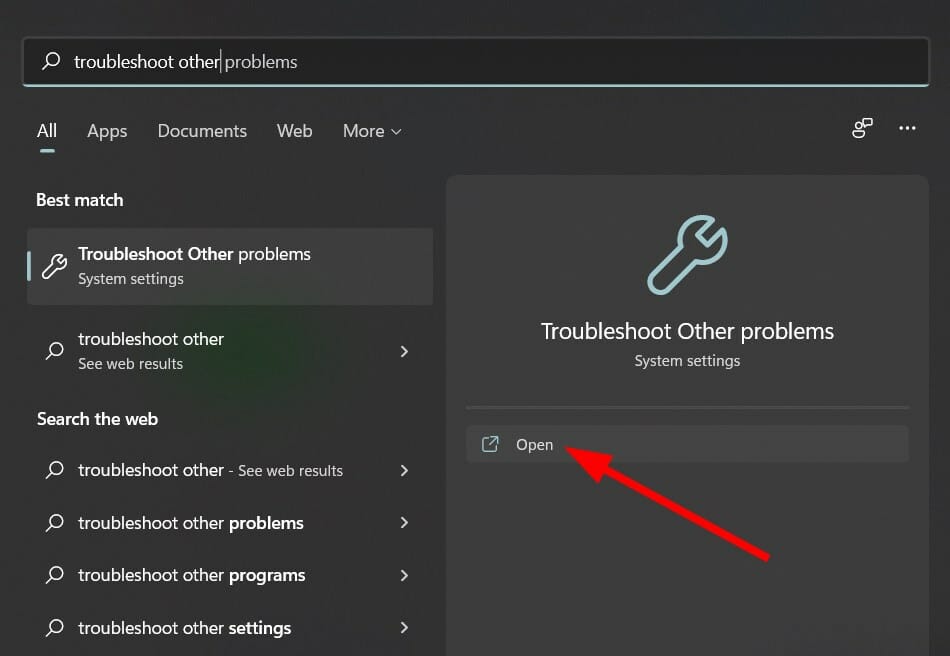
1. Open the Start Menu.
2. Type in Troubleshoot other problems and open the app.
How we test, review and rate?
We have worked for the past 6 months on building a new review system on how we produce content. Using it, we have subsequently redone most of our articles to provide actual hands-on expertise on the guides we made.
For more details you can read how we test, review, and rate at WindowsReport.
3. Click Run next to Windows Update.
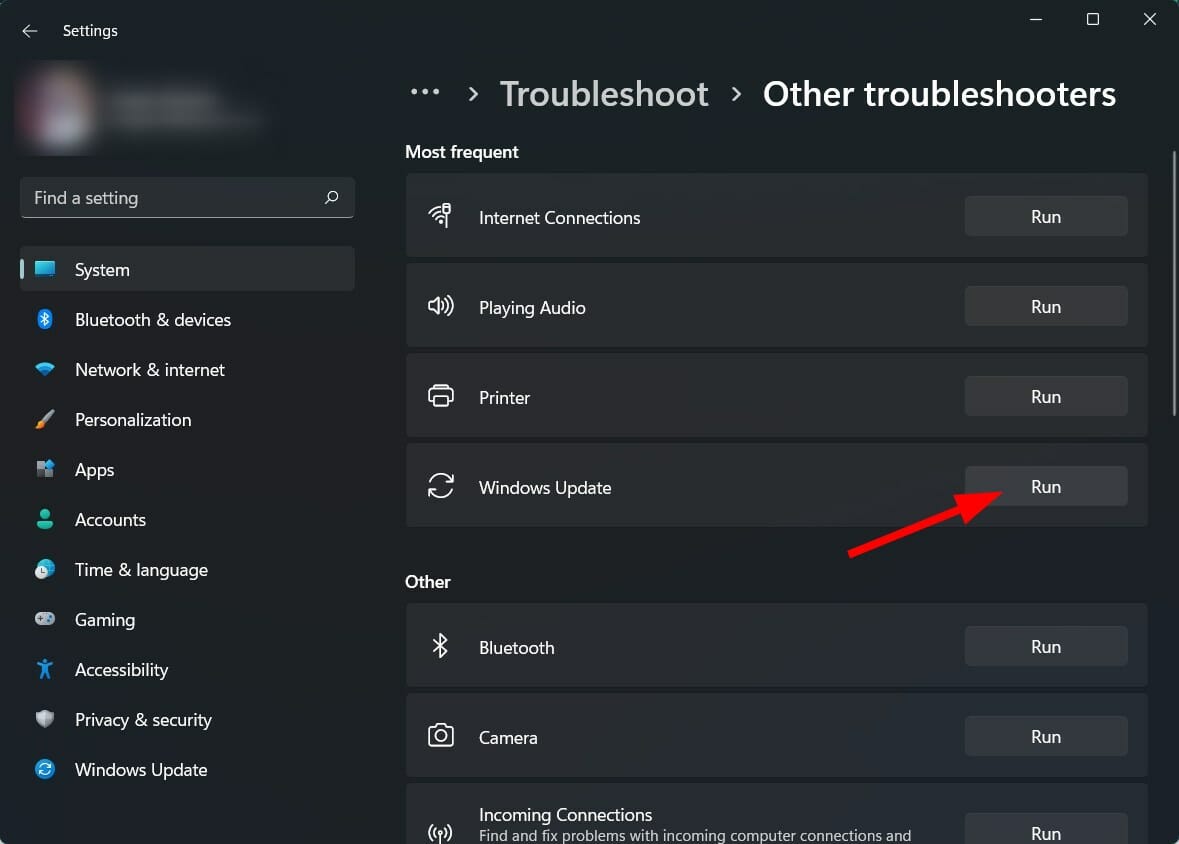
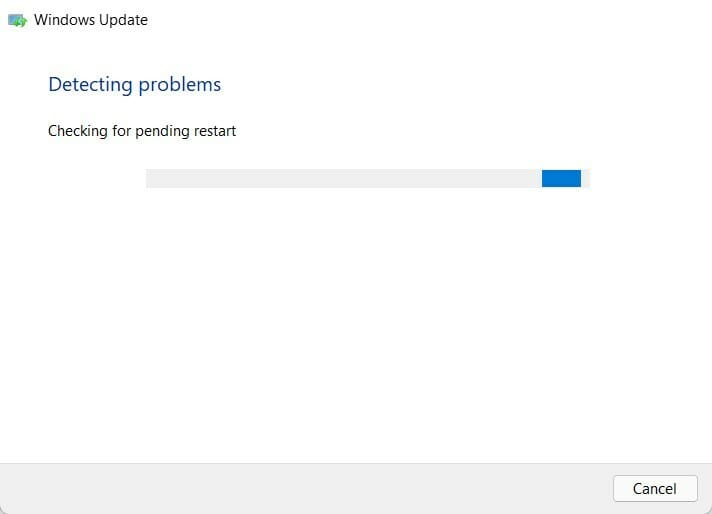
4. The troubleshooter will begin the diagnosis and will check for errors.
5. Apply the recommended fixes.
6. Restart your PC.
One of the most common solutions to fix most of the common Windows 11 issues is to run the in-built Windows troubleshooter.
To fix this Windows 11 update error 0x800f081f, we advise you to try the Windows update troubleshooter. It will not only detect the issue but possibly fix it during the process.
2. Tweak your group policy
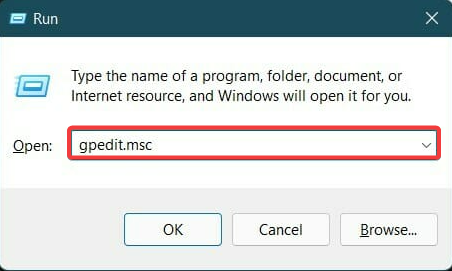
- Press Windows + R keys to open the Run dialogue.
- Type gpedit.msc and hit Enter.

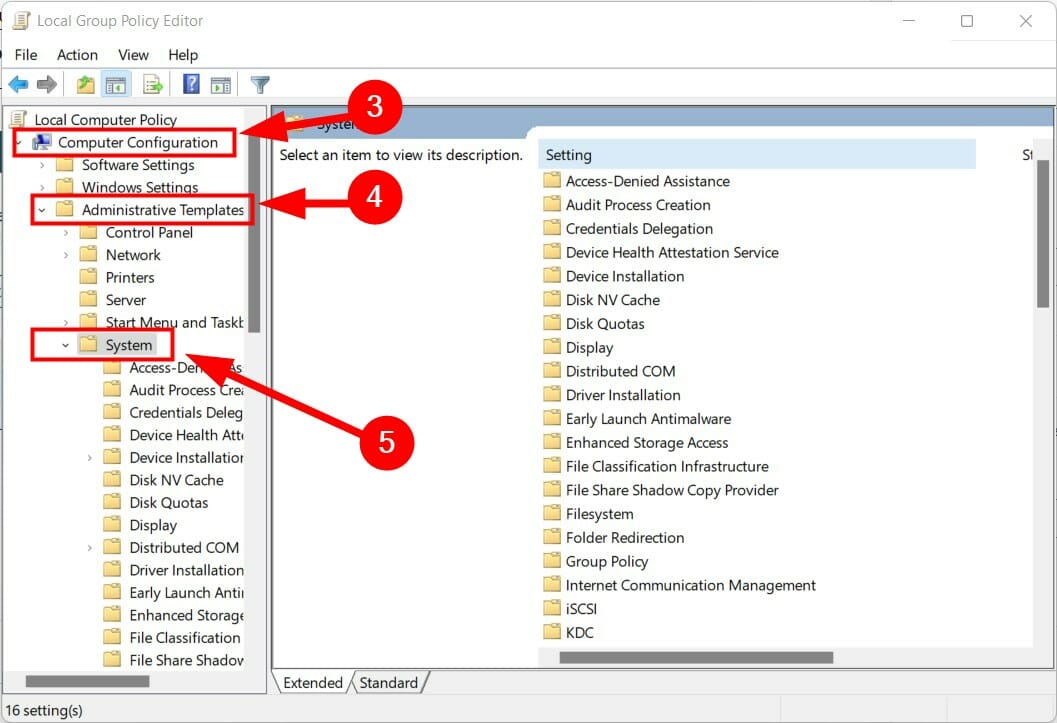
- Expand Computer Configuration.
- Then expand Administrative Templates.
- Click on System.

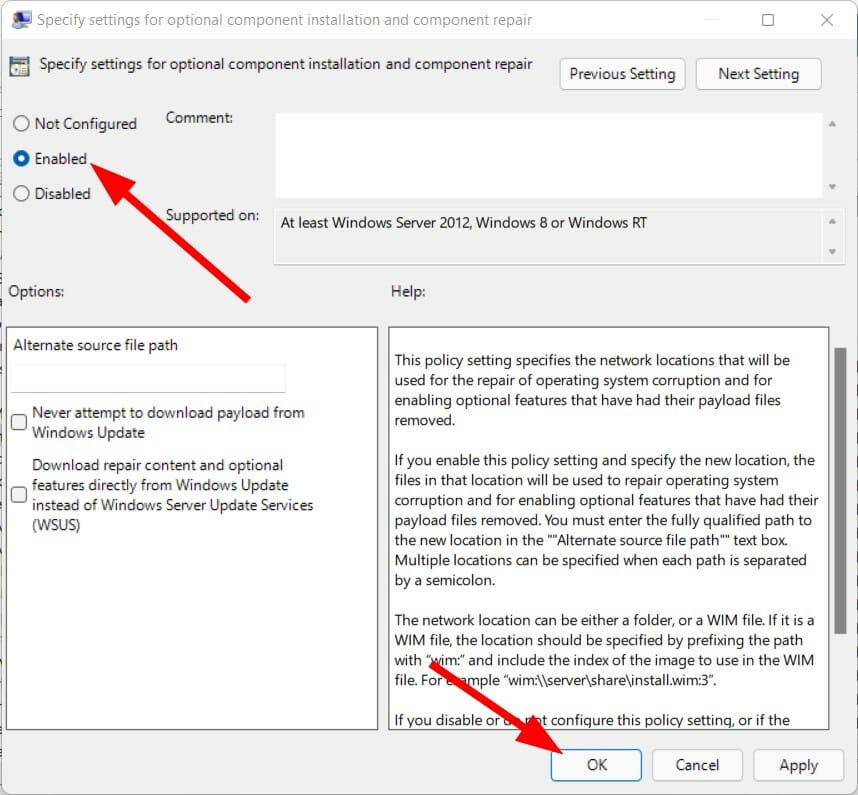
- On the right pane, click on the entry labeled Specify settings for optional component installation and component repair.
- Double-click on this entry to open it.
- Check Enabled and hit OK.


3. Repair Windows system files
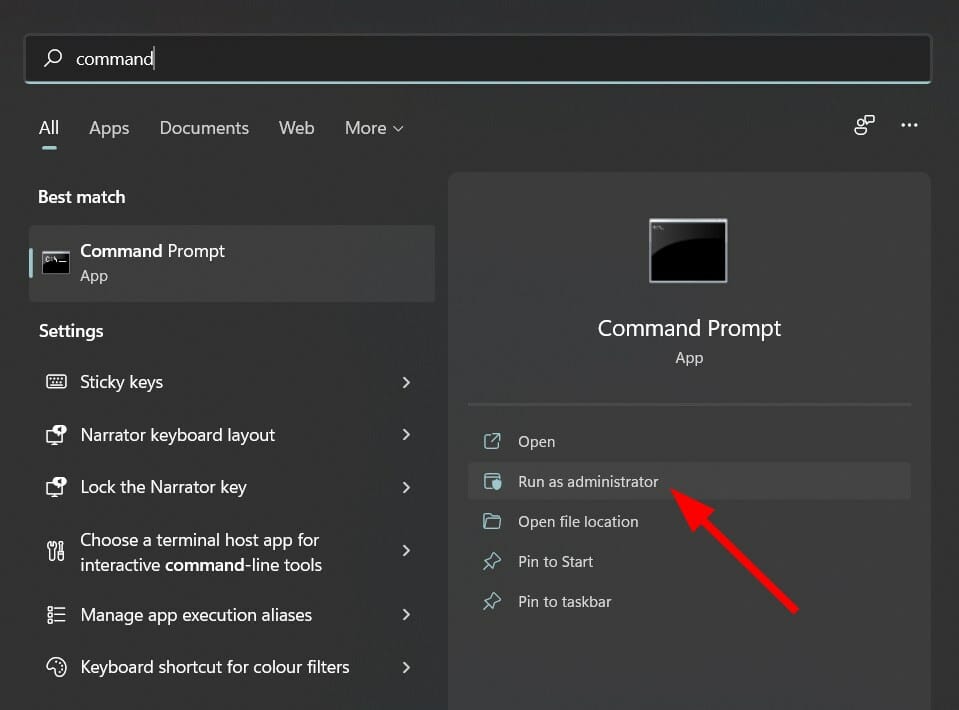
- Open the Start menu.
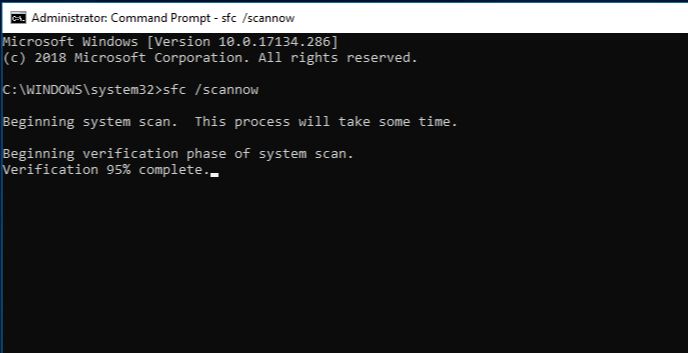
- Search for Command Prompt and run it as an administrator.

- Type the below command and hit Enter.
sfc /scanow
- Your PC will start scanning and, in the process, will try to fix the issue.
- Reboot your PC.
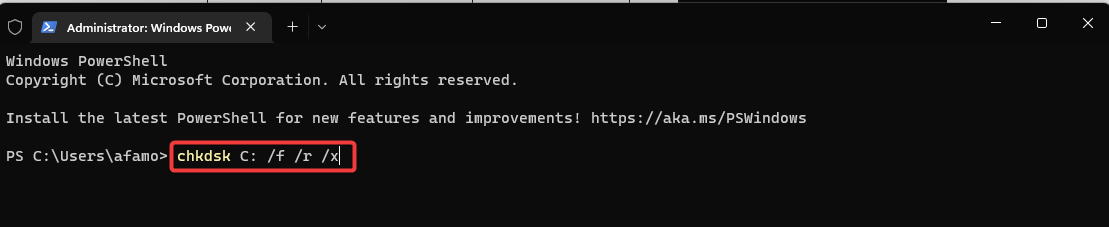
- Again open command prompt.
- Type in the below command and hit Enter
chkdsk C: /f /r /x
- After the process completes, enter the below command and press Enter.
DISM.exe /Online /Cleanup-image /Restorehealth - You will see the message – The operation completed successfully. Close the window and reboot your PC.
Besides this manual process, you can always choose a professional tool that will perform all these steps automatically. It is a safer and much easier option for your computer’s health and performance.
4. Download Windows 11 update manually
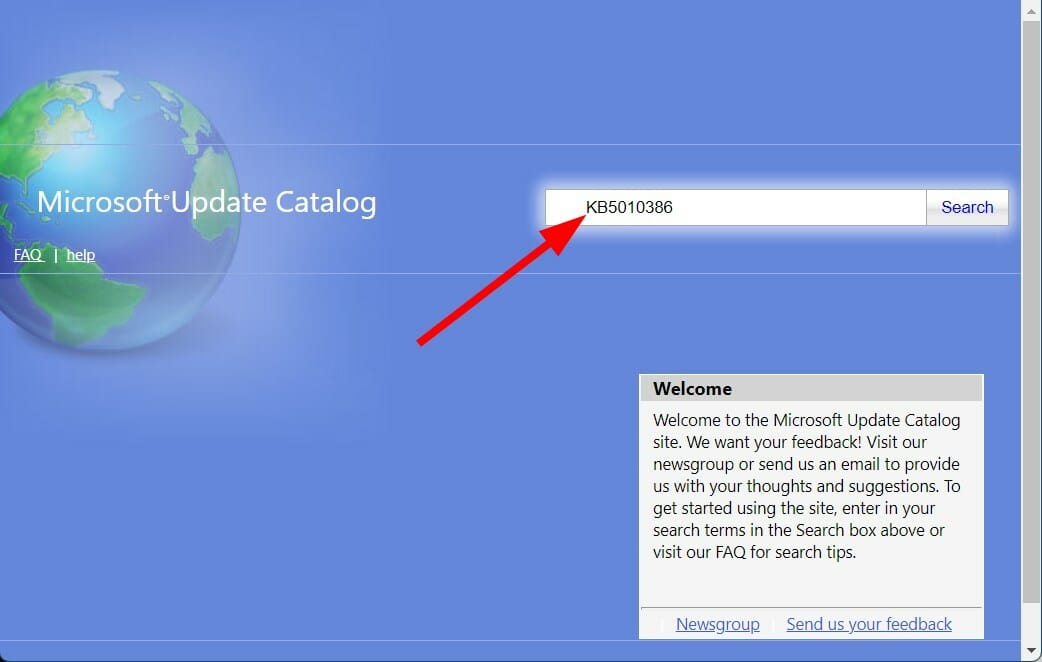
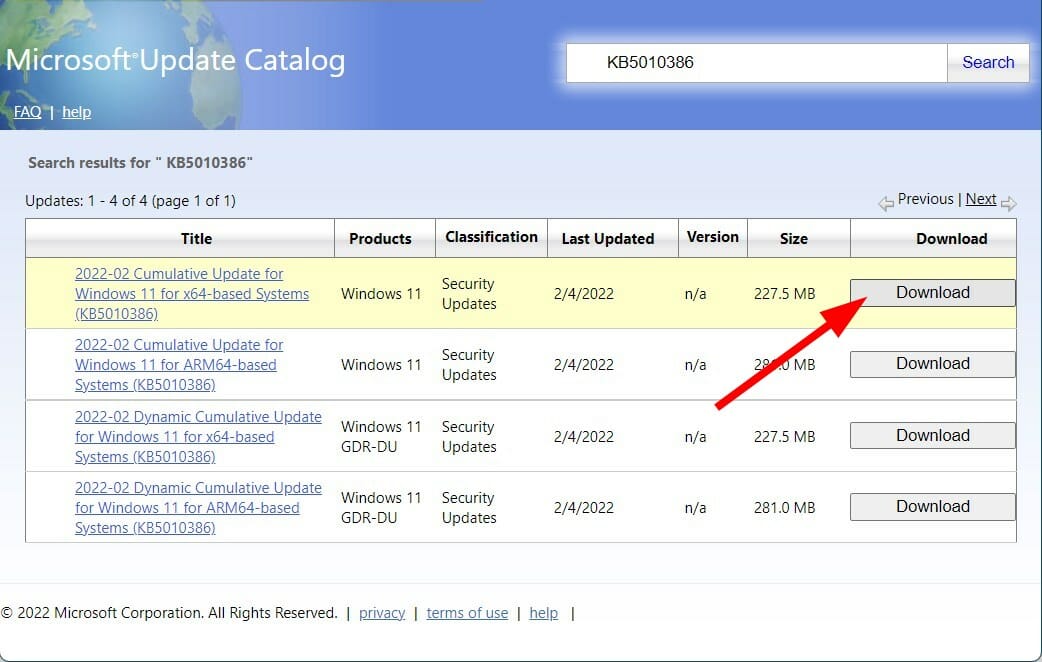
- Open the official Microsoft Catalogue website.
- In the search bar, enter the KB (Knowledge Base) number of the Windows update you wish to download and hit the Search button.

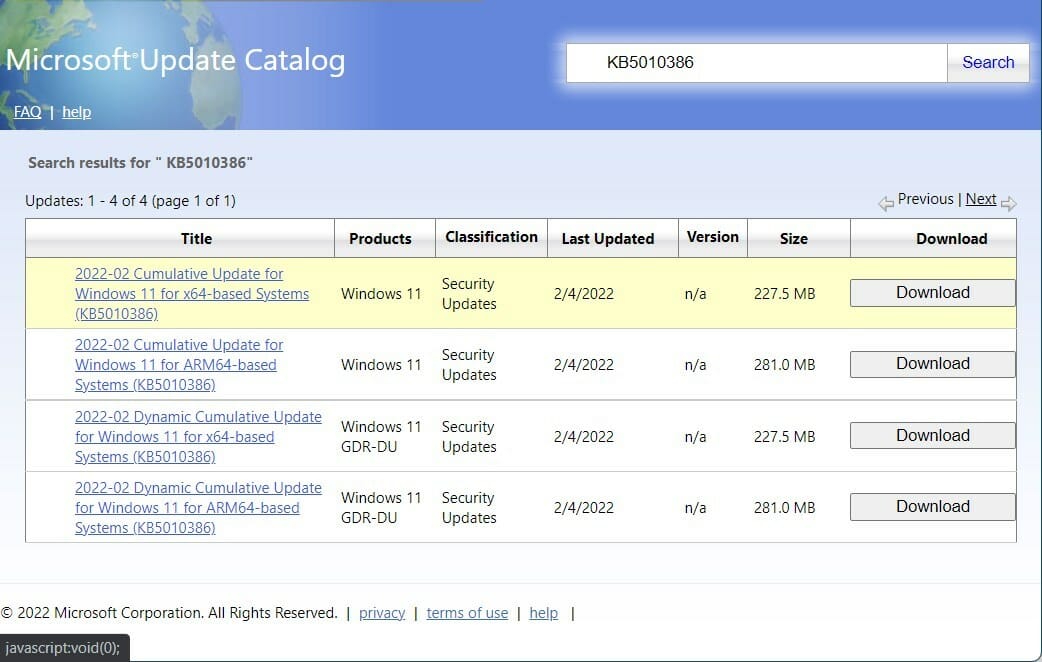
- A list of available update packages associated with the entered KB number will show up.
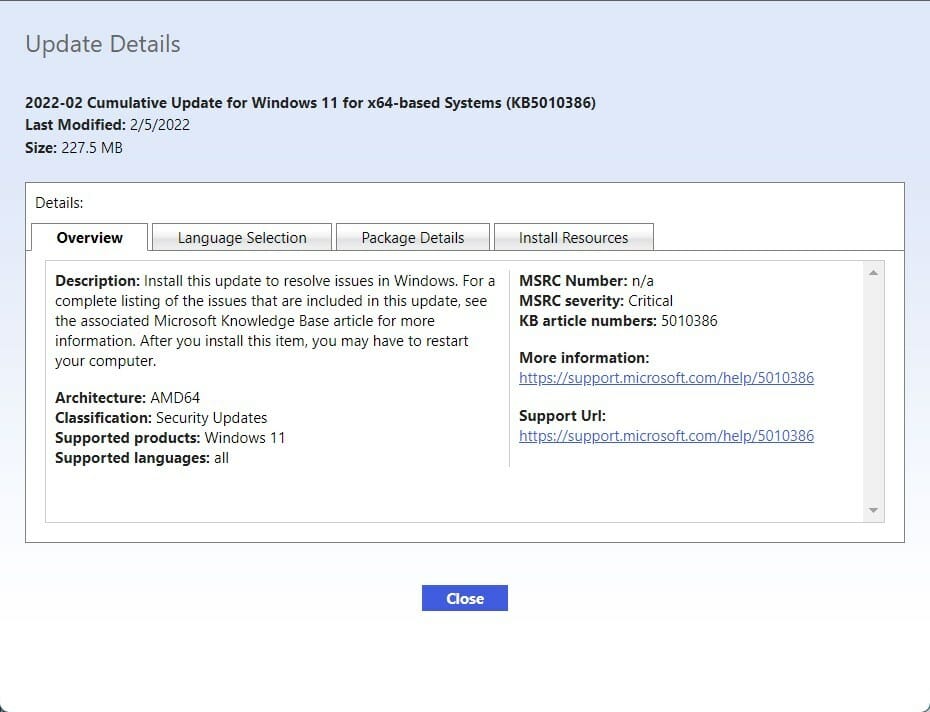
- Click on the update’s title to get more information, such as Installation Resources, Package details, and Languages supported about the update.

- Identify the correct update and hit the Download button.
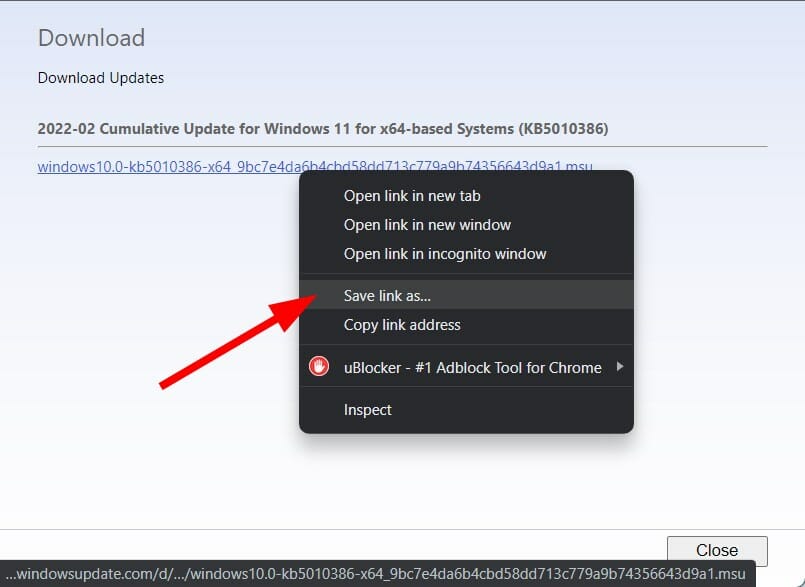
- Right-click on the download link and press Save link as.

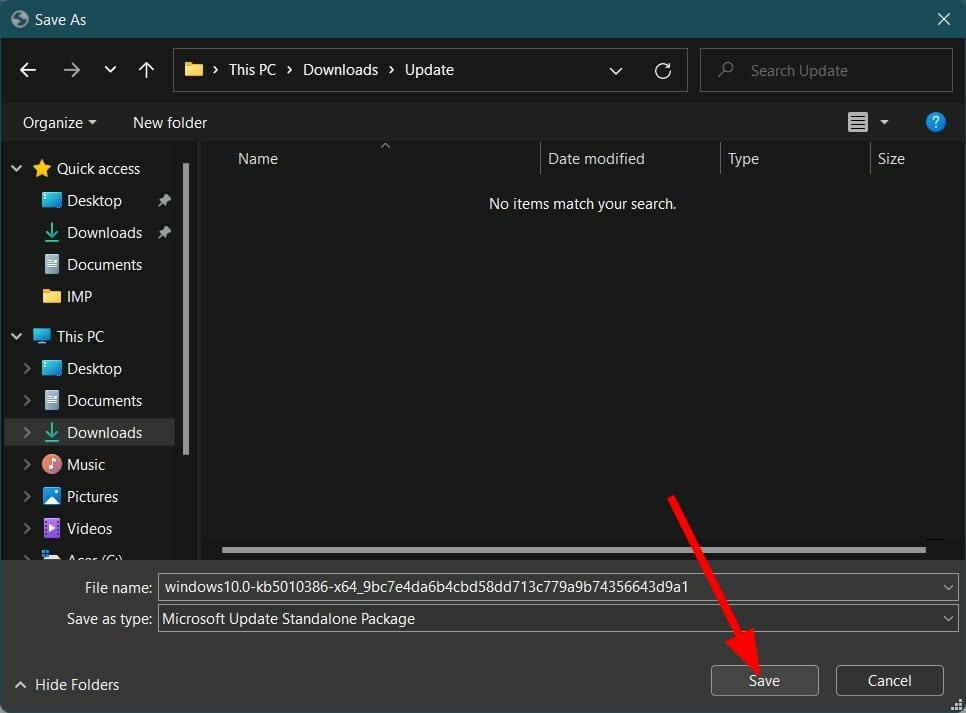
- Choose the download directory and press Save.

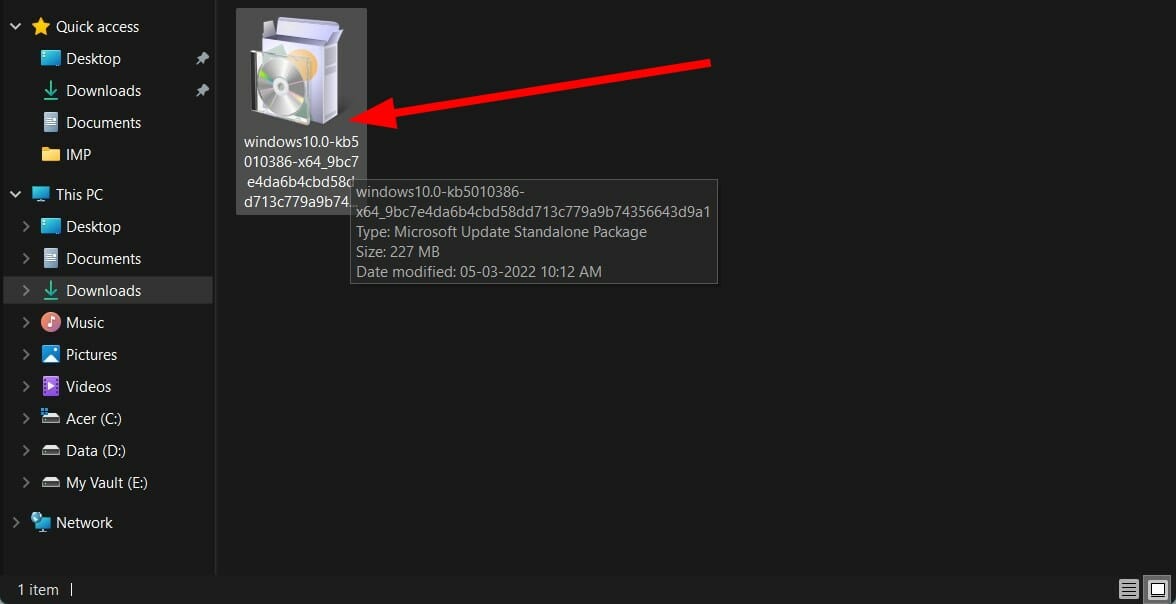
- Open the folder where you have downloaded the Windows 11 update package.
- Double-click on it to run.

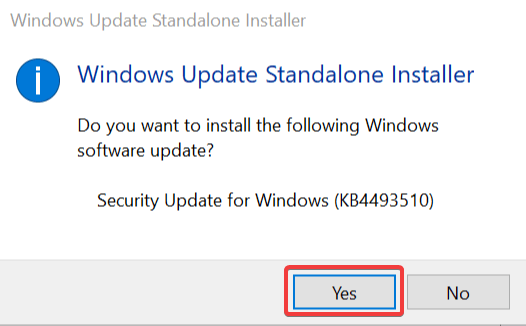
- After a few seconds, press the Yes button on the Windows Update Standalone Installer pop-up to begin the update installation.

- Reboot your PC and check if this fixes the Windows 11 update error 0x800f081f.
5. Clear Windows Update Cache and components
- Open the Start menu.
- Search for Command Prompt and run it as an administrator.
- Type the below commands and hit Enter after you have typed each command, one by one.
Net Stop bitsNet Stop wuauservNet Stop appidsvcNet Stop cryptsvcRen %systemroot%SoftwareDistribution SoftwareDistribution.bakRen %systemroot%system32catroot2 catroot2.bakNet Start bitsNet Start wuauservNet Start appidsvcNet Start cryptsvc
4. Exit cmd and restart your PC.
6. Remove WUServer and WIStatusServer from registry
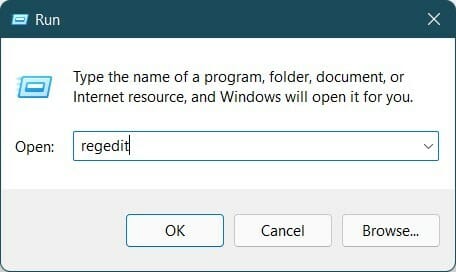
- Open Run dialog using Windows + R keys on your keyboard.
- Type the below command and press Enter.
regedit
- Click on Yes if a prompt asks you for permission.
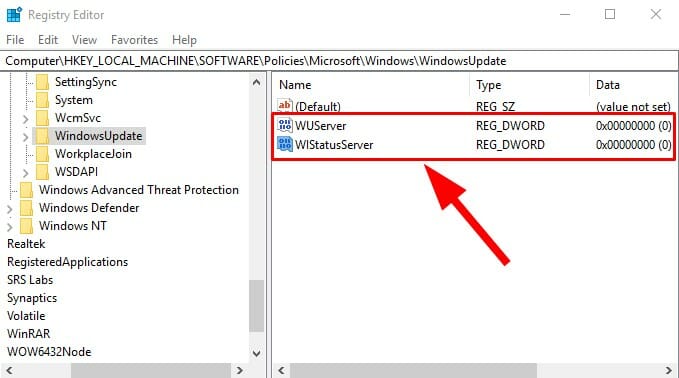
- You need to navigate to the below address
HKEY_LOCAL_MACHINE\SOFTWARE\Policies\Microsoft\Windows\WindowsUpdate - On the right pane, locate WUServer and WIStatusServer.
- Delete both entries.

- If these entries are not available, then hop onto another solution.
Why do my Windows updates keep failing?
There are several potential causes for problems like Windows Update failing repeatedly. Based on user feedback, we have generated a list of the most frequent reasons.
- Out-of-date drivers – Drivers must operate components like graphic cards and network cards that aren’t natively compatible with Windows. Windows Update problems might result from outdated drivers connected to this problem.
- System file errors or absences – System files are essential to the smooth operation of your device. Your system files may have recently been destroyed or damaged, which is why Windows Update failed.
- A problem with the Windows Update service – Your update service may be having problems. If so, alternate methods for downloading the most recent Windows update are provided above.
Remember that not all potential reasons are included in the list mentioned above. However, the error can occur specifically for you because of a problem with your machine.
What else can I do to avoid Windows 11 update error 0x800f081f?
When you come across an error, and that too while installing a Windows 11 update, then it can be frustrating and annoying.
The solutions mentioned above can be of great help when facing Windows 11 update error 0x800f081f, but that’s not all.
If, for some reason, none of the above steps helped you fix it, then we have some important points that you can follow and check if this fixes the issue or not.
➡ Make sure the .NET Framework is turned on
It is essential since this issue is related to the Microsoft .Net Framework. Open Windows Feature by searching for it on the Start menu and checking the box next to .NET Framework 3.5 (includes .NET 2.0 and 3.0).
Hit OK and reboot your PC. Ensuring the .NET Framework is enabled will let you get automatic updates with no issues.
➡ Turn off Developer Mode
All you need to do is open the Start menu and search for Developer mode. Open it and make sure to turn off Developer mode.
There are instances when developer mode may interfere with Windows update installation and, thus, the error. Make sure it is disabled and check if this fixes the issue or not.
➡ Reset your copy of Windows 11
If absolutely nothing works, then as a last resort, all you can do is reset or reinstall the Windows 11 OS on your PC. Possibly, some critical files were not installed during the previous installation.
If you encounter the 0x800f081f error on Windows 10, we have another article on the topic that you can check out.
Let us know in the comments below which one of the above solutions helped you fix the Windows 11 update error 0x800f081f. Moreover, you can also share with us any other solution.
![]()
Ошибка 0x800f081f в Windows 11 связана с проблемами обновления операционной системы. Эта ошибка может возникнуть, если ваш компьютер не может загрузить или установить необходимые файлы для обновления.
Чтобы исправить эту ошибку, вы можете попробовать следующие решения:
- Перезапустите компьютер и попробуйте выполнить обновление снова.
- Отключите антивирусное программное обеспечение и брандмауэр на время обновления, чтобы убедиться, что они не блокируют установку обновлений.
- Очистите кеш обновления Windows, чтобы удалить временные файлы, которые могут вызывать проблемы. Для этого выполните следующие действия:
- Нажмите клавиши Win+R, чтобы открыть окно “Выполнить”.
- Введите команду “services.msc” и нажмите Enter.
- Найдите службу “Windows Update” и щелкните правой кнопкой мыши по ней, выберите “Остановить”.
- Откройте проводник и перейдите в папку “C:\Windows\SoftwareDistribution”.
- Удалите содержимое папок “Download” и “DataStore”.
- Вернитесь к окну “Услуги” и щелкните правой кнопкой мыши по службе “Windows Update”, выберите “Запустить”.
- Попробуйте выполнить обновление снова.
- Выполните проверку ошибок на жестком диске и исправьте ошибки, если они есть. Для этого выполните следующие действия:
- Нажмите клавиши Win+X и выберите “Командная строка (администратор)”.
- Введите команду “chkdsk c: /f /r” и нажмите Enter. Замените “c” на букву вашего жесткого диска, если она отличается от “c”.
- Подтвердите выполнение операции, нажав “Y” на вопрос о выполнении операции при следующей перезагрузке.
- Перезагрузите компьютер и дождитесь завершения процесса сканирования.
Если ни одно из этих решений не помогло, то попробуйте обратиться в службу поддержки Microsoft для получения дополнительной помощи.

If you’re excited about upgrading your system to the latest Windows 11 update but are encountering the frustrating Error Code 0x800f081f or 0x80070005, don’t worry! These errors are not uncommon, and there are effective solutions to get your installation back on track. In this guide, we’ll walk you through the steps to troubleshoot and fix these error codes so you can smoothly install the Windows 11 updates (KB5029263/KB5029253) without a hitch.
Before we head over, check out our other guides on several other Windows 11 updates not installing errors.
Installing updates is crucial for maintaining the security and performance of your operating system. However, encountering errors during installation can be frustrating. In this guide, we’ll address the Error Code 0x800f081f and 0x80070005, which can occur when installing Windows 11 updates KB5029263/KB5029253, and provide step-by-step solutions.
What is Error Code 0x800f081f and 0x80070005?
Error Code 0x800f081f often indicates a problem with the Windows Update components, while Error Code 0x80070005 points to permission issues. These errors can prevent the update from being installed successfully.
Below you can find 13 different ways to fix the error code 0x800f081f/0x80070005 when installing Windows 11 update KB5029263/KB5029253 on your PC.
1. Run the Windows Update Troubleshooter
- Press Windows + I to open the Settings menu.
- Navigate to “Update & Security” and select “Troubleshoot” from the sidebar.
- Click on “Additional troubleshooters” and run the “Windows Update” troubleshooter.
- Follow the on-screen instructions to complete the troubleshooting process.
If the troubleshooter detects and fixes any issues, attempt to install the updates again.
2. Use the DISM Tool
- Open Command Prompt as an administrator.
- Type the command DISM /Online /Cleanup-Image /RestoreHealth and press Enter.
- Wait for the process to complete.
- Once done, restart your computer.
3. Update Windows 11 Using Media Creation Tool
- Visit the official Microsoft website and download the “Windows 11 Media Creation Tool.” using the second option which is “Create Windows 11 Installation Media.”
- Download the tool and run it on a working computer.
- Accept the terms and conditions, and select the option to “Create installation media (USB flash drive, DVD, or ISO file) for another PC.”
- Choose the language, edition, and architecture (32-bit or 64-bit) that matches your system.
- Select either a USB flash drive or ISO file as the installation media.
- If using a USB flash drive, connect it to the computer, and select the appropriate drive.
- Wait for the Media Creation Tool to download the necessary files and create the bootable media.
- Once the process is complete, restart the computer and boot from the USB drive or DVD.
- Follow the on-screen instructions to install a fresh copy of Windows 11.
- During the installation, you may be prompted to enter your product key. Ensure you have it handy.
- Follow the remaining steps to complete the installation.
- After the installation is finished, reinstall your necessary applications and restore your backed-up files.
4. Perform a Clean Boot
- Press Windows + R, type msconfig, and press Enter.
- In the System Configuration window, go to the Services tab.
- Check Hide all Microsoft services and click Disable all.
- Go to the Startup tab and click Open Task Manager.
- Disable all startup items from the Task Manager.
- Close the Task Manager and click OK in the System Configuration window.
- Restart your computer and attempt to install the updates.
5. Manually Download and Install the Update
- Visit the Microsoft Update Catalog website.
- Search for the KB5029263/KB5029253 update.
- Download the appropriate version for your system.
- Double-click the downloaded file to install the update.
6. Check Disk Space
- Press Windows + E to open File Explorer.
- Right-click on the drive where Windows is installed and select “Properties.”
- Ensure there is enough free space (at least 20GB) for the update to install.
7. Check Disk for Errors
Disk errors can sometimes prevent updates from installing correctly. Here’s how to check and fix disk errors:
- Press Windows + S, type Command Prompt, right-click it, and select Run as administrator.
- In the Command Prompt, type chkdsk /f and press Enter.
- You might need to restart your computer. Confirm by typing Y and pressing Enter.
- After the disk check and repairs are complete, try installing the updates again.
8. Disable Third-Party Security Software
- Locate the third-party antivirus or security software icon in the system tray.
- Right-click on the icon and choose “Disable” or “Turn Off.”
- Confirm the action and attempt the update installation.
9. Reset Windows Update Components
Method 1
This method will automatically stop and restart all the Windows update services on your Windows 11 PC.
- Open Notepad on your PC.
- Now, copy and paste all the commands given below to the Notepad and save it on your desktop with the file name Wufix.bat.
- SC config trustedinstaller start=auto
- net stop bits
- net stop wuauserv
- net stop msiserver
- net stop cryptsvc
- net stop appidsvc
- Ren %Systemroot%\SoftwareDistribution SoftwareDistribution.old
- Ren %Systemroot%\System32\catroot2 catroot2.old
- regsvr32.exe /s atl.dll
- regsvr32.exe /s urlmon.dll
- regsvr32.exe /s mshtml.dll
- netsh winsock reset
- netsh winsock reset proxy
- rundll32.exe pnpclean.dll,RunDLL_PnpClean /DRIVERS /MAXCLEAN
- dism /Online /Cleanup-image /ScanHealth
- dism /Online /Cleanup-image /CheckHealth
- dism /Online /Cleanup-image /RestoreHealth
- dism /Online /Cleanup-image /StartComponentCleanup
- Sfc /ScanNow
- net start bits
- net start wuauserv
- net start msiserver
- net start cryptsvc
- net start appidsvc
- Right-click on the Wufix file and click Run as administrator.
- Restart your PC.
- After the PC restarts, try installing or updating your Windows 11 again, and the error shouldn’t be there.
Method 2
- Open the Command Prompt as an administrator.
- Type the following commands one by one, pressing Enter after each:
- net stop wuauserv
- net stop cryptSvc
- net stop bits
- net stop msiserver
- Next, type ren C:\Windows\SoftwareDistribution SoftwareDistribution.old and press Enter.
- Then, type ren C:\Windows\System32\catroot2 catroot2.old and press Enter.
- Finally, restart the services by typing the following commands:
- net start wuauserv
- net start cryptSvc
- net start bits
- net start msiserver
- Close the Command Prompt and attempt to install the update again.
10. System Restore
If none of the above methods work and you recently made changes to your system, you can try a system restore:
- Press Windows + S, type Create a restore point, and open the corresponding setting.
- Click System Restore and follow the prompts to restore your system to a point before the problematic update.
11. Modify Group Policy Settings
- Press Windows + R, type gpedit.msc, and press Enter.
- Navigate to “Computer Configuration” > “Administrative Templates” > “System.”
- Find and double-click on “Specify settings for optional component installation and component repair.”
- Select “Enabled” and set the option to “Never attempt to download payload from Windows Update.”
- Click “OK” and restart your computer.
12. Check System Files
- Open Command Prompt as an administrator.
- Type the command sfc /scannow and press Enter.
- Wait for the scan to complete and follow any repair instructions provided.
13. Seek Professional Assistance
If none of the methods work, consider seeking help from Microsoft support or a professional technician.
Conclusion
Encountering Error Code 0x800f081f or 0x80070005 when installing Windows 11 updates can be frustrating, but with the right steps, you can overcome these obstacles. By following the troubleshooting methods outlined in this guide, you can ensure a smooth update process and enjoy the latest features and security enhancements that Windows 11 offers.
Frequently Asked Questions (FAQs)
Q1: Can I skip troubleshooting and wait for the next update?
A: It’s not recommended. Skipping updates can leave your system vulnerable to security risks. It’s best to resolve the issue promptly.
Q2: Will performing a clean boot affect my data?
A: No, a clean boot only temporarily disables startup programs. Your data will remain intact.
Q3: How do I know if my system files are corrupted?
A: You can use the SFC tool to scan and repair corrupted files. The tool will notify you if any issues are found.
Q4: Can third-party antivirus software be the sole cause of the error?
A: While possible, other factors can contribute to the error. It’s recommended to disable security software temporarily for troubleshooting.
Q5: What if I’m uncomfortable performing these steps on my own?
A: If you’re not confident in your technical skills, consider seeking help from Microsoft support or a professional computer technician.
Содержание
- Вариант 1: Запуск устранения неполадок
- Вариант 2: Проверка целостности системных файлов
- Вариант 3: Включение .NET Framework 3.5
- Вариант 4: Очистка папок с файлами обновления
- Вариант 5: Отключение антивируса
- Вариант 6: Восстановление системы
- Вариант 7: Ручное обновление из образа
- Вариант 8: Ручное скачивание обновления
- Вариант 9: Ручной сброс компонентов «Центра обновления Windows»
- Совместимость Windows 11 с компьютером
- Вопросы и ответы
Единого способа устранить ошибку 0x800f081f нет, поскольку она бывает вызвана самыми разными неполадками в системе. Именно поэтому рекомендуется пробовать все рекомендации по очереди, начиная с первых и самых легких. Перед этим также не забудьте проверить, достаточно ли свободного места на диске C для установки обновления, так как это тоже может повлиять на рассматриваемую проблему.
Вариант 1: Запуск устранения неполадок
Довольно простым вариантом является использование автоматического средства устранения неполадок, которое есть в Windows. Похвастаться высокой эффективностью их обнаружения оно не может, однако справится с самыми распространенными причинами, да и от пользователя требуется лишь запустить приложение.
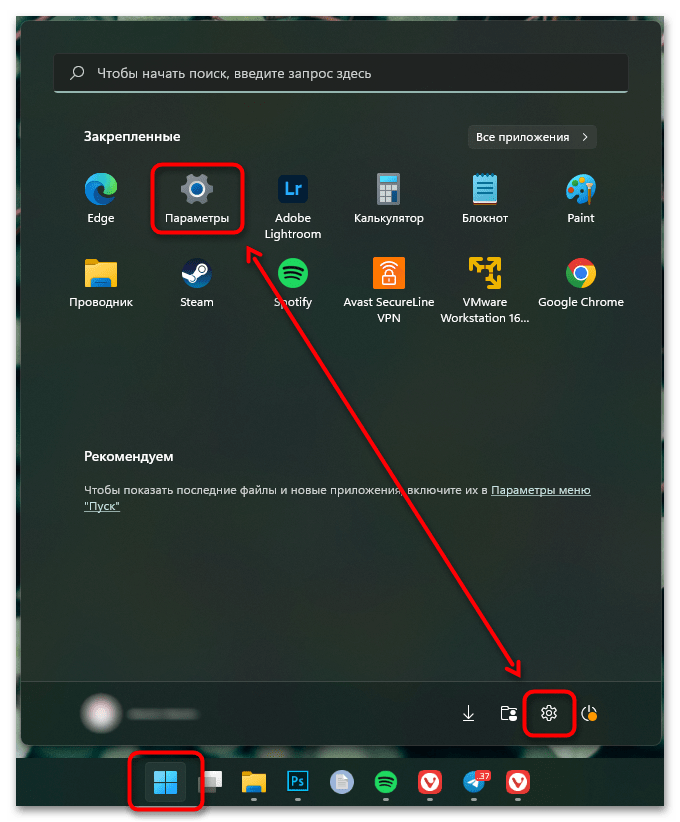
- Откройте системные «Параметры» через «Пуск».
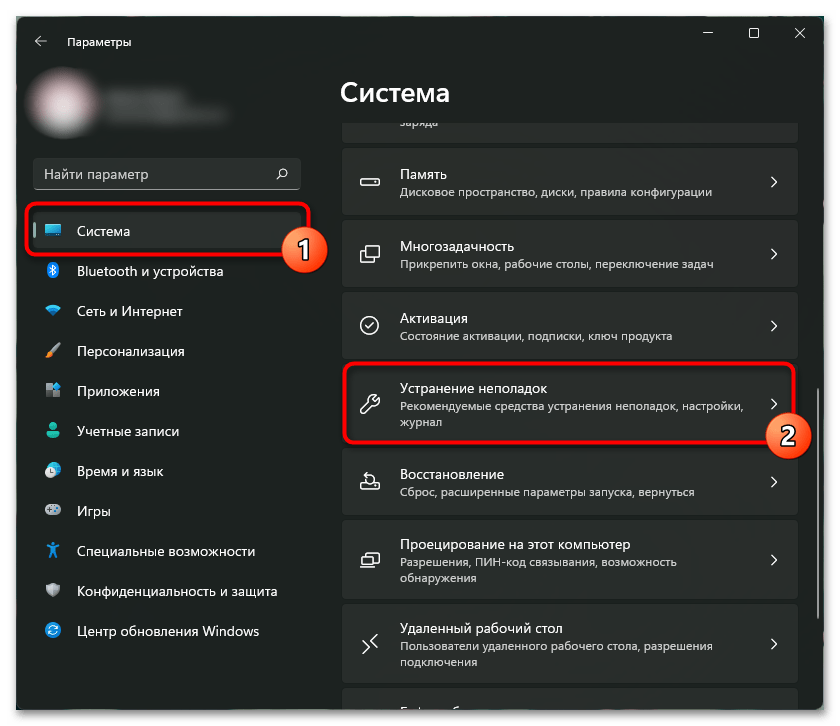
- Через первый же раздел «Система» переключитесь в «Устранение неполадок».
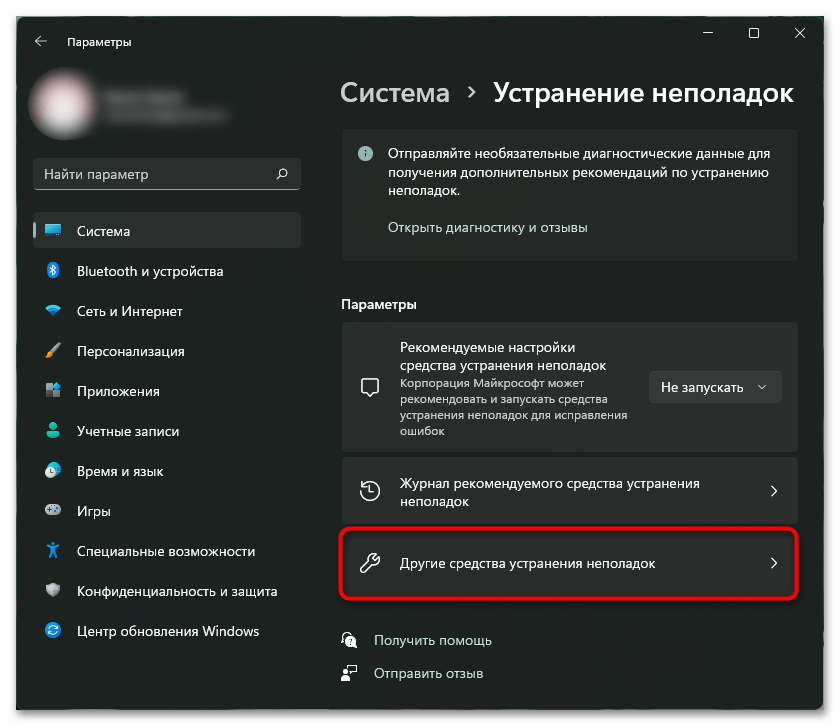
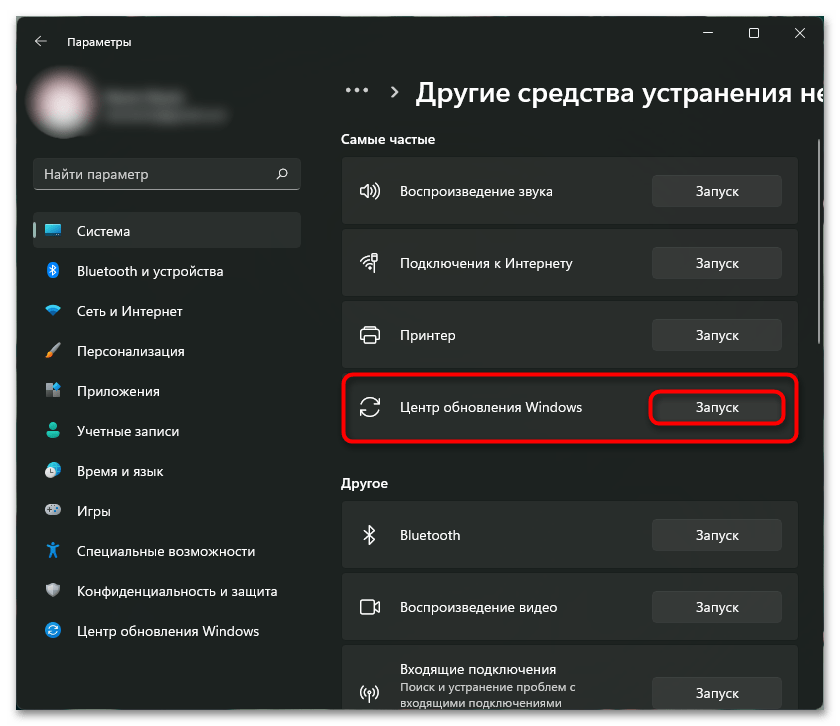
- Кликните по строчке «Другие средства устранения неполадок».
- Из списка средств отыщите «Центр обновления Windows» и нажмите по «Запуск».
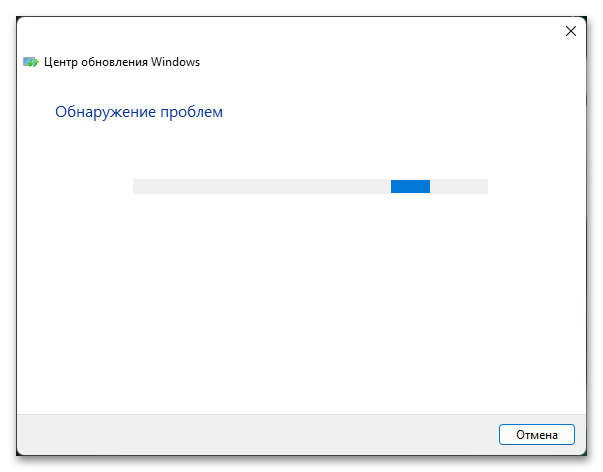
- Начнется автоматическое сканирование, подождите несколько секунд.
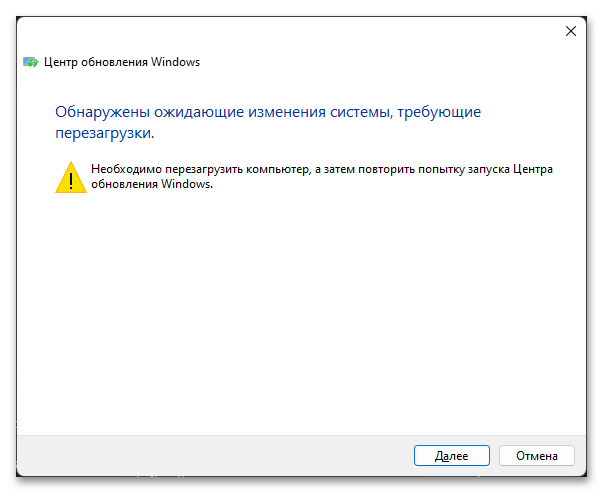
- По его результатам уже будет понятно, можно ли что-то предпринять (или система это может исправить и сама) или придется двигаться дальше. Если какое-то решение было предложено, воспользуйтесь им, а затем проверьте, была ли устранена ошибка.
Вариант 2: Проверка целостности системных файлов
За нормальную работу критически важных и некоторых второстепенных компонентов операционной системы отвечают определенные файлы, но они могут повредиться в ходе неудачных предыдущих обновлений, проблем с жестким диском или других ситуаций. Исправить их могут системные утилиты, которыми мы и предлагаем воспользоваться.
Эти утилиты проверяют целостность файлов и, если находят проблемные, восстанавливают их из резервного хранилища. У нас на сайте есть отдельная статья, направленная на использование обеих утилит. И хотя она написана под Windows 10, для Windows 11 отличий не будет никаких.
Подробнее: Использование и восстановление проверки целостности системных файлов в Windows
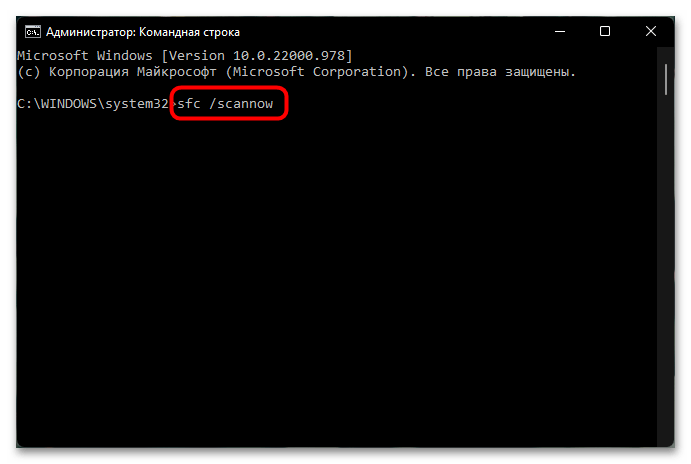
Вам необходимо правильно применить инструкции, которые даны в вышеупомянутой статье. В данной ситуации сперва рекомендуем воспользоваться «Шаг 2: Запуск DISM». Если утилита найдет и исправит некоторые повреждения, перезагрузите компьютер. После этого выполните инструкцию из «Шаг 1: Запуск SFC». Смысл тот же — если увидите уведомление о том, что файлы были восстановлены, перезагрузите компьютер.
При запуске DISM и/или SFC вы можете столкнуться с тем, что одно или оба хранилища этих утилит повреждены. Для их восстановления в той же статье по ссылке выше есть отдельные подзаголовки, где рассказывается, как выполнить исправление. Если повреждены оба, сперва восстанавливайте DISM, потом SFC. После этого возвращайтесь к попытке их запуска.
Соответственно, после всех проделанных манипуляций пробуйте установить обновление.
Вариант 3: Включение .NET Framework 3.5
Иногда операционке могут потребоваться .NET-файлы для установки обновления, а именно файлы от .NET Framework 3.5. Поскольку по умолчанию этот компонент отключен в Вин 11, в результате неудачной попытки инсталляции возникает ошибка с кодом 0x800f081f. Решение простейшее: включить этот компонент.
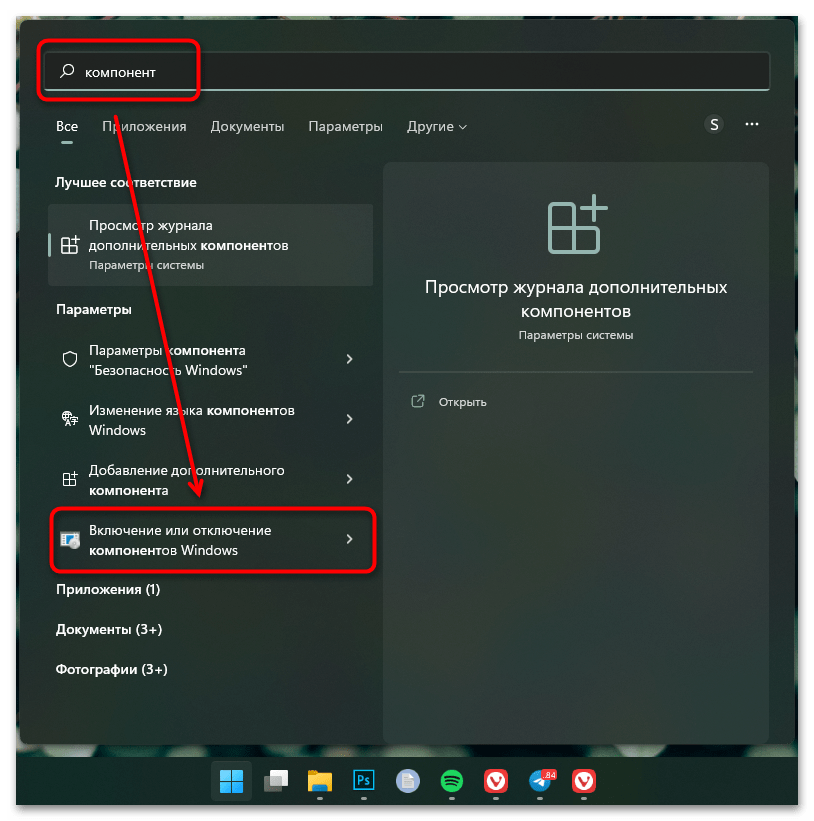
- Откройте «Пуск» и начните набирать запрос «компонент». Из списка результатов выберите «Включение или отключение компонентов Windows».
- Первым в списке будет «.NET Framework 3.5» — нажмите по нему, чтобы квадрат стал синим. У компонента есть дополнительные опции, разворачиваемые «плюсиком», но их включать не обязательно. Сохраните изменения кнопкой «ОК».
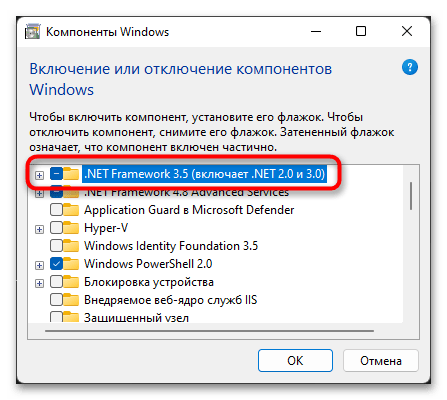
Теперь попробуйте установить обновление еще раз. Если же .NET Framework 3.5 и так включен, значит, вы это уже делали ранее при решении какой-то другой неполадки. Тогда переходите к другим рекомендациям.
Вариант 4: Очистка папок с файлами обновления
Первая папка, о которой пойдет речь, называется «SoftwareDistribution» и напрямую связана с «Центром обновления Windows», и именно в ней хранятся некоторые временные файлы, необходимые для установки апдейта. Если файлы, которые сейчас не могут установиться, скачались в папку с ошибкой (например, не докачались) или произошла другая непредвиденная неполадка, находятся как раз внутри «SoftwareDistribution», попробуйте их удалить вручную.
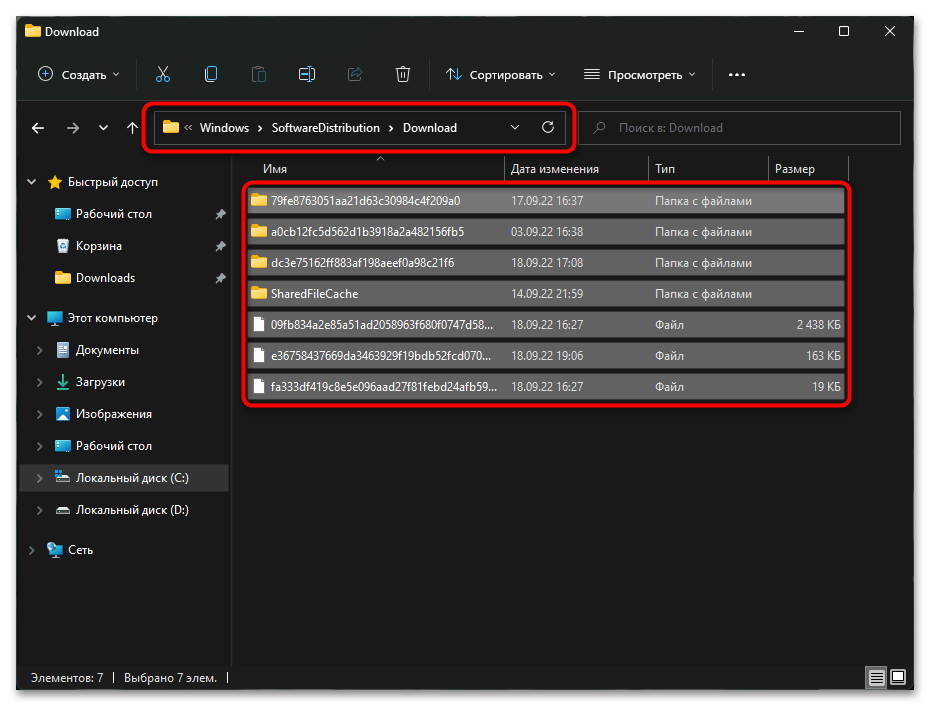
- Запустите «Проводник», перейдите по пути
C:\Windows\SoftwareDistributionи найдите внутри папку «Download». Откройте ее, выделите все файлы сочетанием клавиш Ctrl + A и удалите их, нажав клавишу Delete. - Скорее всего, появится окно об отсутствии прав. Поставьте галочку у пункта «Выполнить для всех текущих элементов» и нажмите «Продолжить».

После удаления откройте «Центр обновления Windows» и проверьте, устранился ли сбой.
Также может помочь удаление всех файлов из папки «SoftwareDistribution», но на всякий случай рекомендуем сделать резервную копию.
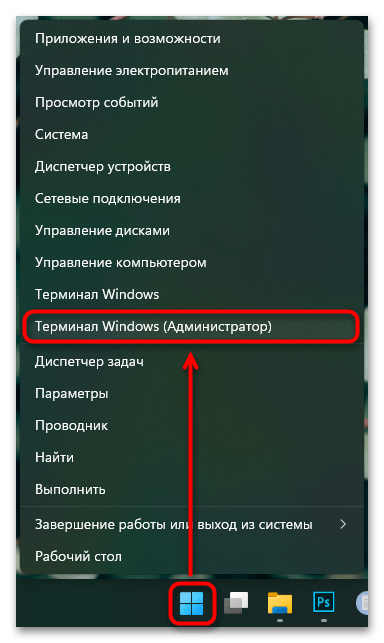
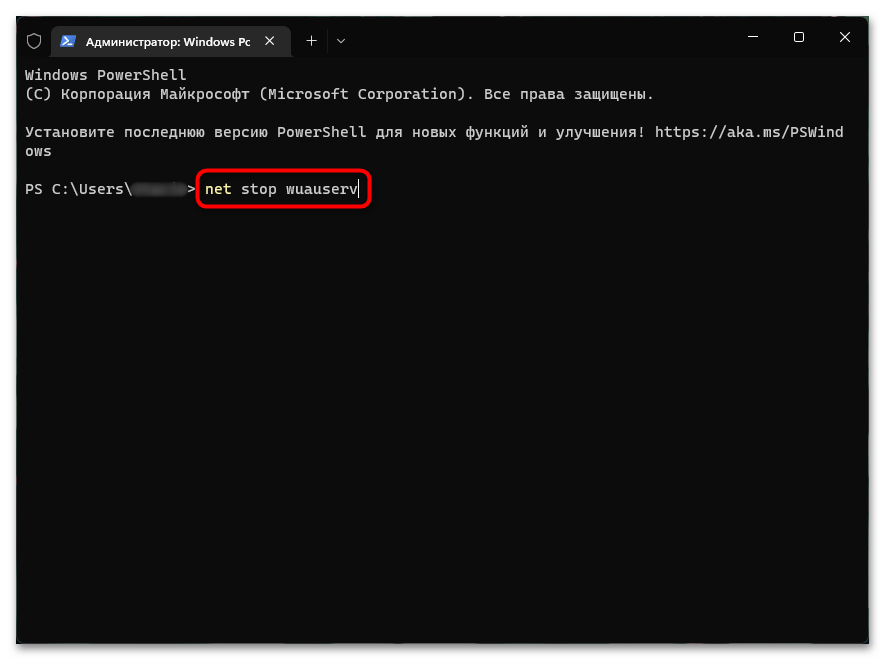
- Если система не позволяет вам удалить файлы из «SoftwareDistribution», остановите работу «Центра обновления Windows». Для этого нажмите правой кнопкой мышки по «Пуску» и вызовите «Терминал Windows (Администратор)».
- Вставьте команду
net stop wuauservи нажмите Enter. - Удалите файлы из папки «SoftwareDistribution» (кстати, раз уж открыли консоль, можете удалить папку через нее, а не через «Проводник» — для этого вставьте команду
rd /s /q %systemroot%\SoftwareDistributionи нажмите Enter). - Можете снова запустить остановленную службу командой
net start wuauservи попробовать скачать обновление еще раз.

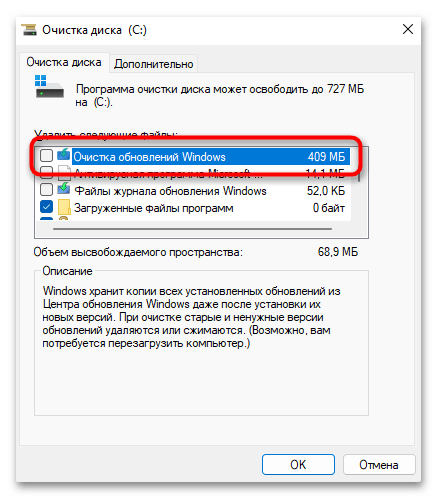
Вторая папка — «WinSxS», — тоже содержит в себе файлы обновлений и др., поэтому ее очистка может помочь. Однако сама процедура очистки существенно отличается от рассмотренной выше — удалять из «WinSxS» все подряд (или папку целиком) нельзя. Используйте нашу статью по ссылке ниже для правильной очистки. Инструкция написана под Win 10, но для обладателей 11 ничего не поменялось.
Подробнее: Способы очистки папки «WinSxS» в Windows
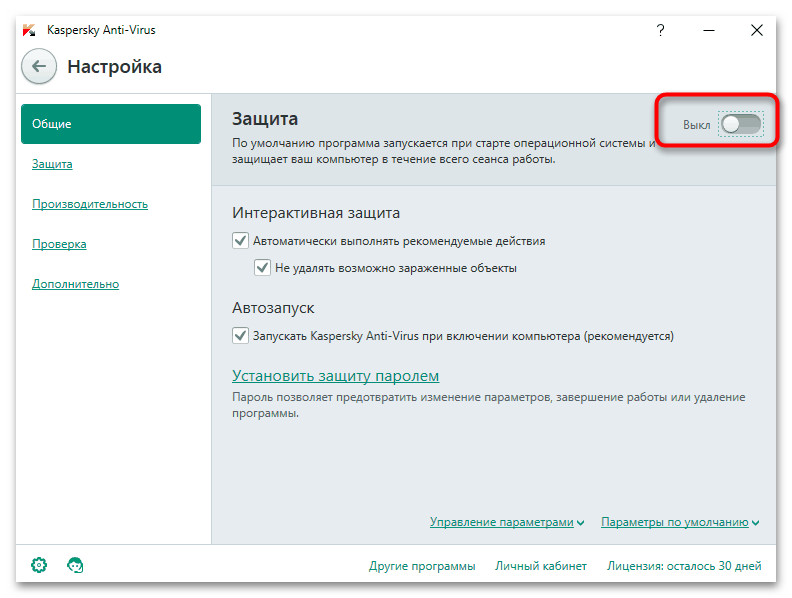
Вариант 5: Отключение антивируса
Это довольно редкая причина, но все же стоит о ней напомнить. Разные антивирусы, даже самые популярные, изредка ложно срабатывают на попытку Windows скачать обновления, блокируя этот процесс. Если вы пользуетесь сторонним решением, отключите его на время и попробуйте установить проблемное обновление. Затем не забудьте включить антивирусное ПО обратно.
Читайте также: Отключение антивируса
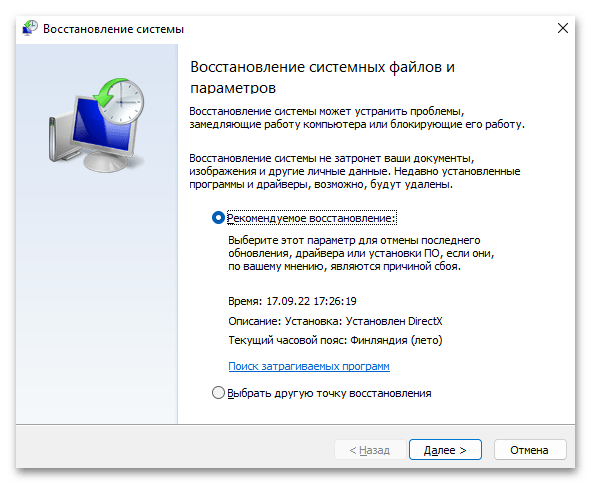
Вариант 6: Восстановление системы
Порой справиться самостоятельно с возникшей неполадкой не удается, и тогда может помочь откат операционки до одной из точек восстановления, когда все работало нормально. Конечно же, способ подойдет только тем, у кого на компьютере было заранее включено автоматическое создание точек восстановления (или кто периодически делал это самостоятельно).
Если вы не знаете, как пользоваться восстановлением системы, в нашей статье по ссылке ниже можете воспользоваться инструкцией на эту тему. Она целиком подходит для пользователей Windows 11.
Подробнее: Откат к точке восстановления в Windows
Вариант 7: Ручное обновление из образа
Альтернативный вариант для тех, у кого 0x800f081f возникает при попытке обновить версию ОС и кому не помогает ни одна из предложенных ранее рекомендаций, включая точку восстановления (или этой точки вовсе нет). Скачайте чистый образ Windows 11 (его последнюю версию, до которой не удается обновиться), а еще лучше приложение Media Creation Tool, и запишите систему на флешку, сделав последнюю загрузочной.
Скачать Media Creation Tool
Подробнее: Руководство по созданию загрузочной флешки с Windows
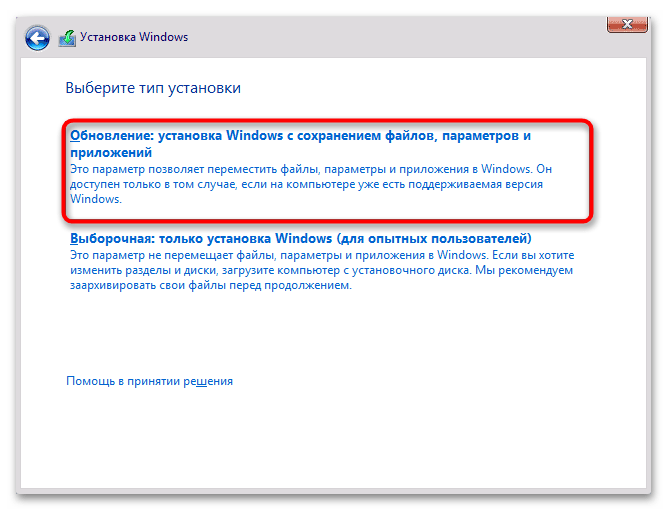
После этого загрузитесь с нее и на этапе выбора типа установки используйте «Обновление». В этом случае все личные файлы и приложения будут сохранены, просто произведется принудительное обновление Виндовс.
Вариант 8: Ручное скачивание обновления
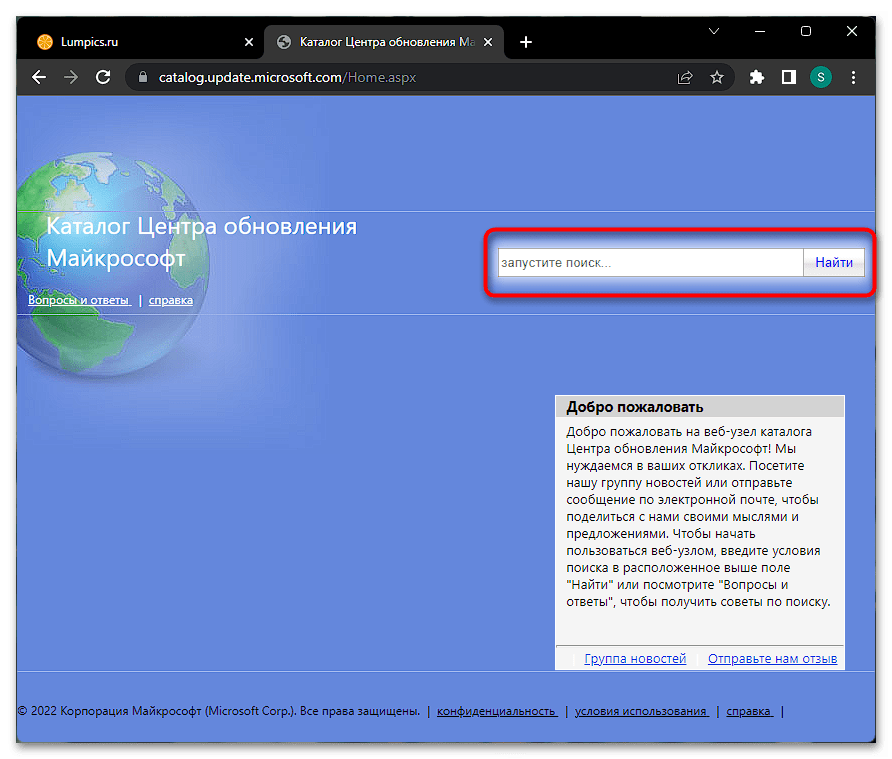
Еще один возможный метод исправления проблемы — самостоятельное скачивание обновления, установить которое не получается через «Центр обновления Windows». На этой странице всегда пишется название апдейта, которое планируется установить. Для ручного скачивания откройте страницу по ссылке ниже и вставьте название обновления в поисковую строку.
Перейти в Каталог Центра обновления Майкрософт
Скачайте необходимый апдейт, запустите установочный файл и следуйте подсказкам мастера установки.
Одним из радикальных вариантов устранения проблемы является самостоятельный сброс «Центра обновления Windows», в результате чего может получиться устранить рассматриваемую и другие (если такие есть) ошибки, связанные с апдейтами.
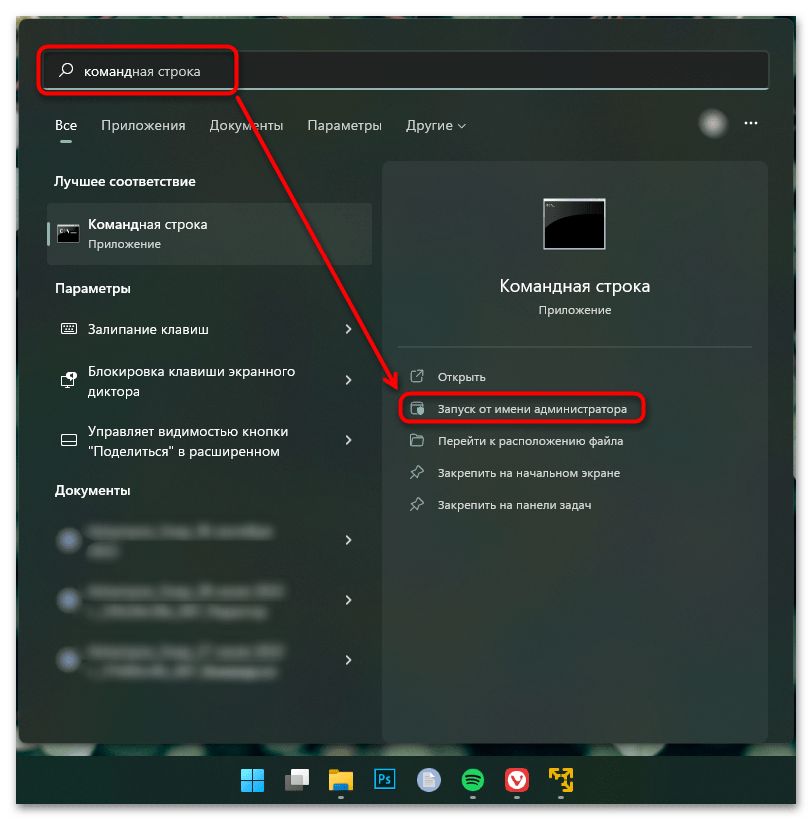
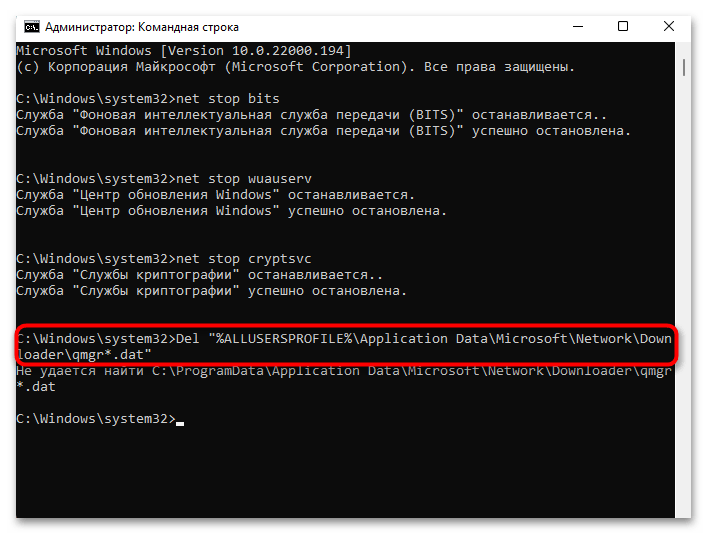
- Откройте «Командную строку» с правами администратора.
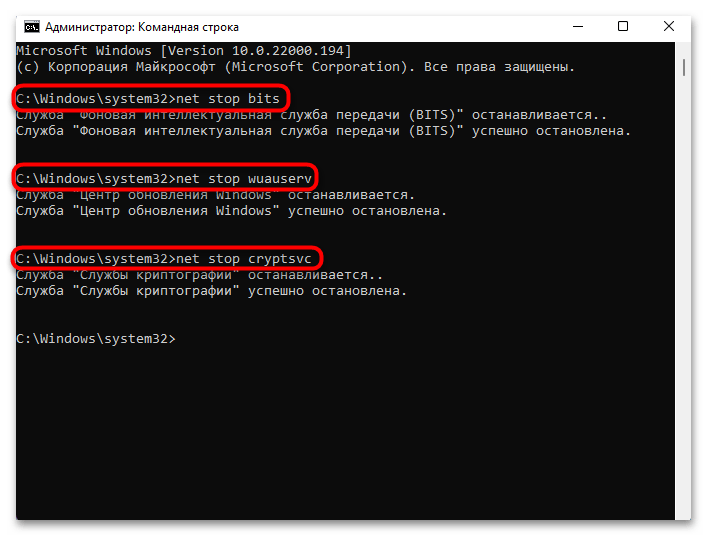
- Введите туда последовательно 3 команды, останавливающие системные службы, после ввода каждой нажимая Enter:
net stop bits

net stop wuauserv

net stop cryptsvc - Теперь выполните команду
Del "%ALLUSERSPROFILE%\Application Data\Microsoft\Network\Downloader\qmgr*.dat", удаляющую файлы «qmgr*.dat». При получении ошибки о том, что не удается найти файл, предпринимать ничего не нужно, просто переходите далее. - Если по какой-то причине в качестве пути у вас отображается не
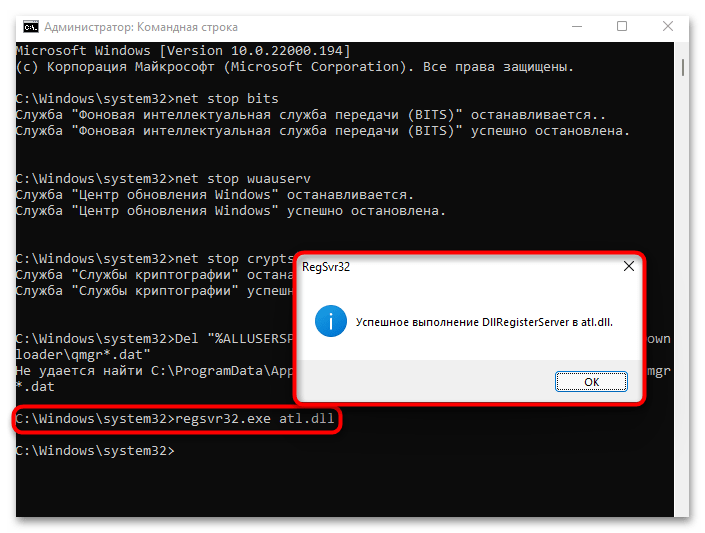
C:\Windows\System32, а что-то другое, напишитеcd /d %windir%\system32для перехода в соответствующую директорию. - Сейчас будет самая продолжительная по времени задача. Понадобится зарегистрировать в системе все файлы из списка ниже. Копируйте каждый из них и вставляйте в консоль, после каждой из них нажимая Enter. Сразу все команды зарегистрировать не получится. Каждая операция по регистрации будет сопровождаться диалоговым окном.
regsvr32.exe atl.dll

regsvr32.exe urlmon.dll

regsvr32.exe mshtml.dll

regsvr32.exe shdocvw.dll

regsvr32.exe browseui.dll

regsvr32.exe jscript.dll

regsvr32.exe vbscript.dll

regsvr32.exe scrrun.dll

regsvr32.exe msxml.dll

regsvr32.exe msxml3.dll

regsvr32.exe msxml6.dll

regsvr32.exe actxprxy.dll

regsvr32.exe softpub.dll

regsvr32.exe wintrust.dll

regsvr32.exe dssenh.dll

regsvr32.exe rsaenh.dll

regsvr32.exe gpkcsp.dll

regsvr32.exe sccbase.dll

regsvr32.exe slbcsp.dll

regsvr32.exe cryptdlg.dll

regsvr32.exe oleaut32.dll

regsvr32.exe ole32.dll

regsvr32.exe shell32.dll

regsvr32.exe initpki.dll

regsvr32.exe wuapi.dll

regsvr32.exe wuaueng.dll

regsvr32.exe wuaueng1.dll

regsvr32.exe wucltui.dll

regsvr32.exe wups.dll

regsvr32.exe wups2.dll

regsvr32.exe wuweb.dll

regsvr32.exe qmgr.dll

regsvr32.exe qmgrprxy.dll

regsvr32.exe wucltux.dll

regsvr32.exe muweb.dll
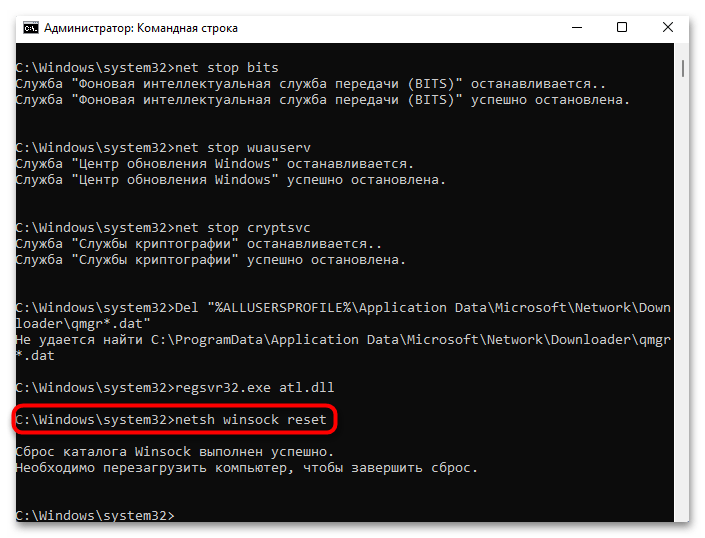
regsvr32.exe wuwebv.dll - Сбросьте «WinSock» командой
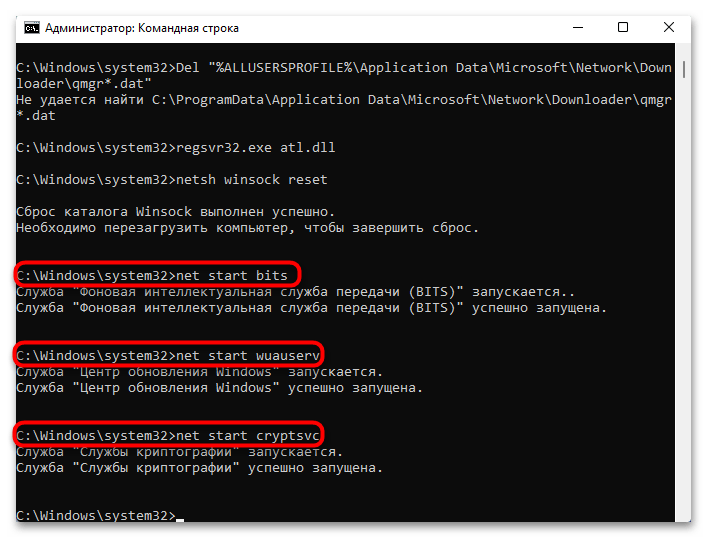
netsh winsock reset. - Запустите остановленные службы командами ниже. Как вы уже понимаете, вводить их надо так же по одной, как и останавливали.
net start bits

net start wuauserv

net start cryptsvc - Перезагрузите компьютер и пробуйте скачать и установить обновление.
Если это не помогло, откройте еще раз консоль, выполните Шаг 1 из предыдущей инструкции, поочередно выполните в ней следующие команды, затем выполните Шаг 6 (т. е. остановите 3 службы, отвечающие за обновления, командами ниже сбросьте службы «BITS» и «Центр обновления Windows» до стандартных значений дескриптора безопасности и запустите 3 службы обратно):
sc.exe sdset bits D:(A;CI;CCDCLCSWRPWPDTLOCRSDRCWDWO;;;SY)(A;;CCDCLCSWRPWPDTLOCRSDRCWDWO;;;BA)(A;;CCLCSWLOCRRC;;;IU)(A;;CCLCSWLOCRRC;;;SU)

sc.exe sdset wuauserv D:(A;;CCLCSWRPLORC;;;AU)(A;;CCDCLCSWRPWPDTLOCRSDRCWDWO;;;BA)(A;;CCDCLCSWRPWPDTLOCRSDRCWDWO;;;SY)
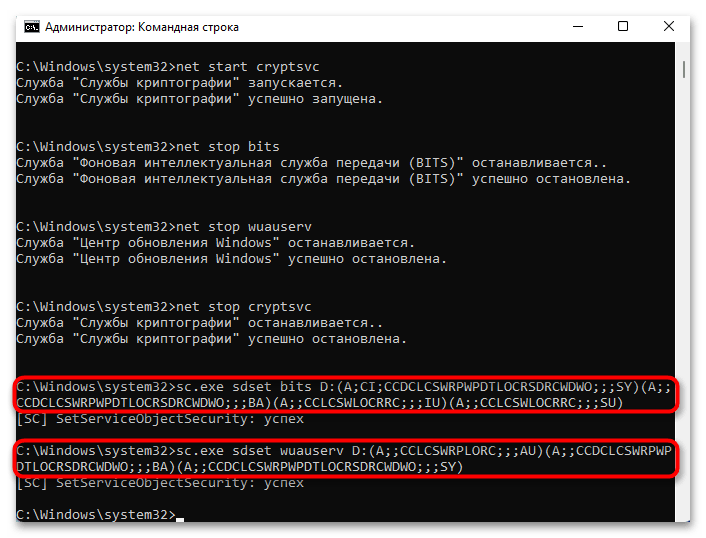
Проверяйте, исчезла ли ошибка.
Совместимость Windows 11 с компьютером
Ошибка 0x800f081f также может свидетельствовать о том, что текущее «железо» компьютера (как правило, материнская плата) несовместимо в новой версией Windows 11. Такая ошибка появляется при попытке системы скачать именно крупное обновление, а не обычное мелкое. Увы, определить совместимость компонента ПК и последнего обновления Windows 11 просто так не получится, поскольку подобной информации в свободном доступе нет. Можно лишь попробовать узнать название материнской платы, а затем поискать в интернете, есть ли другие пользователи с этой же материнской, столкнувшиеся с ошибкой 0x800f081f при установке апдейта ОС.
Читайте также: Просмотр характеристик материнской платы
Проще всего (но это не является 100%-ной гарантией) посмотреть, поддерживается ли материнская плата производителем, найдя ее по названию на сайте компании, в разделе скачивания драйвера. Зачастую все становится понятно при выборе операционной системы: если в списке нет Windows 11, значит, драйверов изготовитель не выпускал, соответственно, стабильная работа последней версии Windows 11 с использованием данной материнской платы не гарантируется. Даже если Windows 11 заявлена в списке поддерживаемых ОС, просмотрите сам список драйверов и дату их выхода тоже: так, если представлен неполный список программного обеспечения, это означает, что производитель платы хоть и позволил перейти на 11, но дальнейшая поддержка, по всей видимости, приостановлена.
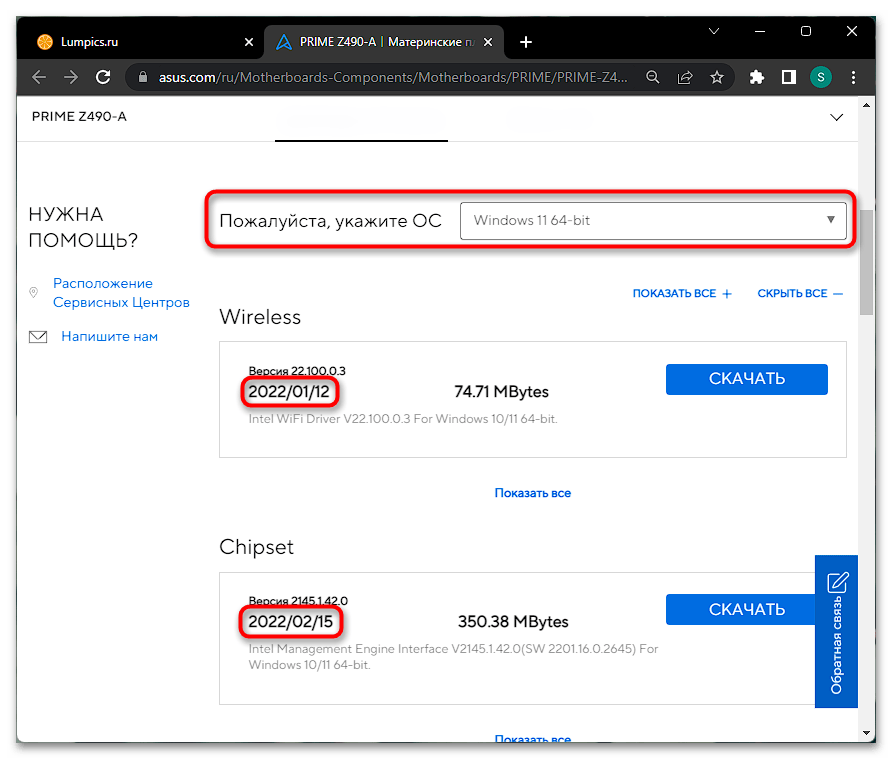
Об этом чаще всего свидетельствует отсутствие драйвера для чипсета (чипсет является одним из важнейших компонентов ПК), а имеются лишь драйверы для сетевого адаптера и аудио. По дате выхода последних обновлений также можно понять, продолжается ли поддержка. Если все они были выпущены давно (грубо говоря, почти параллельно с выходом Windows 11), и больше не дорабатывались, по всей видимости, поддержка платы также остановлена.
Отметим, что даже если вы обновлялись до Windows 11 с Windows 10, возможно, хоть и сам процесс перехода был нормальный, это не гарантирует возможности получения дальнейших апдейтов. Связано это с тем, что Microsoft могла изменить требования к аппаратным характеристикам для обеспечения работоспособности тех или иных своих новых функций. Другими словами, иногда нововведения для ОС могут оказаться несовместимы с вашим компьютером (как правило, потому, что какое-то его комплектующее аппаратно устарело), из-за этого установить крупное обновление не получится. При этом какие-нибудь мелкие обновления будут продолжать инсталлироваться без проблем.
Help: How to fix the error: 0x800f081f?
“I encountered error: 0x800f081f while trying to install Windows 11, and I don’t know how to fix it.”
Error 0x800f081f is one of the most common error codes related to Windows 11 updates, along with 0x800F0906, 0x800F0907, and 0x800F0922. This error code appears when Windows cannot download the critical files for a given update. When this error code is encountered, the user will typically see an error message that reads, «Windows could not find required files to complete the requested changes. Error code: 0x800f081f».
Fortunately, several methods have proven successful at solving this issue. In this blog post, we’ll discuss the 6 common methods to solve install error: 0x800f081f, so you can get your system up and work again quickly!

- Part 1: What Causes Install Error: 0x800f081f to Appear?
- Part 2: Back Up Your Data & System before Fixing Error: 0x800f081fHOT
-
Part 3: How to Fix Install Error-0x800f081f Windows 11?
- Method 1. Run the Windows Update Troubleshooter
- Method 2. Repair Windows System files
- Method 3. Adjust Your Group Policy
- Method 4. Reinstall Microsoft .NET Framework 3.5
- Method 5. Remove Windows Update Cache and Components
- Method 6. Delete WUServer and WIStatusServer From the Registry
Part 1: What Causes Install Error: 0x800f081f to Appear?
When installing the latest Windows 11 22H2 update, many users encounter the error code 0x800f081f. This dism error 0x800f081f can be frustrating, and while there is no single cause of this Windows 11 install error — 0x800f081f, a few common factors may be contributing to the issue.
The main causes behind 0x800f081f Windows 11 include:
- An incompatible system.
- Corrupt Windows update components.
- Misconfigured Group policy settings.
- The unavailability of Microsoft .NET Framework 3.5.
Fortunately, there are some working solutions to fix the install error — 0x800f081f Windows 11. If you want to know, keep reading!
Part 2: Back Up Your Data & System before Fixing Error: 0x800f081f
Manually troubleshooting Windows 11 install error — 0x800f081f can be complex and there is a risk of data loss if not handled carefully. Therefore, to avoid losing important data, we highly recommend you back up your data, including operating system before fixing install error — 0x800f081f. You can use 4DDiG Partition Manager to help you back up your data and operating system easily and quickly. This user-friendly tool offers a range of features to manage and safeguard your data.
-
Efficient Disk Cloning
You can safeguard your valuable data by cloning your entire hard drive. This feature provides a reliable backup solution, ensuring that your important data are protected. -
One-click OS Migration to SSD
You can easily migrate your Windows OS to an SSD without reinstalling the entire System. -
Hassle-free Hard Drive Upgrade
Upgrade to a larger hard drive seamlessly while preserving your data. -
Flexible Partition Management
You can optimize your disk space by extending, splitting, creating, deleting, and formatting partitions according to your needs.
Here are the steps that you use 4DDiG Partition Manager to back up your data and system:
-
Download and install 4DDiG Partition Manager on your PC, and then connect an external disk to your computer. Launch the application and navigate to the main menu, select the «Clone Disk» option.

-
Choose the target disk that will receive the cloned data from the source disk, and then click on the «Continue» button.
-
Keep in mind that cloning will overwrite all data on the target disk. Therefore, once you have confirmed that everything is correct, click on the «Sure» button.
-
Now you will see a preview of the process. So again check everything and click on the Start button to start the process.
-
The whole process will take some time so be patient. Once the process is completed, you can click on the Finish button.
By following these simple steps, you can easily back up your data and system in advance and avoid potential problems in the future.
In this article, we will provide 6 effective methods you can use to fix error 0x800f081f. So, if you’re having trouble installing Windows 11 22H2 update due to error 0x800f081f, read on for detailed instructions.
Method 1. Run the Windows Update Troubleshooter
If you are experiencing Windows 11 install error — 0x800f081f, you can use the Windows Update Troubleshooter to find and fix any errors. Here’s how:
-
Open the Start Menu and type in «Troubleshoot other problems.»
-
Scroll down the list of troubleshooting options and click «Run» next to Windows Update.
-
The troubleshooter will begin the diagnosis and check for errors.
- If any errors are found, it will list recommended fixes. Apply the fixes that it suggests, and then restart your PC.
This should help to resolve the install error — 0x800f081f Windows 11 issue.
Method 2. Repair Windows System files
To quickly and efficiently scan for and repair any errors in your system files, use these simple steps:
- Bring up the Start menu and look for «Command Prompt.»
-
Run Command Prompt as an administrator.
-
Type in the command «sfc /scanow» and hit Enter.
-
Reboot the PC and relaunch the Command Prompt and input the command «chkdsk C: /f /r /x,» then hit Enter.
- Enter the command «DISM.exe /Online /Cleanup-image /Restorehealth» and press Enter.
- Close the window and reboot the PC.
Method 3. Adjust Your Group Policy
If you’re having trouble installing Windows 11 due to the error 0x800f081f, one possible solution is to adjust your Group Policy settings. This method involves setting up a Windows update configuration that allows for optional component installation and component repair. Here’s what you need to do:
-
To launch the Run dialogue, press the Windows + R keys simultaneously.
-
Enter gpedit.msc and hit Enter.
-
Extend Computer Configuration, then Administrative Templates, then System.
-
Click on the entry labeled Specify settings for optional component installation and component repair.
- Double-click on this entry to open it.
-
Check Enabled and hit OK.
By adjusting your Group Policy settings, you can allow Windows 11 to install optional components and component repair to fix errors like install error — 0x800f081f Windows 11. If you’re still having trouble, try the other methods outlined in this article.
Method 4. Reinstall Microsoft .NET Framework 3.5
Reinstalling the Microsoft .NET Framework 3.5 should help to solve the Windows 11 install error — 0x800f081f issue. The Microsoft .NET Framework 3.5 can be enabled through the Windows Control Panel.
-
To do this, click the Windows key and type «Turn Windows features on or off.»
-
When the dialogue box appears, look down and make sure the .NET Framework 3.5 (including .NET 2.0 and 3.0) option is selected.
- Click OK and then reboot your computer if prompted.
Method 5. Remove Windows Update Cache and Components
The fifth method to fix Windows 11 Install Error: 0x800f081f is removing the Windows Update cache and components. This may help remove any unnecessary components that are preventing the installation from completing. To do this, follow the steps below:
Step 1. Open the Start menu. Enter «Command Prompt» and run it as an administrator.
Step 2. Type the below commands and hit Enter after each command:
- Net stop wuauserv
- Net stop cryptSvc
- Net stop bits
- Net Stop appidsvc
- Ren %systemroot%system32catroot2 catroot2.bak
- Ren %systemroot%SoftwareDistribution SoftwareDistribution.bak
- Ren %systemroot%system32catroot2 catroot2.bak
- Net Start bits
- Net Start wuauserv
- Net Start appidsvc
- Net Start cryptsvc
Step 3. Exit cmd and restart the PC.
You will have removed all Windows Update cache and components from your system by executing these commands. This should help fix any errors related to Install Error: 0x800f081f on Windows 11.
Method 6. Delete WUServer and WIStatusServer From the Registry
If you’re receiving the 0x800f081f error when attempting to install Windows 11, one potential fix is to delete the WUServer and WIStatusServer entries from the registry. This can be done by following the steps below:
-
Launch the Run dialog by clicking the Windows + R keys simultaneously.
-
Type «regedit» in the field and press Enter. If prompted for permission, click Yes.
-
To the left in the Registry Editor window, find the «HKEY_LOCAL_MACHINE\SOFTWARE\Policies\Microsoft\Windows\WindowsUpdate.»
- On the right pane of the window, locate WUServer and WIStatusServer. Right-click on both entries and select Delete.
- Restart your computer and try installing Windows 11 again.
FAQ about Install error — 0x800f081f
What else can I do to prevent dism error 0x800f081f from appearing?
It is critical to understand that the above solutions may not always work to fix error 0x800f081f. Therefore, it is essential to take additional measures to ensure that this error does not occur in the future. Here are some tips to help prevent dism error 0x800f081f:
- Ensure the .NET Framework is turned on in the Windows Features window and updated regularly.
- Ensure that Developer Mode is turned off, which can interfere with Windows update installation.
- Reset or reinstall the Windows 11 OS as a last resort, but only if all other solutions have been exhausted.
Summary
Install Error-0x800f081f is a common problem for Windows 11 users. The Error: 0x800f081f can be caused by many factors but can be solved by the 6 effective methods outlined in this blog post. Please don’t forget to back up your data and operating system before fixing Windows 11 install error — 0x800f081f. The good news is 4DDiG Partition Manager can easily help you do this!
4DDiG Partition Manager
4DDiG Partition Manager is a simple and secure professional system migration tool that can migrate Windows OS to SSD in one click without reinstalling your system, effectively clone your entire hard drive to backup your data and more. It supports securely moving installed applications, system updates, drivers, custom settings from one PC to another.
Free Download
BUY NOW
Free Download
BUY NOW