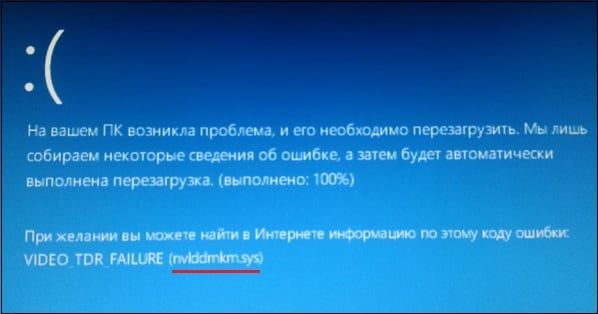
Пользователи графических карт «Nvidia» могут столкнуться внезапным появлением на экране их ПК «синего экрана смерти», в тексте которого упомянут неизвестный драйвер «nvlddmkm.sys». Часто это происходит после установки в систему очередного системного обновления или какой-либо внешней программы, после чего «синий экран» начинает появляться с завидным постоянством. Появление ошибки video_tdr_failure (nvlddmkm.sys) сигнализирует о некорректной работе драйвера для графической карты «Нвидиа», и обычно решается набором стандартных способов. В данном материале я разберу суть рассматриваемой дисфункции, а также представлю способы устранить экран смерти nvlddmkm.sys на Виндовс 7/10.
Содержание
- Причины дисфункции с Nvidia
- Решение №1. Переименовываем и копируем файл nvlddmkm.sys
- Решение №2. Выполняем откат графического драйвера
- Решение №3. Осуществляем чистую установку драйвера
- Решение №4. Проверяем модули памяти
- Решение №5. Деактивируем разгон системы
- Решение №6. Задействуем более мощный БП
- Решение №7. Используем функционал утилиты CHKDSK
- Заключение
Причины дисфункции с Nvidia
Рассматриваемая мной проблема nvlddmkm.sys является довольно частым гостей в системах, работающих на ОС Виндовс 7,8 и 10. При этом разработчики от «Нвидиа» и «Майкрософт» всячески открещиваются от своей вины в появлении данной ошибки, отправляя жалующихся на проблему юзеров в «Майкрософт» (в случае «Нвидиа»), и в «Нвидиа» (в случае «Майкрософт»).
При тщательном рассмотрении можно сделать вывод, что в статистическом большинстве случаев причиной возникновения проблемы является драйвер от «Нвидиа». Во время инсталляции большинства графических драйверов в ОС Виндовс старая версия драйвера «nvlddmkm.sys» часто копируется в директорию:
![]()
Программы обращаются туда за новейшей версией драйвера, но находят там лишь устаревший вариант.

Кроме некорректной версии графического драйвера, причиной возникновения дисфункции также может быть:
- Перегрев системы (в частности, из-за оверклокинга);
- Некорректная работа какой-либо из планок памяти;
- Недостаточная мощность блока питания ПК;
- Плохие («битые») сектора на жёстком диске;
- Конфликт устройств (программного обеспечения);
- Недостаточный объём файла подкачки;
- Неверные настройки БИОС.
Рассмотрим несколько эффективных способов исправить возникшую ошибку.
Решение №1. Переименовываем и копируем файл nvlddmkm.sys
Скачайте и установите на ваш ПК самые свежие драйвера «Нвидиа». Теперь перейдите в папку:
![]()
найдите там файл nvlddmkm.sys, и переименуйте его в nvlddmkm.sys.old.
Теперь перейдите в директорию Нвидиа (обычно это C:\Nvidia), и найдите там файл nvlddmkm.sy_. Скопируйте данный файл на ваш рабочий стол (или в директорию рабочего стола на диске). Теперь нажмите на кнопку «Пуск», в строке поиска впишите cmd, и нажмите ввод.
В открывшемся окне командной строки введите:
![]()
и нажмите ввод.
Далее введите:
![]()
и вновь нажмите на ввод.
После это скопируйте файл nvlddmkm.sys с вашего рабочего стола в:
![]()
Перезагрузите ваш ПК.
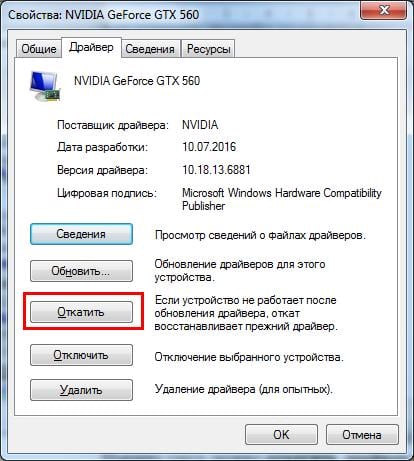
Решение №2. Выполняем откат графического драйвера
Если ранее проблем не наблюдалось, а они появились после установки какого-нибудь обновления (нового драйвера), попробуйте откатить ПК на предыдущий драйвер.
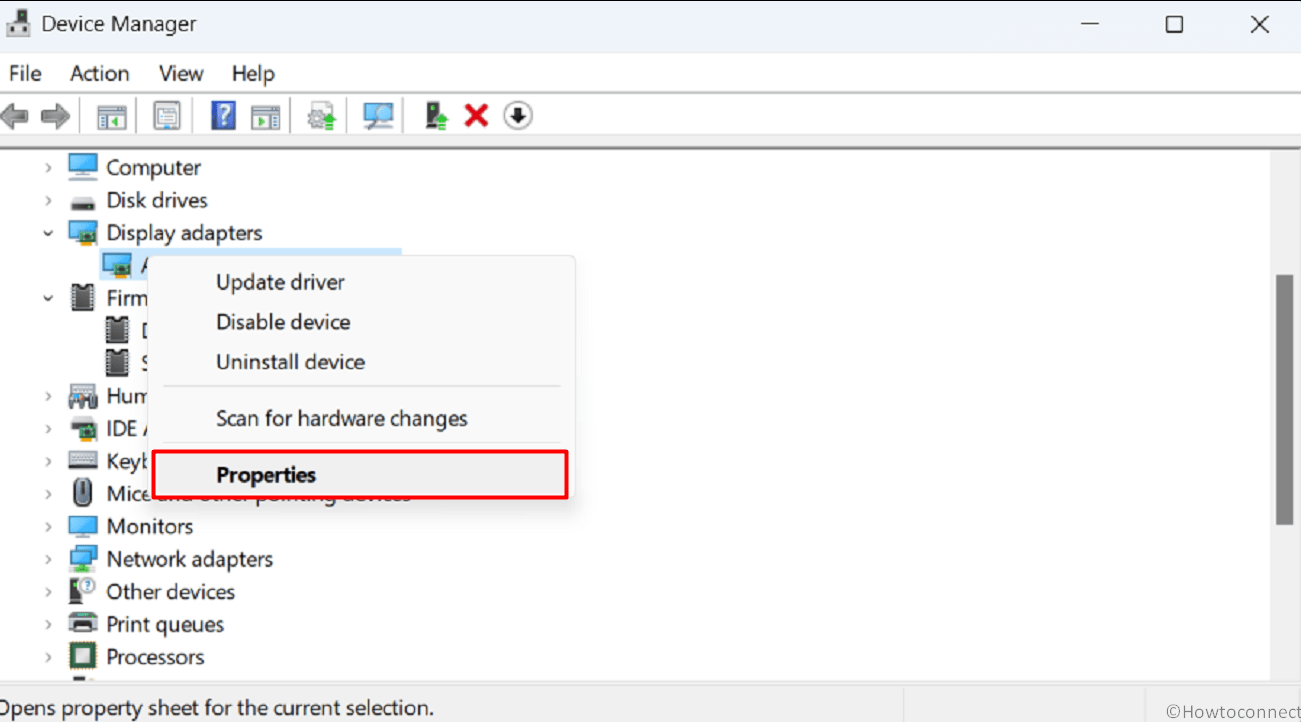
- Для этого нажмите на «Пуск», в строке поиска введите devmgmt.msc и нажмите ввод.
- В открывшемся окне «Диспетчера устройств» разверните вкладку «Видеоадаптеры», кликните на вашей графической карте, нажмите правую клавишу мыши и выберите «Свойства».
- Теперь нам необходимо перейти на вкладку «Драйвер», и выберите там «Откатить драйвер».
- Затем перезагрузите наш PC.
Решение №3. Осуществляем чистую установку драйвера
Если предыдущие решения оказалась неэффективны в решении синего экрана nvlddmkm.sys, тогда необходимо полностью удалить графический драйвер «Нвидиа» и его составляющие из системы с помощью специального инструментария (например, программы «DriverSweeper»).
Затем перезагрузите ПК, загрузитесь в безопасном или обычном режиме, и запустите или установщик новых драйверов от «Нвидиа». Если на жёстком диске он отсутствует, его необходимо предварительно скачать на жёсткий диск, или специальную программу для обновления драйверов уровня «ДрайверПак Солюшн». После установки новых драйверов перезагрузите вашу машину.

Решение №4. Проверяем модули памяти
В некоторых случаях причиной дисфункции nvlddmkm.sys является нестабильная работа планок памяти ПК. Если у вас подключено несколько планок, тогда попробуйте попеременно задействовать лишь одну, и понаблюдать, будет ли появляться ошибка. Если ошибка исчезнет, значит виновата какая-либо из неподключенных в данный момент планок.
Также можно воспользоваться специальными инструментами для тестинга памяти, уровня «Memtest86».
Решение №5. Деактивируем разгон системы
Причиной ошибки также может являться перегрев системы (в частности из-за её искусственного разгона). Отключите такой разгон в БИОС (при наличии такой возможности), и деактивируйте программы для такого разгона.
Решение №6. Задействуем более мощный БП
Ещё одним эффективным решением nvlddmkm.sys станет задействование в системе более мощного БП. У ряда пользователей рассматриваемая в статье ошибка возникала из-за недостаточной мощности БП, потому замену на мощную альтернативу позволила устранить проблему.
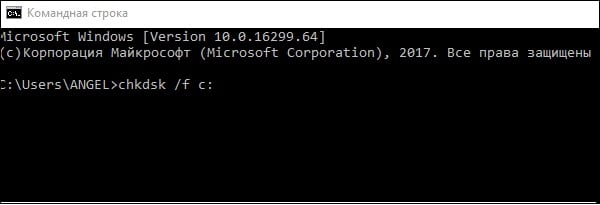
Решение №7. Используем функционал утилиты CHKDSK
Ещё одним вариантом решения дисфункции будет проверка винчестера на наличие ошибок. Для этого необходимо задействовать функционал утилиты CHKDSK. Запустите командную строку, и там введите:
![]()
и нажмите ввод. Дождитесь окончания процедуры проверки.
Заключение
В большинстве случаев причиной проблем nvlddmkm.sys является некорректная работа графического драйвера, который необходимо заменить на модерный аналог. Если это не помогло, рекомендую воспользоваться другими приведёнными в статье решениями, что позволит избавится от ошибки nvlddmkm.sys на ОС Виндовс 7 и 10.
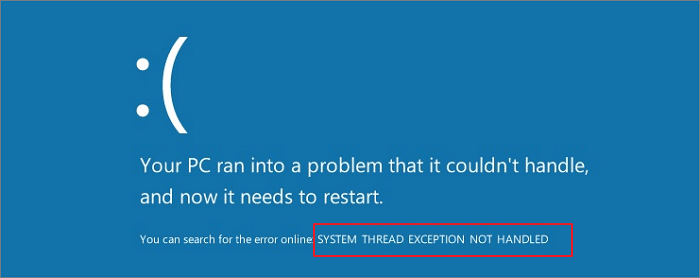
“System Thread Exception not Handled Nvlddmkm.sys” bug checking is a general problem for Windows computers having Nvidia graphics cards installed. This fatal error suddenly appears causing system crash when using an application that involves a large extent of GPU. Nvlddmkm.sys refers to the kernel mode driver (a small program) directly associated with NVIDIA Graphics that allows your computer to establish communication with hardware. When system thread generated an exception that the error handler didn’t catch, this BSOD occurs leading to system crash and unexpected restart of computer.
Nvlddmkm.sys System Thread Exception not Handled Nvlddmkm.sys is generally triggered because of obsolete or incompatible NVIDIA graphics card driver. Furthermore, conflicts with third-party applications, corrupt system files, malware, and Windows update bugs are potential reasons behind this BSOD. However, you can easily solve this stop error with the help of solutions in the coming part of this post. What failed: nvlddmkm.sys is commonly accompanied by VIDEO_TDR_FAILURE, PAGE_FAULT_IN_NONPAGED_AREA, DRIVER_IRQL_NOT_LESS_OR_EQUAL, and more.
Here is how to fix System Thread Exception not Handled Nvlddmkm.sys Error in Windows 11 or 10 –
Ways-1: Update NVIDIA Graphics Driver
Since this Blue Screen Error has a direct relation with NVIDIA Graphics, the outdated driver version might be the most authentic reason. The driver may be incompatible, buggy, corrupt, underdeveloped, or unable to compete with the running big or high-resolution running game or application.
As a result, when Windows calls nvlddmkm.sys and does not find it in return, System thread creates an exception and the bug check is triggered. Therefore, updating the driver is the most prior solution to fix the BSOD –
- Press Windows and R keys.
- Type devmgmt.msc.
- Click on OK.
- When Device Manager appears, double-click on Display adapters.
- Right click on NVIDIA GeForce (the existing version).
- Select Update driver.
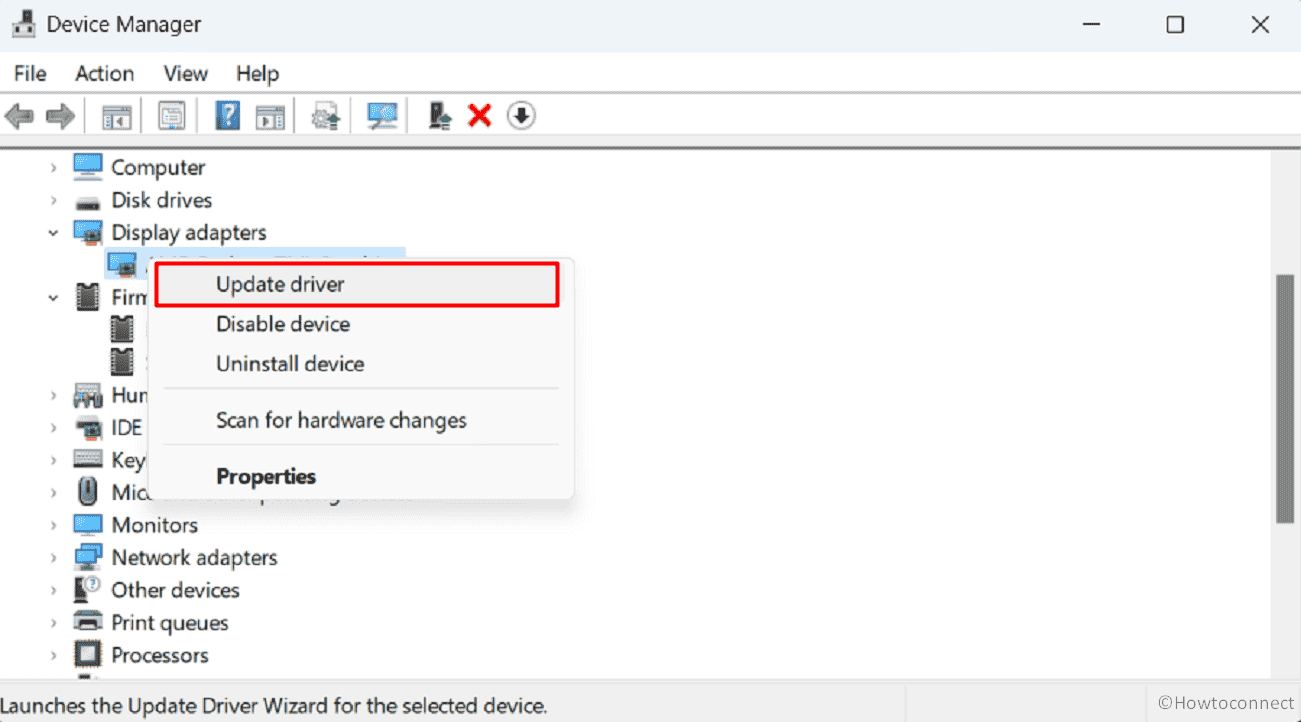
- When another window prompts; click on Search automatically for drivers option.
- Restart your computer and check if the error is resolved.
- In case, the BSOD still persists, navigate to – https://www.nvidia.com/en-us/geforce/drivers/.
- Search the latest version using the dropdown on the web page and download the driver.
- Launch the setup file and follow the onscreen instructions to complete installation.
- Reboot the device and the error should be fixed.
Way-2: Roll Back the driver
If the previous method fails to solve System Thread Exception not Handled Nvlddmkm.sys blue screen problem then it indicates that there are any bugs in the latest version. Therefore, rolling back the driver to an earlier version may help to withdraw the BSOD occurring. Follow the steps for the same –
- Right-click on the Start button and select “Device Manager”.
- Go to the “NVIDIA GeForce” Display adapter.
- Then, right click on it and select – Properties.
- Click on the Drivers tab.
- Select – Roll Back Driver.
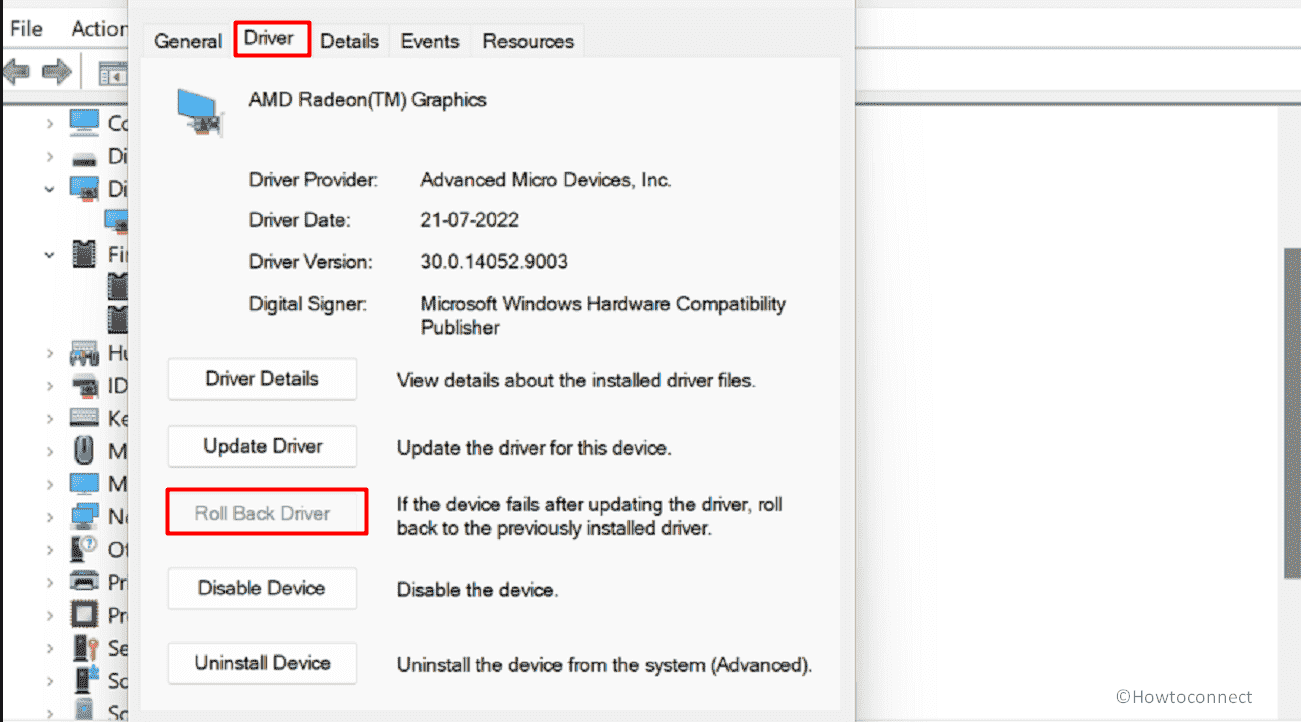
- Click Yes on the confirmation dialog box.
- Restart the device and check if the issue is corrected.
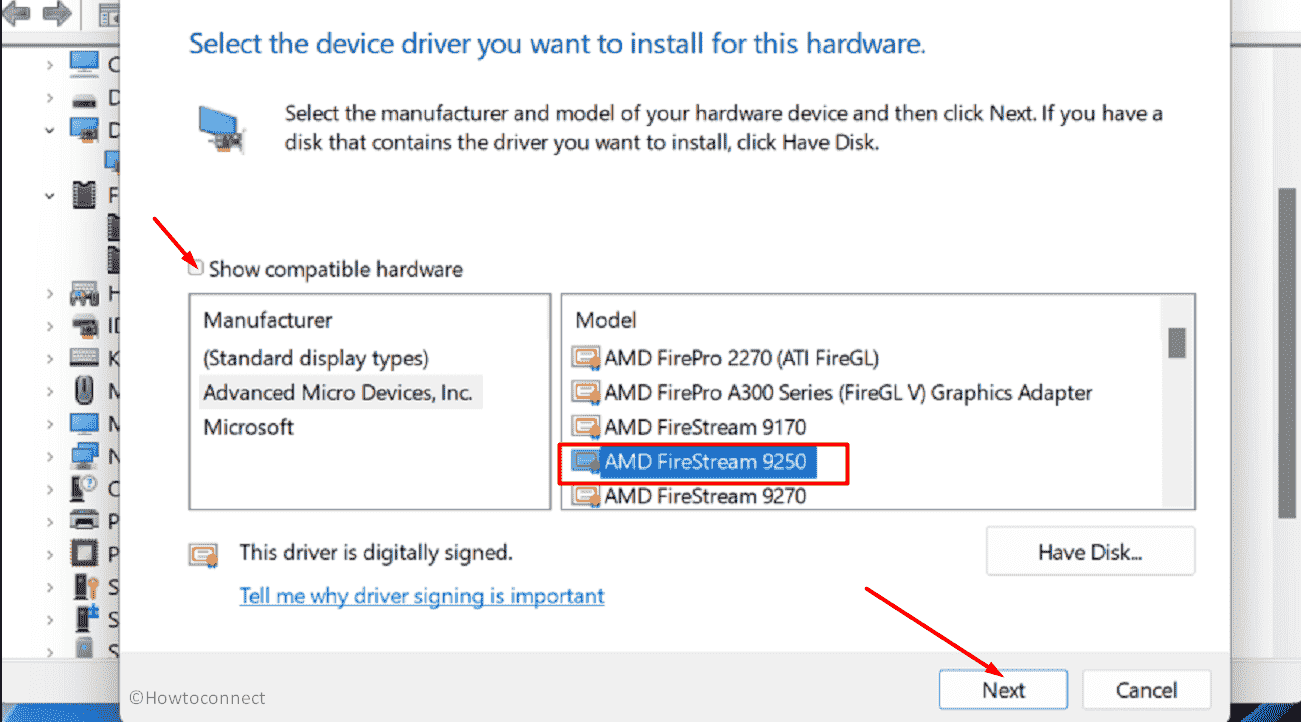
- Sometimes, Rol Back Driver is greyed out (presently also on my laptop). In this case, there is a manual way to downgrade the driver; follow –
- Right-click on the NVIDIA GeForce and choose “Update driver”.
- On the ‘Update drivers’ wizard, select Browse my computer for drivers.
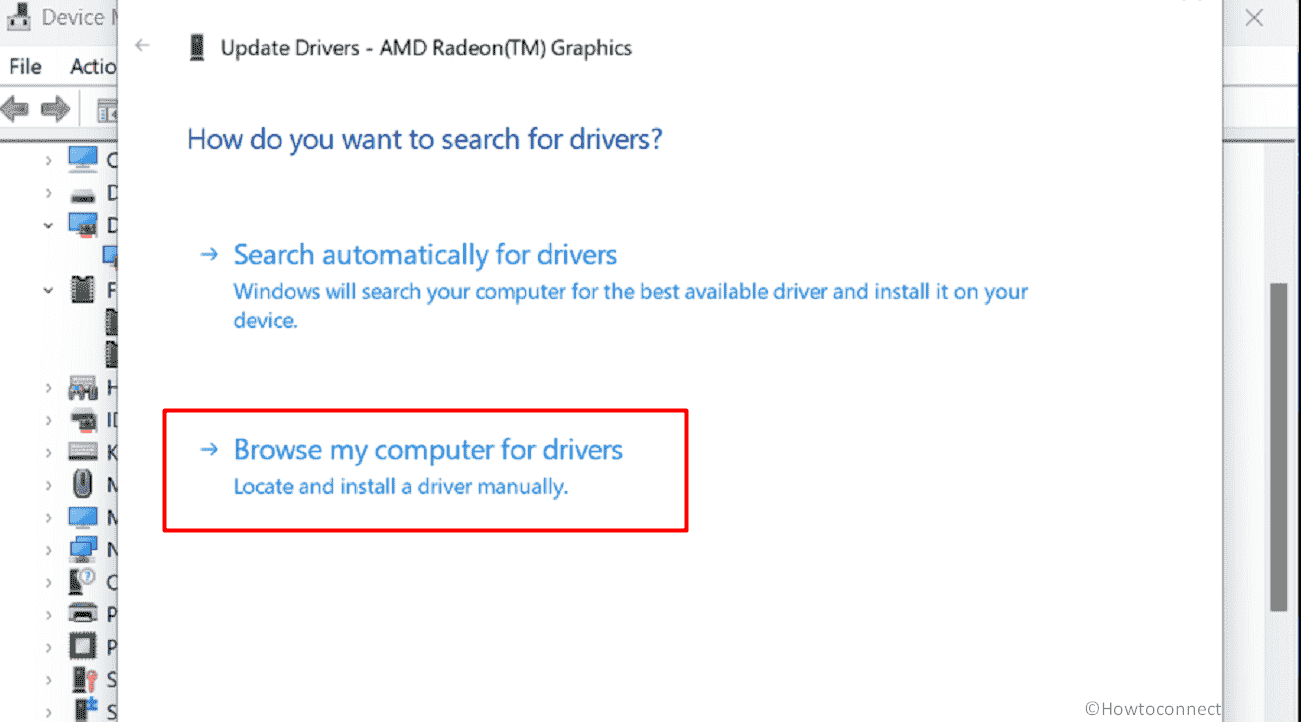
- Click on – Let me pick from a list of available drivers on my computer.
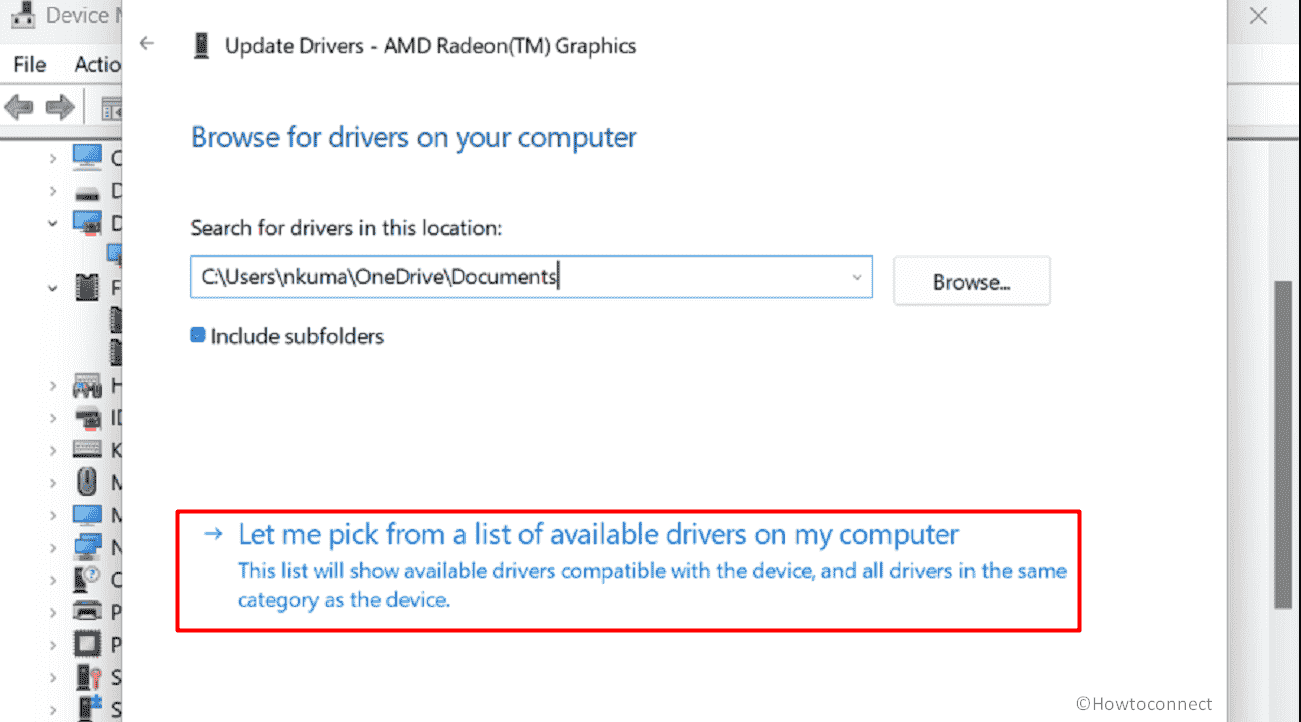
- Uncheck the box – Show compatible hardware.
- This will show multiple older driver versions in a list under Models. Note: on my computer, AMD driver is installed so the screenshot is showing AMD’s older version of drivers. On yours, you will see NVIDIA drivers.
- Select the previous version and click on Next.
- Follow the guide on the screen and finish the rollback.
- Finally, restart the PC and ensure that the error doesn’t show up.
Way-3: Uninstall and then reinstall the driver
Both the methods are not working or supporting getting rid of the bug check means the driver is corrupted or involved in any conflict. This may be the consequence of any third party program which has been recently installed or updated or buggy Windows update. Furthermore, malware or virus can cause this annoyance which we will address in the later part of this article.
Whatever the reason be, to deal with What failed: nvlddmkm.sys blue screen you need to uninstall and reinstall the NVIDIA driver. This process is likely to properly install the software, so, proceed with the steps:
- Click on Start.
- Type – “devmgmt.msc” (without quotes).
- Press Enter.
- On Device Manager, right-click on the NVIDIA display adapter and select – Uninstall device.

- Click on “Uninstall” when a popup shows.
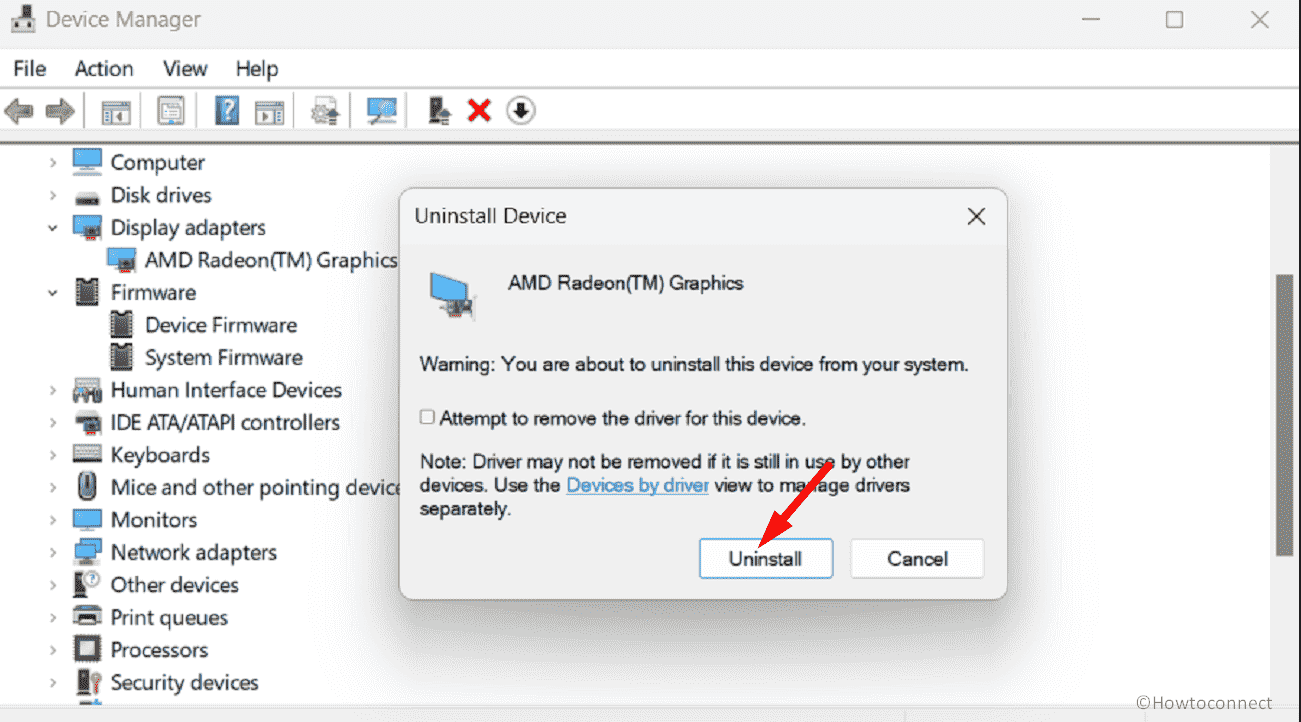
- Restart the computer which will automatically reinstall the application.
Or,
- Click on Search and type appwiz.cpl.
- Press Enter in order to launch the Programs and Features window.
- Locate NVIDIA in the list and click on it.
- Click on ‘Uninstall’.
- Choose Yes on the confirmation pop-up.
- Go with the Uninstallation wizard if appears to conclude the procedure.
- Then, install the driver you have downloaded during following the Way-1.
Follow the guide – How to Reinstall NVIDIA Drivers in Windows 11 or 10
Way-4: Run System File Checker and DISM successively
Corruption in the system files and Windows image format may cause to generate the nvlddmkm.sys system_thread_exception_not_handled. Windows built-in tools (that exclude the risk of less trustworthy software) can help you to repair the Blue Screen error Nvlddmkm.sys.
These are SFC and DISM that can work on both glitches and help you come out, hence, deploy them one by one by moving forward with the instructions –
- Press – Winkey+R.
- Type – cmd.exe.
- Then, press – Ctrl+Shift+Enter.
- Select the Yes option on the User account control pop-up.
- Once the Command prompt appears, type the syntax
Sfc /Scannowand hit Enter. - After the execution is completed reboot the computer and see if the bug checking does not initiate.
- But if nvlddmkm.sys error still persists then open the Command prompt once again and run the below codes one line at a time –
Dism /Online /cleanup-image /checkhealth
Dism /Online /cleanup-image /scanhealth
Dism /Online /cleanup-image /restorehealth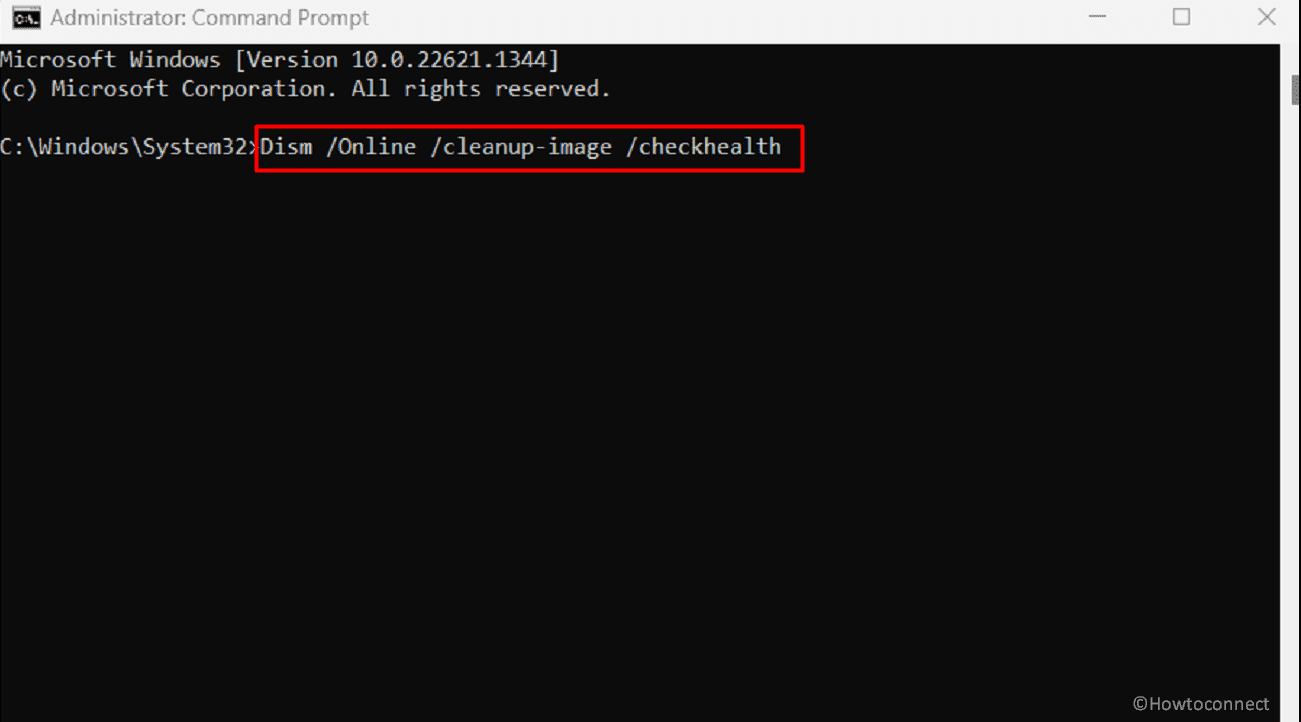
- When these 3 commands finish running then reboot the device.
These are 4 basic solutions so the BSOD should be fixed after following the above-mentioned methods. If the error still continues then there is possibility of more factors forcing this bug check so we recommend following How to Use BlueScreenView to Detect the Cause of Blue Screen and WhoCrashed: A Tool to analyze Dump and reveal culprit driver on Windows to explore more files that are causing the system break. Now, have a look at some more solutions –
Way-5: Use Microsoft Defender Offline scan or Full Scan
Malware and virus are other factors that create messes that end up with nvlddmkm.sys error windows 11 error. However, no room for frustration is here because Windows provides strong tools to completely and quickly remove or quarantine them. You only need to use them –
- Press Winkey and type Windows Security.
- Click on “Windows Security” app from the result.
- Select Virus & threat protection.
- Then, click the Scan options link.
- Save your work because the system will restart and close all the running tasks when using this option.
- Check the option – Microsoft Defender Offline scan.
- Click on “Scan now”.
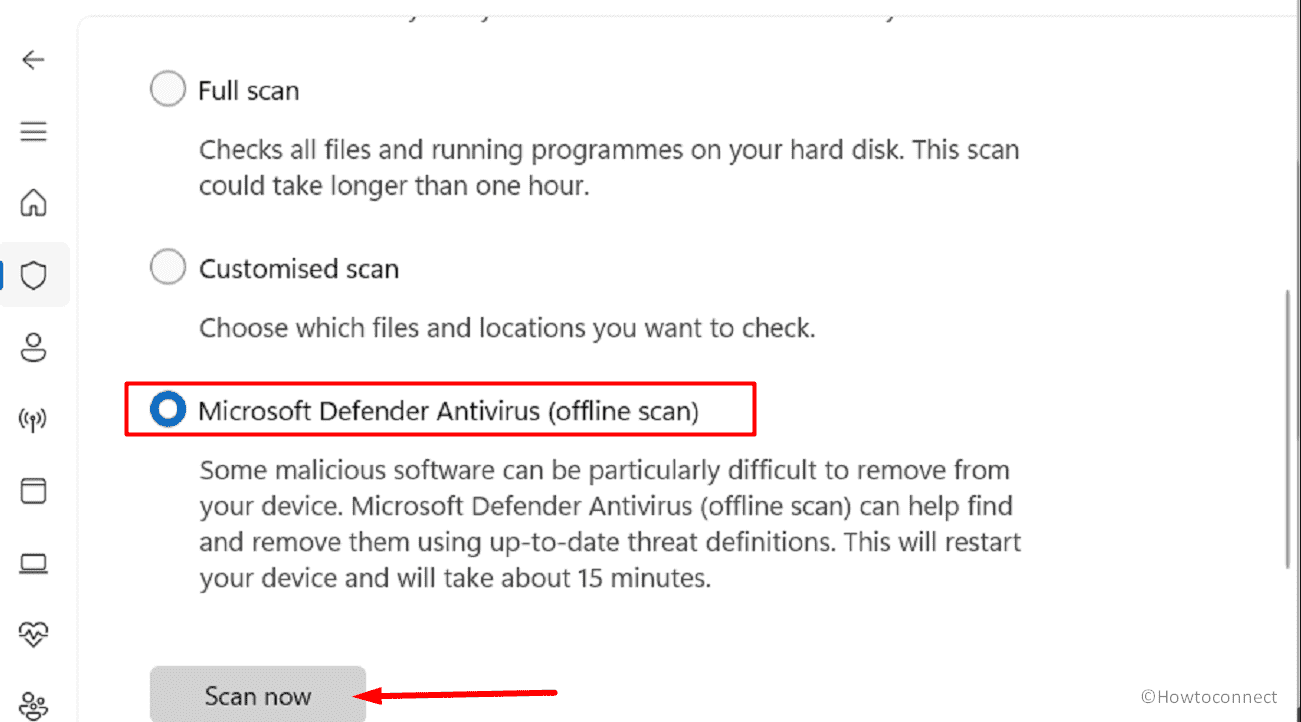
- When a pop-up is prompted, click on “Scan”.
- Wait until the computer restarts and detects threats thoroughly.
- Now go to Windows Security > Virus & threat protection > Protection History.
- Select the found threats and remove them using Action dropdown.
- To use full scan, check the option “Full scan” and click on “Scan now”.
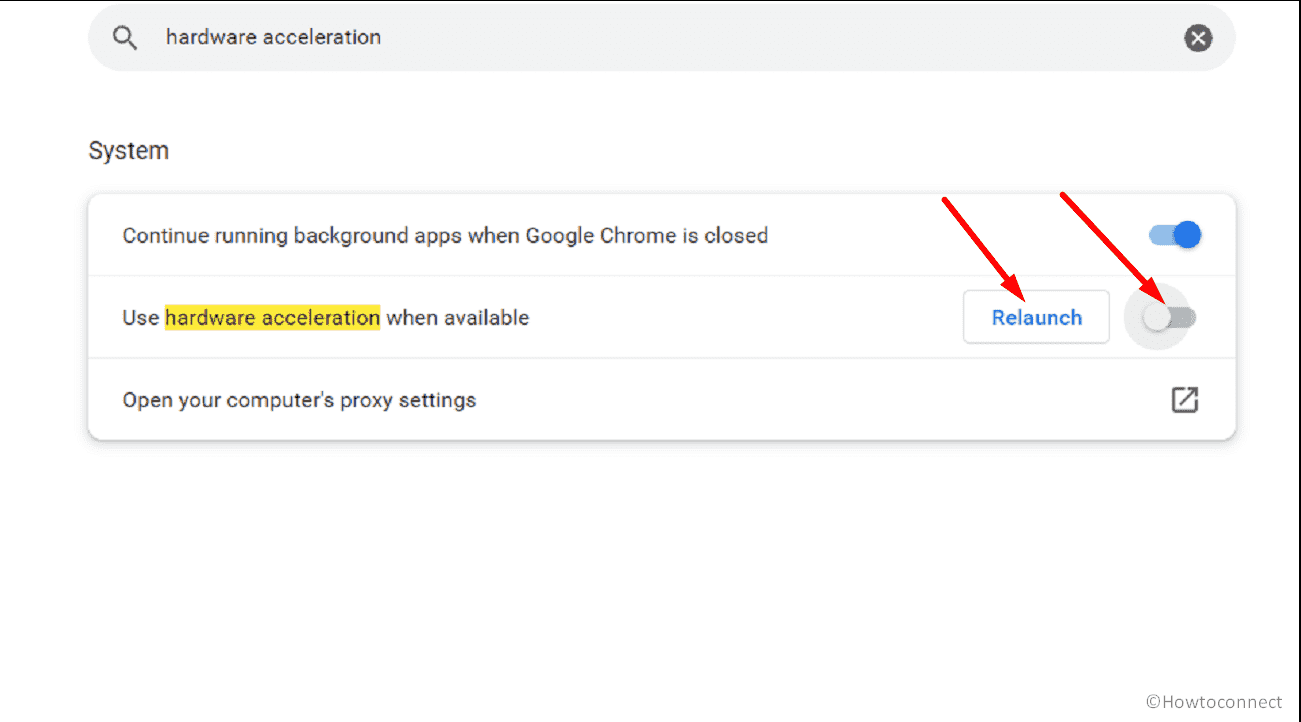
Way-6: Disable Hardware acceleration in browser
Enabled Hardware acceleration setting in web browsers causes compatibility issues with the graphics card driver, leading to the “System Thread Exception not Handled Nvlddmkm.sys” error on the cost of PC performance improvement. To solve this, disable the setting. Here’s how:
1] In Google Chrome or Microsoft Edge
- Launch the browser.
- Click on 3-dots icon (ellipsis) from the top right corner and select Settings.
- In the Search box, type Hardware Acceleration.
- Turn off “Use hardware acceleration when available” from the result.
- Click on Relaunch.
2] In Firefox
- Click on “hamburger menu (3-lines) icon “and select “Settings”.
- Type – hardware.
- Uncheck the option Use recommended performance settings.
- And then remove the tick from Use hardware acceleration when available.
Way-7: Install pending Windows Updates
System Thread Exception not Handled Nvlddmkm.sys BSOD or Blue Screen error, when triggered due to bugs in Windows update, this method will give you relief. Redmond is known to push patches to kill the bugs and issues when informed. Therefore, head to the steps:
- Press Windows+S.
- Type – updates.
- Hit – Enter.
- On the Settings page that appears, click on – Check for updates.
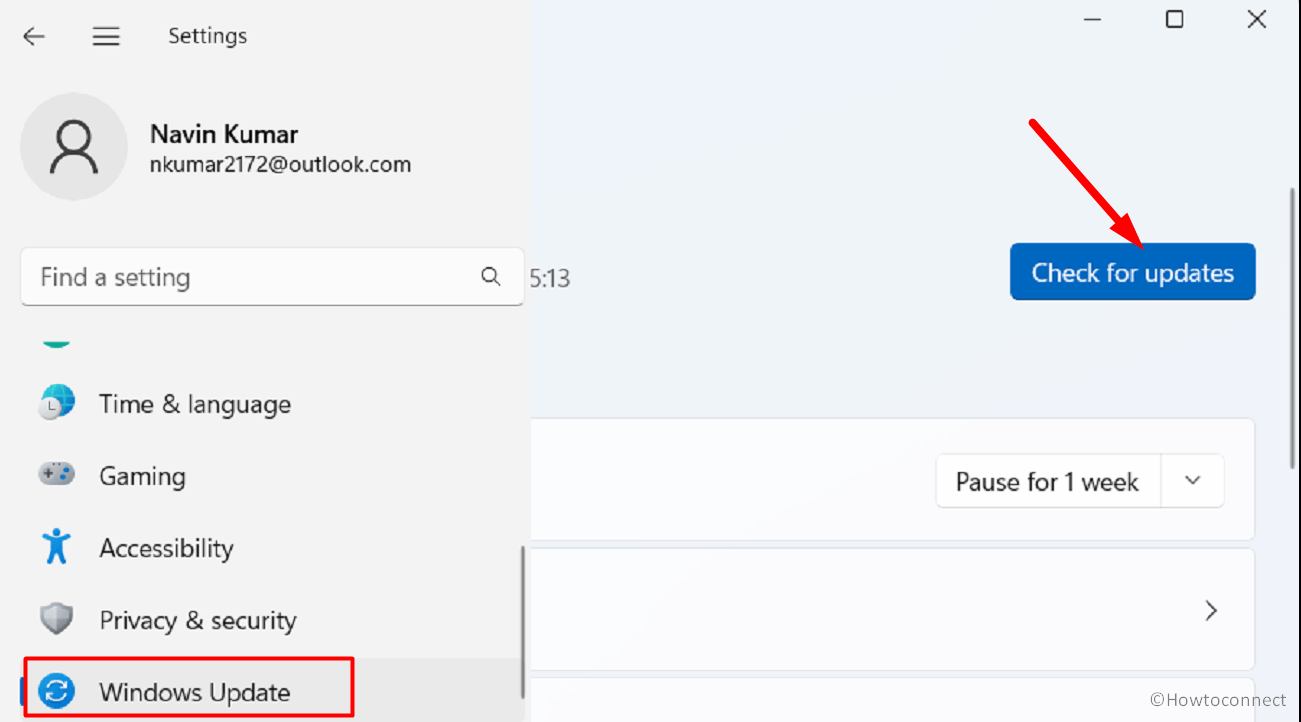
- Wait for some time and allow the system to scan and download the update (if found).
- When asked, click on Restart now.
- Run Windows Update
Way-8: Disable Nvidia ShadowPlay
Sometimes, Nvlddmkm.sys error may show due to Nvidia ShadowPlay, a graphics card (GPU) integrated feature, that allows users to record and share gameplay footage. Although, you have the privilege to disable this using a few quick steps –
- Right-click on Desktop.
- Select – NVIDIA Control Panel.
- Click on the Preferences tab
- Then select – GeForce Experience.
- Click on the Settings cog icon.
- In the General tab, scroll down and disable the In-Game Overlay.
- Restart your computer and check if the error is resolved.
Way-9: Enable Clean boot
Nvlddmkm.sys blue screen error can go to a dead end after enabling Clean boot because this feature has the capability to run the system with a minimal set of drivers and applications. Thus, the programs interfering with the normal functionalities of the system are disabled and the Blue screen is fixed. Follow the steps:
- Click on the Search and type – msconfig.
- Press “Enter” to launch System Configuration window.
- Switch to the Services tab.
- Check the box for – Hide all Microsoft Services.
- Click on – Disable all.
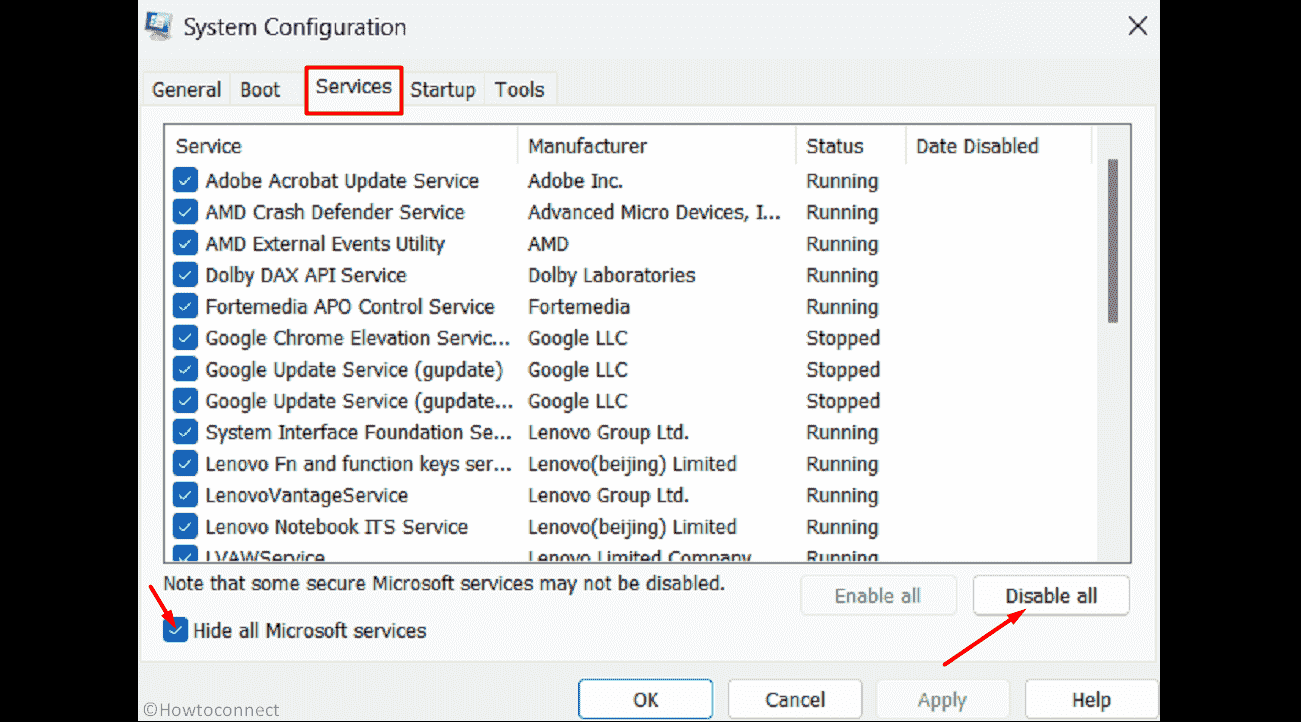
- Then, go to the Startup tab.
- Click on Open Task Manager.
- Go to the “Task Manager”, right click on the apps one by one, and select Disable each time.
- Close the tool and come back to the System Configuration window.
- Click on Apply and OK.
Way-10: Perform Clean install
This is a foolproof method that provides immunity to Windows 11 against any BSOD bugcheck or any other issue. System Thread Exception not Handled Nvlddmkm.sys will have no trace after you clean install the software on your device. Hence, go with the guide –
- Navigate to – https://www.microsoft.com/software-download/windows11
- Scroll down to the “Create Windows 11 Installation Media” section and click on Download now.
- Launch the setup file and follow the instructions to complete the installation.
- For a step-by-step method, follow How to Use Rufus to Install ‘Windows 10 or 11’.
Methods:
Ways-1: Update NVIDIA Graphics Driver
Way-2: Roll Back the driver
Way-3: Uninstall and then reinstall the driver
Way-4: Run System File Checker and DISM successively
Way-5: Use Microsoft Defender Offline scan or Full Scan
Way-6: Disable Hardware acceleration in browser
Way-7: Install pending Windows Updates
Way-8: Disable Nvidia ShadowPlay
Way-9: Enable Clean boot
Way-10: Perform Clean install
That’s all!!
Repair any Windows problems such as Blue/Black Screen, DLL, Exe, application, Regisrty error and quickly recover system from issues using Reimage.
Изучим ситуацию, когда на компьютере/ноутбуке с графическим процессором от nVidia появляется ошибка nvlddmkm.sys в Windows 10. Также коснемся других аналогичных проблем с драйверами, решения которых аналогичны для всех случаев.
Из-за огромного перечня источников неполадки и большого списка вероятных решений статья написана в стиле «проблема-решение».
Содержание
- Симптомы
- Откат драйвера
- Выполняем откат до предыдущей редакции драйвера
- Установка прежней версии ПО
- Поврежденный драйвер или его конфликт с какой-либо программой
- Перегрев графического процессора
- Сброс настроек BIOS
Симптомы
Выглядит это как классический синий экран смерти с кодом ошибки, на котором отображается процесс создания дампа. После его завершения компьютер перезапускается. Более продвинутым пользователям, увидев название проблемного файла nvlddmkm.sys должно стать понятно, что это системный файл, касающийся драйверов для управления функционирование графической карты (в данном случае nVidia).
[shortcod1]
Поэтому проблема касается только пользователей, чьи компьютеры оснащены видеокартами этого калифорнийского производителя. Возникает она, в большей мере, в среде Windows 10, хотя была замечена и в предыдущих редакциях ОС от Майкрософт.

На форумах и в интернете приведено достаточно много вариантов решения неполадки. Их и рассмотрим, начав из самого действенного (вывод основывается на количестве положительных отзывов пользователей).
Откат драйвера
Наибольшее количество пользователей отметило, что драйверы для видеокарты от Nvidia и десятый Windows конфликтуют после обновления первых. Отсюда следует, что проблему вызывает какая-то недоработка со стороны программистов калифорнийского гиганта. Ждать следующей версии программного обеспечения можно долго (хотя в таких случаях разработчики реагируют быстро), поэтому необходимо прибегнуть к откату драйвера до предыдущей версии.
Инструкция актуальна для пользователей, которые столкнулись с неполадкой после апгрейда драйвера для графического адаптера.
Здесь есть два пути: откат и переустановка более старой версии.
Выполняем откат до предыдущей редакции драйвера
1. Вызываем «Диспетчер устройств» через Win+X.
2. Разворачиваем список «Видеоустройства».
3. Открываем «Свойства» видеокарты.

4. Во вкладке «Драйвер» жмем «Откатить драйвер…».

5. Указываем причину решения, которая будет отправлена разработчику, и жмем «Да».

6. По завершении всех операций перезагружаемся.
Установка прежней версии ПО
[shortcod2]
1. Удаляем все программные продукты от Nvidia, включая драйверы на звуковые устройства и PhysX.
ПО, касающееся управления видеокартой, рекомендуется деинсталлировать через Display Driver Uninstaller, для удаления остальных драйверов подойдет что-то вроде DriverSweeper.
Если ошибка не позволяет запустить компьютер вообще (появляется во время запуска Windows 10), тогда необходимо загрузиться в безопасном режиме.
2. После деинсталляции всех продуктов перезагружаем компьютер.
3. Переходим на официальную страницу поддержки видеокарт от Nvidia по адресу http://www.nvidia.ru/page/home.html
4. Переходим по ссылке «Драйверы» и выбираем «Бета и архивные» в выпадающем меню.
5. Загружаем один из последних программных продуктов.

6. Запускаем инсталлятор, указываем место распаковки дистрибутива.
7. В окне инсталлятора выбираем нужные компоненты и обязательно отмечаем опцию, отвечающую за чистую инсталляцию софта.

8. Выполнив все это обязательно перезапускаем Windows
Поврежденный драйвер или его конфликт с какой-либо программой
В данной ситуации, как и с появлением сообщения video tdr failure (касается файла atikmpag.sys при эксплуатации устройств от ATI), рекомендуется обновить системное программное обеспечение, но делать это следует не через Центр обновления, а вручную, скачав последнюю версию инсталлятора с сайта nvidia.ru и установив софт вручную, как это показано в предыдущем случае.
Также здесь может помочь откат системы к прежнему состоянию, когда проблемы не было.
Перегрев графического процессора
При возникновении ситуации рекомендуется проверить качество отвода тепла от компонентов систем, таких как графический адаптер. Если видеокарта была разогнана, перегрев компонентов устройства с большой долей вероятности вызовет проблемы.
Здесь необходимо сразу же вернуть видеокарту в штатный для нее режим работы, а если разгон так необходим — подумать о совершенствовании системы охлаждения.
Проверить температурный режим девайса поможет утилита для отображения данных с датчиков оборудования, такая как HWMonitor, GPU-Z или им подобная.
Сброс настроек BIOS
В случае с появлением сообщения с текстом «system thread exception not handled» или синего экрана, виновником которого является nvlddmkm.sys, можно сбросить настройки BIOS, если предыдущие варианты не помогли. Углубляться в детали процесса не станем: во время загрузки компьютера жмем по клавише входа в настройки БИОСа, находим опцию или кнопку, отвечающую за сброс настроек на заводские, и жмем/вызываем ее.

Еще один вариант сброса — вытаскивание батареи питания CMOS на пару секунд.
The Nvlddmkm.sys error saying the System Thread Exception Not Handled is a Blue Screen of Death (BSOD) error that is faced by many Windows users who are using an Nvidia GPU.
The exact cause of this error is different for individuals. So, if you are facing this error on your computer, you may not sure why is this error appeared on your screen and what to do now.
Don’t worry, we are here to help you fix this error with some easy steps. So, let’s solve this without wasting any time.

Table of Contents
- Factors That Cause the System_Thread_Exception_Not_Handled Nvlddmkm.sys error?
- 1. Incompatible Graphics Drivers
- 2. Conflict Between Voltage and Memory Timing
- 3. Overheating
- 4. Issues With the RAM
- 5. Restricted Features of GPU
- 6. GPU Overload
- Methods To Fix the Nvlddmkm.sys Error
- Method 1: Update the Graphics Drivers
- Method 2: Uninstall Corrupted Drivers
- Step 1: Boot into Safe Mode
- Step 2: Identify the Corrupted Driver
- Step 3: Reinstall the Corrupted Driver
- Method 3: Fix Damaged or Corrupted Files
- Fix 1: Using the CHKDSK tool
- Fix 2: Using the System File Checker tool
- Fix 3: Using the DISM tool
- Method 4: Underclock the Settings of Your GPU
- Method 5: Perform System Restore
- Frequently Asked Questions
- Conclusion
Factors That Cause the System_Thread_Exception_Not_Handled Nvlddmkm.sys error?
The Nvlddmkm.sys error occurs when the Windows display driver named Nvidia Windows Longhorn Display Driver Model Kernel Mode (NVLDDMKM) driver doesn’t respond due to some factors. The most common factors behind this error are described below:
1. Incompatible Graphics Drivers
Nvlddmkm.sys is directly connected to the graphics driver. So, if the graphics card’s driver is incompatible with your operating system, then you’ll be taken to the BSOD, and Nvlddmkm.sys error will occur.
2. Conflict Between Voltage and Memory Timing
If the voltage of your graphics card and the timing information don’t match, then the Nvlddmkm.sys error may occur.
3. Overheating
Excessive heat can damage and reduce the performance of your GPU and trigger Nvlddmkm.sys error on your computer.
4. Issues With the RAM
RAM is also responsible to create some memory issue that triggers the Nvlddmkm.sys error.
Upgrade to Quality RAM. No More Errors. Shop Now.
5. Restricted Features of GPU
It often happens that some features of your graphics card are restricted on your operating system and if you break the rules accidentally, then the Nvlddmkm.sys error may pop up on your screen.
Unlock Nvidia GPU Power! Avoid Errors, Experience Seamless Graphics. Upgrade Today.
6. GPU Overload
The process of a computer is normally handled by the CPU. But if you are running too many processes at a time, then the CPU may unable to handle all those processes, and transferred them to the GPU. If the GPU also fails to run those processes, then the Nvlddmkm.sys error occurs.
Methods To Fix the Nvlddmkm.sys Error
To fix the System_thread_exception_not_handled Nvlddmkm.sys error, you need to follow the methods below:
Method 1: Update the Graphics Drivers
As Nvlddmkm.sys error indicates the problem with the display adapter or the graphics driver, you need to update the driver to fix the issue. Here is to follow:
- Press Windows + X key and select Device Manager from the Power User Menu.
- On the Device Manager window, expand the display adapters and right-click on the graphics driver.
- Now, select update driver and click Automatically search for drivers.
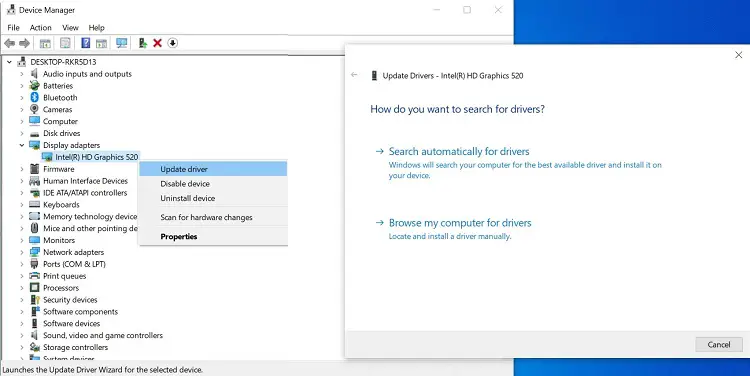
After updating the driver successfully, check if the error is resolved or not. If not then try other methods below.
Method 2: Uninstall Corrupted Drivers
You uninstall any corrupted driver that is causing the mentioned error. To identify and delete the malfunctioning drivers, follow the steps below:
Note: Skip the first step if you can log in to Windows.
Step 1: Boot into Safe Mode
If you are stuck on the blue screen error and unable to access the windows then you need to boot into safe mode. Here is how you can boot into safe mode:
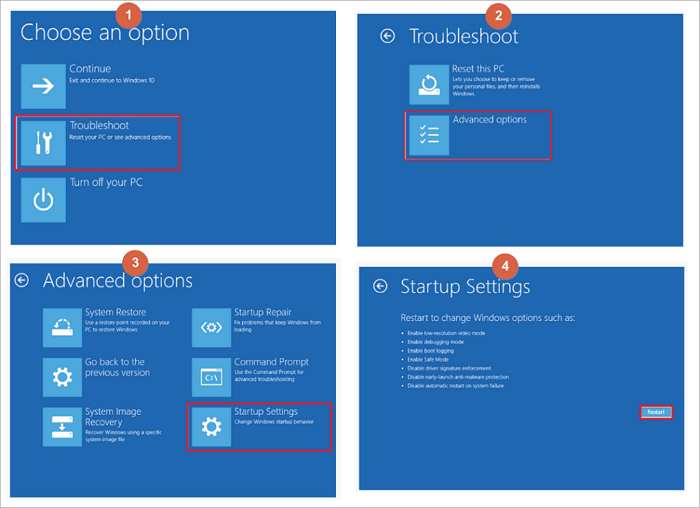
- Restart your PC and when it boots, press the F11 key.
- On the recovery menu, navigate to Troubleshoot > Advanced options > Startup Settings.
- Select “Enable Safe Mode” among the other options in the following window by pressing 4 or F4.
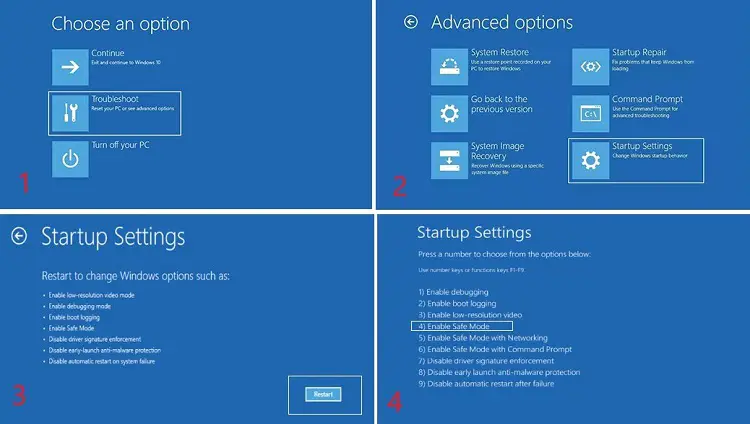
Now, your PC will reboot into Safe mode and you have to identify the culprit that causing the error. Follow the next step to do so.
Step 2: Identify the Corrupted Driver
- Press the Windows + R key to open the Run box.
- Then type “eventvwr” and hit Enter.
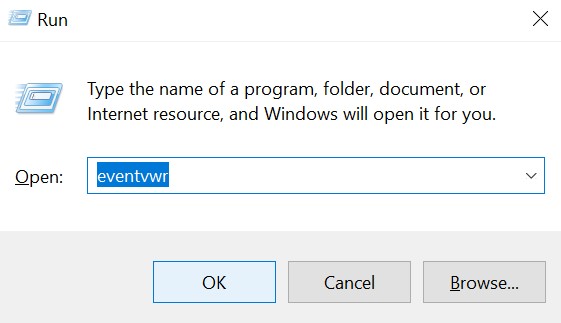
- On the Event Viewer, navigate to Windows Logs > System.
- Now, check the error log.

If you find the error SYSTEM_ THREAD_EXCEPTION_NOT_HANDLED is followed by nvlddmkm.sys, then it means that the display card driver is corrupted and you need to reinstall it.
Step 3: Reinstall the Corrupted Driver
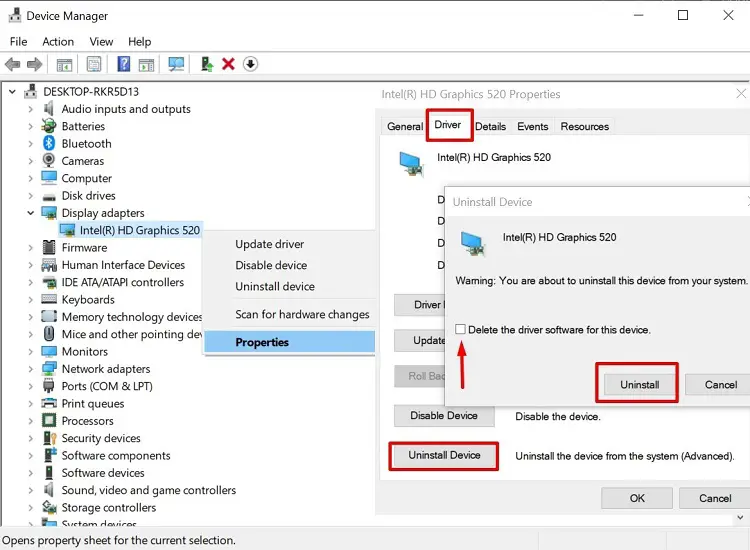
Now you need to find and reinstall your corrupted display card driver. Here is how you can do it:
- Press the Windows + X keys and choose Device Manager from the menu.
- Now, expand the Display adapter and right-click on the driver.
- Then, select properties and go to the Driver tab.
- Now, click on Roll Back Driver, select a reason, and click Yes.
- If rollback doesn’t help you fix the error, click on Uninstall Device.
- Now, reinstall the display driver that is compatible with your device.
Method 3: Fix Damaged or Corrupted Files
You can fix damaged or corrupted files on your computer with three different tools to fix damaged files. All three ways to fix corrupted files are described below:
Fix 1: Using the CHKDSK tool
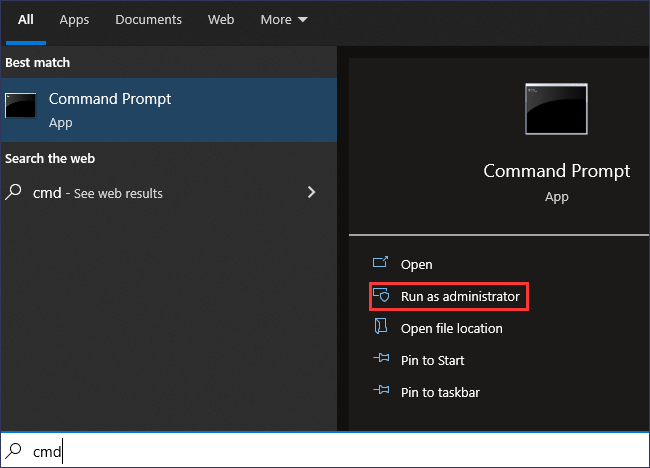
- Press the Win + R keys and type cmd on the Run box.
- Then hold down Ctrl + Shift and press Enter to open the Command prompt as Administrator.
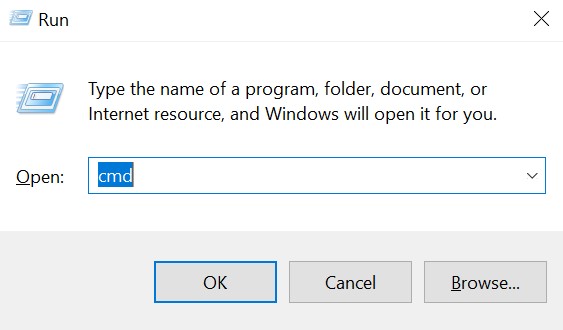
- On the command prompt, type CHKDSK C: /F /R and press Enter.
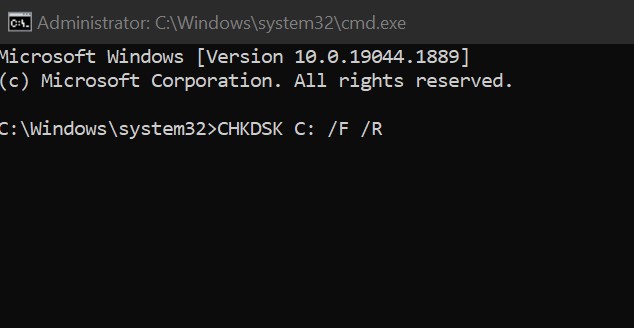
- Then, it will ask you to schedule a check disk the next time you restart your PC. Type Y and press Enter.
- Now, restart your PC.
- Your PC will boot up and perform a full system scan to find any corrupted files and will fix them automatically.
Fix 2: Using the System File Checker tool
- Run the Command Prompt with the administrator privileges as mentioned above.
- Then type SFC /scannow and press Enter.
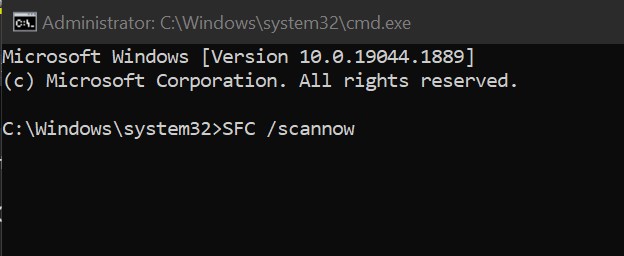
- The system file checker will scan your computer and fix corrupted files automatically.
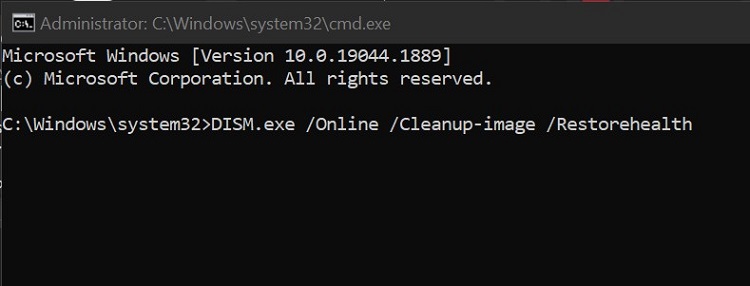
Fix 3: Using the DISM tool
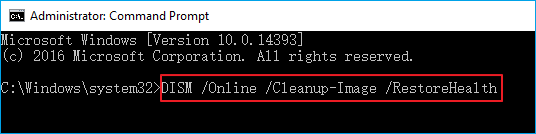
- Open the Command Prompt as administrator.
- Then type the following command and press enter:
DISM.exe /Online /Cleanup-image /Restorehealth
- Now, wait patiently until the process finishes. It will resolve issues automatically.
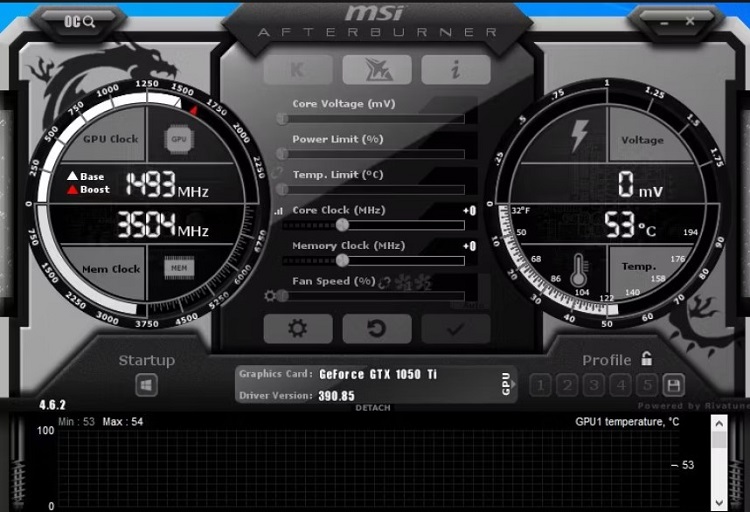
Method 4: Underclock the Settings of Your GPU
Many users have fixed the same issue by underclocking their GPU as it reduces the temperature and decreases the voltage. Here is the instruction on underclocking GPU settings:
- Launch the MSI Afterburner utility and look for a slider that reads Core Clock.
- Adjust the slider and move it towards the left until it’s at -50 or so.
- Apply the settings and restart your computer.
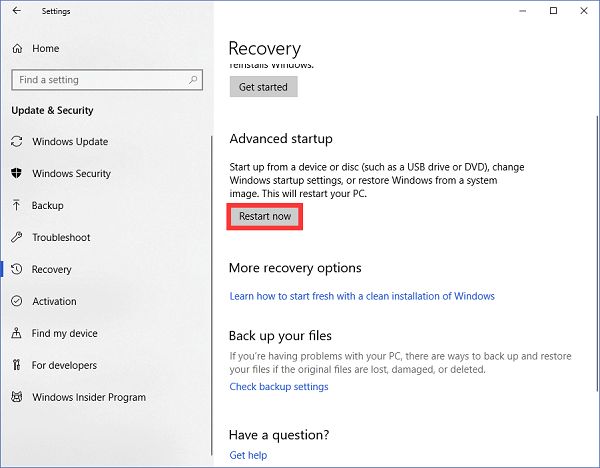
Method 5: Perform System Restore
If none of the above-mentioned methods work for you, you can try restoring the system by following steps:
- Navigate to “Settings” > “Updates & Security” > “Recovery”.
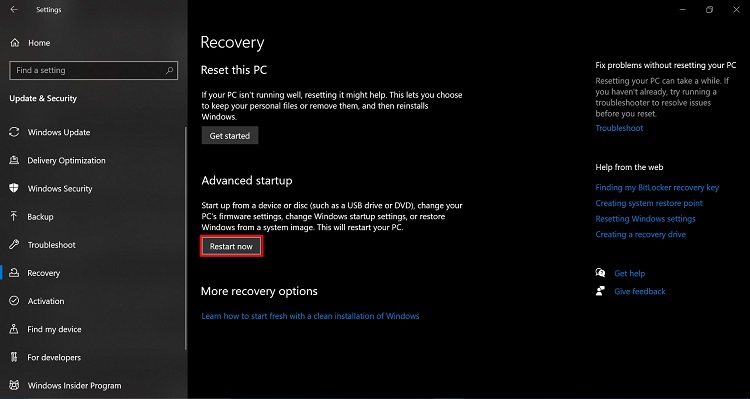
- You will be taken to the Advanced startup menu. Now, click “Restart now”.
- Then, select “System Restore”.
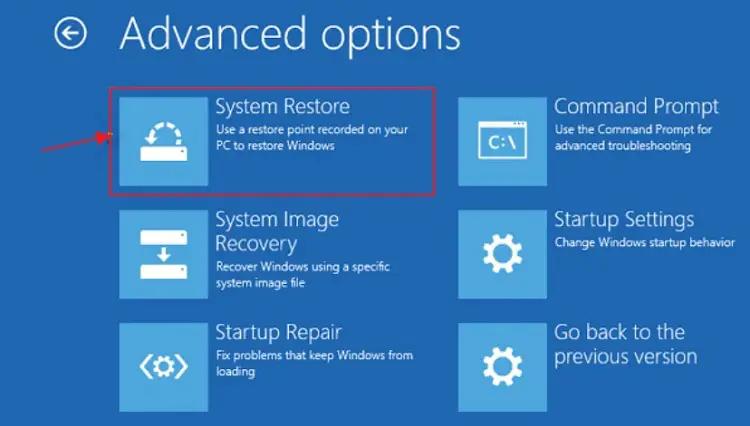
- Now provide your account name and password to perform the system restore.
Frequently Asked Questions
How Do I Fix Nvlddmkm.sys Error?
To fix the Nvlddmkm.sys error, you need to apply the following methods on your computer. You can find the detailed instruction in the above article.
- Update the graphics card drivers.
- Reinstall malfunctioning drivers.
- Fix damaged or corrupted files.
- Underclock GPU settings
- System Restore.
What Causes Nvlddmkm.sys Error?
There can be many factors that may cause the Nvlddmkm.sys error on your computer. The factors are:
- Corrupted display adapter or driver.
- Incorrect memory timing and voltage.
- Overheating.
- Running too many Processes at a time.
- Incompatible graphics card or driver.
Conclusion
Hopefully, you are now convinced that after reading this guide you can fix the System_thread_exception_not_handled Nvlddmkm.sys error that appeared as Blue Screen of Death (BSOD) on your computer. We are eagerly waiting for your comment on which method you will have applied to fix this error. You can save this guide if this error occurs again on your computer.
How to fix system_thread_exception_not_handled issue in 6 ways:
| Workable Solutions | Step-by-step Troubleshooting |
|---|---|
| Fix 1. Boot Into Safe Mode | Click on «Start». While pressing the Shift button on your keyboard, click on «Restart»…Full steps |
| Fix 2. Uninstall Incompatible Programs | Click on the start menu and go to «Settings». The above screen will appear. Go into «Apps»…Full steps |
| Fix 3. Uninstall or Upgrade Faulty Driver | Click on the Start menu and search for the «Device Manager». Once it appears, click on it…Full steps |
| Fix 4. Repair System Files | Launch the command prompt through the Start menu and run it as an administrator…Full steps |
| Fix 5. Perform Startup Repair | Click on «Troubleshoot» and «Advanced options». Click on «Startup Repair»…Full steps |
| Fix 6. Perform System Restore | Go to «Settings» and click on «Updates & Security». Now, click on the «Recovery» option…Full steps |
Often times windows users face the common error: system_thread_exception_not_handled (nviddmkm.sys or atikmpag.sys). This can happen with any Windows 10/11 user for a lot of reasons for example, because of outdated drivers.
This error can occur all of a sudden on your computer or laptop screen while using it. Also, the same «system_thread_exception_not_handled Windows 10» error can occur once you turn on your system. Some users even call it a death screen as they assume their Windows OS is all done.
In reality, there are some quick fixes to this solution. In this article, we will discuss how to fix system_thread_exception_not_handled nvlddmkm.sys error on Windows 10/11.
What Does System Thread Exception Not Handled Mean
This error means that an exception has been generated by the system thread, which the error handler is unable to handle.
A variety of factors cause this error, but the most frequent offender is a device driver. When a driver becomes outdated or damaged, it may cause difficulties with your system.
Another possible source of this problem is a faulty system file. System files are essential for Windows to function correctly, and if they become damaged, the result may be numerous problems. For example, this error might occur if there’s a problem with your Registry or Winsock files. You can fix this error with various methods.
System Thread Exception Not Handled Error Causes
Now, this system error can occur because of many reasons. Below are some of those reasons.
Corrupt Files
Your corrupt system files are the number one reason why such an error can ruin your experience. So, in this regard, it is best to fix those corrupt files (More on this later). With this approach, you can get rid of this blue death screen.
Issue with a Running Background Program
When you see the error message «system_thread_exception_not_handled,» a problem occurs with one of the programs running in the background. This program is responsible for tasks like drawing graphics and playing sound.
Malfunctioning Device Driver
The «system_thread_exception_not_handled» error is generally caused by a malfunctioning device driver. A device driver is a program that allows your computer to communicate with hardware devices. When there is an issue with a device driver, the system thread may fail, resulting in the error message.
Solutions to Solving System Thread Exception Not Handled in Windows 10/11
Now for the «system_thread_exception_not_handled Windows 10» error, there are some fixes that you can implement. Here we will be sharing a total of 6 solutions to this common error. You can opt for any of these to get rid of this error. So, let us take a look at these fixes.
Fix 1. Boot Into Safe Mode
So, one solution to this error is to get into your Pc’s safe mode. Now, before we dive into it, we have to understand the importance of this safe mode. The safe mode in your system is the mode that lets you find out the possible causes of any unexpected Windows error.
In this case, we are trying to fix the «system_thread_exception_not_handled Windows 10» error. So, first, we will have to boot our system into safe mode. Here is how you can do this.
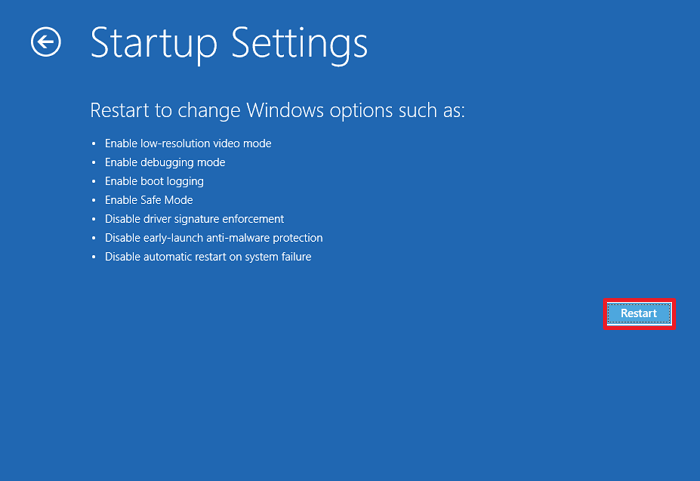
Step 1. Click on «Start». While pressing the Shift button on your keyboard, click on «Restart» from the Start menu.
Step 2. The following screen should appear. It is the Windows RE (recovery environment screen). From here, you have to click on «Advanced options».
Step 3. Now click on the «Startup Settings» to view the available booting options.
Step 4. From here, click on «Restart».
Step 5. Once the Windows restart, it will give you the following options to boot the system. Click on option no 4, «Enable safe mode» to boot your system in safe mode.
This way, you can boot your system in safe mode. Note that some of the fixes require you to enable your Windows in Safe Mode. So, this step is a must to do for some of the fixes to the error we are trying to get rid of.
Fix 2. Uninstall Incompatible Programs
The system thread exception error also sometimes occurs because of an incompatible program installed. Now, in most cases, a user doesn’t have an idea that a certain program in their windows 10/11 can cause such unexpected errors.
So, you have to uninstall that particular program creating this issue. Usually, a recently installed software or an application is the culprit here. So, uninstall that specific application first. To do so, simply follow these steps.
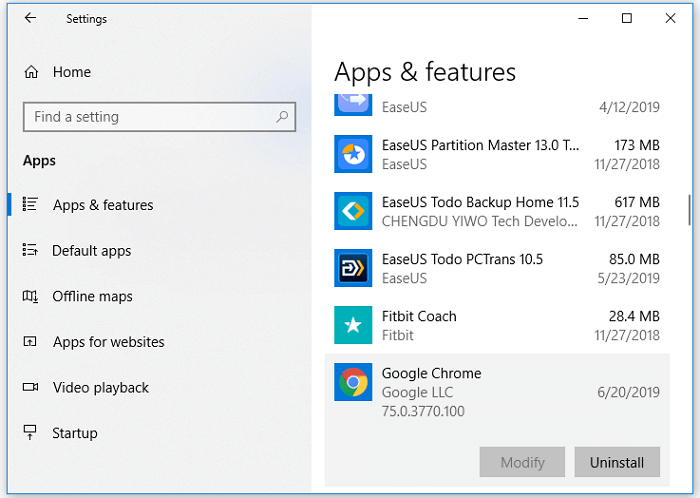
Step 1. Click on the start menu and go to «Settings». The above screen will appear. From here, you have to go into «Apps».
Step 2. From the list of installed apps, choose the program that you have recently installed. Click on it and choose «Uninstall».
So, this way, you can easily uninstall the recently installed program on your Windows 10/11.
Fix 3. Uninstall or Upgrade Faulty Driver
The recently updated or some faulty drivers can also cause the system_thread_exception_not_handled error in windows 10/11. As we discussed in the case of the recently installed program, the recently updated driver can also cause your windows to behave like this.
So, to fix this issue, you have to uninstall or upgrade that faulty driver.
Step 1. Click on the Start menu and search for the «Device Manager». Once it appears, click on it.
Step 2. The Device Manager will show all the drivers installed in your Windows 10/11. From here, you have to figure out the faulty or recently installed driver.
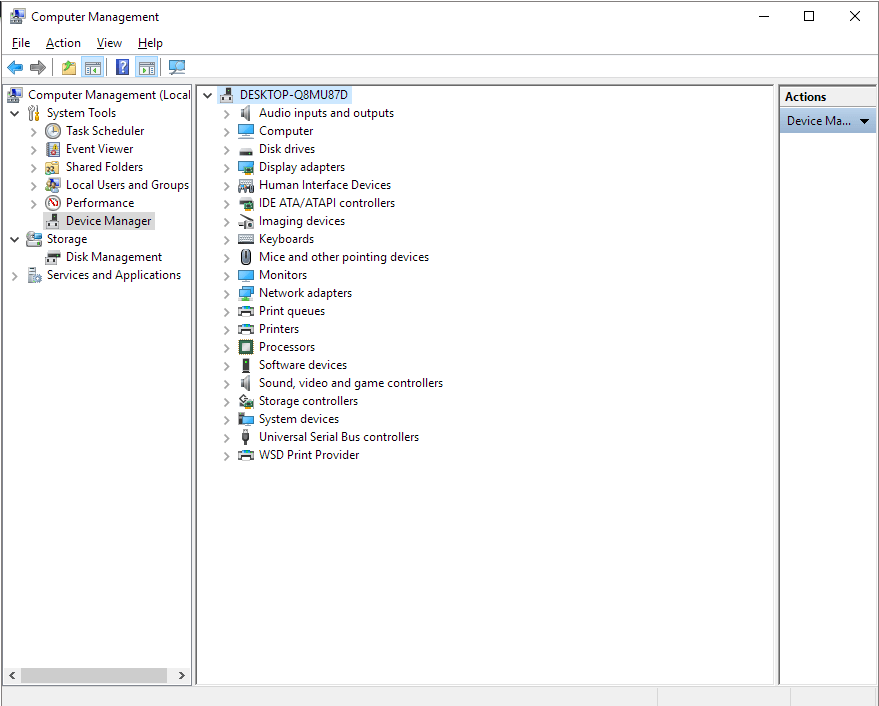
Step 3. Right-click on the faulty driver, and you will get a few options. From this option, choose «Uninstall».

Step 4. And that’s it. Your faulty driver is no longer a part of your Windows OS.
Fix 4. Check and Repair Problematic System Files
We discussed how a faulty program and a driver could cause such errors. Now, let us explain to you another reason for such errors. Your system’s problematic files can also cause this issue. So, the best fix in this regard is to repair those faulty files.
Step 1. Launch the Command Prompt through the Start menu and run it as an administrator.
Step 2. Now type DISM/ Online /Cleanup Image /ScanHealth. Press the enter button to run this command.
Step 3. Once you have entered this command, you have to wait a bit. During this time, Windows will automatically repair all those corrupted files.
Fix 5. Perform Startup Repair
Another way to solve this common error is to perform startup repair. This repair method is easy and will repair those broken, old, and malfunctioning files in your system. So, here is how to perform a startup repair.
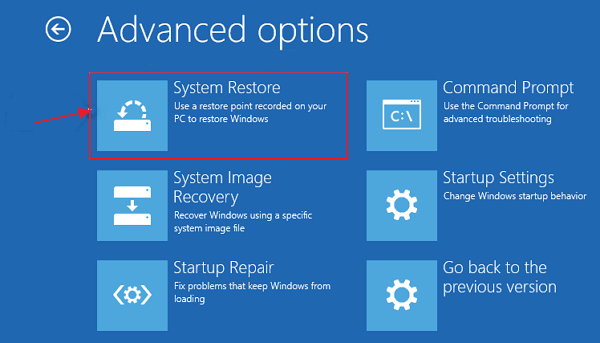
Step 1. You have to go to your Windows Advanced Startup options to perform a startup repair. To enter into this mode, you just have to press F11 as soon as your system boots. Click on «Troubleshoot» to proceed further.
Step 2. When you have accessed the Advanced Startup options, you have to click on «Advanced options».
Step 3. From here, click on «Startup Repair». The windows will ask you to choose the account name and its password. Just enter that. The windows will start repairing those corrupted files for your ease.

Fix 6. Perform System Restore
If none of the above-mentioned methods work for you, you can opt for the system restoring option. Here are the steps to follow.
Step 1. Go to «Settings» and click on «Updates & Security». Now, click on the «Recovery» option.
Step 2. You will be directed to the Advanced startup of Windows. Click «Restart now».
Step 3. Now, click on «System Restore». Again, the windows will ask you to choose the account name and its password. Just enter that. The system will start to restore.
How to Restore Data from a Computer That Cannot Boot Windows 10/11
When the BSOD system_thread_exception_not_handled problem error occurs or other boot issues appear, you won’t be able to access your systems’ files and data stored in them. Do not worry, and you can get out of this situation as well. Reliable data recovery software such as EaseUS Data Recovery Wizard can help you solve this issue.
With this data recovery program, you can recover more than 100 file types from all the common storage devices with ease. It enables you to recover data from a PC/laptop hard drive that won’t boot in a WinPE environment. EaseUS advanced data recovery software also supports NAS data recovery and Linux data recovery.
Now, download this 100% safe and secure data recovery software to restore files efficiently.
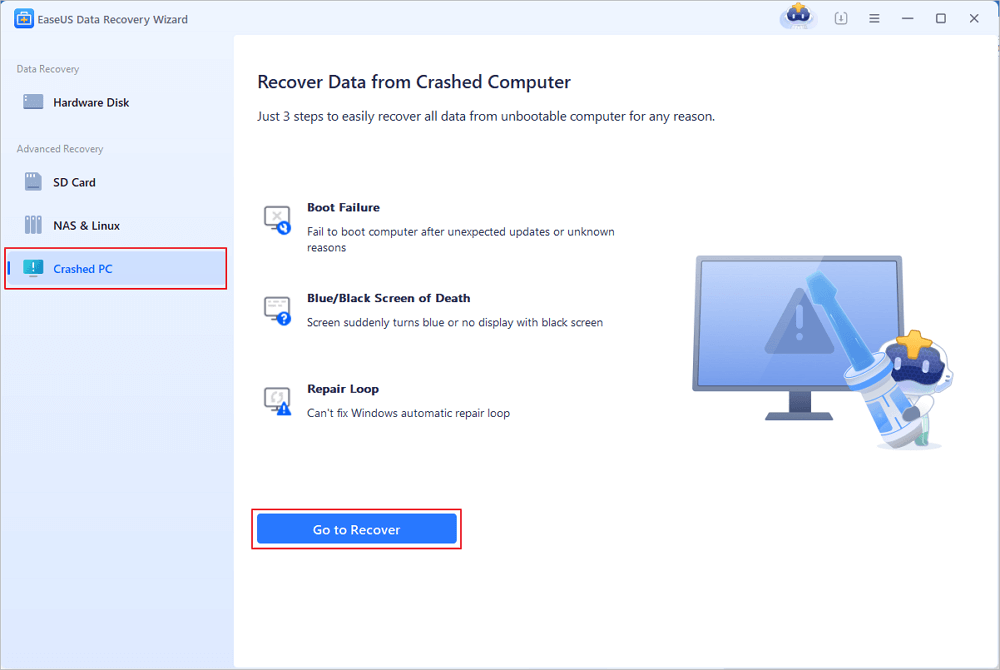
Step 1. Create a bootable disk
Launch EaseUS Data Recovery Wizard, choose «Crashed PC Recovery» and click «Go to Recover».
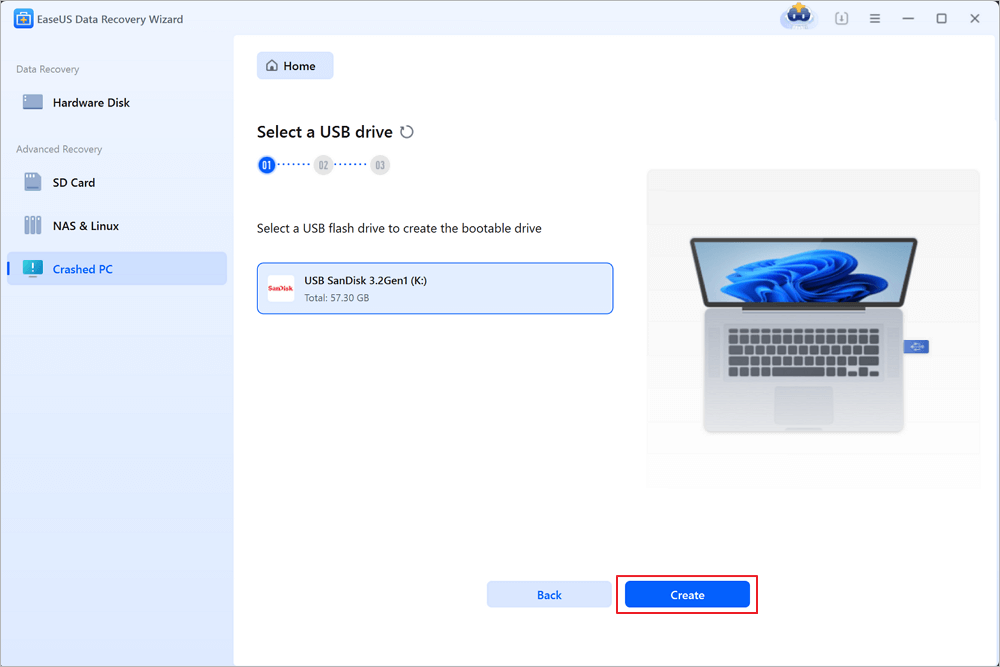
Select an empty USB to create the bootable drive and click «Create».
Warning: When you create a bootable disk, EaseUS Data Recovery Wizard will erase all data saved in the USB drive. Back up important data beforehand.
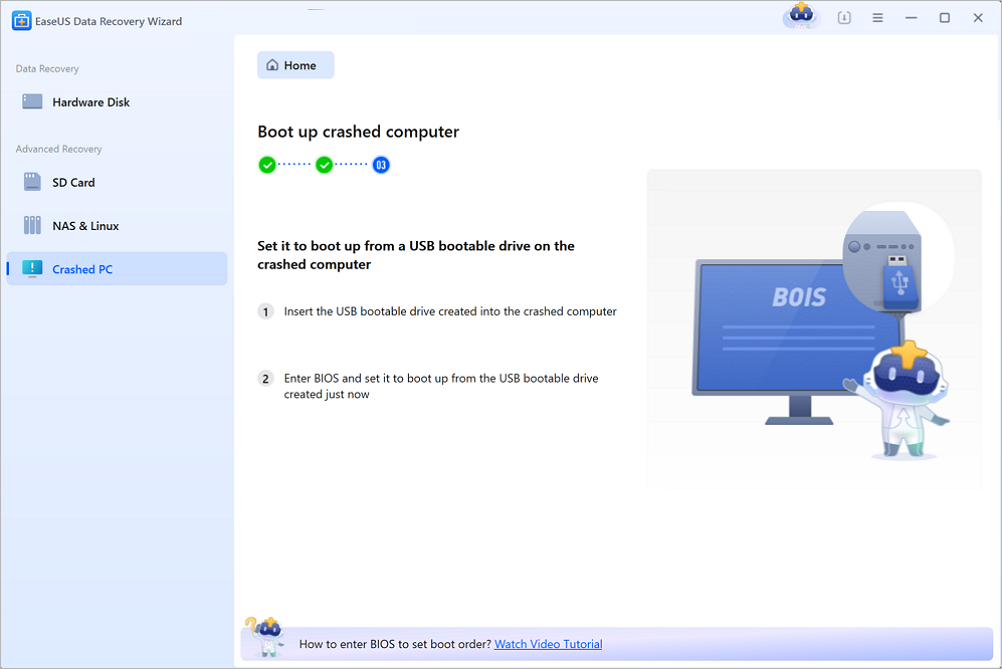
Step 2. Boot your computer from the bootable USB
Connect the bootable disk to the PC that won’t boot and change your computer boot sequence in BIOS. For most users, it works well when they restart their computer and press F2 simultaneously to enter BIOS.
Set to boot the PC from «Removable Devices» (bootable USB disk) beyond Hard Drive. Press «F10» to save and exit.
Step 3. Recover data from a crashed system/PC
After booting from EaseUS Data Recovery Wizard bootable disk, select the drive you want to scan to find all your lost files. Preview and recover the files you need to a safe location.

Conclusion
With more than 5 fixes, you know now how to fix system_thread_exception_not_handled nvlddmkm.sys error on windows 10/11. The reasons why this error occurs can be many. If any of the above-highlighted methods doesn’t work for you, the Ease US Data Recovery Wizard is always there to rescue you.
It can help you recover your data files on a fast and hassle-freeway. Its user interface is clean and straightforward. So, Download EaseUS Data Recovery Wizard today!