Если при запуске компьютера или ноутбука, вы увидели, что появилась ошибка 0x80070005 в Windows 11, которая была дополнена информационным сообщением в виде «Не удалось запустить службу Windows Audio на локальном компьютере», будьте готовы к тому, что после окончательной загрузки системы, она не будет иметь не какого звукового сопровождения. Не один звуковой элемент в вашей системе не будет работать, не зависимо от того, было это устройство подключено перед загрузкой ОС или же, данное устройство вы пытаетесь подключить уже после появления уведомления об ошибке.

Как исправить ошибку 0x80070005 в Windows 11?
- Для того, чтоб решить вашу проблемную ситуацию, необходимо: выполнить клик правой кнопкой мыши по иконке с динамиком – расположена данная иконка на «Панели задач» → кликаем по «Устранение неполадок» → остается ожидать результат от «Мастера диагностики по звуковым устройствам», который будет пытаться исправить проблему, связанную со службой Audio.

- Выполните запуск командной строки от имени администратора → выполните поочередно ввод четырех команд, не забываем после каждой нажимать на «Enter»:
- sfc /scannow
- Dism /Online /Cleanup-Image /CheckHealth
- Dism /Online /Cleanup-Image /ScanHealth
- Dism /Online /Cleanup-Image /RestoreHealth
Все вышеописанные действия санкционируют запуск инструментов SFC и DISM, что позволит проверить и исправить в автоматическом режиме все системные файлы.

- Одновременно нажмите на — Win+R → воспользуйтесь командой regedit, что позволит получить доступ к редактору реестра → выполните переход по следующему пути — HKEY_LOCAL_MACHINE\SYSTEM\CurrentControlSet\Services\Audiosrv → наведите курсор мыши на «Audiosrv» и выполните правый клик мыши → кликаем по «Разрешения…» → «СИСТЕМА» → «Пользователи» → «Администраторы» → проверьте, чтоб был открыт полноценный доступ.
Все вышеописанное позволяет активизировать процесс Audiosrv, чтоб он имел полные права и смог выполнить поставленные перед ним задачи на все 100%. Если полный доступ не будет активен, то Audiosrv не сможет полноценно запуститься и как итог, вы увидите сообщение — Не удалось запустить службу Windows Audio на локальном компьютере.

- Одновременное нажатие на Win+R откроет окно «Выполнить» → пропищите команду «services.msc» → начинаем поиск службы «Windows Audio», как только служба будет найдена, необходимо по ней выполнить двойной клик мыши → переходите во вкладку «Вход в систему» → выбираете «С системной учетной записью» → устанавливаете отметку напротив «Разрешить взаимодействие с рабочим столом» → жмете на «Ок».

Более чем в 95% случае, вышеописанные способы позволяют справиться в возникновение проблемы — ошибка 0x80070005 в Windows 11 исчезает и более не беспокоить пользовательское устройство.

If you’re excited about upgrading your system to the latest Windows 11 update but are encountering the frustrating Error Code 0x800f081f or 0x80070005, don’t worry! These errors are not uncommon, and there are effective solutions to get your installation back on track. In this guide, we’ll walk you through the steps to troubleshoot and fix these error codes so you can smoothly install the Windows 11 updates (KB5029263/KB5029253) without a hitch.
Before we head over, check out our other guides on several other Windows 11 updates not installing errors.
Installing updates is crucial for maintaining the security and performance of your operating system. However, encountering errors during installation can be frustrating. In this guide, we’ll address the Error Code 0x800f081f and 0x80070005, which can occur when installing Windows 11 updates KB5029263/KB5029253, and provide step-by-step solutions.
What is Error Code 0x800f081f and 0x80070005?
Error Code 0x800f081f often indicates a problem with the Windows Update components, while Error Code 0x80070005 points to permission issues. These errors can prevent the update from being installed successfully.
Below you can find 13 different ways to fix the error code 0x800f081f/0x80070005 when installing Windows 11 update KB5029263/KB5029253 on your PC.
1. Run the Windows Update Troubleshooter
- Press Windows + I to open the Settings menu.
- Navigate to “Update & Security” and select “Troubleshoot” from the sidebar.
- Click on “Additional troubleshooters” and run the “Windows Update” troubleshooter.
- Follow the on-screen instructions to complete the troubleshooting process.
If the troubleshooter detects and fixes any issues, attempt to install the updates again.
2. Use the DISM Tool
- Open Command Prompt as an administrator.
- Type the command DISM /Online /Cleanup-Image /RestoreHealth and press Enter.
- Wait for the process to complete.
- Once done, restart your computer.
3. Update Windows 11 Using Media Creation Tool
- Visit the official Microsoft website and download the “Windows 11 Media Creation Tool.” using the second option which is “Create Windows 11 Installation Media.”
- Download the tool and run it on a working computer.
- Accept the terms and conditions, and select the option to “Create installation media (USB flash drive, DVD, or ISO file) for another PC.”
- Choose the language, edition, and architecture (32-bit or 64-bit) that matches your system.
- Select either a USB flash drive or ISO file as the installation media.
- If using a USB flash drive, connect it to the computer, and select the appropriate drive.
- Wait for the Media Creation Tool to download the necessary files and create the bootable media.
- Once the process is complete, restart the computer and boot from the USB drive or DVD.
- Follow the on-screen instructions to install a fresh copy of Windows 11.
- During the installation, you may be prompted to enter your product key. Ensure you have it handy.
- Follow the remaining steps to complete the installation.
- After the installation is finished, reinstall your necessary applications and restore your backed-up files.
4. Perform a Clean Boot
- Press Windows + R, type msconfig, and press Enter.
- In the System Configuration window, go to the Services tab.
- Check Hide all Microsoft services and click Disable all.
- Go to the Startup tab and click Open Task Manager.
- Disable all startup items from the Task Manager.
- Close the Task Manager and click OK in the System Configuration window.
- Restart your computer and attempt to install the updates.
5. Manually Download and Install the Update
- Visit the Microsoft Update Catalog website.
- Search for the KB5029263/KB5029253 update.
- Download the appropriate version for your system.
- Double-click the downloaded file to install the update.
6. Check Disk Space
- Press Windows + E to open File Explorer.
- Right-click on the drive where Windows is installed and select “Properties.”
- Ensure there is enough free space (at least 20GB) for the update to install.
7. Check Disk for Errors
Disk errors can sometimes prevent updates from installing correctly. Here’s how to check and fix disk errors:
- Press Windows + S, type Command Prompt, right-click it, and select Run as administrator.
- In the Command Prompt, type chkdsk /f and press Enter.
- You might need to restart your computer. Confirm by typing Y and pressing Enter.
- After the disk check and repairs are complete, try installing the updates again.
8. Disable Third-Party Security Software
- Locate the third-party antivirus or security software icon in the system tray.
- Right-click on the icon and choose “Disable” or “Turn Off.”
- Confirm the action and attempt the update installation.
9. Reset Windows Update Components
Method 1
This method will automatically stop and restart all the Windows update services on your Windows 11 PC.
- Open Notepad on your PC.
- Now, copy and paste all the commands given below to the Notepad and save it on your desktop with the file name Wufix.bat.
- SC config trustedinstaller start=auto
- net stop bits
- net stop wuauserv
- net stop msiserver
- net stop cryptsvc
- net stop appidsvc
- Ren %Systemroot%\SoftwareDistribution SoftwareDistribution.old
- Ren %Systemroot%\System32\catroot2 catroot2.old
- regsvr32.exe /s atl.dll
- regsvr32.exe /s urlmon.dll
- regsvr32.exe /s mshtml.dll
- netsh winsock reset
- netsh winsock reset proxy
- rundll32.exe pnpclean.dll,RunDLL_PnpClean /DRIVERS /MAXCLEAN
- dism /Online /Cleanup-image /ScanHealth
- dism /Online /Cleanup-image /CheckHealth
- dism /Online /Cleanup-image /RestoreHealth
- dism /Online /Cleanup-image /StartComponentCleanup
- Sfc /ScanNow
- net start bits
- net start wuauserv
- net start msiserver
- net start cryptsvc
- net start appidsvc
- Right-click on the Wufix file and click Run as administrator.
- Restart your PC.
- After the PC restarts, try installing or updating your Windows 11 again, and the error shouldn’t be there.
Method 2
- Open the Command Prompt as an administrator.
- Type the following commands one by one, pressing Enter after each:
- net stop wuauserv
- net stop cryptSvc
- net stop bits
- net stop msiserver
- Next, type ren C:\Windows\SoftwareDistribution SoftwareDistribution.old and press Enter.
- Then, type ren C:\Windows\System32\catroot2 catroot2.old and press Enter.
- Finally, restart the services by typing the following commands:
- net start wuauserv
- net start cryptSvc
- net start bits
- net start msiserver
- Close the Command Prompt and attempt to install the update again.
10. System Restore
If none of the above methods work and you recently made changes to your system, you can try a system restore:
- Press Windows + S, type Create a restore point, and open the corresponding setting.
- Click System Restore and follow the prompts to restore your system to a point before the problematic update.
11. Modify Group Policy Settings
- Press Windows + R, type gpedit.msc, and press Enter.
- Navigate to “Computer Configuration” > “Administrative Templates” > “System.”
- Find and double-click on “Specify settings for optional component installation and component repair.”
- Select “Enabled” and set the option to “Never attempt to download payload from Windows Update.”
- Click “OK” and restart your computer.
12. Check System Files
- Open Command Prompt as an administrator.
- Type the command sfc /scannow and press Enter.
- Wait for the scan to complete and follow any repair instructions provided.
13. Seek Professional Assistance
If none of the methods work, consider seeking help from Microsoft support or a professional technician.
Conclusion
Encountering Error Code 0x800f081f or 0x80070005 when installing Windows 11 updates can be frustrating, but with the right steps, you can overcome these obstacles. By following the troubleshooting methods outlined in this guide, you can ensure a smooth update process and enjoy the latest features and security enhancements that Windows 11 offers.
Frequently Asked Questions (FAQs)
Q1: Can I skip troubleshooting and wait for the next update?
A: It’s not recommended. Skipping updates can leave your system vulnerable to security risks. It’s best to resolve the issue promptly.
Q2: Will performing a clean boot affect my data?
A: No, a clean boot only temporarily disables startup programs. Your data will remain intact.
Q3: How do I know if my system files are corrupted?
A: You can use the SFC tool to scan and repair corrupted files. The tool will notify you if any issues are found.
Q4: Can third-party antivirus software be the sole cause of the error?
A: While possible, other factors can contribute to the error. It’s recommended to disable security software temporarily for troubleshooting.
Q5: What if I’m uncomfortable performing these steps on my own?
A: If you’re not confident in your technical skills, consider seeking help from Microsoft support or a professional computer technician.
Ошибка установки 0x80070005 в Windows 11 обычно связана с недостаточными правами доступа.
Для исправления этой ошибки можно попробовать следующие решения:
- Запустить установку от имени администратора: Щелкните правой кнопкой мыши по файлу установки и выберите “Запустить от имени администратора”. Подтвердите, что вы хотите запустить файл от имени администратора.
- Отключить антивирус: Некоторые антивирусные программы могут блокировать установку программ. Попробуйте временно отключить антивирусную программу и запустить установку.
- Установить обновления Windows: Установите все доступные обновления Windows, так как это может исправить проблемы с установкой.
- Проверить диск на ошибки: Нажмите Win+X, выберите “Панель управления” и перейдите в “Система и безопасность” > “Администрирование” > “Диспетчер дисков”. Выберите диск, на котором вы пытаетесь установить Windows, и выберите “Проверить”.
- Создать новый установочный диск или USB-накопитель: Если проблема все еще не решена, попробуйте создать новый установочный диск или USB-накопитель и повторить установку.
- Использовать инструменты Windows Update Troubleshooter и DISM: Инструмент Windows Update Troubleshooter может помочь исправить проблемы с обновлениями, а DISM (Deployment Image Servicing and Management) может помочь исправить поврежденные системные файлы. Оба инструмента можно найти в параметрах Windows 11 в разделе “Обновление и безопасность” > “Отладка”.
 Ошибка 0x80070005 «Отказано в доступе» наиболее часто встречается в трех случаях — при установке обновлений Windows, активации системы и при восстановлении системы. Если же аналогичная проблема возникает в других ситуациях, как правило, решения будут теми же, так как причина ошибки одна.
В этой инструкции подробно опишу работающие в большинстве случаев способы исправить ошибку доступа восстановления системы и установки обновлений с кодом 0x80070005. К сожалению, рекомендуемые шаги не гарантированно приводят к ее исправлению: в некоторых случаях требуется вручную определять, к какому файлу или папке и какому процессу требуется доступ и предоставлять его вручную. Описанное ниже подойдет для Windows 11, Windows 10, 8.1 и 7.
Исправляем ошибку 0x80070005 с помощью subinacl.exe
Первый способ в большей степени относится к ошибке 0x80070005 при обновлении и активации Windows, так что если проблема у вас возникает при попытке восстановления системы, рекомендую начать со следующего способа, а уже потом, если не поможет, вернуться к данному.
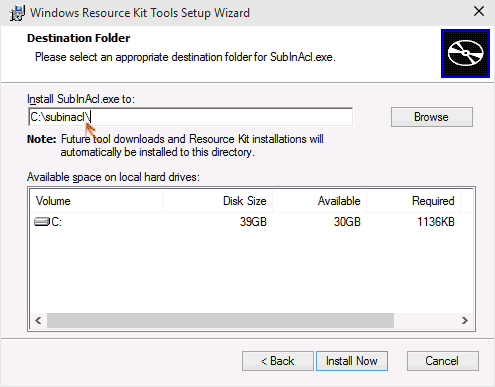
Для начала, загрузите утилиту subinacl.exe с официального сайта Microsoft (обновление: Microsoft удалила утилиту с официального сайта, но её можно скачать так, как описано в этой статье): http://www.microsoft.com/en-us/download/details.aspx?id=23510 и установите ее на компьютер. При этом, рекомендую устанавливать в какую-то папку, близкую к корню диска, например C:\subinacl\ (именно с таким расположением я буду приводить пример кода далее).
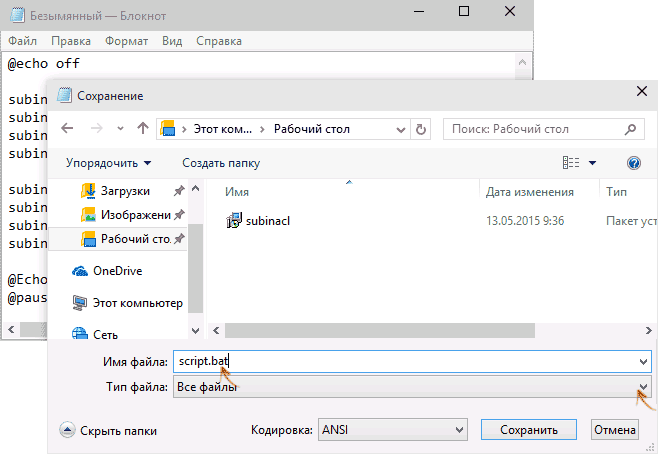
После этого, запустите Блокнот и введите в него следующий код:
@echo off

Set OSBIT=32
IF exist "%ProgramFiles(x86)%" set OSBIT=64
set RUNNINGDIR=%ProgramFiles%
IF %OSBIT% == 64 set RUNNINGDIR=%ProgramFiles(x86)%
C:\subinacl\subinacl.exe /subkeyreg "HKEY_LOCAL_MACHINE\SOFTWARE\Microsoft\Windows\CurrentVersion\Component Based Servicing" /grant="nt service\trustedinstaller"=f

@Echo Gotovo.
@pause
В блокноте выберите «Файл» — «Сохранить как», затем в диалоговом окне сохранения выберите в поле «Тип файла» — «Все файлы» и укажите имя файла с расширением .bat, сохраните его (я сохраняю на рабочий стол).
Кликните правой кнопкой мыши по созданному файлу и выберите пункт «Запуск от имени Администратора». По завершении вы увидите надпись: «Gotovo» и предложение нажать любую клавишу. После этого закройте командную строку, перезагрузите компьютер и попробуйте выполнить ту операцию, которая выдавала ошибку 0x80070005 снова.
Если указанный сценарий не сработал, попробуйте аналогичным образом еще один вариант кода (Внимание: код ниже может привести к неработоспособности Windows, выполняйте его только если готовы к такому исходу и знаете, что делаете):
@echo off

C:\subinacl\subinacl.exe /subkeyreg HKEY_LOCAL_MACHINE /grant=administrators=f
C:\subinacl\subinacl.exe /subkeyreg HKEY_CURRENT_USER /grant=administrators=f
C:\subinacl\subinacl.exe /subkeyreg HKEY_CLASSES_ROOT /grant=administrators=f
C:\subinacl\subinacl.exe /subdirectories %SystemDrive% /grant=administrators=f

C:\subinacl\subinacl.exe /subkeyreg HKEY_LOCAL_MACHINE /grant=system=f
C:\subinacl\subinacl.exe /subkeyreg HKEY_CURRENT_USER /grant=system=f
C:\subinacl\subinacl.exe /subkeyreg HKEY_CLASSES_ROOT /grant=system=f
C:\subinacl\subinacl.exe /subdirectories %SystemDrive% /grant=system=f

@Echo Gotovo.
@pause
После запуска скрипта от имени администратора, откроется окно, в котором в течение нескольких минут поочередно будут меняться права доступа на разделы реестра, файлы и папки Windows, по завершении нажмите любую клавишу.
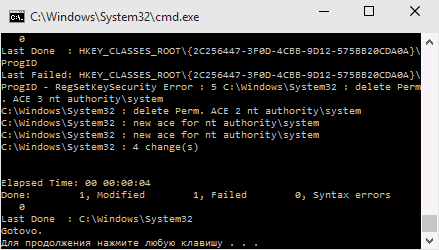
Опять же, лучше перезагрузить компьютер после его выполнения и только после этого проверять, удалось ли исправить ошибку.
Ошибка восстановления системы или при создании точки восстановления
Теперь об ошибке доступа 0x80070005 при использовании функций восстановления системы. Первое, на что следует обратить внимание — ваш антивирус: очень часто такая ошибка в Windows 11, 10, и 8.1 бывает следствием функций защиты антивируса. Попробуйте, используя настройки самого антивируса, временно отключить его самозащиту и другие функции. В крайнем случае, можно попробовать удалить антивирус.
Если это не помогло, то следует попробовать выполнить следующие шаги по исправлению ошибки:
- Проверить, не переполнены ли локальные диски компьютера. Очистить, если да. Также, возможен вариант, когда ошибка появляется, если Восстановление системы использует один из зарезервированных системой дисков и нужно отключить защиту для этого диска. Как это сделать: зайдите в панель управления — Восстановление — Настройка восстановления системы. Выберите диск и нажмите кнопку «Настроить», после чего выберите пункт «Отключить защиту». Внимание: при этом действии имеющиеся точки восстановления будут удалены.
- Посмотреть, не установлено ли «Только чтение» для папки System Volume Information. Для этого в панели управления откройте «Параметры папок» и на вкладке «Вид» уберите отметку с «Скрывать защищенные системные файлы», а также включите «Показывать скрытые файлы и папки». После этого, на диске C кликните правой кнопкой мыши по System Volume Information, выберите пункт «Свойства», проверьте, чтобы не было отметки «Только чтение».
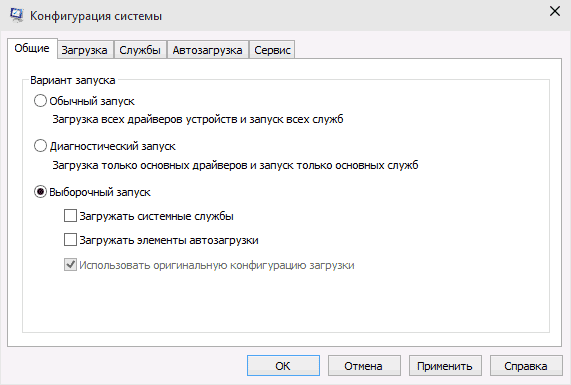
- Попробуйте выполнить выборочный запуск Windows. Для этого нажмите клавиши Win+R на клавиатуре, введите msconfig и нажмите Enter. В появившемся окне на вкладке «Общие» включите либо диагностический запуск, либо выборочный, отключив все элементы автозагрузки.

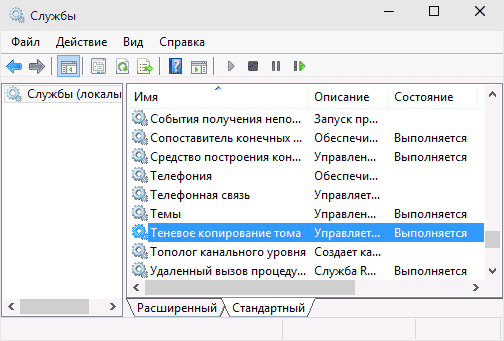
- Проверьте, включена ли служба Теневое копирование тома. Для этого нажмите Win+R на клавиатуре, введите services.msc и нажмите Enter. В списке найдите данную службу, при необходимости запустите ее и установите для нее автоматический запуск.

- Попробуйте сбросить репозиторий. Для этого перезагрузите компьютер в безопасном режиме (можно использовать вкладку «Загрузка» в msconfig) с минимальным набором сервисов. Запустите командную строку от имени администратора и введите команду net stop winmgmt и нажмите Enter. После этого переименуйте папку Windows\System32\wbem\repository во что-то другое, например, repository-old. Снова перезагрузите компьютер в безопасном режиме и введите ту же команду net stop winmgmt в командной строке от имени администратора. После этого используйте команду winmgmt /resetRepository и нажмите Enter. Перезагрузите компьютер в обычном режиме.
Дополнительная информация: если ошибку вызывают какие-либо программы, связанные с работой веб-камеры, попробуйте отключить в параметрах вашего антивируса защиту веб-камеры (например, в ESET — Контроль устройств — Защита веб камеры).
Пожалуй, на данный момент — это все способы, которые я могу советовать для исправления ошибки 0x80070005 «Отказано в доступе». Если эта проблема возникает у вас в каких-то других ситуациях, описывайте их в комментариях, возможно, я смогу помочь.
Certainly, Error Code 0x80070005 is a common Windows update error that can occur due to various reasons, such as permission issues, corrupted system files, or conflicts with third-party software. Here’s a step-by-step solution to help you resolve this error on Windows 11:
Step 1: Run Windows Update Troubleshooter
-
Press
Win + Ito open the Windows Settings. -
Click on «Privacy & Security» and then select «Troubleshoot.»
-
Under «Troubleshoot,» click on «Additional troubleshooters.»
-
Locate and run the «Windows Update» troubleshooter. Follow the on-screen instructions to complete the troubleshooting process.
Step 2: Check Date and Time Settings
-
Incorrect date and time settings can sometimes cause update errors. To check and correct them:
-
Right-click on the date and time in the taskbar and select «Adjust date/time.»
-
Toggle on the «Set time automatically» and «Set time zone automatically» options.
Step 3: Run SFC and DISM Scans
-
SFC (System File Checker) and DISM (Deployment Imaging Service and Management Tool) scans can help repair corrupted system files:
-
Open a Command Prompt with administrative privileges. To do this, search for «Command Prompt,» right-click on it, and select «Run as administrator.»
-
In the Command Prompt window, type the following command and press Enter:
sfc /scannow -
Wait for the scan to complete. If any issues are found and repaired, restart your computer.
-
After restarting, run a DISM scan. In the same Command Prompt window, type:
dism /online /cleanup-image /restorehealth -
Let the DISM scan complete, and then restart your computer again.
Step 4: Disable Third-Party Antivirus/Firewall
-
Sometimes, third-party security software can interfere with Windows updates. Temporarily disable your antivirus and firewall software.
-
Reattempt the Windows update. If successful, consider adding Windows Update and related processes to the software’s exclusion list.
Step 5: Reset Windows Update Components
-
Open a Command Prompt with administrative privileges as explained earlier.
-
Enter the following commands one by one, pressing Enter after each:
arduino
net stop wuauserv net stop cryptSvc net stop bits net stop msiserver ren C:\Windows\SoftwareDistribution SoftwareDistribution.old ren C:\Windows\System32\catroot2 catroot2.old net start wuauserv net start cryptSvc net start bits net start msiserver -
Close the Command Prompt and restart your computer.
Step 6: Perform a Clean Boot
-
Press
Win + R, typemsconfig, and press Enter to open the System Configuration window. -
Under the «General» tab, select «Selective startup» and uncheck the «Load startup items» box.
-
Go to the «Services» tab, check «Hide all Microsoft services,» and then click «Disable all.»
-
Click «Apply» and then «OK.»
-
Restart your computer and try running the update again.
Step 7: Manually Install the Update
If all else fails, you can try manually downloading and installing the problematic update:
-
Go to the Microsoft Update Catalog website (https://www.catalog.update.microsoft.com/Home.aspx).
-
Search for the specific update by its KB number.
-
Download the update that matches your system architecture (32-bit or 64-bit).
-
Double-click the downloaded file to install the update manually.
Remember to create a system restore point before making significant changes to your system, and if possible, back up your important data before attempting these troubleshooting steps.