by Vlad Turiceanu
Passionate about technology, Windows, and everything that has a power button, he spent most of his time developing new skills and learning more about the tech world. Coming… read more
Updated on
- Virtualbox allows you to run multiple operating systems on a computer.
- The PC must meet the Windows 11 requirements before it can operate smoothly via Virtualbox.
- Giving the administrator’s right to Virtualbox may effectively install Windows 11.
People believe that you can’t install Windows 11 on VirtualBox. Hence, they ask, How can I install Windows 11 on Virtualbox?
VirtualBox is software for cross-platform virtualization. It allows you to run different operating systems on one computer simultaneously. For instance, Mac OS X, Linux, and Microsoft Windows run on one computer simultaneously.
However, some users complain that they cannot install Windows 11 on their VirtualBox.
Hence, we have put together some guidelines on what you can do if you encounter errors installing Windows 11 on VirtualBox. However, before that, let’s examine the causes of this problem.
What causes Windows 11 not to install on VirtualBox error?
- Improper configuration of the Virtual machine. If the Virtual machine configuration is not complete, it won’t be able to accommodate the Microsoft Windows 11.
2. The security activities of an Antivirus can cause errors in the process of installing Windows 11 on your VirtualBox.
3. If the VirtualBox is not running as administrator on your computer, it can also cause this error.
4. The most common cause of this error is compatibility. If your computer can’t meet the requirements for installing Windows 11, it won’t install. So, the two clients must be on the same level of capability.
What are the minimum PC requirements to install Windows 11 on Virtualbox?
How we test, review and rate?
We have worked for the past 6 months on building a new review system on how we produce content. Using it, we have subsequently redone most of our articles to provide actual hands-on expertise on the guides we made.
For more details you can read how we test, review, and rate at WindowsReport.
The basic requirements to install Windows 11 are:
- 1 GHz or faster two core 64-bit compatible processor
- 4 GB or more RAM
- 64 GB or larger storage space
- UEFI, Secure Boot capable system firmware
- TPM 2.0
- A graphics card compatible with DirectX 12 or later with the WDDM 2.0 driver
What can I do if Windows 11 is not installing on Virtualbox?
1. Bypass Windows 11 system requirements check on VirtualBox
One way to solve the issue of Windows 11 not installing on Virtualbox is to bypass the system requirements check. Here is how to do it.
1. Quit the installation process.
2. Press the Shift + F10 keys to prompt Windows, type Regedit, and press Enter to initiate the Registry editor.
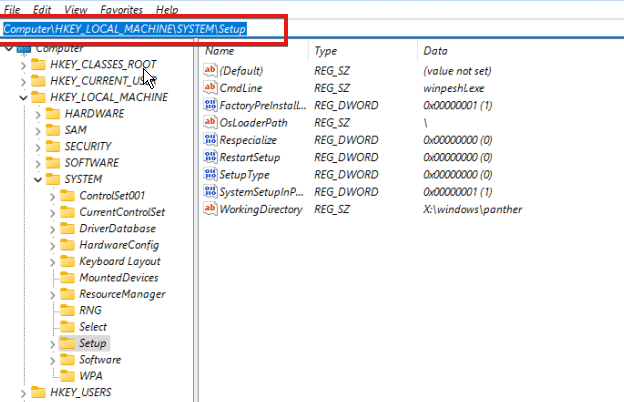
3. Navigate the registry editor using this path: Computer\HKEY_LOCAL_MACHINE\SYSTEM\Setup
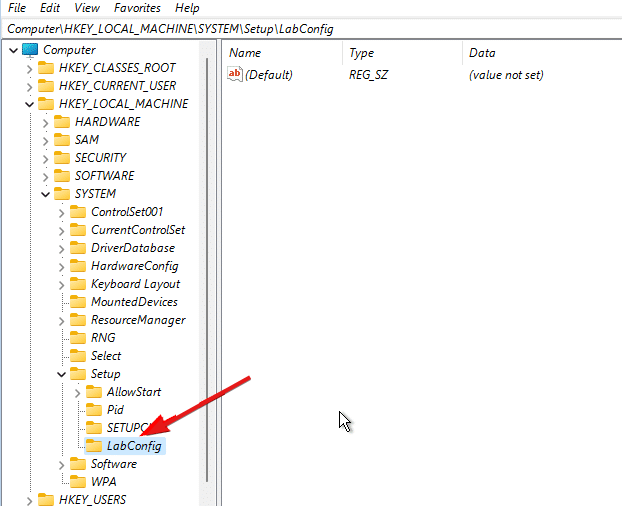
4. Right-click the Setup folder, select New > key and name the new folder LabConfig.
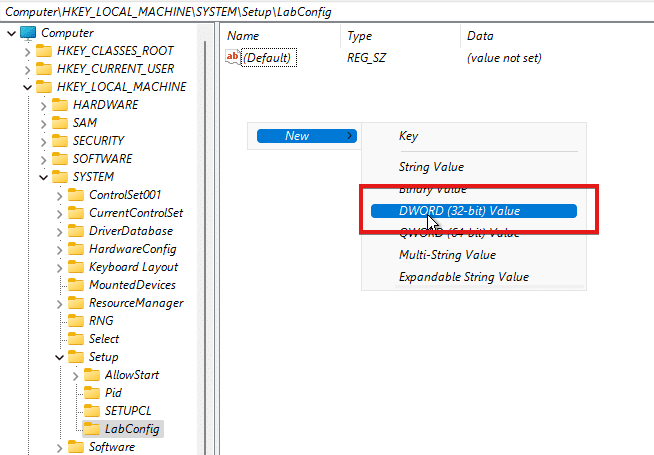
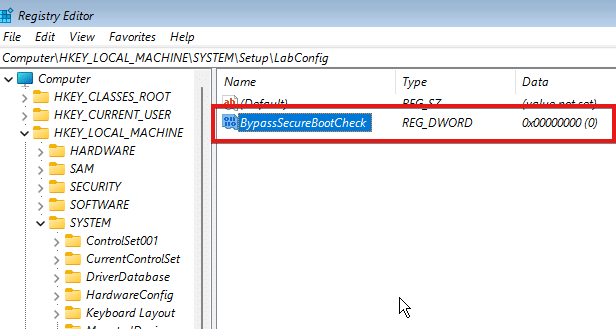
5. Open the LabConfig folder, right-click on New and choose DWORD (32-bit) Value name the value BypassSecureBootCheck.
6. In the new value, click the BypassSecureBootCheck option and change its value to 1.
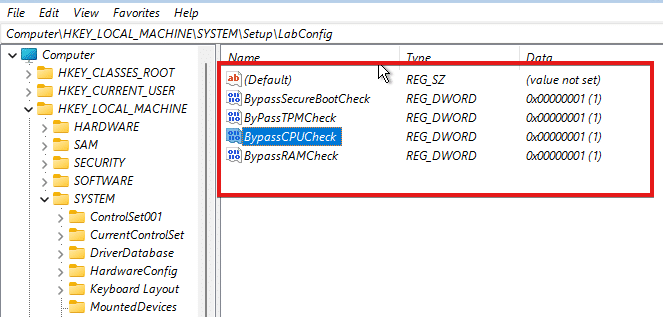
7. Perform step 5 again, but name the value BypassTPMCheck.
8. Click on it, and adjust its value data to 1 to skip the TPM 2.0 requirement check.
9. Perform step 5 again and change the name to BypassCPUCheck.
10. Repeat the above step and name its value BypassRAMCheck. (The above configuration will enable the registry editor to bypass CPU, RAM, TPM 2.0, and Secure Boot checks)
11. Exit the Registry Editor and restart the installation process.
After this, the installation should go through without any error messages. However, if you still encounter Windows 11 not installing on VirtualBox, try these other fixes.
2. Allow VirtualBox Installer to run as an Administrator
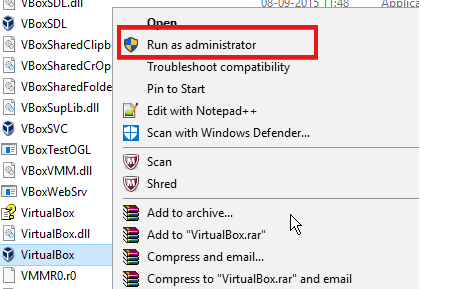
- Go to the VirtualBox installer directory.
- Right-click on it and select the Run as an administrator option from the drop-down.

- Click Yes to save the changes.
3. Disable Windows Security temporarily
- Press the Windows key, input Windows Security, and launch it.

- Select Virus & threat protection, and click on Manage settings.

- Toggle the Real-time protection to Off.


By disabling this, downloaded or installed files will not be scanned until the following scheduled scan.
4. Try an alternative virtualization tool
In case the solutions described above didn’t help you to fix VirtualBox issues on installing Windows 11, maybe it’s time to change your resources.
You can benefit from more effective instruments that will help you with desktop virtualization and assure Windows 11 building on your PC.
The VMware workstation will provide you with an error-free installation of Windows 11 or DirectX 11 for games and apps. Plus, enjoy other performance enhancements like file transfers and Hyper-V mode support.
⇒ Get VMware
Is TPM necessary for Windows 11?
TPM 2.0 is essential for Windows 11. It is crucial for some features like security. Also, it works for BitLocker.
The best troubleshooting solution to fix Windows 11 is not installing on Virtualbox error. However, you can also check out our guide on fixing Windows 11 Virtualbox errors.
Further, if you have encountered a VirtualBoxVM.exe application error on Windows 10/11, our article can also provide a detailed guide to fixing it. In addition, we have covered other fixes you can use for VirtualBox-related errors here.
![]()
Введение
VirtualBox — популярная программа виртуализации, разработанная компанией Oracle. Она позволяет пользователям установить и запустить операционные системы внутри виртуальной среды, работая параллельно с основной операционной системой. VirtualBox обладает множеством возможностей и широко используется для разработки, тестирования и обучения.
Однако, при переходе на новую операционную систему Windows 11, пользователи VirtualBox иногда сталкиваются с некоторыми проблемами и ошибками. В этой энциклопедической статье мы рассмотрим основные проблемы, связанные с VirtualBox на Windows 11, и предложим шаги по их исправлению.
Проблема 1: Неудачная установка VirtualBox на Windows 11
Иногда при установке VirtualBox на Windows 11 пользователи сталкиваются с ошибками и неудачными попытками установить программу. Вот несколько шагов, которые могут помочь решить эту проблему:
-
Убедитесь, что ваша версия VirtualBox совместима с Windows 11. Посетите официальный сайт VirtualBox и загрузите последнюю версию программы, совместимую с вашей операционной системой.
-
Запустите установочный файл VirtualBox с правами администратора. Щелкните правой кнопкой мыши по файлу установки и выберите «Запустить от имени администратора».
-
Отключите антивирусное программное обеспечение на время установки VirtualBox. Некоторые антивирусные программы могут блокировать установку программ виртуализации.
-
Если у вас все еще возникают проблемы с установкой VirtualBox, попробуйте выполнить чистую установку Windows 11 или обновить свою операционную систему до последней версии. Некоторые конфликты или ошибки могут быть вызваны несовместимостью между VirtualBox и Windows 11.
Проблема 2: Ошибка запуска виртуальной машины
Еще одной распространенной проблемой на Windows 11 является ошибка запуска виртуальной машины. Если виртуальная машина не запускается или выдает ошибку, рекомендуется выполнить следующие шаги:
-
Верификация настроек BIOS/UEFI: Проверьте, что настройки в BIOS/UEFI разрешают работу с виртуализацией. Возможно, вам потребуется включить опцию «Intel Virtualization Technology» или «AMD-V» в настройках BIOS/UEFI.
-
Переустановите VirtualBox Guest Additions: Если у вас уже установлены VirtualBox Guest Additions на виртуальной машине, попробуйте переустановить их. Войдите в меню «Устройства» в главном окне VirtualBox и выберите «Вставить образ дополнений гостевой ОС».
-
Проверьте наличие обновлений: Убедитесь, что ваша версия VirtualBox и виртуальной машины обновлена до последней версии. Часто обновления содержат исправления ошибок и новые функции.
Проблема 3: Проблемы с сетевым подключением внутри виртуальной машины
Если у вас возникли проблемы с подключением к сети внутри виртуальной машины на Windows 11, следуйте этим рекомендуемым шагам:
-
Проверьте настройки сети виртуальной машины: Убедитесь, что настройки сетевого адаптера внутри виртуальной машины корректно сконфигурированы. Возможно, вам потребуется настроить сетевой мост или другие настройки, соответствующие вашей сетевой инфраструктуре.
-
Проверьте настройки межсетевого экрана внутри виртуальной машины: Убедитесь, что межсетевой экран внутри виртуальной машины не блокирует подключение к сети. Разрешите доступ для приложений VirtualBox или проверьте правила фильтрации сетевых пакетов.
-
Попробуйте изменить тип адаптера: Если у вас все еще возникают проблемы с сетевым подключением, попробуйте изменить тип адаптера VirtualBox в настройках сети виртуальной машины. Переключитесь между NAT, мостом, виртуальным шлюзом и другими типами.
Заключение
Исправление проблем с VirtualBox на Windows 11 может быть сложной задачей, но следуя рекомендациям из этой статьи, вы можете разрешить большинство распространенных проблем. Если вы все еще сталкиваетесь с трудностями, рекомендуется обратиться за поддержкой к официальному сообществу VirtualBox или к команде разработчиков.
VirtualBox is a widely used virtualization software that allows users to run multiple operating systems on a single machine. However, like any software, VirtualBox installations can sometimes encounter issues, even on the latest Windows 11 operating system. In this guide, we will discuss the ways to fix VirtualBox Installation Failed in Windows.
If you’re facing installation failures while trying to set up VirtualBox on Windows 11, this guide will walk you through potential solutions to get your virtualization environment up and running smoothly.
There are many reasons why VirtualBox installation might fail on Windows 11. Since it requires certain dependencies before you can install VirtualBox, make sure to first install all the required dependencies.
However, even after installing them, if you are still facing the Installation Failed error, you can try out some methods to fix it. So let’s get started.
1. Turn Off Hyper-V
The Windows Hypervisor Platform (Hyper-V) is a feature that can interfere with VirtualBox. By using it, you can create a virtual machine just like in VirtualBox. This can lead to conflicts between the two platforms. To avoid this, attempt to disable Hyper-V and then proceed with the VirtualBox installation on Windows 11.
Here is how you can turn off Hyper-V
1. Click on the Windows icon and type Turn Windows features on or off.

2. Open it from the search result.
3. You’ll get a Windows Features window. Here, uncheck the Hyper-V feature and click OK to save the changes.
4. Finally, restart your PC.

After that, attempt to install VirtualBox on your Windows 11. If it does not work you can try out the below-mentioned methods.
2. Update Windows
Outdated Windows versions can sometimes contribute to this issue. It’s essential to confirm that your Windows 11 operating system is current with the latest updates and patches. Outdated system files can intermittently result in conflicts during software installations.
Here’s how you can update your Windows operating system:
1. Press Windows + I to open the Windows settings.
2. Click on the Windows Update tab on the left pane and then click on the Check for Update button.
3. Now, your system will check for updates. If there are any updates available, you will receive an option to download and install them.

4. Once the update is installed, restart your Windows 11 PC.
3. Ensure Enough Disk Space
To install any software on your device, you need to ensure that you have enough available storage to save the installed software files.
One of the most common reasons for installation failures on computers is insufficient disk space. You can try freeing up disk space to resolve the VirtualBox installation failed issue.
To check your system’s storage, follow the steps below:
1. Open the File Explorer by pressing the Windows + E key combination.
2. Right-click on the C Drive and from the menu that appears, click on the Properties option.
Note: Here, we are checking the disk properties of the C drive, because all the Windows system files and software installation fields are stored on the C drive.

3. Here, under the General tab, you can see the Disk space information.

4. If you have insufficient disk space, consider deleting unnecessary files from the disk. To free up space, you can refer to our guide on how to use Storage Sense in Windows 11.
4. Clear Temp Files
Temp files are temporary files stored on your computer. You should regularly clean these files; otherwise, they may cause your computer to slow down and result in various errors, such as installation errors or failures.
Many users have found that deleting the temp directory resolves installation issues and helps free up disk space.
Here’s how you can clean the temp files from your system:
1. Press the Windows + R keys to open the Run dialog.
2. Here, type the following command and click on the OK button to open the Temp folder.
%temp%
3. In this folder, you will find the temporary files of the system. Press Ctrl + A to select all and click on the Delete button.

4. After that, make sure to also delete them from the Recycle Bin.
5. Run Installer as Administrator
After following all of the above-mentioned methods, you can now attempt to run the VirtualBox Installer file to install VirtualBox on Windows. However, you have to run the installer as an administrator.
To do so, follow these steps:
1. Locate the VirtualBox setup file and right-click on it.
2. Now, click on Run as administrator from the context menu that appears.

3. A User Account Control prompt will appear. Here, click the Yes button.
4. Then, the installation wizard will appear. Follow the on-screen instructions to install VirtualBox on Windows.

We already have a detailed guide on how to install Oracle VM VirtualBox on Windows. You can check out the linked guide.
Conclusion
That’s it! This is how you can VirtualBox Installation Failed in Windows 11. Installing VirtualBox on Windows 11 can sometimes pose challenges due to compatibility issues and conflicts with other virtualization platforms. By following the methods outlined in this guide, you can troubleshoot and resolve installation failures.
Remember to double-check the system requirements, run the installer as an administrator, and ensure that conflicting features like Hyper-V are disabled. With patience and a systematic approach, you’re likely to have VirtualBox up and running smoothly on your Windows 11 system. This will enable you to create and manage virtual machines for various purposes effectively.
15 марта 2022, вторник
01:25
Компания Microsoft объявила, что проблемы совместимости между Windows 11 и Oracle VM VirtualBox были решены со стороны корпорации. Исправление со стороны Oracle было внесено еще в VirtualBox 6.1.28, который был выпущен в октябре прошлого года.

Когда Windows 11 только была выпущена, возникли проблемы с тем, что виртуальные машины VirtualBox (VMs) не могли запускаться при установке ‘Hyper-V’ или ‘Windows Hypervisor’, или возникали ошибки, поэтому были приняты защитные меры для временного прекращения доставки обновления.
Эта мера предосторожности уже снята, и если вы уже обновились до VirtualBox 6.1.28 или более поздней версии и у вас нет других проблем, обновление до Windows 11 будет доступно в течение 48 часов. Пользователи должны иметь возможность обновляться через «Windows Update», если они хотят это сделать.
Обратите внимание, что VirtualBox может сосуществовать с Hyper-V, но производительность будет значительно снижена. Если производительность является приоритетом, отключение Hyper-V следует рассматривать как жизнеспособный вариант, но учтите, что функции ОС, связанные с Hyper-V, в этом случае будут недоступны.
Oracle VM VirtualBox — это программное обеспечение, которое позволяет создавать и выполнять на рабочем столе несколько виртуальных машин для систем на базе x86. Он разработан с открытым исходным кодом и официально поддерживается Windows, Mac, Linux и Solaris. Также можно использовать USB-устройства хостовой ОС из гостевой ОС (виртуальной машины) и управлять VirtualBox с помощью языка сценариев Python и т.д. Последняя версия на данный момент — v6.1.32 выпущена в январе этого года.
Oracle VM VirtualBox начиная с версии 6.1.28 позволяет использовать Windows 11 и RHEL 8.5 в качестве гостевых операционных систем.
рекомендации
4070 MSI по старой цене дешевле Palit
13900K в Регарде дешевле чем при курсе 60
Ищем PHP-программиста для апгрейда конфы

How to fix VirtualBox not working on Windows 11. If you use VirtualBox, virtual machines may not start after upgrading to Windows 11 and you may get errors. The error occurs because of an incompatibility issue between VirtualBox and Windows 11 when you install Hyper-V on your computer. Microsoft is aware of the issue, and the company confirmed that Oracle released an update to fix it.
Method 1
If you have upgraded to Windows 11, you can troubleshoot VirtualBox not working by disabling Microsoft Hyper-V with these steps:
Step 1: Enter the phrase Turn Windows features on or off into Windows Search and click on the corresponding option from the search results.
Step 2: In the Windows Features window, uncheck the Hyper-V feature.

Step 3: Click OK and Restart now to restart the computer.
In addition, you can also uninstall and re-download VirtualBox to the latest version from the download link provided in the article to solve the problem.
=> Download VirtualBox here.
Method 2
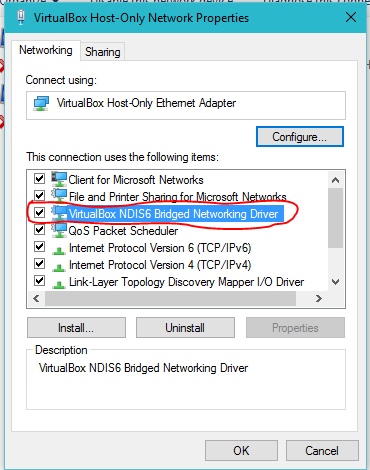
1. Open Windows Network Connections
2. Right click on VirtualBox Host only adapter that created
3. Choose properties
4. Check “VirtualBox NDIS6 Bridged Networking driver”
5. Disable and Enable the adapter
Method 3
- Back up Comodo settings (General Setttings > Configuration > Export), mainly for HIPS.
- Disable internet connection by disconnecting the Ethernet cable.
- uninstall Comodo using the “I want to permanently remove it” option.
- reboot Windows. browser tried to open a Comodo website, so check for startup processes/services (w/ CCleaner), disable these and reboot again.
- remove old VirtualBox traces (preferences, registry, caches and certificates, as described in the OP), then reboot Windows again.
- install VirtualBox 6.1.18 in the default location while unchecking “Host-Only Networking”, then reboot Windows again.
- open the VirtualBox GUI and created a host-only adapter (File > Host Network Manager > Create). Device Manager instantly displayed the adapter as functional.
- reboot Windows again, it still show as working.
- restore my old VirtualBox settings (Users\Username\.VirtualBox folder) and it still work.
- reconnect ethernet cable and reinstalled Comodo, then restore its settings.
- reboot Windows again, the adapter still show as functional. Even creating new ones work without issues.
- reinstall Genymotion. During installation it creates two new host-only adapters. Still, after restoring settings there, everything works without issues.
Ngolongnd hopes this article helps you!