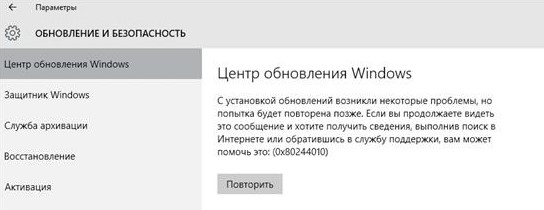
После установки нового сервера WSUS в сети нашей компании многие клиенты не смогли получить новые обновления с сервера с ошибкой 0x80244010. Как оказалось, эта ошибка характерна не только для компьютеров, обновляющихся с внутреннего сервера WSUS, но и для устройств, получающих обновления напрямую с Windows Update. Рассмотрим, основные способы исправления ошибки 0x80244010 и восстановления работоспособности системы обновлений.
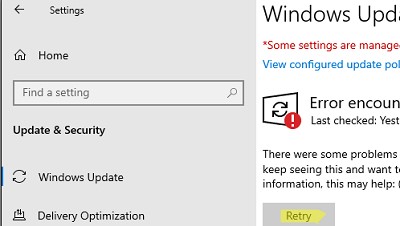
Если вы увидели ошибку получения или установки обнволения в графической Control Panel или панели Settings, нужно открыть лог агента WindowsUpdate.log. В старых версиях Windows 7 и 8 это файл
%Windir%\WindowsUpdate.log
. В современных Windows 10/11 и Windows Server 2022/2019 вы можете сгенерировать файл WindowsUpdate.log с помощью PowerShell:
Get-WindowsUpdateLog -logpath C:\PS\Logs\WindowsUpdate.log
В моем случае в журнале обновлений обнаружились такие ошибки:
PT WARNING: Exceeded max server round trips: 0x80244010 PT WARNING: Sync of Updates: 0x80244010 PT WARNING: SyncServerUpdatesInternal failed: 0x80244010 Agent * WARNING: Failed to synchronize, error = 0x80244010 Agent * WARNING: Exit code = 0x80244010 Agent ********* Agent ** END ** Agent: Finding updates [CallerId = AutomaticUpdates] Agent ************* Agent WARNING: WU client failed Searching for update with error 0x80244010 AU >>## RESUMED ## AU: Search for updates [CallId = {128CCEAD-F84D-405E-9BC2-607D1694894B}]

AU # WARNING: Search callback failed, result = 0x80244010 AU # WARNING: Failed to find updates with error code 80244010
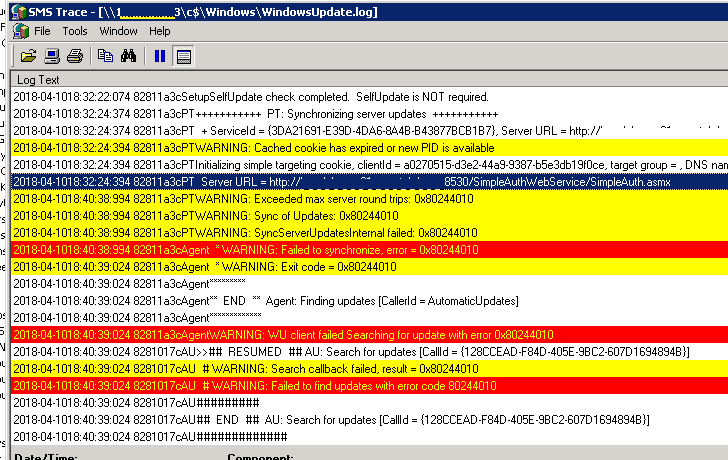
Обратите внимание на строку Exceeded max server round trips: 0x80244010. Эта ошибка говорит, что при обращении к серверу обновлений (в моем случае это WSUS) было превышено максимальное количество обращений. В результате чего сервер обновлений отключает клиента, который превысил лимит обращений (по умолчанию лимит — 200 обращений).
Также в Windows Update есть ограничение в 200 Кб на максимальный размер XML файла, который клиент получает с сервера в рамках одного обращения. Чем большее количество обновлений на сервере для клиента нужно проверить, тем больший размер XML файла. Если клиент не смог получить необходимые данные с сервера обновлений за 200 сессий, он временно отключается от сервера и возвращает ошибку.
Чаще всего такая ошибка возникает из-за плохого или нестабильного сетевого соединения с сервером обновлений, или когда клиенту нужно получить слишком большое количество обновлений (новый клиент сервера WSUS или компьютер, на котором давно не устанавливались обновлений).
В большинстве случаев пользователю достаточно через несколько минут повторно нажать на кнопку Retry/ Check for Updates в панели управления или выполнить команду:
wuauclt.exe / detectnow
В большинстве случаев это решает проблему, но в том случае если клиентов в сети много, такой способ решения проблемы неприемлем.
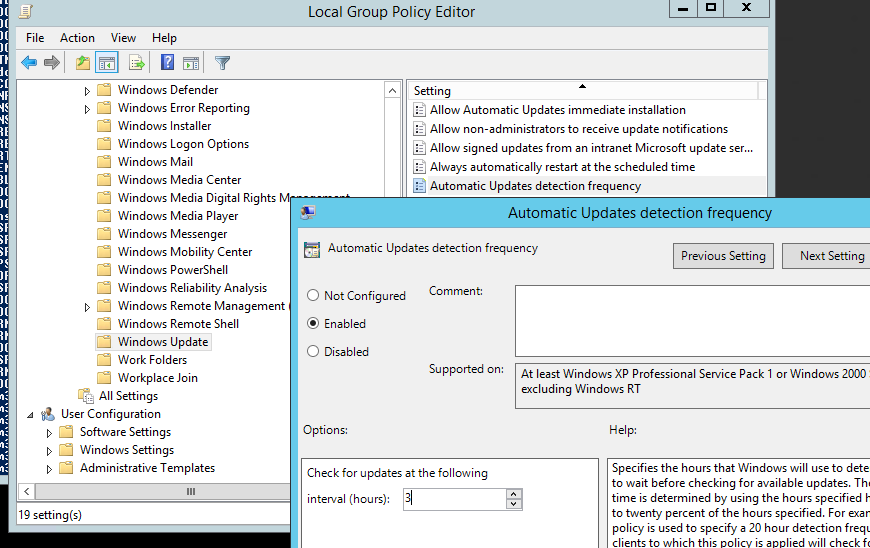
По умолчанию клиент проверяет обновления на сервере каждые 22 часа. Вы можете изменить этот интервал с помощью параметров групповых политик компьютера. Откройте редактор локальной GPO (
gpedit.msc
) или отредактируйте доменные политику в консоли Group Policy Management Console (
gpmc.msc
). Перейдите в раздел Computer Configuration -> Administrative Templates -> Windows Components -> Windows Update.
Включите параметр Automatic Update detection frequency и увеличьте частоту синхронизаций клиента с сервером обновлений до 3 часов.
Также можно на стороне сервера WSUS убрать ограничение на максимальный размер XML файла, который может скачать клиент с сервера. Для этого откройте SQL Server Management Studio и подключитесь к базе данных SUSDB. Выполните выполнить следующую команду T-SQL.
USE SUSDB
GO
Проверьте и запомните текущее значение:
select MaxXMLPerRequest from tbConfigurationC
Отключите ограничение:
UPDATE tbConfigurationC SET MaxXMLPerRequest = 0
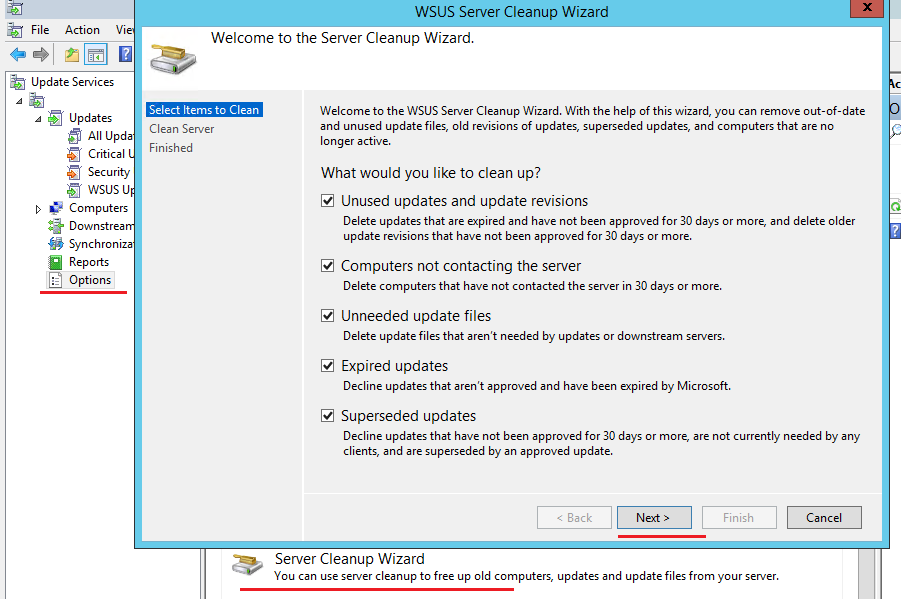
Чтобы не менять настройки в базе WSUS, можно выполнить очистку WSUS сервера с помощью встроенного мастера очистки (Консоль Update Service -> Options -> Server Cleanup Wizard -> все опции -> Next). Это удалит старые, неиспользуемые, и замененные обновления (особенно много мусора от обновлений MS Office), из-за которых может долго выполняться сканирование.
В результате такой операции, клиент Windows Update будет получать намного меньше мета-информации с WSUS сервера, и его взаимодействие должно уместиться в 200 сессий по 200кб.
Также попробуйте увеличить производительность пула WsusPool в IIS на сервере WSUS по рекомендация из стати Ошибка обновления Windows 80244022
WsusPool (Application Pools -> WsusPool -> Advanced settings):
- Private Memory Limit (KB) – 0 (убрать лимит 1.2 на использование RAM рабочим процессов WSUS)
- Queue Length — 25000 (увеличить длину очереди к пулу приложения с 10000)
- Limit Interval (minutes) — 15 (увеличить минут время для сброса счетчиков и выполнения CPU Throttling с 5 минут до 15)
- Service Unavailable Response — TcpLevel (при старом значение HttpLevel клиенту возвращается ошибка HTTP 503)
Отредактируйте файл config ( C:\Program Files\Update Services\WebServices\ClientWebService\web.config), заменив строку
httpRuntime maxRequestLength="4096"
на
httpRuntime maxRequestLength="204800" executionTimeout="7200"
Если все рассмотренные способы не помогли исправить ошибку обновления на клиенте, попробуйте полностью сбросить на нем настройки Windows Update и восстановить настройки по-умолчанию. После чего выполните несколько циклов поиска обновлений.
Иногда случаются ситуации, когда центр обновления Windows не может загрузить и установить обновления. Также, проблемы могут возникнуть, если обновление скачано, но не устанавливается. Чаще всего ошибки появляются после переустановки или установки операционной системы, а также в случае сбоев в ОС.
Рассмотрим наиболее распространенные варианты ошибок.
Этот сбой в системе встречается достаточно редко и трудно поддается исправлению.
Попробуйте отключить автозапуск разных программ, от которых не зависит функциональность системы. Откройте «Панель управления»
.
Апрельское обновление 2020:
- Шаг 1: (Windows 10, 8, 7, XP, Vista — Microsoft Gold Certified).
- Шаг 2: Нажмите «Начать сканирование», Чтобы найти проблемы реестра Windows, которые могут вызывать проблемы с ПК.
- Шаг 3: Нажмите «Починить все», Чтобы исправить все проблемы.
Ошибка появляется, когда вы пытаетесь установить что-либо на свой компьютер. Это означает, что произошел конфликт устанавливаемой программы и Net Framework.
Для начала, найдите на своем компьютере Net Framework. Часто пользователи удаляют папки и программы, которые считают лишними, таким образом, если вы не нашли это программное приложение, то, скорее всего, оно удалено. Установите заново.
- Откройте Диспетчер задач — Службы , найдите службу, которая следит за работой удаленного рабочего стола (TermService ). Остановите её: правая кнопка мыши — Остановить;
- установите WSUS;
- Запустите остановленную ранее службу удалённого рабочего стола;
- еще раз запускаете неудавшийся процесс, применив права Администратора.
У одного из заказчиков столкнулся с интересной проблемой установки обновлений на клиентах с Windows 7. Обновления распространяются посредством сервера WSUS, интегрированного в среду System Center Configuration Manager. На SCCM сервере используется Windows Server 2008 R2, версия WSUS соответственно — WSUS 3.0 SP2. Должны обновляется клиентские ПК с Windows 7 SP (порядка 2000 компьютеров).
Клиентские компьютеры не могут получить обновления с Software Update Point, в журналах при этом фиксируется ошибка 0×80244022.
OnSearchComplete — Failed to end search job. Error = 0×80244022. Scan failed with error = 0×80244022.
2017-08-09 11:02:04:371 612 4858 Setup WARNING: SelfUpdate check failed to download package information, error = 0×80244022 2017-08-09 11:02:04:371 612 4858 Setup WARNING: SelfUpdate check failed to download package information, error = 0×80244022 2017-08-09 11:02:04:371 612 4858 Agent * WARNING: Skipping scan, self-update check returned 0×80244022 2017-08-09 11:02:04:371 612 4858 Agent * WARNING: Exit code = 0×80244022 2017-08-09 11:02:04:371 612 4858 Agent WARNING: WU client failed Searching for update with error 0×80244022 2017-08-09 11:02:04:371 612 4abc AU # WARNING: Search callback failed, result = 0×80244022 2017-08-09 11:02:04:371 612 4abc AU # WARNING: Failed to find updates with error code 80244022
Т.е. по логу видно, не отвечает сайт WSUS отвечает. Действительно, если открыть URL адрес WSUS Administration (https://SCCM-Srv1:8530), появляется ошибка:
Примечание. Более быстро детальное описание ошибки можно получить по ее коду из статьи со списком всех ошибок Windows Update.
После ручного запуска пула, через 20-30 минут он опять падет. В журнале системы при этом обнаружилось интересное сообщениеEvent ID 5117 WAS с текстом: A worker process serving application pool ‘WsusPool’ has requested a recycle because it reached its private bytes memory limit
Примечание. Проблема отчасти напоминает рассмотренный ранее кейс с ошибкой 0×8024401 при получения обновлений c в Windows 10.
Насколько увеличить, решайте сами, рекомендую начать с 3-4 Гб. В моем случае для 2000+ клиентов WSUS, оказалось достаточно 6 Гб памяти.
Осталось перезапустить пул через кнопки Start/Stop или Recycle.
Совет. При большом количестве клиентов WSUS, получающих обновления с SCCM Software Update Point (особенно получающих обновления впервые), в расширенных настройках пула можно увеличить следующие параметры:
Кроме того, рекомендуется установить на WSUS 3.0 SP2 под Windows Server 2008 R2 следующие обновления:
На WSUS 4.0 на Windows Server 2012 R2 такие:
Ошибка центра обновления Windows 7 0×80070005
- Заходим на сайт Майкрософт и качаем программу SubInACL.exe . Далее установите ее на компьютер, на диск С. Адрес установленной утилиты должен выглядеть так — C:\subinacl\.
@echo off Set OSBIT=32 IF exist «%ProgramFiles(x86)%» set OSBIT=64 set RUNNINGDIR=%ProgramFiles% IF %OSBIT% == 64 set RUNNINGDIR=%ProgramFiles(x86)% C:\subinacl\subinacl.exe /subkeyreg «HKEY_LOCAL_MACHINE\SOFTWARE\Microsoft\Windows\CurrentVersion\Component Based Servicing» /grant=»nt service\trustedinstaller»=f @Echo Gotovo. @pause
Ошибка 80244019 центра обновлений Windows 7
- перезагружаете компьютер и запускаете его в безопасном режиме (Delete перед загрузкой системы + выбрать«Безопасный режим« );
- запускаете сканирование на вирусы с помощью антивирусной программы, которая у вас есть в наличии. Желательно проводить глубокую проверку, которая хоть и занимает много времени, зато наиболее эффективна;
- перезагружаете компьютер;
- заходите на вкладку «Панель управления», выбираете иконку «Центр управления сетями и общим доступом»;
- в левом углу окна находите ссылку «Изменение параметров адаптера»;
- найдите иконку своего интернет подключения, используя правую кнопку мыши выберите «Свойства»;
- выберете «Протокол Интернета версии 4» , и нажмите на«Свойства« ;
- во вкладке Общие измените параметры, чтобы они выглядели следующим образом:
https://answers.microsoft.com/en-us/protect/forum/all/my-windows-defender-wont-update/3440d603-bfb0-43a0-af5a-2fc1942b18fb
CCNA, веб-разработчик, ПК для устранения неполадок
Ошибка 80072ее2 центра обновлений Windows 7
- Воспользуйтесь программой CCleaner для удаления ошибок в реестре. Это должно помочь при отсутствии связи файлов в реестре и Центре обновления Windows 7;
- Проведите глубокое сканирование с помощью программы, которая ищет вредоносные файлы;
- Установите все обновления ОС.
- Переустановите Windows Update методом диагностики программой из сайта Майкрософта по ссылке;
- Обновите драйвера;
- Если вышеописанные пункты не помогли, воспользуйтесь функцией «Восстановление системы» чтобы откатить систему до состояния, когда ошибки не возникало и в последствии попробуйте обновить драйвера;
Использование скрипта Reset Windows Update Agent
https://gallery.technet.microsoft.com/scriptcenter/Reset-Windows-Update-Agent-d824badc или у меня с сайта
Распаковываете архив и утилитой SetupDiag.exe. Запустите от имени администратора файл ResetWUEng.cmd.
Вас попросят согласиться с тем, что вы даете согласие, что могут быть произведены изменения в реестре Windows или настройках системы, говорим Y.
В итоге вы увидите окно с 19 настройками, нас будет интересовать второй пункт «Reset the Windows Update Components». Нажимаем двойку.
скрипт выключит нужные службы, произведет настройки и заново все включит.
Если все успешно, то он об этом отрапортует «The operatiom completed successfully»
- Remove From My Forums
-
Question
-
-
Edited by
Friday, October 11, 2019 7:25 AM
-
Edited by
Answers
-
Hi Birdal,
As the article you provided says:
- We have defined the maximum number of trips as 200 within code and it cannot reconfigured.
So, if you click «Update Now» and the error «0x80244010» appears at the end, then the automatic update is normal, and only the update information is completely obtained by this update. Then continue to click «Update Now». As
for how many times you need to click to update immediately, it depends on how many patches you need to install for the installed operating system.
Regards,
Yic
Please remember to mark as answers if they help.
If you have feedback for TechNet Subscriber Support, contact
tnmff@microsoft.com.-
Marked as answer by
_Birdal
Friday, October 11, 2019 1:10 PM
- We have defined the maximum number of trips as 200 within code and it cannot reconfigured.
After installing the latest Windows 10/11 update, you might encounter an error message indicating that the Windows update client failed to detect with error 0x80244010. This error occurs during the Windows Update process, leading the system to roll back or restore to the previous date and time.
The Windows Update error 0x80244010 can be quite frustrating, especially if you are using your computer frequently on a daily basis. In this article, we will discuss the problem, troubleshooting steps, solutions and all to make sure that your OS gets up-to-date with the latest security patches and various features/improvements from Microsoft. So, follow the simple methods below in order to fix problems installing updates in Windows 10/11 0x80244010.
What Is the Windows Update 0x80244010 Error?
Windows Updates are an important part of keeping your Windows PC or laptop up to date, but it’s not uncommon for things to go wrong and end up with errors such as 0x80244010.
According to affected Windows users, the problem installing updates Windows 10/11 0x80244010 error usually occurs after installing a new WSUS server in the network.Most of the time, they simply could not receive and install Windows updates. However, for some of them, the problem is accompanied by the error 0x80244010 code.
But what causes the error 0x80244010 on Windows Update? Here are some of the most common error 0x80244010 culprits:
- System Glitch – This usually occurs on Windows endpoint machines. And if a system glitch is a culprit, the good news is that Microsoft has built-in repair suggestions that can be deployed anytime. Users can just apply the recommended fixes to resolve the issue.
- Corrupted Files in the WU Temp Folder – Sometimes, corrupted files in the WU Temp folder can trigger the 0x80244010 error. Files in this folder may get corrupted after installing a faulty update or after running an antivirus scan. To fix this, users need to run several commands to reset WU components, including those in the Temp folder.
- Problems with Conventional Update Methods – At times, the WU component itself does not work automatically because the WU function has been blocked. To resolve this, you may use the System Update Readiness tool. This allows you to install updates that fail to install via conventional methods.
- Disabled Detection Frequency Policy – The WSUS server only allows a certain number of requests. When your requests exceed the limit, you can no longer install the Windows update. And as a result, you encounter the error message. In this case, you may use the Local Group Policy Editor to grant access to the Automatic Update detection policy and set a certain global update interval.
- Corrupted System Files – In the event that the Windows Update troubleshooter cannot resolve the 0x80244010 error automatically, it is possible that there is an underlying system file corruption issue. The usual fix for this situation is to refresh all Windows components via a Clean Install.
- Unstable Internet Connection – Windows updates and system files may get corrupted and cause the error 0x80244010 because of an unstable internet connection. The easiest way to fix this is just to try installing the error again and again or run a particular command via the Command Prompt window.
- Unsynchronized Updates – If updates are not synchronized, the error 0x80244010 may surface. To synchronize Windows updates, you may set the Windows Update detection policy frequency to automatic.
Ways Fix the Windows Update 0x80244010 Error Code on Windows 10/11
If you are facing the error code 0x80244010 on your Windows computer, then these fixes will help you resolve it without wasting anytime.
Fix #1: Restarting Your Computer
Windows updates are essential not only for your operating system but also for the security of your computer. If you’re receiving a 0x80244010 error code, it might be because you’re using a previous version of Windows while trying to upgrade.
To fix this problem, restart your computer and enter Safe Mode with Networking from the Power User Menu. Once there, type ms-settings:windowsupdate in Cortana and click Scan for Updates to complete that process. Hopefully, this resolves the 0x80244010 error.
Fix #2: Run the Windows Update Troubleshooter
This error is not as mysterious as it seems and can often be resolved by running the Windows Update Troubleshooter. The troubleshooter can help you repair update installation problems or other related errors with the Windows update process.
To run the troubleshooter, follow these steps:
- Go to Settings, then Apps & features.
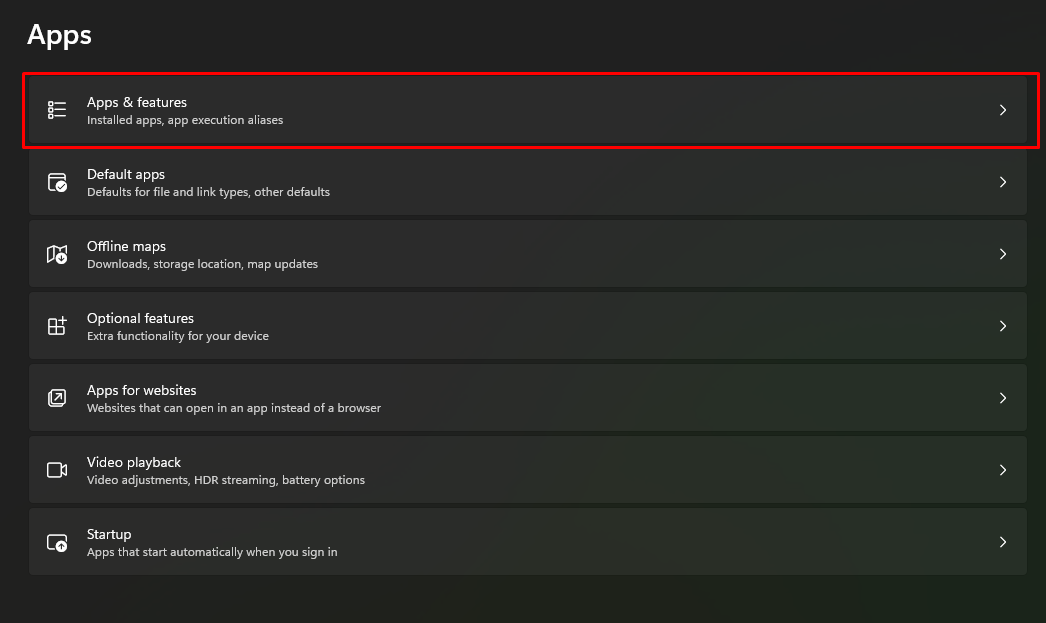
- Select Manage Optional Features.
- Turn on Use my sign-in info to automatically finish setting up your device after a Windows update or restart.
- Open Start Menu and enter Troubleshooting.
- Choose Troubleshooting Tools.
- Select Windows Update.
- When the troubleshooter opens, click Next.
- Click Scan Now. If there are any updates that need to be installed, your computer will start downloading them automatically for you.
Fix #3: Reset the Windows Update Components
When you get the Windows update error code 0x80244010, your Windows Update components may not be properly configured to sync updates.
To fix this problem, reset your components to default values. Here’s how:
- In order to reset your Windows Update components, first, uninstall the Microsoft Security Essentials program and any other third-party antivirus software that you may have installed.
- Next, open an Administrator Command Prompt window as an administrator by typing cmd in Search and pressing Enter or using the keyboard shortcut CTRL+SHIFT+ENTER (right-click and select Command Prompt (Admin)).
- Type or copy/paste the following commands one at a time and press Enter after each command:
- netshwinsock reset catalog
- netsh int ipv4 reset catalog
- netsh int ipv6 reset catalog
- netshwinsock set global mtu=9000 store=active
These commands will restore Windows Update components to their default values.
Fix #4: Use the System Update Readiness Tool
If you are running an old version of Windows, try using the System Update Readiness Tool from Microsoft. The tool scans your PC for missing, damaged, or out-of-date system files and provides online help for correcting them. This may solve your problem by installing Windows Updates that failed previously due to a virus or other corruption.
- Launch an elevated Command Prompt window by pressing the Start menu and typing cmd into the text field.
- Right-click on the top-most result and choose Command Prompt. Choose Run as Administrator.
- If asked for a password, input it and choose Allow.
- Input this command and hit Enter: DISM.exe /Online /Cleanup-image /Restorehealth.
Fix #5: Run System File Checker
Running the System File Checker utility sometimes works to resolve the error. Here’s how to use it:
- Press Win+R or hold down the Windows key and press R on your keyboard.
- Type cmd in and press Enter.
- Right-click on Command Prompt and select Run as Administrator from the list of options that appears.
- In the new window type sfc /scannow then hit Enter. The tool will start scanning for any corrupted files, let it finish its work before shutting down and restarting your PC.
- After the process is completed, you should notice a popup window confirming that no errors were found. If the system file checker finds a problem with a file (or set of files), it might ask you if you want to repair them; this process may take some time, depending on how much space is required to fix everything. Otherwise, just wait until your computer has fully booted up again, and everything is back to normal!
Fix #6: Reset TCP/IP Settings
Resetting TCP/IP Settings is a process in which you will change your computer’s IP address and default gateway back to their default values. Doing this should allow your computer to connect with Microsoft’s servers and receive updates once again. This can be done through Command Prompt or by following these steps:
- Click on Start in the bottom left-hand corner of your screen.
- Type command into the search bar in order to open up a Command Prompt window.
- Enter ipconfig /release at the prompt.
- Close out of the Command Prompt window when it says Successfully released all reserved local addresses.
- Open up another Command Prompt Window.
- Enter ipconfig /renew at the prompt.
- Close out of that Command Prompt Window when it says Successfully renewed DHCP lease.
- Restart your Windows 10/11 computer when prompted to do so.
Fix #7: Disable Proxy Server in Internet Options
Disabling your proxy server can also fix the 0x80244010 error.
First, you’ll need to open your Internet Options in your Control Panel. To do this, type Internet Options into your search bar, click Settings, and then click the tab that says Connections.
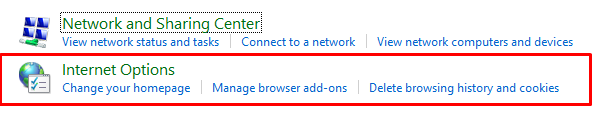
After you’re in Connections, there will be a button called LAN Settings which allows you to disable Proxy Server for connections that don’t go through the proxy server first. Make sure it’s unchecked and hit OK. Then restart your Windows 10/11 computer and try updating it again!
Fix #8: Uninstall and Reinstall the Network Adapter Driver
Uninstalling and reinstalling the network adapter driver has worked and resolved the error for some affected users. Hence, it’s something you may want to try as well.
To do this:
- Open Device Manager (Right-click This PC, Properties, and select Device Manager) and search for your Network Adapter driver.
- Right-click the found driver and select Uninstall.
- Restart your computer if you’re prompted. Wait for a minute or two until it has completely restarted and has gone back to normal (on Desktop).
- If the issue persists, right-click This PC again and choose Properties.
- In the window that pops up, go to Advanced System Settings>Hardware tab.
- Click on Device Installation Settings.
- Click the very first setting in this list: No, let me choose what is best for my computer. You should be taken to a list of drivers installed on your machine; find all associated devices connected via Ethernet and check any boxes before clicking OK.
Fix #9: Use a PC Repair Tool
You can also download a PC repair tool to fix your PC as if you were an expert! In most cases, this error is caused by third-party applications or viruses that have been partially removed from your computer. With this program, you can scan the entire computer, pinpoint all the infected files, delete them without worries, and then optimize your PC performance again.
Fix #10: Disable Firewall or Antivirus while Updating Windows OS
The Firewall or Antivirus could be your culprit. If you have one of these installed, they may be interrupting the installation process, causing you to see the error message.
Try disabling these temporarily while updating your system. When you restart your PC again, it should fix any errors related to starting up with Firewall or Antivirus installed. You can re-enable the protection when all updates are completed.
If you still see a failure with the same error code after trying this step, uninstall your antivirus or firewall completely before continuing.
Fix #11: Perform a Clean Install
This means reinstalling your operating system and drivers but keeping your files, apps, and settings. Doing this might not work for some people, so it’s always a good idea to make a backup before attempting a repair or reinstallation.
In order for this technique to work, you’ll need an external hard drive or USB stick that has enough free space so you can transfer your data from the computer. Once you’ve backed up your files, then do the following:
- Go to Settings > Update & Security > Recovery and click Restart Now.
- If prompted with Choose an option, select Troubleshoot.
- Select Advanced Options > Startup Settings.
- Press 5 to Enter Safe Mode and press Enter.
- Press F8 while in Safe Mode and boot into the Command Prompt.
- Type chkdsk without quotes and hit Enter.
- Type exit without quotes to exit the Command Prompt, type exit again without quotes, and press Enter one more time.
- Restart your computer as normal by clicking Restart Now.
Fix #12: Clear the Windows Update Temporary Cache
Lastly, try clearing your cache to fix the error. Here’s how:
Start by deleting temporary files manually. Click on Start at the bottom left of your screen and type Disk Cleanup into search. Then click on the icon that says Disk Cleanup.
- You will see a box pop up, saying Disk Cleanup Tool has found over XX gigabytes of junk files that can safely be deleted. Do you want to delete these files now?
- Select Yes!
- Select all three boxes and hit OK.
- Next, go to C:\Windows\SoftwareDistribution\Download where you will find a folder called Cache.
- Delete everything inside this folder.
- Now, go back to the Disk Cleanup window where we just cleared our cache, but this time select Temporary Files and Cookies (leave the other checkboxes unchecked).
- Hit OK.
- Restart your computer to make sure everything gets reset properly before we move on.
In Summary
When you are having a problem with downloading and installing new updates for your computer, there are a few things you can do to try and fix this problem. This includes what we have enumerated above, including restarting your computer to check for any new updates, checking your firewall to see if it’s blocking updates, or resetting Windows update components.
Restarting your computer should always be the first step in any update process because this clears up bugs and slows that are occurring in the background. Checking your firewall is also important because, many times, it will block the installation of a downloaded update due to security reasons. The next thing to do is reset Windows update components which could fix a broken component in windows update, including program files, windows services and more. If all else fails, you can always seek guidance from a licensed Windows technician.
Give us some love and rate our post!
После установки нового сервера WSUS в сети нашей компании многие клиенты не смогли получить новые обновления с сервера с ошибкой 0x80244010. Как оказалось, эта ошибка характерна не только для компьютеров, обновляющихся с внутреннего сервера WSUS, но и для устройств, получающих обновления напрямую с Windows Update. Рассмотрим, основные способы исправления ошибки 0x80244010 и восстановления работоспособности системы обновлений.
Для диагностики проблемы нужно открыть лог агента обновлений WindowsUpdate.log (в Windows 7 и 8 он находится в каталоге %Windir% , а в Windows 10 его можно получить так). В журнале обновлений при этом будут присутствовать такие строки:
2018-04-10 18:40:38:994 828 11a3c PT WARNING: Exceeded max server round trips: 0x80244010
2018-04-10 18:40:38:994 828 11a3c PT WARNING: Sync of Updates: 0x80244010
2018-04-10 18:40:38:994 828 11a3c PT WARNING: SyncServerUpdatesInternal failed: 0x80244010
2018-04-10 18:40:38:994 828 11a3c Agent * WARNING: Failed to synchronize, error = 0x80244010
2018-04-10 18:40:39:024 828 11a3c Agent * WARNING: Exit code = 0x80244010
2018-04-10 18:40:39:024 828 11a3c Agent *********
2018-04-10 18:40:39:024 828 11a3c Agent ** END ** Agent: Finding updates [CallerId = AutomaticUpdates]
2018-04-10 18:40:39:024 828 11a3c Agent *************
2018-04-10 18:40:39:024 828 11a3c Agent WARNING: WU client failed Searching for update with error 0x80244010
2018-04-10 18:40:39:024 828 1017c AU >>## RESUMED ## AU: Search for updates [CallId = {128CCEAD-F84D-405E-9BC2-607D1694894B}]
2018-04-10 18:40:39:024 828 1017c AU # WARNING: Search callback failed, result = 0x80244010
2018-04-10 18:40:39:024 828 1017c AU # WARNING: Failed to find updates with error code 80244010

Наибольший интерес вызывает строка Exceeded max server round trips: 0x80244010. Т.е. превышено максимальное число обращений к серверу обновлений (WSUS) во время сканирования обновлений. Об этом же свидетельствует код ошибки Windows Update согласно таблице (SUS_E_PT_EXCEEDED_MAX_SERVER_TRIPS). Т.е. сервер отключает клиента, который превысил лимит обращений. Этот лимит обращений в протоколе получения обновлений Windows устанавливается на сервере обновлений и по умолчанию составляет 200 обращений. Также имеется лимит на максимальный размер XML файла, который клиент получает с сервера в рамках одного обращения — 200 Кб. Чем большее количество обновлений на сервере для клиента нужно проверить, тем больший размер скачиваемого XML файла. В том случае, если клиенту не удается получить необходимые данные за 200 сессий, он временно отключается от сервера и возвращает ошибку.
Эта ошибка возникает, как правило, из-за плохого или нестабильного сетевого соединения с сервером обновлений или когда клиенту нужно получить слишком большое количество обновлений (новый клиент сервера WSUS или компьютер, на котором давно не устанавливались обновлений).
Самый простой вариант попробовать на клиенте несколько раз (3-7 раз) нажать кнопку Try Again или выполнить команду
wuauclt.exe / detectnow
Важно. После каждого запуска поиска обновлений нужно выждать около 15 минут, чтобы дождаться окончания предыдущего цикла поиска обновлений).
В большинстве случаев это решает проблему, но в том случае если клиентов в сети много, такой способ решения проблемы неприемлем.
По умолчанию клиент проверяет обновления на сервере каждые 22 часа. Можно увеличить частоту таких синхронизаций с помощью групповой политики Automatic Update detection frequency (в секции Computer Configuration -> Adminsitrative Templates -> Windows Components -> Windows Update), например до 3 часов.

Также можно на стороне сервера WSUS убрать ограничение на максимальный размер XML файла, который может скачать клиент с сервера. Для этого придется выполнить следующую команду в базе данных WSUSDB.
USE SUSDB
GO
UPDATE tbConfigurationC SET MaxXMLPerRequest = 0
Если вам не хочется менять настройки в базе WSUS, можно выполнить очистку WSUS сервера с помощью встроенного мастера очистки (Консоль Update Service -> Options -> Server Cleanup Wizard -> все опции -> Next), удалив старые, неиспользуемые и замененные обновления (особенно много мусора от обновлений MS Office). В результате такой операции, клиент Windows Update будет получать намного меньше мета-информации с WSUS сервера, и его взаимодействие должно уместиться в 200 сессий по 200кб.

Кроме того, если клиентов сервера WSUS достаточно много, можно попробовать увеличить производительность пула WsusPool согласно рекомендаций из статьи: Ошибка обновления Windows 80244022.
Если все рассмотренные способы не помогли исправить ошибку обновления на каком-то клиенте, выполните на нем скрипт сброса текущих настроек WSUS и удаления локального кэша. После чего выполните несколько циклов поиска обновлений.