Did you lately encounter the 0x8007012f issue while upgrading your Windows 10 to its latest version? Well, this bug may also occur while installing app updates, system updates, or even feature updates. Users have reported receiving two different error messages associated with this issue. They are as follows –
There were some problems installing updates, but we’ll try again later. If you keep seeing this and want to search the web or contact support for information, this may help: (0x8007012F)Or,
ERROR_DELETE_PENDING, The operation has failed, The file cannot be opened because it is in the process of being deleted. Error code: 0x8007012F
Whatever is your case, use these different methods in order to fix this issue on your Windows 10 devices.
Update Error 0x8007012f Solutions
If you are receiving the 0x8007012f error while trying to install security updates for Adobe, go through the below list of solutions sequentially –
- Delete pending.xml file
- Enable the BITS service
- Clear the BITS queue with jobs
- Run Windows Update Troubleshooter
- Clean Windows Cache Folders
- Manually install Cumulative Updates
1] Delete Pending.xml Files
This error typically arises when there lie some pending XML files that should not be there. To overcome this scenario, all you require is to open Command Prompt as an Admin and execute the below code –
Ren c:\windows\winsxs\pending.xml pending.old
- Press the Enter key to start executing this code.
- Running this code will rename the pending.xml files to something “pending.old”.
You may now attempt again to apply the security patches. This time, it should work flawlessly.
2] Enable the BITS
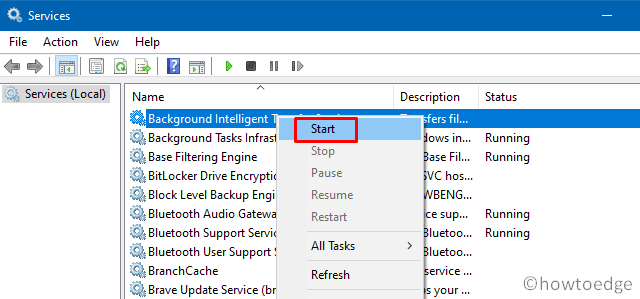
The BITS service must remain enabled for an efficient update process. Since you are getting an update-related issue, check the current state of the Background Intelligent Transfer service on your device. And if you find this turned off, restart this using the following steps –
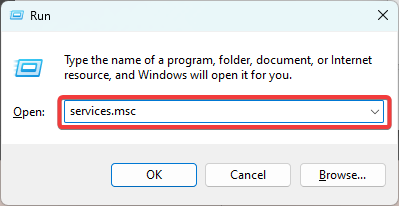
- Press Windows key and R to launch the Run dialog.
- Type services.msc in the text field and press Enter.
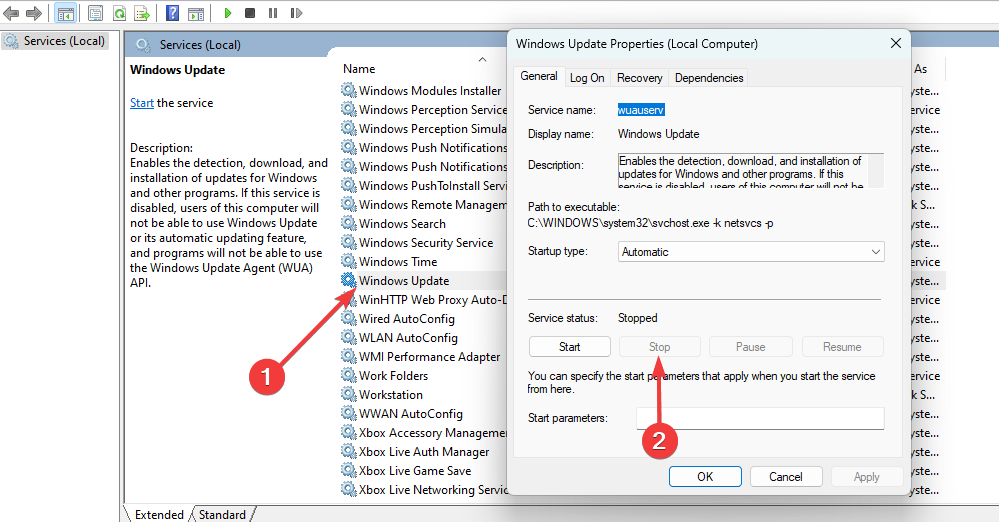
- Subsequently, locate and right-click on Background Intelligent Transfer service.
- If the start option appears in the context menu, hit the same.
Now that you have enabled the BITS service, check if you can upgrade your operating system or not. If not, follow the next set of solutions –
3] Clear the BITS queue with jobs in a Transient Error state
If there are any pending jobs inside the BITS, this will simply prevent new jobs from being downloaded or applied. You may clear all such BITS queues by following the below guideline –
- Right-click anywhere on the desktop and select
New > Text Document. - Open this notepad and copy/paste the below cmdlet inside –
@echo off
net stop BITS
ipconfig /flushdns
ren "%ALLUSERSPROFILE%\Application Data\Microsoft\Network\Downloader\qmgr0.dat" qmgr0.dat.old
ren "%ALLUSERSPROFILE%\Application Data\Microsoft\Network\Downloader\qmgr1.dat" qmgr1.dat.old
net start BITS
- Go to the File tab and select
Save as...option. - Use the drop-down menu to select All files under the Save as type.
- Put abc.bat under the File name and click Save.

- Now that you have saved this file as a batch file, right-click on this and choose Run as Administrator.
Note: You may clear the BITS queue of any ongoing jobs by simply executing a single line code on the Command Prompt having administrative privileges. The code is – bitsadmin.exe /reset /allusers.
4] Run Windows Update Troubleshooter
By default, Microsoft provides a great utility program that can look over the files blocking the update process and fix them. This is none other than the “Update Troubleshooter“. Here’s how to run this program –
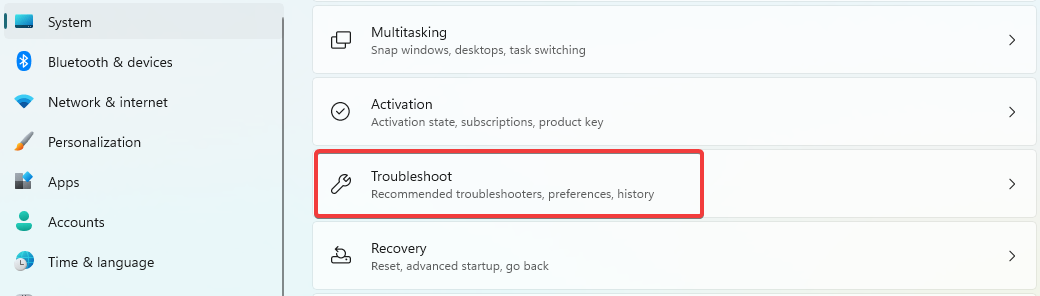
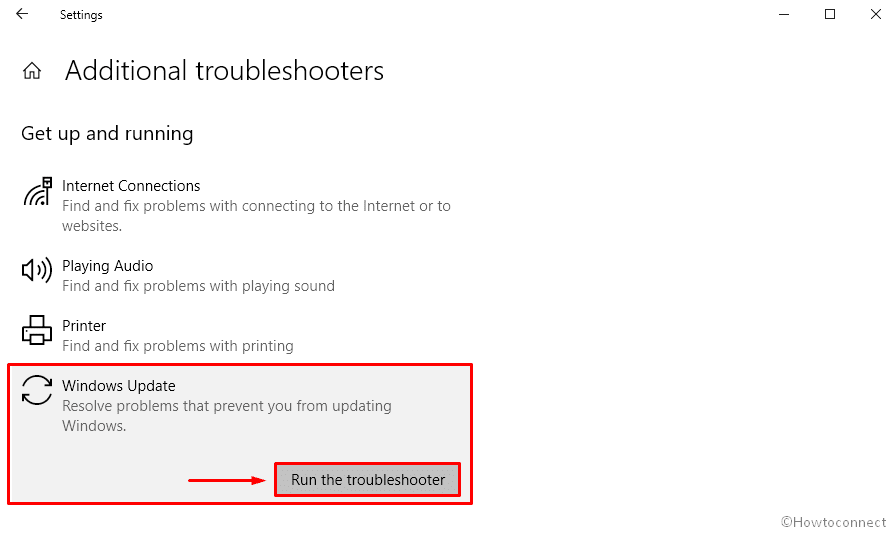
- At first, reach out to the below path –
Settings > Update & Security > Troubleshoot
- Jump to the right side, click “
Additional troubleshooters“. - Moving ahead, click Windows Update and hit “Run the troubleshooter“.

- That’s it, your system will take care of the remaining steps.
- Once over, Restart your PC.
From the next sign-in, you may not encounter the 0x8007012f issue while upgrading Windows 10.
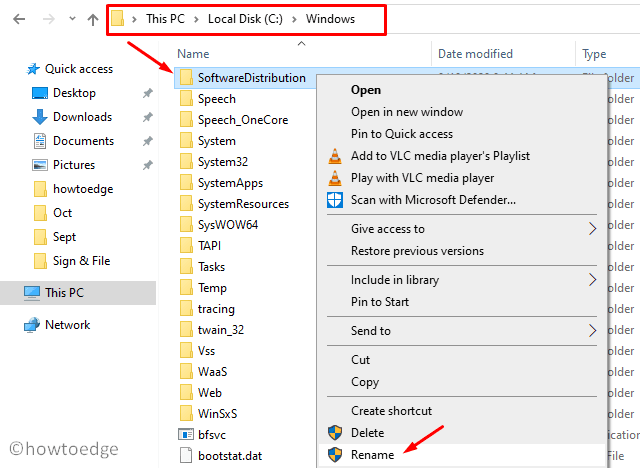
5] Clean Windows Cache folders
If the Windows cache folders get corrupted somehow, this might also prevent installing security updates on the computer. To get rid of this error then you must clear all such folders like SoftwareDistribution and Catroot2. Make sure to disable the update process before proceeding to clean the cache folders. Here’s how to clear these folders –
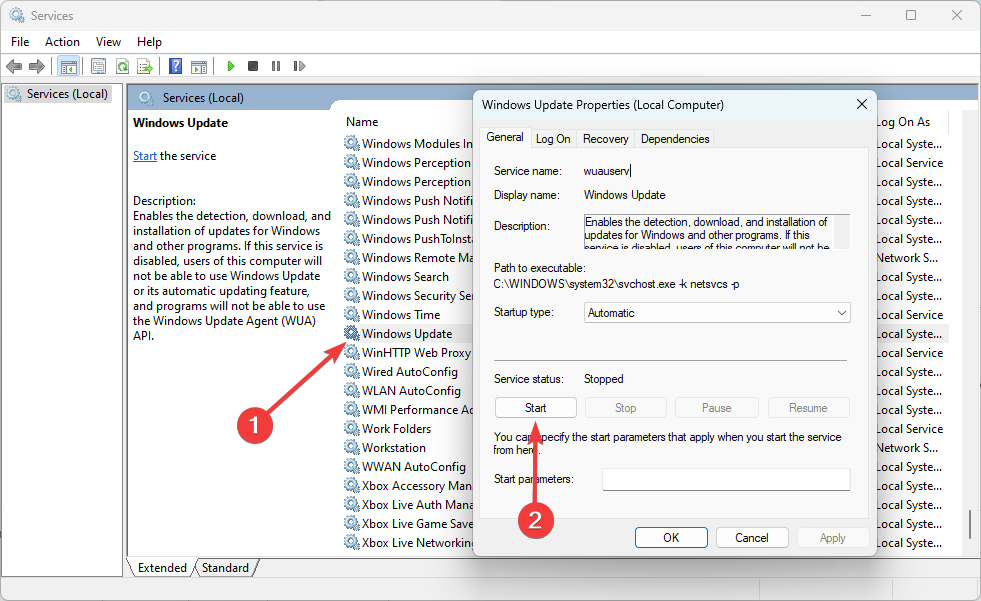
- Click the Start Menu and start typing services.
- When a similar option appears in the results, hit upon it.
- Scroll down to Windows Update in the Services window, make a right-click, and select Stop.
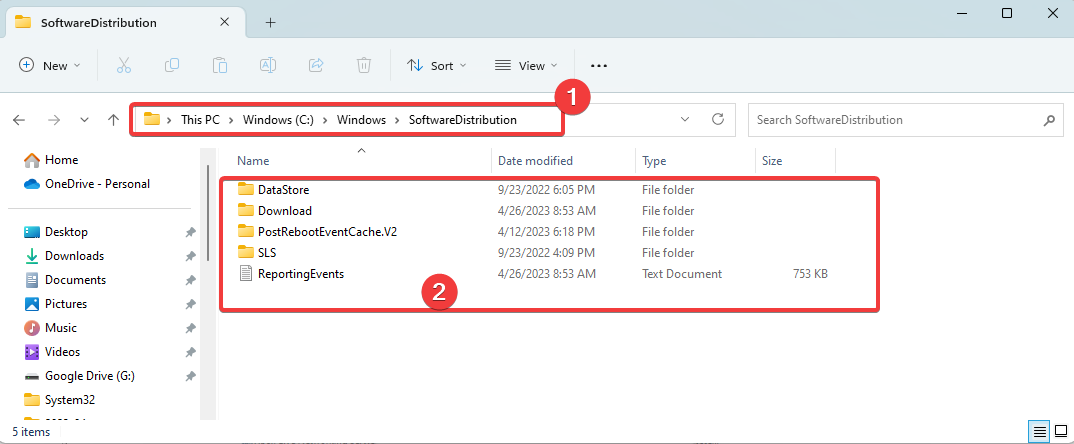
- Next, open the File Explorer using Win + E shortcut key.
- Browse to the following locations one by one, use Ctrl + A to select all items.
- Next, go to the Home tab and hit Delete.
C:/Windows/SoftwareDistribution
C:/Windows/System32/Catroot2
Note: Alternatively, you may also rename the above two folders to sd.old and catroot2.old respectively to avoid any data losses.
- Lastly, re-enable the services that you have stopped earlier.
6] Manually Update Windows
If none of the above fixes resolve the 0x8007012f issue, you may opt to manually install the pending updates. Here’s how to download and apply the standalone package on your device –
- Go to the Windows Update History webpage.
- Select Windows 10 version on the left column then scroll down to “In this release”.
- Click the first link and copy the cumulative number starting with “KB”.

- Press Ctrl + T to enter a new tab, type Update catalog in the address bar, and hit Enter.
- Click the top result and paste the copied cumulative number in the search bar.
- Pressing Enter will display all relevant updates containing the typed-in number.
- Pick the one that matches your system architecture and hit Download next to it.
- After the download completes, open the folder containing this file, and double-click the setup file.
- Wait for the standalone package to install successfully. Once over, you won’t get this error while installing the security updates to Adobe.
That’s it.
Running the Windows Update troubleshooter is the fastest solution
by Afam Onyimadu
Afam is a geek and the go-to among his peers for computer solutions. He has a wealth of experience with Windows operating systems, dating back to his introduction… read more
Updated on
- The 0x8007012f Windows update error makes it impossible to complete the process.
- Old update files, corrupt files, or inactive update services are easy causes of this error.
XINSTALL BY CLICKING THE DOWNLOAD
FILE
Updating Windows is essential as it helps your computer’s security, stability, and performance. However, errors like 0x8007012F will interrupt the process, leading to a failed update.
It often comes with the notification failed to install. We have researched the error, and in this guide, we introduce the most effective solutions in this article.
What causes the 0x8007012F Windows update error?
We gather that the elements below are the primary causes:
How we test, review and rate?
We have worked for the past 6 months on building a new review system on how we produce content. Using it, we have subsequently redone most of our articles to provide actual hands-on expertise on the guides we made.
For more details you can read how we test, review, and rate at WindowsReport.
- Update interruption – This may happen when some vital update services are not running or are poorly configured.
- Cache-related issues – A few people will experience the error if they have old or corrupted cache files.
- Old installer files – If you have old download files on your computer, it may cause conflicts when installing new files and trigger the error.
- Bad system files – For many users, corrupt system files will interfere with the update process and may trigger an error.
The solutions below would come in handy.
How do I fix the 0x8007012f error?
1. Run the Update troubleshooter
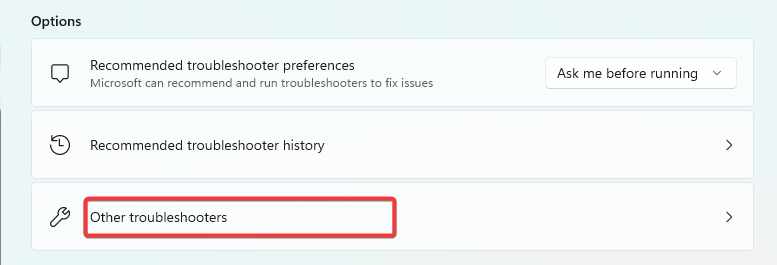
- Press Windows + I to open the Settings app.
- Click on Troubleshoot.

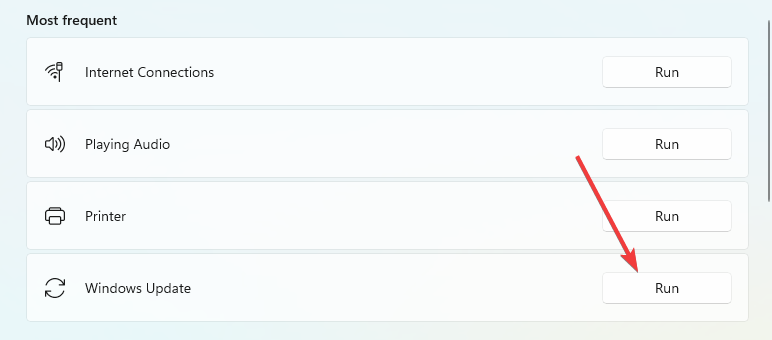
- Select Other troubleshooters.

- Search for Windows Update and click Run.

- Retry the update and verify the error is fixed.
The manual process of troubleshooting your Windows may take longer or don’t fix the issue at all.
However, you have the alternative of using a dedicated system repair tool and entirely restoring corrupted PC files.
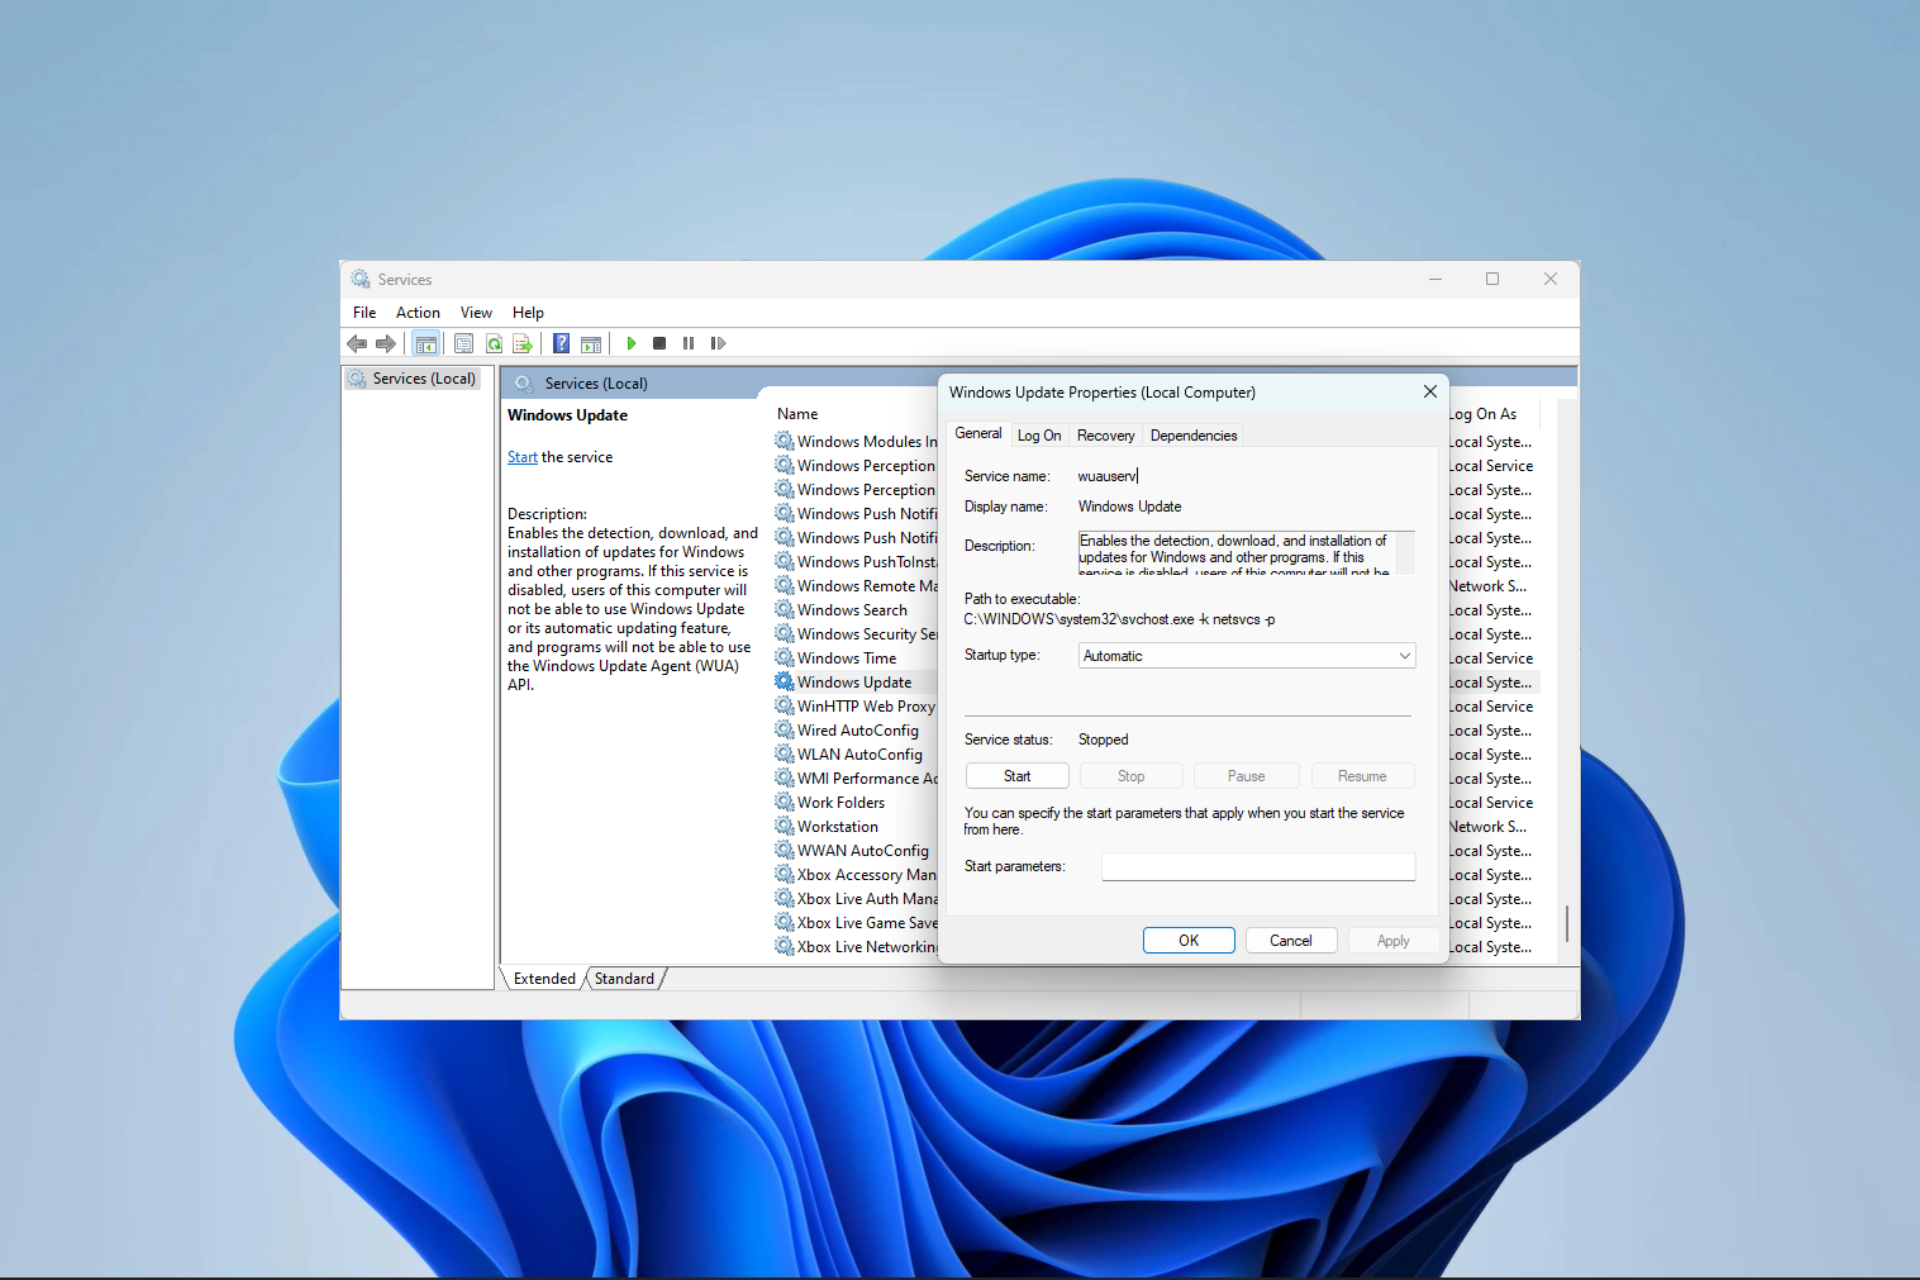
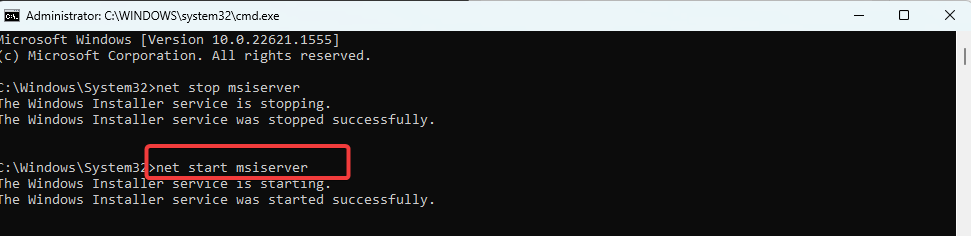
2. Reset BITS and other Windows update components
- Press Windows + R, type cmd, and hit Ctrl + Shift + Enter.

- Type the scripts below and hit Enter after each one to stop vital update components:
net start wuauservnet stop cryptSvcnet stop bitsnet stop msiserver
- Rename the SoftwareDistribution and Catroot2 folders by typing the scripts below and hitting Enter after each one.
ren C:\Windows\SoftwareDistribution SoftwareDistribution.oldren C:\Windows\System32\catroot2 Catroot2.old
- Restart the stopped services by running the scripts below:
net start wauservnet start cryptSvcnet start bitsnet start msiserver


3. Fix system files with a file scan
- Press Windows + R, type cmd, and hit Ctrl + Shift + Enter.
- Input the script below and hit Enter:
sfc /scannow
- The process may take a while. Follow the sunscreen instructions if any repair is needed, then verify it fixed the 0x8007012f error.

- Fix: Set Time Zone Automatically Defaults to Wrong Time Zone
- 0X8007013 Install Error: How to Quickly Fix it
4. Clean the cache folder
- Press Windows + R, type services.msc, and hit Enter.
- Search for the Windows Update service, double-click on it, and hit Stop if it is running.

- Don’t close the Services Windows since you will need to restart the stopped service.
- Press Windows + E, then navigate to the path below, select all the items, and delete them.
C:\Windows\SoftwareDistribution
- Repeat the process, deleting all the content in the path below:
C:\Windows\System32\catroot2 - Return to the open services Windows and restart the stopped Windows Update service.

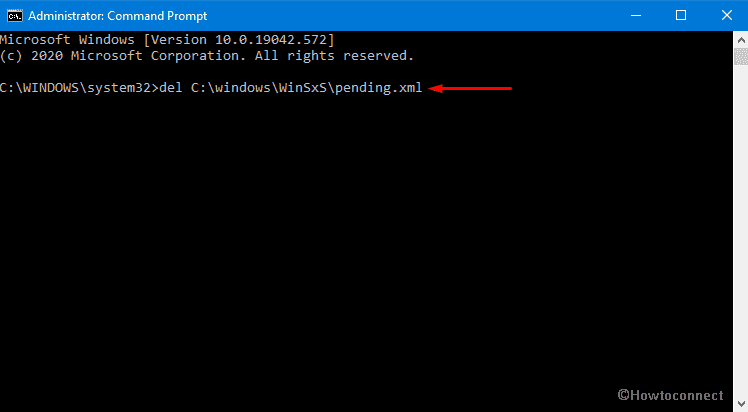
5. Remove the residual Pending.xml files
- Press Windows + R, type cmd, and hit Ctrl + Shift + Enter.
- Type the code below and hit Enter:
Ren c:\windows\winsxs\pending.xml pending.old
- Restart the update and confirm the 0x8007012f error is fixed.

Old updates in this file may stop you from getting new security patches. So, renaming the file forces the computer to create a new Pending.xml file.
Any of the solutions above should fix the update problem. It would be best to try what feels most applicable since they have not been written in any particular order.
Lastly, please update us on the fix that worked using the comments section below.
![]()
Регулярное обновление вашего компьютера помогает защитить ваш компьютер от хакеров, которые используют уязвимости системы для заражения вашего устройства вредоносным ПО. Это очень важно прямо сейчас, учитывая тревожный всплеск числа атак вредоносных программ из-за того, что все больше людей работают из дома.
Установка обновлений в Windows 10 должна быть намного проще через Центр обновления Windows, но это в большинстве случаев это не так. Пользователи сталкиваются с широким спектром ошибок Центра обновления Windows, большинство из которых — распространенные ошибки, с которыми легче справиться.
Но сталкивались ли вы с кодом ошибки Windows 10 0x8007012F? Эта ошибка — одна из книг, потому что многие пользователи Windows не сталкиваются с ней при установке обновлений. Вы, вероятно, рыскали в Интернете в поисках ответов, но нашли скудную информацию о разрешении с кодом ошибки 0x8007012F. Итак, если вы ищете способы справиться с ошибкой Windows 10 с кодом 0x8007012F, вы обратились по адресу.
Что такое код ошибки Windows 10 0x8007012F?
Код ошибки 0x8007012F является проблемой Центра обновления Windows, что означает, что ошибка возникает всякий раз, когда вы пытаетесь установить обновления на свой компьютер. Оно может появляться при установке обновлений приложений, обновлений системы или обновлений функций.
Совет для профессионалов: просканируйте свой компьютер на наличие проблем с производительностью, нежелательных файлов, вредоносных приложений и угроз безопасности
, которые могут вызывают системные проблемы или снижение производительности.
Проблемы с бесплатным сканированием для ПК. 3.145.873загрузкиСовместимость с: Windows 10, Windows 7, Windows 8
Специальное предложение. Об Outbyte, инструкции по удалению, лицензионное соглашение, политика конфиденциальности.
Вот некоторые из сообщений об ошибках, с которыми вы можете столкнуться:
При установке обновлений возникли некоторые проблемы, но мы попробуем позже . Если вы продолжаете видеть это и хотите найти информацию в Интернете или обратиться в службу поддержки, это может помочь: (0x8007012F)
Операция не удалась
Файл не может быть открыт, потому что он находится в процессе быть удаленным.
Код ошибки: 0x8007012F
Сообщения об ошибках на самом деле не очень полезны, особенно первое, потому что они не содержат информации о том, что вызвало ошибку. Если вы получите второе сообщение, вы, вероятно, запутаетесь еще больше, потому что в нем говорится, что файл удаляется. Зачем его удалять при установке обновлений?
Теперь это вызвало большую путаницу среди пользователей Windows, и Microsoft не предложила никакого решения этой ошибки. Она появилась на заре Windows 10, и четких решений этой проблемы нет.
Что еще больше сбивает с толку в этой ошибке, так это то, что она обычно возникает, когда обновления были полностью загружены и в процессе установки достигла 100%. Затем появляется сообщение об ошибке, в котором говорится, что загрузка не удалась, хотя в диалоговом окне говорится, что обновления уже устанавливаются. Если это не раздражает, то что?
Причины появления кода ошибки Windows 10 0x8007012F
При установке обновлений на компьютер играет роль множество факторов. Когда что-то идет не так с любым из этих факторов, это приводит к ошибке. При плохом подключении к Интернету файлы не загружаются полностью или могут быть повреждены. Еще одним элементом, который может повлиять на целостность ваших установочных файлов, является наличие вредоносных программ.
Сверхстрогий брандмауэр или программное обеспечение безопасности также могут препятствовать загрузке обновлений на ваше устройство. Эти функции безопасности управляют входящим трафиком на ваш компьютер и фильтруют входящий. Если они слишком эффективны, вы можете столкнуться с проблемами при загрузке обновлений.
Но основная причина возникновения этой ошибки — старые файлы установщика, имеющиеся на вашем компьютере. Возможно, обновление было прервано в какой-то момент, и вы загрузили еще одну копию файлов установщика, не удаляя полностью старые файлы. В этом случае Центр обновления Windows распознает не новые файлы, а исходную папку загрузки. Следовательно, вы будете продолжать получать эту ошибку, если сначала не удалите старые загрузки.
Как исправить код ошибки 0x8007012F в Windows 10
Поиск рабочего разрешения с кодом ошибки 0x8007012F может быть проблематичным. Вам нужно попробовать несколько решений, прежде чем найти подходящее. Но прежде чем вы перейдете к нашему списку ниже, вы должны сначала внести эти общие исправления:
- Переключитесь на другое подключение к Интернету. Если возможно, подключите с помощью кабеля. В противном случае попробуйте переместить компьютер или ноутбук в ту же комнату, что и маршрутизатор / модем.
- Сканируйте на наличие вредоносных программ и удаляйте ненужные файлы с помощью Outbyte PC Repair. Это не только удалит эти неприятные элементы с вашего компьютера, но и освободит больше места для загрузки обновлений.
- Перезагрузите компьютер. Использование новой системы помогает устранить временные сбои, которые могут мешать процессу обновления.
Эти шаги должны помочь подготовить ваш компьютер к процессу устранения неполадок, если он не исчезнет. ошибки. Если они не работают, вы можете перейти к следующим шагам.
Решение №1: Запустите SFC Tool.
Средство проверки системных файлов — это встроенная утилита, предназначенная для сканирования, исправления или восстановления поврежденных системных файлов. в Windows 10. Поэтому, если код ошибки Windows 10 0x8007012F вызван поврежденными установочными файлами или службой Центра обновления Windows, запуск этого инструмента должен исправить это. Чтобы запустить этот инструмент, откройте командную строку с правами администратора и введите команду: sfc / scannow.
Если средство SFC не работает, необходимо выполнить более глубокое сканирование с помощью средства обслуживания и управления образами развертывания или средства DISM. Он работает так же, как SFC, только область сканирования больше и глубже. Команды, которые вы можете использовать для DISM, включают:
- DISM / Online / Cleanup-Image / CheckHealth
- DISM / Online / Cleanup-Image / ScanHealth
- DISM / Online / Cleanup-Image / RestoreHealth
Просто дайте инструменту поработать, потому что он автоматически попытается восстановить все поврежденные файлы, обнаруженные во время сканирования.
Решение №2 : Сброс службы обновления Windows.
Поскольку эта ошибка в основном вызвана старыми файлами загрузки, вам необходимо сбросить компоненты Центра обновления Windows и переименовать папку загрузки в другое имя, чтобы была создана новая папка Центра обновления Windows. Если переименовать старую папку, ваш компьютер перестанет ее распознавать и вместо этого будет обращаться к новой папке.
Для этого:
- чистые стоповые биты
- net stop wuauserv
Del «% ALLUSERSPROFILE% \ Application
Data \ Microsoft \ Network \ Downloader \ qmgr * .dat »
- Ren% systemroot % \ SoftwareDistribution \ DataStore * .bak
- Ren% systemroot% \ SoftwareDistribution \ Download * .bak
- Ren% systemroot% \ system32 \ catroot2 * .bak
- sc.exe sdset bits
D A ;; CCLCSWRPWPDTLOCRRC ;;; SY) (A ;; CCDCLCSWRPWPDTLOCRSDRCWDWO ;;; BA) (A ;; CCLCSWLOCRRC ;;; AU) (A ;; CCLCSWRPWPDTLOCRRC ;;; PU.exe)
 A ;; CCLCSWRPWPDTLOCRRC ;;; SY) (A ;; CCDCLCSWRPWPDTLOCRSDRCWDWO ;;; BA) (A ;; CCLCSWLOCRRC ;;; AU) (A ;; CCLCSWRPWPDTLOCRRC ;;; PU.exe)
 wuauserv
D: (A ;; CCLCSWRPWPDTLOCRRC ;;; SY) (A ;; CCDCLCSWRPWPDTLOCRSDRCWDWO ;;; BA) (A ;; CCLCSWLOCRRC ;;; AU) (A ;; CCLCSWRPWPDTLOCRRC ;;
- regsvr32.exe atl.dll
- regsvr32.exe urlmon.dll
- regsvr32.exe mshtml.dll
- regsvr32.exe shdocvw. dll
- regsvr32.exe browseui.dll
- regsvr32.exe jscript.dll
- regsvr32.exe vbscript.dll
- regsvr32.exe scrrun.dll
- regsvr32.exe msxml.dll
- regsvr32.exe msxml3.dll
- regsvr32.exe msxml6.dll
- regsvr32 .exe actxprxy.dll
- regsvr32.exe softpub.dll
- regsvr32.exe wintrust.dll
- regsvr32.exe dssenh.dll
- regsvr32.exe rsaenh.dll
- regsvr32.exe gpkcsp.dll
- regsvr32.exe sccbase.dll
- regsvr32.exe slbcsp.dll
- regsvr32.exe cryptdlg.dll
- regsvr32.exe oleaut32.dll
- regsvr32.exe ole32.dll
- regsvr32.exe shell32.dll
- regsvr32.exe initpki.dll
- regsvr32.exe wuapi.dll
- regsvr32.exe wuaueng.dll
- regsvr32.exe wuaueng1.dll
- regsvr32.exe wucltui.dll
- regsvr32.exe wups.dll
- regsvr32.exe wups2.dll
- regsvr32.exe wuweb.dll
- regsvr32.exe qmgr.dll
- regsvr32.exe qmgrprxy .dll
- regsvr32.exe wucltux.dll
- regsvr32.exe muweb.dll
- regsvr32.exe wuwebv.dll
- чистые стартовые биты
- net start wuauserv
Решение №3: Запустите средство устранения неполадок Центра обновления Windows.
Если после сброса всех параметров избавиться от ошибки по-прежнему не удается, можно запустить встроенное средство устранения неполадок, перейдя в настройки устранения неполадок. Прокрутите правую панель вниз и нажмите Центр обновления Windows & gt; Запустите средство устранения неполадок . Этот инструмент просканирует ваш компьютер на предмет проблем, с которыми вы сталкиваетесь при запуске Центра обновления Windows, и, надеюсь, исправит их за вас.
Если все остальное не работает
Последним вариантом будет выполнить чистую установку Windows 10, если все вышеперечисленные шаги не помогают. Это может означать, что вам потребуется больше работы, но, по крайней мере, это решит все проблемы с обновлением Windows, которые у вас могут быть. Это действительно необходимо, если вы сталкиваетесь с кодом ошибки Windows 10 0x8007012F для каждого обновления, которое хотите установить. Но если проблема не слишком серьезна, приведенные выше решения должны каким-то образом помочь.
YouTube видео: Как исправить код ошибки Windows 10 0x8007012F
10, 2023
In this web-based era, hackers are always looking for a way out to make an entrance into your system and infect the device with malware. As most people are working from home lately, there is an alarming spike in the number of virus attacks. System vulnerabilities due to outdated OS is found to be guilty almost every time. That’s why keeping the Windows OS updated is mandatory. Though installing updates is an automatic process in most cases, getting them without any error is a real challenge. Windows Update Error 0x8007012f is one of such fatal codes that obstruct the system from installing the latest patch even after the download and installation progress reaches 100%.
Error 0x8007012f may appear anytime during app updates, system updates, security updates, or feature updates. Unlike other fatal codes, it doesn’t provide any information about what actually caused the issue. The probable causes might be old installer files present on your computer, poor internet connection, presence of malware, or antimalware program. As there is no fixed reason behind this Windows update error, we have prepared a method list that includes the most suitable solutions you can try to successfully resolve 0x8007012f.
Here is how to fix Windows Update Error 0x8007012f –
1] Make use of Windows Update Troubleshooter
Built-in utility Windows Update Troubleshooter generally fixes potential issues that obstruct the system from installing a new patch. From renaming SoftwareDistribution folder, wiping out the old cache associated with Windows update, restarting the dedicated services, resolving and recovering corrupted update files, the utility does it all to fix the existing error code. In order to run the tool, here are steps to follow –
For Windows 10
- Press the – Win+I.
- Click the – Update & Security.
- Choose Troubleshoot present in the left sidebar.
- Shift to right.
- Click – Additional troubleshooters.
- Select – Windows update.
- Hit – Run the troubleshooter.
- Now, the tool will start detecting associated issues causing the update error.
- If it comes with a solution, click Apply a fix or else, follow the guidelines the utility rolls out.
- After completion, restart Windows 10.
For Windows 11
- Right-click on Start button.
- Choose – Settings.
- Move to the right hand side of appearing window.
- Scroll down a bit to find – Troubleshoot.
- Select the same and from following page, click – Other troubleshooters.
- Hit Run button present beside Windows Update.
2] Fix existing system corruption to eradicate Windows Update Error 0x8007012f
Corruption in the system may take place from a sudden power surge, software conflict, virus attack, and for some other reasons. Once an essential system element related to the update component goes missing or becomes faulty, Windows update error 0x8007012f may evolve. To resolve the corruption and restore the missing elements automatically, imitate the below steps –
- Press Win+S to invoke Windows search.
- Type in – cmd.exe.
- Press the – Ctrl+Shift+Enter.
- Click Yes when a UAC asks for consent.
- In the elevated Command Prompt, insert sfc /scannow and hit the – Enter.
- Let the scanning process hit 100%.
- Usually, the command line fixes the corruption that exists in your system. If the issue is critical, follow the instructions the utility suggests.
- Lastly, reboot the PC so that the changes can take place.
3] Bring back the default state of Windows update component
When the system fails to download or install an update because of error 0x8007012f, there might be a high chance that the update agent either has stopped working or there is some issue with the existing cache. The error may also rise up if Windows update service is unable to connect to the Microsoft servers. These problems will go away after resetting the component manually. For that –
- Open Command Prompt with admin privilege.
- Copy the following lines one after another paste into the command prompt and hit Enter after each –
net start wuauserv
net stop cryptSvc
net stop bits
net stop msiserver
- The above commands will immediately disable the Windows update service. The next process is to rename the SoftwareDistribution as well as Catroot2 folder. For that, execute the below commands one by one in that same panel –
ren C:WindowsSoftwareDistribution SoftwareDistribution.old
ren C:WindowsSystem32catroot2 Catroot2.old
- After doing so, re-enable the associated Windows update services that you stopped in the first instance. To do so, the following commands need to be run one after the other –
net start wauserv
net start cryptSvc
net start bits
net start msiserver
4] Remove pending.xml file
Windows update error 0x8007012f often appears even if the system shows that the downloaded and installation process is fully complete. Sometimes, you will also notice some pending Windows updates are refusing to install without any particular reason. Fortunately, you don’t need to do much to deal with those failed updates as these files can be deleted with a little tweak. Steps are as followed –
- Right-click on the Start button and choose – Run.
- Write cmd in the command box and then press – Ctrl+Shift+Enter.
- When a UAC prompts, click – Yes.
- Insert the below line and hit Enter –
del C:\windows\WinSxS\pending.xml
Or else,
- Open File Explorer by pressing Win+E hotkey.
- Navigate the following directory –
C:\Windows\WinSxS
- Look for Pending.xml file.
- Once found, right-click the same and choose Delete.
5] Clear out BITS queue
If BITS queue will have tasks in error state, the same will prevent the system from installing a new update successfully moreover, give rise to Windows Update Error 0x8007012f. To wipe out –
- Open elevated PowerShell or Command Prompt.
- Execute the following command –
bitsadmin.exe /reset /allusers
- After execution, restart the device and check if the Windows update error still exists.
6] Run Background Intelligent Transfer Service Troubleshooter to solve Windows Update Error 0x8007012f
Background Intelligent Transfer Service is one of the essential components as it helps the system and applications during foreground or background downloads and uploads between the Windows OS and a remote server. Anything wrong the same can give rise to Windows Update Error 0x8007012f. Before you run the dedicated troubleshooter to resolve the update issue, make sure the service is running. To check it –
- Press Win+R at one go.
- Click the Windows key and type – services.msc.
- Hit Enter to launch the Services console.
- From the newly appeared window, look for Background Intelligent Transfer Service.
- Double-click the same to invoke its Properties window.
- Set the Startup type to Automatic.
- Click Start button.
- Now, save the changes by clicking Apply followed by OK.
If error 0x8007012f turns up even when the BITS service is running, run the troubleshooter made for the same –
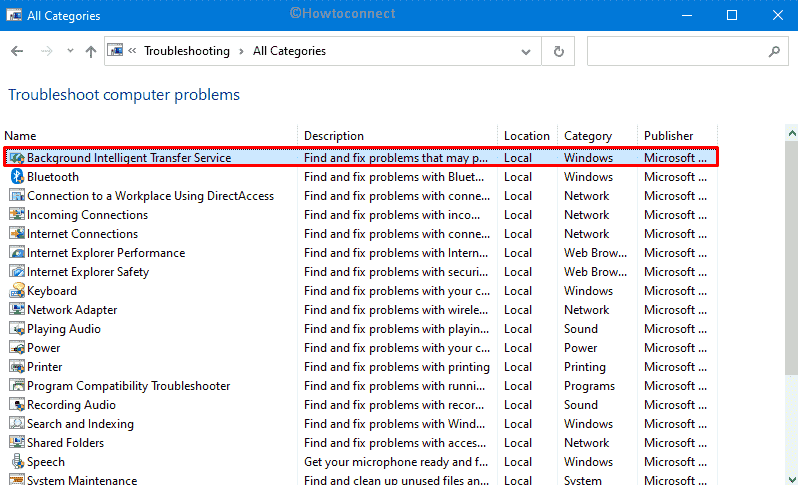
- Click the search icon from taskbar.
- Type in control and hit Enter.
- Set the control panel View by type to Large icons.
- Select the – Troubleshooting.
- Click the link View all present in the left overlay.
- Opt for – Background Intelligent Transfer Service.
- Click the – Advanced.
- Check the box set before – Apply repairs automatically.
- Hit the – Next.
- When the utility finishes detecting problems, click – View detailed information.
- Review the Detection details and then click the – Next.
- Close the wizard.
7] Disable antimalware program for the time being
Oftentimes, your security suite prevents the update from downloading and installing thinking that it has a virus or unwanted program in the download which is just a misinterpretation. To unblock the updates, put the antimalware program out of action temporarily.
Turn off Windows Defender Firewall
- Open Control panel.
- Set its view by to Small icons.
- From the available links, click the – Windows Defender Firewall.
- Select the link that reads – Turn Windows Defender Firewall on or off lying in the left column.
- Click the radio button set beside – Turn off Windows Defender Firewall (not recommended).
- Do the same for both – Private network settings and Public network settings.
- Finally, click the – OK.
- Reboot the PC.
Note – When the system powers up, check for error 0x8007012f. If it goes away, don’t forget to turn on the Windows Defender Firewall.
Disable third-party antimalware program
- Look for the antivirus program icon present in the Notification area. If you don’t see anything there, click the up arrow icon to get hidden icons.
- Right-click on the icon and choose – Disable. As the option may vary for different programs, therefore, you might need to select Stop or Shut down or anything similar.
- The app may also ask to choose a time slot after which it will be enabled automatically. Decide what you prefer.
8] Clean Install Windows to get rid of Windows Update Error 0x8007012f
If nothing from the above helped to rectify Windows Update Error 0x8007012f, try to install the build manually. This way, you will get a fresh version of Windows.
- Open a web browser you prefer.
- Navigate the official page of Microsoft Website.
- Click Download tool now.
- Visit the directory where the system stores downloaded items.
- Double-click the setup file you just got.
- If a UAC turns up, click the – Yes.
- Once Windows Setup wizard becomes ready, click the – Accept.
- Click the radion button present before – Create installation media (USB flash drive, DVD, or ISO file) for another PC and then hit – Next.
- Check if the Language, Edition, and Architecture for your computer selected by the system are correct. After making sure everything is alright, click the – “Next”.
- Select the radio button of ISO file followed by hitting Next.
- Pick a directory where you want to save the copy and then click the – Save.
- Once the downloading process reaches 100%, click the – Finish.
- Now, install the recent version of Windows using the downloaded file.
Methods list
1] Make use of Windows Update Troubleshooter
2] Fix existing system corruption
3] Bring back the default state of Windows update component
4] Remove pending.xml file
5] Clear out BITS queue
6] Run Background Intelligent Transfer Service Troubleshooter
7] Disable antimalware program for the time being
8] Clean Install Windows
That’s all!!
Repair any Windows problems such as Blue/Black Screen, DLL, Exe, application, Regisrty error and quickly recover system from issues using Reimage.
Постоянное обновление вашего компьютера помогает защитить его от хакеров, которые используют уязвимости системы для заражения вашего устройства вредоносными программами. Это очень важно сейчас, учитывая тревожный всплеск числа атак вредоносных программ из-за того, что все больше людей работают из дома.
Установка обновлений должна быть намного проще в Windows 10/11 через Центр обновления Windows, но в большинстве случаев это не так. Существует широкий спектр ошибок Центра обновления Windows, с которыми сталкиваются пользователи, причем большинство из них являются распространенными ошибками, с которыми легче справиться.
Но сталкивались ли вы с кодом ошибки Windows 10/11 0x8007012F? Эта ошибка является единственной для книг, потому что многие пользователи Windows не сталкиваются с ней при установке обновлений. Вы, вероятно, искали ответы в Интернете, но нашли скудную информацию о разрешении кода ошибки 0x8007012F. Итак, если вы ищете способы справиться с кодом ошибки Windows 10/11 0x8007012F, вы попали в нужное место.
Код ошибки 0x8007012F — это проблема Центра обновления Windows, что означает, что ошибка возникает всякий раз, когда вы пытаетесь установить обновления на свой компьютер. Оно может появиться при установке обновлений приложений, системных обновлений или обновлений функций.
Вот некоторые из сообщений об ошибках, с которыми вы можете столкнуться:
Были некоторые проблемы с установкой обновлений, но мы попробуем позже. Если вы продолжаете видеть это и хотите найти информацию в Интернете или обратиться в службу поддержки, это может помочь: (0x8007012F)
Операция не удалась
Файл не может быть открыт, так как он находится в процессе удаления.
Код ошибки: 0x8007012F
Сообщения об ошибках на самом деле не очень полезны, особенно первое, потому что оно не предоставляет информации о том, что вызвало ошибку. Если вы получите второе сообщение, вы, вероятно, еще больше запутаетесь, потому что в нем говорится, что файл удаляется. Зачем его удалять при установке обновлений?
Теперь это вызвало много путаницы среди пользователей Windows, и Microsoft не предложила никакого решения этой ошибки. Это было в первые дни Windows 10/11, и нет четких решений этой проблемы.
Что еще больше сбивает с толку в этой ошибке, так это то, что обычно это происходит, когда обновления были загружены полностью, а процесс установки достиг 100%. Затем появляется сообщение об ошибке, в котором говорится, что загрузка не удалась, хотя в диалоговом окне говорится, что обновления уже устанавливаются. Если это не раздражает, то что?
Причины кода ошибки Windows 10/11 0x8007012F
Когда вы устанавливаете обновления на свой компьютер, играет роль множество факторов. Когда что-то идет не так с любым из этих факторов, это приводит к ошибке. Если у вас плохое интернет-соединение, файлы не будут загружены полностью или могут быть повреждены. Еще одним элементом, который может повлиять на целостность ваших установочных файлов, является наличие вредоносных программ.
Сверхстрогий брандмауэр или программное обеспечение безопасности также могут препятствовать загрузке обновлений на ваше устройство. Эти функции безопасности управляют входящим трафиком на ваш компьютер и фильтруют входящие данные. Если они обеспечивают чрезмерную защиту, вы можете столкнуться с проблемами при загрузке обновлений.
Но основная причина, по которой возникает эта ошибка, связана со старыми файлами установщика, присутствующими на вашем компьютере. Возможно, в какой-то момент обновление было прервано, и вы скачали другую копию файлов установщика, не удалив полностью старые файлы. В этом случае Центр обновления Windows распознает не новые файлы, а исходную папку загрузки. Следовательно, вы будете продолжать получать эту ошибку, если сначала не удалите старые загрузки.
Как исправить код ошибки 0x8007012F в Windows 10/11
Поиск разрешения рабочего кода ошибки 0x8007012F может быть проблематичным. Вам нужно попробовать несколько решений, прежде чем найти правильное. Но прежде чем вы начнете работать с нашим списком ниже, вы должны сначала дать эти общие исправления:
- Переключитесь на другое интернет-соединение. Подключить по кабелю, если есть возможность. Если нет, попробуйте переместить свой компьютер или ноутбук в ту же комнату, что и ваш маршрутизатор/модем.
- Сканируйте на наличие вредоносных программ и избавляйтесь от ненужных файлов, используя Ремонт ПК Outbyte. Это не только удалит эти неприятные элементы с вашего компьютера, но и освободит место для загрузки обновлений.
- Перезагрузите компьютер. Запуск новой системы помогает устранить временные сбои, которые могут помешать процессу обновления.
Эти шаги должны помочь подготовить ваш компьютер к процессу устранения неполадок, если он не избавит вас от ошибки. Если они не работают, вы можете перейти к шагам ниже.
Решение № 1. Запустите инструмент SFC.
Средство проверки системных файлов — это встроенная утилита, предназначенная для сканирования, исправления или восстановления поврежденных системных файлов в Windows 10/11. Поэтому, если код ошибки Windows 10/11 0x8007012F вызван поврежденными установочными файлами или службой Центра обновления Windows, запуск этого инструмента должен это исправить. Чтобы запустить этот инструмент, откройте командную строку с правами администратора и введите команду: sfc /scannow.
Если инструмент SFC не работает, вам необходимо выполнить более глубокое сканирование с помощью системы обслуживания образов развертывания и управления ими или инструмента DISM. Он работает так же, как SFC, только область сканирования больше и глубже. Команды, которые вы можете использовать для DISM, включают:
- DISM/Онлайн/Cleanup-Image/CheckHealth
- DISM /Online /Cleanup-Image /ScanHealth
- DISM/Онлайн/Cleanup-Image/RestoreHealth
Просто дайте инструменту работать, потому что он автоматически попытается восстановить любые поврежденные файлы, обнаруженные во время сканирования.
Решение № 2. Сбросьте службу Центра обновления Windows.
Поскольку эта ошибка в основном вызвана старыми загружаемыми файлами, вам необходимо сбросить компоненты Центра обновления Windows и переименовать папку загрузки во что-то другое, чтобы была создана новая папка Центра обновления Windows. Переименовав старую папку, ваш компьютер больше не будет ее распознавать и вместо этого будет ссылаться на новую папку.
Сделать это:
- Откройте командную строку и запустите ее от имени администратора.
- В окне консоли введите следующие команды, нажимая Enter после каждой строки:
- чистые стоповые биты
- чистая остановка
- Затем введите следующую команду, чтобы удалить файлы qmgr*.dat:
Удалить «%ALLUSERSPROFILE%\Application
Данные\Майкрософт\Сеть\Загрузчик\qmgr*.dat” - Нажмите Enter, чтобы выполнить.
- Переименуйте папку распространения программного обеспечения, используя следующие команды:
- Рен %systemroot%\SoftwareDistribution\DataStore *.bak
- Ren %systemroot%\SoftwareDistribution\Download *.bak
- Рен %systemroot%\system32\catroot2 *.bak
- Затем сбросьте службу BITS, а также службу Центра обновления Windows на их дескриптор безопасности по умолчанию, используя приведенные ниже команды:
- sc.exe sdset биты
D:(A;;CCLCSWRPWPDTLOCRRC;;;SY)(A;;CCDCLCSWRPWPDTLOCRSDRCWDWO;;;BA)(A;;CCLCSWLOCRRC;;;AU)(A;;CCLCSWRPWPDTLOCRRC;;;PU); - sc.exe sdset вуаусерв
D:(A;;CCLCSWRPWPDTLOCRRC;;;SY)(A;;CCDCLCSWRPWPDTLOCRSDRCWDWO;;;BA)(A;;CCLCSWLOCRRC;;;AU)(A;;CCLCSWRPWPDTLOCRRC;;;PU);
- sc.exe sdset биты
- Затем введите следующую команду, чтобы открыть папку System 32: cd /d %windir%\system32
- Вам необходимо перерегистрировать компоненты Центра обновления Windows, используя следующие команды:
- regsvr32.exe atl.dll
- regsvr32.exe urlmon.dll
- regsvr32.exe mshtml.dll
- regsvr32.exe
- regsvr32.exe
- regsvr32.exe jscript.dll
- regsvr32.exe vbscript.dll
- regsvr32.exe
- regsvr32.exe msxml.dll
- regsvr32.exe msxml3.dll
- regsvr32.exe msxml6.dll
- regsvr32.exe
- regsvr32.exe
- regsvr32.exe
- regsvr32.exe dssenh.dll
- regsvr32.exe rsaenh.dll
- regsvr32.exe
- regsvr32.exe
- regsvr32.exe slbcsp.dll
- regsvr32.exe cryptdlg.dll
- regsvr32.exe
- regsvr32.exe ole32.dll
- regsvr32.exe shell32.dll
- regsvr32.exe initpki.dll
- regsvr32.exe
- regsvr32.exe
- regsvr32.exe
- regsvr32.exe
- regsvr32.exe
- regsvr32.exe wups2.dll
- regsvr32.exe
- regsvr32.exe qmgr.dll
- regsvr32.exe qmgrprxy.dll
- regsvr32.exe
- regsvr32.exe
- regsvr32.exe
- Сбросьте Winsock, используя эту строку: netsh сброс винсока
- Также установите параметры прокси: proxycfg.exe -d
- Перезапустите Центр обновления Windows с помощью этих команд:
- чистые стартовые биты
- чистый старт
Решение № 3. Запустите средство устранения неполадок Центра обновления Windows.
Если вы все еще не можете избавиться от ошибки после сброса всего, вы можете запустить встроенное средство устранения неполадок, перейдя в «Настройки устранения неполадок». Прокрутите правую панель вниз и нажмите «Центр обновления Windows» > «Запустить средство устранения неполадок». Этот инструмент просканирует ваш компьютер на наличие проблем, с которыми вы сталкиваетесь при запуске Центра обновления Windows, и, надеюсь, исправит их для вас.
Если все остальное терпит неудачу
Последний вариант — выполнить чистую установку Windows 10/11, если все описанные выше шаги не помогли. Это может означать больше работы для вас, но, по крайней мере, это устранит любое обновление Windows, которое у вас может быть. Это действительно необходимо, если вы сталкиваетесь с кодом ошибки Windows 10/11 0x8007012F для каждого обновления, которое хотите установить. Но если проблема не слишком серьезна, приведенные выше решения должны каким-то образом помочь.