Синий экран с кодом остановки «Kernel Mode Heap Corruption» в Windows 10 может возникнуть при запуске игр и приложений, которые начинают интенсивно использовать ресурсы процессора. Ошибка очень распространена и не указывает на серьезные проблемы с операционной системой. Но в последнее время возникают случаи, когда синий экран BSOD возникает снова и снова при выполнении одного и того же действия, которое первоначально вызвало ошибку.

Причины ошибки
Синий экран Kernel_Mode_Heap_Corruption может возникнуть по ряду причин.
Устаревшие драйвера видеокарты. Часто причиной этой ошибки являются поврежденные или устаревшие графические драйвера. Поэтому, когда запускаем игру или «тяжелое» приложение сталкивается с синим экраном.
Поврежденные системные файлы. Для решения проблемы можно запустить утилиту проверки системных файлов sfc /scannow или Dism /Online /Cleanup-Image /RestoreHealth из командной строки, запущенной от имени администратора.
Несовместимое программное обеспечение. После установки несовместимого приложения может возникнуть конфликт с ОС. Если приложение вносит изменения в системные параметры, Windows может аварийно прекратить работу и выбросить синий экран.
Аппаратные ошибки. При возникновении ошибок в работе оперативной памяти или в случае ее неисправности, Windows не сможет правильно взаимодействовать с устройством и аварийно прерывает работу.
Перейдем к решениям, но для начала войдите в систему с учетной записью администратора и проверьте подключение к интернету.
Удаление несовместимых приложений
Очень часто синий экран с кодом Kernel_Mode_Heap_Corruption возникает по причине программного конфликта. Некоторые приложения могут внести изменения в основные параметры, что приведет к нестабильной работе Windows. Поэтому сначала нужно их определить. Это могут быть программы, установленные перед появлением ошибки или при запуске которых, отображается синий экран.
Откройте окно «Выполнить» нажатием на клавиши Windows + R, наберите команду appwiz.cpl и подтвердите ее выполнение на Enter.
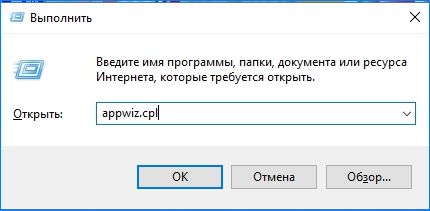
Отобразится список всех программ, установленных на компьютере. Если уверены, что ошибка появилась после установки последней программы, отсортируйте список по дате, кликните на ней правой кнопкой мыши и выберите «Удалить».

Когда синий экран возникает при запуске определенной программы, также найдите ее в списке и удалить.
Проверка драйверов на наличие ошибок
Драйвера являются основными компонентами, которые взаимодействуют между операционной системой и оборудованием. Если они повреждены, то будете сталкиваться с многочисленными ошибками, в частности, с Kernel_Mode_Heap_Corruption. Поэтому попробуем их обновить до последней сборки.
Прежде чем перейти к решению, сделайте точку восстановления на случай возникновения ошибок в работе утилиты.
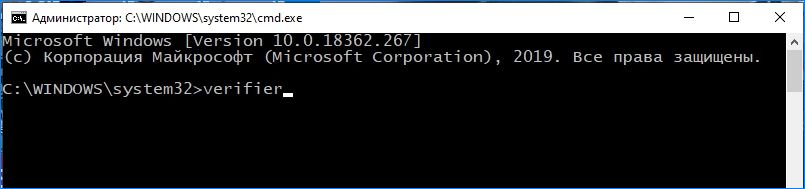
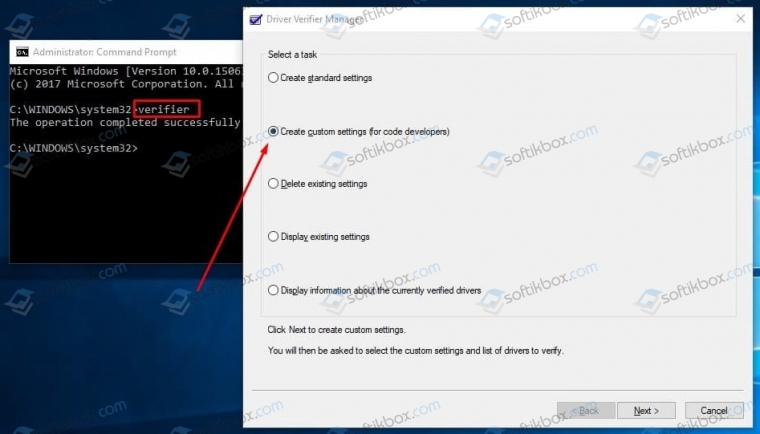
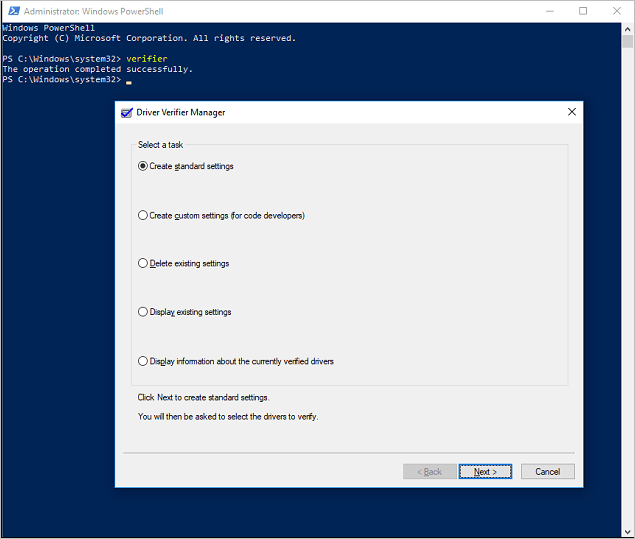
Откройте строку поиска клавишами Windows + S и наберите «командная строка». Кликните на найденный результат правой кнопкой мыши и выберите «Запуск от имени администратора».

В окне командной строки наберите команду:
verifier
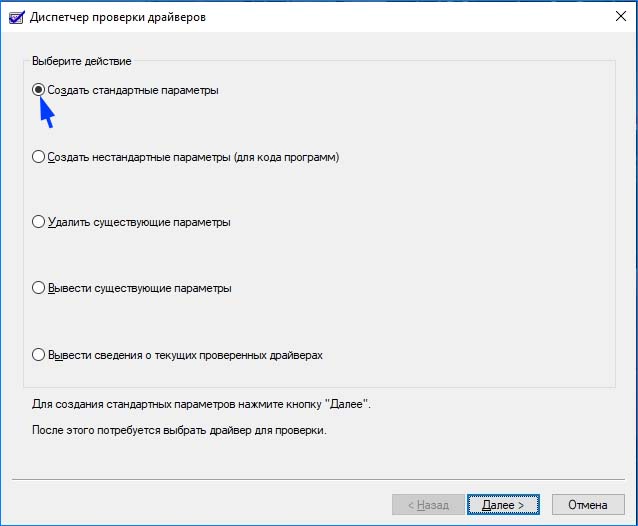
Выберите «Создать стандартные настройки»и нажмите Далее.
Затем выберите «Автоматически выбирать все драйверы, установленные на этом компьютере» и нажмите «Готово». Подтвердите перезагрузку компьютера.
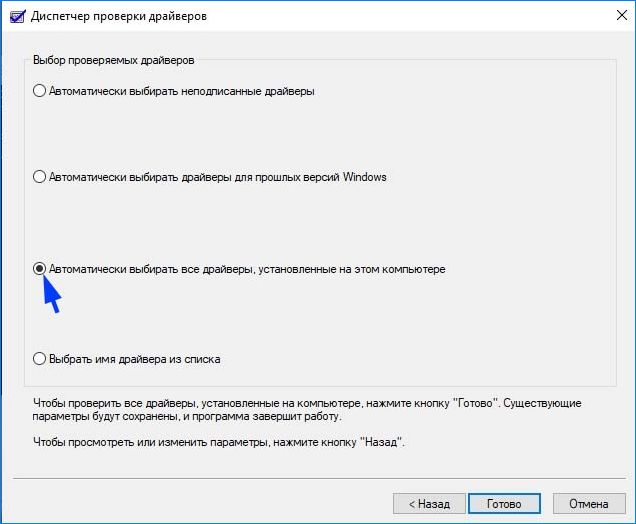
После перезагрузки сразу начнется проверка. При обнаружении неисправных их нужно обновить, выполнив следующие шаги.
Обновление драйверов
Если какие-то драйвера оказались неисправными в ходе проверки предыдущим решением, обновите их вручную до последней версии.
Первое, что нужно сделать, загрузить требуемые драйвера с официального сайта в указанную папку на диске и запустить их установку.
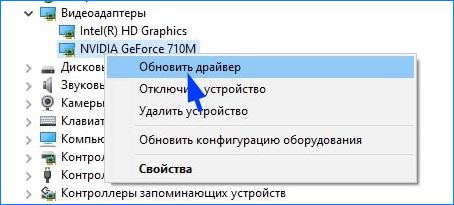
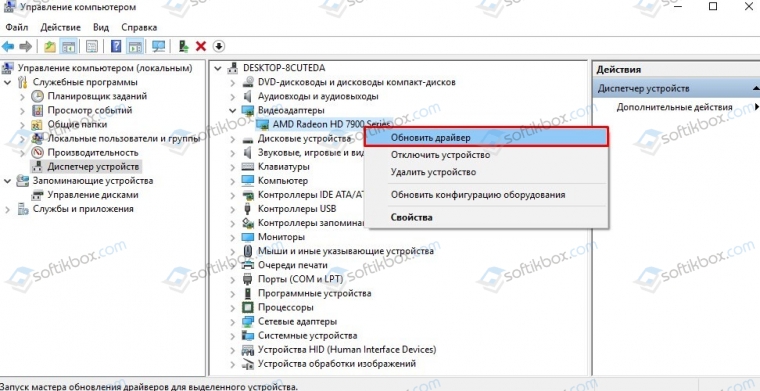
Откройте окно «Выполнить» (Win + R), впишите команду devmgmt.msc для входа в «Диспетчер устройств». В случае повреждения драйверов видеокарты, разверните вкладку «Видеоадаптеры», кликните правой кнопкой мыши на ней и выберите «Обновить».
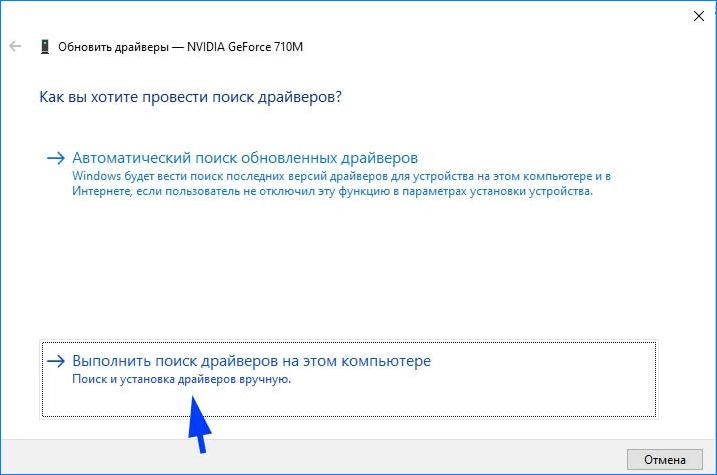
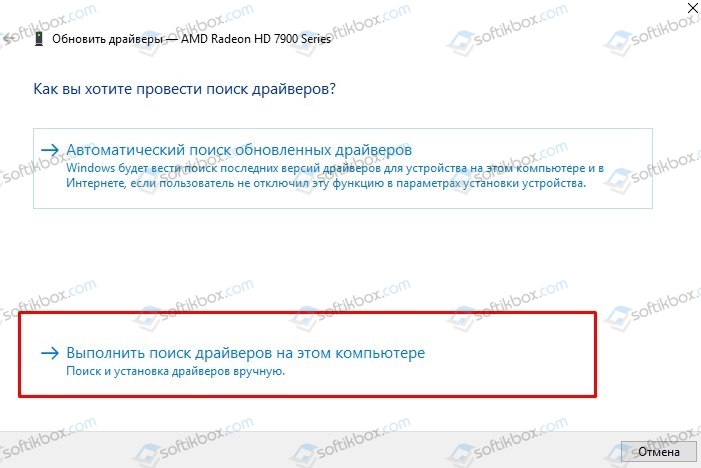
Выберите второй вариант обновления вручную.
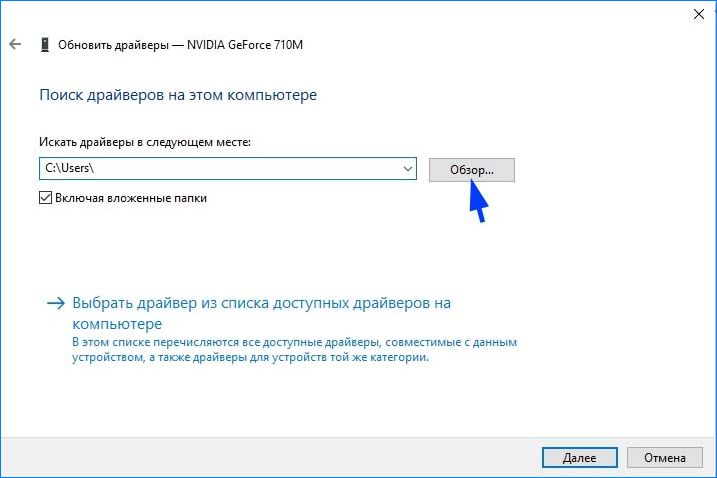
Затем нажмите на кнопку «Обзор», перейдите в папку с загруженными драйверами. Следуйте инструкциям до завершения установки.
Обновите все устройства, драйверы которых были повреждены и перезагрузите компьютер. Если продолжаете сталкиваться с ошибкой Kernel_Mode_Heap_Corruption перейдите к следующему способу.
Проверка оперативной памяти
Ошибка также может возникнуть из-за неполадок планок памяти. Перед запуском теста ОЗУ, нужно извлечь планки из слотов, и аккуратно протереть контакты ластиком. Затем вернуть их обратно, проверить плотность контакта и фиксацию защелок. Проверьте также размещение планок (например, нужно использовать 1 и 3 слот, если на материнской плате есть 2 модуля оперативной памяти).
Для проверки памяти загрузите программу MemTest86+ с официального сайта. Установите флешку и запустите установку программы. Имейте в виду, что при создании загрузочного диска для memtest все содержимое флешки будет удалено.
Переключите в БИОС приоритет на загрузку системы с USB-накопителя. После загрузки запустите проверку ОЗУ. Модули оперативной памяти будут протестированы в несколько циклов.
Запуск восстановления системы
Если не удалось устранить ошибку Kernel_Mode_Heap_Corruption перечисленными способами, попробуйте вернуть Windows в предыдущее состояние до возникновения синего экрана.
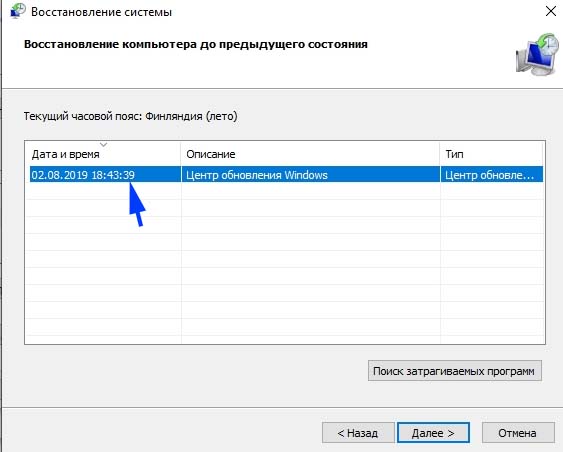
Нажмите Windows + S для вызова строки системного поиска, введите «восстановление» и кликните на найденный результат.

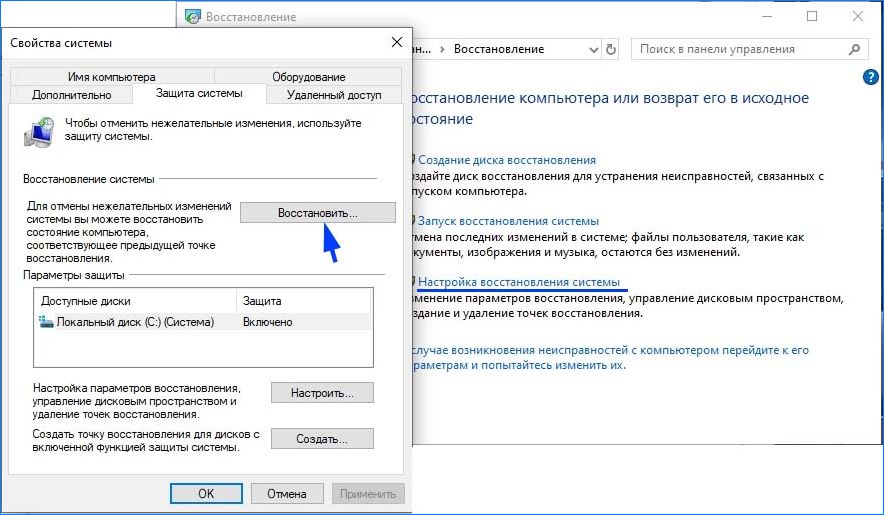
Перейдите в настройки восстановления, затем на вкладке «Защита системы» нажмите кнопку «Восстановить».
На первом экране нажмите на кнопку «Далее». На следующем отметьте флажком «Показать другие точки». Выберите точку восстановления, которая была создана до появления сбоя системы Kernel_Mode_Heap_Corruption.
На экране подтверждения нажмите кнопку «Готово».
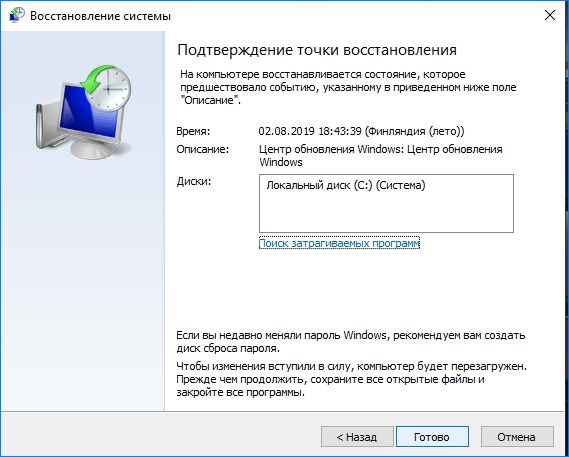
После начнется процесс восстановления. При успешном завершении проверьте, возникает ли ошибка.
17.03.2020
Просмотров: 22910
При загрузке операционной системы, при запуске программы или игры, при работе с настройками самой Windows 10 пользователи могут столкнуться с синим экраном смерти Kernel Mode Heap Corruption, который может возникать по различным причинам. Среди них стоит выделить: повреждение драйверов видеокарты, неполадки с ОЗУ и процессором, конфликт программ и игр с файлами операционной системы, повреждение системных файлов. Поскольку единой причины, которая бы могла вызвать ошибку Kernel Mode Heap Corruption в Windows 10 нет, то решение неполадки усложняется.
Читайте также: Как решить синий экран смерти 0x00000162: KERNEL AUTO BOOST INVALID LOCK RELEASE?
Исправление синего экрана Kernel Mode Heap Corruption в Windows 10
В первую очередь, если на вашем ПК с Windows 10 появился синий экран смерти с кодом Kernel Mode Heap Corruption, стоит провести проверку системы на вирусы. Для этого нужно использовать антивирус с актуальными вирусными базами или бесплатную лечащую утилиту Dr.Web Curelt, которая просканирует Windows 10 на вредоносные объекты.

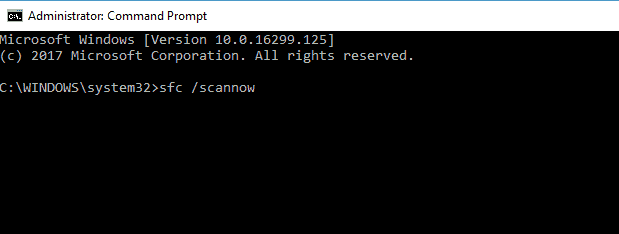
Если по результатам проверки вирусов не было обнаружено, стоит проверить операционную систему на целостность файлов. Для этого в командной строке с правами Администратора нужно ввести такие команды (по очереди):
- sfc /scannow
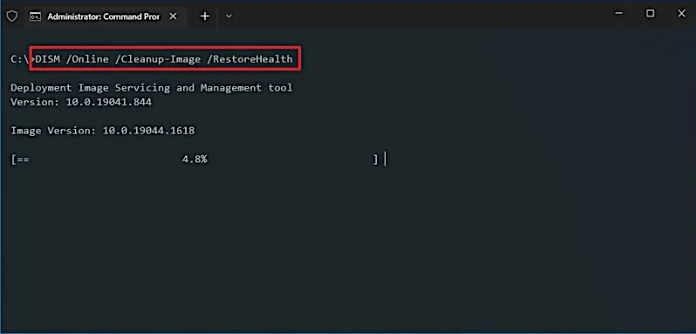
- DISM /ONLINE /CLEANUP-IMAGE /RESTOREHEALTH

Если на ПК будут повреждены системные файлы или файлы загрузчика, то данные утилиты их восстановят. Если же проблем не было обнаружено, то следующим шагом должна быть проверка драйверов видеокарты. Для этого нужно открыть Диспетчер устройств (Win+R, devmgmt.msc) и развернуть ветку «Видеоадаптеры». Нажимаем на значке названия видеокарты правой кнопкой мыши и выбираем «Обновить драйвера».
Далее выбираем «Выполнить поиск драйверов на этом компьютере». Указываем путь к ранее загруженному драйверу.
Позволяем системе обновиться.
ВАЖНО! Драйвера для видеокарты стоит загружать только с официальной страницы производителя оборудования в соответствии с версией и разрядностью Windows 10.
Если после обновления драйверов и перезагрузки операционной системы ошибка KERNEL MODE HEAP CORRUPTION не исчезла, то проблема может крыться в другом драйвере. Чтобы определить, какое ПО вызвало ошибку, стоит проанализировать установленные драйвера. Для этого пригодиться инструмент Verifier. Для его запуска нужно открыть командную строку с правами Администратора и ввести verifier. Далее нужно поставить отметку «Создать стандартные параметры».
Далее ставим отметку «Автоматически выбрать все драйвера, установленные на этом компьютере». После того, как компьютер перезагрузиться, утилита проанализирует установленные драйвера. Если какое-то ПО сбоит, то при загрузке ПК появится об этом уведомление. Далее, по ситуации, нужно переустановить драйвер или откатить его до более раннего состояния.
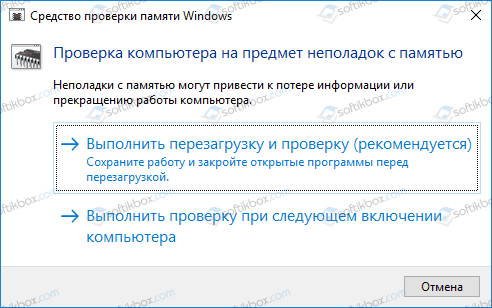
Также на зарубежных форумах пользователи указывали, что ошибка Kernel Mode Heap Corruption в Windows 10 может появиться из-за проблем с оперативной памятью. Для проверки ОЗУ нужно нажать «Win+R» и вводим «mdsched.exe». Появится небольшое окно. Нужно выбирать «Выполнить проверку и перезагрузку (рекомендуется)».
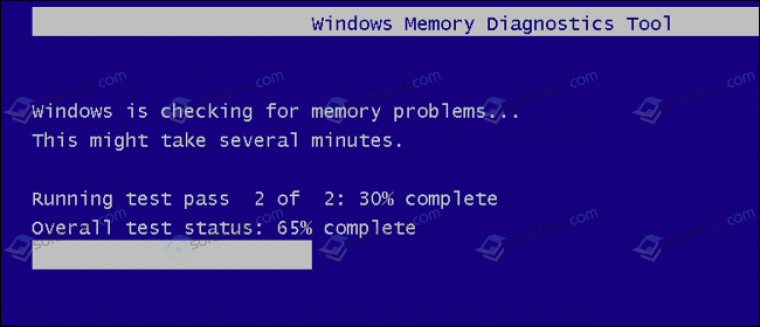
ПК перезагрузиться и на синем экране вы увидите процесс проверки ОЗУ. Ожидаем его завершения. Смотрим результаты.
Для более глубокой проверки можно использовать программу MemTest86. Её нужно записать на флешку или диск и запустить из-под Windows, то есть выставить в BIOSе приоритетность загрузки с носителя.
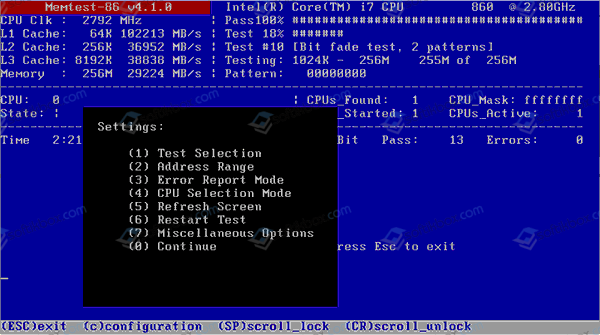
Система перезагрузиться. Нужно запустить проверку ОЗУ. При этом необходимо, чтобы утилита выполнила несколько проходов программой. Проверка может занять несколько часов.
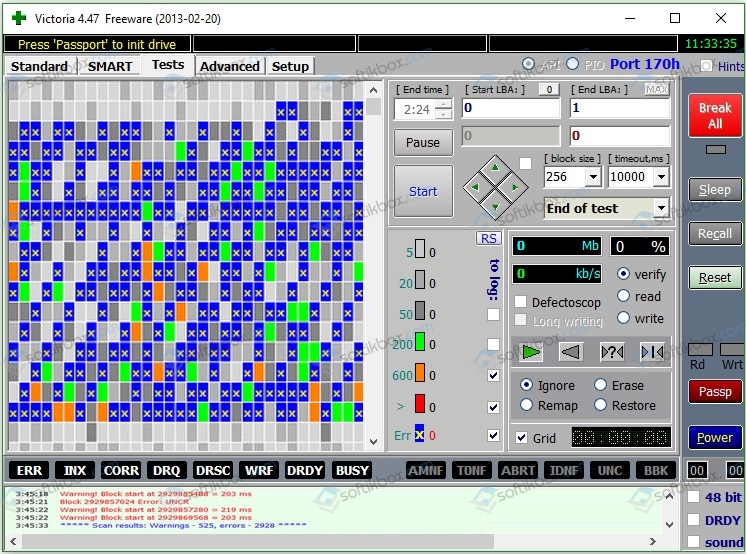
После проверки ОЗУ нужно также проверить температуру процессора на перегрев и жесткий диск на наличие или отсутствие битых секторов. Для первой цели подойдет программа AIDA64, а для второй – Victoria HDD.
В случае, если ошибок с ОЗУ, жестким диском, процессором не обнаружено, стоит обратить внимание на установленный софт. Нужно удалить последнюю установленную или обновленную программу и перезагрузить ПК. Если ошибка исчезла, то софт можно переустановить, только внести в исключение антивируса и инсталлировать с правами Администратора.
Если же исправить ошибку Kernel Mode Heap Corruption вышеуказанными способами не удалось, стоит откатить систему до более раннего состояния или воспользоваться установочным диском.
If you are receiving a KERNEL_MODE_HEAP_CORRUPTION Blue Screen on Windows 11/10, then this post will help you resolve it. One of the primary reasons for this error is a conflict between Windows and an outdated driver or a corrupt Windows driver. Other known reasons include memory leaks or hardware faults. However, there is a rare chance where a software conflict can do that unless it has to do something with the drivers.
The KERNEL MODE HEAP CORRUPTION bug check has a value of 0x0000013A. This indicates that the kernel mode heap manager has detected corruption in a heap.

KERNEL_MODE_HEAP_CORRUPTION BSOD
Follow these methods to resolve the BOSD related to Kernel Mode Heap Corruption.
- Run ChkDsk
- Use Device Verifier Manager
- Update or Rollback Driver
- Fix Corrupt System Files
- Run Memory Diagnostics
- Run Hardware Troubleshooter
You will need a clear understanding of what the methods do here and admin permission.
Moreover, if you can log in normally, good; else you will have to boot into Safe Mode, enter Advanced Startup options screen, or use the Installation Media to boot to be able to carry out these instructions.
1] Run ChkDsk
Run ChkDsk using the following command:
chkdsk c: /r
2] Device Verifier Manager

One of the best methods to check if the driver is an issue is to run the Driver Verifier Manager. The tool will help troubleshoot, identify & resolve common device driver problems.
Open the Run prompt ( Win + R), type verifier, and then press the Enter key. Once the Device Verifier is open, select Create Standard settings and then select Automatically select unsigned drivers. This will narrow down the issue if it’s happening because of unsigned drivers. Once you detect it, uninstall the driver, and then reinstall the correct driver.
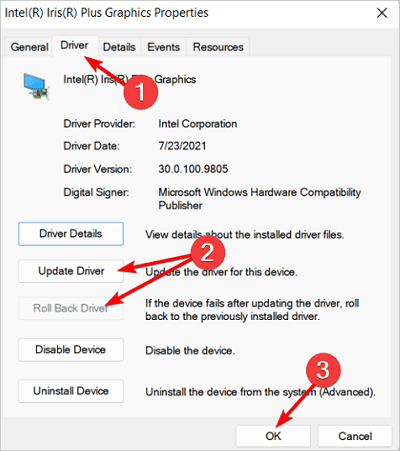
3] Update or Rollback Driver
Depending on the situation, you can either update or roll back the driver and check if the BSOD issue is resolved.
If the BSOD occurred because you have recently updated the driver, you could roll back using the Device Manager. Use Win + X, followed by M to open the device manager. Next, locate the hardware for which you have updated the driver.
Once you find it, double-click to open the properties window, and then select the Drivers tab. If you recently updated the driver, the Rollback Driver button will be enabled. Use that.

If the BSOD occurred after a Windows Update, then it’s possible that you need to install the latest version of the driver, which is compatible with the version of Windows.
Open the Device Manager, locate the device, right-click, and then choose to update the driver. If this doesn’t work, go to the OEM website, and check for an updated driver.
4] Fix Corrupt System Files
System File Checker and DISM are two tools that can help fix corrupt system files that could be the cause of the BOSD screen. Follow our exhaustive guide on how to use them.
SFC command:
sfc /scannow
DISM Command:
Dism /Online /Cleanup-Image /RestoreHealth
First, run the SFC command; if that doesn’t work out, use the DISM command. Make sure to run them on an elevated command prompt.
5] Run Memory Diagnostics
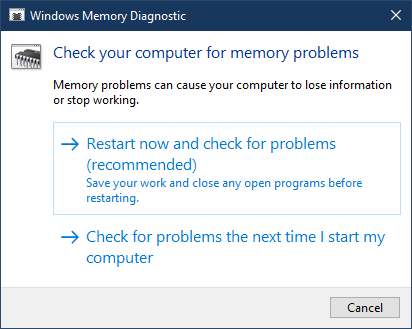
Check your memory. Use the Windows Memory Diagnostic Tool. Go to Control Panel and type “memory” in the Search box. Under Administrative Tools, click Diagnose Your Computer’s Memory Problems. In the Windows Memory Diagnostics Tool, shown here, select one of the options.
6] Run Hardware Troubleshooter

Microsoft offers a built-in hardware troubleshooter that you can invoke using the following command on PowerShell or an elevated Command Prompt.
msdt.exe -id DeviceDiagnostic
Once launched, click on the Advanced link, and uncheck the—Apply repairs automatically—option. You can do this if you want to understand the problem before it gets fixed. Click on the Next button.
The wizard will then run its diagnostics. It may prompt to enable to check for an updated driver. Once done, if there is an issue with the driver, it will figure out and offer a solution.
I hope these solutions help you out with the BSOD related to Kernel Mode Heap Corruption on Windows 11/10. The issue is related to drivers, but it is always good to check for any recently installed software that can also cause the problem.
More Tips: Fix Windows Stop Errors or Blue Screen of Death.
Have you been a Windows user for years? If so, you must have faced BSOD, aka Bluescreen of Death. Because of the critical characteristics of BSOD, kernel mode heap corruption occurs. Moreover, it happens when there is a hardware incompatibility or software conflict.
This BSOD is a general occurrence in the Windows PC, resulting in system crashes. So, don’t be afraid if you see this blue-screen error! In this guide, we will discuss the reasons for this error to happen and 8 diligent ways to fix kernel mode heap corruption on startup.
| Workable Solutions | Step-by-step Troubleshooting |
|---|---|
| 1. Check Event Viewer | Start Windows or an installation DVD twice in a row without success to boot into WinRE…Full steps |
| 2. Check Graphics Drivers | Choose «Device Manager» from the list after right-clicking the start icon…Full steps |
| 3. Update Device Drivers | Press the Windows key and the letter X on your keyboard to access…Full steps |
| 4. Repair Corrupted System Files | To launch the Run dialogue box on your keyboard, simultaneously hit the Windows logo key…Full steps |
| Other Workable Solutions | Check RAM > Run Driver Verifier Manager > Uninstall Incompatible Software…Full steps |
Why Does Kernel Mode Heap Corruption Happen in Windows 11/10?
First, one of the CPU working modes is called a kernel mode (the other is simply the user mode). The ability to control the hardware is unrestricted by default for processes executing kernel mode. However, the following are some of the most frequent reasons.

Corrupted system files
A damaged hard drive’s directory may cause files to seem to flee, which may cause more data loss or degradation.
Calling a component that is not in the index range
This may occur if your computer tries to read an element that is larger than the collection of indexed items.
Defective or deteriorated hardware components
Over time, especially when they are misused, computer parts are prone to degrade. The software can be used to verify your gear, but you can also closely examine its physical condition.
Memory problems in general or memory leaks
This is the outcome of a computer’s RAM being fragmented. It occurs when applications with inadequate programming or design fail to release memory chunks when they are no longer required.
8 Proven Ways to Fix Kernel Mode Heap Corruption BSOD Error
Here are 8 absolute methods that many Windows users have found to be helpful. Therefore, why not attempt the following techniques and resolve the kernel mode heap corruption installing Windows 10 issue yourself before calling a computer technician? Work your way down the list until you discover the one that suits you.
Fix 1. Check Event Viewer to Fix Kernel Mode Heap Corruption
The PC must be able to boot in Safe Mode in Windows 10 to use this procedure. Whenever you face any issue on Windows, checking Event Viewer is the first thing to do! Please follow the instructions below first to enter Safe Mode if your computer can’t launch Windows normally.
- Start Windows or an installation DVD twice in a row without success to boot into WinRE.
- After entering WinRE, go to Troubleshoot > Advanced options.
- To boot into Safe Mode, click Startup Settings and hit the F5 key to select the Enable Safe Mode with networking option.
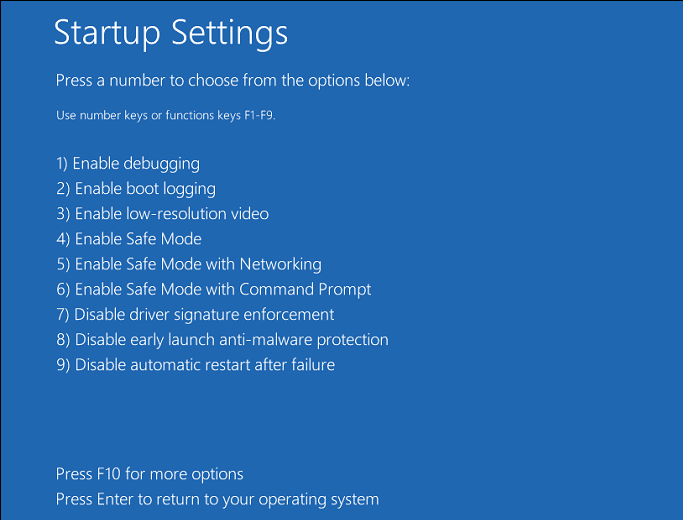
Please follow the instructions below to verify the Event Viewer after entering Windows 10 Safe Mode.
Step 1. To open the Run box, press the «Windows + R» with complete control, and then type «eventvwr.» Enter to launch Event Viewer next.
Step 2. Open «Windows Logs > System» and look for the Kernel Mode Heap Corruption BSOD report.
Step 3. As soon as you locate the log, pay close attention to the description because it can reveal the issue’s root cause. To further aid in solving this issue, you should also take note of the Source and Event ID information.
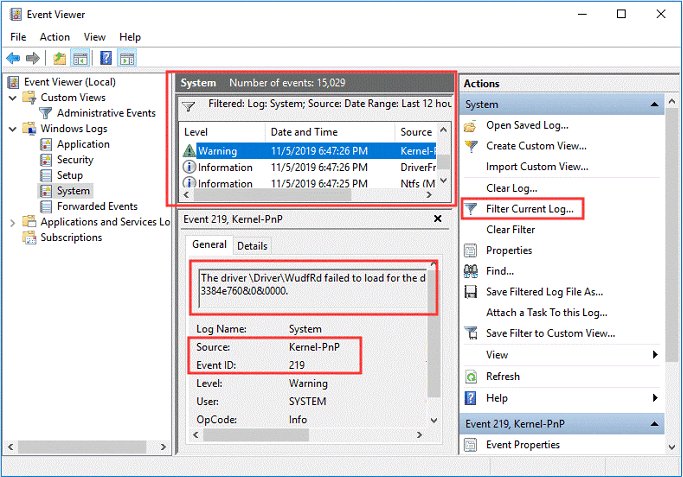
You can properly resolve the issue after reviewing the Windows log.
Fix 2. Check Graphics Drivers to Fix Kernel Mode Heap Corruption
Outdated graphics drivers are a cause that begets Kernel Mode Heap Corruption. So, the steps are given below in order to fix this issue.
Step 1. Choose «Device Manager» from the list after right-clicking the start icon from the Taskbar.
Step 2. Right-clicking twice on the graphics card driver in the Display adapters section will bring up the Properties box.
Step 3. Click «Update Driver» or «Roll Back Driver» after visiting the Driver tab.
Step 4. Click OK right after the process is over.
Step 5. In case you opt for the «Update Driver» option, hit the «Search automatically for drivers» option after that.
Step 6. Restart the computer and see whether the Kernel Mode Heap Corruption blue screen problem has been resolved.
Fix 3. Update Device Drivers to Fix the BSOD Error
An out-of-date or damaged device driver may be the source of the Kernel Mode Heap Corruption problem. You should check if all of your devices drivers-particularly the drivers for your graphics card are updated. If an out-of-date device driver is causing a BSOD error, do the following steps.
Step 1. Press the Windows key and the letter X on your keyboard to access the Power User menu.
Step 2. Toggle to Device Manager.
Step 3. Increase the issue-causing gadget.
Step 4. Update Driver Software can be found by right-clicking the device.
Step 5. Select automatically check for driver software updates.
Device driver updates through Windows Update take some time to show. As a result, you might need to check the support website of your device’s manufacturer to download and install current drivers if Device Manager was unable to detect any new updates.
Fix 4. Repair Corrupted System Files to Fix Kernel Mode Heap Corruption
System file corruption can occasionally be the reason for this blue screen of death. You should do the following thing to fix them. A built-in program called System File Checker can be used to check for corrupt or damaged system files and, if necessary, restore them. However, this program can only analyze significant system files; it cannot repair a corrupted DLL or an entry in the Windows Registry, for example.
Step 1. Scan with SFC
Windows system file checker utility locates and fixes damaged system files.
- To launch the Run dialogue box on your keyboard, simultaneously hit the Windows logo key and R. Ctrl+Shift+Enter will launch Command Prompt as administrator when you type cmd.
- Hit «Yes» when Windows demands permission to make alterations to your device.
- Type the command. sfc /scannow in the command prompt.
- Press Enter on your keyboard once you have finished inputting the command. The SFC tool will start scanning all system files and replacing those damaged or missing.
- Hold off until the verification procedure is finished. Restarting your computer will make the changes effective.
Step 2. Scan with dism.exe
A built-in Windows utility called Deployment Image Servicing and Management (DISM) may determine whether your Windows installation is faulty and restore it if it is.
To launch the Run dialogue box on your keyboard, hit the Windows logo key and R simultaneously. To launch Command Prompt as administrator, type cmd and hit Ctrl+Shift+Enter.
- If asked for your permission, select Yes.
- Type the following command in the Command Prompt window.
Dism /online /cleanup-image /restorehealth
- Press Enter on your keyboard. The DISM utility will then start scanning for issues and attempting to resolve them.
- Hold off till the procedure is over. When your computer restarts, check if the Kernel Mode Heap Corruption issue persists.
Fix 5. Repair Kernel Mode Heap Corruption by Checking RAM
The memory problem is considered another significant reason for kernel mode heap corruption. In order to fix this issue, you must find out and solve RAM problems via Memory Diagnostic. Likewise, this strategy can be implemented only when your PC enters Safe or Windows mode. The steps are followed to repair this error by checking RAM.
Step 1. In the Windows search box, type «Memory Diagnostic.» After that, the best-matched icon must be double-clicked for Windows Memory Diagnostic.
Step 2. Opt for «Restart now and search for problems».
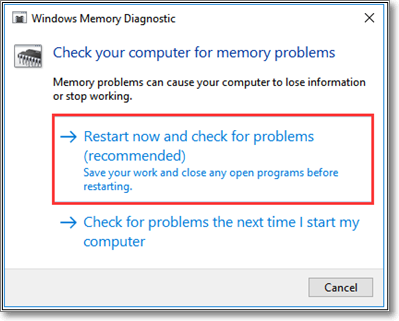
Step 3. The PC will automatically restart and crosscheck the memory. Moreover, it will boot up once the diagnosis procedure is over. After that, you must see the diagnosis report generated in the Event Viewer via the steps mentioned below.
- Activate Event Viewer.
- Open Windows Logs and select System.
- In the box on the right, select Filter Current Log.
- To view all result logs for the memory test, select MemoryDiagnostics-Results in the Event sources box and click the OK button.
- Double-click the most recent result log to check if the diagnostic was successful.
Fix 6. Run Driver Verifier Manager to Fix the Error
Kernel Mode Heap Corruption Windows 10 can also be caused by other faulty drivers. Therefore, if the preceding solution doesn’t work, you can try Driver Verifier to determine if there are any further problematic drivers. Follow the steps below.
Step 1. You can access Driver Verifier Manager in one of two methods.
- Select Windows PowerShell by simultaneously pressing the «Windows + X» keys (Admin). To launch Driver Verifier Manager, enter the command «verifier» and press the Enter key.
- In the Windows search box, type «cmd,» and then pick Run as administrator by right-clicking the Command Prompt application. Then, to launch Driver Verifier Manager, type «verifier» and press the Enter key.
Step 2. Click the «Next» button after checking «Create Standard Settings.» After that, verify «Automatically choose all drivers installed on this PC» and hit the «Finish» button. Once done, Windows will scrutinize the issues in the drivers and reboot your PC if needed.

Step 3. Once your PC reboots, Windows will demonstrate the drivers, which have flaws. After that, you must update, roll back, or reinstall those.
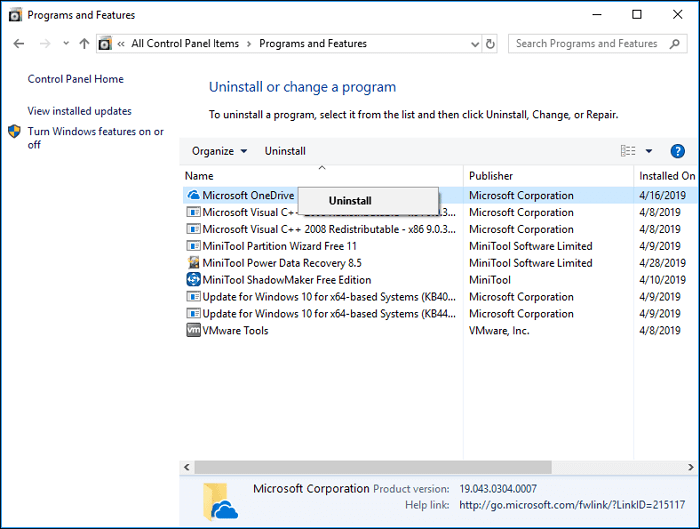
Fix 7. Uninstall Incompatible Software to Fix Kernel Mode Heap Corruption
Running the program in compatibility mode by following these steps will fix the BSOD if the software clash is caused by it being too old and only compatible with Windows 7/8.
Step 1. Select the Open file location from the context menu when you right-click the desktop. software icon.
Step 2. Select Properties by right-clicking the application executable file.
Step 3. Check the box next to Run this program in compatibility mode by moving to the Compatibility tab and doing so. After that, press OK to save your changes.
You should uninstall the incompatible program using the instructions below if other factors are responsible for the software conflict.
- Run by pressing the Windows + R keys simultaneously.
- The Programs and Features window will open once you enter «cpl» into the Run dialogue box and press Enter.
- Click Uninstall from the context menu of the incompatible application.
Fix 8. Reinstall Windows 10 to Fix the BSOD Error
In case any of the aforementioned solutions don’t work, you might need to reinstall or reset your Windows 10 to resolve Windows 10 BSOD error.
The drive where your system is installed will be completely empty after a clean installation of Windows, including all the apps you’ve installed and your personal data. You’ll need an external storage device, like a USB drive, for the clean installation. The clean installation appears more difficult than the one mentioned before, but it has a greater impact. These are the below-mentioned steps to reinstall Windows 10 to resolve this error.
Step 1. Create an installation ISO file with the Windows 11/10 Media creation tool after downloading it.
Step 2. Double-click on the «Setup» file to open it.
Step 3. Select «Download and install updates (recommended).»
Step 4. Follow the onscreen prompts.
Watch this video to obtain more assistance if you still have trouble fixing the kernel mode heap corruption error.
- 0.26 Run CHKDSK scan
- 1.03 Update All Drivers
- 1.26 Conduct an SFC scan
- 2.00 Run hardware and devices troubleshooter
Conclusion
Users may become anxious when encountering the Kernel Mode Heap Corruption blue screen issue; however, these problems are more frequent than you might realize. Running the aforementioned diagnostic steps will usually resolve the issue.
In case you lost your data while resolving this error, downloading EaseUS Data Recovery Wizard will help you recover all of them!
Kernel Mode Heap Corruption on Startup FAQs
The FAQs are the following to understand better this Kernel Mode Heap Corruption on Startup error.
1. What is a kernel mode crash?
A. An operating system crash known as a kernel mode crash (KMC) is triggered by a kernel error. Users that encounter a KMC notice a blue screen and an unforeseen computer breakdown.
2. How to fix kernel data inpage error Windows 10?
A. The best ways to fix kernel data inpage error are the following.
- Repair hard disks
- Conduct a virus scan
- Conduct DISM and SFC scan
- Conduct memory diagnostics
- Crosscheck hardware peripherals
3. How to fix Windows 10 BSOD?
A. These are the methods to fix Windows 10 BSOD.
- Repair Windows 10 BSOD After or During the Windows 10 Update
- Remove BSOD from Windows 10 While Using an App or a Device
4. How do I fix kernel security check failure?
A. These are the ways to fix kernel security check failure.
- Fix system files and damaged sectors that are the root of the Kernel Security Check issue
- System hard disc error check and repair
- To resolve the Kernel Security Check failure issue, run the Memory Diagnostic Tool
- To fix the Kernel BSOD issue, try using System Restore
Оглавление
- 1. Проверка системных файлов
- 2. Проверка драйверов на наличие ошибок
- 3. Обновить драйверы
- 4. Диагностика ОЗУ
Вы можете столкнуться с ошибкой на синем экране BSOD “Kernel Mode Heap Corruption” в Windows 10 при обычной работе за компьютере или когда ваш ПК испытывает нагрузку на оборудование как CPU, GPU или RAM. Ошибка может быть вызвана из-за поврежденного или устаревшего драйвера видеокарты, поврежденных системных файлов, проблемы с оборудованием как ОЗУ, или сама программа или игра является конфликтующей с вашей операционной системой. Разберем, как исправить ошибку Kernel_Mode_Heap_Corruption на синем экране в Windows 10.

1. Проверка системных файлов #
Системные файлы могут вызывать ряд ошибок, в том числе и Kernel Mode Heap Corruption. Откройте командную строку от имени администратора и введите команды по очереди. Эти две команды найдут отсутствующие или поврежденные системные файлы, и автоматически исправят их.
sfc /scannowDISM /ONLINE /CLEANUP-IMAGE /RESTOREHEALTH

2. Проверка драйверов на наличие ошибок #
Какой именно драйвер отвечает за ошибку сложно сказать без анализа. Мы же будем анализировать все драйверы оборудования в системе. Запустите командную строку от имени администратора и введите команду:
verifier- В появившимся окне “Создать стандартные параметры“.
- Далее “Автоматически выбирать все драйверы установленные на этом компьютере“.
Когда Windows перезагрузится, она проанализирует все драйверы, установленные на вашем компьютере, на наличие проблем. Если Проблемы будут обнаружены, то вы получите уведомление об этом.

3. Обновить драйверы #
Если выше способом обнаружился какой-либо драйвер, то его необходимо обновить до последней версии. Нажмите Win+R и введите devmgmt.msc, чтобы попасть быстро в диспетчер устройств. Определите какое устройство вызывает ошибку Kernel Mode Heap Corruption (выше метод), раздвиньте список и нажмите по нему правой кнопкой мыши, после чего выберите “Обновить драйвер“. Далее следуйте рекомендациям на экране.
Вы также можете зайти на сайт производителя оборудования и скачать вручную последнюю версию драйвера.

4. Диагностика ОЗУ #
В первую очередь убедитесь, что оперативная планка у вас вставлена правильно. Также следует достать её из компьютера и продуть слоты от пыли. Еще один момент, если у вас 4 слота на материнской плате для RAM планок, то попробуйте вставить планки в 1 и 3 слот.
Это сложно сделать в ноутбуке, так как многие боятся его разбирать. По этой причине можно запустить диагностику ОЗУ. Нажмите Win+R и введите mdsched.exe, после чего следуйте рекомендациям на экране. Если будут программные ошибки, то инструмент попытается автоматически исправить их, после чего ошибка Kernel Mode Heap Corruption в Windows 10 устраниться.
