Ошибка 0x80242006 появляется из-за неуспешной установки системных обновлений. В результате актуальность ОС уменьшается, а это чревато проблемами, особенно в отношении безопасности.
Способы решения ошибки 0x80242006
Для исправления проблемы пробуйте следующие способы:
- Используйте Windows Update Reset Components (WURC). Это официальная утилита от Microsoft, автоматически устраняющая ошибку 0x80242006 и ей подобные. Скачайте, установите, запустите программу WURC. Следуйте инструкциям, появляющиеся после открытия приложения.
- Примените командную строку под администраторскими полномочиями. Запускайте в ней последовательно эти команды:
sfc /scannow
Dism /Online /Cleanup-Image /ScanHealth
Dism /Online /Cleanup-Image /CheckHealth
Dism /Online /Cleanup-Image /RestoreHealth
Dism /Online /Cleanup-image /StartComponentCleanup
Dism /Online /Cleanup-Image /RestoreHealth
/Source:esd:F:\sources\install.esd:1 /limitaccessПосле запуска и окончания выполнения каждой команды — перегружайте систему.
- Сбросьте настройки сервиса обновления ОС. Отключите автоматическую загрузку обновлений. Удалите все из папки C:\Windows\SoftwareDistribution. Перегрузитесь и включите снова автоматическую загрузку обновлений.
Download Windows Speedup Tool to fix errors and make PC run faster
If you receive error code 0x80242006 while using Windows Update, then this post may be able to help you. It could be caused due to mishandling by the operating system. Another probable cause could be your security software.
0x80242006, WU_E_UH_INVALIDMETADATA. A handler operation could not be completed because the update contains invalid metadata.

Perform an SFC scan and temporarily disable your antivirus software and see if that helps. If it does not, then proceed.
- Rename the Catroot2 and Software Distribution folders
- Run the Windows Update Troubleshooter
- Reset Windows Update components
- Download and install the Windows Update manually
Below, we have explained all these fixes in detail.
1] Rename the Catroot2 and Software Distribution folders
When Windows downloads the updates, they are kept in a dedicated folder called Software Distribution. Files downloaded here are automatically deleted once the installation is complete. However, if it doesn’t clean up or if an installation is still pending, you have two choices. First, rename the SoftwareDistribution folder after pausing Windows Update Service. Next, reset the catroot2 folder.
2] Run the Windows Update Troubleshooter

Some users have reported that running the Windows Update Troubleshooter fixed the problem for them. You could try running it before proceeding with further troubleshooting.
Click on Start > Settings > Updates and Security > Troubleshoot. Then select the Windows Update troubleshooter and run it. Restart the system after that.
3] Reset Windows Update components
If the above two steps fail, you could try resetting the Windows Update components.
4] Download and install the Windows Update manually

Every Windows Update has a KB number. If you know this KB number, you can download the Windows Update from Microsoft Update Catalog. Microsoft Update Catalog is a service provided by Microsoft that lists all Windows Updates. Users can download Windows Update from there and install it manually. After visiting the website, enter the KB number of the Windows Update and download it.
How do I fix Windows Update download error 0x8024a206?
Corrupted Windows Update Components can cause Windows Update failure errors, like the error 0x8024a206 while installing Windows Update. To fix this error, you can use some fixes like resetting Windows Update Components, running the Windows Update Troubleshooter, repairing the corrupted system image files, etc.
What is error 0x80245006 on Windows 10 update?
The Windows Update error 0x80245006 can occur on both Windows 11 and Windows 10 operating systems. This error can occur when the Windows Update database is corrupted, the system file required for Windows Update is not registered correctly, etc. Check the status of BITS and Windows Update Service. Running the Windows Update Troubleshooter can fix this problem. If nothing helps, install the update manually.
All the best!
Anand Khanse is the Admin of TheWindowsClub.com, a 10-year Microsoft MVP (2006-16) & a Windows Insider MVP (2016-2022). Please read the entire post & the comments first, create a System Restore Point before making any changes to your system & be careful about any 3rd-party offers while installing freeware.
Простое решение для распространенной проблемы Центра обновления Windows мы выполним на примере обновления Update 0x80242006. Когда устройство сталкивается с этой ошибкой, оно также получает следующее сообщение в Центре обновления Windows:
WU_E_UH_INVALIDMETADATA
Однако описание ошибки среднему пользователю ничего не говорит:
Не удалось завершить операцию обработчика, поскольку обновление содержит недопустимые метаданные.
Первое, что пользователи обычно пытаются сделать, когда сталкиваются с такой ошибкой — это запускают средство устранения неполадок Windows, которое, как правило, является полезной утилитой Windows 10. Но в данном случае, однако, она не устраняет проблемы CU Windows, а в качестве универсальной таблетки просто предлагает перезапустить службу обновлений. Мы расширим этот вариант.
Чтобы запустить средство устранения неполадок в Windows 10, выполните следующие действия: нажмите кнопку Пуск и перейдите в «Параметры». В открывшемся окне кликните по «Обновление и безопасность» и в левом меню — на «Устранение неполадок».
Если средство устранения неполадок Windows не решило проблему центра обновлений на вашем устройстве, то обходной путь сводится к выполнению серии команд в окне командной строки для переименования папки C:\Windows\SoftwareDistribution загрузки файлов программного обеспечения. Суть метода сводится к тому, что служба Центра обновления Windows после этого автоматически создаст новую папку и возобновит процесс загрузки обновлений. Безусловно, как только вы это сделаете, нужно попытаться проверить наличие обновлений еще раз.
Итак, прежде всего, войдите в систему Windows 10 с учетной записью администратора. Затем запустите окно командной строки с правами администратора, выполнив следующие действия:
Нажмите кнопку Пуск и наберите на клавиатуре cmd. В найденных результатах нажмите правой кнопкой мыши на нужную строку и выберите в контекстном меню «Запустить от имени администратора». Подтвердите свои права.
В только что запущенном окне командной строки вам нужно запустить три команды (убедитесь, что вы копируете и вставляете их в окно одну за другой):
ren %systemroot%\SoftwareDistribution\DataStore *.bak
—
ren %systemroot%\SoftwareDistribution\Download *.bak
—
ren %systemroot%\system32\catroot2 *.bak
Перезагрузка системы не обязательна, но мы все же рекомендуем сделать ее перед проверкой обновлений. При следующей загрузке ПК Центр обновления Windows должен работать правильно, без ошибок.
Этот обходной путь работает во всех версиях Windows 10, включая недавно выпущенное обновление ноября 2019 года (версия 1909). Переименование папки загрузки обновлений также можно выполнить вручную, но в этом случае вам необходимо загрузиться в безопасном режиме, чтобы иметь возможность переименовывать системные файлы, причем, учетная запись администратора по-прежнему будет необходима.
Microsoft объясняет, что недопустимые ошибки в загрузки данных могут возникать при определении конфигурации конкретного ПК. Как отмечают специалисты Microsoft, в зависимости от настроек Центра обновления Windows, когда загрузка завершится, служба собирает данные с устройства и сравнивает их с загруженными метаданными, чтобы создать «журнал действий». Он предоставляется агенту установки вместе с информацией о дальнейших командах, чтобы начать установку, что иногда не происходит.
Установка обновлений на устройстве Windows имеет решающее значение, так как Microsoft использует Центр обновления Windows для доставки исправлений и других патчей безопасности для устранения уязвимостей в операционной системе и предустановленных приложениях. Microsoft выпускает обновления безопасности для Windows каждый второй вторник каждого месяца — в Windows 10 исправления для исправлений во вторник предоставляются в виде накопительных обновлений.
Как накопительные обновления, так и ежемесячные накопительные выпуски включают в себя все ранее выпущенные исправления, поэтому установка последней версии полностью обновляет устройство.
Читайте также:
- Microsoft выпустит заплатку для «чрезвычайно страшной» уязвимости Windows
![]()
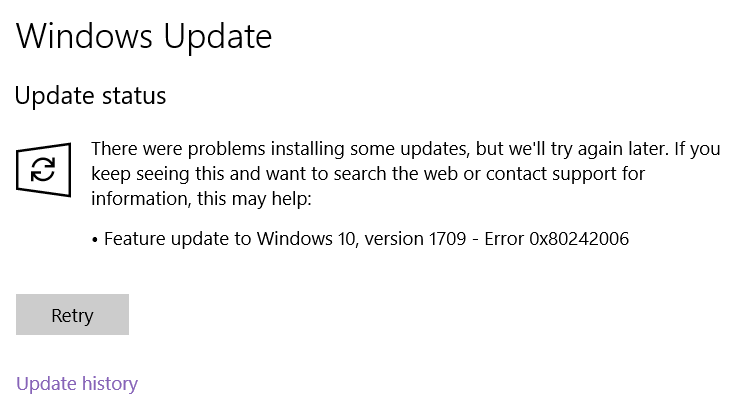
Several Windows 10/11 users have recently opted to revert to previous builds due to issues with the latest update. They reported problems with the Windows Store and Start menu. Of particular concern was the appearance of the error code “Windows 10/11, version 1709 – error 0x80242006”.
Is this error really that serious? What does it do to your device, and what caused it to appear? We’ll delve deep into the root cause of this error below.
Feature Update to Windows 10/11, Version 1803 – Error 0x80242006
The Windows Update error 0x80242006 is a known Windows problem that strikes while trying to install updates, and its frequency of occurrence increases when Microsoft rolls out major builds. In fact, the cases of this error’s appearance soared with the release of the Version 1709, Version 1607, and Version 1703 builds. The release of Version 1803 has also triggered the Windows 10/11 error 0x80242006 for some users.
Nonetheless, the majority of the affected users cited that they were facing the error code with the error message “Feature update to Windows 10/11, version 1803 – Error 0x80242006.”
But what causes the KB4043961 error 0x80242006 to show? Well, there are many potential culprits. The most popular one is an incompatibility issue with Windows Defender, which has caused BITS to update its components. Still, there are other possible triggers to the error. Regardless, we have collated a list of possible fixes that may successfully eliminate the error once and for all.
10 Ways to Resolve the Error Code 0x80242006
So, how do you fix the error code 0x80242006? There are many solutions you can try. However, we are not suggesting that you try them all. We want you to find one that best suits your situation and start from there. You can also consider the level of difficulty of the fix. If it sounds too technical for you, consider looking for other, easier alternatives.
Without further ado, here are the solutions that have worked for many users:
Solution #1: Use the Windows Update Assistant
The Windows 10/11 Update Assistant is a smart tool that downloads and installs feature updates on your device. However, you can’t use it right away because you need to download it first.
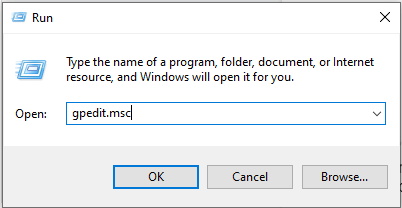
Solution #2: Use the Group Policy Editor
The Group Policy Editor is a Windows administration tool that allows users to manually configure various computer or network settings. Administrators can use it to configure password requirements and define what settings or applications can be changed.
To use this tool to resolve the 0x80242006 error code, follow these steps:
- Press the Windows logo key + R shortcut to launch the Run utility.
- Type gpedit.msc into the text field and press Enter.

- Choose Computer Configuration and click Administrative Templates.
- Next, select System and double-click on Specify settings for optional component installation and component repair.
- Click Enabled and check the Contact Windows Update directly option.
- Save your changes by clicking Apply and OK.
Solution #3: Run the Command Prompt
The Command Prompt is a utility that allows you to give your system instructions. It can be used to troubleshoot problems and automate tasks. It can also resolve the 0x80242006 error code when used correctly.
Here’s how:
- Right-click on the Windows icon.
- Choose Command Prompt (Admin).
- Once the Command Prompt window launches, copy and paste these commands:
- WSReset.exe
- dism /online /cleanup-image /restorehealth
- dism /online /cleanup-image /StartComponentCleanup
- sfc /scannow
- powershell
- Get-AppXPackage -AllUsers |Where-Object {$_.InstallLocation -like “*SystemApps*”} | Foreach {Add-AppxPackage -DisableDevelopmentMode -Register “$($_.InstallLocation)\\AppXManifest.xml”}
- Once these commands have been executed, close the Command Prompt window and restart your computer.
- Upon restart, try downloading and installing the update.
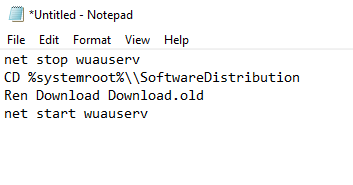
Solution #4: Rename the Windows Update Folder
Another way to resolve the error message is to rename the Windows Update folder or the SoftwareDistribution folder. Here’s a step-by-step guide on what to do:
- Press the Win + R shortcut to access the Run applet.
- Type notepad into the text field and hit Enter.
- Enter these commands:
- net stop wuauserv
- CD %systemroot%\\SoftwareDistribution
- Ren Download Download.old
- net start wuauserv

- Press the Enter key.
- Now, click File in the top-left corner of the window. Choose Save As.
- Rename the file as rename.bat and hit Enter.
- Finally, find the file that you have just created. Right-click on it and choose Run as Administrator.
- Once done, restart your computer.
Solution #5: Reset the Windows Update Components
The Windows Update utility is a handy tool that allows you to automatically install any available Windows Update version. But at times, its components become problematic and trigger errors, like the Windows Update error 0x80242006. In that case, resetting them may do the trick.
Follow these steps:
- Right-click on the Windows icon and choose Command Prompt (Admin).
- Next, disable the BITS, MSI Installer, Cryptographic, and Windows Update services. To do that, type these commands into the Command Prompt. Make sure you press Enter after each of them:
- net stop wuauserv
- net stop cryptSvc
- net stop bits
- net stop msiserver
- Then type these commands to rename the Catroot2 and SoftwareDistribution folders. Again, press Enter after each of them:
- ren C:\\\\Windows\\\\SoftwareDistribution SoftwareDistribution.old
- ren C:\\\\Windows\\\\System32\\\\catroot2 Catroot2.old
- Now, enable the services that have been disabled in the previous step. Input these commands and hit Enter after each of them:
- net start wuauserv
- net start cryptSvc
- net start bits
- net start msiserver
- Lastly, exit the Command Prompt window and restart your device.
Solution #6: Run the Windows Update Troubleshooter
If you get an error code like the Windows Update error code 0x80242006, the Windows Update Troubleshooter can be used to resolve it.
Here’s how to use this troubleshooter:
- Press the Win + I shortcut to launch the Settings utility.
- Go to the Update and Security section and navigate to the Troubleshoot pane.
- Find Windows Update from the list and click on it.
- Click the Run Troubleshooter button and wait for the scan to complete.
Solution #7: Disable Windows Defender
Windows Defender is an antivirus program that comes with your Windows operating system. Unlike other known antivirus programs, it is free and does not require users to install anything.
While it plays a significant role in protecting Windows, it is also notorious for causing issues. One is the error code 0x80242006.
In such a case, try disabling it. Here’s how:
- Press and hold the Win + R shortcut.
- Type gpedit.msc into the text field and press Enter.
- Go to Computer Configurations and select Administrative Templates.
- Click Windows Components and choose Windows Defender.
- Double-click on the Turn Off Windows Defender option.
- Select the Enabled option and click Apply.
- Click OK.
Solution #8: Reset the Windows Update Cache
If there is a corrupt package in your Windows Update cache, you need to reset the cache in question. Most of the time, users will use the Windows Update Troubleshooter to fix this, but it doesn’t really help. The best way to go is to delete the contents of the Windows Update Store folder. Here’s how:
- Launch the Command Prompt with administrator rights.
- Type these commands:
- net stop wuauserv
- net stop bits
- rd /s /q %windir%\SoftwareDistribution
- net start wuauserv
- net start bits
Hit Enter after each of them.
Restart your computer and see if the error persists.
Solution #9: Perform a Clean Install
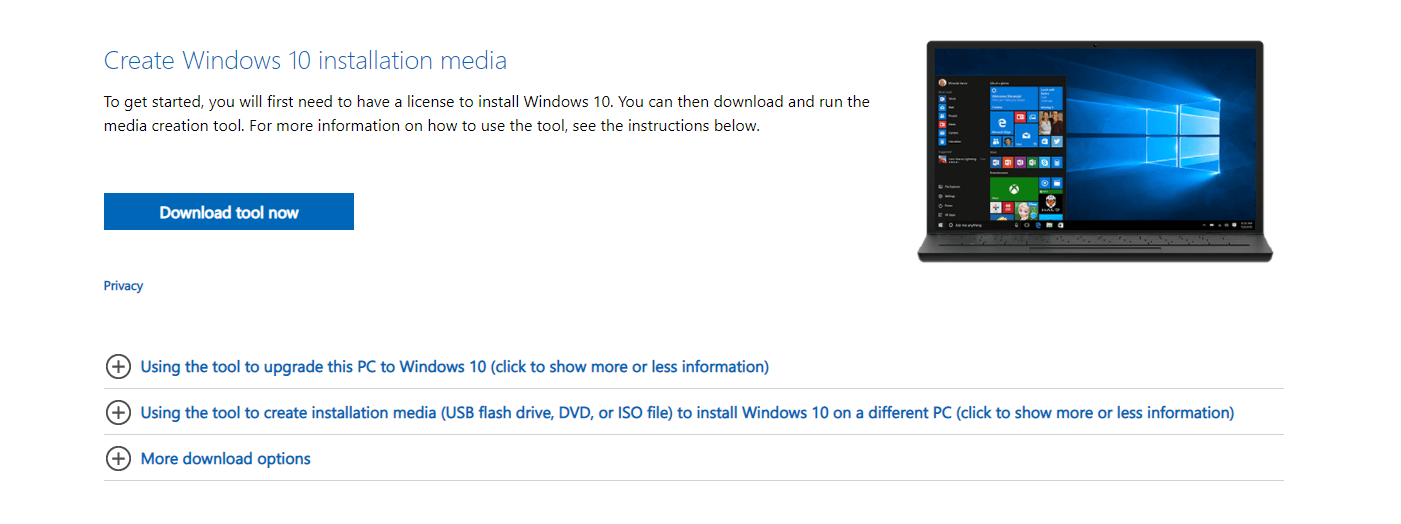
If resetting the cache of Windows Update does not help, try performing a manual installation of the update. Visit the Microsoft Update Catalog and download the update you want to install. And if that doesn’t work, perform a clean install instead.
The idea is to download a Windows installation image from the servers of Microsoft using the Windows Media Creation tool and an external storage device like a USB stick. After that, start by double-clicking on the setup.exe file and then follow the on-screen instructions.
For a detailed guide, refer to these instructions:
- Download the Windows 10/11 Media Creation Tool from Microsoft’s website.

- Next, create a bootable flash drive.
- Boot your new Windows 10/11 installer using the flash drive.
- Next, install Windows.
- Follow the on-screen instructions to complete the setup process.
Solution #10: Check Your System for Outdated Drivers and Junk Files
A device driver is a program that controls a certain type of component that is connected to your computer. It serves as a software interface for hardware devices, allowing operating systems and other applications to access hardware functions without requiring further details.
From time to time, hardware manufacturers roll out new device driver versions to support their latest hardware. But when users choose not to install these newer driver versions, they become more at risk of problems and errors.
That is the reason Windows experts suggest installing driver updates once available. Most of the time, when Windows 10/11 receives an update, drivers are updated, too. However, because you are having problems installing an update, you may have to try other alternatives.
One option you can try is the use of third-party driver updater software. You can find many reliable driver updater tools online.
Aside from checking for outdated drivers, you also have to scan your system for unnecessary files. These space hogs consume your system resources and sometimes even trigger error codes to appear. That is why it is best that you get rid of them every now and then to ensure your computer is running smoothly.
And because manually getting rid of junk files can be time-consuming, we recommend you to use a PC repair tool like Outbyte PC Repair instead. This tool is designed to eliminate unwanted files from your system. It will do the job for you so you don’t need to check every folder for junk to delete.
Windows Update Error 0x80242006: Summary
Windows updates are optional, but disregarding them is like inviting hackers to attack your device. And unfortunately, installing updates may not always be easy as you may encounter errors like the error code 0x80242006 in the process. However, don’t let such problems distract you. There are many things you can do to resolve errors associated with Windows updates.
You can start with using the Windows Update Assistant, but you have to download it first. If you hate the idea of downloading tools, you can use the Group Policy Editor or run the Command Prompt instead. You can even rename the Windows Update folder or reset the Windows Update components.
If you want to take the easy route, consider running the Windows Update Troubleshooter. Other solutions that you can try include disabling Windows Defender, performing a clean install, and ensuring your device drivers are up to date.
Have you resolved the error code 0x80242006 using the solutions above? Share your thoughts below!
Give us some love and rate our post!
Windows updates are crucial for the overall performance and security of your windows computer. However, at times, the update process can fail, leading to various error codes such as Error Code 0x80242006 . This Error 0x80242006 is particularly frustrating as it often appears without any warning, and the update process fails to complete in windows 10 and windows 11.

The Windows Update Error Code 0x80242006 is related to the Windows service or the update files. Some of the common causes of this Windows error 0x80242006 include corrupted or damaged system files, conflicts with other software or antivirus programs, internet connection issues or firewall settings, and outdated drivers or hardware issues.
Solutions to fix this Error Code 0x80242006 :
Run the Windows Update Troubleshooter: The Windows Update Troubleshooter is a built-in tool in Windows that can detect and fix many update-related issues automatically.
- To run it, Go to Settings Option
- Then go to Update & Security

- Troubleshoot > Windows Update.
This tool will diagnose and fix any problems it finds with the update service or update files.
Restart the Windows Update Service:
Sometimes, the Windows update service may stop working, causing the Windows 10 Update error code 0x80242006. To fix this issue,
- Try to restart the Windows update service.
- Press the Windows key + R,
- Type “services.msc,” and hit enter.
- Move down the screen till you see Windows Update and right-click it,
- Then select “Restart.”
Disable antivirus software:
Antivirus software can sometimes interfere with the Windows update process, causing errors such as Windows 11 Update Error 0x80242006. Temporarily disabling antivirus software can help to solve the issue. Once the update process completes successfully, you can re-enable the antivirus software.
Here are general steps to temporarily disable antivirus software on a Windows operating system:
- Press the Windows icon on your system to view the Start menu.
- Search for “Security” or “Windows Security” in the search bar and open it.
- Press on “Virus & threat protection” option.
- Inside of the “Virus & threat protection in settings button,” click to “Manage settings.” option.
- Turn off the “Real-time protection” mode by toggling the switch to off position.
Note that the steps may vary slightly depending on the version of Windows and the specific antivirus software you are using. After completing of the task it requires you to disabling the antivirus software, make sure to re-enable it to keep your system secure.
Check your internet connections’ fix this Error Code 0x80242006:
Ensure that your internet connection is stable and that you have enough bandwidth to download updates. You can also try reset router or modem to resolve any connectivity issues.
Check for hardware issues:
Outdated drivers or hardware issues can cause errors during the update process. Ensure that your hardware is up-to-date and compatible with the latest updates. Might update your drivers manually or use a driver updater tool
Reset windows Update cache steps to fix Error Code 0x80242006:
Here are the steps to reset the Windows Update cache:
- Press the Windows key + X and Choose “Command Prompt (Admin)” or “Windows PowerShell (Admin)” from the menu bar.
- In this Command Prompt or PowerShell window, Enter the following given command and Click Enter key:
net stop wuauserv
- Next, type the following command and press Enter:
net stop cryptSvc
- Type to the following given command and press Enter:
net stop bits
- Finally, enter the following given commands and press Enter:
net stop msiserver
- With all these services stopped, navigate to the following folder:
C:\Windows\SoftwareDistribution
Note: You may need to replace “C” with the drive letter where Windows is installed.
Once you’re in the Software Distribution folder, select all files and folders, and delete them.
- Next, navigate to the following folder:
C:\Windows\System32\catroot2
Note: You may need to replace “C” with the drive letter where Windows is installed.
Once you’re in the catroot2 folder, select all files and folders, and delete them.
After deleting the contents of the Software Distribution and catroot2 folders, go back to the Command Prompt or PowerShell window.
- Type the following command and press Enter to start the Windows Update services again:
net start wuauserv
- Then, follow the command and press Enter:
net start cryptSvc
- Next, follow command and press Enter:
net start bits
- At Last, Enter the following command and press Enter:
net start msiserver
- End the Command Prompt or PowerShell window and restart your computer.
After following these steps, the Windows Update cache should be reset, and you can try running Windows Update again to see if any updates are available.
Reset windows:
Note: Before we proceed, with windows reset, it is better to take back your computer data, as a safety and precaution method. Don’t proceed with reset if you are not sure about, its best to take expert advice and go further.
- Click on windows button.
- Start menu appear in search type in “reset”, in search list reset this PC appears, click on it.
- Click on Reset PC option.
- In reset PC popup windows, Choose the option which says Keep my files.
- You will get as option, which says how would you like to reinstall windows, Select Cloud.
- Follow the on-screen installation.
Reset windows 10 & 11 :
- Go to the Start menu option and click on the Settings icon (gear icon).
- In this Settings window, click on to the “Update & Security” option.
- Press to “Recovery” option from the left-hand menu.
- “Reset this PC”, click on the “Get started” option.
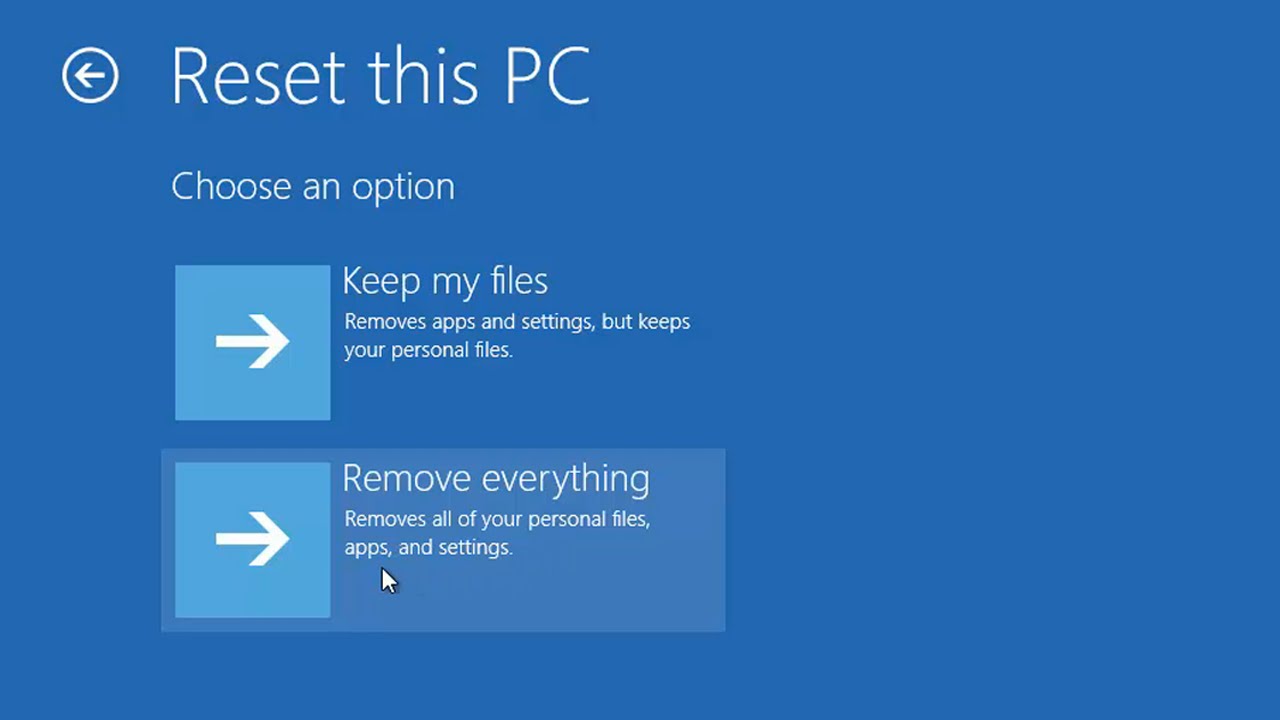
- You will be prompted to choose whether you want to keep your files or remove everything. Pick Out the option that best suits your needs.
- If you chose to remove everything, you will be prompted to choose whether you want to just remove your files or wipe the entire drive.
- Hit to Reset” button to start the process.
- Windows will then restart and begin the reset process. This may take time
- Once the reset is complete, you will need to go through the initial setup process again, just like when you first bought your computer.
In conclusion,
If the issue Windows 10 & 11 Update Error code 0x80242006 still persists, please initiate the chat, One of our Certified Microsoft technicians will help you. We provide support for Microsoft products like Windows and Office and Outlook, we can also set up free tools provided and included with Microsoft Windows and can train you on how to use them to maintain the health of your computer.