The Error 0x80240438 is a recently occurring bug that appears when users try to update their Windows 10 OS or install apps via Microsoft Store. As there is an interlinkage between the store app and the update section, the error remains the same for both. There are primarily three different reasons that lead to this error on Windows 10. They are – Enabled Firewall, Use of IPV6 for the net connectivity, and manually connecting to a Proxy.
Temporarily turning off the Firewall, disabling IPV6, and the use of a manual proxy should resolve the error code 0x80240438. If not, run the update troubleshooter, modify the windows update group policy, or tweak the registry DOWRD key. In this post, we discuss 10 different approaches to correct this issue that are applicable to all Windows 10 Build versions. Let’s explore the solutions in detail –

To solve the Error code 0x80240438 in Windows 10, try the following suggestions –
Fixes List
- Disable Third-party Antivirus Program
- Disable Windows Firewall/ Windows Security
- Manually install the Standalone Package
- Run Windows Update Troubleshooter
- Disable IPV6
- Disable Proxy
- Modify Windows Update features Group Policy
- Reset Windows Update Folders
- Clear Microsoft Store Cache
- Tweak Registry Editor
1] Remove Third-party Antivirus Program
Using a third-party anti-malware program may cause the update or Store error 0x80240438 on Windows 10 PC. This is because there exist two different applications that perform similar tasks i.e. Windows Security. Since you can’t remove the latter one as being the in-built app, you should uninstall the 3rd party antivirus program. Anyways, Windows Defender works quite effectively, unlike its predecessors.
- Hit the Win icon and scroll down to locate the antivirus in the Apps list.
- Make a right-click on the matching result and hit the Uninstall button.
- If the UAC window prompts, tap Yes to confirm this uninstallation.
Note: If you don’t want to uninstall the software, disable it by visiting the Settings page.
- Make sure to reboot your PC as there are leftover files that don’t delete even after the program deletion.
2] Disable Windows Firewall/ Windows Security
Windows Firewall aims to provide maximum security by blocking any files that it finds suspicious. This is very helpful in keeping malicious invaders away. However, this may sometimes block the monthly patch resulting in an error message like 0x80240438. You must check whether this indeed is the case before applying any other fixes. To do so, temporarily disable Windows Firewall using the below steps –
- Press Win + S to start the Search bar, type Windows Firewall and click the top result.
- On the next user interface, click “Turn Windows Defender Firewall on or off“.
- Choose to “Turn off Windows Firewall (not recommended)” under both networks i.e. Private and Public.

- Hit OK to confirm this action. Now, check if the error 0x80240438 resolves or not while opening the Store app/updating Windows 10 OS.
3] Manually install the Standalone Package
Microsoft releases security as well as non-security cumulative updates very often on the patch Tuesday. Since you are already encountering an update error, you may download and install the standalone package that comes with each CU. Here’s how to proceed –
- If you are a Windows 11 user, switch to this article on how to manually download and install the latest cumulative updates on your computer.
Get the name of a Recent CU
- Jointly Press Win+I to launch the Settings app.
- Select Update & Security thereafter Windows Update on the succeeding screen.
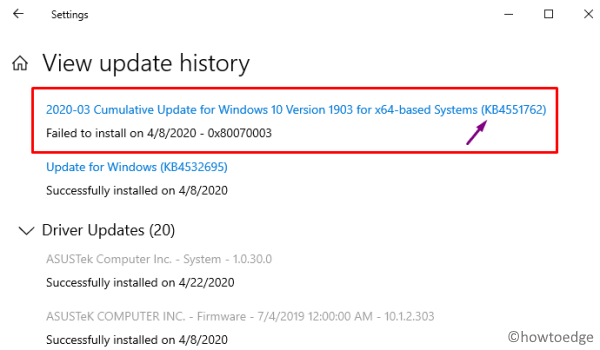
- On the right pane, scroll down and click View Update History.
- Here, you can get a list of all cumulative updates – successful or failed ones.
- Note the failed patch number and move to the next section.
Download the Standalone Package
- Open any of your web browsers and visit Microsoft Update Catalog.
- At the search bar, paste the failed knowledge base number (noted down above) and press Enter.
- A list containing all the matching CUs will appear afterward.
- Click the Download button next to the most suited and latest update as per your system architecture.
- When a new window appears, click the first link to download the .msu file. Wait for a while as this is a relatively big file.
- Once over, go to the Download folder and double-click the set-up file to start installing the standalone package.
4] Run Windows Update Troubleshooter
Windows 10 includes an in-built utility that can troubleshoot any update-related issues. If the error 0x80240438 is still appearing, run the troubleshooter to find and repair the underlying cause. Here are the essential steps to work upon –
Windows 11:
- Go to Settings and click System on the left pane.
- Head over to the right side, scroll down, and click Troubleshoot.
- When this expands, click Other troubleshooters.
- Locate Windows update under “Most frequent”, and hit the Run button.
- Now, wait while this tool diagnoses and resolves the issue automatically.
Windows 10:
- Jointly press WinKey + I to start the Settings app.
- Select Update & Security thereafter Troubleshoot on the succeeding window.
- Jump to the right side and click to expand the Windows Update section.
- Hit Run the troubleshooter to start looking for any update errors.

- Follow the instructions as they appear in the remaining process.
Once over, Restart the PC so that changes performed may become effective.
5] Disable IPV6
Several users have confirmed that disabling IPV6 under the Network settings resolves error 0x80240438 on their PCs. That’s why we have included this in the list of solutions and the procedure is as follows –
- Launch the control panel and reach out to the following location –
Control Panel\Network and Internet\Network Connections
- Make a click on the internet connection (currently in use to access net connectivity) and hit Properties.

- Next, uncheck the box left to “Internet Protocol Version 6 (TPC/IPV6)” and tap OK.

- Make sure to Reboot your PC so as to apply the recent changes.
From the next login, you must be able to update Windows 10 OS or launch Microsoft Store.
6] Disable Proxy
Connecting the PC to a proxy often causes bugs and issues. So, if you are still experiencing the error 0x80240438 while opening the Store app, try once to disable the Proxy. Here are the steps to work upon –
- Press Win+Q hotkey altogether to start the Search box and type “Proxy”.
- Click the top result to launch the Proxy Settings window.
- Move to the right panel and scroll down to “Manual Proxy Setup“.
- Turn off the toggle switch next to “Use a Proxy server” and click the Save button.

Note: If you use a script address, make sure to disable this as well.
- Restart your PC and check whether this error resolves after the next login or not.
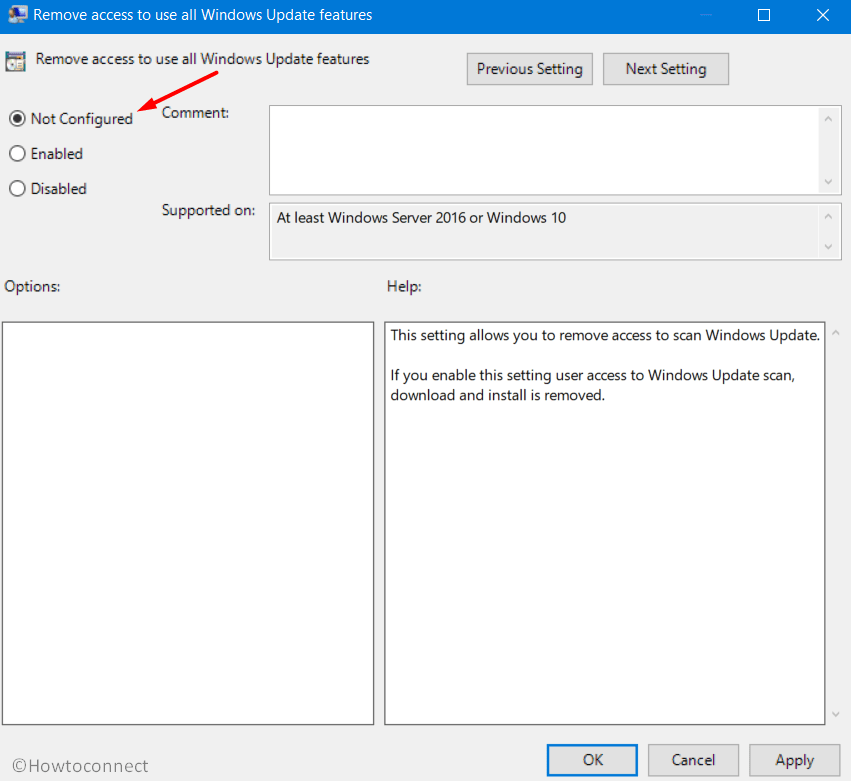
7] Modify Windows Update features Group Policy
If the error 0x80240438 still persists, you should modify the Windows Update features group policy. On different Windows 10 forums, this solution is widely accepted. That’s why we are including this method as well –
- Right-click on the Win icon and select Run.
- Type
gpedit.mscat the empty text box and press Enter. - When the Group Policy window comes into view, browse to the below address –
User Configuration > Administrative Templates > Windows Components > Windows Update
- Move to the adjacent right side and scroll down to locate “Remove Access To Use All Windows Update Features“.
- Once found, double-click on it to open its respective window. Mark the checkbox next to “Not configured” and hit OK.
- Restart your computer so as to implement the changes from the next login.
8] Reset Windows Update Folders
The existing contents inside the SoftwareDistribution and Catroot2 folders may also cause the error 0x80240438 on Windows 11 or 10 PC. To get rid of this nagging issue, you must clean these two update folders accomplishing the below steps –
- Press Win & R to invoke the Run dialog.
- Type cmd at the void, hold Ctrl+Shift and press Enter to launch the Command Prompt as Admin.
- When the UAC window prompts, tap Yes to authorize the access.
- Now, execute the following codes one after another. Make sure to press the Enter key after each command.
net stop bits
net stop wuauserv
net stop appidsvc
net stop cryptsvc
- The above codes will stop the essential update services, now run the below codes to rename certain services –
rmdir %systemroot%\SoftwareDistribution /S /Q
rmdir %systemroot%\system32\catroot2 /S /Q
- Subsequently, configure your network connectivity using the following commands –
netsh winsock reset
netsh winsock reset proxy
- After successfully executing the above codes, restart the services that you have previously stopped.
net start bits
net start wuauserv
net start appidsvc
net start cryptsvc
- Finally, Restart your system and check whether the update error code 0x80240438 gets solved or not.
9] Clear Microsoft Store Cache
Note: This workaround is primarily for Microsoft Store-related error 0x80240438. If you are receiving the error message while performing Windows 10 update, you may skip this solution.
As time passes by, a huge amount of cache piles up in Windows Store. If you don’t clear these unnecessary data, you may end up receiving the error 0x80240438. So, go through the below steps to clear the Store cache –
- Launch the Run dialog, type
wsresetat the void, and press the Enter key. - The Windows console appears immediately afterward clearing off the stored cache.
- When the command prompt finishes the task, Microsoft Store will start without any error code.

10] Tweak Registry Editor
If you are still getting the error 0x80240438 on your computer, modifying the “DisableWindowsUpdateAccess” entry inside the registry may resolve this bug. Here’s how to perform this task –
- Press Winkey + R altogether to start the Run dialog. Type
regeditat the void and press Enter to invoke the Registry Editor. - Using the key ladder on the left pane, reach out to the below path –
HKEY_CURRENT_USER\Software\Microsoft\Windows\CurrentVersion\Policies\WindowsUpdate
- Head over to the right side and locate “DisableWindowsUpdateAccess“.
- Click on this DWORD entry twice and put “0” at its value data.

- Click OK and Restart Windows 10 to implement the above changes.
That’s it, I hope the above fixes do help to resolve the Update and Store Error 0x80240438 on your Windows 11/10 device. If you have any queries or suggestions related to this article, do tell us in the comment section.
Код ошибки 0x80240438 может возникать как для обновлений Windows, так и для Магазина Microsoft в Windows 10. Это связано с тем, что механизм доставки для обоих является взаимозависимым и общим. По этой причине многие коды ошибок Windows Update и Microsoft Store совпадают. Исправить оба легко, и большинство методов одинаковы. Мы обсудим эти исправления в этой статье сегодня.
При установке обновлений возникли проблемы, но мы попробуем позже. Если вы продолжаете видеть это и хотите искать информацию в Интернете или обратиться в службу поддержки, это может помочь – (0x80240438).

Ошибка 0x80240438 для обновлений Windows и магазина Microsoft
Если вы столкнулись с этой проблемой, вам необходимо проверить следующее:
- Запустите средство устранения неполадок Центра обновления Windows.
- Отключите антивирус или брандмауэр.
- Отключить прокси-соединения.
- Измените политику Удалить доступ, чтобы использовать все функции Центра обновления Windows .
- Сбросить папки Windows Update.
- Загрузите обновление вручную.
1] Запустите средства устранения неполадок Центра обновления Windows .
Вы можете запустить средство устранения неполадок Центра обновления Windows, а также средство устранения неполадок Центра обновления Windows от Microsoft и проверить, поможет ли это в решении любой из ваших проблем.
2] Отключите антивирус или брандмауэр
Вы можете временно отключить Защитника Windows, который устанавливается из коробки на вашем компьютере с Windows 10. Вы также можете отключить брандмауэр Windows на своем компьютере и проверить, исправляет ли это ошибки, с которыми вы сталкиваетесь. Если вы используете стороннее программное обеспечение безопасности, отключите их и посмотрите.
3] Отключить прокси-подключения
Начните с ввода Свойства обозревателя в поле поиска Cortana. Нажмите на соответствующий результат.

Теперь перейдите на вкладку Подключения.
Под разделом, помеченным как Настройки локальной сети (LAN). Нажмите на кнопку с надписью Настройки локальной сети.

В разделе Прокси-сервер снимите флажок с отметки Использовать прокси-сервер для вашей локальной сети (эти настройки не будут применяться для подключений удаленного доступа или VPN-подключений).
Нажмите ОК и перезагрузите компьютер, чтобы изменения вступили в силу.
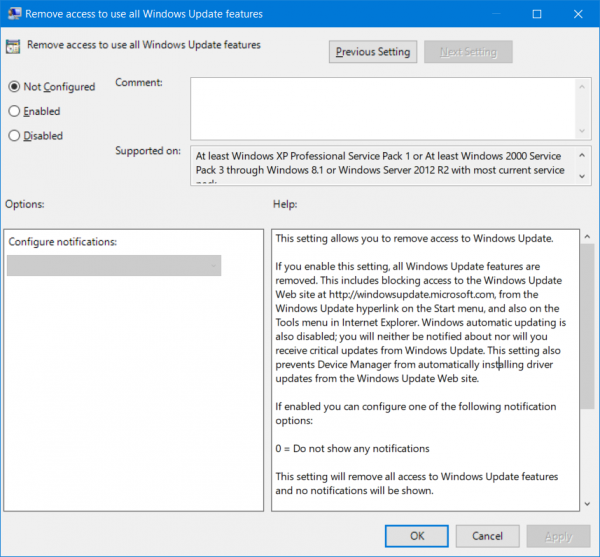
4] Измените Удалить доступ, чтобы использовать все функции Центра обновления Windows Политика .
Нажмите комбинацию кнопок WINKEY + R, чтобы запустить утилиту Run, введите gpedit.msc и нажмите Enter. После открытия редактора групповой политики перейдите к следующему параметру:
Конфигурация пользователя> Административные шаблоны> Компоненты Windows> Центр обновления Windows

Теперь на правой боковой панели дважды нажмите Удалить доступ для использования всех функций Центра обновления Windows и установите для него переключатель Не настроено .
Этот параметр позволяет вам удалить доступ к Центру обновления Windows. Если вы включите этот параметр, все функции Центра обновления Windows будут удалены. Это включает в себя блокировку доступа к веб-сайту Центра обновления Windows по адресу http://windowsupdate.microsoft.com, по гиперссылке Центра обновления Windows в меню «Пуск», а также в меню «Сервис» в Internet Explorer. Автоматическое обновление Windows также отключено; вы не будете ни получать уведомления, ни получать критические обновления из Центра обновления Windows. Этот параметр также запрещает диспетчеру устройств автоматически устанавливать обновления драйверов с веб-сайта Центра обновления Windows.
Если включено, вы можете настроить один из следующих параметров уведомлений:
- 0 = Не показывать никаких уведомлений – этот параметр удалит все доступ к функциям Центра обновления Windows, и никакие уведомления не будут показаны.
- 1 = Показывать уведомления о перезагрузке – этот параметр будет отображать уведомления о перезагрузках, необходимых для завершения установки.

Это решило бы ваши проблемы, если бы это было причиной.
Выйдите из редактора групповой политики и перезагрузите компьютер, чтобы изменения вступили в силу.
5] Сброс папок Центра обновления Windows
Вам необходимо удалить содержимое папки SoftwareDistribution и сбросить папку Catroot2.
6] Загрузите обновление вручную .
Если это не обновление функции, а только накопительное обновление, вы можете вручную загрузить и установить Центр обновления Windows.Чтобы узнать, какое обновление не удалось выполнить, выполните следующие действия:
- Выберите «Настройки»> «Обновление и безопасность»> «Просмотреть историю обновлений».
- Проверьте, какое именно обновление не удалось. Обновления, которые не удалось установить, будут отображаться как Failed в столбце Status.
- Затем перейдите в Центр загрузки Microsoft и найдите это обновление по номеру КБ.
- Как только вы найдете его, скачайте и установите его вручную.
Вы можете использовать Microsoft Update Catalog, службу от Microsoft, которая предоставляет список обновлений программного обеспечения, которые могут распространяться по корпоративной сети. Использование каталога Центра обновления Майкрософт может оказаться универсальным местом для поиска обновлений программного обеспечения, драйверов и исправлений Microsoft.
Всего наилучшего!
Download Windows Speedup Tool to fix errors and make PC run faster
The Error Code 0x80240438 can occur for both Windows Updates and the Microsoft Store on Windows 11/10. This is because the delivery mechanism for both is interdependent and common. This is the reason that many Windows Update and Microsoft Store error codes are the same. Fixing both are easy, and most of the methods are the same. We will be discussing these fixes in this article today.
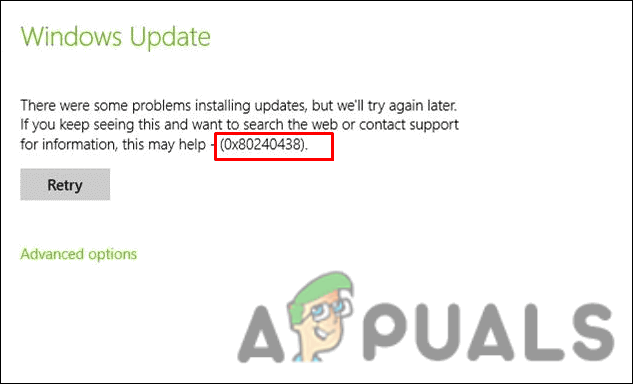
There were some problems installing updates, but we’ll try again later. If you keep seeing this and want to search the web or contact support for information, this may help – (0x80240438).

If you face this issue, you need to check up on the following:
- Run the Windows Update Troubleshooters.
- Disable your Antivirus or Firewall.
- Disable Proxy Connections.
- Modify the Remove access to use all Windows Update features Policy.
- Reset the Windows Update folders.
- Download the Update Manually.
1] Run the Windows Update Troubleshooters
You can run the Windows Update Troubleshooter and also Microsoft’s Online Windows Update Troubleshooter and check if that is any help in fixing any of your issues.
2] Disable your Antivirus or Firewall
You can temporarily disable Windows Defender which is installed out of the box on your Windows computer. You can also disable your Windows Firewall on your computer and check if that fixes the errors that you are encountering. If you are using 3rd-party security software, disable them and see.
3] Disable Proxy Connections
Start by typing in Internet Options in the Cortana Search Box. Click on the appropriate result.
Now navigate to the tab called Connections.
Under the section labeled as Local Area Network (LAN) settings. Click on the button that says LAN Settings.
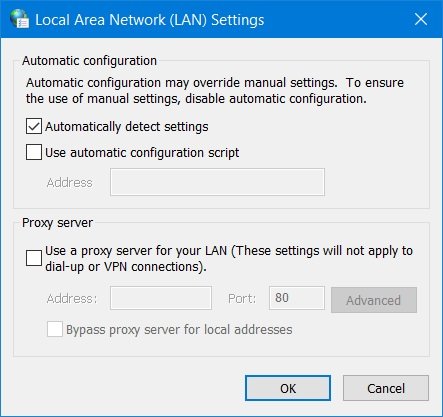
Under the section of Proxy Server, uncheck the option that is labeled as Use a proxy server for your LAN (These settings will not apply to dial-up or VPN connections).
Click on OK and then Reboot the computer for the changes to take effect.
4] Modify the Remove access to use all Windows Update features Policy
Hit the WINKEY + R button combination to launch the Run utility, type in gpedit.msc and hit Enter. Once Group Policy Editor opens, navigate to the following setting-
User Configuration > Administrative Templates > Windows Components > Windows Update
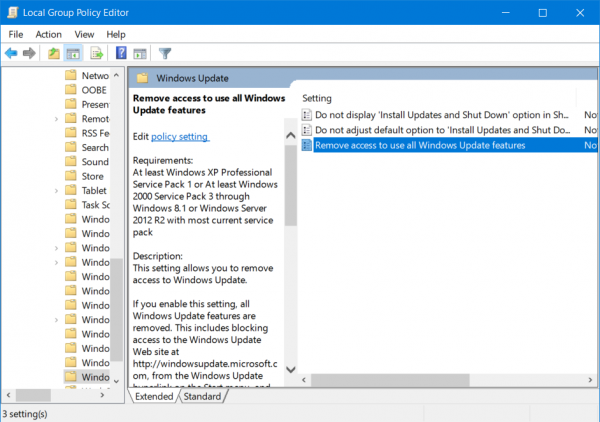
Now, on the right side panel and double click on Remove Access To Use All Windows Update Features and set the radio button to Not Configured for it.
This setting allows you to remove access to Windows Update. If you enable this setting, all Windows Update features are removed. This includes blocking access to the Windows Update Web site at http://windowsupdate.microsoft.com, from the Windows Update hyperlink on the Start menu, and also on the Tools menu in Internet Explorer. Windows automatic updating is also disabled; you will neither be notified about nor will you receive critical updates from Windows Update. This setting also prevents Device Manager from automatically installing driver updates from the Windows Update Web site.
If enabled you can configure one of the following notification options:
- 0 = Do not show any notifications – This setting will remove all access to Windows Update features, and no notifications will be shown.
- 1 = Show restart required notifications – This setting will show notifications about restarts that are required to complete an installation.
This would fix your issues if this was the cause.
Exit the Group Policy Editor and then reboot your computer for the changes to take effect.
5] Reset the Windows Update folders
You need to delete the contents of the SoftwareDistribution folder & reset the Catroot2 folder.
6] Download the Update Manually
If it’s not a feature update, and only a cumulative update, you can manually download and install the Windows Update. To find which update has failed to follow the steps:
- Go to Settings > Update and Security > View Update History
- Check which particular update has failed. Updates that have failed to install will display Failed under the Status column.
- Next, go to Microsoft Download Center, and search for that update using the KB number.
- Once you find it, download, and install it manually.
You could use Microsoft Update Catalog, a service from Microsoft that provides a listing of software updates that can be distributed over a corporate network. Using the Microsoft Update Catalog can prove to be a one-stop location for finding Microsoft software updates, drivers, and hotfixes.
All the best!
Ayush has been a Windows enthusiast since the day he got his first PC with Windows 98SE. He is an active Windows Insider since Day 1 and has been a Windows Insider MVP.
One of the common issues that users come across while updating Windows or installing apps through Microsoft Store is Error Code 0x80240438. Most of the time, both Store and Windows Update encounter the same error code as they have an interlinked delivery mechanism. As each operating system has multiple characteristics, so the culprit of the issue also varies.
Some of the possible causes that put a hindrance in the Windows Update and Store service are proxy settings, Windows Firewall, IPV6, and more. Regardless of the versions of Windows 10 or 11 you are using, the resolutions will be same. So in the article, we will discuss some of the most verified workarounds to resolve bug code 0x80240438. Find out the solutions –
Here is How to Fix Windows 11/10 Update Error Code 0x80240438 –
1] Install the Windows Update Manually
Microsoft is very much keen to release cumulative updates and features quite regularly packing latest modifications and fixes for bugs and issues. Most of these files start downloading and installation follows automatically in presence of an active internet connection. Error code 0x80240438 appears while the Windows Update feature is autonomous and this is just a cumulative patch, unlike feature update. Hence, we can proceed to install the update patch manually using below guidelines –
- Press Windows key and type in – update history.
- Hit – Enter.
- Explore the list of successful and failed updates.
- Check for the failed updates and then navigate to Microsoft Update Catalog.
- Here, search for the KB that got failed to install. Once you see it, download the compatible architecture and install the file manually.
2] Use the Windows Update Troubleshooter
Windows 10 and 11 Update Error code 0x80240438 comes in when the system encounters difficulties in installing related cumulative patch. Many of the similar drawbacks kept on haunting the users over the ages. To eradicate this issue, Microsoft came up with brand new idea of Windows Update Troubleshooter. The tool guides us on how to resolve a specific error that happens while installing an update. Here is how to use the tool –
For Windows 10
- Press Win+I hotkeys at once to launch the Windows Settings app.
- Click on the Update & Security tile to pass forward in the succeeding page.
- When the page arrives, select Troubleshoot from the left pane.
- Jump to alongside right and click – Additional troubleshooters.
- Select Windows Update option from there.
- Hit Run the Troubleshooter button from the expanded pane.

- The utility will now start looking for update errors in the system. It will also provide guidelines to solve the issue accordingly.
- Follow the instructions shown in the display to complete the process.
For Windows 11
- Right-click Start button and choose – Settings.
- Move to the right of Settings page.
- Scroll down a bit and click – Troubleshoot.
- Select – Other troubleshooters.
- From the next page, click Run present beside Windows update.
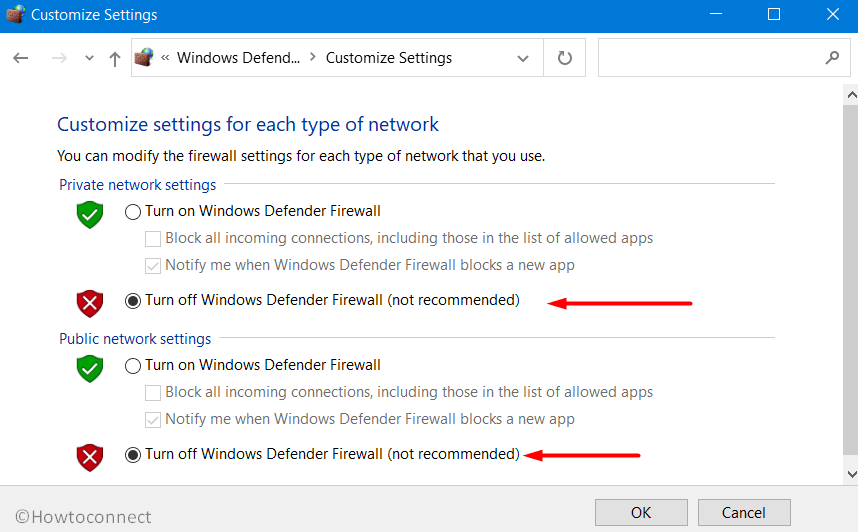
3] Disable Windows Firewall
Having an active security solution often can be detrimental for an update patch to be installed automatically as the tool will detect the file as malware. Windows Firewall provides us real-time protection against malicious invaders and offers maximum security. However, the same can also cause Error code 0x80240438 in Windows 10 and 11. In order to fix the error, we can disable Windows Firewall temporarily until the issue goes off. Here is how to disable the Windows Firewall –
- Open the Taskbar Search pressing Win+Q hotkey together.
- Type Windows Defender Firewall in the empty text space. Select the app after arriving in the result.
- Moving on to the app UI, click Turn Windows Defender Firewall on or off from left pane.
- After a new window unveils, click the radio button against Turn off Windows Firewall (not recommended) option for both the networks on this page.
- Click the OK button and save these changes and there will not be any more 0x80240438 update error.
4] Uninstall Third-party anti-malware tool
Like the Windows Security, any other third party application may often block an update patch and eventually users encounter 0x80240438 error. Moreover, keeping a 3rd party anti-malware solution may be detrimental parallel to Windows Security. So, make room to uninstall security solutions from outside sources right away using the below steps –
- Right-click on Start icon and choose Apps and Features from appearing Win+X menu.
- When the Apps Settings will open up, reach out to the third party security solution on the right pane.
- Select the same and hit Uninstall from expanded pane.
- When UAC prompts for permission, click Yes and follow on-screen guidelines until the process ends.
- Finally, reboot Windows to implement the modifications.
5] Disable IPV6 from Windows
Various forums are evident that disabling IPV6 resolves Error code 0x80240438 in Windows 11 and 10. Therefore we may also give it a try following below instructions –
- Press Win + R keys and invoke the Run dialog box.
- Type ncpa.cpl and click OK button located on wizard to open up Network connections window.
- Moving on to the new window, do a right-click on the internet connection that is connected to your computer.
- Select Properties option from appearing menu.
- Jump to another popup window and uncheck the box against Internet Protocol Version 6 (TPC/IPv6).
- Click on OK button from bottom area and save changes.
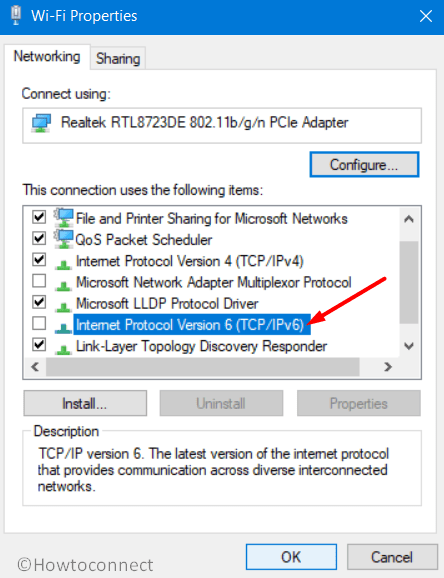
- Lastly, reboot the device and check if the error exists in the system when a new session begins.
6] Tweak Group Policy Editor
Tweaking policy in the Group Policy Editor will let you remove access from Windows Update. Enabling the settings will remove all the Windows Update features from system. Many users have confronted that they have fixed Error code 0x80240438 tweaking the policy. Follow the below guidelines to complete the task –
- Invoke the Run dialog and type gpedit.msc in its empty text box.
- Press Enter key to open Group Policy Editor and navigate to below path –
User Configuration > Administrative Templates > Windows Components > Windows Update
- Upon reaching to Windows Update, jump on the alongside right pane.
- Hereby, make a double click on Remove Access To Use All Windows Update Features.
- Select the radio button against Not Configured.
- If you see it is enabled, configure one of the below notification options –
0 = Do not show any notifications – This setting will remove all access to Windows Update features, and no notifications will be shown.
1 = Show restart required notifications – It will display notifications about restarts that are required to complete the installation.
- Click the OK button finally and close the Group Policy Editor window.
- Restart Windows PC to make changes effective.
7] Disable Proxy server connection
Disable Proxy server connection may also be pretty helpful in eliminating Error code 0x80240438 in Windows 11 and 10. To do so, follow the below steps –
- Press Windows key, type internet options and hit Enter key to access Internet Properties.
- Jump into the Connections tab.
- Move out to Local Area Network (LAN) settings area and click the LAN Settings.
- Upon opening a new settings page, uncheck the box that reads Use a proxy server for your LAN (These settings will not apply to dial-up or VPN connections) under Proxy Server section.
- Click the OK button and later on, reboot Windows to make the changes effective.
8] Clear off Microsoft Store Cache
Windows Update Error code 0x80240438 resembles the Microsoft Store issue as well hence, clearing the Store cache might help. Follow the below guidelines to clear the cache –
- Open Run dialog box pressing Windows key and R.
- Type wsreset in the void text space and press Enter.
- The Command Prompt will open up in a few moments and take over the task.
- Once the process ends, Command Prompt window will close automatically and open Microsoft Store.
See – How to Reset Cache of Windows Store
9] Rename Windows Store cache folder
If the Error code 0x80240438 is evolved from Microsoft Store, renaming the Store Cache folder will resolve the setback. For that –
- Get access to Run and enter following text in its empty search box and press Enter key eventually –
%localappdata%\\Packages\\Microsoft.WindowsStore_8wekyb3d8bbwe\\LocalState- Locate the cache folder, make a right-click on the same, and choose Rename option from menu.
- Name it as cache.old and hit Enter to save it.
- If you don’t find the cache folder in LocalState, make a right-click on empty space and choose New > Folder.
- Enter the name Cache and close File Explorer.
- Now open Windows Settings app and head over to Troubleshoot page.
For Windows 10, Go to Settings => Update & Security => Troubleshoot => Additional troubleshooters.
Windows 11 users, navigate to Settings => Troubleshoot (right column) => Other troubleshooters.
- Reach out to the Windows Store App and hit Run the Troubleshooter or Run button.
- After finishing the process, the error will resolve hopefully.
10] Remove everything from of C:\\Windows\\SoftwareDistribution folder
Some contents in the SoftwareDistribution folder may often be a cause for Error code 0x80240438 in Windows 10 and 11. In order to resolve the issue, delete everything from this folder going through below process –
- Open the Taskbar Search, write services in the void text box, and press Enter to launch the application.
- Move out for Background Intelligent Transfer Service, make a right-click on it and select Stop.
- Close the Services app and open File Explorer pressing Win+E hotkey at once.
- In the upcoming window, navigate to the “C:\Windows\SoftwareDistribution” folder.
- Select all items pressing Ctrl+A hotkey at once and press Delete key on the keyboard.
- Reboot Windows and when the system will load back, we can expect the error will resolve.
11] Modify Registry Editor
Modifying the DWORD value of “DisableWindowsUpdateAccess” is found to resolve Error code 0x80240438 in Windows 11 and10 easily. Follow the below guidelines to accomplish –
- Do a right-click on Start and select Run.
- In the empty text box of the wizard, type regedit and hit Enter to access Registry Editor.
- Navigate to the below directory in left-wing –
HKEY_CURRENT_USER=>Software=>Microsoft=>Windows=>CurrentVersion=>Policies=>WindowsUpdate- On the right pane of WindowsUpdate locate the DWORD DisableWindowsUpdateAccess.
- Make a double click on the same and set the value data as 0.
- Click OK and Restart Windows to implement registry settings.
- After the new session will begin, hopefully, there will be no more 0x80240438 error.
Methods:
1] Install the Windows Update Manually
2] Use the Windows Update Troubleshooter
3] Disable Windows Firewall
4] Uninstall Third party anti-malware tool
5] Disable IPV6 from Windows
6] Tweak Group PolicyEditor
7] Disable Proxy server connection
8] Clear off Microsoft Store Cache
9] Rename Windows Store cache folder
10] Remove everything from of C:\\Windows\\SoftwareDistribution folder
11] Modify Registry Editor
That’s all!!
Repair any Windows problems such as Blue/Black Screen, DLL, Exe, application, Regisrty error and quickly recover system from issues using Reimage.
The Windows update error code 0x80240438 pops up when an update fails to install in Windows 10 or 11. The code states ‘There were some problems installing the updates, but we’ll try later. Upon retrying, the error pops up again.
Let’s have a look at the troubleshooting methods that can help fix the problem once and for all.
1. Disable Windows Firewall
Update error 0x80240438 typically occur when the security programs in the system block the updates, considering them a threat falsely.
This issue can occur with both the Windows Firewall and third-party antivirus solutions. In any case, the only solution is to disable the security program temporarily and then install the update. We highly recommend returning the security program, as not doing so will expose your system to several threats.
Here is how you can disable Windows Firewall:
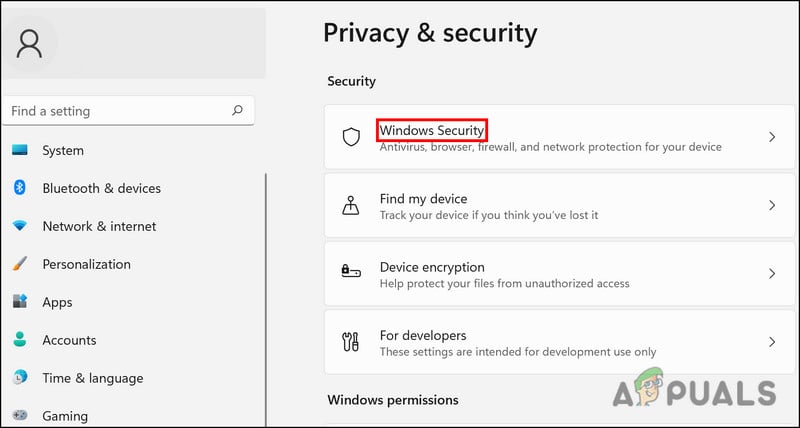
- Press Win + I to open the Settings app.
- Choose Privacy & security from the left pane.
- Head to the right side of the window and navigate to Windows Security > Firewall & network protection.

Access the Windows security settings - Choose your network profile from (Domain network, Private network, and Public network).
- Head to the Microsoft Defender Firewall section and disable the toggle.
- Once done, close the window and try installing the update again.
If you are using a third-party solution, you can simply click on its icon in the taskbar. Choose Disable > Disable until the next restart. After this is done, head over to the Settings app and install the update it again.
2. Run the Update Troubleshooter
The Update Troubleshooter can also help you fix errors while downloading and installing Windows updates. Microsoft developed it specifically to identify, resolve, and identify potential problems within the system that may cause the problem.
Here is how you can run the update troubleshooter:
- Press Win + I keys together to open Windows Settings.
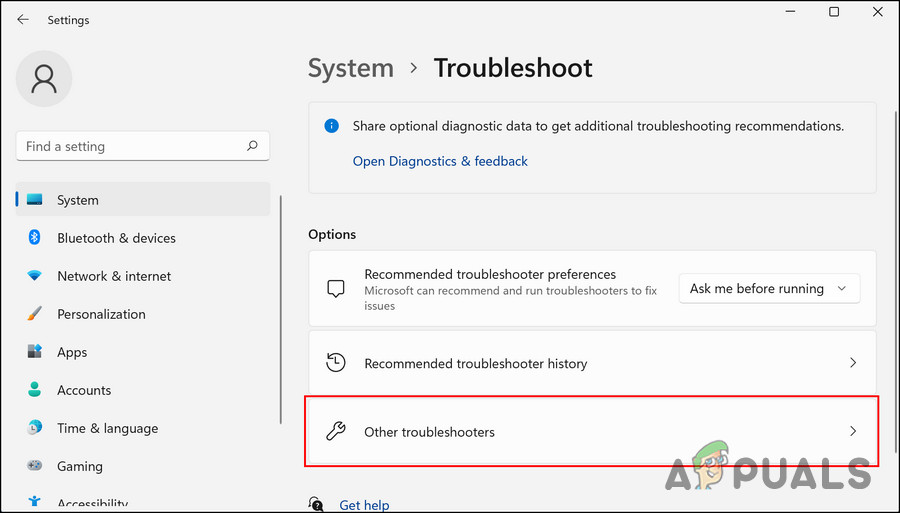
- Choose System from the left pane.
- Select Troubleshoot > Other troubleshooters.

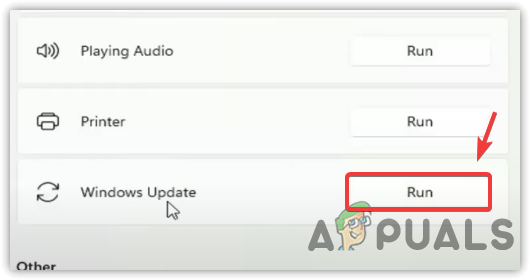
- The Windows Update troubleshooter will appear in the following window. Click on the Run button for it, and it will begin to work.

Running Windows Update Troubleshooter - Wait for the troubleshooter to scan for errors. If it finds any issues, it will notify you, and you can then click on Apply this fix to apply the recommended solution.
- If the troubleshooter fails to identify the problem, click on Close the troubleshooter and proceed to the next method.
3. Install the Update Manually
If you cannot install the updates using the Settings app, you can also do it manually using the Microsoft update catalogue. The Microsoft Update Service provides a list of updates launched. You can find Microsoft software updates, drivers, and hotfixes in one place.
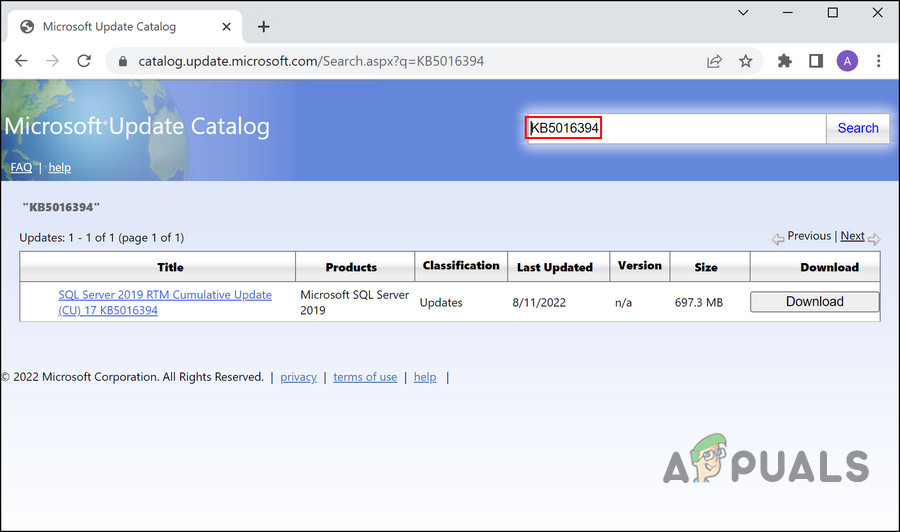
Here is all you need to do:
- Launch your browser and navigate to the Microsoft update catalogue.
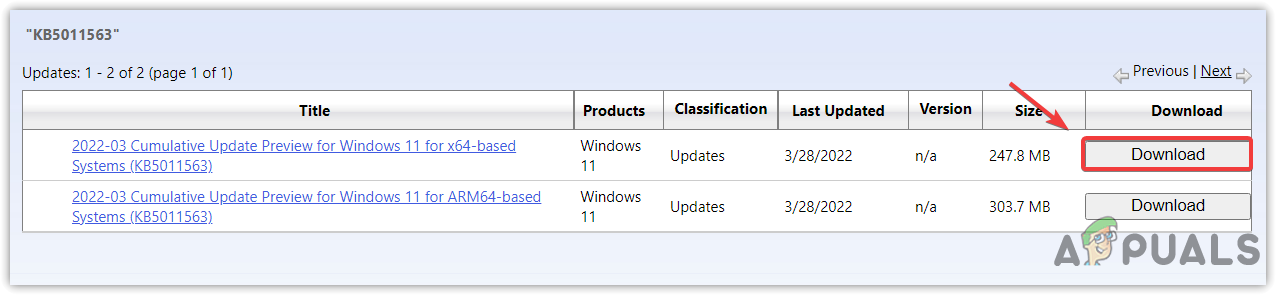
- Using the search box at the top of the screen, enter the KB number of the targeted update.

Search the KB number of the update - You should now be able to view a list of appropriate options in the catalog. Click on the Download button for the right update for your device.

Downloading Windows update From Microsoft Catalog - After the update is downloaded, click on it to Install it.
- Follow the on-screen instructions to complete the installation process.
4. Run System Scans
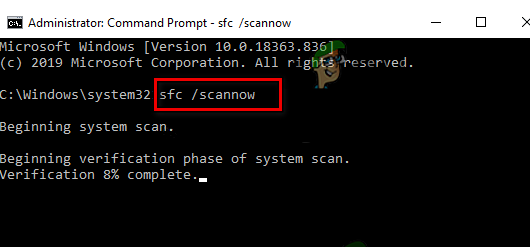
In the case of corruption errors or viruses, the built-in Microsoft-developed utilities may be able to solve the problem.
We will use System File Checker (SFC) and DISM (Deployment Image Servicing and Management) in this situation. The SFC utility will scan the protected system files for potential issues. If any of the files are corrupt, it will replace them with their healthy counterpart.
DISM, on the other hand, is a more powerful tool than SFC and is mainly responsible for repairing a corrupt system image.
Here is how you can run the SFC and DISM utilities:
- Press cmd in the search area of the taskbar and click on Run as administrator.
- In the Command Prompt window, execute the following command:
sfc /scannow

Deploy an SFC scan - Following the execution of the SFC command, execute the DISM command:
DISM /online /cleanup-image /restorehealth

Restoring System Files
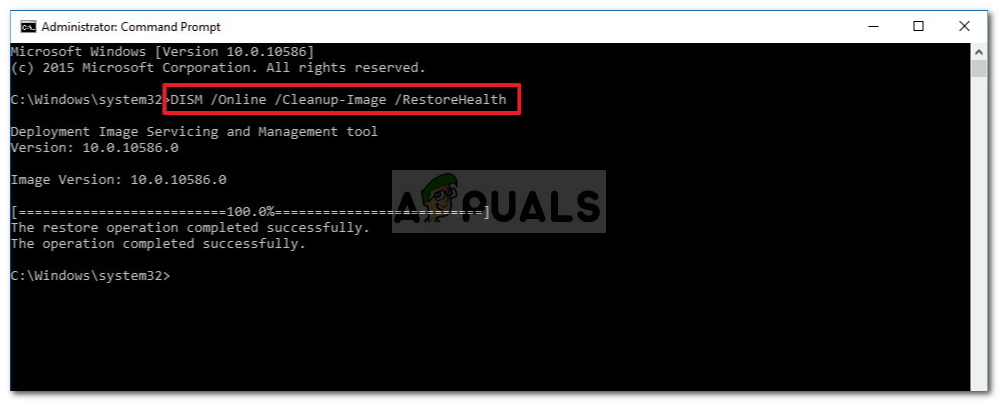
Once the command is executed, try to install the targeted update again.
5. Disable IPV6
Users were also able to fix the issue by disabling Internet Protocol Version 6.
IPv6 (Internet Protocol version 6) is the sixth revision of the Internet Protocol and it replaces IPv4. It provides unique IP addresses for devices that connect to the Internet. It can sometimes cause issues with installing the updates in Windows.
Here is how you can disable it to fix the network drive issue:
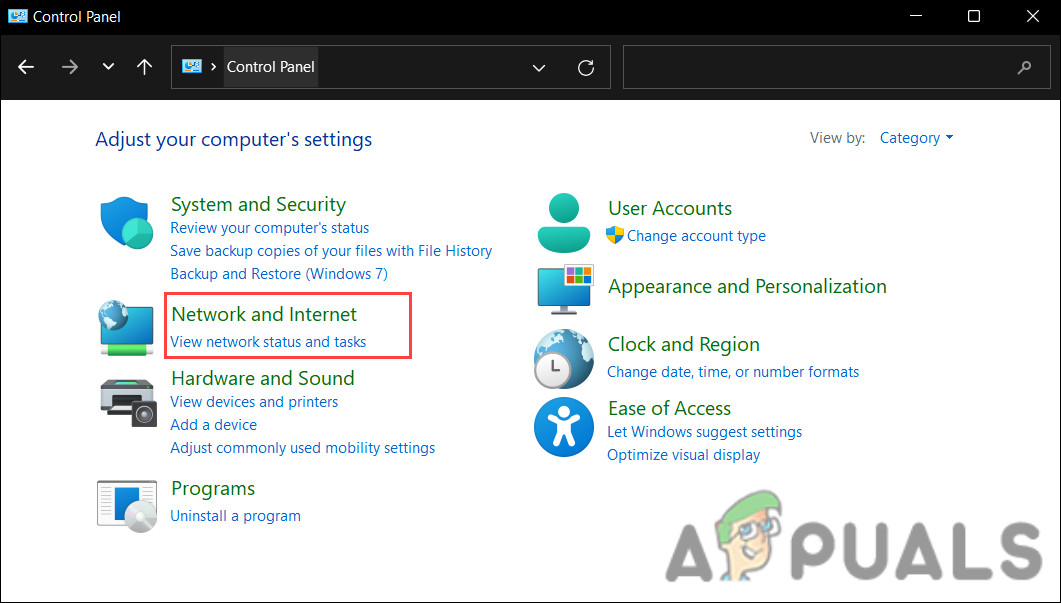
- Type Control Panel in the Windows search.
- Select Network and Internet from the following window.

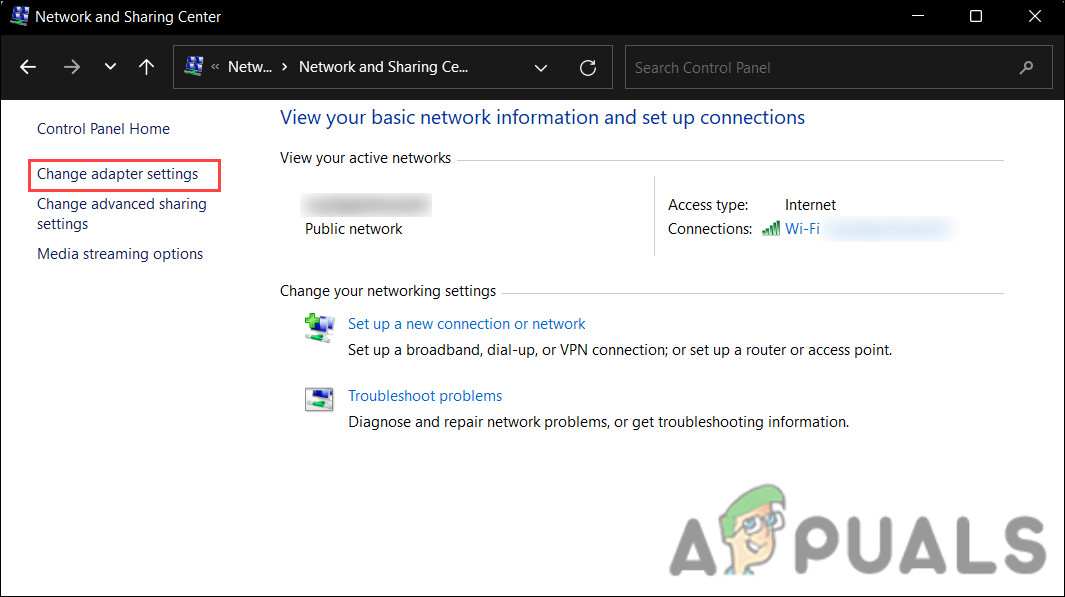
Access the network and internet settings - Head over to Network and Sharing Center, and select Change Adapter Settings.

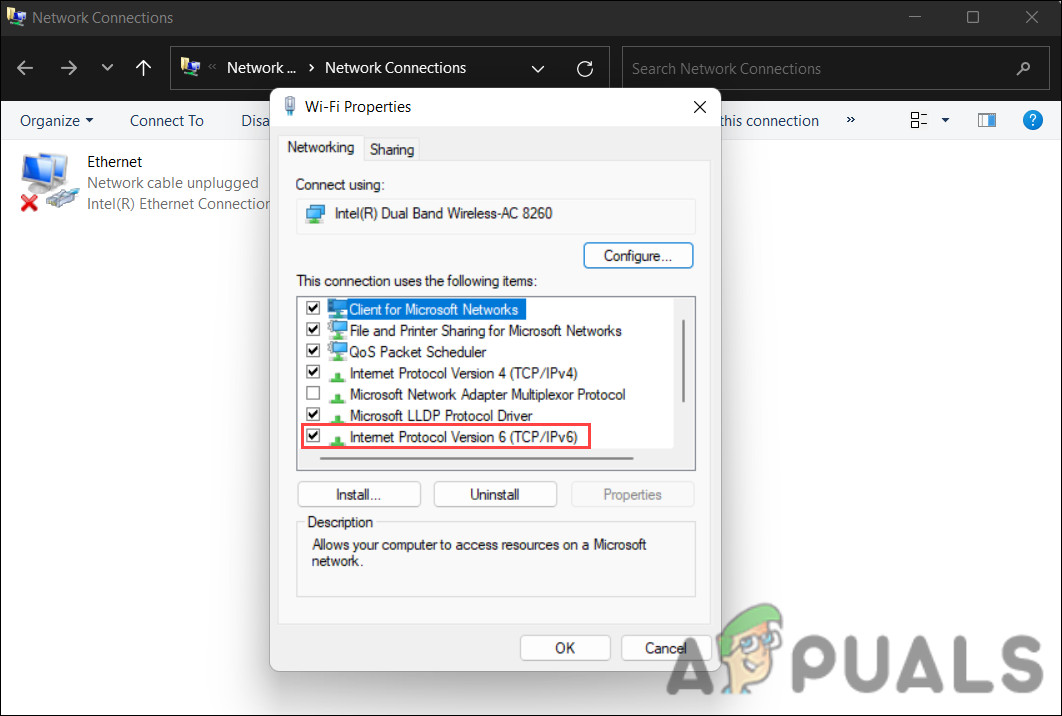
- Open Network Connections and right-click on Wi-Fi.
- Choose Properties.
- In the Properties dialog, navigate to the Networking tab and locate the IPV6 option.
- Uncheck the box for it and click OK to save the changes.

Uncheck the IPV6 option
Hopefully, this will fix the problem.

Zainab Falak
Zainab Falak is a highly educated professional with a background in actuarial science and a strong passion for technology. Her expertise lies in the field of data analytics and she is a proficient programmer in languages such as Python and R. At Appuals, Zainab shares her extensive knowledge of Windows 8, 10, and 11, covering a broad range of topics related to these operating systems. Zainab’s ability to effectively communicate technical concepts in a clear and concise manner has earned her recognition and respect in the tech community. She is committed to staying up-to-date with the latest developments in the field and providing readers with insightful and informative content.