Содержание
- Вариант 1: Запуск устранения неполадок
- Вариант 2: Проверка целостности системных файлов
- Вариант 3: Включение .NET Framework 3.5
- Вариант 4: Очистка папок с файлами обновления
- Вариант 5: Отключение антивируса
- Вариант 6: Восстановление системы
- Вариант 7: Ручное обновление из образа
- Вариант 8: Ручное скачивание обновления
- Вариант 9: Ручной сброс компонентов «Центра обновления Windows»
- Совместимость Windows 11 с компьютером
- Вопросы и ответы
Единого способа устранить ошибку 0x800f081f нет, поскольку она бывает вызвана самыми разными неполадками в системе. Именно поэтому рекомендуется пробовать все рекомендации по очереди, начиная с первых и самых легких. Перед этим также не забудьте проверить, достаточно ли свободного места на диске C для установки обновления, так как это тоже может повлиять на рассматриваемую проблему.
Вариант 1: Запуск устранения неполадок
Довольно простым вариантом является использование автоматического средства устранения неполадок, которое есть в Windows. Похвастаться высокой эффективностью их обнаружения оно не может, однако справится с самыми распространенными причинами, да и от пользователя требуется лишь запустить приложение.
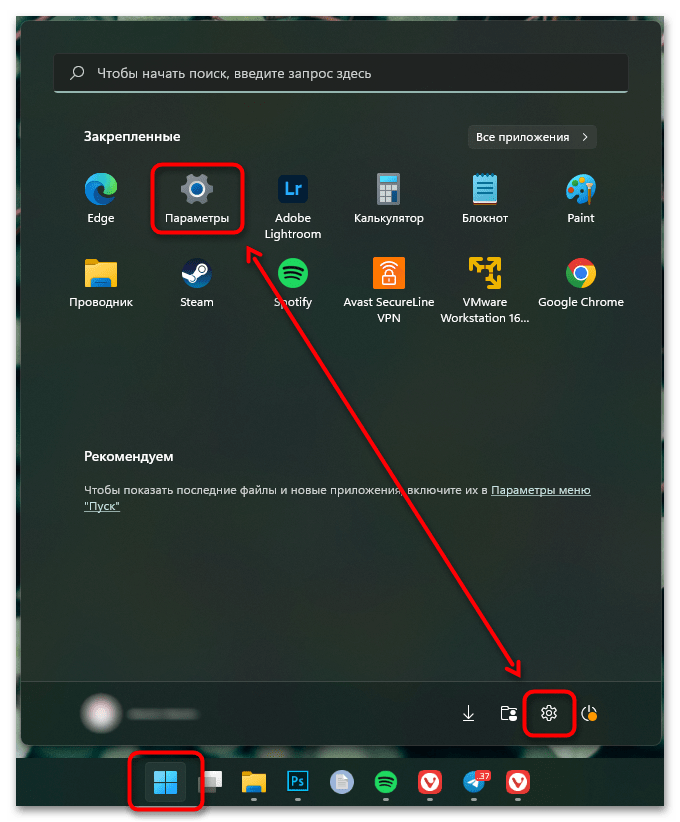
- Откройте системные «Параметры» через «Пуск».
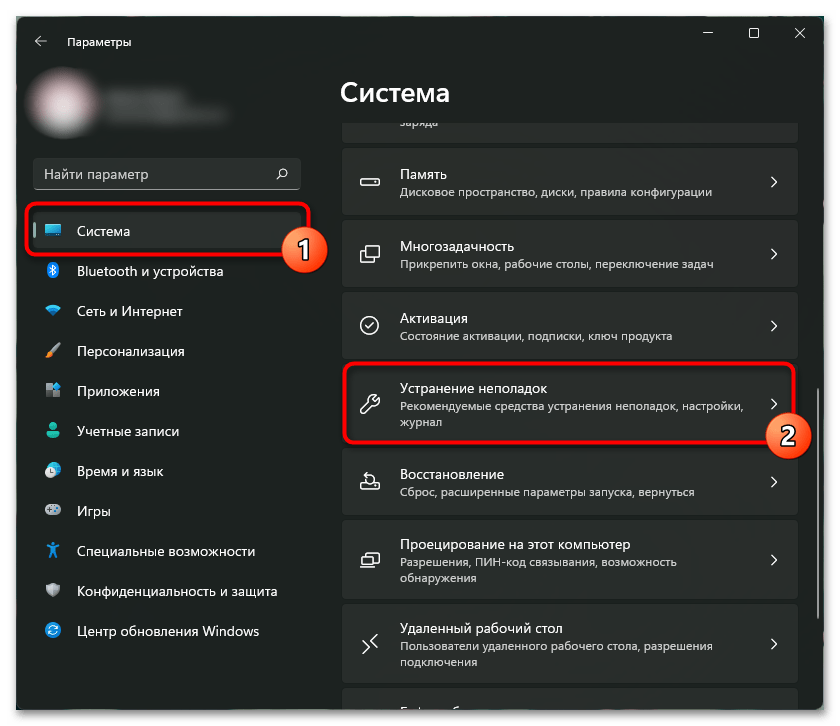
- Через первый же раздел «Система» переключитесь в «Устранение неполадок».
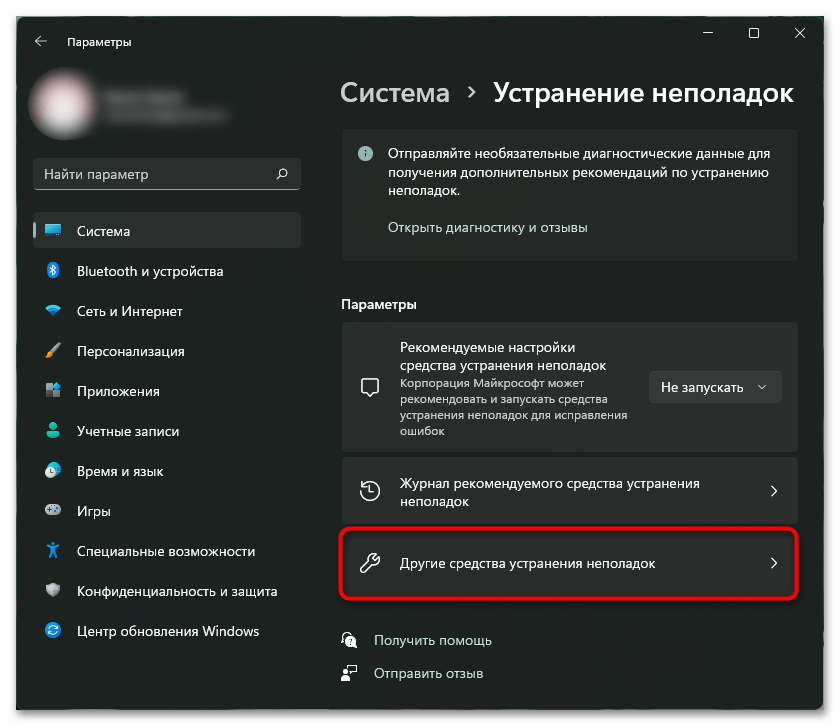
- Кликните по строчке «Другие средства устранения неполадок».
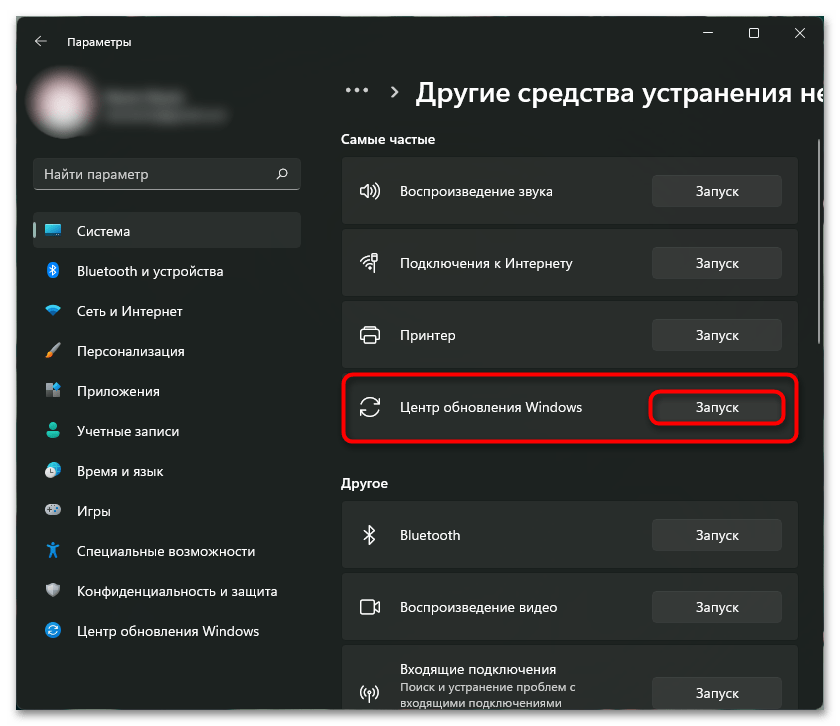
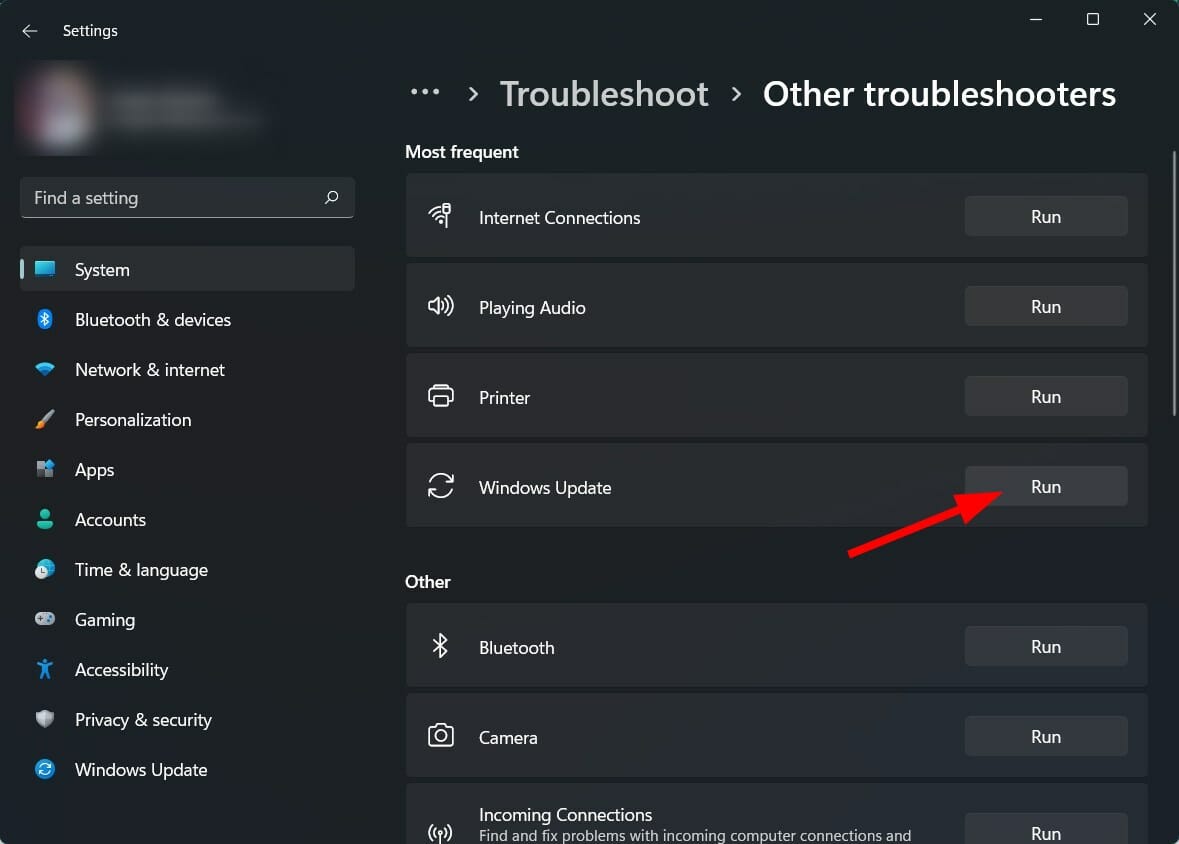
- Из списка средств отыщите «Центр обновления Windows» и нажмите по «Запуск».
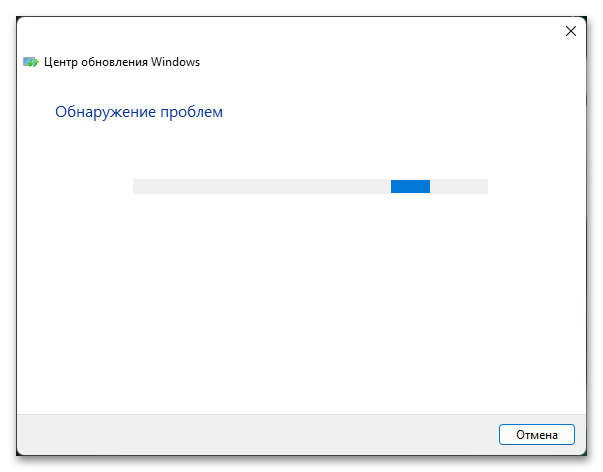
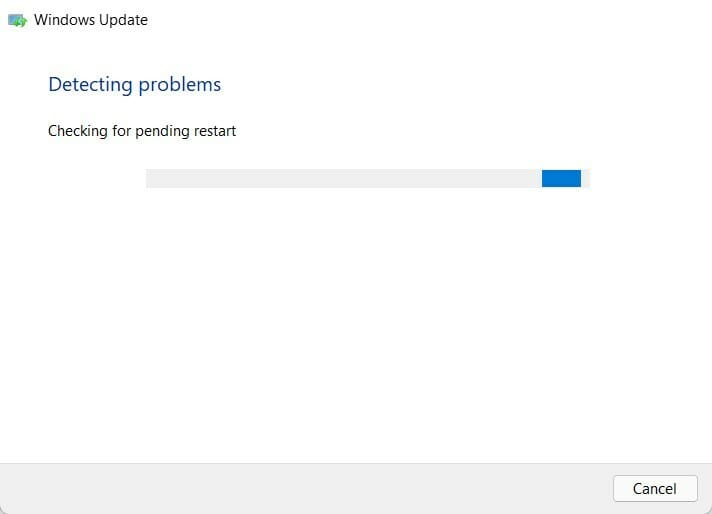
- Начнется автоматическое сканирование, подождите несколько секунд.
- По его результатам уже будет понятно, можно ли что-то предпринять (или система это может исправить и сама) или придется двигаться дальше. Если какое-то решение было предложено, воспользуйтесь им, а затем проверьте, была ли устранена ошибка.
Вариант 2: Проверка целостности системных файлов
За нормальную работу критически важных и некоторых второстепенных компонентов операционной системы отвечают определенные файлы, но они могут повредиться в ходе неудачных предыдущих обновлений, проблем с жестким диском или других ситуаций. Исправить их могут системные утилиты, которыми мы и предлагаем воспользоваться.
Эти утилиты проверяют целостность файлов и, если находят проблемные, восстанавливают их из резервного хранилища. У нас на сайте есть отдельная статья, направленная на использование обеих утилит. И хотя она написана под Windows 10, для Windows 11 отличий не будет никаких.
Подробнее: Использование и восстановление проверки целостности системных файлов в Windows
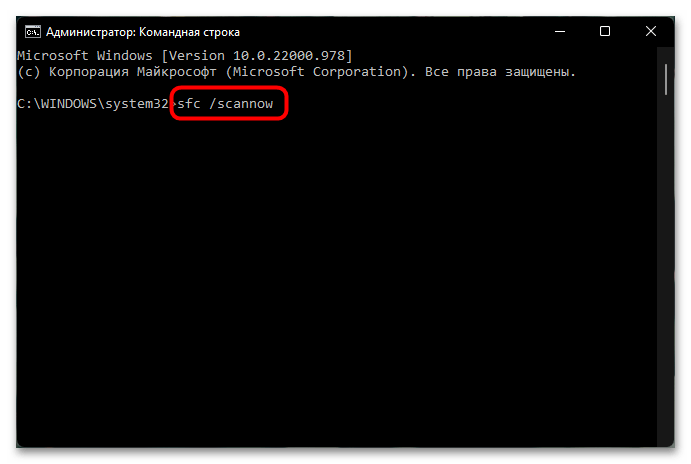
Вам необходимо правильно применить инструкции, которые даны в вышеупомянутой статье. В данной ситуации сперва рекомендуем воспользоваться «Шаг 2: Запуск DISM». Если утилита найдет и исправит некоторые повреждения, перезагрузите компьютер. После этого выполните инструкцию из «Шаг 1: Запуск SFC». Смысл тот же — если увидите уведомление о том, что файлы были восстановлены, перезагрузите компьютер.
При запуске DISM и/или SFC вы можете столкнуться с тем, что одно или оба хранилища этих утилит повреждены. Для их восстановления в той же статье по ссылке выше есть отдельные подзаголовки, где рассказывается, как выполнить исправление. Если повреждены оба, сперва восстанавливайте DISM, потом SFC. После этого возвращайтесь к попытке их запуска.
Соответственно, после всех проделанных манипуляций пробуйте установить обновление.
Вариант 3: Включение .NET Framework 3.5
Иногда операционке могут потребоваться .NET-файлы для установки обновления, а именно файлы от .NET Framework 3.5. Поскольку по умолчанию этот компонент отключен в Вин 11, в результате неудачной попытки инсталляции возникает ошибка с кодом 0x800f081f. Решение простейшее: включить этот компонент.
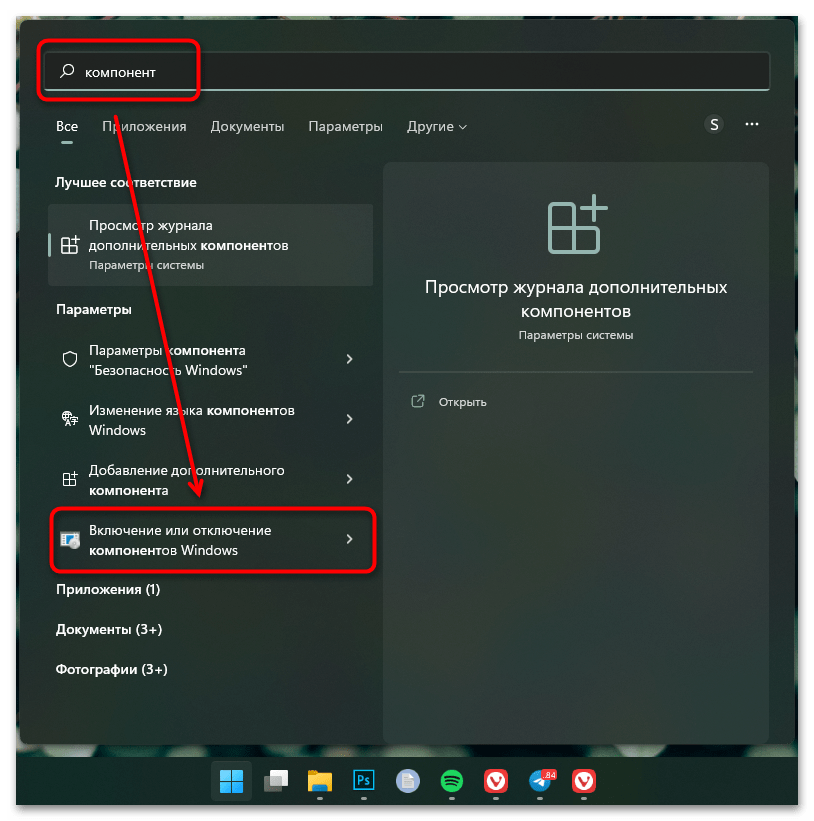
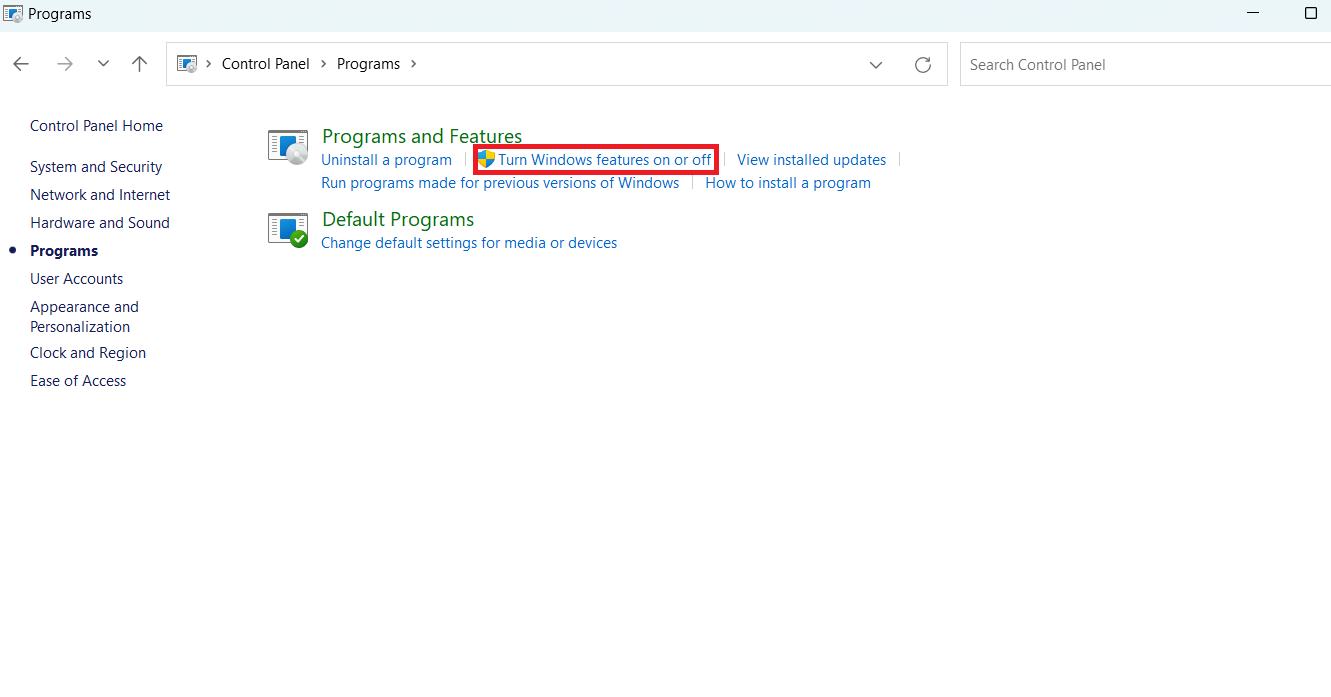
- Откройте «Пуск» и начните набирать запрос «компонент». Из списка результатов выберите «Включение или отключение компонентов Windows».
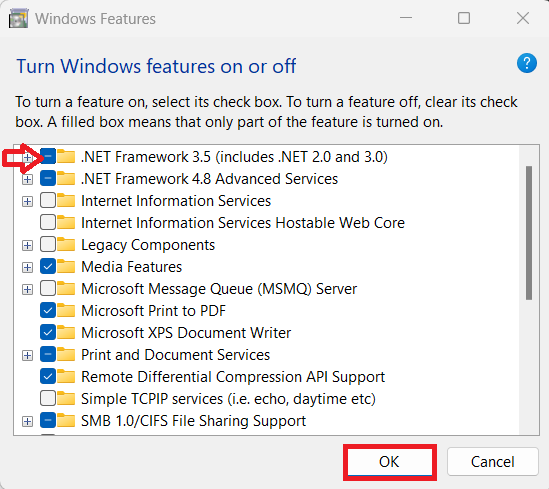
- Первым в списке будет «.NET Framework 3.5» — нажмите по нему, чтобы квадрат стал синим. У компонента есть дополнительные опции, разворачиваемые «плюсиком», но их включать не обязательно. Сохраните изменения кнопкой «ОК».
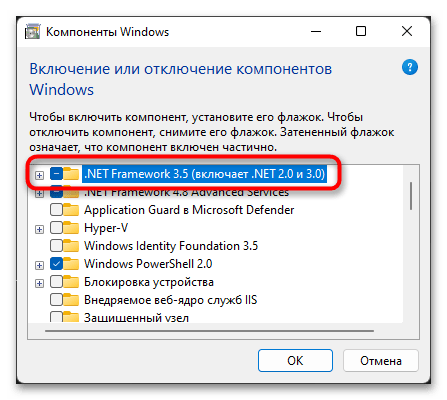
Теперь попробуйте установить обновление еще раз. Если же .NET Framework 3.5 и так включен, значит, вы это уже делали ранее при решении какой-то другой неполадки. Тогда переходите к другим рекомендациям.
Вариант 4: Очистка папок с файлами обновления
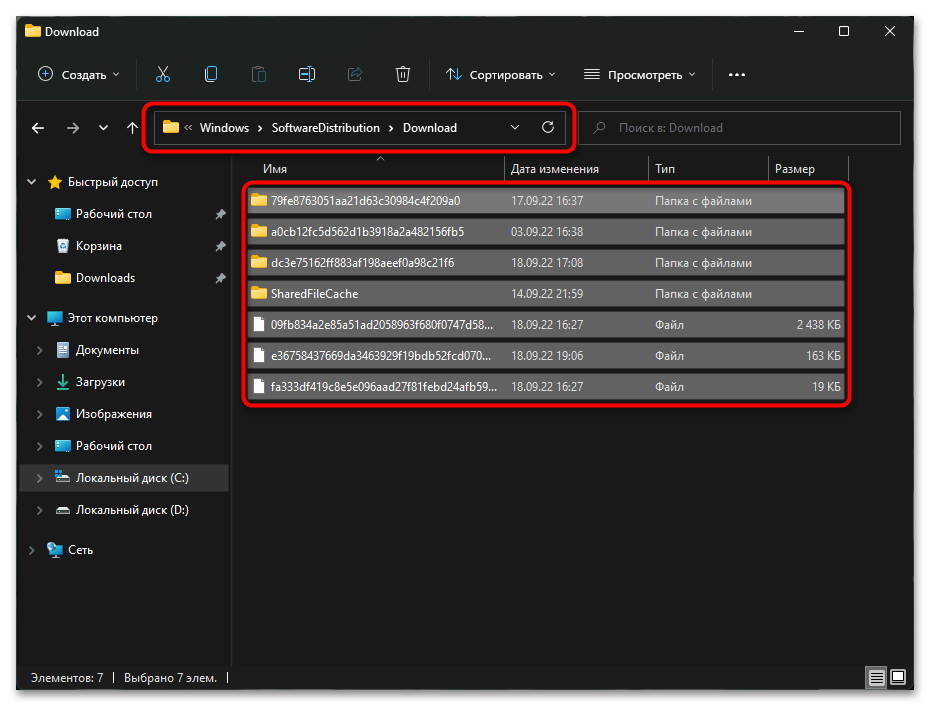
Первая папка, о которой пойдет речь, называется «SoftwareDistribution» и напрямую связана с «Центром обновления Windows», и именно в ней хранятся некоторые временные файлы, необходимые для установки апдейта. Если файлы, которые сейчас не могут установиться, скачались в папку с ошибкой (например, не докачались) или произошла другая непредвиденная неполадка, находятся как раз внутри «SoftwareDistribution», попробуйте их удалить вручную.
- Запустите «Проводник», перейдите по пути
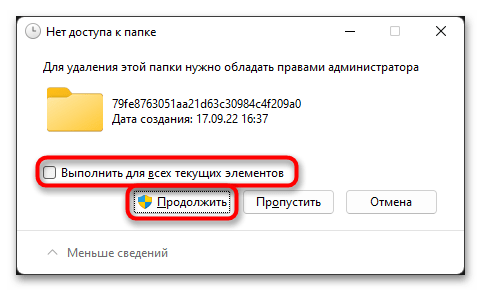
C:\Windows\SoftwareDistributionи найдите внутри папку «Download». Откройте ее, выделите все файлы сочетанием клавиш Ctrl + A и удалите их, нажав клавишу Delete. - Скорее всего, появится окно об отсутствии прав. Поставьте галочку у пункта «Выполнить для всех текущих элементов» и нажмите «Продолжить».
После удаления откройте «Центр обновления Windows» и проверьте, устранился ли сбой.
Также может помочь удаление всех файлов из папки «SoftwareDistribution», но на всякий случай рекомендуем сделать резервную копию.
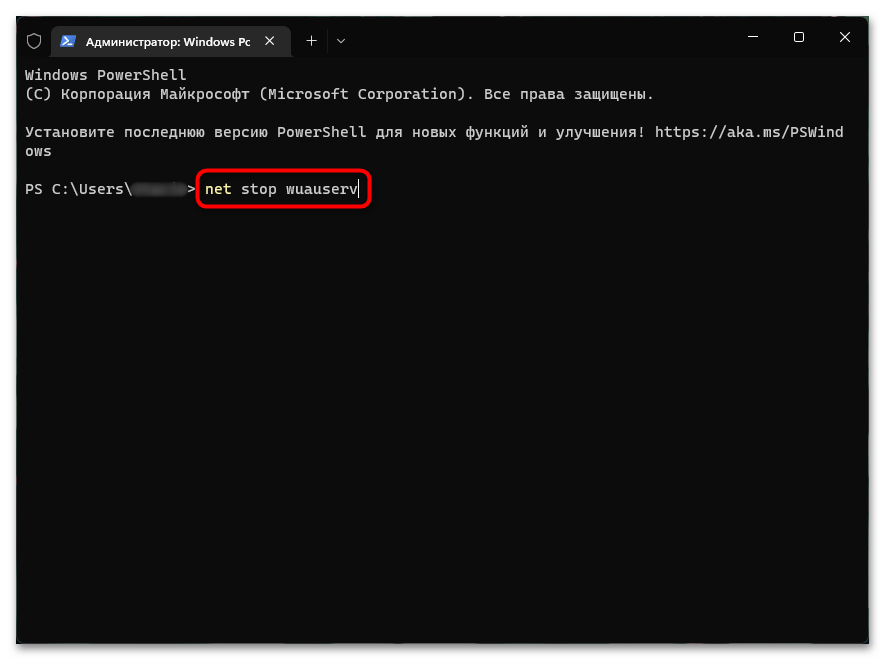
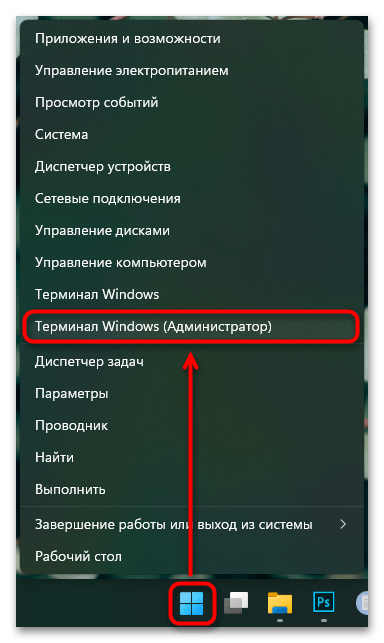
- Если система не позволяет вам удалить файлы из «SoftwareDistribution», остановите работу «Центра обновления Windows». Для этого нажмите правой кнопкой мышки по «Пуску» и вызовите «Терминал Windows (Администратор)».
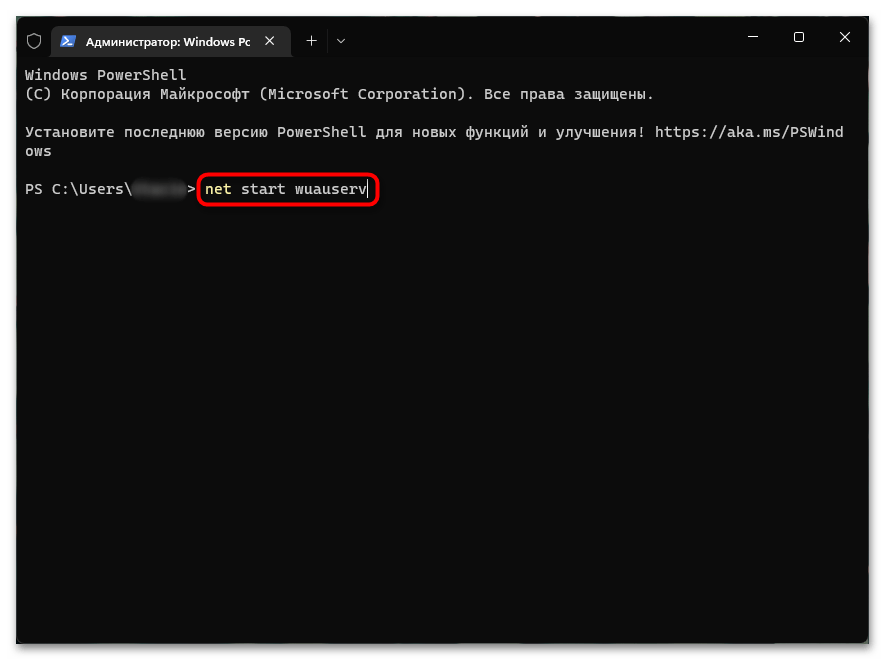
- Вставьте команду
net stop wuauservи нажмите Enter. - Удалите файлы из папки «SoftwareDistribution» (кстати, раз уж открыли консоль, можете удалить папку через нее, а не через «Проводник» — для этого вставьте команду
rd /s /q %systemroot%\SoftwareDistributionи нажмите Enter). - Можете снова запустить остановленную службу командой
net start wuauservи попробовать скачать обновление еще раз.
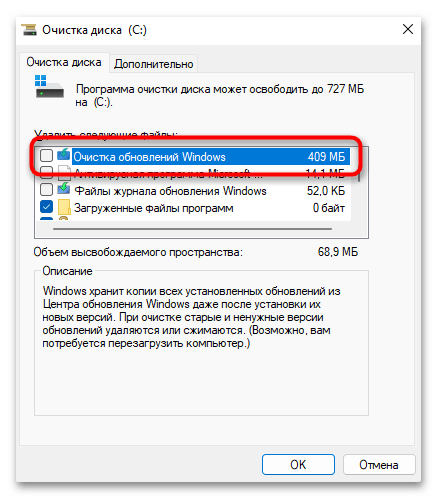
Вторая папка — «WinSxS», — тоже содержит в себе файлы обновлений и др., поэтому ее очистка может помочь. Однако сама процедура очистки существенно отличается от рассмотренной выше — удалять из «WinSxS» все подряд (или папку целиком) нельзя. Используйте нашу статью по ссылке ниже для правильной очистки. Инструкция написана под Win 10, но для обладателей 11 ничего не поменялось.
Подробнее: Способы очистки папки «WinSxS» в Windows
Вариант 5: Отключение антивируса
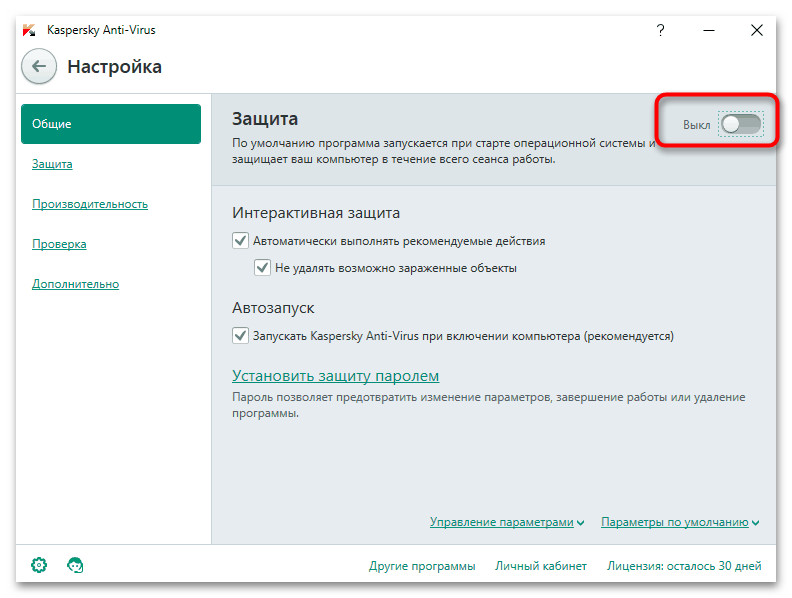
Это довольно редкая причина, но все же стоит о ней напомнить. Разные антивирусы, даже самые популярные, изредка ложно срабатывают на попытку Windows скачать обновления, блокируя этот процесс. Если вы пользуетесь сторонним решением, отключите его на время и попробуйте установить проблемное обновление. Затем не забудьте включить антивирусное ПО обратно.
Читайте также: Отключение антивируса
Вариант 6: Восстановление системы
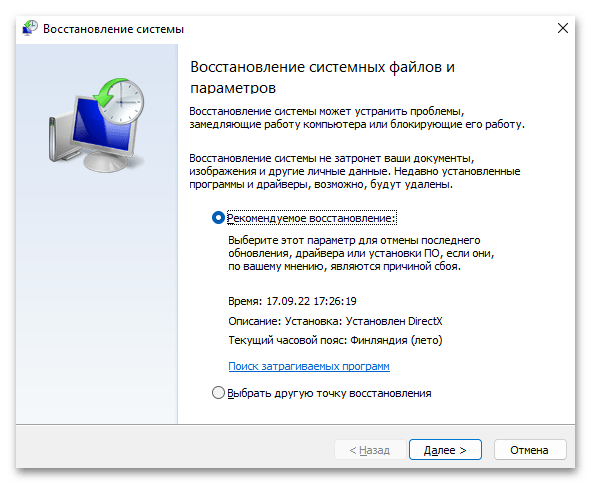
Порой справиться самостоятельно с возникшей неполадкой не удается, и тогда может помочь откат операционки до одной из точек восстановления, когда все работало нормально. Конечно же, способ подойдет только тем, у кого на компьютере было заранее включено автоматическое создание точек восстановления (или кто периодически делал это самостоятельно).
Если вы не знаете, как пользоваться восстановлением системы, в нашей статье по ссылке ниже можете воспользоваться инструкцией на эту тему. Она целиком подходит для пользователей Windows 11.
Подробнее: Откат к точке восстановления в Windows
Вариант 7: Ручное обновление из образа
Альтернативный вариант для тех, у кого 0x800f081f возникает при попытке обновить версию ОС и кому не помогает ни одна из предложенных ранее рекомендаций, включая точку восстановления (или этой точки вовсе нет). Скачайте чистый образ Windows 11 (его последнюю версию, до которой не удается обновиться), а еще лучше приложение Media Creation Tool, и запишите систему на флешку, сделав последнюю загрузочной.
Скачать Media Creation Tool
Подробнее: Руководство по созданию загрузочной флешки с Windows
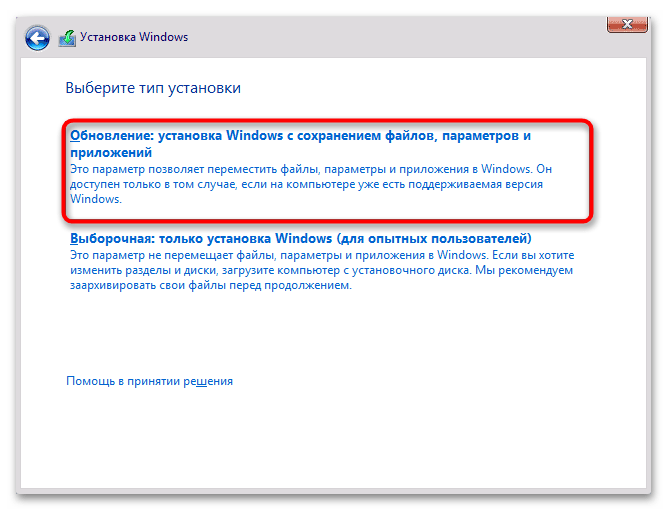
После этого загрузитесь с нее и на этапе выбора типа установки используйте «Обновление». В этом случае все личные файлы и приложения будут сохранены, просто произведется принудительное обновление Виндовс.
Вариант 8: Ручное скачивание обновления
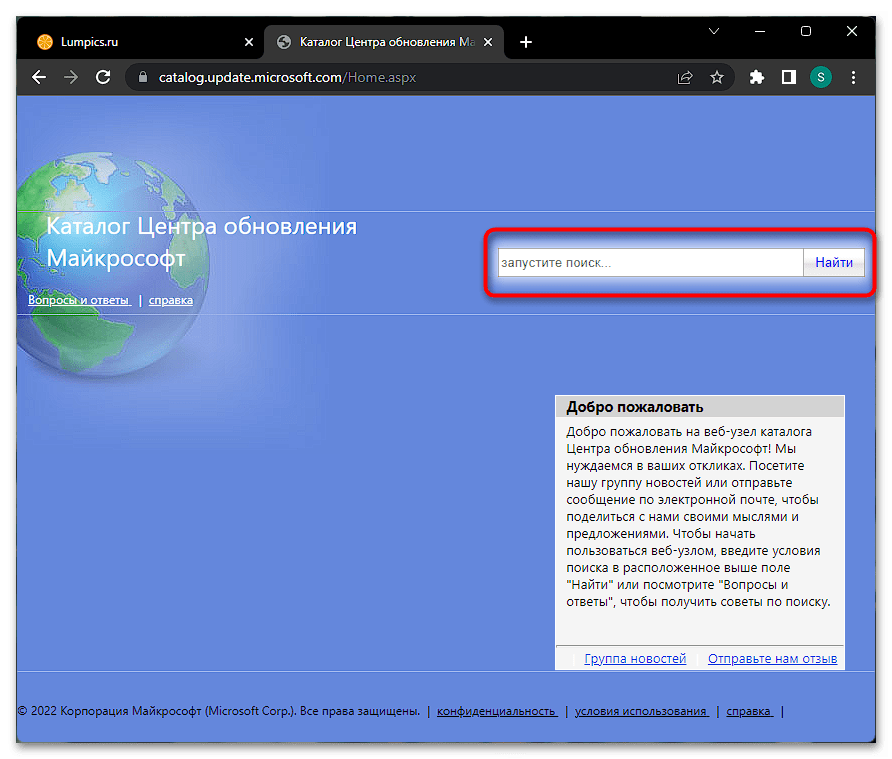
Еще один возможный метод исправления проблемы — самостоятельное скачивание обновления, установить которое не получается через «Центр обновления Windows». На этой странице всегда пишется название апдейта, которое планируется установить. Для ручного скачивания откройте страницу по ссылке ниже и вставьте название обновления в поисковую строку.
Перейти в Каталог Центра обновления Майкрософт
Скачайте необходимый апдейт, запустите установочный файл и следуйте подсказкам мастера установки.
Одним из радикальных вариантов устранения проблемы является самостоятельный сброс «Центра обновления Windows», в результате чего может получиться устранить рассматриваемую и другие (если такие есть) ошибки, связанные с апдейтами.
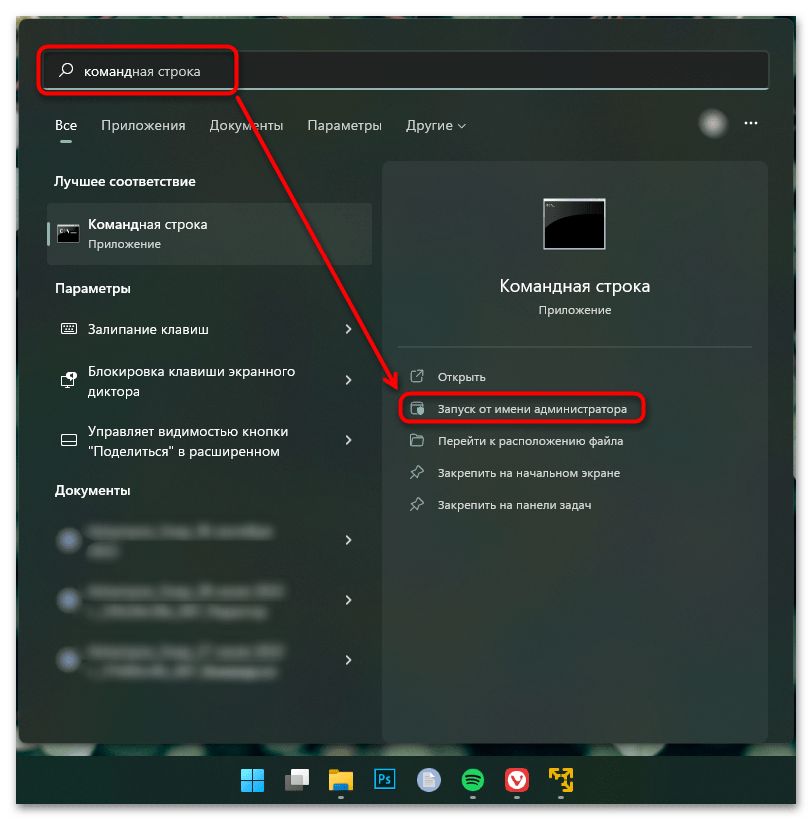
- Откройте «Командную строку» с правами администратора.
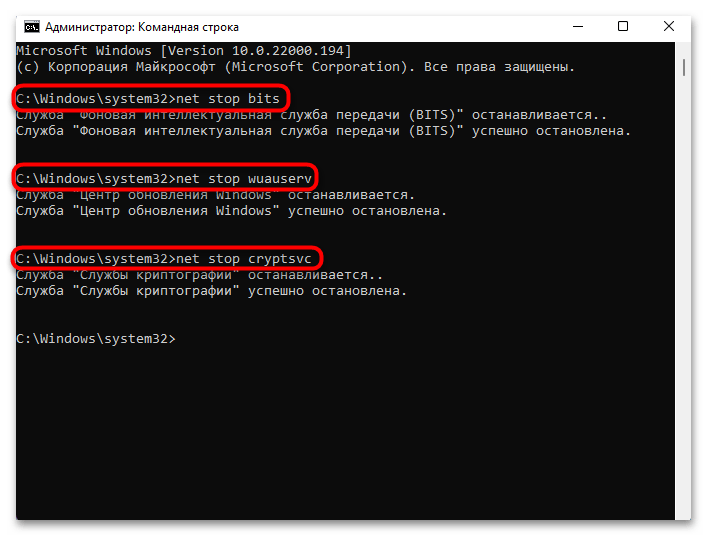
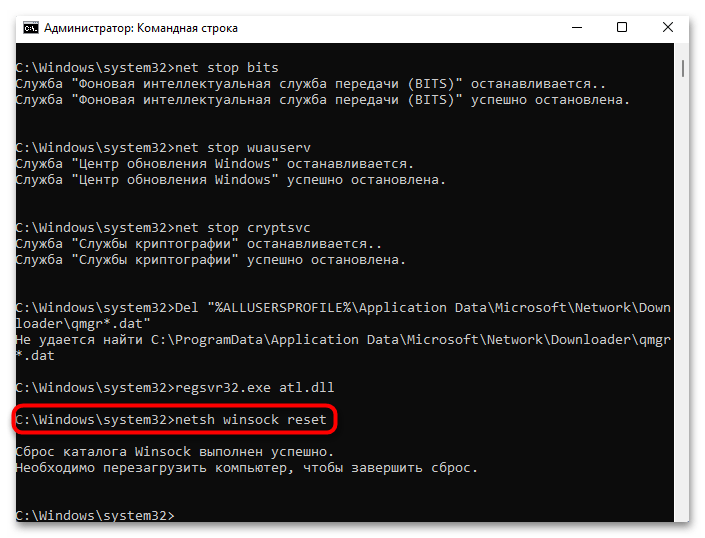
- Введите туда последовательно 3 команды, останавливающие системные службы, после ввода каждой нажимая Enter:
net stop bits

net stop wuauserv

net stop cryptsvc - Теперь выполните команду
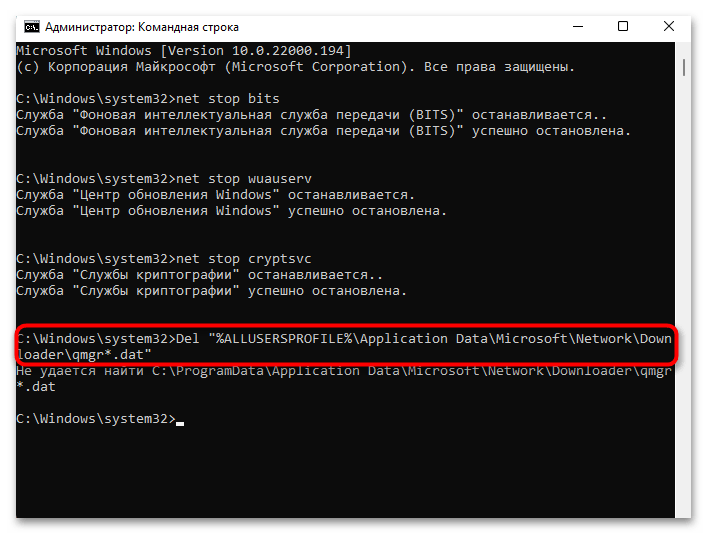
Del "%ALLUSERSPROFILE%\Application Data\Microsoft\Network\Downloader\qmgr*.dat", удаляющую файлы «qmgr*.dat». При получении ошибки о том, что не удается найти файл, предпринимать ничего не нужно, просто переходите далее. - Если по какой-то причине в качестве пути у вас отображается не
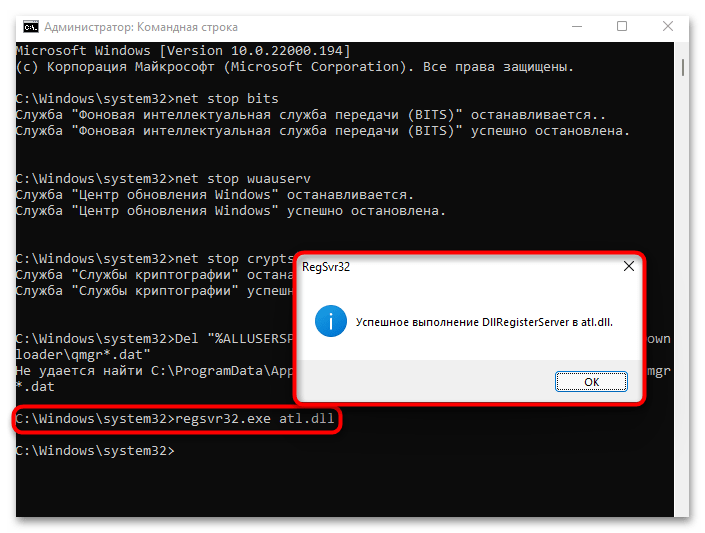
C:\Windows\System32, а что-то другое, напишитеcd /d %windir%\system32для перехода в соответствующую директорию. - Сейчас будет самая продолжительная по времени задача. Понадобится зарегистрировать в системе все файлы из списка ниже. Копируйте каждый из них и вставляйте в консоль, после каждой из них нажимая Enter. Сразу все команды зарегистрировать не получится. Каждая операция по регистрации будет сопровождаться диалоговым окном.
regsvr32.exe atl.dll

regsvr32.exe urlmon.dll

regsvr32.exe mshtml.dll

regsvr32.exe shdocvw.dll

regsvr32.exe browseui.dll

regsvr32.exe jscript.dll

regsvr32.exe vbscript.dll

regsvr32.exe scrrun.dll

regsvr32.exe msxml.dll

regsvr32.exe msxml3.dll

regsvr32.exe msxml6.dll

regsvr32.exe actxprxy.dll

regsvr32.exe softpub.dll

regsvr32.exe wintrust.dll

regsvr32.exe dssenh.dll

regsvr32.exe rsaenh.dll

regsvr32.exe gpkcsp.dll

regsvr32.exe sccbase.dll

regsvr32.exe slbcsp.dll

regsvr32.exe cryptdlg.dll

regsvr32.exe oleaut32.dll

regsvr32.exe ole32.dll

regsvr32.exe shell32.dll

regsvr32.exe initpki.dll

regsvr32.exe wuapi.dll

regsvr32.exe wuaueng.dll

regsvr32.exe wuaueng1.dll

regsvr32.exe wucltui.dll

regsvr32.exe wups.dll

regsvr32.exe wups2.dll

regsvr32.exe wuweb.dll

regsvr32.exe qmgr.dll

regsvr32.exe qmgrprxy.dll

regsvr32.exe wucltux.dll

regsvr32.exe muweb.dll

regsvr32.exe wuwebv.dll - Сбросьте «WinSock» командой
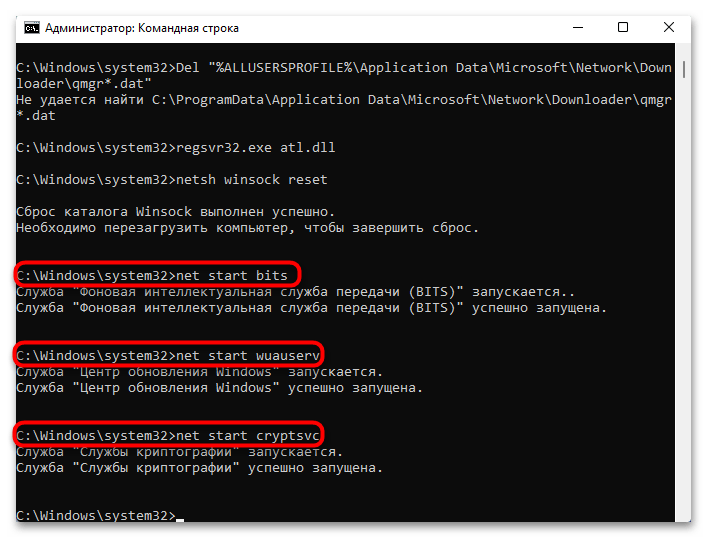
netsh winsock reset. - Запустите остановленные службы командами ниже. Как вы уже понимаете, вводить их надо так же по одной, как и останавливали.
net start bits

net start wuauserv

net start cryptsvc - Перезагрузите компьютер и пробуйте скачать и установить обновление.
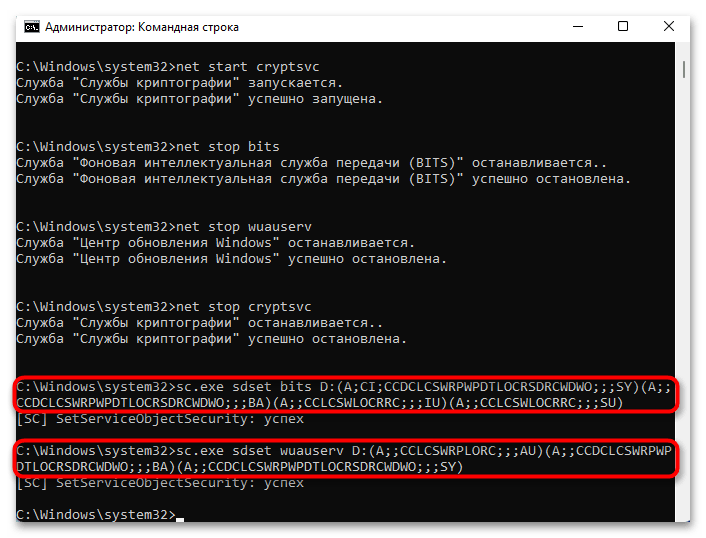
Если это не помогло, откройте еще раз консоль, выполните Шаг 1 из предыдущей инструкции, поочередно выполните в ней следующие команды, затем выполните Шаг 6 (т. е. остановите 3 службы, отвечающие за обновления, командами ниже сбросьте службы «BITS» и «Центр обновления Windows» до стандартных значений дескриптора безопасности и запустите 3 службы обратно):
sc.exe sdset bits D:(A;CI;CCDCLCSWRPWPDTLOCRSDRCWDWO;;;SY)(A;;CCDCLCSWRPWPDTLOCRSDRCWDWO;;;BA)(A;;CCLCSWLOCRRC;;;IU)(A;;CCLCSWLOCRRC;;;SU)

sc.exe sdset wuauserv D:(A;;CCLCSWRPLORC;;;AU)(A;;CCDCLCSWRPWPDTLOCRSDRCWDWO;;;BA)(A;;CCDCLCSWRPWPDTLOCRSDRCWDWO;;;SY)
Проверяйте, исчезла ли ошибка.
Совместимость Windows 11 с компьютером
Ошибка 0x800f081f также может свидетельствовать о том, что текущее «железо» компьютера (как правило, материнская плата) несовместимо в новой версией Windows 11. Такая ошибка появляется при попытке системы скачать именно крупное обновление, а не обычное мелкое. Увы, определить совместимость компонента ПК и последнего обновления Windows 11 просто так не получится, поскольку подобной информации в свободном доступе нет. Можно лишь попробовать узнать название материнской платы, а затем поискать в интернете, есть ли другие пользователи с этой же материнской, столкнувшиеся с ошибкой 0x800f081f при установке апдейта ОС.
Читайте также: Просмотр характеристик материнской платы
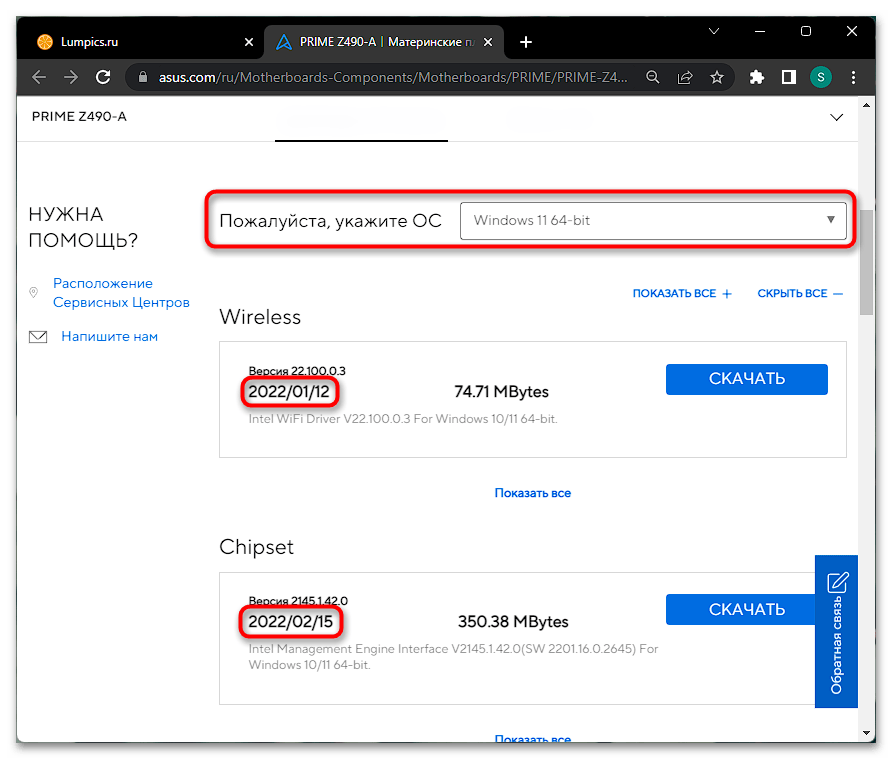
Проще всего (но это не является 100%-ной гарантией) посмотреть, поддерживается ли материнская плата производителем, найдя ее по названию на сайте компании, в разделе скачивания драйвера. Зачастую все становится понятно при выборе операционной системы: если в списке нет Windows 11, значит, драйверов изготовитель не выпускал, соответственно, стабильная работа последней версии Windows 11 с использованием данной материнской платы не гарантируется. Даже если Windows 11 заявлена в списке поддерживаемых ОС, просмотрите сам список драйверов и дату их выхода тоже: так, если представлен неполный список программного обеспечения, это означает, что производитель платы хоть и позволил перейти на 11, но дальнейшая поддержка, по всей видимости, приостановлена.
Об этом чаще всего свидетельствует отсутствие драйвера для чипсета (чипсет является одним из важнейших компонентов ПК), а имеются лишь драйверы для сетевого адаптера и аудио. По дате выхода последних обновлений также можно понять, продолжается ли поддержка. Если все они были выпущены давно (грубо говоря, почти параллельно с выходом Windows 11), и больше не дорабатывались, по всей видимости, поддержка платы также остановлена.
Отметим, что даже если вы обновлялись до Windows 11 с Windows 10, возможно, хоть и сам процесс перехода был нормальный, это не гарантирует возможности получения дальнейших апдейтов. Связано это с тем, что Microsoft могла изменить требования к аппаратным характеристикам для обеспечения работоспособности тех или иных своих новых функций. Другими словами, иногда нововведения для ОС могут оказаться несовместимы с вашим компьютером (как правило, потому, что какое-то его комплектующее аппаратно устарело), из-за этого установить крупное обновление не получится. При этом какие-нибудь мелкие обновления будут продолжать инсталлироваться без проблем.
In this troubleshooting guide where we will address a common issue encountered by Windows 11 users and it is DISM error 0x800f081f. DISM (Deployment Image Servicing and Management) is a powerful command-line tool used to service Windows images, including repair operations. However, when attempting to run DISM and encountering error code 0x800f081f, it indicates that the tool is unable to locate the necessary files to complete the operation. In this article, we will provide step-by-step solutions to help you fix it.
Page Contents
Fix 1: Run Windows Update Troubleshooter
1. Press the Win + I keys to open Settings.
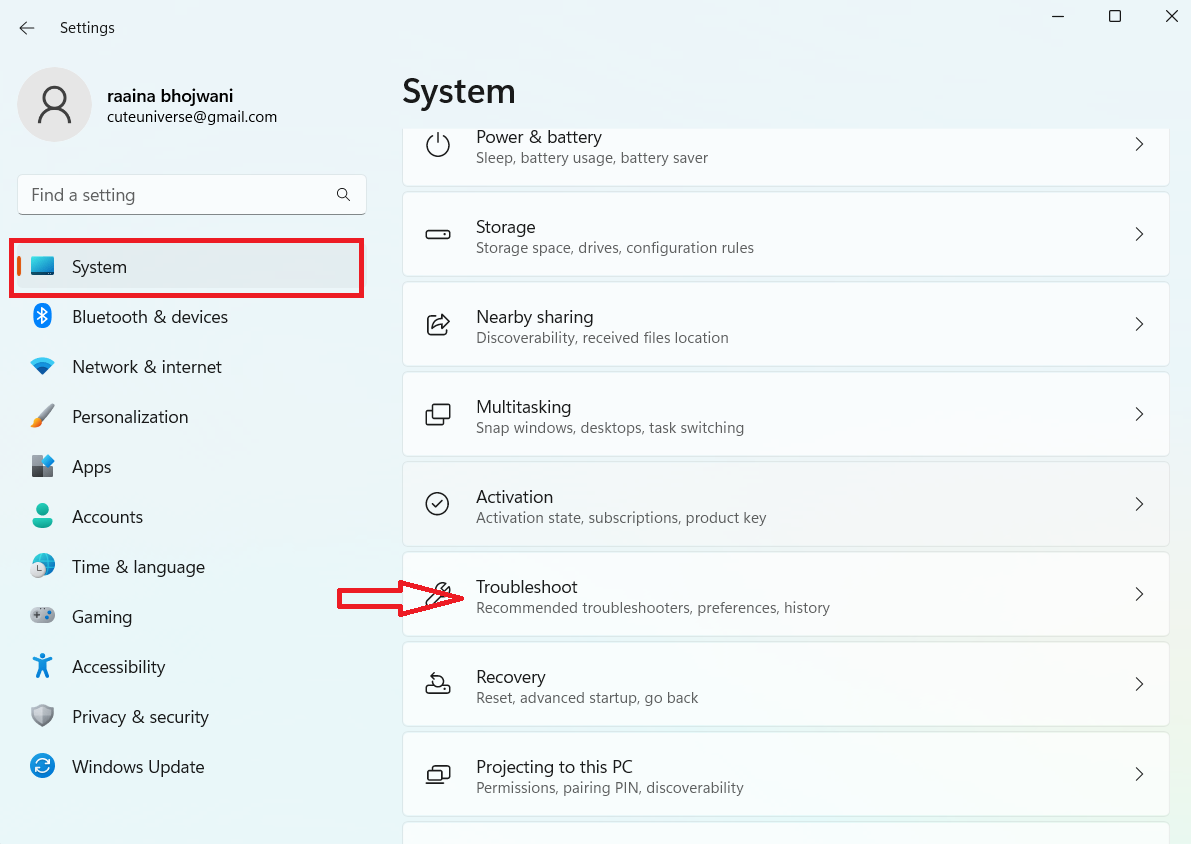
2. Click System > Troubleshoot.
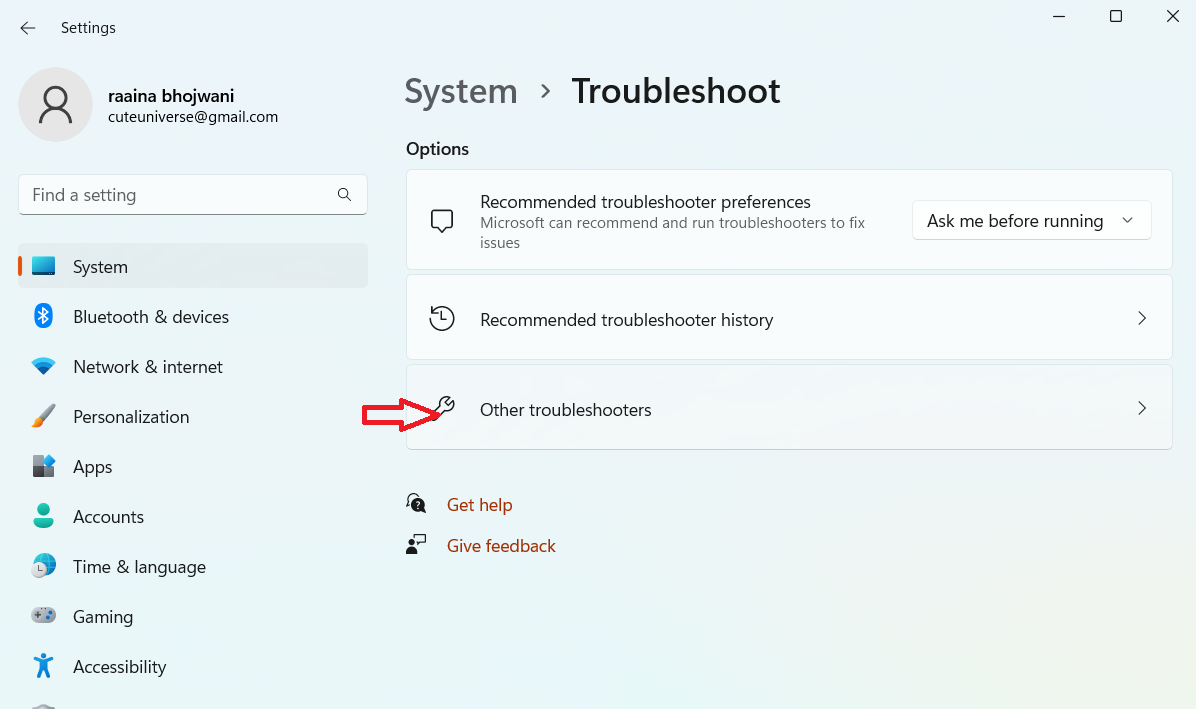
3. Click on Other troubleshooters.
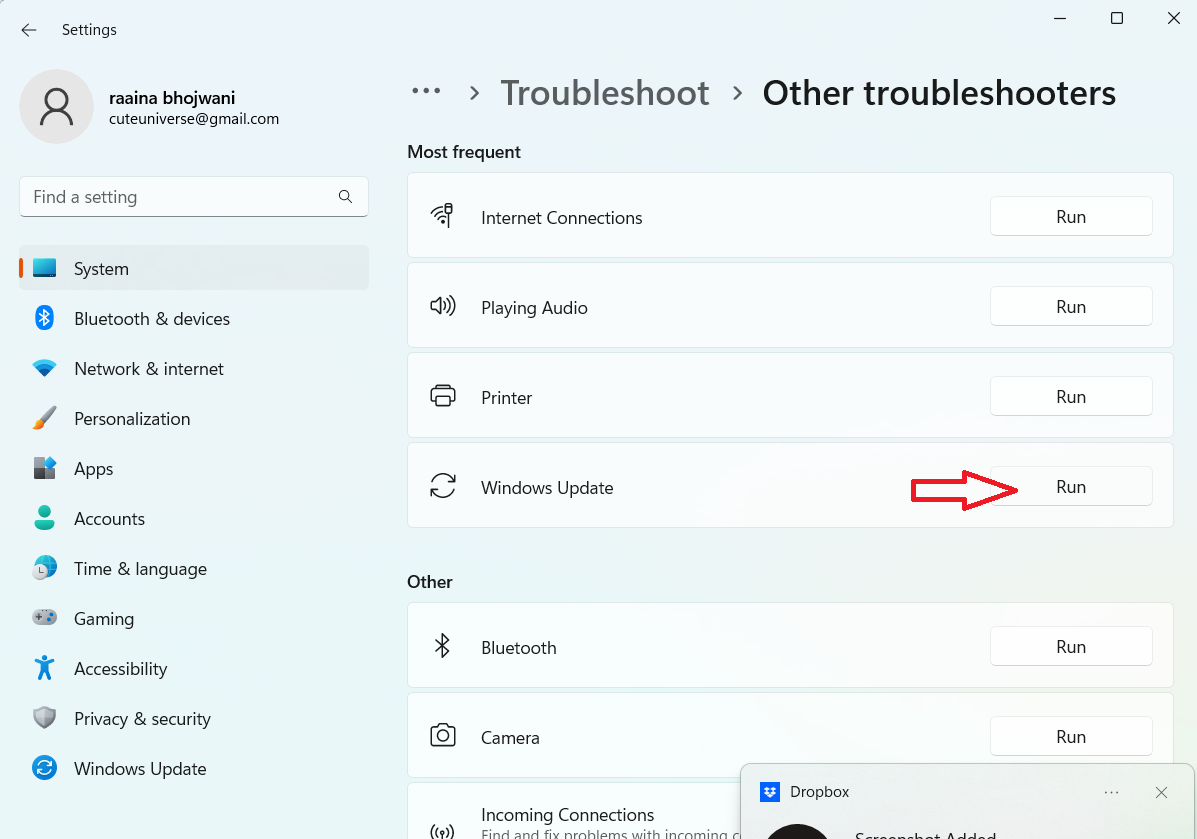
4. Click on the Run button next to Windows Update.
Fix 2: Perform an In-place Upgrade to latest version
1. Download Windows 11 Media Creation Tool on your computer and execute/run it as an administrator.
2. Accept the license terms and choose the “Upgrade this PC now” option when prompted.
3. Then execute DISM command in Command Prompt to check if DISM error 0x800f081f is resolved.
Fix 3: Get source from Windows Image to fix DISM error 0x800f081f on Windows 11
Part 1
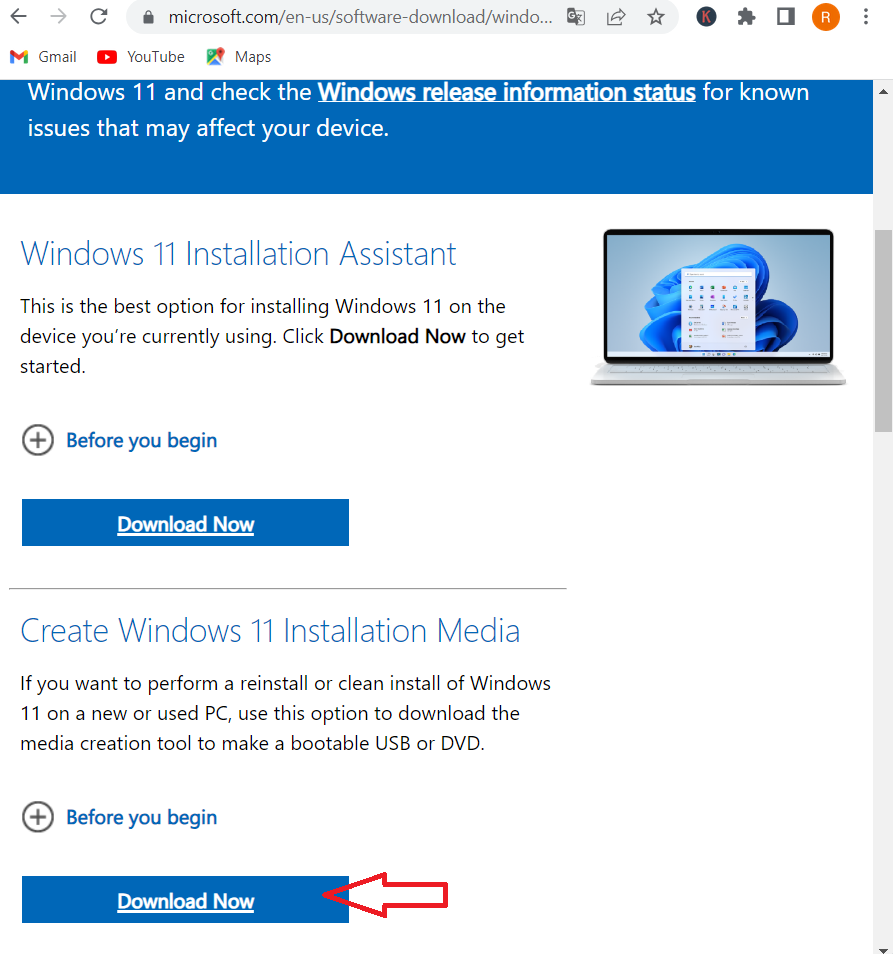
1. Go to the Microsoft Software Download website (https://www.microsoft.com/en-us/software-download/windows11) and click on Create Windows 11 installation media.
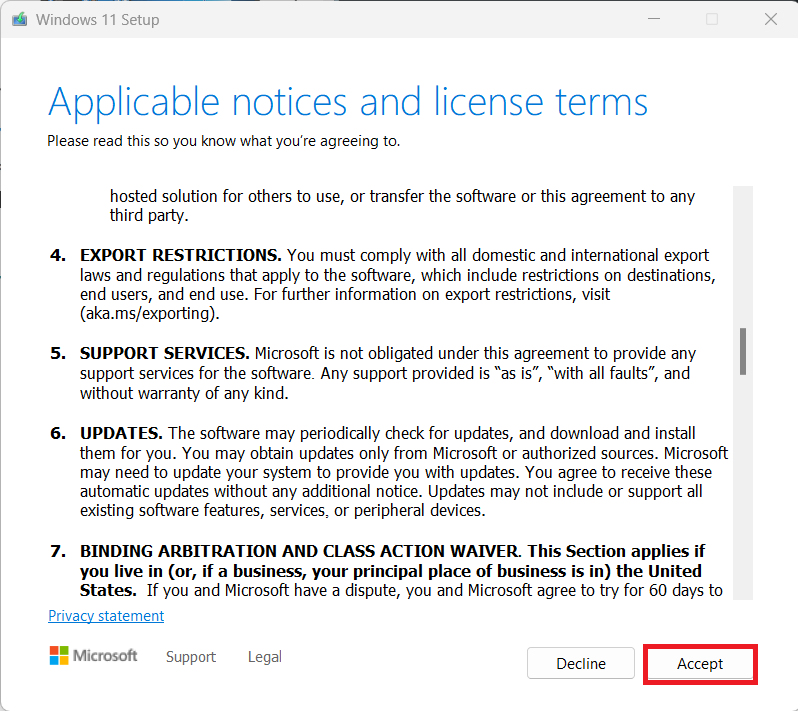
2. Click on Accept to agree with the license terms.
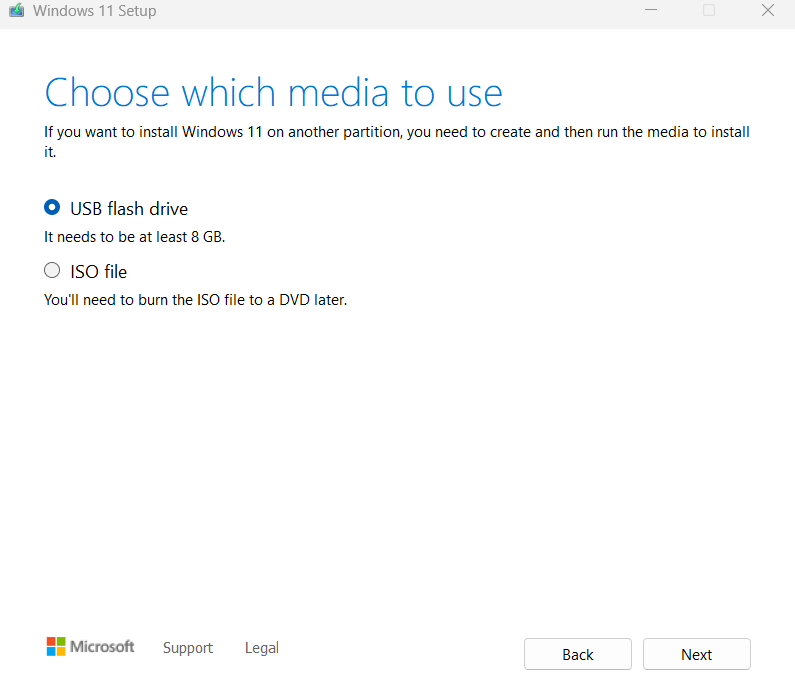
3. Choose the media – USB flash drive or ISO file > click Next.
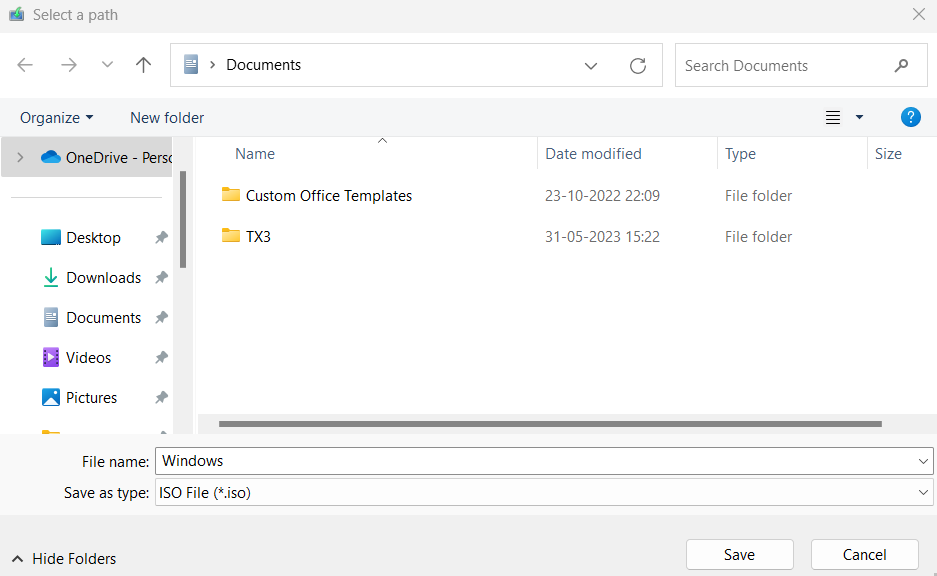
4. Select the download location on your computer > click Save.
5. Open Windows Explorer and find Windows 11 ISO image file.
6. Right-click on the file and choose Mount in the menu.
You can now see a virtual drive on This PC.
Part 2
1. From the mounted Windows ISO file, right-click on the install.esd file from the source folder to copy it to the root folder of drive C:
2. Open Command Prompt as administrator.
3. Type cd\ and press Enter.
4. Then type:
dism /Get-WimInfo /WimFile:install.esd
5. Press Enter.
6. Note down the index number as per the Windows 11 installed version.
7. Execute this command (replace the IndexNumber with the number you just noted down):
dism /export-image /SourceImageFile:install.esd /SourceIndex:IndexNumber /DestinationImageFile:install.wim /Compress:max /CheckIntegrity
Step 3:
1. Open Command Prompt as an administrator.
2. Run the two commands below and hit Enter.
DISM /Online /Cleanup-Image /StartComponentCleanup
DISM /Online /Cleanup-Image /AnalyzeComponentStore
3. Run the following command to specify the C:\install.wim as the source of the known good files.
DISM /Online /Cleanup-Image /RestoreHealth /Source:WIM:c:\install.wim:1 /LimitAccess
4. After this process completes, type sfc /scannow and hit Enter.
Fix 4: Perform a Component Cleanup
1. Run Command Prompt as administrator.
2. Execute the following commands. Press Enter after each command.
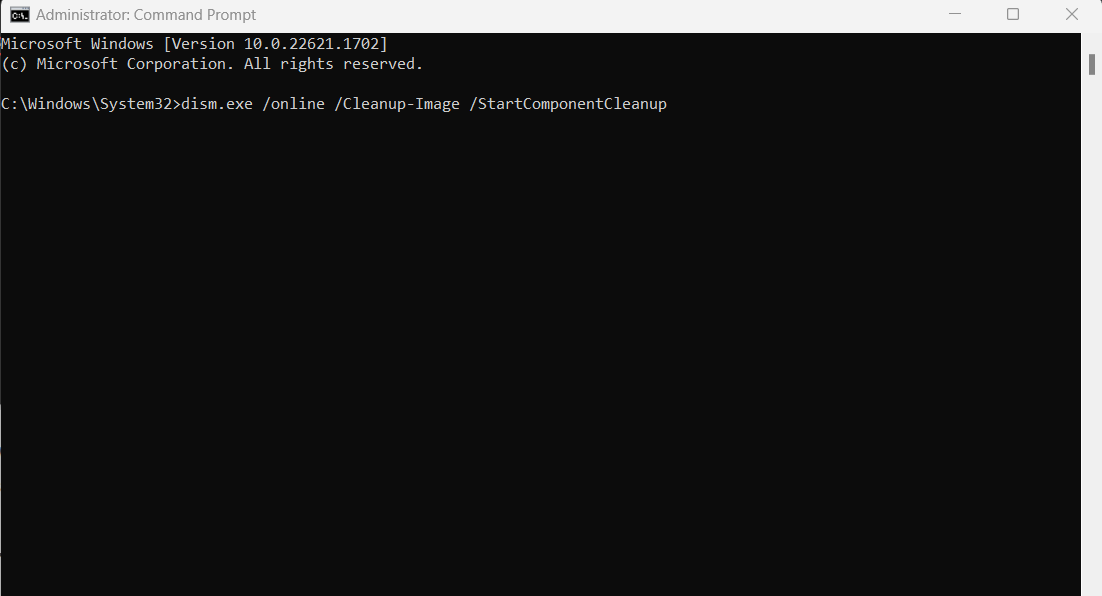
dism.exe /online /Cleanup-Image /StartComponentCleanup
sfc /scannow
Fix 5: Reinstall Microsoft .NET Framework 3.5
1. Open Control Panel.
2. Click on Programs > “Turn Windows features on or off” in Programs and Features.
3. Uncheck .NET Framework 3.5 (includes .NET 2.0 and 3.0) and click OK.
4. Restart your system and check the same option we unchecked in step 3.
That’s it!
READ THESE ARTICLES NEXT
- Fix: DISM Error 0x800f081f, The Source Files Could Not Be Found
- Fix: Transaction support within the specified resource manager is not started or was shut down
- Repair Windows 10 Using DISM Command-line Tool
- [FIX] .NET Framework 3.5/DISM Error 0x800F0954 In Windows 10
- [How To] Use DISM To Manage Feature Updates In Windows 10
- [FIX] DISM Error 0x800f0906 On Windows 10 V1703
- [FIX] DISM Error 14098, The Component Store Has Been Corrupted
- [FIX] DISM Error 1726, The Remote Procedure Call Failed
- [FIX] Repair Your Windows 8 Using DISM Commands
Running the update troubleshooter is an easy fix
by Vladimir Popescu
Being an artist his entire life while also playing handball at a professional level, Vladimir has also developed a passion for all things computer-related. With an innate fascination… read more
Updated on
- Microsoft .NET Framework is an important software to run software and applications on Windows OS.
- If there are some issues with the .NET Framework, then you may experience Windows 11 update error 0x800f081f.
- To fix this, you can try to tweak the Group Policy files, install Windows updates manually, or remove WUServer and WIStatusServer from registry.
XINSTALL BY CLICKING THE DOWNLOAD
FILE
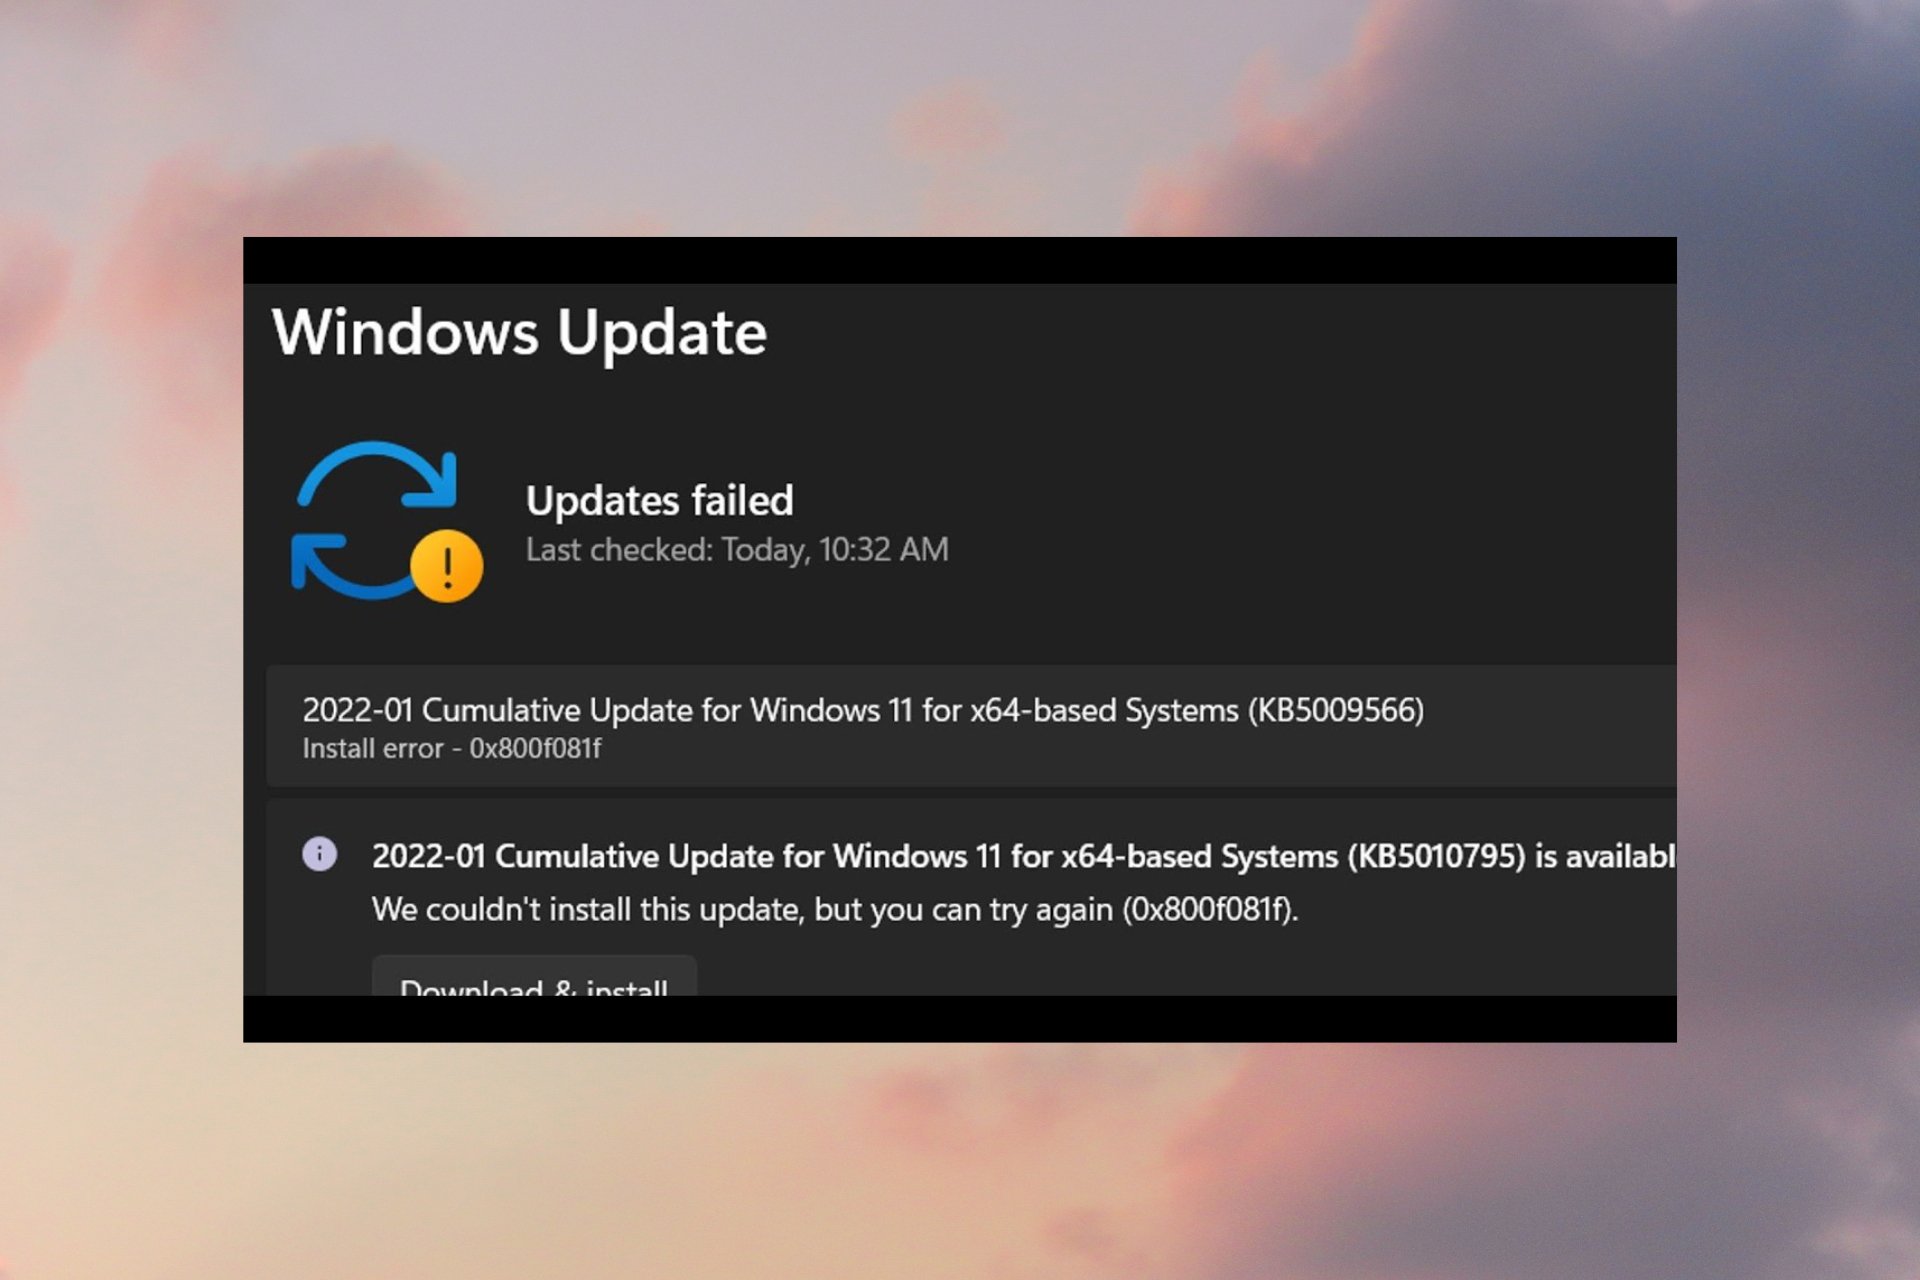
Installing the latest Windows 11 updates is essential for multiple reasons. But our readers have been complaining about the Windows 11 install error 0x800f081f. This error code is mainly related to the Microsoft .NET Framework 3.5 incompatibilities.
Notably, similar issues were reported by users with the Windows 10 OS as well. Here’s what to do to fix it.
What does Windows 11 error code 0x800f081f mean?
Error 0x800f081f is a system error code related to updates in Windows 11. The interesting fact about this error code is that it’s among the most common ones that pop up for the same reason. Here are some of the causes of this error:
- Improper connection – This happens because Windows cannot download the critical files from the available update.
- .Net Framework issue – Microsoft .Net Framework incompatibilities also cause this problem so updating .Net Framework can be a viable solution.
- Improper commands – It may also come up because of the DISM (Deployment Image Servicing and Management) tool, or some Windows PowerShell commands.
The other three error codes are 0x800F0906, 0x800F0907, and 0x800F0922. All these error codes, including error code 0x800F081f, will show you an error message:
There were some problems installing updates, but we’ll try again later. If you keep seeing this and want to search the web or contact support for information, this may help.
Now that we know what we’re dealing with, let’s fix the problem with the solutions below.
How do I fix error code 0x800f081f in Windows 11?
- What does Windows 11 error code 0x800f081f mean?
- How do I fix error code 0x800f081f in Windows 11?
- 1. Run the Windows Update troubleshooter
- 2. Tweak your group policy
- 3. Repair Windows system files
- 4. Download Windows 11 update manually
- 5. Clear Windows Update Cache and components
- 6. Remove WUServer and WIStatusServer from registry
- Why do my Windows updates keep failing?
- What else can I do to avoid Windows 11 update error 0x800f081f?
1. Run the Windows Update troubleshooter
Multiple users reported that Windows Update troubleshooter can help you restore the 0x800f081f error on Windows 11 OS.
1. Open the Start Menu.
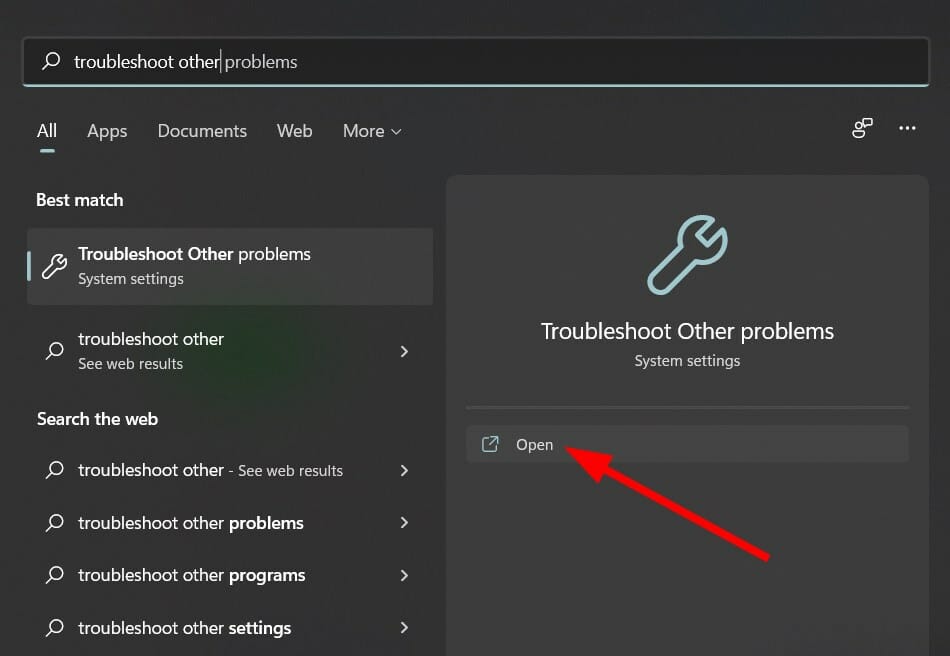
2. Type in Troubleshoot other problems and open the app.
How we test, review and rate?
We have worked for the past 6 months on building a new review system on how we produce content. Using it, we have subsequently redone most of our articles to provide actual hands-on expertise on the guides we made.
For more details you can read how we test, review, and rate at WindowsReport.
3. Click Run next to Windows Update.
4. The troubleshooter will begin the diagnosis and will check for errors.
5. Apply the recommended fixes.
6. Restart your PC.
One of the most common solutions to fix most of the common Windows 11 issues is to run the in-built Windows troubleshooter.
To fix this Windows 11 update error 0x800f081f, we advise you to try the Windows update troubleshooter. It will not only detect the issue but possibly fix it during the process.
2. Tweak your group policy
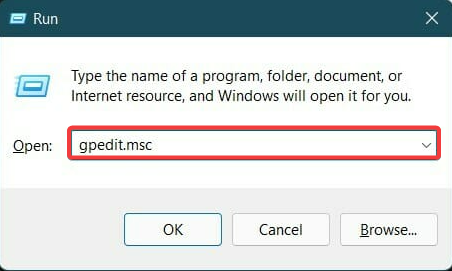
- Press Windows + R keys to open the Run dialogue.
- Type gpedit.msc and hit Enter.
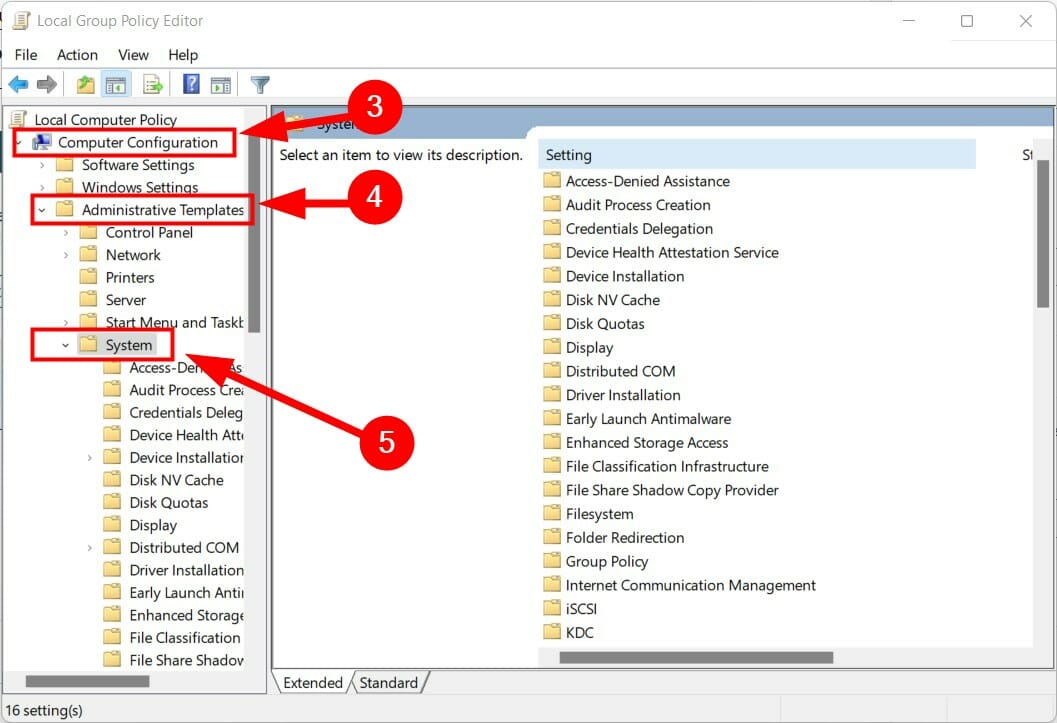
- Expand Computer Configuration.
- Then expand Administrative Templates.
- Click on System.
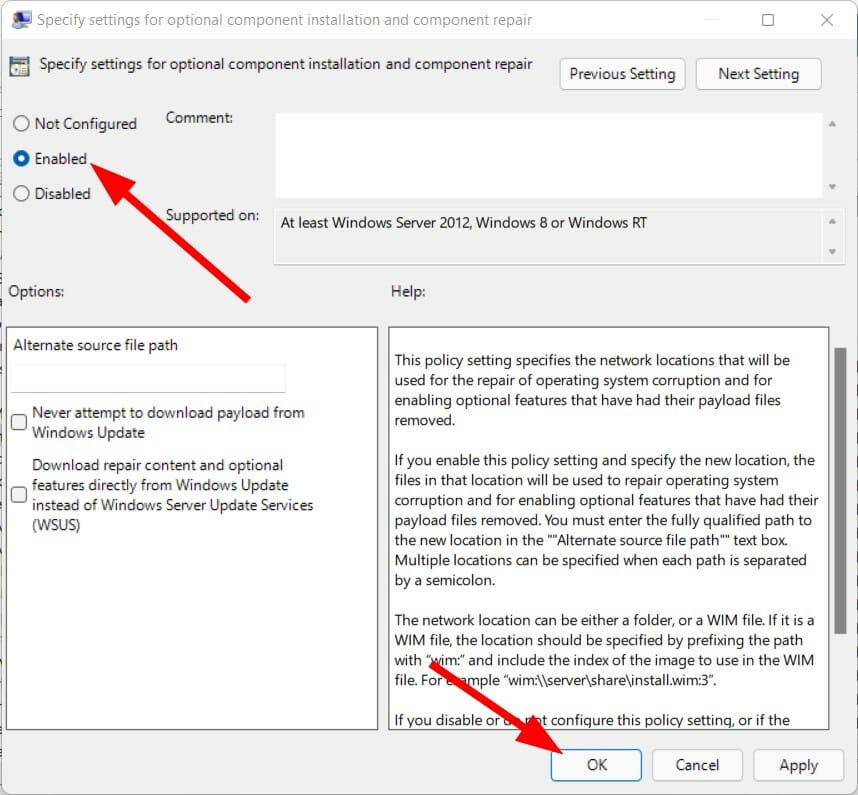
- On the right pane, click on the entry labeled Specify settings for optional component installation and component repair.
- Double-click on this entry to open it.
- Check Enabled and hit OK.
3. Repair Windows system files
- Open the Start menu.
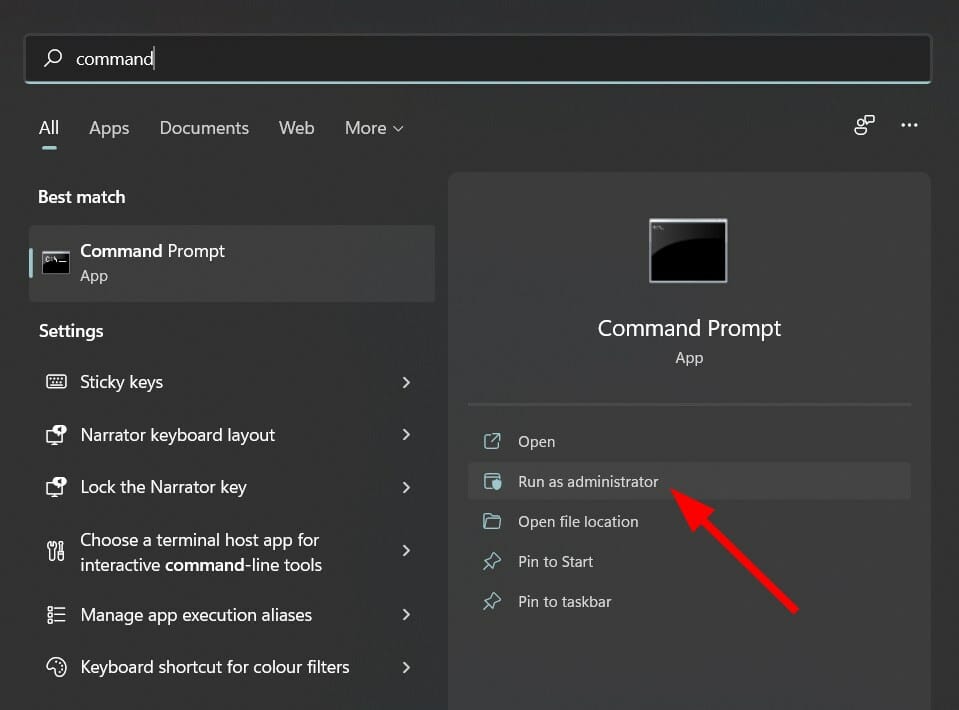
- Search for Command Prompt and run it as an administrator.
- Type the below command and hit Enter.
sfc /scanow - Your PC will start scanning and, in the process, will try to fix the issue.
- Reboot your PC.
- Again open command prompt.
- Type in the below command and hit Enter
chkdsk C: /f /r /x - After the process completes, enter the below command and press Enter.
DISM.exe /Online /Cleanup-image /Restorehealth - You will see the message – The operation completed successfully. Close the window and reboot your PC.
Besides this manual process, you can always choose a professional tool that will perform all these steps automatically. It is a safer and much easier option for your computer’s health and performance.
4. Download Windows 11 update manually
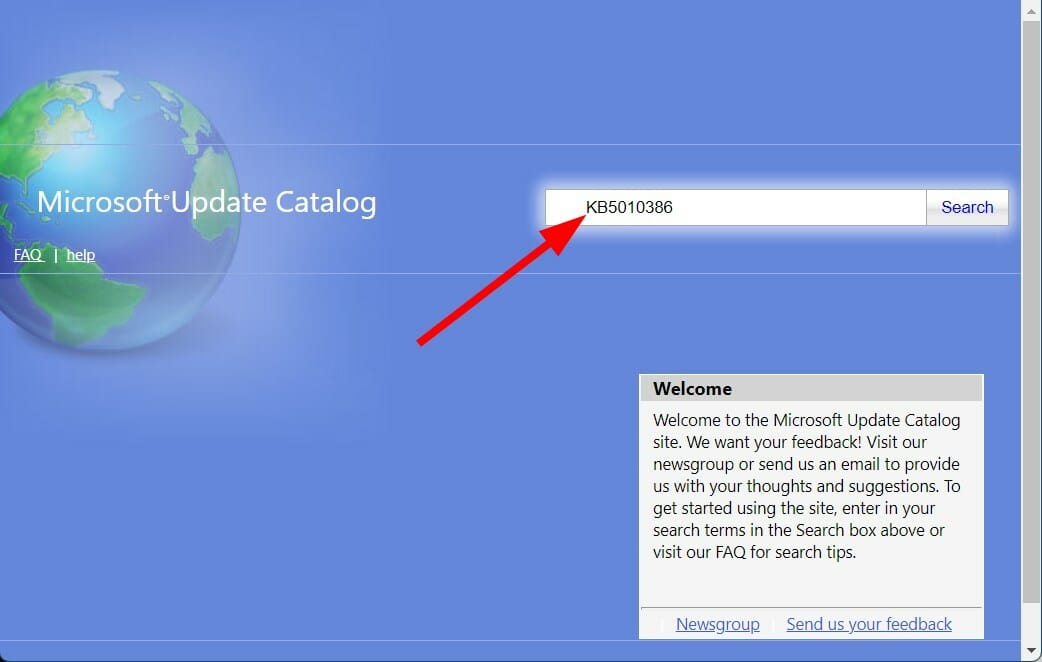
- Open the official Microsoft Catalogue website.
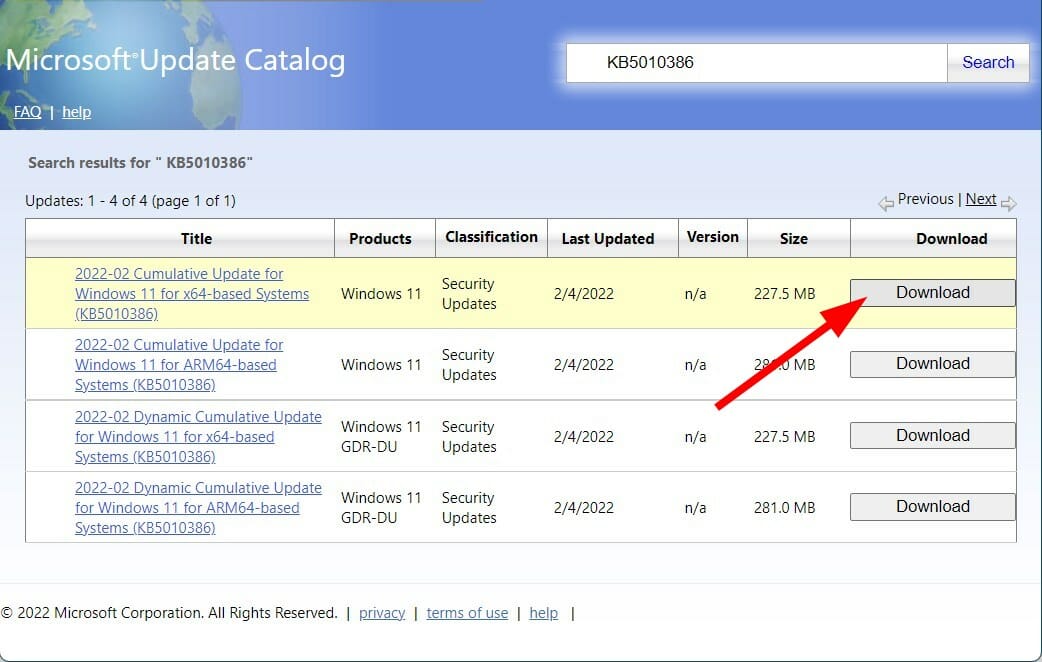
- In the search bar, enter the KB (Knowledge Base) number of the Windows update you wish to download and hit the Search button.
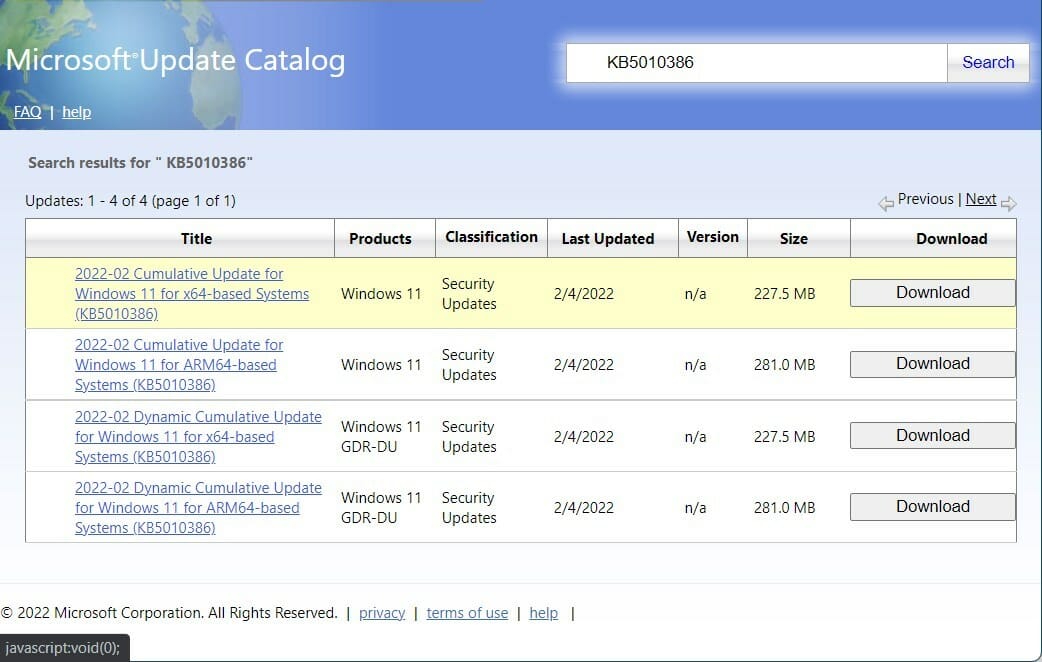
- A list of available update packages associated with the entered KB number will show up.
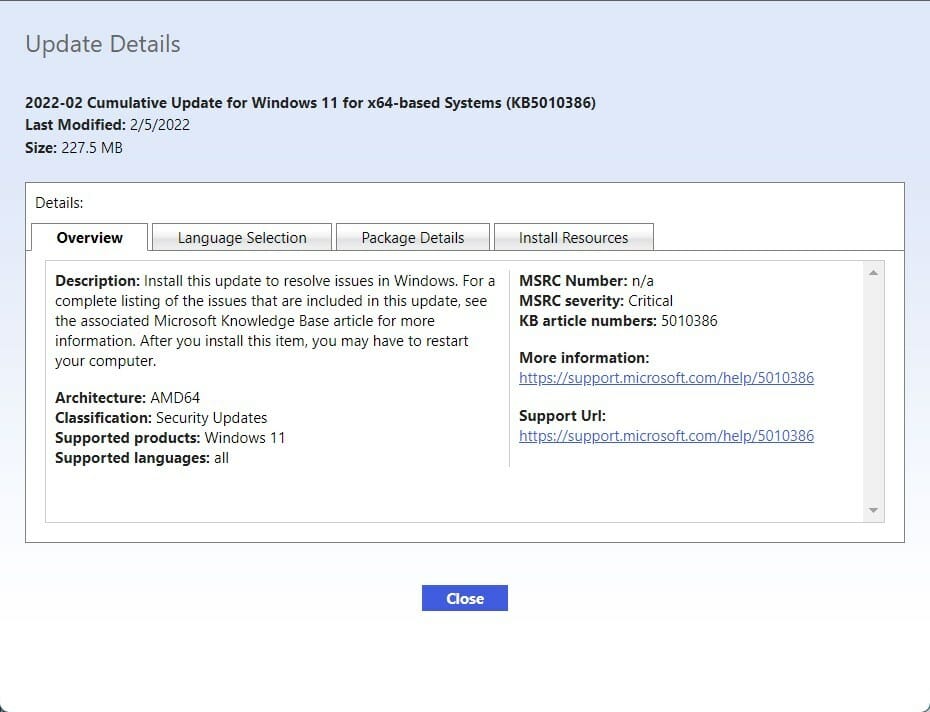
- Click on the update’s title to get more information, such as Installation Resources, Package details, and Languages supported about the update.
- Identify the correct update and hit the Download button.
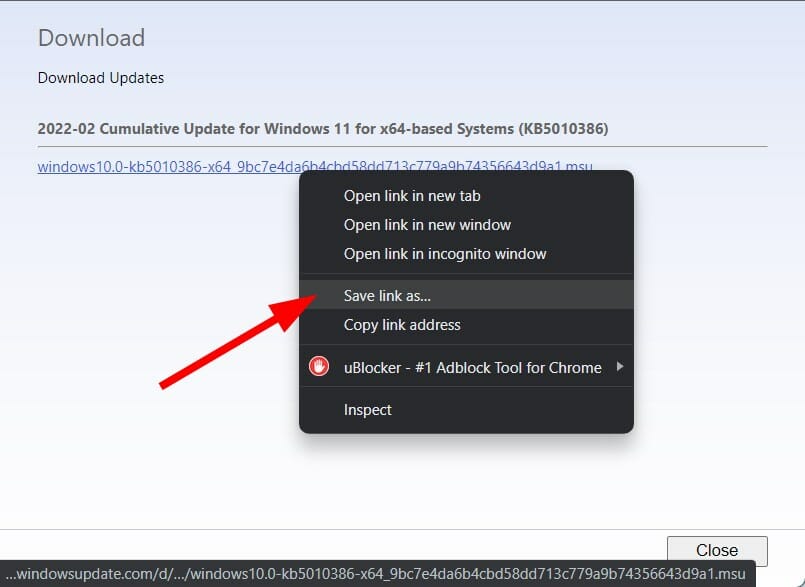
- Right-click on the download link and press Save link as.
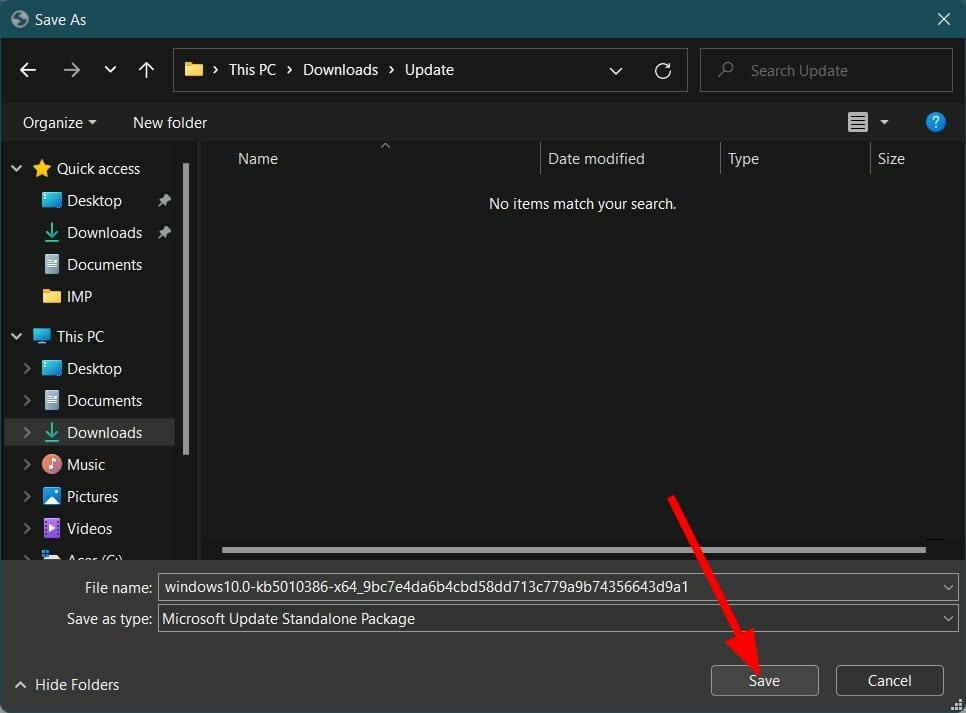
- Choose the download directory and press Save.
- Open the folder where you have downloaded the Windows 11 update package.
- Double-click on it to run.
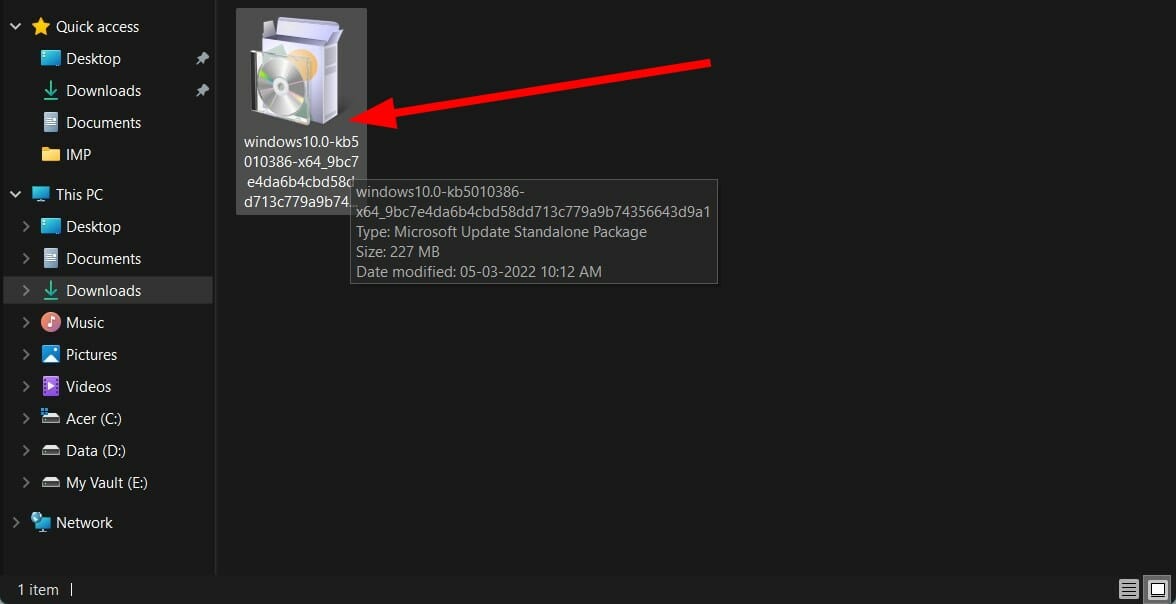
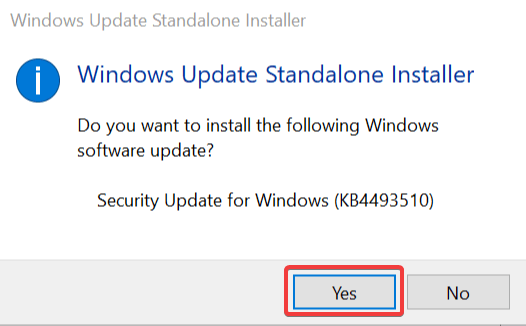
- After a few seconds, press the Yes button on the Windows Update Standalone Installer pop-up to begin the update installation.
- Reboot your PC and check if this fixes the Windows 11 update error 0x800f081f.
5. Clear Windows Update Cache and components
- Open the Start menu.
- Search for Command Prompt and run it as an administrator.
- Type the below commands and hit Enter after you have typed each command, one by one.
Net Stop bitsNet Stop wuauservNet Stop appidsvcNet Stop cryptsvcRen %systemroot%SoftwareDistribution SoftwareDistribution.bakRen %systemroot%system32catroot2 catroot2.bakNet Start bitsNet Start wuauservNet Start appidsvcNet Start cryptsvc
4. Exit cmd and restart your PC.
6. Remove WUServer and WIStatusServer from registry
- Open Run dialog using Windows + R keys on your keyboard.
- Type the below command and press Enter.
regedit - Click on Yes if a prompt asks you for permission.
- You need to navigate to the below address
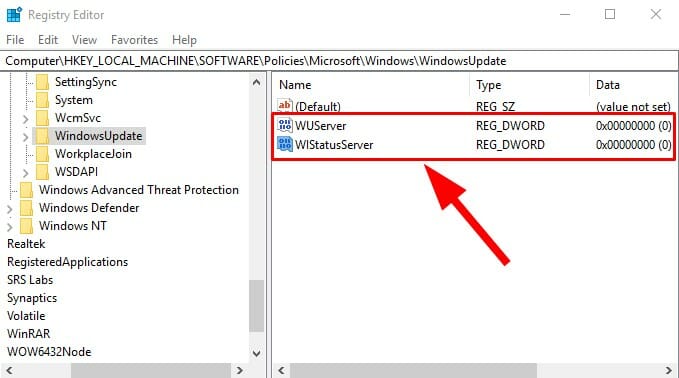
HKEY_LOCAL_MACHINE\SOFTWARE\Policies\Microsoft\Windows\WindowsUpdate - On the right pane, locate WUServer and WIStatusServer.
- Delete both entries.
- If these entries are not available, then hop onto another solution.
Why do my Windows updates keep failing?
There are several potential causes for problems like Windows Update failing repeatedly. Based on user feedback, we have generated a list of the most frequent reasons.
- Out-of-date drivers – Drivers must operate components like graphic cards and network cards that aren’t natively compatible with Windows. Windows Update problems might result from outdated drivers connected to this problem.
- System file errors or absences – System files are essential to the smooth operation of your device. Your system files may have recently been destroyed or damaged, which is why Windows Update failed.
- A problem with the Windows Update service – Your update service may be having problems. If so, alternate methods for downloading the most recent Windows update are provided above.
Remember that not all potential reasons are included in the list mentioned above. However, the error can occur specifically for you because of a problem with your machine.
What else can I do to avoid Windows 11 update error 0x800f081f?
When you come across an error, and that too while installing a Windows 11 update, then it can be frustrating and annoying.
The solutions mentioned above can be of great help when facing Windows 11 update error 0x800f081f, but that’s not all.
If, for some reason, none of the above steps helped you fix it, then we have some important points that you can follow and check if this fixes the issue or not.
➡ Make sure the .NET Framework is turned on
It is essential since this issue is related to the Microsoft .Net Framework. Open Windows Feature by searching for it on the Start menu and checking the box next to .NET Framework 3.5 (includes .NET 2.0 and 3.0).
Hit OK and reboot your PC. Ensuring the .NET Framework is enabled will let you get automatic updates with no issues.
➡ Turn off Developer Mode
All you need to do is open the Start menu and search for Developer mode. Open it and make sure to turn off Developer mode.
There are instances when developer mode may interfere with Windows update installation and, thus, the error. Make sure it is disabled and check if this fixes the issue or not.
➡ Reset your copy of Windows 11
If absolutely nothing works, then as a last resort, all you can do is reset or reinstall the Windows 11 OS on your PC. Possibly, some critical files were not installed during the previous installation.
If you encounter the 0x800f081f error on Windows 10, we have another article on the topic that you can check out.
Let us know in the comments below which one of the above solutions helped you fix the Windows 11 update error 0x800f081f. Moreover, you can also share with us any other solution.
Ошибка DISM 0x800f081f или как исправить отсутствие исходных файлов для получения обновлений.
Сразу: статья сложная, как и сам процесс, и состоит из кучи нюансов. Основная команда для решения вопроса приведена в конце текущей статьи, которую я решил дополнить второй частью. Если вы поймёте содержимое команды «ремонта» — пропускайте абзацы, спустившись вниз. По ходу же я объясняю возможные причины проблемы и как запастись тем, что может помочь её разрешить. Итак, ошибка DISM 0x800f081f проявляет себя сразу после попытки пользователя «починить» образ установленной Windows 10 с помощью команды DISM /Online /Cleanup-Image /RestoreHealth. Ошибка проявляет себя дополнением типа
Не удалось найти исходные файлы. Укажите расположение файлов, необходимых для восстановления компонента с помощью параметра «Источник»…
Перед этим консоль cmd с запущенной DISM нередко подзависает на строке прогресса эдак на 60 — 70%%. Далее DISM отсылает нас на офсайт Microsoft и, как обычно, предлагает ознакомиться с логом инструмента. Чаще всего ситуация получает своё развитие с момента, когда Windows 10 отказывается получить последние обновления:
Ошибка может видоизменяться в том же окне настроек обновлений от сеанса к сеансу, но итог один: те или не скачиваются, либо не устанавливаются:
Причина ошибки DISM 0x800f081f
Флаг DISM /RestoreHealth, как уже указывалось в статье Как починить Windows 10 с помощью DISM, предназначен для исправления проблем с образом Windows 10, используя узел Windows Update. Но если DISM обнаружила, что необходимых для исправления ошибки файлов не хватает, она просит указать дополнительный (к Windows Update) источник. Такие проблемы возникают в тот момент, когда некоторые параметры системы оказываются тесно завязаны со доустановленными средами. И которые обновить с помощью средств WU уже нельзя — чаще всего просто по причине устаревания (когда более новая версия обновления какого-то компонента подменяет предыдущее или поглощает его). Для Windows, кстати, это обычное явление. По опыту скажу — чем более обновлена (читай — обременена) ваша «старая» версия обновлёнными функциями, тем меньше надежды на DISM. Увы. В некоторых случаях это просто неминуемая пичалька. Кроме того, если ваша Windows 10 стала таковой после Windows 7 или Windows 8, я вам вообще вряд ли помогу. Так что перед любыми манипуляциями удостоверьтесь, что запущенная от имени администратора команда
sfc /scannow
отработала и не нашла ошибок или всё починила. Она также хранит свои логи по адресу %windir%\logs\cbs\cbs.log, в котором можно посмотреть на проделанное. Так что (понимаю, что не до этого вам сейчас) есть смысл взглянуть на информацию о команде SFC. Также убедитесь в том, что вы попытались исправить ошибки в хранилище. Итак:
- хранилище компонентов Windows повреждено. Возможно, просто не хватает нескольких конкретных файлов и …
- … Windows не может залезть на сервера обновления, чтобы их восстановить.
- вы указываете на директорию с файлами восстановления, но там таких нет (кривой образ или не те функции).
- вы пытаетесь установить фишку, обращаясь к папке или файлам, на которые у вас нет доступа (часто снятия атрибута ТОЛЬКО ДЛЯ ЧТЕНИЯ должно хватить).
- набор файлов установки повреждён, не полный или содержит неверную (по отношении к уже установленной) версию установки.
Статья эта, как я уже говорил, дополнена второй частью «Причины ошибки DISM Не удалось найти исходные файлы.», в которой я попробовал разобрать различные подходы к решению ошибки со стороны среды DISM, характерной для проблемы «Не удалось найти исходные файлы«. Настоятельно рекомендую прочесть, если в процессе работы по этой статье вы столкнётесь с другими ошибками.
Перед началом работ…
В консоли команд cmd от имени администратора наберите поэтапно:
net stop wuauserv
cd %systemroot%\SoftwareDistribution
ren Download Download.old
net start wuauserv
net stop bits
net start bits
net stop cryptsvc
cd %systemroot%\system32
ren catroot2 catroot2old
net start cryptsvc
Обходим WSUS
Проверьте, есть ли в реестре такой ключ:
HKEY_LOCAL_MACHINE\SOFTWARE\Policies\Microsoft\Windows\WindowsUpdate\AU
Есть? Параметр UseWUServer выводите в 0. Если ни ключа ни параметра нет, переходите к другому ключу:
HKEY_LOCAL_MACHINE\SOFTWARE\Policies\Microsoft\Windows\WindowsUpdate
параметр DisableWindowsUpdateAccess в 0 стой же перезагрузкой. Попробуйте DISM снова.
Что понадобится для дальнейшей работы, если не сработало?
- Валидный install.wim файл тех же версии, выпуска и языковой сборки Windows 10, что и ваша
- не менее 10 Гб свободного места на диске С:.
Напомню, что файл install.wim располагается по адресу
Скачанный_диск-или-папка\sources\install.wim
установочного устройства с файлами Windows 10. Скачать образ ISO и вытащить файл из него можно легально с помощью двух способов:
- (1) утилиты Media Creation Tool . Если не получилось, скачайте программу у меня:
Загрузить утилиту для скачивания ISO Windows10 с К76
- (2) утилиты создания загрузочной флешки Rufus.
Второй способ быстрее и абсолютно надёжен, но первый можно считать вполне официальным:
Чаще всего указанный файл install.wim «поставляется» в чистом виде; иногда — в составе почти одноимённого install.esd. Для монтирования образа я традиционно использую Daemon Tools, хотя прекрасно подойдёт и встроенный инструментарий в Windows 10 через Монтировать. У меня все образы идут с готовым для работы install.wim. Если у вас файл install.esd, читайте следующий абзац; если везёт, как и мне, переходите к следующему.
Если у вас install.esd
- Очередной нюанс перед тем как начать: ESD файлы из установочного образа чаще всего нехотя воспринимаются средой DISM в качестве корректного источника. Посему сами «мелко-мягкие» разрабы советуют начать с конвертации ESD в WIM. У меня лично нет сколь-нибудь серьёзной статистики по этому поводу, но по отзыву некоторых юзеров использование ESD действительно возвращало ошибку, несмотря на верно выбранный образ и правильный синтаксис команды. Команда же(в той же DISM) для этого проста
dism /Export-Image /SourceImageFile:папка:\где\лежит\образISO\install.esd /SourceIndex:X /DestinationImageFile:папка:\где\будет\лежать\новыйISO\install.wim /Compress:Max /CheckIntegrity
Не получается? Воспользуйтесь программами PowerISO или утилитой не для слабонервных ESD2WIM-WIM2ESD.cmd. В первой можно конвертировать ESD в WIM и обратно в графическом интерфейсе программы. Во второй — придётся указывать на файл вручную.
- Если решили продолжить — продолжаем. Копируем install.esd файл в корень диска С — оттуда нам будет лучше с ним работать напрямую. Файл лежит в папке \sources смонтированного образа. Вы его не пропустите, т.к он самый большой.
ВНИМАНИЕ: все окна проводника Windows перед следующими командами закрыть.
- Теперь запускаем консоль cmd от имени администратора и командой
cd\
- Переходим в корень нашего диска. Смотрим состав перекочевавшего сюда файла:
dism /Get-WimInfo /WimFile:install.esd
В моём файле 6 выпусков (если вы скачали предложенными мною способами, у вас меньше или так же). Я использую вариант Windows 10 Pro. Вы можете узнать о своей тут же из консоли, набрав команду:
winver
- Моему выпуску в консоли присвоен индекс 4. Извлекаем нужный install.wim из install.esd:
dism /export-image /SourceImageFile:install.esd /SourceIndex:4 /DestinationImageFile:install.wim /Compress:max /CheckIntegrity
По окончании процесса распаковки вы должны увидеть файл install.wim в той же директории диска. Переходим к действиям в следующем абзаце, начиная с команды очистки хранилища компонентов.
Если у вас файл install.wim
Нам достаточно скопировать файл также как и в предыдущем абзаце — в корень диска С.
ВНИМАНИЕ: все окна проводника Windows закрыть.
После этого запускаем консоль cmd от имени администратора и проверяем список выпусков Windows:
cd\
dism /Get-WimInfo /WimFile:install.wim
Так как у меня установлена Windows 10 Pro, я чуть позже выберу индекс 4. Но для начала мне нужно очистить собственное хранилище компонентов от установленных ранее «обновлённых» файлов. В надежде, конечно, что эти «обновлённые» устаревшие файлы (вместе с другими) будут удалены:
DISM /Online /Cleanup-Image /StartComponentCleanup
А теперь следуем стандартной процедуре анализа состояния образа Windows 10 и применению исправления ошибок, как уже описывалось в статье Как починить Windows 10 с помощью DISM. Вводим поочерёдно:
DISM /Online /Cleanup-Image /AnalyzeComponentStore
DISM /Online /Cleanup-Image /RestoreHealth /Source:WIM:c:\install.wim:4 /LimitAccess
Ещё раз акцентирую внимание на индексе файла — у меня 4. Ждём окончания ремонта. И, как всегда по окончании работ, запускаем старую-добрую проверку системных файлов:
sfc /scannow
Пока всё. Ошибка DISM 0x800f081f вас не должна более побеспокоить. До появления следующей устаревшей версии какого-либо компонента. Успехов нам всем.
DISM /Online /Cleanup-Image /RestoreHealth is one of the most commonly used command lines that can repair a damaged Windows system image. However, some of you may receive DISM error 0x800f081f while running it. If you are struggling with the same error, this guide on MiniTool Website might be helpful to you.
0x800f081f Windows 10 DISM Error
Deployment Image Servicing and Management (DISM) is a useful way to repair corrupted system images. Usually, it works together with System File Checker to scan and repair your computer and return it to a healthy work state.
However, like other inbuilt Windows tools, it goes wrong sometimes. Quite a few users complain that they encounter DISM error 0x800f081f when running the DISM /Online /Cleanup-Image /RestoreHealth command and receiving the following error messages.
- Error: 0x800f081f. The source files could not be found.
- Windows couldn’t find the required files to complete the requested changes. Make sure you’re connected to Internet, and try again. Error: 0x800f081f.
This error indicates that DISM cannot find the files required to fix the online Windows image in the default location. DISM error 0x800f081f can lead to other errors on your computer and prevents other processes from functioning properly, so you must take some measures to get rid of it as soon as it crops up.
How to Fix DISM Error 0x800f081f on Windows 10/11?
Fix 1: Perform a Component Cleanup
You can clean up the image files and make everything run properly with the DISM component cleanup switch. Follow the steps below:
Step 1. Type cmd in the search bar to locate Command Prompt and right-click on it to choose Run as administrator.
Step 2. In the command window, run the following commands one by one and don’t forget to hit Enter after each command.
dism.exe /online /Cleanup-Image /StartComponentCleanup
sfc /scannow
Step 3. When the two commands are complete, run Dism /Online /Cleanup-Image /RestoreHealth again to see if it works properly.
Fix 2: Run Windows Update Troubleshooter
As is known to all, Microsoft Windows Update Center triggers problems regularly and these problems can prevent you from implementing upgrades or improvements by downloading or installing new updates. In this case, Microsoft offers you a troubleshooting tool called Windows Update troubleshooter which can fix most errors including DISM Online Cleanup Image RestoreHealth error 0x800f081f.
Step 1. Press Win + I to open Windows Settings.
Step 2. In the settings menu, scroll down to find Update & Security and click on it.
Step 3. Under the Troubleshoot tab, hit Additional troubleshooters.
Step 4. Under Get up and running, hit Windows Update and then press Run the troubleshooter. Once the troubleshooting process is done, it will show a message to inform you of the result.
Fix 3: Reinstall Microsoft .NET Framework 3.5
Since DISM error 0x800f081f is related to Microsoft .NET Framework 3.5, it is a good option to reinstall it.
Step 1. Click Start and go to Control Panel.
Step 2. Hit Programs and Features > Turn Windows features on or off.
Step 3. Check .NET Framework 3.5 (includes .NET 2.0 and 3.0) and hit OK.
Fix 4: Get Source from Windows Image
Usually, the DISM /Online /Cleanup-Image /RestoreHealth command is used to fix problems by searching in Windows Update or WUSU to replace the corrupted files. If DISM cannot repair a file required by the Windows image, it will result in DISM error 0x800f081f the source files could not be found.
To address this error, you need to specify a valid Windows image file (install.wim) which contains all the files required during the repairing process. The install.wim file should be included in the source folder of Windows 10 Installation media.
Move 1: Download and mount the ISO file
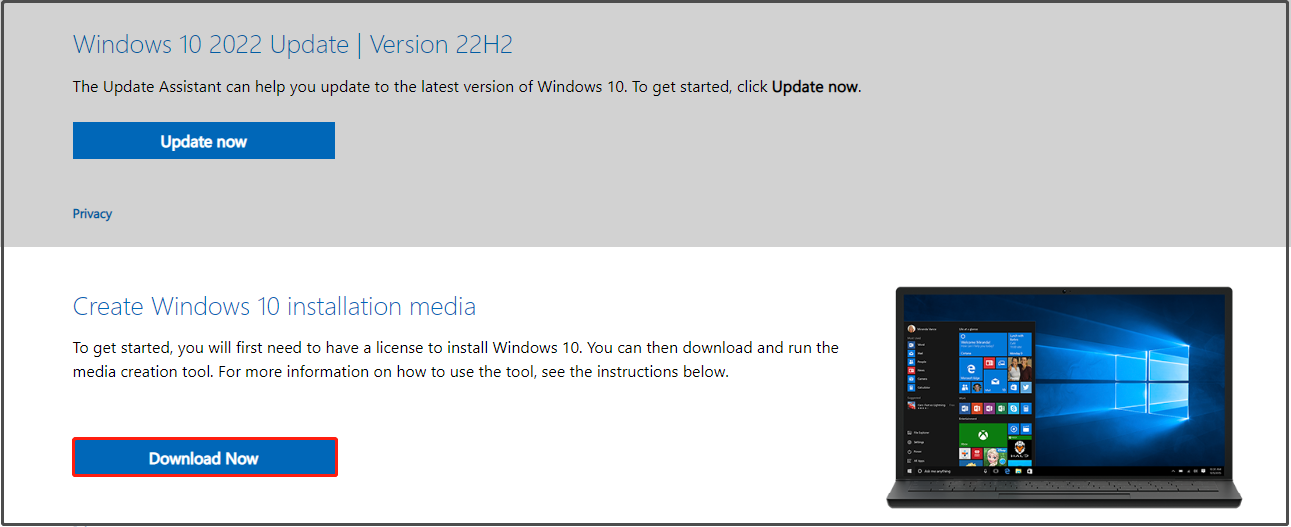
Step 1. Go to the Microsoft Software Download website and hit Download Now under Create Windows 10 installation media.
Step 2. Hit Accept to accept the license terms > tick Create installation media (USB flash drive, DVD, or ISO file) for another PC > hit Next > select Language, Architecture, and Edition > hit Next > tick ISO file > hit Next > choose a download location for Windows 10 ISO file > hit Save.
Step 3. Press Win + E to evoke File Explorer and then locate the Windows 10 ISO image file.
Step 4. Right-click on the ISO file and select Mount in the drop-down menu.
Step 5. After the mounting process is finished, go to This PC and you can see a virtual drive in the right-hand pane.
Move 2: Extract the install.wim file from the install.esd file
Step 1. From the mounted Windows ISO file, right-click on the install.esd file from the source folder to copy it to the root folder of drive C:.
Step 2. Launch Command Prompt as an administrator.
Step 3. Type cd\ to go to the root folder of drive C:.
Step 4. Type the following command and hit Enter to find which images are in the install.esd file.
dism /Get-WimInfo /WimFile:install.esd
Note down the index number according to the Windows 10 installed version.
Step 5. Run the following command to extract the install.wim file according to your Windows version. Don’t forget to replace the IndexNumber with the corresponding index number you noted down just now.
dism /export-image /SourceImageFile:install.esd /SourceIndex:IndexNumber /DestinationImageFile:install.wim /Compress:max /CheckIntegrity
Step 6. Now, you can find the exported install.win file on the drive C:.
Tips:
What if Windows Media Creation Tool is not working? Take it easy! Every problem has a fix. Follow this guide — Best Fixes for Windows 10/11 Media Creation Tool Not Working, and you will work it out.
Move 3: Run DISM Tools
Step 1. Launch Command Prompt as an administrator.
Step 2. Run the two commands below and hit Enter.
DISM /Online /Cleanup-Image /StartComponentCleanup
DISM /Online /Cleanup-Image /AnalyzeComponentStore.
Step 3. Run the following command to specify the C:\install.wim as the source of the known good files.
DISM /Online /Cleanup-Image /RestoreHealth /Source:WIM:c:\install.wim:1 /LimitAccess
Step 4. When this process is done, type sfc /scannow and hit Enter.
Fix 5: Perform an In-place Upgrade
The last method is performing an in-place upgrade. This process will reinstall the entire Windows core with the latest image from Microsoft. It may take a long time, please wait patiently.
Step 1. Download & Install Windows 10 Media Creation Tool on your computer and run it with administrative rights.
Step 2. Accept the license terms and tick Upgrade this PC now.
Step 3. Then, follow the prompts on the screen to complete the upgrade. After the completion, run Dism /Online /Cleanup-Image /RestoreHealth to see if DISM error 0x800f081f is gone.
Tips:
If you fail to run the DISM /Online /Cleanup-Image /RestoreHealth command without error code 0x800f081f, this guide might provide you with some feasible solutions — Best Fixes: DISM /online /cleanup-image /restorehealth Is Stuck.
What’s your opinion about the solutions mentioned in this guide? Which method do you prefer? Click here to share your ideas with your friends on Twitter.Click to Tweet
# Suggestion: Back up Your Computer in Advance
As you can see, it is not easy to troubleshoot manually because you don’t know the exact reason for DISM failed error 0x800f081f. What’s more, you may make some mistakes during the troubleshooting process if you are not proficient in computers. Any small changes may make huge differences or even cause severe consequences to your computer.
As a result, we sincerely advise you to back up your computer in advance. With a backup copy in hand, you can easily restore your system to a normal state. Some of you may assume that creating a backup of your system seems difficult. Don’t worry! With a piece of professional backup software – MiniTool ShadowMaker, everything will be easier.
This free tool is compatible with almost all Windows systems and allows you to create a file, folder, partition, disk, or system backup on your Windows PC. What’s more, it is very popular among the Windows community because of its one-click system backup solution. Without further ado, let’s see how it works!
Step 1. Download, install and launch this program.
MiniTool ShadowMaker TrialClick to Download100%Clean & Safe
Step 2. After launching it, hit Keep Trial to get a 30-day free trial and then go to the Backup page.
Step 3. On this page and you can see the system-required partitions are selected by default in SOURCE and you only need to choose a storage path for your backup in DESTINATION.
Tips:
Here, we recommend you to back up your system to a USB flash drive or an external drive.
Step 4. After making your decision, you can either hit Back Up Now to start the backup process or delay the backup task by hitting Back Up Later.
Then, go to Tools > Media Builder > WinPE-based media with MiniTool plug-in > USB Flash Disk to create a bootable drive. If your computer encounters some other radical changes such as black screen, Blue Screen of Death, or system crashes in the future, you can boot your computer from this USB flash drive and perform a system recovery with the system image that you backed up.
Tips:
As for backing up files, see this tutorial to get detailed instructions — How to Backup Files on Windows 10? Try These Top 4 Ways.
We Need Your Voice
That’s all about the causes and solutions to DISM error 0x800f081f. By now, we believe that you may manage to get rid of this error from your computer. Also, it is highly recommended to back up your system in advance with MiniTool ShadowMaker as a remedy in case that you encounter any severe changes on your system the next time.
Welcome to leave your joy and tell us which solution works for you in the comment zone. For more queries about our software, please feel free to contact us via [email protected].
DISM Error 0x800f081f FAQ
How do I fix error 0x800f081f?
Fix 1: Perform a Component Cleanup
Fix 2: Run Windows Update Troubleshooter
Fix 3: Reinstall Microsoft .NET Framework 3.5
Fix 4: Get Source from Windows Image
Fix 5: Perform an In-place Upgrade
How to fix DISM 0x800f081f error in Windows Server 2016?
To fix DISM 0x800f081f error in Windows Server 2016, you can:
- Run a component cleanup and then perform an SFC scan.
- Offer DISM a location that contains the files it needs to perform the image repair.
- Perform an in-place upgrade.
How do I fix corrupted DISM?
Fix 1: Check Antivirus or Security Programs
Fix 2: Run DISM Command in Clean Boot
Fix 3: Specify the Correct Location of the install.wim File
Fix 4: Uncheck install.wim Read-Only
Fix 5: Clean up System Image Components
Fix 6: Reset Windows Update Service
Fix 7: Run Windows Update Troubleshooter
Fix 8: Disable Proxy on Your Computer
