Install the pending updates in no time
by Ivan Jenic
Passionate about all elements related to Windows and combined with his innate curiosity, Ivan has delved deep into understanding this operating system, with a specialization in drivers and… read more
Updated on
- The Windows Update error code 0x80072af9 is particularly tricky to troubleshoot, given the dearth of details.
- The error usually arises due to corrupt system files, an unstable Internet connection, or a firewall blocking the update.
- To fix things, start by turning off tablet mode or disabling any installed third-party firewall or antivirus, amongst other solutions here.
With each new version of Windows, users get a bunch of additional features and security enhancements critical to the effective functioning of the PC. But the error code 0x80072af9, a Windows Update error, often stands in the way.
The error is encountered when trying to install the latest version of the OS. However, the code is not limited to Windows Update and often pops up in other built-in and third-party apps. So, let’s find out all about the error.
What is error code 0x80072af9?
The error code 0x80072af9 signals that a critical update has failed to install on the PC and prevents you from getting to the latest build. Here are a few reasons you might be getting the error:
- Unstable Internet connection: The most common issue behind this Windows Update error is a slow Internet connection, so you might want to check that.
- Issues with the network adapter: If the network adapter fails at times, primarily while the update is underway, the error code will appear.
- Corrupt system files: When the system files are corrupt, several components of the PC, including Windows Update, fail to function effectively.
- Third-party apps blocking the update: An antivirus or firewall can often block the update from installing. Several users also observed error 0x80072af9 when VPN was set up.
The error code 0x80072af9 appears in the following cases as well:
How we test, review and rate?
We have worked for the past 6 months on building a new review system on how we produce content. Using it, we have subsequently redone most of our articles to provide actual hands-on expertise on the guides we made.
For more details you can read how we test, review, and rate at WindowsReport.
- Error code 0x80072af9 Outlook: Many reported the error when sending emails on Outlook.
- 0x80072AF9 Time Service: A few users had an error log in the Event Viewer pertaining to the Time Service with this error code.
- Error code 0x80072af9 Mail: The Windows Mail app, too, throws the error, usually due to misconfigured browser settings.
- Result failure (error code 0x80072af9): The error code may also be encountered when setting up printers on a Windows device.
How can I fix error code 0x80072af9?
Before we head to the complex solutions, here are a few tips and tricks to try:
- Check the Internet speed and verify if the connection is unstable. If you are connected to a Wi-Fi network, switch to Ethernet when installing the update.
- If you have a VPN set up, or a third-party antivirus or firewall running in the background, disable them all and install the update.
- Many also reported that disabling Tablet Mode allowed them to download the updates, which earlier triggered error code 0x80072af9.
If these don’t work, head to the methods listed next.
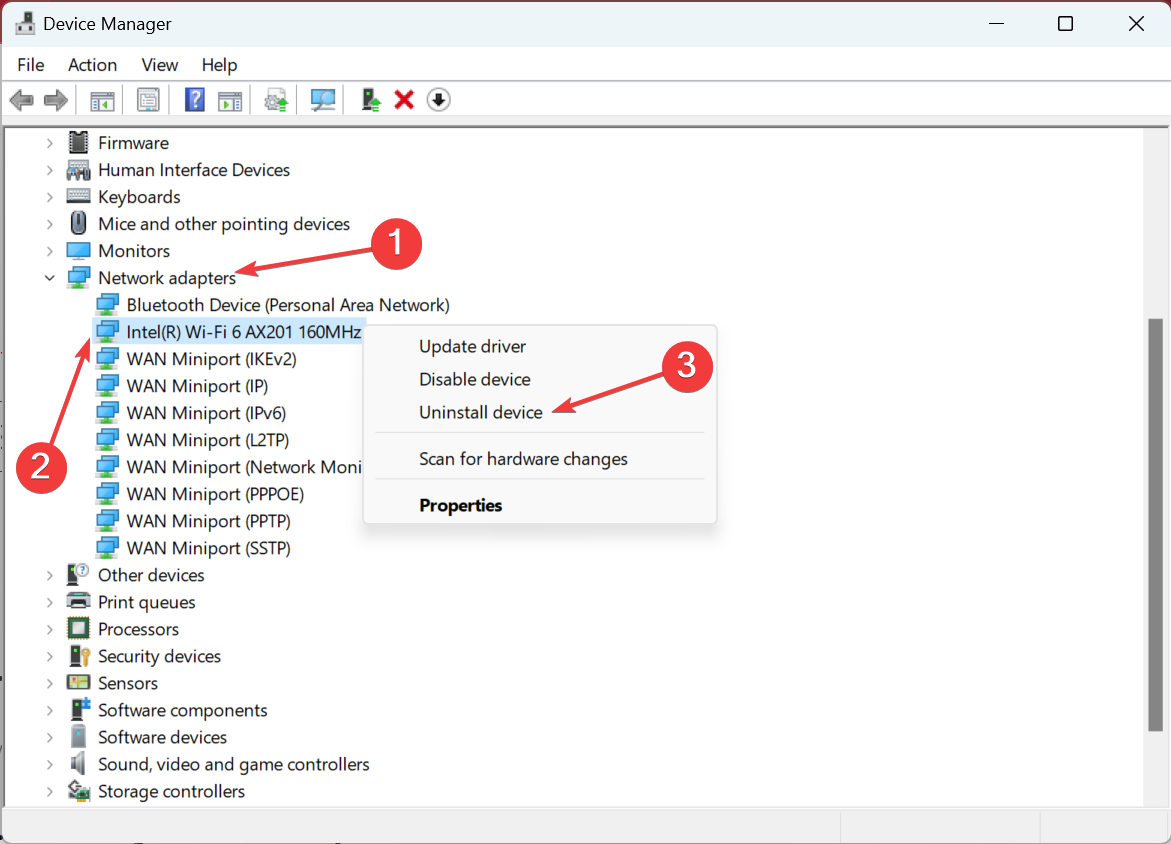
1. Reinstall the network drivers
- Press Windows + X to open the Power User menu, and select Device Manager from the list.

- Expand Network adapters, right-click the active adapter, and then choose Uninstall device.

- Tick the checkbox for Attempt to remove the driver for this device, and click on Uninstall to confirm.

- Once done, restart the computer, and Windows will automatically install the best driver.
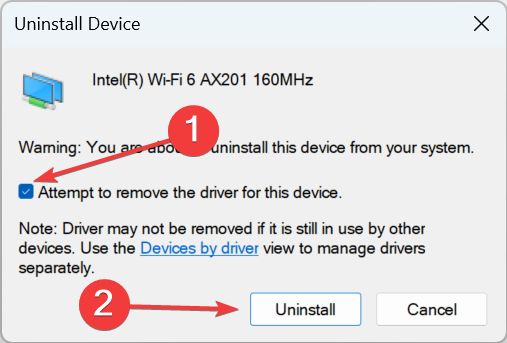
If an intermittent drop in connection led to error code 0x80072af9, reinstalling the network adapter’s driver should do the trick.
2. Run the DISM and SFC scan
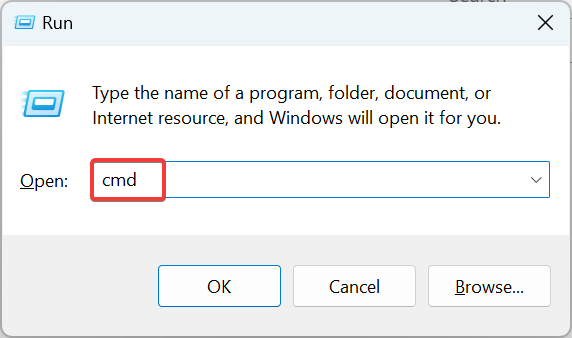
- Press Windows + R to open Run, type cmd, and hit Ctrl + Shift + Enter.

- Click Yes in the UAC prompt.
- Paste the following commands one at a time and hit Enter after each to run the DISM tool:
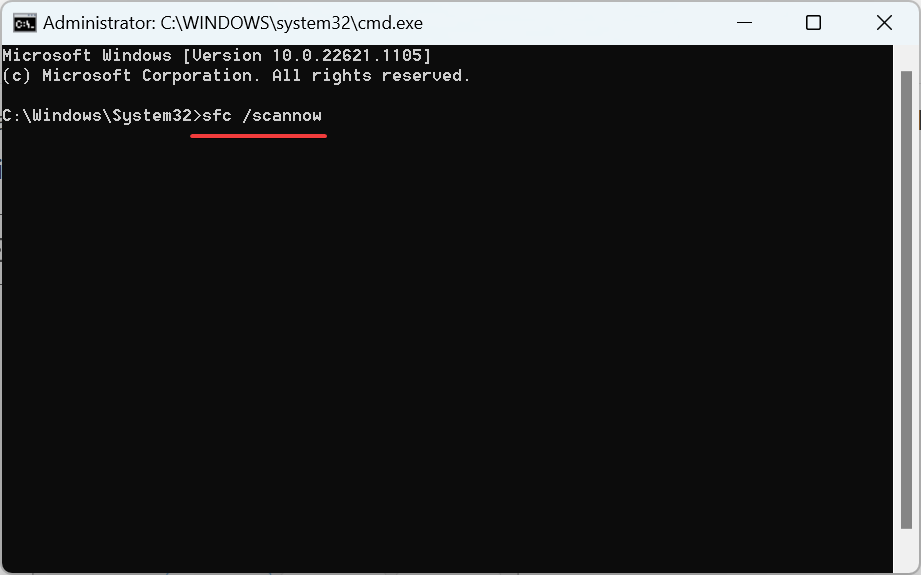
DISM /Online /Cleanup-Image /CheckHealthDISM /Online /Cleanup-Image /ScanHealthDISM /Online /Cleanup-Image /RestoreHealth - Once done, execute the following command to run the SFC scan:
sfc /scannow
Running the DISM tool and SFC scan can help fix corrupt system files. And if that was the underlying cause, you shouldn’t encounter the Windows Update error code 0x80072af9 again.
3. Manually install the update
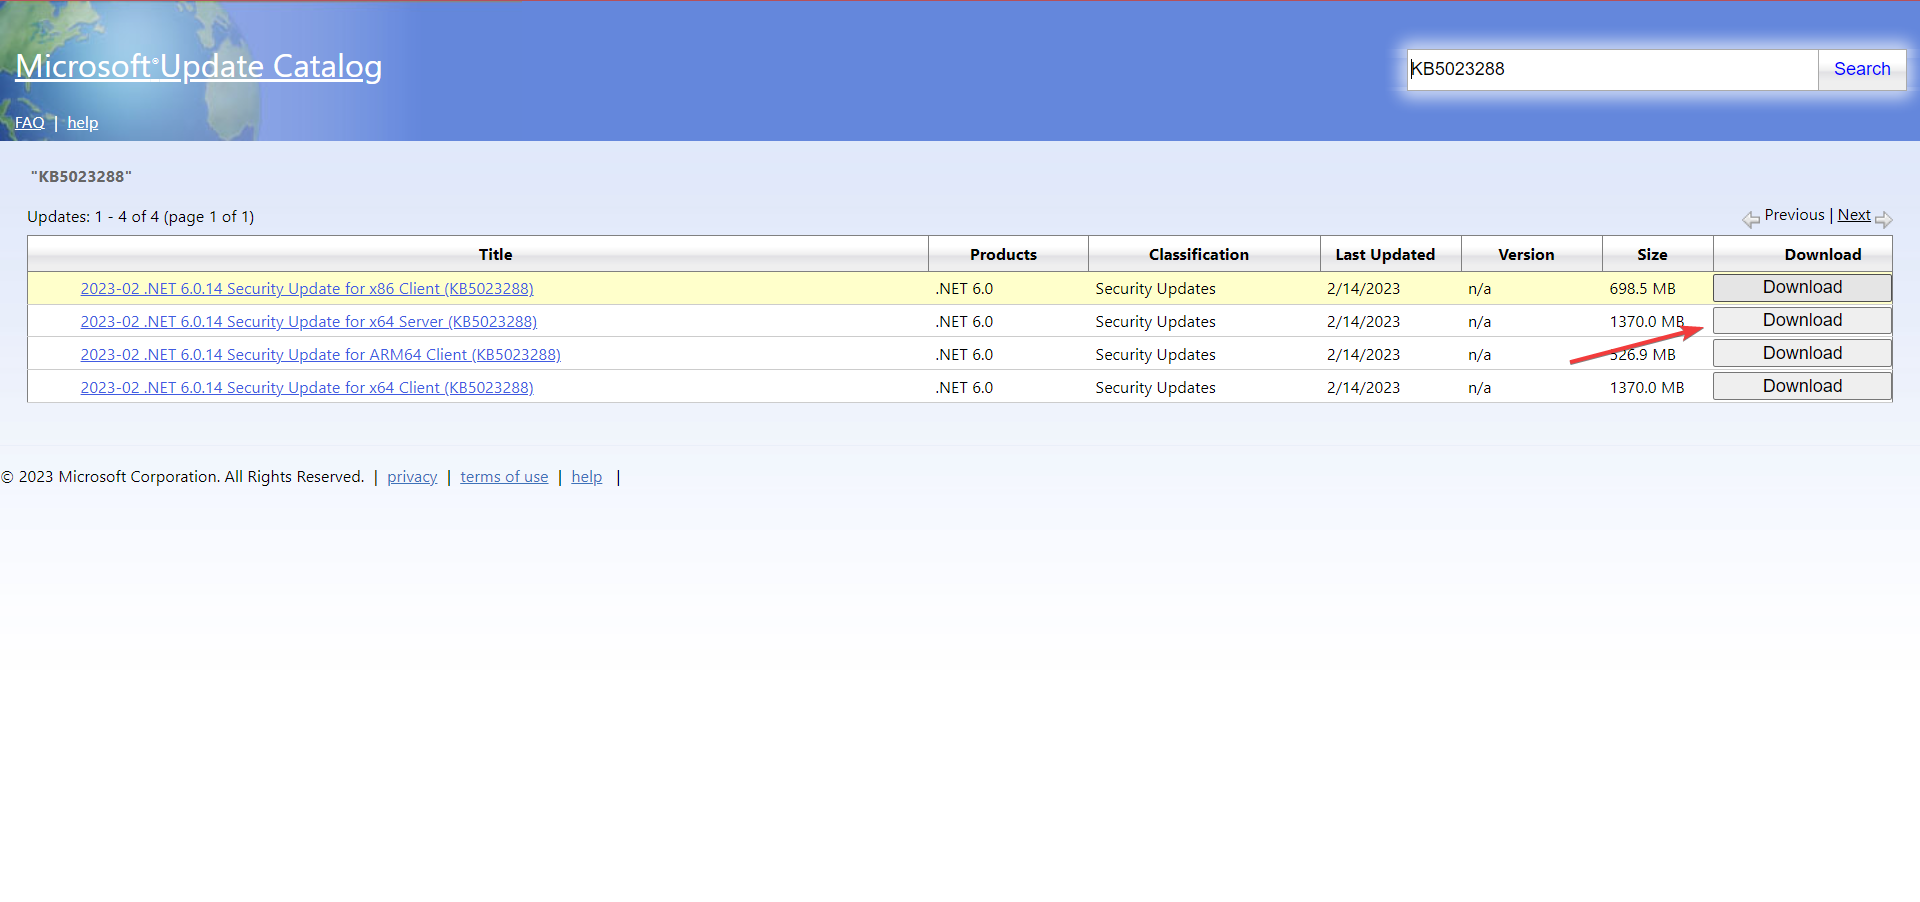
- Identify the KB (Knowledge Base) number for the update triggering the error and then head to Microsoft Update Catalog.
- Paste the KB number in the search box, and hit Enter.

- Click on the Download button next to the update that matches the system architecture, i.e., 32-bit or 64-bit version.
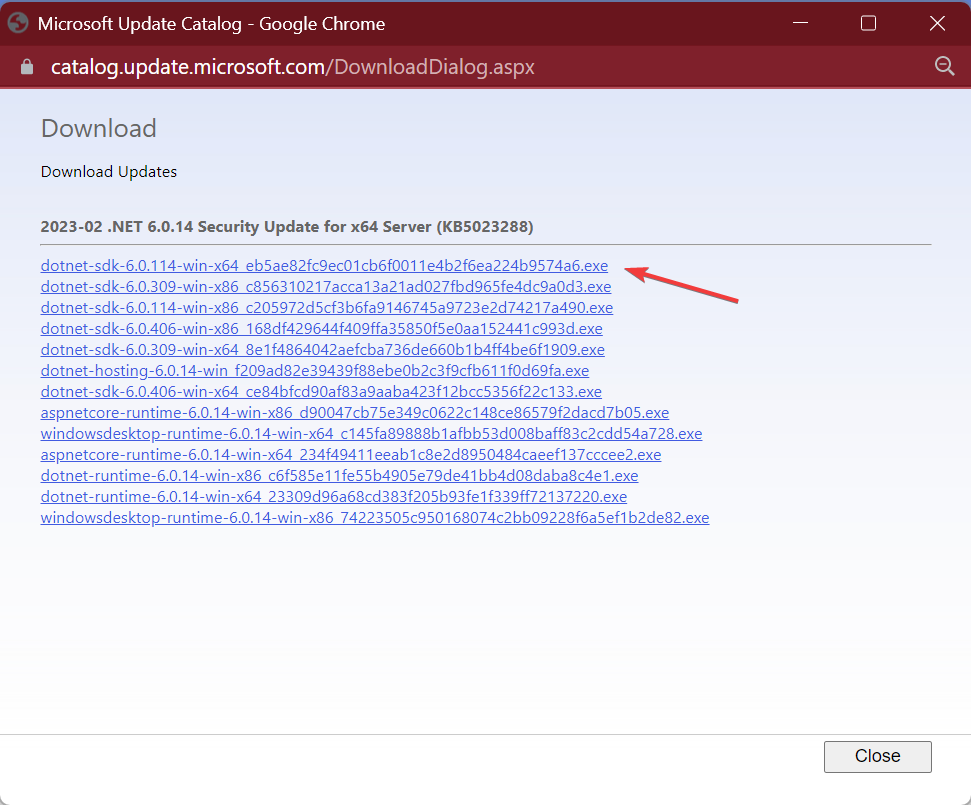
- Now, click on the correct link here, and the download will start.

- Next, run the setup, and follow the on-screen instructions to complete the installation process.


When Windows is unable to install updates automatically, you can always do it manually via the Microsoft Update Catalog and get rid of error code 0x80072af9. All the updates released by Microsoft are listed here.
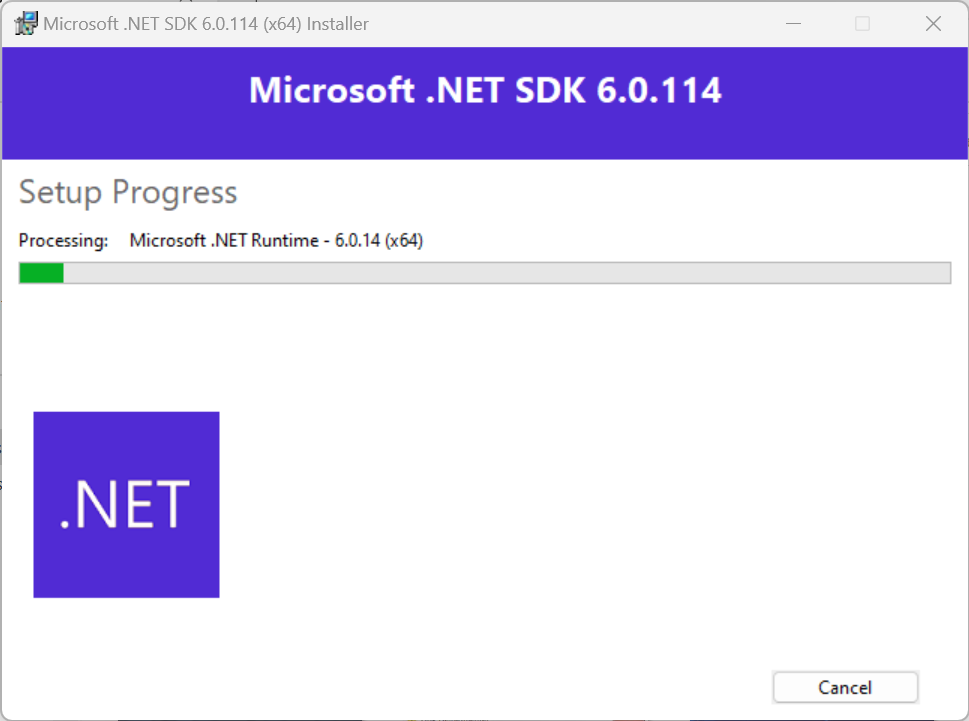
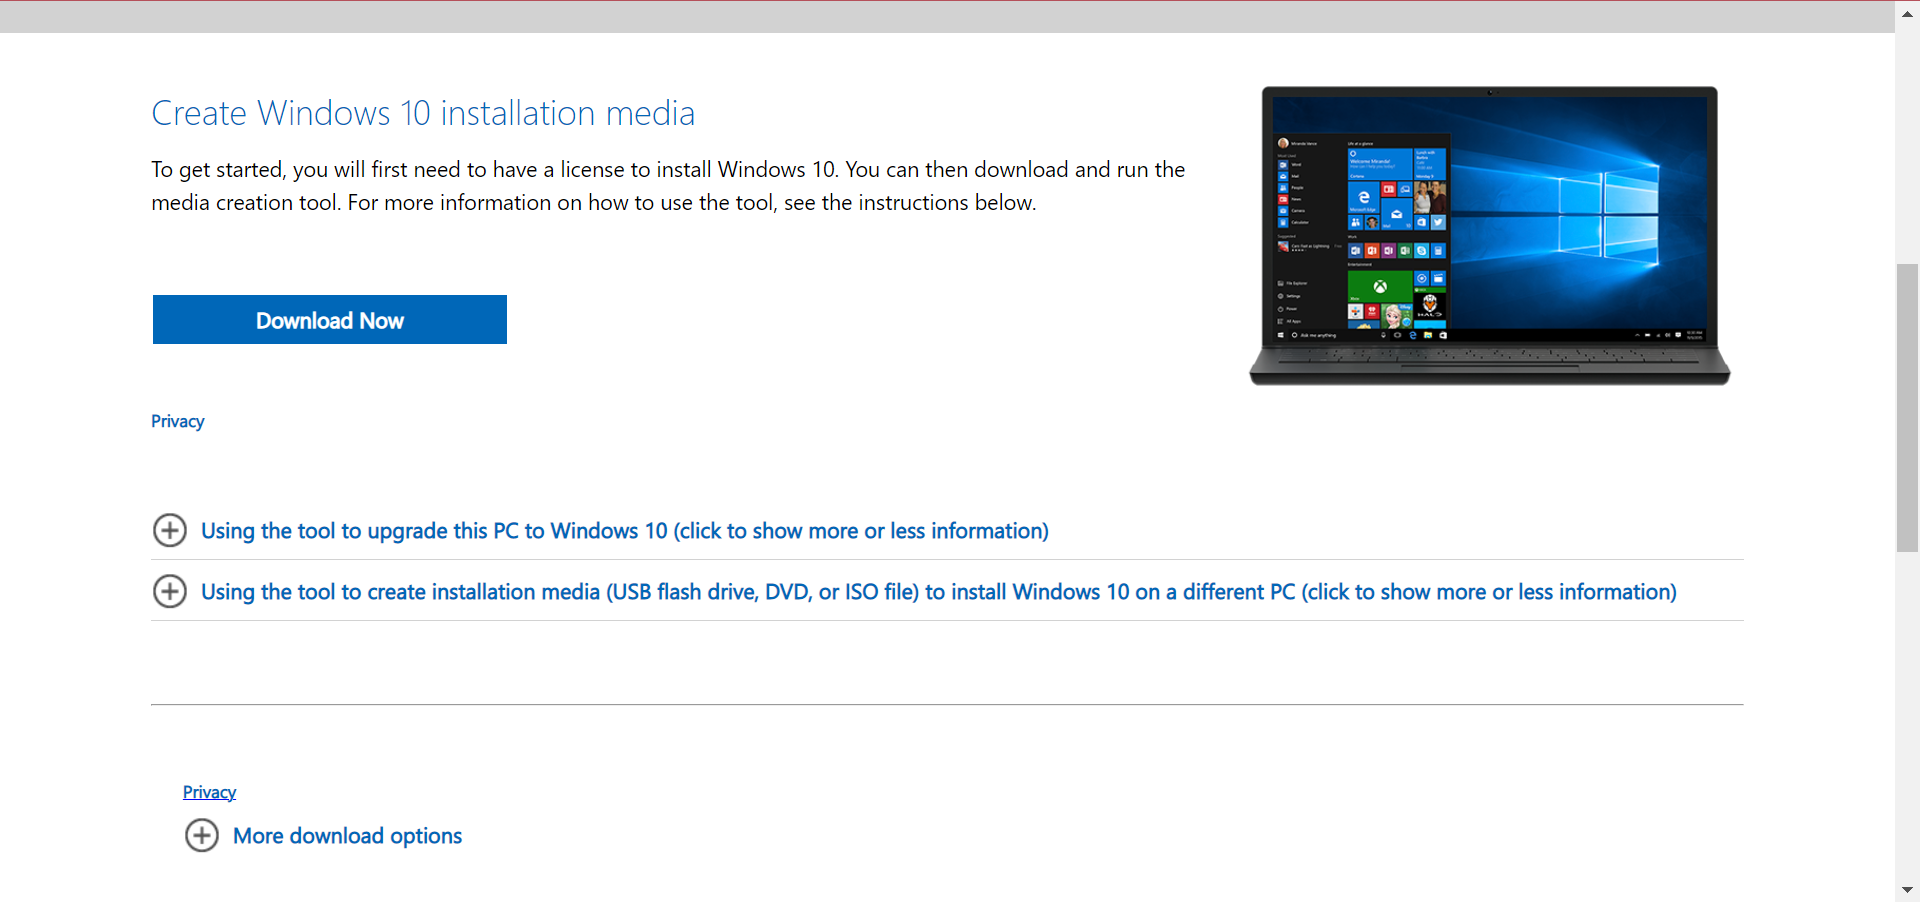
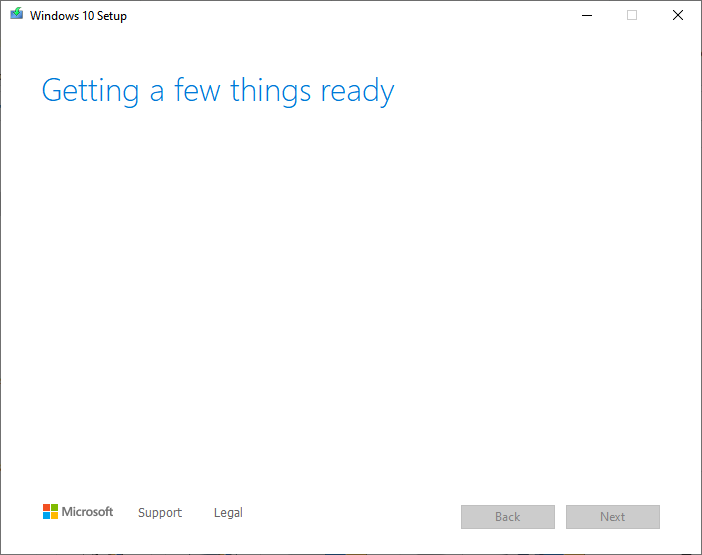
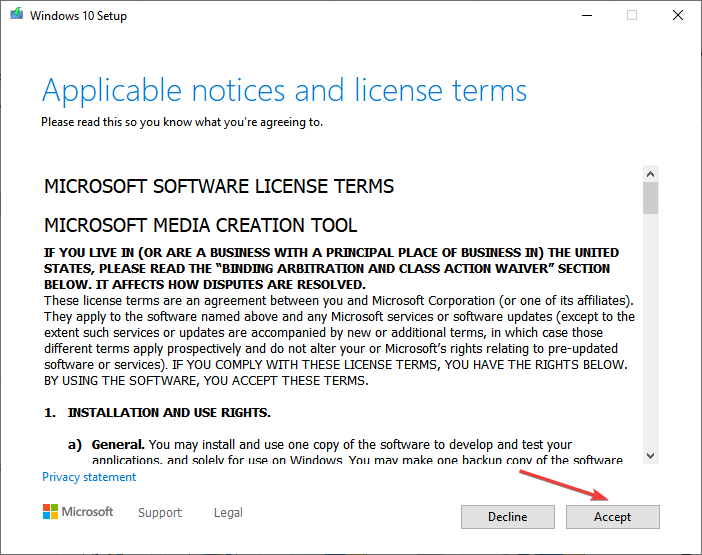
4. Perform an in-place upgrade
- Go to Microsoft’s official website, and download the installation media for Windows 10.
- Now, run the setup and wait for things to get ready.

- Click Accept to agree to the license terms.
- Select Upgrade this PC now, and click on Next to proceed.
- Wait for the setup to download the required files, and then follow the on-screen instructions to complete the process.
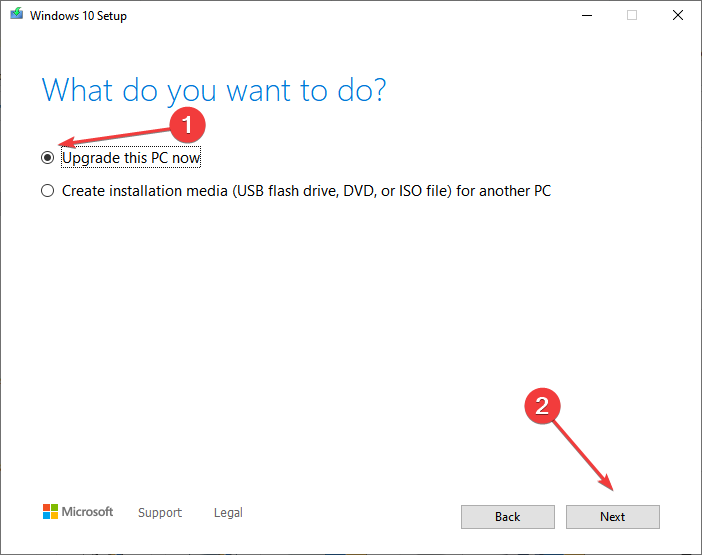

That’s it! If the previous solutions didn’t work, performing an in-place upgrade will help eliminate any underlying causes behind the Windows Update error code 0x80072af9.
How do I fix error code 0x80072af9 with Microsoft Office?
The error code also appears when installing updates for Microsoft Office and could be due to issues with the app itself. That’s why we recommend either repairing or reinstalling Office to fix error code 0x80072af9.
For complete removal before reinstallation, we recommend you use an effective tool. There are many great uninstaller applications on the market, but IOBit Uninstaller offers the most features, so you might want to try it out.
Also, before you leave, check the best PC repair tools, and get one of these to avoid running into such issues again.
For any queries or to share a solution that’s not listed here, drop a comment below.
![]()
Код ошибки 0x80072af9 — одна из распространенных ошибок, с которой сталкиваются пользователи Windows 10/11 при установке обновления или синхронизация почтового приложения. Обычно это сопровождается сообщением об ошибке: «Такой хост неизвестен». По словам некоторых затронутых пользователей, эта ошибка помешала им установить более совершенную сборку Windows.
В разделах ниже давайте узнаем больше об этой ошибке.
Судя по отчетам, ошибка Центра обновления Windows появляется в разных сценариях. Тем не менее, мы составили список ситуаций, когда код ошибки 0x80072af9 срабатывает:
- Произошел сбой сетевого подключения или стороннее вмешательство в работу вашего компьютера и службы Windows Update.
- Режим планшета включен во время установки обновления.
- Вредоносный объект вызвал повреждение важных системных файлов.
- Сторонний антивирус или брандмауэр обеспечивают чрезмерную защиту и не пропускают соединения.
- Системные файлы были повреждены или сломаны из-за внешних факторов. В этом случае восстановление системы является наиболее эффективным решением.
Как исправить ошибку 0x80072af9 в Windows 10/11
Вы пытаетесь установить обновление Windows, и это не удается из-за проблемы с обновлением Windows 0x80072af9? Тогда эта статья для вас. Ниже приведены некоторые исправления, которые сработали для некоторых затронутых пользователей. Следуйте им в рекомендованном порядке, чтобы добиться лучших результатов.
Исправление № 1: используйте средство устранения неполадок Центра обновления Windows
Прежде чем приступить к более сложным исправлениям, давайте начнем с простого исправления: используйте средство устранения неполадок Центра обновления Windows. Некоторые пользователи заявили, что проблема была решена с помощью встроенного Средство устранения неполадок Центра обновления Windows. Эта утилита предназначена для сканирования любых несоответствий в утилите Центра обновления Windows и автоматического применения рекомендуемых исправлений. Использовать средство устранения неполадок Центра обновления Windows очень просто. Вот пошаговая инструкция, что делать:
- Нажмите одновременно клавиши Windows + R, чтобы запустить утилиту «Выполнить».
- Введите ms-settings: устранение неполадок в текстовую область и нажмите Enter. Откроется приложение «Настройки», и вы сразу же попадете на вкладку «Устранение неполадок».
- Прокрутите вниз и найдите раздел «Приступить к работе».
- Нажмите «Центр обновления Windows», а затем нажмите кнопку «Запустить средство устранения неполадок».
- Начнется первоначальное сканирование. Подождите, пока он не будет завершен.
- Нажмите кнопку «Применить это исправление», если рекомендуется исправление.
- После применения исправления выйдите из средства устранения неполадок и перезагрузите компьютер.
- После перезагрузки установите проблемное обновление еще раз и посмотрите, установится ли оно без проблем.
Исправление № 2. Установите проблемное обновление в режиме планшета.
Режим планшета — это новая функция в Windows 10/11, которая позволяет вам взаимодействовать с компьютером с помощью сенсорного экрана. Например, если вы настроили свое устройство так, чтобы указатель мыши был скрыт, когда он не используется, в режиме планшета указатель снова станет видимым, когда вы касаетесь или щелкаете по экрану.
Некоторым пользователям использование этого режима позволяет без проблем установить любое обновление Windows. Вот как установить обновление Windows в режиме планшета:
- Нажмите панель уведомлений в правом нижнем углу экрана.
- Выберите Режим планшета, чтобы включить его.
- Теперь нажмите клавиши Windows + R, чтобы открыть окно «Выполнить».
- Введите ms-settings: обновление Windows и нажмите клавишу Enter на клавиатуре. Эта команда откроет меню обновления Windows.
- Нажмите кнопку «Проверить наличие обновлений» и следуйте инструкциям на экране, чтобы установить неудачное обновление.
Исправление № 3: удалите любое стороннее программное обеспечение безопасности
Используете ли вы сторонний антивирус или брандмауэр? Возможно, это вызывает ошибку обновления 0x80072af9. Некоторые пользователи сообщали, что ошибка была исправлена только после удаления их стороннего программного обеспечения безопасности. Существует несколько способов удалить программу безопасности в Windows 10/11. Мы поделимся ими с вами ниже:
Через настройки приложения
Откройте «Настройки» > «Приложения» > «Приложения и функции». Затем вы увидите список программ, которые вы можете удалить. Найдите программу безопасности здесь и нажмите на нее. Затем выберите Удалить.
Через панель управления
Вы также можете удалить программу через панель управления. Нажмите кнопку «Пуск» и найдите системную папку Windows. Переключитесь на представление значков и найдите «Программы и компоненты». Найдите и щелкните правой кнопкой мыши программу, которую хотите удалить. Нажмите кнопку «Удалить».
Через меню «Пуск»
Другой способ удалить программу безопасности — использовать меню «Пуск». Нажмите кнопку «Пуск» и найдите программу, которую хотите удалить. Щелкните правой кнопкой мыши проблемную программу и выберите «Удалить». Подтвердите свое действие, и программа должна быть удалена.
Исправление № 4: проверьте, не повреждены ли ваши файлы
Файлы Центра обновления Windows хранятся в системном разделе. А иногда вредоносное ПО атакует эти важные системные файлы. После атаки вредоносного ПО эти файлы могут быть повреждены или, что еще хуже, удалены. Итак, стоит проверить, не вызвана ли ошибка повреждением файла в системном разделе.
Хорошо, что Microsoft создала встроенный инструмент для Windows, который можно использовать для проверки поврежденных файлов. Он называется «Проверка системных файлов». Утилита SFC позволяет сканировать компьютер на наличие поврежденных файлов Windows и заменять их свежими копиями из источников установки Windows. Вот как это использовать:
- Нажмите одновременно клавиши Windows + X, чтобы открыть меню WinX.
- Выберите Командная строка (Администратор).
- В командной строке введите команду sfc /scannow и нажмите Enter.
- Должно начаться сканирование SFC. Процесс займет около 15 минут. Убедитесь, что вы не прерываете его.
Исправление № 5: освободите свой компьютер от ненужных файлов
Мусорные файлы — это самое худшее. Со временем они накапливаются на жестком диске, замедляя работу компьютера, а иногда даже вызывая сбои. К счастью, можно быстро и легко удалить все ненужные файлы в Windows 10/11 несколькими щелчками мыши.
Вы можете получить доступ к очистке диска, открыв Проводник и выбрав Этот компьютер > Локальный диск (C:) > Windows > Временные файлы Интернета. Оттуда просто нажмите «Очистить системные файлы» в меню, и все ненужные файлы будут удалены с вашего устройства.
Вы также можете использовать сторонние инструменты для удаления ненужных файлов по вашему выбору. Однако будьте осторожны при установке инструмента. Убедитесь, что вы загружаете только из надежного источника.
Исправление № 6: используйте восстановление системы
Если вы все еще получаете сообщение об ошибке 0x80072af9, вы можете попытаться исправить ее с помощью восстановления системы. Этот инструмент позволяет вернуться к предыдущему рабочему состоянию без потери каких-либо файлов или настроек, которые были изменены с тех пор. Это особенно полезно, если ваш компьютер начинает барахлить или вы видите ошибку при установке нового программного обеспечения или обновлений на свой компьютер.
Чтобы использовать утилиту восстановления системы, выполните следующие действия:
- Нажмите одновременно клавиши Windows + S и введите восстановление системы в поле поиска.
- Выберите пункт «Создать точку восстановления» в результатах поиска.
- Теперь откроется окно «Свойства системы». Нажмите кнопку «Восстановление системы».
- Когда откроется мастер восстановления системы, нажмите «Далее».
- Нажмите «Показать больше точек восстановления», чтобы увидеть все доступные точки восстановления.
- Выберите точку восстановления, созданную до появления ошибки.
- Нажмите Далее, чтобы продолжить.
Следуйте инструкциям на экране, чтобы завершить процесс восстановления системы.
Исправление № 7: обновите устройство с Windows
Если вышеуказанные методы не помогли устранить ошибку 0x80072af9, рассмотрите возможность обновления ПК. Эта процедура не удалит и не удалит ваши личные файлы. Это также не изменит ваши настройки. Что он делает, так это удаляет все сторонние приложения, которые вы установили.
В процессе обновления вашего ПК Windows покажет, какие приложения или программы будут удалены. Вы можете принять к сведению эти программы, чтобы при необходимости переустановить их.
Если вы хотите выполнить обновление ПК, выполните следующие действия:
- Нажмите и удерживайте клавишу Shift, щелкнув правой кнопкой мыши меню «Пуск».
- В следующем меню выберите «Выключить», затем «Перезагрузить». Не отпускайте клавишу Shift, пока не закончите этот шаг.
- При следующем запуске вы увидите среду восстановления/восстановления Windows. Выберите «Устранение неполадок» и выберите «Обновить компьютер».
- После завершения процесса ваш компьютер перезагрузится, и проблема должна быть устранена.
Исправление № 8: выполнить сканирование на наличие вредоносных программ
Если вы подозреваете, что ошибка Центра обновления Windows вызвана заражением вредоносным ПО, немедленно выполните сканирование на наличие вредоносных программ. К счастью, устройства с Windows 10/11 оснащены встроенным сканером вредоносных программ, который можно использовать для избавления от вредоносных программ. Эта программа называется Защитник Windows.
Чтобы использовать Защитник Windows для поиска вредоносных программ, выполните следующие действия.
- Щелкните значок безопасности Защитника Windows на панели уведомлений.
- После этого нажмите кнопку Защита от вирусов и угроз в появившемся окне.
- Далее нажмите кнопку Быстрое сканирование.
- Теперь Защитник Windows начнет сканирование вашего компьютера на наличие угроз.
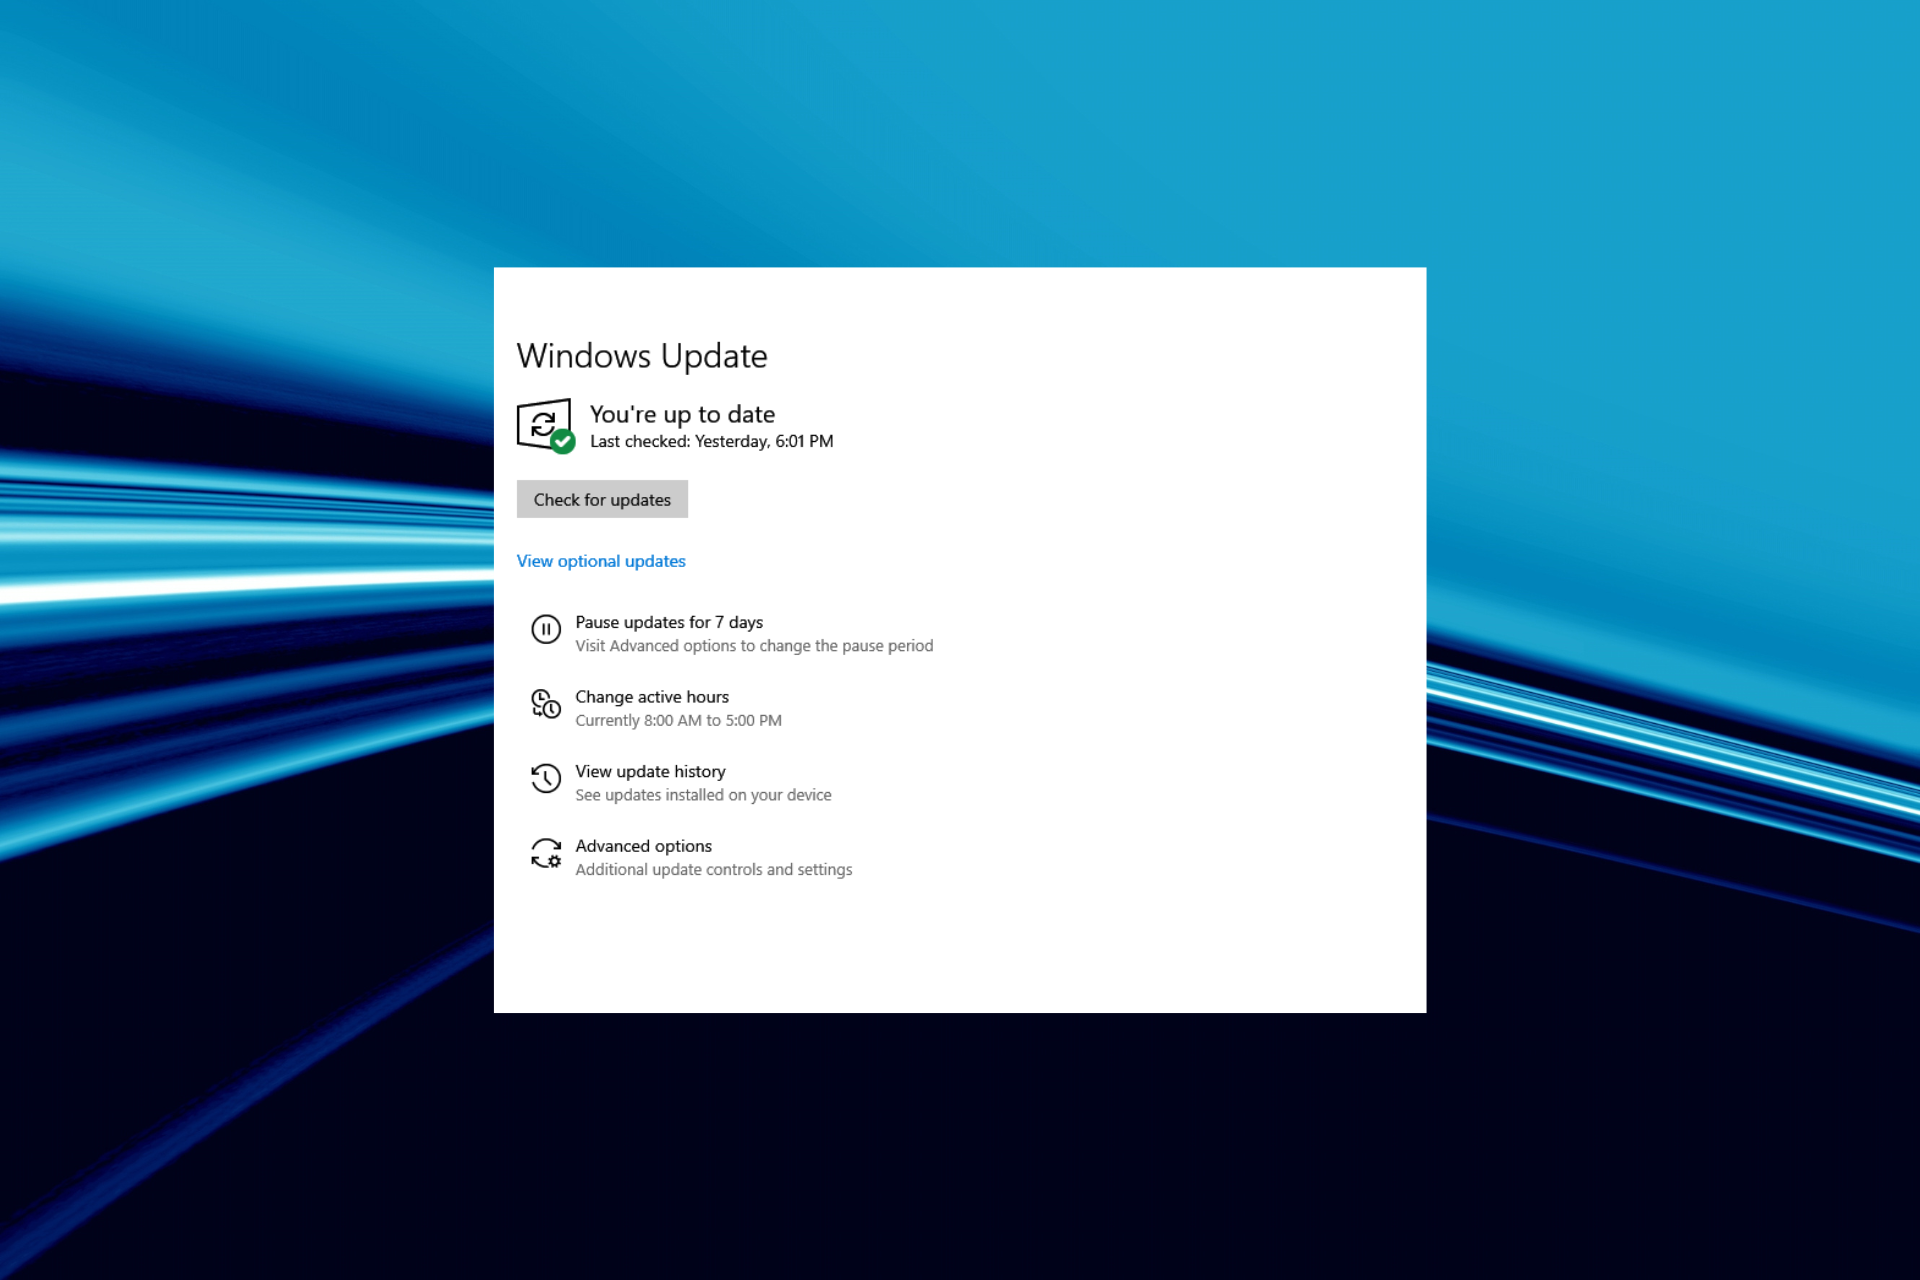
Исправление № 9: установите все ожидающие обновления Windows
Возможно, есть обновление Windows, которое вам все еще нужно установить; вот почему вы видите ошибку. Установите обновление, выполнив простые шаги, указанные ниже:
- Перейдите в поле поиска Windows и введите Центр обновления Windows.
- Нажмите кнопку Проверить наличие обновлений.
- Если доступно обновление, Windows автоматически установит его для вас.
Вывод
Ошибка 0x80072af9 — это распространенная ошибка Windows, обычно вызванная неисправными обновлениями Windows или поврежденными файлами операционной системы. В этой статье мы предоставили вам несколько решений, которые должны помочь вам избавиться от кода ошибки 0x80072af9 в Windows. Если у вас есть какие-либо другие исправления, которые можно добавить в список, поделитесь ими в своем комментарии ниже!
Error Code 0x80072af9 can be seen when you use a VPN, Mail app, or Windows Update. The Windows Time Service can also throw up this error. This error typically appears when attempting to launch Windows Defender or when you check for Windows Updates. It prevents VPN connections or the installation of the most recent definition update. If you face this issue, then this post may be able to help you.

Here is the list of suggestions you can follow to resolve the 0x80072af9 Error Code. Please go through the list and see what may apply in you case:
- Clean up Junk & Temporary Files
- Use the Network Reset option
- Run System File Checker & DISM Tool
- Use System Restore and then run Windows Update
- Manually update Windows Defender
- Reinstall the program that may be throwing up this error.
You will need an admin account to execute these suggestions.
1] Clean up Junk & Temporary Files
Cleaning up junk and temporary files will help smooth system restoration and update. Follow the given steps to clean up.
- Press shortcut Win Key + R to open the Run command dialog box.
- Type cleanmgr in the given space box and click OK.
- Now, select the drive that you want to clean up
- Click OK.
It will remove junk and temporary files.
2] Use the Network Reset option

Use the Network Reset option and see if that works for you. This option in Windows Settings will reinstall Network adapters and reset Networking Components to default.
3] Run System File Checker (SFC) & DISM Tool
SFC command tries to repair damaged system files from the Windows Component Store, while the DISM command tries to repair damaged system files via Windows Update. Running these commands may help eliminate the error code on your windows.
- Right-click on the Start menu.
- Click on Windows Terminal (Admin) to open it
- Type the following and press Enter.
SFC /scannow
- It takes about 10 to 15 minutes for the command to finish running.
Once it fixes the files, it’s time to run the DISM command to repair damaged system files. Type the following in the same Windows Terminal, and press the Enter key.
DISM /Online /Cleanup-Image /RestoreHealth
Once the scan is complete, verify whether the issue has been resolved or not.
4] Use System Restore and then run Windows Update
System Restore enables you to fix installation issues or data corruption without having to reinstall the operating system and restore a system to its previous state. The files and settings saved in the restore point are retrieved, which fixes the Windows environment.

- Click the Start button.
- Type the phrase “system restore” in the search column.
- The Create a restore point option will appear under Settings at the top of the start menu.
- In the window, System Properties, click the System Protection tab and select System Restore. Click Next when the System Restore window appears.
- Choose the preferred restoration point in the next window and click Next.
- To finish the procedure, adhere to the instructions on the screen.
The next step is to update Windows. How to check for Windows Update?
- Use the shortcut Win Key + I to open the Windows Settings.
- Select the Windows Update or Update & Security option.
- Click on Check for updates under the Update Status section on the left pane.
- If updates are available, update.
5] Manually update Windows Defender
First, clear the WinSXS folder. The folder keeps old components when new components appear with a Windows update. Reducing the size may help. The best way to do this is to use the Windows Update Cleanup option in the Disk Cleanup Tool.
You can also run the DISM StartComponentCleanup command to remove old components
Dism /Online /Cleanup-Image /StartComponentCleanup
To clean up more disk space, you may run the following command in the Run prompt for more options in the Disk cleanup tool.
%SystemRoot%\System32\Cmd.exe /c Cleanmgr /sageset:35 & Cleanmgr /sagerun:35
After this, try to install the Windows Defender definition update manually when you’re finished.
6] Reinstall the program that may be throwing up this error
If there is any VPN program that is throwing up this error code, then you could uninstall and then reinstall the program that may be throwing up this error.
It is crucial to follow these steps to get rid of the error so after restoring your PC, check if the error code 0x80072af9 still appears. Since System file corruption can also cause a 0x80072af9 error, a refresh or a repair install is usually effective in resolving this problem. It would help if you only attempted this when nothing else worked.
How to manually download and install updates from Microsoft Server?
You can download the Windows Update by searching the KB number on the Microsoft Catalog website. Once downloaded, you can double-click to start the installation and restart if required. If you are unsure of Windows updates, check the Update history for failed updates.
How to uninstall Windows Updates?
Go to Settings (Win+I), open Settings, click Update & Security and press Windows Updates on the left pane. Next, click Advanced options and choose to View your updates history. To uninstall the Windows Update, click on Uninstall Updates at the top of the page, right-click on the relevant update, and then choose Uninstall from the menu.
Если вы получили сообщение об ошибке «Письмо не может быть отправлено, потому что кажется похожим на спам» ( «Spam limit exceeded» или «Message rejected under suspicion of SPAM»
) или требование ввести контрольные цифры, это могло произойти по следующим причинам:
С вашего ящика отправляются однотипные или шаблонные письма, а также письма с коммерческими или рекламными предложениями. В Яндекс.Почте отправка таких писем не разрешена — наш сервис предназначен для живого общения между людьми.
С вашего ящика ежедневно отправляется большое количество писем — это расценивается нашей системой безопасности как спам. Письма могут отправляться как при вашем участии, так и без вашего ведома.
Чтобы этого не происходило, в Яндекс.Почте установлены технические ограничения на отправку писем в сутки. Обойти или изменить эти ограничения нельзя.
- Ограничения в Почте
- Ограничения в Почте 360 для бизнеса
В течение суток можно отправить с одного ящика 500 писем. Если в письме несколько получателей, то письмо каждому из них считается отдельным письмом.
Дополнительно установлены ограничения на количество получателей:
В течение суток можно отправить с одного ящика 3000 * писем. Если в письме несколько получателей, то письмо каждому из них считается отдельным письмом.
Дополнительно установлены ограничения на количество получателей:
* Учитываются только внешние получатели; владельцы ящиков на этом домене не учитываются.
Наша система безопасности посчитала ваш аккаунт подозрительным. Чаще всего это происходит из-за того, что к вашему ящику не привязан номер телефона или в Яндекс ID указаны вымышленные имя и фамилия.
Большое количество писем с вашего ящика было отправлено на несуществующие адреса. Если письмо было отправлено на несуществующий адрес, вы получите автоматический отчет о недоставке.
Нам поступило несколько жалоб от пользователей на рассылку спама с вашего адреса.
Если это произошло, отправка писем из вашего почтового ящика будет заблокирована. Блокируется только отправка писем — входить в Почту и получать письма вы сможете. Блокировка закончится автоматически через 24 часа, если вы не попытаетесь отправить письмо в течение этого времени, — иначе блокировка продлится еще на 24 часа.
Пока вы ожидаете снятия блокировки, выполните рекомендации, которые помогут избежать проблемы в будущем:
With the introduction of Windows 10, Microsoft promised more stability and better support for all users. Since 2015, the company has stayed up to the task. At least, most of the time.
However, frequent updates occasionally have their own issues. Namely, some mandatory updates are provoking various problems. The update error code 0x80072af9 is just one of them.
Sometimes error 0x80072af9 can appear and prevent your Windows from updating. This error can be problematic, and speaking of Windows errors, here are some similar issues that users reported:
This update’s purpose is to improve the overall security in Microsoft Office. However, as the case proved, it can have a reverse impact on the system.
It is a known culprit for crashes of Office programs, and system drags. Today, we’ll try and help you resolve this issue.
1. Check your antivirus
Using a good antivirus is important if you want to protect your PC from online threats. However, your antivirus can sometimes interfere with your system and cause 0x80072af9 error to appear.
To fix this problem, it’s advised to disable certain antivirus features and check if that helps. If the issue is still present, you might have to disable your antivirus entirely.
In worst-case scenario, your only solution might be to remove your antivirus. If removing the antivirus solves the problem, you should consider switching to a different antivirus such as Bitdefender.
This antivirus offers great features, and it won’t interfere with your system in any way, so feel free to try it out.
2. Try updating your system
For starters, you should try and check for updates right away. Maybe the diligent Microsoft developers have prepared a fix and it is waiting for you to get it.
To check for new KB (Knowledge Base) update, do as follows:
Have in mind that this will work only if there are no corrupted system files. If the problem persists, move on to the next step.
3. Check Windows for corruption
As we all know, updates are installed and stored on the system partition. Moreover, possible malware infection thrives on playing with those essential files.
So, the files can get corrupted or deleted. As a matter of fact, they start working against you. So, we should check them out.
The first step you should take is scanning all partitions with Windows Defender or third-party antimalware software.
Additionally, you’ll want to check files’ integrity with the command prompt. And this is the way to do it:
SFC scan will now start. This scan can take about 15 minutes, so don’t interrupt it.
DISM scan might take 20 minutes or more, so don’t interfere with it. Once the scan is finished, check if the problem is resolved. If the issue is still present, repeat the SFC scan again to fix the problem.
4. Clean up junk files
Additionally, you can use built-in Windows tools to clean up junk system files. Since those can cause a variety of issues due to conflicts with essential files, we should get rid of them.
Have in mind that you can use even trusted third-party cleaners for this task. We’ll walk you through the standard procedure with a built-in disk cleaner:
Run a System Scan to discover potential errors


Click Start Scan to find Windows issues.

Click Repair All to fix issues with Patented Technologies.
There are also many great third-party tools that can clean unnecessary files. If you’re looking for a good third-party tool to clean your files, you might want to consider CCleaner.
This tool is incredibly simple to use, so you should be able to remove unwanted files with ease.
5. Uninstall the update
This is probably not the first nor the last time you installed a faulty update. Moreover, since Windows 10 updates on its own, there is a possibility that things can take a wrong turn.
However, you can at least uninstall malfunctioning updates. In order to get rid of the faulty update, follow these instructions:
That should be that. Restart your PC and check Office behavior after the update file is uninstalled.
6. Reinstall Office
In the end, since this error is related to Office and its apps, you can try and reinstall the whole package. It will cost you some time and nerves, but, it will fix even the most relentless issues.
There are several ways to uninstall an application, but the best method is to use uninstaller software.
In case you’re not familiar, uninstaller software is a special application that will remove the selected application along with all its associated files and registry entries.
By using an uninstaller software, you’ll completely remove the application and it will be as if the application was never installed.
There are many great uninstaller applications on the market, but IOBit Uninstaller offers the most features, so you might want to try it out.
Once you remove Office with this tool, install it again and check if the problem is resolved.
7. Turn off Tablet mode
Windows 10 comes with a useful feature called Tablet mode. As you can probably guess, this feature is meant for tablets, and once you enable it, it will optimize your user interface for touchscreen devices.
However, sometimes this feature can interfere with your system, and according to users, it can even cause error 0x80072af9 to appear.
To fix this problem, you just have to disable Tablet mode. This is incredibly simple, and you can do it by following these steps:
Once this feature is disabled, check if the problem is resolved.
8. Use System Restore
If you keep getting error 0x80072af9, you might be able to fix it using System Restore. In case you’re not familiar, System Restore is a feature that allows you to restore your PC to a previous state and fix any recent problems.
To restore your system using System Restore, you just need to do the following:
After you restore your PC, check if the error code 0x80072af9 still appears.
These were our solutions for Windows 10 update error 0x80072af9. We certainly hope you managed to resolve them. In addition, if you are having any doubts or questions, be sure to share them in the comments section below.
Yes, you can. Simply click the Stop link in the update from the top left corner. A dialogue box should pop up next, providing you with a process to stop the installation progress.
If you turn off your PC during an update, you risk damaging your Windows install, which could further brick it. If this happens, use this guide to fix Windows 10 soft-bricked computers.
 Still having issues? Fix them with this tool:
Ошибка 0x80072f89 в Windows Mail
Ошибка с кодом 0x80072f89 обычно возникает у пользователей операционной системы Windows 10 во время получения или отправления электронного письма через программу Windows Mail. Однако, в сети вы можете найти уведомления о том, что данная ошибка временами появляется и на Windows 8.1.
После проведения небольшого исследования различных тематических форумов выяснилось, что ошибка 0x80072f89 возникает по причине проблемы с SSL-сертификатом. Однако, данное утверждение работает только в том случае, если ошибка появляется непосредственно в приложении Windows Mail.
В сегодняшней статье мы посмотрим с вами, как можно избавиться от этой ошибки и продолжить использовать почтовое приложение системы Windows 10.
Устранение ошибки 0x80072f89 в Windows Mail

Метод №1 Запуск средства устранения неполадок Магазина Windows
Некоторые пользователи смогли разрешить ошибку 0x80072f89, запустив в работу средство устранения неполадок для Магазина Windows. Если данная ошибка возникает в результате каких-то сбоев с данными приложения — средство должно засечь их и устранить.
Заметка: этот метод сработает только для пользователей операционной системы Windows 10. Если вы обладатель старшей Windows, то сразу же переходите ко второму методу.
Вот как можно запустить средство устранения неполадок Магазина Windows:
Дождитесь окончания сканирования, а затем нажмите на кнопку «Применить исправление» для решения найденных проблем с приложениями Магазина Windows, а в нашем случае — Windows Mail. Перезагрузите свой компьютер и проверьте, была ли устранена ошибка 0x80072f89.
Метод №2 Выставление портов
Учитывая, что проблема скорее всего основана на SSL-сертификате, вы можете попробовать разрешить ошибку, добавив определенные порты для серверов входящей и исходящей почты. Сделать это можно следующим образом с помощью встроенных настроек приложения Mail:
Попробуйте снова воспользоваться приложением Windows Mail и посмотрите, была ли устранена ошибка 0x80072f89.
Метод №3 Повторное создание учетной записи Windows Mail
Некоторым пользователям удалось избавиться от этой надоедливой проблемы, попросту повторно создав учетную запись в приложении Windows Mail. Однако, на этот раз при добавлении почты вы не будете указывать параметры SSL.
Попробуйте отослать или получить какое-то электронное письмо, чтобы проверить, была ли исправлена ошибка 0x80072f89.
Источники:
https://windowsreport. com/windows-10-update-error-0x80072af9/
https://gus-g. com/oshibka-0x80072f89-v-windows-mail/