В этой инструкции подробно о том, как исправить ошибку установки обновления 0x80070103 в Windows 11 и Windows 10.
Простые способы исправить ошибку установки 0x80070103
Если ошибка возникла при установке обновления Realtek Extension,Realtek Semiconductor Corp Extension, Intel Corporation Extension или аналогичных, попробуйте выполнить следующие простые шаги (пример для Windows 11, но в Windows 10 действия почти те же):
- Перейдите в Центр обновления в «Параметрах» и откройте пункт «Дополнительные параметры» в нижней части экрана Центра обновлений.
- В дополнительных параметрах откройте пункт «Необязательные обновления».
- Откройте пункты «Обновления драйверов» и «Другие обновления» (если они содержат какие-либо доступные обновления). При наличии в них чего-то, относящегося к Realtek или производителю вашего устройства, скачайте и установите эти обновления.
- Перезагрузите компьютер и попробуйте повторно выполнить установку обновлений, которые сообщили об ошибке 0x80070103
Если предыдущий вариант не помог, попробуйте следующий подход:
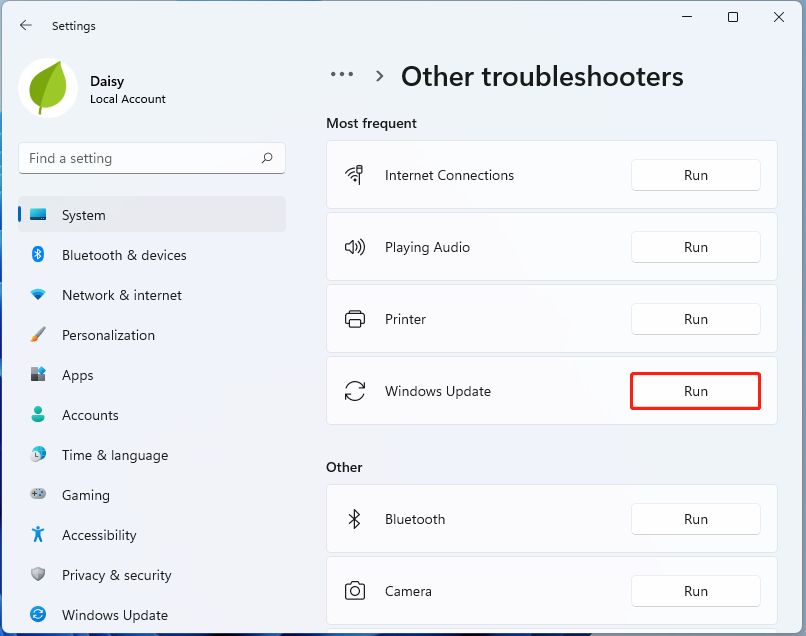
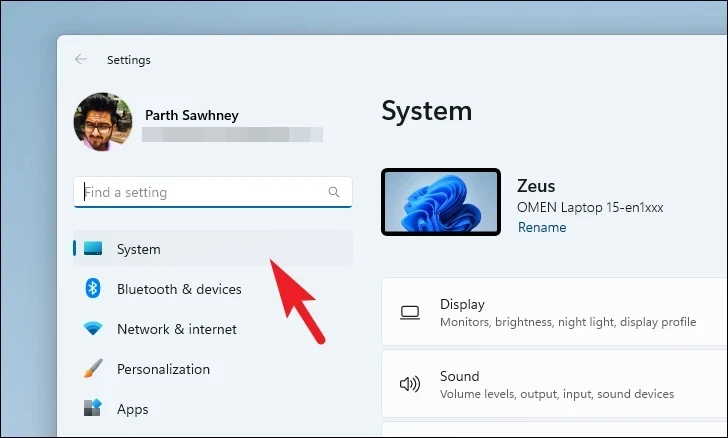
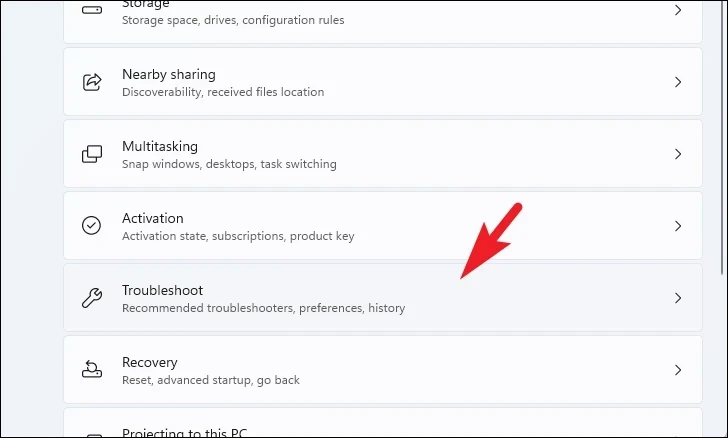
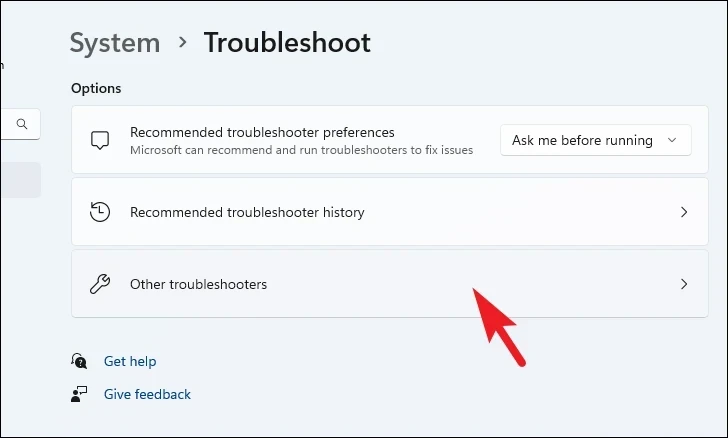
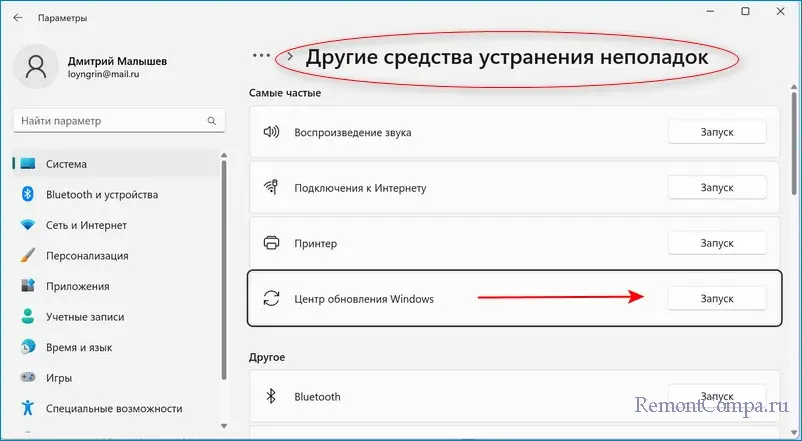
- Откройте Параметры — Система — Устранение неполадок — Другие средства устранения неполадок.
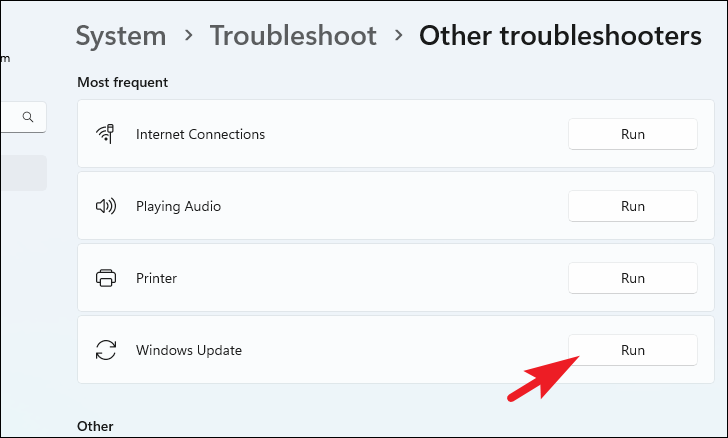
- Запустите средство устранения неполадок для «Центр обновления Windows» и выполните все шаги.
- Перейдите в Центр обновлений и нажмите кнопку «Приостановить» в пункте «Приостановка обновлений».
- Перезагрузите компьютер, затем возобновите получение обновлений.
После возобновления установки обновлений, проверьте, устанавливаются ли они теперь.
Сброс кэша обновлений и его параметров
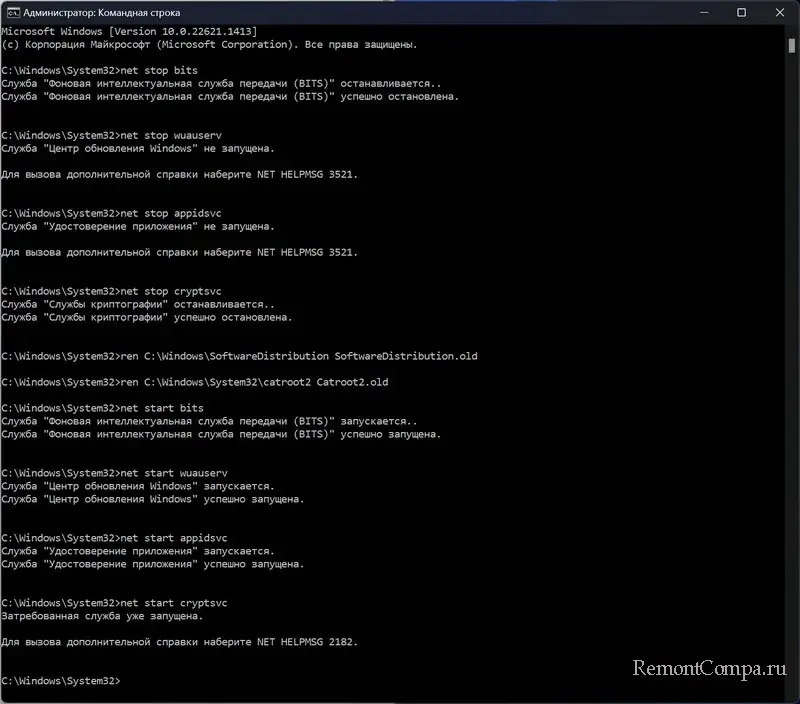
Если предыдущий способ не помог, попробуйте выполнить сброс кэша обновлений Windows, для этого запустите командную строку от имени Администратора и по порядку введите следующие команды
net stop wuauserv
net stop cryptSvc
net stop bits
net stop msiserver
ren C:\Windows\System32\catroot2 catroot2.old
ren C:\Windows\SoftwareDistribution SoftwareDistribution.old
net start cryptSvc
net start bits
net start msiserver
net start wuauserv
Затем снова зайдите в Центр обновлений Windows и попробуйте скачать обновления, установка которых не удается.
Если способ сработал, папку SoftwareDistribution.old в папке Windows и catroot2.old в папке System32 можно удалить, они больше не нужны.
Дополнительная информация
Если предыдущие варианты не помогли, вы можете:
- Попробовать скачать последний драйвер (если обновление относится к устройству) с сайта производителя устройства — вашего ноутбука или материнской платы ПК, именно для вашей модели.
- Использовать дополнительные методы для исправления распространенных ошибок Центра обновлений Windows.
- Скрыть обновления с ошибкой с помощью официальной утилиты Show or Hide Updates, доступной на сайте Майкрософт.
Надеюсь, один из вариантов помог решить проблему, и ошибка была исправлена.
One of the Windows update or install errors on Windows 11 is 0x80070103. The error impacts all the available updates and only displays the “Install error” text. This post from MiniTool provides solutions to the install error 0x80070103 in Windows 11.
Some Windows users report that they receive the “install error 0x80070103 when they try to update their Windows 11. This error usually occurs because Windows 11 is trying to install a driver already installed on the system or was incompatible with it during Windows Update.
Other potential culprits can cause the update error 0x80070103 error in your Windows 11, including:
- Corrupted/damaged system files.
- The driver is in use during the update.
- Update cache data corrupted or damaged.
- Update service stopped/disabled.
Also see:
- How to Fix the Error Code 0x80071AB1 on Windows 11/10?
- How to Fix the Update Error Code 0X8000FFFF in Windows 11/10
- How to Fix Update Error 0xc0000409 in Windows 11 22H2 – 5 Ways
Now, let’s see how to get rid of the “install error 0x80070103” error on Windows 11.
How to Fix Install Error 0x80070103 in Windows 11
Fix 1: Pause and Resume Windows Updates
Before trying the following fixes, try this simple fix. Click the Retry option on the update that encountered an error when trying to install it. Then, pause the update once and resume immediately. Then, you can check if the issue has gone. If not, continue to read.
Fix 2: Manually Install the Update
Another way to complete the installation would be to download it from the Microsoft Update Catalog and then install it manually. Follow the guide below:
Step 1: Open Settings by pressing the Windows + I keys together and click Windows Update.
Step 2: Go to the Update history part. Check if there are failed install numbers.
Step 3: Copy the failed update number. Go to Microsoft Update Catalog and search for the update number.
Step 4: Download it on your PC. Then double-click to launch the installer and then update it.
Fix 3: Run Windows Update Troubleshooter
Windows Update Troubleshooter is a practical built-in tool that enables you to detect and fix errors related to corrupted updates or other Windows updates issues. So, you can try running the troubleshooter to fix the “install error 0x80070103 in Windows 11”. Here’s a tutorial.
Step 1: Press Windows + I to open the Settings application, and then select System from the left vertical menu and click Troubleshoot from the right menu.
Step 2: Click Other troubleshooters to expand all troubleshooters, and then click Run next to the Windows Update section.
Step 3: Now, this troubleshooter will scan issues associated with the Windows Update components. If any fixes are identified, click on Apply this fix and follow the on-screen instructions to complete the repair.
Fix 4: Restart the Windows Update Service
Sometimes simply restarting the Windows Update service might help you to resolve the install error 0x80070103 in Windows 11. Here are the instructions:
Step 1: Press the Windows and R keys at the same time to open the Run dialogue box. Type services.msc and click OK to open the Services application.
Step 2: From the list of applications, right-click Windows Update to select Stop.
Step 3: Then, right-click Windows Update again. This time click Restart.
Once done, restart the computer and check if the install error 0x80070103 is eliminated.
Fix 5: Install the Optional Update
Apart from installing major updates, Windows can sometimes generate updates for upgrading drivers separately. And since the 0x80070103 error is related to problems with drivers, this solution could be effective. Try to follow the steps listed below:
Step 1: Press Windows + I keys to open the Settings window.
Step 2: In the Settings window, select the Windows Update option at the bottom of the left panel and scroll down the right sidebar, and click on Advanced options.
Step 3: Go to the Additional updates section from the left pane and click Optional updates.
Step 4: Select the drivers or other optional updates that you want to install and click the Download & install button.
Step 5: Then Windows 11 will automatically download and install your selected updates. Of course, you may need to reboot your system to execute these changes depending on the updates.
Fix 6: Run SFC and DISM
Another common cause for install error 0x80070103 is related to your system files. To scan and repair your system files, you can try running an SFC (System File Checker) or DISM (Deployment Image Servicing and Management) scan. Here is how to do that:
Step 1: Type cmd in the search box on the taskbar, and then right-click the Command Prompt app and select Run as administrator.
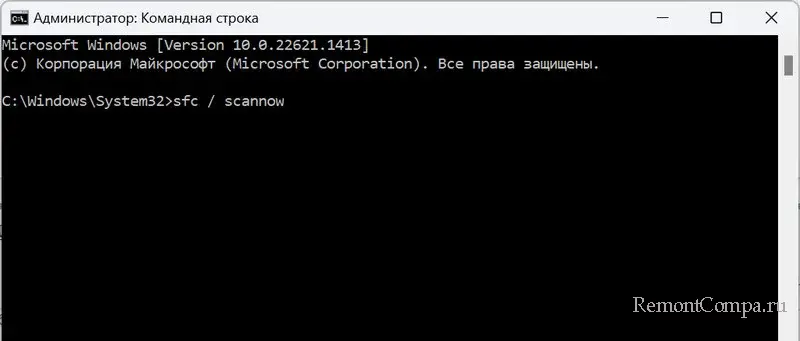
Step 2: Type sfc /scannow command in the elevated command prompt. This process may take you much time to scan, please wait patiently.
Step 3: If the SFC scan doesn’t work, you can try running the command below in the elevated Command Prompt window.
- Dism /Online /Cleanup-Image /CheckHealth
- Dism /Online /Cleanup-Image /ScanHealth
- Dism /Online /Cleanup-Image /RestoreHealth
Once done, reboot your PC and check if the install error 0x80070103 gets fixed.
Fix 7: Delete the SoftwareDistribution Folder
In this section, we walk through the second method – delete the SoftwareDistribution folder to fix the update issue. To do that, you can follow the steps.
Step 1: Type Command Prompt in the Search menu. Then right-click it to choose Run as administrator:
Step 2: Run the following commands one by one and press Enter:
net stop wuauserv
net stop cryptSvc
net stop bits
net stop msiserver
Step 3: Now go to the C:\Windows\SoftwareDistribution folder and delete all the files & folders inside by pressing the Ctrl+A keys to select all and then right-clicking to choose Delete.
After emptying this folder, you can either restart your computer or type the following command one by one in Command Prompt and press Enter to restart Windows Update related services:
net start wuauserv
net start cryptSvc
net start bits
net start msiserver
Now, run Windows Update again and check to see if you still meet the install error 0x80070103 in Windows 11 issue. If the error still exists, try the next fix – repair corrupted system files.
Fix 8: Use Windows 11 Media Creation Tool
When the install error 0x80070103 in Windows 11 appears, you can try using the Windows 11 Media Creation Tool to reinstall your Windows. Here is how to do that:
Tips:
Tip: Before you start the following steps, you had better back up all the important files on your system disk. This post — How to Back up Computer? Here Is a Guide for Windows and Mac maybe is what you need.
Step 1: Download the Windows 11 Media Creation Tool from Microsoft‘s official website.
Step 2: Navigate to the media creation tool you’ve downloaded > run it > accept the license terms.
Two options are offered in the What do you want to do window.
Option 1: Upgrade This PC Now
- Check Upgrade this PC now and click Next.
- Wait while it’s downloading Windows 11. The speed depends on your PC and the internet connection.
- Wait for the settings and configurations verification.
- Choose to Keep personal files and apps, Keep personal files only, or keep Nothing. Then, click Next.
- Follow the on-screen instructions to finish installing Windows 11 on your PC.
Option 2: Create Installation Media
- Check Create installation media (USB flash drive, DVD or ISO file) for another PC and click Next.
- Select Language, Edition, and Architecture manually or check Use the recommended options for this PC.
- Click Next.
- In the Choose which media to use page, please select USB flash drive or ISO file. Please connect the USB drive you prepare in advance if you select a USB flash drive.
- Click Next and follow the on-screen instructions to finish the rest steps.
Suggestion: Back up Your PC Before Updating Windows 11
Before any operations to the Windows operating system like Windows update, it is advised to back up your PC since Windows updates can lead to some issues. Besides, you can choose to back up your important data regularly to keep files safe.
To do this work, MiniTool ShadowMaker is a good assistant that can be compatible with Windows 11/10/8/8.1/7. With it, you can back up and restore files, folders, disks, partitions, and Windows systems. Besides, you can use it to clone your hard drive and sync files.
This backup software offers a Trial Edition that allows a 30-day free trial for all backup features. If you want to use it permanently, get its Pro Edition. Now you can download and try MiniTool ShadowMaker to back up your system.
MiniTool ShadowMaker TrialClick to Download100%Clean & Safe
Step 1: Launch MiniTool ShadowMaker Trial Edition in Windows 11.
Step 2: Go to the Backup interface, you can see system partitions are selected as the backup source. If you need to back up files, click SOURCE > Folders and Files to select items you want to back up.
Step 3: You only need to click DESTINATION to choose a path to save the system image file. It’s highly recommended to choose an external hard drive as the destination.
Step 4: Click Back Up Now to execute the backup task at once or click Back Up Later to delay the backup task.
After that, you are advised to click Tools > Media Builder to create a bootable medium with a USB hard drive, USB flash drive, or CD/DVD disc.
Bottom Line
Are you bothered by the install error 0x80070103 in Windows 11? If you run into the error code during the update process, try the solutions above to easily get rid of that trouble. If you have any other ways to solve the update issue, leave a comment below. Thanks in advance.
Windows 11 is far ahead in design and performance from the previous iterations of the operating system. That being said, it is far from perfect and bugs tend to crop up here and there.
One such issue is the windows update install error 0x80070103. The error impacts all the available updates and only displays “Install error” text which is annoyingly inadequate information to resolve it.
Fortunately, Windows update install errors have been a part of the operating system for quite some time and they are well documented. The errors are usually faced due to a common list of issues that can be easily resolved using the methods provided in this guide.
Thus, giving a look at the common culprits behind the issue can provide a bit more insight into the problem.
Common Culprits Behind the Install Error 0x80070103
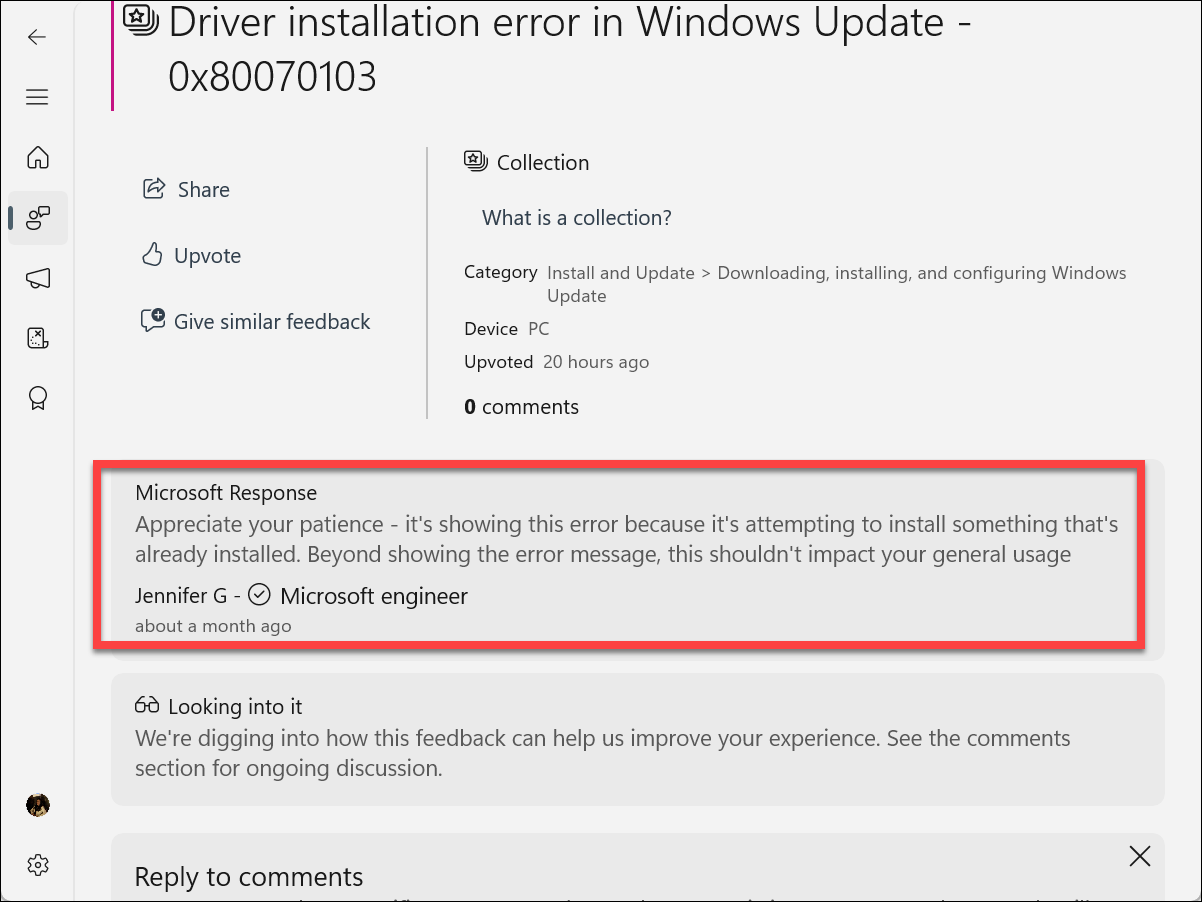
Microsoft has said that the Install Error 0x80070103 is harmless and it usually appears because Windows 11 is trying to install a driver that is already installed on the system or incompatible with it during a Windows update. Microsoft also says that the error shouldn’t impact your general usage since Windows will work in the meanwhile even if you can’t install the updates. They’re also working on fixing it. But if you’re not one to wait, you can try to resolve the error yourself.
There are also other potential culprits that can cause the error on your Windows 11 system which include:
- Corrupted/Damaged System Files
- The driver being updated is under use
- Corrupted or Damaged Update Cache Data
- Update Mechanism Services stopped/disabled
No matter why you might be facing this error, the fixes mentioned below will help you get rid of it and get things working like clockwork again.
1. Pause and Resume the Update
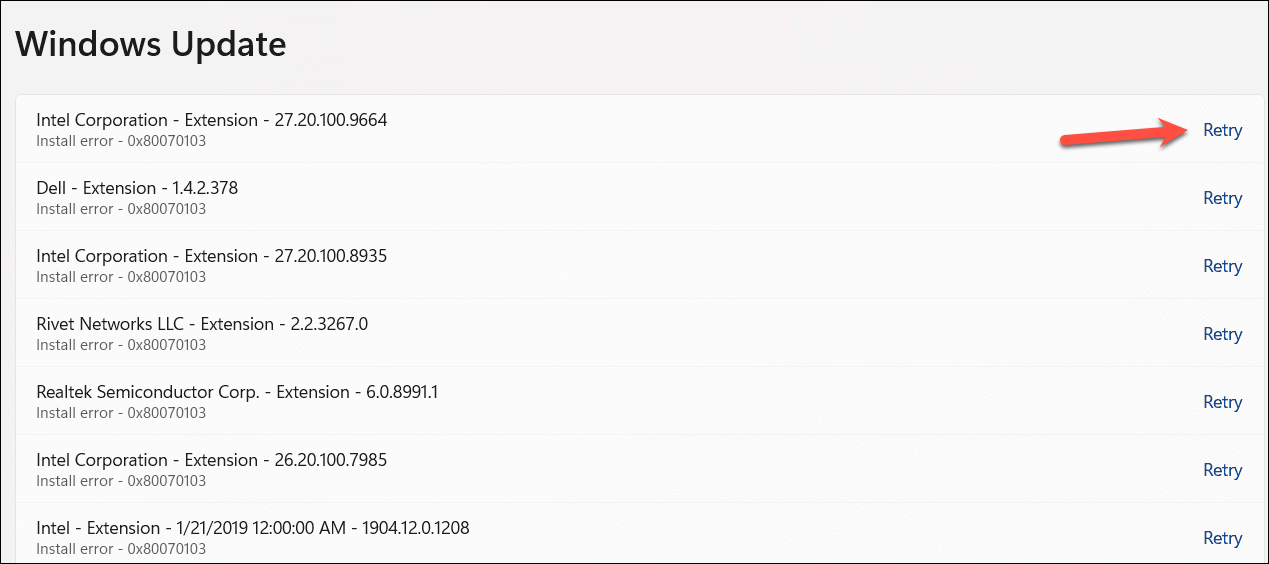
Before embarking on any lengthy fixes, try this simple fix instead. Click the ‘Retry’ option on the update that’s been presenting the error while trying to install it.
Then, pause the update once and resume it immediately. If you’re one of the lucky ones, this simple pause/ resume fix should make the error go away and your updates will be installed.
2. Run Update Troubleshooter
The first and foremost step is to run the troubleshooter to ensure there are no system and/ or configuration issues with the system.
After that, make sure you have selected the ‘System’ tab from the left sidebar.
Next, from the right section, click on the ‘Troubleshooter’ tile.
Afterward, click on the ‘Other troubleshooters’ tile to proceed.
Now, locate the ‘Windows Update’ tile and click on the ‘Run’ button to commence the troubleshooting.
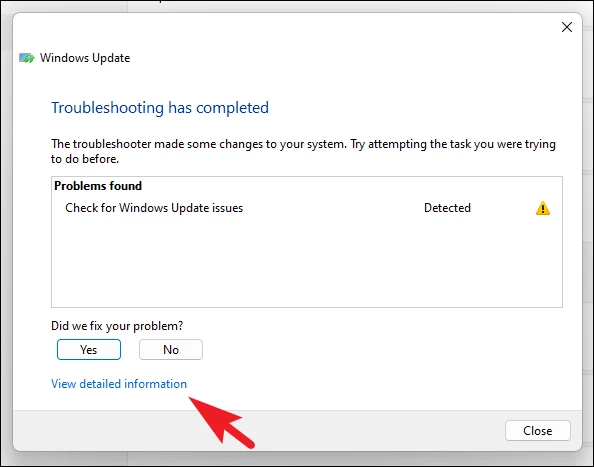
Once the troubleshooting is completed, you will be able to see the list of problems along with suggestions to fix them. To understand the problem deeply, click on the ‘View detailed information’ option.
3. Run DISM and SFC Scan to Fix Corrupted System Files
System files could be damaged or corrupted due to incomplete Windows updates, improper installation of third-party apps, or due to a virus. DISM will first restore the system image and then SFC will use that image to scan for any discrepancies and fix them.
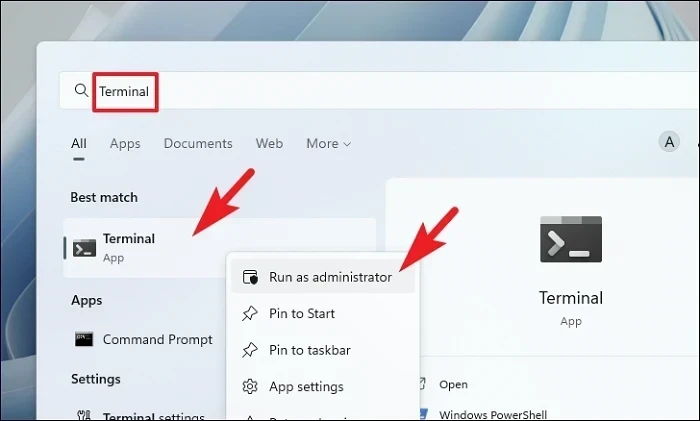
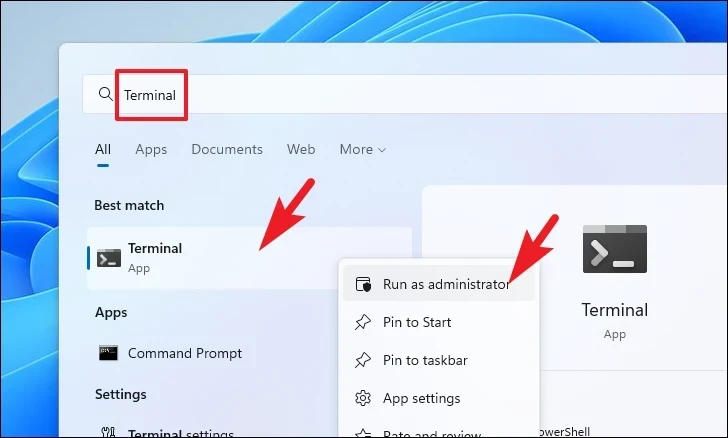
Head to the Start Menu and type Terminal to perform a search. Then, from the search results, right-click on the ‘Terminal’ tile and click on the ‘Run as administrator’ option.
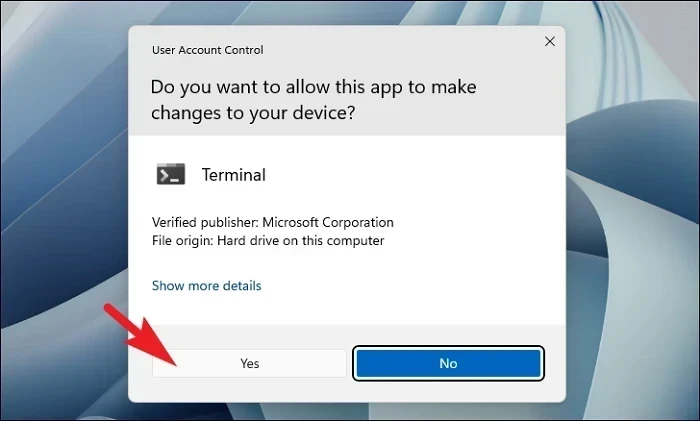
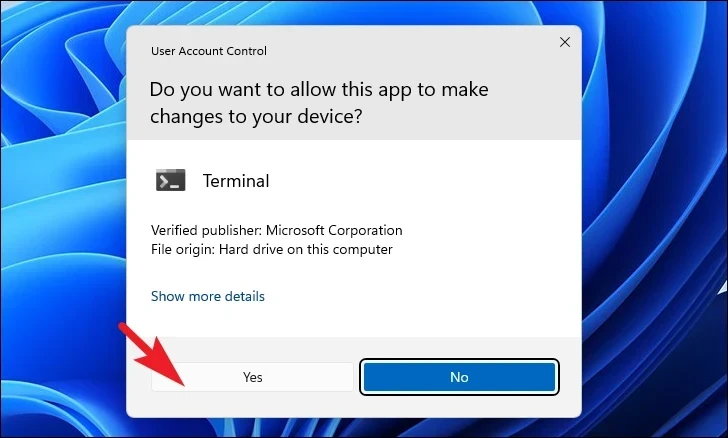
Now, an UAC (User Account Control) window will appear on your screen. If you are not logged in with an admin account, enter the credentials for one. Otherwise, click on the ‘Yes’ button.
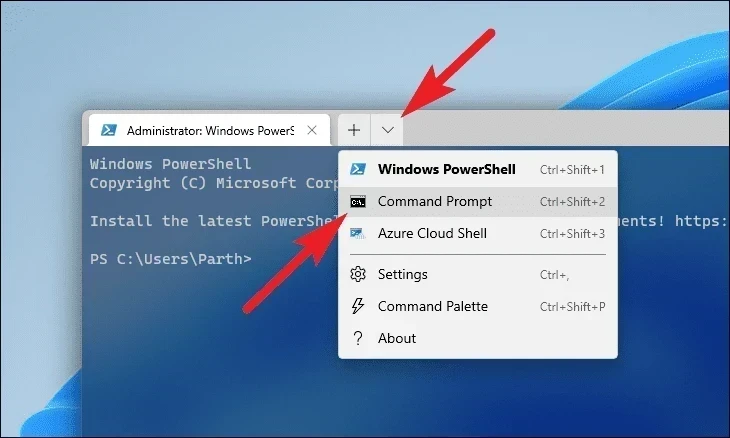
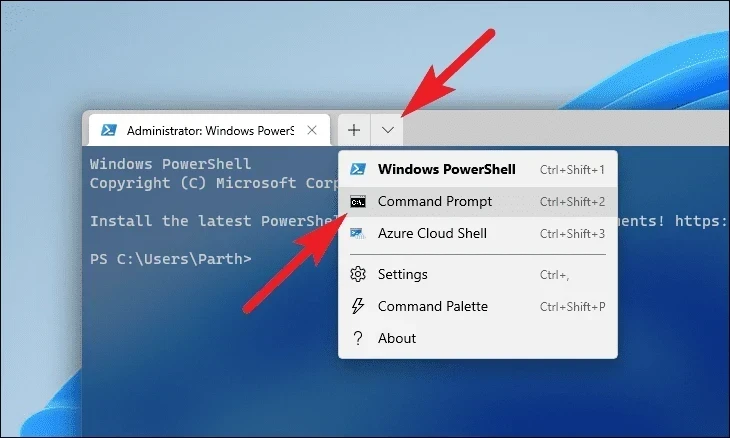
After that, click on the ‘chevron’ (downward arrow) icon and click on the ‘Command Prompt’ option.
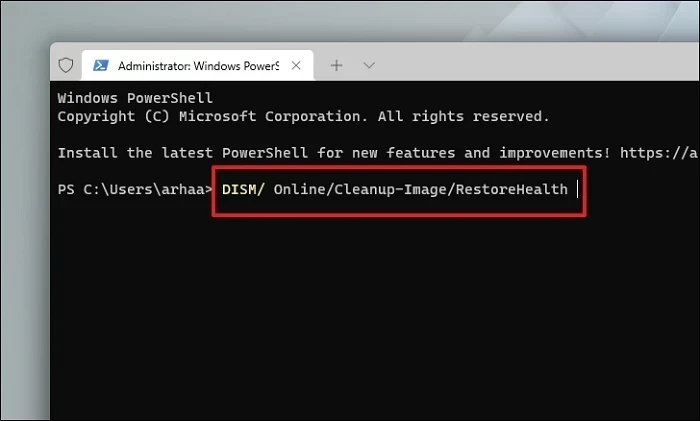
Then, type or copy+paste the below-mentioned command and hit Enter on your keyboard. This will restore the currently installed OS image on your device.
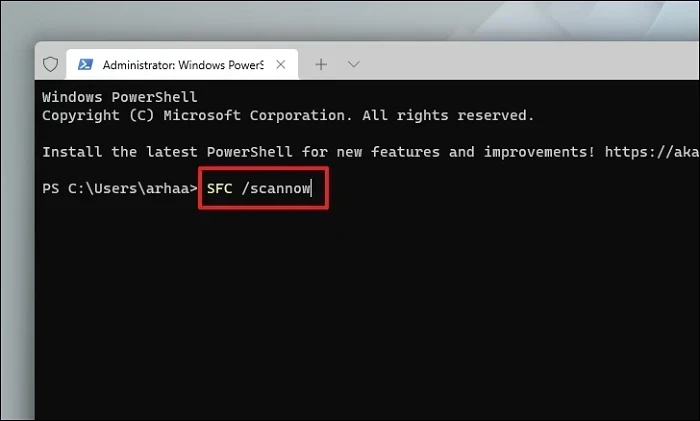
DISM/ Online/ Cleanup-Image/ RestoreHealthAfterward, type or copy+paste the following command to check and repair the system files on your PC.
SFC /scannowOnce done, restart your PC and try to update your PC to check if the problem still persists.
4. Reset Windows Update Service
Windows Update services run in the background silently to make sure all the updates are delivered properly to your system. However, at times, a third-party app or service can interfere with these services causing hindrances to their functionality.
Now, head to the Start Menu and type Terminal. Then, right-click on the tile and select the ‘Run as administrator’ option.
Next, a UAC (User Account Control) window will appear on your screen. If you are not logged in as an admin, provide credentials for one. Otherwise, click on the ‘Yes’ button.
After that, click on the ‘chevron’ icon and select the ‘Command Prompt’ option.
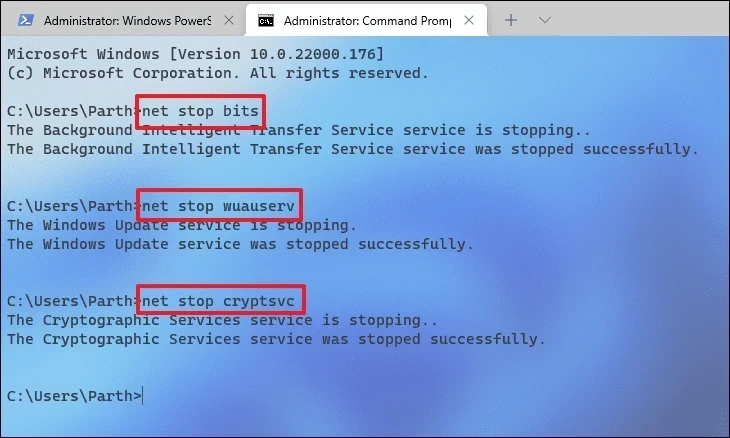
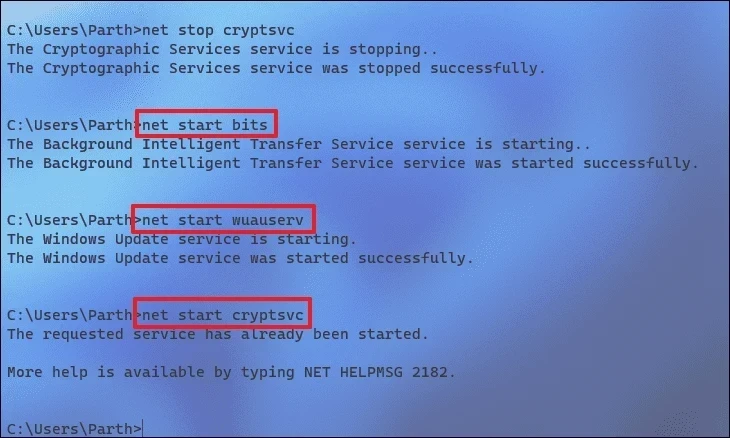
After that, type or copy+paste the below-mentioned command to stop the currently running update service. Ensure you press Enter after you enter each command separately to execute them all.
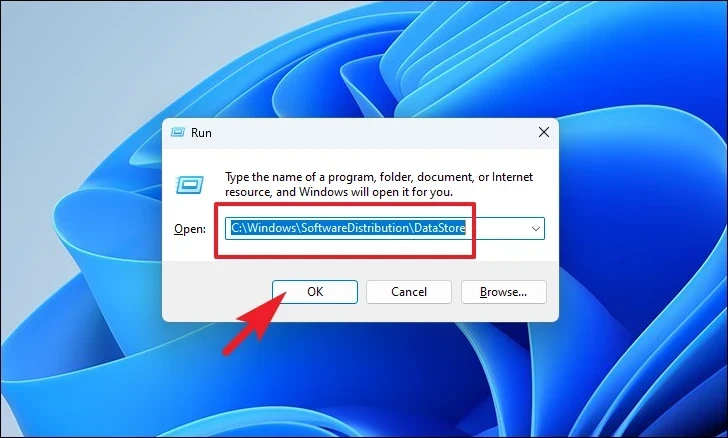
net stop bitsnet stop wuaservnet stop cryptsvcAfter that, press the Windows+R keys together on your keyboard to open the Run command utility. Then, type or copy+paste the below-mentioned address path and click on the ‘OK’ button to proceed.
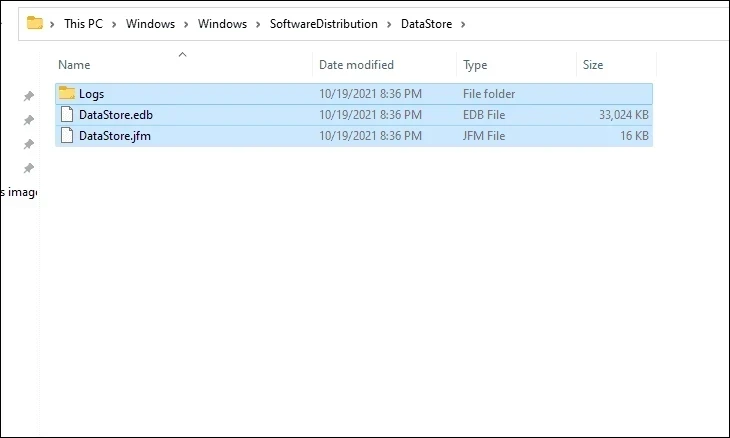
C:\Windows\SoftwareDistribution\DataStoreThen, press the Ctrl+A keys to select all the files and folders, and then press the Shift+Delete keys to permanently delete all the files.
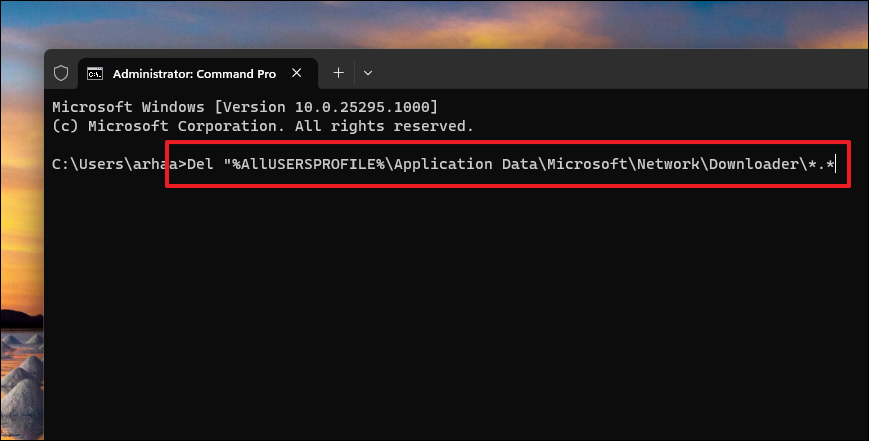
After that, head back to the Command Prompt and type or copy+paste the below-mentioned command and hit Enter.
Del "%AllUSERSPROFILE%\Application Data\Microsoft\Network\Downloader\*.*Then, if prompted, press Y to confirm the deletion of files.
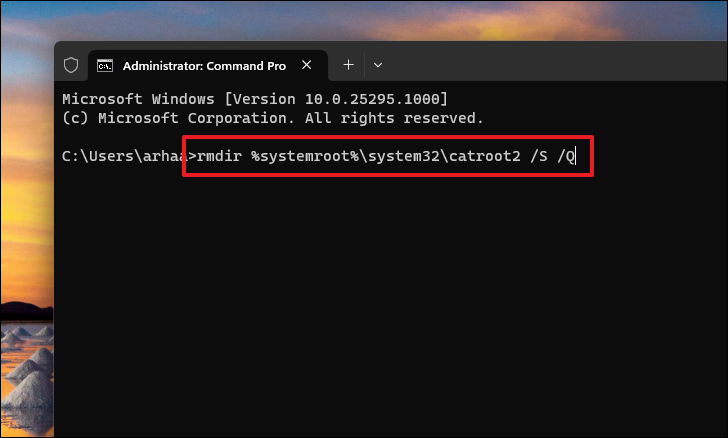
After that type or copy+paste the below-mentioned command and hit Enter. This will clear the Windows Update cache and will enable the operating system to re-download the updates. Make sure to press Enter after each command.
Note: The /S modifier key will delete all subdirectories and the /Q modifier will allow you to delete the files without any additional confirmation.
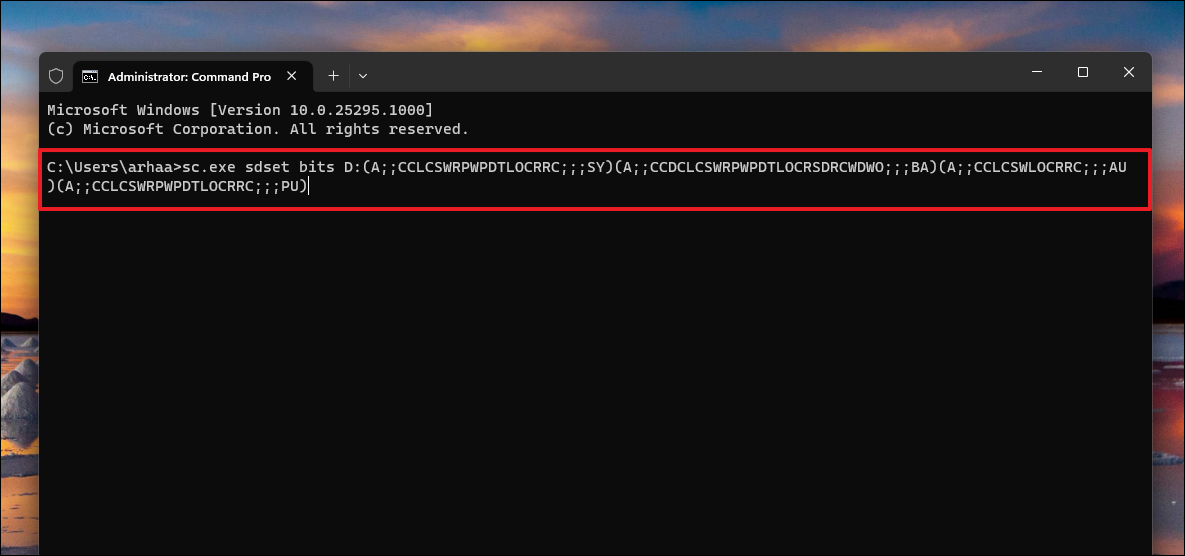
rmdir %systemroot%\system32\catroot2 /S /QThen, type or copy+paste the following command and execute it. This command will reset BITS and Windows Update services to their default security descriptor. Also, make sure to hit Enter after each command.
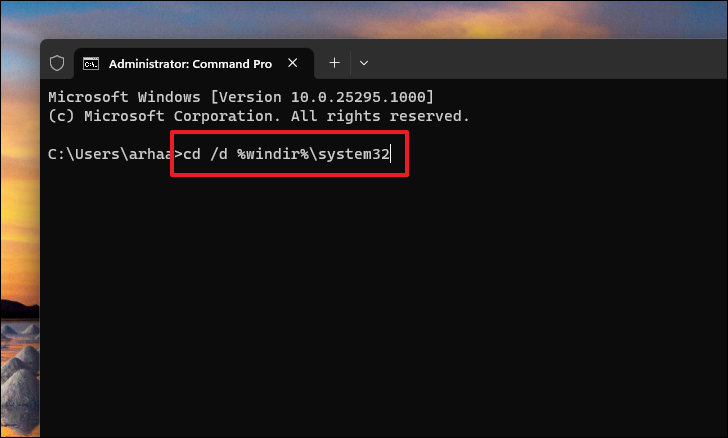
sc.exe sdset bits D:(A;;CCLCSWRPWPDTLOCRRC;;;SY)(A;;CCDCLCSWRPWPDTLOCRSDRCWDWO;;;BA)(A;;CCLCSWLOCRRC;;;AU)(A;;CCLCSWRPWPDTLOCRRC;;;PU)sc.exe sdset wuauserv D:(A;;CCLCSWRPWPDTLOCRRC;;;SY)(A;;CCDCLCSWRPWPDTLOCRSDRCWDWO;;;BA)(A;;CCLCSWLOCRRC;;;AU)(A;;CCLCSWRPWPDTLOCRRC;;;PU)After that, execute the below-mentioned command to change the directory to the System32 folder.
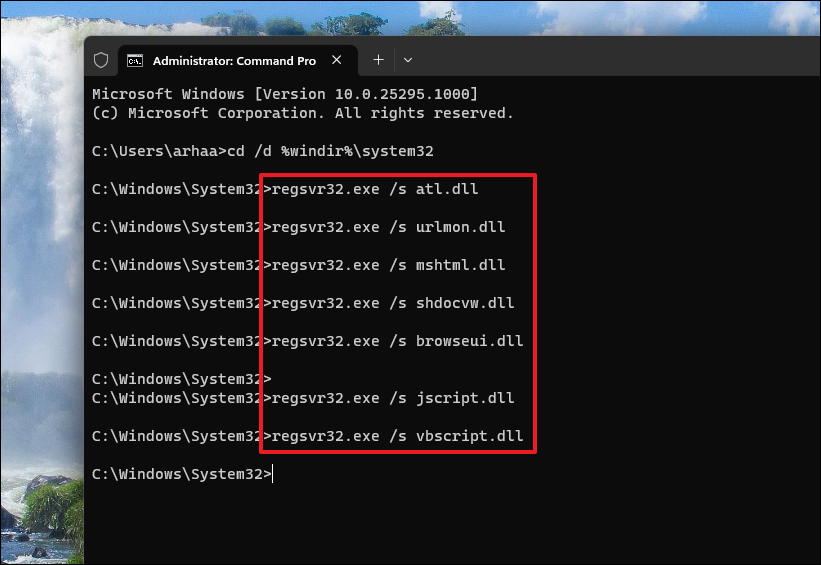
cd /d %windir%\system32Next, type the below-mentioned commands and hit Enter after each command to execute them all. This will update BITS and Update DLL files on the Registry.
regsvr32.exe /s atl.dllregsvr32.exe /s urlmon.dllregsvr32.exe /s mshtml.dllregsvr32.exe /s shdocvw.dllregsvr32.exe /s browseui.dllregsvr32.exe /s jscript.dllregsvr32.exe /s vbscript.dllregsvr32.exe /s scrrun.dllregsvr32.exe /s msxml.dllregsvr32.exe /s msxml3.dllregsvr32.exe /s msxml6.dllregsvr32.exe /s msxml3.dllregsvr32.exe /s msxml6.dllregsvr32.exe /s actxprxy.dllregsvr32.exe /s softpub.dllregsvr32.exe /s wintrust.dllregsvr32.exe /s dssenh.dllregsvr32.exe /s rsaenh.dllregsvr32.exe /s gpkcsp.dllregsvr32.exe /s sccbase.dllregsvr32.exe /s slbcsp.dllregsvr32.exe /s cryptdlg.dllregsvr32.exe /s oleaut32.dllregsvr32.exe /s ole32.dllregsvr32.exe /s shell32.dllregsvr32.exe /s initpki.dllregsvr32.exe /s wuapi.dllregsvr32.exe /s wuaueng.dllregsvr32.exe /s wuaueng1.dllregsvr32.exe /s wucltui.dllregsvr32.exe /s wups.dllregsvr32.exe /s wups2.dllregsvr32.exe /s wuweb.dllregsvr32.exe /s wuweb.dllregsvr32.exe /s qmgr.dllregsvr32.exe /s qmgrprxy.dllregsvr32.exe /s wucltux.dllregsvr32.exe /s wuwebv.dllFinally, head back to the elevated Command Prompt window, type or copy+paste the following command one by one, and hit Enter to start the services you disabled earlier.
net start bitsnet start wuaservnet start cryptsvcAfter that, restart and check if you are able to update your PC.
5. Manually Install the Update
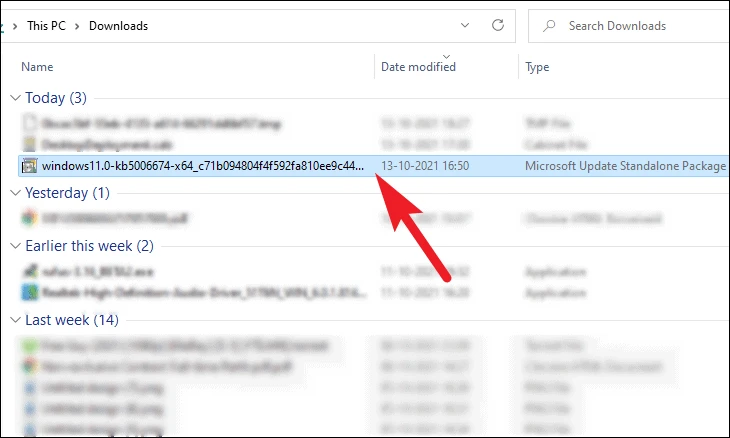
If you haven’t had success with the methods listed till now, you can also manually update the PC by downloading the update from the Microsoft Catalog Website.
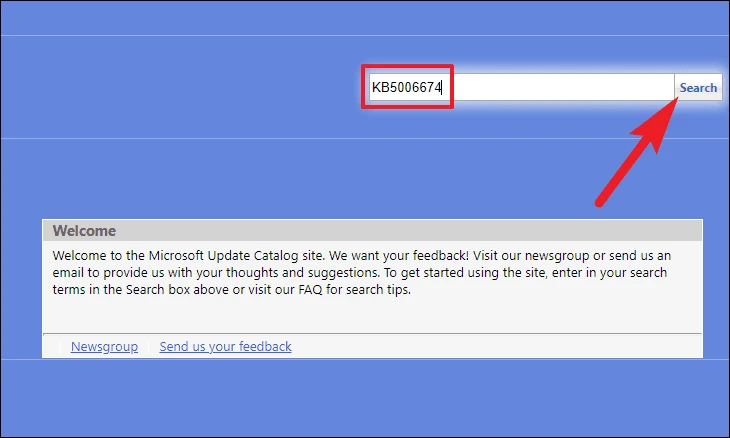
First, head to the Microsoft Catalog website, catalog.update.microsoft.com using your preferred browser. Then, enter the KB (Knowledge Base) number of the update you desire to download in the ‘Search’ bar and hit Enter on your keyboard.
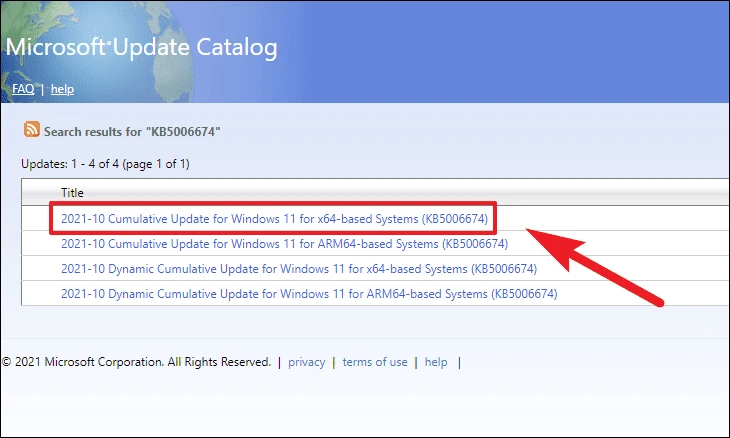
Now, from the list of search results, click on the option that has the ‘x64-based Systems’ suffix.
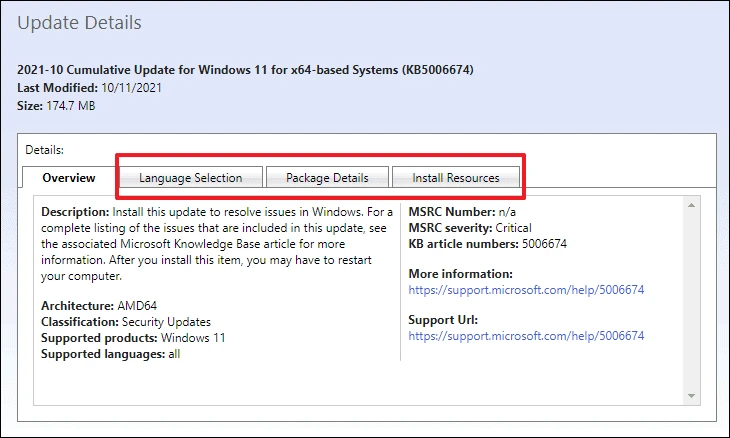
You can then check the supported OS, and package details and install resources for the update.
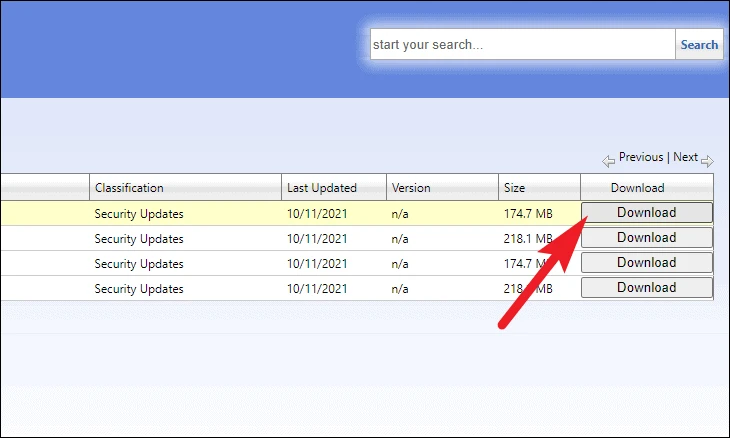
Once identified, move to the previous page of the website and click on the ‘Download’ button. This will open a separate browser window on your screen.
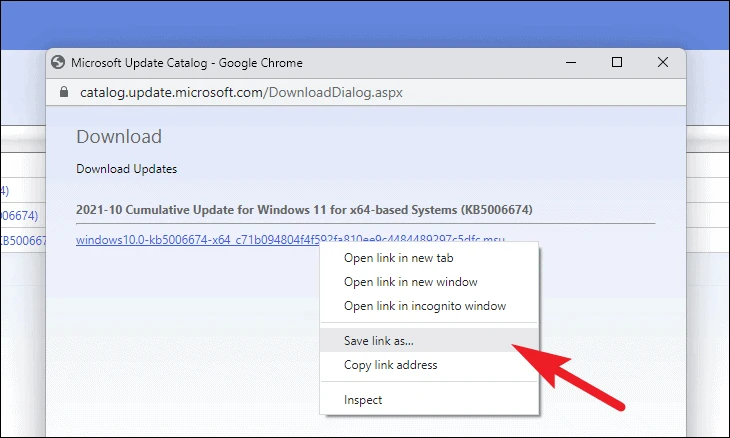
Afterward, right-click on the link displayed and then select the ‘Save link as…’ option.
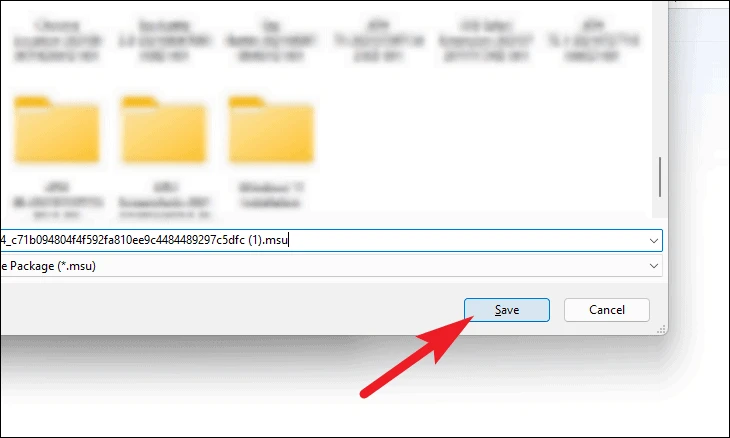
Now, choose a desired directory using File Explorer and click on the ‘Save’ button.
Once downloaded, head to the download directory and double-click on the package to run the installer.
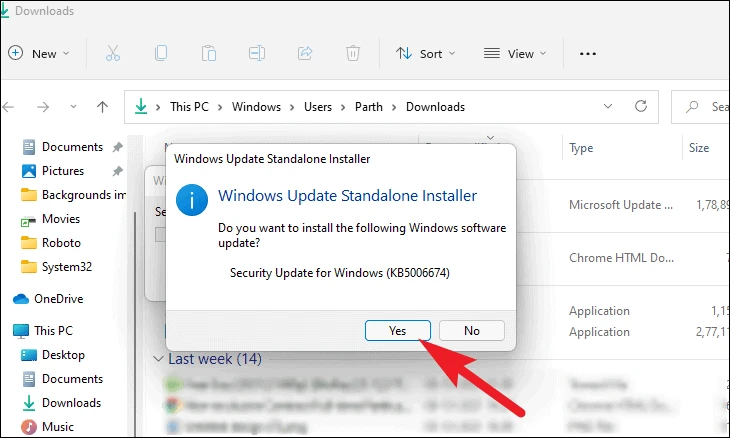
The standalone installer will then prepare your system. Once the update is ready to install, a prompt will appear on your screen. Click on the ‘Yes’ button to proceed.
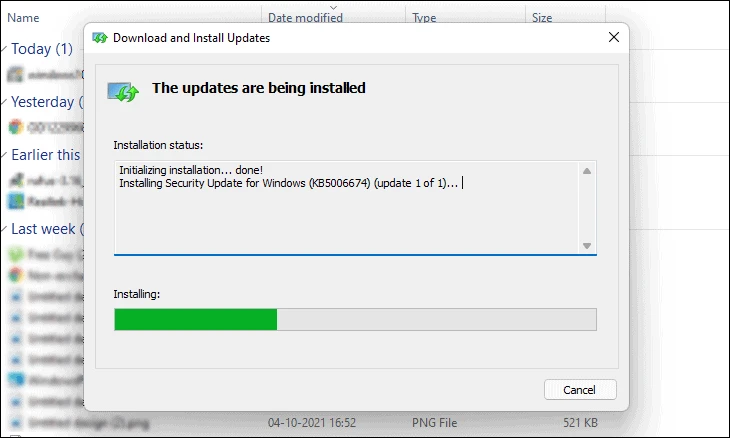
The update package will now take a few minutes to install.
Once the package is installed, restart your PC and check if your PC is updated or not.
6. Reset your PC
In case you haven’t been able to fix the issue using the above-mentioned methods, the last option is to reset your PC to eradicate any deep-rooted systemic issue. Though you will not lose any personal files and folders, the system settings will be reset to factory defaults and all your installed programs will also be deleted.
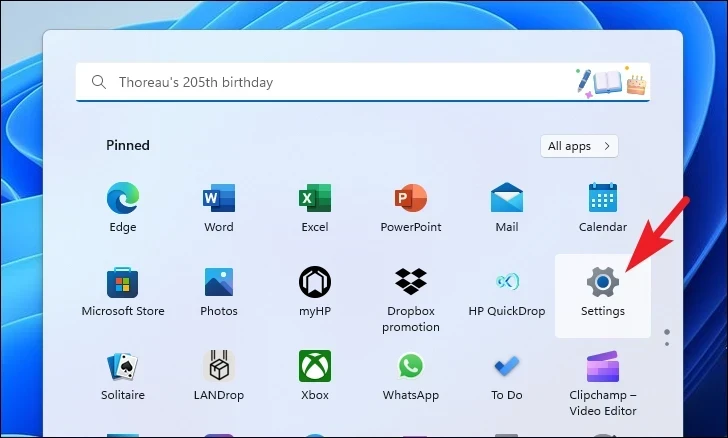
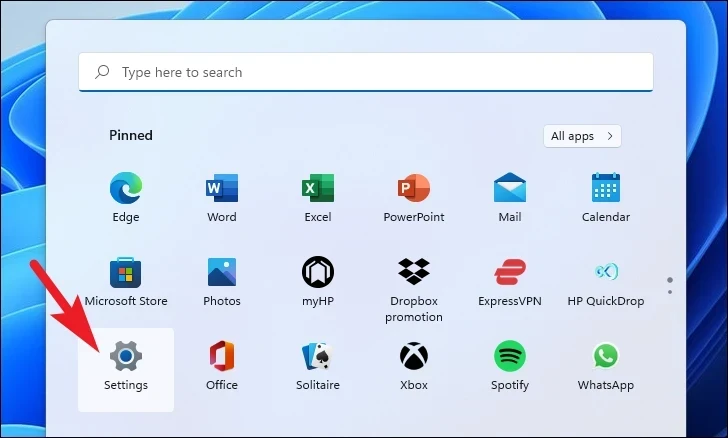
First, head to the Start Menu and click on the ‘Settings’ tile.
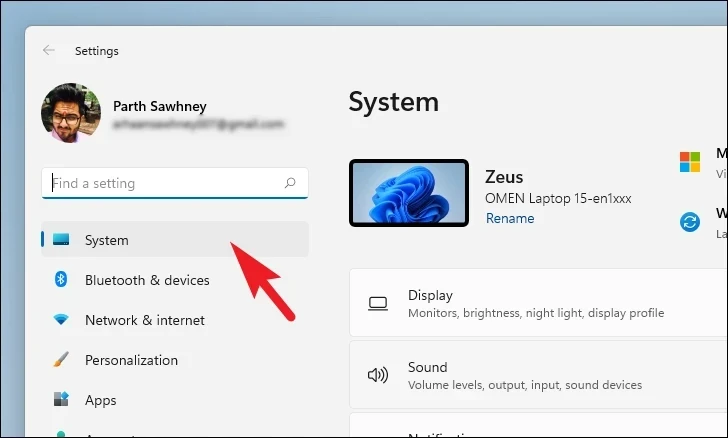
After that, ensure you have selected the ‘System’ tab from the left sidebar.
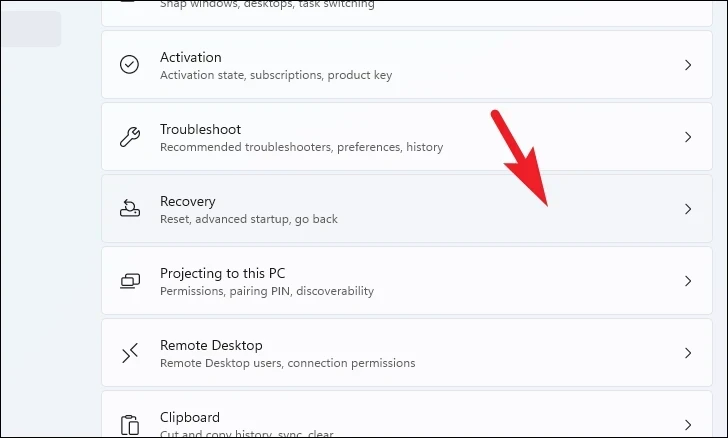
Then, from the right section of the window, scroll down and click on the ‘Recovery’ tile to proceed.
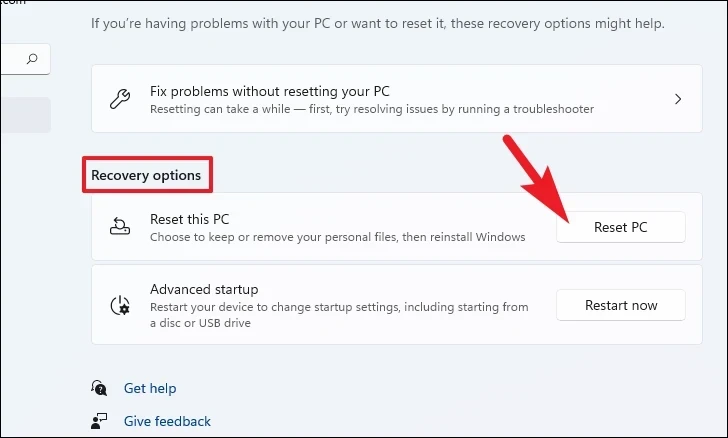
Afterward, locate and click on the ‘Reset PC’ button to proceed. This will bring a separate window to your screen.
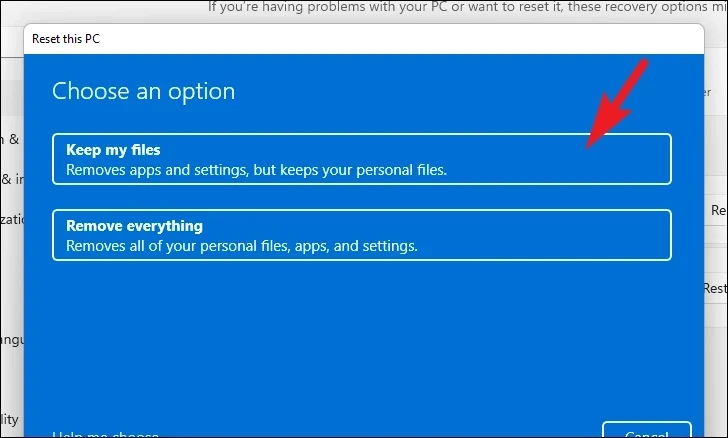
Now, click on the ‘Keep my files’ tile from the opened window, In case you wish to remove all your personal files as well when resetting, click on the ‘Remove everything’ option instead.
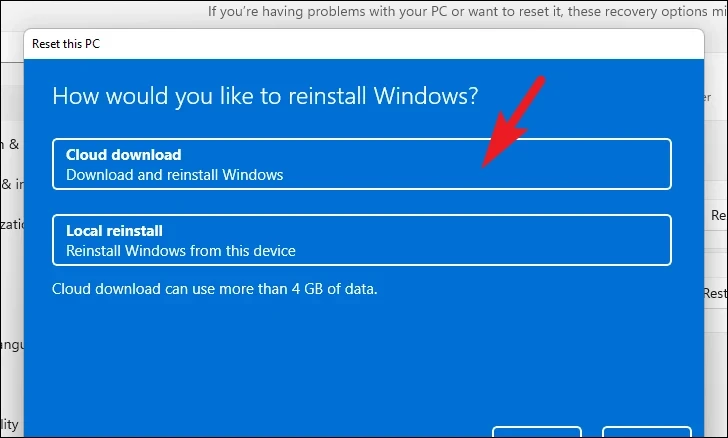
On the next screen, you will need to choose a method for reinstalling the operating system on your machine. Since there could be an issue with the copy already present on your system, it is recommended that you click on the ‘Cloud download’ option.
Note: ‘Cloud download’ will require an active internet connection and will consume upwards of 4 GB of data.
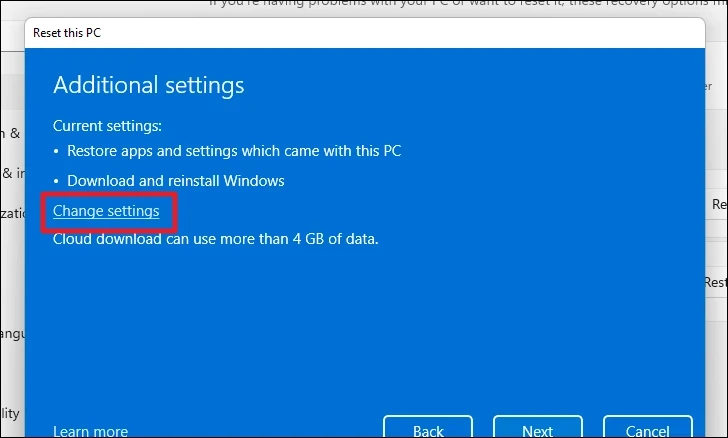
After that, Windows will list the settings that you have chosen. In case you wish to change any of it, click on the ‘Change settings’ option to continue.
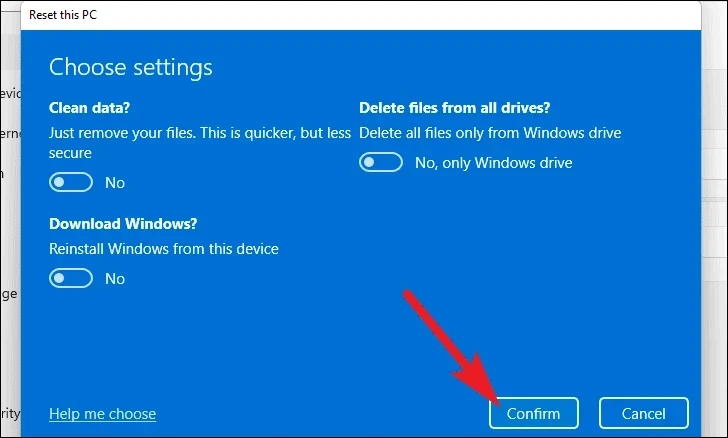
If you chose to change the settings, you can configure the following settings on the next screen. You can choose to not restore the apps and settings by clicking on the toggle switch present under the ‘Restore preinstalled apps?’ option and bringing it to the ‘No’ position. You can even switch from the Cloud download to the local installation by clicking on the toggle switch present under the ‘Download Windows?’ option to change the installation method. Once adjusted according to your preference, click on the ‘Confirm’ button to proceed.
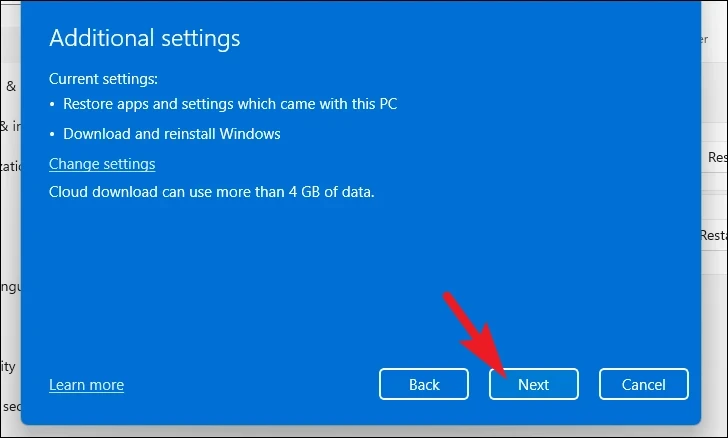
After that, from the main window, click on the ‘Next’ button to continue.
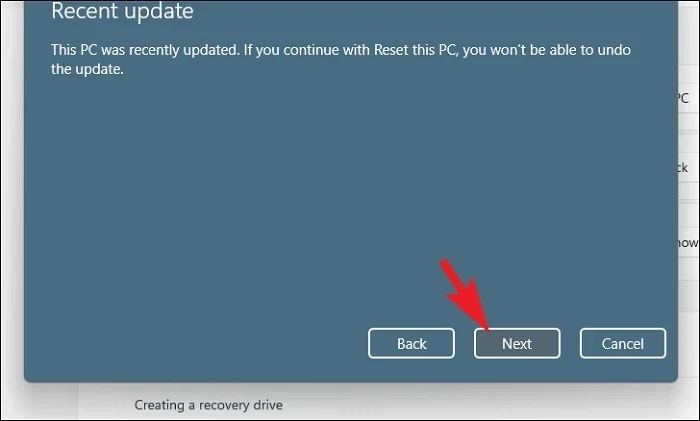
In case your PC was updated recently, you will receive a message on the screen stating that you will not be able to roll back once you rest the PC. To continue, click on the ‘Next’ button.
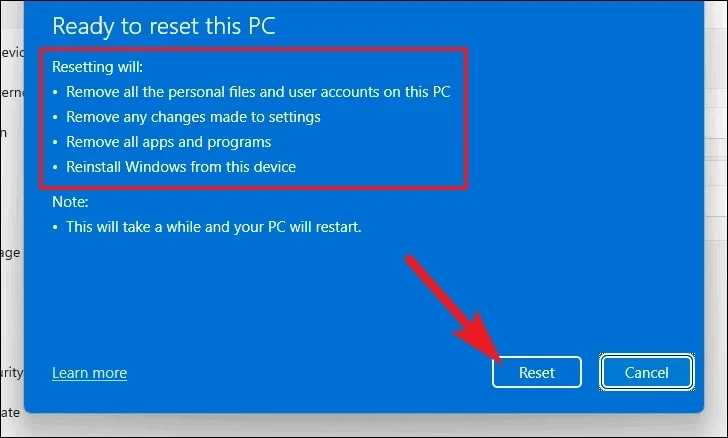
After that, Windows will list out all impacts resetting your PC will have on your system. Read them carefully and click on ‘Reset’ to commence the resetting process.
Install error 0x80070103 is irksome, but thankfully, you can easily resolve it using the above-mentioned methods.
С помощью Центра обновления Windows можно обновить систему, обычно это происходит достаточно легко и безболезненно. Кроме того, Центр обновления позволяет освежить и программное обеспечение, а именно драйвера устройств. В этом случае все может пойти не так гладко. Пользователи Windows 11 начали встречаться с ошибкой 0x80070103. Данная неудача происходит когда Центр обновления Windows пытается установить уже существующий на ПК драйвер, либо причиной также может являться несовместимость драйверов. Кроме того, в сообщении может даже быть указан софт, из-за которого случилась неприятность, но это происходит не всегда. В любом случае проблему нужно решать и мы поможем вам в этом деле.
Частенько вместе с этой ошибкой появляется предложение перезапустить Windows и якобы это должно решить проблему, но этого зачастую не происходит. Поэтому, как и во многих случаях когда имеется проблема, решить мы можем ее с помощью стандартной системной возможности ликвидации неполадок. Работает данная утилита достаточно неплохо в последней редакции Windows и частенько может прийти на помощь и избавиться от разнообразных сбоев. Сейчас рассмотрим как ей воспользоваться.
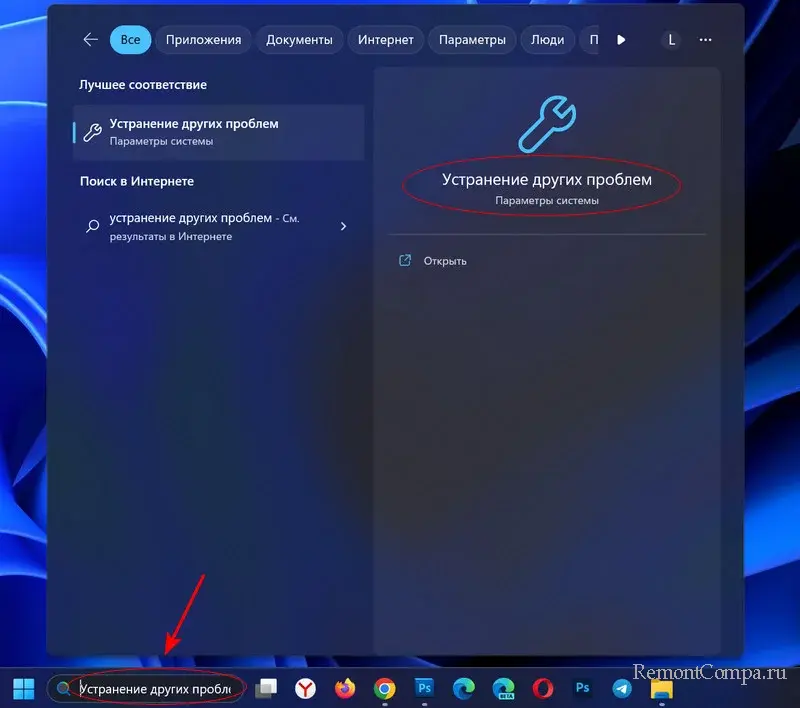
1. Вводим в поле поиска — «Устранение других проблем».
2. Находим «Центр обновления Windows» и кликаем на кнопочку «Run».
3. Придерживаемся руководства и по окончании перезапускаем ПК.
Нередко этот способ не устраняет ошибку, однако он может предложить варианты решения проблемы. В случае если способ не сработал переходим к следующему.
Ошибка может возникать по причине неисправных системных файлов или их отсутствия. Восстановить их можно таким образом.
1. В поиске системы пишем «cmd» и щелкаем на полученный результат.
2. Поочередно прописываем строки и подтверждаем каждую нажатием клавиши Enter.
sfc /scannow
3. Перезагружаем ПК.
Следующий этап — это установка не основных апдейтов.
1. Жмем Win+I и выбираем «Центр обновления Windows».
2. В секции «Дополнительные параметры» выбираем «Дополнительные обновления».
3. При условии что в списке есть неустановленные драйвера совершаем попытку их поставить.
В конечном счёте можно испробовать еще один способ. Обычно наиболее действенный.
1. Win+R, печатаем «cmd», соглашаемся «Ок».
2. Печатаем такие строчки и подтверждаем.
net stop bits
net stop wuauserv
net stop appidsvc
net stop cryptsvc
ren C:\Windows\SoftwareDistribution SoftwareDistribution.old
ren C:\Windows\System32\catroot2 Catroot2.old
Далее вписываем первые четыре строки только вместо «stop» вбиваем «start».
Все равно обновлять драйвера мы рекомендуем с официального ресурса производителя определенного компонента вашего компьютера. Да, уведомлений о выходе новых версий в таком случае не будет, зато такой способ более надёжный и вы всегда будете уверены в том, что у вас установлена наиболее свежая версия драйвера.
При установке операционной системы Windows Vista можно столкнуться с различными ошибками, которые могут затруднить процесс. Одним из часто встречаемых сообщений об ошибке является код 0x80070103. В данной статье мы рассмотрим возможные проблемы, которые могут вызывать данную ошибку, а также предложим методы ее решения.
Код ошибки 0x80070103 указывает на то, что текущее оборудование компьютера уже имеет установленный драйвер, который новая операционная система не совместима или не поддерживает. Возможными причинами этого могут быть отсутствие обновления драйверов или конфликт с уже существующими драйверами.
Один из способов решения проблемы заключается в обновлении драйверов для соответствующего оборудования. Для этого можно воспользоваться встроенным в систему менеджером устройств. Откройте его через меню Пуск, выберите раздел «Панель управления» и найдите пункт «Система и безопасность». Затем выберите «Менеджер устройств» и найдите соответствующее устройство с проблемой. Щелкните правой кнопкой мыши по нему и выберите пункт «Обновить драйвер».
Важно помнить, что перед обновлением драйверов рекомендуется создать точку восстановления системы, чтобы в случае неудачного обновления можно было вернуть все обратно.
Если обновление драйверов не помогает решить проблему, то можно попробовать удалить текущий драйвер и установить его заново. Для этого также нужно открыть Менеджер устройств, найти проблемное устройство, но вместо пункта «Обновить драйвер» выбрать «Удалить устройство». После этого перезагрузите компьютер и операционная система автоматически найдет и установит соответствующий драйвер.
Содержание
- Неподдерживаемое оборудование
- Отсутствие необходимых драйверов
- Конфликт драйверов
- Недостаточное пространство на диске
- Ошибка обновления системы
- Проблемы с подключением к Интернету
- Конфликт с установленными программами
Неподдерживаемое оборудование
Код ошибки 0x80070103 при установке Windows Vista может быть вызван неподдерживаемым оборудованием на вашем компьютере. Это может быть связано с несовместимостью драйверов или проблемами с оборудованием.
Чтобы решить эту проблему, вам следует выполнить следующие действия:
1. Проверьте список совместимого оборудования операционной системы Windows Vista на официальном сайте Microsoft.
2. Установите все доступные обновления и патчи для вашей операционной системы Windows Vista.
3. Проверьте, что все драйверы для вашего оборудования установлены и актуальны. Если драйверы устарели, обновите их с помощью официального сайта производителя оборудования.
4. Если после выполнения этих действий ошибка 0x80070103 при установке Windows Vista все равно возникает, то возможно, некоторое оборудование на вашем компьютере не совместимо с данной операционной системой. В этом случае вам придется обратиться к специалисту или заменить неподдерживаемое оборудование на совместимое.
Будьте внимательны при выборе оборудования для установки операционной системы Windows Vista, чтобы избежать проблемы с неподдерживаемым оборудованием в будущем.
Отсутствие необходимых драйверов
Если компьютер не обладает драйверами для определенного оборудования, Windows Vista не сможет успешно установиться. Поэтому, перед установкой операционной системы, важно удостовериться в наличии всех необходимых драйверов.
Если вы столкнулись с ошибкой 0x80070103 и подозреваете, что проблема может быть связана с отсутствием драйверов, рекомендуется выполнить следующие действия:
- Проверьте, что у вас есть драйверы для всех компонентов компьютера, таких как видеокарта, звуковая карта, сетевой адаптер и т. д. Взгляните на официальный веб-сайт производителя вашего компьютера или оборудования, чтобы найти последние версии драйверов. Скачайте и сохраните их на внешнем носителе, таком как флеш-накопитель.
- Перед установкой Windows Vista, подключите внешний носитель с драйверами к компьютеру. В процессе установки операционной системы будет предложено подключить драйверы. Нажмите на соответствующую опцию и укажите путь к файлам драйверов.
- Если вы уже установили Windows Vista без необходимых драйверов и получили ошибку 0x80070103, вы можете установить драйверы вручную. Найдите скачанные файлы драйверов на внешнем носителе и запустите процесс установки. Следуйте инструкциям на экране, чтобы завершить установку драйверов.
Если указанные выше действия не помогли решить проблему, рекомендуется обратиться за помощью к специалистам или на официальный веб-сайт производителя вашего компьютера или оборудования. Там вы сможете найти более подробные инструкции по установке драйверов или дополнительную информацию о возможных причинах ошибки 0x80070103.
Конфликт драйверов
Одной из возможных причин ошибки 0x80070103 при установке Windows Vista может быть конфликт драйверов. Конфликт драйверов возникает, когда установленные на компьютере драйверы несовместимы с операционной системой.
Чтобы решить проблему, необходимо проверить совместимость драйверов с Windows Vista. Выполните следующие шаги:
- Откройте «Диспетчер устройств».
- Раскройте раздел «Адаптеры видеокарт».
- Найдите устройство, для которого возникает ошибка, и щелкните правой кнопкой мыши.
- Выберите пункт «Свойства» и перейдите на вкладку «Драйвер».
- Проверьте версию и дату драйвера. Если драйвер несовместим с Windows Vista, необходимо обновить его.
Для обновления драйвера существует несколько способов. Один из них — использование программного обеспечения производителя устройства. Приложение производителя позволяет автоматически обновить драйвер устройства до последней версии. Также можно вручную загрузить последнюю версию драйвера с официального сайта производителя и установить его.
После обновления драйвера перезагрузите компьютер и повторите попытку установки Windows Vista. Если все сделано верно, код ошибки 0x80070103 не должен возникать вновь.
Если после выполнения всех указанных действий проблема не устранена, возможно, есть другие конфликтующие драйверы на компьютере. В этом случае рекомендуется обратиться за помощью к специалистам или на форумы, посвященные операционной системе Windows Vista.
Недостаточное пространство на диске
Чтобы решить эту проблему, вам необходимо освободить достаточное пространство на диске. Для этого можно удалить ненужные файлы и программы с компьютера, перенести данные на внешний жесткий диск или в облако, или увеличить объем диска, добавив новый физический диск или расширив объем существующего.
Необходимое количество свободного пространства для успешной установки Windows Vista может варьироваться в зависимости от версии операционной системы и компонентов, которые вы хотите установить. Обычно потребуется не менее 10 гигабайт свободного места, но рекомендуется иметь запас и освободить не менее 20 гигабайт.
Помимо освобождения дискового пространства, также рекомендуется провести дефрагментацию диска. Дефрагментация поможет оптимизировать расположение файлов на диске, улучшив производительность и освободив дополнительное пространство. Для запуска дефрагментации диска можно воспользоваться встроенным инструментом Windows или сторонней программой.
После освобождения достаточно свободного пространства на диске, вы можете повторить попытку установки Windows Vista. Убедитесь, что ваш компьютер соответствует системным требованиям операционной системы, и следуйте инструкциям установщика. Если проблема с недостатком места на диске была единственной причиной ошибки 0x80070103, то после освобождения места установка должна пройти успешно.
Ошибка обновления системы
Код ошибки 0x80070103 может появиться при установке Windows Vista и указывает на проблему с обновлением системы. Эта ошибка может возникать в различных ситуациях, но чаще всего связана с неправильной версией драйвера или некомпатибельностью оборудования.
Одна из причин возникновения ошибки 0x80070103 — установка несовместимого драйвера. Ошибка может возникнуть, если у вас уже установлена более новая версия драйвера, чем та, которую предлагает обновление. В этом случае вам следует проверить, необходимо ли вам обновление драйвера, и если нет, отключить его установку.
Другой возможной причиной ошибки 0x80070103 является некомпатибельность оборудования. Если ваше оборудование несовместимо с Windows Vista, это может привести к ошибке при установке обновления. Чтобы решить эту проблему, вам стоит проверить совместимость вашего оборудования с Windows Vista и, при необходимости, обновить его или заменить на совместимое.
В случае ошибки 0x80070103 при установке Windows Vista, важно также убедиться, что у вас установлена последняя версия операционной системы. Обновления могут содержать исправления для проблем, которые могут вызывать ошибку 0x80070103. Проверьте наличие доступных обновлений и установите их, прежде чем продолжить установку Windows Vista.
В зависимости от конкретной ситуации, вам может потребоваться обратиться к производителю оборудования или посетить сайт поддержки Microsoft для получения дополнительной информации и решения проблемы с ошибкой 0x80070103 при установке Windows Vista.
Проблемы с подключением к Интернету
При установке ОС Windows Vista с возникновением ошибки 0x80070103 возможно столкнуться с проблемами подключения к Интернету. Ниже приведены некоторые из них:
- Отсутствие драйверов для сетевого адаптера
- Неправильные настройки сетевого подключения
- Проблемы с модемом или маршрутизатором
- Неполадки в работе провайдера Интернета
Для решения данных проблем рекомендуется выполнить следующие действия:
- Проверить наличие актуальных драйверов для сетевого адаптера и установить их, если необходимо.
- Проверить настройки сетевого подключения, убедившись в правильности заданных параметров.
- Попробовать перезагрузить модем или маршрутизатор, чтобы исправить возможные сбои в их работе.
- Связаться с технической поддержкой провайдера Интернета для выявления и исправления неполадок в сети.
При правильном выполнении указанных действий можно решить проблемы с подключением к Интернету, связанные с установкой ОС Windows Vista и ошибкой 0x80070103.
Конфликт с установленными программами
Код ошибки 0x80070103 может возникать при попытке установки Windows Vista, если имеются конфликты с уже установленными программами на компьютере. Конфликты могут возникать из-за несовместимости версий программ или наличия незавершенных установок.
Для решения проблемы рекомендуется выполнить следующие действия:
- Проверить список установленных программ на компьютере и убедиться, что все программы обновлены до последних версий. Если обнаружены устаревшие версии программ, необходимо их обновить.
- Удалить программы, которые не используются или вызывают конфликты с установкой Windows Vista. Для этого можно воспользоваться функцией «Установка и удаление программ» в системных настройках компьютера.
- Проверить наличие незавершенных установок программ. Если такие найдены, необходимо завершить или удалить их перед продолжением установки Windows Vista.
Если после выполнения этих шагов ошибка по-прежнему возникает, рекомендуется связаться с производителем программы, вызывающей конфликт, для получения дополнительной поддержки и инструкций по устранению проблемы.


