-
Home
-
Partition Magic
- [Solved] Fail to Update Windows and Receive the Error 0x800700c1
By Vicky |
Last Updated
Many Windows 10 users reported that they failed to update the system and received the Windows Update error code 0x800700c1. This post from MiniTool Partition Wizard analyzes this error code and shows how to get rid of it.
What is 0x800700c1? How to fix 0x800700c1? Start reading.
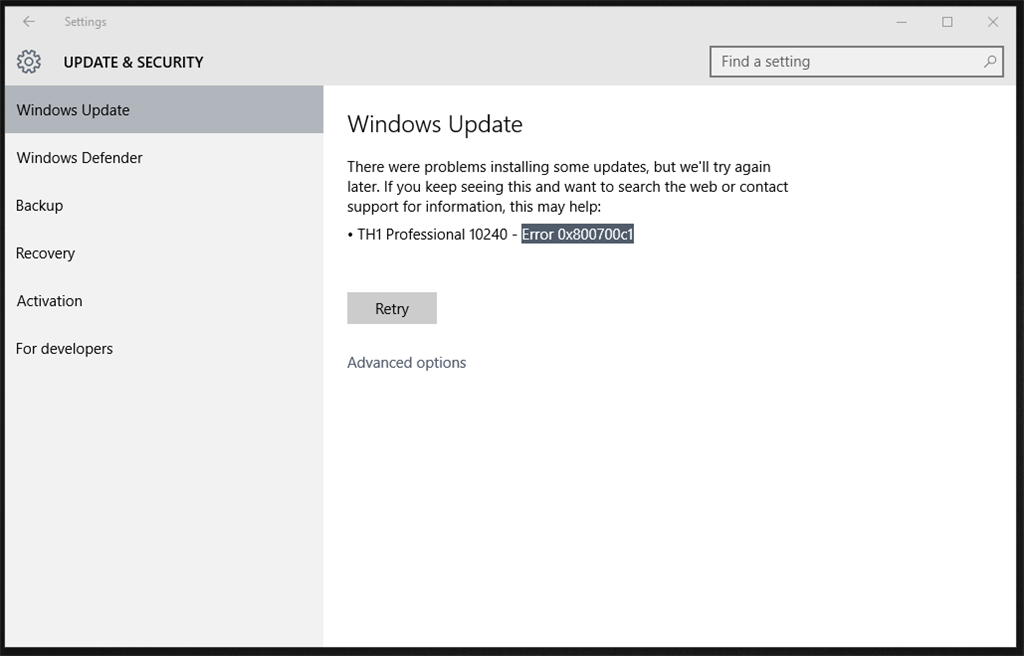
0x800700c1 is one of Windows Update error codes, and its error message goes like this: “There were problems installing some updates, but we’ll try again later. If you keep seeing this and want to search the web or contact support for information, this may help. Feature update to Windows 10 – Error 0x800700c1”.
What triggers this Windows error code 0x800700c1 is various, from Internet connectivity issues to corrupted update components. But this error 0x800700c1 can be fixed using the following common ways:
- Disable or remove your antivirus program.
- Run SFC scan.
- Run the Windows Update troubleshooter.
- Delete update files from the SoftwareDistribution folder.
- Change the startup types of the Windows Installer service.
Note: Please check your Internet connectivity and restart your computer. If you still can’t update Windows 10 and receive the error 0x800700c1, it is time to perform the above ways.
Disable or Remove the Antivirus Program
Antivirus programs can keep your computer from viruses and malware, but they sometimes might stop you from updating the system. So, when you receive the error 0x800700c1, you can try disabling such programs on your computer and see if you can update Windows 10; if you fail again, you need to uninstall them and see if the error disappears.
Run SFC Scan Using Command Prompt
Run the sfc/scannow command using Command Prompt to check and repair corrupted system files. For that, here is the tutorial: Type Command Prompt into the Windows search bar, right-click the search result, choose Run as administrator, type sfc/scannow, and hit the Enter key.
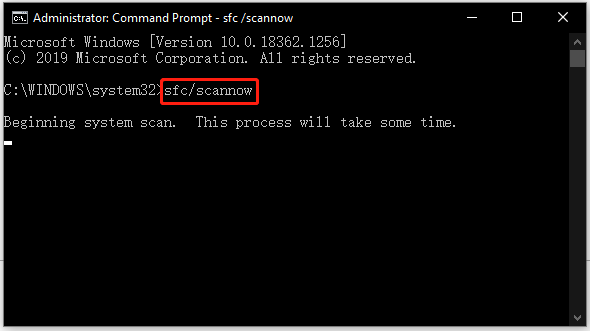
The process will take some time, so be patient. When the process ends, you can try updating Windows 10 again and see if the Windows Update error code will appear.
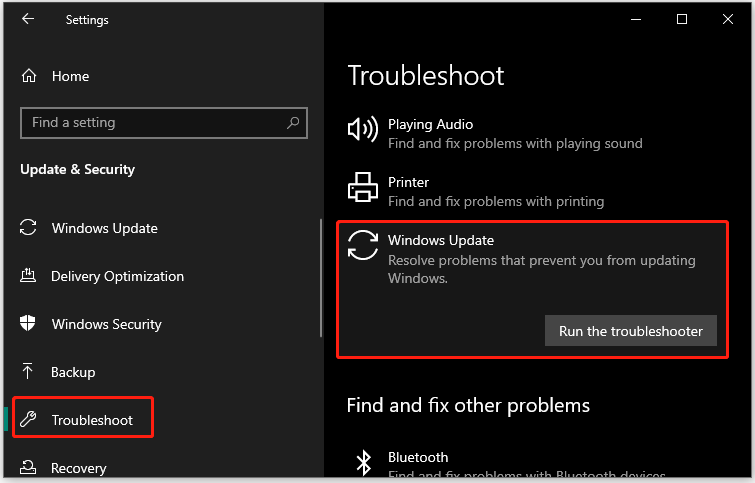
Run the Windows Update Troubleshooter
Windows 10 provides its users with a tool called Windows Update troubleshooter. This tool can resolve problems that prevent you from updating Windows. So, when you are stuck in the error code 0x800700c1, it is wise to run this tool.
How to run this tool? You just need to:
- Press Windows + I to bring up the Settings
- Choose Update & Security on the window.
- Switch to the Troubleshoot tab on the left side.
- Locate and click Windows Update on the right side and then click the Run the troubleshooter
- Wait for this tool to finish its work.
Delete Update Files from the SoftwareDistribution Folder
When the temporary Windows Update files are corrupted, the error code 0x800700c1. In this case, you need to delete all temporary Windows Update files from the SoftwareDistribution folder. The steps are as follows:
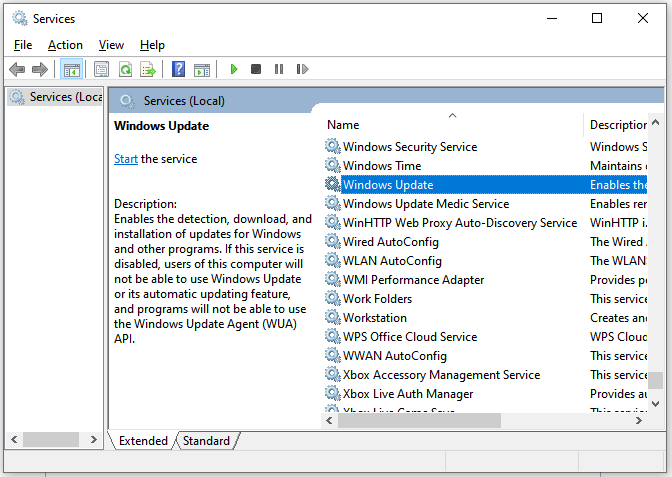
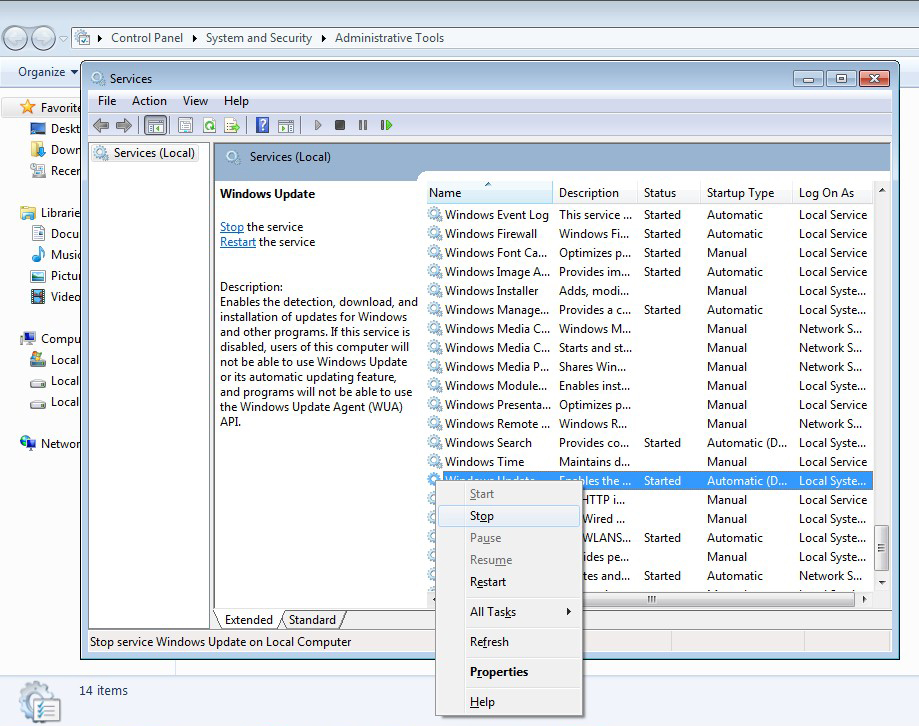
Step 1: Make sure that the Windows Update service has stopped.
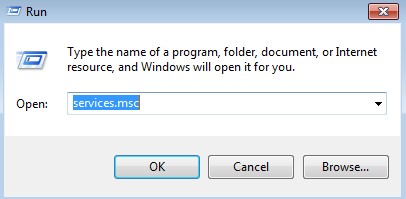
- Type services into the Windows search bar and click the Enter
- Locate this service on the window.
- Right-click it and then choose the Stop
Step 2: Delete the files from the SoftwareDistribution folder.
- Go to the path: This PC > C drive > Windows > SoftwareDistribution > Download.
- Select all the files and folders available in the Downloads folder.
- Right-click the highlighted zone and choose the Delete.
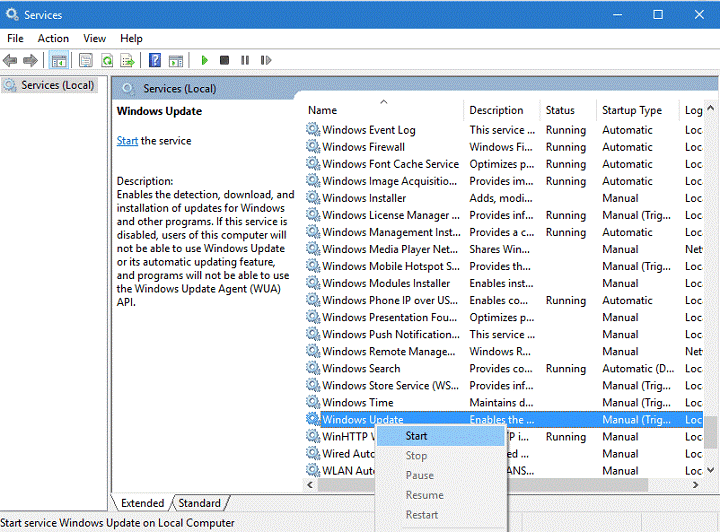
Step 3: Repeat Step 1, but this time, right-click the Windows Update service and choose the Start option.
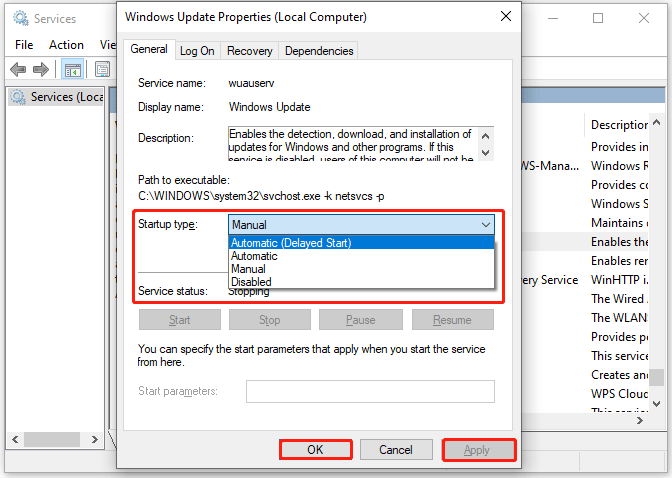
Change the Startup Types of the Windows Installer Service
Changing the startup types of the Windows Installer Service to Automatic could help you get rid of the Windows Update error code 0x800700c1.
You just need to go to the Services app (follow the steps given above); then find and double-click the Windows Update service; next the Automatic option from the Startup type menu; finally, click the Apply button and the OK button to save this change.
Now try updating Windows 10 again. Does the process go smoothly? If the error code 0x800700c1 persists, the last solution is to update your Windows via Media Creation tool.
Read more: How to Upgrade Windows 10 to Windows 11? See a Detailed Guide!
About The Author
Position: Columnist
Vicky is a website editor who has been writing tech articles since she was graduated from university. Most of her articles talk about Windows PC and hard disk issues. Some of her articles also touch on YouTube usage and issues.
During her spare time, she likes to spend time reading, watching videos, and sitting on her Yoga mat to relax.
Обновление Windows 10 Anniversary прошло не так уж гладко для всех пользователей. Многие из них дали отчет о том, что их обновление постоянно прерывается ошибкой 0x800700c1. В сообщении ошибки говорится примерно следующее:
Обновление до Windows 10, версия ****- Ошибка 0x800700c1
Некоторые из пользователей решили свою проблему отключением антивируса. Другие же попросту загрузили вручную установочный диск и с помощью его выполнили обновление.
Давайте теперь поближе рассмотрим эти методы решения ошибки 0x800700c1.
Решения для ошибки 0x800700c1
Метод №1 Загрузка установочного диска вручную
В некоторых случая когда автоматическое обновление не работает, вы можете попробовать загрузить установочный диск вручную и через него запустить обновление. Для этого сделайте следующее:
- Скачайте установочный диск с этой ссылки.
- Выберите «Загрузить средство» и запустите его через Администратора.
- В лицензионном соглашении выберите «Принять».
- На вопрос «Что вы хотите сделать?», выберите «Обновить этот ПК» и нажмите «Дальше».
Средство начнет загружать Windows 10. По окончанию установки начнется процесс обновления.
- Установка потребует от вас лицензионного ключа, если вы делаете это в первый раз. Если вы выполняете обновление или его переустановку, то вы не должны вводить его.
- Когда Windows 10 будет готово к установке, вы увидите список того, что вы выбрали и что будет в обновлении.
- Выберите «Установить».
Во время процесса установки ваш ПК может несколько раз перезагружаться.
Метод №2 Отключение антивируса
Есть вероятность, что именно включенный антивирус не дает вам выполнить обновление. Простое отключение антивируса смогло помочь некоторым пользователям справиться с ошибкой 0x800700c1.
Просто зайдите в настройки своего антивируса и отключите его защиту от вирусов в реальном времени. После этого попробуйте провести обновление.
Error Code 0x800700c1 is usually the result of a connection issue, corrupted data, or a problem with your network. In this article, we will discuss about how to fix the Windows Update Error Code 0x800700c1 and related error, windows update errors in Windows 10/11 operating system. These steps should help with all errors and not just the ones listed. If you have reached this step and if it is not solved then it will advise you to reset the computer.

Disclaimers:
Before you attempt to fix an issue with the windows update, we highly recommend you to take a registry backup and create a system restore point as a precaution method. In case if something goes wrong, we can restore your computer to the same stage and fix the issues. (In case if you not sure how to back it up, talk to an expert for assistance)
Reasons for the Error Code 0x800700c1 in Windows 10/11 Update
Windows Update Error Code 0x800700c1 happen when there is
- Internet connectivity issue and
- Temp store file location contains active malware
Windows 10 Update Error Code 0x800700c1 Support
Downloading Windows updates should be set on to update automatically but this does come with its own problems. One of them being if you are a person that uses a pre-paid data service it could use up all your data and you will probably be unaware that it is happening. Generally, Windows updates use a lot of data and if there is a problem with the particular network that you are using it could have problems due to the length of time it takes and if it is a poor network the interruptions could cause errors with the update.
The Solution Applies to the Following Versions of Microsoft Windows
- Windows 7, 8, 8.1
- Windows 10, 11
Steps to fix error code 0x800700c1 on Windows 10/11
- Check for Internet Connectivity, Since this update error is related to Network and malware issue, you can try checking the Internet connection
- If it’s reliably fast and quick, you should resolve the errors when the network issue is gone
- It means that your Windows 10 system is clean
- Clear the temporary files and other cache on your computer using any tool or manual commands
- You can do it very quickly with a tool like CCleaner
If any malware is there, you can also use Malware bytes, which is a free tool for personal use. It can be run efficiently and check for other hidden malware not found by the traditional anti-virus tools. After the restoration of the Internet Connection, check for this Windows Update installer error.
How to use Windows Update Troubleshooter?
An easy, simple click can solve the Windows 11 Update Error 0x800700c1. For this purpose, you can make use of the default troubleshooter. The below steps are shown for 20H2 update. It works even for 2004 or 1909 updates. Only the interface may change.
- Press Win + I keys together to open Settings
- Click on Update & Security > Troubleshoot
- There are few options where you can tell how Troubleshooter should behave here
- For example, you can choose the option that says, “Ask me before running troubleshooters”
- Click on “Additional troubleshooters” below

- Click on “Windows Update” troubleshooter
- Then, click on “Run the troubleshooter”
- It will automatically run checking the relevant processes. Let it finish

Finally, you should see no error message. Restart the computer. Then recheck the Windows 10 Update.
Rename software distribution folder to fix windows 11 update error code 0x800700c1
This folder exists on Windows OS. To temporarily store files related to the Windows Update installation, this folder has its use. Even the Windows Update History files exist here.
- So if this gets corrupt, the above error code can be displayed
- To do the above task, you need to stop some services and rename the above folder
- Run command prompt in elevated mode (start – type “cmd” – right click on command prompt app and select “run as administrator“)
- Type “net stop wuauserv“

- Type “net stop bits“
- Open the folder “c:\windows” and locate SoftwareDistribution folder, rename or delete as you please or if you want to keep using command prompt simply type “ren c:\windows\softwaredistribution softwaredistribution.old“

Windows 10 Update from Media Creation Tool
Sometimes the in-built Update check tool may not work. In that case, go to the following link – You could see the latest update for Windows 10. For example, on my computer, it shows it as “Windows 10 October 2020 Update”. Click on “Update Now” below that message.

It will ask for some permissions. Leave the default ones if you don’t want to change any settings or files. Then this Microsoft software tool will automatically download the relevant updates and install them.
Check these Windows Services
Another common culprit for Windows 10 update error is 0x800700c1 is some services becoming corrupt. You either need to restart them or stop them and start again.
Some of these update services are
- Background Intelligent Transfer Service
- Cryptographic Services
- Windows Update
- Windows Update Medic Service
- Remote Procedure Call (RPC) Services
Press the Win + R keys together and enter “services. msc” to open the Services window. Otherwise, you can open them from Task Manager also. Another option is to search “Services” in the Windows Search box.

- Right-click the appropriate service and click on “Restart” for the above services
- Could you do it for each service? Otherwise, you can click on “Stop”. It will stop the service temporarily
- Then you can start again. If any of them are under the “Manual” startup type, you can double-click that service
- Either make it “Automatic” or “Automatic (Delayed)” . Then restart the computer and check if these services are running

More Steps to fix the Troubleshooting Windows Update Error 0x800700c1
Update outdated drivers in Windows
Windows allows manually updated the divers. In case Windows 10 automatically download the new drivers or you install the new drivers from the downloaded manufacture’s website.
- Open the system and go to the start menu
- Then enter the control panel from the search box and open it
- Here we go to click on system and security after that go to click on system
- Then open the new window and go to click on advanced system settings
- Then open the system properties window and open the hardware and go to click on device installation setting
- Finally, open the new window and click on related option and press save changes
If you choose the former, Windows will automatically install the driver and ask you to reboot the computer afterward. The latter allows you to update the driver with the driver file that you have downloaded. This step should fix windows update error 0x800700c1 and related errors.
Reinstall Windows Update
- Open the Run Window through the Windows key+R
- Then enter the services.msc in the command box and press ok
- Right-click Windows Update in the Services management console, and then select Stop. If you are running Windows, right-click Automatic Updates, and then select Stop
- After Windows Update stops, right-click Windows Update, and then select Start. If you are running Windows, right-click Automatic Updates, and then select Start
Check corrupted system files to fix error code 0x800700c1
- Go to the Windows key+R and click it
- Then open the Run Window and enter the cmd in a search box after that press ok
- Then open the command prompt and type the command SFC/Scan now in the command prompt and press enter

- The system will take some time to check. Let it run for a while. If it finds any issues in “OS” integrity it will automatically fix it.

Disable Windows Firewall temporarily
- Open the system and go to the start menu
- After that enter, the firewall in the search box then left click on the Windows firewall in control panel.
- Then click Turn on Windows Firewall on or off.

- Open both firewalls like private and public
- Then set both firewalls to turn off and press ok
- After that go to the start menu and enter the cmd in the search box.
- Then right-click on the cmd and select the Run as administrator and press yes
- Finally, some commands are entered in the command prompt and press enter
regsvr32 wuapi.dll
Next: regsvr32 wuaueng.dll
regsvr32 wucltui.dll
Then finally Re-enable your firewall is on.
We can also set up free tools meant for Microsoft Windows versions and train you on how to use them to maintain the health of your computers. You will also get support for Microsoft Windows restore points. That is helpful to use when the system having any issues to restore back to the earlier point.

Chat with our Technician to fix your computer issues Now. If the issue still persists, please initiate the chat, One of our Certified Microsoft technicians will help you. If you are having issues with upgrading/updating the operating system/office products on your computer please reach us on chat. We provide support for Microsoft products like Windows, Office and Outlook.
You can also visit our website for more details and information. Our experts provide the best solutions to resolve the error code issue and fix them completely.
Windows 10 Anniversary update is not going perfectly for all. People have actually mentioned that the update keeps failing with the Error 0x800700c1. We are going to explain a number of methods that assist to repair Error Code 0x800700c1 while running Windows 10 Anniversary Update. Actually, there is nothing much to say about this error as it’s basically the like the others.
The exact error message on the screen is “Feature update to Windows 10, version ****- Error 0x800700c1”.
We know how frustrating it is not to obtain the update efficiently. Thankfully, it’s not that difficult to work around this problem.
Cause of Error 0x800700c1
- Internet connectivity issue.
- Issue with the antivirus software.
Fixing Windows 10 Update Error 0x800700c1
Method 1: Disable Anti-virus
There are numerous users who were experiencing error code 0x800700c1 while trying Windows 10 Anniversary update, were able to complete the update by disabling Antivirus software on their computers.
- Locate the antivirus software icon in the Windows Notification Area.
- Right-Click on the icon. You should see the option Disable, Stop, Turn off or something similar. Select the option to stop the antivirus security.
Method 2: Updated Outdated Drivers in Windows
- Open the system and go to the start menu.
- Then enter the control panel from the search box and open it.
- Here we go to system and security after that click on system.
- Open the new window and click on advanced system settings.
- Then open the system properties window and open the hardware and click on device installation setting.
- Finally, open the new window and click on related option and press save changes.
Method 3: Reinstall Windows Update
- Press Windows + R to open the Run
- Then enter the services.msc in the command box and press ok.
- Right-click Windows Update in the Services management console, and then select Stop. If you are running Windows, right-click Automatic Updates, and then select Stop.
- After Windows Update stops, right-click Windows Update, and then select Start. If you are running Windows, right-click Automatic Updates, and then select Start.
Method 4: Download Media Creation Tool
Navigate to the official Microsoft’s website and search for Media Creation Tool there.
- Click on the Download Tool option and then perform the following steps.
- When the ISO file is downloaded, right-click on it and select Run as Administrator.
- On the first page, click Accept to proceed.
- After that, select Upgrade this PC now and click Next.
- If you are upgrading for the first time, you will have to enter the Product License Key.
- Once the setup is ready, you will receive a “sum up” of what options you’ve chosen.
- Now you have to click on Change option to indicate what data you want to keep on your machine (Keep personal files and apps, Keep personal files only, or Nothing).
- Finally, select Install.
![]() Loading…
Loading…
By Dr. Joseph H Volker
|
On August 8, 2018
The update error 0x800700c1 occurs when your system downloads the required update files but fails to install them. There is likely corrupted data in the update files, or the Windows services that help in this installation are not running.
However, this issue is easy to manage. Troubleshooting Windows Update or resetting the Update Components will fix this issue in most cases. Worst case, you’ll have to reset your PC or make a clean install, which is still not that bad of a solution.
Table of Contents
What Causes Error 0x800700c1
Here are some of the causes for your system failing to install update files:
- Network connection issues
- Corrupted or missing system files
- Update installation services failing to start
- Improper shutdown
- Improper installation of software or updates
- Malware infection
The first thing you can do is to reboot your PC. If you have a habit of hibernating your PC instead of a proper shutdown, your system won’t apply any installed updates. It can possibly cause many update errors. So, properly restart or shut down and turn on your PC.
Also, make sure to check your internet connection as any connectivity issues may also cause this error.
Then, move on to the solutions below if the issue remains unresolved.
Windows Update Troubleshooter
Windows includes an Update Troubleshooter that checks and fixes most update errors. It is better to launch this feature before trying any advanced solutions. Here’s how you can use this Troubleshooter to fix update errors:
- Launch Settings (press Windows + I) and click on Update & Security.

- Select Troubleshooter from the left sidebar.
- If you see the troubleshooting options, scroll down and click on Windows Update Troubleshooter.
- If not, select Additional troubleshooters. Then, search for and click on Windows Update.
- Hit Run the troubleshooter.


If the Troubleshooter from your system fails to solve this issue, you can try out this Windows Update Troubleshooter for Windows 10.
Repair System File Corruption
You can solve many system issues, including update errors, by simply repairing system file corruption. Please use the System File Checker (SFC) and the Deployment Image Servicing and Management (DISM) for this task. Follow the directions below to do so:
- Search for Command Prompt in the search bar. Then, right-click on it and select Run as administrator.
- Paste the commands below and press enter after each to execute them.
dism /online /cleanup-image /restorehealth
sfc /scannow
Finally, reboot your PC and check if the error persists. If it does, try running these commands in safe mode. To boot your PC in safe mode,
- Go to Start > Power.
- Click Restart while pressing the Shift key. It will direct you to Windows Recovery Environment.
- Go to Troubleshoot > Advanced options > Startup Settings > Restart.
- Press 4 or F4 to boot in safe mode.


Then, follow the above steps to run DISM and SFC.
Reset Windows Update Components
This is the most common solution for several Windows Update errors. In this method, we perform the following processes:
- Resetting Windows Update services.
- Deleting the files downloaded for the update.
- Restoring Windows Update cache files.
- Registering some Windows Update libraries
Here’s the step-by-step method to execute these processes:
- First, click on the Wi-Fi icon on the notification bar and select Airplane Mode.
- Then, launch Command Prompt as Administrator.
- Type the following commands and press Enter after each to execute them:
net stop bits
net stop wuauserv
net stop cryptsvc
net stop msiserver
net stop appidsvc
del "%ALLUSERSPROFILE%\Application Data\Microsoft\Network\Downloader\qmgr*.dat"
ren C:\Windows\SoftwareDistribution SoftwareDistribution.bak
ren C:\Windows\System32\catroot2 catroot2.bak
regsvr32 /s wuapi.dll
regsvr32 /s wuaueng.dll
regsvr32 /s wucltui.dll
netsh winsock reset
net start bits
net start wuauserv
net start appidsvc
net start cryptsvc
net start msiserver
For more information, please browse through the Microsoft documentation for resetting Windows Update components.
Scan for Malware
A few malware programs exist that prevent the system from accessing update services. We recommend using reliable antivirus programs and enabling real-time protection to prevent such issues.
Please scan your computer if you encounter this error. The method differs between different antivirus software. It’s also best to enable cloud-based protection on your antivirus programs.
To scan your computer with the Virus & Threat Protection,
- Click on the Windows Security icon (Shield icon) from the notification tray.
- Click the triple-lines and select Virus & threat protection.

- Click on Scan options under Current threats.
- Check on Full scan and click Scan now.
- Wait for the process to complete. It will take a while.


Temporarily Disable Third-Party Antivirus & Firewall
You can try temporarily disabling any third-party antivirus or firewall when you encounter this error. Some antivirus programs may stop installing updates if they falsely recognize them as threats to your system.
Install Update With Media Creation
Microsoft regularly updates the Windows installation media, so you can use this to install the updates on your PC manually. This method may also repair your system, thereby, fixing any precious errors.
You can also use the Windows Update Assistant as an alternative way to install updates. However, it might not fix the update error.
To install the update with media creation,
- Go to the Microsoft download website and click on your Windows version.
- Under Create Windows 10 installation media, click on Download tool now.
- Launch the installation file.
- Select Accept to agree with the License terms.
- Then, choose Upgrade this PC now and click Next.

- Follow the on-screen instructions.

Perform System Restore
System Restore allows you to revert to a previously created restore point. Any errors encountered after the restore point will likely be resolved after performing a system restore.
Follow the steps below to perform a system restore:
- Type
systempropertiesprotectionin the Run command and press Enter. It opens the System Protection tab in System Properties. - Click on System Restore to initiate the process.

- Follow the on-screen instructions. You can select any restore point you want.
- There is also an option to check for affected programs. You’ll need to reinstall them after executing the system restore.

Reset Your PC
If you don’t have an appropriate restore point or all previous methods prove ineffective, the last option is to reset your OS.
We recommend you backup all your necessary files before resetting your PC. Follow these instructions to perform a system reset:
- Launch Settings and go to Update and Security.
- Select Recovery from the left sidebar.
- Under Reset this PC, click on Get started.
- Choose Keep my files when prompted and click Ok.

- Follow the on-screen instructions.


It’s best to delete your old partition and perform a clean install of Windows if the error still reoccurs.
Related Questions
Running SFC Displayed Windows Resource Protection Could Not Perform the Requested Operation.
This error occurs due to problems with Windows Module Installer. We have a dedicated article that tackles this issue. Please visit it to resolve the issue.
There may also be cases when Windows Resource Protection found problems with integrity of system files but couldn’t fix them. We also have a detailed article on this particular issue: Windows Resource Protection Found Corrupt Files.