If your PC is running slowly, the following suggestions might help speed things up. The tips are listed in order, so start with the first one, see if that helps, and then continue to the next one if it doesn’t.
One of the best ways to get the most out of your PC is to make sure you have the latest version of Windows 11 installed. When you check for updates, your PC will also search for the latest device drivers, which can also help improve your PC’s performance.
To check for updates
-
Do one of the following:
-
If the status says «You’re up to date,» continue and check for optional updates.
-
If the status says «Updates are available,» once they are downloaded, select Install now.
-
-
Select the updates you want to install, then select Install.
-
Restart your PC and see if it seems to run better.
Sometimes an optional update, like a new non-critical driver, will be available that may help.
To check for optional updates
-
Select the Start button, then select Settings > Windows Update > Advanced options > Optional updates.
-
If additional updates are available, select them and then select Download & install.
-
Restart your PC and see if it seems to run better.
For more info about updates, including how you can have them installed automatically, see the Windows Update FAQ.
For Windows Update troubleshooting info, see Update Windows and Troubleshoot problems updating Windows.
If your PC still runs slowly, continue to the next tip.
Having many apps, programs, web browsers, and so on open at once can slow down your PC. Having a lot of browser tabs open at once can also slow it down quite a bit. If this is happening, close any apps, browser tabs, etc., that you don’t need and see if that helps speed up your PC. If it doesn’t seem to help, restart your PC and then open just the apps, programs and browser windows you need.
To restart your PC
-
Select the Start button, then select Power > Restart .
-
After your PC restarts, open just the apps you need, then close them when you’re done.
Sometimes apps that were made for an earlier version of Windows will still run on Windows 11, but they might slow down your PC. If this happens after you open a certain program, check the software company’s website for an updated version, or run the Program Compatibility Troubleshooter.
To run the Program Compatibility Troubleshooter
-
Select Search , type troubleshoot in the search box, then select Troubleshoot settings > Other troubleshooters .
-
Under Other, select the Run button next to Program Compatibility Troubleshooter .
-
Select the program that you’re having problems with, then select Next and continue through the troubleshooter.
PC still running slowly? Continue to the next tip.
ReadyBoost lets you use a removable drive, like a USB flash drive, to improve your PC’s performance without opening your PC and adding more memory (RAM). To use ReadyBoost, you’ll need a USB flash drive or a memory card that has at least 500 MB free and a high data transfer rate.
To use ReadyBoost
-
Insert the USB flash drive into a USB port on your PC.
-
Select File Explorer from the taskbar.
-
Press and hold (or right-click) the USB flash drive (or SD card if you used one instead), then select Properties.
-
Select the ReadyBoost tab, then select Use this device.
Windows determines if the device can use ReadyBoost. If it can’t, it’ll let you know. -
After Windows determines how much free space to use to optimize memory, select OK to reserve this space so ReadyBoost can use it.
When you look at the contents of the USB flash drive in File Explorer, you’ll see a file named ReadyBoost.sfcache on the flash drive. This file shows how much space is reserved for ReadyBoost.
Note: ReadyBoost can’t be used if Windows is installed on a solid state drive (SSD). An SSD is already fast, and ReadyBoost won’t be able to improve its performance.
The paging file is an area on your hard disk that Windows uses like memory. There’s a setting in Windows 11 that manages the page file size automatically, which can help improve your PC’s performance.
To make sure automatic page file management is turned on
-
Select Search on the taskbar, type advanced system in the search box, and then select View advanced system settings, which has Control panel listed underneath it.
-
In System Properties, select the Advanced tab, then select Settings in the Performance area.
-
In Performance Options, select the Advanced tab, then select Change in the Virtual memory area.
-
Make sure the Automatically manage paging file size for all drives check box is selected. If it is, continue to the next tip. If it’s not, select it and then restart your PC by selecting Start > Power > Restart .
Use your PC and see if it’s running better. If it’s not, try the next tip.
You may improve performance if you free some disk space on your PC.
To check for low disk space
-
Your drives will be listed in the Storage area. Note the amount of free space and total size for each drive.
Note: If your PC is not low on space, try the next tip.
You can use Storage Sense to delete unnecessary or temporary files from your device, which can also free up space.
If you turn on Storage Sense, Windows will automatically free up space by getting rid of unnecessary files—including files in your recycle bin—when you’re low on disk space or at intervals you specify. The instructions below show you how to delete temporary files and how to turn on and configure Storage Sense.
If you can’t find Storage Sense on your device using the following steps, see the «Free up space with Disk cleanup» section below instead.
Note: You may not want to delete temporary files to improve performance. While these files may not be used at the moment, they help your apps load and run faster.
To delete temporary files with Storage Sense
-
Select Temporary files in the storage breakdown. Note: If you don’t see Temporary files listed, select Show more categories.
-
Windows will take a few moments to determine what files and apps are taking up the most space on your PC.
-
Select the items you want to delete, and then select Remove files.
To see what’s in your Recycle Bin before you empty it, open it from your desktop. If you don’t see the Recycle Bin icon on your desktop, in the search bar on the taskbar, type recycle bin, then select Recycle Bin from the list of results.
Note: Windows moves files you delete to the Recycle Bin in case you change your mind and need them again in the future. You might be able to free up a significant amount of space by deleting Recycle Bin files to permanently remove files you’ve previously deleted.
To turn on and configure Storage Sense
-
In the Storage management area, turn on Storage Sense.
-
Select the for Storage Sense to configure it.
-
Under Cleanup of temporary files, ensure Keep Windows running smoothly by automatically cleaning up temporary system and app files is checked.
-
Under Configure cleanup schedules, choose how often you want Storage Sense to run.
-
For the files you want Storage Sense to delete (your choices are files in your Recycle Bin and in your Downloads folder), select the preferred time intervals, or select Never if you want Storage Sense to leave those types of files alone.
-
Scroll down and select Run Storage Sense now.
-
Windows will take a few moments to clean up your files, and then you’ll see a message indicating how much disk space has been freed up.
If your system doesn’t have Storage Sense, you can use the Disk Cleanup tool to delete temporary files and system files from your device.
To run Disk Cleanup
-
Select Search , type disk cleanup, then select Disk Cleanup from the list of results.
-
Select the checkbox next to the type of files you want to delete. (To view a description of each type of file, select the name.) By default, Downloaded Program Files, Temporary Internet Files, and Thumbnails are selected. Be sure to clear those check boxes if you don’t want to delete those files.
-
To free up even more space, select Clean up system files. Disk Cleanup will take a few moments to calculate the amount of space that a can be freed up.
Note: If it’s been fewer than 10 days since you upgraded to Windows 11, your previous version of Windows will be listed as a system file you can delete. If you need to free up drive space, you can delete it, but keep in mind that you’ll be deleting your Windows.old folder, which contains files that give you the option to go back to your previous version of Windows. If you delete your previous version of Windows, this can’t be undone. (You won’t be able to go back to your previous version of Windows.)
-
Select the types of files you want to delete, select OK, then select Delete files in the confirmation window to start the cleanup.
If your PC still runs slowly, try uninstalling apps you don’t use anymore.
To uninstall apps you don’t use anymore
-
Search for a specific app or sort them to see which ones are using the most space.
-
When you find an app to remove, select the More icon next to it and, if possible, select Uninstall.
-
Restart your PC and see if performance has improved.
If your PC still runs slowly, try moving files to another drive.
If you have photos, music, or other files that you want to keep but don’t use often, consider saving them to removable media, like a USB drive. You’ll still be able to use them when the drive is connected, but they won’t take up space on your PC.
To move files to another drive
-
Connect the removable media to your PC.
-
Select File Explorer from the taskbar and find the files you want to move.
-
Select the files, then on the taskbar, select Cut .
-
Select your removable media from the location list, then select Paste .
-
When the move is complete, restart your PC and see if performance has improved.
Get more info about freeing drive space in Windows.
If your PC still runs slowly, try the next tip.
Windows 11 includes many visual effects, such as animations and shadow effects. These look great, but they can also use additional system resources and can slow down your PC. This is especially true if you have a PC with a smaller amount of memory (RAM).
To adjust the visual effects in Windows
-
Select Search , type performance, then select Adjust the appearance and performance of Windows in the list of results.
-
On the Visual Effects tab, select Adjust for best performance > Apply.
-
Restart your PC and see if that speeds up your PC.
If your PC still runs slowly, continue to the next tip.
Your PC settings let you choose where files will be saved by default. You can save files on your PC or to OneDrive by default and sync files between the two locations. This lets you get to your files from any device that can connect to the internet, and it helps make sure your files are backed up in case your PC is ever damaged or lost. However, files must sync between your PC and OneDrive, and syncing can slow down your PC. You can pause OneDrive syncing temporarily and see if it helps improve your PC performance.
To pause syncing to OneDrive
-
On the taskbar, look for OneDrive near the notification area.
-
Select OneDrive > Help & Settings > Pause syncing, and then choose how long you want to pause syncing your files.
-
Restart your PC and see if your performance issues have improved with syncing paused.
-
To resume syncing your files, select OneDrive > Help & Settings > Resume syncing.
You can also visit Fix OneDrive sync problems to check for any sync issues.
When you turn on your PC, some programs start automatically and run in the background. You can disable these programs so they don’t run when your PC starts.
Many programs are designed to start automatically when Windows does. You don’t realize they’re running, but they’ll open quickly when you go to use them. This is helpful for programs you use a lot, but not for programs you don’t use often because it increases the time it takes Windows to start.
Find the programs that start automatically
Sometimes you can determine which programs start automatically by looking at the program icons in the notification area on the far right of the taskbar. Check there first to see if there are any programs running that you don’t want to start automatically. To try to find out the name of the program, point to the icon with your mouse pointer. Make sure you select Show hidden icons , so you don’t miss any programs.
Even after you check the notification area, you might still miss some programs that run automatically at startup. Here’s how you can find all the programs that start automatically, and stop the ones that you don’t want to start automatically when Windows starts.
To stop a program from starting automatically
-
In the Startup Apps area, find the program you want to stop from starting automatically and set it to Off.
Note: If you turn off a program and it continues to start automatically when Windows starts, you should scan for viruses and malware. See the next section for more info.
A virus, malware, or malicious software could cause your PC to run slowly. Other symptoms include unexpected pop-up messages, programs that unexpectedly start automatically, or the sound of your hard disk constantly working.
The best way to handle viruses and malicious software is to try to prevent them by running antimalware and antivirus software and keeping it up to date. However, even if you take precautions, your PC can still become infected.
You can scan your PC for viruses or other malicious software by using Windows Security (formerly Windows Defender Security Center), which is included in Windows 11. For more info, see How to protect your Windows PC.
Notes:
-
If you’re using other antivirus or anti-malware software, see the documentation for that program to learn how to scan for viruses. Also, make sure multiple antivirus programs aren’t running at the same time. If they are, choose the one you want to run, and then disable or uninstall any others.
-
If you have another antivirus program installed and turned on, Windows Security will be turned off by default.
To scan for viruses using Windows Security
-
Select Virus & threat protection, then select Protection updates under Virus & threat protection updates.
-
On the Protection updates screen, select Check for updates to make sure you have the most recent updates.
-
Select Virus & threat protection, then select Quick scan.
Wait for Windows Security to finish scanning for viruses and malware.
-
Do one of the following, depending on the results of the scan:
-
Run the recommended advanced scan. This scan takes longer but searches more extensively for threats on your PC.
-
If Windows Security finds a virus or malware and can’t remove or quarantine it, contact Microsoft Support for help.
-
If no viruses are found, restart your PC and try to reproduce the performance problem you were having with your PC.
-
Note: If Windows Security doesn’t open, can’t update the definition file, or can’t finish scanning for viruses, try running Microsoft Defender Antivirus (offline scan), which is explained below.
To scan for malware and viruses with Microsoft Defender Antivirus (offline scan)
-
Save any documents or anything else you might have open on your PC.
-
Select Virus & threat protection, and then under Current threats, select Scan options > Microsoft Defender Antivirus (offline scan) > Scan now.
Your PC will restart, and Microsoft Defender Antivirus (offline scan) will run and scan for viruses and malware. The scan might take 15 minutes or so, and your PC will restart again after that.
-
Try to reproduce the performance issue.
If your PC still runs slowly, continue to the next tip.
Restoring your PC undoes recent changes that might be causing problems. If you think a recently installed app, driver, or update for Windows could be causing problems, you might get things running normally again by restoring your PC to an earlier point, called a restore point.
Notes:
-
Restoring from a restore point won’t affect your personal files, but it will remove apps, drivers, and updates that were installed after the restore point was created.
-
System restore works for changes made in the last 7 to 14 days.
To restore your PC from a restore point
-
Select Search on the taskbar, type advanced system, then select View advanced system settings from the list of results.
-
On the System Protection tab, select System Restore.
-
Select Recommended restore to go with the most recent restore point Windows has made automatically, or Choose a different restore point to select one yourself, then select Next.
-
If you chose to select a different restore point, select one, then select Next. Either way, select Finish to begin restoring.
-
Once the restore is completed, restart your PC and see if performance has improved.
If you don’t see any restore points, it might be because system protection isn’t turned on.
To turn on system protection
-
In the search box on the taskbar, type create a restore point, then select Create a restore point from the list of results.
-
On the System Protection tab, select Configure.
-
Select Turn on system protection > OK.
If your PC is running slowly, the following suggestions might help speed things up. The tips are listed in order, so start with the first one, see if that helps, and then continue to the next one if it doesn’t.
One of the best ways to get the most out of your PC is to make sure you have the latest version of Windows 10 installed. When you check for updates, your PC will also search for the latest device drivers, which can also help improve your PC’s performance.
To check for updates
-
Select the Start button, then select Settings > Update & Security > Windows Update > Check for updates.
Check for Windows updates
-
Do one of the following:
-
If the status says «You’re up to date,» go to the next tip.
-
If the status says «Updates are available,» select Install now.
-
-
Select the updates you want to install, then select Install.
-
Restart your PC and see if it seems to run better.
For more info about updates, including how you can have them installed automatically, see the Windows Update FAQ.
For Windows Update troubleshooting info, see Update Windows 10 and Troubleshoot problems updating Windows 10.
If your PC still runs slowly, continue to the next tip.
Having many apps, programs, web browsers, and so on open at once can slow down your PC. Having a lot of browser tabs open at once can also slow it down quite a bit. If this is happening, close any apps, browser tabs, etc., that you don’t need and see if that helps speed up your PC. If it doesn’t seem to help, restart your PC and then open just the apps, programs and browser windows you need.
To restart your PC
-
Select the Start button, then select Power > Restart.
-
After your PC restarts, open just the apps you need, then close them when you’re done.
Sometimes apps that were made for an earlier version of Windows will still run on Windows 10, but they might slow down your PC. If this happens after you open a certain program, check the software company’s website for an updated version, or run the Program Compatibility Troubleshooter.
To run the Program Compatibility Troubleshooter
-
In the search box on the taskbar, type troubleshoot, then select Troubleshoot settings, which has System settings listed underneath it.
-
In the list of troubleshooters, select Program Compatibility Troubleshooter > Run the troubleshooter.
-
Select the program that you’re having problems with, then select Next and continue through the troubleshooter.
PC still running slowly? Continue to the next tip.
ReadyBoost lets you use a removable drive, like a USB flash drive, to improve your PC’s performance without opening your PC and adding more memory (RAM). To use ReadyBoost, you’ll need a USB flash drive or a memory card that has at least 500 MB free and a high data transfer rate.
To use ReadyBoost
-
Insert the USB flash drive into a USB port on your PC.
-
Select File Explorer from the taskbar.
-
Press and hold (or right-click) the USB flash drive (or SD card if you used one instead), then select Properties.
-
Select the ReadyBoost tab, then select Use this device.
Windows determines if the device can use ReadyBoost. If it can’t, it’ll let you know. -
After Windows determines how much free space to use to optimize memory, select OK to reserve this space so ReadyBoost can use it.
When you look at the contents of the USB flash drive in File Explorer, you’ll see a file named ReadyBoost.sfcache on the flash drive. This file shows how much space is reserved for ReadyBoost.
Note: ReadyBoost can’t be used if Windows is installed on a solid state drive (SSD). An SSD is already fast, and ReadyBoost won’t be able to improve its performance.
The paging file is an area on your hard disk that Windows uses like memory. There’s a setting in Windows 10 that manages the page file size automatically, which can help improve your PC’s performance.
To make sure automatic page file management is turned on
-
In the search box on the taskbar, type advanced system, and then select View advanced system settings, which has Control panel listed underneath it.
-
In System Properties, select the Advanced tab, then select Settings in the Performance area.
-
In Performance Options, select the Advanced tab, then select Change in the Virtual memory area.
-
Make sure the Automatically manage paging file size for all drives check box is selected. If it is, continue to the next tip. If it’s not, select it and then restart your PC by selecting the Start button > Power > Restart.
Use your PC and see if it’s running better. If it’s not, try the next tip.
You may improve performance if you free some disk space on your PC.
To check for low disk space
-
Your drives will be listed in the Storage area. Note the amount of free space and total size for each drive.
Note: If your PC is not low on space, try the next tip.
You can use Storage Sense to delete unnecessary or temporary files from your device, which can also free up space.
If you turn on Storage Sense, Windows will automatically free up space by getting rid of unnecessary files—including files in your recycle bin—when you’re low on disk space or at intervals you specify. The instructions below show you how to delete temporary files and how to turn on and configure Storage Sense.
If you can’t find Storage Sense on your device using the following steps, see the «Free up space with Disk cleanup» section below instead.
Note: You may not want to delete temporary files to improve performance. While these files may not be used at the moment, they help your apps load and run faster.
To delete temporary files with Storage Sense
-
Select Temporary files in the storage breakdown. Note: If you don’t see Temporary files listed, select Show more categories.
-
Windows will take a few moments to determine what files and apps are taking up the most space on your PC.
-
Select the items you want to delete, and then select Remove files.
To see what’s in your Recycle Bin before you empty it, open it from your desktop. If you don’t see the Recycle Bin icon on your desktop, in the search bar on the taskbar, type recycle bin, then select Recycle Bin from the list of results.
Note: Windows moves files you delete to the Recycle Bin in case you change your mind and need them again in the future. You might be able to free up a significant amount of space by deleting Recycle Bin files to permanently remove files you’ve previously deleted.
To turn on and configure Storage Sense
-
In the Storage area, turn on Storage Sense.
-
Select Configure Storage Sense or run it now.
-
In the Storage Sense area, choose how often you want Storage Sense to run.
-
In the Temporary Files area, select Delete temporary files that my apps aren’t using.
-
Select which files you want Storage Sense to delete (your choices are files in your Recycle Bin and in your Downloads folder), then select the corresponding time intervals.
-
Scroll down and select Clean now.
-
Windows will take a few moment to clean up your files, and then you’ll see a message indicating how much disk space has been freed up.
If your system doesn’t have Storage Sense, you can use the Disk Cleanup tool to delete temporary files and system files from your device.
To run Disk Cleanup
-
In the search box on the taskbar, type disk cleanup, then select Disk Cleanup from the list of results.
-
Select the checkbox next to the type of files you want to delete. (To view a description of each type of file, select the name.) By default, Downloaded Program Files, Temporary Internet Files, and Thumbnails are selected. Be sure to clear those check boxes if you don’t want to delete those files.
-
To free up even more space, select Clean up system files.Disk Cleanup will take a few moments to calculate the amount of space that a can be freed up.
Note: If it’s been fewer than 10 days since you upgraded to Windows 10, your previous version of Windows will be listed as a system file you can delete. If you need to free up drive space, you can delete it, but keep in mind that you’ll be deleting your Windows.old folder, which contains files that give you the option to go back to your previous version of Windows. If you delete your previous version of Windows, this can’t be undone. (You won’t be able to go back to your previous version of Windows.)
-
Select the types of files you want to delete, select OK, then select Delete files in the confirmation window to start the cleanup.
If your PC still runs slowly, try uninstalling apps you don’t use anymore.
To uninstall apps you don’t use anymore
-
Search for a specific app or sort them to see which ones are using the most space.
-
When you find an app to remove, choose it from the list and select Uninstall.
-
Restart your PC and see if performance has improved.
If your PC still runs slowly, try moving files to another drive.
If you have photos, music, or other files that you want to keep but don’t use often, consider saving them to removable media, like a USB drive. You’ll still be able to use them when the drive is connected, but they won’t take up space on your PC.
To move files to another drive
-
Connect the removable media to your PC.
-
Select File Explorer from the taskbar and find the files you want to move.
-
Select the files, go to Home, then select Move to >Choose location.
-
Select your removable media from the location list, then select Move.
-
Restart your PC and see if performance has improved.
Get more info about freeing drive space in Windows 10.
If your PC still runs slowly, try the next tip.
Windows 10 includes many visual effects, such as animations and shadow effects. These look great, but they can also use additional system resources and can slow down your PC. This is especially true if you have a PC with a smaller amount of memory (RAM).
To adjust the visual effects in Windows
-
In the search box on the taskbar, type performance, then select Adjust the appearance and performance of Windows in the list of results.
-
On the Visual Effects tab, select Adjust for best performance > Apply.
-
Restart your PC and see if that speeds up your PC.
If your PC still runs slowly, continue to the next tip.
Your PC settings let you choose where files will be saved by default. You can save files on your PC or to OneDrive by default and sync files between the two locations. This lets you get to your files from any device that can connect to the internet, and it helps make sure your files are backed up in case your PC is ever damaged or lost. However, files must sync between your PC and OneDrive, and syncing can slow down your PC. You can pause OneDrive syncing temporarily and see if it helps improve your PC performance.
To pause syncing to OneDrive
-
On the taskbar, look for OneDrive near the notification area.
-
Select OneDrive > More > Pause syncing, and then choose how long you want to pause syncing your files.
-
Restart your PC and see if your performance issues have improved with syncing paused.
-
To resume syncing your files, select OneDrive > More >Resume syncing.
You can also visit Fix OneDrive sync problems to check for any sync issues.
Notes:
-
If you have Window 10 version 1709 or higher, you can use OneDrive Files On-Demand to choose which files you want to sync and always keep on your PC. This can help improve PC performance if you reduce the number of files that are synced to your PC. To see which version of Windows 10 your device is currently running, select the Start button, then select Settings > System > About.
Open About settings -
For more info on OneDrive Files On-Demand, see Learn about OneDrive Files On-Demand.
When you turn on your PC, some programs start automatically and run in the background. You can disable these programs so they don’t run when your PC starts.
Many programs are designed to start automatically when Windows does. You don’t realize they’re running, but they’ll open quickly when you go to use them. This is helpful for programs you use a lot, but not for programs you don’t use often because it increases the time it takes Windows to start.
Find the programs that start automatically
Sometimes you can determine which programs start automatically by looking at the program icons in the notification area on the far right of the taskbar. Check there first to see if there are any programs running that you don’t want to start automatically. To try to find out the name of the program, point to the icon with your mouse pointer. Make sure you select Show hidden icons , so you don’t miss any programs.
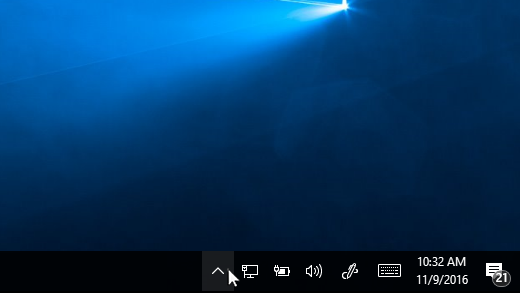
Notification area with mouse pointing to show hidden icons
Even after you check the notification area, you might still miss some programs that run automatically at startup. Here’s how you can find all the programs that start automatically, and stop the ones that you don’t want to start automatically when Windows starts.
To stop a program from starting automatically
-
In the Startup Apps area, find the program you want to stop from starting automatically and set it to Off.
Notes:
-
If you turn off a program and it continues to start automatically when Windows starts, you should scan for viruses and malware. See the next section for more info.
-
To use the procedure above to stop a program from starting automatically, you need to have Windows 10 (Version 1803 or higher) installed. To see which version of Windows 10 your device is currently running, select the Start button, then select Settings > System > About.
Open About settings -
If you have Windows 10 (Version 1709 or earlier) installed, press Ctrl + Alt + Delete, select Task Manager, select Startup, select the program you want to stop from starting automatically, then select Disable.
A virus, malware, or malicious software could cause your PC to run slowly. Other symptoms include unexpected pop-up messages, programs that unexpectedly start automatically, or the sound of your hard disk constantly working.
The best way to handle viruses and malicious software is to try to prevent them by running antimalware and antivirus software and keeping it up to date. However, even if you take precautions, your PC can still become infected.
You can scan your PC for viruses or other malicious software by using Windows Security (formerly Windows Defender Security Center), which is included in Windows 10. For more info, see How to protect your Windows 10 PC.
Notes:
-
If you’re using other antivirus or anti-malware software, see the documentation for that program to learn how to scan for viruses. Also, make sure multiple antivirus programs aren’t running at the same time. If they are, choose the one you want to run, and then disable or uninstall any others.
-
If you have another antivirus program installed and turned on, Windows Security will be turned off by default.
To scan for viruses using Windows Security (Windows 10 Version 1809 or later)
-
Select Virus & threat protection, then select Check for updates under Virus & threat protection updates.
-
On the Protection updates screen, select Check for updates to make sure you have the most recent updates.
-
Select Virus & threat protection, then select Quick scan.
Wait for Windows Security to finish scanning for viruses and malware.
-
Do one of the following, depending on the results of the scan:
-
Run the recommended advanced scan. This scan takes longer but searches more extensively for threats on your PC.
-
If Windows Security finds a virus or malware and can’t remove or quarantine it, contact Microsoft Support for help.
-
If no viruses are found, restart your PC and try to reproduce the performance problem you were having with your PC.
-
Notes:
-
If Windows Security doesn’t open, can’t update the definition file, or can’t finish scanning for viruses, try running Windows Defender Offline, which is explained below in To scan for malware and viruses with Windows Defender Offline (Windows 10 Version 1809 or later).
-
To see which version of Windows 10 your device is currently running, select the Start button, then select Settings > System > About.
Open About settings
To scan for viruses using Windows Defender Security Center (Windows 10 Version 1803)
-
Select Virus & threat protection, then select Virus & threat protection updates > Check for updates to make sure you have the latest definition file.
-
Select the Virus & threat protection tab, then select Scan now.
Wait for Windows Defender Security Center to finish scanning for viruses and malware.
-
Do one of the following, depending on the results of the scan:
-
Run the recommended advanced scan. This scan takes longer but searches more extensively for threats on your PC.
-
If Windows Defender Security Center finds a virus or malware and can’t remove or quarantine it, contact Microsoft Support for help.
-
If no viruses are found, restart your PC and try to reproduce the performance problem you were having with your PC.
-
Notes:
-
If Windows Defender Security Center doesn’t open, can’t update the definition file, or can’t finish scanning for viruses, try running Windows Defender in Offline Mode, which is explained below in To scan for malware and viruses with Windows Defender Offline (Windows 10 Version 1803).
-
To see which version of Windows 10 your device is currently running, select the Start button, then select Settings > System > About.
Open About settings
To scan for malware and viruses with Windows Defender Offline (Windows 10 Version 1809 or later)
-
Save any documents or anything else you might have open on your PC.
-
Select Virus & threat protection, and then under Current threats, select Scan options > Windows Defender Offline scan > Scan now.
Your PC will restart, and Windows Defender Offline will run and scan for viruses and malware. The scan might take 15 minutes or so, and your PC will restart again after that.
-
Try to reproduce the performance issue.
If your PC still runs slowly, continue to the next tip.
To scan for malware and viruses with Windows Defender Offline (Windows 10 Version 1803)
-
Save any documents or anything else you might have open on your PC.
-
Select Virus & threat protection, then select Run a new advanced scan > Windows Defender Offline scan > Scan now.
Your PC will restart, and Windows Defender Offline will run and scan for viruses and malware. The scan might take 15 minutes or so, and your PC will restart again after that.
-
Try to reproduce the performance issue.
If your PC still runs slowly, continue to the next tip.
Restoring your PC undoes recent changes that might be causing problems. If you think a recently installed app, driver, or update for Windows could be causing problems, you might get things running normally again by restoring your PC to an earlier point, called a restore point.
Notes:
-
Restoring from a restore point won’t affect your personal files, but it will remove apps, drivers, and updates that were installed after the restore point was created.
-
System restore works for changes made in the last 7 to 14 days.
To restore your PC from a restore point
-
In the search box on the taskbar, type restore point, then select Create a restore point from the list of results.
-
On the System Protection tab, select System Restore.
-
Select Next, then choose the restore point related to the app, driver, or update that might be causing the problem. Then select Next > Finish.
-
Restart your PC and see if performance has improved.
If you don’t see any restore points, it might be because system protection isn’t turned on.
To turn on system protection
-
In the search box on the taskbar, type restore point, then select Create a restore point from the list of results.
-
On the System Protection tab, select Configure.
-
Select Turn on system protection > OK.
Need more help?
Want more options?
Explore subscription benefits, browse training courses, learn how to secure your device, and more.
Communities help you ask and answer questions, give feedback, and hear from experts with rich knowledge.
Find solutions to common problems or get help from a support agent.
Ускоряем производительность вашей системы до уровня элитного ПК бояра. Можно посмотреть видео, но для тех, кому удобнее читать — внутри есть материал в текстовом формате.
Предисловие
Мне нравится возится с железками, приводить компьютеры в боевое состояние и разбираться в различном ПО. Обусловлено это тем, что в моей семье всегда было много компьютеров. После нескольких походов в сервисные центры еще в нулевых, стало понятно, что отдавать ПК на несколько дней, обычно скорее даже недель, часто без решения проблемы — это не вариант. Тогда я стал разбираться как вся эта магия работает, сначала в самой винде, а потом и внутри корпуса.
Так я начал самостоятельно диагностировать неполадки, обслуживать и приводить свои машинки в рабочее состояние, а позже и собирать ПК. В итоге со временем стал это делать не только для себя, но и по просьбе друзей / знакомых и даже подрабатывать этим делом. Не так давно в качестве хобби завёл себе канал на ютубе, чтобы выкладывать ролики про железо + ПО и подтягивать скилл в монтаже. Подумал, что будет уместно поделиться видосом про настройку винды на сайте, который читаю каждый день и где сидит много ПК бояр. Буду рад, если мои рекомендации окажутся полезны для вас и вашего железного друга. Перейдем ближе к сути.
Оглавление
Вступление
Оптимизация однозначно позволит легче дышать не самым сильным машинкам и вздохнуть на полную грудь производительным ПК.
Однако, не питайте иллюзий:
Не существует магических способов превратить слабый компьютер в монстра для игр какие махинации вы бы не проворачивали с вашим ПК
За несколько лет существования Windows10 я перепробовал всевозможные способы оптимизации системы, а теперь поделюсь с вами теми, к которым пришел сам на этот момент.
Фактически оптимизация Windows 10 делится на три основных этапа:
1. Установка обновлений и драйверов
2. Настройка Windows 10
3. Уход за системой
Первый этап подразумевает, что Windows 10 уже установлена на компьютер. Я не буду объяснять процесс установки, поэтому если у вас есть такая потребность — воспользуйтесь любым актуальным гайдом по установке. Отмечу только то, что вам в обязательном порядке нужно установить Windows 10 с официального сайта Microsoft. Только так вы можете быть уверены, что у вас чистая ОС без вшитых вирусов и вырезанных функций.
0. Затемнение экрана
Перед тем как начать, заглянем в «Панель управления», здесь поставьте «Крупные значки«, чтобы появились все иконки настроек.
Зайдите в «Учетные записи пользователей«, нажмите »Изменить параметры контроля учетных записей«. Здесь выберите предпоследний уровень уведомлений, в котором написано »Не затемнять рабочий стол». Это нужно чтобы отключить затемнение экрана при всплывающих окнах на подтверждение действия программы.
Либо выбираем последний нижний уровень – тогда мы полностью отключаем надоедливые всплывашки. Не знаю как вас, а меня дико напрягает это постоянное затемнение экрана. Просто так занимает время и стопорит систему, особенно это заметно на слабых машинках. Жмем ОК.
1. Установка обновлений и драйверов
1.1. Обновление Windows 10
Открываем пуск, параметры Windows 10. Выбираем раздел «Обновления и безопасность«, жмем »Проверить наличие обновлений«. Если что-то находит, ждем загрузку, когда она закончится, как правило запрашивается перезагрузка ПК. Делаем ребут, снова проверяем обновления. Если появились новые апдейты – повторяем процедуру пока не увидим надпись »У вас установлены все последние обновления».
Несмотря на то, что иногда в обновлениях попадаются заплатки на безопасность понижающие производительность железа (все мы помним уязвимости Spectre и Meltdown) — это все равно нужно делать для правильной работы системы, поэтому я настойчиво не рекомендую блокировать обновления каким-либо способом, взятым на просторах интернета.
Дальше сразу спускаемся ниже, открываем «Изменить период активности«, здесь должно стоять »Автоматически изменять период активности на основе действий». Система сама определит, когда вы используете компьютер и подберет оптимальное время для установки обновлений, чтобы не делать это когда вы обычно используете ПК.
Открываем «Дополнительные параметры«, тут отключаем все, кроме уведомлений про обновления.
1.2. Установка драйверов
Переходим к одному из самых важных аспектов работы системы. Несмотря на то, что винда автоматически подтягивает стандартные драйвера, он не устанавливает специализированные драйвера для видеокарты и материнской платы. А это супер важно для производительности в играх и различных медиа редакторах. Поэтому сначала переходим на официальный сайт производителя вашей материнской платы либо ноутбука. По модели в разделе поддержки находим драйвера. Качаем все это добро и поочередно устанавливаем.
Для материнских плат на базе AMD можно скачать драйвер чипсета на официальном сайте, если нет на сайте производителя материнской платы. Для этого выбираем Chipsets, сокет и чипсет материнской платы.
Если не знаете модель материнки, скачайте CPU-Z и посмотрите во вкладке Mainboard. Ссылку оставлю в описании.
После этого точно также заходим на официальный сайт производителя вашей видеокарты nvidia или AMD. Даже если у вас процессор AMD или Intel со встроенным видео. Скачиваем и устанавливаем.
Обязательно проверяем чтобы у вас точно стояла последняя версия драйвера и делаем это периодически, особенно после выхода новых игр.
2. Настройка Windows 10
Возвращаемся в «Параметры«.
2.1 Система
Во вкладке «Уведомления« полностью их отключаем, потому что не нужны и только мешают. Во вкладке »Фокусировка внимания» выбираем только будильники, чтобы точно не отвлекаться на ненужные уведомления.
2.1.1 Схема электропитания
Во вкладке «Питание и спящий режим» я ставлю отключение экрана через 10 минут на случай, если усну при просмотре фильма, а спящий режим полностью выключаю. Вы ставите исходя из своих потребностей. Можно включить спящий режим, если вы часто используете ноутбук без зарядки батареи.
Здесь переходим в «Дополнительные параметры питания«. Выбираем схему электропитания «Высокая производительность». Если ее нет, то выбираем сбалансированную.
Если у вас компьютер на базе AMD и вы установили драйвер на чипсет материнской платы, у вас могут быть фирменные схемы электропитания здесь. В таком случае выбирайте «AMD High Performance» и больше ничего не трогайте.
В остальных случаях жмем «Настройка схемы электропитания» — «Изменить дополнительные параметры питания«. В графе »Отключать жесткий через» вписываем много девяток. «Параметры адаптера беспроводной сети« ставим максимальная производительность. »Сон после« – никогда. »Разрешить гибридный спящий режим» – выкл. «Гибернация после« – никогда. »Параметры USB»: «Параметр временного отключения юсб порта» ставим запрещено. «Управление питанием процессора»: «Минимальное состояние« выставляем на 100%, »Политика охлаждения» – активный, «Максимальное состояние проца« – 100%. »Изменение качества воспроизведения видео« ставим изменение качества воспроизведения видео для повышения производительности. »При воспроизведении видео» – оптимизация качества видео. Жмем ОК. Закрываем лишние окна.
2.1.2 Память
Здесь можно включить или выключить функцию контроля памяти для автоматической чистки файлового мусора. Я отключаю, чтобы не возникло ситуации, когда я что-то закинул в корзину, а потом понадобилось оттуда достать обратно, а корзина уже очистилась автоматом. К тому же вам все равно нужно будет регулярно проводить чистку вручную, но к этому мы вернемся на этапе ухода за системой.
2.2 Устройства, автозапуск
Вкладка «Автозапуск», здесь заранее для всех съемных носителей ставим параметр «Открыть папку для просмотра файлов«, чтобы при подключении планшета/телефона и других девайсов их данные сразу открывались как со съемного носителя вроде флешки.
2.3 Персонализация
Во вкладке «Пуск» проверяем чтобы тумблер «Иногда показывать предложения в меню Пуск» был выключен.
Можете еще зайти во вкладку «Панель задач«, нажать »Включение и выключение системных значков« и отключить »Центр уведомлений«и другие ненужные значки. Остальные настройки я здесь не затрагиваю, потому что это уже больше про оформление рабочего стола. Если вам будет интересно как настроить и оформить удобный и красивый рабочий стол – дайте знать комментариях, чтобы я выпустил об этом отдельный материал.
2.4 Игры
Переходим в параметры «Игры«. Тут не обязательно все отключать, »Игровой режим» уже не влияет так негативно на систему, как это было раньше. Майки его неплохо оптимизировали и теперь это фактически аналог Shadowplay от nvidia. Возможно разберу функционал игрового режима как-нибудь отдельно, тут есть много интересных фишечек.
Но если он вам точно не нужен, то отключаем запись во вкладке «Меню игры« и во вкладке »Клипы» тоже все отключаем. Во вкладке игровой режим оставляем «Режим игры» включенным. Этот тумблер предотвращает запуск любых неприятных процессов виндоус во время игры, вроде запуска обновлений либо внезапной проверки на вирусы.
2.5 Специальные возможности
Заходим в раздел «Специальные возможности«, во вкладке »Голосовые функции« отключаем распознавание речи, а во вкладке »Клавиатура« убираем все, кроме »Сочетание клавиш: PRINT screen«. Теперь вас не будет донимать залипание клавиш и резко выкидывать на рабочий стол из игры, когда вы несколько раз быстро нажали одинаковые кнопки.
2.6 Конфиденциальность (отключение телеметрии)
Все отключаем вплоть до вкладки «Диагностика и отзывы«. Здесь выставляем »Обязательные диагностические данные«. Ниже все отключаем, ставим частоту формирования отзывов »Никогда« и »Спрашивать меня перед устранение неполадок«.
В журнале действий убираем галочки. Дальше во всех вкладках можно отключить доступ к различным функциям для виндоус и приложений. Я оставляю доступ к камере, микрофону, телефонным звонкам, обмену сообщениями, радио, другим устройствам, документам, изображениям, видео и файловой системе. Вы можете настроить под себя исходя из того, как и какие приложения вы используете.
Больше всего нас интересует вкладка «Фоновые приложения«, здесь мы полностью отключаем работу в фоновом режиме. Если вам по какой-то причине нужно, чтобы какое-то приложение работало даже в фоне, включаем тумблер, отключаем все приложения кроме нужного.
2.7 Визуальные эффекты Windows
Открываем «Свойства« компьютера, »Дополнительные параметры системы«, в окне «Быстродействия» жмем «Параметры«.
Жмем обеспечить наилучшее быстродействие, лично я оставляю галочки на «Анимация окон при свертывании и развертывании», «Вывод эскизов вместо значка», «Отображения содержимого окна при перетаскивании» и «Сглаживание неровностей экранных шрифтов». Без этих настроек мне не комфортно пользоваться системой. Вы можете настроить под себя убрав все галочки или оставив те, что вам нужны. Должен сказать, что на самом деле, если у вас актуальный производительный компьютер, то в принципе можете особо не заморачиваться здесь.
2.8 Точки восстанавления
В «Дополнительные параметры системы« переходим на вкладку »Защита системы« – »Настроить« – »Отключить защиту системы«. Таким образом отключаем точки восстановления на всех дисках.
Создание которых тоже нагружает компьютер, и как правило, в самый неподходящий момент. Учтите, что вы не сможете воспользоваться восстановлением в случае каких-то сбоев системы, чтобы сделать откат. Поэтому если вам нужна такая функция, сначала сделайте точку восстановления, а уже после этого отключайте.
2.9 Индексация дисков
Теперь открываем свойства дисков и на каждом диске поочередно убираем галочку «Разрешить индексировать содержимое файлов на этом диске«.
Актуально в основном для слабых машин либо если у вас диски с большим объемом памяти. Должен предупредить, если вы часто пользуетесь поиском виндоус, его работа может немного замедлится, но нагрузка на систему снизится. Это может занять какое-то время, так что не переживайте, что компьютер застопорился. Здесь же можно нажать «Очистка диска», поставить галочки и провести чистку диска, но нас это не сильно интересует, тк скоро мы почистим все и сразу с помощью CCleaner.
2.10 SmartScreen
Возвращаемся в параметры «Обновления и Безопасности Windows», открываем вкладку «Безопасность виндоус». Быстро забегаем в «Управление приложениями и браузером» и полностью отключаем SmartScreen, чтобы он не напрягал нас постоянными проверками всех приложений и файлов.
Также можно отключить «оптимизацию доставки», тк вряд ли вам понадобится устанавливать обновления с одного компьютера на другой в локальной сети. И службу архивации.
2.11 Встроенный Защитник Windows 10 (антивирус)
Возвращаемся в «Безопасность Windows«, выбираем »Защита от вирусов и угроз«. В режиме реального времени я использую только штатный антивирус Windows 10. При этом обычно я отключаю все его функции, кроме основной, чтобы снизить нагрузку на производительность, но не оставлять систему совсем без защиты.
Если вы все-таки хотите полностью отключить антивирус и максимально снизить нагрузку на систему, у вас не получится сделать это просто выключив тумблер. Например, это имеет смысл если у вас реально слабый ПК.
В этом случае жмите комбинацию клавиш Win+R и пишите команду gpedit.msc чтобы открыть «Редактор локальной групповой политики«.
Если выдает ошибку «Не удалось открыть объект групповой политики на этом компьютере. Возможно, у вас недостаточно прав», то открываем папку по адресу:
C:\Windows\System32\GroupPolicy\Machine
Теперь даляем файл Registry.pol (на свой страх и риск, естественно), перезагружаем ПК и все должно заработать должным образом.
В редакторе политики раздел «Конфигурация компьютера« открываем »Административные шаблоны« — »Компоненты Windows«, потом Антивирусная программа «Защитник Windows», здесь открываем «Выключить антивирусную программу Защитник Windows» выбираем «Включено», жмем ОК. Открываем «Разрешить постоянную работу службы защиты от вредоносных программ», выбираем «Отключено«, жмем ОК.
Дальше открываем папку «Защита в режиме реального времени«, здесь открываем »Выключить защиту в режиме реального времени», выбираем «Включено«, жмем ОК. Открываем »Проверять все загруженные файлы и вложения», выбираем «Отключено«, жмем ОК. Теперь у вас в параметрах защиты должна быть надпись »Параметрами защиты от вирусов и угроз управляет ваша организация» или Админ.
3.Уход за системой
3.1 Чистка вирусов антивирусом Malwarebytes
Сам я уже несколько лет пользуюсь антивирусом Malwarebytes сугубо в режиме разовой чистки с регулярностью примерно раз в 3 месяца. Вы можете делать чаще либо реже в зависимости от того, как часто у вас находятся вирусы, у меня они появляются довольно редко.
Наша дружба с Malwarebytes началась со случая, когда мне не помог CureIt от DrWeb во время напряженной вирусной атаки. Я тогда подхватил вирусище и у нас началась занятная игра в кто быстрее: он устанавливает всякий шлак со скоростью одна программа в секунду, или я это все удаляю. Тогда в поисках решения наткнулся на Malwarebytes и он сразу меня выручил. С тех пор только он, и пока ни разу не подводил. Так что могу рекомендовать его и вам. Качаем с оф сайта.
Выбираем личный компьютер, скипаем защитника браузера, нам предлагают премиум, жмем не сейчас и приступаем к работе. Здесь я обычно выключаю все тумблеры, чтобы снизить нагрузку на систему и сканирование прошло быстрее.
Делаем сканирование, смотрим нет ли там нужных файлов, которые нам нужны и мы знаем, что это, если есть – убираем галочки на них, отправляем всю нечисть в карантин.
После этого я удаляю Malwarebytes, тк на ближайшие пару месяцев он мне не нужен.
3.2 Удаление лишних программ
И теперь со спокойной душой идем удалять лишние программы. Здесь стабильно работает одно золотое правило:
Чем меньше лишнего ПО у вас установлено, тем лучше работает ваш железный друг
Открываем «Приложения«, здесь внимательно просматриваем все программы и удаляем всякий шлак. Руководствуемся принципом: »Не знаю или не использую – удалить». Только не поленитесь погуглить часть приложений, чтобы не удалить что-то нужное вроде драйверов на принтер, программы майкрософт также не надо удалять.
Приведу по памяти список самых распространенных мусорных программ на моей практике, которые являются либо подставными вирусами, либо дают излишнюю нагрузку будучи бесполезными: Web Сompanion, Avast, Kaspersky, McAfee, любые программы Comodo, различные автоматические установщики драйверов типа Driver Pack Solutions.
Также добавлю, что лично я, не использую программы Яндекс и Mail.ru, если присутствует такая возможность, тк на мой взгляд они нецелесообразно используют ресурсы ПК и в целом ведут агрессивную политику распространения часто без согласия пользователя и не только. Но на принципиальность в этом вопросе не претендую, тк понимаю, что многие используют для работы.
Во вкладке «Приложения по умолчанию» можно выбрать приложения которые будут работать, очевидно, по умолчанию, для открытия браузера, музыки, изображений и видео.
Во вкладке «Автономные карты«, если вдруг используете карты, лучше переставить расположение хранилища на второй диск, чтобы не захламлять системный диск. А так, жмем удалить карты, они могут занимать место просто так и отключаем обновление карт. Заходим в приложения для вебсайтов и отключаем карты.
3.3. Настройка автозагрузки
Можно сразу открыть диспетчер задач правой кнопкой по панели задач либо комбинацией Ctrl+Shift+Esc, открываем вкладку «Автозагрузка» и отключаем запуск всех программ, которые нам не нужны при запуске системы. Здесь имеет смысл оставлять только то, чем вы пользуетесь постоянно и всегда держите открытым.
И вообще лучше иметь привычку закрывать все лишнее, некоторые открытые программы в фоновом режиме могут существенно замедлять работу вашего компьютера.
3.4. Загрузка файлов на другой диск
Дальше рекомендую переставить загрузку скачанных файлов с основного диска на другой, если он есть. Особенно это актуально, если у вас система на SSD с небольшим объемом памяти, потому что чем больше занято места, тем хуже работает ваш накопитель. А в загрузках, как правило, остается много ненужных файлов.
Заходим в свой браузер, в моем случае это Google Chrome, открываем «Настройки«, находим раздел »Скачанные файлы«, жмем изменить и выбираем заранее созданную папку на нужном диске.
Минимум на вашем системной диске должно быть 20% свободного места, а в идеале 30-50%. Также учтите, если у вас есть привычка хранить файлы на рабочем столе, то все эти файлы числятся именно на системной диске. Разумней их тоже перекинуть на второй диск. В крайнем случае можно создать папку на другом диске и поместить ярлык этой папки на рабочий стол, если без этого никак.
3.5. Adblock — блокировка рекламы
Также рекомендую установить расширение Adblock для вашего браузера, оно блокирует рекламу на сайтах, благодаря чему страницы грузятся быстрее и легче. Для гугл хром прикрепляю ссылку на тот, которым давно пользуюсь сам.
3.6. Чистка кеша, куков, и ресстра — CCleaner
Существуют разные программы для чистки мусорных файлов, но я использую именно CCleaner. Он меня полностью устраивает и проблем с ним никогда не возникало. Так что могу его рекомендовать к использованию на постоянке.
Единственное за что могу его поругать, так это за всякий шлак, который он может иногда предлагать установить вместе с ним. Поэтому будьте внимательны и убирайте все галочки с установки ненужных программ перед тем, как принимать установку. Ссылка на скачивание.
Выбираем «Стандартная очистка«. На всякий случай убедитесь, что у вас где-то записаны все логины и пароли от аккаунтов на сайтах. Они не должны удалится, но при чистке куков всякое может быть. Жмем очистка, дожидаемся очистки.
Выбираем «Реестр«. Жмем »Поиск проблем«, дожидаемся результата, жмем »Исправить выбранное«, дальше »Исправить отмеченное«. Сохранять копию реестра необязательно, у меня ни разу не возникало проблем после чистки.
Также клинером можно удалять программы и менять автозагрузку при включении компьютера, но это мы уже сделали в самой винде. Обычно я захожу в параметры, раздел интеллектуальная чистка и убираю галочку «Включить интеллектуальную чистку и сообщать когда имеются ненужные файлы, чтобы клинер не надоедал оповещениями. Не забывайте периодически проводить чистку примерно раз в месяц.
Итоги
Удаление программных пакетов Windows, отключение служб, Win 10 Tweaker
Я бы мог добавить еще несколько пунктов, но не вижу смысла в удалении отдельных программных пакетов виндоус через powershell. Это было актуально только на старта выхода Windows 10. Сейчас все достаточно хорошо оптимизировано, поэтому в этом нет такой потребности.
Тоже самое по поводу отключения служб вроде внутренней службы факса и подобных. Касательно отдельных программ таких как Win 10 Tweaker, их настройки могут слетать после обновлений виндоус.
Поймите меня правильно, это все можно использовать, но на мой взгляд, в этом есть смысл только если есть конкретная задача, которую решает только подобный подход, в других случаях – это уже лишние движения.
Подытожим
Я постарался максимально доступно показать, как дать вашей системе возможность работать на полную и охватить все что касается непосредственно настройки Windows 10. Самое главное: не устанавливать откровенно шлаковое ПО, своевременно удалять мусор и обновлять виндоус + драйвера. Остальное можно сказать опционально. Конечно, кроме этого, нужно следить за температурой железа и проводить профилактику с чисткой пыли и заменой термопасты чтобы все показатели были в норме.
Пришло время запускать игры и проверять на сколько поднялся ваш ультра геймерский фпс. Если что-то упустил — будет интересно прочитать об этом в комментах. На этом у меня все, пусть ваше железо приносит вам пользу.
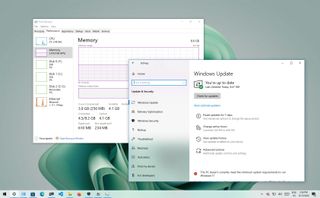
(Image credit: Future)
Although Windows 10 is a fast operating system, the performance will start degrading at some point due to many factors, including compatibility issues and bugs, viruses or other types of malware, hardware problems, and more.
If your computer is getting slower, it does not necessarily mean you have to replace it with a new system. Simple software and hardware tweaks can significantly speed up the Windows 10 experience.
This guide will walk you through a long list of ways to speed up, optimize, and improve the performance of your computer — whether it has an older or modern hardware configuration.
1. Restart computer
Shutting down and restarting your computer is perhaps one of the first things you can do to speed up the system. (It might be obvious, but it’s not the first thing that usually comes to mind.)
When the device restarts, the computer usually terminates the applications and processes. The data loaded into memory also gets cleared, which helps to resolve everyday performance and stability issues due to keeping the operating system running for a long time.
To shut down and restart your computer to speed up Windows 10, use these steps:
- Open Start.
- Click the Power button.
- Select the Shut down option.
- Quick tip: The «Sleep» or «Hibernate» options do not reset the system or clear the data in memory.
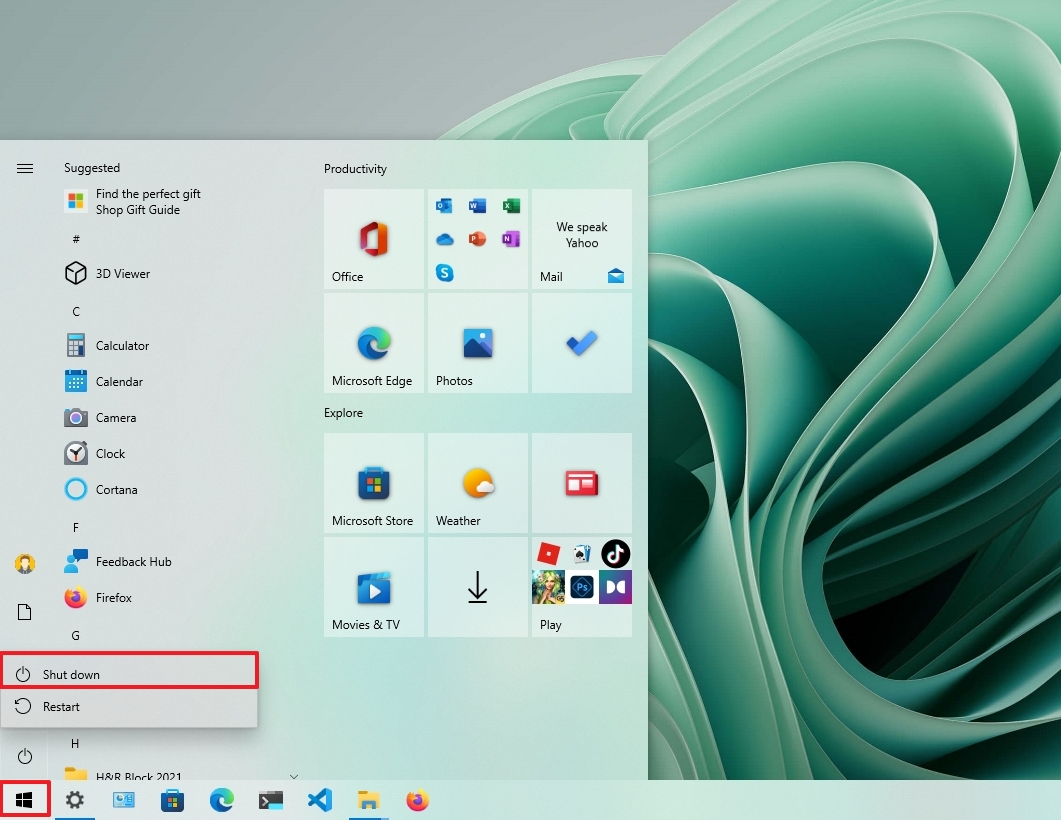
- Press the power button to turn on the computer.
After you complete the steps, Windows 10 will restart, and this time the performance should be noticeably improved.
2. Disable startup apps
On Windows 10, many apps can register themselves to start automatically during startup and continue to run in the background, wasting system resources that can slow down the experience.
When you try to speed up Windows 10, it’s recommended to disable all the apps running at startup, or at least those you do not use regularly.
To disable apps at startup on Windows 10 to speed up the system, use these steps:
- Open Settings.
- Click on Apps.
- Click on Startup.
- Click the Sort by menu and select the Startup impact option.
- Turn off the toggle switch for any unnecessary app (especially those marked as «High impact» by the system).
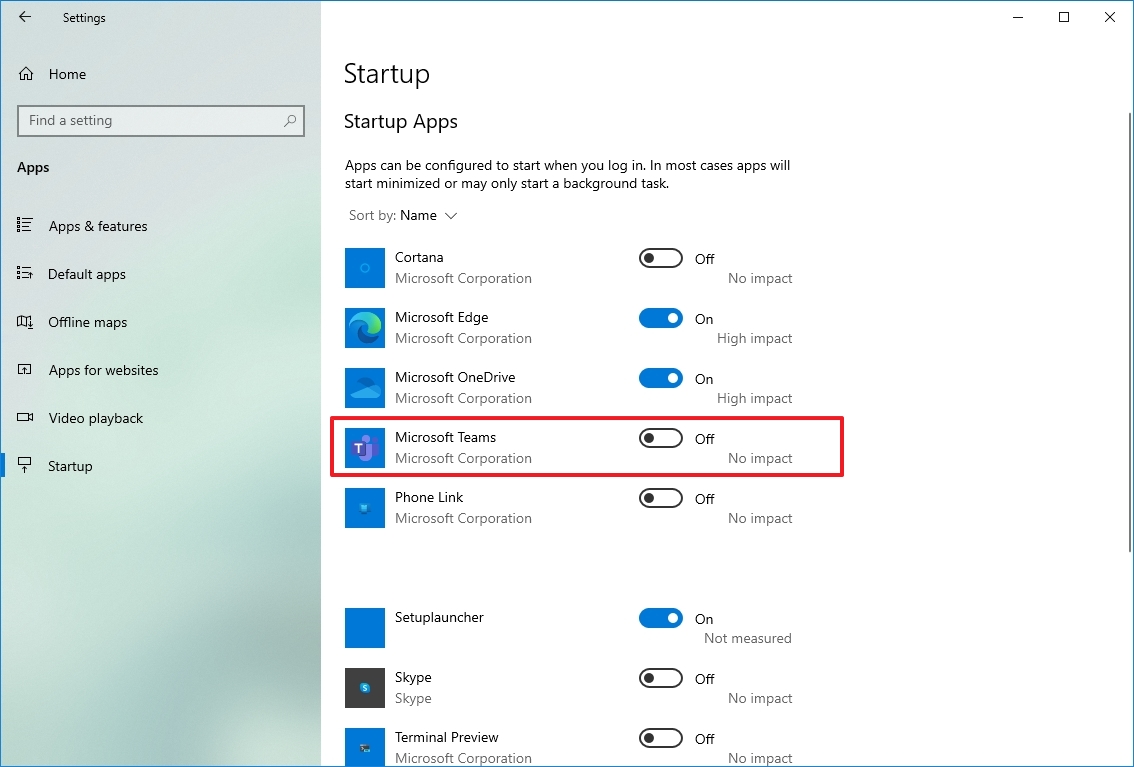
- Restart your computer.
Once you complete the steps, the computer should start faster than before. Of course, the improvement gain will vary depending on the apps you disabled and hardware configuration.
3. Disable apps relaunch on startup
Windows 10 has a feature that restarts the apps from your last session after a reboot, even before you sign in. Although this is a convenience feature that can speed up the process of quickly resuming where you left off, it can also impact system performance.
If the feature to restart apps at startup is enabled, you can disable it with these steps:
- Open Settings.
- Click on Accounts.
- Click on Sign-in options.
- Under the «Restart apps» section, turn off the toggle switch.
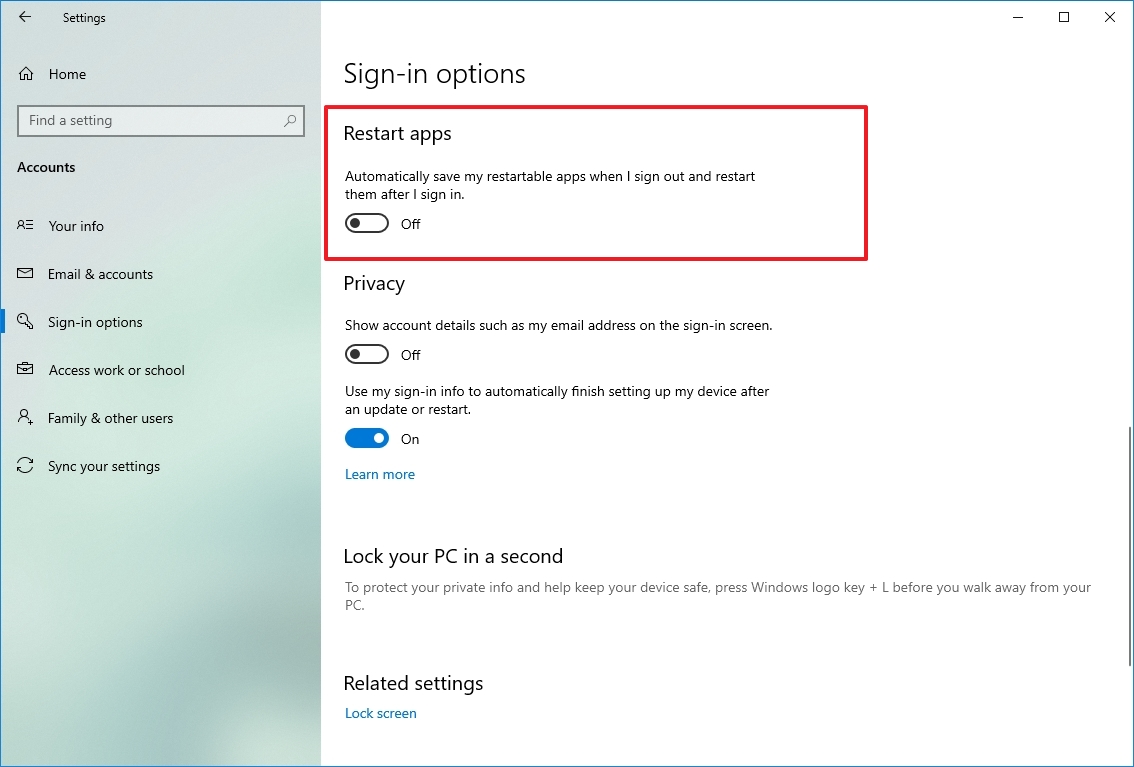
After you complete the steps, the apps running on the desktop won’t reopen during the next restart, speeding up the overall system performance.
4. Disable background apps
On Windows 10, some apps can continue to run tasks in the background even when you’re not using them. If you want to speed up your computer as much as possible, you can decide which apps can operate in the background or disable the feature to block all apps.
To stop apps from running in the background to speed up Windows 10, use these steps:
- Open Settings.
- Click on Privacy.
- Click on Background apps.
- Turn off the toggle switch for the apps you want to stop running in the background.

- (Optional) Turn off the «Let apps run in the background» toggle switch to disable the feature for all modern apps (excluding win32 apps).
Once you complete the steps, apps will not waste any more resources when you do not actively use them to increase system performance.
5. Uninstall non-essential apps
Typically, new devices come with applications you do not need, including the usual bloatware and system tools you will never use, which will only waste space on the drive and resources. When trying to increase the system performance, you should always remove those non-essential applications.
To uninstall non-essential apps on Windows 10, use these steps:
- Open Settings.
- Click on Apps.
- Click on Apps & features.
- Select the app to remove.
- Click the Uninstall button.
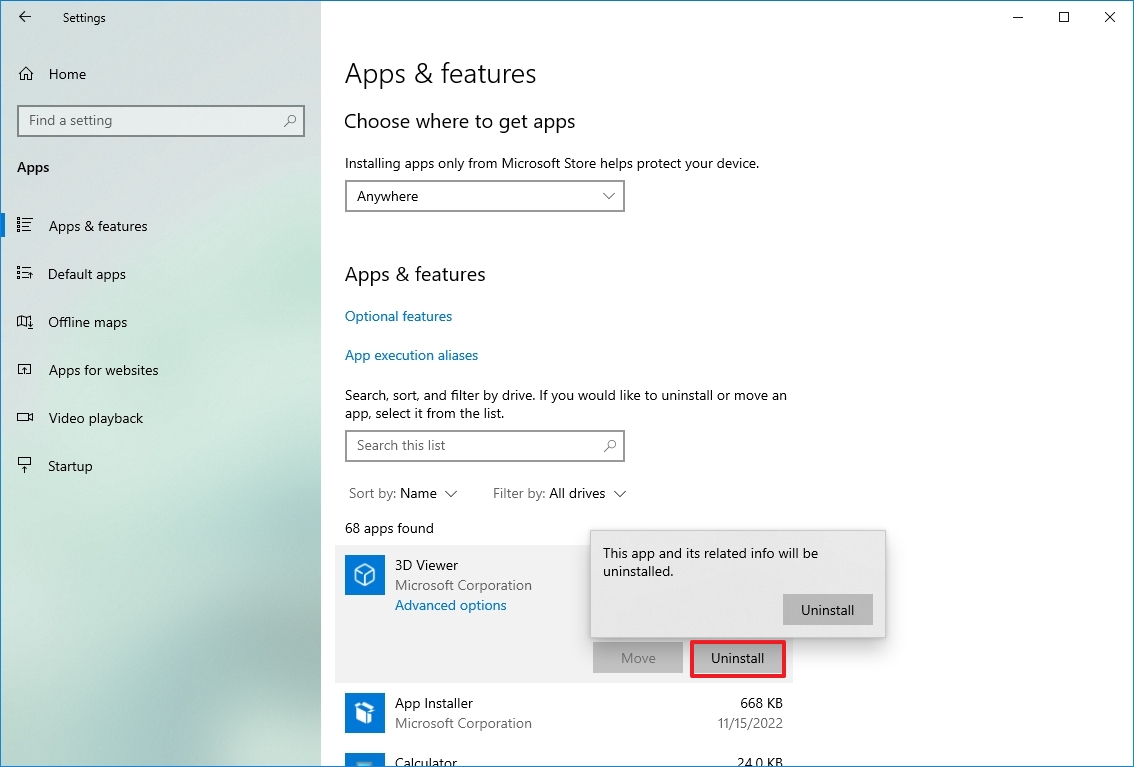
- Click the Uninstall button again. Or continue with the on-screen directions to finish removing the app.
After you complete the steps, you may need to repeat the instructions to uninstall other non-essential apps from the device.
6. Install quality apps only
Old and poorly designed apps and apps that load unnecessary features can negatively affect the performance of your computer. Also, just because an app comes from a company you trust does not mean it’s a good app.
Only install good apps if you want to keep your device healthy and snappy. Typically, you want to install apps available from the Microsoft Store because they’ve been reviewed for security and performance. If the app is not in the store, only download apps from trusted sources and confirm they work on Windows 10.
If you are unsure, you can research online to get more information about the app. For example, you can check the software vendor’s forums to check whether users are experiencing issues or post a question in the forums to find out more details.
To install apps from the Microsoft Store on Windows 10, use these steps:
- Open Microsoft Store.
- Use the search box to find an app.
- Select the app from the result.
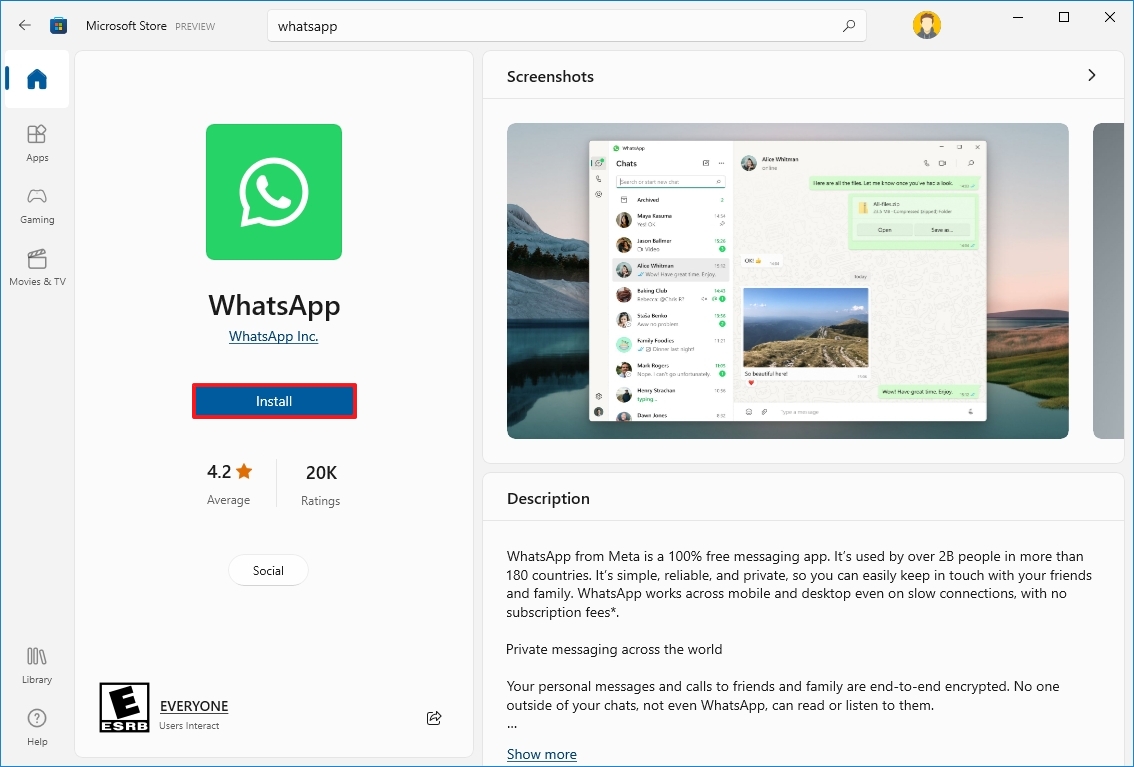
- Click the Install button.
Once you complete the steps, the app will install on your device. If the app is not in the Microsoft Store, download the installer from the trusted source, and follow the vendor support website steps to install and configure the program.
7. Clean up hard drive space
Whether you have a traditional Disk Hard Drive (HDD) or Solid-State Drive (SSD), it’s never wise to run Windows with a full hard drive because it will affect performance.
If the device has relatively new hardware and you notice apps, managing files, and other tasks are struggling to complete, it is likely because the drive is running out of space. Usually, this becomes more evident after the drive is filled with around 70 percent of the total capacity.
One way to prevent the storage from impacting performance is to use the Storage settings to delete temporary and unnecessary files to reclaim space.
To free up space with to speed up Windows 10, use these steps:
- Open Settings.
- Click on System.
- Click on Storage.
- Under the «Local Disk» section, click the Temporary files option. (If you do not see the option, click the «Show more categories» option to view the remaining items in the list.)
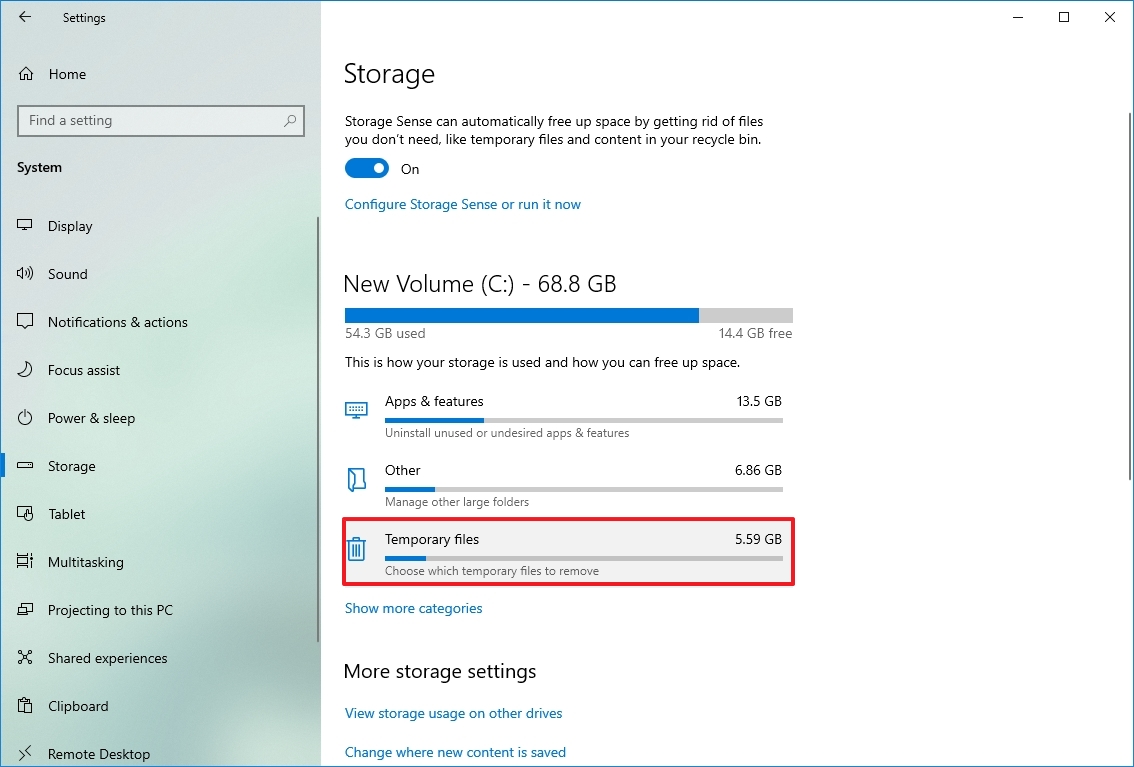
- Check the files you want to delete to reclaim space and improve system performance.
- Quick tip: When selecting the temporary files, remember that checking the Downloads option will delete everything inside the «Downloads» folder. If you want to keep these files, do not check this option. Also, you can select to delete the «Previous Windows Installation(s)» item (if applicable).
- Click the Remove files button.
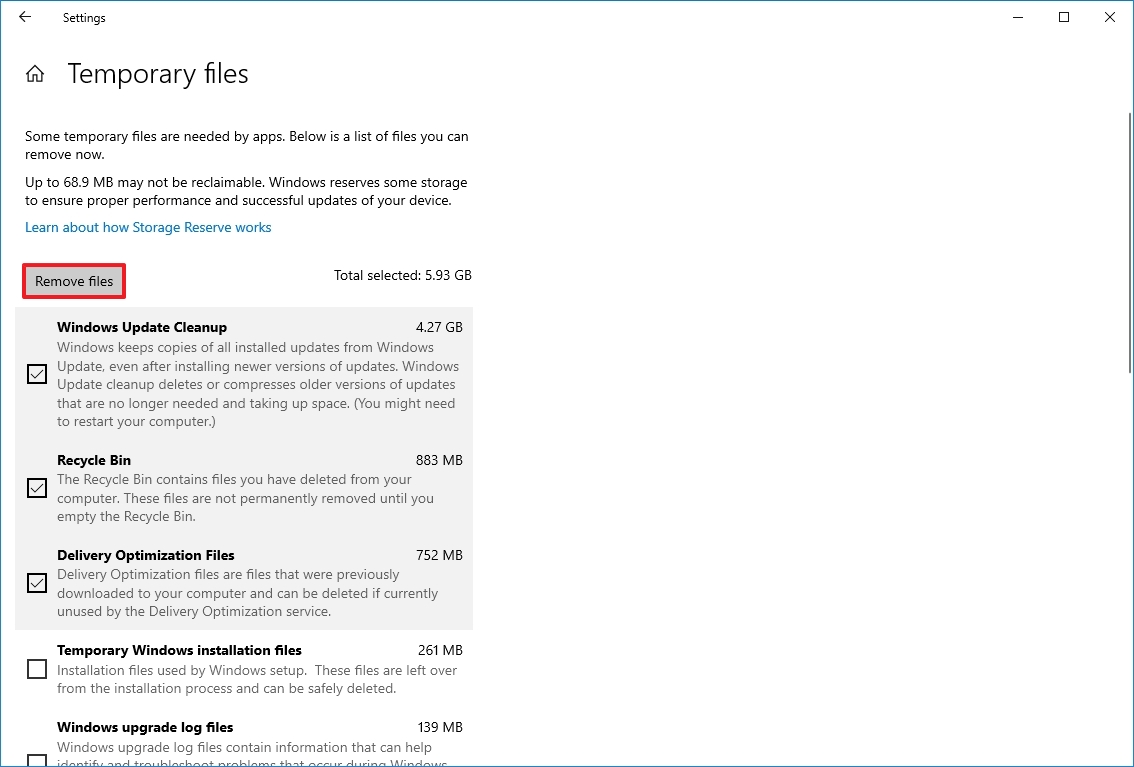
Once you complete the steps, the device’s performance should be noticeably improved if the system can reclaim enough space.
In addition to using the Storage settings, you can also use the OneDrive Files On-demand feature to free up space. You can use these instructions to set up Files On-demand on your device.
If you cannot reclaim enough space, use this guide to find more ways to optimize the storage on your computer.
8. Use drive defragmentation
Organizing the data can increase responsiveness if you have a computer with older hardware and a traditional rotating platters hard drive.
To run the defragmentation tool to speed up the system drive, use these steps:
- Open Settings.
- Click on System.
- Click on Storage.
- Under the «More storage settings» section, click the Optimize Drives option.
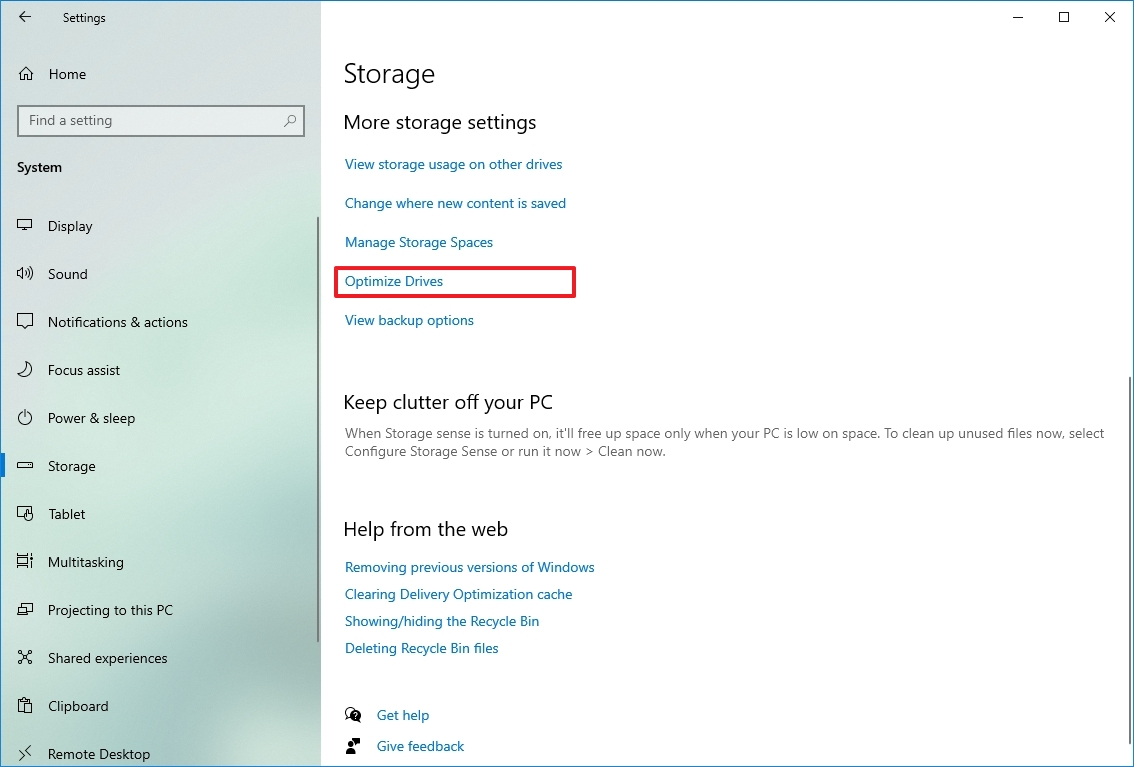
- Select the drive that needs defragmentation.
- Click the Optimize button.
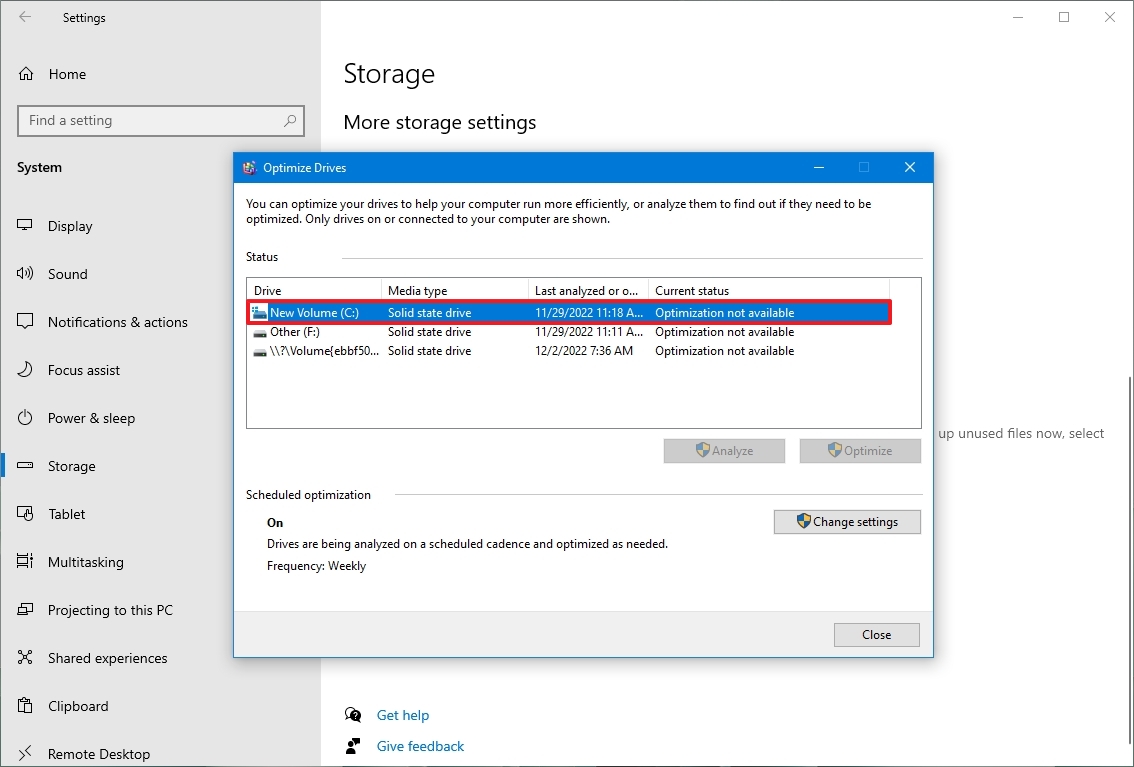
After you complete the steps, the tool will rearrange the files to make them accessible more quickly the next time they are needed, translating into noticeable performance improvement. The only caveat is that the process can take a long time, depending on the data stored on the drive. (If you have an older system, it is best to leave the process running overnight.)
If you have a computer with an SSD, using the defragmentation tool will run the trim command to inform the storage device of the blocks with data that can be safely erased. This process can significantly improve performance because the drive won’t have to erase the blocks during the writing data process.
9. Configure ReadyBoost
In addition, to use the defragmentation tool on computers with older hardware, you can also use the ReadyBoost feature to boost performance.
ReadyBoost is not new to Windows 10. It’s been around for years as a feature that uses a flash drive or SD card to cache files to boost the overall system performance. (If the device has an SSD, this feature won’t be available since it won’t offer additional benefits.)
To enable ReadyBoost to speed up your computer, connect a USB flash drive and use these steps:
- Open File Explorer.
- Click on «This PC» from the left pane.
- Under the «Devices and drives» section, right-click the USB flash drive and select the Properties option.
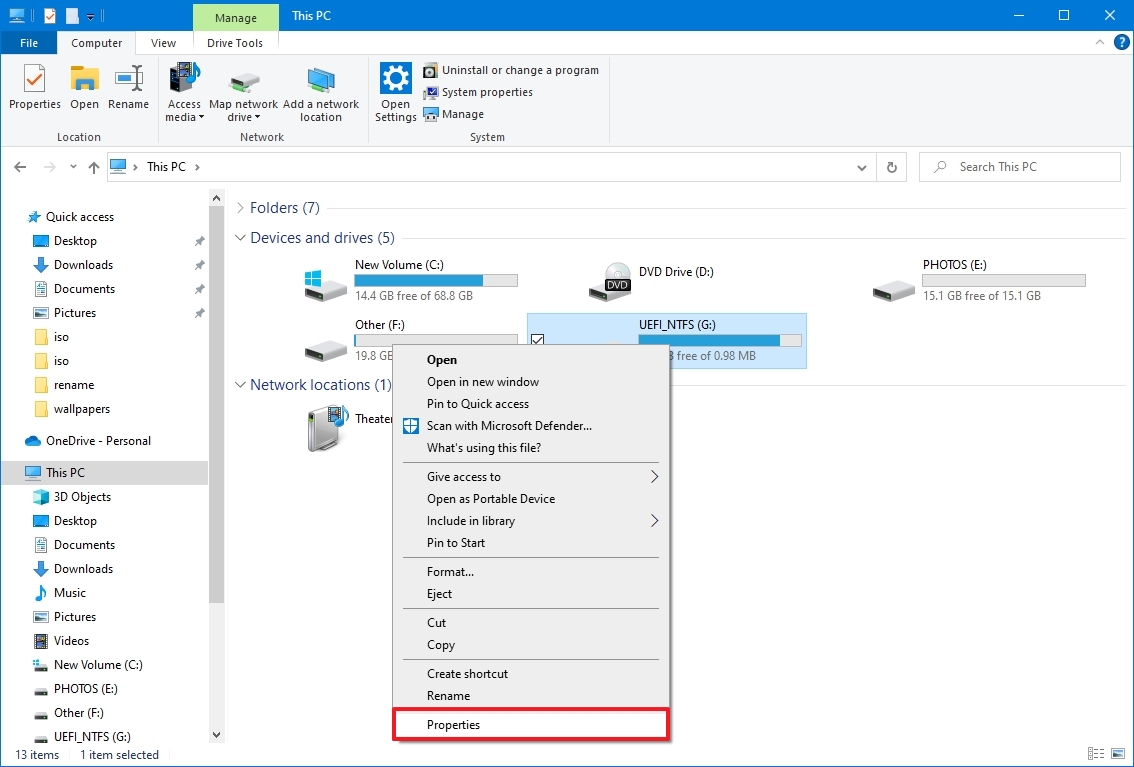
- Click on the ReadyBoost tab.
- Select the «Dedicate this device to ReadyBoost» option.
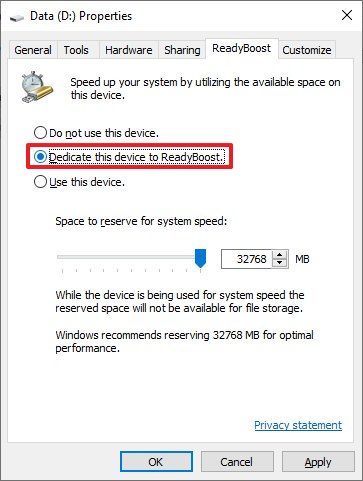
- Click the Apply button.
- Click the OK button.
Once you complete the steps, the removable drive should help boost the computer’s performance.
We recommend the SanDisk Extreme Go if you need a USB flash drive to use with ReadyBoost because of its storage capacity, reliability, and price.
Reliable storage
The SanDisk Extreme Go (CZ800) is an excellent choice to use with the ReadyBoost feature. The USB drive offers up to 128GB of storage with fast transfer speeds of up to 200MB/s, it’s backed by a strong brand, and it is affordable.
10. Perform malware scan
When a device starts to run very slowly, this could indicate a malware infection. Typically, viruses, spyware, and other malware types are known to take up many system resources making a device unusable.
Although Windows 10 comes with the Microsoft Defender Antivirus, it does not guarantee that malware will make its way into the system. If you suspect the device has been infected, you should try running a full virus scan.
To run a full virus scan on Windows 10, use these steps:
- Open Start.
- Search for Windows Security and click the top result to open the app.
- Click on Virus & threat protection.
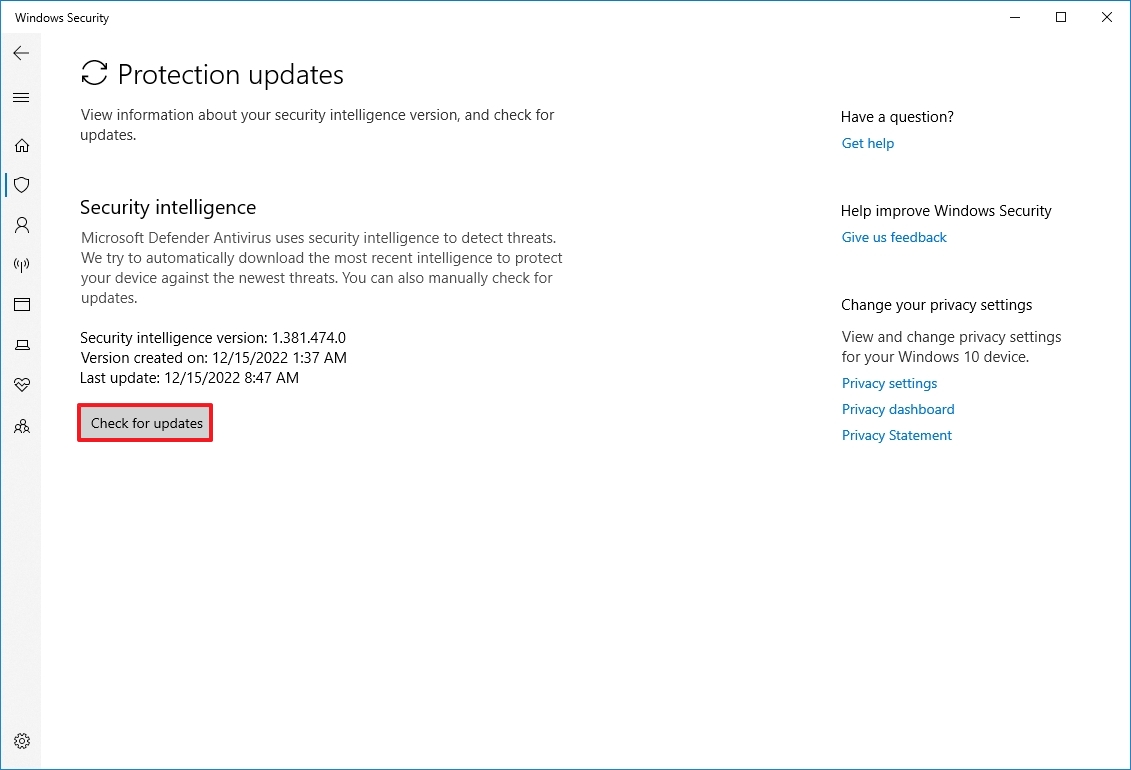
- Under the «Virus & threat protection updates» section, click the «Check for updates» option.

- Click the Check for updates button.
- Click on Virus & threat protection from the left pane.
- Under the «Current threats» section, click the Scan options option.
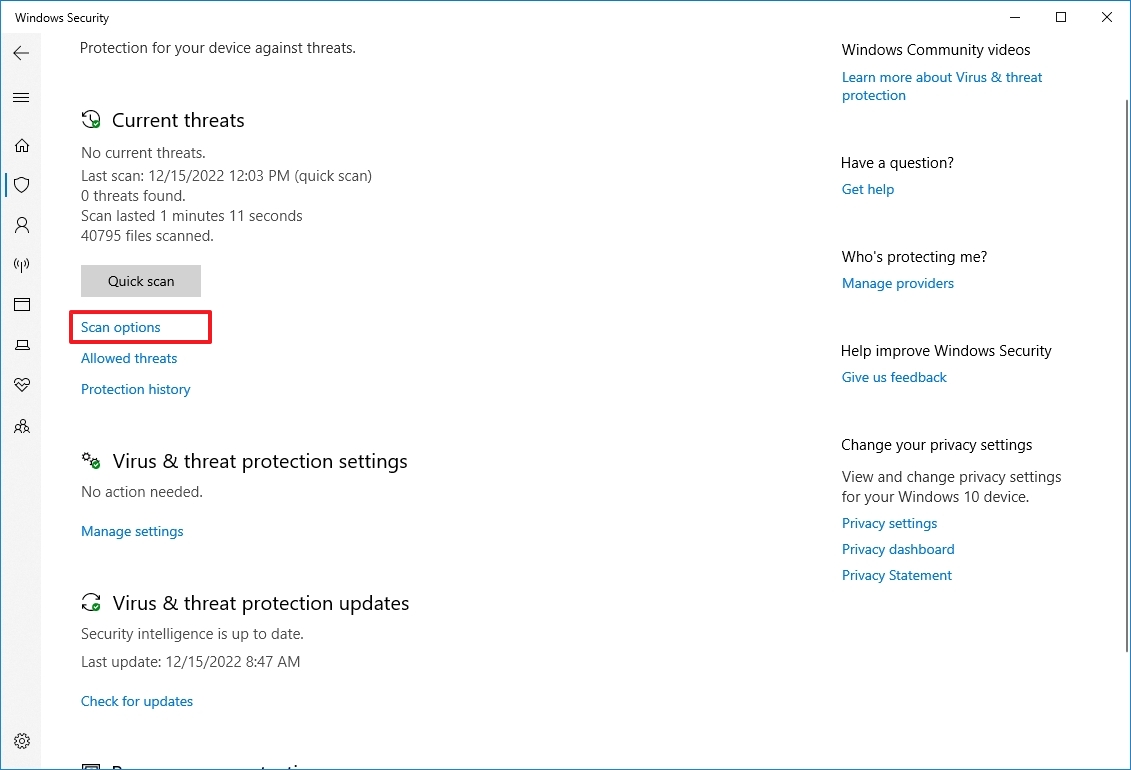
- Select the Full scan option.
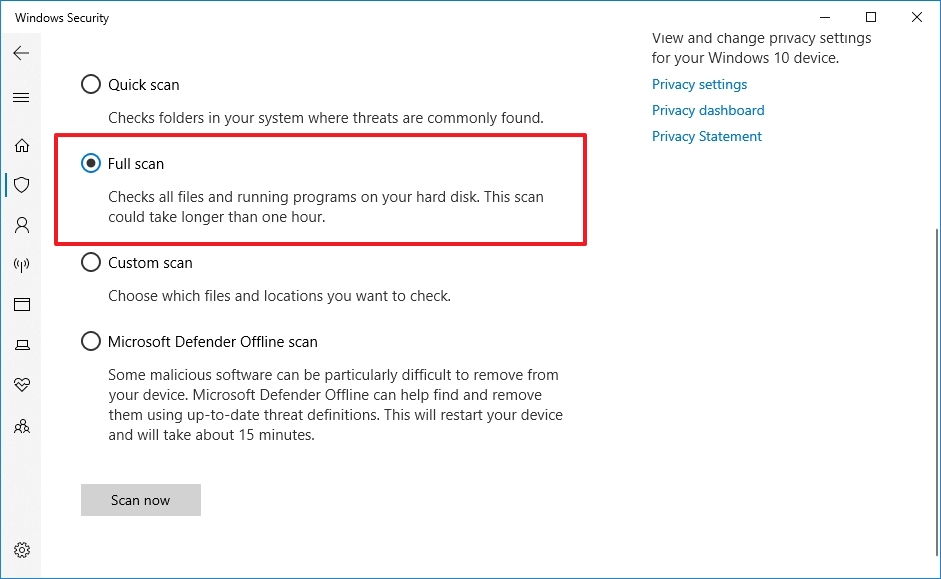
- Click the Scan now button.
After you complete the steps, Microsoft Defender Antivirus should detect and remove any malware impacting performance.
Microsoft Defender Offline scan
If you cannot use the default antivirus because it’s not running, updates don’t work, or scanning problems, the device probably has one of those tricky malware that cannot be removed while the system is running. If this is the case, the antivirus can perform an offline scan.
To complete a Microsoft Defender Antivirus offline scan, use these steps:
- Open Start.
- Search for Windows Security and click the top result to open the app.
- Click on Virus & threat protection.
- Under the «Current threats» section, click the Scan options option.
- Select the «Microsoft Defender Offline scan» option.
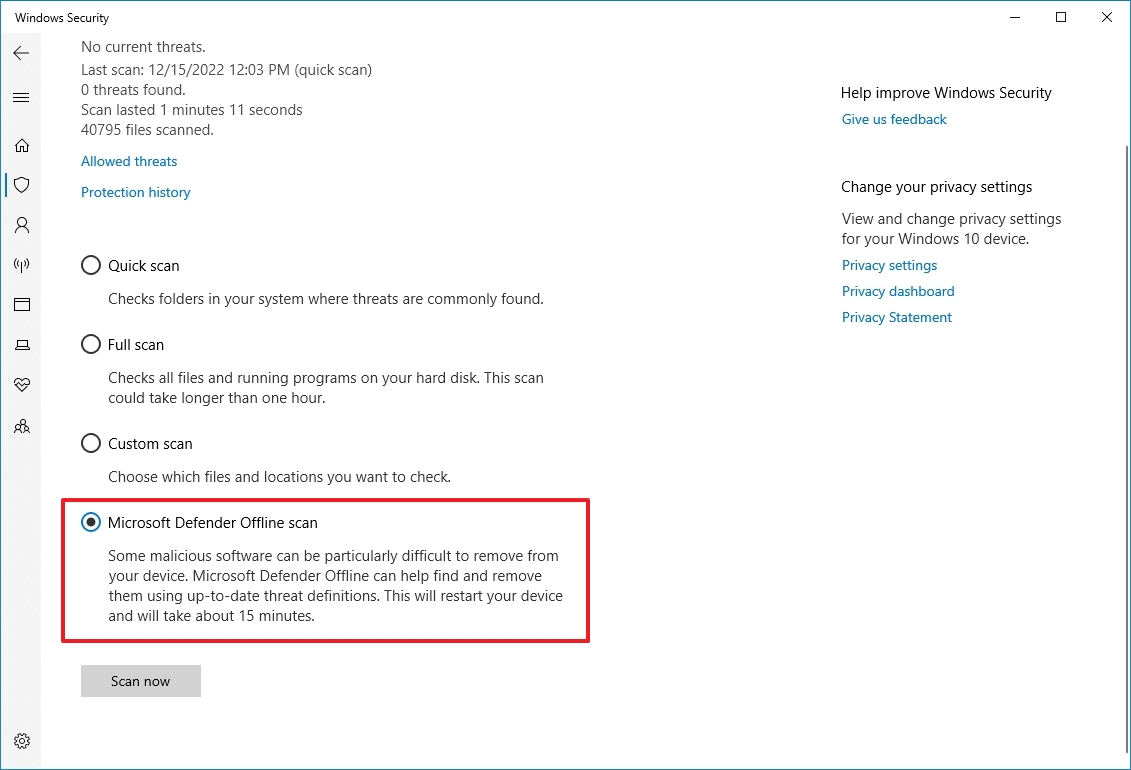
- Click the Scan now button.
Once you complete the steps, the system will automatically restart into the offline experience of Microsoft Defender, and it will perform a scan to detect and remove any threats that could not be removed while Windows 10 was running.
If you use other anti-malware solutions like Malwarebytes, Bitdefender, Trend Micro, or Norton, check their support documentation to remove viruses and other malicious programs.
11. Install latest update
Microsoft proactively releases updates to address problems, add new features, and patch security vulnerabilities. While sometimes updates are the reason for things not working correctly, maintaining the update can speed up your computer.
Install cumulative updates
On Windows 10, updates happen automatically, but depending on the update or the device’s configuration, they don’t always download and install as soon as they become available. If your computer is running slower than usual, it could be possible that an update is available to improve performance.
To install updates manually on Windows 10, use these steps:
- Open Settings.
- Click on Update & Security.
- Click on Windows Update.
- Click the Check for updates button.
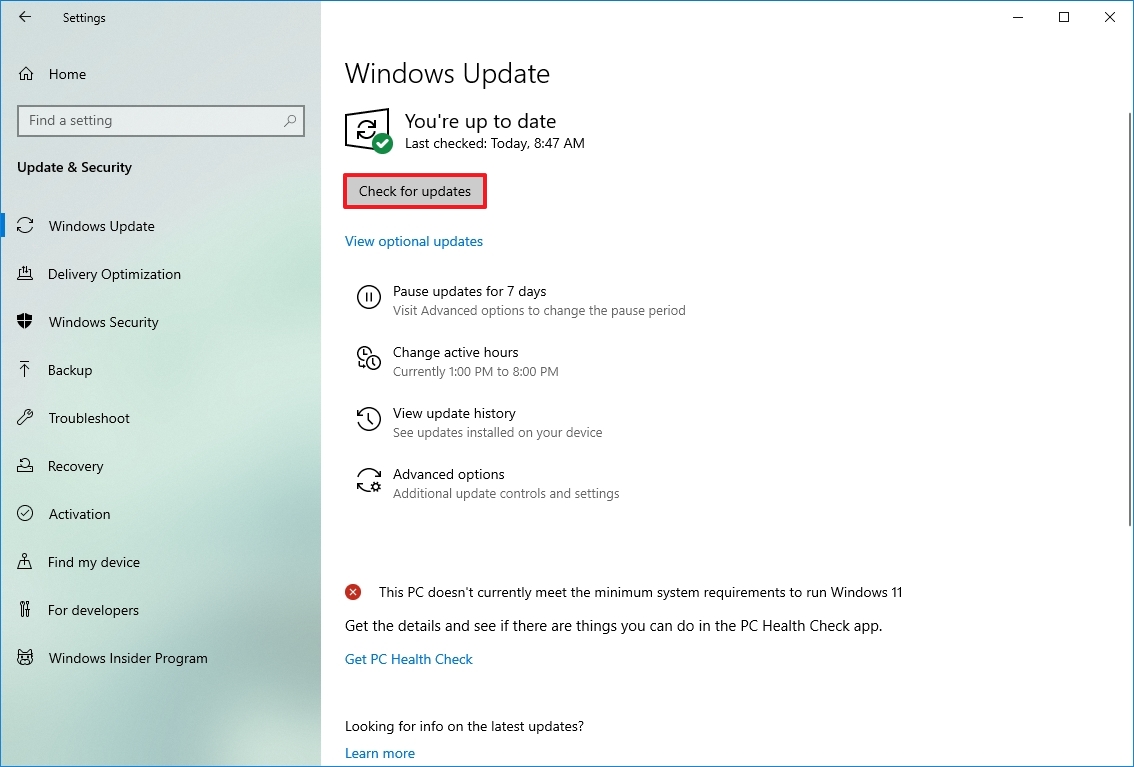
- (Optional) Under the «Optional updates available» section, click the «Download and install now» option if there’s a cumulative update available.
- Click the Restart now button.
After you complete the steps, the new update should help to improve system performance.
Upgrade to latest version
If the device has an older version of Windows 10, upgrading to the most recent version can help speed up the performance or introduce new features that could make you more productive to get work done faster.
To upgrade to the most recent version of Windows 10, use these steps:
- Open Settings.
- Click on Update & Security.
- Click on Windows Update.
- Click the Check for updates button.
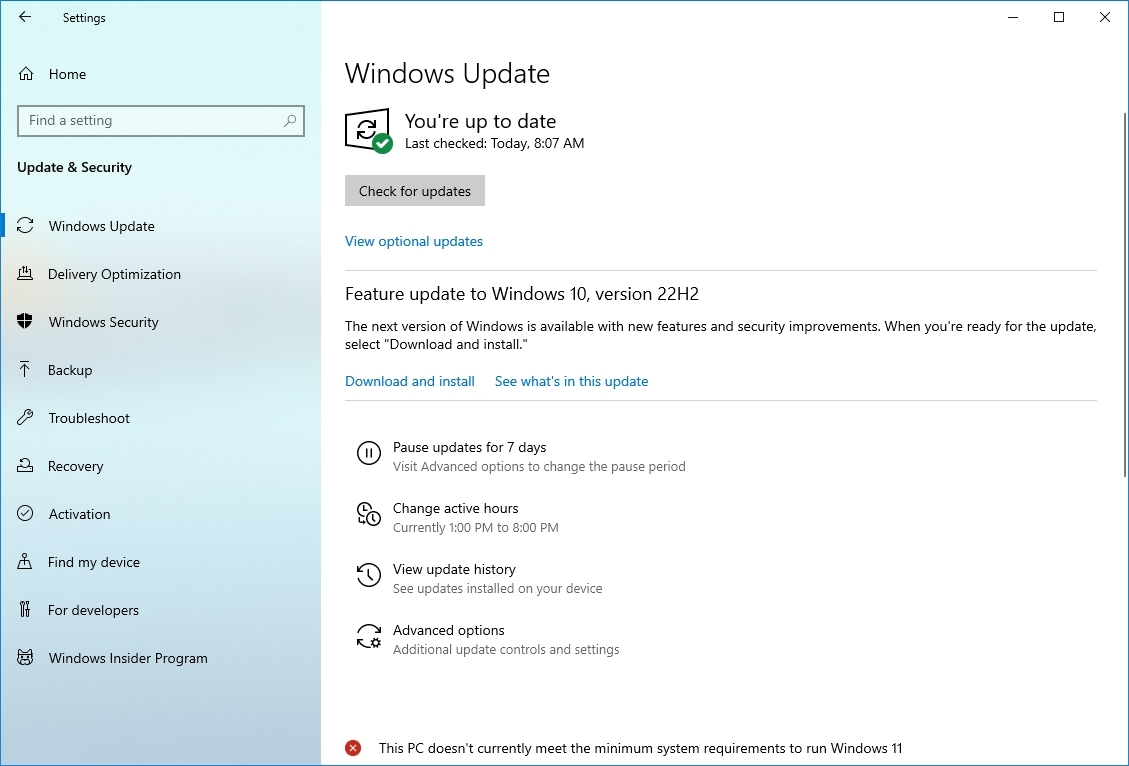
- Under the «Feature Update» section, click the «Download and install» option if a new version is available. (If the option is unavailable, the computer already has the most recent version installed, or the latest version is not yet fully compatible with your hardware configuration.)
- Click the Restart now button.
Once you complete the steps, the device will restart to apply the new version, improving the overall system performance.
Update device drivers
If your computer is running slow because of a compatibility issue or a poorly designed driver, you could resolve the issue by installing the most recent or pre-release version of the driver from the manufacturer’s support website manually.
Before proceeding, you need to download the latest available driver package from the manufacturer’s website, uncompress the files using the self-extracting or .zip extension file, and then use these steps:
Quick note: It is recommended to use the manufacturer support website instructions to complete this task. If instructions are not available, you can refer to the steps below.
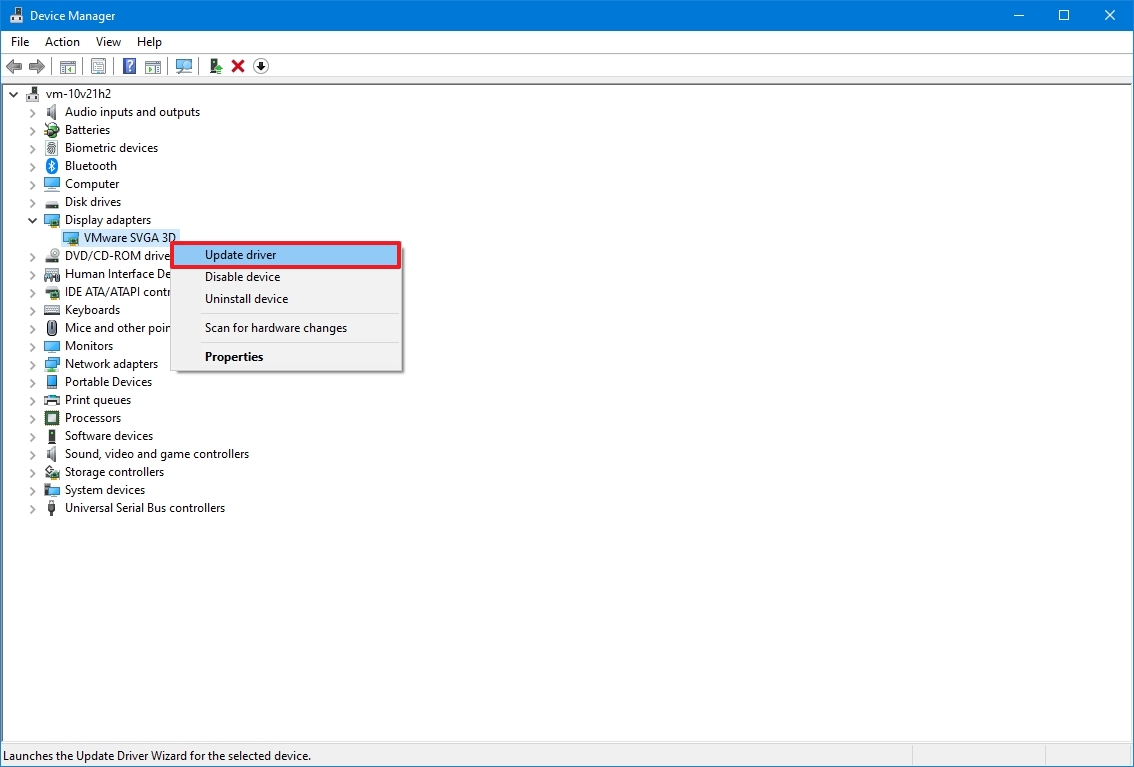
- Open Start.
- Search for Device Manager and click the top result to open the app.
- Expand the branch for the device driver causing problems. For example, Display adapters.
- Right-click the device and select the Update driver option.
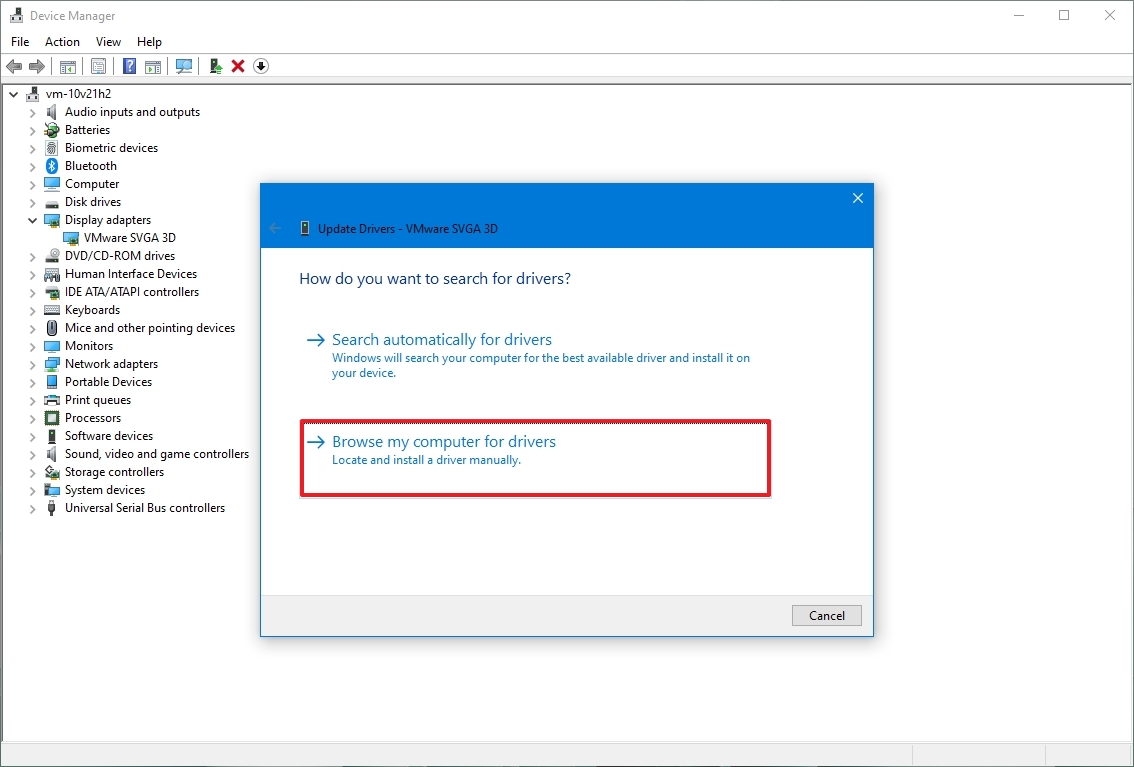
- Click the «Browse my computer for driver software» option.
- Under the «Search for drivers in this location» section, click the Browse button.
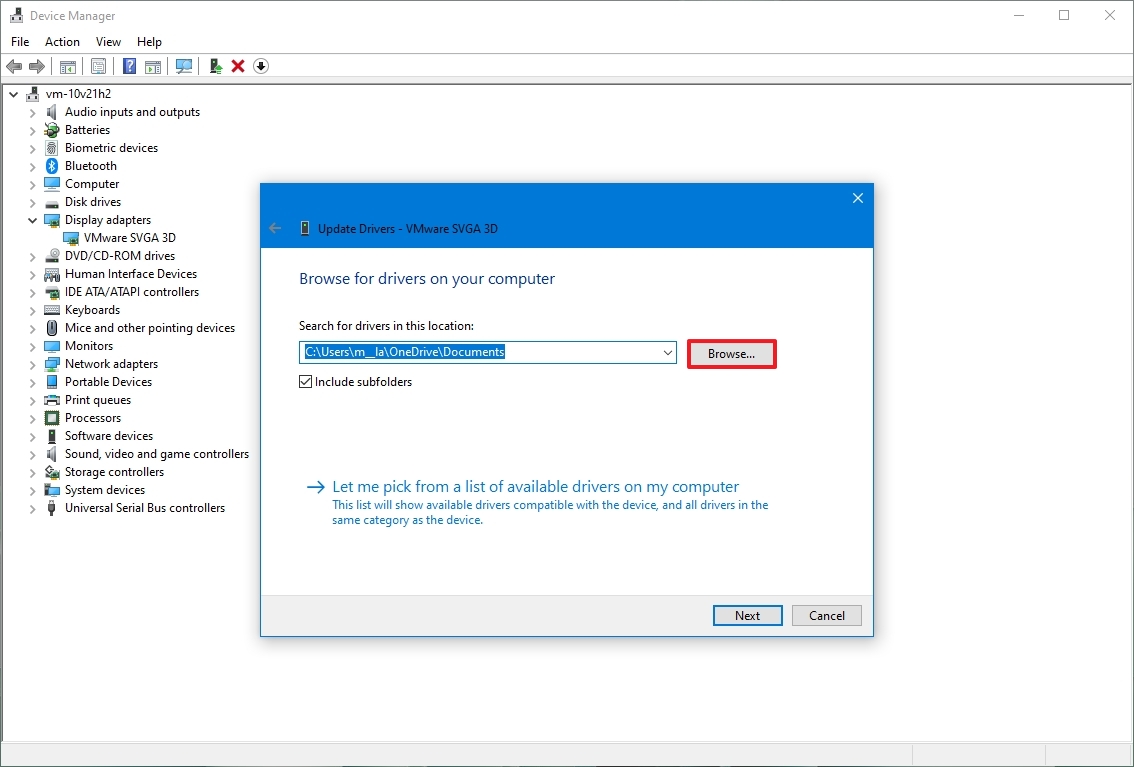
- Select the folder with the device driver installation files.
- Click the OK button.
- Click the Next button.
- Click the Close button.
After you complete the steps, the new version of the driver will install to fix compatibility or any other issues affecting the system and boost performance.
On Windows 10, there are multiple ways to update device drivers. If you need additional assistance, you can use this guide outlining different methods to update a driver manually.
Update applications
Outdated apps can slow down a computer, usually due to bugs or compatibility problems with a newer version of Windows 10.
While apps from the Microsoft Store can update automatically, you have to install updates manually for many traditional desktop apps. If you have an app affecting performance, check your software support website for a newer update and the instructions to apply it.
To update Microsoft Store apps manually on Windows 10, use these steps:
- Open Microsoft Store.
- Click the Library button from the bottom-left corner.
- Click the Get updates button.
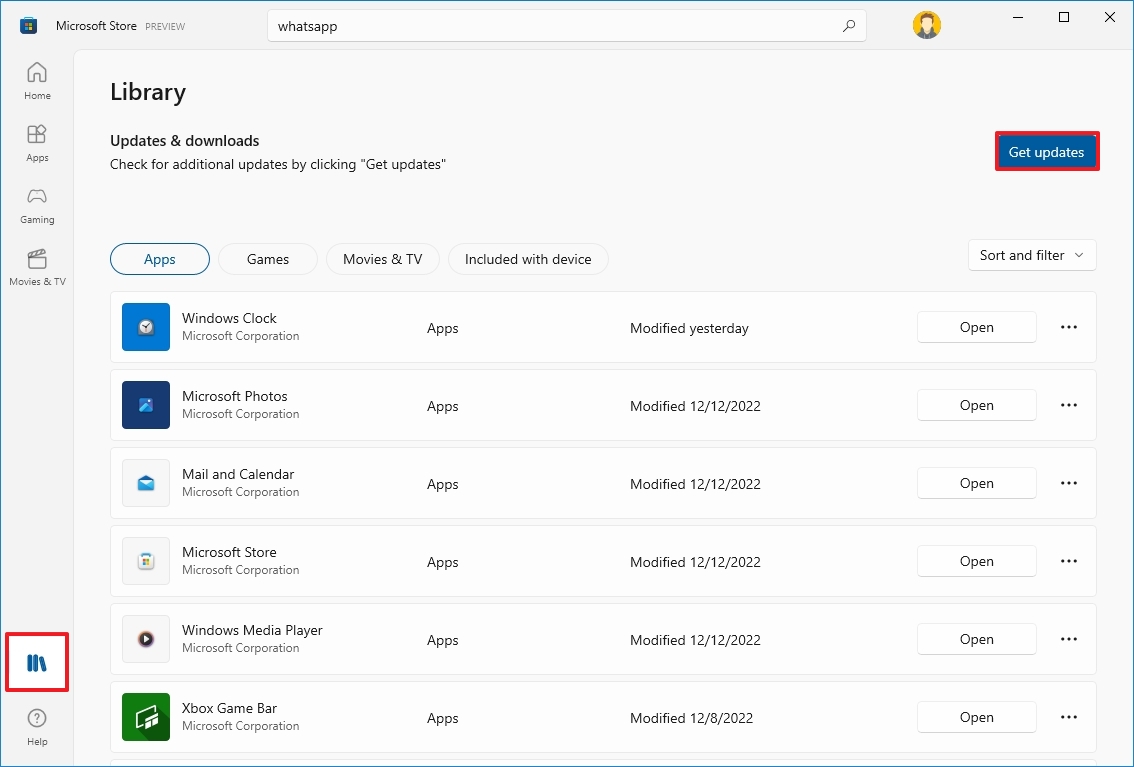
Once you complete the steps, if updates are available, they will download and install automatically.
12. Switch to high performance power plan
Windows 10 includes different plans (Balanced, Power saver, and High performance) to optimize the power usage on your computer. If you want to boost the system performance, use the «High performance» option since it allows the device to use more power to operate faster.
To select a new power plan on Windows 10, use these steps:
- Open Settings.
- Click on System.
- Click on Power & sleep.
- Under the «Related settings» section, click the «Additional power settings» option.
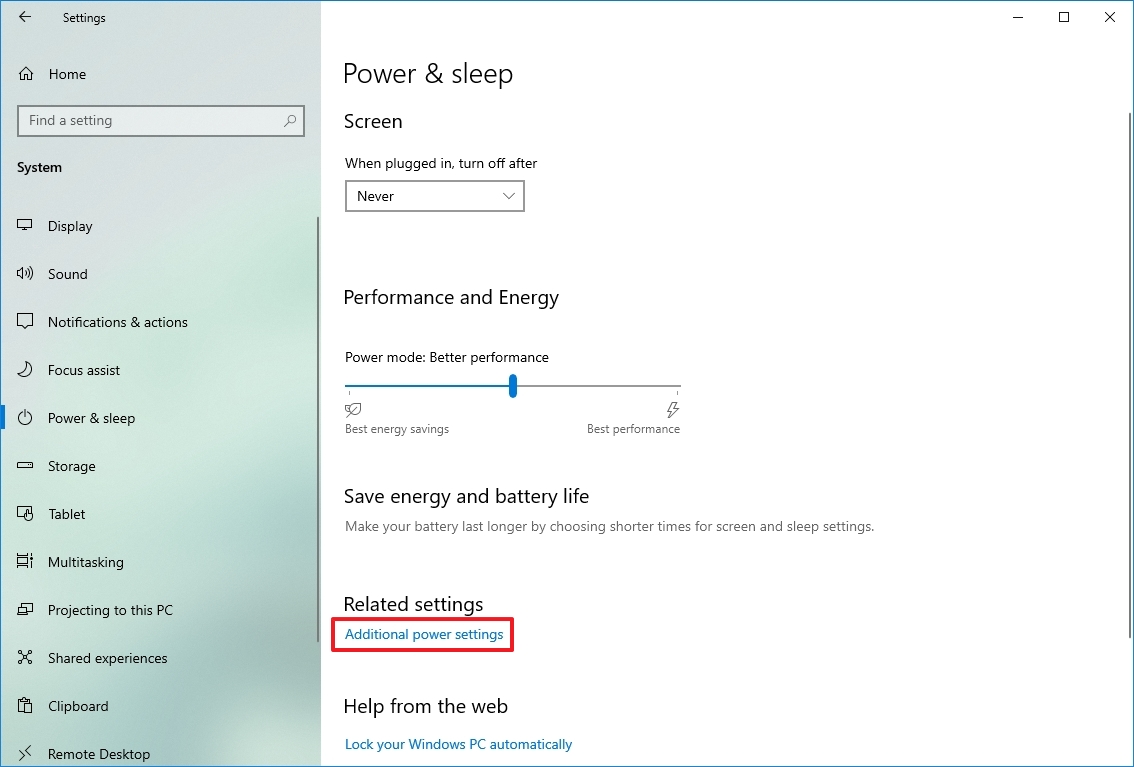
- Click the «Show additional plans» option (if applicable).
- Select the «High-performance power» plan.
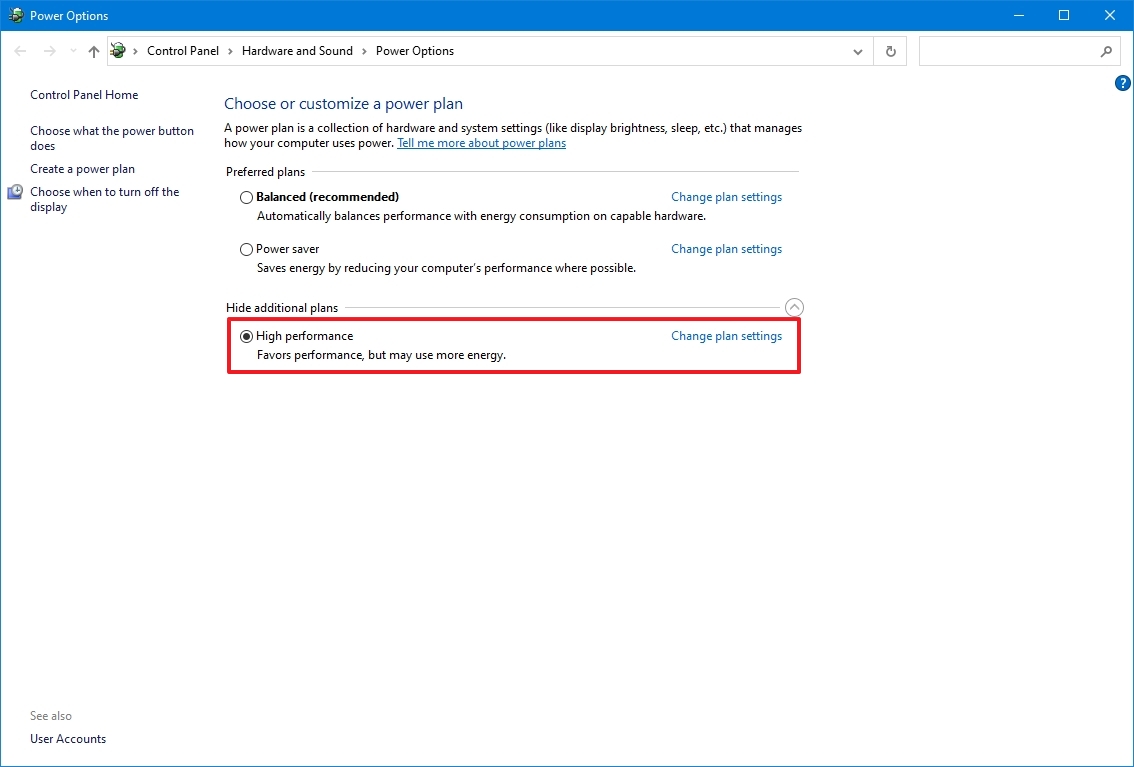
If you don’t see any plans, you may need to create a custom power plan to improve performance using the «High performance» settings.
On laptops, you can also change the mode to increase performance by tapping or clicking the battery icon in the taskbar’s notification area and selecting the Best performance option using the slider.
13. Disable system visual effects
On Windows 10, you will find many visual effects, from animations to shadows to more advanced visual elements, such as blur and transparency, and part of the Fluent Design language.
Although these effects can make the experience more visually appealing, they also require resources that can slow down computers with older hardware. However, you can disable these effects to save resources and make Windows 10 feel faster.
Disable visual effects
To disable animations, shadows, smooth fonts, and other effects on Windows 10, use these steps:
- Open Settings.
- Click on System.
- Click on About.
- Under the «Related settings» section, click the «Advanced system settings» option from the right pane.

- Click the Advanced tab.
- Under the «Performance» section, click the Settings button.
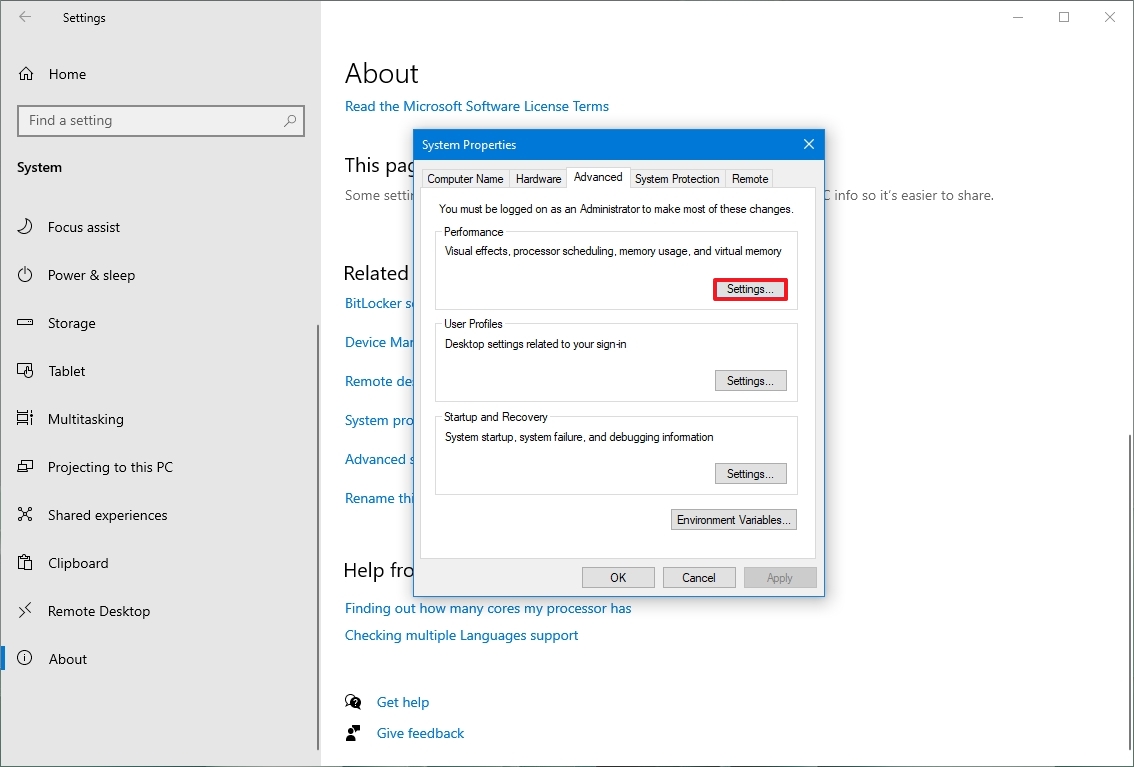
- Click the Visual Effects tab.
- Select the «Adjust for best performance» option to disable all the effects and animations.
- Quick tip: Using this option will also affect the way fonts are rendered. If you want to keep fonts crisp and more readable, select the Custom option, clear all the settings, but leave the «Smooth edges of screen fonts» option checked.
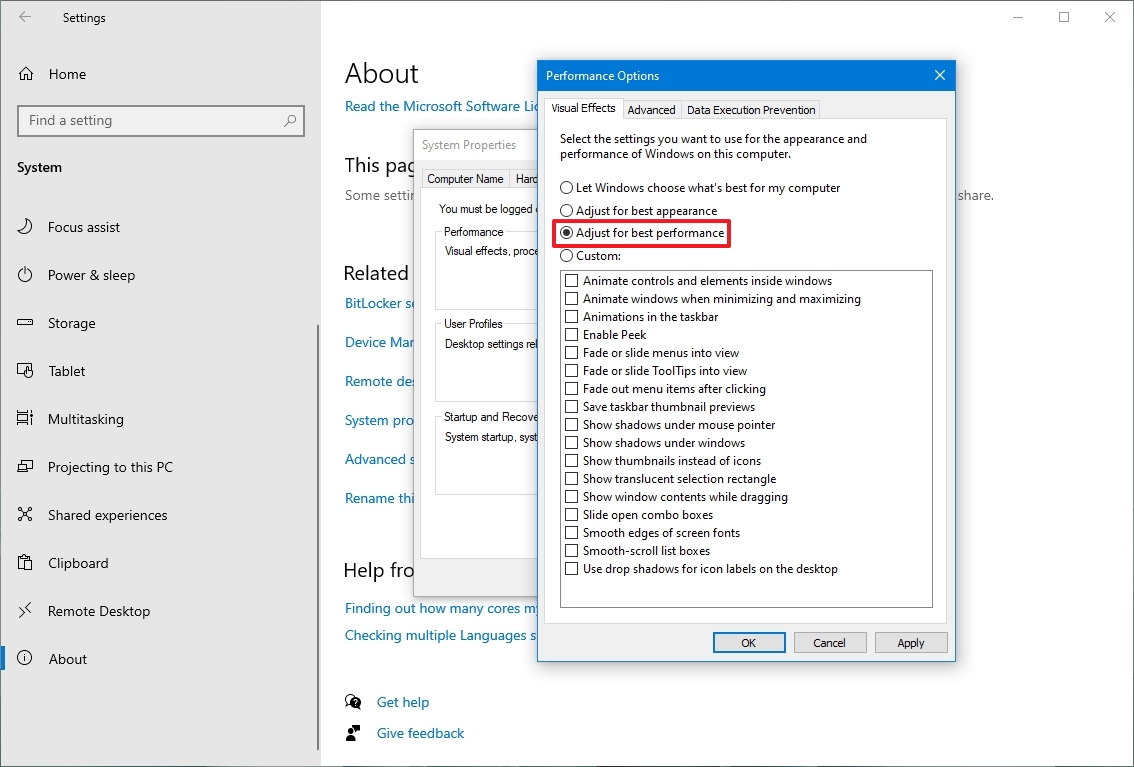
- Click the Apply button.
- Click the OK button.
Once you complete the steps, the visual effects will be disabled, and interacting with elements (windows and menus) will feel more responsive.
Disable transparency effects
To speed up Windows 10 disabling transparency effects, use these steps:
- Open Settings.
- Click on Personalization.
- Click on Colors.
- Turn off the Transparency effects toggle switch.
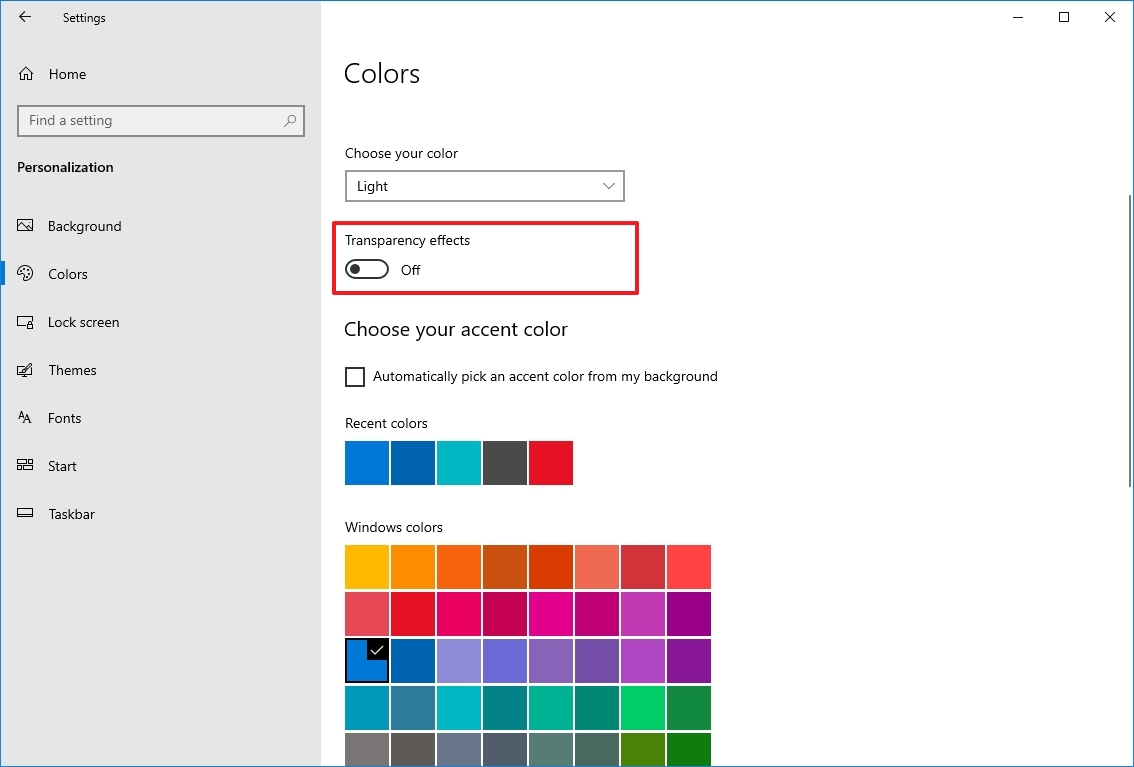
After you complete the steps, Windows 10 will feel faster, and the device will free up some system resources for more critical tasks.
14. Disable search indexing
Although Windows 10 search is an important feature to find apps, settings, and files, the indexing process can sometimes consume resources that can negatively impact the experience – especially on low-end devices. If you want to improve the system performance as much as possible, you can exclude specific locations to prevent the indexer from using resources excessively.
To configure the indexer to improve system performance on Windows 10, use these steps:
- Open Settings.
- Click on Search.
- Click on Search Windows.
- (Optional) Turn on the «Respect Device Power Mode Settings» toggle switch.
- Quick note: When you enable this feature, the system will temporarily throttle or pause search and updates to the index database to extend battery life while on battery power.
- Under the «More Search Indexer Settings» section, click the «Advanced Search Indexer Settings» option.
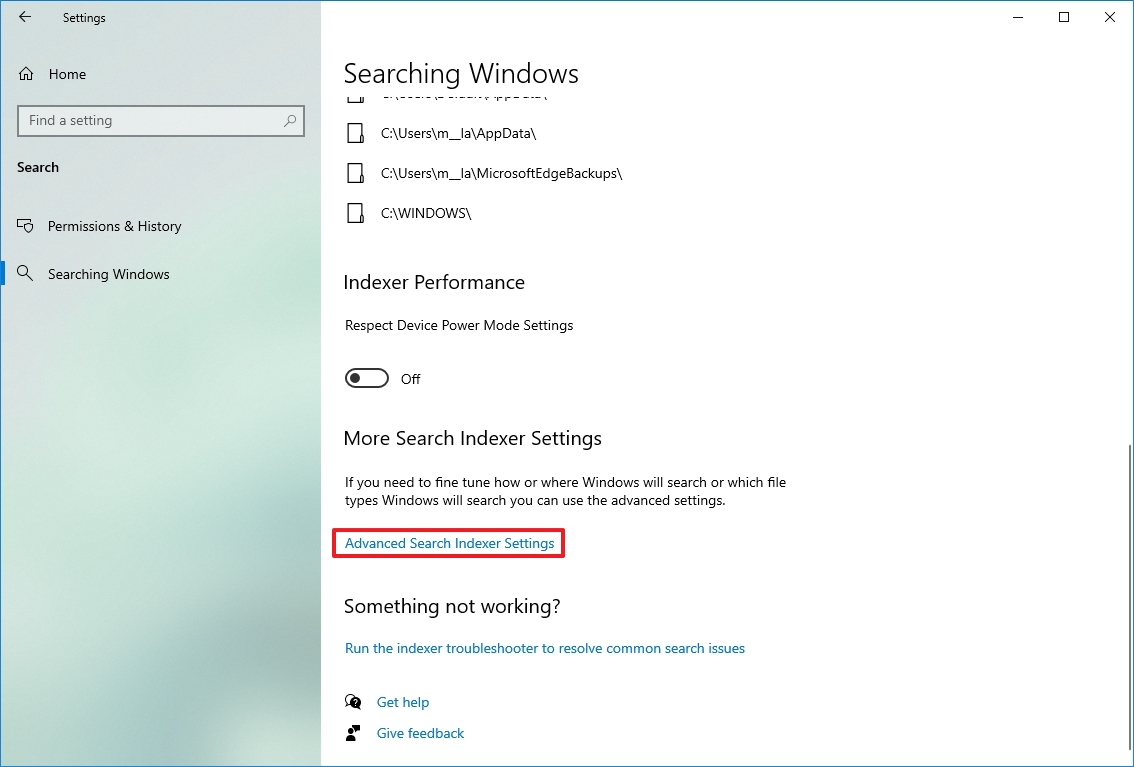
- Click the Modify button.
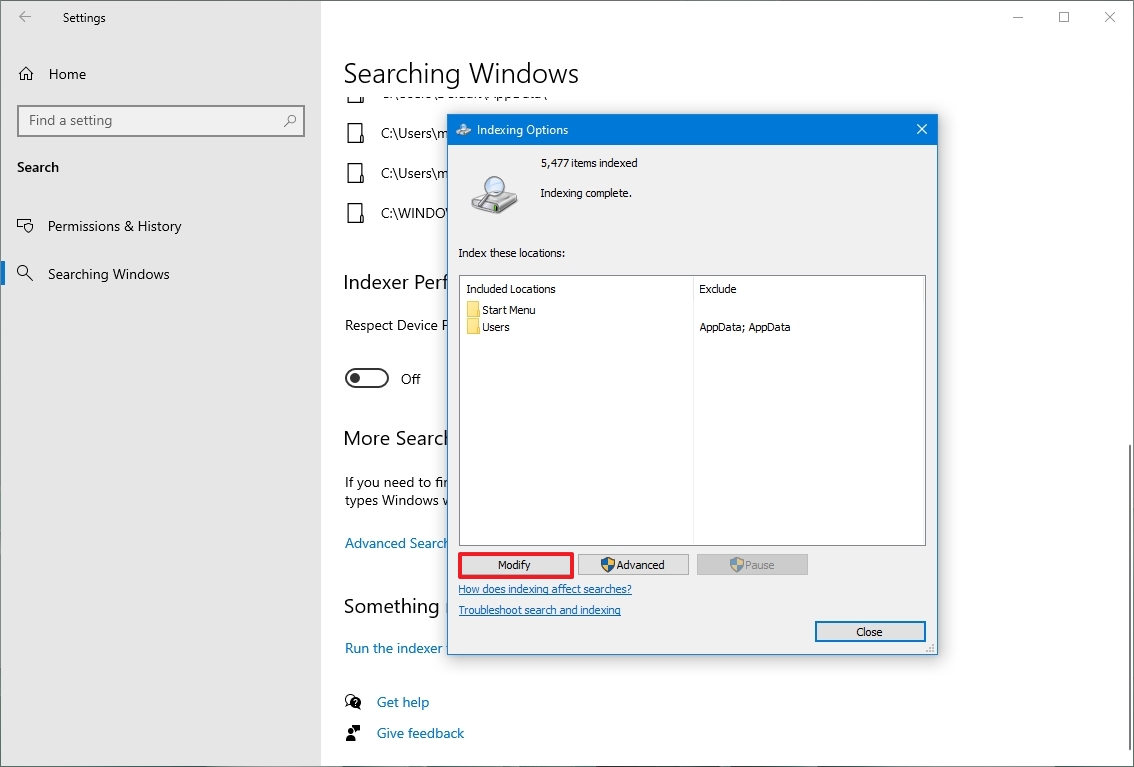
- Click the Show all locations button.
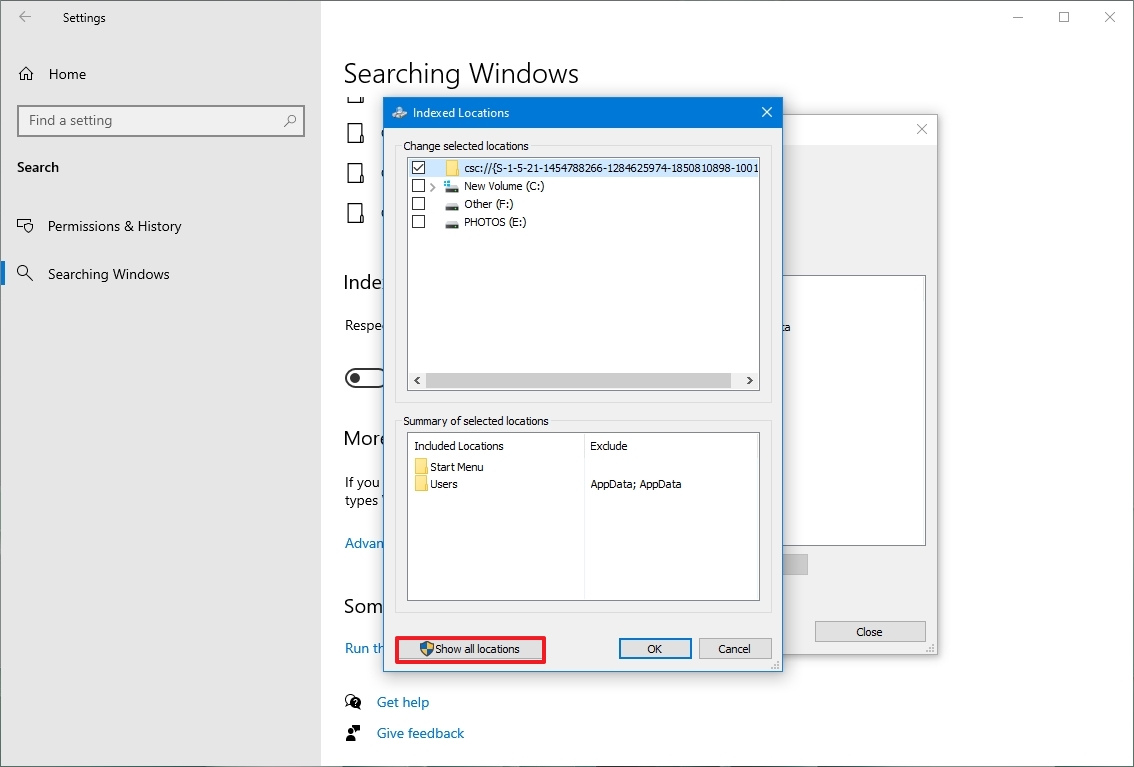
- Under the «Change selected locations» section, clear all the selected locations.
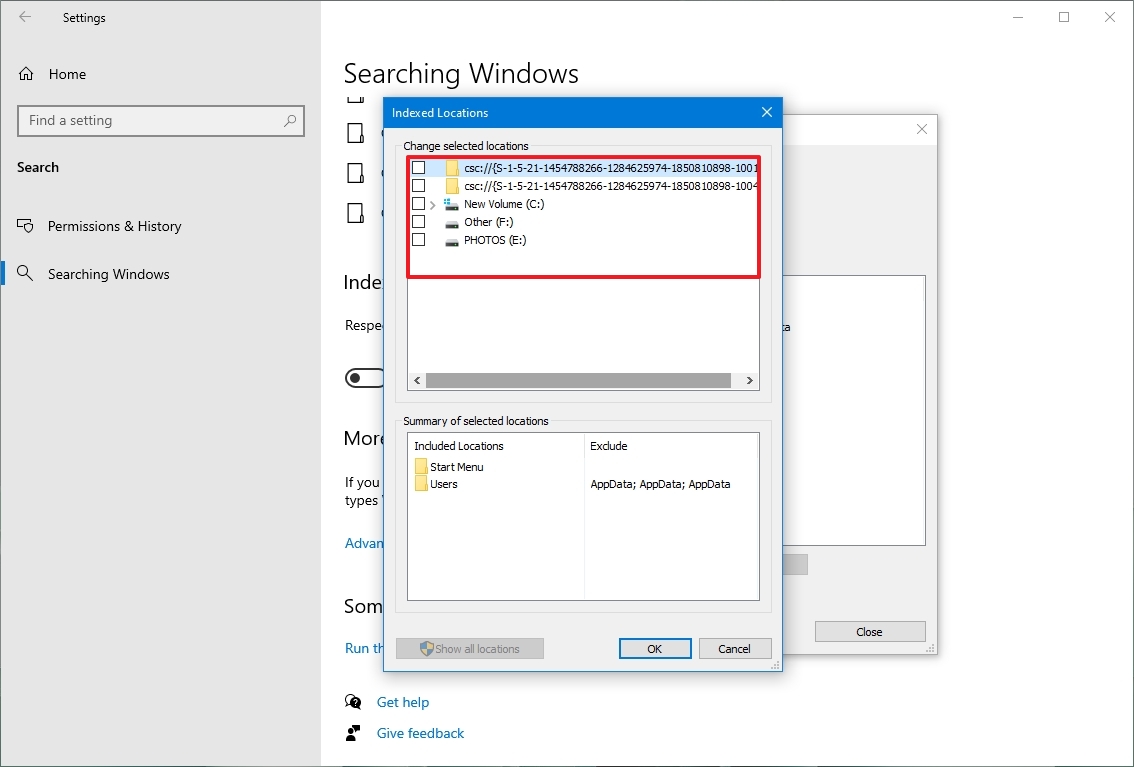
- Click the OK button.
- Click the Close button.
Once you complete the steps, Windows Search will continue to run on your device, but Windows 10 will no longer index the specified locations, improving the overall performance.
15. Increase page file size
On Windows 10, the «page file» is a hidden file on the drive that works as memory, and it acts as an overflow of the system memory, which holds data for apps currently running on the computer.
If you increase the size of the paging file, it can help boost system performance.
To modify the page file to increase performance on Windows 10, use these steps:
- Open Settings.
- Click on System.
- Click on About.
- Under the «Related settings» section, click the «Advanced system settings» option.
- Click the Advanced tab.
- Under the «Performance» section, click the Settings button.
- Click the Advanced tab.
- Under the «Virtual memory» section, click the Change button.
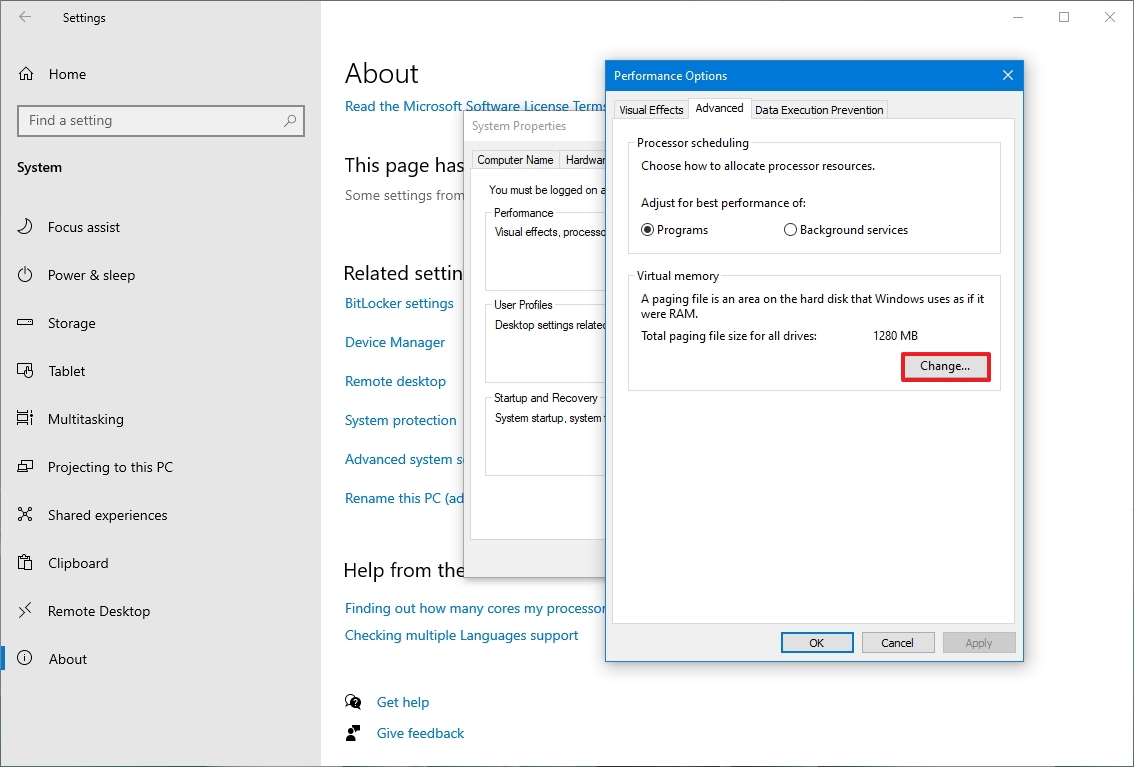
- Clear the «Automatically manage paging files size for all drives» option.
- Select the Custom size option.
- Specify the initial and maximum size for the paging file in megabytes.
- Quick tip: Typically, it is recommended to use a number one and a half times the total available memory for the «Initial size» and three times of available memory for the «Maximum size» when possible. You can confirm the total amount of memory available on the About settings page.

- Click the Set button.
- Click the OK button.
- Click the OK button again.
- Restart your computer.
After you complete the steps, the device will restart, and you should notice a performance boost while using apps. The performance will be more noticeable when configuring the page file in a Solid-State Drive.
If the new settings are causing issues or performance does not improve, you can always revert the changes with the same instructions outlined above. However, on step 9, select the System managed size option and check the «Automatically manage paging files size for all drives» option.
16. Restore previous working state
Sometimes your device will slow down after installing a new system update, driver, or application. If you cannot determine why the computer is slow, you can undo any changes by restoring the previous working state using a System Restore point.
To apply a restore point to fix performance issues on Windows 10, use these steps:
- Open Start.
- Search for Create a restore point and click the top result to open the System Properties app.
- Click the System Protection tab.
- Click the System Restore button.
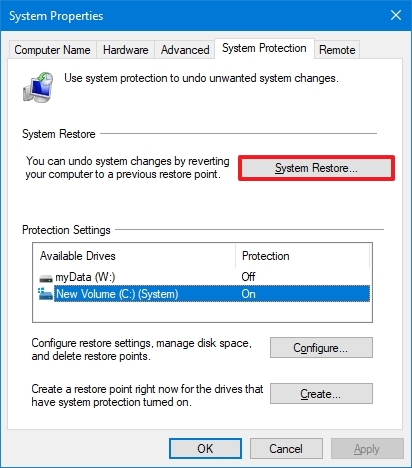
- Click the Next button.
- Select the most recent restore point to resolve the performance issue.
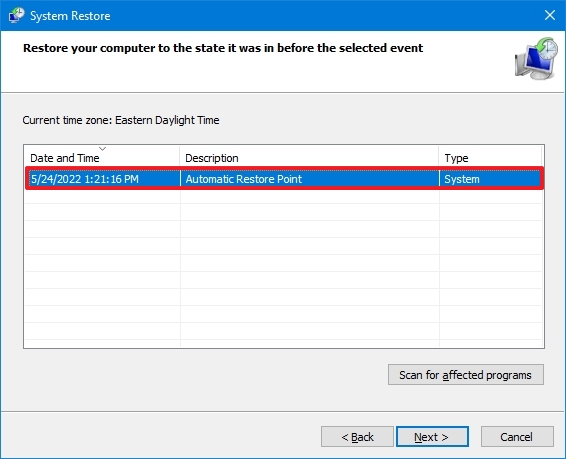
- Click the «Scan for affected programs» button to identify the apps that will be removed if they were installed after the restore point was created.
- Click the Close button.
- Click the Next button.
- Click the Finish button.
Once you complete the steps, the computer will roll back to a previous state bringing back when performance was not an issue.
System Restore is not enabled by default. This means you must set it up before you can revert system changes.
17. Repair Windows setup files
If the computer shows performance issues, it could be due to corrupted system files. If this is the case, you can use the Deployment Image Service and Management Tool (DISM) and System File Checker (SFC) command-line tools to fix the setup without reinstallation.
Fix installation files with DISM
To use DISM to repair corrupted system files to improve performance and stability on Windows 10, use these steps:
- Open Start.
- Search for Command Prompt, right-click the top result, and click the Run as Administrator option.
- Type the following command to repair the installation and press Enter: DISM /Online /Cleanup-image /Restorehealth
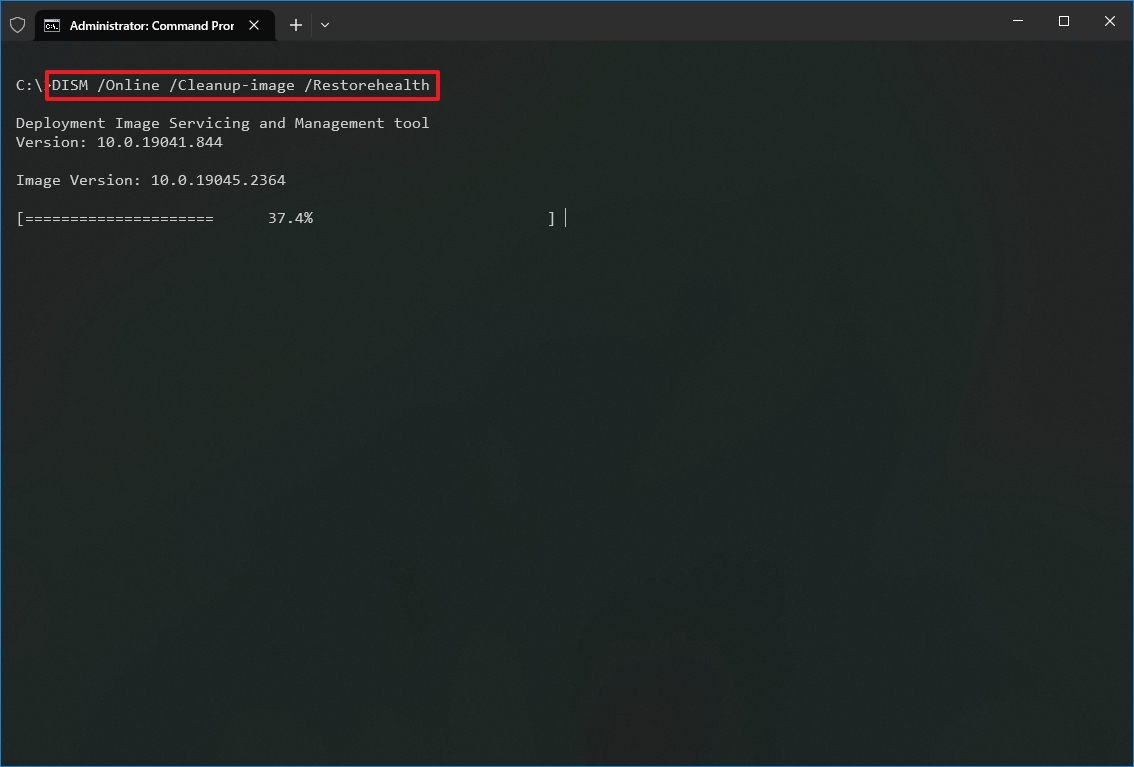
After completing the steps, the device should operate normally if the utility has finished successfully. You should also use the SFC command-line tool if the scan had issues. (You can always learn more about this feature in our DISM walkthrough guide.)
Fix installation files with SFC
To use SFC to repair corrupted system files on Windows 10, use these steps:
- Open Start.
- Search for Command Prompt, right-click the top result and click the Run as Administrator option.
- Type the following command to repair the installation and press Enter: sfc /scannow
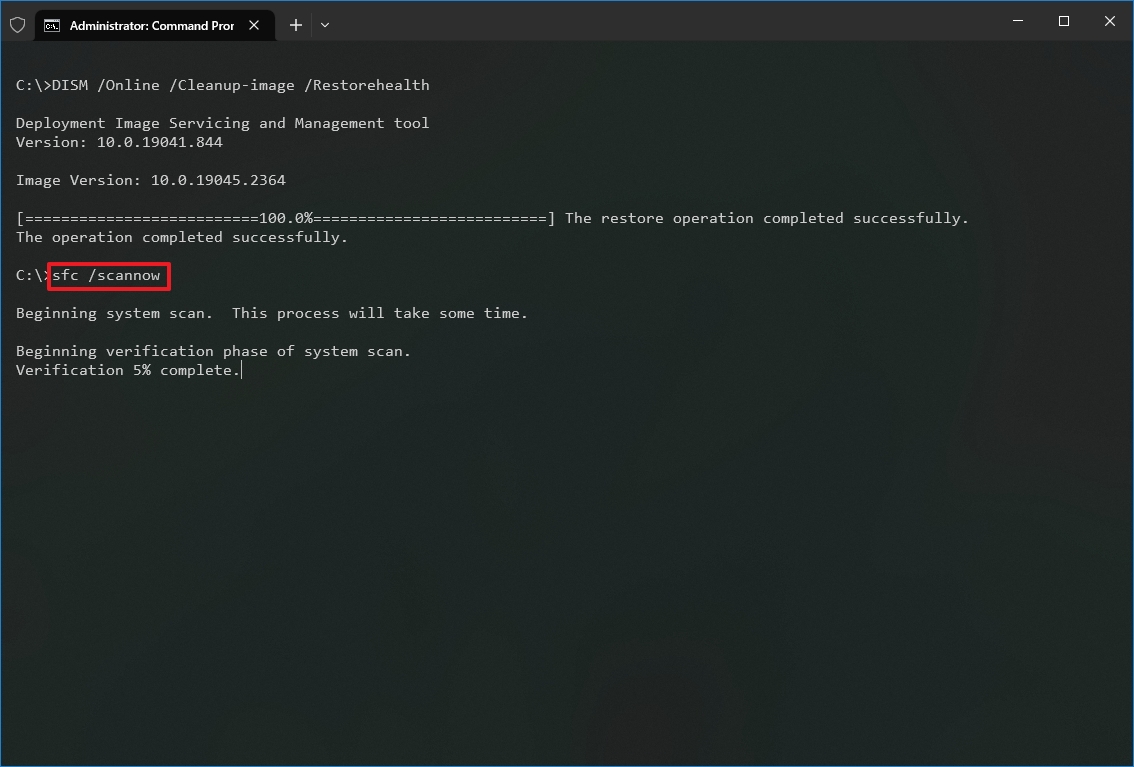
Once you complete the steps, the tool should be able to fix any problem affecting performance.
You can check this guide with more details on using the System File Checker tool, including the steps to view scan details, repair individual files, and perform an offline system repair.
18. Reset device to factory defaults
Alternatively, you can reset the computer to the factory default settings to start fresh with a clean copy of Windows 10 to improve startup and shutdown, battery life, and overall system performance.
Warning: If you choose to erase your files, you should consider creating a full backup or copying your files to an external drive before proceeding.
To reset a device to its default settings on Windows 10, use these steps:
- Open Settings.
- Click on Update & Security.
- Click on Recovery.
- Under the «Reset this PC» section, click the Get started button.
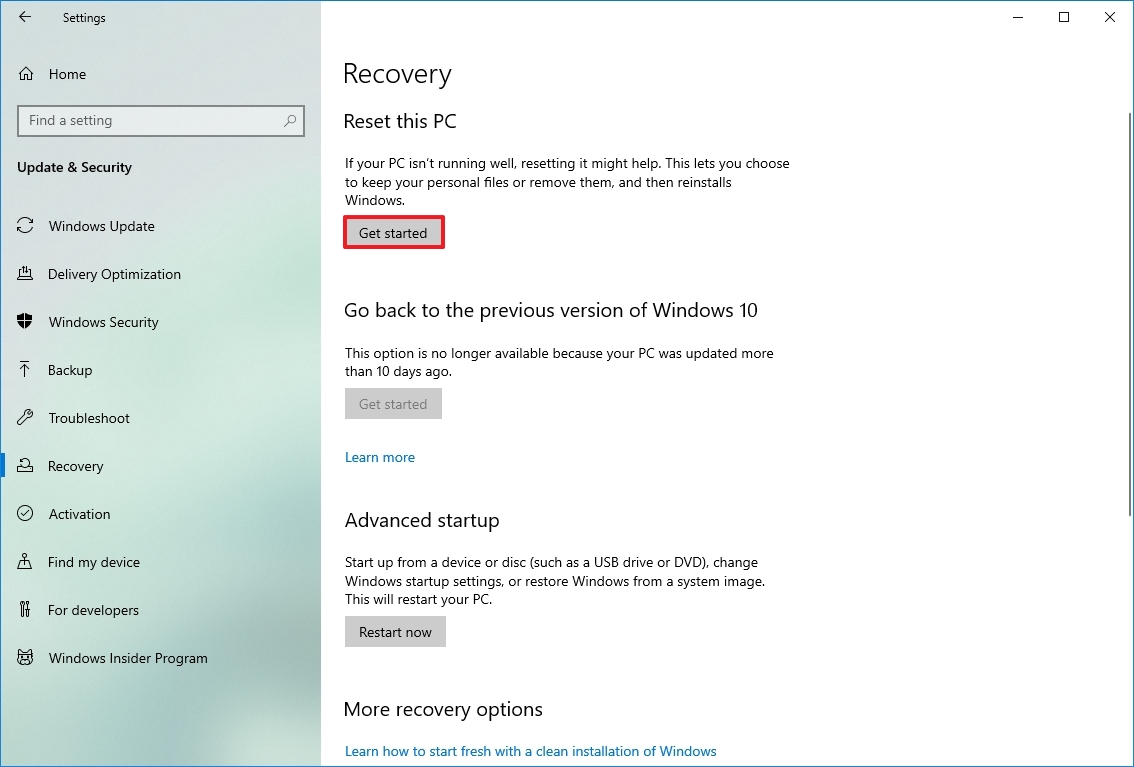
- Click the Keep my files button. (You can also click the Remove everything button to erase everything and install a clean copy of Windows 10.)
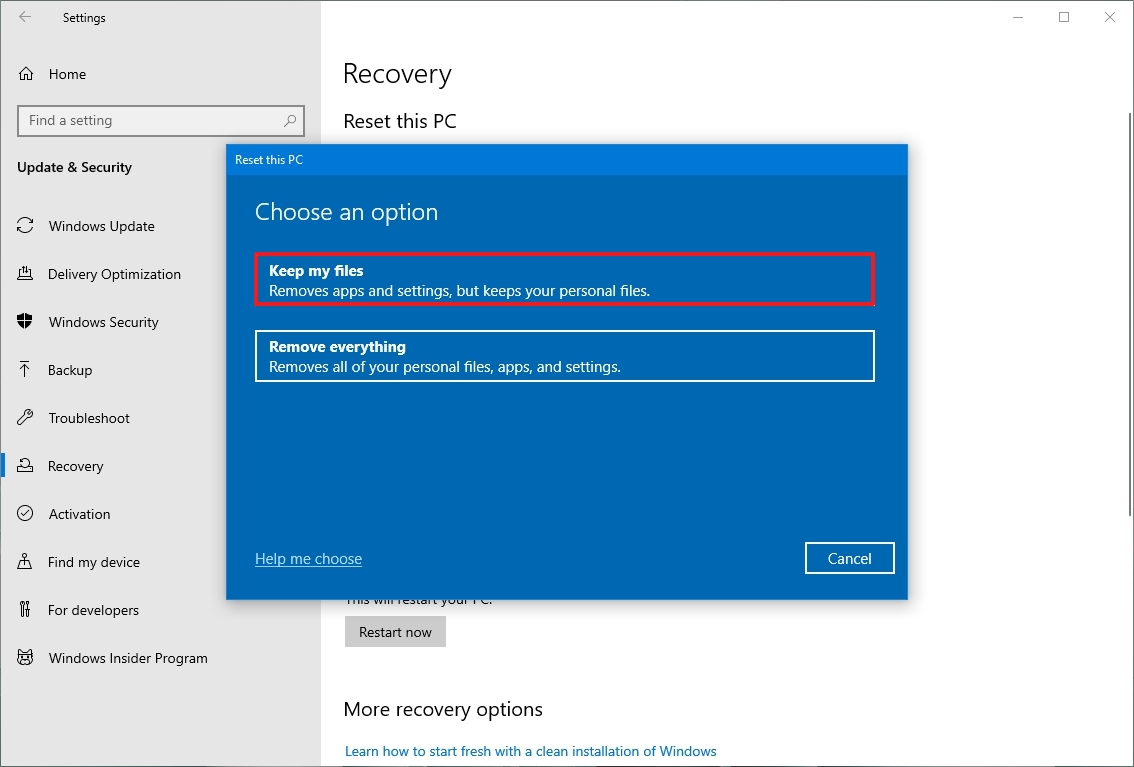
- Select the Local reinstall option.
- Quick tip: If you want a clean installation of Windows 10 without the apps that came pre-installed with the device or if the Local reinstall option does not work, select the Cloud download option.
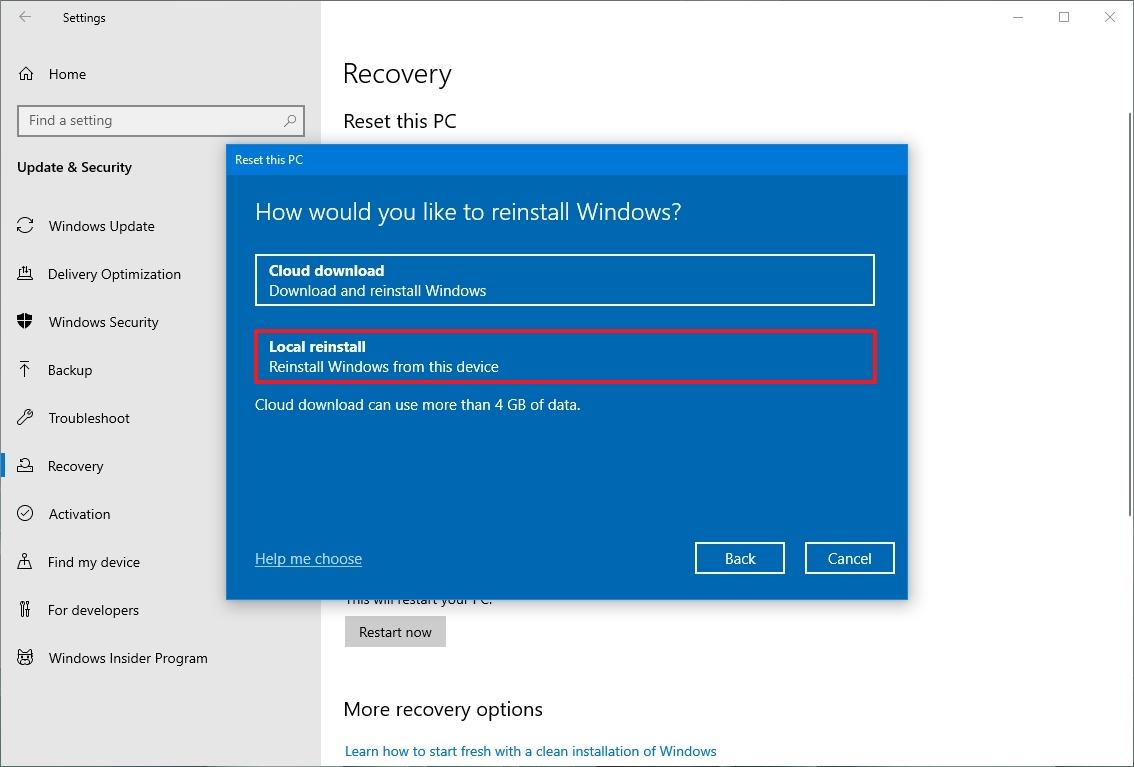
- Click the Next button.
- Click the Reset button.
After you complete the steps, Windows 10 will be reinstalled, removing previous configurations, settings, and apps to help you boost system performance. If you select the option to remove everything, remember to restore your files from a previous backup after the process.
If you want to install Windows 10 from scratch, check out our in-depth guide to do a clean installation.
19. Upgrade to faster drive
If you are not noticing performance improvements even after the reset process, it might be time to upgrade the hard drive to an SSD.
Upgrading to a Solid-State Drive is perhaps one of the best ways to increase performance on older hardware. Usually, SSDs do not have moving parts like traditional hard drives, meaning data can be read and written much faster.
When you replace an HDD with an SSD, Windows 10 will boot noticeably faster, apps will launch and run quicker, and the overall performance will be snappier and faster.
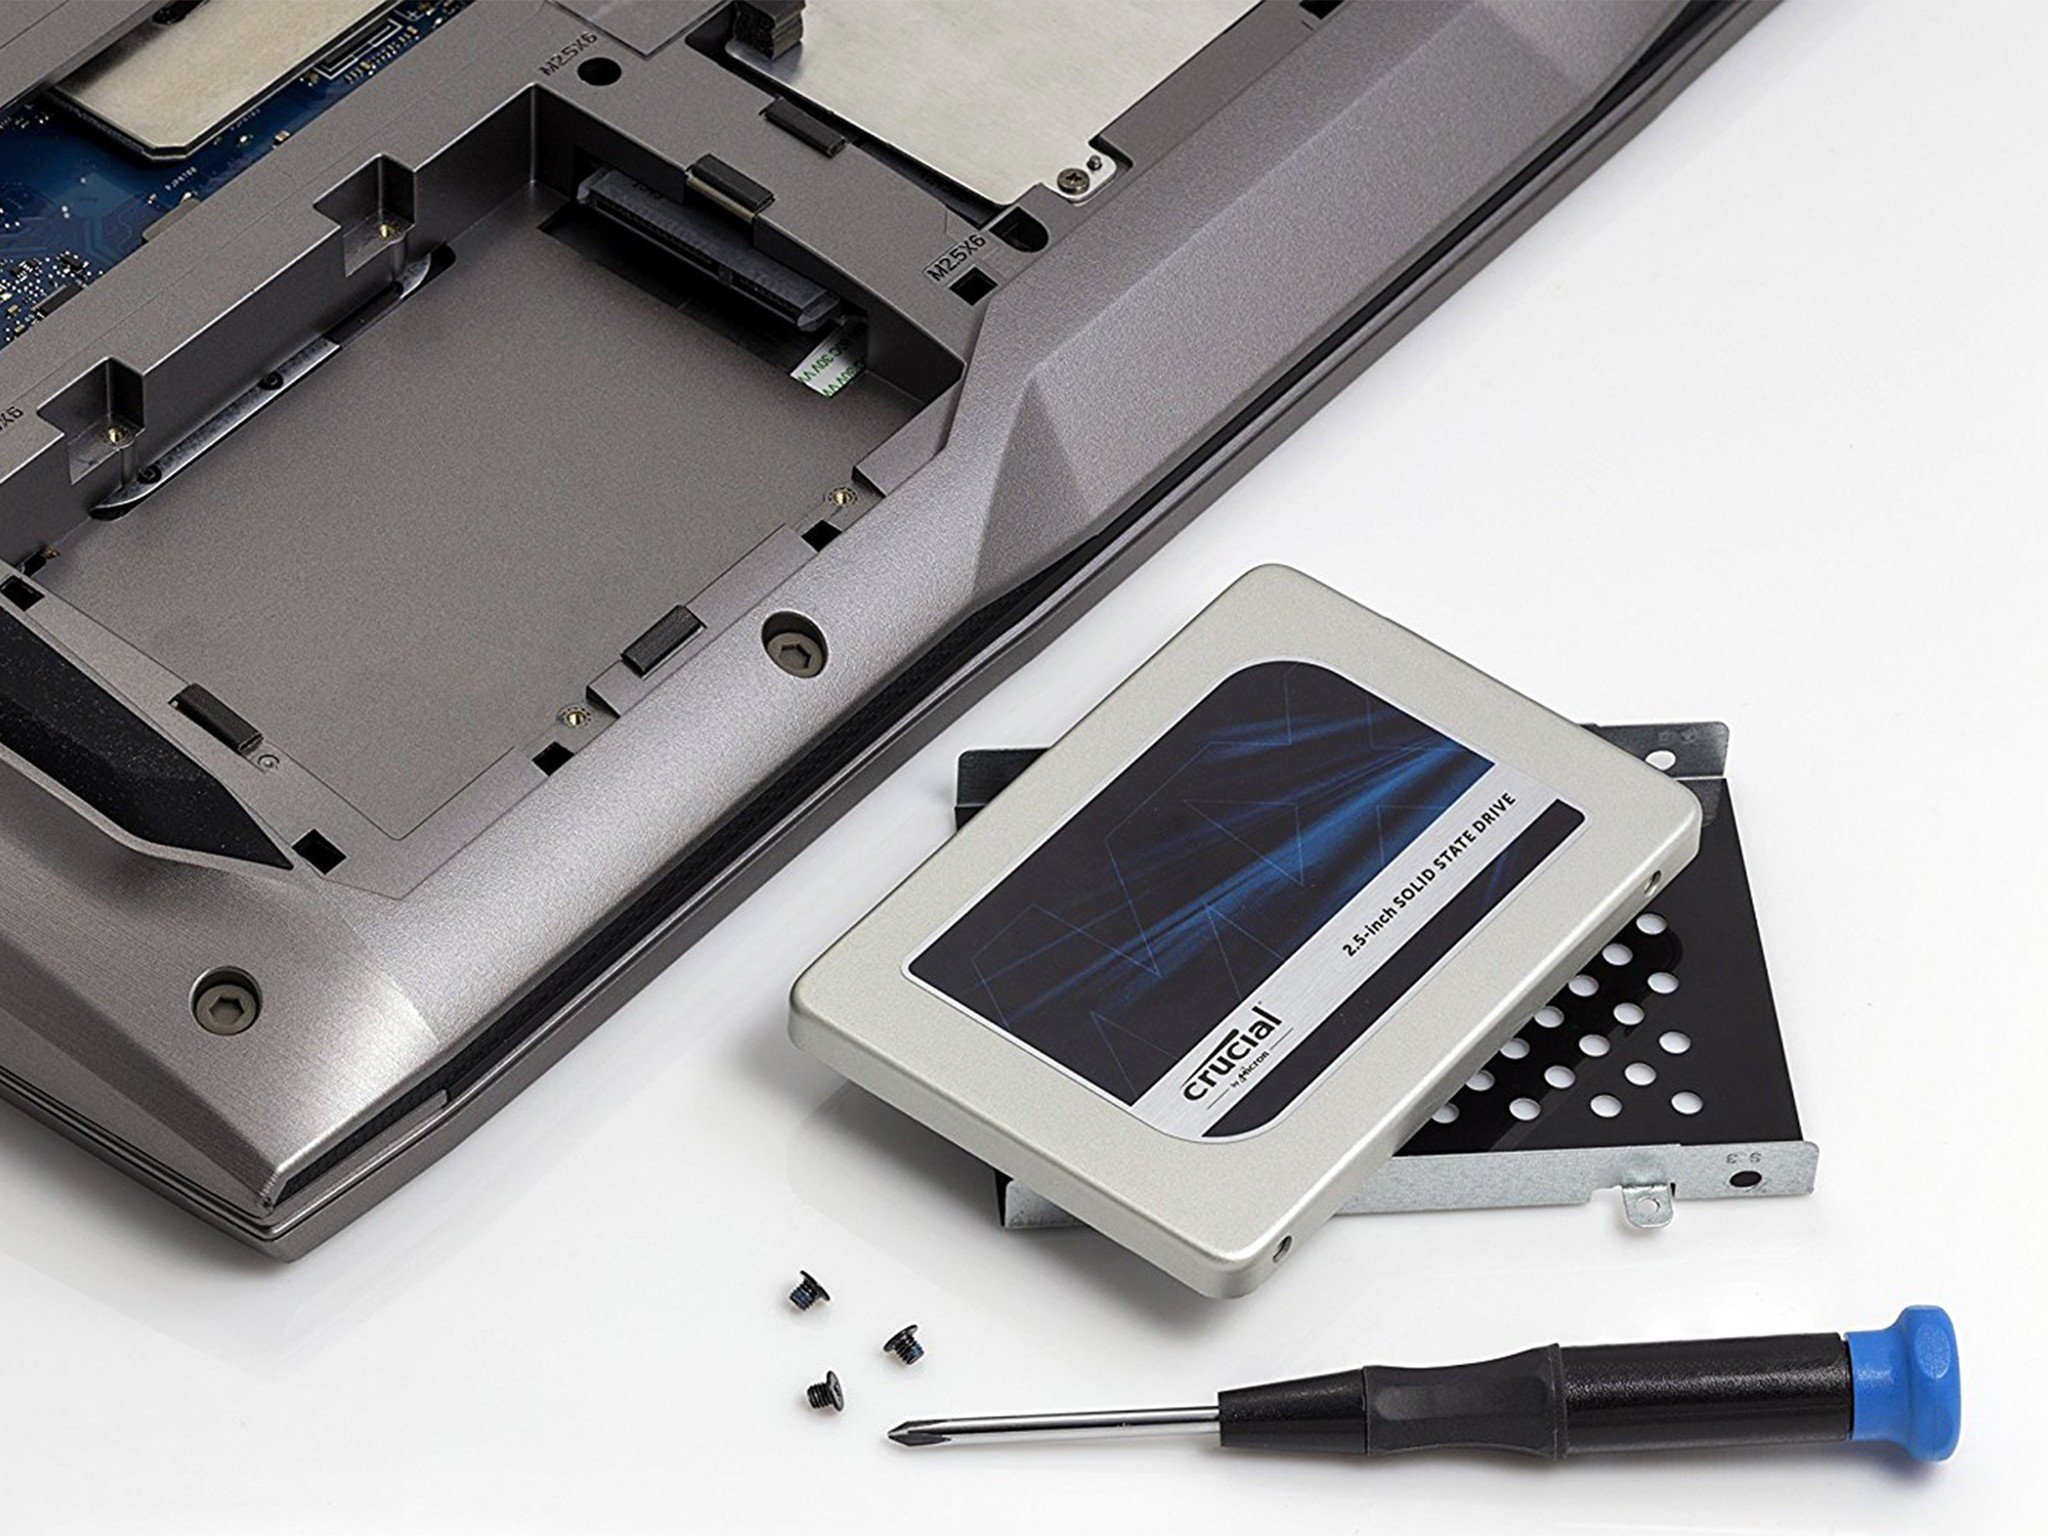
If you plan to upgrade to an SSD, we recommend the Samsung 860 EVO because of its fast performance, reliability, and five-year warranty.
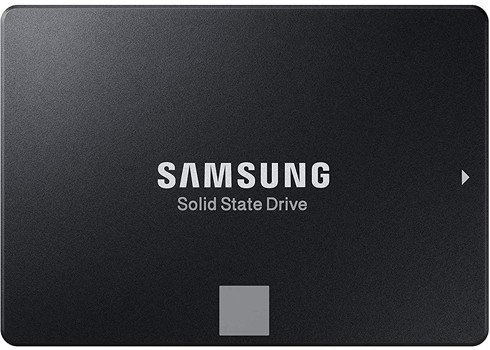
Blazing speeds
The Samsung 870 EVO is one of the most popular Solid-State Drives (SSD) because of its reliability and price. It also offers excellent performance (up to 560MB/s read and 530MB/s write speeds) compared to traditional hard drives, and every drive is backed with a five-year warranty.
20. Upgrade system memory
Insufficient system memory can also be why your computer is running slow, especially if you work with multiple apps and many open tabs in the web browser.
To determine whether your computer needs more memory, you must first confirm the total amount of memory installed on the device and how the system uses it.
To view the total amount and current memory usage on Windows 10, use these steps:
- Open Start.
- Search for Task Manager, and click the top result to open the app.
- Click the Performance tab.
- Click on Memory from the left pane.
- On the right, check the total amount of RAM in the top-right corner, and in the bottom-left corner, under «In use (Compressed),» you can find the out total amount of memory currently in use.
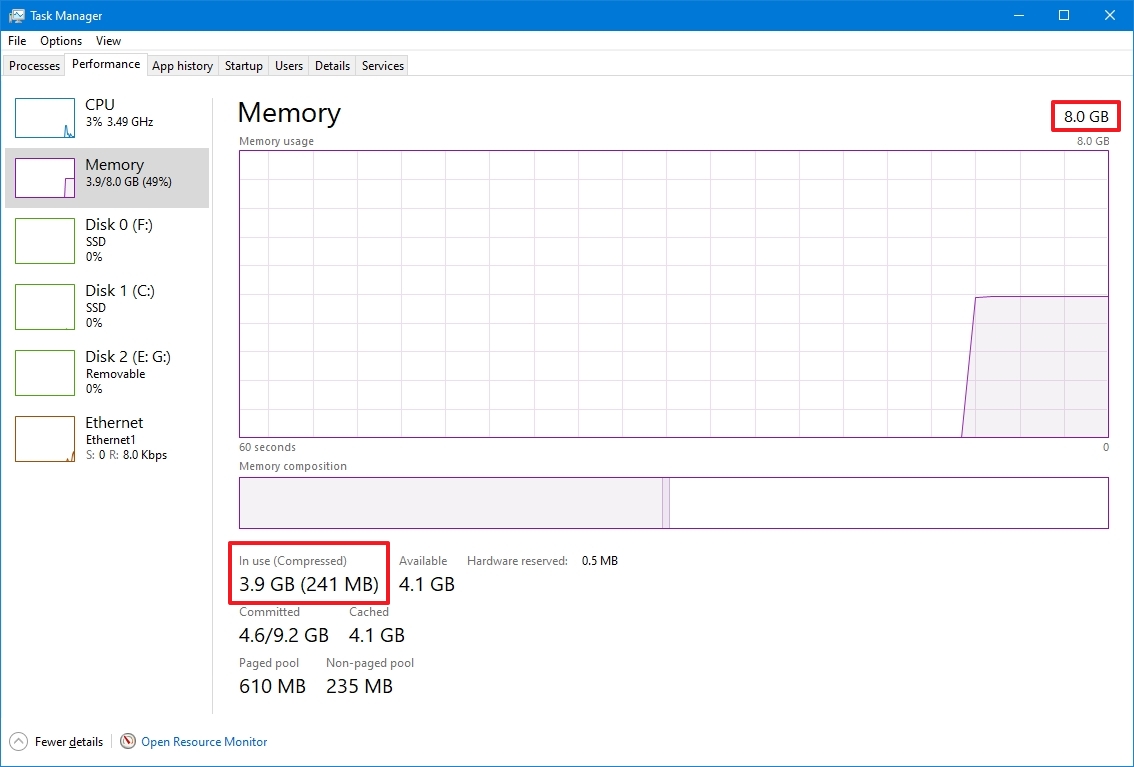
If the total amount of «in use» memory is constantly high (around 80 percent), it’s time to add memory sticks.
Although adding more memory is relatively straightforward, finding a compatible kit can be tricky. Always use Task Manager to find out the type of memory you need and whether any slots are available. It is also recommended to check your device manufacturer’s website to find more specific information about the memory requirements.
More resources
For more helpful articles, coverage, and answers to common questions about Windows 10, visit the following resources:
- Windows 11 on Windows Central — All you need to know
- Windows 10 on Windows Central — All you need to know

Cutting-edge operating system
A refreshed design in Windows 11 enables you to do what you want effortlessly and safely, with biometric logins for encrypted authentication and advanced antivirus defenses.
All the latest news, reviews, and guides for Windows and Xbox diehards.
Mauro Huculak is technical writer for WindowsCentral.com. His primary focus is to write comprehensive how-tos to help users get the most out of Windows 10 and its many related technologies. He has an IT background with professional certifications from Microsoft, Cisco, and CompTIA, and he’s a recognized member of the Microsoft MVP community.
Windows 10 is more powerful, Faster and secure compared to the previous OS. And with regular updates, Microsoft adds new features, security improvements and bug fixes. But sometimes compatibility issues, bugs, malware and viruses, and even failing hardware Slow down the performance. Especially after the Windows 10 update, a number of users report Laptop freezes, Stuck not responding at startup. If you are also struggling with this problem, If your PC is running slow, use these tips to help speed up and increase the performance of Windows 10.
Contents
- 1 How to Optimize Windows 10 Performance
- 1.1 Disable programs that run on startup
- 1.2 Disable Unwanted Startup Services
- 1.3 Disable visual effects
- 1.4 Kill bloatware
- 1.5 Run Disk Cleanup
- 1.6 Turn on Windows 10 Fast Startup Feature
- 1.7 Disable Background Apps
- 1.8 Disable Search Indexing
- 1.9 Adjust Virtual Memory
- 1.10 Launch the Windows troubleshooter
- 1.11 Update Drivers Regularly
- 2 Switch to High-performance power plan
- 3 Repair system files
- 3.1 Upgrade to a faster drive
How to Optimize Windows 10 Performance
If you want a quick boost in Windows 10 performance, try cleaning Windows 10 junk, Tweak system settings, and stop unwanted startup services. It can create a noticeable difference in window speed.
- Install and run third-party free system optimizer like Ccleaner to clean junk, and cache and fix registry problems with one click.
- Perform a full system scan with the latest updated antivirus software.
- Also, make sure your PC has the latest updates installed, or you can check for updates from Windows settings, Update & Security.
Disable programs that run on startup
The most common reason your Windows 10 PC may feel sluggish is you’ve got too many programs running in the background – programs that you may never use, or only rarely use. Stop them from running, You will notice your Windows computer will run more smoothly.
- Open task manager using Ctrl+Shift +Esc key
- Go to the startup tab.
- There Identify the programs that you are not using regularly and don’t want to run automatically.
- Disable them in the status section.
- Make sure do not to disable your programs published by Microsoft Corporation.

Disable Unwanted Startup Services
Also After Disable Startup programs disable some unnecessary services which run on Windows startup on the background use system resources and cause windows to run slowly.
- Press Windows + R, type msconfig and ok
- This will open the system configuration window,
- move to the services tab and select the Hide all Microsoft services check box.
- Uncheck all unnecessary services you want to disable and click Apply, Ok To make save changes.
This will ask for system restart to make save changes. Save any working data and restart Windows. This will help to speed up your Windows 10 performance while startup.

Disable visual effects
Start with windows vista and 7 Now Windows 10 also have some nice eye candy shadows, animations, and visual effects. Another reason for your PC to be running slow can be visual effects and animations that increase the burden on the system’s resources. On fast, newer PCs, these don’t usually affect system performance. But on slower and older PCs, they can exact a performance hit.
- Press Windows + R, type Sysdm.cpl hit the Enter key.
- This will open system properties with several tabs.
- Click on the Advanced tab, and under Performance click Settings.
- Now On the Visual Effects tab, select Adjust for best performance.
- click apply and ok to make save changes.

Kill bloatware
One of the biggest factors that slow down any Windows computer is unwanted software, aka bloatware. They take up CPU, system resources, book disk and memory space unnecessarily hindering other applications to perform at their full potential.
To remove bloatware or unused applications, follow these steps:
- Press Windows + R, type appwiz.cpl and ok
- This will open the program and Features and display all installed app lists.
- Select the unused application and click Uninstall/Change to remove it.
- Follow the instructions in the uninstall dialog boxes to uninstall the software
Run Disk Cleanup
Occasionally you may need to clean up your computer in order to get rid of old software, temporary objects, and junk files. Some software programs might not be completely uninstalled and the leftover files can cause performance issues. Try Disk CleanUp for this purpose.-
- Press Windows Key + E and select this PC
- Right-click on the C drive and select Properties.
- Click the General tab.
- Now click on Disk Cleanup.
- Select all items from the list box and then click OK.

Turn on Windows 10 Fast Startup Feature
With Windows 10 there is a new “hybrid” startup mode Called Fast Startup, which helps in starting your PC faster after a shutdown by cutting down on boot-up time, using caching for some necessary resources into a single file on the hard disk. And at the time of startup, this master file is loaded back into the RAM speeds up the process manifolds.
- Open the Control panel,
- Search for and select power options
- Click on Choose what the power buttons do
- Then click on Change settings that are currently unavailable.
- Finally, tick the box Turn on fast startup (recommended).
- Now click the Save Changes button to enable the same

Disable Background Apps
In Windows 10, lots of background activities happen to collect information regarding your location, typing behavior, account info, etc. These apps run unnecessarily in the background And take unnecessary system resources, heat up your PC and reduce its overall performance. That’s why it’s better to disable background apps to speed up your Windows 10.
- Press Windows + X and select Settings
- Click Privacy, then Background apps
- Switch off the toggles to turn off background apps you don’t need or use
- Also, you can turn off toggle key Background apps ( let apps run in the background ) to turn off all running apps.

Disable Search Indexing
Windows Search indexing Feature improves the search tool’s responses and speeds up searching in Windows 10. But It weakens the performance, however, as it runs in the background and utilizes a lot of system resources. Owing to this reason, if you do searches occasionally, then it’s best to disable it.
Follow the below steps to disable search indexing:
- Press Windows + R, type services.msc and ok
- In the services list, look for Windows Search and double-click it
- In the new window, for Startup type, select Manual or Disabled and then click the OK button to save your changes
Adjust Virtual Memory
Windows has two types of memory physical memory ( RAM ) and virtual memory known as (paging file). With a low RAM, it’s difficult to handle multitasking smoothly on Windows 10 computers. The recommended solution for this is to upgrade the RAM or another option is to Adjust the virtual memory (allocate more virtual memory) to optimize the Windows performance.
- Click on the start menu search type performance and select Adjust the appearance and performance of Windows.
- This will open the performance options popup.
- Next, move to Advanced Tab and then click on the Change button under Virtual Memory.
- In the new window that appears, uncheck Automatically manage paging file size for all drives.
- Select the C: drive and then click the radio button for Custom size
Now set the Initial size (MB) to the size of your RAM and the Maximum size (MB) to double the size of your RAM (for ex., if the size of the RAM is 4GB, set the initial size to (1024 x 4 = 4096) 4096 MB and maximum size to 8192 MB). Now click the Set button and then apply, OK to make save changes. This will Ask for system restart to make save changes effective save any work and restart windows.

Launch the Windows troubleshooter
Windows 10 has a very useful, little-known tool that can sniff out performance problems and solve them. . If there are issues affecting your PC but you can’t find them yourself, then it’s easy to find and fix those using the troubleshooting tool. To launch it, open the control panel -> small icon view click on troubleshooting -> Now under system and security click on Run maintenance tasks.
A screen titled “Troubleshoot and help prevent computer problems” will appear. Click Next. The troubleshooter will find files and shortcuts you don’t use, identify any performance and other issues on your PC, report them to you and then fix them. Also, Run the other tools there fix problems with Windows updates and improve power usage to fix problems and improve Windows system performance.
Update Drivers Regularly
Incomplete driver installation and outdated drivers are serious problems that gradually slow down your computer. Device manufacturers release new updates to fix internal bugs and improve system performance. Regularly updating the drivers can improve your computer’s performance. to manually update drivers
- type device manager on the start menu search and hit the enter key. This will open the Device Manager and all installed drivers list.
- Right-click any device with an exclamation mark (You have to expand each entry to reveal yellow exclamation marks).
- Select Update Driver Software.
Switch to High-performance power plan
Windows 10 ships with three predefined power plans, including Balanced, Power saver, and High performance to optimize the power usage of your device. If you’re looking to boost performance, you should be using the “High performance” option, which allows your computer to run faster.
To change the current power plan on your device, do the following:
- Open Control Panel.
- Click on Hardware and Sound.
- Click on Power Options.
- Select the High performance power plan.

Repair system files
If you’re experiencing performance issues as a result of corrupted system files, you can use the Deployment Image Service and Management Tool (DISM) command-line tool to fix your current installation without the need to reinstall Windows 10. In the case that DISM is unable to repair system files, Windows 10 also includes the System File Checker (SFC) command-line tool, which can download and replace corrupted system files using Windows Update.
Using DISM
- Open the command prompt as administrator, then execute the following command.
- DISM /Online /Cleanup-image /Restorehealth,
- Wait for the scanning process to 100% complete,
- Now type the command sfc /scannow and hit enter key to run the system file checker utility,
- Restart Windows after completing the scanning process, you may notice the difference.

Upgrade to a faster drive
If you have an older computer, the biggest performance bottleneck you’re likely to face is the hard drive, as traditional rotating platter drives typically perform much slower than pretty much any other piece of hardware. Upgrading to an SSD is perhaps the best thing you can do to increase system performance.
Here is the difference between SSD and HDD

Did you have additional tips to make Windows 10 faster? Share on the comments below.
Also read:
- 3 effective solutions to fix 100% disk usage in Windows 10 22H2 update
- Fix unidentified network no internet access Windows 10, 8.1 and 7
- Remote desktop not working after the Windows 10 update? Try these 5 Solutions
- Solved: The proxy server is not responding in Windows 10, 8.1 and 7
- Fix Error 0xa00f4244 webcam not working Windows 10
Сегодня речь пойдет про оптимизацию Windows 10. И это не будет «баян» с большинства сайтов, и не будет одна из поверхностных манипуляций с операционной системой. Нет, сегодня все будет куда более серьезно, потому что здесь мы детально рассмотрим, как ускорить работу Windows 10 и выжать максимум быстродействия из компьютера, но без ущерба для работы, разумеется. Для большинства пользователей слово «оптимизация» равносильно слову «кастрация» системы или «ненужные манипуляции» и так далее. Но изначально, оптимизация – это в первую очередь отсечение лишнего и тонкая настройка, тюнинг. В умелых руках хорошая оптимизация ощутимо поднимает производительность ПК без надобности разгона процессора.
Еще со времен Windows XP предпринимались попытки повысить скорость работы и отклика системы. Энтузиасты отключали службы и процессы для улучшения быстродействия. С тех пор ничего не изменилось. Компанию Microsoft можно понять – она всеми силами пытается поднять планку функционала на максимум, но у всего этого есть и обратная сторона медали – за все это приходится платить ценой объема оперативной памяти, постоянного обращения к жесткому диску, еще большей загруженности центрального процессора. Но ведь далеко не всем нужен полный функционал…
Покончим с прелюдией и приступим к делу. Задача простая – подойти максимально детально к оптимизации Windows 10.
Чтобы все структурировать и ничего не перепутать, дальнейшие действия будут разделены на шаги.
Отключение индексации дисков
Будем идти от простого к сложному и начнем, пожалуй, с индексации дисков.
Она нужна для более быстрого поиска на жестком диске. Но так ли часто нужен поиск? Служба индексации всегда висит в системе независимо от того, нужен поиск файлов или нет, а если ее отключить – ничего не случится. Просто отныне поиск фотографии, документа, или любого другого файла будет идти чуть-чуть дольше. Именно чуть-чуть. А владельцам твердотельных накопителей ее отключать нужно в любом случае, поскольку каждое лишнее обращение сокращает срок службы SSD-диска.
И так, для отключения Индексации необходимо открыть «Этот компьютер» и правым кликом щелкнуть по локальному диску, на котором установлена Windows 10. В принципе, можно потом проделать эту операцию и с другими дисками. В контекстном меню необходимо выбрать «Свойства», и в открывшемся окне внизу снять галочку «Разрешить индексировать содержимое файлов …» и нажать «Ок». После этого начнут появляться всплывающие окна, в которых требуется либо соглашаться и продолжать, либо, если это невозможно, нажимать «Пропустить все».

Отключение контроля учетных записей (UAC)
Контроль учетных записей, или UAC (User Account Control), призван решить проблему безопасности пользователя, своего рода умное ограничение доступа. На деле это выглядит как бесконечный поток уведомлений, о том, насколько уверен пользователь в открытии файла и он ли это вообще. Большинству пользователей достаточно для своей безопасности иметь лишь антивирусное программное обеспечение. Чтобы отключить UAC, необходимо правым кликом на меню «Пуск» открыть меню и найти «Панель управления». Далее раздел «Система и безопасность». В нем, сверху, в разделе «Центр безопасности и обслуживания» есть подраздел «Изменение параметров контроля учетных записей».

Появится окно с ползунком, который необходимо всего лишь сдвинуть максимально вниз и нажать «Ок».

Отключение гибернации
Гибернация – это некий умный режим сна, в котором операционная система задействует минимум ресурсов, потребляя минимальное количество электроэнергии для поддержания работы. На деле этот режим полезен только для владельцев ноутбуков – и то не всегда. А вот взамен – резервирует для себя большое количество дискового пространства и, естественно, тоже немного грузит систему. Проще всего гибернацию отключить через командную строку. Для этого нужно через комбинацию «Win+R» вызвать приложение «Выполнить», ввести в поле cmd и нажать ввод. Откроется командная строка, в которой необходимо ввести команду:
powercfg –h off
и нажать «Enter».
Отключение защиты системы
Этот шаг уже по желанию. Конечно, если в семье есть дети или есть необходимость глубоко «рыться» в системе Windows, или просто есть страх все потерять при случае «а мало ли что вдруг», то можно и не трогать Восстановление системы. Ну а в остальных случаях можно смело отключить. Правым кликом по меню «Пуск» необходимо открыть меню и найти пункт «Система». Далее, слева – параметр «Защита системы».

В открывшемся окне, щелкнув по кнопке «Настроить», нужно выбрать «Отключить защиту системы». Здесь же можно по желанию удалить и предыдущие точки восстановления, нажав соответствующую кнопку.
Отключение удаленного доступа
Удаленный доступ есть в самой системе изначально, но, как и все вышеперечисленные службы, он работает всегда, вне зависимости нужен он или нет. При большом желании, тот же бесплатный TeamViewer справляется с этой задачей на 100% – да и в освоении он предельно прост. Чтобы отключить удаленный доступ, необходимо перейти на его вкладку в том же окне, где и «Защита системы».

В открывшемся окне осталось только наложить запрет на удаленный доступ, «Удаленного помощника» и т.д.
Отключение Xbox Game DVR
А вот здесь уже интереснее. Game DVR – это встроенное приложение для Xbox. Оно породило немало возмущений среди пользователей и сейчас вы поймете почему. Эта служба во время онлайн баталий сама снимает игровой процесс на видео. Причем всегда и без спроса, и даже без какого-либо уведомления. Естественно, это очень сильно снижает производительность в играх. Для того, чтобы ее отключить необходимо открыть левым кликом меню «Пуск» и в поле поиска набрать powershell.
В найденных значениях появится Windows Powershell, которое нам и нужно. Необходимо запустить его от имени администратора и в появившемся окне команд набрать:
Get-AppxPackage *xbox* | Remove-AppxPackage
и нажать «Enter».
Удаление ненужных приложений
Лучше на всякий случай проверить компьютер на наличие ненужных программ. Дело в том, что среди них могут быть и такие приложения от Microsoft, как «Карты», «Почта и Календарь», «Улучшите свой Office», «Центр отзывов» и т.д. Все это, конечно же, тоже собирает статистику, отправляет отчеты производителю и потребляет небольшую часть ресурсов операционной системы. Чтобы посмотреть наличие этих приложений, необходимо правым кликом на кнопке Пуск вызвать контекстное меню и выбрать пункт «Приложения и возможности». Что не нужно – удаляем. Подробно вопрос про удаление программ в Windows 10 мы уже рассматривали.

На вкладке «Уведомления и действия» можно также отключить все назойливые уведомления.
Настройка схемы электропитания
Этот параметр в обсуждении не нуждается. Для владельцев ноутбука – скорее всего их лучше не трогать, ну а всем остальным можно изменить значение по-умолчанию. Для этого в том же окне «Параметры» на вкладке «Питание и спящий режим» есть «Дополнительные параметры питания». В этом окне необходимо выбрать «Высокая производительность». Ощутимого прироста это, конечно, не даст, но все равно совсем будет не лишним.

На вкладке «Автономные карты», кстати, также можно все отключить. Вряд ли они нужны большинству пользователей.
Для ноутбуков сменить схему электропитания можно также через «Центр мобильности Windows»:

Также не забывайте, что тонкие настройки схемы электропитания под себя можно сделать в Дополнительных параметрах:

Ускорение загрузки Windows
По умолчанию система грузится с одного ядра процессора, игнорируя остальные. Исправив это, можно добиться чуть более быстрой загрузки операционной системы. Чтобы это сделать, необходимо нажать комбинацию клавиш «Win+R». В открывшемся окне ввести msconfig. Откроется Конфигурация системы. В ней, на вкладке Загрузка есть кнопка «Дополнительные параметры».

Выбираем максимальное количество ЦП и идем дальше.
Внимание. Если вы не понимаете смысла настроек в этом окне или сомневаетесь, то лучше ничего не трогать и оставить все по-умолчанию, иначе система может не загрузиться! Если все таки такое случилось, попробуйте зайти в Безопасный режим (кнопка F8 при старте системы для выбора вариантов загрузки) и откатить настройки обратно.
Проверка автозагрузки приложений
Немаловажно будет проверить, что грузится при запуске компьютера. Это сделать легко в Диспетчере задач, вызвав его через комбинацию «Ctrl+Alt+Delete» и проверив вкладку «Автозагрузка».
Подробнее влияние автозагрузки программ мы разбирали в статье про причины «тормозов» Windows 10.

Отключение лишних служб Windows
Этот шаг уже для более продвинутых пользователей, поскольку неверные действия могут повлечь немало проблем. Перечень всех служб можно найти, нажав комбинацию клавиш «Win+R» и вбив в поле services.msc. Если нет нужды в службах Xbox, то можно отключить все, что с ними связано, также как и все, что связано с Hyper-V (т.е. виртуализацией). «Защитник Windows» и «Брандмауэр Windows» тоже можно смело отключать – для всего этого существует антивирус. Остальное – строго по усмотрению и только на свой страх и риск.

Выключение фоновых приложений
Фоновые процессы могут послужить причиной сильной потери производительности ПК. Необходимо проверить, все ли там в порядке. Меню «Пуск», «Параметры», «Конфиденциальность». На нижней вкладке «Фоновые приложения» убираем все, что не нужно.

Примечание. Если включено получение обновлений для системы, сюда придется заходить после каждого обновления. Дело в том, что после каждого такого обновления Windows велика вероятность того, что некоторые системные программы снова поставятся на запуск.
Отключение дефрагментации дисков
Дефрагментацию жестких дисков лучше проводить по своему усмотрению, а не по расписанию, как предлагает Windows. Отключить ее можно, запустив «Оптимизация дисков» в разделе Администрирование в Панели управления.

Включение ReadyBoost для ускорения кэширования дисков
Windows 10 регулярно сохраняет кэшированные данные на жестком диске, а затем, когда эти данные нужны, извлекает их оттуда. Время, необходимое для получения кэшированных данных, зависит от скорости вашего жесткого диска. Если у вас традиционный жесткий диск, а не SSD, есть способ, который поможет ускорить работу кэша – использование технологии ReadyBoost. Она позволяет Windows кэшировать данные на флэш-накопитель USB, который быстрее жесткого диска. Получение данных из этого более быстрого кэша должно ускорить работу Windows.
Сначала подключите флэш-накопитель USB к одному из USB-портов компьютера. Флэш-накопитель должен поддерживать как минимум USB 2.0, а лучше USB 3 или более быстрый. Чем быстрее ваша флешка, тем больше прирост скорости. Кроме того, для максимальной производительности ищите флэш-накопитель, объем которого как минимум вдвое превышает объем оперативной памяти вашего компьютера.
После того как вы подключите флешку, откройте Проводник и нажмите “Этот компьютер “. Найди свой USB-накопитель.Щелкните его правой кнопкой мыши, выберите “Свойства” и перейдите на вкладку “ReadyBoost”.

Появится окно с вопросом, хотите ли вы использовать флэш-накопитель в качестве кэша, и рекомендациями по размеру кэша. Оставьте размер кэша как есть или измените его, если хотите. Затем выберите “Предоставлять это устройство для технологии ReadyBoost” и нажмите Применить, а затем нажмите OK.
Примечание: обратите внимание, что если при переходе на вкладку ReadyBoost вы увидите сообщение “Это устройство не может быть использовано для ReadyBoost”, это означает, что ваш флеш-накопитель не соответствует минимальным стандартам производительности ReadyBoost, поэтому вам придется вставить новый.
По мере использования компьютера ReadyBoost начнет заполнять кэш файлами, поэтому вы можете заметить увеличение дисковой активности. В зависимости от интенсивности использования компьютера может потребоваться несколько дней, чтобы кэш заполнился и обеспечил максимальное повышение производительности. Если вы не заметили увеличения производительности, попробуйте использовать флэш-диск большей емкости.
Примечание: Если у вас SSD, ReadyBoost не даст вам никакой дополнительной скорости, а может даже навредить производительности. Поэтому не используйте эту функцию в системе с SSD.
Отключение визуальных эффектов и прозрачности
Небольшой плюс в производительности для слабых систем может дать отключение визуальных эффектов в параметрах «Быстродействия» в «Свойствах системы».

Рекомендуем выставить опцию как на экране ниже «Обеспечить наилучшее быстродействие».

Дополнительно к настройкам выше можно выключить эффекты прозрачности в разделе «Цвета» в персонализации экрана.

Обновление драйверов оборудования
Ваш компьютер может работать медленно из-за проблем совместимости или некачественных драйверов. Вы можете решить эту проблему самостоятельно, установив обновленную версию драйвера с сайта поддержки производителя устройства вручную.
Прежде чем приступить к обновлению, необходимо загрузить последнюю доступную версию ПО драйвера с сайта производителя и распаковать файлы с помощью архиватора (если это не самораспаковывающийся архив).
Читайте также нашу подробную инструкцию по обновлению драйверов в Windows 10.
Примечание: Настоятельно рекомендуем изучить инструкции на сайте производителя до выполнения обновления.
Заключение
На этом, пожалуй, все. Сегодня мы рассмотрели 14 шагов, как оптимизировать и существенно ускорить работу Windows 10. Есть еще «Центр обновлений», который тоже можно отключить, но полностью отключить его непросто. Это уже будет совсем другая история и отдельная статья.
Новость: Знакомтесь с нашей новой статьей про оптимизацию Windows 11.
Оптимизация Windows 10 ускоряем работу системы
Часто задаваемые вопросы (FAQ)
Зачем нужно оптимизировать компьютер с Windows 10?
Оптимизация компьютера с Windows 10 поможет вам улучшить его производительность, уменьшить лаги и ускорить работу в целом.
Какие распространенные проблемы могут замедлить работу компьютера с Windows 10?
К распространенным проблемам, которые могут замедлить работу компьютера с Windows 10, относятся слишком большое количество программ, работающих в фоновом режиме, устаревшее оборудование, нехватка места на диске и заражение вредоносным ПО.
Какие есть советы по оптимизации Windows 10?
Чтобы оптимизировать Windows 10, нужно отключить ненужные программы в автозапуске, освободить дисковое пространство, проверить компьютер на вирусы, обновить драйверы и отключить визуальные эффекты.
Как освободить дисковое пространство на компьютере с Windows 10?
Вы можете освободить место на диске компьютера с Windows 10, удалив ненужные программы, удалив временные файлы, а также используя очистку диска.
Как часто следует заниматься оптимизацией Windows 10?
Это зависит от многих факторов. Но в общем случае, оптимизировать Windows 10 следует регулярно, например, раз в месяц, чтобы обеспечить ее бесперебойную работу.
Каковы преимущества оптимизации Windows 10?
Оптимизация Windows 10 позволяет повысить общую скорость и производительность ПК, уменьшить количество задержек и сбоев, а также продлить срок его службы.